Intesis M-BUS to Modbus TCP Server Gateway

Product Information
Specifications
- Product Name: M-BUS to Modbus TCP Server Gateway
- User Manual Version: 1.0.3
- Publication Date: 2025-07-21
Description and Order Codes
INMBSMEBxxx0100 Protocol Translator Gateway
M-Bus to Modbus TCP server gateway
| ORDER CODE | LEGACY ORDER CODE |
| INMBSMEB0200100 | IBMBSMEB0200100 |
| INMBSMEB0500100 | IBMBSMEB0500100 |
NOTICE
The order code may vary depending on the product seller and the buyer’s location.
Gateway Capacity
| Element | INMBSMEB0200100 | INMBSMEB0500100 | Notes |
| Type of Modbus client devices | Modbus TCP | Those supporting the Modbus protocol. Communication over TCP/IP. | |
| Number of Modbus client devices | Up to five TCP connections | Number of Modbus client devices supported by the gateway. | |
| Number of Modbus registers | 500 | 1250 | Maximum number of points that can be defined in the virtual Modbus server device inside the gateway. |
| Type of M-Bus devices | M-Bus EIA-485 slave devices | Those supporting the M-Bus EN-1434-3 Standard. Communication over EIA-485. | |
| Number of M-Bus slave devices | 20 | 50 | Number of M-Bus slave devices supported by the gateway. |
| Number of M-Bus signals | 500 | 1250 | Number of M-Bus signals (readings in the meters) that can be read from the gateway. |
General Information
Intended Use of the User Manual
- This manual contains the main features of this Intesis gateway and the instructions for its appropriate installation, configuration, and operation.
- Any person who installs, configures, or operates this gateway or any associated equipment should be aware of this manual’s contents.
- Keep this manual for future reference during the installation, configuration, and operation.
General Safety Information
IMPORTANT
Follow these instructions carefully. Improper work may seriously harm your health and damage the gateway and/or any other equipment connected to it.
- Only technical personnel, following these instructions and the country legislation for installing electrical equipment, can install and manipulate this gateway.
- Install this gateway indoors, in a restricted access location, avoiding exposure to direct solar radiation, water, high relative humidity, or dust.
- Preferably, mount this gateway on a DIN rail inside a grounded metallic cabinet, following the instructions in this manual.
- If mounting on a wall, firmly fix this gateway on a non-vibrating surface, following the instructions in this manual. Connect this gateway only to networks without routing to the outside plant.
- All communication ports are considered for indoor use and must only be connected to SELV circuits.
- Disconnect all systems from power before manipulating and connecting them to the gateway.
- Use SELV-rated NEC class 2 or limited power source (LPS) power supply.
MANDATORY GROUND CONNECTION - YOU MUST connect the gateway to the installation ground terminal. Always use the gateway’s dedicated connector.
- NEVER use the positive or negative gateway’s connectors to establish this connection. Not following this indication can cause ground loops and damage the gateway and/or any other equipment connected to it.
- If the power supply includes a ground connection, that terminal must be connected to ground.
- Use a circuit breaker between the gateway and the power supply. Rating: 250 V, 6 A.
- Supply the correct voltage to power the gateway. The admitted range is detailed in the technical specifications table.
- Respect the expected polarity of power and communication cables when connecting them to the gateway. Safety instructions in other languages can be found here.
Admonition Messages and Symbols
 CAUTION
Instruction that must be followed to avoid a potentially hazardous situation that, if not avoided, could result in minor or moderate injury. IMPORTANT
Instruction that must be followed to avoid a risk of reduced functionality and/or damage to the equipment or to avoid a network security risk. NOTE
NOTE
Additional information which may facilitate installation and/or operation. TIP
TIP
Helpful advice and suggestions. NOTICE
Remarkable Information.
Overview
- This Intesis® gateway allows to integrate M-Bus devices into Modbus TCP systems easily.
- The aim of this integration is to make M-Bus devices accessible from a Modbus control system or device to get the same behavior as if the M-Bus device was part of the Modbus installation.
- For this, the Intesis gateway acts as a Modbus TCP server device in its Modbus interface, allowing it to read/write points from the Modbus client device(s). From the M-Bus point of view, the gateway acts as an M-Bus level converter and Master device (EN-1434-3). The gateway performs the readings of the M-Bus slave device(s) by automatic continuous polling or on demand (to reduce battery consumption).
- The gateway configuration is carried out through the Intesis MAPS configuration tool.
 IMPORTANT
This document assumes that the user is familiar with Modbus and M-Bus technologies and their technical terms.
Inside the Package
ITEMS INCLUDED
- Intesis INMBSMEBxxx0100 Protocol Translator Gateway
- Installation guide
Gateway Main Features
- Embedded level converter. Direct connection to M-Bus meters with no extra hardware required.
- Scan function: detect M-Bus meters and their available registers automatically.
- Import/Export of M-Bus meter templates. Reduce commissioning time when adding multiple meters of the same type.
- Baud rate configurable within the M-Bus allowed range (300 to 9600 bps. The devices are normally configured at 2400 bps).
- Specific parameters and timeouts are available to maximize compatibility with any possible peculiarity between different meter manufacturers.
- Availability of variables for communication errors, both at meter and general level, helping you to know if the communication with one or more meters has failed.
- DIN rail and wall mounting case.
- Flexible configuration using the Intesis MAPS configuration tool.
Gateway General Functionality
- This gateway acts as a server on its Modbus side and as a master on its M-Bus interface, thus allowing the integration of M-Bus devices into a Modbus system.
- The gateway is continuously polling the devices (together or individually), storing in its memory the current status of every signal you want to track, and serving this data to the installation when requested. This continuous polling can be activated/deactivated through a Modbus signal. It is also possible to configure the gateway to make a single polling of the meters (refresh of readings) at startup.
- Primary or secondary addressing is allowed for M-Bus devices. When a signal status changes, the gateway sends a write telegram to the installation, waits for the response, and performs the corresponding action.
- This action can be: force a polling of a specific M-Bus device or force a polling of all M-Bus devices. This can also be forced from the Modbus side at any time by writing a 1 in the corresponding binary point specially enabled for this purpose.
Other M-Bus information accessible from Modbus, using specific points of the gateway, is:
- Bus activity: Indicates if meters are currently being polled or polling is on standby.
- M-Bus status of every meter: This is sent by the own meter with every poll and indicates the internal status, which is manufacturer specific in every case.
A lack of response from a signal activates a communication error, allowing you to know which signal from which M-Bus device is not correctly working. There is also a general communication error available that will be active whenever the communication with one or more M-Bus meters has failed.
Hardware
Mounting
- IMPORTANT
Before mounting, please ensure that the chosen installation place preserves the gateway from direct solar radiation, water, high relative humidity, or dust. - NOTE
Mount the gateway on a wall or over a DIN rail. We recommend the DIN rail mounting option, preferably inside a grounded metallic industrial cabinet. - IMPORTANT
Ensure the gateway has sufficient clearances for all connections when mounted. See Dimensions (page 13).
DIN RAIL MOUNTING
- Fit the gateway’s top-side clip in the upper edge of the DIN rail.
- Press the low side of the gateway gently to lock it in the DIN rail.
- Make sure the gateway is firmly fixed.
NOTE
For some DIN rails, to complete step 2, you may need a small screwdriver or similar to pull the bottom clip down.
WALL MOUNTING
IMPORTANT
For reasons of security, the maximum height for wall mounting is two meters (6.5 feet).
- Press the rear panel clips outwards until you hear a click.
- Use the clip holes to screw the gateway to the wall.
NOTE
Use M3 screws, 25mm (1″) length. - Make sure the gateway is firmly fixed.

Connection
- CAUTION
Disconnect all systems from power before manipulating and connecting them to the gateway. - IMPORTANT
Keep communication cables away from power and ground wires. - NOTE
Mount the gateway in the desired place before wiring it.
Gateway Connectors
- Power supply: 24 VDC, Max.: 220 mA, 5.2 W
- Port A: M-Bus port, for M-Bus bus connection.
- Ethernet port: For Modbus TCP connection.
| Port A connectors | M-Bus wires |
| A1 | + |
| A2 | – |
NOTE
You can also use the Ethernet Port to connect the gateway to the PC for configuration purposes.
WIRING THE CONNECTORS
IMPORTANT
For all connectors, use solid or stranded wires (twisted or with ferrule).
Cross-section/gauge per terminal:
- One core: 0.2 .. 2.5 mm2 / 24 .. 11 AWG
- Two cores: 0.2 .. 1.5 mm2 / 24 .. 15 AWG
- Three cores: Not permitted
NOTE
To know more about each port’s specifications, see Technical Specifications (page 12).
Common Connections
Connecting the Gateway to the Power Supply
The power supply connector is a green pluggable terminal block (3 poles) labeled as 24Vdc.
IMPORTANT
- Use a SELV-rated NEC class 2 or limited power source (LPS) power supply.
- Connect the gateway’s ground terminal to the installation grounding.
- A wrong connection may cause earth loops that can damage the Intesis gateway and/or any other system equipment.
Apply the voltage within the admitted range and of enough power:
24 VDC, Max.: 220 mA, 5.2 W
IMPORTANT
Respect the polarity labeled on the power connector for the positive and negative wires.
Connection Procedure for M-Bus
- The gateway connects directly to the M-Bus system without requiring any external RS-232 or EIA-485 to M-Bus level converter.
- Connect the M-Bus bus to connectors A1 (+) and A2 (-) of the gateway’s Port A. Respect the polarity.
- Remember that the gateway provides 36 VDC M-Bus voltage to the bus, acting also as an M-Bus level converter.
- If no response from the M-Bus device(s) to the frames sent by the gateway is received, check that they are operative and reachable from the network connection used by the gateway.
Connection Procedure for Modbus TCP
NOTE
Remember to check the Common Connections (page 10).
Connect the Modbus TCP Ethernet cable to the gateway’s Ethernet Port.
- IMPORTANT
Use a straight Ethernet UTP/FTP CAT5 or higher cable. - IMPORTANT
When commissioning the gateway for the first time, DHCP will be enabled for 30 seconds. After that time, the default IP address 192.168.100.246 will be set. - NOTE
The default port is 502. - IMPORTANT
If communicating through the LAN of the building, contact the network administrator and make sure traffic on the used port is allowed through all LAN paths.
Technical Specifications
| Housing | Plastic, type PC (UL 94 V-0). Color: Light Grey. RAL 7035Net dimensions (HxWxD): 93 x 53 x 58 mm / 3.6 x 2.1 x 2.3″ |
| Mounting | WallDIN rail (recommended mounting) EN60715 TH35 |
| Terminal wiring For power supply and low-voltagesignals |
For distances longer than 3.05 meters (10 feet), use Class 2 cables. |
| Power |
|
| Ethernet | 1 x Ethernet 10/100 Mbps RJ45 |
| Port A | 1 x M-Bus port: pluggable terminal block (two poles) M-Bus power consumption:
Voltage rating: 36 VDC |
| LED indicators |
|
| Operational temperature | Celsius: 0 .. 60°C / Fahrenheit: 32 .. 140°F |
| Operational humidity | 5 to 95%, no condensation |
| Protection | IP20 (IEC60529) |
Dimensions
Net dimensions (HxWxD)
- Millimeters: 93 x 53 x 58 mm
- Inches: 3.6 x 2.1 x 2.3″
 IMPORTANT
Ensure the gateway has sufficient clearance for all connections when mounted.
M-Bus System
General Description
The M-Bus (“Meter-Bus”) is a European standard for remote reading of heat meters, and it is also usable for all other types of consumption meters, as well as for various sensors and actuators.
M-Bus standards are:
- EN 13757-2 (physical and link layer – Wired M-Bus)
- EN 13757-3 (application layer)
Many manufacturers of energy meters, pulse counters, water meters, electricity meters, etc., add an M-Bus interface to their devices, enabling them to be interconnected and remotely monitored through a 2-wire bus based on the M-Bus standards. There are many manufacturers of these measurement devices incorporating the M-Bus interface, and also some other manufacturers of specific M-Bus communication devices such as bus repeaters, EIA-232/EIA-485 to M-Bus level converters, etc.
M-Bus Interface
- The gateway connects directly to the M-Bus system. No external level converter is required.
- Connection to the M-Bus is made via the EIA-485 connection. Notice that the gateway also powers the bus, so no extra hardware is required to connect to M-Bus compatible meters or devices.
M-Bus Signals
The gateway supports several meter magnitudes and units typically used on energy, electricity, water, and other meters. This information is required to add the desired signals when integrating meters manually, as this process is done through the Intesis MAPS configuration tool by setting the meters up and then adding the signals each meter uses and assigning them accordingly in the Signals tab (page 20).
NOTICE
- The type of signals available from each meter may differ depending on the manufacturer and model, so please refer to the device’s technical documentation to determine the signals available for a given meter when adding meters manually.
- However, Intesis MAPS also offers a much quicker and simpler alternative method for meter detection in the form of a scanning function. This scan detects all meters available on the bus and their signals and imports each signal with the units and details each meter provides. These signals can then be matched with the corresponding Modbus registers in the Signals tab for integration with the BMS.
Modbus System
General Description
- The Modbus protocol is an application-layer messaging protocol developed by Modicon in 1979. It is used to establish client-server communication between intelligent devices over different types of buses or networks. The Intesis gateway supports Modbus TCP.
- Modbus is a request/reply protocol and offers services specified by function codes. Modbus function codes are elements of Modbus request/reply PDUs (Protocol Data Units).
ModBus Interface
The Intesis gateway acts as a server device in its Modbus interface; the interface for this model is the Ethernet port. To access the points and resources of the gateway from a Modbus client device, you must specify the Modbus register addresses configured inside the gateway as those configured inside the gateway corresponding to the signals of the field device protocol.
Functions Supported
Table 1. Modbus functions
| # | Function | Read/Write |
| 01 | Read Coils | R |
| 02 | Read Discrete Inputs | R |
| 03 | Read Holding Registers | R |
| 04 | Read Input Registers | R |
| 05 | Write Single Coil | W |
| 06 | Write Single Register | W |
| 15 | Write Multiple Coils | W |
| 16 | Write Multiple Registers | W |
- If poll records are used to read or write more than one register, the range of addresses requested must contain valid addresses; if not, the Intesis gateway will return the corresponding Modbus error code.
- All registers are of 2 bytes (16 bits)1, even if they are associated with signals of bit type on the other protocol’s side. Its content is expressed in MSB .. LSB.2
- Modbus error codes are fully supported. They are sent whenever a non-valid Modbus action or address is required.
Modbus TCP
- Modbus TCP communication is characterized basically by the embedding of the Modbus RTU protocol into TCP/IP frames, which allows faster communication and a longer distance between client and server devices in comparison with RTU communication over a serial line. Another benefit is using common TCP/IP infrastructure in buildings and transmitting over WAN or the internet. It also allows the coexistence of one or more clients and, of course, one or more server devices in a given network, all interconnected through a TCP/IP-based network.
- Use the configuration tool to configure the IP settings of the gateway (DHCP status, own IP, netmask, and default gateway) and the TCP port.
- Default value. The measurement-related registers can be configured to be 4 or 8 bytes (32 or 64 bits) in Intesis MAPS if required.
- MSB: most significant bit; LSB: least significant bit
Address Map
The Modbus address map is fully configurable; any point in the gateway can be freely configured with the desired Modbus register address.
Modbus Server Interface Points Definition
- The Modbus registers are fully configurable through the Intesis MAPS configuration tool; any point in the gateway can be freely configured with the desired Modbus register address.
- Every point defined in the gateway has the following Modbus features associated with it:
| Feature | Description |
| #Bits |
|
| Data Coding Format |
|
| Function Code |
|
| Byte Order |
|
| Register Address | The Modbus register address inside the server device for the point. |
| Bit inside the register | Bit inside the Modbus register (optional). The Intesis gateway allows bit decoding from generic 16 bits input/holding Modbus registers.Some devices use the bit coding into 16 bits input/holding Modbus registers to encode digital values. These registers are generally accessible using Modbus function codes 03 and 04 (read holding/input registers). |
| Read/Write |
|
Setup Process with the Configuration Tool
Prerequisites
For this integration, you need:
- The items delivered by HMS Networks:
- The Intesis INMBSMEBxxx0100 Protocol Translator Gateway.
- Link to download the configuration tool.
- Product documentation.
- The respective M-Bus devices connected to the Port A of the gateway.
- A computer to run the Intesis MAPS configuration tool. Requirements:
- Windows® 7 or higher.
- Hard disk free space: 1 GB.
- RAM: 4GB.
- An Ethernet cable.
Intesis MAPS Configuration and Monitoring Tool
Introduction
- Intesis MAPS is a software tool for the configuration and monitoring of the Intesis gateways. It has been designed and developed in-house, ensuring an up-to-date tool to get all the potential of our gateways. It is compatible with Windows® 7 and higher.
- The installation procedure and the main functions are explained in the Intesis MAPS user manual. Please also check the Intesis MAPS user manual for specific information about the different parameters and how to configure them.
Create a New Project from a Template
- Open Intesis MAPS.
- Click Create New Project in the Start menu on the left.
You can create a project from scratch using a template. To find the appropriate template, filter the search by:- Clicking on the protocol logos.
- Typing the order code in the Order Code field.|
NOTE - The order code is printed on the silver label placed on the gateway’s right side.
- Looking for the Project Name on the list: IN-MBSTCP-MBUS.

- Select the desired template.
- Click Next or double-click the template on the list.
NOTE
Templates are just a starting point for your integration. Depending on the type of integration, you may have to modify some parameters.
IMPORTANT
Don’t forget to save your project on your computer before exiting Intesis MAPS. To do so, go to Project → Save or Save As. Later on, you can load the project to Intesis MAPS and continue with the configuration.
Main Menu Overview
The following sections provide an overview of the five tabs that compose the Intesis MAPS main menu. Through these options, you will establish a connection between the gateway and the computer, set up your project through the Configuration and Signals tabs, send it to the gateway, and monitor that everything works fine using the Diagnostic tab.
TIP
Tooltip: Hover the cursor over a field, and a message will appear indicating the purpose of the parameter.
Connection Tab
Click the Connection button in the menu bar to configure the gateway connection parameters.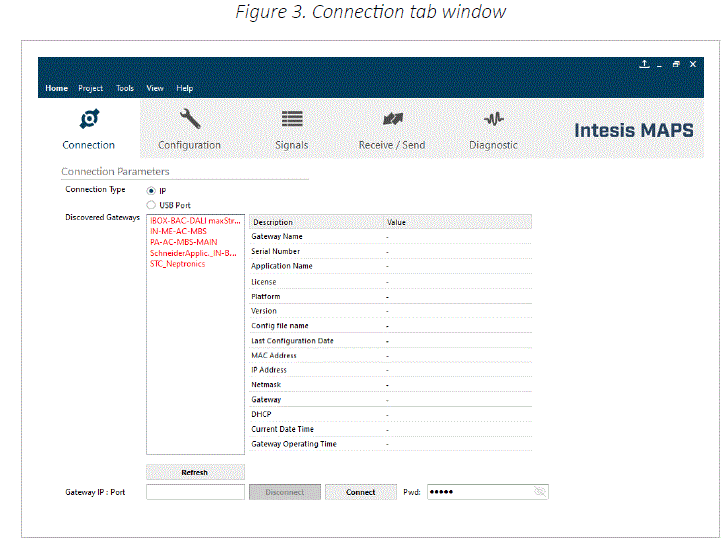
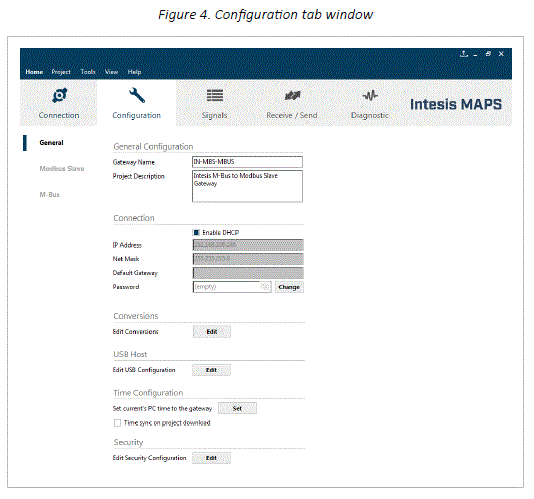
Configuration Tab
Select the Configuration tab to configure the connection parameters. This window contains three subsets of information: General (gateway general parameters), Modbus server (Modbus interface configuration), and M-Bus (M-Bus interface parameters).
Signals Tab
All available objects, object instances, their corresponding Modbus register, and other main parameters are listed in the Signals tab. More information on each parameter and how to configure it can be found in the Intesis MAPS user manual.

Receive/Send Tab
Send:
Once you have finished setting the parameters, you have to send the configuration to the gateway:
Follow these steps:
- Click the Send button.
- If the gateway is still factory-set, you will be prompted to save the project on your PC. Once saved, the configuration is automatically sent to the gateway.
- If you have already saved the project, the configuration is automatically sent to the gateway.
- Connect again with the gateway after sending the file.

NOTICE
The gateway will reboot automatically once the new configuration is loaded. This process may take a few seconds.
Receive:
- Use this function to get the configuration of a gateway, for example, when you need to change some parameters of a gateway already mounted in an installation.
- Once the configuration is completed and sent, the gateway is already operative. Even so, you should check that everything is working correctly by entering the Diagnostic tab.
Diagnostic Tab
IMPORTANT
Connection with the gateway is required to use the diagnostic tools.
Figure 6. Diagnostic tab window. Find the ToolBox between the upper tabs bar and the Console view. Below it, from left to right: Console viewer, Protocol viewers (one above the other), and the Signals viewer
This section has two main parts:
ToolBox
Use the tools section to:
- Check the current hardware status of the gateway.
- Save communication logs to a ZIP file for diagnostic purposes.
- Get information on the gateway.
- Reset the gateway.
Viewers
Intesis MAPS provides several viewers:
- A generic console viewer for general information about communications and the gateway status.
- A viewer for both protocols to check their current status.
- A signals viewer to simulate the BMS behavior or check the system’s current values.
The layout of these viewers can be modified: - Using the Select Diagnostics View option from the View menu:

NOTE
Layouts 3 and 4 offer two different tabbed options:
- Fixed console to the left and tabbed browser for the other viewers
- Full tabbed browser
- Clicking and dragging the border of a viewer. To do so, place the cursor over
 the edge of a viewer. On the vertical edges, the cursor changes to to adjust the width, and on the horizontal edges, the cursor changes to to adjust the height.
Mouser Electronics
Authorized Distributor
Click to View Pricing, Inventory, Delivery & Lifecycle Information:
HMS Networks: INMBSMEB0200100 INMBSMEB0500100
Copyright © 2025 Intesis
Disclaimer
- The information in this document is for informational purposes only. Please inform HMS Networks of any inaccuracies or omissions found in this document. HMS Networks disclaims any responsibility or liability for any errors that may appear in this document.
- HMS Networks reserves the right to modify its products in line with its policy of continuous product development. The information in this document shall therefore not be construed as a commitment on the part of HMS Networks and is subject to change without notice. HMS Networks makes no commitment to update or keep current the information in this document.
- The data, examples and illustrations found in this document are included for illustrative purposes and are only intended to help improve understanding of the functionality and handling of the product. In view of the wide range of possible applications of the product, and because of the many variables and requirements associated with any particular implementation, HMS Networks cannot assume responsibility or liability for actual use based on the data, examples or illustrations included in this document nor for any damages incurred during installation of the product. Those responsible for the use of the product must acquire sufficient knowledge in order to ensure that the product is used correctly in their specific application and that the application meets all performance and safety requirements including any applicable laws, regulations, codes and standards. Further, HMS Networks will under no circumstances assume liability or responsibility for any problems that may arise as a result from the use of undocumented features or functional side effects found outside the documented scope of the product. The effects caused by any direct or indirect use of such aspects of the product are undefined and may include e.g. compatibility issues and stability issues.
FAQ
How many Modbus client devices are supported by the gateway?
The gateway supports up to 500 Modbus client devices.
What is the maximum number of M-Bus signals that can be read from the gateway?
The gateway can read up to 50 M-Bus signals from connected meters.
Documents / Resources
 |
Intesis M-BUS to Modbus TCP Server Gateway [pdf] User Manual v1, Version 1.0.3, M-BUS to Modbus TCP Server Gateway, M-BUS, Modbus TCP Server Gateway, TCP Server Gateway, Server Gateway, Gateway |