![]() មគ្គុទ្ទេសក៍អ្នកប្រើប្រាស់លំហូរផ្ទាល់ខ្លួនរបស់ PolarFire FPGA
មគ្គុទ្ទេសក៍អ្នកប្រើប្រាស់លំហូរផ្ទាល់ខ្លួនរបស់ PolarFire FPGA
Libero SoC v2024.2
សេចក្តីផ្តើម (សួរសំណួរ)
កម្មវិធី Libero System-on-Chip (SoC) ផ្តល់នូវបរិយាកាសរចនា Field Programmable Gate Array (FPGA) ដែលរួមបញ្ចូលគ្នាយ៉ាងពេញលេញ។ ទោះជាយ៉ាងណាក៏ដោយ អ្នកប្រើប្រាស់មួយចំនួនប្រហែលជាចង់ប្រើឧបករណ៍សំយោគភាគីទីបី និងឧបករណ៍ក្លែងធ្វើនៅខាងក្រៅបរិយាកាស Libero SoC ។ ឥឡូវនេះ Libero អាចត្រូវបានដាក់បញ្ចូលទៅក្នុងបរិយាកាសរចនា FPGA ។ វាត្រូវបានណែនាំឱ្យប្រើ Libero SoC ដើម្បីគ្រប់គ្រងលំហូរការរចនា FPGA ទាំងមូល។
ការណែនាំអ្នកប្រើប្រាស់នេះពិពណ៌នាអំពីលំហូរផ្ទាល់ខ្លួនសម្រាប់ឧបករណ៍ PolarFire និង PolarFire SoC Family ដែលជាដំណើរការដើម្បីរួមបញ្ចូល Libero ជាផ្នែកនៃលំហូរការរចនា FPGA ធំជាងនេះ។ Supported Device Families® តារាងខាងក្រោមរាយបញ្ជីគ្រួសារឧបករណ៍ដែល Libero SoC គាំទ្រ។ ទោះជាយ៉ាងណាក៏ដោយ ព័ត៌មានមួយចំនួននៅក្នុងការណែនាំនេះអាចអនុវត្តបានតែចំពោះគ្រួសារជាក់លាក់នៃឧបករណ៍ប៉ុណ្ណោះ។ ក្នុងករណីនេះព័ត៌មានបែបនេះត្រូវបានកំណត់យ៉ាងច្បាស់។
តារាង 1. គ្រួសារឧបករណ៍ដែលគាំទ្រដោយ Libero SoC
| គ្រួសារឧបករណ៍ | ការពិពណ៌នា |
| PolarFire® | PolarFire FPGAs ផ្តល់ថាមពលទាបបំផុតរបស់ឧស្សាហកម្មនៅដង់ស៊ីតេមធ្យម ជាមួយនឹងសុវត្ថិភាពពិសេស និងភាពជឿជាក់។ |
| PolarFire SoC | PolarFire SoC គឺជា SoC FPGA ដំបូងបង្អស់ដែលមានចង្កោមស៊ីភីយូ RISC-V ដែលមានភាពស៊ីសង្វាក់គ្នា និងជាប្រព័ន្ធរងនៃអង្គចងចាំ L2 ដែលអាចកំណត់បានដែលអាចឱ្យកម្មវិធីលីនុច និងកម្មវិធីតាមពេលវេលាជាក់ស្តែង។ |
ជាងview (សួរសំណួរ)
ខណៈពេលដែល Libero SoC ផ្តល់នូវបរិយាកាសការរចនាពីចុងដល់ចប់រួមបញ្ចូលគ្នាយ៉ាងពេញលេញ ដើម្បីបង្កើតការរចនា SoC និង FPGA វាក៏ផ្តល់នូវភាពបត់បែនក្នុងការដំណើរការការសំយោគ និងការក្លែងធ្វើជាមួយឧបករណ៍ភាគីទីបីនៅខាងក្រៅបរិយាកាស Libero SoC ។ ទោះជាយ៉ាងណាក៏ដោយ ជំហានរចនាមួយចំនួនត្រូវតែស្ថិតនៅក្នុងបរិយាកាស Libero SoC ។
តារាងខាងក្រោមរាយបញ្ជីជំហានសំខាន់ៗនៅក្នុងលំហូរការរចនា FPGA និងបង្ហាញពីជំហានដែល Libero SoC ត្រូវតែប្រើ។
តារាង 1-1 ។ លំហូរនៃការរចនា FPGA
| ជំហានលំហូរនៃការរចនា | ត្រូវតែប្រើ Libero | ការពិពណ៌នា |
| ធាតុរចនា៖ HDL | ទេ | ប្រើឧបករណ៍កែ HDL ភាគីទីបីនៅខាងក្រៅ Libero® SoC ប្រសិនបើចង់បាន។ |
| ធាតុរចនា៖ អ្នកកំណត់រចនាសម្ព័ន្ធ | បាទ | បង្កើតគម្រោង Libero ដំបូងសម្រាប់ការបង្កើតសមាសភាគស្នូលកាតាឡុក IP ។ |
| ការបង្កើតឧបសគ្គ PDC/SDC ដោយស្វ័យប្រវត្តិ | ទេ | ឧបសគ្គដែលទទួលបានត្រូវការ HDL ទាំងអស់។ files និងឧបករណ៍ប្រើប្រាស់ derive_constraints នៅពេលអនុវត្តនៅខាងក្រៅ Libero SoC ដូចដែលបានពិពណ៌នានៅក្នុងឧបសម្ព័ន្ធ C-Derive Constraints។ |
| ការក្លែងធ្វើ | ទេ | ប្រើឧបករណ៍ភាគីទីបីនៅខាងក្រៅ Libero SoC ប្រសិនបើចង់បាន។ តម្រូវឱ្យទាញយកបណ្ណាល័យក្លែងធ្វើដែលបានចងក្រងជាមុនសម្រាប់ឧបករណ៍គោលដៅ ឧបករណ៍ក្លែងធ្វើគោលដៅ និងកំណែ Libero គោលដៅដែលប្រើសម្រាប់ការអនុវត្តកម្មវិធីខាងក្រោយ។ |
| សំយោគ | ទេ | ប្រើឧបករណ៍ភាគីទីបីនៅខាងក្រៅ Libero SoC ប្រសិនបើចង់បាន។ |
| ការអនុវត្តការរចនា៖ គ្រប់គ្រងឧបសគ្គ ចងក្រងបញ្ជីសុទ្ធ ទីកន្លែង និងផ្លូវ (សូមមើលពីលើview) | បាទ | បង្កើតគម្រោង Libero ទីពីរសម្រាប់ការអនុវត្តផ្នែកខាងក្រោយ។ |
| ការផ្ទៀងផ្ទាត់ពេលវេលា និងថាមពល | បាទ | ស្នាក់នៅក្នុងគម្រោង Libero ទីពីរ។ |
| កំណត់រចនាសម្ព័ន្ធទិន្នន័យ និងការចងចាំការចាប់ផ្តើមការរចនា | បាទ | ប្រើឧបករណ៍នេះដើម្បីគ្រប់គ្រងប្រភេទផ្សេងគ្នានៃការចងចាំ និងការចាប់ផ្ដើមការរចនានៅក្នុងឧបករណ៍។ ស្នាក់នៅក្នុងគម្រោងទីពីរ។ |
| ការសរសេរកម្មវិធី File ជំនាន់ | បាទ | ស្នាក់នៅក្នុងគម្រោងទីពីរ។ |
![]() សំខាន់៖ អ្នក។ ត្រូវតែទាញយកបណ្ណាល័យដែលបានចងក្រងជាមុនដែលមាននៅ បណ្ណាល័យពិសោធន៏ដែលបានចងក្រងជាមុន ទំព័រដើម្បីប្រើម៉ាស៊ីនក្លែងធ្វើភាគីទីបី។
សំខាន់៖ អ្នក។ ត្រូវតែទាញយកបណ្ណាល័យដែលបានចងក្រងជាមុនដែលមាននៅ បណ្ណាល័យពិសោធន៏ដែលបានចងក្រងជាមុន ទំព័រដើម្បីប្រើម៉ាស៊ីនក្លែងធ្វើភាគីទីបី។
នៅក្នុងលំហូរ FPGA ក្រណាត់សុទ្ធ សូមបញ្ចូលការរចនារបស់អ្នកដោយប្រើ HDL ឬធាតុគ្រោងការណ៍ ហើយឆ្លងកាត់វាដោយផ្ទាល់
ទៅឧបករណ៍សំយោគ។ លំហូរនៅតែត្រូវបានគាំទ្រ។ PolarFire និង PolarFire SoC FPGAs មានសារៈសំខាន់
ប្លុក IP រឹងដែលមានកម្មសិទ្ធិដែលតម្រូវឱ្យមានការប្រើប្រាស់ស្នូលកំណត់រចនាសម្ព័ន្ធ (SgCores) ពី Libero SoC IP
កាតាឡុក។ ការដោះស្រាយពិសេសគឺត្រូវបានទាមទារសម្រាប់ប្លុកណាមួយដែលមានមុខងារ SoC៖
- PolarFire
- PF_UPROM
- PF_SYSTEM_SERVICES
- PF_CCC
- PF CLK DIV
- PF_CRYPTO
- PF_DRI
- PF_INIT_MONITOR
- PF_NGMUX
- PF_OSC
- RAMs (TPSRAM, DPSRAM, URAM)
- PF_SRAM_AHBL_AXI
- PF_XCVR_ERM
- PF_XCVR_REF_CLK
- PF_TX_PLL
- PF_PCIE
- PF_IO
- PF_IOD_CDR
- PF_IOD_CDR_CCC
- PF_IOD_GENERIC_RX
- PF_IOD_GENERIC_TX
- PF_IOD_GENERIC_TX_CCC
- PF_RGMII_TO_GMII
- PF_IOD_OCTAL_DDR
- PF_DDR3
- PF_DDR4
- PF_LPDDR3
- PF_QDR
- PF_CORESMARTBERT
- PF_TAMPER
- PF_TVS ហើយដូច្នេះនៅលើ។
បន្ថែមពីលើ SgCores ដែលបានរាយបញ្ជីមុន មាន IP ទន់ DirectCore ជាច្រើនដែលអាចរកបានសម្រាប់គ្រួសារឧបករណ៍ PolarFire និង PolarFire SoC នៅក្នុង Libero SoC Catalog ដែលប្រើធនធានក្រណាត់ FPGA ។
សម្រាប់ធាតុរចនា ប្រសិនបើអ្នកប្រើសមាសធាតុណាមួយមុននេះ អ្នកត្រូវតែប្រើ Libero SoC សម្រាប់ផ្នែកនៃធាតុរចនា (ការកំណត់រចនាសម្ព័ន្ធសមាសធាតុ) ប៉ុន្តែអ្នកអាចបន្តធាតុដែលនៅសល់នៃការរចនារបស់អ្នក (ធាតុ HDL ហើយដូច្នេះនៅលើ) នៅខាងក្រៅ Libero ។ ដើម្បីគ្រប់គ្រងលំហូរនៃការរចនា FPGA នៅខាងក្រៅ Libero សូមអនុវត្តតាមជំហានដែលមាននៅក្នុងការណែនាំនេះដែលនៅសល់។
1.1 វដ្តជីវិតសមាសធាតុ (សួរសំណួរ)
ជំហានខាងក្រោមពិពណ៌នាអំពីវដ្តជីវិតនៃសមាសភាគ SoC និងផ្តល់ការណែនាំអំពីរបៀបគ្រប់គ្រងទិន្នន័យ។
- បង្កើតសមាសភាគដោយប្រើឧបករណ៍កំណត់រចនាសម្ព័ន្ធរបស់វានៅក្នុង Libero SoC ។ វាបង្កើតប្រភេទទិន្នន័យខាងក្រោម៖
- HDL files
- ការចងចាំ files
- ការជំរុញនិងការក្លែងធ្វើ files
- សមាសធាតុ SDC file - សម្រាប់ HDL files, instantiate និងរួមបញ្ចូលពួកវានៅក្នុងការរចនា HDL ដែលនៅសល់ដោយប្រើឧបករណ៍/ដំណើរការរចនាខាងក្រៅ។
- ផ្គត់ផ្គង់អង្គចងចាំ files និងការជំរុញ files ទៅឧបករណ៍ក្លែងធ្វើរបស់អ្នក។
- សមាសភាគផ្គត់ផ្គង់ SDC file ដើម្បីទាញយកឧបករណ៍កម្រិតសម្រាប់ការបង្កើតឧបសគ្គ។ សូមមើលឧបសម្ព័ន្ធ C—Derive Constraints សម្រាប់ព័ត៌មានលម្អិតបន្ថែម។
- អ្នកត្រូវតែបង្កើតគម្រោង Libero ទីពីរ ដែលអ្នកនាំចូលបញ្ជីសុទ្ធក្រោយការសំយោគ និងទិន្នន័យមេតានៃសមាសភាគរបស់អ្នក ដូច្នេះការបញ្ចប់ការតភ្ជាប់រវាងអ្វីដែលអ្នកបានបង្កើត និងអ្វីដែលអ្នកកម្មវិធី។
1.2 ការបង្កើតគម្រោង Libero SoC (សួរសំណួរ)
ជំហានរចនាមួយចំនួនត្រូវតែដំណើរការនៅខាងក្នុងបរិស្ថាន Libero SoC (តារាង 1-1)។ សម្រាប់ជំហានទាំងនេះដើម្បីដំណើរការ អ្នកត្រូវតែបង្កើតគម្រោង Libero SoC ពីរ។ គម្រោងទីមួយត្រូវបានប្រើសម្រាប់ការកំណត់រចនាសម្ព័ន្ធ និងការបង្កើតធាតុផ្សំនៃការរចនា ហើយគម្រោងទីពីរគឺសម្រាប់ការអនុវត្តជាក់ស្តែងនៃការរចនាកម្រិតកំពូល។
1.3 លំហូរផ្ទាល់ខ្លួន (សួរសំណួរ)
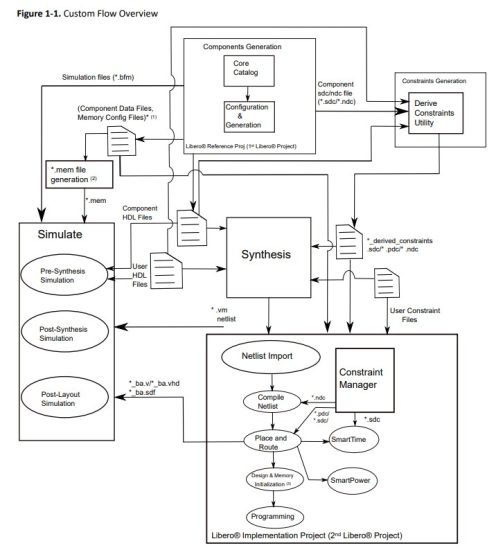
រូបខាងក្រោមបង្ហាញ៖
- Libero SoC អាចត្រូវបានរួមបញ្ចូលជាផ្នែកមួយនៃលំហូរការរចនា FPGA ធំជាងជាមួយនឹងឧបករណ៍សំយោគភាគីទីបី និងឧបករណ៍ក្លែងធ្វើនៅខាងក្រៅបរិយាកាស Libero SoC ។
- ជំហានផ្សេងៗពាក់ព័ន្ធនឹងលំហូរ ដោយចាប់ផ្តើមពីការបង្កើតការរចនា និងការដេរភ្ជាប់គ្រប់វិធីរហូតដល់ការសរសេរកម្មវិធីឧបករណ៍។
- ការផ្លាស់ប្តូរទិន្នន័យ (ធាតុចូល និងទិន្នផល) ដែលត្រូវតែកើតឡើងនៅជំហានលំហូរការរចនានីមួយៗ។
![]() គន្លឹះ៖
គន្លឹះ៖
- SNVM.cfg, UPROM.cfg
- *.mem file ជំនាន់សម្រាប់ការក្លែងធ្វើ៖ pa4rtupromgen.exe យក UPROM.cfg ជាការបញ្ចូល និងបង្កើត UPROM.mem ។
ខាងក្រោមនេះជាជំហានក្នុងលំហូរផ្ទាល់ខ្លួន៖
- ការកំណត់រចនាសម្ព័ន្ធ និងការបង្កើតសមាសធាតុ៖
ក. បង្កើតគម្រោង Libero ដំបូង (ដើម្បីបម្រើជាគម្រោងយោង) ។
ខ. ជ្រើសរើសស្នូលពីកាតាឡុក។ ចុចពីរដងលើស្នូល ដើម្បីផ្តល់ឱ្យវានូវឈ្មោះសមាសភាគ និងកំណត់រចនាសម្ព័ន្ធសមាសភាគ។
វានាំចេញទិន្នន័យសមាសភាគដោយស្វ័យប្រវត្តិ និង fileស. Component Manifests ក៏ត្រូវបានបង្កើតផងដែរ។ សូមមើល Component Manifests សម្រាប់ព័ត៌មានលម្អិត។ សម្រាប់ព័ត៌មានលម្អិត សូមមើល ការកំណត់រចនាសម្ព័ន្ធសមាសភាគ។ - បញ្ចប់ការរចនា RTL របស់អ្នកនៅខាងក្រៅ Libero៖
ក. បញ្ចូលសមាសធាតុ HDL ភ្លាមៗ files.
ខ. ទីតាំងរបស់ HDL files ត្រូវបានរាយក្នុងបញ្ជីសមាសធាតុ files. - បង្កើតឧបសគ្គ SDC សម្រាប់សមាសធាតុ។ ប្រើឧបករណ៍ប្រើប្រាស់ Derive Constraints ដើម្បីបង្កើតការកំណត់ពេលវេលា file(SDC) ផ្អែកលើ៖
ក. សមាសធាតុ HDL files
ខ. សមាសធាតុ SDC files
គ. អ្នកប្រើប្រាស់ HDL files
សម្រាប់ព័ត៌មានលម្អិត សូមមើលឧបសម្ព័ន្ធ C-Derive Constraints។ - ឧបករណ៍សំយោគ/ឧបករណ៍ក្លែងធ្វើ៖
ក. ទទួលបាន HDL files, រំញោច files និងទិន្នន័យសមាសភាគពីទីតាំងជាក់លាក់ដូចដែលបានកត់សម្គាល់នៅក្នុង Component Manifests ។
ខ. សំយោគ និងក្លែងធ្វើការរចនាដោយប្រើឧបករណ៍ភាគីទីបីនៅខាងក្រៅ Libero SoC ។ - បង្កើតគម្រោង Libero (ការអនុវត្ត) ទីពីររបស់អ្នក។
- យកការសំយោគចេញពីខ្សែសង្វាក់ឧបករណ៍លំហូរការរចនា (គម្រោង > ការកំណត់គម្រោង > លំហូរការរចនា > ជម្រះប្រអប់ធីក បើកការសំយោគ) ។
- នាំចូលប្រភពរចនា files (ក្រោយការសំយោគ *.vm បញ្ជីសុទ្ធពីឧបករណ៍សំយោគ)៖
- នាំចូលក្រោយការសំយោគ *.vm បញ្ជីសុទ្ធ (File> Import > Synthesized Verilog Netlist (VM))។
- សមាសធាតុទិន្នន័យមេតា *.cfg files សម្រាប់ uPROM និង/ឬ sNVM ។ - នាំចូលសមាសធាតុប្លុក Libero SoC ណាមួយ។ fileស. ប្លុក files ត្រូវតែនៅក្នុង *.cxz file ទម្រង់។
សម្រាប់ព័ត៌មានបន្ថែមអំពីរបៀបបង្កើតប្លុក សូមមើល មគ្គុទ្ទេសក៍អ្នកប្រើប្រាស់លំហូរប្លុក PolarFire. - នាំចូលឧបសគ្គនៃការរចនា៖
- ឧបសគ្គនាំចូល I/O files (កម្មវិធីគ្រប់គ្រងកម្រិត> I/OAttributes> នាំចូល)។
- នាំចូលផែនការជាន់ *.pdc files (កម្មវិធីគ្រប់គ្រងកម្រិត> អ្នករៀបចំផែនការជាន់> នាំចូល) ។
- នាំចូល *.sdc ដែនកំណត់ពេលវេលា files (កម្មវិធីគ្រប់គ្រងកម្រិត> ពេលវេលា> នាំចូល)។ នាំចូល SDC file បង្កើតតាមរយៈឧបករណ៍ Derive Constraint ។
- នាំចូលកម្រិត *.ndc files (Constraints Manager> NetlistAttributes> Import) ប្រសិនបើមាន។ - ឧបសគ្គ file និងការផ្សារភ្ជាប់ឧបករណ៍
- នៅក្នុងកម្មវិធីគ្រប់គ្រងកម្រិត សូមភ្ជាប់ *.pdc files ដើម្បីដាក់ និងផ្លូវគឺ *.sdc files ដើម្បីដាក់ និងកំណត់ផ្លូវ និងពេលវេលាផ្ទៀងផ្ទាត់ និង *.ndc files ដើម្បីចងក្រងបញ្ជីសុទ្ធ។ - ការអនុវត្តការរចនាពេញលេញ
- ទីកន្លែង និងផ្លូវ ផ្ទៀងផ្ទាត់ពេលវេលា និងថាមពល កំណត់រចនាសម្ព័ន្ធទិន្នន័យ និងការចងចាំពីការចាប់ផ្តើមការរចនា និងការសរសេរកម្មវិធី file ជំនាន់។ - ធ្វើឱ្យការរចនាមានសុពលភាព
- ធ្វើឱ្យការរចនាមានសុពលភាពលើ FPGA និងបំបាត់កំហុសតាមការចាំបាច់ដោយប្រើឧបករណ៍រចនាដែលផ្តល់ជាមួយឈុតរចនា Libero SoC ។
ការកំណត់រចនាសម្ព័ន្ធសមាសភាគ (សួរសំណួរ)
ជំហានដំបូងនៅក្នុងលំហូរផ្ទាល់ខ្លួនគឺដើម្បីកំណត់រចនាសម្ព័ន្ធសមាសធាតុរបស់អ្នកដោយប្រើគម្រោង Libero យោង (ហៅផងដែរថាគម្រោង Libero ដំបូងក្នុងតារាង 1-1) ។ នៅក្នុងជំហានបន្តបន្ទាប់ អ្នកប្រើទិន្នន័យពីគម្រោងយោងនេះ។
ប្រសិនបើអ្នកកំពុងប្រើសមាសធាតុណាមួយដែលបានរាយបញ្ជីមុននេះ នៅក្រោម Overview នៅក្នុងការរចនារបស់អ្នក អនុវត្តជំហានដែលបានពិពណ៌នានៅក្នុងផ្នែកនេះ។
ប្រសិនបើអ្នកមិនប្រើសមាសធាតុខាងលើណាមួយទេ អ្នកអាចសរសេរ RTL របស់អ្នកនៅខាងក្រៅ Libero ហើយនាំចូលវាដោយផ្ទាល់ទៅក្នុងឧបករណ៍សំយោគ និងក្លែងធ្វើរបស់អ្នក។ បន្ទាប់មក អ្នកអាចបន្តទៅផ្នែកក្រោយការសំយោគ ហើយនាំចូលតែបញ្ជីរសំយោគក្រោយការសំយោគ *.vm របស់អ្នកទៅក្នុងគម្រោងការអនុវត្ត Libero ចុងក្រោយរបស់អ្នក (ហៅផងដែរថាគម្រោង Libero ទីពីរនៅក្នុងតារាង 1-1)។
2.1 ការកំណត់រចនាសម្ព័ន្ធសមាសធាតុដោយប្រើ Libero (សួរសំណួរ)
បន្ទាប់ពីជ្រើសរើសសមាសធាតុដែលត្រូវតែប្រើពីបញ្ជីមុន សូមអនុវត្តជំហានខាងក្រោម៖
- បង្កើតគម្រោង Libero ថ្មី (ការកំណត់រចនាសម្ព័ន្ធស្នូល និងជំនាន់): ជ្រើសរើសឧបករណ៍ និងគ្រួសារដែលអ្នកកំណត់គោលដៅរចនាចុងក្រោយរបស់អ្នក។
- ប្រើស្នូលមួយ ឬច្រើនដែលបានរៀបរាប់នៅក្នុងលំហូរផ្ទាល់ខ្លួន។
ក. បង្កើត SmartDesign និងកំណត់រចនាសម្ព័ន្ធស្នូលដែលចង់បាន ហើយបញ្ចូលវាភ្លាមៗនៅក្នុងសមាសធាតុ SmartDesign ។
ខ. ផ្សព្វផ្សាយម្ជុលទាំងអស់ទៅកម្រិតកំពូល។
គ. បង្កើត SmartDesign ។
ឃ. ចុចពីរដងលើឧបករណ៍ក្លែងធ្វើ (ជម្រើសណាមួយនៃ Pre-Synthesis ឬ Post-Synthesis ឬ Post-Layout) ដើម្បីហៅកម្មវិធីក្លែងធ្វើ។ អ្នកអាចចេញពីម៉ាស៊ីនក្លែងធ្វើបន្ទាប់ពីវាត្រូវបានហៅ។ ជំហាននេះបង្កើតការក្លែងធ្វើ fileចាំបាច់សម្រាប់គម្រោងរបស់អ្នក។
![]() គន្លឹះ៖ អ្នក។ ត្រូវតែអនុវត្តជំហាននេះប្រសិនបើអ្នកចង់ក្លែងធ្វើការរចនារបស់អ្នកនៅខាងក្រៅ Libero ។
គន្លឹះ៖ អ្នក។ ត្រូវតែអនុវត្តជំហាននេះប្រសិនបើអ្នកចង់ក្លែងធ្វើការរចនារបស់អ្នកនៅខាងក្រៅ Libero ។
សម្រាប់ព័ត៌មានបន្ថែម សូមមើលការក្លែងធ្វើការរចនារបស់អ្នក។
អ៊ី រក្សាទុកគម្រោងរបស់អ្នក - នេះគឺជាគម្រោងយោងរបស់អ្នក។
2.2 ការបង្ហាញសមាសធាតុ (សួរសំណួរ)
នៅពេលអ្នកបង្កើតសមាសធាតុរបស់អ្នក សំណុំនៃ files ត្រូវបានបង្កើតសម្រាប់សមាសធាតុនីមួយៗ។ របាយការណ៍ Component Manifest លម្អិតអំពីសំណុំ files បានបង្កើត និងប្រើប្រាស់ក្នុងជំហានបន្តបន្ទាប់នីមួយៗ (ការសំយោគ ការក្លែងធ្វើ ការបង្កើតកម្មវិធីបង្កប់ និងដូច្នេះនៅលើ)។ របាយការណ៍នេះផ្តល់ឱ្យអ្នកនូវទីតាំងទាំងអស់ដែលបានបង្កើត fileត្រូវការដើម្បីបន្តជាមួយនឹងលំហូរផ្ទាល់ខ្លួន។ អ្នកអាចចូលប្រើសមាសធាតុ manifest នៅក្នុងតំបន់របាយការណ៍៖ ចុច រចនា > របាយការណ៍ ដើម្បីបើកផ្ទាំងរបាយការណ៍។ នៅក្នុងផ្ទាំងរបាយការណ៍ អ្នកឃើញសំណុំនៃ manifest.txt files (ជាងview) មួយសម្រាប់សមាសធាតុនីមួយៗដែលអ្នកបានបង្កើត។
គន្លឹះ៖ អ្នកត្រូវតែកំណត់សមាសភាគ ឬម៉ូឌុលជា '"root"' ដើម្បីមើលសមាសធាតុ manifest file មាតិកានៅក្នុងផ្ទាំងរបាយការណ៍។
ម៉្យាងទៀត អ្នកអាចចូលប្រើរបាយការណ៍ manifest នីមួយៗ files សម្រាប់សមាសធាតុស្នូលនីមួយៗដែលបានបង្កើត ឬសមាសភាគ SmartDesign ពី / សមាសធាតុ / ការងារ / / / _manifest.txt ឬ / សមាសធាតុ / ការងារ / / _manifest.txt អ្នកក៏អាចចូលប្រើ manifest ផងដែរ។ file មាតិកានៃសមាសភាគនីមួយៗដែលបានបង្កើតពីផ្ទាំងសមាសភាគថ្មីនៅក្នុង Libero ដែលជាកន្លែង file ទីតាំងត្រូវបានរៀបរាប់ដោយគោរពតាមថតគម្រោង។ ផ្ដោតលើរបាយការណ៍ Component Manifest ខាងក្រោម៖
- ប្រសិនបើអ្នកបញ្ចូលស្នូលទៅក្នុង SmartDesign សូមអាន file _manifest.txt ។
- ប្រសិនបើអ្នកបានបង្កើតសមាសធាតុសម្រាប់ស្នូល សូមអាន _manifest.txt ។
អ្នកត្រូវតែប្រើរបាយការណ៍ Manifests សមាសធាតុទាំងអស់ដែលអនុវត្តចំពោះការរចនារបស់អ្នក។ សម្រាប់អតីតampដូច្នេះ ប្រសិនបើគម្រោងរបស់អ្នកមាន SmartDesign ដែលមានធាតុផ្សំស្នូលមួយ ឬច្រើនភ្លាមៗនៅក្នុងវា ហើយអ្នកមានបំណងប្រើពួកវាទាំងអស់នៅក្នុងការរចនាចុងក្រោយរបស់អ្នក នោះអ្នកត្រូវតែជ្រើសរើស files បានរាយក្នុងរបាយការណ៍ Component Manifests នៃសមាសធាតុទាំងអស់នោះ សម្រាប់ប្រើប្រាស់ក្នុងលំហូរការរចនារបស់អ្នក។
2.3 ការបកស្រាយការបង្ហាញ Files (សួរសំណួរ)
នៅពេលអ្នកបើកការបង្ហាញសមាសធាតុ fileអ្នកឃើញផ្លូវទៅ files នៅក្នុងគម្រោង Libero របស់អ្នក និងចង្អុលបង្ហាញកន្លែងដែលនៅក្នុងលំហូរនៃការរចនាដើម្បីប្រើវា។ អ្នកអាចឃើញប្រភេទដូចខាងក្រោមនៃ files នៅក្នុងការបង្ហាញមួយ។ file:
- ប្រភព HDL files សម្រាប់ឧបករណ៍សំយោគ និងក្លែងធ្វើទាំងអស់។
- រំញោច files សម្រាប់ឧបករណ៍ក្លែងធ្វើទាំងអស់។
- ឧបសគ្គ files
ខាងក្រោមនេះគឺជា Component Manifest នៃសមាសភាគស្នូល PolarFire ។ ប្រភេទនីមួយៗ file គឺចាំបាច់នៅក្នុងលំហូរនៃការរចនារបស់អ្នក។ ផ្នែកខាងក្រោមពិពណ៌នាអំពីការរួមបញ្ចូល files ពី manifest ចូលទៅក្នុងលំហូរការរចនារបស់អ្នក។
ការបង្កើតឧបសគ្គ (សួរសំណួរ)
នៅពេលអនុវត្តការកំណត់រចនាសម្ព័ន្ធ និងការបង្កើត ត្រូវប្រាកដថាសរសេរ/បង្កើតដែនកំណត់ SDC/PDC/NDC files សម្រាប់ការរចនាបញ្ជូនពួកវាទៅ Synthesis, Place-and-Route, និង Verify Timing tools។
ប្រើឧបករណ៍ប្រើប្រាស់ Derive Constraints នៅខាងក្រៅបរិយាកាស Libero ដើម្បីបង្កើតឧបសគ្គជំនួសឱ្យការសរសេរពួកវាដោយដៃ។ ដើម្បីប្រើឧបករណ៍ប្រើប្រាស់ Derive Constraint នៅខាងក្រៅបរិយាកាស Libero អ្នកត្រូវតែ៖
- ផ្គត់ផ្គង់អ្នកប្រើប្រាស់ HDL, សមាសភាគ HDL, និងដែនកំណត់ SDC សមាសភាគ files
- បញ្ជាក់ម៉ូឌុលកម្រិតកំពូល
- បញ្ជាក់ទីតាំងកន្លែងដែលត្រូវបង្កើតឧបសគ្គដែលបានទាញយក files
ឧបសគ្គនៃសមាសភាគ SDC មាននៅក្រោម / សមាសធាតុ / ការងារ / / / ថតបន្ទាប់ពីការកំណត់រចនាសម្ព័ន្ធនិងការបង្កើតសមាសភាគ។
សម្រាប់ព័ត៌មានលម្អិតបន្ថែមអំពីរបៀបបង្កើតឧបសគ្គសម្រាប់ការរចនារបស់អ្នក សូមមើលឧបសម្ព័ន្ធ C-Derive Constraints។
សំយោគការរចនារបស់អ្នក (សួរសំណួរ)
លក្ខណៈពិសេសចម្បងមួយនៃលំហូរផ្ទាល់ខ្លួនគឺអនុញ្ញាតឱ្យអ្នកប្រើការសំយោគភាគីទីបី
ឧបករណ៍នៅខាងក្រៅ Libero ។ លំហូរផ្ទាល់ខ្លួនគាំទ្រការប្រើប្រាស់ Synopsys SynplifyPro ។ ដើម្បីសំយោគរបស់អ្នក។
គម្រោង, ប្រើនីតិវិធីដូចខាងក្រោម:
- បង្កើតគម្រោងថ្មីនៅក្នុងឧបករណ៍សំយោគរបស់អ្នក កំណត់គោលដៅគ្រួសារឧបករណ៍ដូចគ្នា ស្លាប់ និងកញ្ចប់ដូចគម្រោង Libero ដែលអ្នកបានបង្កើត។
ក. នាំចូល RTL ផ្ទាល់ខ្លួនរបស់អ្នក។ files ដូចដែលអ្នកធ្វើធម្មតា។
ខ. កំណត់លទ្ធផលសំយោគទៅជារចនាសម្ព័ន្ធ Verilog (.vm) ។
គន្លឹះ៖ រចនាសម្ព័ន្ធ Verilog (.vm) គឺជាទម្រង់លទ្ធផលសំយោគដែលគាំទ្រតែមួយគត់នៅក្នុង PolarFire ។ - នាំចូលសមាសធាតុ HDL files ចូលទៅក្នុងគម្រោងសំយោគរបស់អ្នក៖
ក. សម្រាប់របាយការណ៍បង្ហាញសមាសធាតុនីមួយៗ៖ សម្រាប់នីមួយៗ file នៅក្រោមប្រភព HDL files សម្រាប់ឧបករណ៍សំយោគ និងក្លែងធ្វើទាំងអស់ សូមនាំចូល file ទៅក្នុងគម្រោងសំយោគរបស់អ្នក។ - នាំចូល file polarfire_syn_comps.v (ប្រសិនបើប្រើ Synopsys Synplify) ពី
ទីតាំងដំឡើង>/data/aPA5M ទៅគម្រោងសំយោគរបស់អ្នក។ - នាំចូល SDC ដែលបានបង្កើតពីមុន file តាមរយៈឧបករណ៍កំណត់ដែលបានមកពី (សូមមើលឧបសម្ព័ន្ធ
ក-សample SDC Constraints) ចូលទៅក្នុងឧបករណ៍សំយោគ។ ឧបសគ្គនេះ។ file រឹតបន្តឹងឧបករណ៍សំយោគដើម្បីសម្រេចបាននូវការបិទពេលវេលាជាមួយនឹងការខិតខំប្រឹងប្រែងតិច និងការរចនាឡើងវិញតិចជាងមុន។
![]() សំខាន់៖
សំខាន់៖
- ប្រសិនបើអ្នកមានគម្រោងប្រើ *.sdc ដូចគ្នា។ file ដើម្បីដាក់កម្រិត Place-and-Route ក្នុងដំណាក់កាលអនុវត្តការរចនា អ្នកត្រូវតែនាំចូល *.sdc នេះទៅក្នុងគម្រោងសំយោគ។ នេះគឺដើម្បីធានាថាមិនមានឈ្មោះវត្ថុរចនាមិនត្រូវគ្នាក្នុងបញ្ជីសុទ្ធដែលបានសំយោគនិងឧបសគ្គទីកន្លែងនិងផ្លូវក្នុងកំឡុងដំណាក់កាលអនុវត្តនៃដំណើរការរចនា។ ប្រសិនបើអ្នកមិនរួមបញ្ចូលនេះ *.sdc file ក្នុងជំហានសំយោគ បញ្ជីសុទ្ធដែលបានបង្កើតពីការសំយោគអាចនឹងបរាជ័យក្នុងជំហានទីកន្លែង និងផ្លូវ ដោយសារឈ្មោះវត្ថុរចនាមិនត្រូវគ្នា។
ក. នាំចូល Netlist Attributes *.ndc ប្រសិនបើមាន ទៅក្នុងឧបករណ៍សំយោគ។
ខ. ដំណើរការសំយោគ។ - ទីតាំងនៃលទ្ធផលឧបករណ៍សំយោគរបស់អ្នកមានបញ្ជី *.vm file បង្កើតក្រោយសំយោគ។ អ្នកត្រូវតែនាំចូលបញ្ជីសុទ្ធទៅក្នុងគម្រោងការអនុវត្ត Libero ដើម្បីបន្តដំណើរការរចនា។
ក្លែងធ្វើការរចនារបស់អ្នក (សួរសំណួរ)
ដើម្បីក្លែងធ្វើការរចនារបស់អ្នកនៅខាងក្រៅ Libero (នោះគឺការប្រើបរិយាកាសក្លែងធ្វើ និងម៉ាស៊ីនក្លែងធ្វើផ្ទាល់ខ្លួនរបស់អ្នក) សូមអនុវត្តជំហានដូចខាងក្រោមៈ
- រចនា Files:
ក. ការក្លែងធ្វើមុនសំយោគ៖
• នាំចូល RTL របស់អ្នកទៅក្នុងគម្រោងក្លែងធ្វើរបស់អ្នក។
• សម្រាប់របាយការណ៍បង្ហាញសមាសធាតុនីមួយៗ។
- នាំចូលនីមួយៗ file នៅក្រោមប្រភព HDL files សម្រាប់ឧបករណ៍សំយោគ និងក្លែងធ្វើទាំងអស់ទៅក្នុងគម្រោងក្លែងធ្វើរបស់អ្នក។
• ចងក្រងឯកសារទាំងនេះ files តាមការណែនាំរបស់អ្នកក្លែងធ្វើ។
ខ. ការក្លែងធ្វើក្រោយសំយោគ៖
• នាំចូលបញ្ជីសុទ្ធក្រោយសំយោគ *.vm របស់អ្នក (បង្កើតក្នុងការសំយោគការរចនារបស់អ្នក) ទៅក្នុងគម្រោងក្លែងធ្វើរបស់អ្នក ហើយចងក្រងវា។
គ. ការក្លែងធ្វើក្រោយប្លង់៖
• ជាដំបូង បញ្ចប់ការអនុវត្តការរចនារបស់អ្នក (សូមមើល ការអនុវត្តការរចនារបស់អ្នក)។ ត្រូវប្រាកដថាគម្រោង Libero ចុងក្រោយរបស់អ្នកស្ថិតក្នុងស្ថានភាពក្រោយប្លង់។
• ចុចពីរដងបង្កើត BackAnnotated Files នៅក្នុងបង្អួចលំហូររចនា Libero ។ វាបង្កើតបានពីរ files:
/ អ្នករចនា / / _ba.v/vhd / អ្នករចនា /
/ _ba.sdf
• នាំចូលទាំងពីរនេះ។ files ចូលទៅក្នុងឧបករណ៍ក្លែងធ្វើរបស់អ្នក។ - ការជំរុញ និងការកំណត់រចនាសម្ព័ន្ធ files:
ក. សម្រាប់របាយការណ៍បង្ហាញសមាសធាតុនីមួយៗ៖
• ចម្លងទាំងអស់។ files នៅក្រោមការជំរុញ Files សម្រាប់ផ្នែកឧបករណ៍ក្លែងធ្វើទាំងអស់ទៅកាន់ថត root នៃគម្រោងក្លែងធ្វើរបស់អ្នក។
ខ. ធានាថា Tcl files នៅក្នុងបញ្ជីមុន (ក្នុងជំហាន 2.a) ត្រូវបានប្រតិបត្តិជាដំបូង មុនពេលចាប់ផ្តើមនៃការក្លែងធ្វើ។
គ. UPROM.mem៖ ប្រសិនបើអ្នកប្រើស្នូល UPROM ក្នុងការរចនារបស់អ្នកជាមួយនឹងជម្រើស ប្រើមាតិកាសម្រាប់ការក្លែងធ្វើបានបើកសម្រាប់អតិថិជនផ្ទុកទិន្នន័យមួយ ឬច្រើនដែលអ្នកចង់ក្លែងធ្វើ អ្នកត្រូវតែប្រើ pa4rtupromgen (pa4rtupromgen.exe នៅលើ windows) ដើម្បីបង្កើត UPROM.mem file. ការប្រតិបត្តិ pa4rtupromgen យក UPROM.cfg file ជាការបញ្ចូលតាមរយៈស្គ្រីប Tcl file និងបញ្ចេញ UPROM.mem file ទាមទារសម្រាប់ការក្លែងធ្វើ។ UPROM.mem នេះ។ file ត្រូវតែចម្លងទៅថតក្លែងធ្វើ មុនពេលដំណើរការការក្លែងធ្វើ។ អតីតample បង្ហាញពីការប្រើប្រាស់ដែលអាចប្រតិបត្តិបាន pa4rtupromgen ត្រូវបានផ្តល់ជូនក្នុងជំហានខាងក្រោម។ UPROM.cfg file មាននៅក្នុងថតឯកសារ / សមាសធាតុ / ការងារ / / នៅក្នុងគម្រោង Libero ដែលអ្នកធ្លាប់បង្កើតសមាសធាតុ UPROM ។
ឃ. snvm.mem៖ ប្រសិនបើអ្នកប្រើស្នូលសេវាប្រព័ន្ធក្នុងការរចនារបស់អ្នក ហើយបានកំណត់រចនាសម្ព័ន្ធផ្ទាំង sNVM នៅក្នុងស្នូលជាមួយនឹងជម្រើស ប្រើមាតិកាសម្រាប់ការក្លែងធ្វើបានបើកសម្រាប់អតិថិជនមួយ ឬច្រើនដែលអ្នកចង់ក្លែងធ្វើ snvm.mem file ត្រូវបានបង្កើតដោយស្វ័យប្រវត្តិទៅ
ថត / សមាសធាតុ / ការងារ / / នៅក្នុងគម្រោង Libero ដែលអ្នកធ្លាប់បង្កើតសមាសភាគសេវាប្រព័ន្ធ។ snvm.mem នេះ។ file ត្រូវតែចម្លងទៅថតក្លែងធ្វើ មុនពេលដំណើរការការក្លែងធ្វើ។ - បង្កើតថតឯកសារដែលធ្វើការ និងថតរងដែលមានឈ្មោះថា ការក្លែងធ្វើក្រោមថតដែលធ្វើការ។
ការប្រតិបត្តិ pa4rtupromgen រំពឹងថានឹងមានវត្តមាននៃថតរងការក្លែងធ្វើនៅក្នុងថតការងារ ហើយស្គ្រីប *.tcl ត្រូវបានដាក់ក្នុងថតរងការក្លែងធ្វើ។ - ចម្លង UPROM.cfg file ពីគម្រោង Libero ដំបូងដែលបានបង្កើតសម្រាប់ការបង្កើតសមាសធាតុទៅក្នុងថតការងារ។
- បិទភ្ជាប់ពាក្យបញ្ជាខាងក្រោមនៅក្នុងស្គ្រីប *.tcl ហើយដាក់វានៅក្នុងថតចម្លងដែលបានបង្កើតក្នុងជំហានទី 3 ។
Sample *.tcl សម្រាប់ឧបករណ៍ PolarFire និង PolarFire Soc Family ដើម្បីបង្កើត URPOM.mem file
ពី UPROM.cfg
set_device -fam - ស្លាប់ - pkg
set_input_cfg -ផ្លូវ
set_sim_mem - ផ្លូវFile/UPROM.mem>
gen_sim -use_init មិនពិត
សម្រាប់ឈ្មោះខាងក្នុងត្រឹមត្រូវដែលត្រូវប្រើសម្រាប់ស្លាប់ និងកញ្ចប់ សូមមើល *.prjx file នៃគម្រោង Libero ដំបូង (ប្រើសម្រាប់ការបង្កើតសមាសធាតុ) ។
អាគុយម៉ង់ use_init ត្រូវតែកំណត់ទៅមិនពិត។
ប្រើពាក្យបញ្ជា set_sim_mem ដើម្បីបញ្ជាក់ផ្លូវទៅកាន់លទ្ធផល file UPROM.mem នោះគឺ
បង្កើតនៅពេលដំណើរការស្គ្រីប file ជាមួយ pa4rtupromgen អាចប្រតិបត្តិបាន។ - នៅប្រអប់បញ្ចូលពាក្យបញ្ជាឬស្ថានីយ cygwin សូមចូលទៅកាន់ថតការងារដែលបានបង្កើតក្នុងជំហានទី 3 ។
ប្រតិបត្តិពាក្យបញ្ជា pa4rtupromgen ជាមួយនឹងជម្រើស-script ហើយបញ្ជូនវាទៅវានូវស្គ្រីប *.tcl ដែលបានបង្កើតក្នុងជំហានមុន។
សម្រាប់វីនដូ
/designer/bin/pa4rtupromgen.exe \\
-script./simulation/ .tcl
សម្រាប់លីនុច៖
/bin/pa4rtupromgen
-script./simulation/ .tcl - បន្ទាប់ពីការប្រតិបត្តិដោយជោគជ័យនៃ pa4rtupromgen ដែលអាចប្រតិបត្តិបាន សូមពិនិត្យមើលថា UPROM.mem file ត្រូវបានបង្កើតនៅក្នុងទីតាំងដែលបានបញ្ជាក់នៅក្នុងពាក្យបញ្ជា set_sim_mem ក្នុងស្គ្រីប *.tcl ។
- ដើម្បីក្លែងធ្វើ sNVM សូមចម្លង snvm.mem file ពីគម្រោង Libero ដំបូងរបស់អ្នក (ប្រើសម្រាប់ការកំណត់រចនាសម្ព័ន្ធសមាសភាគ) ចូលទៅក្នុងថតចម្លងកម្រិតកំពូលនៃគម្រោងក្លែងធ្វើរបស់អ្នក ដើម្បីដំណើរការការក្លែងធ្វើ (នៅខាងក្រៅ Libero SoC)។ ដើម្បីក្លែងធ្វើមាតិកា UPROM សូមចម្លង UPROM.mem ដែលបានបង្កើត file ចូលទៅក្នុងថតក្លែងធ្វើកម្រិតកំពូលនៃគម្រោងក្លែងធ្វើរបស់អ្នក ដើម្បីដំណើរការការក្លែងធ្វើ (នៅខាងក្រៅ Libero SoC)។
![]() សំខាន់៖ ទៅ ក្លែងធ្វើមុខងារនៃ SoC Components ទាញយកបណ្ណាល័យពិសោធន៏ PolarFire ដែលបានចងក្រងជាមុន ហើយនាំចូលពួកវាទៅក្នុងបរិយាកាសក្លែងធ្វើរបស់អ្នក ដូចដែលបានពិពណ៌នានៅទីនេះ។ សម្រាប់ព័ត៌មានលម្អិត សូមមើលឧបសម្ព័ន្ធ ខ-ការនាំចូលបណ្ណាល័យក្លែងធ្វើទៅក្នុងបរិយាកាសក្លែងធ្វើ។
សំខាន់៖ ទៅ ក្លែងធ្វើមុខងារនៃ SoC Components ទាញយកបណ្ណាល័យពិសោធន៏ PolarFire ដែលបានចងក្រងជាមុន ហើយនាំចូលពួកវាទៅក្នុងបរិយាកាសក្លែងធ្វើរបស់អ្នក ដូចដែលបានពិពណ៌នានៅទីនេះ។ សម្រាប់ព័ត៌មានលម្អិត សូមមើលឧបសម្ព័ន្ធ ខ-ការនាំចូលបណ្ណាល័យក្លែងធ្វើទៅក្នុងបរិយាកាសក្លែងធ្វើ។
ការអនុវត្តការរចនារបស់អ្នក (សួរសំណួរ)
បន្ទាប់ពីបញ្ចប់ការក្លែងធ្វើសំយោគ និងក្រោយការសំយោគនៅក្នុងបរិយាកាសរបស់អ្នក អ្នកត្រូវតែប្រើ Libero ម្តងទៀត ដើម្បីអនុវត្តការរចនារបស់អ្នក ដំណើរការពេលវេលា និងការវិភាគថាមពល និងបង្កើតកម្មវិធីរបស់អ្នក។ file.
- បង្កើតគម្រោង Libero ថ្មីសម្រាប់ការអនុវត្តជាក់ស្តែង និងប្លង់នៃការរចនា។ ត្រូវប្រាកដថាដើម្បីកំណត់គោលដៅឧបករណ៍ដូចគ្នាទៅនឹងគម្រោងយោងដែលអ្នកបានបង្កើតនៅក្នុងការកំណត់រចនាសម្ព័ន្ធសមាសភាគ។
- បន្ទាប់ពីការបង្កើតគម្រោង សូមដកការសំយោគចេញពីខ្សែសង្វាក់ឧបករណ៍ក្នុងបង្អួចលំហូរការរចនា (គម្រោង > ការកំណត់គម្រោង > លំហូររចនា > ដោះធីកបើកការសំយោគ)។
- នាំចូលក្រោយការសំយោគរបស់អ្នក *.vm file នៅក្នុងគម្រោងនេះ (File > នាំចូល > បញ្ជីឈ្មោះសុទ្ធដែលបានសំយោគ (VM))។
 គន្លឹះ៖ វាត្រូវបានណែនាំអោយអ្នកបង្កើតតំណភ្ជាប់ទៅកាន់វា។ fileដូច្នេះប្រសិនបើអ្នកធ្វើសមកាលកម្មការរចនារបស់អ្នកឡើងវិញ Libero តែងតែប្រើបញ្ជីក្រោយសំយោគចុងក្រោយបំផុត។
ក. នៅក្នុងបង្អួចរចនាឋានានុក្រម សូមចំណាំឈ្មោះរបស់ម៉ូឌុលឫស។
- នាំចូលឧបសគ្គទៅក្នុងគម្រោង Libero ។ ប្រើកម្មវិធីគ្រប់គ្រងកម្រិតដើម្បីនាំចូលឧបសគ្គ *.pdc/*.sdc/*.ndc ។
ក. នាំចូល I/O *.pdc ឧបសគ្គ files (កម្មវិធីគ្រប់គ្រងកំហិត > គុណលក្ខណៈ I/O > នាំចូល) ។
ខ. នាំចូលការរៀបចំផែនការជាន់លើកម្រិត *.pdc files (អ្នកគ្រប់គ្រងកម្រិត> អ្នករៀបចំផែនការជាន់> នាំចូល) ។
គ. នាំចូលដែនកំណត់ពេលវេលា *.sdc files (កម្មវិធីគ្រប់គ្រងកម្រិត> ពេលវេលា> នាំចូល)។ ប្រសិនបើការរចនារបស់អ្នកមានស្នូលណាមួយដែលបានរាយក្នុង Overviewធានាថានាំចូល SDC file បង្កើតតាមរយៈឧបករណ៍កំណត់កម្រិតទាញយក។
ឃ. នាំចូលកម្រិត *.ndc files (កម្មវិធីគ្រប់គ្រងឧបសគ្គ > គុណលក្ខណៈបញ្ជីសុទ្ធ > នាំចូល) ។ - ឧបសគ្គដែលពាក់ព័ន្ធ Files ដើម្បីរចនាឧបករណ៍។
ក. បើកកម្មវិធីគ្រប់គ្រងឧបសគ្គ (គ្រប់គ្រងឧបសគ្គ> បើកការគ្រប់គ្រងឧបសគ្គ View).
ធីកប្រអប់ធីក ទីកន្លែង និងផ្លូវ និងពេលវេលាផ្ទៀងផ្ទាត់ នៅជាប់នឹងឧបសគ្គ file ដើម្បីបង្កើតការរឹតត្បិត file និងការផ្សារភ្ជាប់ឧបករណ៍។ ភ្ជាប់ឧបសគ្គ *.pdc ទៅនឹងទីកន្លែង និងផ្លូវ និង *.sdc ទៅទាំងការផ្ទៀងផ្ទាត់ទីកន្លែង និងផ្លូវ និងពេលវេលា។ ភ្ជាប់ *.ndc file ដើម្បីចងក្រង Netlist ។
គន្លឹះ: ប្រសិនបើ ទីកន្លែង និងផ្លូវបរាជ័យជាមួយនឹងកម្រិត *.sdc នេះ។ fileបន្ទាប់មកនាំចូលដូចគ្នានេះ *.sdc file ដើម្បីសំយោគ និងដំណើរការសំយោគឡើងវិញ។ - ចុច Compile Netlist ហើយបន្ទាប់មក Place and Route ដើម្បីបញ្ចប់ជំហានប្លង់។
- ឧបករណ៍កំណត់រចនាសម្ព័ន្ធទិន្នន័យ និងការចងចាំដំបូងអនុញ្ញាតឱ្យអ្នកចាប់ផ្តើមប្លុករចនា ដូចជា LSRAM, µSRAM, XCVR (ឧបករណ៍បញ្ជូន) និង PCIe ដោយប្រើទិន្នន័យដែលរក្សាទុកក្នុងអង្គចងចាំ µPROM, sNVM ឬខាងក្រៅ SPI Flash storage ។ ឧបករណ៍មានផ្ទាំងខាងក្រោមសម្រាប់កំណត់លក្ខណៈជាក់លាក់នៃលំដាប់ចាប់ផ្តើមការរចនា ការកំណត់អតិថិជនការចាប់ផ្តើម អតិថិជនទិន្នន័យអ្នកប្រើប្រាស់។
- ផ្ទាំងចាប់ផ្តើមការរចនា
- ផ្ទាំង µPROM
- ផ្ទាំង sNVM
- ផ្ទាំង SPI Flash
- ផ្ទាំង RAMs ក្រណាត់
ប្រើផ្ទាំងនៅក្នុងឧបករណ៍ដើម្បីកំណត់រចនាសម្ព័ន្ធទិន្នន័យ និងការចងចាំចាប់ផ្តើមការរចនា។ បន្ទាប់ពីបញ្ចប់ការកំណត់រចនាសម្ព័ន្ធ សូមអនុវត្តជំហានខាងក្រោមដើម្បីរៀបចំទិន្នន័យចាប់ផ្ដើម៖
• បង្កើតម៉ាស៊ីនភ្ញៀវចាប់ផ្ដើម
• បង្កើត ឬនាំចេញប៊ីតស្ទ្រីម
• រៀបចំកម្មវិធីឧបករណ៍
សម្រាប់ព័ត៌មានលម្អិតអំពីរបៀបប្រើឧបករណ៍នេះ សូមមើលមគ្គុទ្ទេសក៍អ្នកប្រើប្រាស់លំហូរការរចនា Libero SoC ។ សម្រាប់ព័ត៌មានបន្ថែមអំពីពាក្យបញ្ជា Tcl ដែលប្រើដើម្បីកំណត់រចនាសម្ព័ន្ធផ្ទាំងផ្សេងៗនៅក្នុងឧបករណ៍ និងបញ្ជាក់ការកំណត់រចនាសម្ព័ន្ធអង្គចងចាំ files (*.cfg) សូមមើល មគ្គុទ្ទេសក៍យោងពាក្យបញ្ជា Tcl. - បង្កើតកម្មវិធី File ពីគម្រោងនេះ ហើយប្រើវាដើម្បីសរសេរកម្មវិធី FPGA របស់អ្នក។
ឧបសម្ព័ន្ធ A-Sample ឧបសគ្គ SDC (សួរសំណួរ
Libero SoC បង្កើតការកំណត់ពេលវេលា SDC សម្រាប់ស្នូល IP មួយចំនួនដូចជា CCC, OSC, Transceiver ជាដើម។ ការឆ្លងកាត់ឧបសគ្គរបស់ SDC ទៅនឹងឧបករណ៍រចនាបង្កើនឱកាសនៃការជួបនឹងការបិទពេលវេលាជាមួយនឹងការខិតខំប្រឹងប្រែងតិច និងការរចនាឡើងវិញតិចជាងមុន។ ផ្លូវឋានានុក្រមពេញលេញពីឧទាហរណ៍កម្រិតកំពូលត្រូវបានផ្តល់ឱ្យសម្រាប់វត្ថុរចនាទាំងអស់ដែលយោងនៅក្នុងឧបសគ្គ។
7.1 ដែនកំណត់ពេលវេលា SDC (សួរសំណួរ)
នៅក្នុងគម្រោងសេចក្តីយោងស្នូល Libero IP កម្រិតកំពូល SDC នេះ។ file អាចរកបានពីកម្មវិធីគ្រប់គ្រងកំហិត (លំហូរការរចនា > បើកការគ្រប់គ្រងឧបសគ្គ View > ពេលវេលា > ទាញយកឧបសគ្គ) ។
![]() សំខាន់៖ មើល នេះ file ដើម្បីកំណត់ឧបសគ្គ SDC ប្រសិនបើការរចនារបស់អ្នកមាន CCC, OSC, Transceiver និងសមាសភាគផ្សេងទៀត។ កែប្រែផ្លូវឋានានុក្រមពេញលេញ ប្រសិនបើចាំបាច់ ដើម្បីផ្គូផ្គងឋានានុក្រមរចនារបស់អ្នក ឬប្រើឧបករណ៍ប្រើប្រាស់ និងជំហាន Derive_Constraints នៅក្នុងឧបសម្ព័ន្ធ C—ទាញយកឧបសគ្គនៅលើកម្រិតសមាសភាគ SDC file.
សំខាន់៖ មើល នេះ file ដើម្បីកំណត់ឧបសគ្គ SDC ប្រសិនបើការរចនារបស់អ្នកមាន CCC, OSC, Transceiver និងសមាសភាគផ្សេងទៀត។ កែប្រែផ្លូវឋានានុក្រមពេញលេញ ប្រសិនបើចាំបាច់ ដើម្បីផ្គូផ្គងឋានានុក្រមរចនារបស់អ្នក ឬប្រើឧបករណ៍ប្រើប្រាស់ និងជំហាន Derive_Constraints នៅក្នុងឧបសម្ព័ន្ធ C—ទាញយកឧបសគ្គនៅលើកម្រិតសមាសភាគ SDC file.
រក្សាទុក file ទៅឈ្មោះផ្សេង ហើយនាំចូល SDC file ទៅកាន់ឧបករណ៍សំយោគ ឧបករណ៍ទីកន្លែង និងផ្លូវ និងការផ្ទៀងផ្ទាត់ពេលវេលា ដូចគ្នានឹងឧបសគ្គ SDC ផ្សេងទៀតដែរ files.
7.1.1 បានមកពី SDC File (សួរសំណួរ)
# នេះ។ file ត្រូវបានបង្កើតដោយផ្អែកលើប្រភព SDC ខាងក្រោម files:
# /drive/icicle_kit_ref_des/icicle-kit-reference-design-master/MPFS_ICICLE/component/work/
PF_CCC_C0/PF_CCC_C0_0/PF_CCC_C0_PF_CCC_C0_0_PF_CCC.sdc
# /drive/icicle_kit_ref_des/icicle-kit-reference-design-master/MPFS_ICICLE/component/work/
CLK_DIV/CLK_DIV_0/CLK_DIV_CLK_DIV_0_PF_CLK_DIV.sdc
# /drive/icicle_kit_ref_des/icicle-kit-reference-design-master/MPFS_ICICLE/component/work/
TRANSMIT_PLL/TRANSMIT_PLL_0/TRANSMIT_PLL_TRANSMIT_PLL_0_PF_TX_PLL.sdc
# /drive/icicle_kit_ref_des/icicle-kit-reference-design-master/MPFS_ICICLE/component/work/
DMA_INITIATOR/DMA_INITIATOR_0/DMA_INITIATOR.sdc
# /drive/icicle_kit_ref_des/icicle-kit-reference-design-master/MPFS_ICICLE/component/work/
FIC0_INITIATOR/FIC0_INITIATOR_0/FIC0_INITIATOR.sdc
# /drive/icicle_kit_ref_des/icicle-kit-reference-design-master/MPFS_ICICLE/component/work/
ICICLE_MSS/ICICLE_MSS.sdc
# /drive/icicle_kit_ref_des/icicle-kit-reference-design-master/MPFS_ICICLE/component/work/
PF_PCIE_C0/PF_PCIE_C0_0/PF_PCIE_C0_PF_PCIE_C0_0_PF_PCIE.sdc
# /drive/icicle_kit_ref_des/icicle-kit-reference-design-master/MPFS_ICICLE/component/work/
PCIE_INITIATOR/PCIE_INITIATOR_0/PCIE_INITIATOR.sdc
# /drive/aPA5M/cores/constraints/osc_rc160mhz.sdc
# *** រាល់ការកែប្រែចំពោះរឿងនេះ file នឹងត្រូវបាត់បង់ ប្រសិនបើឧបសគ្គដែលបានមកត្រូវបានដំណើរការឡើងវិញ។ ***
create_clock -name {CLOCKS_AND_RESETS_inst_0/OSCILLATOR_160MHz_inst_0/OSCILLATOR_160MHz_0/
I_OSC_160/CLK} -period 6.25
[ get_pins { CLOCKS_AND_RESETS_inst_0/OSCILLATOR_160MHz_inst_0/OSCILLATOR_160MHz_0/
I_OSC_160/CLK } ] create_clock -name {REF_CLK_PAD_P} -period 10 [ get_ports { REF_CLK_PAD_P } ] create_clock -name {CLOCKS_AND_RESETS_inst_0/TRANSMIT_PLL_0/TRANSMIT_0PLll_0
DIV_CLK} -រយៈពេល ៨
[ get_pins { CLOCKS_AND_RESETS_inst_0/TRANSMIT_PLL_0/TRANSMIT_PLL_0/txpll_isnt_0/DIV_CLK } ] create_generated_clock -name {CLOCKS_AND_RESETS_inst_0/CCC_FIC_x_CLK0/CPF_0
OUT0} -multiply_by 25 -divide_by 32 -source
[ get_pins { CLOCKS_AND_RESETS_inst_0/CCC_FIC_x_CLK/PF_CCC_C0_0/pll_inst_0/REF_CLK_0 } ] - ដំណាក់កាលទី 0
[ get_pins { CLOCKS_AND_RESETS_inst_0/CCC_FIC_x_CLK/PF_CCC_C0_0/pll_inst_0/OUT0 } ] create_generated_clock -name {CLOCKS_AND_RESETS_inst_0/CCC_FIC_x_CLK0/CPF_0
OUT1} -multiply_by 25 -divide_by 32 -source
[ get_pins { CLOCKS_AND_RESETS_inst_0/CCC_FIC_x_CLK/PF_CCC_C0_0/pll_inst_0/REF_CLK_0 } ] - ដំណាក់កាលទី 0
[ get_pins { CLOCKS_AND_RESETS_inst_0/CCC_FIC_x_CLK/PF_CCC_C0_0/pll_inst_0/OUT1 } ] create_generated_clock -name {CLOCKS_AND_RESETS_inst_0/CCC_FIC_x_CLK0/CPF_0
OUT2} -multiply_by 25 -divide_by 32 -source
[ get_pins { CLOCKS_AND_RESETS_inst_0/CCC_FIC_x_CLK/PF_CCC_C0_0/pll_inst_0/REF_CLK_0 } ] - ដំណាក់កាលទី 0
[ get_pins { CLOCKS_AND_RESETS_inst_0/CCC_FIC_x_CLK/PF_CCC_C0_0/pll_inst_0/OUT2 } ] create_generated_clock -name {CLOCKS_AND_RESETS_inst_0/CCC_FIC_x_CLK0/CPF_0
OUT3} -multiply_by 25 -divide_by 64 -source
[ get_pins { CLOCKS_AND_RESETS_inst_0/CCC_FIC_x_CLK/PF_CCC_C0_0/pll_inst_0/REF_CLK_0 } ] - ដំណាក់កាលទី 0
[ get_pins { CLOCKS_AND_RESETS_inst_0/CCC_FIC_x_CLK/PF_CCC_C0_0/pll_inst_0/OUT3 } ] create_generated_clock -name {CLOCKS_AND_RESETS_inst_0/CLK_160MHz_to_CLK_80MHz/CLK_0MHz
Y_DIV} -divide_by 2 -source
[ get_pins { CLOCKS_AND_RESETS_inst_0/CLK_160MHz_to_CLK_80MHz/CLK_DIV_0/I_CD/A } ] [ get_pins { CLOCKS_AND_RESETS_inst_0/CLK_160MHz_to_CLK_80MHz/CLIK_DIV/false] -តាមរយៈ [ get_nets { DMA_INITIATOR_inst_0/ARESETN* } ] set_false_path -from [ get_cells { DMA_INITIATOR_inst_0/*/SlvConvertor_loop[*].slvcnv/slvCDC/
genblk1*/rdGrayCounter*/cntGray* } ] -to [ get_cells { DMA_INITIATOR_inst_0/*/SlvConvertor_loop[*].slvcnv/slvCDC/genblk1*/
rdPtr_s1* } ] set_false_path -from [ get_cells { DMA_INITIATOR_inst_0/*/SlvConvertor_loop[*].slvcnv/slvCDC/
genblk1*/wrGrayCounter*/cntGray* } ] -to [ get_cells { DMA_INITIATOR_inst_0/*/SlvConvertor_loop[*].slvcnv/slvCDC/genblk1*/
wrPtr_s1* } ] set_false_path -through [ get_nets { FIC0_INITIATOR_inst_0/ARESETN* } ] set_false_path -to [ get_pins { PCIE/PF_PCIE_C0_0/PCIE_1/INTERRUPT[0] PCIE/PF_0PCIE_C0_
PCIE_1/INTERRUPT[1] PCIE/PF_PCIE_C0_0/PCIE_1/INTERRUPT[2] PCIE/PF_PCIE_C0_0/PCIE_1/
INTERRUPT[3] PCIE/PF_PCIE_C0_0/PCIE_1/INTERRUPT[4] PCIE/PF_PCIE_C0_0/PCIE_1/INTERRUPT[5]
PCIE/PF_PCIE_C0_0/PCIE_1/INTERRUPT[6] PCIE/PF_PCIE_C0_0/PCIE_1/INTERRUPT[7] PCIE/PF_PCIE_C0_0/
PCIE_1/WAKEREQ PCIE/PF_PCIE_C0_0/PCIE_1/MPERST_N } ] set_false_path -from [ get_pins { PCIE/PF_PCIE_C0_0/PCIE_1/TL_CLK } ] set_false_path -through [ get_nets { PCIE_IN_0RETIA ]/
ឧបសម្ព័ន្ធ B-ការនាំចូលបណ្ណាល័យក្លែងធ្វើទៅក្នុងបរិយាកាសក្លែងធ្វើ (សួរសំណួរ)
កម្មវិធីក្លែងធ្វើលំនាំដើមសម្រាប់ការក្លែងធ្វើ RTL ជាមួយ Libero SoC គឺ ModelSim ME Pro។
បណ្ណាល័យដែលបានចងក្រងជាមុនសម្រាប់កម្មវិធីក្លែងធ្វើលំនាំដើមគឺអាចរកបានជាមួយនឹងការដំឡើង Libero នៅថត /Designer/lib/modelsimpro/precompiled/vlog for® គ្រួសារដែលគាំទ្រ។ Libero SoC ក៏គាំទ្រការបោះពុម្ពរបស់ភាគីទីបីផ្សេងទៀតនៃ ModelSim, Questasim, VCS, Xcelium
សកម្ម HDL និង Riviera Pro ។ ទាញយកបណ្ណាល័យដែលបានចងក្រងជាមុនរៀងៗខ្លួនពី Libero SoC v12.0 និងក្រោយ ផ្អែកលើម៉ាស៊ីនក្លែងធ្វើ និងកំណែរបស់វា។
ស្រដៀងទៅនឹងបរិស្ថាន Libero, run.do file ត្រូវតែបង្កើតដើម្បីដំណើរការការក្លែងធ្វើនៅខាងក្រៅ Libero ។
បង្កើត run.do សាមញ្ញ file ដែលមានពាក្យបញ្ជាដើម្បីបង្កើតបណ្ណាល័យសម្រាប់លទ្ធផលចងក្រង ផែនទីបណ្ណាល័យ ការចងក្រង និងការក្លែងធ្វើ។ អនុវត្តតាមជំហានដើម្បីបង្កើត run.do មូលដ្ឋាន file.
- បង្កើតបណ្ណាល័យឡូជីខលដើម្បីរក្សាទុកលទ្ធផលនៃការចងក្រងដោយប្រើពាក្យបញ្ជា vlib vlib presynth ។
- គូសផែនទីឈ្មោះបណ្ណាល័យឡូជីខលទៅថតបណ្ណាល័យដែលបានចងក្រងជាមុនដោយប្រើពាក្យបញ្ជា vmap vmap .
- ចងក្រងប្រភព files—ប្រើពាក្យបញ្ជាចងក្រងភាសាជាក់លាក់ដើម្បីចងក្រងការរចនា files ចូលទៅក្នុងថតការងារ។
- vlog សម្រាប់ .v/.sv
- vcom សម្រាប់ .vhd - ផ្ទុកការរចនាសម្រាប់ការក្លែងធ្វើដោយប្រើពាក្យបញ្ជា vsim ដោយបញ្ជាក់ឈ្មោះនៃម៉ូឌុលកម្រិតកំពូលណាមួយ។
- ក្លែងធ្វើការរចនាដោយប្រើពាក្យបញ្ជារត់។
បន្ទាប់ពីផ្ទុកការរចនា ពេលវេលាក្លែងធ្វើត្រូវបានកំណត់ទៅសូន្យ ហើយអ្នកអាចបញ្ចូលពាក្យបញ្ជារត់ ដើម្បីចាប់ផ្តើមការក្លែងធ្វើ។
នៅក្នុងបង្អួចប្រតិចារឹកកម្មវិធីត្រាប់តាម ប្រតិបត្តិ run.do file ដូច run.do រត់ការក្លែងធ្វើ។ សample run.do file ដូចខាងក្រោម។
កំណត់ដោយស្ងៀមស្ងាត់ ACTELLIBNAME PolarFire កំណត់ PROJECT_DIR “W:/Test/basic_test” ប្រសិនបើ
{[file exists presynth/_info]} { បន្ទរ “INFO: Simulation library presynth exists” } else
{ file លុប -force presynth vlib presynth } vmap presynth presynth vmap PolarFire
“X:/Libero/Designer/lib/modelsimpro/precompiled/vlog/PolarFire” vlog -sv -work presynth
“${PROJECT_DIR}/hdl/top.v” vlog “+incdir+${PROJECT_DIR}/stimulus” -sv -work presynth “$
{PROJECT_DIR}/stimulus/tb.v" vsim -L PolarFire -L presynth -t 1ps presynth.tb បន្ថែមរលក /tb/*
ដំណើរការ 1000ns log /tb/* ចេញ
ឧបសម្ព័ន្ធ C - ទទួលបានឧបសគ្គ (សួរសំណួរ)
ឧបសម្ព័ន្ធនេះពិពណ៌នាអំពីពាក្យបញ្ជា Derive Constraints Tcl ។
9.1 ទាញយកឧបសគ្គ Tcl ពាក្យបញ្ជា (សួរសំណួរ)
ឧបករណ៍ប្រើប្រាស់ derive_constraints ជួយអ្នកទាញយកឧបសគ្គពី RTL ឬអ្នកកំណត់រចនាសម្ព័ន្ធនៅខាងក្រៅបរិយាកាសរចនា Libero SoC ។ ដើម្បីបង្កើតឧបសគ្គសម្រាប់ការរចនារបស់អ្នក អ្នកត្រូវការ User HDL, Component HDL, និង Component Constraints fileស. សមាសធាតុ SDC មានឧបសគ្គ files អាចរកបាននៅក្រោម / សមាសធាតុ / ការងារ / / / ថតបន្ទាប់ពីការកំណត់រចនាសម្ព័ន្ធនិងការបង្កើតសមាសភាគ។
សមាសធាតុនីមួយៗមានកម្រិត file មានពាក្យបញ្ជា set_component tcl (បញ្ជាក់ឈ្មោះសមាសភាគ) និងបញ្ជីនៃឧបសគ្គដែលបានបង្កើតបន្ទាប់ពីការកំណត់រចនាសម្ព័ន្ធ។ ឧបសគ្គត្រូវបានបង្កើតដោយផ្អែកលើការកំណត់រចនាសម្ព័ន្ធ និងជាក់លាក់ចំពោះសមាសធាតុនីមួយៗ។
Exampលេ 9-1 ។ ឧបសគ្គផ្នែក File សម្រាប់ PF_CCC Core
នេះគឺជាអតីតample នៃការរឹតបន្តឹងសមាសភាគ file សម្រាប់ស្នូល PF_CCC៖
set_component PF_CCC_C0_PF_CCC_C0_0_PF_CCC
# ក្រុមហ៊ុនមីក្រូឈីប
# កាលបរិច្ឆេទ៖ 2021-Oct-26 04:36:00
# នាឡិកាមូលដ្ឋានសម្រាប់ PLL #0
create_clock -period 10 [ get_pins { pll_inst_0/REF_CLK_0 } ] create_generated_clock -divide_by 1 -source [ get_pins { pll_inst_0/
REF_CLK_0 } ] -phase 0 [ get_pins { plll_inst_0/OUT0 } ] នៅទីនេះ create_clock និងcreate_generated_clock គឺជាឯកសារយោង និងលទ្ធផលកំណត់នាឡិការៀងៗខ្លួន ដែលត្រូវបានបង្កើតដោយផ្អែកលើការកំណត់រចនាសម្ព័ន្ធ។
9.1.1 ធ្វើការជាមួយឧបករណ៍ប្រើប្រាស់ derive_constraints (សួរសំណួរ)
ទាញយកឧបសគ្គឆ្លងកាត់តាមការរចនា និងបែងចែកឧបសគ្គថ្មីសម្រាប់ឧទាហរណ៍នីមួយៗនៃសមាសភាគដោយផ្អែកលើសមាសភាគដែលបានផ្តល់ពីមុន SDC fileស. សម្រាប់នាឡិកាយោង CCC វាផ្សាយឡើងវិញតាមរយៈការរចនាដើម្បីស្វែងរកប្រភពនៃនាឡិកាយោង។ ប្រសិនបើប្រភពគឺជា I/O នោះដែនកំណត់នាឡិកាយោងនឹងត្រូវបានកំណត់នៅលើ I/O ។ ប្រសិនបើវាជាលទ្ធផល CCC ឬប្រភពនាឡិកាផ្សេងទៀត (ឧទាហរណ៍ample, Transceiver, oscillator) វាប្រើនាឡិកាពីសមាសភាគផ្សេងទៀត ហើយរាយការណ៍ការព្រមានប្រសិនបើចន្លោះពេលមិនត្រូវគ្នា។ ដែនកំណត់ទាញយកក៏នឹងបែងចែកឧបសគ្គសម្រាប់ម៉ាក្រូមួយចំនួនដូចជា លំយោលនៅលើបន្ទះឈីប ប្រសិនបើអ្នកមានវានៅក្នុង RTL របស់អ្នក។
ដើម្បីប្រតិបត្តិឧបករណ៍ប្រើប្រាស់ derive_constraints អ្នកត្រូវតែផ្គត់ផ្គង់ .tcl file អាគុយម៉ង់បន្ទាត់ពាក្យបញ្ជាជាមួយព័ត៌មានខាងក្រោមនៅក្នុងលំដាប់ដែលបានបញ្ជាក់។
- បញ្ជាក់ព័ត៌មានឧបករណ៍ដោយប្រើព័ត៌មាននៅក្នុងផ្នែក set_device ។
- បញ្ជាក់ផ្លូវទៅកាន់ RTL files ដោយប្រើព័ត៌មាននៅក្នុងផ្នែក read_verilog ឬ read_vhdl ។
- កំណត់ម៉ូឌុលកម្រិតកំពូលដោយប្រើព័ត៌មាននៅក្នុងផ្នែក set_top_level ។
- បញ្ជាក់ផ្លូវទៅកាន់សមាសភាគ SDC files ដោយប្រើព័ត៌មាននៅក្នុងផ្នែក read_sdc ឬ read_ndc ។
- ប្រតិបត្តិ files ដោយប្រើព័ត៌មាននៅក្នុងផ្នែក derive_constraints ។
- បញ្ជាក់ផ្លូវទៅកាន់ឧបសគ្គដែលបានមកពី SDC file ដោយប្រើព័ត៌មាននៅក្នុងផ្នែក write_sdc ឬ write_pdc ឬ write_ndc ។
Exampលេ 9-2 ។ ការប្រតិបត្តិ និងខ្លឹមសារនៃ derive.tcl File
ខាងក្រោមនេះគឺជាអតីតample អាគុយម៉ង់បន្ទាត់ពាក្យបញ្ជា ដើម្បីប្រតិបត្តិឧបករណ៍ប្រើប្រាស់ derive_constraints ។
$ /bin{64}/derive_constraints derive.tcl
ខ្លឹមសារនៃ derive.tcl file:
# ព័ត៌មានឧបករណ៍
set_device -family PolarFire -die MPF100T -ល្បឿន -1
# RTL files
read_verilog -mode system_verilog project/component/work/txpll0/
txpll0_txpll0_0_PF_TX_PLL.v
read_verilog -mode system_verilog {project/component/work/txpll0/txpll0.v}
read_verilog -mode system_verilog {project/component/work/xcvr0/I_XCVR/
xcvr0_I_XCVR_PF_XCVR.v}
read_verilog -mode system_verilog {project/component/work/xcvr0/xcvr0.v}
read_vhdl -mode vhdl_2008 {project/hdl/xcvr1.vhd}
# សមាសធាតុ SDC files
set_top_level {xcvr1}
read_sdc -component {project/component/work/txpll0/txpll0_0/
txpll0_txpll0_0_PF_TX_PLL.sdc}
read_sdc -component {project/component/work/xcvr0/I_XCVR/
xcvr0_I_XCVR_PF_XCVR.sdc}
# ប្រើពាក្យបញ្ជា derive_constraint
derive_constraints
លទ្ធផល #SDC/PDC/NDC files
write_sdc {project/constraint/xcvr1_derived_constraints.sdc}
write_pdc {project/constraint/fp/xcvr1_derived_constraints.pdc}
9.1.2 set_device (សួរសំណួរ)
ការពិពណ៌នា
បញ្ជាក់ឈ្មោះគ្រួសារ ឈ្មោះស្លាប់ និងចំណាត់ថ្នាក់ល្បឿន។
set_device - គ្រួសារ - ស្លាប់ - ល្បឿន
អាគុយម៉ង់
| ប៉ារ៉ាម៉ែត្រ | ប្រភេទ | ការពិពណ៌នា |
| - គ្រួសារ | ខ្សែអក្សរ | បញ្ជាក់ឈ្មោះគ្រួសារ។ តម្លៃដែលអាចធ្វើបានគឺ PolarFire®, PolarFire SoC ។ |
| - ស្លាប់ | ខ្សែអក្សរ | បញ្ជាក់ឈ្មោះស្លាប់។ |
| - ល្បឿន | ខ្សែអក្សរ | បញ្ជាក់កម្រិតល្បឿនឧបករណ៍។ តម្លៃដែលអាចមានគឺ STD ឬ -1 ។ |
| ប្រភេទត្រឡប់ | ការពិពណ៌នា |
| 0 | ពាក្យបញ្ជាបានជោគជ័យ។ |
| 1 | ពាក្យបញ្ជាបានបរាជ័យ។ មានកំហុស។ អ្នកអាចសង្កេតមើលសារកំហុសនៅក្នុងកុងសូល។ |
បញ្ជីនៃកំហុស
| កូដកំហុស | សារកំហុស | ការពិពណ៌នា |
| ERR0023 | ប៉ារ៉ាម៉ែត្រដែលត្រូវការ - ស្លាប់បាត់ | ជម្រើសនៃការស្លាប់គឺជាកាតព្វកិច្ច ហើយត្រូវតែបញ្ជាក់។ |
| ERR0005 | មិនស្គាល់អត្តសញ្ញាណ 'MPF30' | តម្លៃនៃជម្រើស -die មិនត្រឹមត្រូវទេ។ មើលបញ្ជីតម្លៃដែលអាចមាននៅក្នុងការពិពណ៌នារបស់ជម្រើស។ |
| ERR0023 | ប៉ារ៉ាម៉ែត្រ - ស្លាប់បាត់បង់តម្លៃ | ជម្រើសស្លាប់ត្រូវបានបញ្ជាក់ដោយគ្មានតម្លៃ។ |
| ERR0023 | ប៉ារ៉ាម៉ែត្រដែលត្រូវការ - គ្រួសារបាត់ | ជម្រើសគ្រួសារគឺចាំបាច់ ហើយត្រូវតែបញ្ជាក់។ |
| ERR0004 | គ្រួសារមិនស្គាល់ 'PolarFire®' | ជម្រើសគ្រួសារមិនត្រឹមត្រូវទេ។ មើលបញ្ជីតម្លៃដែលអាចមាននៅក្នុងការពិពណ៌នារបស់ជម្រើស។ |
| ………… បន្ត | ||
| កូដកំហុស | សារកំហុស | ការពិពណ៌នា |
| ERR0023 | ប៉ារ៉ាម៉ែត្រ—គ្រួសារបាត់តម្លៃ | ជម្រើសគ្រួសារត្រូវបានបញ្ជាក់ដោយគ្មានតម្លៃ។ |
| ERR0023 | ប៉ារ៉ាម៉ែត្រដែលត្រូវការ - ល្បឿនបាត់ | ជម្រើសល្បឿនគឺចាំបាច់ ហើយត្រូវតែបញ្ជាក់។ |
| ERR0007 | មិនស្គាល់ល្បឿន ' | ជម្រើសល្បឿនមិនត្រឹមត្រូវទេ។ មើលបញ្ជីតម្លៃដែលអាចមាននៅក្នុងការពិពណ៌នារបស់ជម្រើស។ |
| ERR0023 | ប៉ារ៉ាម៉ែត្រ - ល្បឿនបាត់តម្លៃ | ជម្រើសល្បឿនត្រូវបានបញ្ជាក់ដោយគ្មានតម្លៃ។ |
Example
set_device -family {PolarFire} -die {MPF300T_ES} -speed -1
set_device -family SmartFusion 2 -die M2S090T -speed -1
9.1.3 read_verilog (សួរសំណួរ)
ការពិពណ៌នា
អាន Verilog file ដោយប្រើការផ្ទៀងផ្ទាត់។
read_verilog [-lib ] [-របៀប ]fileឈ្មោះ >
អាគុយម៉ង់
| ប៉ារ៉ាម៉ែត្រ | ប្រភេទ | ការពិពណ៌នា |
| - lib | ខ្សែអក្សរ | បញ្ជាក់បណ្ណាល័យដែលមានម៉ូឌុលដែលត្រូវបញ្ចូលទៅក្នុងបណ្ណាល័យ។ |
| - របៀប | ខ្សែអក្សរ | បញ្ជាក់ស្តង់ដារ Verilog ។ តម្លៃដែលអាចធ្វើបានគឺ verilog_95, verilog_2k, system_verilog_2005, system_verilog_2009, system_verilog, verilog_ams, verilog_psl, system_verilog_mfcu ។ តម្លៃគឺមិនប្រកាន់អក្សរតូចធំទេ។ លំនាំដើមគឺ verilog_2k ។ |
| fileឈ្មោះ | ខ្សែអក្សរ | Verilog file ឈ្មោះ។ |
| ប្រភេទត្រឡប់ | ការពិពណ៌នា |
| 0 | ពាក្យបញ្ជាបានជោគជ័យ។ |
| 1 | ពាក្យបញ្ជាបានបរាជ័យ។ មានកំហុស។ អ្នកអាចសង្កេតមើលសារកំហុសនៅក្នុងកុងសូល។ |
បញ្ជីនៃកំហុស
| កូដកំហុស | សារកំហុស | ការពិពណ៌នា |
| ERR0023 | ប៉ារ៉ាម៉ែត្រ- lib បាត់តម្លៃ | ជម្រើស lib ត្រូវបានបញ្ជាក់ដោយគ្មានតម្លៃ។ |
| ERR0023 | ប៉ារ៉ាម៉ែត្រ-របៀបបាត់តម្លៃ | ជម្រើសរបៀបត្រូវបានបញ្ជាក់ដោយគ្មានតម្លៃ។ |
| ERR0015 | របៀបមិនស្គាល់ ' ' | របៀប verilog ដែលបានបញ្ជាក់គឺមិនស្គាល់។ សូមមើលបញ្ជីនៃរបៀប verilog ដែលអាចធ្វើទៅបាននៅក្នុង—ការពិពណ៌នាជម្រើសរបៀប។ |
| ERR0023 | ប៉ារ៉ាម៉ែត្រដែលត្រូវការ file ឈ្មោះបាត់ | គ្មាន verilog file ផ្លូវត្រូវបានផ្តល់ជូន។ |
| ERR0016 | បានបរាជ័យដោយសារធាតុញែករបស់ Verific | កំហុសវាក្យសម្ព័ន្ធនៅក្នុង verilog file. ឧបករណ៍ញែករបស់ Verific អាចត្រូវបានគេសង្កេតឃើញនៅក្នុងកុងសូលខាងលើសារកំហុស។ |
| ERR0012 | set_device មិនត្រូវបានហៅទេ។ | ព័ត៌មានឧបករណ៍មិនត្រូវបានបញ្ជាក់ទេ។ ប្រើពាក្យបញ្ជា set_device ដើម្បីពណ៌នាអំពីឧបករណ៍។ |
Example
read_verilog -mode system_verilog {component/work/top/top.v}
read_verilog -mode system_verilog_mfcu design.v
9.1.4 read_vhdl (សួរសំណួរ)
ការពិពណ៌នា
បន្ថែម VHDL file នៅក្នុងបញ្ជីនៃ VHDL files.
read_vhdl [-lib ] [-របៀប ]fileឈ្មោះ >
អាគុយម៉ង់
| ប៉ារ៉ាម៉ែត្រ | ប្រភេទ | ការពិពណ៌នា |
| - lib | — | បញ្ជាក់បណ្ណាល័យដែលមាតិកាត្រូវតែបន្ថែម។ |
| - របៀប | — | បញ្ជាក់ស្តង់ដារ VHDL ។ លំនាំដើមគឺ VHDL_93 ។ តម្លៃដែលអាចធ្វើបានគឺ vhdl_93, vhdl_87, vhdl_2k, vhdl_2008, vhdl_psl ។ តម្លៃគឺមិនប្រកាន់អក្សរតូចធំទេ។ |
| fileឈ្មោះ | — | VHDL file ឈ្មោះ។ |
| ប្រភេទត្រឡប់ | ការពិពណ៌នា |
| 0 | ពាក្យបញ្ជាបានជោគជ័យ។ |
| 1 | ពាក្យបញ្ជាបានបរាជ័យ។ មានកំហុស។ អ្នកអាចសង្កេតមើលសារកំហុសនៅក្នុងកុងសូល។ |
បញ្ជីនៃកំហុស
| កូដកំហុស | សារកំហុស | ការពិពណ៌នា |
| ERR0023 | ប៉ារ៉ាម៉ែត្រ- lib បាត់តម្លៃ | ជម្រើស lib ត្រូវបានបញ្ជាក់ដោយគ្មានតម្លៃ។ |
| ERR0023 | ប៉ារ៉ាម៉ែត្រ-របៀបបាត់តម្លៃ | ជម្រើសរបៀបត្រូវបានបញ្ជាក់ដោយគ្មានតម្លៃ។ |
| ERR0018 | របៀបមិនស្គាល់ ' ' | របៀប VHDL ដែលបានបញ្ជាក់គឺមិនស្គាល់។ សូមមើលបញ្ជីនៃរបៀប VHDL ដែលអាចធ្វើទៅបាននៅក្នុង—ការពិពណ៌នាជម្រើសរបៀប។ |
| ERR0023 | ប៉ារ៉ាម៉ែត្រដែលត្រូវការ file ឈ្មោះបាត់ | គ្មាន VHDL file ផ្លូវត្រូវបានផ្តល់ជូន។ |
| ERR0019 | មិនអាចចុះឈ្មោះ invalid_path.v file | VHDL ដែលបានបញ្ជាក់ file មិនមាន ឬមិនមានសិទ្ធិអាន។ |
| ERR0012 | set_device មិនត្រូវបានហៅទេ។ | ព័ត៌មានឧបករណ៍មិនត្រូវបានបញ្ជាក់ទេ។ ប្រើពាក្យបញ្ជា set_device ដើម្បីពណ៌នាអំពីឧបករណ៍។ |
Example
read_vhdl -mode vhdl_2008 osc2dfn.vhd
read_vhdl {hdl/top.vhd}
9.1.5 set_top_level (សួរសំណួរ)
ការពិពណ៌នា
បញ្ជាក់ឈ្មោះនៃម៉ូឌុលកម្រិតកំពូលនៅក្នុង RTL ។
set_top_level [-lib ]
អាគុយម៉ង់
| ប៉ារ៉ាម៉ែត្រ | ប្រភេទ | ការពិពណ៌នា |
| - lib | ខ្សែអក្សរ | បណ្ណាល័យដើម្បីស្វែងរកម៉ូឌុល ឬអង្គភាពកម្រិតកំពូល (ស្រេចចិត្ត)។ |
| ឈ្មោះ | ខ្សែអក្សរ | ម៉ូឌុលកម្រិតកំពូល ឬឈ្មោះអង្គភាព។ |
| ប្រភេទត្រឡប់ | ការពិពណ៌នា |
| 0 | ពាក្យបញ្ជាបានជោគជ័យ។ |
| 1 | ពាក្យបញ្ជាបានបរាជ័យ។ មានកំហុស។ អ្នកអាចសង្កេតមើលសារកំហុសនៅក្នុងកុងសូល។ |
បញ្ជីនៃកំហុស
| កូដកំហុស | សារកំហុស | ការពិពណ៌នា |
| ERR0023 | កម្រិតកំពូលនៃប៉ារ៉ាម៉ែត្រចាំបាច់ត្រូវបានបាត់ | ជម្រើសកម្រិតកំពូលគឺចាំបាច់ ហើយត្រូវតែបញ្ជាក់។ |
| ERR0023 | ប៉ារ៉ាម៉ែត្រ- lib បាត់តម្លៃ | ជម្រើស lib ត្រូវបានបញ្ជាក់ដោយគ្មានតម្លៃ។ |
| ERR0014 | មិនអាចស្វែងរកកម្រិតកំពូលបានទេ។ នៅក្នុងបណ្ណាល័យ | ម៉ូឌុលកម្រិតកំពូលដែលបានបញ្ជាក់មិនត្រូវបានកំណត់នៅក្នុងបណ្ណាល័យដែលបានផ្តល់ឱ្យទេ។ ដើម្បីជួសជុលកំហុសនេះ ម៉ូឌុលកំពូល ឬឈ្មោះបណ្ណាល័យត្រូវតែកែតម្រូវ។ |
| ERR0017 | ភាពល្អិតល្អន់បានបរាជ័យ | កំហុសក្នុងដំណើរការលម្អិត RTL ។ សារកំហុសអាចត្រូវបានគេសង្កេតឃើញពីកុងសូល។ |
Example
set_top_level {top}
set_top_level -lib hdl កំពូល
9.1.6 read_sdc (សួរសំណួរ)
ការពិពណ៌នា
អាន SDC file ចូលទៅក្នុងមូលដ្ឋានទិន្នន័យសមាសភាគ។
read_sdc - សមាសភាគfileឈ្មោះ >
អាគុយម៉ង់
| ប៉ារ៉ាម៉ែត្រ | ប្រភេទ | ការពិពណ៌នា |
| - សមាសធាតុ | — | នេះគឺជាទង់ចាំបាច់សម្រាប់ពាក្យបញ្ជា read_sdc នៅពេលដែលយើងទាញយកឧបសគ្គ។ |
| fileឈ្មោះ | ខ្សែអក្សរ | ផ្លូវទៅកាន់ SDC file. |
| ប្រភេទត្រឡប់ | ការពិពណ៌នា |
| 0 | ពាក្យបញ្ជាបានជោគជ័យ។ |
| 1 | ពាក្យបញ្ជាបានបរាជ័យ។ មានកំហុស។ អ្នកអាចសង្កេតមើលសារកំហុសនៅក្នុងកុងសូល។ |
បញ្ជីនៃកំហុស
| កូដកំហុស | សារកំហុស | ការពិពណ៌នា |
| ERR0023 | ប៉ារ៉ាម៉ែត្រដែលត្រូវការ file ឈ្មោះបាត់។ | ជម្រើសចាំបាច់ file ឈ្មោះមិនត្រូវបានបញ្ជាក់ទេ។ |
| ERR0000 | SDC file <file_path> មិនអាចអានបានទេ។ | SDC ដែលបានបញ្ជាក់ file មិនមានសិទ្ធិអានទេ។ |
| ERR0001 | មិនអាចបើកបានទេ។file_ផ្លូវ> file. | អេសឌីស៊ី file មិនមានទេ។ ផ្លូវត្រូវកែ។ |
| ERR0008 | បាត់ពាក្យបញ្ជា set_component នៅក្នុងfile_ផ្លូវ> file | សមាសធាតុដែលបានបញ្ជាក់របស់អេសឌីស៊ី file មិនបញ្ជាក់សមាសភាគ។ |
| កូដកំហុស | សារកំហុស | ការពិពណ៌នា |
| ERR0009 | <List of errors from sdc file> | អេសឌីស៊ី file មានពាក្យបញ្ជា sdc មិនត្រឹមត្រូវ។ សម្រាប់អតីតampឡេ
នៅពេលមានកំហុសក្នុងការកំណត់ set_multicycle_path៖ កំហុសខណៈពេលកំពុងប្រតិបត្តិពាក្យបញ្ជា read_sdc: ក្នុងfile_ផ្លូវ> file៖ កំហុសក្នុងពាក្យបញ្ជា set_multicycle_path៖ មិនស្គាល់ប៉ារ៉ាម៉ែត្រ [get_cells {reg_a}] ។ |
Example
read_sdc -component {./component/work/ccc0/ccc0_0/ccc0_ccc0_0_PF_CCC.sdc}
9.1.7 read_ndc (សួរសំណួរ)
ការពិពណ៌នា
អាន NDC file ចូលទៅក្នុងមូលដ្ឋានទិន្នន័យសមាសភាគ។
read_ndc - សមាសធាតុfileឈ្មោះ >
អាគុយម៉ង់
| ប៉ារ៉ាម៉ែត្រ | ប្រភេទ | ការពិពណ៌នា |
| - សមាសធាតុ | — | នេះគឺជាទង់ចាំបាច់សម្រាប់ពាក្យបញ្ជា read_ndc នៅពេលដែលយើងទាញយកឧបសគ្គ។ |
| fileឈ្មោះ | ខ្សែអក្សរ | ផ្លូវទៅកាន់ NDC file. |
| ប្រភេទត្រឡប់ | ការពិពណ៌នា |
| 0 | ពាក្យបញ្ជាបានជោគជ័យ។ |
| 1 | ពាក្យបញ្ជាបានបរាជ័យ។ មានកំហុស។ អ្នកអាចសង្កេតមើលសារកំហុសនៅក្នុងកុងសូល។ |
បញ្ជីនៃកំហុស
| កូដកំហុស | សារកំហុស | ការពិពណ៌នា |
| ERR0001 | មិនអាចបើកបានទេ។file_ផ្លូវ> file | គ.ជ.ប file មិនមានទេ។ ផ្លូវត្រូវកែ។ |
| ERR0023 | ប៉ារ៉ាម៉ែត្រដែលត្រូវការ—AtclParamO_ បាត់។ | ជម្រើសចាំបាច់ fileឈ្មោះមិនត្រូវបានបញ្ជាក់ទេ។ |
| ERR0023 | ប៉ារ៉ាម៉ែត្រដែលត្រូវការ - សមាសធាតុបាត់។ | ជម្រើសសមាសភាគគឺចាំបាច់ ហើយត្រូវតែបញ្ជាក់។ |
| ERR0000 | NDC file 'file_path>' មិនអាចអានបានទេ។ | NDC ដែលបានបញ្ជាក់ file មិនមានសិទ្ធិអានទេ។ |
Example
read_ndc -component {component/work/ccc1/ccc1_0/ccc_comp.ndc}
9.1.8 derive_constraints (សួរសំណួរ)
ការពិពណ៌នា
សមាសភាគបន្ទាន់ SDC files ចូលទៅក្នុងមូលដ្ឋានទិន្នន័យកម្រិតរចនា។
derive_constraints
អាគុយម៉ង់
| ប្រភេទត្រឡប់ | ការពិពណ៌នា |
| 0 | ពាក្យបញ្ជាបានជោគជ័យ។ |
| 1 | ពាក្យបញ្ជាបានបរាជ័យ។ មានកំហុស។ អ្នកអាចសង្កេតមើលសារកំហុសនៅក្នុងកុងសូល។ |
បញ្ជីនៃកំហុស
| កូដកំហុស | សារកំហុស | ការពិពណ៌នា |
| ERR0013 | កម្រិតកំពូលមិនត្រូវបានកំណត់ទេ។ | នេះមានន័យថា ម៉ូឌុល ឬអង្គភាពកម្រិតកំពូលមិនត្រូវបានបញ្ជាក់ទេ។ ដើម្បីជួសជុលការហៅទូរសព្ទនេះ សូមចេញឯកសារ ពាក្យបញ្ជា set_top_level មុនពេលពាក្យបញ្ជា derive_constraints ។ |
Example
derive_constraints
9.1.9 write_sdc (សួរសំណួរ)
ការពិពណ៌នា
សរសេរកម្រិត file ក្នុងទម្រង់ SDC ។
write_sdcfileឈ្មោះ >
អាគុយម៉ង់
| ប៉ារ៉ាម៉ែត្រ | ប្រភេទ | ការពិពណ៌នា |
| <fileឈ្មោះ > | ខ្សែអក្សរ | ផ្លូវទៅកាន់ SDC file នឹងត្រូវបានបង្កើត។ នេះគឺជាជម្រើសចាំបាច់។ ប្រសិនបើ file មាន វានឹងត្រូវបានសរសេរជាន់ពីលើ។ |
| ប្រភេទត្រឡប់ | ការពិពណ៌នា |
| 0 | ពាក្យបញ្ជាបានជោគជ័យ។ |
| 1 | ពាក្យបញ្ជាបានបរាជ័យ។ មានកំហុស។ អ្នកអាចសង្កេតមើលសារកំហុសនៅក្នុងកុងសូល។ |
បញ្ជីនៃកំហុស
| កូដកំហុស | សារកំហុស | ការពិពណ៌នា |
| ERR0003 | មិនអាចបើកបានទេ។file ផ្លូវ> file. | File ផ្លូវមិនត្រឹមត្រូវ។ ពិនិត្យមើលថាតើមានថតមេឬអត់។ |
| ERR0002 | SDC file 'file ផ្លូវ>' មិនអាចសរសេរបានទេ។ | SDC ដែលបានបញ្ជាក់ file មិនមានការអនុញ្ញាតសរសេរ។ |
| ERR0023 | ប៉ារ៉ាម៉ែត្រដែលត្រូវការ file ឈ្មោះបាត់។ | អេសឌីស៊ី file ផ្លូវគឺជាជម្រើសចាំបាច់ ហើយត្រូវតែបញ្ជាក់។ |
Example
write_sdc "derived.sdc"
9.1.10 write_pdc (សួរសំណួរ)
ការពិពណ៌នា
សរសេរឧបសគ្គខាងរូបវន្ត (Derive Constraints only)។
write_pdcfileឈ្មោះ >
អាគុយម៉ង់
| ប៉ារ៉ាម៉ែត្រ | ប្រភេទ | ការពិពណ៌នា |
| <fileឈ្មោះ > | ខ្សែអក្សរ | ផ្លូវទៅកាន់ PDC file នឹងត្រូវបានបង្កើត។ នេះគឺជាជម្រើសចាំបាច់។ ប្រសិនបើ file ផ្លូវមាន វានឹងត្រូវបានសរសេរជាន់ពីលើ។ |
| ប្រភេទត្រឡប់ | ការពិពណ៌នា |
| 0 | ពាក្យបញ្ជាបានជោគជ័យ។ |
| 1 | ពាក្យបញ្ជាបានបរាជ័យ។ មានកំហុស។ អ្នកអាចសង្កេតមើលសារកំហុសនៅក្នុងកុងសូល។ |
បញ្ជីនៃកំហុស
| កូដកំហុស | សារកំហុស | ការពិពណ៌នា |
| ERR0003 | មិនអាចបើកបានទេ។file ផ្លូវ> file | នេះ។ file ផ្លូវមិនត្រឹមត្រូវ។ ពិនិត្យមើលថាតើមានថតមេឬអត់។ |
| ERR0002 | ភីឌីស៊ី file 'file ផ្លូវ>' មិនអាចសរសេរបានទេ។ | PDC ដែលបានបញ្ជាក់ file មិនមានការអនុញ្ញាតសរសេរ។ |
| ERR0023 | ប៉ារ៉ាម៉ែត្រដែលត្រូវការ file ឈ្មោះបាត់ | ភីឌីស៊ី file ផ្លូវគឺជាជម្រើសចាំបាច់ ហើយត្រូវតែបញ្ជាក់។ |
Example
write_pdc “derived.pdc”
9.1.11 write_ndc (សួរសំណួរ)
ការពិពណ៌នា
សរសេរឧបសគ្គ NDC ទៅជា ក file.
write_ndcfileឈ្មោះ >
អាគុយម៉ង់
| ប៉ារ៉ាម៉ែត្រ | ប្រភេទ | ការពិពណ៌នា |
| fileឈ្មោះ | ខ្សែអក្សរ | ផ្លូវទៅកាន់ NDC file នឹងត្រូវបានបង្កើត។ នេះគឺជាជម្រើសចាំបាច់។ ប្រសិនបើ file មាន វានឹងត្រូវបានសរសេរជាន់ពីលើ។ |
| ប្រភេទត្រឡប់ | ការពិពណ៌នា |
| 0 | ពាក្យបញ្ជាបានជោគជ័យ។ |
| 1 | ពាក្យបញ្ជាបានបរាជ័យ។ មានកំហុស។ អ្នកអាចសង្កេតមើលសារកំហុសនៅក្នុងកុងសូល។ |
បញ្ជីនៃកំហុស
| កូដកំហុស | សារកំហុស | ការពិពណ៌នា |
| ERR0003 | មិនអាចបើកបានទេ។file_ផ្លូវ> file. | File ផ្លូវមិនត្រឹមត្រូវ។ មិនមានថតមេទេ។ |
| ERR0002 | NDC file 'file_path>' មិនអាចសរសេរបានទេ។ | NDC ដែលបានបញ្ជាក់ file មិនមានការអនុញ្ញាតសរសេរ។ |
| ERR0023 | ប៉ារ៉ាម៉ែត្រដែលត្រូវការ _AtclParamO_ បាត់។ | គ.ជ.ប file ផ្លូវគឺជាជម្រើសចាំបាច់ ហើយត្រូវតែបញ្ជាក់។ |
Example
write_ndc “derived.ndc”
9.1.12 add_include_path (សួរសំណួរ)
ការពិពណ៌នា
បញ្ជាក់ផ្លូវដើម្បីស្វែងរករួមបញ្ចូល files នៅពេលអាន RTL files.
add_include_path
អាគុយម៉ង់
| ប៉ារ៉ាម៉ែត្រ | ប្រភេទ | ការពិពណ៌នា |
| ថត | ខ្សែអក្សរ | បញ្ជាក់ផ្លូវដើម្បីស្វែងរករួមបញ្ចូល files នៅពេលអាន RTL fileស. ជម្រើសនេះគឺចាំបាច់។ |
| ប្រភេទត្រឡប់ | ការពិពណ៌នា |
| 0 | ពាក្យបញ្ជាបានជោគជ័យ។ |
| ប្រភេទត្រឡប់ | ការពិពណ៌នា |
| 1 | ពាក្យបញ្ជាបានបរាជ័យ។ មានកំហុស។ អ្នកអាចសង្កេតមើលសារកំហុសនៅក្នុងកុងសូល។ |
បញ្ជីនៃកំហុស
| កូដកំហុស | សារកំហុស | ការពិពណ៌នា |
| ERR0023 | ប៉ារ៉ាម៉ែត្រដែលត្រូវការរួមមានផ្លូវបាត់។ | ជម្រើសថតគឺចាំបាច់ហើយត្រូវតែផ្តល់ឱ្យ។ |
ចំណាំ: ប្រសិនបើ ផ្លូវថតមិនត្រឹមត្រូវទេ បន្ទាប់មក add_include_path នឹងត្រូវបានឆ្លងកាត់ដោយគ្មានកំហុស។
ទោះយ៉ាងណាក៏ដោយ ពាក្យបញ្ជា read_verilog/read_vhd នឹងបរាជ័យ ដោយសារឧបករណ៍ញែករបស់ Verific ។
Example
add_include_path component/work/COREABC0/COREABC0_0/rtl/vlog/core
ពិនិត្យឡើងវិញប្រវត្តិសាស្ត្រ (សួរសំណួរ)
ប្រវត្តិកែប្រែពិពណ៌នាអំពីការផ្លាស់ប្តូរដែលត្រូវបានអនុវត្តនៅក្នុងឯកសារ។ ការផ្លាស់ប្តូរត្រូវបានរាយបញ្ជីដោយការកែប្រែ ដោយចាប់ផ្តើមជាមួយនឹងការបោះពុម្ពផ្សាយបច្ចុប្បន្នបំផុត។
| ការពិនិត្យឡើងវិញ | កាលបរិច្ឆេទ | ការពិពណ៌នា |
| F | ៥/៥ | ការផ្លាស់ប្តូរខាងក្រោមត្រូវបានធ្វើឡើងនៅក្នុងការកែប្រែនេះ៖ • ផ្នែកដែលបានធ្វើបច្ចុប្បន្នភាពឧបសម្ព័ន្ធ B—ការនាំចូលបណ្ណាល័យក្លែងធ្វើទៅក្នុងបរិយាកាសក្លែងធ្វើ។ |
| E | ៥/៥ | ការផ្លាស់ប្តូរខាងក្រោមត្រូវបានធ្វើឡើងនៅក្នុងការកែប្រែនេះ៖ • ផ្នែកដែលបានធ្វើបច្ចុប្បន្នភាពជាងview. • ផ្នែកដែលបានធ្វើបច្ចុប្បន្នភាពបានមកពី SDC File. • ផ្នែកដែលបានធ្វើបច្ចុប្បន្នភាពឧបសម្ព័ន្ធ B—ការនាំចូលបណ្ណាល័យក្លែងធ្វើទៅក្នុងបរិយាកាសក្លែងធ្វើ។ |
| D | ៥/៥ | ឯកសារនេះត្រូវបានចេញផ្សាយជាមួយនឹង Libero 2024.1 SoC Design Suite ដោយគ្មានការផ្លាស់ប្តូរពី v2023.2 ។ ផ្នែកដែលបានធ្វើបច្ចុប្បន្នភាព ធ្វើការជាមួយឧបករណ៍ប្រើប្រាស់ derive_constraints |
| C | ៥/៥ | ឯកសារនេះត្រូវបានចេញផ្សាយជាមួយនឹង Libero 2023.2 SoC Design Suite ដោយគ្មានការផ្លាស់ប្តូរពី v2023.1 ។ |
| B | ៥/៥ | ឯកសារនេះត្រូវបានចេញផ្សាយជាមួយនឹង Libero 2023.1 SoC Design Suite ដោយគ្មានការផ្លាស់ប្តូរពី v2022.3 ។ |
| A | ៥/៥ | ការពិនិត្យឡើងវិញដំបូង។ |
ការគាំទ្រ Microchip FPGA
ក្រុមផលិតផល Microchip FPGA គាំទ្រផលិតផលរបស់ខ្លួនជាមួយនឹងសេវាកម្មគាំទ្រផ្សេងៗ រួមទាំងសេវាអតិថិជន មជ្ឈមណ្ឌលជំនួយបច្ចេកទេសអតិថិជន ក webគេហទំព័រ និងការិយាល័យលក់ទូទាំងពិភពលោក។
អតិថិជនត្រូវបានស្នើឱ្យចូលមើលធនធានលើបណ្តាញ Microchip មុនពេលទាក់ទងផ្នែកជំនួយព្រោះវាទំនងជាថាសំណួររបស់ពួកគេត្រូវបានឆ្លើយរួចហើយ។
ទាក់ទងមជ្ឈមណ្ឌលគាំទ្របច្ចេកទេសតាមរយៈ webគេហទំព័រនៅ www.microchip.com/support. រៀបរាប់ពីលេខផ្នែកឧបករណ៍ FPGA ជ្រើសរើសប្រភេទករណីដែលសមស្រប និងការរចនាអាប់ឡូត files ខណៈពេលដែលបង្កើតករណីជំនួយបច្ចេកទេស។
ទាក់ទងផ្នែកបម្រើអតិថិជនសម្រាប់ការគាំទ្រផលិតផលដែលមិនមែនជាបច្ចេកទេស ដូចជាតម្លៃផលិតផល ការធ្វើឱ្យប្រសើរផលិតផល ព័ត៌មានបច្ចុប្បន្នភាព ស្ថានភាពការបញ្ជាទិញ និងការអនុញ្ញាត។
- ពីអាមេរិកខាងជើង ទូរស័ព្ទទៅលេខ 800.262.1060
- ពីជុំវិញពិភពលោក ទូរស័ព្ទទៅលេខ 650.318.4460
- ទូរសារ ពីគ្រប់ទិសទីក្នុងពិភពលោក 650.318.8044
ព័ត៌មានមីក្រូឈីប
មីក្រូឈីប Webគេហទំព័រ
Microchip ផ្តល់ការគាំទ្រតាមអ៊ីនធឺណិតតាមរយៈរបស់យើង។ webគេហទំព័រនៅ www.microchip.com/. នេះ។ webគេហទំព័រត្រូវបានប្រើដើម្បីធ្វើ files និងព័ត៌មានងាយស្រួលអាចរកបានសម្រាប់អតិថិជន។ ខ្លឹមសារមួយចំនួនដែលអាចរកបានរួមមាន:
- ការគាំទ្រផលិតផល - សន្លឹកទិន្នន័យ និងកំហុស កំណត់ចំណាំកម្មវិធី និងសample កម្មវិធី ធនធានរចនា មគ្គុទ្ទេសក៍របស់អ្នកប្រើ និងឯកសារជំនួយផ្នែករឹង ការចេញផ្សាយកម្មវិធីចុងក្រោយបំផុត និងកម្មវិធីដែលបានទុកក្នុងប័ណ្ណសារ
- ជំនួយបច្ចេកទេសទូទៅ - សំណួរដែលគេសួរញឹកញាប់ (FAQs), សំណើជំនួយបច្ចេកទេស, ក្រុមពិភាក្សាអនឡាញ, ការចុះបញ្ជីសមាជិកកម្មវិធីដៃគូរចនា Microchip
- អាជីវកម្មរបស់ Microchip - ការណែនាំអំពីការជ្រើសរើសផលិតផល និងការបញ្ជាទិញ ការចេញផ្សាយព័ត៌មានថ្មីៗរបស់ Microchip ការចុះបញ្ជីសិក្ខាសាលា និងព្រឹត្តិការណ៍ ការចុះបញ្ជីការិយាល័យលក់ Microchip អ្នកចែកចាយ និងតំណាងរោងចក្រ។
សេវាកម្មជូនដំណឹងអំពីការផ្លាស់ប្តូរផលិតផល
សេវាកម្មជូនដំណឹងអំពីការផ្លាស់ប្តូរផលិតផលរបស់ Microchip ជួយរក្សាអតិថិជនបច្ចុប្បន្នលើផលិតផល Microchip ។ អតិថិជននឹងទទួលបានការជូនដំណឹងតាមអ៊ីមែល នៅពេលណាដែលមានការផ្លាស់ប្តូរ ការអាប់ដេត ការកែប្រែ ឬកំហុសទាក់ទងនឹងគ្រួសារផលិតផល ឬឧបករណ៍អភិវឌ្ឍន៍ដែលចាប់អារម្មណ៍។ ដើម្បីចុះឈ្មោះ សូមចូលទៅកាន់ www.microchip.com/pcn ហើយធ្វើតាមការណែនាំចុះឈ្មោះ។
ជំនួយអតិថិជន
អ្នកប្រើប្រាស់ផលិតផល Microchip អាចទទួលបានជំនួយតាមរយៈបណ្តាញជាច្រើន៖
- អ្នកចែកចាយ ឬ តំណាង
- ការិយាល័យលក់ក្នុងស្រុក
- វិស្វករដំណោះស្រាយបង្កប់ (ESE)
- ជំនួយបច្ចេកទេស
អតិថិជនគួរតែទាក់ទងអ្នកចែកចាយ តំណាង ឬ ESE របស់ពួកគេសម្រាប់ការគាំទ្រ។ ការិយាល័យលក់ក្នុងស្រុកក៏អាចរកបានដើម្បីជួយអតិថិជនផងដែរ។ ការចុះបញ្ជីការិយាល័យលក់ និងទីតាំងត្រូវបានរួមបញ្ចូលនៅក្នុងឯកសារនេះ។ ជំនួយបច្ចេកទេសអាចរកបានតាមរយៈ webគេហទំព័រនៅ៖ www.microchip.com/support
មុខងារការពារលេខកូដឧបករណ៍មីក្រូឈីប
ចំណាំព័ត៌មានលម្អិតខាងក្រោមនៃមុខងារការពារកូដនៅលើផលិតផល Microchip៖
- ផលិតផល Microchip បំពេញតាមលក្ខណៈជាក់លាក់ដែលមាននៅក្នុងសន្លឹកទិន្នន័យ Microchip ជាក់លាក់របស់ពួកគេ។
- Microchip ជឿជាក់ថាផលិតផលគ្រួសាររបស់វាមានសុវត្ថិភាពនៅពេលប្រើក្នុងលក្ខណៈដែលបានគ្រោងទុក ក្នុងលក្ខណៈប្រតិបត្តិការ និងក្រោមលក្ខខណ្ឌធម្មតា។
- Microchip ផ្តល់តម្លៃ និងការពារយ៉ាងចាស់ដៃនូវសិទ្ធិកម្មសិទ្ធិបញ្ញារបស់វា។ ការប៉ុនប៉ងរំលោភលើមុខងារការពារកូដនៃផលិតផល Microchip ត្រូវបានហាមឃាត់យ៉ាងតឹងរ៉ឹង ហើយអាចបំពានច្បាប់រក្សាសិទ្ធិសហស្សវត្សរ៍ឌីជីថល។
- ទាំង Microchip ឬក្រុមហ៊ុនផលិត semiconductor ផ្សេងទៀតមិនអាចធានាសុវត្ថិភាពនៃកូដរបស់វាបានទេ។ ការការពារលេខកូដមិនមានន័យថាយើងកំពុងធានាថាផលិតផល "មិនអាចបំបែកបាន" នោះទេ។ ការការពារលេខកូដកំពុងវិវត្តឥតឈប់ឈរ។ មីក្រូឈីបបានប្តេជ្ញាចិត្តក្នុងការធ្វើឱ្យប្រសើរឡើងជាបន្តបន្ទាប់នូវមុខងារការពារកូដនៃផលិតផលរបស់យើង។
សេចក្តីជូនដំណឹងផ្លូវច្បាប់
ការបោះពុម្ពផ្សាយនេះ និងព័ត៌មាននៅទីនេះអាចត្រូវបានប្រើប្រាស់តែជាមួយផលិតផល Microchip ប៉ុណ្ណោះ រួមទាំងការរចនា សាកល្បង និងរួមបញ្ចូលផលិតផល Microchip ជាមួយកម្មវិធីរបស់អ្នក។ ការប្រើប្រាស់ព័ត៌មាននេះក្នុងលក្ខណៈផ្សេងទៀតបំពានលក្ខខណ្ឌទាំងនេះ។ ព័ត៌មានទាក់ទងនឹងកម្មវិធីឧបករណ៍ត្រូវបានផ្តល់ជូនសម្រាប់ភាពងាយស្រួលរបស់អ្នកប៉ុណ្ណោះ ហើយអាចត្រូវបានជំនួសដោយការអាប់ដេត។ វាជាទំនួលខុសត្រូវរបស់អ្នកក្នុងការធានាថាកម្មវិធីរបស់អ្នកត្រូវនឹងលក្ខណៈជាក់លាក់របស់អ្នក។ ទាក់ទងការិយាល័យលក់ Microchip ក្នុងតំបន់របស់អ្នកសម្រាប់ការគាំទ្របន្ថែម ឬ ទទួលបានជំនួយបន្ថែមនៅ www.microchip.com/en-us/support/design-help/client-support-services.
ព័ត៌មាននេះត្រូវបានផ្តល់ដោយមីក្រូឈីប “ដូចដែល”។ មីក្រូឈីបមិនតំណាងឱ្យ ឬការធានានៃប្រភេទណាមួយឡើយ ទោះជាបញ្ជាក់ ឬបង្កប់ន័យ សរសេរ ឬផ្ទាល់មាត់ លក្ខន្តិកៈ ឬបើមិនដូច្នេះទេ ពាក់ព័ន្ធនឹងព័ត៌មានដែលរួមបញ្ចូល ប៉ុន្តែមិនមានកំណត់ចំពោះតម្រូវការ ដោយមិនកំណត់។ ភាពទន់ខ្សោយ និងភាពសមស្របសម្រាប់គោលបំណងពិសេស ឬការធានា ទាក់ទងទៅនឹងលក្ខខណ្ឌ គុណភាព ឬដំណើរការរបស់វា។ ក្នុងករណីណាក៏ដោយមីក្រូឈីបនឹងទទួលខុសត្រូវចំពោះការខូចខាតដោយប្រយោល ពិសេស ការដាក់ទណ្ឌកម្ម ចៃដន្យ ឬជាលទ្ធផលនៃការបាត់បង់ ការខូចខាត ថ្លៃដើម ឬការចំណាយលើប្រភេទណាមួយដែលទាក់ទងនឹងការផ្លាស់ប្តូរ ស្ថានភាពមិនផ្លាស់ប្តូរ ឬស្ថានភាពប្រែប្រួល។ ត្រូវបានណែនាំពីធី លទ្ធភាពឬការខូចខាតគឺអាចមើលឃើញ។ ក្នុងកម្រិតពេញលេញបំផុតដែលច្បាប់អនុញ្ញាត ការទទួលខុសត្រូវសរុបរបស់មីក្រូឈីប លើការទាមទារទាំងអស់ តាមរបៀបណាក៏ដោយដែលទាក់ទងនឹងព័ត៌មាន ឬការប្រើប្រាស់របស់វានឹងមិនលើសពីចំនួននៃថ្លៃសេវានោះទេ ប្រសិនបើមាន ដែលអ្នកមាន។
ការប្រើប្រាស់ឧបករណ៍ Microchip នៅក្នុងកម្មវិធីជំនួយអាយុជីវិត និង/ឬកម្មវិធីសុវត្ថិភាពគឺស្ថិតក្នុងហានិភ័យរបស់អ្នកទិញទាំងស្រុង ហើយអ្នកទិញយល់ព្រមការពារ ទូទាត់សំណង និងកាន់ Microchip ដែលគ្មានគ្រោះថ្នាក់ពីការខូចខាត សំណង ការប្តឹងផ្តល់ ឬការចំណាយដែលបណ្តាលមកពីការប្រើប្រាស់បែបនេះ។ គ្មានអាជ្ញាប័ណ្ណណាមួយត្រូវបានបញ្ជូនដោយប្រយោល ឬបើមិនដូច្នេះទេ នៅក្រោមកម្មសិទ្ធិបញ្ញារបស់ Microchip ណាមួយ លើកលែងតែមានចែងផ្សេងពីនេះ។
ពាណិជ្ជសញ្ញា
ឈ្មោះ និងស្លាកសញ្ញារបស់ Microchip, និមិត្តសញ្ញា Microchip, Adaptec, AVR, និមិត្តសញ្ញា AVR, AVR Freaks, BesTime, BitCloud, CryptoMemory, CryptoRF, dsPIC, flexPWR, HELDO, IGLOO, JukeBlox, KeeLoq, Kleer, LANCheck, LinkMD, maXuchty MediaLB, megaAVR, Microsemi, Microsemi logo, MOST, MOST, MOST, MPLAB, OptoLyzer, PIC, picoPower, PICSTART, PIC32 logo, PolarFire, Prochip Designer, QTouch, SAM-BA, SenGenuity, SpyNIC, SST, SST Logoymmetric, SuperFlash, , SyncServer, Tachyon, TimeSource, tinyAVR, UNI/O, Vectron, និង XMEGA គឺជាពាណិជ្ជសញ្ញាដែលបានចុះបញ្ជីរបស់ Microchip Technology Incorporated in the USA and other countries.
AgileSwitch, ClockWorks, The Embedded Control Solutions Company, EtherSynch, Flashtec, Hyper Speed Control, HyperLight Load, Libero, motorBench, mTouch, Powermite 3, Precision Edge, ProASIC, ProASIC Plus, និមិត្តសញ្ញា ProASIC Plus, Quiet-Wire, SmartFusion, SyncWorld, TimeCesium, TimeHub, TimePictra, TimeProvider, និង ZL គឺជាពាណិជ្ជសញ្ញាចុះបញ្ជីរបស់ Microchip Technology Incorporated in USA
ការសង្កត់គ្រាប់ចុចនៅជាប់គ្នា, AKS, អាណាឡូកសម្រាប់យុគសម័យឌីជីថល, កុងតាក់ណាមួយ, AnyIn, AnyOut, Augmented Switching, BlueSky, BodyCom, Clockstudio, CodeGuard, CryptoAuthentication, CryptoAutomotive, CryptoCompanion, CryptoPICDnamicontroller, ds, , DAM, ECAN, Espresso T1S, EtherGREEN, EyeOpen, GridTime, IdealBridge, IGaT, In-Circuit Serial Programming, ICSP, INICnet, Intelligent Paralleling, IntelliMOS, Inter-Chip Connectivity, JitterBlocker, Knob-on-gin-Display, អតិបរមាView, memBrain, Mindi, MiWi, MPASM, MPF, MPLAB Certified logo, MPLIB, MPLINK, mSiC, MultiTRAK, NetDetach, Omniscient Code Generation, PICDEM, PICDEM.net, PICkit, PICtail, Power MOS IV, Power MOS 7, PowerSmart, Pure , QMatrix, ICE ពិត, Ripple Blocker, RTAX, RTG4, SAM-ICE, Serial Quad I/O, simpleMAP, SimpliPHY, SmartBuffer, SmartHLS, SMART-IS, storClad, SQI, SuperSwitcher, SuperSwitcher II, Switchtec, Total Endurance , Trusted Time, TSHARC, Turing, USBCheck, VariSense, VectorBlox, VeriPHY, ViewSpan, WiperLock, XpressConnect, និង ZENA គឺជាពាណិជ្ជសញ្ញារបស់ Microchip Technology Incorporated in USA និងប្រទេសដទៃទៀត។
SQTP គឺជាសញ្ញាសម្គាល់សេវាកម្មរបស់ Microchip Technology Incorporated in USA
និមិត្តសញ្ញា Adaptec, ប្រេកង់លើតម្រូវការ, Silicon Storage Technology, និង Symmcom គឺជាពាណិជ្ជសញ្ញាដែលបានចុះបញ្ជីរបស់ Microchip Technology Inc. នៅក្នុងប្រទេសផ្សេងទៀត។
GestIC គឺជាពាណិជ្ជសញ្ញាចុះបញ្ជីរបស់ Microchip Technology Germany II GmbH & Co. KG ដែលជាក្រុមហ៊ុនបុត្រសម្ព័ន្ធរបស់ Microchip Technology Inc. ក្នុងប្រទេសផ្សេងៗ។
ពាណិជ្ជសញ្ញាផ្សេងទៀតទាំងអស់ដែលបានរៀបរាប់នៅទីនេះគឺជាកម្មសិទ្ធិរបស់ក្រុមហ៊ុនរៀងៗខ្លួន។
2024, Microchip Technology Incorporated និងក្រុមហ៊ុនបុត្រសម្ព័ន្ធរបស់ខ្លួន។ រក្សាសិទ្ធិគ្រប់យ៉ាង។
ISBN: 978-1-6683-0183-8
ប្រព័ន្ធគ្រប់គ្រងគុណភាព
សម្រាប់ព័ត៌មានទាក់ទងនឹងប្រព័ន្ធគ្រប់គ្រងគុណភាពរបស់ Microchip សូមចូលទៅកាន់ www.microchip.com/quality.
ការលក់ និងសេវាកម្មទូទាំងពិភពលោក
| អាមេរិក | អាស៊ី/ប៉ាស៊ីហ្វិក | អាស៊ី/ប៉ាស៊ីហ្វិក | អឺរ៉ុប |
| ការិយាល័យសាជីវកម្ម 2355 មហាវិថី Chandler ខាងលិច Chandler, AZ 85224-6199 ទូរស័ព្ទ៖ ៨៦៦-៤៤៧-២១៩៤ ទូរសារ៖ ៨៦៦-៤៤៧-២១៩៤ ជំនួយបច្ចេកទេស៖ www.microchip.com/support Web អាស័យដ្ឋាន៖ www.microchip.com អាត្លង់តា ឌុលធូ, GA ទូរស័ព្ទ៖ ៨៦៦-៤៤៧-២១៩៤ ទូរសារ៖ ៨៦៦-៤៤៧-២១៩៤ Austin, TX ទូរស័ព្ទ៖ ៨៦៦-៤៤៧-២១៩៤ បូស្តុន Westborough, MA ទូរស័ព្ទ៖ ៨៦៦-៤៤៧-២១៩៤ ទូរសារ៖ ៨៦៦-៤៤៧-២១៩៤ ឈីកាហ្គោ Itasca, IL ទូរស័ព្ទ៖ ៨៦៦-៤៤៧-២១៩៤ ទូរសារ៖ ៨៦៦-៤៤៧-២១៩៤ ដាឡាស អាឌីសុន, TX ទូរស័ព្ទ៖ ៨៦៦-៤៤៧-២១៩៤ ទូរសារ៖ ៨៦៦-៤៤៧-២១៩៤ ទីក្រុង Detroit Novi, MI ទូរស័ព្ទ៖ ៨៦៦-៤៤៧-២១៩៤ Houston, TX ទូរស័ព្ទ៖ ៨៦៦-៤៤៧-២១៩៤ រដ្ឋ Indianapolis Noblesville, IN ទូរស័ព្ទ៖ ៨៦៦-៤៤៧-២១៩៤ ទូរសារ៖ ៨៦៦-៤៤៧-២១៩៤ ទូរស័ព្ទ៖ ៨៦៦-៤៤៧-២១៩៤ ទីក្រុង Los Angeles បេសកកម្ម Viejo, CA ទូរស័ព្ទ៖ ៨៦៦-៤៤៧-២១៩៤ ទូរសារ៖ ៨៦៦-៤៤៧-២១៩៤ ទូរស័ព្ទ៖ ៨៦៦-៤៤៧-២១៩៤ Raleigh, NC ទូរស័ព្ទ៖ ៨៦៦-៤៤៧-២១៩៤ ញូវយ៉ក, ញូវយ៉ក ទូរស័ព្ទ៖ ៨៦៦-៤៤៧-២១៩៤ San Jose, CA ទូរស័ព្ទ៖ ៨៦៦-៤៤៧-២១៩៤ ទូរស័ព្ទ៖ ៨៦៦-៤៤៧-២១៩៤ ប្រទេសកាណាដា - តូរ៉ុនតូ ទូរស័ព្ទ៖ ៨៦៦-៤៤៧-២១៩៤ ទូរសារ៖ ៨៦៦-៤៤៧-២១៩៤ |
អូស្ត្រាលី - ស៊ីដនី ទូរស័ព្ទ៖ 61-2-9868-6733 ចិន - ប៉េកាំង ទូរស័ព្ទ៖ 86-10-8569-7000 ប្រទេសចិន - ទីក្រុង Chengdu ទូរស័ព្ទ៖ 86-28-8665-5511 ប្រទេសចិន - ទីក្រុង Chongqing ទូរស័ព្ទ៖ 86-23-8980-9588 ប្រទេសចិន - Dongguan ទូរស័ព្ទ៖ 86-769-8702-9880 ប្រទេសចិន - ក្វាងចូវ ទូរស័ព្ទ៖ 86-20-8755-8029 ប្រទេសចិន - Hangzhou ទូរស័ព្ទ៖ 86-571-8792-8115 ប្រទេសចិន - ហុងកុង SAR ទូរស័ព្ទ៖ 852-2943-5100 ប្រទេសចិន - ណានជីង ទូរស័ព្ទ៖ 86-25-8473-2460 ប្រទេសចិន - ទីក្រុង Qingdao ទូរស័ព្ទ៖ 86-532-8502-7355 ចិន - សៀងហៃ ទូរស័ព្ទ៖ 86-21-3326-8000 ប្រទេសចិន - សេនយ៉ាង ទូរស័ព្ទ៖ 86-24-2334-2829 ប្រទេសចិន - ទីក្រុង Shenzhen ទូរស័ព្ទ៖ 86-755-8864-2200 ប្រទេសចិន - ស៊ូចូវ ទូរស័ព្ទ៖ 86-186-6233-1526 ប្រទេសចិន - វូហាន ទូរស័ព្ទ៖ 86-27-5980-5300 ចិន - ស៊ីអាន ទូរស័ព្ទ៖ 86-29-8833-7252 ប្រទេសចិន - Xiamen ទូរស័ព្ទ៖ 86-592-2388138 ប្រទេសចិន - ជូហៃ ទូរស័ព្ទ៖ 86-756-3210040 |
ប្រទេសឥណ្ឌា - Bangalore ទូរស័ព្ទ៖ 91-80-3090-4444 ប្រទេសឥណ្ឌា - ញូវដេលី ទូរស័ព្ទ៖ 91-11-4160-8631 ឥណ្ឌា - ភូន ទូរស័ព្ទ៖ 91-20-4121-0141 ប្រទេសជប៉ុន - អូសាកា ទូរស័ព្ទ៖ 81-6-6152-7160 ជប៉ុន - តូក្យូ ទូរស័ព្ទ៖ 81-3-6880- 3770 កូរ៉េ - ដាហ្គូ ទូរស័ព្ទ៖ 82-53-744-4301 កូរ៉េ - សេអ៊ូល។ ទូរស័ព្ទ៖ 82-2-554-7200 ម៉ាឡេស៊ី - កូឡាឡាំពួរ ទូរស័ព្ទ៖ 60-3-7651-7906 ម៉ាឡេស៊ី - ប៉េណាង ទូរស័ព្ទ៖ 60-4-227-8870 ហ្វីលីពីន - ម៉ានីល។ ទូរស័ព្ទ៖ 63-2-634-9065 សិង្ហបុរី ទូរស័ព្ទ៖ 65-6334-8870 តៃវ៉ាន់ - ស៊ីនជូ ទូរស័ព្ទ៖ 886-3-577-8366 តៃវ៉ាន់ - កៅសុង ទូរស័ព្ទ៖ 886-7-213-7830 តៃវ៉ាន់ - តៃប៉ិ ទូរស័ព្ទ៖ 886-2-2508-8600 ប្រទេសថៃ - បាងកក ទូរស័ព្ទ៖ 66-2-694-1351 វៀតណាម - ហូជីមិញ ទូរស័ព្ទ៖ 84-28-5448-2100 |
អូទ្រីស - វែល។ ទូរស័ព្ទ៖ 43-7242-2244-39 ទូរសារ៖ 43-7242-2244-393 ដាណឺម៉ាក - ទីក្រុង Copenhagen ទូរស័ព្ទ៖ 45-4485-5910 ទូរសារ៖ 45-4485-2829 ហ្វាំងឡង់ - អេសភី ទូរស័ព្ទ៖ 358-9-4520-820 បារាំង - ប៉ារីស Tel: 33-1-69-53-63-20 Fax: 33-1-69-30-90-79 អាឡឺម៉ង់ - Garching ទូរស័ព្ទ៖ 49-8931-9700 អាល្លឺម៉ង់ - ហាន់ ទូរស័ព្ទ៖ 49-2129-3766400 អាល្លឺម៉ង់ - Heilbronn ទូរស័ព្ទ៖ 49-7131-72400 អាល្លឺម៉ង់ - Karlsruhe ទូរស័ព្ទ៖ 49-721-625370 អាល្លឺម៉ង់ - ទីក្រុង Munich Tel: 49-89-627-144-0 Fax: 49-89-627-144-44 អាល្លឺម៉ង់ - Rosenheim ទូរស័ព្ទ៖ 49-8031-354-560 អ៊ីស្រាអ៊ែល - Hod Hasharon ទូរស័ព្ទ៖ 972-9-775-5100 អ៊ីតាលី - មីឡាន ទូរស័ព្ទ៖ 39-0331-742611 ទូរសារ៖ 39-0331-466781 ប្រទេសអ៊ីតាលី - Padova ទូរស័ព្ទ៖ 39-049-7625286 ប្រទេសហូឡង់ - Drunen ទូរស័ព្ទ៖ 31-416-690399 ទូរសារ៖ 31-416-690340 ន័រវែស - Trondheim ទូរស័ព្ទ៖ 47-72884388 ប៉ូឡូញ - វ៉ារស្សាវ៉ា ទូរស័ព្ទ៖ 48-22-3325737 រូម៉ានី - Bucharest Tel: 40-21-407-87-50 អេស្ប៉ាញ - ម៉ាឌ្រីដ Tel: 34-91-708-08-90 Fax: 34-91-708-08-91 ស៊ុយអែត - Gothenberg Tel: 46-31-704-60-40 ស៊ុយអែត - ស្តុកខម ទូរស័ព្ទ៖ 46-8-5090-4654 ចក្រភពអង់គ្លេស - Wokingham ទូរស័ព្ទ៖ 44-118-921-5800 ទូរសារ៖ 44-118-921-5820 |
![]()
ឯកសារ/ធនធាន
 |
MICROCHIP DS00004807F លំហូរផ្ទាល់ខ្លួនរបស់គ្រួសារ PolarFire FPGA [pdf] ការណែនាំអ្នកប្រើប្រាស់ DS00004807F លំហូរផ្ទាល់ខ្លួនរបស់គ្រួសារ PolarFire FPGA, DS00004807F, លំហូរផ្ទាល់ខ្លួនរបស់គ្រួសារ PolarFire FPGA, លំហូរផ្ទាល់ខ្លួន FPGA គ្រួសារ, លំហូរផ្ទាល់ខ្លួន, លំហូរ |