ओव्हरview
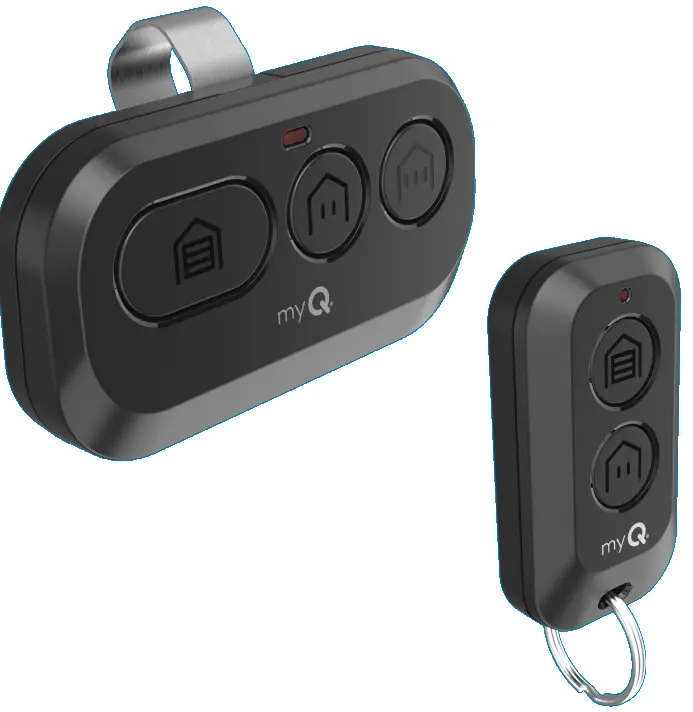
तुमचा रिमोट कंट्रोल १९९७ नंतर उत्पादित केलेल्या सर्व चेंबरलेन®, लिफ्टमास्टर® आणि क्राफ्ट्समन® गॅरेज डोअर ओपनर्सशी सुसंगत आहे, क्राफ्ट्समन सिरीज १०० वगळता. तुमचा रिमोट कंट्रोल तीन (CH1997 आणि CH100C) किंवा दोन (CH363 आणि CH363C) सुसंगत उपकरणांपर्यंत ऑपरेट करण्यासाठी प्रोग्राम केला जाऊ शकतो, जसे की गॅरेज डोअर ओपनर्स आणि गेट ऑपरेटर. रिमोट कंट्रोलवरील प्रत्येक बटण एकमेकांपासून स्वतंत्रपणे काम करते आणि ते स्वतंत्रपणे प्रोग्राम केले पाहिजे. या मॅन्युअलमधील प्रतिमा केवळ संदर्भासाठी आहेत आणि तुमचे उत्पादन वेगळे दिसू शकते.
चेतावणी
हलत्या गेट किंवा गॅरेजच्या दारातून संभाव्य गंभीर इजा किंवा मृत्यू टाळण्यासाठी:
- ALWAYS keep remote controls out of reach of children. NEVER permit children to operate, or play with the remote control transmitters.
- गेट किंवा दरवाजा फक्त तेव्हाच सक्रिय करा जेव्हा ते स्पष्टपणे दिसत असेल, योग्यरित्या समायोजित केले असेल आणि दरवाजाच्या प्रवासात कोणतेही अडथळे नसतील.
- पूर्णपणे बंद होईपर्यंत नेहमी गेट किंवा गॅरेज दरवाजा दृष्टीस ठेवा. कोणालाही हलवणारे गेट किंवा दरवाजा ओलांडण्याची परवानगी देऊ नका.
चेतावणी: हे उत्पादन तुम्हाला शिशासह रसायनांच्या संपर्कात आणू शकते, जे कॅलिफोर्निया राज्याला कर्करोग किंवा जन्म दोष किंवा इतर पुनरुत्पादक हानीसाठी ओळखले जाते. अधिक माहितीसाठी येथे जा www.P65Warnings.ca.gov.
myQ अॅप वापरून तुमचा रिमोट तुमच्या वाय-फाय गॅरेज डोअर ओपनरशी प्रोग्राम करा.
अत्यंत शिफारसित: रिमोट नेमिंग, सूचना आणि प्रवेश इतिहास यासारख्या रोमांचक वैशिष्ट्यांना अनलॉक करण्यासाठी तुमचा वाय-फाय गॅरेज डोअर ओपनर myQ अॅपशी कनेक्ट करा आणि तुमचा रिमोट गॅरेज डोअर ओपनरशी प्रोग्राम करा.
Connected to the mGarage Door Opener AlryQ Appeady
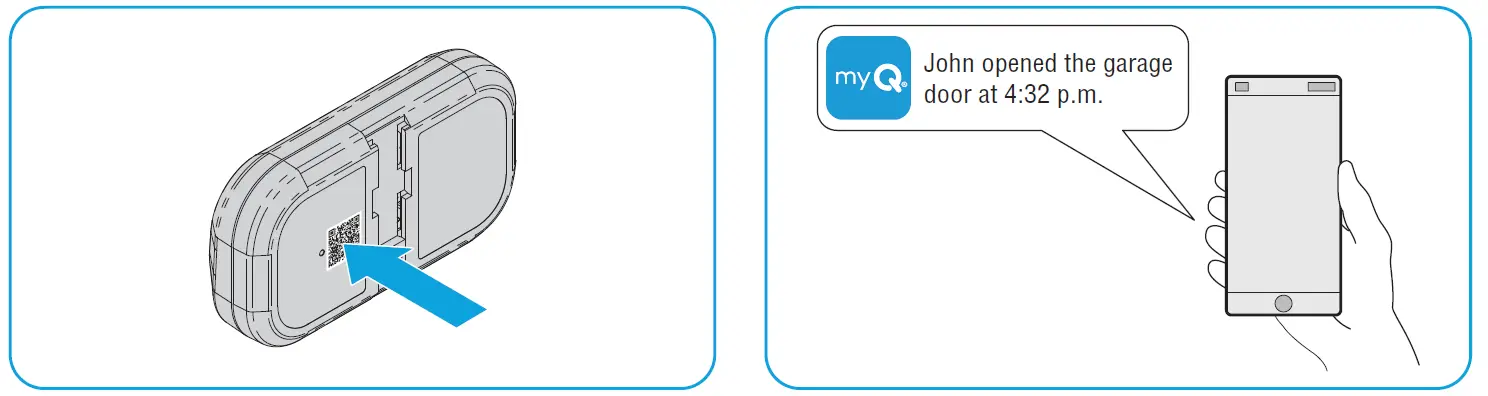
तुमच्या रिमोटच्या उलट बाजूस असलेला QR कोड स्कॅन करा आणि myQ अॅपमधील प्रोग्रामिंग सूचनांचे पालन करा.

जर तुमचा गॅरेज डोअर ओपनर myQ अॅपशी जोडलेला नसेल तर
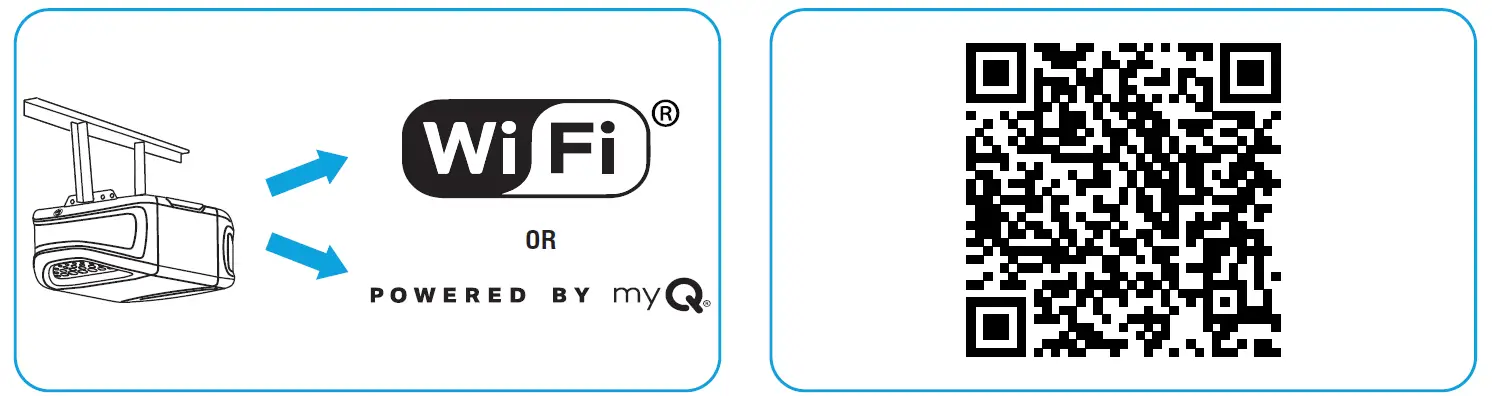
- Look for a “Wi-Fi®” or a “Powered by myQ” logo to determine if your garage door opener is myQ compatible.
- Scan the QR Code below to download the myQ app. Follow the instructions in the myQ app to connect your garage door opener.
 Once your garage door opener is connected, scan the QR code on the reverse side of your remote, and follow the programming instructions in the myQ app.
- Once your remote is programmed in the myQ app, you can name your remote, view इतिहासात प्रवेश करा आणि तुमचा रिमोट गॅरेज दरवाजा उघडणारा सक्रिय करतो तेव्हा सूचना प्राप्त करा.
आपण सुरू करण्यापूर्वी
गॅरेजचा दरवाजा सर्व अडथळ्यांपासून मुक्त आहे याची खात्री करा. गॅरेज दरवाजा उघडणाऱ्याला एक कार्यरत दिवा आहे याची खात्री करा कारण तो एक प्रोग्रामिंग इंडिकेटर आहे.

शिफारस: सुरुवात करण्यापूर्वी सर्व प्रोग्रामिंग पायऱ्या वाचा.
पद्धत अ: Program to a Security+ 3.0 Protocol Garage oor Opener (White Learn Button) Using the Learn Button on Door Control Panel
शिफारस: Have your door control panel product manual available, as models vary in how to set the garage door opener into programming mode.
Follow the instructions below for your door control panel model to set your garage door opener into programming mode. Follow the instructions below for your door control panel model to set your garage door opener into programming mode.

३० सेकंदांच्या आत, तुम्हाला वापरायच्या असलेल्या रिमोट कंट्रोलवरील बटण दाबा आणि धरून ठेवा.
Release the button when the garage door opener lights flash and/or two clicks are heard.

यशस्वी चाचणी: तुम्ही प्रोग्राम केलेले रिमोट बटण दाबा. गॅरेज डोअर ओपनर सक्रिय होईल. जर गॅरेज डोअर सक्रिय झाला नाही, तर प्रोग्रामिंगच्या पायऱ्या पुन्हा करा.
पद्धत ब: ओपनरच्या लर्न बटणाचा वापर करून सिक्युरिटी+ ३.० प्रोटोकॉल गॅरेज डोअर ओपनर (पांढरे लर्न बटण) वर प्रोग्राम करा
- Locate the LEARN button on your garage door opener (a ladder may be required).
Press and immediately release the LEARN button.
- ३० सेकंदांच्या आत, तुम्हाला वापरायच्या असलेल्या रिमोट कंट्रोलवरील बटण दाबा आणि धरून ठेवा.
Release the button when the garage door opener lights flash and/or two clicks are heard.
TEST FOR SUCCESS: Press the remote button you programmed. The garage door opener will activate. If the garage door does not activate, repeat the programming steps.
पद्धत C: Program to All Compatible Garage Door Openers (White, Yellow, Purple, Red, & Orange Learn Buttons)
- Start with your garage door closed. Press and hold the two smaller buttons on the remote simultaneously until the red LED stays solid (typically 6 seconds), then release the buttons.

पर्याय १: Follow the instructions below for your door control panel model to set your garage door opener into programming mode.
शिफारस: Have your door control panel product manual available, as models vary in how to set the garage door opener into programming mode.
दरवाजा नियंत्रण पॅनेल
दरवाजा सक्रियकरण पॅनल उचला. LEARN बटण दोनदा दाबा (दुसऱ्यांदा दाबल्यानंतर, दरवाजा नियंत्रण पॅनलवरील LED वारंवार पल्स होईल).

दरवाजा नियंत्रण पुश बटण
लाईट बटण दाबा आणि धरून ठेवा, नंतर दरवाजा सक्रियकरण बटण दाबा आणि सोडा. बटण LED फ्लॅश होण्यास सुरुवात होईल.

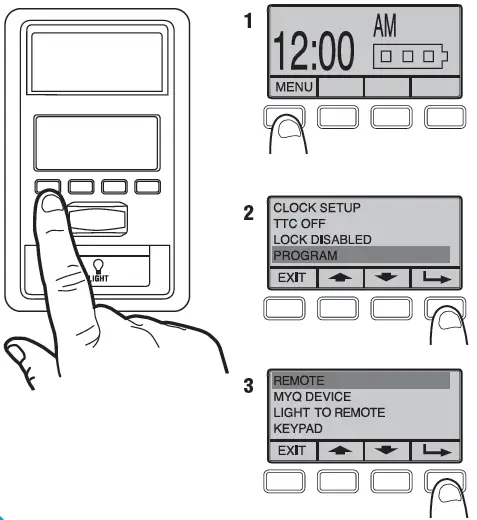
स्मार्ट डोअर कंट्रोल पॅनल
- मेनू निवडा.
- Scroll down and select PROGRAM.
- Scroll down and select REMOTE.
स्क्रीनवरील सूचनांचे पालन करू नका.
MOVE DIRECTLY TO STEP 04.
पर्याय १: Locate the LEARN button on your garage door opener (a ladder may be required).
Press and immediately release the LEARN button.

- Press and release the button that you would like to program twice (second press must be within 20 seconds of the first press). The red LED will flash intermittently as the remote sends the preprogrammed codes to the garage door opener.
- Wait for the garage door opener to move the door. This can take up to 25 seconds.
During this time, your garage door opener light might flash.
When the garage door opener moves, within 3 seconds, press and release any button on the remote to confirm the code and exit programming.

TEST FOR SUCCESS: Press the remote button you programmed in step 4. The garage door opener will activate. If the garage door does not activate, repeat the programming steps.
बॅटरी कमी झाल्यावर आणि ती बदलण्याची आवश्यकता असल्यास तुमच्या रिमोट कंट्रोलवरील LED फ्लॅश होणे थांबेल. बॅटरी फक्त 3V CR2032 कॉइन सेल बॅटरीने बदला. जुनी बॅटरी योग्यरित्या विल्हेवाट लावा.
बॅटरी बदलण्यासाठी, खाली दाखवल्याप्रमाणे सूचनांचे पालन करा.
- On the back side of the remote, using a Phillips #1 screwdriver, unscrew the captive screw until it rotates freely.
- With the remote button side up, pry open the remote top housing from the bottom housing (if the housing will not separate, check that the captive screw is rotating freely).
 With a cotton swab, push the old battery out of its holder in the direction of the nearest edge.
- Insert the replacement battery positive side up.

- Align the remote top and bottom housing so they clip together. Tighten the captive screw until the top and bottom housing no longer shift (do not overtighten the screw to avoid cracking the plastic housing).

The LED on your remote control will stop flashing when the battery is low and needs to be replaced.
बॅटरी फक्त 3V CR2032 कॉइन सेल बॅटरीने बदला. जुनी बॅटरी योग्यरित्या विल्हेवाट लावा.
बॅटरी बदलण्यासाठी, खाली दाखवल्याप्रमाणे सूचनांचे पालन करा.
- With the remote button side down, separate the top and bottom housings of the remote by placing a flat screwdriver blade into the gap in the corner of the remote and gently twisting.
- Pry the top housing from the bottom housing.
 Following the “REMOVE” arrows direction printed on the logic board, with a cotton swab, push the old battery out of its holder
- Following the “INSERT” arrow direction printed on the logic board, insert the replacement battery positive side up.

- Align the remote top and bottom housing and press so they clip back together.

चेतावणी
- अंतर्ग्रहण धोका: या उत्पादनामध्ये बटण सेल किंवा नाण्याची बॅटरी असते.
- सेवन केल्यास मृत्यू किंवा गंभीर दुखापत होऊ शकते.
- एक गिळलेला बटण सेल किंवा नाणे बॅटरी 2 तासांत अंतर्गत रासायनिक बर्न्स होऊ शकते.
- नवीन आणि वापरलेल्या बॅटरी मुलांच्या आवाक्याबाहेर ठेवा.
- शरीराच्या कोणत्याही भागामध्ये बॅटरी गिळली किंवा घातल्याचा संशय असल्यास त्वरित वैद्यकीय मदत घ्या.
चेतावणी
- स्थानिक नियमांनुसार वापरलेल्या बॅटरी काढा आणि ताबडतोब रीसायकल करा किंवा विल्हेवाट लावा आणि मुलांपासून दूर ठेवा. घरातील कचऱ्यामध्ये किंवा जाळण्यात बॅटरीची विल्हेवाट लावू नका.
- जरी वापरलेल्या बॅटरीमुळे गंभीर दुखापत किंवा मृत्यू होऊ शकतो.
- उपचारांच्या माहितीसाठी स्थानिक विष नियंत्रण केंद्रावर कॉल करा.
- बॅटरी प्रकार: CR2032
- बॅटरी व्हॉल्यूमtagई: 3 व्ही
- नॉन-रिचार्ज करण्यायोग्य बॅटरी रिचार्ज केल्या जाऊ नयेत.
- डिस्चार्ज, रिचार्ज, वेगळे करणे, वरील उष्णता (निर्मात्याचे निर्दिष्ट तापमान रेटिंग) किंवा जाळण्याची सक्ती करू नका. असे केल्याने व्हेंटिंग, गळती किंवा स्फोट झाल्यामुळे दुखापत होऊ शकते परिणामी रासायनिक बर्न होऊ शकते.
- ध्रुवीयतेनुसार (+ आणि -) बॅटरी योग्यरित्या स्थापित झाल्याची खात्री करा.
- जुन्या आणि नवीन बॅटरी, भिन्न ब्रँड किंवा प्रकारच्या बॅटरी, जसे की अल्कधर्मी, कार्बन-जस्त किंवा रिचार्ज करण्यायोग्य बॅटरी मिक्स करू नका.
- स्थानिक नियमांनुसार दीर्घ कालावधीसाठी वापरल्या जात नसलेल्या उपकरणांमधून बॅटरी काढा आणि ताबडतोब रीसायकल करा किंवा विल्हेवाट लावा.
- बॅटरी कंपार्टमेंट नेहमी पूर्णपणे सुरक्षित करा. जर बॅटरीचा डबा सुरक्षितपणे बंद होत नसेल, तर उत्पादन वापरणे थांबवा, बॅटरी काढून टाका आणि मुलांपासून दूर ठेवा.
बदली भाग
| वर्णन | भाग क्रमांक |
| व्हिजर क्लिप | ५७४-५३७-८९०० |
अतिरिक्त संसाधने
एक वर्षाची मर्यादित वॉरंटी
The Chamberlain Group LLC (“Seller”) warrants to the first consumer purchaser of this product that it is free from defect in materials and/or works man ship for a period of 1 year from the date of purchase.
अधिक माहितीसाठी, भेट द्या www.myq.com/warranty
आमच्याशी संपर्क साधा
अतिरिक्त माहिती किंवा सहाय्यासाठी, कृपया भेट द्या: समर्थन.chamberlaingroup.com
सूचना: हे डिव्हाइस FCC नियमांच्या भाग 15 चे पालन करते आणि इनोव्हेशन, सायन्स आणि इकॉनॉमिक डेव्हलपमेंट कॅनडा परवाना-मुक्त RSS चे पालन करते. ऑपरेशन खालील दोन अटींच्या अधीन आहे:
- हे डिव्हाइस हानीकारक हस्तक्षेप होऊ शकत नाही, आणि
- अवांछित ऑपरेशन होऊ शकणाऱ्या हस्तक्षेपासह, या डिव्हाइसने प्राप्त झालेला कोणताही हस्तक्षेप स्वीकारला पाहिजे.
अनुपालनासाठी जबाबदार असलेल्या पक्षाने स्पष्टपणे मंजूर न केलेले कोणतेही बदल किंवा बदल उपकरणे चालवण्याचा वापरकर्त्याचा अधिकार रद्द करू शकतात.
©2025 चेंबरलेन ग्रुप एलएलसी
myQ and the myQ logo are trademarks, service marks, and/or registered trademarks of The Chamberlain Group LLC. All other trademarks, service marks and product names used herein are the property of their respective owners. The Chamberlain Group LLC. 300 Windsor Drive, Oak Brook, IL, 60523, United States
वारंवार विचारले जाणारे प्रश्न
- प्रश्न: माझा गॅरेज डोअर ओपनर कनेक्ट केलेला आहे की नाही हे मला कसे कळेल? myQ अॅप?
A: You can scan the QR code on the reverse side of your remote and follow the instructions in the myQ app to check the connection status. - प्रश्न: जर माझे रिमोट कंट्रोल बटण वाजत नसेल तर मी काय करावे? कार्यक्रम यशस्वी झाला?
A: Ensure that you are following the programming steps correctly and that there are no interferences during the process. Try reprogramming after troubleshooting any issues.
कागदपत्रे / संसाधने
 |
myQ L993M २-बटण कीचेन आणि ३-बटण रिमोट कंट्रोल [pdf] सूचना पुस्तिका L993M, CH363, CH363C, Q363LA, L932M, CH382, CH382C, L993M २-बटण कीचेन आणि ३-बटण रिमोट कंट्रोल, L2M, २-बटण कीचेन आणि ३-बटण रिमोट कंट्रोल, कीचेन आणि ३-बटण रिमोट कंट्रोल, बटण रिमोट कंट्रोल, रिमोट कंट्रोल |