تمام شدview
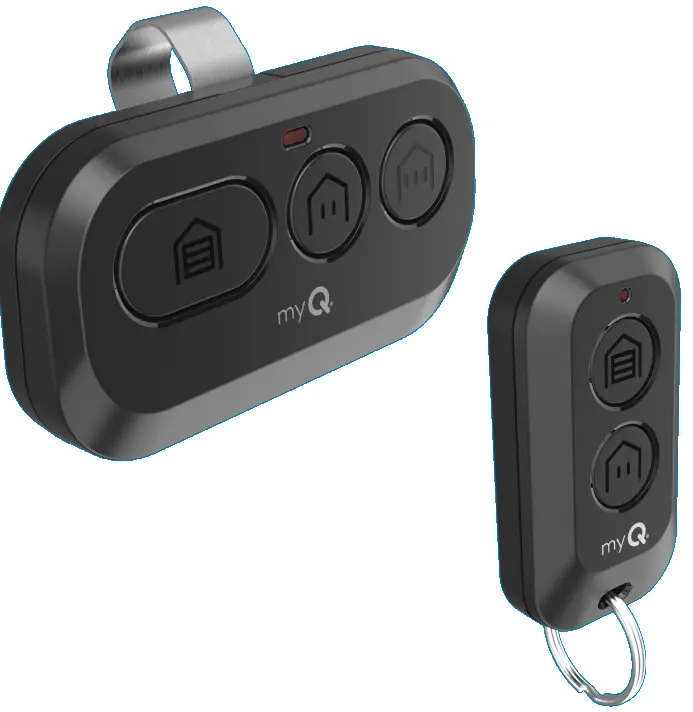
Your remote control is compatible with all Chamberlain®, LiftMaster®, and Craftsman® garage door openers manufactured after 1997 with the exception of Craftsman Series 100. Your remote control can be programmed to operate up to three (CH363 & CH363C) or two (CH382 & CH382C) compatible devices, such as garage door openers and gate operators. Each button on the remote control works independently of the other and must be programmed separately. The images throughout this manual are for reference only and your product may look different
هشدار
برای جلوگیری از صدمات جدی یا مرگ ناشی از دروازه متحرک یا درب گاراژ:
- همیشه کنترل از راه دور را دور از دسترس کودکان نگه دارید. هرگز اجازه ندهید کودکان با فرستندههای کنترل از راه دور کار کنند یا با آنها بازی کنند.
- دروازه یا در را فقط زمانی فعال کنید که به وضوح دیده شود، به درستی تنظیم شده باشد و هیچ مانعی برای حرکت درب وجود نداشته باشد.
- همیشه درب گاراژ یا گاراژ را در معرض دید قرار دهید تا کاملاً بسته شود. هرگز اجازه ندهید که کسی از دروازه یا درب متحرک عبور کند.
هشدار: این محصول می تواند شما را در معرض مواد شیمیایی از جمله سرب قرار دهد که در ایالت کالیفرنیا به عنوان عامل سرطان یا نقایص مادرزادی یا سایر آسیب های تولید مثل شناخته شده است. برای اطلاعات بیشتر به www.p65warnings.ca.gov.
Program Your Remote to Your Wi-Fi Garage Door Opener Using the myQ App
HIGHLY RECOMMENDED: Connect your Wi-Fi Garage Door Opener to the myQ app and program your Remote to the Garage Door Opener to unlock exciting features such as remote naming, notifications and access history.
Connected to the mGarage Door Opener AlryQ Appeady
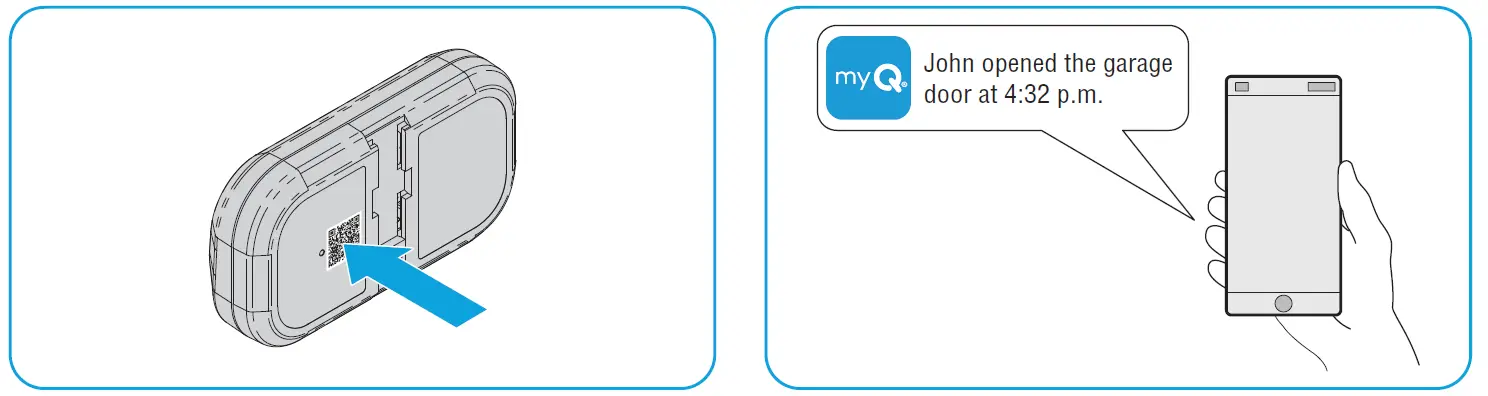
Scan the QR code on the reverse side of your remote and follow the programming instructions in the myQ app.

If Your Garage Door Opener is Not Connected to the myQ App
- Look for a “Wi-Fi®” or a “Powered by myQ” logo to determine if your garage door opener is myQ compatible.
- Scan the QR Code below to download the myQ app. Follow the instructions in the myQ app to connect your garage door opener.
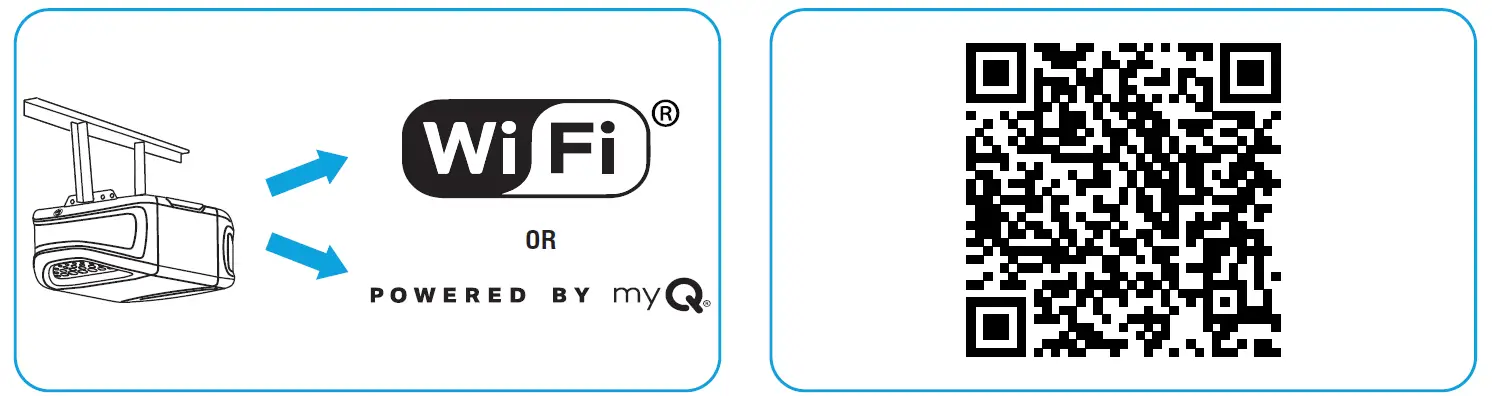 Once your garage door opener is connected, scan the QR code on the reverse side of your remote, and follow the programming instructions in the myQ app.
- پس از اینکه ریموت شما در برنامه myQ برنامهریزی شد، میتوانید برای ریموت خود نامی انتخاب کنید. view به تاریخچه دسترسی داشته باشید و وقتی ریموت شما درب بازکن گاراژ را فعال میکند، اعلان دریافت کنید.
قبل از شروع
Be sure the garage door is clear of ALL obstructions. Make sure the garage door opener has a working light because it is a programming indicator.

RECOMMENDATION: Read through all programming steps before you start.
روش A: Program to a Security+ 3.0 Protocol Garage oor Opener (White Learn Button) Using the Learn Button on Door Control Panel
توصیه: Have your door control panel product manual available, as models vary in how to set the garage door opener into programming mode.
Follow the instructions below for your door control panel model to set your garage door opener into programming mode. Follow the instructions below for your door control panel model to set your garage door opener into programming mode.

در عرض 30 ثانیه، دکمه روی کنترل از راه دور را فشار دهید و نگه دارید.
Release the button when the garage door opener lights flash and/or two clicks are heard.

TEST FOR SUCCESS: Press the remote button you programmed. The garage door opener will activate. If the garage door does not activate, repeat the programming steps.
Method B: Program to a Security+ 3.0 Protocol Garage Door Opener (White Learn Button) Using the Opener’s Learn Button
- Locate the LEARN button on your garage door opener (a ladder may be required).
Press and immediately release the LEARN button.
- در عرض 30 ثانیه، دکمه روی کنترل از راه دور را فشار دهید و نگه دارید.
Release the button when the garage door opener lights flash and/or two clicks are heard.
آزمون موفقیت: Press the remote button you programmed. The garage door opener will activate. If the garage door does not activate, repeat the programming steps.
روش ج: Program to All Compatible Garage Door Openers (White, Yellow, Purple, Red, & Orange Learn Buttons)
- Start with your garage door closed. Press and hold the two smaller buttons on the remote simultaneously until the red LED stays solid (typically 6 seconds), then release the buttons.

گزینه 1: Follow the instructions below for your door control panel model to set your garage door opener into programming mode.
توصیه: Have your door control panel product manual available, as models vary in how to set the garage door opener into programming mode.
پنل کنترل درب
Lift the door activation panel. Press the LEARN button twice (after the second press, the LED on the door control panel will pulse repeatedly).

Door Control Push Button
Press and hold the light button, then press and release the door activation button. The button LED will begin to flash.

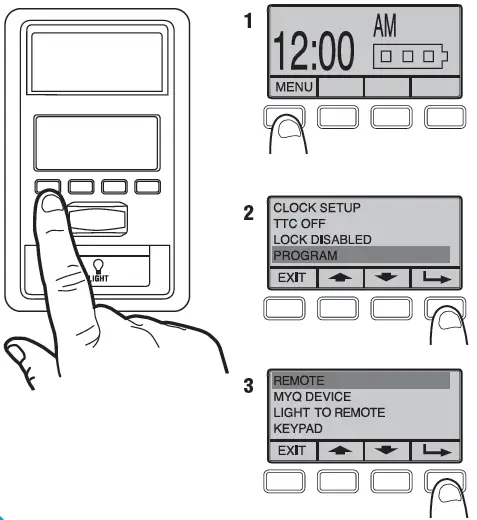
Smart Door Control Panel
- MENU را انتخاب کنید.
- به پایین بروید و برنامه را انتخاب کنید.
- به پایین بروید و REMOTE را انتخاب کنید.
دستورالعملهای روی صفحه نمایش را دنبال نکنید.
مستقیماً به مرحله 04 بروید.
گزینه 2: Locate the LEARN button on your garage door opener (a ladder may be required).
Press and immediately release the LEARN button.

- Press and release the button that you would like to program twice (second press must be within 20 seconds of the first press). The red LED will flash intermittently as the remote sends the preprogrammed codes to the garage door opener.
- Wait for the garage door opener to move the door. This can take up to 25 seconds.
During this time, your garage door opener light might flash.
When the garage door opener moves, within 3 seconds, press and release any button on the remote to confirm the code and exit programming.

آزمون موفقیت: Press the remote button you programmed in step 4. The garage door opener will activate. If the garage door does not activate, repeat the programming steps.
The LED on your remote control will stop flashing when the battery is low and needs to be replaced. Replace the battery with only 3V CR2032 coin cell battery. Dispose of the old battery properly.
To replace battery, follow the instructions as shown below.
- On the back side of the remote, using a Phillips #1 screwdriver, unscrew the captive screw until it rotates freely.
- در حالی که دکمه ریموت رو به بالا است، محفظه بالایی ریموت را از محفظه پایینی باز کنید (اگر محفظه جدا نمیشود، بررسی کنید که پیچ نگهدارنده آزادانه میچرخد).
 With a cotton swab, push the old battery out of its holder in the direction of the nearest edge.
- Insert the replacement battery positive side up.

- Align the remote top and bottom housing so they clip together. Tighten the captive screw until the top and bottom housing no longer shift (do not overtighten the screw to avoid cracking the plastic housing).

The LED on your remote control will stop flashing when the battery is low and needs to be replaced.
Replace the battery with only 3V CR2032 coin cell battery. Dispose of the old battery properly.
To replace battery, follow the instructions as shown below.
- With the remote button side down, separate the top and bottom housings of the remote by placing a flat screwdriver blade into the gap in the corner of the remote and gently twisting.
- Pry the top housing from the bottom housing.
 Following the “REMOVE” arrows direction printed on the logic board, with a cotton swab, push the old battery out of its holder
- Following the “INSERT” arrow direction printed on the logic board, insert the replacement battery positive side up.

- Align the remote top and bottom housing and press so they clip back together.

هشدار
- خطر بلع: این محصول حاوی یک سلول دکمه ای یا باتری سکه ای است.
- در صورت بلعیدن، مرگ یا آسیب جدی ممکن است رخ دهد.
- بلعیده شدن سلول دکمه ای یا باتری سکه ای می تواند در کمتر از 2 ساعت باعث سوختگی شیمیایی داخلی شود.
- باتری های نو و مستعمل را دور از دسترس کودکان نگه دارید.
- اگر مشکوک به بلعیده شدن یا قرار دادن باتری در هر قسمتی از بدن هستید، فوراً به دنبال مراقبت پزشکی باشید.
هشدار
- باتری های مستعمل را طبق مقررات محلی خارج کرده و فوراً بازیافت یا دور بیندازید و از دسترس کودکان دور نگه دارید. باتری ها را در سطل زباله خانگی یا سوزاندن نگذارید.
- حتی باتری های استفاده شده ممکن است باعث آسیب شدید یا مرگ شوند.
- برای اطلاعات درمانی با یک مرکز کنترل مسمومیت محلی تماس بگیرید.
- نوع باتری: CR2032
- باتری جلدtage: 3 ولت
- باتری های غیر قابل شارژ نباید دوباره شارژ شوند.
- از تخلیه، شارژ مجدد، جدا کردن، حرارت بالاتر (درجه حرارت مشخص شده توسط سازنده) یا سوزاندن اجباری خودداری کنید. انجام این کار ممکن است منجر به آسیب ناشی از تهویه، نشت یا انفجار شود که منجر به سوختگی شیمیایی می شود.
- اطمینان حاصل کنید که باتری ها بر اساس قطبیت (+ و -) به درستی نصب شده اند.
- باتری های قدیمی و جدید، مارک های مختلف یا انواع باتری ها مانند باتری های قلیایی، کربن روی یا باتری های قابل شارژ را با هم مخلوط نکنید.
- باتری ها را از تجهیزاتی که طبق مقررات محلی برای مدت طولانی مورد استفاده قرار نگرفته اند، فوراً بازیافت یا دور بیندازید.
- همیشه محفظه باتری را کاملاً ایمن کنید. اگر محفظه باتری به طور ایمن بسته نمی شود، استفاده از محصول را متوقف کنید، باتری ها را خارج کرده و از کودکان دور نگه دارید.
قطعات تعویضی
| توضیحات | شماره قطعه |
| کلیپ Visor | 041-0494-000 |
منابع اضافی
یک سال گارانتی محدود
The Chamberlain Group LLC (“Seller”) warrants to the first consumer purchaser of this product that it is free from defect in materials and/or works man ship for a period of 1 year from the date of purchase.
برای اطلاعات بیشتر مراجعه کنید www.myq.com/warranty
تماس با ما
برای کسب اطلاعات بیشتر یا کمک به این آدرس مراجعه کنید: support.chamberlainggroup.com
توجه: این دستگاه با بخش 15 قوانین FCC و RSS های معاف از مجوز برای نوآوری، علم و توسعه اقتصادی کانادا مطابقت دارد. بهره برداری مشروط به دو شرط زیر است:
- این دستگاه ممکن است تداخل مضر ایجاد نکند، و
- این دستگاه باید هرگونه تداخل دریافتی را بپذیرد، از جمله تداخلی که ممکن است باعث عملکرد ناخواسته شود.
هرگونه تغییر یا تعدیل که به صراحت توسط طرف مسئول تطبیق تأیید نشده باشد ، می تواند اختیار کاربر را برای کار با تجهیزات از بین ببرد.
© 2025 گروه چمبرلین LLC
myQ and the myQ logo are trademarks, service marks, and/or registered trademarks of The Chamberlain Group LLC. All other trademarks, service marks and product names used herein are the property of their respective owners. The Chamberlain Group LLC. 300 Windsor Drive, Oak Brook, IL, 60523, United States
سوالات متداول
- Q: How do I know if my garage door opener is connected to the myQ app?
A: You can scan the QR code on the reverse side of your remote and follow the instructions in the myQ app to check the connection status. - Q: What should I do if my remote control button does not program successfully?
A: Ensure that you are following the programming steps correctly and that there are no interferences during the process. Try reprogramming after troubleshooting any issues.
اسناد / منابع
 |
myQ L993M 2-Button Keychain and 3-Button Remote Control [pdfدفترچه راهنما L993M, CH363, CH363C, Q363LA, L932M, CH382, CH382C, L993M 2-Button Keychain and 3-Button Remote Control, L993M, 2-Button Keychain and 3-Button Remote Control, Keychain and 3-Button Remote Control, Button Remote Control, Remote Control |