Tapos naview
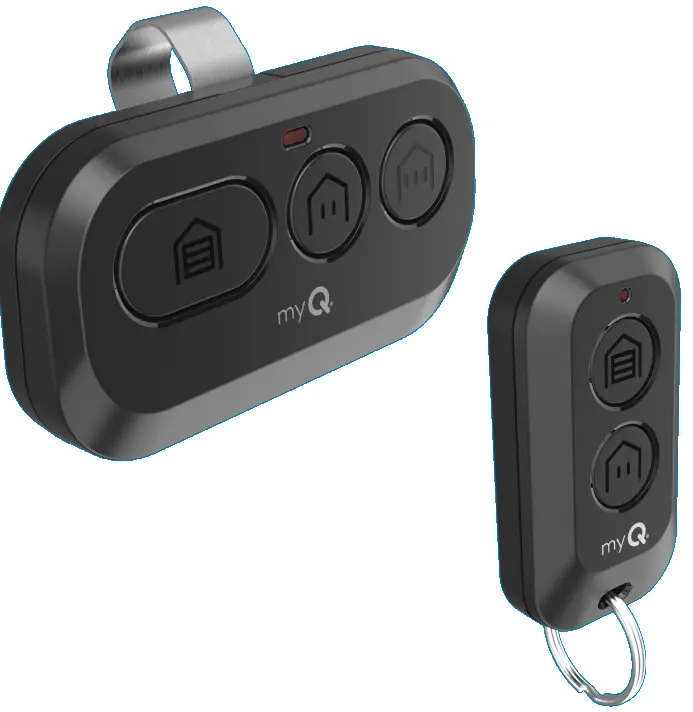
Ang imong remote control kay compatible sa tanang Chamberlain®, LiftMaster®, ug Craftsman® garage door openers nga gigama human sa 1997 gawas sa Craftsman Series 100. Ang imong remote control mahimong maprograma aron moandar hangtod sa tulo (CH363 & CH363C) o duha (CH382 & CH382C) compatible gate nga mga device. Ang matag buton sa hilit nga kontrol molihok nga independente sa lain ug kinahanglan nga gilain nga giprograma. Ang mga hulagway sa tibuok niini nga manwal kay para lamang sa pakisayran ug ang imong produkto mahimong lahi tan-awon
WARNING
Aron malikayan ang posibleng SERYOSO nga KASAMALAN o KAMATAYON gikan sa naglihok nga ganghaan o pultahan sa garahe:
- pirmi itago ang mga remote control nga dili maabot sa mga bata. AYAW tugoti ang mga bata sa pag-operate, o pagdula sa mga remote control transmitter.
- I-aktibo ang ganghaan o pultahan LAMANG kung kini klaro nga makita, husto nga gi-adjust ug wala’y mga babag sa pagbiyahe sa pultahan.
- KANUNAY ipadayon ang panan-aw sa ganghaan o garahe hangtod nga hingpit nga masirhan. DILI gyud pagtugotan ang bisan kinsa nga makatabok sa agianan sa mobalhin nga ganghaan o pultahan.
WARNING: Kini nga produkto mahimong maladlad kanimo sa mga kemikal lakip ang tingga, nga nahibal-an sa Estado sa California nga hinungdan sa kanser o mga depekto sa pagpanganak o uban pang kadaot sa pagsanay. Alang sa dugang impormasyon adto sa www.P65Warnings.ca.gov.
Programa ang Imong Remote sa Imong Wi-Fi Garage Door Opener Gamit ang myQ App
HIGHLY RECOMMENDED: Ikonektar ang imong Wi-Fi Garage Door Opener sa myQ app ug i-program ang imong Remote sa Garage Door Opener aron maablihan ang mga kulbahinam nga bahin sama sa hilit nga pagngalan, mga pahibalo ug kasaysayan sa pag-access.
Konektado sa mGarage Door Opener AlryQ Appeady
I-scan ang QR code sa likod nga bahin sa imong remote ug sunda ang mga instruksyon sa programming sa myQ app.

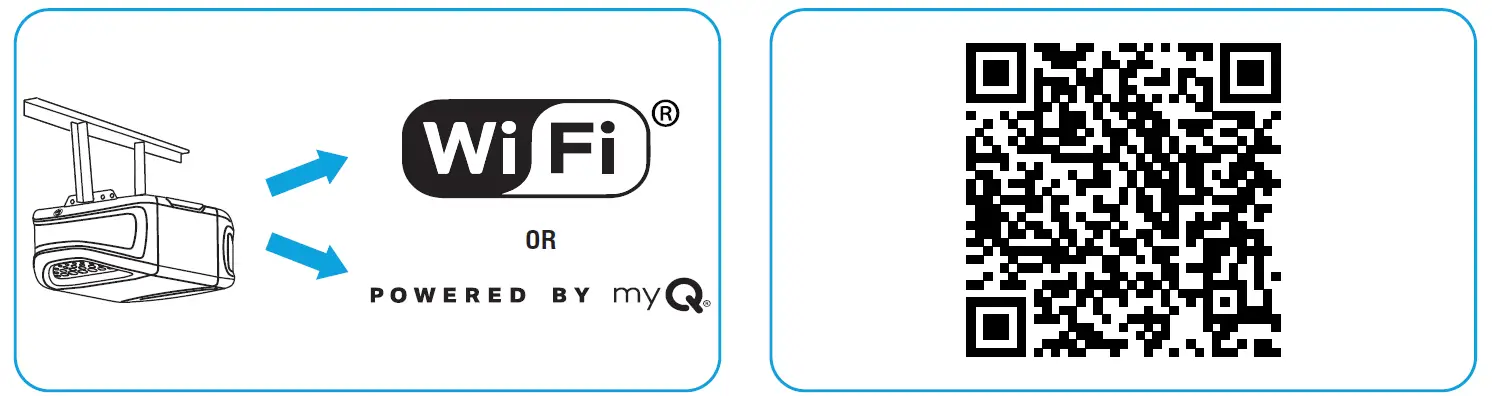
Kung Dili Konektado ang Imong Pultahan sa Garage sa myQ App
- Pangitag “Wi-Fi®” o “Powered by myQ” nga logo aron mahibal-an kung ang imong pultahan sa garahe compatible sa myQ.
- I-scan ang QR Code sa ubos aron ma-download ang myQ app. Sunda ang mga instruksyon sa myQ app aron makonektar ang imong opener sa pultahan sa garahe.
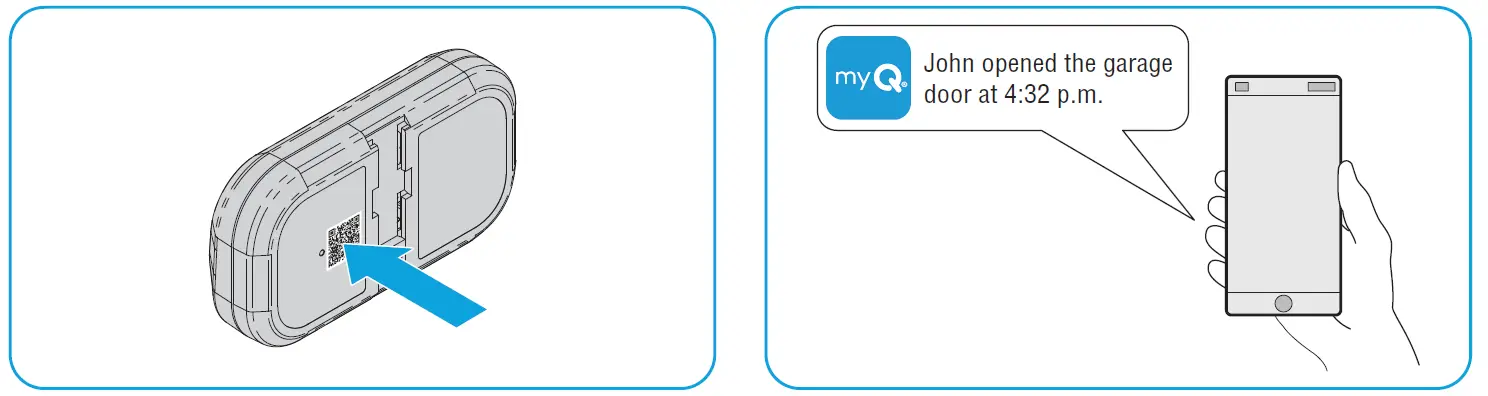
 Kung konektado na ang imong opener sa pultahan sa garahe, i-scan ang QR code sa likod nga bahin sa imong remote, ug sunda ang mga instruksiyon sa programming sa myQ app.
- Kung maprogram na ang imong remote sa myQ app, mahimo nimong nganlan ang imong remote, view access sa kasaysayan, ug makadawat og mga pahibalo sa diha nga ang imong hilit nga activate sa garahe pultahan opener.
Sa Dili Ka pa Magsugod
Siguroha nga ang pultahan sa garahe walay TANANG babag. Siguruha nga ang pagbukas sa pultahan sa garahe adunay suga nga nagtrabaho tungod kay kini usa ka timailhan sa pagprograma.

REKOMENDASYON: Basaha ang tanang lakang sa pagprograma sa dili ka pa magsugod.
Pamaagi A: Program ngadto sa Security+ 3.0 Protocol Garage o Opener (White Learn Button) Gamit ang Learn Button sa Door Control Panel
REKOMENDASYON: Ipagamit ang manwal sa produkto sa imong control panel sa pultahan, tungod kay lainlain ang mga modelo kung giunsa i-set ang opener sa garahe sa programming mode.
Sunda ang mga instruksyon sa ubos para sa imong modelo sa control panel sa pultahan aron mabutang ang imong opener sa pultahan sa garahe ngadto sa programming mode. Sunda ang mga instruksyon sa ubos para sa imong modelo sa control panel sa pultahan aron mabutang ang imong opener sa pultahan sa garahe ngadto sa programming mode.

Sulod sa 30 segundos, pindota ug hupti ang buton sa remote control nga gusto nimong gamiton.
Ipagawas ang buton kung ang mga suga sa pagbukas sa pultahan sa garahe mokidlap ug/o madungog ang duha ka pag-klik.

TEST FOR SUCCESS: Pindota ang remote button nga imong giprograma. Ang pagbukas sa pultahan sa garahe mag-aktibo. Kung ang pultahan sa garahe dili ma-aktibo, balika ang mga lakang sa pagprograma.
Pamaagi B: Programa ngadto sa Security+ 3.0 Protocol Garage Door Opener (White Learn Button) Gamit ang Opener's Learn Button
- Pangitaa ang KAT-ON nga buton sa imong opener sa pultahan sa garahe (mahimong gikinahanglan ang usa ka hagdan).
Pindota ug buhii dayon ang LEARN button.
- Sulod sa 30 segundos, pindota ug hupti ang buton sa remote control nga gusto nimong gamiton.
Ipagawas ang buton kung ang mga suga sa pagbukas sa pultahan sa garahe mokidlap ug/o madungog ang duha ka pag-klik.
PAGSULAY ALANG SA KALAMPUSAN: Pindota ang hilit nga buton nga imong giprograma. Ang pagbukas sa pultahan sa garahe mag-aktibo. Kung ang pultahan sa garahe dili ma-aktibo, balika ang mga lakang sa pagprograma.
Pamaagi C: Programa sa Tanan nga Katugbang nga Mga Pagbukas sa Pultahan sa Garahe (Puti, Dilaw, Purple, Pula, ug Kahel nga Mga Butang sa Pagkat-on)
- Pagsugod sa imong garahe nga sirado ang pultahan. Pindota ug kupti ang duha ka gagmay nga mga buton sa hilit nga dungan hangtod nga ang pula nga LED magpabilin nga solid (kasagaran 6 segundos), dayon buhian ang mga buton.

Opsyon 1: Sunda ang mga instruksyon sa ubos para sa imong modelo sa control panel sa pultahan aron mabutang ang imong opener sa pultahan sa garahe ngadto sa programming mode.
REKOMENDASYON: Ipagamit ang manwal sa produkto sa imong control panel sa pultahan, tungod kay lainlain ang mga modelo kung giunsa i-set ang opener sa garahe sa programming mode.
Door Control Panel
Ipataas ang panel sa pagpaaktibo sa pultahan. Pindota ang KATUN-ON nga buton kaduha (pagkahuman sa ikaduhang pagpindot, ang LED sa control panel sa pultahan magbalik-balik nga pulso).

Door Control Push Button
Pindota ug hupti ang light button, dayon pindota ug buhian ang door activation button. Ang butones nga LED magsugod sa pagkidlap.

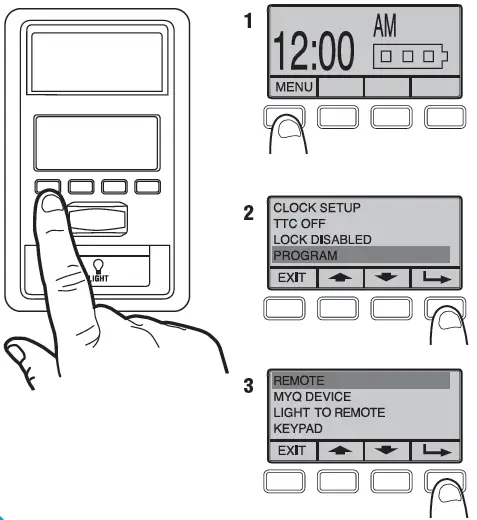
Smart Door Control Panel
- Pilia ang MENU.
- I-scroll down ug pilia ang PROGRAM.
- Pag-scroll paubos ug pilia ang REMOTE.
Ayaw pagsunod sa mga instruksyon sa screen.
DIREKTA NGA LAHI SA STEP 04.
Opsyon 2: Pangitaa ang KAT-ON nga buton sa imong opener sa pultahan sa garahe (mahimong gikinahanglan ang usa ka hagdan).
Pindota ug buhii dayon ang LEARN button.

- Pindota ug buhian ang buton nga gusto nimong i-program kaduha (ikaduha nga pagpindot kinahanglan sulod sa 20 segundos sa unang pagpindot). Ang pula nga LED mokidlap intermittently samtang ang remote nagpadala sa preprogrammed code ngadto sa garahe door opener.
- Paghulat alang sa pagbukas sa pultahan sa garahe nga ibalhin ang pultahan. Mahimo kini nga hangtod sa 25 segundos.
Niini nga panahon, ang suga sa pagbukas sa pultahan sa garahe mahimong mokidlap.
Kung molihok ang opener sa pultahan sa garahe, sulod sa 3 segundos, pindota ug buhian ang bisan unsang buton sa hilit aron makumpirma ang code ug paggawas sa programming.

PAGSULAY ALANG SA KALAMPUSAN: Pindota ang hilit nga buton nga imong giprograma sa lakang 4. Ang pagbukas sa pultahan sa garahe mo-activate. Kung ang pultahan sa garahe dili ma-aktibo, balika ang mga lakang sa pagprograma.
Ang LED sa imong remote control mohunong sa pagkidlap kon ubos na ang baterya ug kinahanglang ilisan. Ilisan ang baterya og 3V CR2032 coin cell nga baterya lamang. Ilabay sa hustong paagi ang daan nga baterya.
Aron mapulihan ang baterya, sunda ang mga panudlo sama sa gipakita sa ubos.
- Sa luyo nga bahin sa hilit, gamit ang Phillips #1 screwdriver, tangtangon ang screw sa bihag hangtod nga kini libre nga magtuyok.
- Uban ang hilit nga butones sa kilid, ablihi ang hilit nga taas nga pabalay gikan sa ubos nga pabalay (kung ang pabalay dili magbulag, susiha nga ang bihag nga tornilyo libre nga nagtuyok).
 Uban sa usa ka cotton swab, iduso ang daan nga baterya gikan sa iyang kuptanan sa direksyon sa labing duol nga ngilit.
- Isulod ang puli nga baterya nga positibo nga bahin sa taas.

- I-align ang hilit nga ibabaw ug ubos nga housing aron magkadungan sila. Hupti ang bihag nga tornilyo hangtud nga ang ibabaw ug ubos nga balay dili na mabalhin (ayaw pag-ayo ang tornilyo aron dili mabuak ang plastik nga balay).

Ang LED sa imong remote control mohunong sa pagkidlap kon ubos na ang baterya ug kinahanglang ilisan.
Ilisan ang baterya og 3V CR2032 coin cell nga baterya lamang. Ilabay sa hustong paagi ang daan nga baterya.
Aron mapulihan ang baterya, sunda ang mga panudlo sama sa gipakita sa ubos.
- Uban sa hilit nga butones nga kilid sa ubos, ibulag ang ibabaw ug ubos nga mga housing sa remote pinaagi sa pagbutang og flat screwdriver blade ngadto sa gintang sa suok sa remote ug hinayhinay nga pagtuyok.
- Guntinga ang ibabaw nga pabalay gikan sa ubos nga pabalay.
 Pagsunod sa direksyon sa "TANGA" nga mga udyong nga giimprinta sa logic board, gamit ang cotton swab, iduso ang daan nga baterya gikan sa gikuptan niini.
- Pagsunod sa direksyon sa pana nga "INSERT" nga giimprinta sa logic board, isulod ang puli nga baterya nga positibo nga kilid sa taas.

- I-align ang hilit nga ibabaw ug ubos nga pabalay ug pindota aron sila mag-clip balik.

WARNING
- HAZARD SA INGESTION: Kini nga produkto adunay sulod nga butones nga cell o sensilyo nga baterya.
- PATAY o grabeng kadaot mahimong mahitabo kon makaon.
- Ang gitulon nga butones nga cell o sensilyo nga baterya mahimong hinungdan sa Internal Chemical Burns sulod sa 2 ka oras.
- PAGHATAG sa bag-o ug gigamit nga mga baterya OUT OF REACH sa mga BATA.
- Pangitaa dayon nga medikal nga atensyon kung ang usa ka baterya gisuspetsahan nga gilamoy o gisulod sa bisan unsang bahin sa lawas.
WARNING
- Kuhaa ug dayon i-recycle o ilabay ang gigamit nga mga baterya sumala sa lokal nga mga regulasyon ug ipahilayo sa mga bata. AYAW ilabay ang mga baterya sa basura sa panimalay o sunugon.
- Bisan ang gigamit nga mga baterya mahimong hinungdan sa grabe nga kadaot o kamatayon.
- Tawga ang lokal nga sentro sa pagkontrol sa hilo alang sa impormasyon sa pagtambal.
- Uri sa Baterya: CR2032
- Baterya Voltagug: 3v
- Ang dili ma-recharge nga mga baterya dili kinahanglan nga i-recharge.
- Ayaw pugsa ang pagdiskarga, pag-recharge, pagdisassemble, pagpainit sa ibabaw (gitakda nga temperatura sa pabrika) o pagsunog. Ang pagbuhat niini mahimong moresulta sa kadaot tungod sa pagpahungaw, pagtulo o pagbuto nga moresulta sa pagkasunog sa kemikal.
- Siguruha nga ang mga baterya na-install sa husto sumala sa polarity (+ ug -).
- Ayaw pagsagol sa daan ug bag-o nga mga baterya, lain-laing mga brand o matang sa mga baterya, sama sa alkaline, carbon-zinc, o rechargeable nga mga baterya.
- Kuhaa ug dayon i-recycle o ilabay ang mga baterya gikan sa mga kagamitan nga wala magamit sa taas nga panahon sumala sa lokal nga mga regulasyon.
- Kanunay nga hingpit nga luwasa ang kompartamento sa baterya. Kung ang kompartamento sa baterya dili sirado pag-ayo, hunong sa paggamit sa produkto, kuhaa ang mga baterya, ug ipahilayo kini sa mga bata.
Mga Kapuli nga Parte
| Deskripsyon | Numero sa Bahin |
| Visor Clip | 041-0494-000 |
Dugang nga mga Kapanguhaan
Usa ka Tuig nga Limitado nga Garantiya
Ang Chamberlain Group LLC ("Tigbaligya") naggarantiya sa unang konsumidor nga nakapalit niini nga produkto nga kini walay depekto sa mga materyales ug / o nagtrabaho nga barko sa tawo sulod sa 1 ka tuig gikan sa petsa sa pagpalit.
Alang sa dugang impormasyon, bisitaha www.myq.com/warranty
Kontaka Kami
Para sa dugang nga impormasyon o tabang, palihog bisitaha ang: suporta.chamberlaingroup.com
PAHIBALO: Kini nga aparato nagsunod sa bahin 15 sa mga lagda sa FCC ug mga RSS nga wala’y lisensya sa Innovation, Science ug Economic Development Canada. Ang operasyon gipailalom sa mosunod nga duha ka kondisyon:
- Kini nga aparato mahimong dili hinungdan sa makadaot nga interference, ug
- Kinahanglang dawaton niini nga device ang bisan unsang interference nga nadawat, lakip ang interference nga mahimong hinungdan sa dili gusto nga operasyon.
Ang bisan unsang mga pagbag-o o pagbag-o nga dili tin-aw nga gi-aprubahan sa partido nga responsable alang sa pagsunod mahimo nga magpawalay gahum sa tiggamit sa pagpaandar sa kagamitan.
©2025 Ang Chamberlain Group LLC
Ang myQ ug ang logo sa myQ kay mga marka sa pamatigayon, mga marka sa serbisyo, ug/o mga rehistradong marka sa pamatigayon sa The Chamberlain Group LLC. Ang tanan nga uban pang mga marka sa pamatigayon, mga marka sa serbisyo ug mga ngalan sa produkto nga gigamit dinhi mao ang kabtangan sa ilang tag-iya. Ang Chamberlain Group LLC. 300 Windsor Drive, Oak Brook, IL, 60523, Estados Unidos
Mga FAQ
- P: Giunsa nako pagkahibalo kung ang akong pagbukas sa pultahan sa garahe konektado sa myQ app?
A: Mahimo nimong i-scan ang QR code sa likod nga bahin sa imong remote ug sundon ang mga instruksyon sa myQ app aron masusi ang status sa koneksyon. - P: Unsa ang akong buhaton kung ang akong remote control button wala malampuson nga programa?
A: Siguruha nga imong gisunod sa husto ang mga lakang sa pagprograma ug nga wala’y mga pagpanghilabot sa panahon sa proseso. Sulayi ang pag-reprogramming pagkahuman sa pagsulbad sa bisan unsang mga isyu.
Mga Dokumento / Mga Kapanguhaan
 |
myQ L993M 2-Button Keychain ug 3-Button Remote Control [pdf] Manwal sa Instruksyon L993M, CH363, CH363C, Q363LA, L932M, CH382, CH382C, L993M 2-Button Keychain ug 3-Button Remote Control, L993M, 2-Button Keychain ug 3-Button Remote Control, Keychain ug 3-Button Remote Control, Remote Control ug 3-Button Remote Control |