Baigėsiview
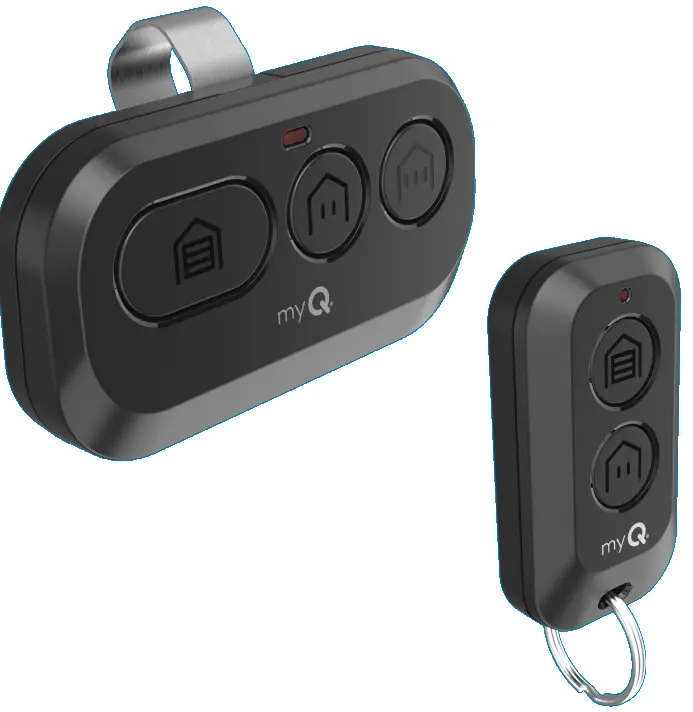
Your remote control is compatible with all Chamberlain®, LiftMaster®, and Craftsman® garage door openers manufactured after 1997 with the exception of Craftsman Series 100. Your remote control can be programmed to operate up to three (CH363 & CH363C) or two (CH382 & CH382C) compatible devices, such as garage door openers and gate operators. Each button on the remote control works independently of the other and must be programmed separately. The images throughout this manual are for reference only and your product may look different
ĮSPĖJIMAS
Kad išvengtumėte galimų SURMŲ SUŽALOJIMŲ arba MIRTIES dėl judančių vartų ar garažo durų:
- ALWAYS keep remote controls out of reach of children. NEVER permit children to operate, or play with the remote control transmitters.
- Aktyvinkite vartus arba duris TIK tada, kai jie aiškiai matomi, yra tinkamai sureguliuoti ir nėra kliūčių durims eiti.
- VISADA nepamirškite vartų ar garažo vartų, kol jie bus visiškai uždaryti. NIEKADA neleiskite niekam kirsti judančių vartų ar durų kelio.
ĮSPĖJIMAS: Šis gaminys gali paveikti jus su cheminėmis medžiagomis, įskaitant šviną, kurios Kalifornijos valstijoje, kaip žinoma, sukelia vėžį, apsigimimus ar kitą žalą reprodukcijai. Norėdami gauti daugiau informacijos, eikite į www.P65Warnings.ca.gov.
Program Your Remote to Your Wi-Fi Garage Door Opener Using the myQ App
HIGHLY RECOMMENDED: Connect your Wi-Fi Garage Door Opener to the myQ app and program your Remote to the Garage Door Opener to unlock exciting features such as remote naming, notifications and access history.
Connected to the mGarage Door Opener AlryQ Appeady
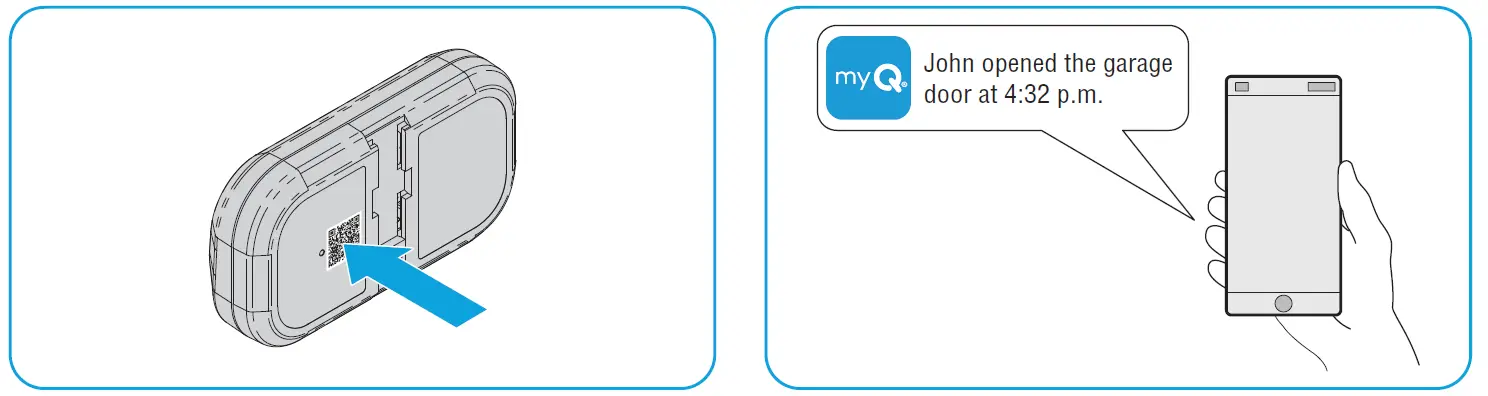
Scan the QR code on the reverse side of your remote and follow the programming instructions in the myQ app.

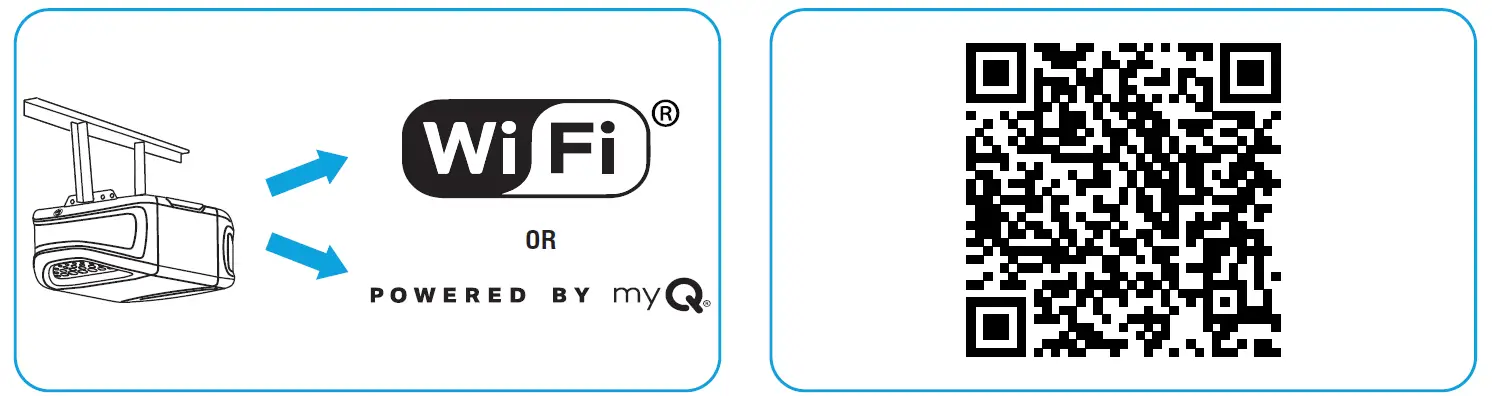
If Your Garage Door Opener is Not Connected to the myQ App
- Look for a “Wi-Fi®” or a “Powered by myQ” logo to determine if your garage door opener is myQ compatible.
- Scan the QR Code below to download the myQ app. Follow the instructions in the myQ app to connect your garage door opener.
 Once your garage door opener is connected, scan the QR code on the reverse side of your remote, and follow the programming instructions in the myQ app.
- Once your remote is programmed in the myQ app, you can name your remote, view access history, and receive notifications when your remote activates the garage door opener.
Prieš pradėdami
Be sure the garage door is clear of ALL obstructions. Make sure the garage door opener has a working light because it is a programming indicator.

REKOMENDACIJA: Prieš pradėdami perskaitykite visus programavimo veiksmus.
A metodas: Program to a Security+ 3.0 Protocol Garage oor Opener (White Learn Button) Using the Learn Button on Door Control Panel
REKOMENDACIJA: Have your door control panel product manual available, as models vary in how to set the garage door opener into programming mode.
Follow the instructions below for your door control panel model to set your garage door opener into programming mode. Follow the instructions below for your door control panel model to set your garage door opener into programming mode.

Per 30 sekundžių paspauskite ir palaikykite nuspaudę nuotolinio valdymo pulto mygtuką, kurį norite naudoti.
Release the button when the garage door opener lights flash and/or two clicks are heard.

TEST FOR SUCCESS: Press the remote button you programmed. The garage door opener will activate. If the garage door does not activate, repeat the programming steps.
B metodas: programavimas prie „Security+ 3.0“ protokolo garažo vartų atidarytuvo (baltas mokymosi mygtukas) naudojant atidarytuvo mokymosi mygtuką
- Locate the LEARN button on your garage door opener (a ladder may be required).
Press and immediately release the LEARN button.
- Per 30 sekundžių paspauskite ir palaikykite nuspaudę nuotolinio valdymo pulto mygtuką, kurį norite naudoti.
Release the button when the garage door opener lights flash and/or two clicks are heard.
TEST FOR SUCCESS: Press the remote button you programmed. The garage door opener will activate. If the garage door does not activate, repeat the programming steps.
C metodas: Program to All Compatible Garage Door Openers (White, Yellow, Purple, Red, & Orange Learn Buttons)
- Start with your garage door closed. Press and hold the two smaller buttons on the remote simultaneously until the red LED stays solid (typically 6 seconds), then release the buttons.

1 variantas: Follow the instructions below for your door control panel model to set your garage door opener into programming mode.
REKOMENDACIJA: Have your door control panel product manual available, as models vary in how to set the garage door opener into programming mode.
Durų valdymo skydelis
Pakelkite durų aktyvinimo skydelį. Du kartus paspauskite MOKYMOSI mygtuką (po antro paspaudimo durų valdymo skydelio šviesos diodas pakartotinai mirksės).

Durų valdymo mygtukas
Press and hold the light button, then press and release the door activation button. The button LED will begin to flash.

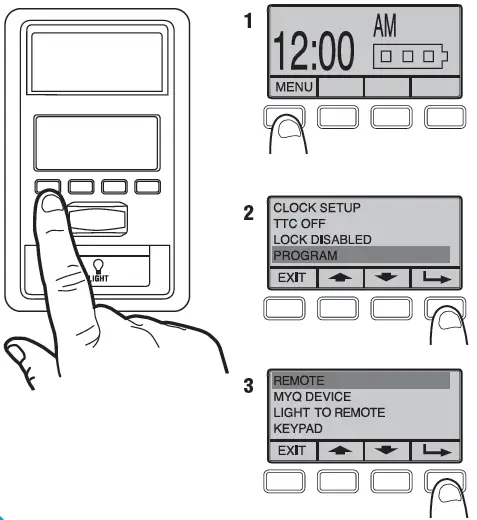
Išmaniųjų durų valdymo pultas
- Pasirinkite MENU.
- Scroll down and select PROGRAM.
- Scroll down and select REMOTE.
Do not follow on screen instructions.
MOVE DIRECTLY TO STEP 04.
2 variantas: Locate the LEARN button on your garage door opener (a ladder may be required).
Press and immediately release the LEARN button.

- Press and release the button that you would like to program twice (second press must be within 20 seconds of the first press). The red LED will flash intermittently as the remote sends the preprogrammed codes to the garage door opener.
- Wait for the garage door opener to move the door. This can take up to 25 seconds.
During this time, your garage door opener light might flash.
When the garage door opener moves, within 3 seconds, press and release any button on the remote to confirm the code and exit programming.

TEST FOR SUCCESS: Press the remote button you programmed in step 4. The garage door opener will activate. If the garage door does not activate, repeat the programming steps.
The LED on your remote control will stop flashing when the battery is low and needs to be replaced. Replace the battery with only 3V CR2032 coin cell battery. Dispose of the old battery properly.
Norėdami pakeisti bateriją, vadovaukitės toliau pateiktomis instrukcijomis.
- On the back side of the remote, using a Phillips #1 screwdriver, unscrew the captive screw until it rotates freely.
- With the remote button side up, pry open the remote top housing from the bottom housing (if the housing will not separate, check that the captive screw is rotating freely).
 With a cotton swab, push the old battery out of its holder in the direction of the nearest edge.
- Insert the replacement battery positive side up.

- Align the remote top and bottom housing so they clip together. Tighten the captive screw until the top and bottom housing no longer shift (do not overtighten the screw to avoid cracking the plastic housing).

The LED on your remote control will stop flashing when the battery is low and needs to be replaced.
Replace the battery with only 3V CR2032 coin cell battery. Dispose of the old battery properly.
Norėdami pakeisti bateriją, vadovaukitės toliau pateiktomis instrukcijomis.
- With the remote button side down, separate the top and bottom housings of the remote by placing a flat screwdriver blade into the gap in the corner of the remote and gently twisting.
- Pry the top housing from the bottom housing.
 Following the “REMOVE” arrows direction printed on the logic board, with a cotton swab, push the old battery out of its holder
- Following the “INSERT” arrow direction printed on the logic board, insert the replacement battery positive side up.

- Align the remote top and bottom housing and press so they clip back together.

ĮSPĖJIMAS
- PAVOJUS NURIJUS: Šiame gaminyje yra mygtuko elementas arba monetos baterija.
- Nurijus, gali įvykti mirtis arba sunkus sužalojimas.
- Prarijus mygtuko elementas arba monetos baterija gali sukelti vidinius cheminius nudegimus vos per 2 valandas.
- Naujas ir naudotas baterijas LAIKYKITE VAIKAMS NEPASIEKIAMOJE VIETOJE.
- Nedelsdami kreipkitės medicininės pagalbos, jei įtariate, kad baterija buvo praryta arba įdėta į bet kurią kūno dalį.
ĮSPĖJIMAS
- Išimkite ir nedelsdami perdirbkite arba išmeskite panaudotas baterijas pagal vietines taisykles ir laikykite vaikams nepasiekiamoje vietoje. NEGALIMA išmesti baterijų į buitines šiukšles arba sudeginti.
- Net panaudotos baterijos gali sunkiai sužaloti arba mirti.
- Norėdami gauti informacijos apie gydymą, skambinkite vietiniam apsinuodijimų kontrolės centrui.
- Baterijos tipas: CR2032
- Baterijos tūristage: 3 V.
- Neįkraunamos baterijos neturi būti įkraunamos.
- Negalima jėga iškrauti, įkrauti, ardyti, nekaitinti virš (gamintojo nurodytos temperatūros) ir nedeginti. Taip elgdamiesi galite susižaloti dėl ventiliacijos, nuotėkio arba sprogimo, dėl kurio galite nudeginti chemines medžiagas.
- Įsitikinkite, kad baterijos yra tinkamai įdėtos pagal poliškumą (+ ir -).
- Nemaišykite senų ir naujų baterijų, skirtingų gamintojų ar tipų baterijų, tokių kaip šarminės, anglies-cinko ar įkraunamos baterijos.
- Išimkite ir nedelsdami perdirbkite arba išmeskite baterijas iš ilgą laiką nenaudotos įrangos pagal vietines taisykles.
- Visada visiškai pritvirtinkite akumuliatoriaus skyrių. Jei akumuliatoriaus skyrius neužsidaro patikimai, nustokite naudoti gaminį, išimkite baterijas ir laikykite jas vaikams nepasiekiamoje vietoje.
Atsarginės dalys
| Aprašymas | Dalies numeris |
| Skydelis | 041-0494-000 |
Papildomi ištekliai
Vienerių metų ribota garantija
The Chamberlain Group LLC (“Seller”) warrants to the first consumer purchaser of this product that it is free from defect in materials and/or works man ship for a period of 1 year from the date of purchase.
Norėdami gauti daugiau informacijos, apsilankykite www.myq.com/warranty
Susisiekite su mumis
Norėdami gauti papildomos informacijos ar pagalbos, apsilankykite: support.chamberlaingroup.com
PASTABA: Šis įrenginys atitinka FCC taisyklių 15 dalį ir Kanados inovacijų, mokslo ir ekonominės plėtros RSS, kuriems netaikoma licencija. Eksploatacijai taikomos dvi sąlygos:
- Šis prietaisas negali sukelti žalingų trukdžių ir
- Šis įrenginys turi priimti bet kokius gaunamus trikdžius, įskaitant trikdžius, kurie gali sukelti nepageidaujamą veikimą.
Bet kokie pakeitimai ar modifikacijos, kurių aiškiai nepatvirtino už atitiktį atsakinga šalis, gali panaikinti vartotojo teisę naudoti įrangą.
©2025 The Chamberlain Group LLC
myQ and the myQ logo are trademarks, service marks, and/or registered trademarks of The Chamberlain Group LLC. All other trademarks, service marks and product names used herein are the property of their respective owners. The Chamberlain Group LLC. 300 Windsor Drive, Oak Brook, IL, 60523, United States
DUK
- Q: How do I know if my garage door opener is connected to the myQ app?
A: You can scan the QR code on the reverse side of your remote and follow the instructions in the myQ app to check the connection status. - Q: What should I do if my remote control button does not program successfully?
A: Ensure that you are following the programming steps correctly and that there are no interferences during the process. Try reprogramming after troubleshooting any issues.
Dokumentai / Ištekliai
 |
myQ L993M 2-Button Keychain and 3-Button Remote Control [pdfNaudojimo instrukcija L993M, CH363, CH363C, Q363LA, L932M, CH382, CH382C, L993M 2-Button Keychain and 3-Button Remote Control, L993M, 2-Button Keychain and 3-Button Remote Control, Keychain and 3-Button Remote Control, Button Remote Control, Remote Control |