Overview
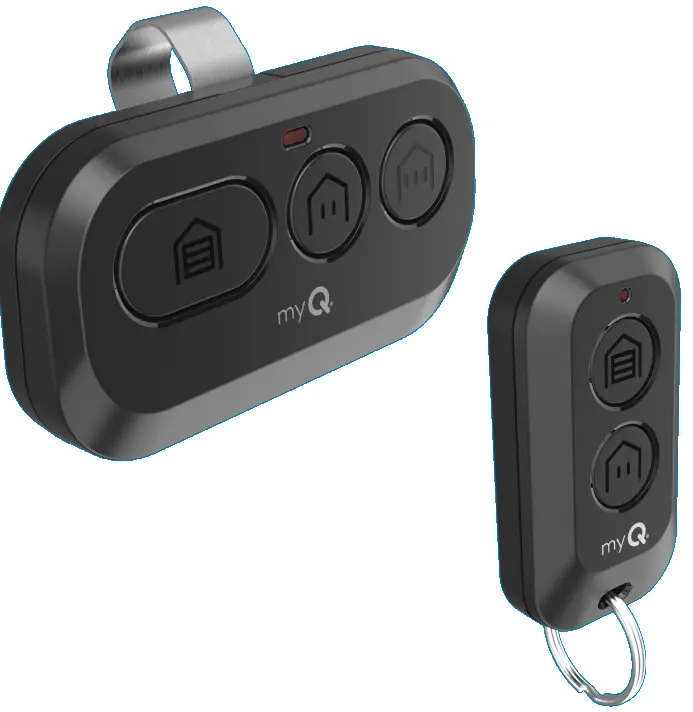
Your remote control is compatible with all Chamberlain®, LiftMaster®, and Craftsman® garage door openers manufactured after 1997 with the exception of Craftsman Series 100. Your remote control can be programmed to operate up to three (CH363 & CH363C) or two (CH382 & CH382C) compatible devices, such as garage door openers and gate operators. Each button on the remote control works independently of the other and must be programmed separately. The images throughout this manual are for reference only and your product may look different
ATTENZIONE
Per prevene pussibuli FERITI GRAVI o MORTE da un cancellu in muvimentu o una porta di garage:
- Tenite SEMPRE i telecomandi fora di a portata di i zitelli. ÙN permette MAI à i zitelli di fà funziunà o di ghjucà cù i trasmettitori di u telecomandu.
- Attivate a porta o a porta SOLAMENTE quandu si pò vede chjaramente, hè adattatu bè è ùn ci sò micca ostaculi à u viaghju di a porta.
- SEMPRE tene a porta di u portone o di u garage in vista finu à chjude cumpletamente. MAI permettenu à nimu di attraversà a strada di a porta o di a porta in muvimentu.
ATTENZIONE: Stu pruduttu pò espose à i sustanzi chimichi cumpresi u piombo, chì sò cunnisciuti da u Statu di California per causà cancer, difetti di nascita o altre dannu riproduttivu. Per più infurmazione vai à www.P65Warnings.ca.gov.
Program Your Remote to Your Wi-Fi Garage Door Opener Using the myQ App
HIGHLY RECOMMENDED: Connect your Wi-Fi Garage Door Opener to the myQ app and program your Remote to the Garage Door Opener to unlock exciting features such as remote naming, notifications and access history.
Connected to the mGarage Door Opener AlryQ Appeady
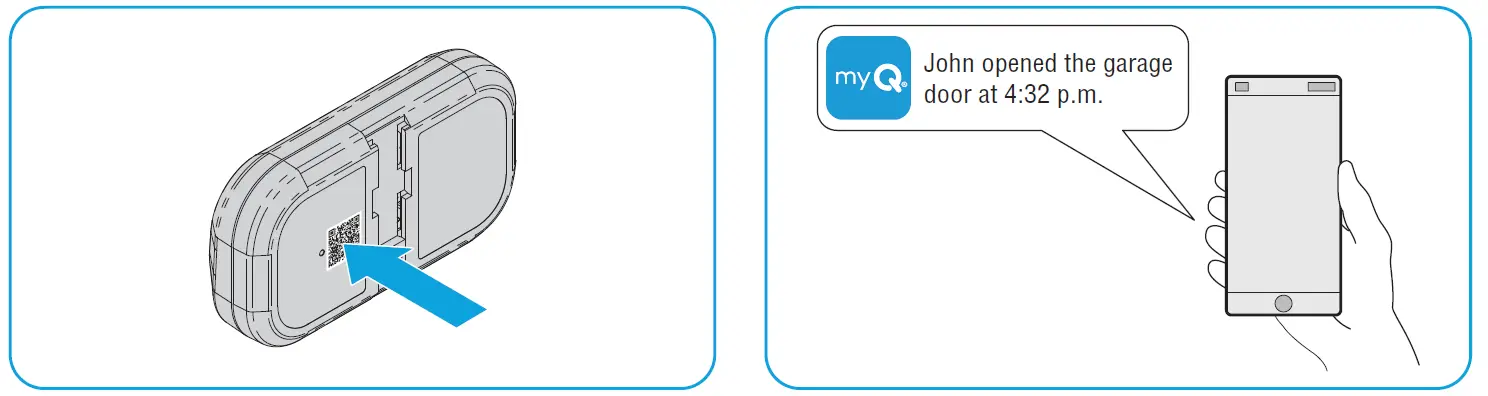
Scan the QR code on the reverse side of your remote and follow the programming instructions in the myQ app.

If Your Garage Door Opener is Not Connected to the myQ App
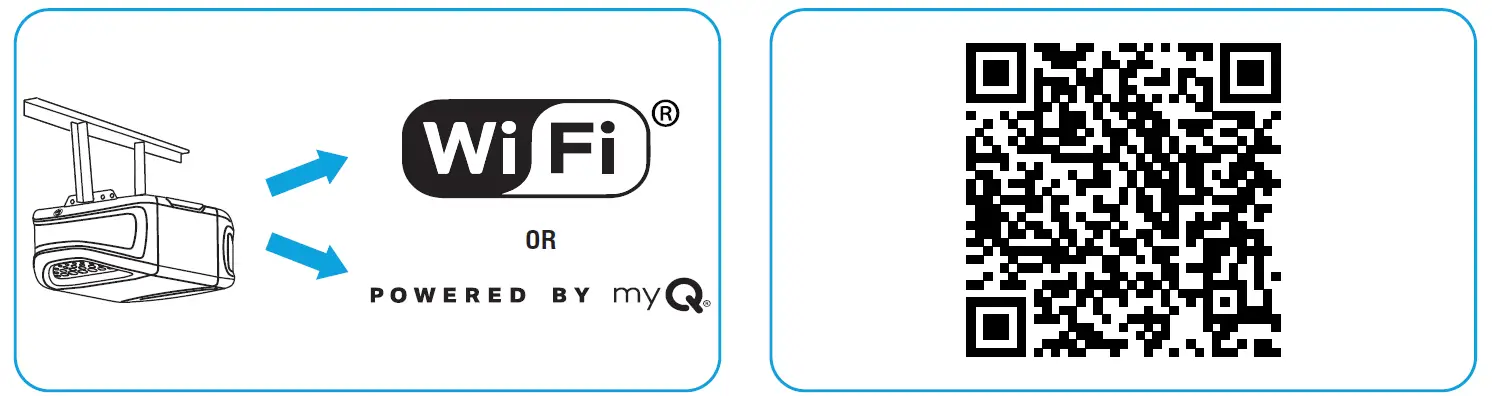
- Look for a “Wi-Fi®” or a “Powered by myQ” logo to determine if your garage door opener is myQ compatible.
- Scan the QR Code below to download the myQ app. Follow the instructions in the myQ app to connect your garage door opener.
 Once your garage door opener is connected, scan the QR code on the reverse side of your remote, and follow the programming instructions in the myQ app.
- Una volta chì u vostru telecomandu hè prugrammatu in l'app myQ, pudete dà un nome à u vostru telecomandu, view accede à a storia è riceve notifiche quandu u vostru telecomando attiva l'apriporta di u garage.
Prima di principià
Be sure the garage door is clear of ALL obstructions. Make sure the garage door opener has a working light because it is a programming indicator.

RACCOMANDAZIONE: Leghjite tutti i passi di prugrammazione prima di cumincià.
Mètudu A: Program to a Security+ 3.0 Protocol Garage oor Opener (White Learn Button) Using the Learn Button on Door Control Panel
RECOMMANDAZIONI: Have your door control panel product manual available, as models vary in how to set the garage door opener into programming mode.
Follow the instructions below for your door control panel model to set your garage door opener into programming mode. Follow the instructions below for your door control panel model to set your garage door opener into programming mode.

In 30 secondi, appughjà è tene premutu u buttone di u telecomandu chì vulete aduprà.
Release the button when the garage door opener lights flash and/or two clicks are heard.

TEST DI SUCCESSU: Appughjà u buttone di u telecomandu chì avete prugrammatu. L'apriporta di u garage s'attiverà. Sè a porta di u garage ùn s'attiva micca, ripetite i passi di prugrammazione.
Metudu B: Prugrammazione à un apriporta di garage Security+ 3.0 Protocol (buttone biancu d'apprendimentu) Utilizendu u buttone d'apprendimentu di l'apriporta
- Locate the LEARN button on your garage door opener (a ladder may be required).
Press and immediately release the LEARN button.
- In 30 secondi, appughjà è tene premutu u buttone di u telecomandu chì vulete aduprà.
Release the button when the garage door opener lights flash and/or two clicks are heard.
TEST DI SUCCESSU: Press the remote button you programmed. The garage door opener will activate. If the garage door does not activate, repeat the programming steps.
Metudu C: Program to All Compatible Garage Door Openers (White, Yellow, Purple, Red, & Orange Learn Buttons)
- Start with your garage door closed. Press and hold the two smaller buttons on the remote simultaneously until the red LED stays solid (typically 6 seconds), then release the buttons.

Opzione 1: Follow the instructions below for your door control panel model to set your garage door opener into programming mode.
RECOMMANDAZIONI: Have your door control panel product manual available, as models vary in how to set the garage door opener into programming mode.
Panel di cuntrollu di a porta
Alzate u pannellu d'attivazione di a porta. Appughjate duie volte u buttone LEARN (dopu à a seconda pressione, u LED nantu à u pannellu di cuntrollu di a porta pulserà ripetutamente).

Pulsante di cuntrollu di a porta
Press and hold the light button, then press and release the door activation button. The button LED will begin to flash.

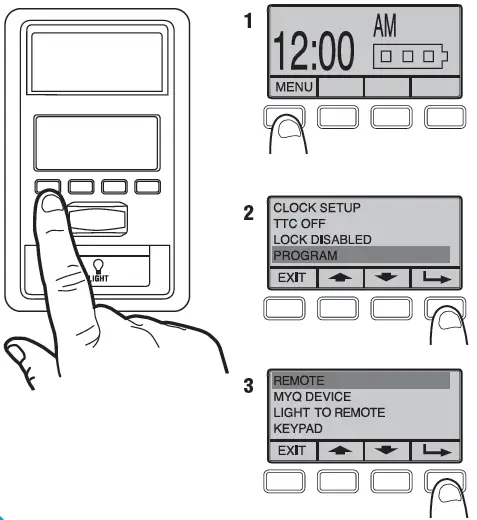
Pannellu di cuntrollu di porta intelligente
- Selezziunate MENU.
- Scorri in giù è selezziunate PROGRAMMA.
- Scorri in giù è selezziunate REMOTE.
Ùn seguitate micca l'istruzzioni nantu à u screnu.
PASSATE DIRETTAMENTE À U PASSU 04.
Opzione 2: Locate the LEARN button on your garage door opener (a ladder may be required).
Press and immediately release the LEARN button.

- Press and release the button that you would like to program twice (second press must be within 20 seconds of the first press). The red LED will flash intermittently as the remote sends the preprogrammed codes to the garage door opener.
- Wait for the garage door opener to move the door. This can take up to 25 seconds.
During this time, your garage door opener light might flash.
When the garage door opener moves, within 3 seconds, press and release any button on the remote to confirm the code and exit programming.

TEST DI SUCCESSU: Press the remote button you programmed in step 4. The garage door opener will activate. If the garage door does not activate, repeat the programming steps.
The LED on your remote control will stop flashing when the battery is low and needs to be replaced. Replace the battery with only 3V CR2032 coin cell battery. Dispose of the old battery properly.
Per rimpiazzà a batteria, seguitate l'istruzzioni cum'è mostratu quì sottu.
- On the back side of the remote, using a Phillips #1 screwdriver, unscrew the captive screw until it rotates freely.
- Cù u buttone di u telecomandu in sù, fate leva per apre l'alloghju superiore di u telecomandu da l'alloghju inferiore (se l'alloghju ùn si separa micca, verificate chì a vite imperdibile gira liberamente).
 With a cotton swab, push the old battery out of its holder in the direction of the nearest edge.
- Insert the replacement battery positive side up.

- Align the remote top and bottom housing so they clip together. Tighten the captive screw until the top and bottom housing no longer shift (do not overtighten the screw to avoid cracking the plastic housing).

The LED on your remote control will stop flashing when the battery is low and needs to be replaced.
Rimpiazzate a batteria solu cù una batteria à bottone CR2032 di 3V. Smaltite a vechja batteria currettamente.
Per rimpiazzà a batteria, seguitate l'istruzzioni cum'è mostratu quì sottu.
- With the remote button side down, separate the top and bottom housings of the remote by placing a flat screwdriver blade into the gap in the corner of the remote and gently twisting.
- Pry the top housing from the bottom housing.
 Following the “REMOVE” arrows direction printed on the logic board, with a cotton swab, push the old battery out of its holder
- Following the “INSERT” arrow direction printed on the logic board, insert the replacement battery positive side up.

- Align the remote top and bottom housing and press so they clip back together.

ATTENZIONE
- RISCHI DI INGESTIONE: Stu pruduttu cuntene una pila di buttone o una pila di munita.
- A MORTE o ferite gravi pò accade se ingeritu.
- Una pila di bottone o una batteria di munita inghiottita pò causà bruciature chimiche interne in appena 2 ore.
- TENERE batterie novi è usate fora di a portata di i zitelli.
- Circate l'assistenza medica immediata se una batteria hè suspettata d'esse inghjulata o inserita in ogni parte di u corpu.
ATTENZIONE
- Eliminate è riciclate immediatamente o sguassate e batterie usate in cunfurmità cù i regulamenti lucali è tene fora di i zitelli. Ùn sguassate micca e batterie in i rifiuti domestici o incinerate.
- Ancu e batterie usate ponu causà ferite gravi o morte.
- Chjamate un centru di cuntrollu di velenu lucale per infurmazione di trattamentu.
- Tipu di batteria: CR2032
- Batteria Voltage: 3 V
- Batterie non-rechargeable ùn sò micca esse ricaricate.
- Ùn forzà micca a scaricamentu, ricaricà, disassemble, riscalda sopra (a temperatura specificata da u fabricatore) o incinerate. Fendu cusì pò esse ferite per via di ventilazione, perdite o splusioni chì risultanu in ustioni chimichi.
- Assicuratevi chì e pile sò stallate currettamente secondu a polarità (+ è -).
- Ùn mischjà pile vechji è novi, diverse marche o tippi di batterie, cum'è alkaline, carbon-zinc, o batterie rechargeable.
- Eliminate è riciclà immediatamente o sguassate e batterie da l'equipaggiu chì ùn hè micca utilizatu per un periudu di tempu prolongatu secondu e regulazioni lucali.
- Assicuratevi sempre cumplettamente u compartmentu di a batteria. Se u compartmentu di a batteria ùn si chjude micca in modu sicuru, cessate di utilizà u pruduttu, sguassate e batterie è tenete fora di i zitelli.
Pezzi di sustituzione
| Descrizzione | Part Number |
| Clip di visiera | 041-0494-000 |
Risorse supplementari
Un annu di garanzia limitata
The Chamberlain Group LLC (“Seller”) warrants to the first consumer purchaser of this product that it is free from defect in materials and/or works man ship for a period of 1 year from the date of purchase.
Per più infurmazione, visitate www.myq.com/garanzia
Cuntatta ci
Per più infurmazione o assistenza, visitate: support.chamberlaingroup.com
AVVISU: Stu dispusitivu hè in cunfurmità cù a parte 15 di e regule FCC è l'Innuvazione, a Scienza è u Sviluppu Ecunomicu di u Canada RSS esenti da licenza. U funziunamentu hè sottumessu à i seguenti dui cundizioni:
- Stu dispusitivu ùn pò causari interferenza dannusu, è
- Stu dispusitivu deve accettà ogni interferenza ricevuta, cumpresi l'interferenza chì pò causà operazione indesiderata.
Ogni cambiamentu o mudificazione micca espressamente appruvata da u partitu rispunsevule di a conformità puderia annullà l'autorità di l'utilizatore per operà l'equipaggiamentu.
© 2025 The Chamberlain Group LLC
myQ and the myQ logo are trademarks, service marks, and/or registered trademarks of The Chamberlain Group LLC. All other trademarks, service marks and product names used herein are the property of their respective owners. The Chamberlain Group LLC. 300 Windsor Drive, Oak Brook, IL, 60523, United States
FAQs
- Q: How do I know if my garage door opener is connected to the myQ app?
A: You can scan the QR code on the reverse side of your remote and follow the instructions in the myQ app to check the connection status. - Q: What should I do if my remote control button does not program successfully?
A: Ensure that you are following the programming steps correctly and that there are no interferences during the process. Try reprogramming after troubleshooting any issues.
Documenti / Risorse
 |
myQ L993M 2-Button Keychain and 3-Button Remote Control [pdfManuale d'istruzzioni L993M, CH363, CH363C, Q363LA, L932M, CH382, CH382C, L993M 2-Button Keychain and 3-Button Remote Control, L993M, 2-Button Keychain and 3-Button Remote Control, Keychain and 3-Button Remote Control, Button Remote Control, Remote Control |