Finiteview
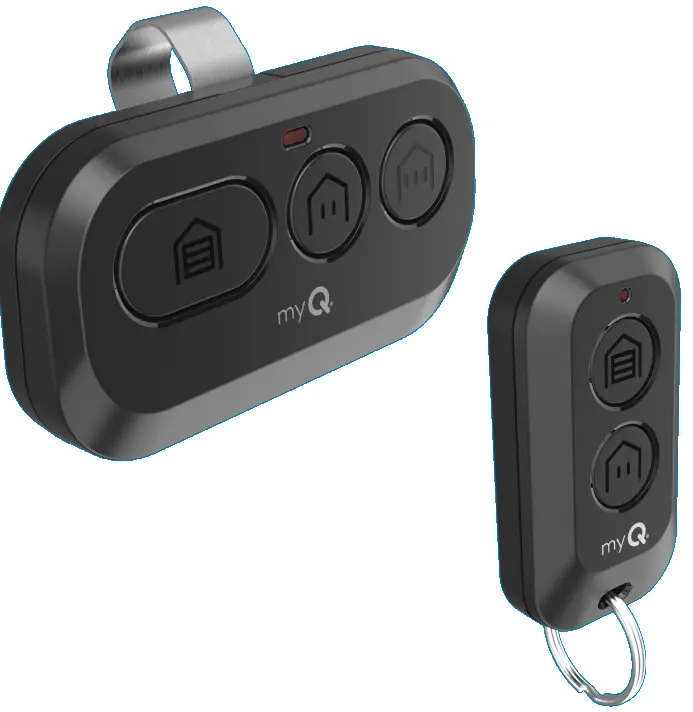
Your remote control is compatible with all Chamberlain®, LiftMaster®, and Craftsman® garage door openers manufactured after 1997 with the exception of Craftsman Series 100. Your remote control can be programmed to operate up to three (CH363 & CH363C) or two (CH382 & CH382C) compatible devices, such as garage door openers and gate operators. Each button on the remote control works independently of the other and must be programmed separately. The images throughout this manual are for reference only and your product may look different
AVERTO
Por malhelpi ebla GRAVA VUNZO aŭ MORTO de moviĝanta pordo aŭ garaĝa pordo:
- ALWAYS keep remote controls out of reach of children. NEVER permit children to operate, or play with the remote control transmitters.
- Aktivigu pordon aŭ pordon NUR kiam ĝi videblas klare, estas taŭge ĝustigita kaj ne estas obstrukcoj al pordovojaĝado.
- ĈIAM tenu pordegon aŭ garaĝan pordon videbla ĝis tute fermita. NENIAM permesu al iu ajn transiri vojon de moviĝanta pordego aŭ pordo.
AVERTO: Ĉi tiu produkto povas elmontri vin al kemiaĵoj inkluzive de plumbo, kiuj estas konataj al la Ŝtato de Kalifornio kaŭzi kanceron aŭ denaskajn difektojn aŭ aliajn reproduktajn damaĝojn. Por pliaj informoj iru al www.P65Warnings.ca.gov.
Program Your Remote to Your Wi-Fi Garage Door Opener Using the myQ App
HIGHLY RECOMMENDED: Connect your Wi-Fi Garage Door Opener to the myQ app and program your Remote to the Garage Door Opener to unlock exciting features such as remote naming, notifications and access history.
Connected to the mGarage Door Opener AlryQ Appeady
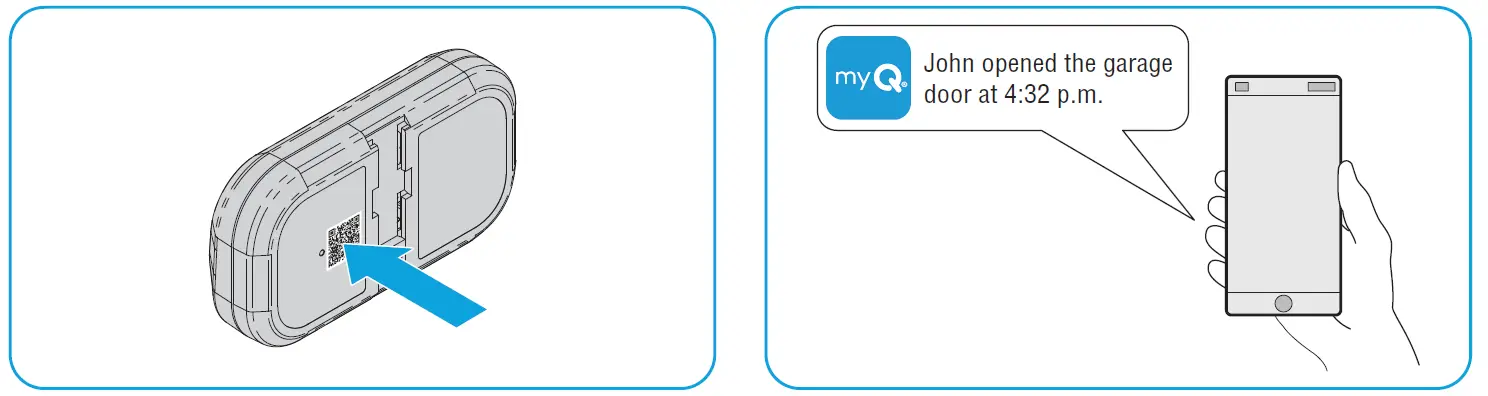
Scan the QR code on the reverse side of your remote and follow the programming instructions in the myQ app.

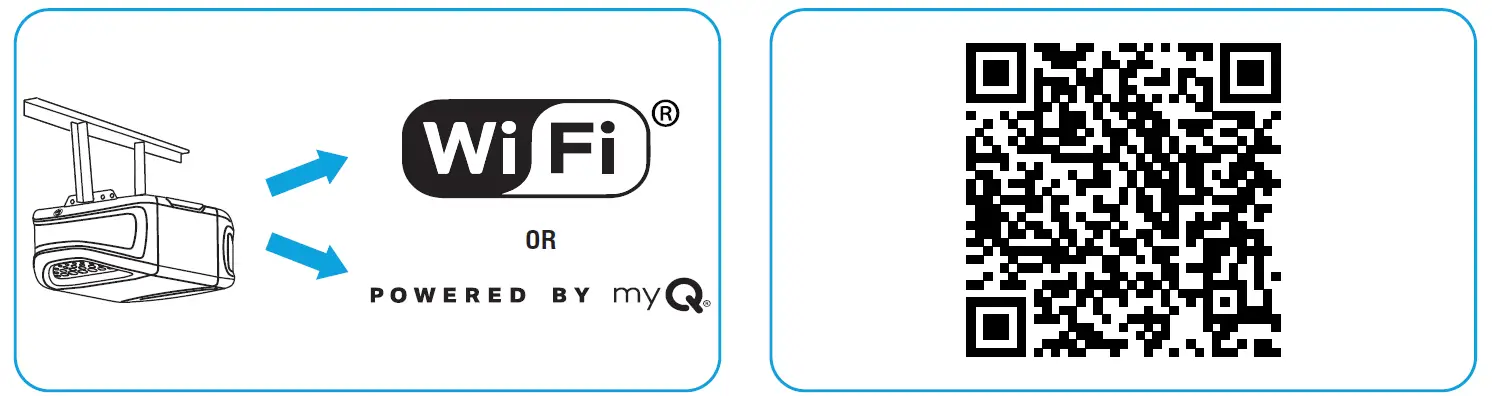
If Your Garage Door Opener is Not Connected to the myQ App
- Look for a “Wi-Fi®” or a “Powered by myQ” logo to determine if your garage door opener is myQ compatible.
- Scan the QR Code below to download the myQ app. Follow the instructions in the myQ app to connect your garage door opener.
 Once your garage door opener is connected, scan the QR code on the reverse side of your remote, and follow the programming instructions in the myQ app.
- Once your remote is programmed in the myQ app, you can name your remote, view aliri la historion kaj ricevi sciigojn kiam via teleregilo aktivigas la garaĝpordegan malfermilon.
Antaŭ ol Vi Komencu
Be sure the garage door is clear of ALL obstructions. Make sure the garage door opener has a working light because it is a programming indicator.

RECOMMENDATION: Read through all programming steps before you start.
Metodo A: Program to a Security+ 3.0 Protocol Garage oor Opener (White Learn Button) Using the Learn Button on Door Control Panel
RECOMENDO: Have your door control panel product manual available, as models vary in how to set the garage door opener into programming mode.
Follow the instructions below for your door control panel model to set your garage door opener into programming mode. Follow the instructions below for your door control panel model to set your garage door opener into programming mode.

Ene de 30 sekundoj, premu kaj tenu la butonon de la teleregilo, kiun vi volas uzi.
Release the button when the garage door opener lights flash and/or two clicks are heard.

TEST FOR SUCCESS: Press the remote button you programmed. The garage door opener will activate. If the garage door does not activate, repeat the programming steps.
Method B: Program to a Security+ 3.0 Protocol Garage Door Opener (White Learn Button) Using the Opener’s Learn Button
- Locate the LEARN button on your garage door opener (a ladder may be required).
Press and immediately release the LEARN button.
- Ene de 30 sekundoj, premu kaj tenu la butonon de la teleregilo, kiun vi volas uzi.
Release the button when the garage door opener lights flash and/or two clicks are heard.
TEST FOR SUCCESS: Press the remote button you programmed. The garage door opener will activate. If the garage door does not activate, repeat the programming steps.
Metodo C: Program to All Compatible Garage Door Openers (White, Yellow, Purple, Red, & Orange Learn Buttons)
- Start with your garage door closed. Press and hold the two smaller buttons on the remote simultaneously until the red LED stays solid (typically 6 seconds), then release the buttons.

Opcio 1: Follow the instructions below for your door control panel model to set your garage door opener into programming mode.
RECOMENDO: Have your door control panel product manual available, as models vary in how to set the garage door opener into programming mode.
Pordo Kontrolo Panelo
Lift the door activation panel. Press the LEARN button twice (after the second press, the LED on the door control panel will pulse repeatedly).

Door Control Push Button
Press and hold the light button, then press and release the door activation button. The button LED will begin to flash.

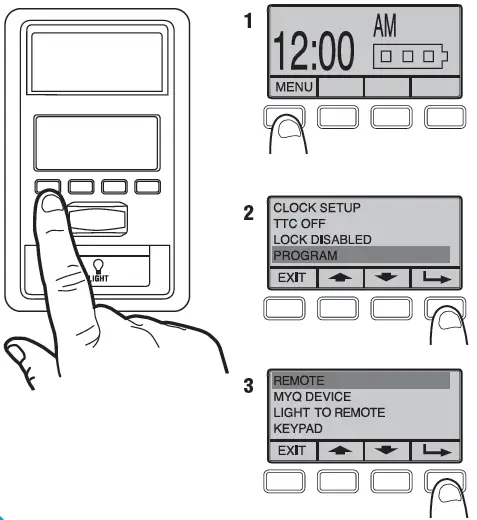
Smart Door Control Panel
- Elektu MENU.
- Scroll down and select PROGRAM.
- Scroll down and select REMOTE.
Ne sekvu la instrukciojn sur la ekrano.
MOVE DIRECTLY TO STEP 04.
Opcio 2: Locate the LEARN button on your garage door opener (a ladder may be required).
Press and immediately release the LEARN button.

- Press and release the button that you would like to program twice (second press must be within 20 seconds of the first press). The red LED will flash intermittently as the remote sends the preprogrammed codes to the garage door opener.
- Wait for the garage door opener to move the door. This can take up to 25 seconds.
During this time, your garage door opener light might flash.
When the garage door opener moves, within 3 seconds, press and release any button on the remote to confirm the code and exit programming.

TEST FOR SUCCESS: Press the remote button you programmed in step 4. The garage door opener will activate. If the garage door does not activate, repeat the programming steps.
The LED on your remote control will stop flashing when the battery is low and needs to be replaced. Replace the battery with only 3V CR2032 coin cell battery. Dispose of the old battery properly.
To replace battery, follow the instructions as shown below.
- On the back side of the remote, using a Phillips #1 screwdriver, unscrew the captive screw until it rotates freely.
- With the remote button side up, pry open the remote top housing from the bottom housing (if the housing will not separate, check that the captive screw is rotating freely).
 With a cotton swab, push the old battery out of its holder in the direction of the nearest edge.
- Insert the replacement battery positive side up.

- Align the remote top and bottom housing so they clip together. Tighten the captive screw until the top and bottom housing no longer shift (do not overtighten the screw to avoid cracking the plastic housing).

The LED on your remote control will stop flashing when the battery is low and needs to be replaced.
Replace the battery with only 3V CR2032 coin cell battery. Dispose of the old battery properly.
To replace battery, follow the instructions as shown below.
- With the remote button side down, separate the top and bottom housings of the remote by placing a flat screwdriver blade into the gap in the corner of the remote and gently twisting.
- Pry the top housing from the bottom housing.
 Following the “REMOVE” arrows direction printed on the logic board, with a cotton swab, push the old battery out of its holder
- Following the “INSERT” arrow direction printed on the logic board, insert the replacement battery positive side up.

- Align the remote top and bottom housing and press so they clip back together.

AVERTO
- INGESTA DANGERO: Ĉi tiu produkto enhavas butonĉelon aŭ monerpilon.
- MORTO aŭ grava vundo povas okazi se ingestitaj.
- Englutita butonĉelo aŭ monerbaterio povas kaŭzi Internajn Kemiajn Brulvundojn en eĉ nur 2 horoj.
- KONTENU novajn kaj uzitajn bateriojn EKSTERE DE ATINGO de INFANOJ.
- Serĉu tujan medicinan atenton se oni suspektas ke kuirilaro estas glutita aŭ enmetita en iun parton de la korpo.
AVERTO
- Forigu kaj tuj recikli aŭ forigu uzitajn bateriojn laŭ lokaj regularoj kaj tenu for de infanoj. NE forĵetu bateriojn en hejma rubo aŭ forbrulu.
- Eĉ uzitaj kuirilaroj povas kaŭzi severan vundon aŭ morton.
- Voku lokan venenan kontrolon por informoj pri kuracado.
- Baterio Tipo: CR2032
- Baterio Voltage: 3 V
- Neŝargeblaj kuirilaroj ne estas reŝargeblaj.
- Ne trudu malŝarĝon, reŝargi, malmunti, varmigi supre (specifita temperaturo de la fabrikanto) aŭ forbruligi. Fari tion povas rezultigi vundon pro elfluado, elfluado aŭ eksplodo rezultiganta kemiajn brulvundojn.
- Certigu, ke la kuirilaroj estas instalitaj ĝuste laŭ poluseco (+ kaj -).
- Ne miksu malnovajn kaj novajn kuirilarojn, malsamajn markojn aŭ specojn de baterioj, kiel alkalaj, karbon-zinkaj aŭ reŝargeblaj baterioj.
- Forigu kaj tuj recikli aŭ forigu bateriojn de ekipaĵo ne uzata dum longa tempo laŭ lokaj regularoj.
- Ĉiam tute sekurigu la kuirilaron. Se la kuirilaro ne sekure fermiĝas, ĉesu uzi la produkton, forigu la bateriojn kaj tenu ilin for de infanoj.
Anstataŭaj Partoj
| Priskribo | Parta Nombro |
| Vizera Klipo | 041-0494-000 |
Pliaj Rimedoj
Unu Jara Limigita Garantio
The Chamberlain Group LLC (“Seller”) warrants to the first consumer purchaser of this product that it is free from defect in materials and/or works man ship for a period of 1 year from the date of purchase.
Por pliaj informoj, vizitu www.myq.com/warranty
Kontaktu Nin
Por pliaj informoj aŭ helpo, bonvolu viziti: support.chamberlaingroup.com
AVISO: Ĉi tiu aparato konformas al parto 15 de la FCC-reguloj kaj licencaj RSS-oj pri Innovation, Science and Economic Development Canada. Funkciado estas kondiĉigita de la sekvaj du kondiĉoj:
- Ĉi tiu aparato eble ne kaŭzas malutilan interferon, kaj
- Ĉi tiu aparato devas akcepti ajnan interferon ricevitan, inkluzive de interfero kiu povas kaŭzi nedeziratan operacion.
Ĉiuj ŝanĝoj aŭ modifoj ne eksplicite aprobitaj de la respondeca partio pri plenumo povus nuligi la aŭtoritaton de la uzanto funkciigi la ekipaĵon.
©2025 The Chamberlain Group LLC
myQ and the myQ logo are trademarks, service marks, and/or registered trademarks of The Chamberlain Group LLC. All other trademarks, service marks and product names used herein are the property of their respective owners. The Chamberlain Group LLC. 300 Windsor Drive, Oak Brook, IL, 60523, United States
Oftaj Demandoj
- Q: How do I know if my garage door opener is connected to the myQ app?
A: You can scan the QR code on the reverse side of your remote and follow the instructions in the myQ app to check the connection status. - Q: What should I do if my remote control button does not program successfully?
A: Ensure that you are following the programming steps correctly and that there are no interferences during the process. Try reprogramming after troubleshooting any issues.
Dokumentoj/Rimedoj
 |
myQ L993M 2-Button Keychain and 3-Button Remote Control [pdf] Instrukcia Manlibro L993M, CH363, CH363C, Q363LA, L932M, CH382, CH382C, L993M 2-Button Keychain and 3-Button Remote Control, L993M, 2-Button Keychain and 3-Button Remote Control, Keychain and 3-Button Remote Control, Button Remote Control, Remote Control |