Beigāsview
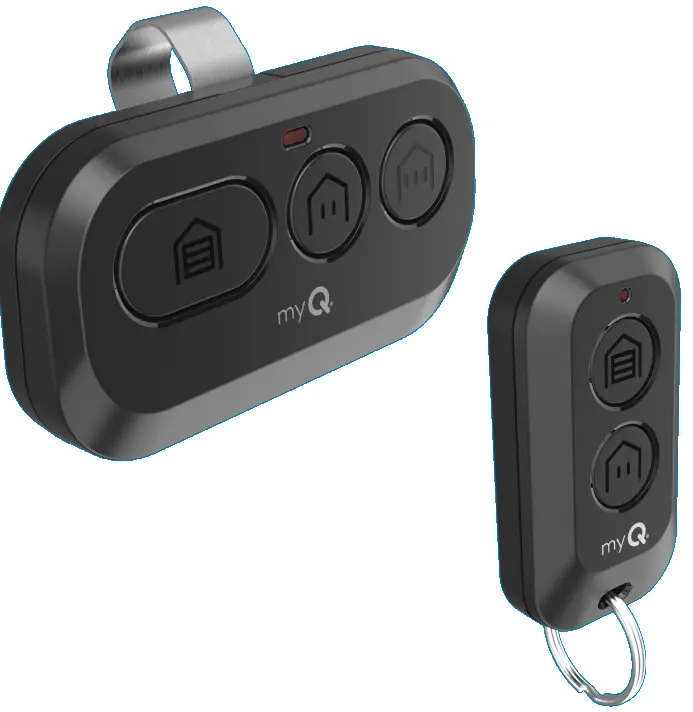
Your remote control is compatible with all Chamberlain®, LiftMaster®, and Craftsman® garage door openers manufactured after 1997 with the exception of Craftsman Series 100. Your remote control can be programmed to operate up to three (CH363 & CH363C) or two (CH382 & CH382C) compatible devices, such as garage door openers and gate operators. Each button on the remote control works independently of the other and must be programmed separately. The images throughout this manual are for reference only and your product may look different
BRĪDINĀJUMS
Lai novērstu iespējamus Nopietnus savainojumus vai NĀVĒJU no kustīgiem vārtiem vai garāžas durvīm:
- ALWAYS keep remote controls out of reach of children. NEVER permit children to operate, or play with the remote control transmitters.
- Aktivizējiet vārtus vai durvis TIKAI tad, ja tās ir skaidri redzamas, ir pareizi noregulētas un nav šķēršļu durvju kustībai.
- VIENMĒR turiet vārtus vai garāžas durvis redzamā vietā, līdz tās ir pilnībā aizvērtas. NEKAD neļaujiet nevienam šķērsot kustīgo vārtu vai durvju ceļu.
BRĪDINĀJUMS: Šis produkts var jūs pakļaut ķīmiskām vielām, tostarp svinam, kas Kalifornijas štatā ir zināms, ka tās izraisa vēzi vai iedzimtus defektus vai citus reproduktīvos traucējumus. Lai iegūtu vairāk informācijas, dodieties uz www.P65Warnings.ca.gov.
Program Your Remote to Your Wi-Fi Garage Door Opener Using the myQ App
HIGHLY RECOMMENDED: Connect your Wi-Fi Garage Door Opener to the myQ app and program your Remote to the Garage Door Opener to unlock exciting features such as remote naming, notifications and access history.
Connected to the mGarage Door Opener AlryQ Appeady
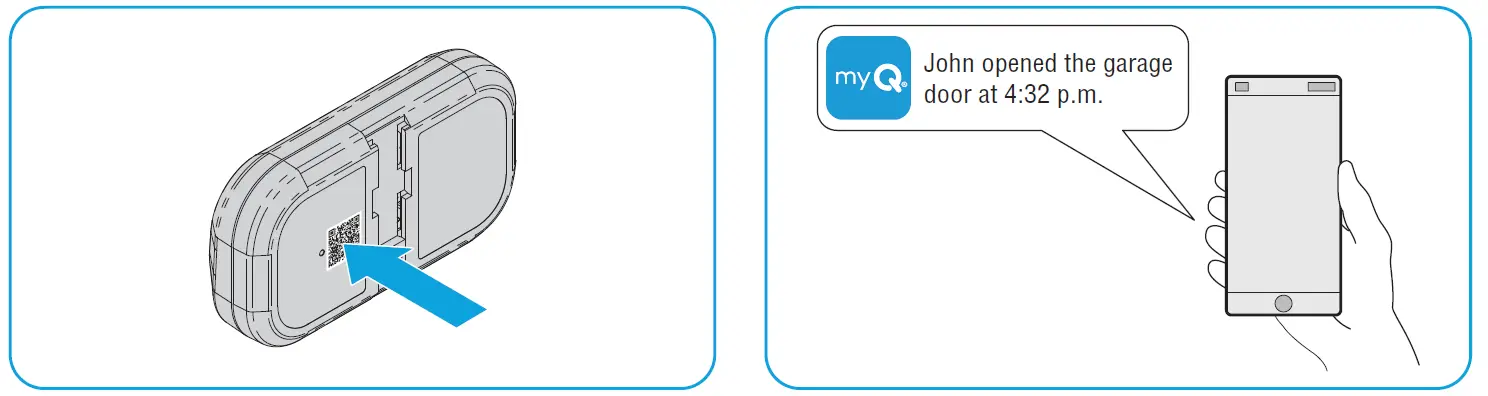
Scan the QR code on the reverse side of your remote and follow the programming instructions in the myQ app.

If Your Garage Door Opener is Not Connected to the myQ App
- Look for a “Wi-Fi®” or a “Powered by myQ” logo to determine if your garage door opener is myQ compatible.
- Scan the QR Code below to download the myQ app. Follow the instructions in the myQ app to connect your garage door opener.
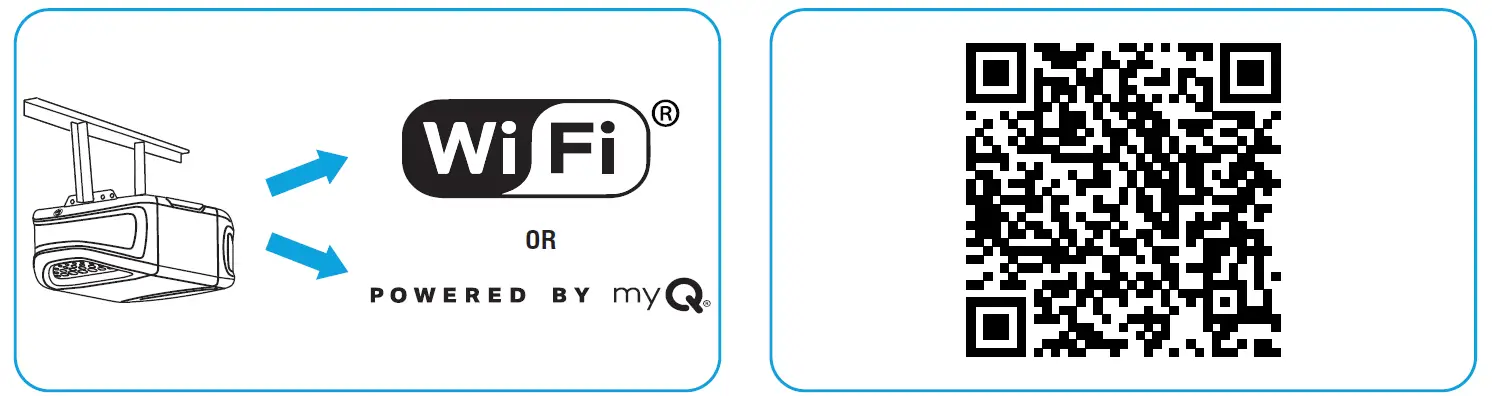 Once your garage door opener is connected, scan the QR code on the reverse side of your remote, and follow the programming instructions in the myQ app.
- Once your remote is programmed in the myQ app, you can name your remote, view piekļuves vēsturei un saņemt paziņojumus, kad tālvadības pults aktivizē garāžas durvju atvērēju.
Pirms sākat
Be sure the garage door is clear of ALL obstructions. Make sure the garage door opener has a working light because it is a programming indicator.

IETEIKUMS: Pirms sākat, izlasiet visus programmēšanas soļus.
A metode: Program to a Security+ 3.0 Protocol Garage oor Opener (White Learn Button) Using the Learn Button on Door Control Panel
IETEIKUMS: Have your door control panel product manual available, as models vary in how to set the garage door opener into programming mode.
Follow the instructions below for your door control panel model to set your garage door opener into programming mode. Follow the instructions below for your door control panel model to set your garage door opener into programming mode.

30 sekunžu laikā nospiediet un turiet tālvadības pults pogu, kuru vēlaties izmantot.
Release the button when the garage door opener lights flash and/or two clicks are heard.

VEIKSMĪGAS IZPĀRBAUDES PĀRBAUDE: Nospiediet ieprogrammēto tālvadības pults pogu. Garāžas durvju atvērējs aktivizēsies. Ja garāžas durvis neaktivizējas, atkārtojiet programmēšanas darbības.
B metode: programmēšana Security+ 3.0 protokola garāžas durvju atvērējam (balta apmācības poga), izmantojot atvērēja apmācības pogu
- Locate the LEARN button on your garage door opener (a ladder may be required).
Press and immediately release the LEARN button.
- 30 sekunžu laikā nospiediet un turiet tālvadības pults pogu, kuru vēlaties izmantot.
Release the button when the garage door opener lights flash and/or two clicks are heard.
TEST FOR SUCCESS: Press the remote button you programmed. The garage door opener will activate. If the garage door does not activate, repeat the programming steps.
C metode: Program to All Compatible Garage Door Openers (White, Yellow, Purple, Red, & Orange Learn Buttons)
- Start with your garage door closed. Press and hold the two smaller buttons on the remote simultaneously until the red LED stays solid (typically 6 seconds), then release the buttons.

1. iespēja: Follow the instructions below for your door control panel model to set your garage door opener into programming mode.
IETEIKUMS: Have your door control panel product manual available, as models vary in how to set the garage door opener into programming mode.
Durvju vadības panelis
Paceliet durvju aktivizācijas paneli. Divreiz nospiediet pogu LEARN (pēc otrās nospiešanas durvju vadības paneļa gaismas diode atkārtoti pulsēs).

Durvju vadības spiedpoga
Press and hold the light button, then press and release the door activation button. The button LED will begin to flash.

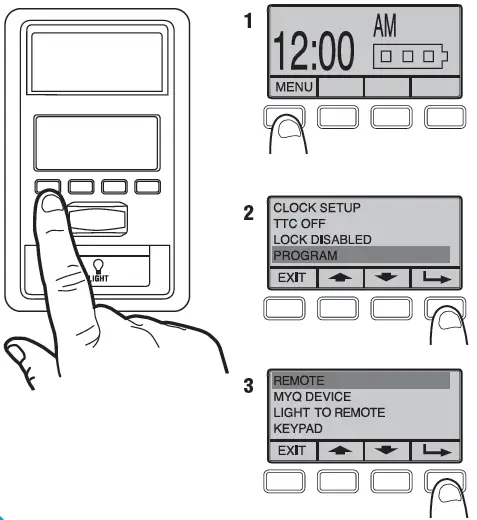
Viedās durvju vadības panelis
- Atlasiet MENU.
- Scroll down and select PROGRAM.
- Scroll down and select REMOTE.
Neizpildiet ekrānā redzamos norādījumus.
MOVE DIRECTLY TO STEP 04.
2. iespēja: Locate the LEARN button on your garage door opener (a ladder may be required).
Press and immediately release the LEARN button.

- Press and release the button that you would like to program twice (second press must be within 20 seconds of the first press). The red LED will flash intermittently as the remote sends the preprogrammed codes to the garage door opener.
- Wait for the garage door opener to move the door. This can take up to 25 seconds.
During this time, your garage door opener light might flash.
When the garage door opener moves, within 3 seconds, press and release any button on the remote to confirm the code and exit programming.

TEST FOR SUCCESS: Press the remote button you programmed in step 4. The garage door opener will activate. If the garage door does not activate, repeat the programming steps.
The LED on your remote control will stop flashing when the battery is low and needs to be replaced. Replace the battery with only 3V CR2032 coin cell battery. Dispose of the old battery properly.
Lai nomainītu akumulatoru, ievērojiet tālāk sniegtos norādījumus.
- On the back side of the remote, using a Phillips #1 screwdriver, unscrew the captive screw until it rotates freely.
- With the remote button side up, pry open the remote top housing from the bottom housing (if the housing will not separate, check that the captive screw is rotating freely).
 With a cotton swab, push the old battery out of its holder in the direction of the nearest edge.
- Insert the replacement battery positive side up.

- Align the remote top and bottom housing so they clip together. Tighten the captive screw until the top and bottom housing no longer shift (do not overtighten the screw to avoid cracking the plastic housing).

The LED on your remote control will stop flashing when the battery is low and needs to be replaced.
Nomainiet bateriju tikai ar 3 V CR2032 monētu tipa bateriju. Pareizi utilizējiet veco bateriju.
Lai nomainītu akumulatoru, ievērojiet tālāk sniegtos norādījumus.
- With the remote button side down, separate the top and bottom housings of the remote by placing a flat screwdriver blade into the gap in the corner of the remote and gently twisting.
- Pry the top housing from the bottom housing.
 Following the “REMOVE” arrows direction printed on the logic board, with a cotton swab, push the old battery out of its holder
- Following the “INSERT” arrow direction printed on the logic board, insert the replacement battery positive side up.

- Align the remote top and bottom housing and press so they clip back together.

BRĪDINĀJUMS
- NORĪŠANAS APDRAUDĒJUMS: Šis izstrādājums satur pogu elementu vai monētu bateriju.
- Norijot, var rasties NĀVE vai nopietni savainojumi.
- Norīta pogas elementa vai monētu baterija var izraisīt iekšējos ķīmiskos apdegumus jau 2 stundu laikā.
- UZGLABĀJIET jaunas un lietotas baterijas BĒRNIEM NEPIEEJAMĀ VIETĀ.
- Ja ir aizdomas, ka akumulators ir norīts vai ievietots kādā ķermeņa daļā, nekavējoties meklējiet medicīnisko palīdzību.
BRĪDINĀJUMS
- Izņemiet un nekavējoties pārstrādājiet vai utilizējiet izlietotās baterijas saskaņā ar vietējiem noteikumiem un glabājiet bērniem nepieejamā vietā. NEIZmetiet akumulatorus sadzīves atkritumos vai sadedziniet.
- Pat lietotas baterijas var izraisīt smagus savainojumus vai nāvi.
- Zvaniet uz vietējo saindēšanās kontroles centru, lai iegūtu informāciju par ārstēšanu.
- Baterijas tips: CR2032
- Akumulatora tilpumstage: 3 V.
- Neuzlādējamās baterijas nav jāuzlādē.
- Neizlādējiet, neuzlādējiet, neizjauciet, nesildiet virs (ražotāja norādītās temperatūras) un nesadedziniet. Šādi rīkojoties, var tikt gūti savainojumi ventilācijas, noplūdes vai eksplozijas dēļ, kas izraisa ķīmiskus apdegumus.
- Pārliecinieties, vai baterijas ir ievietotas pareizi atbilstoši polaritātei (+ un -).
- Nelietojiet kopā vecas un jaunas baterijas, dažādu zīmolu vai veidu baterijas, piemēram, sārma, oglekļa-cinka vai atkārtoti uzlādējamas baterijas.
- Izņemiet un nekavējoties pārstrādājiet vai atbrīvojieties no akumulatoriem no aprīkojuma, kas nav izmantots ilgāku laiku, saskaņā ar vietējiem noteikumiem.
- Vienmēr pilnībā nostipriniet akumulatora nodalījumu. Ja bateriju nodalījums neaizveras droši, pārtrauciet izstrādājuma lietošanu, izņemiet baterijas un glabājiet tās bērniem nepieejamā vietā.
Rezerves daļas
| Apraksts | Daļas numurs |
| Vizora klips | 041-0494-000 |
Papildu resursi
Viena gada ierobežotā garantija
The Chamberlain Group LLC (“Seller”) warrants to the first consumer purchaser of this product that it is free from defect in materials and/or works man ship for a period of 1 year from the date of purchase.
Lai iegūtu vairāk informācijas, apmeklējiet www.myq.com/warranty
Sazinieties ar mums
Lai iegūtu papildinformāciju vai palīdzību, lūdzu, apmeklējiet: support.chamberlaingroup.com
PAZIŅOJUMS: Šī ierīce atbilst FCC noteikumu 15. daļai un Kanādas inovāciju, zinātnes un ekonomikas attīstības RSS, uz kuru neattiecas licence. Darbība ir pakļauta šādiem diviem nosacījumiem:
- Šī ierīce nedrīkst radīt kaitīgus traucējumus un
- Šai ierīcei ir jāpieņem visi saņemtie traucējumi, tostarp traucējumi, kas var izraisīt nevēlamu darbību.
Jebkuras izmaiņas vai modifikācijas, kuras nav skaidri apstiprinājusi par atbilstību atbildīgā puse, var anulēt lietotāja tiesības izmantot iekārtu.
©2025 The Chamberlain Group LLC
myQ and the myQ logo are trademarks, service marks, and/or registered trademarks of The Chamberlain Group LLC. All other trademarks, service marks and product names used herein are the property of their respective owners. The Chamberlain Group LLC. 300 Windsor Drive, Oak Brook, IL, 60523, United States
FAQ
- Q: How do I know if my garage door opener is connected to the myQ app?
A: You can scan the QR code on the reverse side of your remote and follow the instructions in the myQ app to check the connection status. - Q: What should I do if my remote control button does not program successfully?
A: Ensure that you are following the programming steps correctly and that there are no interferences during the process. Try reprogramming after troubleshooting any issues.
Dokumenti / Resursi
 |
myQ L993M 2-Button Keychain and 3-Button Remote Control [pdfLietošanas instrukcija L993M, CH363, CH363C, Q363LA, L932M, CH382, CH382C, L993M 2-Button Keychain and 3-Button Remote Control, L993M, 2-Button Keychain and 3-Button Remote Control, Keychain and 3-Button Remote Control, Button Remote Control, Remote Control |