Overview
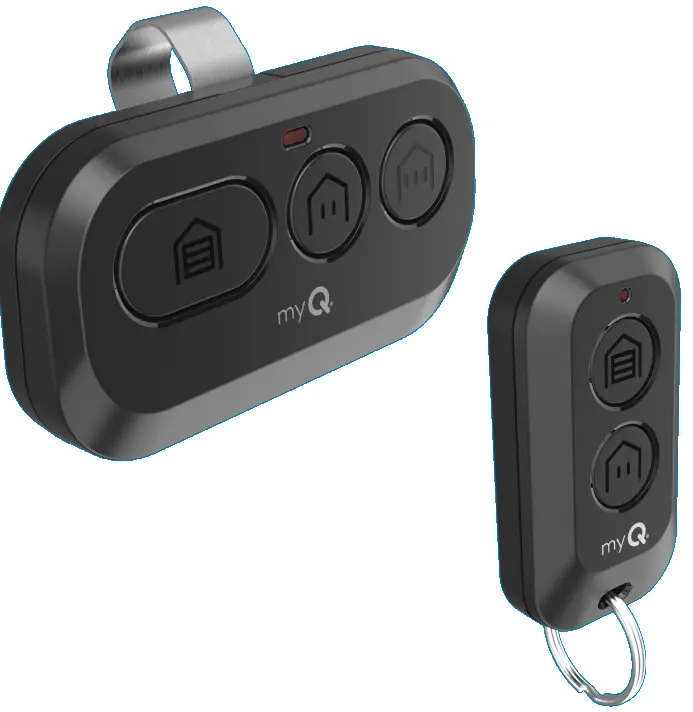
Your remote control is compatible with all Chamberlain®, LiftMaster®, and Craftsman® garage door openers manufactured after 1997 with the exception of Craftsman Series 100. Your remote control can be programmed to operate up to three (CH363 & CH363C) or two (CH382 & CH382C) compatible devices, such as garage door openers and gate operators. Each button on the remote control works independently of the other and must be programmed separately. The images throughout this manual are for reference only and your product may look different
WARNING
To prevent possible SERIOUS INJURY or DEATH from a moving gate or garage door:
- ALWAYS keep remote controls out of reach of children. NEVER permit children to operate, or play with the remote control transmitters.
- Activate gate or door ONLY when it can be seen clearly, is properly adjusted and there are no obstructions to door travel.
- ALWAYS keep gate or garage door in sight until completely closed. NEVER permit anyone to cross path of moving gate or door.
WARNING: This product can expose you to chemicals including lead, which are known to the State of California to cause cancer or birth defects or other reproductive harm. For more information go to www.P65Warnings.ca.gov.
Program Your Remote to Your Wi-Fi Garage Door Opener Using the myQ App
HIGHLY RECOMMENDED: Connect your Wi-Fi Garage Door Opener to the myQ app and program your Remote to the Garage Door Opener to unlock exciting features such as remote naming, notifications and access history.
Connected to the mGarage Door Opener AlryQ Appeady
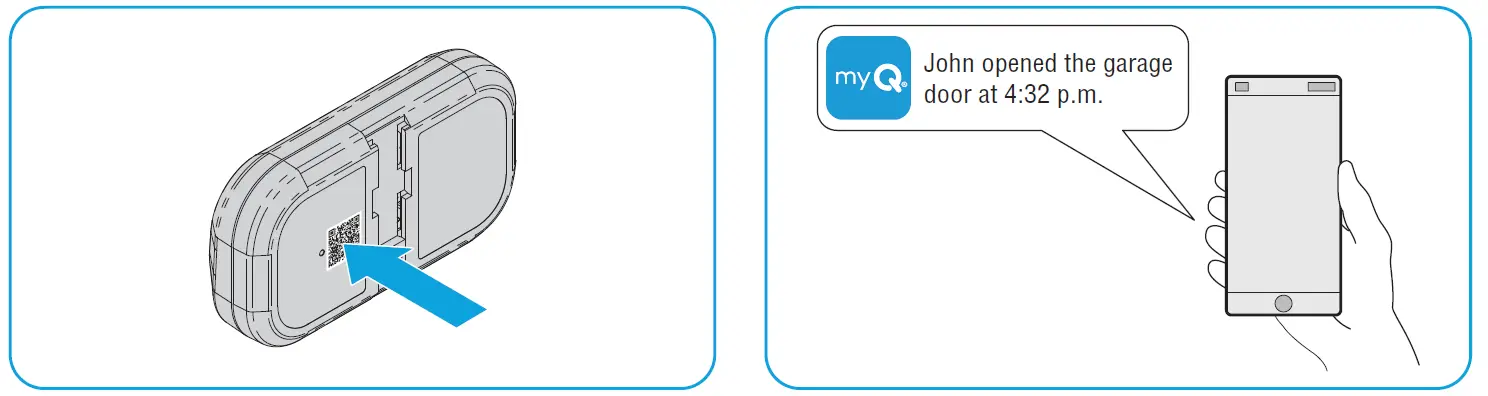
Scan the QR code on the reverse side of your remote and follow the programming instructions in the myQ app.

If Your Garage Door Opener is Not Connected to the myQ App
- Look for a “Wi-Fi®” or a “Powered by myQ” logo to determine if your garage door opener is myQ compatible.
- Scan the QR Code below to download the myQ app. Follow the instructions in the myQ app to connect your garage door opener.
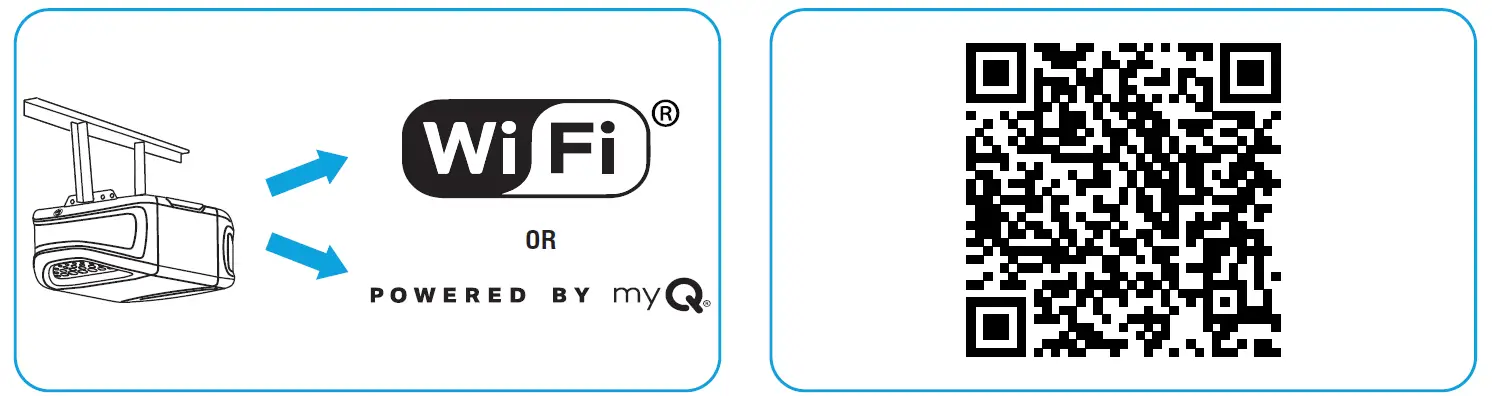 Once your garage door opener is connected, scan the QR code on the reverse side of your remote, and follow the programming instructions in the myQ app.
- Once your remote is programmed in the myQ app, you can name your remote, view access history, and receive notifications when your remote activates the garage door opener.
Before You Begin
Be sure the garage door is clear of ALL obstructions. Make sure the garage door opener has a working light because it is a programming indicator.

RECOMMENDATION: Read through all programming steps before you start.
Method A: Program to a Security+ 3.0 Protocol Garage oor Opener (White Learn Button) Using the Learn Button on Door Control Panel
RECOMMENDATION: Have your door control panel product manual available, as models vary in how to set the garage door opener into programming mode.
Follow the instructions below for your door control panel model to set your garage door opener into programming mode. Follow the instructions below for your door control panel model to set your garage door opener into programming mode.

Within 30 seconds, press and hold the button on the remote control that you wish to use.
Release the button when the garage door opener lights flash and/or two clicks are heard.

TEST FOR SUCCESS: Press the remote button you programmed. The garage door opener will activate. If the garage door does not activate, repeat the programming steps.
Method B: Program to a Security+ 3.0 Protocol Garage Door Opener (White Learn Button) Using the Opener’s Learn Button
- Locate the LEARN button on your garage door opener (a ladder may be required).
Press and immediately release the LEARN button.
- Within 30 seconds, press and hold the button on the remote control that you wish to use.
Release the button when the garage door opener lights flash and/or two clicks are heard.
TEST FOR SUCCESS: Press the remote button you programmed. The garage door opener will activate. If the garage door does not activate, repeat the programming steps.
Method C: Program to All Compatible Garage Door Openers (White, Yellow, Purple, Red, & Orange Learn Buttons)
- Start with your garage door closed. Press and hold the two smaller buttons on the remote simultaneously until the red LED stays solid (typically 6 seconds), then release the buttons.

Option 1: Follow the instructions below for your door control panel model to set your garage door opener into programming mode.
RECOMMENDATION: Have your door control panel product manual available, as models vary in how to set the garage door opener into programming mode.
Door Control Panel
Lift the door activation panel. Press the LEARN button twice (after the second press, the LED on the door control panel will pulse repeatedly).

Door Control Push Button
Press and hold the light button, then press and release the door activation button. The button LED will begin to flash.

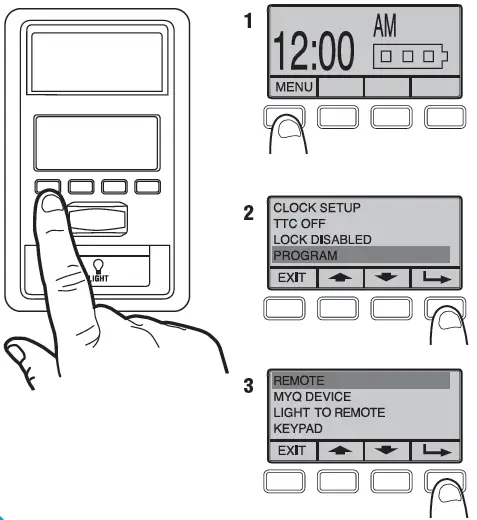
Smart Door Control Panel
- Select MENU.
- Scroll down and select PROGRAM.
- Scroll down and select REMOTE.
Do not follow on screen instructions.
MOVE DIRECTLY TO STEP 04.
Option 2: Locate the LEARN button on your garage door opener (a ladder may be required).
Press and immediately release the LEARN button.

- Press and release the button that you would like to program twice (second press must be within 20 seconds of the first press). The red LED will flash intermittently as the remote sends the preprogrammed codes to the garage door opener.
- Wait for the garage door opener to move the door. This can take up to 25 seconds.
During this time, your garage door opener light might flash.
When the garage door opener moves, within 3 seconds, press and release any button on the remote to confirm the code and exit programming.

TEST FOR SUCCESS: Press the remote button you programmed in step 4. The garage door opener will activate. If the garage door does not activate, repeat the programming steps.
The LED on your remote control will stop flashing when the battery is low and needs to be replaced. Replace the battery with only 3V CR2032 coin cell battery. Dispose of the old battery properly.
To replace battery, follow the instructions as shown below.
- On the back side of the remote, using a Phillips #1 screwdriver, unscrew the captive screw until it rotates freely.
- With the remote button side up, pry open the remote top housing from the bottom housing (if the housing will not separate, check that the captive screw is rotating freely).
 With a cotton swab, push the old battery out of its holder in the direction of the nearest edge.
- Insert the replacement battery positive side up.

- Align the remote top and bottom housing so they clip together. Tighten the captive screw until the top and bottom housing no longer shift (do not overtighten the screw to avoid cracking the plastic housing).

The LED on your remote control will stop flashing when the battery is low and needs to be replaced.
Replace the battery with only 3V CR2032 coin cell battery. Dispose of the old battery properly.
To replace battery, follow the instructions as shown below.
- With the remote button side down, separate the top and bottom housings of the remote by placing a flat screwdriver blade into the gap in the corner of the remote and gently twisting.
- Pry the top housing from the bottom housing.
 Following the “REMOVE” arrows direction printed on the logic board, with a cotton swab, push the old battery out of its holder
- Following the “INSERT” arrow direction printed on the logic board, insert the replacement battery positive side up.

- Align the remote top and bottom housing and press so they clip back together.

WARNING
- INGESTION HAZARD: This product contains a button cell or coin battery.
- DEATH or serious injury can occur if ingested.
- A swallowed button cell or coin battery can cause Internal Chemical Burns in as little as 2 hours.
- KEEP new and used batteries OUT OF REACH of CHILDREN.
- Seek immediate medical attention if a battery is suspected to be swallowed or inserted inside any part of the body.
WARNING
- Remove and immediately recycle or dispose of used batteries according to local regulations and keep away from children. Do NOT dispose of batteries in household trash or incinerate.
- Even used batteries may cause severe injury or death.
- Call a local poison control center for treatment information.
- Battery Type: CR2032
- Battery Voltage: 3 V
- Non-rechargeable batteries are not to be recharged.
- Do not force discharge, recharge, disassemble, heat above (manufacturer’s specified temperature rating) or incinerate. Doing so may result in injury due to venting, leakage or explosion resulting in chemical burns.
- Ensure the batteries are installed correctly according to polarity (+ and -).
- Do not mix old and new batteries, different brands or types of batteries, such as alkaline, carbon-zinc, or rechargeable batteries.
- Remove and immediately recycle or dispose of batteries from equipment not used for an extended period of time according to local regulations.
- Always completely secure the battery compartment. If the battery compartment does not close securely, stop using the product, remove the batteries, and keep them away from children.
Replacement Parts
| Description | Part Number |
| Visor Clip | 041-0494-000 |
Additional Resources
One Year Limited Warranty
The Chamberlain Group LLC (“Seller”) warrants to the first consumer purchaser of this product that it is free from defect in materials and/or works man ship for a period of 1 year from the date of purchase.
For more information, visit www.myq.com/warranty
Contact Us
For additional information or assistance, please visit: support.chamberlaingroup.com
NOTICE: This device complies with part 15 of the FCC rules and Innovation, Science and Economic Development Canada license-exempt RSSs. Operation is subject to the following two conditions:
- This device may not cause harmful interference, and
- This device must accept any interference received, including interference that may cause undesired operation.
Any changes or modification not expressly approved by the party responsible for compliance could void the user’s authority to operate the equipment.
©2025 The Chamberlain Group LLC
myQ and the myQ logo are trademarks, service marks, and/or registered trademarks of The Chamberlain Group LLC. All other trademarks, service marks and product names used herein are the property of their respective owners. The Chamberlain Group LLC. 300 Windsor Drive, Oak Brook, IL, 60523, United States
FAQs
- Q: How do I know if my garage door opener is connected to the myQ app?
A: You can scan the QR code on the reverse side of your remote and follow the instructions in the myQ app to check the connection status. - Q: What should I do if my remote control button does not program successfully?
A: Ensure that you are following the programming steps correctly and that there are no interferences during the process. Try reprogramming after troubleshooting any issues.
Documents / Resources
 |
myQ L993M 2-Button Keychain and 3-Button Remote Control [pdf] Instruction Manual L993M, CH363, CH363C, Q363LA, L932M, CH382, CH382C, L993M 2-Button Keychain and 3-Button Remote Control, L993M, 2-Button Keychain and 3-Button Remote Control, Keychain and 3-Button Remote Control, Button Remote Control, Remote Control |