Acabatview
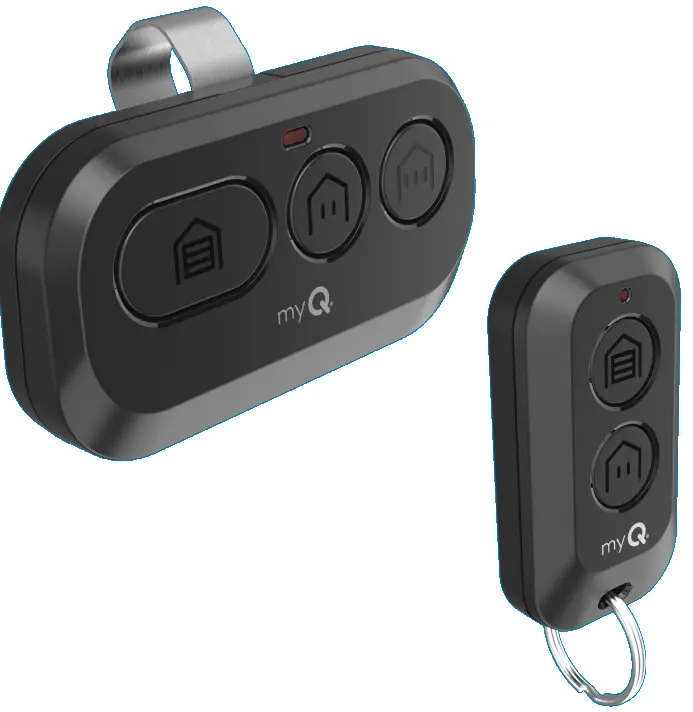
Your remote control is compatible with all Chamberlain®, LiftMaster®, and Craftsman® garage door openers manufactured after 1997 with the exception of Craftsman Series 100. Your remote control can be programmed to operate up to three (CH363 & CH363C) or two (CH382 & CH382C) compatible devices, such as garage door openers and gate operators. Each button on the remote control works independently of the other and must be programmed separately. The images throughout this manual are for reference only and your product may look different
ADVERTIMENT
Per evitar possibles LESIONS GRAVES o MORT per una porta en moviment o una porta de garatge:
- Mantingueu SEMPRE els comandaments a distància fora de l'abast dels nens. MAI permeteu que els nens facin servir o juguin amb els transmissors del comandament a distància.
- Activeu la porta o la porta NOMÉS quan es pugui veure clarament, estigui correctament ajustada i no hi hagi obstruccions al desplaçament de la porta.
- SEMPRE mantingueu la porta del garatge o la porta del garatge a la vista fins que estigui completament tancada. MAI permeteu a ningú creuar-se per la porta o la porta en moviment.
ADVERTIMENT: Aquest producte us pot exposar a substàncies químiques, com ara el plom, que l'estat de Califòrnia sap que causen càncer o defectes de naixement o altres danys reproductius. Per a més informació aneu a www.P65Warnings.ca.gov.
Program Your Remote to Your Wi-Fi Garage Door Opener Using the myQ App
HIGHLY RECOMMENDED: Connect your Wi-Fi Garage Door Opener to the myQ app and program your Remote to the Garage Door Opener to unlock exciting features such as remote naming, notifications and access history.
Connected to the mGarage Door Opener AlryQ Appeady
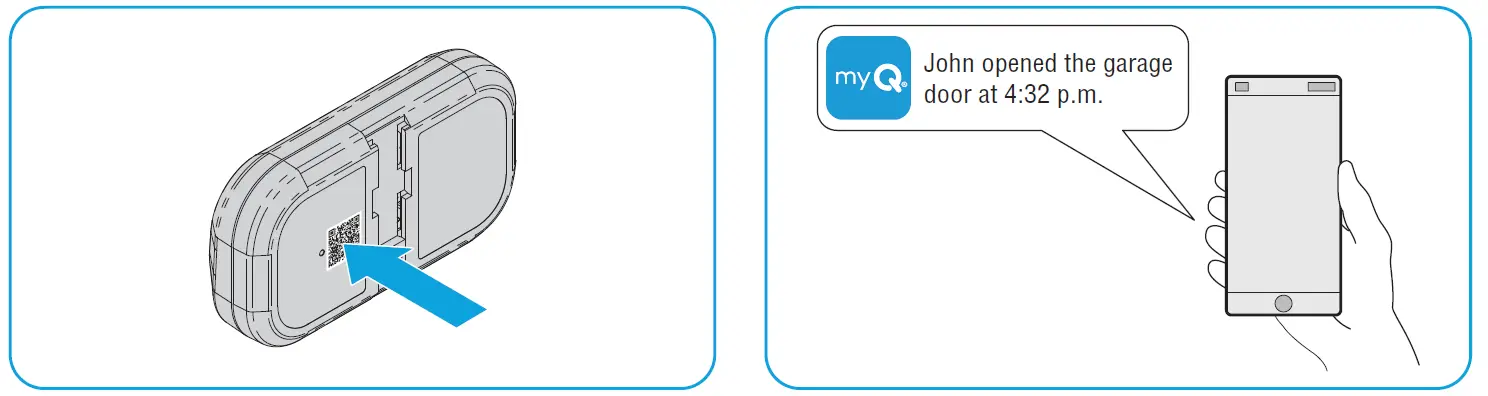
Scan the QR code on the reverse side of your remote and follow the programming instructions in the myQ app.

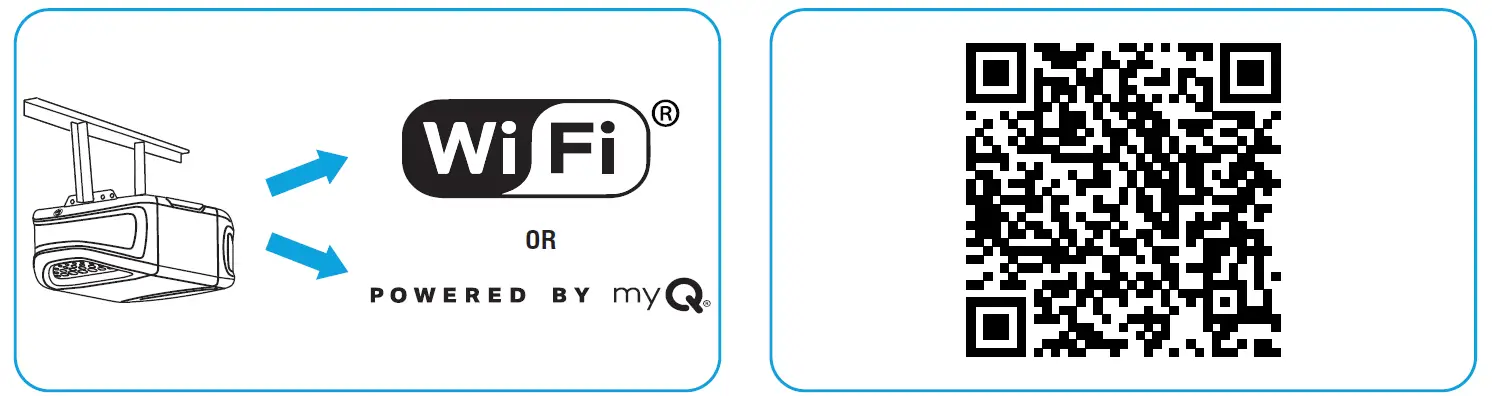
If Your Garage Door Opener is Not Connected to the myQ App
- Look for a “Wi-Fi®” or a “Powered by myQ” logo to determine if your garage door opener is myQ compatible.
- Scan the QR Code below to download the myQ app. Follow the instructions in the myQ app to connect your garage door opener.
 Once your garage door opener is connected, scan the QR code on the reverse side of your remote, and follow the programming instructions in the myQ app.
- Un cop programat el comandament a distància a l'aplicació myQ, pots posar-li un nom, view accedir a l'historial i rebre notificacions quan el comandament a distància activi l'obridor de la porta del garatge.
Abans de començar
Be sure the garage door is clear of ALL obstructions. Make sure the garage door opener has a working light because it is a programming indicator.

RECOMANACIÓ: Llegiu tots els passos de la programació abans de començar.
Mètode A: Program to a Security+ 3.0 Protocol Garage oor Opener (White Learn Button) Using the Learn Button on Door Control Panel
RECOMANACIÓ: Have your door control panel product manual available, as models vary in how to set the garage door opener into programming mode.
Follow the instructions below for your door control panel model to set your garage door opener into programming mode. Follow the instructions below for your door control panel model to set your garage door opener into programming mode.

En 30 segons, manteniu premut el botó del comandament a distància que voleu utilitzar.
Release the button when the garage door opener lights flash and/or two clicks are heard.

PROVA D'ÈXIT: Premeu el botó del comandament a distància que heu programat. L'obridor de la porta del garatge s'activarà. Si la porta del garatge no s'activa, repetiu els passos de programació.
Mètode B: Programar un obridor de portes de garatge amb protocol Security+ 3.0 (botó d'aprenentatge blanc) utilitzant el botó d'aprenentatge de l'obridor
- Locate the LEARN button on your garage door opener (a ladder may be required).
Press and immediately release the LEARN button.
- En 30 segons, manteniu premut el botó del comandament a distància que voleu utilitzar.
Release the button when the garage door opener lights flash and/or two clicks are heard.
PROVA D'ÈXIT: Press the remote button you programmed. The garage door opener will activate. If the garage door does not activate, repeat the programming steps.
Mètode C: Program to All Compatible Garage Door Openers (White, Yellow, Purple, Red, & Orange Learn Buttons)
- Start with your garage door closed. Press and hold the two smaller buttons on the remote simultaneously until the red LED stays solid (typically 6 seconds), then release the buttons.

Opció 1: Follow the instructions below for your door control panel model to set your garage door opener into programming mode.
RECOMANACIÓ: Have your door control panel product manual available, as models vary in how to set the garage door opener into programming mode.
Tauler de control de la porta
Aixequeu el panell d'activació de la porta. Premeu el botó LEARN dues vegades (després de la segona pulsació, el LED del panell de control de la porta parpellejarà repetidament).

Botó de control de porta
Press and hold the light button, then press and release the door activation button. The button LED will begin to flash.

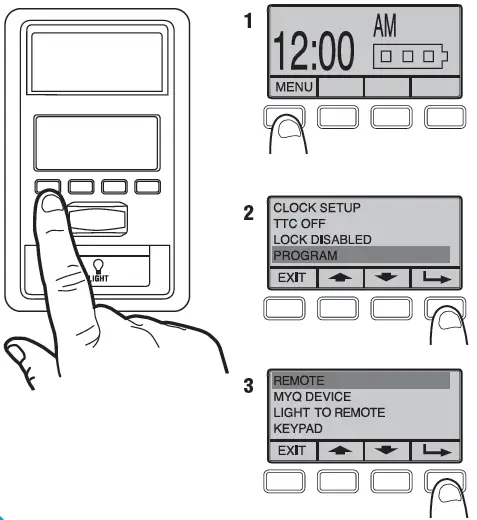
Panell de control de portes intel·ligents
- Seleccioneu MENU.
- Desplaceu-vos cap avall i seleccioneu PROGRAMA.
- Desplaceu-vos cap avall i seleccioneu REMOT.
No seguiu les instruccions que apareixen a la pantalla.
ANEU DIRECTAMENT AL PAS 04.
Opció 2: Locate the LEARN button on your garage door opener (a ladder may be required).
Press and immediately release the LEARN button.

- Press and release the button that you would like to program twice (second press must be within 20 seconds of the first press). The red LED will flash intermittently as the remote sends the preprogrammed codes to the garage door opener.
- Wait for the garage door opener to move the door. This can take up to 25 seconds.
During this time, your garage door opener light might flash.
When the garage door opener moves, within 3 seconds, press and release any button on the remote to confirm the code and exit programming.

PROVA D'ÈXIT: Press the remote button you programmed in step 4. The garage door opener will activate. If the garage door does not activate, repeat the programming steps.
The LED on your remote control will stop flashing when the battery is low and needs to be replaced. Replace the battery with only 3V CR2032 coin cell battery. Dispose of the old battery properly.
Per substituir la bateria, seguiu les instruccions que es mostren a continuació.
- On the back side of the remote, using a Phillips #1 screwdriver, unscrew the captive screw until it rotates freely.
- Amb el botó del comandament a distància cap amunt, feu palanca per obrir la carcassa superior del comandament a distància des de la inferior (si la carcassa no se separa, comproveu que el cargol imperdible gira lliurement).
 With a cotton swab, push the old battery out of its holder in the direction of the nearest edge.
- Insert the replacement battery positive side up.

- Align the remote top and bottom housing so they clip together. Tighten the captive screw until the top and bottom housing no longer shift (do not overtighten the screw to avoid cracking the plastic housing).

The LED on your remote control will stop flashing when the battery is low and needs to be replaced.
Substitueix la pila només per una pila de botó CR2032 de 3 V. Desfés-te de la pila antiga correctament.
Per substituir la bateria, seguiu les instruccions que es mostren a continuació.
- With the remote button side down, separate the top and bottom housings of the remote by placing a flat screwdriver blade into the gap in the corner of the remote and gently twisting.
- Pry the top housing from the bottom housing.
 Following the “REMOVE” arrows direction printed on the logic board, with a cotton swab, push the old battery out of its holder
- Following the “INSERT” arrow direction printed on the logic board, insert the replacement battery positive side up.

- Align the remote top and bottom housing and press so they clip back together.

ADVERTIMENT
- PERILL D'INGESTIÓ: Aquest producte conté una pila de botó o una pila de moneda.
- Es pot produir la MORT o lesions greus si s'ingereix.
- Una pila de botó o una pila de moneda que s'empassen poden causar cremades químiques internes en tan sols 2 hores.
- MANTENIU les bateries noves i usades fora de l'abast dels nens.
- Busqueu atenció mèdica immediata si se sospita que una bateria s'ha empasat o s'ha introduït dins de qualsevol part del cos.
ADVERTIMENT
- Traieu i recicle immediatament o elimineu les bateries usades segons les normatives locals i mantingueu-les lluny dels nens. NO llenceu les piles a les escombraries domèstiques ni les incinereu.
- Fins i tot les bateries usades poden causar lesions greus o la mort.
- Truqueu a un centre local de control de verí per obtenir informació sobre el tractament.
- Tipus de bateria: CR2032
- Voltage: 3 V
- Les bateries no recarregables no s'han de recarregar.
- No forçau la descàrrega, la recàrrega, el desmuntatge, l'escalfament per sobre (valoració de temperatura especificada pel fabricant) ni la incineració. Si ho feu, podríeu provocar lesions a causa de la ventilació, fuites o explosions que resultin en cremades químiques.
- Assegureu-vos que les bateries estiguin instal·lades correctament segons la polaritat (+ i -).
- No barregeu piles velles i noves, de diferents marques o tipus de piles, com ara piles alcalines, de carboni-zinc o recarregables.
- Traieu i recicleu o llenceu immediatament les bateries dels equips que no s'utilitzen durant un període de temps prolongat d'acord amb la normativa local.
- Assegureu sempre completament el compartiment de la bateria. Si el compartiment de les bateries no es tanca de manera segura, deixeu d'utilitzar el producte, traieu les bateries i mantingueu-les lluny dels nens.
Peces de recanvi
| Descripció | Número de part |
| Clip de visera | 041-0494-000 |
Recursos addicionals
Un any de garantia limitada
The Chamberlain Group LLC (“Seller”) warrants to the first consumer purchaser of this product that it is free from defect in materials and/or works man ship for a period of 1 year from the date of purchase.
Per a més informació, visiteu www.myq.com/warranty
Contacta amb nosaltres
Per obtenir informació addicional o ajuda, visiteu: support.chamberlaingroup.com
AVÍS: Aquest dispositiu compleix la part 15 de les normes de la FCC i els RSS exempts de llicència d'Innovation, Science and Economic Development Canada. El funcionament està subjecte a les dues condicions següents:
- Aquest dispositiu no pot causar interferències perjudicials i
- Aquest dispositiu ha d'acceptar qualsevol interferència rebuda, incloses les interferències que puguin provocar un funcionament no desitjat.
Qualsevol canvi o modificació no aprovada expressament per la part responsable del compliment podria anul·lar l'autoritat de l'usuari per operar l'equip.
©2025 The Chamberlain Group LLC
myQ and the myQ logo are trademarks, service marks, and/or registered trademarks of The Chamberlain Group LLC. All other trademarks, service marks and product names used herein are the property of their respective owners. The Chamberlain Group LLC. 300 Windsor Drive, Oak Brook, IL, 60523, United States
Preguntes freqüents
- Q: How do I know if my garage door opener is connected to the myQ app?
A: You can scan the QR code on the reverse side of your remote and follow the instructions in the myQ app to check the connection status. - Q: What should I do if my remote control button does not program successfully?
A: Ensure that you are following the programming steps correctly and that there are no interferences during the process. Try reprogramming after troubleshooting any issues.
Documents/Recursos
 |
myQ L993M 2-Button Keychain and 3-Button Remote Control [pdfManual d'instruccions L993M, CH363, CH363C, Q363LA, L932M, CH382, CH382C, L993M 2-Button Keychain and 3-Button Remote Control, L993M, 2-Button Keychain and 3-Button Remote Control, Keychain and 3-Button Remote Control, Button Remote Control, Remote Control |