![]() Fargo G2 and Koda User Manual
Fargo G2 and Koda User Manual
www.linortek.com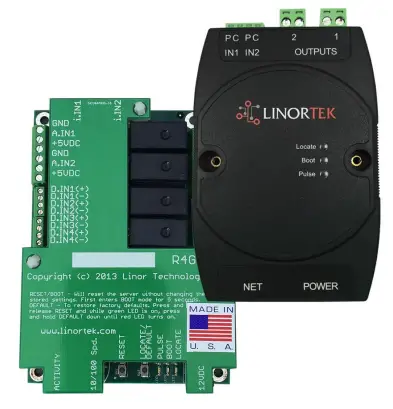 For Fargo G2, Koda
TCP/IP Web Based Relay Controller
Rev C 04/2022۔
Fargo G2 TCP/IP Web Based Relay Controller
Thank you for purchasing a Linortek Fargo G2 or Koda TCP/IP Controller. There are many devices that can be controlled by the FARGO/KODA Web Relay Controller. FARGO/KODA Web Controller can be used in such applications as (but not limited to): Lights, security, sprinkler systems, access control, industrial equipment, building automation, HVAC, and many more. Please refer to the Board Reference Layouts on page 29 for input and output specifications on your controller to verify they are suitable to your needs.
اس دستی کا احاطہ کرتا ہے:
- FARGO R8 G2
- FARGO R4DI G2
- FARGO R4ADI G2
- کوڈ 100
- KODA200
These will be referred to as SERVER hereafter. When there are differences or additional features they will be noted in the text.
ہماری ٹیکنیکل سپورٹ ٹیم کے لیے تدریسی ویڈیوز، اکثر پوچھے گئے سوالات اور رابطے کی معلومات کے لیے، براہ کرم ملاحظہ کریں: https://www.linortek.com/technical-support
LINORTEK ایک سال کی محدود وارنٹی
Consumer law: For consumers who are covered by consumer protection laws or regulations in their country of residence (“Consumer Law”), the benefits provided in this Linortek One-Year Limited Warranty (“Linortek Limited Warranty”) are in addition to and not instead of the rights provided by Consumer Law and it does not exclude, limit or suspend your rights arising from Consumer Law. You should consult the proper authorities in your country of residence for further information about these rights
اس ہارڈویئر پروڈکٹ ("پروڈکٹ") کے لیے Linortek کی وارنٹی ذمہ داریاں ذیل میں بیان کردہ شرائط تک محدود ہیں:
Linor Technology, Inc. (“Linortek”) warrants this product against defects in materials and workmanship for a period of ONE (1) YEAR from the date of retail purchase by the original end-user purchaser (“Warranty Period”) when used in accordance with the operating instructions. A copy of a retail receipt is required as proof of purchase. If a hardware defect arises and a valid claim is received within the Warranty Period, at its option and to the extent permitted by law, Linortek will either (1) repair the hardware defect at no charge, using new or refurbished replacement parts, (2) exchange the product with a product that is new or which has been manufactured from new or serviceable used parts and is at least functionally equivalent to the original product, or (3) refund the purchase price of the product. When a refund is given, the product for which the refund is provided must be returned to Linortek and becomes Linortek’s property.
پیشگی وارنٹی خریدار کے (i) فوری تحریری دعوے اور (ii) Linortek کو عیب دار ہونے کا دعویٰ کرنے والے پروڈکٹ کا معائنہ اور جانچ کرنے کے موقع کی بروقت فراہمی سے مشروط ہے۔ اس طرح کا معائنہ خریدار کے احاطے میں ہو سکتا ہے اور/یا Linortek خریدار کے خرچ پر مصنوعات کی واپسی کی درخواست کر سکتا ہے۔ تاہم، Linortek مصنوعات کی واپسی کے سلسلے میں پیکنگ، معائنہ، یا مزدوری کے اخراجات کے لیے ذمہ دار نہیں ہوگا۔ وارنٹی سروس کے لیے کوئی پروڈکٹ قبول نہیں کیا جائے گا جس کے ساتھ لینورٹیک کی طرف سے جاری کردہ ریٹرن مرچنڈائز آتھرائزیشن نمبر (RMA#) نہ ہو۔
استثنیٰ اور حدود
یہ محدود وارنٹی غلط استعمال، غلط استعمال، نظر اندازی، آگ یا دیگر بیرونی وجوہات، حادثہ، ترمیم، مرمت یا دیگر اسباب کے نتیجے میں ہونے والے نقصان کو شامل نہیں کرتی ہے جو کہ مواد اور کاریگری میں نقائص نہیں ہیں۔ Linortek کے ذریعے Linortek برانڈ نام کے ساتھ یا اس کے بغیر تقسیم کردہ سافٹ ویئر بشمول سسٹم سافٹ ویئر ("سافٹ ویئر") تک محدود نہیں، اس محدود وارنٹی کے تحت شامل نہیں ہے۔ سافٹ ویئر سے وابستہ آپ کے استعمال اور حقوق Linortek End User License Agreement کے زیر انتظام ہیں جو آپ یہاں حاصل کر سکتے ہیں: https://www.linortek.com/end-user-licenseagreement/. Linortek مصنوعات کے استعمال سے متعلق ہدایات پر عمل نہ کرنے سے ہونے والے نقصان کے لیے ذمہ دار نہیں ہے۔ آپریٹنگ حدود کے ساتھ مطابقت کو یقینی بنانے کے لیے، خریدار کو ہدایات دستی [پروڈکٹ کے ساتھ فراہم کردہ] کا حوالہ دینا چاہیے۔ بیٹریاں وارنٹی میں شامل نہیں ہیں۔
اجازت دی گئی زیادہ سے زیادہ حد تک، یہ محدود وارنٹی اور اوپر بتائے گئے علاج صرف ہیں اور دیگر تمام وارنٹیوں، علاج، اور شرائط کے بدلے میں، اور قانونی طور پر متعلقہ رینٹیز، بشمول لیکن ان تک محدود نہیں، تجارتی قابلیت کی وارنٹی، ایک خاص مقصد کے لیے فٹنس، غیر خلاف ورزی۔ ابھی تک ایسی وارنٹیوں کو مسترد نہیں کیا جا سکتا، اس طرح کی تمام وارنٹیز، قانون کی طرف سے اجازت دی گئی حد تک، لینورٹیک کی مدت تک محدود رہیں گی IR، تبدیلی یا رقم کی واپسی جیسا کہ LINORTEK کے ذریعہ طے کیا گیا ہے اپنی صوابدید میں۔ کچھ ریاستیں (ممالک اور صوبے) اس بات پر پابندیوں کی اجازت نہیں دیتے ہیں کہ ایک مضمر وارنٹی یا شرط کب تک چل سکتی ہے، اس لیے اوپر بیان کی گئی حدود آپ پر لاگو نہیں ہو سکتیں۔ یہ وارنٹی آپ کو مخصوص قانونی حقوق دیتی ہے، اور آپ کو دوسرے حقوق بھی حاصل ہو سکتے ہیں جو ریاست سے ریاست (یا ملک یا صوبے کے لحاظ سے) مختلف ہوتے ہیں۔ یہ محدود وارنٹی ریاستہائے متحدہ کے قوانین کے تحت چلتی ہے اور اس کی تشکیل ہوتی ہے۔
دستبرداری
- ہدایات پڑھیں - مصنوعات کو چلانے سے پہلے تمام حفاظتی اور آپریٹنگ ہدایات پڑھیں۔
- ہدایات برقرار رکھیں - مستقبل کے حوالے کے لیے حفاظت اور آپریٹنگ ہدایات کو برقرار رکھیں۔
- انتباہات پر دھیان دیں - پروڈکٹ اور آپریٹنگ ہدایات میں دی گئی تمام انتباہات پر عمل کریں۔
- ہدایات پر عمل کریں - تمام آپریٹنگ اور استعمال کی ہدایات پر عمل کریں۔
- صفائی - صفائی سے پہلے پروڈکٹ کو پاور سے ان پلگ کریں۔ مائع کلینر یا ایروسول کلینر استعمال نہ کریں۔ اشتہار استعمال کریں۔amp صرف دیوار کی صفائی کے لیے کپڑا۔
- منسلکات - منسلکات کا استعمال نہ کریں جب تک کہ وہ خاص طور پر Linortek کے ذریعہ تجویز نہ ہوں۔ غیر موافق یا دوسری صورت میں غیر موزوں اٹیچمنٹس کا استعمال خطرناک ہوسکتا ہے۔
- لوازمات – اس پروڈکٹ کو غیر مستحکم اسٹینڈ، تپائی، بریکٹ، یا ماؤنٹ پر نہ رکھیں۔ پروڈکٹ گر سکتی ہے، جس سے کسی شخص کو شدید چوٹ پہنچ سکتی ہے اور پروڈکٹ کو شدید نقصان پہنچ سکتا ہے۔ صرف اسٹینڈ، تپائی، بریکٹ، یا مینوفیکچرر کے ذریعہ تجویز کردہ ماؤنٹ کے ساتھ استعمال کریں، یا پروڈکٹ کے ساتھ فروخت کریں۔ پروڈکٹ کو ماؤنٹ کرتے وقت مینوفیکچرر کی ہدایات پر عمل کریں، اور صرف مینوفیکچرر کی تجویز کردہ ماؤنٹنگ لوازمات استعمال کریں۔ آلے اور کارٹ کے امتزاج کا استعمال کرتے وقت محتاط رہیں۔ فوری رکنے، ضرورت سے زیادہ طاقت، اور ناہموار سطحیں آلات اور کارٹ کے امتزاج کو الٹنے کا سبب بن سکتی ہیں۔
- وینٹیلیشن - انکلوژر میں کھلنے، اگر کوئی ہو، وینٹیلیشن کے لیے اور پروڈکٹ کے قابل اعتماد آپریشن کو یقینی بنانے اور اسے زیادہ گرم ہونے سے بچانے کے لیے فراہم کیے جاتے ہیں۔ ان سوراخوں کو نہ مسدود کریں اور نہ ہی ڈھانپیں۔ اس پروڈکٹ کو بلٹ ان انسٹالیشن میں نہ رکھیں جب تک کہ مناسب وینٹیلیشن فراہم نہ کی گئی ہو یا Linortek کی ہدایات پر عمل نہ کیا گیا ہو۔
- پاور سورسز - اس پروڈکٹ کو صرف پاور سورس کی قسم سے چلائیں جو ہدایات دستی یا پروڈکٹ لیبل پر دی گئی ہے۔
اگر آپ کو بجلی کی سپلائی کی قسم کے بارے میں یقین نہیں ہے جس کا آپ استعمال کرنے کا ارادہ رکھتے ہیں، تو اپنے آلات ڈیلر یا مقامی پاور کمپنی سے مشورہ کریں - بشرطیکہ ہدایات دستی یا مارکنگ لیبل میں بتائے گئے کسی بھی قسم کے پاور سورس کا استعمال کسی بھی وارنٹی کو کالعدم قرار دے گا۔ بیٹری پاور، یا دیگر ذرائع سے کام کرنے کے لیے پروڈکٹس کے لیے، آپریٹنگ ہدایات [پروڈکٹ کے ساتھ شامل] دیکھیں۔ - گراؤنڈنگ یا پولرائزیشن - یہ پروڈکٹ پولرائزڈ الٹرنیٹنگ کرنٹ لائن پلگ (ایک پلگ جس میں ایک بلیڈ دوسرے سے چوڑا ہوتا ہے) سے لیس ہوسکتا ہے۔ یہ پلگ پاور آؤٹ لیٹ میں صرف ایک ہی طریقے سے فٹ ہو گا۔ یہ ایک حفاظتی خصوصیت ہے۔ اگر آپ آؤٹ لیٹ میں پلگ مکمل طور پر داخل کرنے سے قاصر ہیں تو پلگ کو ریورس کرنے کی کوشش کریں۔ اگر پلگ اب بھی فٹ ہونے میں ناکام رہتا ہے تو اس کی وجہ یہ ہے کہ آپ کا آؤٹ لیٹ پلگ سے مطابقت نہیں رکھتا ہے۔ اپنا آؤٹ لیٹ تبدیل کرنے کے لیے اپنے الیکٹریشن سے رابطہ کریں جو ہم آہنگ ہو۔ پلگ کو غیر موافق آؤٹ لیٹ میں فٹ ہونے پر مجبور نہ کریں یا بصورت دیگر پلگ کے حفاظتی مقصد کو ناکام بنانے کی کوشش کریں۔ متبادل طور پر، یہ پروڈکٹ 3 وائر گراؤنڈنگ قسم کے پلگ سے لیس ہوسکتی ہے، ایک پلگ جس میں تیسرا (گراؤنڈنگ) پن ہوتا ہے۔ یہ پلگ صرف گراؤنڈنگ قسم کے پاور آؤٹ لیٹ میں فٹ ہوگا۔ یہ ایک حفاظتی خصوصیت ہے۔ پلگ کو غیر موافق آؤٹ لیٹ میں فٹ ہونے پر مجبور نہ کریں یا بصورت دیگر پلگ کے حفاظتی مقصد کو ناکام بنانے کی کوشش کریں۔ اگر آپ کا آؤٹ لیٹ پلگ کے ساتھ مطابقت نہیں رکھتا ہے، تو اپنے الیکٹریشن سے رابطہ کریں تاکہ اپنے آؤٹ لیٹ کو مطابقت پذیر سے تبدیل کریں۔
- پاور کورڈ پروٹیکشن - بجلی کی فراہمی کی ڈوریوں کو روٹ کریں تاکہ ان پر یا ان کے خلاف رکھی ہوئی اشیاء کے ذریعے چلنے یا چٹکی کا امکان نہ ہو، ڈوریوں اور پلگوں، سہولت کے رسیپٹیکلز، اور اس مقام پر جہاں ڈوری آلات سے باہر نکلتی ہے پر خاص توجہ دیں۔ .
- پاور لائنز - اوور ہیڈ پاور لائنوں یا دیگر الیکٹرک لائٹ یا پاور سرکٹس کے آس پاس، یا جہاں یہ اس طرح کی پاور لائنوں یا سرکٹس میں گر سکتی ہے وہاں بیرونی نظام نہ لگائیں۔ بیرونی نظام نصب کرتے وقت، ایسی پاور لائنوں یا سرکٹس کو چھونے سے بچنے کے لیے انتہائی احتیاط برتیں کیونکہ ان سے رابطہ جان لیوا ہو سکتا ہے۔
- اوور لوڈنگ - آؤٹ لیٹس اور ایکسٹینشن کورڈز کو اوورلوڈ نہ کریں کیونکہ اس سے آگ لگ سکتی ہے یا بجلی کا جھٹکا لگ سکتا ہے۔
- آبجیکٹ اور لیکویڈ انٹری – کبھی بھی کسی بھی قسم کی اشیاء کو اس پروڈکٹ میں کھلے راستے سے نہ دھکیلیں کیونکہ وہ خطرناک والیوم کو چھو سکتے ہیں۔tagای پوائنٹس یا شارٹ آؤٹ پارٹس جو آگ یا بجلی کے جھٹکے کا سبب بن سکتے ہیں۔ مصنوعات پر کبھی بھی کسی قسم کا مائع نہ پھیلائیں۔
- سروسنگ - خود اس پروڈکٹ کی خدمت کرنے کی کوشش نہ کریں کیونکہ کور کھولنے یا ہٹانے سے آپ کو خطرناک حجم کا سامنا کرنا پڑ سکتا ہے۔tagای یا دیگر خطرات۔ مصنوعات کی تمام سروسنگ کا حوالہ Linortek کو دیں۔
- نقصان کی ضرورت سروس - آؤٹ لیٹ سے پروڈکٹ کو ان پلگ کریں اور درج ذیل شرائط کے تحت سروسنگ کو Linortek کسٹمر سپورٹ سے رجوع کریں:
a جب پاور سپلائی کی ہڈی یا پلگ خراب ہو جاتا ہے۔
ب اگر مائع پھیل گیا ہے، یا اشیاء پروڈکٹ پر گر گئی ہیں۔
c اگر پروڈکٹ کو بارش یا پانی سے دوچار کیا گیا ہے۔
d اگر پروڈکٹ آپریٹنگ ہدایات پر عمل کرکے عام طور پر کام نہیں کرتی ہے [پروڈکٹ کے ساتھ شامل ہے]۔ صرف ان کنٹرولز کو ایڈجسٹ کریں جو آپریٹنگ ہدایات میں شامل ہیں، کیونکہ دیگر کنٹرولز کی غلط ایڈجسٹمنٹ کے نتیجے میں نقصان ہو سکتا ہے اور اکثر پروڈکٹ کو اس کے معمول کے کام پر بحال کرنے کے لیے کسی مستند ٹیکنیشن کے ذریعے وسیع کام کی ضرورت ہوتی ہے۔
ای. اگر مصنوع کو گرا دیا گیا ہے یا کابینہ کو نقصان پہنچا ہے۔
f اگر پروڈکٹ کارکردگی میں ایک واضح تبدیلی کو ظاہر کرتا ہے۔ - متبادل پرزے - اگر متبادل پرزے ضروری ہوں تو کم والیوم رکھیںtage الیکٹریشن انہیں صرف مینوفیکچرر کے ذریعہ مخصوص کردہ حصے کا استعمال کرتے ہوئے تبدیل کرتا ہے۔ غیر مجاز متبادل کے نتیجے میں آگ لگنے، بجلی کے جھٹکے یا دیگر خطرات پیدا ہو سکتے ہیں۔ متبادل حصوں پر پایا جا سکتا ہے https://www.linortek.com/store/
- سیفٹی چیک - اس پروڈکٹ کی کسی بھی سروس یا مرمت کے مکمل ہونے پر، سروس ٹیکنیشن سے حفاظتی چیک کرنے کے لیے کہیں تاکہ یہ معلوم کیا جا سکے کہ پروڈکٹ مناسب آپریٹنگ حالت میں ہے۔
- Coax Grounding - اگر کوئی بیرونی کیبل سسٹم پروڈکٹ سے منسلک ہے، تو یقینی بنائیں کہ کیبل سسٹم گراؤنڈ ہے۔ صرف USA ماڈلز- نیشنل الیکٹریکل کوڈ کا سیکشن 810، ANSI/NFPA No.70-1981، ماؤنٹ اور سپورٹنگ ڈھانچے کی مناسب گراؤنڈنگ، ڈسچارج پروڈکٹ کو کوکس کی گرائونڈنگ، گرائونڈنگ کنڈکٹرز کا سائز، مقام کے حوالے سے معلومات فراہم کرتا ہے۔ ڈسچارج پروڈکٹ، گراؤنڈنگ الیکٹروڈ سے کنکشن، اور گراؤنڈنگ الیکٹروڈ کے تقاضے
- بجلی - بجلی کے طوفان کے دوران اس پروڈکٹ کے اضافی تحفظ کے لیے، یا اسے طویل عرصے تک بغیر توجہ کے اور غیر استعمال شدہ چھوڑنے سے پہلے، اسے وال آؤٹ لیٹ سے ان پلگ کریں اور کیبل سسٹم کو منقطع کریں۔ یہ بجلی اور بجلی کی لائن میں اضافے کی وجہ سے مصنوعات کو پہنچنے والے نقصان کو روکے گا۔
- بیرونی استعمال - یہ پروڈکٹ واٹر پروف نہیں ہے اور اسے گیلے ہونے کی اجازت نہیں ہونی چاہیے۔ بارش یا دیگر قسم کے مائع کو بے نقاب نہ کریں۔
رات بھر گھر سے باہر نہ نکلیں کیونکہ گاڑھا ہونا ہو سکتا ہے۔ - بیٹریاں، فیوز تبدیل کرتے وقت یا بورڈ لیول پروڈکٹ کو سنبھالتے وقت الیکٹرو سٹیٹک ڈسچارج سے محتاط رہیں جو الیکٹرانک آلات کو نقصان پہنچا سکتے ہیں۔ گراؤنڈ الیکٹرانکس سروس بینچ استعمال کرنا بہتر ہے۔ اگر یہ دستیاب نہیں ہے تو آپ دھات کے آلے یا پائپ کو چھو کر خود کو خارج کر سکتے ہیں۔ بیٹریاں یا فیوز تبدیل کرتے وقت i) بیٹری کی تاروں کے علاوہ کسی بھی تار کو نہ چھوئیں اور ii) پرنٹ شدہ سرکٹ بورڈ۔
ذمہ داری کی حد
IN NO EVENT WILL LINOR TECHNOLOGY BE LIABLE, WHETHER IN CONTRACT, TORT, OR OTHERWISE, FOR ANY INCIDENTAL, SPECIAL, INDIRECT, CONSEQUENTIAL OR PUNITIVE DAMAGES, INCLUDING, BUT NOT LIMITED TO, DAMAGES FOR ANY LOSS OF USE, LOSS OF TIME, INCONVENIENCE, COMMERCIAL LOSS, OR LOST PROFITS, SAVINGS, OR REVENUES TO THE FULL EXTENT SUCH MAY BE DISCLAIMED BY LAW. DISCLAIMER FOR CRITICAL APPLICATIONS
یہ پروڈکٹ لائف سپورٹ پروڈکٹ یا دوسرے استعمال کے لیے ارادہ یا مجاز نہیں ہے جس میں ناکامی ذاتی چوٹ یا موت کا سبب بن سکتی ہے۔ اگر آپ یا آپ کے گاہک اس طرح کے غیر ارادی یا غیر مجاز استعمال کے لیے اس پروڈکٹ کو استعمال کرتے ہیں یا اس کے استعمال کی اجازت دیتے ہیں، تو آپ Linor ٹیکنالوجی اور اس سے منسلک اداروں، اور ہر ایک کے افسران، ملازمین اور تقسیم کاروں کو اس طرح کے استعمال سے متعلق تمام ذمہ داریوں سے مکمل طور پر معاوضہ دینے پر اتفاق کرتے ہیں، بشمول وکیلوں کی فیس اور اخراجات۔
استعمال کی حد بندی کے لیے مزید نوٹس
جب تک کہ خاص طور پر بیان نہ کیا جائے، ہماری مصنوعات لائن والیوم کو تبدیل کرنے کے لیے ڈیزائن نہیں کی گئی ہیں۔tage (110V اور اس سے اوپر) ڈیوائسز۔ لائن والیوم پر چلنے والے آلے کو کنٹرول کرنے کے لیےtagایک مستند الیکٹریشن کے لیے ضروری ہے کہ وہ درمیانی آلہ نصب کرے جیسے کہ ریلے۔ کنٹرول کرنے کے لیے آلات کا انتخاب کرتے وقت، کم والیوم کو منتخب کرنا بہتر ہے۔tagای کنٹرولز جیسے کہ 24VAC solenoid سے پانی کے بہاؤ کو کنٹرول کرتا ہے۔ صرف اہل الیکٹریشن لائن والیوم کو تار لگا سکتے ہیں۔tagای ڈیوائس۔ مزید برآں، مقامی کوڈز کی پیروی کی جانی چاہیے جس میں وائر گیج سائز اور مناسب رہائش شامل ہیں لیکن ان تک محدود نہیں۔ Linortek ہماری مصنوعات کو غلط طریقے سے استعمال کرنے پر صارف یا تیسرے فریق کو پہنچنے والے نقصان کی کوئی ذمہ داری قبول نہیں کرتا ہے۔ یہ ذمہ داری صارف کے ساتھ رہتی ہے۔ Linortek ہماری مصنوعات کے غلط استعمال کی وجہ سے ڈیوائس کو پہنچنے والے نقصان کی کوئی ذمہ داری قبول نہیں کرتا ہے۔
ریلے والیومTAGای وضاحتیں
الیکٹریکل سرکٹس یا دیگر آلات سے آلات کو جوڑتے وقت براہ کرم احتیاط برتیں۔ یہ web کنٹرولر کسی بھی والیوم سے جڑنے کے لیے ڈیزائن نہیں کیا گیا ہے۔tage greater than 48V. Utilizing this arrangement, should allow you to virtually control anything. It is important that you use licensed electricians and comply with electrical codes that are applicable to your location. These codes exist for your safety, as well as the safety of others. Linortek assumes no responsibility for any harm or damage resulting from a failure adhere to local laws, ordinances or regulations or failure to follow specified instructions for installation and product usage.
Linortek سافٹ ویئر اور دستاویزات کے لیے اینڈ یوزر لائسنس کا معاہدہ
یہ اختتامی صارف لائسنس کا معاہدہ ("EULA") آپ (ایک فرد یا واحد ادارہ) اور Linor Technology, Inc. ("Linortek" یا "ہم" یا "ہم") کے درمیان ایک قانونی معاہدہ ہے جو آپ کے سافٹ ویئر کے استعمال کو کنٹرول کرتا ہے۔ اور دستاویزات ("سافٹ ویئر") فرگو، کوڈا، نیٹ بیل، IoTMeter، اور iTrixx سیریز کی مصنوعات ("Linortek Products") میں سرایت یا اس سے وابستہ ہیں۔
یہ EULA آپ کے Linortek کے استعمال کو کنٹرول نہیں کرتا ہے۔ webسائٹ یا Linortek مصنوعات (سافٹ ویئر کو چھوڑ کر)۔ Linortek کا آپ کا استعمال webسائٹ Linortek کے زیر انتظام ہے۔ webسائٹ کی سروس کی شرائط اور Linortek کی پرائیویسی پالیسی جو یہاں مل سکتی ہے:
http://www.linortek.com/terms-and-conditions آپ کی Linortek پروڈکٹس کی خریداری (سافٹ ویئر کو چھوڑ کر) Linortek کی محدود وارنٹی کے تحت چلتی ہے، جو اس پر مل سکتی ہے۔ https://www.linortek.com/linortek-one-year-limited-warranty/
This EULA governs your access and use of the Software. This EULA gives you specific legal rights, and you may also have other legal rights in addition, which vary from jurisdiction to jurisdiction. The disclaimers, exclusions, and limitations of liability under
this EULA will not apply to the extent prohibited or limited by applicable law. Some jurisdictions do not allow the exclusion of implied warranties or the exclusion or limitation of incidental or consequential damages or other rights, so those provisions of this EULA may not apply to you.
سافٹ ویئر یا دستاویزات کو انسٹال کرنے، ان تک رسائی، کاپی کرنے اور/یا استعمال کرکے آپ اپنی یا اس ہستی کی جانب سے اس EULA کے شرائط و ضوابط کے پابند ہونے پر اتفاق کرتے ہیں جس کی آپ اس طرح کی تنصیب، رسائی، کاپی کرنے اور/یا کے سلسلے میں نمائندگی کرتے ہیں۔ استعمال کریں آپ اس بات کی نمائندگی اور ضمانت دیتے ہیں کہ (i) آپ کو اپنی طرف سے اس EULA کی شرائط کو قبول کرنے اور ان سے اتفاق کرنے کا حق، اختیار اور صلاحیت ہے جس کی آپ نمائندگی کرتے ہیں (ii) آپ کی رہائش کے دائرہ اختیار میں آپ کی قانونی عمر کافی ہے۔ ، (iii) آپ کسی ایسے ملک میں واقع نہیں ہیں جو امریکی حکومت کی پابندی کے تابع ہے، یا جسے امریکی حکومت نے "دہشت گردی کی حمایت کرنے والے" ملک کے طور پر نامزد کیا ہے؛ اور (ii) آپ امریکی حکومت کی کسی بھی ممنوعہ یا ممنوعہ جماعتوں کی فہرست میں درج نہیں ہیں۔
اگر آپ اس EULA کی شرائط کے پابند نہیں رہنا چاہتے ہیں تو آپ سافٹ ویئر کو کسی بھی طرح سے انسٹال، رسائی، کاپی یا استعمال نہیں کر سکتے ہیں (چاہے آپ نے خریدی ہوئی ڈیوائس پر پہلے سے انسٹال ہو یا نہ ہو)۔
- سافٹ ویئر/سافٹ ویئر لائسنس کے استعمال کی اجازت۔
اس EULA کی شرائط کے ساتھ مشروط، Linortek آپ کو ایک محدود، قابل تنسیخ، غیر خصوصی، غیر ذیلی، ناقابل منتقلی حق اور لائسنس فراہم کرتا ہے (a) سافٹ ویئر کی ایک کاپی، ایگزیکیوٹیبل آبجیکٹ کوڈ فارم میں ڈاؤن لوڈ، انسٹال اور اس پر عمل درآمد صرف، صرف Linortek پروڈکٹ پر جس کی آپ ملکیت یا کنٹرول کرتے ہیں اور (b) سافٹ ویئر کو مکمل طور پر Linortek پروڈکٹ کے سلسلے میں اس کے مطلوبہ استعمال کے مطابق استعمال کریں جیسا کہ Linortek پر بیان کیا گیا ہے۔ webسائٹ (ہر ایک 1(a) اور 1(b) ایک "اجازت یافتہ استعمال" اور اجتماعی طور پر "اجازت یافتہ استعمال")۔ - آپ کے سافٹ ویئر کے استعمال پر پابندیاں۔
آپ متفق ہیں کہ اوپر سیکشن 1 میں بیان کردہ اجازت یافتہ استعمال کے علاوہ کسی اور مقصد کے لیے سافٹ ویئر استعمال کرنے کی دوسروں کو اجازت نہیں دیں گے۔ اس کا مطلب ہے، دوسری چیزوں کے علاوہ، آپ یہ نہیں کر سکتے ہیں:
(a) سافٹ ویئر کے کسی بھی حصے میں ترمیم، تبدیلی، ترمیم، موافقت، ترجمہ، مشتق کام بنانا، جدا کرنا، ریورس انجینئر یا ریورس کمپائل کرنا (سوائے اس حد کے کہ قابل اطلاق قوانین انٹرآپریبلٹی مقاصد کے لیے اس طرح کی پابندی کو خاص طور پر منع کرتے ہیں، جس صورت میں آپ اتفاق کرتے ہیں سب سے پہلے Linortek سے رابطہ کریں اور Linortek کو ایسی تبدیلیاں کرنے کا موقع فراہم کریں جو انٹرآپریبلٹی مقاصد کے لیے درکار ہوں؛
(b) لائسنس، تفویض، تقسیم، ترسیل، فروخت، کرایہ، میزبان، آؤٹ سورس، انکشاف یا بصورت دیگر سافٹ ویئر کو کسی تجارتی مقصد کے لیے استعمال کرنا یا کسی تیسرے فریق کو سافٹ ویئر دستیاب کرنا؛
(c) کسی تیسرے فریق کو کسی تیسرے فریق کی جانب سے یا اس کے فائدے کے لیے سافٹ ویئر استعمال کرنے کی اجازت دینا؛
(d) سافٹ ویئر کا کوئی حصہ کسی بھی ڈیوائس یا کمپیوٹر پر Linortek پروڈکٹ کے علاوہ استعمال کریں جس کی آپ ملکیت یا کنٹرول کرتے ہیں؛
(e) سافٹ ویئر کو کسی بھی طرح سے استعمال کریں جو کسی قابل اطلاق مقامی، قومی یا بین الاقوامی قانون کی خلاف ورزی کرتا ہو۔ یا
(f) remove or alter any labels, symbols, legends or proprietary notices, including but not limited to any copyright, trademark, logo in the Software. You may not disclose the results of any performance or functional evaluation of anyof the Software to any third party without the prior written consent of Linortek for each such release. - اپڈیٹس۔
Linortek سافٹ ویئر کی کارکردگی کو بہتر بنانے کے لیے وقتاً فوقتاً اپ ڈیٹس، اپ گریڈ، پیچ، بگ فکسز اور دیگر ترمیمات ("اپ ڈیٹس") تیار کر سکتا ہے۔ سوائے اس کے کہ جیسا کہ Linortek پر فراہم کیا گیا ہو۔ webسائٹ، یہ اپڈیٹس آپ کو مفت فراہم کیے جائیں گے۔ یہ اپ ڈیٹس آپ کو اطلاع دیئے بغیر خود بخود انسٹال ہو سکتے ہیں۔ سافٹ ویئر استعمال کرکے، آپ خودکار اپ ڈیٹس کے لیے بھی رضامندی دیتے ہیں۔ اگر آپ اس سے متفق نہیں ہیں تو آپ کسی بھی طرح سے سافٹ ویئر کو انسٹال، رسائی، کاپی یا استعمال نہیں کر سکتے۔ - ملکیت۔
The Software is licensed to you and not sold. Linortek reserves all rights to the Software and any Updates not expressly granted herein. The Software and Linortek Products are protected by copyright, trademark and other intellectual property laws andtreaties. Linortek and its licensors own the title, copyright, trademarks and other intellectual property rights in the Software.
You are not granted any rights to Linortek’s trademarks or service marks. There are no implied licenses in this EULA. - ختم کرنا۔
This EULA is effective from the date you first use the Software and will continue for as long as you own the Linortek Product associated with it or until you or Linortek terminate this agreement under this section. You may terminate this EULA at any time upon written notice to Linortek at the address provided below. Linortek may terminate this EULA at any time if you fail to comply with any of the terms in this agreement. The license granted in this EULA terminates immediately when the agreement terminates. Upon termination, you must stop using the Linortek Product and the Software and you must delete all copies of the
Software. The terms of Sections 2 will still remain in effect after the agreement terminates. - وارنٹی ڈس کلیمر۔
EXTENT PERMITTED BY APPLICABLE LAW, LINORTEK PROVIDES THE SOFTWARE “AS-IS” AND DISCLAIMS ALL WARRANTIES AND CONDITIONS, WHETHER EXPRESS, IMPLIED, OR STATUTORY, INCLUDING THE WARRANTIES OF MERCHANTABILITY, FITNESS FOR A PARTICULAR PURPOSE, TITLE, QUIET ENJOYMENT, ACCURACY, AND NON-INFRINGEMENT OF THIRD-PARTY RIGHTS. LINORTEK DOES NOT GUARANTEE ANY SPECIFIC RESULTS FROM THE USE OF THE SOFTWARE. LINORTEK MAKES NO WARRANTY THAT THE SOFTWARE WILL BE UNINTERRUPTED, FREE OF VIRUSES OR OTHER HARMFUL CODE, TIMELY, SECURE, OR ERROR-FREE. YOU USE THE SOFTWARE AND THE LINORTEK PRODUCT AT YOUR OWN DISCRETION AND RISK. YOU WILL BE SOLELY RESPONSIBLE FOR (AND LINORTEK DISCLAIMS) ANY AND ALL LOSS, LIABILITY, OR DAMAGES RESULTING FROM YOUR USE OF THE SOFTWARE
AND LINORTEK PRODUCT. - ذمہ داری کی حد۔
اس EULA میں اور خاص طور پر اس "Limitation of Liability" کی شق میں کچھ بھی ایسی ذمہ داری کو خارج کرنے کی کوشش نہیں کرے گا جسے قابل اطلاق قانون کے تحت خارج نہیں کیا جا سکتا۔
قابل اطلاق قانون کے ذریعہ زیادہ سے زیادہ حد تک ، مذکورہ بالا وارنٹی دستبرداری کے علاوہ ، کسی بھی صورت میں (ا) لینورٹیک کسی بھی نتیجے میں ، مثالی ، خصوصی ، یا حادثاتی نقصانات کے لئے ذمہ دار نہیں ہوگا ، بشمول کھوئے ہوئے اعداد و شمار یا کھوئے ہوئے منافع کے ل any ، جس میں کوئی نقصانات ہیں۔ پروڈکٹس یا سافٹ ویئر سے یا اس سے متعلق، یہاں تک کہ اگر LINORTEK کو اس طرح کے نقصانات کے امکان کا علم ہو یا اس کا علم ہو، اور (B) LINORTEK کی مجموعی مجموعی ذمہ داری سے متعلق ذمہ داری سے متعلق دیگر متعلقہ ذمہ داریوں کے ساتھ ایک ایسی رقم تک محدود ہو گی جو آپ کی طرف سے LINORTEK اور LINORTEK کے مجاز ڈسٹریبیوٹر یا سیلز کے نمائندے کو پروڈکٹس یا خدمات فراہم کرنے والے 6 کے لیے اصل میں ادا کی گئی رقم سے زیادہ نہ ہو۔ یہ حد مجموعی ہے اور ایک سے زیادہ واقعات یا دعووں کی موجودگی سے اس میں اضافہ نہیں ہوگا۔ LINORTEK LINORTEK کے لائسنس دہندگان اور سپلائرز کی کسی بھی قسم کی تمام ذمہ داریوں سے انکار کرتا ہے۔ - ایکسپورٹ قوانین کی تعمیل۔
آپ تسلیم کرتے ہیں کہ سافٹ ویئر اور متعلقہ ٹیکنالوجی امریکی برآمدی کنٹرول قوانین کے امریکی برآمدی دائرہ اختیار کے تابع ہیں اور دوسرے ممالک میں برآمد یا درآمد کے ضوابط کے تابع ہو سکتے ہیں۔ آپ تمام قابل اطلاق بین الاقوامی اور قومی قوانین اور ضوابط کی سختی سے تعمیل کرنے سے اتفاق کرتے ہیں جو سافٹ ویئر پر لاگو ہوتے ہیں، بشمول یو ایس ایکسپورٹ ایڈمنسٹریشن ریگولیشنز کے ساتھ ساتھ یو ایس اور دیگر حکومتوں کی طرف سے جاری کردہ اختتامی صارف، اختتامی استعمال، اور منزل کی پابندیاں۔ آپ تسلیم کرتے ہیں کہ آپ کی ذمہ داری ہے کہ آپ سافٹ ویئر اور متعلقہ ٹیکنالوجی کو برآمد کرنے، دوبارہ برآمد کرنے یا درآمد کرنے کی اجازت حاصل کریں، جیسا کہ ضرورت ہو۔
آپ Linortek کو اس سیکشن کے تحت آپ کی ذمہ داریوں کی خلاف ورزی سے پیدا ہونے والے یا اس سے متعلق کسی بھی اور تمام دعووں، نقصانات، واجبات، نقصانات، جرمانے، جرمانے، اخراجات اور اخراجات (بشمول اٹارنی کی فیس) سے بے ضرر رہیں گے۔ - اسائنمنٹ۔
آپ اس EULA کے تحت اپنے حقوق یا ذمہ داریوں میں سے کسی کو تفویض نہیں کر سکتے ہیں، اور تفویض کرنے کی کوئی بھی کوشش باطل اور اثر کے بغیر ہوگی۔ - نوٹس
Linortek آپ کو اس EULA سے متعلق کوئی بھی نوٹس ای میل اور ایڈریس کا استعمال کرتے ہوئے فراہم کر سکتا ہے جو آپ نے Linortek کے ساتھ رجسٹر ہوتے وقت فراہم کیا تھا۔ - چھوٹ
مؤثر ہونے کے لیے، Linortek کی طرف سے کوئی بھی اور تمام چھوٹ اس کے تحت تحریری اور ایک مجاز Linortek نمائندے کے دستخط شدہ ہونی چاہیے۔ اس کے تحت کسی بھی اصطلاح کو نافذ کرنے میں Linortek کی کسی بھی دوسری ناکامی کو چھوٹ نہیں سمجھا جائے گا۔ - سختی
اس EULA کی کوئی بھی شق جو ناقابل نفاذ پائی جاتی ہے اس میں ترمیم اور تشریح کی جائے گی تاکہ قابل اطلاق قانون کے تحت اس پروویژن کے مقاصد کو زیادہ سے زیادہ حد تک پورا کیا جا سکے اور باقی تمام دفعات پوری قوت اور اثر میں رہیں گی۔ - گورننگ قانون؛ مقام
You agree that this EULA, and any claim, dispute, action, cause of action, issue, or request for relief arising out of or relating to this EULA, will be governed by the laws of the state of North Carolina, U.S.A., without regard to conflicts of laws principles, provided that if you reside in a country that will not apply U.S. law to disputes related to these terms, then the laws of your country will apply. You also agree that the United Nations Convention on Contracts for the International Sale of Goods shall not
apply. You agree that regardless of any statute or law to the contrary, any cause of action against us arising out of or related to the Linortek webسائٹ، سافٹ ویئر یا Linortek پروڈکٹس کو ایک (1) سال کے اندر کارروائی کی وجہ جمع ہونے کے بعد شروع ہونا چاہیے یا اس طرح کی کارروائی کی وجہ کو مستقل طور پر روک دیا جائے گا۔ اس EULA سے متعلق کسی بھی کارروائی یا کارروائی کو Raleigh، North Carolina میں واقع وفاقی یا ریاستی عدالت میں لایا جانا چاہیے اور ہر فریق اس طرح کے کسی بھی دعوے یا تنازعہ میں کسی بھی عدالت کے دائرہ اختیار اور مقام کو اٹل طور پر جمع کرائے، سوائے اس کے کہ Linortek حکم امتناعی کی درخواست کر سکتا ہے۔ کسی بھی عدالت میں ریلیف جو اس کی دانشورانہ املاک کے تحفظ کا دائرہ اختیار رکھتی ہے۔ - کیلیفورنیا تجویز 65 وارننگ۔
 انتباہ: یہ پروڈکٹ آپ کو سیسہ سمیت کیمیکلز سے بے نقاب کر سکتی ہے، جو ریاست کیلیفورنیا میں کینسر کا سبب بنتی ہے۔ مزید معلومات کے لیے، www.P65Warnings.ca.gov پر جائیں۔
شروع کرنا
The Fargo SERVER is what is called a “bare board” product and is supplied without a housing. It operates on low voltage; however you need to use simple handling precautions to prevent damage to the circuits. All electronics are susceptible to electrostatic discharge. This high voltage “shock” can permanently damage your device. Before handling the product, you should touch a surface such as a grounded workbench or table. It is also best to handle the device from its edges. If you notice that your chair or clothes often cause static discharges, you must exercise extra caution. The unit is supplied with four rubber feet which keeps the bottom of the board from coming into contact with the surface you put it on. Be careful not to let metal objects, such as screw drivers or hardware, come in contact with the bottom of this product. The board can be mounted on a panel using stand offs and #4 hardware. The mounting holes are connected to the GROUND signal. The SERVER unit is a self-contained web server configured with various input and output circuits. Although the relays are rated for higher voltages، یہ پروڈکٹ لائن والیوم پر استعمال کے لیے ڈیزائن نہیں کیا گیا ہے۔tages. You should never use voltages through the SERVER product exceeding 48 volts. IT IS NOT SAFE.
The KODA SERVER is a housed unit with a DIN rail mountable enclosure that can be snapped onto a DIN rail or attached to any flat surface such as a wall or under a counter. KODA 100 has two relays (48VAC@1A), KODA 200 has four relays which can drive 10V 50mA to external devices. The unit is supplied with a DIN Rail mountable enclosure with removable terminal connectors for easy installation. The KODA SERVER can be mounted on a panel or on the wall using the DIN rail mount clip. The removable wire terminal connectors simplify field installation and allow for easy troubleshooting and maintenance: the unit can be removed from the system without disturbing the system wiring.
سرور کی وائرنگ
نوٹ: For a diagram showing the location of all connectors on your SERVER referenced in this section, please see the section – Board Layout Reference.
احتیاط: یہ یونٹ زمین سے الگ تھلگ ہیں۔ ہمیشہ جڑیں تاکہ پاور لوپ صرف سرور یونٹ سے منسلک ہو۔
بیرونی زمینی کنکشن استعمال نہ کریں۔ ایسا کرنے سے SERVER یا POE شروع کرنے والے آلے کو نقصان پہنچ سکتا ہے۔
- Place the unit on a table or bench being careful not to let any metal objects come into contact with the bottom of the circuit board (Fargo Only).
- Connect the 12VDC power supply to a suitable AC outlet and plug the barrel connector into the SERVER at the location labelled “12VDC/POWER”. Alternatively, you may also use POE. At this point the GREEN/Boot LED should come on and start flashing indicating the SERVER is operating and is in the “Bootload Mode”. This mode allows the user to update the server software that is used on the unit. After about 5 seconds, the GREEN LED will go off and the RED LED will start blinking once per second indicating the SERVER is operating in “Server Mode” and is accessible on a network utilizing TCP/IP protocols.
احتیاط: جب آپ POE نیٹ ورک سوئچ استعمال کرتے ہیں، اسی وقت سرور کو پاور کرنے کے لیے 12VDC پاور سپلائی کا استعمال نہ کریں، یہ بورڈ کو نقصان پہنچائے گا۔ - Plug an Ethernet cable into the RJ45/NET connector. The “Connection” LED will come on if a 100MHz network is available, otherwise it will remain off and the “Activity” LED should start blinking indicating network activity. Fargo G2 Relay Connections
There are 8 relays on the FARGO R8 and 4 on the FARGO R4. These are dry contact relays. These units are designed for only low voltage کنٹرول اور والیوم نہیں ہونا چاہیے۔tage applied to the relay greater than 48 volts. This is for your safety as well as to stay within the parameters of the parts and circuit board design. The relays have 3 terminals labelled NO, C and NC which stand for Normally Open, Common and Normally Closed. When activated, the relay moves the connection from CNC to CNO. If you want to make a connection when the relay is activated, connect your wires between C and NO. When the relay is activated C and NO will be connected together. If you want to break a circuit when the relay is activated, make your connections to C and NC. When the relay is activated the circuit will be broken (or open)
Koda Relay Connection
There are 2 relays on the KODA 100. The KODA 100 has 2 removable 2 position connectors (1 for each relay) and are simply numbered “1” and “2”. These relays are normally open.
There are 4 relays on the KODA 200. The KODA 200 has 1 removable 8 position connector. Each relay has a “+” connection and a numbered connection. The relays may be set to supply about 10VDC by selecting “+V” on the setting switch (see Board Layout Reference page 29) or set to dry contact DC on the switch. If “+V” is selected then the voltage will be present on the “+” terminal and the numbered terminal is the return. Otherwise, a normally open dry contact exists across the “+” and numbered connection. KODA 100/200 is designed for only low voltage کنٹرول اور والیوم نہیں ہونا چاہیے۔tage 48 وولٹ سے زیادہ ریلے پر لاگو ہوتا ہے۔ یہ آپ کی حفاظت کے ساتھ ساتھ حصوں اور سرکٹ بورڈ کے ڈیزائن کے پیرامیٹرز کے اندر رہنے کے لیے ہے۔

![]() کسی بھی صورت میں LINOR ٹکنالوجی ذمہ دار نہیں ہوگی، چاہے معاہدے میں ہو، tort، یا دوسری صورت میں، کسی بھی اتفاقی، خصوصی، بالواسطہ، نتیجہ خیز یا تعزیراتی نقصانات کے لیے، بغیر کسی وقفے کے، بغیر کسی وقفے کے، , تجارتی نقصان، یا کھوئے ہوئے منافع، بچتیں، یا مکمل حد تک ریوینیو جو کہ قانون کی طرف سے مسترد کیا جا سکتا ہے۔
کسی بھی صورت میں LINOR ٹکنالوجی ذمہ دار نہیں ہوگی، چاہے معاہدے میں ہو، tort، یا دوسری صورت میں، کسی بھی اتفاقی، خصوصی، بالواسطہ، نتیجہ خیز یا تعزیراتی نقصانات کے لیے، بغیر کسی وقفے کے، بغیر کسی وقفے کے، , تجارتی نقصان، یا کھوئے ہوئے منافع، بچتیں، یا مکمل حد تک ریوینیو جو کہ قانون کی طرف سے مسترد کیا جا سکتا ہے۔
استعمال کی حد بندی کے لیے مزید نوٹس
جب تک کہ خاص طور پر بیان نہ کیا جائے، اس پروڈکٹ کو لائن والیوم کو تبدیل کرنے کے لیے ڈیزائن نہیں کیا گیا ہے۔tagای ڈیوائسز۔ اس حد میں تمام FARGO اور KODA مصنوعات شامل ہیں۔ لائن والیوم پر چلنے والے آلے کو کنٹرول کرنے کے لیےtages صارف کو لازمی طور پر انسٹال کرنا چاہیے اور درمیانی ڈیوائس جیسے کہ ریلے۔
وائرنگ ایک لائن والیومtagدرمیانی ڈیوائس کا استعمال کرتے ہوئے e ڈیوائس، آپ کو یا تو ایک مستند الیکٹریشن ہونا چاہیے یا کسی مستند الیکٹریشن کی خدمات کا استعمال کرنا چاہیے۔ مزید برآں، مقامی کوڈز کی پیروی کی جانی چاہیے، بشمول وائر گیج کا سائز اور مناسب رہائش۔
Linortek cannot assume any responsibility for harm to the user or third parties for improperly using our Fargo/Koda products. This liability remains with the user. Linortek cannot assume any responsibility for damage to the device for improperly using our SERVER product.
For relay specifications, please see Board Reference Layout page 29
Digital Input Connections (Fargo R4 and Koda)
The digital inputs allow the SERVER to detect an external on/off state of a sensor. With this information the SERVER can display whether an input is on or off, count events in a resettable or non-resettable counter, and calculate the frequency (such as for use as a tachometer) or the period of the input. There are two modes of operation for the digital inputs – PULL UP and ISOLATED.
a) PULL UP mode connects a 1K resistor to an internal voltage آپ کو ٹرمینلز 1 اور 2 میں ایک سادہ سوئچ (جیسے مقناطیسی دروازے کا سوئچ) استعمال کرنے کی اجازت دیتا ہے۔
b) ISOLATED mode allows you to directly drive the SERVER’s optoisolator with an external voltage اگرچہ اندرونی 1K ریزسٹر۔ یہ جلدtage 5V سے 24V کی رینج میں ہو سکتا ہے جو کم از کم 2mA یا زیادہ سے زیادہ 30mA آپٹو آئسولیٹر ڈائیوڈ کو فراہم کرتا ہے۔ اس جلد سے کوئی اور اندرونی تعلق نہیں ہے۔tage so it is an isolated input. Please note, when connecting a 12VDC-¬24VDC circuit to the input, an external resistor (can be provided at request, 2.2k ohm 0.5watt) must be used.
These modes are selected by the switch on the SERVER (see Board Layout Reference page 29) marked ISO and PU for isolated and pull up respectively. These are set at the factory to ISO by default.
Wiring a push button: For distances up to 500 feet, a 20 AWG shielded wire is suitable for wiring a push button. If the distance between the push button and the controller extends up to 5,000 feet, use a 16 AWG shielded cable instead. Keep in mind that longer cable runs are more susceptible to signal interference.
احتیاط: If you intend to use isolated mode, verify that the input switch is set to ISO before applying an external voltage دوسری صورت میں کرنا SERVER یا POE شروع کرنے والے آلے کو نقصان پہنچا سکتا ہے۔
Analog Input Connections (Fargo R4ADI)
The analog inputs allow the SERVER to read the value of external equipment. There are 2 analog inputs.
For AC current monitoring, use one of the two 3.5mm stereo inputs to interface with a current sensor.
2 اینالاگ ان پٹ ٹرمینل بلاکس غیر الگ تھلگ 0-5V کرنٹ سینسرز سے جڑے ہوئے ہیں جو مختلف آلات جیسے کہ درجہ حرارت یا پریشر سینسر سے منسلک ہو سکتے ہیں۔ سرور زمینی اور بجلی کا کنکشن فراہم کرتا ہے تاکہ پیمائش بیرونی والیوم کے بغیر کی جا سکے۔tage references. You should use a sensor that is isolated so that that it makes no connection to a remote ground. See drawing under Board Reference Layout page 29.
Accessing your SERVER
ایک بار جب آپ کا سرور آن ہو جاتا ہے اور نیٹ ورک سے جڑ جاتا ہے، تو یہ خود بخود DHCP کے ذریعے ایک IP ایڈریس حاصل کر لے گا جب تک کہ آپ کا روٹر ایسا کرنے کے لیے کنفیگر ہو جائے۔ جڑنے کے لیے، اپنے میں آئی پی ایڈریس درج کریں۔ web browser. This will take you to your SERVER’s landing page. To log in, click the Log In button on the top right of the page. Your browser will prompt you to enter your username and password. By default, these credentials are both set to admin. To find your SERVER’s IP address, see below.
Linortek Discoverer کے ساتھ اپنا IP پتہ تلاش کرنا
دریافت کرنے والا پروگرام خود بخود آپ کے سرور کو تلاش کر لے گا۔ ڈسکوور ایک جاوا پروگرام ہے، اور اس فیچر کو استعمال کرنے کے لیے جاوا رن ٹائم انسٹال کرنے کی ضرورت ہے۔ جاوا یہاں پایا جا سکتا ہے: http://java.com/en/download/index.jsp.
Discover پروگرام ڈاؤن لوڈ کرنے کے لیے، براہ کرم یہاں جائیں: https://www.linortek.com/downloads/supportprogramming/
کروم اور فائر فاکس براؤزر کے استعمال کی سفارش کی جاتی ہے۔ براہ کرم نوٹ کریں: اگر آپ انٹرنیٹ ایکسپلورر استعمال کرنے کو ترجیح دیتے ہیں، تو انٹرنیٹ ایکسپلورر Linortek Discoverer کو زپ کے طور پر محفوظ کرتا ہے۔ file پہلے سے طے شدہ طور پر Discoverer کو استعمال کرنے کے لیے، آپ کو Save as کو منتخب کرنے اور نام تبدیل کرنے کی ضرورت ہوگی۔ file Linortek Discoverer.jar کے طور پر جب آپ ڈاؤن لوڈ کریں۔
ڈسکور پروگرام کو ڈاؤن لوڈ کرتے وقت، بعض اوقات آپ کو اپنے براؤزر کی سیکیورٹی سیٹنگز کے لحاظ سے ایک پاپ اپ وارننگ میسج نظر آئے گا، جس میں پوچھا جائے گا کہ کیا آپ اسے رکھنا چاہتے ہیں یا رد کرنا چاہتے ہیں۔ file, please click the Keep button as this is a Java program, and it won’t harm your computer.
ایک بار جب Discoverer آپ کے آلے کو تلاش کرتا ہے، تو یہ ظاہر کرے گا:
- آئی پی ایڈریس
- میزبان کا نام
- میک ایڈریس
- دیگر معلومات:
a بلیو ایل ای ڈی (اگر آن ہو)
ب پروڈکٹ کا نام
c سرور سافٹ ویئر ریویژن
d پورٹ نمبر (اگر پورٹ ہو)

اس ڈیوائس پر کلک کریں جسے آپ استعمال کرنا چاہتے ہیں سرور کو لانچ کرنے کے لیے Discoverer پروگرام میں دکھایا گیا ہے۔ web pages in your browser. Click the Login button on the homepage. The default username/password is: admin/admin. You may change these as you desire or disable this feature in the settings menu.
Connecting your SERVER Directly to Your PC
You can also plug your SERVER directly to your PC if there is no network connection available. If you plug your SERVER into your PC’s Ethernet port it will use the default IP address: 169.254.1.1 unless you have previously configured your SERVER to use a static IP. Enter 169.254.1.1 into your web browser to connect. No internet connection is required. Once configured, you can then install your SERVER where you desired.
سرور کنفیگریشن
لاگ ان
Once you have entered the IP address and port number, if set, the Login page will open. This page shows the name of this server which you may change in Configure/Network Config.
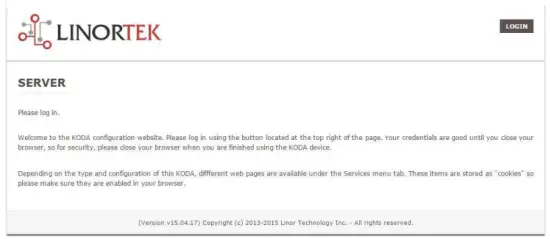
This page is static with no background activity and is a useful place to park if you are not using the SERVER and do not want to close the connection.
By pressing LOGIN, you will be asked for your username and password. These credentials will be retained by the browser until the browser is closed. You can disable the password requirement in Settings page. See section page 21.
ہوم پیج
ایک بار جب آپ کے لاگ ان کی اسناد داخل ہو جائیں گی، آپ کو درخواست کے مرکزی صفحہ پر بھیج دیا جائے گا۔ ہوم یا انڈیکس صفحہ سسٹم کی کچھ معلومات دکھاتا ہے اور جسمانی ڈیوائس کو تلاش کرنے کی صلاحیت پیش کرتا ہے اگر یہ کسی دوسرے علاقے میں ہو۔ تفصیل کے لیے نیچے دی گئی فہرست دیکھیں۔

- TIME – Displayed along with the day of the week. This time may be set to be in a 12 hour format with AM/PM indicator or 24 hour format.
- DATE - موجودہ تاریخ یہاں ظاہر کی گئی ہے۔
- VOLTS - والیومtagای بورڈ پر ظاہر ہوتا ہے۔ یہ مفید ہو سکتا ہے اگر سرور دوسرے آلات کے ساتھ چل رہا ہو، والیومtage variance can be noted. Fargo and Koda servers have an input voltage range of 1248vDC.
- TEMPERATURE – Temperature on the board is displayed. This display may be either °C or °F. This temperature will be affected by the heat generated by SERVER itself so it will always be slightly higher than ambient temperature.
- LEDs - 3 LEDs دکھائے گئے ہیں۔ ریڈ ایل ای ڈی سسٹم پلس ہے۔ جب تک سرور چل رہا ہے اسے فی سیکنڈ میں ایک بار پلک جھپکنا چاہیے۔ گرین ایل ای ڈی کو بوٹ لوڈر کے اختیارات کے لیے استعمال کیا جاتا ہے اور عام طور پر اس پر نظر نہیں آتا webسائٹ بلیو ایل ای ڈی قابل کلک ہے اور آپ اسے اس سے آن اور آف کر سکتے ہیں۔ web صفحہ یہ آلہ کو جسمانی طور پر تلاش کرنے کے لیے مفید ہے اگر یہ اسی طرح کی دیگر اکائیوں کے ساتھ استعمال میں ہو کیونکہ یہ اس یونٹ پر روشنی ڈالے گا جس پر یہ web براؤزر منسلک ہے. ڈسکوور پروگرام یہ بھی نوٹ کرے گا کہ آیا بلیو ایل ای ڈی آن ہے۔ اسے اکثر "لوکیٹ" فنکشن کہا جاتا ہے۔
خدمات
سروسز کا ٹیب متحرک ہے اور آپ کے سرور کی ترتیب کے لحاظ سے تبدیل ہو جائے گا۔ یہ وہ جگہ ہے جہاں آپ ان پٹ، آؤٹ پٹ، سینسر اور دیگر خصوصی کنٹرولز کو کنٹرول کر سکتے ہیں۔
In/Out or Relays Page
Depending on which SERVER you are using, the first page on the SERVICES tab will be either In/Out or Relays.
In/Out has the relay controls and the input controls on one page, while Relays only has the relay controls.
ریلے کنٹرول
An In/Out page is displayed below. Some relay control pages have 2, 4 or 8 relays displayed. Each relay has a number, in this case 1 to 4.

The State LED shows whether the relay is on or off indicated by GREEN and RED respectively. This icon is clickable to manually control the corresponding relay. Each relay can have a Name as well as identifiers for the Normally Open, Common and Normally Closed connections.
چار اسٹیٹس ایل ای ڈی ہیں جو دکھاتے ہیں:
- Email – If an email is to be sent when this relay is switched on/off
- پلس - اگر یہ ریلے پلس چوڑائی اور پلس چوڑائی ضرب (مدت) کے ساتھ سیٹ کیا گیا ہے - مزید معلومات کے لیے اگلا سیکشن دیکھیں
- Sched. – If there is a schedule created in the Tasks page (see page 15) set to automatically trigger this relay.
- ٹائمڈ - اگر پلس سیٹ ہے اور یہ ریلے ایکٹیویٹ ہو جاتا ہے، تو ٹائمڈ ایل ای ڈی سرخ ہو جائے گی یہ ظاہر کرتی ہے کہ ریلے فی الحال ٹائمر پر کام کر رہا ہے۔
Click the Edit Icon to edit the controls for the corresponding relay. This will take you to the Set Relay page (see page 11).
ان پٹ
The In/Out or Inputs page (depending on your SERVER) will display information from each input. The SERVERs have a combination of inputs. The Fargo R4DI has four digital inputs, The R4ADI has, four digital inputs, four analog inputs. The KODA SERVER has two digital inputs.
At the top of each input is a label (ex: DIN 1, AIN 2) specifying whether it is a digital input (DIN) or analog input (AIN) as well as the input number. This label will turn green when the input is enabled. Inside the box will be any display configured from the Set Input page (see page 12 for digital input, page 14 for analog input). A red dot in the lower-left corner indicating the state of a linked relay (if any), will turn green when the linked relay is activated.
Finally, an Edit icon in the lower-right corner of the box to edit the corresponding input. This will take you to the Set Digital Input or Set Analog Input page (page 12 or page 14).
Set Relay Page
SET RELAY صفحہ آپ کو ریلے سے متعلق مختلف خصوصیات کو سیٹ کرنے کی اجازت دیتا ہے۔
- Relay Select – The Relay that you are editing (identified by the line on which you clicked the Edit icon on the RELAY page).
- Name – Enter a 15-character Relay Name. This and the following 3 fields may be used for any identifying information desired.
- NO Name – Enter a 7-character name for the Normally Open (NO) connection.
- Com Name – Enter a 7-character name for the Common (COM) connection.
- NC Name – Enter a 7-character name for the Normally Closed (NC) connection.
- Pulse Width – When you control the relay it turns on or off. You may control it for a timed turned on period by entering a Pulse Width when 0 means there is no timed event and a number represents duration of the pulse. The maximum number you can enter here is 4 digits, ie. 1234.
- نبض کی چوڑائی ضرب - نبض کی لمبائی کو مزید واضح کرنے کے لیے پلس چوڑائی کی مزید وضاحت کے لیے پلس چوڑائی ضرب کا انتخاب کریں۔ آپ منتخب کر سکتے ہیں:
• کوئی نہیں۔
• mS (Millisecond, 1/1000 second)
• Sec (Seconds)
• Min (Minutes) - ریلے کی قسم - سرور جسمانی طور پر سرور پر یا دوسرے ذرائع استعمال کرکے ریلے تک رسائی حاصل کرسکتا ہے۔ آپ منتخب کر سکتے ہیں:
• Normal – relay physically on the SERVER
• Latched – not currently supported
• Remote – a relay on another SERVER accessed over the network
• Zigbee – a relay at a remote device accessed over an RF system
• Normal and Remote – both relays activated
• Normal and Zigbee – both relays activated - مقام کی شناخت - یہ ایک ایسا نمبر ہے جو دور دراز کے مقام کی نشاندہی کرتا ہے۔
- مقام پر ریلے – مقام پر ریلے یا ڈیوائس کی نمائندگی کرنے والا نمبر
- ای میل بھیجیں - اگر ریلے آن یا آف ہو تو سرور کو ای میل بھیجنے کے لیے پروگرام کیا جا سکتا ہے۔

ڈیجیٹل ان پٹ پیج سیٹ کریں۔
ڈیجیٹل ان پٹس کو ڈسپلے کی مختلف اقسام کے استعمال پر مختلف ریڈ آؤٹ فراہم کرنے کے لیے سیٹ کیا جا سکتا ہے۔ ان پٹ ڈیٹا کو ظاہر کرنے کے علاوہ، آپ ڈسپلے کو نام دے سکتے ہیں اور ساتھ ہی اس کے ساتھ ریلے کو جوڑ سکتے ہیں۔ یہ ریلے گرین سے ریڈ میں تبدیل ہو جائے گا کیونکہ یہ آگے سے آف تک جاتا ہے اور ساتھ ہی اسے کنٹرول کرنے کے لیے کلک بھی کیا جا سکتا ہے۔ ترمیم پنسل آئیکن پر کلک کر کے، آپ اس ان پٹ کے لیے ترتیبات میں ترمیم کر سکتے ہیں:
- Digital Input Selected – The Digital Input that you are editing (identified by the line on which you clicked the Edit icon).
- نام - آپ اس ان پٹ کے لیے 15 حروف کا نام سیٹ کر سکتے ہیں۔ یہ نام ڈسپلے کے اوپری حصے میں بار میں جاتا ہے۔
- لیبل - ایک 7-حروف کا لیبل سیٹ کریں جو اصل فعال ڈسپلے پر ظاہر ہوتا ہے۔
- درست کرنے والا - اس فیلڈ کا استعمال کرتے ہوئے آپ ڈسپلے پیج پر ویلیو کو ظاہر کرنے سے پہلے کسی قدر کو شامل، گھٹا، ضرب یا تقسیم کر سکتے ہیں۔ یہ ایک 2-ویلیو کریکٹر ہے جس میں ہر ایک کو ایک اسپیس کریکٹر سے الگ کیا جاتا ہے۔ (یعنی "+2، -2، *3، /3")
- استعمال کریں - اس ان پٹ کو فعال پر سیٹ کرتا ہے۔ ان پٹ نمبر کے اشارے کو سبز کر دیتا ہے۔ واضح رہے کہ ان پٹ استعمال میں CPU وقت اور دیگر وسائل استعمال کرتا ہے اس کی قسم کے لحاظ سے۔ اگرچہ تمام ان پٹ ایک ہی وقت میں فعال ہو سکتے ہیں، لیکن یہ تجویز کی جاتی ہے کہ صرف ان کو آن کریں جنہیں آپ استعمال کرنا چاہتے ہیں۔
- قسم - ان پٹ ڈیٹا کو نتائج کی ایک حد کا حساب لگانے کے لیے استعمال کیا جا سکتا ہے۔ آپ منتخب کر سکتے ہیں:
• State – This is useful for knowing if an input is on or off, like a door switch being on or off.
• CounterNR – This is a non-resettable counter.
• CounterR – This is a resettable counter.
• Frequency – Counts the frequency of an input in KHz (kilo hertz or1/1000 seconds). This could be useful in displaying a tachometer where 60Hz = 1 R.P.M.
• Period – in 1/1000 seconds an input in kHz (milliseconds or1/1000 seconds). This would be useful for measuring timed events. - ڈسپلے - یہ انتخاب آپ کو استعمال شدہ ڈسپلے کی قسم کو تبدیل کرنے دیتا ہے۔ آپ منتخب کر سکتے ہیں:
• Dot – A single dot with the value in the middle. This can be used for State. You can make a dumb indicator by changing the color of the Dot based on the value. The label is under the Dot.
• Values – Displays the Corrected Value with the Label in a box directly below it.
• Meter – This Meter has configurable scale based on the Min/Max values and arcs can be colored per the Color ranges. The Label is displayed within the Meter.
• VBar – Also based on the Min/Max values for the scale and the bar changes color based on the values in the Color ranges. - Relay L/T – Enter a Relay number here. If it is a local relay it will show GREEN or RED depending if it is on or off. By clicking on it the relay will turn on and off. The name comes from the relay settings page. This may be useful if you want to turn the subject of a display on and off. Any relay can be used on any input and each may be reused for any other input. Adding an L after the relay number (ex: 2L) will link the state of the input to the state of the relay. This is an easy and immediate way to have an input follow the relay. Adding a T after the relay number will trigger the relay to the state of the input. This is an easy and immediate way to have a relay follow the input.
- Command Z/N/I – This field is used for issuing various commands to the Digital Input controller: Z Zero the resettable counter. N Leave the input as Normal. I Invert the input.
- Value – These are Min/Max values used for the display. This is useful for preventing a Meter from going past its end or setting the value of a VBar. This is the Value after the Corrector. The system cannot display a value past Max, so be sure this is at least set to 1.
- پیلا/سرخ/سبز - تین رنگ ہیں جو ڈسپلے کی مزید وضاحت کے لیے استعمال کیے جا سکتے ہیں۔ ڈسپلے ویلیو میں رنگ کی وضاحت کرنے کے لیے ان رنگوں کی رینج سیٹ کریں۔ یہ درست کرنے والے کے بعد کی قدر ہے۔ نوٹ کریں کہ اگر آپ ریاست کی قسم استعمال کر رہے ہیں تو آپ RED = 0 سے 0 تک، GREEN = 1 سے 1 تک اور پیلا = 2 سے 2 تک تفویض کرنا چاہتے ہیں۔ چونکہ ریاست ہمیشہ 1 یا 0 ہوتی ہے اس سے مبہم معلومات کو روکا جائے گا اور پیلے رنگ کو استعمال ہونے سے روکیں۔ آپ ریاست کی قسم کے لیے کوئی بھی دو رنگ منتخب کر سکتے ہیں۔

Set Analog Input Page
اینالاگ ان پٹس کو ڈسپلے کی اقسام کی ایک رینج استعمال کرنے پر مختلف ریڈ آؤٹ فراہم کرنے کے لیے سیٹ کیا جا سکتا ہے۔ ان پٹ ڈیٹا کو ظاہر کرنے کے علاوہ، آپ ڈسپلے کو نام دے سکتے ہیں اور ساتھ ہی اس کے ساتھ ریلے کو جوڑ سکتے ہیں۔ یہ ریلے گرین سے ریڈ میں تبدیل ہو جائے گا کیونکہ یہ آگے سے آف تک جاتا ہے اور ساتھ ہی اسے کنٹرول کرنے کے لیے کلک بھی کیا جا سکتا ہے۔
- Analog Input Selected – The Analog Input that you are editing (identified by the line on which you clicked the Edit icon).
- نام - آپ اس ان پٹ کے لیے 15 حروف کا نام سیٹ کر سکتے ہیں۔ یہ نام ڈسپلے کے اوپری حصے میں بار میں جاتا ہے۔
- لیبل - ایک 7-حروف کا لیبل سیٹ کریں جو اصل فعال ڈسپلے پر ظاہر ہوتا ہے۔
- درست کرنے والا - اس فیلڈ کا استعمال کرتے ہوئے آپ ڈسپلے پیج پر ویلیو کو ظاہر کرنے سے پہلے کسی قدر کو شامل، گھٹا، ضرب یا تقسیم کر سکتے ہیں۔ یہ ایک 2-ویلیو کریکٹر ہے جس میں ہر ایک کو ایک اسپیس کریکٹر سے الگ کیا جاتا ہے۔ (یعنی "+2، -2، *3، /3")
- USE – Sets this input to active. Turns the input number indicator to GREEN. It should be noted that when in use the input consumes CPU time and other resources depending on its type. Although all inputs may be active at the same time, it is recommended to turn on only those you want to use.
- قسم - ان پٹ ڈیٹا کو نتائج کی ایک حد کا حساب لگانے کے لیے استعمال کیا جا سکتا ہے۔ آپ منتخب کر سکتے ہیں:
• Analog 1 – Analog 1 input from a SERVER with an input such as found on a R4ADI.
• Analog 2 – Analog 2 input from a SERVER with an input such as found on a R4ADI.
• AC Current 1 – AC current sensor 1 input from a SERVER with an input such as found on a R4ADI.
• AC Current 2 – AC current sensor 2 input from a SERVER with an input such as found on a R4ADI.
• AC Current 3 – Not used
• Volts – The measurement of the voltage powering the SERVER.
• Current – On “S” models, this is the current consumed by the SERVER.
• Int. Temp – Temperature from the board mounted sensor.
• Ext. Temp – Temperature from the “S” model SERVER.
• R. Humidity – % Relative Humidity from the “S” model SERVER.
• MMA X – The X axis accelerometer data from the “S” model SERVER.
• MMA Y – The Y axis accelerometer data from the “S” model SERVER.
• MMA Z – The Z axis accelerometer data from the “S” model SERVER. - ڈسپلے - یہ انتخاب آپ کو استعمال شدہ ڈسپلے کی قسم کو تبدیل کرنے دیتا ہے۔ آپ منتخب کر سکتے ہیں:
1. Dot – A single dot with the value in the middle. This can be used for State. You can make a dumb indicator by changing the color of the Dot based on the value. The label is under the Dot.
2. Values – Displays the Corrected Value with the Label in a box directly below it.
3. Meter – This Meter has configurable scale based on the Min/Max values and arcs can be colored per the Color ranges. The Label is displayed within the Meter.
4. VBar – Also based on the Min/Max values for the scale and the bar changes color based on the values in the Color ranges. - Relay – Enter a Relay number here. If it is a local relay it will show Green or RED depending if it is on or off.
By clicking on it the relay will turn on and off. The name comes from the relay settings page. This may be useful if you want to turn the subject of a display on and off. Any relay can be used on any input and each may be reused for any other input. - قدر - یہ کم سے کم/زیادہ سے زیادہ اقدار ہیں جو ڈسپلے کے لیے استعمال ہوتی ہیں۔ یہ میٹر کو اس کے اختتام سے گزرنے یا VBar کی قدر کو سیٹ کرنے سے روکنے کے لیے مفید ہے۔ یہ درست کرنے والے کے بعد کی قدر ہے۔ سسٹم زیادہ سے زیادہ کی قدر کو ظاہر نہیں کر سکتا لہذا یقینی بنائیں کہ یہ کم از کم 1 پر سیٹ ہے۔
- پیلا/سرخ/سبز - تین رنگ ہیں جو ڈسپلے کی مزید وضاحت کے لیے استعمال کیے جا سکتے ہیں۔ ڈسپلے ویلیو میں رنگ کی وضاحت کرنے کے لیے ان رنگوں کی رینج سیٹ کریں۔ یہ درست کرنے والے کے بعد کی قدر ہے۔ نوٹ کریں کہ اگر آپ ریاست کی قسم استعمال کر رہے ہیں تو آپ RED = 0 سے 0 تک، GREEN = 1 سے 1 تک اور پیلا = 2 سے 2 تک تفویض کرنا چاہتے ہیں۔ چونکہ ریاست ہمیشہ 1 یا 0 ہوتی ہے اس سے مبہم معلومات کو روکا جائے گا اور پیلے رنگ کو استعمال ہونے سے روکیں۔ آپ ریاست کی قسم کے لیے کوئی بھی دو رنگ منتخب کر سکتے ہیں۔

Tasks Page
The TASKS page displays the automatic events that can be programmed into the SERVER. You can schedule up to 16 events in the SERVER. These are constructed as IF … THEN statements. In addition, the IF term can have 2 elements (IF a, AND/OR/NOT b … THEN c). This provides a simple to program and powerful way to take advantage of the data acquired by the SERVER. The Tasks page shows you an overview of configured tasks. You can click the dot in the State column to turn a task on or off indicated by a green dot for ON, and a red dot for OFF. To edit or create a task, click the Edit icon to the right of the task line. This will take you to the Set Schedule page detailed in the next section.

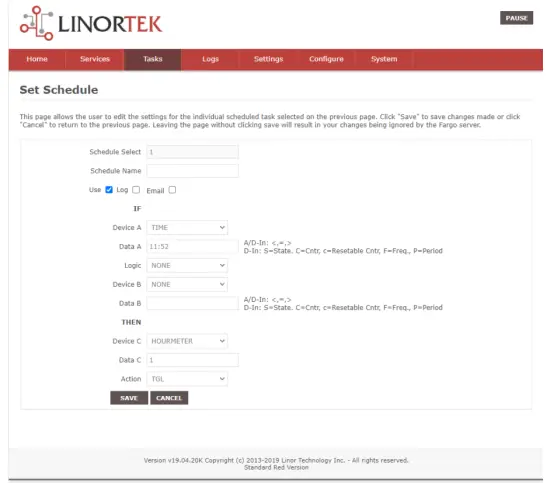
Set Schedule Page
The SET SCHEDULE page allows you to create time and logic-based events that will occur automatically if the conditions are met.
- Schedule Select – Determined by clicking on a schedule line from the previous page.
- Schedule Name – Enter a 15-character Schedule Name.
- USE – In order for a Schedule line to be active you must select the USE button. If there is an error detected in entering Schedule data, the USE box will automatically uncheck.
- LOG - اس آئٹم کے لیے لاگ کو منتخب کریں تاکہ سسٹم لاگ میں ہر بار اس پر عمل درآمد ہو۔
- Email – Click Email to automatically send an email when this schedule is executed.
- Device A – Select Device A for the first term in the IF statement from the drop box.
- Data A – Select Data A for the above device. Depending on the device selected, the Data used for testing may have special properties. See the list below for Data that may be entered. If an error is detected indata entry when the “Save” button is pushed, the USE box will uncheck and the Data box containing the error will be highlighted.
• Minute – Enter: mm
• Hour – Enter: hh (use 24-hour system)
• Day – Enter: dd
• DayofWeek – Enter: Sunday = 1, Monday = 2, Tuesday = 3, Wednesday = 4, Thursday = 5, Friday = 6, Saturday = 7, Weekday = 8, Weekend = 9
• Time – Enter: hh:mm (use leading zeros, seconds are ignored) (use 24 hour system) ex:07:30 or 14:05
• Date – Enter: yy/mm/dd (use leading zeros) ex: 20/01/10 for January 10, 2020
• Relay – Enter: Relay number and (+ or -), ex: 01+ for Relay 1 ON or 01- for Relay 1 OFF
• Button – Enter: + or – (for ON or OFF respectively)
• Flag – Enter: Flag number(opt.+), or Flag number (for ON or OFF respectively)
• Temp – Enter: >, = or < value; example: >40 (ہمیشہ ڈگری سینٹی گریڈ)
• Volts – Enter: >, = or < value; example: <10
• Analog – Analog input. Enter an input number and >, = or < and value. Example: 3<123 (This value is raw data value prior to any Corrector used by the input display page.)
• Digital – Digital input. Enter Input Number, Type, >, =, or < and value; example: 1F>7500 (This value is the raw data value prior to any Corrector used on the display page). Type can be (case sensitive):
• S State (On/Off)
• C Non-resettable counter
• c Resettable counter (lower case ‘c’)
• F Frequency in 1/1000 seconds
• P Period in 1/1000 seconds - منطق - ڈیوائس A اور ڈیوائس B کے درمیان منطق کا موازنہ مرتب کریں۔
• AND – True if: Device A is true AND Device B is true
• OR – True if: Device A is true OR Device B is true
• NOT – True if: Device A is true and Device B is NOT true - Device B – Select Device B for testing from the drop box.
- ڈیٹا B - اوپر والے آلے کے لیے ڈیٹا B کو منتخب کریں۔ منتخب کردہ ڈیوائس پر منحصر ہے کہ جانچ کے لیے استعمال ہونے والے ڈیٹا میں خاص خصوصیات ہو سکتی ہیں۔ اوپر کی فہرست دیکھیں۔
- ڈیوائس C - وہ ہے جسے کنٹرول کرنا ہے۔
- ڈیٹا C - ڈیوائس C کے لیے پراپرٹی سیٹ کریں۔ سنٹیکس کا استعمال اس طرح کیا جاتا ہے:
• RELAY – These are relays on this SERVER. You can set up to four per schedule. Enter separated by commas, for example "1,2,3,4"
• FLAG – This is a storage flag that can be used to make more complex schedules. There are 8 flags that can be turned on or off.
• REMOTE – Refers to a remote SERVER unit. When these conditions are met, this SERVER will send a command to control a remote SERVER. The Data field for a remote unit should be in the format,
“REMOTE UNIT NUMBER, REMOTE UNIT RELAY”. For example، "3,5"۔ ان ریموٹ سرورز کی شناخت صفحہ کنفیگر/ریموٹ ڈیوائس کنفیگ میں ہونی چاہیے۔
• COUNTER – Adds count to digital input counter – set as 1 or 2 depending on which digital input is counting
• BLUE LED – No data.
• eMAIL – Will send eMail, no data.
• NOTIFY – Will send notification to Kodalert, set 1- 8 for Settings/Alarm Notification number. (Not Implemented) - ایکشن - ڈیوائس سی کے ساتھ کیا کرنا ہے۔ اختیارات یہ ہیں:
• ON – Turns device ON
• OFF – Turns device OFF
• TGL – Toggles state of Device C
• RESET – Resets CounterR

لاگز کا صفحہ
The Logs tab displays over 10,000 entries from actions taken by the SERVER or by users themselves. This feature allows several actions for the convenience of displaying and collecting data from the SERVER.
- The checkboxes above the date allow the user to filter logs from different sources. To filter out logs you do not wish to see from a certain source simply uncheck the box.
- Each log has a reference number and a time and date attached in a “yyyy/mm/dd” and “hh:mm:ss” format. Afterwards is the event displayed.
- To scroll through the logs, use the arrows to the right-hand side, where the horizonal line and arrow brings you to the start or end, the double arrow moves up or down a page, and the single arrow moves up or down a single log.
- To refresh the logs manually click the REFRESH button below the Log Details.
- To download the Log Details, click the DOWNLOAD button below the Log Details, this allows you to save the logs as a separate file.
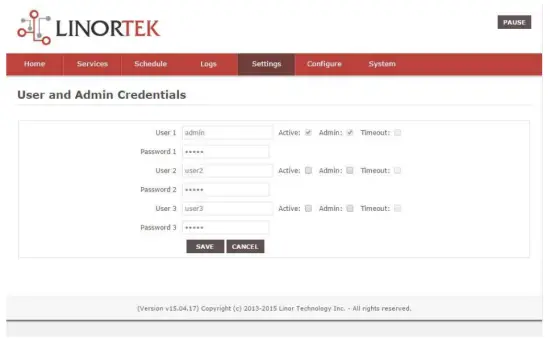
صارف اور منتظم اسناد کا صفحہ
Use this page from the Settings drop down menu. Here you can set up to 3 users for your SERVER system. As a default only User 1 is Active. Here you can:
- User Name and Password – Each user has their own credentials. As a default these are set toadmin/admin, user2/user2 and user3/user3 for Users 1, 2 and 3 respectively. The passwords are never displayed. نوٹ: when you reset the password, it must be less than 13-character.
- فعال - اس صارف کو سائن آن کرنے کے لیے چیک کرنا ضروری ہے، آپ صارف 1 کو غیر فعال نہیں کر سکتے۔
- ایڈمن - زیادہ تر صفحات میں صرف ایڈمن ہی ڈیٹا محفوظ کر سکتا ہے۔ یہ آپ کے سرور کو کسی غیر مجاز شخص کے ذریعہ تبدیل ہونے سے بچاتا ہے۔
- ٹائم آؤٹ - اس وقت فعال نہیں ہے۔
وقت/تاریخ صفحہ
اس صفحہ کو ترتیبات کے ڈراپ ڈاؤن مینو سے استعمال کریں۔ یہ صفحہ آپ کو وقت اور تاریخ کا نظام ترتیب دینے کی اجازت دیتا ہے۔
- Time – Set time using an hh:mm:ss format.
- تاریخ - yy/mm/dd فارمیٹ کا استعمال کرتے ہوئے تاریخ سیٹ کریں۔
- Time Zone – Set desired time zone 5 for EST, 8 for PST, you can now add a :mm for setting part hour, for example, 5:30 5 گھنٹے اور 30 منٹ پر ایک ٹائم زون ہے۔
- ڈے لائٹ سیونگ ٹائم استعمال کریں - ڈے لائٹ سیونگ ڈے پر اپنے سسٹم ٹائم کو خودکار طریقے سے ایڈجسٹ کرنے کے لیے منتخب کریں۔ (تمام ٹائم زونز میں درست نہیں ہے۔)
- MIL ٹائم استعمال کریں - 24 گھنٹے کی شکل استعمال کرنے کے لیے منتخب کریں۔
- Use NTP Update – Select to synchronize SERVER time with NTP server
- این ٹی پی Web سائٹ - یہ اپ ڈیٹس کے لیے منتخب NTP سرور ہے۔
- NTP وقفہ - منٹوں میں اپ ڈیٹس کے درمیان وقت کا وقفہ۔
- Log NTP Event – Normally NTP exceptions will be logged, select this option to Log every NTP event. (May be useful in debugging.)

ترتیبات کا صفحہ
Access this page from the Settings dropdown menu. Select these settings to enable various features in the SERVER
- Use Active Main – No longer used. (Select PAUSE to go inactive.)
- لاگ ان کی ضرورت ہے - اگر منتخب نہیں کیا گیا تو سرور بغیر اسناد کے تمام رسائی کی اجازت دے گا۔
- Use IP Ranges – Not Implemented.
- Use RESTFUL IP Ranges – Not implemented.
- Use Remote IP Ranges – Not implemented.
- RESTful توثیق کا استعمال کریں - RESTful کے لیے صارف نام اور پاس ورڈ درکار ہے۔
- ریلے کی حد میں توسیع کریں - 8 ریلے کو قابل بناتا ہے۔
- ریلے ریڈیو بٹن استعمال کریں - اگر سیٹ ہو تو، جب ایک ریلے آن کیا جاتا ہے، باقی تمام بند ہو جاتے ہیں۔
- SSL Port No. – Not supported – For future use.
- سسٹم ای میلز کا استعمال کریں - اضافی ای میل پیغامات کو قابل بناتا ہے۔
- فارن ہائیٹ استعمال کریں - سیلسیس یا فارن ہائیٹ کا انتخاب کریں۔
- PGM Dynamic Relays – Changes properties of relays in task schedule.
- CLR PGMs on Start – Reinitialize tasks on start up.
- RTC Temperature Compensation – All Koda boards can add Temperature and Humidity sensor.
- AM2302 استعمال کریں – AM2302 درجہ حرارت اور نمی کا سینسر استعمال کریں (الگ الگ فروخت کیا جاتا ہے)۔
- Java Report – Send data to HourCollector app over ethernet (only for IoTMeter)
- Use Metric – Not supported – For future use.
- UART Usage – Enter “Audio” for Netbell-NTG, “Clock” for Netbell clock.
- Switch Bypass (1/2) – Ignores physical inputs if set. For example, in a Koda 200 board, you want to ignore input 1 switch, check Switch Bypass 1
- Setting 19 – Not supported – For future use
- آڈیو استعمال کریں۔ File System – Activate SD Card reader for Netbell-NTG
- WiFi Report – Enable data transfer over WiFi (WiFi IoTMeter only)
- Active Landing Page – Not supported – For future use.
- . Invert Relay Control – The relay is set to NO by default. By checking this box the relay will be inverted to NC.
- Setting 24 – Not supported – For future use.

متحرک DNS صفحہ
Access this page from the Configure dropdown menu. From this page you can assign dynamic DNS settings. This page, along with proper port forwarding through the router, can enable global access to a device behind a NAT router or firewall. You will need to assign a static IP address and port number (see Network Config Page on page 25) and port the IP address on your router (refer to your router’s user manual). An internet IP address will have to be hosted in order to access your SERVER from the internet. Currently the only IP hosting service supported is provided by DynDNS (https://dyn.com)
- DDNS استعمال کریں - اس سروس کو فعال کرتا ہے۔
- DDNS سروس - ڈراپ باکس سے ایک سروس منتخب کریں۔ فی الحال صرف تعاون یافتہ سروس DynDNS ہے۔
- صارف کا نام - اس سے مراد DDNS سروس میں قائم کردہ اکاؤنٹ ہے۔
- پاس ورڈ – DDNS سروس میں رسائی کے لیے پاس ورڈ۔
- Host – This is the IP name registered at the DDNS service for rerouting to this SERVER

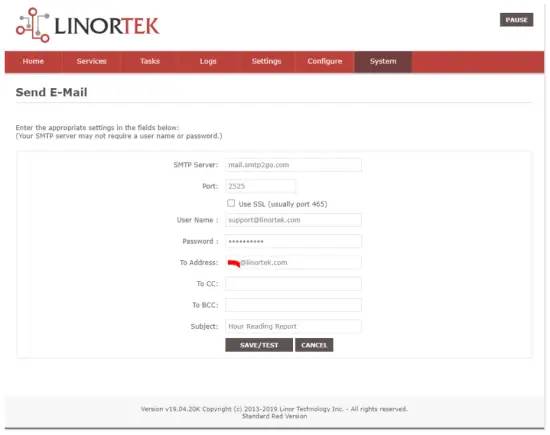
ای میل سیٹ اپ صفحہ
مختلف ماڈیولز سے ای میل پیغامات بھیجنے میں استعمال کرنے کے لیے سرور کے لیے ایک ای میل اکاؤنٹ ترتیب دیں۔ کنفیگر ٹیب سے اس صفحہ تک رسائی حاصل کریں۔
نوٹ: This unit is NOT compatible with SSL/TLS, there are 3rd party SMTP delivery servers which do not require SSL and can be used. For instructions on how to use a 3rd party SMTP delivery service, please refer to Appendix 1 at the end of this manual).
- SMTP سرور - باہر جانے والا میل سرور درج کریں جسے آپ استعمال کرنا چاہتے ہیں۔
- پورٹ - یہ اس سرور کی بندرگاہ ہے۔ آپ اس معلومات کے ساتھ ساتھ دیگر سیٹ اپ فیلڈز کے لیے اپنی میل سروس آن لائن دیکھ سکتے ہیں۔
- SSL استعمال کریں - جب آپ فریق ثالث SMTP سرور استعمال کرتے ہیں تو اسے غیر نشان زد چھوڑ دیں۔
- صارف کا نام - آپ کے ای میل اکاؤنٹ کا نام۔
- پاس ورڈ – ای میل اکاؤنٹ کا پاس ورڈ۔
- To Address – Enter up to 3 address for this email set up. An addressee, a CC and a BC.
- موضوع - ای میل ہیڈر کی سبجیکٹ لائن۔

نیٹ ورک کنفیگریشن پیج
Access this page from the Configure dropdown menu. This page allows the configuration of the SERVER’s network settings.
احتیاط: Incorrect settings may cause the board to lose network connectivity. In order to access a device in your network remotely you must PORT the device. This tells your router that information coming in should be sent to a specific device on your network.
- MAC Address – This is a unique MAC address that is assigned to this product at time of assembly. It cannot be altered.
- میزبان کا نام - یہ ایک Netbios نام ہے جس پر اس یونٹ کو کچھ نیٹ ورکس میں ایڈریس کیا جا سکتا ہے۔ یہ آپ کے راؤٹر کی لیز ڈائرکٹری میں بھی ظاہر ہو سکتا ہے۔ یہ آپ کے سرور کو نام دینے کے لیے ایک مفید جگہ بناتا ہے اور ہوم پیج اور ڈسکوور پر ظاہر ہوتا ہے۔
- پورٹ نمبر - یہ IP ایڈریس کا حصہ بن جاتا ہے اور انٹرنیٹ تک رسائی کے لیے ضروری ہے۔ اگر یہ سیٹ نہیں ہے، تو SERVER 80 کے پورٹ نمبر پر ڈیفالٹ ہو جاتا ہے۔
- IP Address – Typically you only change the last group of numbers. If you change this IP address make sure to reserve this IP on your router and no other devices are using this IP address or you may not be able to reach this SERVER. If this happens you may need to Restore Defaults using the push button method.
- گیٹ وے - عام طور پر آپ کے TCP/IP نیٹ ورک پر ایک روٹر جو آپ کے ISP تک رسائی کے نقطہ کے طور پر کام کرتا ہے۔
- سب نیٹ ماسک - ایک 32 بٹ نمبر جو ایک IP ایڈریس کو ماسک کرتا ہے، اور IP ایڈریس کو نیٹ ورک ایڈریس اور میزبان ایڈریس میں تقسیم کرتا ہے۔ بس اسے 255.255.255.0 پر چھوڑ دیں۔
- بنیادی DNS - ایک بنیادی DNS۔
- سیکنڈری DNS - ایک ثانوی DNS۔

IP رینج کنفیگریشن صفحہ
Access this page from the Configure dropdown menu. Use these security settings to select a range of IP address that will be allowed to access the SERVER.CAUTION: Incorrect settings may cause the board to lose network connectivity. Not implemented on this SERVER.
ریموٹ ڈیوائسز کا صفحہ
Access this page from the Configure dropdown menu. These settings allow the SERVER to remotely control the relays on another SERVER. This is done by selecting the Remote Device in the Schedule program or by setting up a relay as a REMOTE. There are 8 possible REMOTE locations.
احتیاط: غلط ترتیبات کی وجہ سے بورڈ اپنے ریموٹ کنکشن سے محروم ہو جائے گا۔
- ڈیوائس کا نام - مستقبل کے حوالے کے لیے اس ڈیوائس کے لیے متن کا نام درج کریں۔
- آئی پی ایڈریس – پورٹ نمبر سمیت ریموٹ ڈیوائس کا آئی پی ایڈریس۔
- صارف کا نام - بنیادی توثیق میں استعمال کیا جاتا ہے۔
- Password – Used in Basic Authentication.

Kodalert Page
Not Yet Implemented. Access this page from the Configure dropdown menu. Kodalert provides an interface for alerts of Internet connected devices. Kodalert is a cloud based, open platform monitoring and alert system for the Internet of Things in your physical world. Any Thing that can send an email or TCP messages including our SERVERS, other manufactures devices and people using email can use Kodalert. It can work for multiple remote locations, alert multiple users instantly using the rules you setup by text, email, smart phone Apps push notification or audible alarm instantly when something happens.
- الرٹ نمبر
- ٹیسٹ
- استعمال کریں۔
- قاعدہ
In the Alarm Notification page, you can change the state (on/off) of the relay by clicking the green circle in the state column. Push the EDIT icon to change the Alarm’s settings.

وضاحتیں
FARGO R8G2
- 10M/100M RJ45 Internet interface with connection and activity LEDs
- 8 Relay outputs, 1FORMC 48 Volt Max (24VAC/DC 3A)
- Status LEDs (pulse, bootloader, and locate)
- Ethernet Bootloader (for server hardware code upgrade)
- PoE or 12VDC @500mA (nominal)
- Web interface w/basic authentication
- On board temperature sensor and voltagای سینسر
Reset /Locate pushbutton (blue LED) - Working Temperature from 0 to +70 Celsius
- Storage Temperature from 40 to +125 Celsius
- Humidity from 10% to 80% noncondensing
- Dimensions 74mm x 100mm x 20mm, mounting holes 64mm x 92mm Ф 3.2mm 4 places
- تعاون یافتہ پروٹوکول: HTTP/SMTP/SNTP
FARGO R4G2
- 10M/100M RJ45 Internet interface with connection and activity LEDs
- 4 1FormC relays 48 Volt Max (24VAC/DC 3A)
- 2 optically isolated digital inputs, 12V 1mA or pulldown switch selectable, 2 conductor screw terminal connectors for each.
- 2 Analog 0-5VDC Inputs 30mA 3.3VDC power source PTC protected. 3 conductor screw terminal connectors for each (3.3VDC, input, ground) (R4ADI only)
- 2 Current sensor inputs. 3.5mm stereo jack connector for each (R4ADI only)
- Status LEDs (pulse, bootloader, and locate)
- Ethernet Bootloader (for server hardware code upgrade
- POE or 12VDC @500mA (nominal)
- Web interface w/basic authentication
- On board temperature sensor and voltagای سینسر
- Reset/Locate pushbutton
- Working Temperature from 0 to +70 Celsius
- Storage Temperature from 40 to +125 Celsius
- Humidity from 10% to 80% noncondensing
- Dimensions 74mm x 100mm x 20mm, mounting holes 64mm x 92mm Ф 3.2mm 4 places
- تعاون یافتہ پروٹوکول: HTTP/SMTP/SNTP
KODA100
- 10M/100M RJ45 Internet interface with connection and activity LEDs
- 2 1-Form-A relay 48VAC@8A Max
- 2 optically isolated digital inputs, 12V 1mA or pulldown switch selectable
- Status LEDs (pulse, bootloader, and locate)
- Ethernet Bootloader (for server hardware code upgrade)
- POE or 12VDC @500mA (nominal)
- Web interface w/basic authentication
- On board temperature sensor and voltagای سینسر
- Reset/Locate pushbutton (blue LED)
- Working temperature from 0 to +70 Celsius
- Storage temperature from 40 to +125 Celsius
- Humidity from 10% to 80% noncondensing
- طول و عرض: 70mm x 100mm x 25mm
- تعاون یافتہ پروٹوکول: HTTP/SMTP/SNTP
KOD200
- 10M/100M RJ45 Internet interface with connection and activity LEDs
- 4 1FormA relays 48 Volt Max 1A dry contact or drive 10V ±10% 50mA to external devices
- 2 optically isolated digital inputs, 12V 1mA or pulldown switch selectable
- Status LEDs (pulse, bootloader, and locate)
- Ethernet Bootloader (for server hardware code upgrade)
- POE or 12VDC @500mA (nominal)
- Web interface w/basic authentication
- On board temperature sensor and voltagای سینسر
- Reset/Locate pushbutton (blue LED)
- Working Temperature from 0 to +70 Celsius
- Storage Temperature from 40 to +125 Celsius
- Humidity from 10% to 80% noncondensing
- طول و عرض: 70mm x 100mm x 25mm
- تعاون یافتہ پروٹوکول: HTTP/SMTP/SNTP
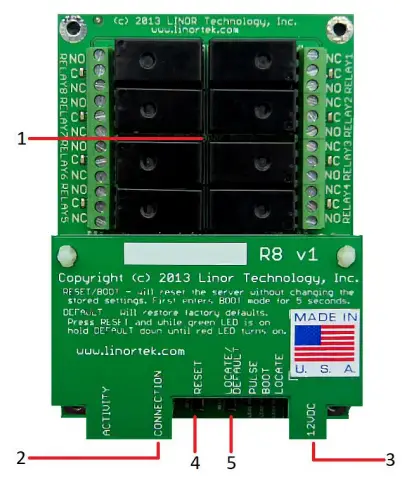
بورڈ ریفرنس لے آؤٹ
Fargo R8
- 8 Relay outputs, 1FORMC 48 Volt Max (24VAC/DC 3A)
- Rj45 رابط
- پاور کنیکٹر (12VDC)
- ری سیٹ بٹن
- تلاش کریں بٹن
Fargo R4
- 3.5mm Inputs for AC Current Sensor (R4ADI Only)
- Analog Inputs (R4ADI Only)
- 4 Relay outputs, 1FORMC 48 Volt Max (24VAC/DC 3A)
- ڈیجیٹل ان پٹ
- Digital Input Switches (Input 1 on right.
Up: Pullup, Down: Isolated) - Rj45 رابط
- ری سیٹ بٹن
- تلاش کریں بٹن
- پاور کنیکٹر (12VDC)

کوڈا 100
- Digital Inputs (#1 on the left) 5VDC-48VDC (12VDC-48VDC must use the external resistor)
- Relay Outputs (#1 is on the right) 8A@48VAC Max
- Digital Input Switches (IN 1 on left. UP: Isolated, Down: Pullup)
- ری سیٹ بٹن
- دوبارہ لوڈ کرنے کا بٹن (نیلی ایل ای ڈی کو آن کرتا ہے - ڈسکوور پر شناخت کرتا ہے)
- Rj45 رابط
- پاور کنیکٹر (12VDC)
- درجہ حرارت/ہمیڈیٹی سینسر کے لیے USB منی کنیکٹر (علیحدہ فروخت)

کوڈا 200
- Digital Inputs (#1 on the left) 5VDC-48VDC (12VDC-48VDC must use the external resistor)
- Relay Outputs (#1 is on left) 48 Volt Max 1A dry contact or drive 10V ±10% 50mA
- Digital Input Switches (IN 1 on left. UP: Isolated, Down: Pullup)
- Relay Switches (Up for dry contact, down for 10V/50mA)
- ری سیٹ بٹن
- دوبارہ لوڈ کرنے کا بٹن (نیلی ایل ای ڈی کو آن کرتا ہے - ڈسکوور پر شناخت کرتا ہے)
- Rj45 رابط
- پاور کنیکٹر (12VDC)
- درجہ حرارت/ہمیڈیٹی سینسر کے لیے USB منی کنیکٹر (علیحدہ فروخت)

فیکٹری ری سیٹ
To perform a factory Reset, push the Reset button. When the green LED turns on, push and hold the Reload button until the flashing red LED turns off and then turns on solid. Refer to Board Reference Layout section for the button locations on your device.
This user-manual supplements the documentation for the following Linortek products:
- نیٹ بیل -2
- نیٹ بیل -8
- Netbell-K (and variants)
- iTrixx-NHM
For more information, documentation and how-to videos, visit https://www.linortek.com/downloads/
یہ دستاویز پر پایا جا سکتا ہے www.linortek.com/downloads/documentations/
اگر آپ کو اپنے آلے کے ساتھ مدد کی ضرورت ہو تو براہ کرم ملاحظہ کریں۔ www.linortek.com/technical-support
Linor Technology, Inc.
معلومات کو بغیر اطلاع کے تبدیل کیا جاسکتا ہے۔
ضمیمہ 1
Linortek Fargo اور Koda آلات کے لیے 3rd پارٹی SMTP سروس کا استعمال کرتے ہوئے SSL ای میلز کیسے بھیجیں
پہلے سے طے شدہ طور پر، کوڈا/فارگو آلات غیر SSL SMTP ای میل سرورز استعمال کرتے ہیں۔ لیکن آج زیادہ تر ای میل سرورز SSL سیکیورٹی پروٹوکول میں تبدیل ہو چکے ہیں، وہاں تھرڈ پارٹی ایس ایم ٹی پی ڈیلیوری سرورز ہیں جن کو SSL کی ضرورت نہیں ہے اور استعمال کیا جا سکتا ہے۔ مارکیٹ میں بہت سارے SMTP ای میل سروس فراہم کرنے والے ہیں۔ ہم SMTP3GO بطور سابق استعمال کرتے ہیں۔ampترتیب دینے کے عمل کو ظاہر کرنے کے لیے۔ SMTP2GO 1000 ای میلز/ماہ کے ساتھ استعمال کرنے کے لیے مفت ہے۔ SMTP2GO استعمال کرنے کے لیے، براہ کرم ملاحظہ کریں: https://www.smtp2go.com/ .
مرحلہ 1۔ SMTP2GO اکاؤنٹ بنائیں۔
اکاؤنٹ بنانے کے لیے صرف "سائن اپ" پر کلک کریں، پیمانے پر "1K ای میلز" کا انتخاب کریں، اور "مفت منصوبہ" کا انتخاب کریں (اگر آپ کو ماہانہ 1000 سے زیادہ ای میلز بھیجنے کی ضرورت ہے، تو وہ منصوبہ منتخب کریں جو آپ کی ضروریات کو پورا کرے۔)

SMTP2GO پر ایک اکاؤنٹ بنانے کے لیے، ایک کارپوریٹ ای میل ایڈریس کی ضرورت ہوگی۔ مفت ای میل سروس جیسے جی میل یا یاہو آپ کو جاری نہیں رہنے دے گی۔ اپنے SMTP2GO اکاؤنٹ کو فعال کرنے کے بعد، آپ کو ایک صارف شامل کرنے کی ضرورت ہے۔
مرحلہ 2۔ صارف شامل کریں۔
SMTP2GO پر آپ جو صارف بناتے ہیں، وہ آؤٹ گوئنگ میل سرور ہو گا جب آپ ای میل رپورٹس بھیجنے کے لیے Fargo/Koda ڈیوائس سیٹ اپ کریں گے، براہ کرم یقینی بنائیں کہ اگر آپ مفت ای میل اکاؤنٹ جیسے Yahoo یا Gmail استعمال کرتے ہیں تو آپ کا کارپوریشن ای میل سرور ای میلز کو بلاک نہیں کرے گا۔ یہاں ایک صارف شامل کریں۔
اپنے SMTP2GO اکاؤنٹ میں لاگ ان کریں، بائیں جانب کے مینو میں "Settings"> "SMTP Users" کا انتخاب کریں، "Add SMTP صارف" پر کلک کریں اور فارم پُر کریں۔
 صارف کو آپ کے SMTP2GO اکاؤنٹ میں شامل کرنے کے بعد، یہ وہ معلومات دکھائے گا جس کی آپ کو اپنے Fargo/Koda ڈیوائسز پر ای میل نوٹیفکیشن سیٹ اپ کرنے کے لیے درکار ہے۔

مرحلہ 3. Linortek ڈیوائس کو ترتیب دیں۔
ایک اکاؤنٹ بنانے اور صارف کو شامل کرنے کے بعد، اپنے Linortek ڈیوائس میں لاگ ان کریں، کنفیگر پر جائیں - ای میل نوٹیفکیشن سیٹ اپ کرنے کے لیے سیٹ اپ پیج کو ای میل کریں:
- SMTP سرور - باہر جانے والا میل سرور درج کریں جسے آپ استعمال کرنا چاہتے ہیں، یہ ہمارے سابق میں mail.smtp2go.com ہے۔ample
- پورٹ - یہ اس سرور کی بندرگاہ ہے۔ ہمارے سابق میں SMTP پورٹ 2525 ہے۔ample
- SSL استعمال کریں - جب آپ فریق ثالث SMTP سرور استعمال کرتے ہیں تو اسے غیر نشان زد چھوڑ دیں۔
- صارف کا نام - SMTP2GO کا صارف نام جب ہم نے پچھلے مرحلے میں صارف بنایا تھا۔
- پاس ورڈ - SMTP2GO سے صارف کا پاس ورڈ جب ہم نے پچھلے مرحلے میں صارف بنایا تھا۔
- ایڈریس کے لیے - اس ای میل سیٹ اپ کے لیے 3 تک پتے درج کریں۔ ایک مخاطب، ایک CC اور ایک BC۔
- موضوع - ای میل ہیڈر کی سبجیکٹ لائن۔
جیسے ہی آپ "محفوظ کریں/ٹیسٹ" کو مارتے ہیں، آلہ خود بخود ٹیسٹ ای میل بھیجتا ہے۔ اگر یہ ان باکس فولڈر میں نہیں ہے تو براہ کرم اسے تلاش کرنے کے لیے جنک/دوسرے فولڈر کو چیک کریں۔
مرحلہ 4۔ خودکار ای میل اطلاعات کے لیے کام سیٹ کریں۔
You should be able to receive email notifications for various events from the Fargo/Koda boards at this point. If you need to receive condition logic notification, you can use our condition logic configuration to setup such report. To setup the logic condition report notification, go to Tasks page on your Fargo/Koda device, click the Edit icon of a Schedule. For details of how to create a logic-based event, please refer to the Set Schedule Page on the Fargo/Koda User Manual, which can be downloaded here:
https://www.linortek.com/download/fargo%20g2_koda%20downloads/fargo%20g2_koda%20documentation/Fargo-G2-and-Koda-User-Manual.pdf
اس میں ایسample ہم نیٹ ورک آور میٹر ڈیوائس کو بطور سابق استعمال کریں گے۔ampہر روز صبح 11:52 بجے ای میل رپورٹس کیسے حاصل کی جائیں۔
جیسے ہی کام کی تمام شرائط پوری ہو جاتی ہیں، آپ کو درج ذیل ای میل موصول ہوتی ہے۔
Hour Reading Report
![]() support@linortek.com
support@linortek.com
Mon 4/11/2022 11:52 AM
To: Liyu Nalven
HM 1, my machine, is at 000242.01 hrs.
Reply Forward
![]()
دستاویزات / وسائل
 |
LINORTEK Fargo G2 TCP/IP Web Based Relay Controller [پی ڈی ایف] یوزر مینوئل Fargo G2, Koda, Fargo G2 TCP-IP Web Based Relay Controller, Web Based Relay Controller, Based Relay Controller, Relay Controller |