![]() Fargo G2 and Koda User Manual
Fargo G2 and Koda User Manual
www.linortek.com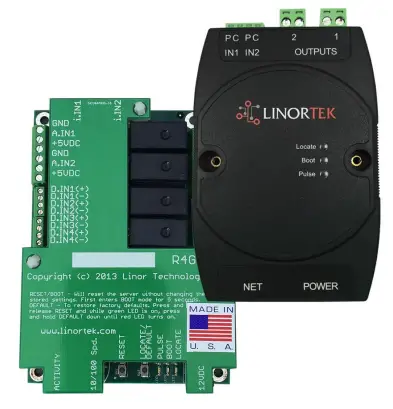 For Fargo G2, Koda
TCP/IP Web Based Relay Controller
Ds C 04/2022
Fargo G2 TCP/IP Web Based Relay Controller
Thank you for purchasing a Linortek Fargo G2 or Koda TCP/IP Controller. There are many devices that can be controlled by the FARGO/KODA Web Relay Controller. FARGO/KODA Web Controller can be used in such applications as (but not limited to): Lights, security, sprinkler systems, access control, industrial equipment, building automation, HVAC, and many more. Please refer to the Board Reference Layouts on page 29 for input and output specifications on your controller to verify they are suitable to your needs.
Hierdie handleiding dek:
- FARGO R8 G2
- FARGO R4DI G2
- FARGO R4ADI G2
- KODE 100
- KODA200
These will be referred to as SERVER hereafter. When there are differences or additional features they will be noted in the text.
Vir instruksionele video's, Gereelde Vrae en kontakinligting vir ons tegniese ondersteuningspan, besoek asseblief: https://www.linortek.com/technical-support
LINORTEK EEN-JAAR BEPERKTE WAARBORG
Consumer law: For consumers who are covered by consumer protection laws or regulations in their country of residence (“Consumer Law”), the benefits provided in this Linortek One-Year Limited Warranty (“Linortek Limited Warranty”) are in addition to and not instead of the rights provided by Consumer Law and it does not exclude, limit or suspend your rights arising from Consumer Law. You should consult the proper authorities in your country of residence for further information about these rights
Linortek se waarborgverpligtinge vir hierdie hardewareproduk (“Produk”) is beperk tot die bepalings hieronder uiteengesit:
Linor Technology, Inc. (“Linortek”) warrants this product against defects in materials and workmanship for a period of ONE (1) YEAR from the date of retail purchase by the original end-user purchaser (“Warranty Period”) when used in accordance with the operating instructions. A copy of a retail receipt is required as proof of purchase. If a hardware defect arises and a valid claim is received within the Warranty Period, at its option and to the extent permitted by law, Linortek will either (1) repair the hardware defect at no charge, using new or refurbished replacement parts, (2) exchange the product with a product that is new or which has been manufactured from new or serviceable used parts and is at least functionally equivalent to the original product, or (3) refund the purchase price of the product. When a refund is given, the product for which the refund is provided must be returned to Linortek and becomes Linortek’s property.
Die voorafgaande waarborg is onderhewig aan die Koper se (i) vinnige skriftelike eis en (ii) tydige voorsiening aan Linortek van 'n geleentheid om die Produk te inspekteer en te toets wat beweer word dat dit gebrekkig is. Sodanige inspeksie kan op die koper se perseel wees en/of Linortek kan die teruggawe van die produk op die koper se koste versoek. Linortek sal egter nie verantwoordelik wees vir verpakking, inspeksie of arbeidskoste in verband met die terugstuur van die produk nie. Geen produk sal aanvaar word vir waarborgdiens wat nie vergesel word van 'n terugstuurgoedermagtigingsnommer (RMA#) wat deur Linortek uitgereik is nie.
UITSLUITINGS EN BEPERKINGS
Hierdie beperkte waarborg sluit skade uit wat voortspruit uit misbruik, misbruik, verwaarlosing, brand of ander eksterne oorsake, ongelukke, modifikasies, herstelwerk of ander oorsake wat nie defekte in materiaal en vakmanskap is nie. Sagteware wat deur Linortek versprei word met of sonder die Linortek-handelsnaam insluitend, maar nie beperk nie tot stelselsagteware ("Sagteware") word nie onder hierdie Beperkte Waarborg gedek nie. Jou gebruik en regte wat met die sagteware geassosieer word, word beheer deur die Linortek Eindgebruikerslisensie-ooreenkoms wat jy hier kan vind: https://www.linortek.com/end-user-licenseagreement/. Linortek is nie verantwoordelik vir skade wat ontstaan as gevolg van die versuim om instruksies met betrekking tot die produk se gebruik te volg nie. Om voldoening aan bedryfsbeperkings te verseker, moet Koper na die instruksiehandleiding [wat saam met die produk voorsien word] verwys. Batterye is nie by die waarborg ingesluit nie.
IN DIE MAKSIMUM MAAT WORD TOEGELAAT, IS HIERDIE BEPERKTE WAARBORG EN DIE RESMIDDELS HIERBO STEL UITSLUITEND EN IN PLAATS VAN ALLE ANDER WAARBORGE, RESMIDDELS EN VOORWAARDES, EN LINORTEK WORD SPESIFIEK VRYWYL OM NIE ALLES TE LAAT NIE. , WAARBORGE VAN VERHANDELBAARHEID, GESKIKTHEID VIR 'N SPESIFIEKE DOEL, NIE-Skending. SOVER SO WAARBORGE NIE UITGEWYK KAN WORD NIE, SAL ALLE SULKE WAARBORGE, IN DIE MAAT DEUR DIE WET TOEGESTAAN, IN TYDSDUUR BEPERK WORD TOT DIE DUUR VAN DIE LINORTEK BEPERKTE WAARBORG EN DIE VERHAALSTELLING OM TERUGBEPERKING TE WORD DEUR TERUGBEPERKTE BEPERK. IN SY UITSLUITENDE DISKRESIE. SOMMIGE STATE (LANDE EN PROVINSIES) LAAT NIE BEPERKINGS TOE OP HOE LANK 'N GEÏSPLISEERDE WAARBORG OF VOORWAARDE MAG HOU NIE, DUS DIE BEPERKINGS WAT BO BESKRYF IS MAG NIE OP JOU VAN TOEPASSING IS NIE. HIERDIE WAARBORG GEE JOU SPESIFIEKE REGSREGTE, EN JY MAG OOK ANDER REGTE HET WAT VAN STAAT TOT STAAT (OF PER LAND OF PROVINSIE) VERSKIL. HIERDIE BEPERKTE WAARBORG WORD BEHEER DEUR EN UITLEG ONDER DIE WETTE VAN DIE VERENIGDE STATE.
Disclaimers
- Lees instruksies – Lees al die veiligheids- en bedryfsinstruksies voordat u die produk gebruik.
- Behou instruksies – Behou die veiligheids- en bedryfsinstruksies vir toekomstige verwysing.
- Let op waarskuwings – Volg alle waarskuwings op die produk en in die gebruiksinstruksies.
- Volg instruksies – Volg alle bedienings- en gebruiksinstruksies.
- Skoonmaak – Ontkoppel die produk van krag voordat dit skoongemaak word. Moenie vloeibare skoonmaakmiddels of aërosolskoonmakers gebruik nie. Gebruik advertensieamp lap slegs vir die skoonmaak van die omhulsel.
- Aanhegsels – Moenie aanhegsels gebruik nie, tensy dit spesifiek deur Linortek aanbeveel word. Die gebruik van onversoenbare of andersins ongeskikte aanhegsels kan gevaarlik wees.
- Bykomstighede – Moenie hierdie produk op 'n onstabiele staander, driepoot, bracket of montering plaas nie. Die produk kan val, wat ernstige beserings aan 'n persoon en ernstige skade aan die produk veroorsaak. Gebruik slegs met 'n staander, driepoot, bracket of montering wat deur die vervaardiger aanbeveel word, of saam met die produk verkoop word. Volg die vervaardiger se instruksies wanneer u die produk monteer, en gebruik slegs monteringsbykomstighede wat deur die vervaardiger aanbeveel word. Wees versigtig wanneer u 'n toestel- en wa-kombinasie gebruik. Vinnige stops, oormatige krag en ongelyke oppervlaktes kan veroorsaak dat die toestel en wa-kombinasie omslaan.
- Ventilasie – Openings in die omhulsel, indien enige, word voorsien vir ventilasie en om betroubare werking van die produk te verseker en om dit teen oorverhitting te beskerm. Moenie hierdie openinge blokkeer of bedek nie. Moenie hierdie produk in 'n ingeboude installasie plaas nie, tensy behoorlike ventilasie voorsien word of die Linortek se instruksies nagekom is.
- Kragbronne – Bedryf hierdie produk slegs vanaf die tipe kragbron wat in die instruksiehandleiding of op die produketiket aangedui word.
As jy nie seker is van die tipe kragtoevoer wat jy beplan om te gebruik nie, raadpleeg jou toestelhandelaar of plaaslike kragmaatskappy – met dien verstande dat die gebruik van enige kragbrontipe anders as wat in die instruksiehandleiding of merketiket aangedui word, enige waarborg ongeldig sal maak. Vir produkte wat bedoel is om van batterykrag of ander bronne te werk, verwys na die bedryfsinstruksies [ingesluit by die produk]. - Aarding of polarisasie - Hierdie produk kan toegerus wees met 'n gepolariseerde wisselstroomlynprop ('n prop met een lem wyer as die ander). Hierdie prop sal net op een manier in die kragaansluiting pas. Dit is 'n veiligheidskenmerk. As jy nie die prop heeltemal in die uitlaat kan steek nie, probeer om die prop om te keer. As die prop steeds nie pas nie, is dit omdat jou uitlaat nie met die prop versoenbaar is nie. Kontak jou elektrisiën om jou uitlaat te vervang met een wat versoenbaar is. Moenie die prop dwing om in 'n onversoenbare uitlaat te pas of andersins probeer om die veiligheidsdoel van die prop te verslaan nie. Alternatiewelik kan hierdie produk toegerus wees met 'n 3-draad aardingstipe prop, 'n prop met 'n derde (aardings) pen. Hierdie prop sal net in 'n aarding-tipe kragaansluiting pas. Dit is 'n veiligheidskenmerk. Moenie die prop dwing om in 'n onversoenbare uitlaat te pas of andersins probeer om die veiligheidsdoel van die prop te verslaan nie. As jou uitlaat nie met die prop nie versoenbaar is nie, kontak jou elektrisiën om jou uitlaat te vervang met een wat versoenbaar is.
- Kragkoordbeskerming – Beweeg kragtoevoerdrade sodat dit nie waarskynlik op of vasgeknyp sal word deur items wat daarop of teen hulle geplaas is nie, let veral op toue en proppe, geriefshouers en die punt waar die toue uit die toestel kom. .
- Kraglyne – Moenie 'n buitestelsel op enige plek in die omgewing van oorhoofse kraglyne of ander elektriese lig- of kragkringe plaas, of waar dit in sulke kraglyne of stroombane kan val nie. Wanneer u 'n buitestelsel installeer, moet u uiters versigtig wees om nie aan sulke kraglyne of stroombane te raak nie, aangesien kontak met hulle dodelik kan wees.
- Oorlaai – Moenie uitlate en verlengsnoere oorlaai nie, aangesien dit brand of elektriese skok kan veroorsaak.
- Voorwerp- en vloeistoftoegang - Moet nooit voorwerpe van enige aard in hierdie produk deur openinge druk nie, aangesien dit gevaarlike volume kan raak.tage punte of kort-uit dele wat brand of elektriese skok kan veroorsaak. Moet nooit enige vloeistof op die produk mors nie.
- Versorging – Moenie self probeer om hierdie produk te versien nie, aangesien die oopmaak of verwydering van deksels jou kan blootstel aan gevaarliketage of ander gevare. Verwys alle diens van die produk na Linortek.
- Skade wat diens vereis – Trek die produk uit die stopcontact en verwys diens na Linortek-kliëntediens onder die volgende voorwaardes:
a. Wanneer die kragtoevoerkoord of -prop beskadig is.
b. As vloeistof gemors is, of voorwerpe op die produk geval het.
c. As die produk aan reën of water blootgestel is.
d. As die produk nie normaal werk nie deur die gebruiksinstruksies te volg [ingesluit by die produk]. Pas slegs daardie kontroles aan wat deur die bedryfsinstruksies gedek word, aangesien 'n onbehoorlike aanpassing van ander kontroles skade kan veroorsaak en dikwels uitgebreide werk deur 'n gekwalifiseerde tegnikus sal verg om die produk na sy normale werking te herstel.
e. As die produk val of die kas beskadig is.
f. As die produk 'n duidelike verandering in prestasie toon. - Vervangingsonderdele - As vervangingsonderdele nodig is, het 'n Lae-Voltage Elektrisiën vervang hulle deur slegs deel te gebruik wat deur die vervaardiger gespesifiseer is. Ongemagtigde vervangings kan brand, elektriese skok of ander gevare tot gevolg hê. Vervangingsonderdele kan gevind word by https://www.linortek.com/store/
- Veiligheidskontrole – Na voltooiing van enige diens of herstelwerk aan hierdie produk, vra die dienstegnikus om veiligheidskontroles uit te voer om vas te stel dat die produk in behoorlike werkende toestand is.
- Koakseergronding – As 'n buitekabelstelsel aan die produk gekoppel is, maak seker dat die kabelstelsel geaard is. Slegs VSA-modelle – Artikel 810 van die Nasionale Elektriese Kode, ANSI/NFPA No.70-1981, verskaf inligting met betrekking tot behoorlike aarding van die montering en ondersteunende struktuur, aarding van die koaksering na 'n ontladingsproduk, grootte van aardgeleiers, ligging van ontladingsproduk, verbinding met aardelektrodes en vereistes vir die aardelektrode.
- Weerlig – Vir ekstra beskerming van hierdie produk tydens 'n weerligstorm, of voordat dit vir lang tye onbewaak en ongebruik gelaat word, trek dit uit die muurprop en ontkoppel die kabelstelsel. Dit sal skade aan die produk as gevolg van weerlig en kraglynstuwings voorkom.
- Buiteluggebruik – Hierdie produk is nie waterdig nie en moet nie toegelaat word om nat te word nie. Moenie aan reën of ander soorte vloeistof blootstel nie.
Moenie oornag buite die huis laat nie aangesien kondensasie kan voorkom. - Wees versigtig vir elektrostatiese ontlading wat elektroniese toestelle kan beskadig terwyl u batterye, versmeltings verander of 'n produk op bordvlak hanteer. Dit is die beste om 'n geaarde elektroniese diensbank te gebruik. As dit nie beskikbaar is nie, kan jy jouself ontslaan deur aan 'n metaaltoestel of pyp te raak. Moenie aan i) enige ander drade as die batterydrade en ii) die gedrukte stroombaan raak terwyl jy die batterye of versmeltings verander nie.
BEPERKING VAN AANSPREEKLIKHEID
IN NO EVENT WILL LINOR TECHNOLOGY BE LIABLE, WHETHER IN CONTRACT, TORT, OR OTHERWISE, FOR ANY INCIDENTAL, SPECIAL, INDIRECT, CONSEQUENTIAL OR PUNITIVE DAMAGES, INCLUDING, BUT NOT LIMITED TO, DAMAGES FOR ANY LOSS OF USE, LOSS OF TIME, INCONVENIENCE, COMMERCIAL LOSS, OR LOST PROFITS, SAVINGS, OR REVENUES TO THE FULL EXTENT SUCH MAY BE DISCLAIMED BY LAW. DISCLAIMER FOR CRITICAL APPLICATIONS
Hierdie produk is nie bedoel of gemagtig vir lewensondersteunende produk of vir ander gebruike waarvoor 'n mislukking persoonlike besering of dood kan veroorsaak nie. As jy of jou kliënte hierdie produk vir sulke onbedoelde of ongemagtigde gebruike gebruik of toelaat, stem jy in om Linor Technology en sy affiliasies, en die beamptes, werknemers en verspreiders van elkeen ten volle te vrywaar van alle aanspreeklikheid wat met sodanige gebruik verband hou, insluitend prokureursfooie en koste.
VERDERE KENNISGEWING VIR GEBRUIKBEPERKING
Tensy spesifiek vermeld, is ons produkte NIE ontwerp om lyn voltage (110V en hoër) toestelle. Om toestel te beheer wat op lyn voltages 'n gekwalifiseerde elektrisiën MOET 'n tussengangertoestel soos 'n aflos installeer. Wanneer u toestelle kies om te beheer, is dit die beste om lae volume te kiestage kontroles soos 'n 24VAC solenoïde na watervloeibeheer. Slegs gekwalifiseerde elektrisiëns mag 'n lyn voltage toestel. Boonop moet plaaslike kodes gevolg word, insluitend maar nie beperk nie tot draadmaatgrootte en geskikte behuising. Linortek aanvaar geen verantwoordelikheid vir skade aan die gebruiker of derde partye vir die onbehoorlike gebruik van ons produkte nie. Hierdie aanspreeklikheid bly by die gebruiker. Linortek aanvaar geen verantwoordelikheid vir skade aan die toestel as gevolg van die onbehoorlike gebruik van ons produkte nie.
RELAIS VOLTAGE SPESIFIKASIES
Wees asseblief versigtig wanneer toestelle aan elektriese stroombane of ander toerusting gekoppel word. Hierdie web beheerder is NIE ontwerp om aan enige voltage greater than 48V. Utilizing this arrangement, should allow you to virtually control anything. It is important that you use licensed electricians and comply with electrical codes that are applicable to your location. These codes exist for your safety, as well as the safety of others. Linortek assumes no responsibility for any harm or damage resulting from a failure adhere to local laws, ordinances or regulations or failure to follow specified instructions for installation and product usage.
Eindgebruikerlisensie-ooreenkoms vir Linortek-sagteware en -dokumentasie
Hierdie eindgebruikerlisensie-ooreenkoms (“EULA”) is 'n wetlike ooreenkoms tussen JOU ('n individu of enkele entiteit) en Linor Technology, Inc. (“Linortek” of “ons” of “ons”) wat jou gebruik van die sagteware beheer en dokumentasie (“sagteware”) ingebed in of geassosieer met die Fargo-, Koda-, Netbell-, IoTMeter- en iTrixx-reeks produkte (“Linortek-produkte”).
Hierdie EULA beheer nie jou gebruik van die Linortek nie webwebwerf of die Linortek-produkte (uitgesluit die sagteware). Jou gebruik van die Linortek webterrein word beheer deur die Linortek webwerfdiensbepalings en die Linortek-privaatheidsbeleid wat gevind kan word by:
http://www.linortek.com/terms-and-conditions [Jou aankoop van Linortek-produkte (uitgesluit die sagteware) word beheer deur die Linortek-beperkte waarborg, wat gevind kan word by https://www.linortek.com/linortek-one-year-limited-warranty/
This EULA governs your access and use of the Software. This EULA gives you specific legal rights, and you may also have other legal rights in addition, which vary from jurisdiction to jurisdiction. The disclaimers, exclusions, and limitations of liability under
this EULA will not apply to the extent prohibited or limited by applicable law. Some jurisdictions do not allow the exclusion of implied warranties or the exclusion or limitation of incidental or consequential damages or other rights, so those provisions of this EULA may not apply to you.
Deur die sagteware of dokumentasie te installeer, toegang te verkry, te kopieer en/of te gebruik stem jy in om gebonde te wees aan die bepalings en voorwaardes van hierdie EULA namens jouself of die entiteit wat jy verteenwoordig in verband met sodanige installasie, toegang, kopiëring en/of gebruik. Jy verteenwoordig en waarborg dat (i) jy die reg, gesag en kapasiteit het om die bepalings van hierdie EULA namens jouself of die entiteit wat jy verteenwoordig te aanvaar en daartoe in te stem (ii) jy oor voldoende wettige ouderdom is in jou jurisdiksie van verblyf , (iii) jy nie geleë is in 'n land wat onderworpe is aan 'n Amerikaanse regeringsverbod, of wat deur die Amerikaanse regering as 'n "terroriste-ondersteunende" land aangewys is nie; en (ii) jy nie gelys is op enige lys van die Amerikaanse regering van verbode of beperkte partye nie.
As jy nie gebonde wil wees aan die bepalings van hierdie EULA nie, mag jy nie die Sagteware op enige manier installeer, toegang kry, kopieer of gebruik nie (hetsy vooraf geïnstalleer op 'n toestel wat jy gekoop het of nie).
- Toegelate gebruik van sagteware/sagtewarelisensie.
Onderhewig aan die bepalings van hierdie EULA, verleen Linortek aan jou 'n beperkte, herroepbare, nie-eksklusiewe, nie-sublisensieerbare, nie-oordraagbare reg en lisensie om (a) een kopie van die sagteware af te laai, te installeer en uit te voer, in uitvoerbare objekkodevorm slegs, uitsluitlik op die Linortek-produk wat jy besit of beheer en om (b) die sagteware uitsluitlik in verband met die Linortek-produk te gebruik in ooreenstemming met die beoogde gebruik daarvan soos beskryf op die Linortek webterrein (elk van 1(a) en 1(b) 'n "Toegelaten gebruik" en gesamentlik "Toegelaten gebruike"). - Beperkings op jou gebruik van die sagteware.
Jy stem in om nie, en om nie ander toe te laat om, die sagteware te gebruik vir enige ander doel as die Toegelate Gebruike wat in Afdeling 1 hierbo beskryf word nie. Dit beteken onder andere dat jy nie:
(a) enige deel van die Sagteware wysig, verander, wysig, pas aan, vertaal, maak afgeleide werke van, demonteer, reverse engineer of omgekeerde samestelling (behalwe in die mate wat toepaslike wette spesifiek sodanige beperking vir interoperabiliteitsdoeleindes verbied, in welke geval jy instem om eers Linortek te kontak en Linortek 'n geleentheid te bied om sulke veranderinge te skep wat nodig is vir interoperabiliteitsdoeleindes;
(b) die Sagteware vir enige kommersiële doel lisensieer, toewys, versprei, versend, verkoop, verhuur, gasheer, uitkontrakteer, openbaar of andersins gebruik of Sagteware aan enige derde party beskikbaar stel;
(c) enige derde party toelaat om die sagteware namens of tot voordeel van enige derde party te gebruik;
(d) enige gedeelte van die Sagteware op enige toestel of rekenaar anders as die Linortek-produk wat jy besit of beheer, gebruik;
(e) die sagteware gebruik op enige manier wat enige toepaslike plaaslike, nasionale of internasionale wetgewing oortree; of
(f) remove or alter any labels, symbols, legends or proprietary notices, including but not limited to any copyright, trademark, logo in the Software. You may not disclose the results of any performance or functional evaluation of anyof the Software to any third party without the prior written consent of Linortek for each such release. - Opdaterings.
Linortek kan van tyd tot tyd opdaterings, opgraderings, regstellings, foutoplossings en ander wysigings (“Opdaterings”) ontwikkel om die werkverrigting van die sagteware te verbeter. Behalwe soos anders bepaal op die Linortek webwebwerf, sal hierdie opdaterings gratis aan jou verskaf word. Hierdie opdaterings kan outomaties geïnstalleer word sonder kennisgewing aan jou. Deur die sagteware te gebruik, stem jy ook in tot outomatiese opdaterings. As jy nie hiertoe instem nie, mag jy nie die Sagteware op enige manier installeer, toegang kry, kopieer of gebruik nie. - Eienaarskap.
The Software is licensed to you and not sold. Linortek reserves all rights to the Software and any Updates not expressly granted herein. The Software and Linortek Products are protected by copyright, trademark and other intellectual property laws andtreaties. Linortek and its licensors own the title, copyright, trademarks and other intellectual property rights in the Software.
You are not granted any rights to Linortek’s trademarks or service marks. There are no implied licenses in this EULA. - Beëindiging.
This EULA is effective from the date you first use the Software and will continue for as long as you own the Linortek Product associated with it or until you or Linortek terminate this agreement under this section. You may terminate this EULA at any time upon written notice to Linortek at the address provided below. Linortek may terminate this EULA at any time if you fail to comply with any of the terms in this agreement. The license granted in this EULA terminates immediately when the agreement terminates. Upon termination, you must stop using the Linortek Product and the Software and you must delete all copies of the
Software. The terms of Sections 2 will still remain in effect after the agreement terminates. - Waarborg vrywaring.
EXTENT PERMITTED BY APPLICABLE LAW, LINORTEK PROVIDES THE SOFTWARE “AS-IS” AND DISCLAIMS ALL WARRANTIES AND CONDITIONS, WHETHER EXPRESS, IMPLIED, OR STATUTORY, INCLUDING THE WARRANTIES OF MERCHANTABILITY, FITNESS FOR A PARTICULAR PURPOSE, TITLE, QUIET ENJOYMENT, ACCURACY, AND NON-INFRINGEMENT OF THIRD-PARTY RIGHTS. LINORTEK DOES NOT GUARANTEE ANY SPECIFIC RESULTS FROM THE USE OF THE SOFTWARE. LINORTEK MAKES NO WARRANTY THAT THE SOFTWARE WILL BE UNINTERRUPTED, FREE OF VIRUSES OR OTHER HARMFUL CODE, TIMELY, SECURE, OR ERROR-FREE. YOU USE THE SOFTWARE AND THE LINORTEK PRODUCT AT YOUR OWN DISCRETION AND RISK. YOU WILL BE SOLELY RESPONSIBLE FOR (AND LINORTEK DISCLAIMS) ANY AND ALL LOSS, LIABILITY, OR DAMAGES RESULTING FROM YOUR USE OF THE SOFTWARE
AND LINORTEK PRODUCT. - Beperking van aanspreeklikheid.
Niks in hierdie EULA en in die besonder binne hierdie "Beperking van Aanspreeklikheid"-klousule sal probeer om aanspreeklikheid uit te sluit wat nie onder toepaslike wetgewing uitgesluit kan word nie.
IN DIE MAKSIMUM MATE WAT DEUR TOEPASLIKE WET TOEGESTAAN WORD, SAL LINORTEK, BEnewens BOGENOEMDE WAARBORGVRYWAARINGS, IN GEEN GEVAL (A) AANSPREEKLIK WEES VIR ENIGE GEVOLLIKE, VOORBEELDLIKE, SPESIALE OF TOEVALLE SKADE, INGESLUIT VIR 'N LASTE SKADE, INSLUITENDE SKADE. VANAF OF VERBAND MET DIE PRODUKTE OF SAGTEWARE, SELFS AL HET LINORTEK GEWEET OF MOES GEWEET HET VAN DIE MOONTLIKHEID VAN SULKE SKADE, EN (B) LINORTEK SE TOTALE KUMULATIEWE AANSPREEKLIKHEID VOORTKOMENDE UIT DIE ANDER OF VERWANTE PRODUKTE, MET DIE ANDER OF VERWANTE PRODUKTE. SAL BEPERK WORD TOT 'N BEDRAG OM NOOIT DIE BEDRAG TE OORSKRYF DEUR JOU EINTLIK AAN LINORTEK EN LINORTEK SE GEMAGTIGDE VERSPREIDER OF VERKOOP VERTEENWOORDIGER VIR DIE PRODUKTE OF DIENSTE WAT IN DIE VORIGE 6 MAANDE BETAAL IS BETAAL NIE. HIERDIE BEPERKING IS KUMULATIEF EN SAL NIE VERHOOG WORD DEUR DIE BESTAAN VAN MEER AS EEN VOORVAL OF EIS NIE. LINORTEK WYS ALLE AANSPREEKLIKHEID VAN ENIGE SOORT LINORTEK SE LISENSIEGEVERS EN VERSKAFFERS. - Voldoening aan Uitvoerwette.
Jy erken dat die Sagteware en verwante tegnologie onderhewig is aan Amerikaanse uitvoerbeheerwette Amerikaanse uitvoerjurisdiksie en kan onderhewig wees aan uitvoer- of invoerregulasies in ander lande. Jy stem in om streng te voldoen aan alle toepaslike internasionale en nasionale wette en regulasies wat op die Sagteware van toepassing is, insluitend die VSA Uitvoeradministrasieregulasies asook eindgebruiker-, eindgebruik- en bestemmingsbeperkings wat deur VSA en ander regerings uitgereik is. Jy erken dat jy die verantwoordelikheid het om magtiging te verkry om die Sagteware en verwante tegnologie uit te voer, weer uit te voer of in te voer, soos vereis mag word.
Jy sal Linortek vrywaar en skadeloos hou van enige en alle eise, verliese, aanspreeklikhede, skadevergoeding, boetes, boetes, koste en uitgawes (insluitend prokureursfooie) wat voortspruit uit of verband hou met enige verbreking deur jou van jou verpligtinge ingevolge hierdie afdeling. - Opdrag.
Jy mag nie enige van jou regte of verpligtinge ingevolge hierdie EULA toewys nie, en enige poging om toe te ken sal nietig en sonder effek wees. - Kennisgewings.
Linortek kan enige kennisgewing aan jou verskaf wat verband hou met hierdie EULA deur die e-pos en adres wat jy verskaf het toe jy by Linortek geregistreer het, te gebruik. - Kwytskelding
Om effektief te wees, moet enige afstanddoening deur Linortek hieronder skriftelik wees en deur 'n gemagtigde Linortek-verteenwoordiger onderteken word. Enige ander versuim van Linortek om enige bepaling hieronder af te dwing, sal nie as 'n afstanddoening beskou word nie. - Skeiding.
Enige bepaling van hierdie EULA wat as onafdwingbaar gevind word, sal geredigeer en geïnterpreteer word om die doelwitte van daardie bepaling te bereik tot die grootste mate moontlik onder toepaslike wetgewing en alle oorblywende bepalings sal ten volle van krag en effek bly. - Toepassingsreg; Lokaal.
You agree that this EULA, and any claim, dispute, action, cause of action, issue, or request for relief arising out of or relating to this EULA, will be governed by the laws of the state of North Carolina, U.S.A., without regard to conflicts of laws principles, provided that if you reside in a country that will not apply U.S. law to disputes related to these terms, then the laws of your country will apply. You also agree that the United Nations Convention on Contracts for the International Sale of Goods shall not
apply. You agree that regardless of any statute or law to the contrary, any cause of action against us arising out of or related to the Linortek webwerf, moet die sagteware of die Linortek-produkte binne een (1) jaar nadat die aksieoorsaak ontstaan het, 'n aanvang neem, of so 'n aksieoorsaak sal permanent verbied word. Enige aksie of prosedure met betrekking tot hierdie EULA moet in 'n federale of staatshof in Raleigh, Noord-Carolina gebring word en elke party onderwerp hulle onherroeplik aan die jurisdiksie en plek van enige sodanige hof in enige sodanige eis of dispuut, behalwe dat Linortek 'n bevel mag aanvra. verligting in enige hof wat jurisdiksie het om sy intellektuele eiendom te beskerm. - Kalifornië Proposition 65 Waarskuwing.
 WAARSKUWING: Hierdie produk kan jou blootstel aan chemikalieë, insluitend lood, wat aan die staat Kalifornië bekend is om kanker te veroorsaak. Vir meer inligting, gaan na www.P65Warnings.ca.gov.
Aan die gang
The Fargo SERVER is what is called a “bare board” product and is supplied without a housing. It operates on low voltage; however you need to use simple handling precautions to prevent damage to the circuits. All electronics are susceptible to electrostatic discharge. This high voltage “shock” can permanently damage your device. Before handling the product, you should touch a surface such as a grounded workbench or table. It is also best to handle the device from its edges. If you notice that your chair or clothes often cause static discharges, you must exercise extra caution. The unit is supplied with four rubber feet which keeps the bottom of the board from coming into contact with the surface you put it on. Be careful not to let metal objects, such as screw drivers or hardware, come in contact with the bottom of this product. The board can be mounted on a panel using stand offs and #4 hardware. The mounting holes are connected to the GROUND signal. The SERVER unit is a self-contained web server configured with various input and output circuits. Although the relays are rated for higher voltages, hierdie produk is nie ontwerp vir gebruik by lyn voltages. You should never use voltages through the SERVER product exceeding 48 volts. IT IS NOT SAFE.
The KODA SERVER is a housed unit with a DIN rail mountable enclosure that can be snapped onto a DIN rail or attached to any flat surface such as a wall or under a counter. KODA 100 has two relays (48VAC@1A), KODA 200 has four relays which can drive 10V 50mA to external devices. The unit is supplied with a DIN Rail mountable enclosure with removable terminal connectors for easy installation. The KODA SERVER can be mounted on a panel or on the wall using the DIN rail mount clip. The removable wire terminal connectors simplify field installation and allow for easy troubleshooting and maintenance: the unit can be removed from the system without disturbing the system wiring.
Bedrading van die bediener
Let wel: For a diagram showing the location of all connectors on your SERVER referenced in this section, please see the section – Board Layout Reference.
Waarskuwing: Hierdie eenhede is grondgeïsoleer. Koppel altyd sodat kraglus slegs aan die SERVER-eenheid gekoppel is.
MOENIE eksterne grondverbindings gebruik nie. Deur dit te doen, kan die SERVER of POE-oorsprong toestel beskadig.
- Place the unit on a table or bench being careful not to let any metal objects come into contact with the bottom of the circuit board (Fargo Only).
- Connect the 12VDC power supply to a suitable AC outlet and plug the barrel connector into the SERVER at the location labelled “12VDC/POWER”. Alternatively, you may also use POE. At this point the GREEN/Boot LED should come on and start flashing indicating the SERVER is operating and is in the “Bootload Mode”. This mode allows the user to update the server software that is used on the unit. After about 5 seconds, the GREEN LED will go off and the RED LED will start blinking once per second indicating the SERVER is operating in “Server Mode” and is accessible on a network utilizing TCP/IP protocols.
WAARSKUWING: WANNEER JY POE-NETWERKSKAKELAAR GEBRUIK, MOENIE DIE 12VDC-KRAGTOEPASSING GEBRUIK OM DIE BEDINER TERSELFDERTYD TE KRAG NIE, SAL DIT DIE RAAD BESKADIG. - Plug an Ethernet cable into the RJ45/NET connector. The “Connection” LED will come on if a 100MHz network is available, otherwise it will remain off and the “Activity” LED should start blinking indicating network activity. Fargo G2 Relay Connections
There are 8 relays on the FARGO R8 and 4 on the FARGO R4. These are dry contact relays. These units are designed for only low voltage beheer en moet nie 'n voltage applied to the relay greater than 48 volts. This is for your safety as well as to stay within the parameters of the parts and circuit board design. The relays have 3 terminals labelled NO, C and NC which stand for Normally Open, Common and Normally Closed. When activated, the relay moves the connection from CNC to CNO. If you want to make a connection when the relay is activated, connect your wires between C and NO. When the relay is activated C and NO will be connected together. If you want to break a circuit when the relay is activated, make your connections to C and NC. When the relay is activated the circuit will be broken (or open)
Koda Relay Connection
There are 2 relays on the KODA 100. The KODA 100 has 2 removable 2 position connectors (1 for each relay) and are simply numbered “1” and “2”. These relays are normally open.
There are 4 relays on the KODA 200. The KODA 200 has 1 removable 8 position connector. Each relay has a “+” connection and a numbered connection. The relays may be set to supply about 10VDC by selecting “+V” on the setting switch (see Board Layout Reference page 29) or set to dry contact DC on the switch. If “+V” is selected then the voltage will be present on the “+” terminal and the numbered terminal is the return. Otherwise, a normally open dry contact exists across the “+” and numbered connection. KODA 100/200 is designed for only low voltage beheer en moet nie 'n voltage toegepas op die aflos groter as 48 volt. Dit is vir jou veiligheid sowel as om binne die parameters van die onderdele en stroombaanontwerp te bly.

![]() IN GEEN GEVAL SAL LINOR-TEGNOLOGIE AANSPREEKLIK WEES NIE, HETsy IN KONTRAK, DORTSLAG, OF ANDER ANDERS, VIR ENIGE TOEVALLE, SPESIALE, INDIREKTE, GEVOLGS- OF STRAF SKADE, INSLUITEND, MAAR NIE BEPERK TOT, SKADE VIR ENIGE TYD, VOOR ENIGE TYD, , KOMMERSIËLE VERLIES, OF VERLORE WINSTE, SPAARS OF INKOMSTE IN DIE VOLLE OMSTREK KAN DAARVAN DOOR DIE WET VERWYL WORD.
IN GEEN GEVAL SAL LINOR-TEGNOLOGIE AANSPREEKLIK WEES NIE, HETsy IN KONTRAK, DORTSLAG, OF ANDER ANDERS, VIR ENIGE TOEVALLE, SPESIALE, INDIREKTE, GEVOLGS- OF STRAF SKADE, INSLUITEND, MAAR NIE BEPERK TOT, SKADE VIR ENIGE TYD, VOOR ENIGE TYD, , KOMMERSIËLE VERLIES, OF VERLORE WINSTE, SPAARS OF INKOMSTE IN DIE VOLLE OMSTREK KAN DAARVAN DOOR DIE WET VERWYL WORD.
VERDERE KENNISGEWING VIR GEBRUIKBEPERKING
Tensy spesifiek vermeld, is hierdie produk NIE ontwerp om lyn voltage toestelle. Hierdie beperking sluit alle FARGO EN KODA produkte in. Om toestel te beheer wat op lyn voltages die gebruiker MOET installeer en tussengangertoestel soos 'n aflos.
Wanneer 'n lyn voltage toestel wat tussengangertoestel gebruik, MOET jy óf 'n gekwalifiseerde elektrisiën wees óf die dienste van 'n gekwalifiseerde elektrisiën gebruik. Daarbenewens moet plaaslike kodes gevolg word, insluitend, maar nie beperk nie tot, draadmaatgrootte en geskikte behuising.
Linortek cannot assume any responsibility for harm to the user or third parties for improperly using our Fargo/Koda products. This liability remains with the user. Linortek cannot assume any responsibility for damage to the device for improperly using our SERVER product.
For relay specifications, please see Board Reference Layout page 29
Digital Input Connections (Fargo R4 and Koda)
The digital inputs allow the SERVER to detect an external on/off state of a sensor. With this information the SERVER can display whether an input is on or off, count events in a resettable or non-resettable counter, and calculate the frequency (such as for use as a tachometer) or the period of the input. There are two modes of operation for the digital inputs – PULL UP and ISOLATED.
a) PULL UP mode connects a 1K resistor to an internal voltage wat jou toelaat om 'n eenvoudige skakelaar (soos 'n magnetiese deurskakelaar) oor terminale 1 en 2 te gebruik. Dit wanneer die skakelaar geaktiveer word, word 'n sein na die inset gestuur.
b) ISOLATED mode allows you to directly drive the SERVER’s optoisolator with an external voltage al is 'n interne 1K-weerstand. Hierdie voltage kan in die reeks van 5V tot 24V wees wat 'n minimum van 2mA of 'n maksimum van 30mA aan die opto-isolatordiode verskaf. Daar is geen ander interne verband met hierdie voltage so it is an isolated input. Please note, when connecting a 12VDC-¬24VDC circuit to the input, an external resistor (can be provided at request, 2.2k ohm 0.5watt) must be used.
These modes are selected by the switch on the SERVER (see Board Layout Reference page 29) marked ISO and PU for isolated and pull up respectively. These are set at the factory to ISO by default.
Wiring a push button: For distances up to 500 feet, a 20 AWG shielded wire is suitable for wiring a push button. If the distance between the push button and the controller extends up to 5,000 feet, use a 16 AWG shielded cable instead. Keep in mind that longer cable runs are more susceptible to signal interference.
Waarskuwing: If you intend to use isolated mode, verify that the input switch is set to ISO before applying an external voltage. As u anders doen, kan dit die SERVER of POE-oorsprongtoestel beskadig.
Analog Input Connections (Fargo R4ADI)
The analog inputs allow the SERVER to read the value of external equipment. There are 2 analog inputs.
For AC current monitoring, use one of the two 3.5mm stereo inputs to interface with a current sensor.
Die 2 analoog insetterminaalblokke is gekoppel aan nie-geïsoleerde 0-5V stroomsensors wat aan 'n verskeidenheid toestelle soos temperatuur- of druksensors gekoppel kan word. Die SERVER verskaf 'n grond- en kragverbinding sodat metings gedoen kan word sonder eksterne voltage references. You should use a sensor that is isolated so that that it makes no connection to a remote ground. See drawing under Board Reference Layout page 29.
Accessing your SERVER
Sodra jou SERVER aangeskakel is en aan die netwerk gekoppel is, sal dit outomaties 'n IP-adres via DHCP kry solank jou router opgestel is om dit te doen. Om te koppel, voer die IP-adres in jou web browser. This will take you to your SERVER’s landing page. To log in, click the Log In button on the top right of the page. Your browser will prompt you to enter your username and password. By default, these credentials are both set to admin. To find your SERVER’s IP address, see below.
Vind u IP-adres met Linortek Discoverer
Die Discoverer-program sal jou SERVER outomaties opspoor. Die Discoverer is 'n Java-program en vereis dat Java Runtime geïnstalleer word om hierdie kenmerk te gebruik. Java kan hier gevind word: http://java.com/en/download/index.jsp.
Om die Discover-program af te laai, gaan asseblief na: https://www.linortek.com/downloads/supportprogramming/
Gebruik van Chrome- en Firefox-blaaiers word aanbeveel. Neem asseblief kennis: As jy verkies om Internet Explorer te gebruik, stoor Internet Explorer Linortek Discoverer as 'n zip file by verstek. Om die Discoverer te gebruik, sal jy Stoor as moet kies en die hernoem file as Linortek Discoverer.jar wanneer jy aflaai.
Wanneer jy die Discover-program aflaai, sal jy soms 'n opspringwaarskuwingsboodskap sien, afhangende van jou blaaier-sekuriteitinstellings, wat vra of jy dit wil behou of weggooi file, please click the Keep button as this is a Java program, and it won’t harm your computer.
Sodra Discoverer jou toestel opspoor, sal dit wys:
- IP-adres
- Gasheernaam
- MAC-adres
- Ander inligting:
a. Blou LED (indien aan)
b. Produk Naam
c. Bediener sagteware hersiening
d. Poortnommer (indien oorgedra)

Klik op die toestel wat jy wil gebruik wat op die Discoverer-program gewys word om die SERVER te begin web pages in your browser. Click the Login button on the homepage. The default username/password is: admin/admin. You may change these as you desire or disable this feature in the settings menu.
Connecting your SERVER Directly to Your PC
You can also plug your SERVER directly to your PC if there is no network connection available. If you plug your SERVER into your PC’s Ethernet port it will use the default IP address: 169.254.1.1 unless you have previously configured your SERVER to use a static IP. Enter 169.254.1.1 into your web browser to connect. No internet connection is required. Once configured, you can then install your SERVER where you desired.
Bedienerkonfigurasie
Meld aan
Once you have entered the IP address and port number, if set, the Login page will open. This page shows the name of this server which you may change in Configure/Network Config.
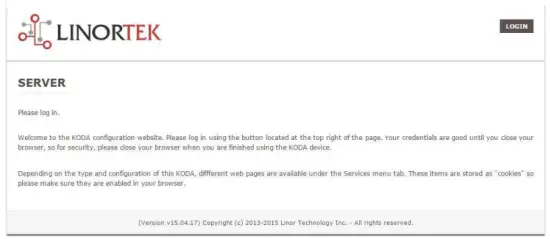
This page is static with no background activity and is a useful place to park if you are not using the SERVER and do not want to close the connection.
By pressing LOGIN, you will be asked for your username and password. These credentials will be retained by the browser until the browser is closed. You can disable the password requirement in Settings page. See section page 21.
Tuisblad
Sodra u aanmeldbewyse ingevoer is, sal u na die hoofbladsy van die toepassing herlei word. Die Tuis- of Indeksbladsy vertoon sommige van die stelselinligting en bied die vermoë om die fisiese toestel op te spoor as dit in 'n area met ander is. Sien lys hieronder vir beskrywing.

- TIME – Displayed along with the day of the week. This time may be set to be in a 12 hour format with AM/PM indicator or 24 hour format.
- DATUM – Huidige datum word hier vertoon.
- VOLTS – Voltage by die bord word vertoon. Dit kan nuttig wees as die SERVER saam met ander toerusting aangedryf word, voltage variance can be noted. Fargo and Koda servers have an input voltage range of 1248vDC.
- TEMPERATURE – Temperature on the board is displayed. This display may be either °C or °F. This temperature will be affected by the heat generated by SERVER itself so it will always be slightly higher than ambient temperature.
- LED's - Daar is 3 LED's wat vertoon word. Die ROOI LED is die stelselpuls. Dit behoort ongeveer een keer per sekonde te flikker solank die bediener aan die gang is. Die GROEN LED word gebruik vir selflaai-opsies en is oor die algemeen nie sigbaar op die webwebwerf. Die BLOU LED is klikbaar en jy kan dit hieruit aan en af skakel web bladsy. Dit is nuttig om die toestel fisies op te spoor indien dit saam met ander soortgelyke eenhede gebruik word, aangesien dit sal verlig op die eenheid waarna dit web blaaier gekoppel is. Die Discoverer-program sal ook oplet of die BLOU LED aan is. Dit word dikwels na verwys as 'n "Losiseer"-funksie.
Dienste
Die Dienste-oortjie is dinamies en sal verander na gelang van die opstelling van jou bediener. Dit is waar jy die insette, uitsette, sensors en ander spesialiteitskontroles kan beheer.
In/Out or Relays Page
Depending on which SERVER you are using, the first page on the SERVICES tab will be either In/Out or Relays.
In/Out has the relay controls and the input controls on one page, while Relays only has the relay controls.
Aflosbeheer
An In/Out page is displayed below. Some relay control pages have 2, 4 or 8 relays displayed. Each relay has a number, in this case 1 to 4.

The State LED shows whether the relay is on or off indicated by GREEN and RED respectively. This icon is clickable to manually control the corresponding relay. Each relay can have a Name as well as identifiers for the Normally Open, Common and Normally Closed connections.
Daar is vier status-LED's wat wys:
- Email – If an email is to be sent when this relay is switched on/off
- Pols - As hierdie aflos ingestel is met 'n polswydte en polswydte vermenigvuldiger (duur) - sien volgende afdeling vir meer inligting
- Sched. – If there is a schedule created in the Tasks page (see page 15) set to automatically trigger this relay.
- Tyd - As puls gestel is en hierdie aflos is geaktiveer, sal die Tyd-LED rooi word wat wys dat die aflos tans op 'n tydhouer werk.
Click the Edit Icon to edit the controls for the corresponding relay. This will take you to the Set Relay page (see page 11).
Insette
The In/Out or Inputs page (depending on your SERVER) will display information from each input. The SERVERs have a combination of inputs. The Fargo R4DI has four digital inputs, The R4ADI has, four digital inputs, four analog inputs. The KODA SERVER has two digital inputs.
At the top of each input is a label (ex: DIN 1, AIN 2) specifying whether it is a digital input (DIN) or analog input (AIN) as well as the input number. This label will turn green when the input is enabled. Inside the box will be any display configured from the Set Input page (see page 12 for digital input, page 14 for analog input). A red dot in the lower-left corner indicating the state of a linked relay (if any), will turn green when the linked relay is activated.
Finally, an Edit icon in the lower-right corner of the box to edit the corresponding input. This will take you to the Set Digital Input or Set Analog Input page (page 12 or page 14).
Set Relay Page
Die STEL RELAIS-bladsy laat jou toe om verskeie eienskappe met betrekking tot die Relay in te stel.
- Relay Select – The Relay that you are editing (identified by the line on which you clicked the Edit icon on the RELAY page).
- Name – Enter a 15-character Relay Name. This and the following 3 fields may be used for any identifying information desired.
- NO Name – Enter a 7-character name for the Normally Open (NO) connection.
- Com Name – Enter a 7-character name for the Common (COM) connection.
- NC Name – Enter a 7-character name for the Normally Closed (NC) connection.
- Pulse Width – When you control the relay it turns on or off. You may control it for a timed turned on period by entering a Pulse Width when 0 means there is no timed event and a number represents duration of the pulse. The maximum number you can enter here is 4 digits, ie. 1234.
- Polswydtevermenigvuldiger - Om die polslengte verder te definieer, kies 'n polswydtevermenigvuldiger om die polswydte verder te definieer. Jy kan kies:
• Geen
• mS (Millisecond, 1/1000 second)
• Sec (Seconds)
• Min (Minutes) - Relay Tipe - die SERVER kan fisies toegang tot aflosse op die SERVER verkry of met ander maniere. Jy kan kies:
• Normal – relay physically on the SERVER
• Latched – not currently supported
• Remote – a relay on another SERVER accessed over the network
• Zigbee – a relay at a remote device accessed over an RF system
• Normal and Remote – both relays activated
• Normal and Zigbee – both relays activated - Ligging-ID – dit is 'n nommer wat 'n afgeleë ligging identifiseer
- Aflos by ligging – 'n nommer wat die aflos of toestel by die ligging verteenwoordig
- Stuur e-pos – die SERVER kan geprogrammeer word om 'n e-pos te stuur as die aflos aan of afgeskakel is.

Stel digitale invoerbladsy in
Die digitale insette kan ingestel word om verskeie uitlesings te verskaf by die gebruik van 'n reeks vertoontipes. Benewens die vertoon van die invoerdata, kan jy die skerm benoem asook 'n aflos daarmee assosieer. Hierdie aflos sal van Groen na ROOI verander soos dit van aan na af gaan, asook klikbaar om dit te beheer. Deur op die wysig potloodikoon te klik, kan jy die instellings vir hierdie invoer wysig:
- Digital Input Selected – The Digital Input that you are editing (identified by the line on which you clicked the Edit icon).
- Naam - Jy kan 'n 15-karakter naam vir hierdie invoer stel. Hierdie naam verskyn in die balk boaan die skerm.
- Etiket – Stel 'n etiket van 7 karakters in wat op die werklike aktiewe skerm vertoon word.
- Korrigeerder – Deur hierdie veld te gebruik, kan jy 'n waarde optel, aftrek, vermenigvuldig of deel voordat die waarde op die vertoonbladsy gewys word. Dit is 'n 2-waarde-korrigeerder met elkeen wat deur 'n enkele spasie-karakter geskei word. (bv. “+2, -2, *3, /3”)
- GEBRUIK – Stel hierdie invoer op aktief. Draai die invoernommer-aanwyser na groen. Daar moet kennis geneem word dat wanneer dit gebruik word, die invoer SVE tyd en ander hulpbronne verbruik, afhangende van die tipe. Alhoewel alle insette op dieselfde tyd aktief kan wees, word dit aanbeveel om slegs dié aan te skakel wat jy wil gebruik.
- Tipe – Die invoerdata kan gebruik word om 'n reeks resultate te bereken. Jy kan kies:
• State – This is useful for knowing if an input is on or off, like a door switch being on or off.
• CounterNR – This is a non-resettable counter.
• CounterR – This is a resettable counter.
• Frequency – Counts the frequency of an input in KHz (kilo hertz or1/1000 seconds). This could be useful in displaying a tachometer where 60Hz = 1 R.P.M.
• Period – in 1/1000 seconds an input in kHz (milliseconds or1/1000 seconds). This would be useful for measuring timed events. - Vertoon - Met hierdie keuse kan jy die vertoontipe wat gebruik word, verander. Jy kan kies:
• Dot – A single dot with the value in the middle. This can be used for State. You can make a dumb indicator by changing the color of the Dot based on the value. The label is under the Dot.
• Values – Displays the Corrected Value with the Label in a box directly below it.
• Meter – This Meter has configurable scale based on the Min/Max values and arcs can be colored per the Color ranges. The Label is displayed within the Meter.
• VBar – Also based on the Min/Max values for the scale and the bar changes color based on the values in the Color ranges. - Relay L/T – Enter a Relay number here. If it is a local relay it will show GREEN or RED depending if it is on or off. By clicking on it the relay will turn on and off. The name comes from the relay settings page. This may be useful if you want to turn the subject of a display on and off. Any relay can be used on any input and each may be reused for any other input. Adding an L after the relay number (ex: 2L) will link the state of the input to the state of the relay. This is an easy and immediate way to have an input follow the relay. Adding a T after the relay number will trigger the relay to the state of the input. This is an easy and immediate way to have a relay follow the input.
- Command Z/N/I – This field is used for issuing various commands to the Digital Input controller: Z Zero the resettable counter. N Leave the input as Normal. I Invert the input.
- Value – These are Min/Max values used for the display. This is useful for preventing a Meter from going past its end or setting the value of a VBar. This is the Value after the Corrector. The system cannot display a value past Max, so be sure this is at least set to 1.
- Geel/Rooi/Groen – Daar is drie kleure wat gebruik kan word om 'n vertoning verder te definieer. Stel die reeks van hierdie kleure om 'n kleur te definieer na die vertoonwaarde. Dit is die Waarde na die Korrekter. Let daarop dat as jy 'n toestandtipe gebruik, jy dalk ROOI = Van 0 tot 0 wil toeken, GROEN = Van 1 tot 1 en GEEL = Van 2 tot 2. Aangesien 'n toestand altyd óf 1 óf 0 is, sal dit dubbelsinnige inligting voorkom en voorkom dat die GEEL kleur gebruik word. Jy kan enige twee kleure kies wat jy wil vir 'n staat tipe.

Set Analog Input Page
Die analoog insette kan ingestel word om verskeie uitlesings te verskaf by die gebruik van 'n reeks vertoontipes. Benewens die vertoon van die invoerdata, kan jy die skerm benoem asook 'n aflos daarmee assosieer. Hierdie aflos sal van Groen na ROOI verander soos dit van aan na af gaan, asook klikbaar om dit te beheer.
- Analog Input Selected – The Analog Input that you are editing (identified by the line on which you clicked the Edit icon).
- Naam - Jy kan 'n 15-karakter naam vir hierdie invoer stel. Hierdie naam verskyn in die balk boaan die skerm.
- Etiket – Stel 'n etiket van 7 karakters in wat op die werklike aktiewe skerm vertoon word.
- Korrigeerder – Deur hierdie veld te gebruik, kan jy 'n waarde optel, aftrek, vermenigvuldig of deel voordat die waarde op die vertoonbladsy gewys word. Dit is 'n 2-waarde-korrigeerder met elkeen wat deur 'n enkele spasie-karakter geskei word. (bv. “+2, -2, *3, /3”)
- USE – Sets this input to active. Turns the input number indicator to GREEN. It should be noted that when in use the input consumes CPU time and other resources depending on its type. Although all inputs may be active at the same time, it is recommended to turn on only those you want to use.
- Tipe – Die invoerdata kan gebruik word om 'n reeks resultate te bereken. Jy kan kies:
• Analog 1 – Analog 1 input from a SERVER with an input such as found on a R4ADI.
• Analog 2 – Analog 2 input from a SERVER with an input such as found on a R4ADI.
• AC Current 1 – AC current sensor 1 input from a SERVER with an input such as found on a R4ADI.
• AC Current 2 – AC current sensor 2 input from a SERVER with an input such as found on a R4ADI.
• AC Current 3 – Not used
• Volts – The measurement of the voltage powering the SERVER.
• Current – On “S” models, this is the current consumed by the SERVER.
• Int. Temp – Temperature from the board mounted sensor.
• Ext. Temp – Temperature from the “S” model SERVER.
• R. Humidity – % Relative Humidity from the “S” model SERVER.
• MMA X – The X axis accelerometer data from the “S” model SERVER.
• MMA Y – The Y axis accelerometer data from the “S” model SERVER.
• MMA Z – The Z axis accelerometer data from the “S” model SERVER. - Vertoon - Met hierdie keuse kan jy die vertoontipe wat gebruik word, verander. Jy kan kies:
1. Dot – A single dot with the value in the middle. This can be used for State. You can make a dumb indicator by changing the color of the Dot based on the value. The label is under the Dot.
2. Values – Displays the Corrected Value with the Label in a box directly below it.
3. Meter – This Meter has configurable scale based on the Min/Max values and arcs can be colored per the Color ranges. The Label is displayed within the Meter.
4. VBar – Also based on the Min/Max values for the scale and the bar changes color based on the values in the Color ranges. - Relay – Enter a Relay number here. If it is a local relay it will show Green or RED depending if it is on or off.
By clicking on it the relay will turn on and off. The name comes from the relay settings page. This may be useful if you want to turn the subject of a display on and off. Any relay can be used on any input and each may be reused for any other input. - Waarde – Dit is Min/Max waardes wat vir die vertoning gebruik word. Dit is nuttig om te verhoed dat 'n meter verby sy einde gaan of om die waarde van 'n VBar te stel. Dit is die Waarde na die Korrekter. Die stelsel kan nie 'n waarde verby Max vertoon nie, so maak seker dat dit ten minste op 1 gestel is.
- Geel/Rooi/Groen – Daar is drie kleure wat gebruik kan word om 'n vertoning verder te definieer. Stel die reeks van hierdie kleure om 'n kleur te definieer na die vertoonwaarde. Dit is die Waarde na die Korrekter. Let daarop dat as jy 'n toestandtipe gebruik, jy dalk ROOI = Van 0 tot 0 wil toeken, GROEN = Van 1 tot 1 en GEEL = Van 2 tot 2. Aangesien 'n toestand altyd óf 1 óf 0 is, sal dit dubbelsinnige inligting voorkom en voorkom dat die GEEL kleur gebruik word. Jy kan enige twee kleure kies wat jy wil vir 'n staat tipe.

Tasks Page
The TASKS page displays the automatic events that can be programmed into the SERVER. You can schedule up to 16 events in the SERVER. These are constructed as IF … THEN statements. In addition, the IF term can have 2 elements (IF a, AND/OR/NOT b … THEN c). This provides a simple to program and powerful way to take advantage of the data acquired by the SERVER. The Tasks page shows you an overview of configured tasks. You can click the dot in the State column to turn a task on or off indicated by a green dot for ON, and a red dot for OFF. To edit or create a task, click the Edit icon to the right of the task line. This will take you to the Set Schedule page detailed in the next section.

Set Schedule Page
The SET SCHEDULE page allows you to create time and logic-based events that will occur automatically if the conditions are met.
- Schedule Select – Determined by clicking on a schedule line from the previous page.
- Schedule Name – Enter a 15-character Schedule Name.
- USE – In order for a Schedule line to be active you must select the USE button. If there is an error detected in entering Schedule data, the USE box will automatically uncheck.
- LOG – Kies log vir hierdie item om in die stelsellog te verskyn elke keer as dit uitgevoer word.
- Email – Click Email to automatically send an email when this schedule is executed.
- Device A – Select Device A for the first term in the IF statement from the drop box.
- Data A – Select Data A for the above device. Depending on the device selected, the Data used for testing may have special properties. See the list below for Data that may be entered. If an error is detected indata entry when the “Save” button is pushed, the USE box will uncheck and the Data box containing the error will be highlighted.
• Minute – Enter: mm
• Hour – Enter: hh (use 24-hour system)
• Day – Enter: dd
• DayofWeek – Enter: Sunday = 1, Monday = 2, Tuesday = 3, Wednesday = 4, Thursday = 5, Friday = 6, Saturday = 7, Weekday = 8, Weekend = 9
• Time – Enter: hh:mm (use leading zeros, seconds are ignored) (use 24 hour system) ex:07:30 or 14:05
• Date – Enter: yy/mm/dd (use leading zeros) ex: 20/01/10 for January 10, 2020
• Relay – Enter: Relay number and (+ or -), ex: 01+ for Relay 1 ON or 01- for Relay 1 OFF
• Button – Enter: + or – (for ON or OFF respectively)
• Flag – Enter: Flag number(opt.+), or Flag number (for ON or OFF respectively)
• Temp – Enter: >, = or < value; example: >40 (altyd grade C)
• Volts – Enter: >, = or < value; example: <10
• Analog – Analog input. Enter an input number and >, = or < and value. Example: 3<123 (This value is raw data value prior to any Corrector used by the input display page.)
• Digital – Digital input. Enter Input Number, Type, >, =, or < and value; example: 1F>7500 (This value is the raw data value prior to any Corrector used on the display page). Type can be (case sensitive):
• S State (On/Off)
• C Non-resettable counter
• c Resettable counter (lower case ‘c’)
• F Frequency in 1/1000 seconds
• P Period in 1/1000 seconds - Logika - Stel 'n logika-vergelyking op tussen Toestel A en Toestel B.
• AND – True if: Device A is true AND Device B is true
• OR – True if: Device A is true OR Device B is true
• NOT – True if: Device A is true and Device B is NOT true - Device B – Select Device B for testing from the drop box.
- Data B – Kies Data B vir die bogenoemde toestel. Afhangende van die toestel wat gekies is, kan die data wat vir toetsing gebruik word, spesiale eienskappe hê. Sien bogenoemde lys.
- Toestel C – is wat om te beheer.
- Data C – Stel eienskap vir Toestel C. Sintaksis word soos volg gebruik:
• RELAY – These are relays on this SERVER. You can set up to four per schedule. Enter separated by commas, for exampdie “1,2,3,4”
• FLAG – This is a storage flag that can be used to make more complex schedules. There are 8 flags that can be turned on or off.
• REMOTE – Refers to a remote SERVER unit. When these conditions are met, this SERVER will send a command to control a remote SERVER. The Data field for a remote unit should be in the format,
“REMOTE UNIT NUMBER, REMOTE UNIT RELAY”. For example, "3,5". Hierdie afgeleë SERVERS moet geïdentifiseer word in die bladsy Configure/Remote Device Config.
• COUNTER – Adds count to digital input counter – set as 1 or 2 depending on which digital input is counting
• BLUE LED – No data.
• eMAIL – Will send eMail, no data.
• NOTIFY – Will send notification to Kodalert, set 1- 8 for Settings/Alarm Notification number. (Not Implemented) - Aksie – Wat om te doen met Toestel C. Opsies is:
• ON – Turns device ON
• OFF – Turns device OFF
• TGL – Toggles state of Device C
• RESET – Resets CounterR

Logs Bladsy
The Logs tab displays over 10,000 entries from actions taken by the SERVER or by users themselves. This feature allows several actions for the convenience of displaying and collecting data from the SERVER.
- The checkboxes above the date allow the user to filter logs from different sources. To filter out logs you do not wish to see from a certain source simply uncheck the box.
- Each log has a reference number and a time and date attached in a “yyyy/mm/dd” and “hh:mm:ss” format. Afterwards is the event displayed.
- To scroll through the logs, use the arrows to the right-hand side, where the horizonal line and arrow brings you to the start or end, the double arrow moves up or down a page, and the single arrow moves up or down a single log.
- To refresh the logs manually click the REFRESH button below the Log Details.
- To download the Log Details, click the DOWNLOAD button below the Log Details, this allows you to save the logs as a separate file.
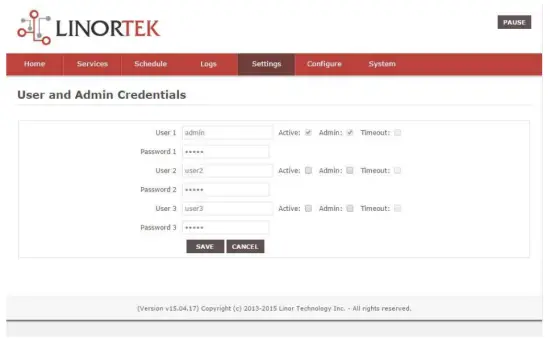
Gebruikers- en administrateurbewyse-bladsy
Use this page from the Settings drop down menu. Here you can set up to 3 users for your SERVER system. As a default only User 1 is Active. Here you can:
- User Name and Password – Each user has their own credentials. As a default these are set toadmin/admin, user2/user2 and user3/user3 for Users 1, 2 and 3 respectively. The passwords are never displayed. Let wel: when you reset the password, it must be less than 13-character.
- Aktief – Moet gemerk word vir hierdie gebruiker om aan te meld, jy kan nie Gebruiker 1 deaktiveer nie.
- Admin – Slegs admin kan data op die meeste bladsye stoor. Dit beskerm jou SERVER teen verandering deur 'n ongemagtigde persoon.
- Uitteltyd – Nie op hierdie tydstip geaktiveer nie.
Tyd/Datum Bladsy
Gebruik hierdie bladsy vanaf die Instellings-aftreklys. Hierdie bladsy laat jou toe om die tyd- en datumstelsel op te stel.
- Time – Set time using an hh:mm:ss format.
- Datum – Stel datum met 'n jj/mm/dd-formaat.
- Time Zone – Set desired time zone 5 for EST, 8 for PST, you can now add a :mm for setting part hour, for example, 5:30 is 'n tydsone op 5 uur en 30 minute.
- Gebruik Dagligbesparingstyd – Kies om jou stelseltyd outomaties op dagligbesparingsdag aan te pas. (Nie akkuraat in alle tydsones nie.)
- Gebruik MIL-tyd – Kies om 24-uur-formaat te gebruik.
- Use NTP Update – Select to synchronize SERVER time with NTP server
- NTP Web Webwerf – Dit is die geselekteerde NTP-bediener vir opdaterings.
- NTP-interval – Tydinterval tussen opdaterings in minute.
- Log NTP Event – Normally NTP exceptions will be logged, select this option to Log every NTP event. (May be useful in debugging.)

Instellingsbladsy
Access this page from the Settings dropdown menu. Select these settings to enable various features in the SERVER
- Use Active Main – No longer used. (Select PAUSE to go inactive.)
- Vereis aanmelding – Indien nie gekies nie, sal die SERVER alle toegang sonder geloofsbriewe toelaat.
- Use IP Ranges – Not Implemented.
- Use RESTFUL IP Ranges – Not implemented.
- Use Remote IP Ranges – Not implemented.
- Gebruik RESTful Authentication – Vereis gebruikersnaam en wagwoord vir RESTful.
- Brei aflosreeks uit – Aktiveer 8 relais.
- Gebruik Relay Radio Buttons – Indien gestel, wanneer een relais aangeskakel is, is al die ander afgeskakel.
- SSL Port No. – Not supported – For future use.
- Gebruik Stelsel-e-posse – Aktiveer bykomende e-posboodskappe.
- Gebruik Fahrenheit - Kies Celsius of Fahrenheit.
- PGM Dynamic Relays – Changes properties of relays in task schedule.
- CLR PGMs on Start – Reinitialize tasks on start up.
- RTC Temperature Compensation – All Koda boards can add Temperature and Humidity sensor.
- Gebruik AM2302 – Gebruik AM2302 temperatuur- en humiditeitsensor (apart verkoop).
- Java Report – Send data to HourCollector app over ethernet (only for IoTMeter)
- Use Metric – Not supported – For future use.
- UART Usage – Enter “Audio” for Netbell-NTG, “Clock” for Netbell clock.
- Switch Bypass (1/2) – Ignores physical inputs if set. For example, in a Koda 200 board, you want to ignore input 1 switch, check Switch Bypass 1
- Setting 19 – Not supported – For future use
- Gebruik oudio File System – Activate SD Card reader for Netbell-NTG
- WiFi Report – Enable data transfer over WiFi (WiFi IoTMeter only)
- Active Landing Page – Not supported – For future use.
- . Invert Relay Control – The relay is set to NO by default. By checking this box the relay will be inverted to NC.
- Setting 24 – Not supported – For future use.

Dinamiese DNS-bladsy
Access this page from the Configure dropdown menu. From this page you can assign dynamic DNS settings. This page, along with proper port forwarding through the router, can enable global access to a device behind a NAT router or firewall. You will need to assign a static IP address and port number (see Network Config Page on page 25) and port the IP address on your router (refer to your router’s user manual). An internet IP address will have to be hosted in order to access your SERVER from the internet. Currently the only IP hosting service supported is provided by DynDNS (https://dyn.com)
- Gebruik DDNS – Aktiveer hierdie diens.
- DDNS-diens – Kies 'n diens uit die drop box. Tans is die enigste ondersteunde diens DynDNS
- Gebruikersnaam – Dit verwys na die rekening wat by die DDNS-diens opgestel is.
- Wagwoord – Wagwoord vir toegang by die DDNS-diens.
- Host – This is the IP name registered at the DDNS service for rerouting to this SERVER

E-pos opstelbladsy
Stel 'n e-posrekening op vir die SERVER om te gebruik in die stuur van e-posboodskappe vanaf verskeie modules. Toegang tot hierdie bladsy vanaf die Configure-oortjie.
Let wel: This unit is NOT compatible with SSL/TLS, there are 3rd party SMTP delivery servers which do not require SSL and can be used. For instructions on how to use a 3rd party SMTP delivery service, please refer to Appendix 1 at the end of this manual).
- SMTP-bediener – Voer die uitgaande posbediener in wat u wil gebruik.
- Poort – Dit is die poort op daardie bediener. Jy kan jou posdiens aanlyn soek vir hierdie inligting sowel as die ander opstelvelde.
- Gebruik SSL - Laat dit ongemerk wanneer jy 'n derdeparty SMTP-bediener gebruik.
- Gebruikersnaam - Jou e-posrekeningnaam.
- Wagwoord - E-pos rekening wagwoord.
- To Address – Enter up to 3 address for this email set up. An addressee, a CC and a BC.
- Onderwerp – Onderwerplyn van die e-poskopskrif.

Netwerkkonfigurasiebladsy
Access this page from the Configure dropdown menu. This page allows the configuration of the SERVER’s network settings.
WAARSKUWING: Incorrect settings may cause the board to lose network connectivity. In order to access a device in your network remotely you must PORT the device. This tells your router that information coming in should be sent to a specific device on your network.
- MAC Address – This is a unique MAC address that is assigned to this product at time of assembly. It cannot be altered.
- Gasheernaam – Dit is 'n Netbios-naam waarby hierdie eenheid in sommige netwerke aangespreek kan word. Dit kan ook in jou router se huurgids verskyn. Dit maak 'n nuttige plek om jou SERVER te noem en verskyn op die Tuisblad en op die Ontdekker.
- Poortnommer – Dit word deel van die IP-adres en is nodig vir internettoegang. As dit nie gestel is nie, sal die SERVER verstek na 'n poortnommer van 80.
- IP Address – Typically you only change the last group of numbers. If you change this IP address make sure to reserve this IP on your router and no other devices are using this IP address or you may not be able to reach this SERVER. If this happens you may need to Restore Defaults using the push button method.
- Gateway – Tipies 'n router op jou TCP/IP-netwerk wat dien as 'n toegangspunt tot jou ISP.
- Subnetmasker – 'n 32-bis-nommer wat 'n IP-adres masker en die IP-adres in netwerkadres en gasheeradres verdeel. Los dit net by 255.255.255.0
- Primêre DNS – 'n Primêre DNS.
- Sekondêre DNS – 'n Sekondêre DNS.

IP-reeks-konfigurasiebladsy
Access this page from the Configure dropdown menu. Use these security settings to select a range of IP address that will be allowed to access the SERVER.CAUTION: Incorrect settings may cause the board to lose network connectivity. Not implemented on this SERVER.
Afgeleë toestelle bladsy
Access this page from the Configure dropdown menu. These settings allow the SERVER to remotely control the relays on another SERVER. This is done by selecting the Remote Device in the Schedule program or by setting up a relay as a REMOTE. There are 8 possible REMOTE locations.
WAARSKUWING: Verkeerde instellings sal veroorsaak dat die bord sy afstandverbindings verloor.
- Toestelnaam – Voer 'n teksnaam vir hierdie toestel in vir toekomstige verwysing.
- IP-adres – Die IP-adres van die afgeleë toestel, insluitend 'n poortnommer.
- Gebruikersnaam – Gebruik in basiese verifikasie.
- Password – Used in Basic Authentication.

Kodalert Page
Not Yet Implemented. Access this page from the Configure dropdown menu. Kodalert provides an interface for alerts of Internet connected devices. Kodalert is a cloud based, open platform monitoring and alert system for the Internet of Things in your physical world. Any Thing that can send an email or TCP messages including our SERVERS, other manufactures devices and people using email can use Kodalert. It can work for multiple remote locations, alert multiple users instantly using the rules you setup by text, email, smart phone Apps push notification or audible alarm instantly when something happens.
- Waarskuwingsnommer
- Toets
- Gebruik
- Reël
In the Alarm Notification page, you can change the state (on/off) of the relay by clicking the green circle in the state column. Push the EDIT icon to change the Alarm’s settings.

Spesifikasies
FARGO R8G2
- 10M/100M RJ45 Internet interface with connection and activity LEDs
- 8 Relay outputs, 1FORMC 48 Volt Max (24VAC/DC 3A)
- Status LEDs (pulse, bootloader, and locate)
- Ethernet Bootloader (for server hardware code upgrade)
- PoE or 12VDC @500mA (nominal)
- Web interface w/basic authentication
- On board temperature sensor and voltagen sensor
Reset /Locate pushbutton (blue LED) - Working Temperature from 0 to +70 Celsius
- Storage Temperature from 40 to +125 Celsius
- Humidity from 10% to 80% noncondensing
- Dimensions 74mm x 100mm x 20mm, mounting holes 64mm x 92mm Ф 3.2mm 4 places
- Ondersteunde protokolle: HTTP/SMTP/SNTP
FARGO R4G2
- 10M/100M RJ45 Internet interface with connection and activity LEDs
- 4 1FormC relays 48 Volt Max (24VAC/DC 3A)
- 2 optically isolated digital inputs, 12V 1mA or pulldown switch selectable, 2 conductor screw terminal connectors for each.
- 2 Analog 0-5VDC Inputs 30mA 3.3VDC power source PTC protected. 3 conductor screw terminal connectors for each (3.3VDC, input, ground) (R4ADI only)
- 2 Current sensor inputs. 3.5mm stereo jack connector for each (R4ADI only)
- Status LEDs (pulse, bootloader, and locate)
- Ethernet Bootloader (for server hardware code upgrade
- POE or 12VDC @500mA (nominal)
- Web interface w/basic authentication
- On board temperature sensor and voltagen sensor
- Reset/Locate pushbutton
- Working Temperature from 0 to +70 Celsius
- Storage Temperature from 40 to +125 Celsius
- Humidity from 10% to 80% noncondensing
- Dimensions 74mm x 100mm x 20mm, mounting holes 64mm x 92mm Ф 3.2mm 4 places
- Ondersteunde protokolle: HTTP/SMTP/SNTP
KODA100
- 10M/100M RJ45 Internet interface with connection and activity LEDs
- 2 1-Form-A relay 48VAC@8A Max
- 2 optically isolated digital inputs, 12V 1mA or pulldown switch selectable
- Status LEDs (pulse, bootloader, and locate)
- Ethernet Bootloader (for server hardware code upgrade)
- POE or 12VDC @500mA (nominal)
- Web interface w/basic authentication
- On board temperature sensor and voltagen sensor
- Reset/Locate pushbutton (blue LED)
- Working temperature from 0 to +70 Celsius
- Storage temperature from 40 to +125 Celsius
- Humidity from 10% to 80% noncondensing
- Afmetings: 70 mm x 100 mm x 25 mm
- Ondersteunde protokolle: HTTP/SMTP/SNTP
KOD200
- 10M/100M RJ45 Internet interface with connection and activity LEDs
- 4 1FormA relays 48 Volt Max 1A dry contact or drive 10V ±10% 50mA to external devices
- 2 optically isolated digital inputs, 12V 1mA or pulldown switch selectable
- Status LEDs (pulse, bootloader, and locate)
- Ethernet Bootloader (for server hardware code upgrade)
- POE or 12VDC @500mA (nominal)
- Web interface w/basic authentication
- On board temperature sensor and voltagen sensor
- Reset/Locate pushbutton (blue LED)
- Working Temperature from 0 to +70 Celsius
- Storage Temperature from 40 to +125 Celsius
- Humidity from 10% to 80% noncondensing
- Afmetings: 70 mm x 100 mm x 25 mm
- Ondersteunde protokolle: HTTP/SMTP/SNTP
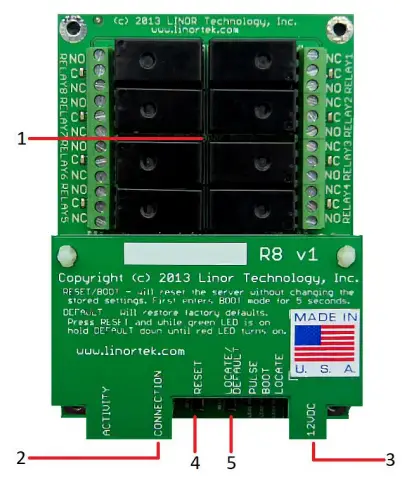
Raadsverwysingsuitleg
Fargo R8
- 8 Relay outputs, 1FORMC 48 Volt Max (24VAC/DC 3A)
- Rj45 Connector
- Kragaansluiting (12VDC)
- Herstel-knoppie
- Soek knoppie
Fargo R4
- 3.5mm Inputs for AC Current Sensor (R4ADI Only)
- Analog Inputs (R4ADI Only)
- 4 Relay outputs, 1FORMC 48 Volt Max (24VAC/DC 3A)
- Digitale insette
- Digital Input Switches (Input 1 on right.
Up: Pullup, Down: Isolated) - Rj45 Connector
- Herstel-knoppie
- Soek knoppie
- Kragaansluiting (12VDC)

Koda 100
- Digital Inputs (#1 on the left) 5VDC-48VDC (12VDC-48VDC must use the external resistor)
- Relay Outputs (#1 is on the right) 8A@48VAC Max
- Digital Input Switches (IN 1 on left. UP: Isolated, Down: Pullup)
- Herstel-knoppie
- Herlaai-knoppie (skakel blou LED aan – identifiseer op Discoverer)
- Rj45 Connector
- Kragaansluiting (12VDC)
- USB Mini Connector vir temperatuur / humiditeit sensor (apart verkoop)

Koda 200
- Digital Inputs (#1 on the left) 5VDC-48VDC (12VDC-48VDC must use the external resistor)
- Relay Outputs (#1 is on left) 48 Volt Max 1A dry contact or drive 10V ±10% 50mA
- Digital Input Switches (IN 1 on left. UP: Isolated, Down: Pullup)
- Relay Switches (Up for dry contact, down for 10V/50mA)
- Herstel-knoppie
- Herlaai-knoppie (skakel blou LED aan – identifiseer op Discoverer)
- Rj45 Connector
- Kragaansluiting (12VDC)
- USB Mini Connector vir temperatuur / humiditeit sensor (apart verkoop)

Fabrieksterugstelling
To perform a factory Reset, push the Reset button. When the green LED turns on, push and hold the Reload button until the flashing red LED turns off and then turns on solid. Refer to Board Reference Layout section for the button locations on your device.
This user-manual supplements the documentation for the following Linortek products:
- Netbell-2
- Netbell-8
- Netbell-K (and variants)
- iTrixx-NHM
For more information, documentation and how-to videos, visit https://www.linortek.com/downloads/
Hierdie dokument kan gevind word by www.linortek.com/downloads/documentations/
As jy hulp nodig het met jou toestel, besoek asseblief www.linortek.com/technical-support
Linor Tegnologie, Inc.
Inligting onderhewig aan verandering sonder kennisgewing.
Bylaag 1
Hoe om SSL-e-posse te stuur met behulp van 'n derdeparty SMTP-diens vir Linortek Fargo- en Koda-toestelle
By verstek gebruik Koda/Fargo-toestelle nie-SSL SMTP-e-posbedieners. Maar die meeste van die e-posbedieners het vandag oorgeskakel na SSL-sekuriteitsprotokol, daar is derdeparty-SMTP-afleweringsbedieners wat nie SSL benodig nie en gebruik kan word. Daar is baie SMTP-e-posdiensverskaffers in die mark. Ons gebruik SMTP3GO as 'n example om die opstelproses te demonstreer. SMTP2GO is gratis om te gebruik met tot 1000 e-posse/maand. Om SMTP2GO te gebruik, besoek asseblief: https://www.smtp2go.com/ .
Stap 1. Skep die SMTP2GO-rekening.
Om 'n rekening te skep, klik eenvoudig op "Sluit aan", kies "1K e-posse" op die skaal en kies "Gratis plan" (As jy meer as 1000 e-posse per maand moet stuur, kies die plan wat aan jou vereistes voldoen.)

Om 'n rekening op SMTP2GO te skep, sal 'n korporatiewe e-posadres nodig wees. Gratis e-posdiens soos Gmail of Yahoo laat jou nie voortgaan nie. Nadat u u SMTP2GO-rekening geaktiveer het, moet u 'n gebruiker byvoeg.
Stap 2. Voeg 'n gebruiker by.
Die gebruiker wat jy op SMTP2GO skep, sal die uitgaande posbediener wees wanneer jy die Fargo/Koda-toestel opstel om e-posverslae te stuur, maak asseblief seker dat jou korporasie-e-posbediener nie die e-posse blokkeer as jy gratis e-posrekeninge soos Yahoo of Gmail gebruik om voeg 'n gebruiker hier by.
Teken in op jou SMTP2GO-rekening, op die linkerkant kieslys kies “Instellings” > “SMTP-gebruikers”, Klik op “Voeg SMTP-gebruiker by” en vul die vorm in.
 Nadat die gebruiker by jou SMTP2GO-rekening gevoeg is, sal dit die inligting vertoon wat jy nodig het om die e-poskennisgewing op jou Fargo/Koda-toestelle op te stel.

Stap 3. Konfigureer die Linortek-toestel.
Nadat jy 'n rekening geskep en 'n gebruiker bygevoeg het, meld aan by jou Linortek-toestel, navigeer na Configure – E-pos-opstellingbladsy om e-poskennisgewing op te stel:
- SMTP-bediener – Voer die uitgaande posbediener in wat jy wil gebruik, dit is mail.smtp2go.com in ons example.
- Poort – Dit is die poort op daardie bediener. Die SMTP-poort is 2525 in ons eksample.
- Gebruik SSL - Laat dit ongemerk wanneer jy 'n derdeparty SMTP-bediener gebruik.
- Gebruikersnaam - Die gebruikersnaam van SMTP2GO toe ons 'n gebruiker in die vorige stap geskep het.
- Wagwoord – Die gebruiker se wagwoord vanaf SMTP2GO toe ons 'n gebruiker in vorige stap geskep het.
- Na adres – Voer tot 3 adresse in vir hierdie e-posopstelling. 'n Geadresseerde, 'n BK en 'n BK.
- Onderwerp – Onderwerplyn van die e-poskopskrif.
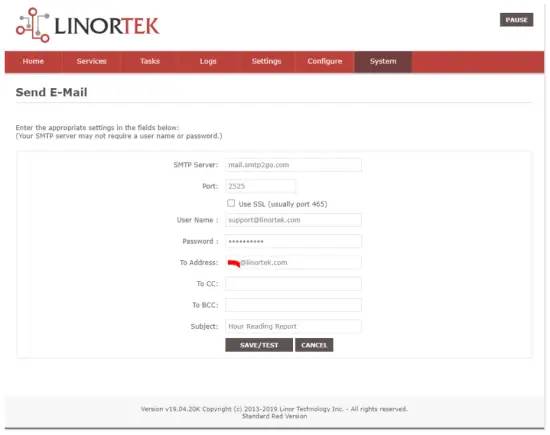
Sodra jy "Stoor/Toets" druk, stuur die toestel outomaties die toets-e-pos. Gaan asseblief die vouer vir gemors/ander na om dit te vind as dit nie in die inkassie-lêergids is nie.
Stap 4. Stel die taak vir outomatiese e-poskennisgewings.
You should be able to receive email notifications for various events from the Fargo/Koda boards at this point. If you need to receive condition logic notification, you can use our condition logic configuration to setup such report. To setup the logic condition report notification, go to Tasks page on your Fargo/Koda device, click the Edit icon of a Schedule. For details of how to create a logic-based event, please refer to the Set Schedule Page on the Fargo/Koda User Manual, which can be downloaded here:
https://www.linortek.com/download/fargo%20g2_koda%20downloads/fargo%20g2_koda%20documentation/Fargo-G2-and-Koda-User-Manual.pdf
In hierdie aample Ons sal die Network Hour Meter-toestel as 'n examplees vir hoe om e-posverslae elke dag om 11:52 te ontvang.
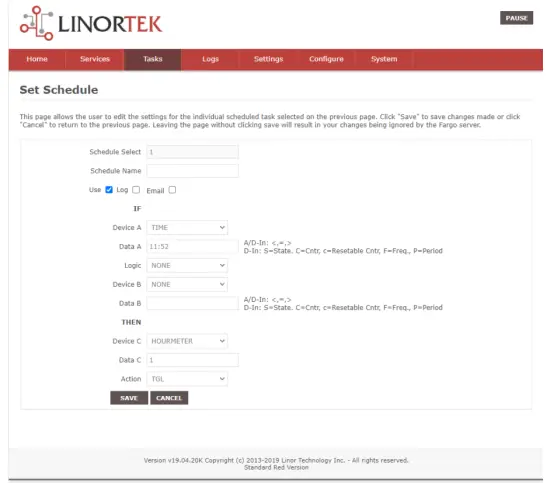
Sodra aan alle voorwaardes van die taak voldoen word, kry jy die volgende e-pos:
Hour Reading Report
![]() support@linortek.com
support@linortek.com
Mon 4/11/2022 11:52 AM
To: Liyu Nalven
HM 1, my machine, is at 000242.01 hrs.
Reply Forward
![]()
Dokumente / Hulpbronne
 |
LINORTEK Fargo G2 TCP/IP Web Based Relay Controller [pdfGebruikershandleiding Fargo G2, Koda, Fargo G2 TCP-IP Web Based Relay Controller, Web Based Relay Controller, Based Relay Controller, Relay Controller |