![]() Fargo G2 and Koda User Manual
Fargo G2 and Koda User Manual
www.linortek.com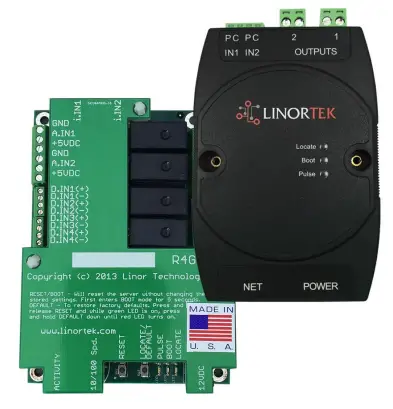 For Fargo G2, Koda
TCP/IP Web ឧបករណ៍បញ្ជាបញ្ជូនតដែលមានមូលដ្ឋាន
បប ៣/១៩
Fargo G2 TCP/IP Web ឧបករណ៍បញ្ជាបញ្ជូនតដែលមានមូលដ្ឋាន
អរគុណសម្រាប់ការទិញasing a Linortek Fargo G2 or Koda TCP/IP Controller. There are many devices that can be controlled by the FARGO/KODA Web Relay Controller. FARGO/KODA Web Controller can be used in such applications as (but not limited to): Lights, security, sprinkler systems, access control, industrial equipment, building automation, HVAC, and many more. Please refer to the Board Reference Layouts on page 29 for input and output specifications on your controller to verify they are suitable to your needs.
សៀវភៅណែនាំនេះគ្របដណ្តប់៖
- FARGO R8 G2
- FARGO R4DI G2
- FARGO R4ADI G2
- លេខកូដ ១
- KODA200
These will be referred to as SERVER hereafter. When there are differences or additional features they will be noted in the text.
សម្រាប់វីដេអូអប់រំ សំណួរដែលសួរញឹកញាប់ និងព័ត៌មានទំនាក់ទំនងសម្រាប់ក្រុមជំនួយបច្ចេកទេសរបស់យើង សូមចូលទៅកាន់៖ https://www.linortek.com/technical-support
LINORTEK ការធានារយៈពេលមួយឆ្នាំមានកំណត់
Consumer law: For consumers who are covered by consumer protection laws or regulations in their country of residence (“Consumer Law”), the benefits provided in this Linortek One-Year Limited Warranty (“Linortek Limited Warranty”) are in addition to and not instead of the rights provided by Consumer Law and it does not exclude, limit or suspend your rights arising from Consumer Law. You should consult the proper authorities in your country of residence for further information about these rights
កាតព្វកិច្ចធានារបស់ Linortek សម្រាប់ផលិតផលផ្នែករឹងនេះ (“ផលិតផល”) ត្រូវបានកំណត់ចំពោះលក្ខខណ្ឌដែលមានចែងខាងក្រោម៖
Linor Technology, Inc. (“Linortek”) warrants this product against defects in materials and workmanship for a period of ONE (1) YEAR from the date of retail purchase by the original end-user purchaser (“Warranty Period”) when used in accordance with the operating instructions. A copy of a retail receipt is required as proof of purchase. If a hardware defect arises and a valid claim is received within the Warranty Period, at its option and to the extent permitted by law, Linortek will either (1) repair the hardware defect at no charge, using new or refurbished replacement parts, (2) exchange the product with a product that is new or which has been manufactured from new or serviceable used parts and is at least functionally equivalent to the original product, or (3) refund the purchase price of the product. When a refund is given, the product for which the refund is provided must be returned to Linortek and becomes Linortek’s property.
ការធានាខាងលើគឺជាកម្មវត្ថុនៃការទាមទារជាលាយលក្ខណ៍អក្សរភ្លាមៗរបស់អ្នកទិញ (i) និង (ii) ការផ្តល់ទាន់ពេលវេលាដល់ Linortek នូវឱកាសមួយក្នុងការត្រួតពិនិត្យ និងសាកល្បងផលិតផលដែលអះអាងថាមានកំហុស។ ការត្រួតពិនិត្យបែបនេះអាចស្ថិតនៅក្នុងបរិវេណរបស់អ្នកទិញ ហើយ/ឬ Linortek អាចស្នើសុំការត្រឡប់មកវិញនៃផលិតផលដោយចំណាយរបស់អ្នកទិញ។ ទោះជាយ៉ាងណាក៏ដោយ Linortek នឹងមិនទទួលខុសត្រូវចំពោះការវេចខ្ចប់ ការត្រួតពិនិត្យ ឬថ្លៃពលកម្មទាក់ទងនឹងការត្រឡប់មកវិញនៃផលិតផលនោះទេ។ គ្មានផលិតផលណាមួយត្រូវបានទទួលយកសម្រាប់សេវាកម្មធានាដែលមិនត្រូវបានអមដោយលេខការអនុញ្ញាតទំនិញត្រឡប់មកវិញ (RMA#) ដែលចេញដោយ Linortek។
ការលើកលែង និងដែនកំណត់
ការធានាមានកំណត់នេះមិនរាប់បញ្ចូលការខូចខាតដែលបណ្តាលមកពីការរំលោភបំពាន ការប្រើប្រាស់ខុស ការធ្វេសប្រហែស អគ្គីភ័យ ឬមូលហេតុខាងក្រៅផ្សេងទៀត គ្រោះថ្នាក់ ការកែប្រែ ការជួសជុល ឬមូលហេតុផ្សេងទៀតដែលមិនមែនជាពិការភាពនៃសម្ភារៈ និងការងារ។ កម្មវិធីដែលចែកចាយដោយ Linortek ដោយមានឬគ្មានឈ្មោះម៉ាក Linortek រួមទាំង ប៉ុន្តែមិនកំណត់ចំពោះកម្មវិធីប្រព័ន្ធ (“កម្មវិធី”) មិនត្រូវបានគ្របដណ្តប់ក្រោមការធានាមានកំណត់នេះទេ។ ការប្រើប្រាស់ និងសិទ្ធិរបស់អ្នកដែលទាក់ទងនឹងកម្មវិធីត្រូវបានគ្រប់គ្រងដោយកិច្ចព្រមព្រៀងអាជ្ញាប័ណ្ណអ្នកប្រើប្រាស់ចុងក្រោយ Linortek ដែលអ្នកអាចរកបាននៅទីនេះ៖ https://www.linortek.com/end-user-licenseagreement/. Linortek មិនទទួលខុសត្រូវចំពោះការខូចខាតដែលកើតចេញពីការមិនធ្វើតាមការណែនាំទាក់ទងនឹងការប្រើប្រាស់ផលិតផលនោះទេ។ ដើម្បីធានាបាននូវការអនុលោមតាមដែនកំណត់ប្រតិបត្តិការ អ្នកទិញគួរតែយោងទៅសៀវភៅណែនាំ [ផ្តល់ជាមួយផលិតផល]។ ថ្មមិនត្រូវបានរាប់បញ្ចូលក្នុងការធានាទេ។
ក្នុងកម្រិតអតិបរិមាដែលត្រូវបានអនុញ្ញាត ការធានា និងដំណោះស្រាយដែលមានកំណត់ខាងលើគឺមានលក្ខណៈផ្តាច់មុខ ហើយជំនួសឱ្យការធានា ដំណោះស្រាយ និងលក្ខខណ្ឌផ្សេងៗ និងការកំណត់ជាក់លាក់ក្នុងការកំណត់ផ្នែកគ្រប់គ្រងទាំងអស់ រួមទាំង ប៉ុន្តែមិនកំណត់ចំពោះការធានានៃការលក់ដូរ, សម្បទាសម្រាប់គោលបំណងពិសេសមិនបំពាន។ រហូតមកដល់ពេលនេះ ការធានាបែបនេះមិនអាចប្រកែកបាន ការធានាបែបនេះទាំងអស់នឹងត្រូវកំណត់ក្នុងវិសាលភាពដែលបានអនុញ្ញាតដោយច្បាប់ ត្រូវបានកំណត់ក្នុងរយៈពេលរហូតដល់រយៈពេលនៃការធានា LINORTEK RIGHTWERSALLY AIRBEDYED ឬសងប្រាក់វិញតាមការកំណត់ដោយ LINORTEK នៅក្នុងការវិនិច្ឆ័យតែមួយគត់របស់វា។ រដ្ឋមួយចំនួន (ប្រទេស និងខេត្ត) មិនអនុញ្ញាតឱ្យមានដែនកំណត់លើរយៈពេលដែលការធានា ឬលក្ខខណ្ឌអាចបន្តបានយូរ ដូច្នេះដែនកំណត់ដែលបានពិពណ៌នាខាងលើមិនអាចអនុវត្តចំពោះអ្នកបានទេ។ ការធានានេះផ្តល់ឱ្យអ្នកនូវសិទ្ធិផ្លូវច្បាប់ជាក់លាក់ ហើយអ្នកក៏អាចមានសិទ្ធិផ្សេងទៀតដែលប្រែប្រួលពីរដ្ឋទៅរដ្ឋ (ឬតាមប្រទេស ឬខេត្ត)។ ការធានាមានកម្រិតនេះត្រូវបានគ្រប់គ្រងដោយ និងសាងសង់ក្រោមច្បាប់របស់សហរដ្ឋអាមេរិក។
ការបដិសេធ
- អានការណែនាំ - អានការណែនាំអំពីសុវត្ថិភាព និងប្រតិបត្តិការទាំងអស់ មុនពេលដំណើរការផលិតផល។
- រក្សាការណែនាំ - រក្សាសុវត្ថិភាព និងសេចក្តីណែនាំប្រតិបត្តិការសម្រាប់ជាឯកសារយោងនាពេលអនាគត។
- ការព្រមានដោយយកចិត្តទុកដាក់ - ប្រកាន់ខ្ជាប់នូវការព្រមានទាំងអស់លើផលិតផល និងនៅក្នុងសេចក្តីណែនាំប្រតិបត្តិការ។
- ធ្វើតាមការណែនាំ - ធ្វើតាមការណែនាំប្រតិបត្តិការ និងប្រើប្រាស់ទាំងអស់។
- ការសម្អាត - ដកផលិតផលចេញពីថាមពលមុនពេលសម្អាត។ កុំប្រើឧបករណ៍សម្អាតរាវ ឬថ្នាំសម្អាតអេរ៉ូសូល។ ប្រើការផ្សាយពាណិជ្ជកម្មamp ក្រណាត់សម្រាប់សម្អាតតែធុងប៉ុណ្ណោះ។
- ឯកសារភ្ជាប់ - កុំប្រើឯកសារភ្ជាប់ លុះត្រាតែពួកវាត្រូវបានណែនាំជាពិសេសដោយ Linortek ។ ការប្រើប្រាស់ឯកសារភ្ជាប់ដែលមិនឆបគ្នា ឬមិនសមស្របអាចមានគ្រោះថ្នាក់។
- គ្រឿងបន្ថែម - កុំដាក់ផលិតផលនេះនៅលើជើងទម្រ ជើងកាមេរ៉ា តង្កៀប ឬម៉ោនដែលមិនស្ថិតស្ថេរ។ ផលិតផលអាចធ្លាក់ចុះ បណ្តាលឱ្យមានរបួសធ្ងន់ធ្ងរដល់មនុស្សម្នាក់ និងការខូចខាតធ្ងន់ធ្ងរដល់ផលិតផល។ ប្រើតែជាមួយជើងទម្រ ជើងកាមេរ៉ា តង្កៀប ឬម៉ោនដែលបានណែនាំដោយក្រុមហ៊ុនផលិត ឬលក់ជាមួយផលិតផល។ អនុវត្តតាមការណែនាំរបស់អ្នកផលិតនៅពេលដំឡើងផលិតផល ហើយប្រើតែឧបករណ៍ភ្ជាប់ដែលបានណែនាំដោយក្រុមហ៊ុនផលិតប៉ុណ្ណោះ។ ប្រយ័ត្នពេលប្រើឧបករណ៍រួមផ្សំ និងរទេះ។ ការឈប់រហ័ស កម្លាំងខ្លាំងពេក និងផ្ទៃមិនស្មើគ្នាអាចបណ្តាលឱ្យឧបករណ៍ និងរទេះក្រឡាប់។
- ខ្យល់ចេញចូល - ការបើកនៅក្នុងឯករភជប់ប្រសិនបើមានត្រូវបានផ្តល់ជូនសម្រាប់ខ្យល់ចេញចូល និងដើម្បីធានាបាននូវប្រតិបត្តិការដែលអាចទុកចិត្តបាននៃផលិតផល និងដើម្បីការពារវាពីការឡើងកំដៅ។ កុំបិទ ឬបិទបាំងការបើកទាំងនេះ។ កុំដាក់ផលិតផលនេះក្នុងការដំឡើងដែលភ្ជាប់មកជាមួយ លុះត្រាតែមានខ្យល់ចេញចូលត្រឹមត្រូវ ឬការណែនាំរបស់ Linortek ត្រូវបានប្រកាន់ខ្ជាប់។
- ប្រភពថាមពល - ដំណើរការផលិតផលនេះតែពីប្រភេទប្រភពថាមពលដែលមានបង្ហាញក្នុងសៀវភៅណែនាំ ឬនៅលើស្លាកផលិតផលប៉ុណ្ណោះ។
ប្រសិនបើអ្នកមិនប្រាកដអំពីប្រភេទនៃការផ្គត់ផ្គង់ថាមពលដែលអ្នកគ្រោងនឹងប្រើប្រាស់ សូមពិគ្រោះជាមួយអ្នកលក់ឧបករណ៍របស់អ្នក ឬក្រុមហ៊ុនថាមពលក្នុងស្រុក ប្រសិនបើការប្រើប្រាស់ប្រភេទប្រភពថាមពលណាមួយក្រៅពីបានបញ្ជាក់នៅក្នុងសៀវភៅណែនាំណែនាំ ឬស្លាកសញ្ញានឹងចាត់ទុកជាមោឃៈនូវការធានាណាមួយ។ សម្រាប់ផលិតផលដែលមានបំណងដំណើរការពីថាមពលថ្ម ឬប្រភពផ្សេងទៀត សូមមើលការណែនាំប្រតិបត្តិការ [រួមបញ្ចូលជាមួយផលិតផល]។ - ការដាក់ដី ឬប៉ូឡារីហ្សីហ្សីសិន – ផលិតផលនេះអាចត្រូវបានបំពាក់ដោយដោតខ្សែចរន្តឆ្លាស់គ្នាដែលមានបន្ទាត់រាងប៉ូល (ឌុយមួយមានកាំបិតធំជាងមួយទៀត)។ ដោតនេះនឹងបញ្ចូលទៅក្នុងព្រីភ្លើងតែមួយផ្លូវប៉ុណ្ណោះ។ នេះគឺជាមុខងារសុវត្ថិភាព។ ប្រសិនបើអ្នកមិនអាចបញ្ចូលឌុយចូលទៅក្នុងព្រីបានពេញលេញទេ សូមព្យាយាមដាក់ដោតបញ្ច្រាស។ ប្រសិនបើដោតនៅតែមិនដំណើរការ វាគឺដោយសារតែព្រីរបស់អ្នកមិនឆបគ្នាជាមួយដោត។ ទាក់ទងអគ្គីសនីរបស់អ្នកដើម្បីជំនួសព្រីរបស់អ្នកជាមួយនឹងឧបករណ៍ដែលត្រូវគ្នា។ កុំបង្ខំឌុយឱ្យសមនឹងព្រីដែលមិនឆបគ្នា ឬព្យាយាមកម្ចាត់គោលបំណងសុវត្ថិភាពនៃដោត។ ម៉្យាងទៀត ផលិតផលនេះអាចត្រូវបានបំពាក់ដោយដោតខ្សែដី 3 ខ្សែ ដែលជាឌុយដែលមានម្ជុលទីបី (ដី) ។ ឌុយនេះនឹងដាក់បានតែនៅក្នុងព្រីភ្លើងប្រភេទដីប៉ុណ្ណោះ។ នេះគឺជាមុខងារសុវត្ថិភាព។ កុំបង្ខំឌុយឱ្យសមនឹងព្រីដែលមិនឆបគ្នា ឬព្យាយាមកម្ចាត់គោលបំណងសុវត្ថិភាពនៃដោត។ ប្រសិនបើព្រីរបស់អ្នកមិនឆបគ្នាជាមួយដោត សូមទាក់ទងអគ្គិសនីរបស់អ្នក ដើម្បីជំនួសព្រីរបស់អ្នកជាមួយនឹងអ្វីដែលត្រូវគ្នា។
- ការការពារខ្សែភ្លើង - កំណត់ផ្លូវខ្សែផ្គត់ផ្គង់ថាមពល ដើម្បីកុំឱ្យពួកវាទំនងជាត្រូវបានដើរ ឬខ្ទាស់ដោយរបស់ដែលដាក់នៅលើ ឬប្រឆាំងនឹងពួកវា ដោយយកចិត្តទុកដាក់ជាពិសេសទៅលើខ្សែ និងដោត ប្រដាប់ទទួលភាពងាយស្រួល និងចំណុចដែលខ្សែចេញពីឧបករណ៍។ .
- ខ្សែថាមពល - កុំដាក់ប្រព័ន្ធខាងក្រៅនៅកន្លែងណាមួយដែលនៅជិតខ្សែថាមពលលើស ឬភ្លើងអគ្គិសនីផ្សេងទៀត ឬសៀគ្វីថាមពល ឬកន្លែងដែលវាអាចធ្លាក់ចូលទៅក្នុងខ្សែថាមពល ឬសៀគ្វីបែបនេះ។ នៅពេលដំឡើងប្រព័ន្ធខាងក្រៅ សូមប្រើការប្រុងប្រយ័ត្នបំផុត ដើម្បីកុំឱ្យប៉ះខ្សែថាមពល ឬសៀគ្វីអគ្គីសនី ដោយសារការប៉ះពួកវាអាចបណ្តាលឱ្យស្លាប់។
- ការផ្ទុកលើសទម្ងន់ - កុំផ្ទុកលើសទម្ងន់នៃព្រី និងខ្សែបន្ថែម ព្រោះវាអាចបណ្តាលឱ្យមានអគ្គីភ័យ ឬឆក់អគ្គិសនី។
- ការបញ្ចូលវត្ថុ និងវត្ថុរាវ – មិនត្រូវរុញវត្ថុគ្រប់ប្រភេទចូលទៅក្នុងផលិតផលនេះតាមរយៈការបើកឡើយ ព្រោះវាអាចប៉ះនឹងកម្រិតគ្រោះថ្នាក់។tagចំណុច e ឬផ្នែកខ្លីដែលអាចបណ្តាលឱ្យមានអគ្គីភ័យឬឆក់អគ្គិសនី។ មិនត្រូវកំពប់រាវគ្រប់ប្រភេទលើផលិតផលឡើយ។
- សេវាកម្ម - កុំព្យាយាមផ្តល់សេវាកម្មដល់ផលិតផលនេះដោយខ្លួនឯង ព្រោះការបើក ឬដោះគម្របអាចនាំឱ្យអ្នកជួបគ្រោះថ្នាក់។tage ឬគ្រោះថ្នាក់ផ្សេងទៀត។ បញ្ជូនសេវាកម្មទាំងអស់នៃផលិតផលទៅ Linortek ។
- ការខូចខាតដែលទាមទារសេវាកម្ម - ដកផលិតផលចេញពីព្រី ហើយបញ្ជូនសេវាកម្មទៅកាន់ផ្នែកជំនួយអតិថិជន Linortek ក្រោមលក្ខខណ្ឌដូចខាងក្រោម៖
ក. នៅពេលដែលខ្សែផ្គត់ផ្គង់ថាមពល ឬដោតត្រូវបានខូច។
ខ. ប្រសិនបើវត្ថុរាវត្រូវបានកំពប់ ឬវត្ថុបានធ្លាក់លើផលិតផល។
គ។ ប្រសិនបើផលិតផលត្រូវបានប៉ះពាល់នឹងទឹកភ្លៀងឬទឹក។
ឃ. ប្រសិនបើផលិតផលមិនដំណើរការជាធម្មតាដោយធ្វើតាមការណែនាំប្រតិបត្តិការ [រួមបញ្ចូលជាមួយផលិតផល]។ កែតម្រូវតែការគ្រប់គ្រងទាំងនោះដែលត្រូវបានគ្របដណ្តប់ដោយសេចក្តីណែនាំប្រតិបត្តិការប៉ុណ្ណោះ ព្រោះការកែតម្រូវមិនត្រឹមត្រូវនៃការគ្រប់គ្រងផ្សេងទៀតអាចបណ្តាលឱ្យមានការខូចខាត ហើយជារឿយៗនឹងត្រូវការការងារយ៉ាងទូលំទូលាយដោយអ្នកបច្ចេកទេសដែលមានលក្ខណៈសម្បត្តិគ្រប់គ្រាន់ដើម្បីស្ដារផលិតផលទៅប្រតិបត្តិការធម្មតារបស់វា។
ង។ ប្រសិនបើផលិតផលត្រូវបានធ្លាក់ចុះឬគណៈរដ្ឋមន្ត្រីត្រូវបានខូចខាត។
f. ប្រសិនបើផលិតផលបង្ហាញការផ្លាស់ប្តូរជាក់លាក់នៅក្នុងការអនុវត្ត។ - ការជំនួសគ្រឿងបន្លាស់ - ប្រសិនបើផ្នែកជំនួសចាំបាច់ ត្រូវមានវ៉ុលទាបtage អគ្គីសនីជំនួសពួកគេដោយប្រើតែផ្នែកដែលបានបញ្ជាក់ដោយក្រុមហ៊ុនផលិត។ ការជំនួសដោយគ្មានការអនុញ្ញាតអាចបណ្តាលឱ្យមានអគ្គីភ័យ ការឆក់អគ្គិសនី ឬគ្រោះថ្នាក់ផ្សេងទៀត។ ផ្នែកជំនួសអាចរកបាននៅ https://www.linortek.com/store/
- ការត្រួតពិនិត្យសុវត្ថិភាព - នៅពេលបញ្ចប់សេវាកម្ម ឬការជួសជុលផលិតផលនេះ សូមសួរអ្នកបច្ចេកទេសសេវាកម្មឱ្យធ្វើការត្រួតពិនិត្យសុវត្ថិភាព ដើម្បីកំណត់ថាផលិតផលស្ថិតក្នុងស្ថានភាពប្រតិបត្តិការត្រឹមត្រូវ។
- Coax Grounding - ប្រសិនបើប្រព័ន្ធខ្សែខាងក្រៅត្រូវបានភ្ជាប់ជាមួយផលិតផល ត្រូវប្រាកដថាប្រព័ន្ធខ្សែត្រូវបានចាក់ដី។ គំរូរបស់សហរដ្ឋអាមេរិកតែប៉ុណ្ណោះ – ផ្នែកទី 810 នៃក្រមអគ្គីសនីជាតិ ANSI/NFPA No.70-1981 ផ្តល់ព័ត៌មានទាក់ទងនឹងការភ្ជាប់ដីត្រឹមត្រូវនៃការដំឡើង និងរចនាសម្ព័ន្ធទ្រទ្រង់ ការភ្ជាប់ដីនៃ coax ទៅនឹងផលិតផលបញ្ចេញ ទំហំនៃចំហាយដី ទីតាំង នៃផលិតផលបង្ហូរ ការភ្ជាប់ទៅនឹងអេឡិចត្រូតដី និងតម្រូវការសម្រាប់អេឡិចត្រូតដី។
- រន្ទះ - សម្រាប់ការការពារបន្ថែមនៃផលិតផលនេះក្នុងអំឡុងពេលមានព្យុះរន្ទះ ឬមុនពេលទុកវាចោលដោយមិនមានការប្រុងប្រយ័ត្ន និងមិនបានប្រើប្រាស់ក្នុងរយៈពេលយូរ សូមដកដោតចេញពីព្រីជញ្ជាំង ហើយផ្តាច់ប្រព័ន្ធខ្សែ។ នេះនឹងការពារការខូចផលិតផលដោយសាររន្ទះ និងការកើនឡើងនៃខ្សែថាមពល។
- ការប្រើប្រាស់ខាងក្រៅ - ផលិតផលនេះមិនជ្រាបទឹក និងមិនគួរត្រូវបានអនុញ្ញាតឱ្យសើមឡើយ។ កុំប៉ះពាល់នឹងទឹកភ្លៀង ឬវត្ថុរាវផ្សេងៗ។
កុំទុកចោលក្រៅផ្ទះពេញមួយយប់ ព្រោះអាចមានជាតិខាប់។ - ខណៈពេលដែលផ្លាស់ប្តូរថ្ម ហ្វុយស៊ីប ឬគ្រប់គ្រងផលិតផលកម្រិតក្តារ សូមប្រយ័ត្នចំពោះការឆក់អគ្គិសនីដែលអាចបំផ្លាញឧបករណ៍អេឡិចត្រូនិច។ វាជាការល្អបំផុតក្នុងការប្រើកៅអីសេវាអេឡិចត្រូនិចដែលមានមូលដ្ឋាន។ ប្រសិនបើវាមិនអាចប្រើបានទេ អ្នកអាចបញ្ចេញដោយខ្លួនឯងដោយប៉ះឧបករណ៍ ឬបំពង់ដែក។ ខណៈពេលផ្លាស់ប្តូរថ្ម ឬហ្វុយហ្ស៊ីប កុំប៉ះ i) ខ្សភ្លើងណាមួយក្រៅពីខ្សភ្លើងថ្ម និង ii) បន្ទះសៀគ្វីដែលបានបោះពុម្ព។
ដែនកំណត់នៃការទទួលខុសត្រូវ
IN NO EVENT WILL LINOR TECHNOLOGY BE LIABLE, WHETHER IN CONTRACT, TORT, OR OTHERWISE, FOR ANY INCIDENTAL, SPECIAL, INDIRECT, CONSEQUENTIAL OR PUNITIVE DAMAGES, INCLUDING, BUT NOT LIMITED TO, DAMAGES FOR ANY LOSS OF USE, LOSS OF TIME, INCONVENIENCE, COMMERCIAL LOSS, OR LOST PROFITS, SAVINGS, OR REVENUES TO THE FULL EXTENT SUCH MAY BE DISCLAIMED BY LAW. DISCLAIMER FOR CRITICAL APPLICATIONS
ផលិតផលនេះមិនត្រូវបានបម្រុងទុក ឬត្រូវបានអនុញ្ញាតសម្រាប់ផលិតផលទ្រទ្រង់ជីវិត ឬសម្រាប់ការប្រើប្រាស់ផ្សេងទៀត ដែលការបរាជ័យអាចបណ្តាលឱ្យមានរបួស ឬស្លាប់ផ្ទាល់ខ្លួន។ ប្រសិនបើអ្នក ឬអតិថិជនរបស់អ្នកប្រើប្រាស់ ឬអនុញ្ញាតឱ្យប្រើប្រាស់ផលិតផលនេះសម្រាប់ការប្រើប្រាស់ដោយអចេតនា ឬគ្មានការអនុញ្ញាតនោះ អ្នកយល់ព្រមសងសំណងទាំងស្រុងចំពោះក្រុមហ៊ុន Linor Technology និងសាខារបស់វា ហើយមន្ត្រី បុគ្គលិក និងអ្នកចែកចាយនីមួយៗ ពីការទទួលខុសត្រូវទាំងអស់ដែលទាក់ទងនឹងការប្រើប្រាស់នោះ រួមទាំង ថ្លៃឈ្នួល និងថ្លៃដើមមេធាវី។
សេចក្តីជូនដំណឹងបន្ថែមអំពីដែនកំណត់នៃការប្រើប្រាស់
លើកលែងតែមានការបញ្ជាក់ជាក់លាក់ ផលិតផលរបស់យើងមិនត្រូវបានរចនាឡើងដើម្បីប្តូរបន្ទាត់ voltage (110V និងខ្ពស់ជាងនេះ) ឧបករណ៍។ ដើម្បីគ្រប់គ្រងឧបករណ៍ដែលដំណើរការនៅបន្ទាត់ voltagអគ្គិសនីដែលមានសមត្ថភាព ត្រូវតែដំឡើងឧបករណ៍អន្តរការី ដូចជាឧបករណ៍បញ្ជូនត។ នៅពេលជ្រើសរើសឧបករណ៍ដើម្បីគ្រប់គ្រង វាជាការល្អបំផុតក្នុងការជ្រើសរើសវ៉ុលទាបtage គ្រប់គ្រងដូចជា solenoid 24VAC ទៅនឹងការគ្រប់គ្រងលំហូរទឹក។ មានតែជាងអគ្គិសនីដែលមានសមត្ថភាពប៉ុណ្ណោះដែលអាចភ្ជាប់ខ្សែវ៉ុលtage ឧបករណ៍។ លើសពីនេះ លេខកូដក្នុងស្រុកត្រូវតែអនុវត្តតាម រួមទាំង ប៉ុន្តែមិនកំណត់ចំពោះទំហំរង្វាស់ខ្សែ និងលំនៅដ្ឋានសមរម្យ។ Linortek មិនទទួលខុសត្រូវចំពោះការខូចខាតដល់អ្នកប្រើប្រាស់ ឬភាគីទីបីចំពោះការប្រើប្រាស់ផលិតផលរបស់យើងដោយមិនត្រឹមត្រូវ។ ការទទួលខុសត្រូវនេះនៅតែមានជាមួយអ្នកប្រើប្រាស់។ Linortek មិនទទួលខុសត្រូវចំពោះការខូចខាតឧបករណ៍ ដោយសារការប្រើប្រាស់ផលិតផលរបស់យើងមិនត្រឹមត្រូវ។
RELAY VOLTAGអ៊ី ជាក់លាក់
សូមប្រុងប្រយ័ត្ននៅពេលភ្ជាប់ឧបករណ៍ទៅសៀគ្វីអគ្គិសនី ឬឧបករណ៍ផ្សេងទៀត។ នេះ។ web ឧបករណ៍បញ្ជាមិនត្រូវបានរចនាឡើងដើម្បីភ្ជាប់ទៅវ៉ុលណាមួយទេ។tage greater than 48V. Utilizing this arrangement, should allow you to virtually control anything. It is important that you use licensed electricians and comply with electrical codes that are applicable to your location. These codes exist for your safety, as well as the safety of others. Linortek assumes no responsibility for any harm or damage resulting from a failure adhere to local laws, ordinances or regulations or failure to follow specified instructions for installation and product usage.
កិច្ចព្រមព្រៀងអាជ្ញាប័ណ្ណអ្នកប្រើប្រាស់ចុងក្រោយសម្រាប់កម្មវិធី Linortek និងឯកសារ
កិច្ចព្រមព្រៀងអាជ្ញាប័ណ្ណអ្នកប្រើប្រាស់ចុងក្រោយនេះ (“EULA”) គឺជាកិច្ចព្រមព្រៀងផ្លូវច្បាប់រវាងអ្នក (បុគ្គល ឬអង្គភាពតែមួយ) និងក្រុមហ៊ុន Linor Technology, Inc. (“Linortek” ឬ “យើង” ឬ “ពួកយើង”) ដែលគ្រប់គ្រងការប្រើប្រាស់កម្មវិធីរបស់អ្នក និងឯកសារ (“សូហ្វវែរ”) ដែលបង្កប់ក្នុង ឬភ្ជាប់ជាមួយផលិតផលស៊េរី Fargo, Koda, Netbell, IoTMeter និង iTrixx (“ផលិតផល Linortek”)។
EULA នេះមិនគ្រប់គ្រងការប្រើប្រាស់ Linortek របស់អ្នកទេ។ webគេហទំព័រ ឬផលិតផល Linortek (មិនរាប់បញ្ចូលកម្មវិធី)។ ការប្រើប្រាស់ Linortek របស់អ្នក។ webគេហទំព័រត្រូវបានគ្រប់គ្រងដោយ Linortek webលក្ខខណ្ឌនៃសេវាកម្មគេហទំព័រ និងគោលការណ៍ឯកជនភាព Linortek ដែលអាចរកបាននៅ៖
http://www.linortek.com/terms-and-conditions [ការទិញផលិតផល Linortek របស់អ្នក (មិនរាប់បញ្ចូលកម្មវិធី) ត្រូវបានគ្រប់គ្រងដោយការធានាមានកំណត់ Linortek ដែលអាចរកបាននៅ https://www.linortek.com/linortek-one-year-limited-warranty/
This EULA governs your access and use of the Software. This EULA gives you specific legal rights, and you may also have other legal rights in addition, which vary from jurisdiction to jurisdiction. The disclaimers, exclusions, and limitations of liability under
this EULA will not apply to the extent prohibited or limited by applicable law. Some jurisdictions do not allow the exclusion of implied warranties or the exclusion or limitation of incidental or consequential damages or other rights, so those provisions of this EULA may not apply to you.
តាមរយៈការដំឡើង ការចូលប្រើ ការចម្លង និង/ឬការប្រើប្រាស់កម្មវិធី ឬឯកសារ អ្នកយល់ព្រមនឹងចងដោយលក្ខខណ្ឌនៃ EULA នេះក្នុងនាមខ្លួនអ្នក ឬអង្គភាពដែលអ្នកតំណាងទាក់ទងនឹងការដំឡើង ការចូលប្រើ ការចម្លង និង/ឬ ប្រើ។ អ្នកតំណាង និងធានាថា (i) អ្នកមានសិទ្ធិ សិទ្ធិអំណាច និងសមត្ថភាពក្នុងការទទួលយក និងយល់ព្រមតាមលក្ខខណ្ឌនៃ EULA នេះក្នុងនាមខ្លួនអ្នក ឬអង្គភាពដែលអ្នកតំណាង (ii) អ្នកមានអាយុស្របច្បាប់គ្រប់គ្រាន់នៅក្នុងយុត្តាធិការនៃលំនៅដ្ឋានរបស់អ្នក។ , (iii) អ្នកមិនស្ថិតនៅក្នុងប្រទេសដែលជាកម្មវត្ថុនៃការដាក់ទណ្ឌកម្មរបស់រដ្ឋាភិបាលសហរដ្ឋអាមេរិក ឬដែលត្រូវបានកំណត់ដោយរដ្ឋាភិបាលសហរដ្ឋអាមេរិកជាប្រទេស "គាំទ្រភេរវកម្ម" ។ និង (ii) អ្នកមិនបានចុះបញ្ជីក្នុងបញ្ជីរបស់រដ្ឋាភិបាលសហរដ្ឋអាមេរិកណាមួយនៃភាគីដែលត្រូវបានហាមឃាត់ ឬដាក់កម្រិត។
ប្រសិនបើអ្នកមិនចង់ត្រូវបានកំណត់ដោយលក្ខខណ្ឌនៃ EULA នេះ អ្នកមិនអាចដំឡើង ចូលប្រើ ចម្លង ឬប្រើកម្មវិធីតាមវិធីណាមួយទេ (មិនថាដំឡើងឬមិនដំឡើងជាមុនលើឧបករណ៍ដែលអ្នកបានទិញ)។
- ការអនុញ្ញាតប្រើប្រាស់កម្មវិធី/អាជ្ញាប័ណ្ណកម្មវិធី។
អនុលោមតាមលក្ខខណ្ឌនៃ EULA នេះ Linortek ផ្តល់ឱ្យអ្នកនូវសិទ្ធិមានកំណត់ ដកហូតបាន មិនអាចដកវិញបាន មិនផ្តាច់មុខ មិនអាចផ្ទេរសិទ្ធិ និងអាជ្ញាប័ណ្ណទៅ (ក) ទាញយក ដំឡើង និងប្រតិបត្តិច្បាប់ចម្លងមួយនៃកម្មវិធីនៅក្នុងទម្រង់កូដវត្ថុដែលអាចប្រតិបត្តិបាន។ មានតែនៅលើផលិតផល Linortek ដែលអ្នកជាម្ចាស់ ឬគ្រប់គ្រង និងដើម្បី (b) ប្រើប្រាស់កម្មវិធីតែមួយគត់ដែលទាក់ទងនឹងផលិតផល Linortek ស្របតាមការប្រើប្រាស់ដែលមានបំណងដូចដែលបានពិពណ៌នានៅលើ Linortek webគេហទំព័រ (នីមួយៗនៃ 1(a) និង 1(b) "ការប្រើប្រាស់ដែលបានអនុញ្ញាត" និងជារួម "ការប្រើប្រាស់ដែលបានអនុញ្ញាត")។ - ការរឹតបន្តឹងលើការប្រើប្រាស់កម្មវិធីរបស់អ្នក។
អ្នកយល់ព្រមមិន និងមិនអនុញ្ញាតឱ្យអ្នកដទៃប្រើកម្មវិធីសម្រាប់គោលបំណងណាមួយក្រៅពីការប្រើប្រាស់ដែលបានអនុញ្ញាតដែលបានពិពណ៌នានៅក្នុងផ្នែកទី 1 ខាងលើ។ នេះមានន័យថា ក្នុងចំណោមរបស់ផ្សេងទៀត អ្នកមិនអាច៖
(ក) កែសម្រួល កែប្រែ កែប្រែ សម្រប បកប្រែ បង្កើតស្នាដៃចម្លងនៃ ការបំបែក វិស្វករបញ្ច្រាស ឬចងក្រងផ្នែកណាមួយនៃកម្មវិធី (លើកលែងតែវិសាលភាពនៃច្បាប់ជាធរមាន ជាពិសេសហាមប្រាមការរឹតបន្តឹងបែបនេះសម្រាប់គោលបំណងអន្តរប្រតិបត្តិការ ក្នុងករណីដែលអ្នកយល់ព្រម ទាក់ទង Linortek ជាមុនសិន និងផ្តល់ឱកាសឱ្យ Linortek បង្កើតការផ្លាស់ប្តូរតាមតម្រូវការសម្រាប់គោលបំណងអន្តរប្រតិបត្តិការ);
(b) អាជ្ញាប័ណ្ណ ចាត់តាំង ចែកចាយ បញ្ជូន លក់ ជួល ម្ចាស់ផ្ទះ ធនធាន បញ្ចេញ ឬបើមិនដូច្នេះទេ ប្រើកម្មវិធីសម្រាប់គោលបំណងពាណិជ្ជកម្មណាមួយ ឬធ្វើឱ្យកម្មវិធីមានសម្រាប់ភាគីទីបីណាមួយ;
(គ) អនុញ្ញាតឱ្យភាគីទីបីប្រើប្រាស់កម្មវិធីក្នុងនាម ឬសម្រាប់ផលប្រយោជន៍របស់ភាគីទីបីណាមួយ;
(d) ប្រើប្រាស់ផ្នែកណាមួយនៃកម្មវិធីនៅលើឧបករណ៍ ឬកុំព្យូទ័រណាមួយក្រៅពីផលិតផល Linortek ដែលអ្នកជាម្ចាស់ ឬគ្រប់គ្រង។
(ង) ប្រើប្រាស់កម្មវិធីក្នុងមធ្យោបាយណាមួយដែលបំពានច្បាប់ក្នុងស្រុក ជាតិ ឬអន្តរជាតិដែលអាចអនុវត្តបាន។ ឬ
(f) remove or alter any labels, symbols, legends or proprietary notices, including but not limited to any copyright, trademark, logo in the Software. You may not disclose the results of any performance or functional evaluation of anyof the Software to any third party without the prior written consent of Linortek for each such release. - បច្ចុប្បន្នភាព។
Linortek អាចអភិវឌ្ឍការអាប់ដេត អាប់ដេត បំណះ ជួសជុលកំហុស និងការកែប្រែផ្សេងទៀត ("អាប់ដេត") ពីពេលមួយទៅពេលមួយ ដើម្បីកែលម្អដំណើរការនៃកម្មវិធី។ លើកលែងតែដូចដែលបានផ្តល់ឱ្យផ្សេងទៀតនៅលើ Linortek webគេហទំព័រ ការអាប់ដេតទាំងនេះនឹងត្រូវបានផ្តល់ជូនអ្នកដោយមិនគិតថ្លៃ។ ការអាប់ដេតទាំងនេះអាចត្រូវបានដំឡើងដោយស្វ័យប្រវត្តិដោយមិនមានការជូនដំណឹងដល់អ្នក។ ដោយប្រើកម្មវិធី អ្នកក៏យល់ព្រមចំពោះការអាប់ដេតដោយស្វ័យប្រវត្តិផងដែរ។ ប្រសិនបើអ្នកមិនយល់ព្រមចំពោះបញ្ហានេះទេ អ្នកមិនអាចដំឡើង ចូលប្រើ ចម្លង ឬប្រើកម្មវិធីតាមមធ្យោបាយណាមួយឡើយ។ - កម្មសិទ្ធិ។
The Software is licensed to you and not sold. Linortek reserves all rights to the Software and any Updates not expressly granted herein. The Software and Linortek Products are protected by copyright, trademark and other intellectual property laws andtreaties. Linortek and its licensors own the title, copyright, trademarks and other intellectual property rights in the Software.
You are not granted any rights to Linortek’s trademarks or service marks. There are no implied licenses in this EULA. - ការបញ្ចប់។
This EULA is effective from the date you first use the Software and will continue for as long as you own the Linortek Product associated with it or until you or Linortek terminate this agreement under this section. You may terminate this EULA at any time upon written notice to Linortek at the address provided below. Linortek may terminate this EULA at any time if you fail to comply with any of the terms in this agreement. The license granted in this EULA terminates immediately when the agreement terminates. Upon termination, you must stop using the Linortek Product and the Software and you must delete all copies of the
Software. The terms of Sections 2 will still remain in effect after the agreement terminates. - ការបដិសេធការធានា។
EXTENT PERMITTED BY APPLICABLE LAW, LINORTEK PROVIDES THE SOFTWARE “AS-IS” AND DISCLAIMS ALL WARRANTIES AND CONDITIONS, WHETHER EXPRESS, IMPLIED, OR STATUTORY, INCLUDING THE WARRANTIES OF MERCHANTABILITY, FITNESS FOR A PARTICULAR PURPOSE, TITLE, QUIET ENJOYMENT, ACCURACY, AND NON-INFRINGEMENT OF THIRD-PARTY RIGHTS. LINORTEK DOES NOT GUARANTEE ANY SPECIFIC RESULTS FROM THE USE OF THE SOFTWARE. LINORTEK MAKES NO WARRANTY THAT THE SOFTWARE WILL BE UNINTERRUPTED, FREE OF VIRUSES OR OTHER HARMFUL CODE, TIMELY, SECURE, OR ERROR-FREE. YOU USE THE SOFTWARE AND THE LINORTEK PRODUCT AT YOUR OWN DISCRETION AND RISK. YOU WILL BE SOLELY RESPONSIBLE FOR (AND LINORTEK DISCLAIMS) ANY AND ALL LOSS, LIABILITY, OR DAMAGES RESULTING FROM YOUR USE OF THE SOFTWARE
AND LINORTEK PRODUCT. - ដែនកំណត់នៃការទទួលខុសត្រូវ។
គ្មានអ្វីនៅក្នុង EULA នេះទេ និងជាពិសេសនៅក្នុងឃ្លា "ដែនកំណត់នៃការទទួលខុសត្រូវ" នេះនឹងព្យាយាមដកចេញនូវការទទួលខុសត្រូវដែលមិនអាចត្រូវបានដកចេញនៅក្រោមច្បាប់ជាធរមាន។
ក្នុងវិសាលភាពអតិបរមាដែលត្រូវបានអនុញ្ញាតដោយច្បាប់ជាធរមាន បន្ថែមពីលើការបដិសេធការធានាខាងលើ គ្មានព្រឹត្តិការណ៍ណាមួយនឹង (A) LINORTEK ទទួលខុសត្រូវចំពោះការខាតបង់ជាលទ្ធផល ភាពជាឧទាហរណ៍ ជាក់ស្តែង ជាក់លាក់ណាមួយឡើយ ពី ឬទាក់ទងនឹងផលិតផល ឬសូហ្វវែរ ទោះបីជា LINORTEK ដឹង ឬគួរតែដឹងពីលទ្ធភាពនៃការខូចខាតបែបនេះក៏ដោយ និង (ខ) ទំនួលខុសត្រូវរួមសរុបរបស់ LINORTEK ផលិតនៅរោងចក្រ រីវើតធឺរ ពីតំបន់ជុំវិញ។ នឹងត្រូវកំណត់ចំពោះចំនួនដែលមិនត្រូវលើសពីចំនួនដែលអ្នកបានបង់ពិតប្រាកដទៅឱ្យអ្នកចែកចាយដែលមានការអនុញ្ញាតពី LINORTEK និង LINORTEK ឬអ្នកតំណាងផ្នែកលក់សម្រាប់ផលិតផល ឬសេវាកម្ម (6 សេវាកម្ម)។ ដែនកំណត់នេះគឺប្រមូលផ្តុំហើយនឹងមិនត្រូវបានកើនឡើងដោយអត្ថិភាពនៃឧប្បត្តិហេតុឬការទាមទារលើសពីមួយ។ LINORTEK បដិសេធរាល់ទំនួលខុសត្រូវរបស់អ្នកផ្តល់អាជ្ញាប័ណ្ណ និងអ្នកផ្គត់ផ្គង់របស់ LINORTEK គ្រប់ប្រភេទ។ - ការអនុលោមតាមច្បាប់នាំចេញ។
អ្នកទទួលស្គាល់ថាកម្មវិធី និងបច្ចេកវិជ្ជាដែលពាក់ព័ន្ធត្រូវបានអនុលោមតាមច្បាប់គ្រប់គ្រងការនាំចេញរបស់សហរដ្ឋអាមេរិក យុត្តាធិការនាំចេញរបស់សហរដ្ឋអាមេរិក ហើយអាចជាកម្មវត្ថុនៃបទប្បញ្ញត្តិការនាំចេញ ឬការនាំចូលក្នុងប្រទេសផ្សេងទៀត។ អ្នកយល់ព្រមគោរពយ៉ាងតឹងរ៉ឹងជាមួយច្បាប់ និងបទប្បញ្ញត្តិអន្តរជាតិ និងជាតិជាធរមានទាំងអស់ ដែលអនុវត្តចំពោះកម្មវិធី រួមទាំងបទប្បញ្ញត្តិគ្រប់គ្រងការនាំចេញរបស់សហរដ្ឋអាមេរិក ក៏ដូចជាការរឹតបន្តឹងអ្នកប្រើប្រាស់ ការប្រើប្រាស់ចុងក្រោយ និងទិសដៅដែលចេញដោយរដ្ឋាភិបាលសហរដ្ឋអាមេរិក និងរដ្ឋាភិបាលផ្សេងទៀត។ អ្នកទទួលស្គាល់ថាអ្នកមានទំនួលខុសត្រូវក្នុងការទទួលបានការអនុញ្ញាតក្នុងការនាំចេញ នាំចេញឡើងវិញ ឬនាំចូលកម្មវិធី និងបច្ចេកវិទ្យាដែលពាក់ព័ន្ធតាមតម្រូវការ
អ្នកនឹងទូទាត់សំណង និងរក្សាទុក Linortek ដោយមិនបង្កគ្រោះថ្នាក់ពីការទាមទារ ការខាតបង់ ការទទួលខុសត្រូវ ការខូចខាត ការផាកពិន័យ ការផាកពិន័យ ការចំណាយ និងការចំណាយ (រួមទាំងថ្លៃសេវាមេធាវី) ដែលកើតឡើងពី ឬទាក់ទងនឹងការបំពានណាមួយដោយអ្នកនៃកាតព្វកិច្ចរបស់អ្នកនៅក្រោមផ្នែកនេះ។ - កិច្ចការ។
អ្នកមិនអាចផ្តល់សិទ្ធិ ឬកាតព្វកិច្ចរបស់អ្នកនៅក្រោម EULA នេះទេ ហើយការប៉ុនប៉ងណាមួយដើម្បីចាត់តាំងនឹងត្រូវទុកជាមោឃៈ និងគ្មានប្រសិទ្ធភាព។ - សេចក្តីជូនដំណឹង។
Linortek អាចផ្តល់ការជូនដំណឹងដល់អ្នកទាក់ទងនឹង EULA នេះ ដោយប្រើអ៊ីមែល និងអាសយដ្ឋានដែលអ្នកបានផ្តល់នៅពេលអ្នកចុះឈ្មោះជាមួយ Linortek។ - ការលះបង់
ដើម្បីឱ្យមានប្រសិទ្ធភាព ការលើកលែងណាមួយ និងទាំងអស់ដោយ Linortek នៅទីនេះត្រូវតែសរសេរជាលាយលក្ខណ៍អក្សរ និងចុះហត្ថលេខាដោយអ្នកតំណាង Linortek ដែលមានការអនុញ្ញាត។ ការបរាជ័យផ្សេងទៀតរបស់ Linortek ក្នុងការអនុវត្តលក្ខខណ្ឌណាមួយខាងក្រោមនឹងមិនត្រូវបានចាត់ទុកថាជាការលះបង់នោះទេ។ - ភាពធ្ងន់ធ្ងរ។
ការផ្តល់ណាមួយនៃ EULA នេះដែលត្រូវបានរកឃើញថាមិនអាចអនុវត្តបាន នឹងត្រូវបានកែសម្រួល និងបកស្រាយ ដើម្បីសម្រេចគោលបំណងនៃការផ្តល់នោះក្នុងកម្រិតធំបំផុតដែលអាចធ្វើទៅបានក្រោមច្បាប់ជាធរមាន ហើយបទប្បញ្ញត្តិដែលនៅសល់ទាំងអស់នឹងនៅតែជាធរមាន និងមានប្រសិទ្ធភាពពេញលេញ។ - ច្បាប់គ្រប់គ្រង; ទីកន្លែង។
You agree that this EULA, and any claim, dispute, action, cause of action, issue, or request for relief arising out of or relating to this EULA, will be governed by the laws of the state of North Carolina, U.S.A., without regard to conflicts of laws principles, provided that if you reside in a country that will not apply U.S. law to disputes related to these terms, then the laws of your country will apply. You also agree that the United Nations Convention on Contracts for the International Sale of Goods shall not
apply. You agree that regardless of any statute or law to the contrary, any cause of action against us arising out of or related to the Linortek webគេហទំព័រ កម្មវិធី ឬផលិតផល Linortek ត្រូវតែចាប់ផ្តើមក្នុងរយៈពេលមួយ (1) ឆ្នាំបន្ទាប់ពីបុព្វហេតុនៃសកម្មភាពកើតឡើង ឬបុព្វហេតុនៃសកម្មភាពនេះនឹងត្រូវបានរារាំងជាអចិន្ត្រៃយ៍។ រាល់សកម្មភាព ឬដំណើរការពាក់ព័ន្ធនឹង EULA នេះត្រូវតែនាំយកទៅតុលាការសហព័ន្ធ ឬរដ្ឋដែលមានទីតាំងនៅ Raleigh រដ្ឋ North Carolina ហើយភាគីនីមួយៗមិនអាចដកហូតវិញបានចំពោះយុត្តាធិការ និងទីកន្លែងនៃតុលាការណាមួយក្នុងការទាមទារ ឬជម្លោះបែបនេះ លើកលែងតែ Linortek អាចស្វែងរកការហាមឃាត់ ការបន្ធូរបន្ថយនៅក្នុងតុលាការណាមួយដែលមានយុត្តាធិការដើម្បីការពារកម្មសិទ្ធិបញ្ញារបស់ខ្លួន។ - ការព្រមានរបស់ California Proposition 65 ។
 ព្រមាន៖ ផលិតផលនេះអាចធ្វើឲ្យអ្នកប្រឈមនឹងសារធាតុគីមី រួមទាំងសារធាតុសំណ ដែលត្រូវបានគេស្គាល់នៅក្នុងរដ្ឋកាលីហ្វ័រញ៉ា ដើម្បីបង្កជំងឺមហារីក។ សម្រាប់ព័ត៌មានបន្ថែម សូមចូលទៅកាន់គេហទំព័រ www.P65Warnings.ca.gov ។
ការចាប់ផ្តើម
The Fargo SERVER is what is called a “bare board” product and is supplied without a housing. It operates on low voltage; however you need to use simple handling precautions to prevent damage to the circuits. All electronics are susceptible to electrostatic discharge. This high voltage “shock” can permanently damage your device. Before handling the product, you should touch a surface such as a grounded workbench or table. It is also best to handle the device from its edges. If you notice that your chair or clothes often cause static discharges, you must exercise extra caution. The unit is supplied with four rubber feet which keeps the bottom of the board from coming into contact with the surface you put it on. Be careful not to let metal objects, such as screw drivers or hardware, come in contact with the bottom of this product. The board can be mounted on a panel using stand offs and #4 hardware. The mounting holes are connected to the GROUND signal. The SERVER unit is a self-contained web server configured with various input and output circuits. Although the relays are rated for higher voltages ផលិតផលនេះមិនត្រូវបានរចនាឡើងសម្រាប់ប្រើនៅ line voltages. You should never use voltages through the SERVER product exceeding 48 volts. IT IS NOT SAFE.
The KODA SERVER is a housed unit with a DIN rail mountable enclosure that can be snapped onto a DIN rail or attached to any flat surface such as a wall or under a counter. KODA 100 has two relays (48VAC@1A), KODA 200 has four relays which can drive 10V 50mA to external devices. The unit is supplied with a DIN Rail mountable enclosure with removable terminal connectors for easy installation. The KODA SERVER can be mounted on a panel or on the wall using the DIN rail mount clip. The removable wire terminal connectors simplify field installation and allow for easy troubleshooting and maintenance: the unit can be removed from the system without disturbing the system wiring.
ភ្ជាប់ម៉ាស៊ីនមេ
ចំណាំ៖ For a diagram showing the location of all connectors on your SERVER referenced in this section, please see the section – Board Layout Reference.
ប្រយ័ត្ន៖ គ្រឿងទាំងនេះគឺនៅដាច់ពីគេក្នុងដី។ ភ្ជាប់ជានិច្ចដើម្បីឱ្យរង្វិលជុំថាមពលត្រូវបានភ្ជាប់ទៅឯកតា SERVER ប៉ុណ្ណោះ។
កុំប្រើការតភ្ជាប់ដីខាងក្រៅ។ ការធ្វើដូច្នេះអាចបំផ្លាញ SERVER ឬ POE ឧបករណ៍ដើម។
- Place the unit on a table or bench being careful not to let any metal objects come into contact with the bottom of the circuit board (Fargo Only).
- Connect the 12VDC power supply to a suitable AC outlet and plug the barrel connector into the SERVER at the location labelled “12VDC/POWER”. Alternatively, you may also use POE. At this point the GREEN/Boot LED should come on and start flashing indicating the SERVER is operating and is in the “Bootload Mode”. This mode allows the user to update the server software that is used on the unit. After about 5 seconds, the GREEN LED will go off and the RED LED will start blinking once per second indicating the SERVER is operating in “Server Mode” and is accessible on a network utilizing TCP/IP protocols.
ប្រយ័ត្ន៖ នៅពេលអ្នកប្រើ POE NETWORK SWITCH កុំប្រើការផ្គត់ផ្គង់ថាមពល 12VDC ដើម្បីផ្តល់ថាមពលដល់ Server ក្នុងពេលតែមួយ វានឹងធ្វើឱ្យខូច Board។ - Plug an Ethernet cable into the RJ45/NET connector. The “Connection” LED will come on if a 100MHz network is available, otherwise it will remain off and the “Activity” LED should start blinking indicating network activity. Fargo G2 Relay Connections
There are 8 relays on the FARGO R8 and 4 on the FARGO R4. These are dry contact relays. These units are designed for only low voltage គ្រប់គ្រងហើយមិនគួរមានវ៉ុលទេ។tage applied to the relay greater than 48 volts. This is for your safety as well as to stay within the parameters of the parts and circuit board design. The relays have 3 terminals labelled NO, C and NC which stand for Normally Open, Common and Normally Closed. When activated, the relay moves the connection from CNC to CNO. If you want to make a connection when the relay is activated, connect your wires between C and NO. When the relay is activated C and NO will be connected together. If you want to break a circuit when the relay is activated, make your connections to C and NC. When the relay is activated the circuit will be broken (or open)
Koda Relay Connection
There are 2 relays on the KODA 100. The KODA 100 has 2 removable 2 position connectors (1 for each relay) and are simply numbered “1” and “2”. These relays are normally open.
There are 4 relays on the KODA 200. The KODA 200 has 1 removable 8 position connector. Each relay has a “+” connection and a numbered connection. The relays may be set to supply about 10VDC by selecting “+V” on the setting switch (see Board Layout Reference page 29) or set to dry contact DC on the switch. If “+V” is selected then the voltage will be present on the “+” terminal and the numbered terminal is the return. Otherwise, a normally open dry contact exists across the “+” and numbered connection. KODA 100/200 is designed for only low voltage គ្រប់គ្រងហើយមិនគួរមានវ៉ុលទេ។tage បានអនុវត្តទៅ relay ធំជាង 48 វ៉ុល។ នេះគឺសម្រាប់សុវត្ថិភាពរបស់អ្នក ក៏ដូចជាការស្នាក់នៅក្នុងប៉ារ៉ាម៉ែត្រនៃផ្នែក និងការរចនាបន្ទះសៀគ្វី។

![]() គ្មានព្រឹត្តិការណ៍ណាមួយដែលបច្ចេកវិទ្យា LINOR នឹងទទួលខុសត្រូវឡើយ ទោះជានៅក្នុងកិច្ចសន្យា ការទារ ឬបើមិនដូច្នេះទេ សម្រាប់ការខូចខាតដោយចៃដន្យ ពិសេស ដោយអចេតនា ឬការផាកពិន័យ រួមទាំងការខាតបង់ ប៉ុន្តែវាមិនមានសម្រាប់ការប្រើប្រាស់ទេ ការបាត់បង់ពាណិជ្ជកម្ម ឬការបាត់បង់ប្រាក់ចំណេញ ការសន្សំ ឬចំណូលក្នុងកម្រិតពេញលេញ អាចត្រូវបានបដិសេធដោយច្បាប់។
គ្មានព្រឹត្តិការណ៍ណាមួយដែលបច្ចេកវិទ្យា LINOR នឹងទទួលខុសត្រូវឡើយ ទោះជានៅក្នុងកិច្ចសន្យា ការទារ ឬបើមិនដូច្នេះទេ សម្រាប់ការខូចខាតដោយចៃដន្យ ពិសេស ដោយអចេតនា ឬការផាកពិន័យ រួមទាំងការខាតបង់ ប៉ុន្តែវាមិនមានសម្រាប់ការប្រើប្រាស់ទេ ការបាត់បង់ពាណិជ្ជកម្ម ឬការបាត់បង់ប្រាក់ចំណេញ ការសន្សំ ឬចំណូលក្នុងកម្រិតពេញលេញ អាចត្រូវបានបដិសេធដោយច្បាប់។
សេចក្តីជូនដំណឹងបន្ថែមអំពីដែនកំណត់នៃការប្រើប្រាស់
លើកលែងតែមានការបញ្ជាក់ជាក់លាក់ ផលិតផលនេះមិនត្រូវបានរចនាឡើងដើម្បីប្តូរបន្ទាត់វ៉ុលទេ។tage ឧបករណ៍។ ដែនកំណត់នេះរួមបញ្ចូលទាំងផលិតផល FARGO និង KODA ទាំងអស់។ ដើម្បីគ្រប់គ្រងឧបករណ៍ដែលដំណើរការនៅបន្ទាត់ voltagអ្នកប្រើប្រាស់ត្រូវតែដំឡើង និងឧបករណ៍អន្តរការី ដូចជាឧបករណ៍បញ្ជូនត។
នៅពេលភ្ជាប់ខ្សែ voltage ឧបករណ៍ដោយប្រើឧបករណ៍អន្តរការី អ្នកត្រូវតែជាជាងអគ្គិសនីដែលមានលក្ខណៈសម្បត្តិគ្រប់គ្រាន់ ឬប្រើប្រាស់សេវាកម្មរបស់ជាងអគ្គិសនីដែលមានលក្ខណៈសម្បត្តិគ្រប់គ្រាន់។ លើសពីនេះ លេខកូដក្នុងស្រុកត្រូវតែអនុវត្តតាម រួមទាំង ប៉ុន្តែមិនកំណត់ចំពោះទំហំរង្វាស់ខ្សែ និងលំនៅដ្ឋានសមរម្យ។
Linortek cannot assume any responsibility for harm to the user or third parties for improperly using our Fargo/Koda products. This liability remains with the user. Linortek cannot assume any responsibility for damage to the device for improperly using our SERVER product.
For relay specifications, please see Board Reference Layout page 29
Digital Input Connections (Fargo R4 and Koda)
The digital inputs allow the SERVER to detect an external on/off state of a sensor. With this information the SERVER can display whether an input is on or off, count events in a resettable or non-resettable counter, and calculate the frequency (such as for use as a tachometer) or the period of the input. There are two modes of operation for the digital inputs – PULL UP and ISOLATED.
a) PULL UP mode connects a 1K resistor to an internal voltage អនុញ្ញាតឱ្យអ្នកប្រើកុងតាក់សាមញ្ញ (ដូចជាកុងតាក់ទ្វារម៉ាញេទិក) ឆ្លងកាត់ស្ថានីយទី 1 និងទី 2។ វានៅពេលដែលកុងតាក់ត្រូវបានធ្វើឱ្យសកម្ម សញ្ញាត្រូវបានផ្ញើទៅធាតុបញ្ចូល។
b) ISOLATED mode allows you to directly drive the SERVER’s optoisolator with an external voltage ទោះបីមានរេស៊ីស្តង់ 1K ខាងក្នុង។ វ៉ុលនេះ។tage អាចស្ថិតនៅក្នុងចន្លោះពី 5V ដល់ 24V ដែលផ្គត់ផ្គង់អប្បបរមា 2mA ឬអតិបរមា 30mA ដល់ optoisolator diode។ មិនមានទំនាក់ទំនងខាងក្នុងផ្សេងទៀតទៅនឹងវ៉ុលនេះទេ។tage so it is an isolated input. Please note, when connecting a 12VDC-¬24VDC circuit to the input, an external resistor (can be provided at request, 2.2k ohm 0.5watt) must be used.
These modes are selected by the switch on the SERVER (see Board Layout Reference page 29) marked ISO and PU for isolated and pull up respectively. These are set at the factory to ISO by default.
Wiring a push button: For distances up to 500 feet, a 20 AWG shielded wire is suitable for wiring a push button. If the distance between the push button and the controller extends up to 5,000 feet, use a 16 AWG shielded cable instead. Keep in mind that longer cable runs are more susceptible to signal interference.
ប្រយ័ត្ន៖ If you intend to use isolated mode, verify that the input switch is set to ISO before applying an external voltagអ៊ី ការធ្វើផ្ទុយទៅវិញអាចនឹងបំផ្លាញឧបករណ៍ដែលមានប្រភពមកពី SERVER ឬ POE។
Analog Input Connections (Fargo R4ADI)
The analog inputs allow the SERVER to read the value of external equipment. There are 2 analog inputs.
For AC current monitoring, use one of the two 3.5mm stereo inputs to interface with a current sensor.
ប្លុកស្ថានីយបញ្ចូលអាណាឡូកចំនួន 2 ត្រូវបានភ្ជាប់ទៅឧបករណ៍ចាប់សញ្ញាបច្ចុប្បន្ន 0-5V ដែលមិនដាច់ដោយឡែក ដែលអាចត្រូវបានភ្ជាប់ទៅឧបករណ៍ជាច្រើនដូចជាឧបករណ៍ចាប់សញ្ញាសីតុណ្ហភាព ឬសម្ពាធ។ SERVER ផ្តល់នូវការតភ្ជាប់ដី និងថាមពល ដូច្នេះការវាស់វែងអាចត្រូវបានធ្វើឡើងដោយគ្មានវ៉ុលខាងក្រៅtage references. You should use a sensor that is isolated so that that it makes no connection to a remote ground. See drawing under Board Reference Layout page 29.
Accessing your SERVER
នៅពេលដែល SERVER របស់អ្នកត្រូវបានបើក និងភ្ជាប់ទៅបណ្តាញ វានឹងទទួលបានអាសយដ្ឋាន IP ដោយស្វ័យប្រវត្តិតាមរយៈ DHCP ដរាបណារ៉ោតទ័ររបស់អ្នកត្រូវបានកំណត់រចនាសម្ព័ន្ធដើម្បីធ្វើដូច្នេះ។ ដើម្បីភ្ជាប់ សូមបញ្ចូលអាសយដ្ឋាន IP ទៅក្នុងរបស់អ្នក។ web browser. This will take you to your SERVER’s landing page. To log in, click the Log In button on the top right of the page. Your browser will prompt you to enter your username and password. By default, these credentials are both set to admin. To find your SERVER’s IP address, see below.
ស្វែងរកអាសយដ្ឋាន IP របស់អ្នកជាមួយ Linortek Discoverer
កម្មវិធី Discoverer នឹងកំណត់ទីតាំង SERVER របស់អ្នកដោយស្វ័យប្រវត្តិ។ Discoverer គឺជាកម្មវិធី Java ហើយទាមទារឱ្យដំឡើង Java Runtime ដើម្បីប្រើមុខងារនេះ។ Java អាចរកបាននៅទីនេះ៖ http://java.com/en/download/index.jsp.
ដើម្បីទាញយកកម្មវិធី Discover សូមចូលទៅកាន់៖ https://www.linortek.com/downloads/supportprogramming/
ការប្រើប្រាស់កម្មវិធីរុករក Chrome និង Firefox ត្រូវបានណែនាំ។ សូមចំណាំ៖ ប្រសិនបើអ្នកចូលចិត្តប្រើ Internet Explorer នោះ Internet Explorer រក្សាទុក Linortek Discoverer ជា Zip file តាមលំនាំដើម។ ដើម្បីប្រើ Discoverer អ្នកនឹងត្រូវជ្រើសរើស Save as ហើយប្តូរឈ្មោះ file ជា Linortek Discoverer.jar នៅពេលអ្នកទាញយក។
នៅពេលទាញយកកម្មវិធី Discover ពេលខ្លះអ្នកនឹងឃើញសារព្រមានលេចឡើង អាស្រ័យលើការកំណត់សុវត្ថិភាពកម្មវិធីរុករកតាមអ៊ីនធឺណិតរបស់អ្នក ដោយសួរថាតើអ្នកចង់រក្សាទុក ឬបោះបង់វា file, please click the Keep button as this is a Java program, and it won’t harm your computer.
នៅពេលដែល Discoverer កំណត់ទីតាំងឧបករណ៍របស់អ្នក វានឹងបង្ហាញ៖
- អាសយដ្ឋាន IP
- ឈ្មោះម៉ាស៊ីន
- អាសយដ្ឋាន MAC
- ព័ត៌មានផ្សេងទៀត៖
ក. LED ពណ៌ខៀវ (ប្រសិនបើបើក)
ខ. ឈ្មោះផលិតផល
គ. ការកែប្រែកម្មវិធីម៉ាស៊ីនមេ
ឃ. លេខច្រក (ប្រសិនបើច្រក)

ចុចឧបករណ៍ដែលអ្នកចង់ប្រើដែលបង្ហាញនៅលើកម្មវិធី Discoverer ដើម្បីបើកដំណើរការ SERVER web pages in your browser. Click the Login button on the homepage. The default username/password is: admin/admin. You may change these as you desire or disable this feature in the settings menu.
Connecting your SERVER Directly to Your PC
You can also plug your SERVER directly to your PC if there is no network connection available. If you plug your SERVER into your PC’s Ethernet port it will use the default IP address: 169.254.1.1 unless you have previously configured your SERVER to use a static IP. Enter 169.254.1.1 into your web browser to connect. No internet connection is required. Once configured, you can then install your SERVER where you desired.
ការកំណត់រចនាសម្ព័ន្ធម៉ាស៊ីនមេ
ចូល
Once you have entered the IP address and port number, if set, the Login page will open. This page shows the name of this server which you may change in Configure/Network Config.
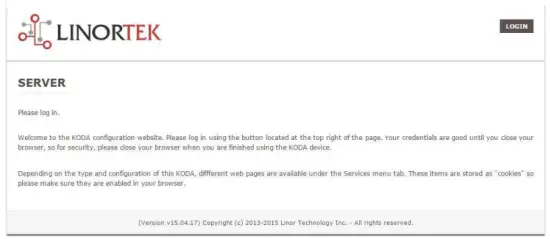
This page is static with no background activity and is a useful place to park if you are not using the SERVER and do not want to close the connection.
By pressing LOGIN, you will be asked for your username and password. These credentials will be retained by the browser until the browser is closed. You can disable the password requirement in Settings page. See section page 21.
ទំព័រដើម
នៅពេលដែលការចូលគណនីរបស់អ្នកត្រូវបានបញ្ចូល អ្នកនឹងត្រូវបានបញ្ជូនបន្តទៅកាន់ទំព័រសំខាន់នៃកម្មវិធី។ ទំព័រដើម ឬលិបិក្រមបង្ហាញព័ត៌មានប្រព័ន្ធមួយចំនួន និងផ្តល់នូវសមត្ថភាពក្នុងការកំណត់ទីតាំងឧបករណ៍ជាក់ស្តែងប្រសិនបើវាស្ថិតនៅក្នុងតំបន់ជាមួយអ្នកដទៃ។ សូមមើលបញ្ជីខាងក្រោមសម្រាប់ការពិពណ៌នា។

- TIME – Displayed along with the day of the week. This time may be set to be in a 12 hour format with AM/PM indicator or 24 hour format.
- DATE - កាលបរិច្ឆេទបច្ចុប្បន្នត្រូវបានបង្ហាញនៅទីនេះ។
- វ៉ុល - វ៉ុលtage នៅលើក្តារត្រូវបានបង្ហាញ។ វាអាចមានប្រយោជន៍ប្រសិនបើ SERVER ត្រូវបានបំពាក់ជាមួយឧបករណ៍ផ្សេងទៀត voltage variance can be noted. Fargo and Koda servers have an input voltage range of 1248vDC.
- TEMPERATURE – Temperature on the board is displayed. This display may be either °C or °F. This temperature will be affected by the heat generated by SERVER itself so it will always be slightly higher than ambient temperature.
- LEDs - មាន LEDs 3 បង្ហាញ។ LED ក្រហមគឺជាជីពចររបស់ប្រព័ន្ធ។ វាគួរព្រិចភ្នែកម្តងក្នុងមួយវិនាទី ដរាបណាម៉ាស៊ីនមេកំពុងដំណើរការ។ LED ពណ៌បៃតងត្រូវបានប្រើសម្រាប់ជម្រើសកម្មវិធីចាប់ផ្ដើមប្រព័ន្ធ ហើយជាទូទៅមិនអាចមើលឃើញនៅលើ webគេហទំព័រ។ អំពូល LED ពណ៌ខៀវអាចចុចបាន ហើយអ្នកអាចបើក និងបិទវាបាន web ទំព័រ។ វាមានសារៈប្រយោជន៍សម្រាប់ការកំណត់ទីតាំងឧបករណ៍ ប្រសិនបើវាប្រើប្រាស់ជាមួយគ្រឿងស្រដៀងគ្នាផ្សេងទៀត ដោយសារវានឹងបំភ្លឺលើឧបករណ៍ដែលឧបករណ៍នេះ web កម្មវិធីរុករកត្រូវបានភ្ជាប់។ កម្មវិធី Discoverer នឹងកត់សម្គាល់ផងដែរប្រសិនបើអំពូល LED ពណ៌ខៀវបើក។ ជារឿយៗវាត្រូវបានគេហៅថាមុខងារ "កំណត់ទីតាំង" ។
សេវាកម្ម
ផ្ទាំងសេវាកម្មគឺថាមវន្ត ហើយនឹងផ្លាស់ប្តូរអាស្រ័យលើការកំណត់រចនាសម្ព័ន្ធនៃម៉ាស៊ីនមេរបស់អ្នក។ នេះគឺជាកន្លែងដែលអ្នកអាចគ្រប់គ្រងធាតុបញ្ចូល ទិន្នផល ឧបករណ៍ចាប់សញ្ញា និងការគ្រប់គ្រងពិសេសផ្សេងទៀត។
In/Out or Relays Page
Depending on which SERVER you are using, the first page on the SERVICES tab will be either In/Out or Relays.
In/Out has the relay controls and the input controls on one page, while Relays only has the relay controls.
ការត្រួតពិនិត្យការបញ្ជូនត
An In/Out page is displayed below. Some relay control pages have 2, 4 or 8 relays displayed. Each relay has a number, in this case 1 to 4.

The State LED shows whether the relay is on or off indicated by GREEN and RED respectively. This icon is clickable to manually control the corresponding relay. Each relay can have a Name as well as identifiers for the Normally Open, Common and Normally Closed connections.
មាន LED ស្ថានភាពចំនួនបួនដែលបង្ហាញ:
- Email – If an email is to be sent when this relay is switched on/off
- ជីពចរ – ប្រសិនបើការបញ្ជូនតនេះត្រូវបានកំណត់ជាមួយនឹងទទឹងជីពចរ និងមេគុណទទឹងជីពចរ (រយៈពេល) – សូមមើលផ្នែកបន្ទាប់សម្រាប់ព័ត៌មានបន្ថែម
- Sched. – If there is a schedule created in the Tasks page (see page 15) set to automatically trigger this relay.
- កំណត់ពេល - ប្រសិនបើជីពចរត្រូវបានកំណត់ ហើយការបញ្ជូនតនេះត្រូវបានធ្វើឱ្យសកម្ម ភ្លើង LED ដែលបានកំណត់ពេលនឹងប្រែពណ៌ក្រហមដែលបង្ហាញថាការបញ្ជូនតកំពុងដំណើរការលើកម្មវិធីកំណត់ម៉ោង។
Click the Edit Icon to edit the controls for the corresponding relay. This will take you to the Set Relay page (see page 11).
ធាតុចូល
The In/Out or Inputs page (depending on your SERVER) will display information from each input. The SERVERs have a combination of inputs. The Fargo R4DI has four digital inputs, The R4ADI has, four digital inputs, four analog inputs. The KODA SERVER has two digital inputs.
At the top of each input is a label (ex: DIN 1, AIN 2) specifying whether it is a digital input (DIN) or analog input (AIN) as well as the input number. This label will turn green when the input is enabled. Inside the box will be any display configured from the Set Input page (see page 12 for digital input, page 14 for analog input). A red dot in the lower-left corner indicating the state of a linked relay (if any), will turn green when the linked relay is activated.
Finally, an Edit icon in the lower-right corner of the box to edit the corresponding input. This will take you to the Set Digital Input or Set Analog Input page (page 12 or page 14).
Set Relay Page
ទំព័រ SET RELAY អនុញ្ញាតឱ្យអ្នកកំណត់លក្ខណៈសម្បត្តិផ្សេងៗដែលទាក់ទងនឹងការបញ្ជូនត។
- Relay Select – The Relay that you are editing (identified by the line on which you clicked the Edit icon on the RELAY page).
- Name – Enter a 15-character Relay Name. This and the following 3 fields may be used for any identifying information desired.
- NO Name – Enter a 7-character name for the Normally Open (NO) connection.
- Com Name – Enter a 7-character name for the Common (COM) connection.
- NC Name – Enter a 7-character name for the Normally Closed (NC) connection.
- Pulse Width – When you control the relay it turns on or off. You may control it for a timed turned on period by entering a Pulse Width when 0 means there is no timed event and a number represents duration of the pulse. The maximum number you can enter here is 4 digits, ie. 1234.
- Pulse Width Multiplier - ដើម្បីកំណត់ប្រវែងជីពចរបន្ថែម សូមជ្រើសរើស Pulse Width Multiplier ដើម្បីកំណត់ទទឹងជីពចរបន្ថែមទៀត។ អ្នកអាចជ្រើសរើស៖
•គ្មាន
• mS (Millisecond, 1/1000 second)
• Sec (Seconds)
• Min (Minutes) - ប្រភេទបញ្ជូនត - SERVER អាចចូលប្រើការបញ្ជូនតដោយផ្ទាល់នៅលើ SERVER ឬដោយប្រើមធ្យោបាយផ្សេងទៀត។ អ្នកអាចជ្រើសរើស៖
• Normal – relay physically on the SERVER
• Latched – not currently supported
• Remote – a relay on another SERVER accessed over the network
• Zigbee – a relay at a remote device accessed over an RF system
• Normal and Remote – both relays activated
• Normal and Zigbee – both relays activated - លេខសម្គាល់ទីតាំង - នេះគឺជាលេខសម្គាល់ទីតាំងពីចម្ងាយ
- បញ្ជូនបន្តនៅទីតាំង – លេខតំណាងឱ្យការបញ្ជូនត ឬឧបករណ៍នៅទីតាំង
- ផ្ញើអ៊ីមែល – SERVER អាចត្រូវបានកម្មវិធីដើម្បីផ្ញើអ៊ីមែល ប្រសិនបើការបញ្ជូនតត្រូវបានបើក ឬបិទ។

កំណត់ទំព័របញ្ចូលឌីជីថល
ការបញ្ចូលឌីជីថលអាចត្រូវបានកំណត់ដើម្បីផ្តល់នូវការអានផ្សេងៗលើការប្រើប្រាស់ជួរនៃប្រភេទអេក្រង់។ បន្ថែមពីលើការបង្ហាញទិន្នន័យបញ្ចូល អ្នកអាចដាក់ឈ្មោះការបង្ហាញ ក៏ដូចជាភ្ជាប់ការបញ្ជូនតជាមួយវាផងដែរ។ ការបញ្ជូនតនេះនឹងផ្លាស់ប្តូរពីបៃតងទៅក្រហមព្រោះវាបន្តពីលើទៅបិទ ក៏ដូចជាអាចចុចដើម្បីគ្រប់គ្រងវាបាន។ ដោយចុចលើរូបតំណាងកែសម្រួលខ្មៅដៃ អ្នកអាចកែសម្រួលការកំណត់សម្រាប់ការបញ្ចូលនេះ៖
- Digital Input Selected – The Digital Input that you are editing (identified by the line on which you clicked the Edit icon).
- ឈ្មោះ - អ្នកអាចកំណត់ឈ្មោះ 15 តួអក្សរសម្រាប់ការបញ្ចូលនេះ។ ឈ្មោះនេះស្ថិតនៅក្នុងរបារនៅផ្នែកខាងលើនៃអេក្រង់។
- ស្លាក - កំណត់ស្លាក 7 តួអក្សរដែលត្រូវបានបង្ហាញនៅលើការបង្ហាញសកម្មពិតប្រាកដ។
- អ្នកកែតម្រូវ - ដោយប្រើវាលនេះ អ្នកអាចបន្ថែម ដក គុណ ឬចែកតម្លៃមួយ មុនពេលតម្លៃត្រូវបានបង្ហាញនៅលើទំព័របង្ហាញ។ នេះគឺជាកម្មវិធីកែតម្លៃ 2 ដែលនីមួយៗត្រូវបានបំបែកដោយតួអក្សរដកឃ្លាតែមួយ។ (ឧទាហរណ៍ “+2, -2, *3, /3”)
- USE - កំណត់ការបញ្ចូលនេះទៅជាសកម្ម។ បង្វែរសូចនាករលេខបញ្ចូលទៅជាពណ៌បៃតង។ វាគួរតែត្រូវបានកត់សម្គាល់ថានៅពេលប្រើការបញ្ចូលស៊ីភីយូស៊ីភីយូនិងធនធានផ្សេងទៀតអាស្រ័យលើប្រភេទរបស់វា។ ទោះបីជាធាតុបញ្ចូលទាំងអស់អាចសកម្មក្នុងពេលតែមួយក៏ដោយ វាត្រូវបានណែនាំឱ្យបើកតែអ្វីដែលអ្នកចង់ប្រើប៉ុណ្ណោះ។
- ប្រភេទ - ទិន្នន័យបញ្ចូលអាចត្រូវបានប្រើដើម្បីគណនាជួរនៃលទ្ធផល។ អ្នកអាចជ្រើសរើស៖
• State – This is useful for knowing if an input is on or off, like a door switch being on or off.
• CounterNR – This is a non-resettable counter.
• CounterR – This is a resettable counter.
• Frequency – Counts the frequency of an input in KHz (kilo hertz or1/1000 seconds). This could be useful in displaying a tachometer where 60Hz = 1 R.P.M.
• Period – in 1/1000 seconds an input in kHz (milliseconds or1/1000 seconds). This would be useful for measuring timed events. - ការបង្ហាញ - ការជ្រើសរើសនេះអនុញ្ញាតឱ្យអ្នកផ្លាស់ប្តូរប្រភេទការបង្ហាញដែលបានប្រើ។ អ្នកអាចជ្រើសរើស៖
• Dot – A single dot with the value in the middle. This can be used for State. You can make a dumb indicator by changing the color of the Dot based on the value. The label is under the Dot.
• Values – Displays the Corrected Value with the Label in a box directly below it.
• Meter – This Meter has configurable scale based on the Min/Max values and arcs can be colored per the Color ranges. The Label is displayed within the Meter.
• VBar – Also based on the Min/Max values for the scale and the bar changes color based on the values in the Color ranges. - Relay L/T – Enter a Relay number here. If it is a local relay it will show GREEN or RED depending if it is on or off. By clicking on it the relay will turn on and off. The name comes from the relay settings page. This may be useful if you want to turn the subject of a display on and off. Any relay can be used on any input and each may be reused for any other input. Adding an L after the relay number (ex: 2L) will link the state of the input to the state of the relay. This is an easy and immediate way to have an input follow the relay. Adding a T after the relay number will trigger the relay to the state of the input. This is an easy and immediate way to have a relay follow the input.
- Command Z/N/I – This field is used for issuing various commands to the Digital Input controller: Z Zero the resettable counter. N Leave the input as Normal. I Invert the input.
- Value – These are Min/Max values used for the display. This is useful for preventing a Meter from going past its end or setting the value of a VBar. This is the Value after the Corrector. The system cannot display a value past Max, so be sure this is at least set to 1.
- លឿង / ក្រហម / បៃតង - មានបីពណ៌ដែលអាចត្រូវបានប្រើដើម្បីកំណត់ការបង្ហាញបន្ថែមទៀត។ កំណត់ជួរនៃពណ៌ទាំងនេះដើម្បីកំណត់ពណ៌មួយទៅនឹងតម្លៃបង្ហាញ។ នេះគឺជាតម្លៃបន្ទាប់ពីអ្នកកែតម្រូវ។ ចំណាំថាប្រសិនបើអ្នកកំពុងប្រើប្រភេទរដ្ឋ អ្នកប្រហែលជាចង់កំណត់ RED = ពី 0 ដល់ 0, បៃតង = ពី 1 ដល់ 1 និងពណ៌លឿង = ពី 2 ទៅ 2។ ដោយសាររដ្ឋមួយតែងតែជា 1 ឬ 0 វានឹងការពារព័ត៌មានមិនច្បាស់លាស់ និង ការពារមិនឱ្យប្រើពណ៌លឿង។ អ្នកអាចជ្រើសរើសពណ៌ពីរដែលអ្នកចូលចិត្តសម្រាប់ប្រភេទរដ្ឋ។

Set Analog Input Page
ការបញ្ចូលអាណាឡូកអាចត្រូវបានកំណត់ដើម្បីផ្តល់នូវការអានផ្សេងៗលើការប្រើប្រាស់ជួរនៃប្រភេទការបង្ហាញ។ បន្ថែមពីលើការបង្ហាញទិន្នន័យបញ្ចូល អ្នកអាចដាក់ឈ្មោះការបង្ហាញ ក៏ដូចជាភ្ជាប់ការបញ្ជូនតជាមួយវាផងដែរ។ ការបញ្ជូនតនេះនឹងផ្លាស់ប្តូរពីបៃតងទៅក្រហមព្រោះវាបន្តពីលើទៅបិទ ក៏ដូចជាអាចចុចដើម្បីគ្រប់គ្រងវាបាន។
- Analog Input Selected – The Analog Input that you are editing (identified by the line on which you clicked the Edit icon).
- ឈ្មោះ - អ្នកអាចកំណត់ឈ្មោះ 15 តួអក្សរសម្រាប់ការបញ្ចូលនេះ។ ឈ្មោះនេះស្ថិតនៅក្នុងរបារនៅផ្នែកខាងលើនៃអេក្រង់។
- ស្លាក - កំណត់ស្លាក 7 តួអក្សរដែលត្រូវបានបង្ហាញនៅលើការបង្ហាញសកម្មពិតប្រាកដ។
- អ្នកកែតម្រូវ - ដោយប្រើវាលនេះ អ្នកអាចបន្ថែម ដក គុណ ឬចែកតម្លៃមួយ មុនពេលតម្លៃត្រូវបានបង្ហាញនៅលើទំព័របង្ហាញ។ នេះគឺជាកម្មវិធីកែតម្លៃ 2 ដែលនីមួយៗត្រូវបានបំបែកដោយតួអក្សរដកឃ្លាតែមួយ។ (ឧទាហរណ៍ “+2, -2, *3, /3”)
- USE – Sets this input to active. Turns the input number indicator to GREEN. It should be noted that when in use the input consumes CPU time and other resources depending on its type. Although all inputs may be active at the same time, it is recommended to turn on only those you want to use.
- ប្រភេទ - ទិន្នន័យបញ្ចូលអាចត្រូវបានប្រើដើម្បីគណនាជួរនៃលទ្ធផល។ អ្នកអាចជ្រើសរើស៖
• Analog 1 – Analog 1 input from a SERVER with an input such as found on a R4ADI.
• Analog 2 – Analog 2 input from a SERVER with an input such as found on a R4ADI.
• AC Current 1 – AC current sensor 1 input from a SERVER with an input such as found on a R4ADI.
• AC Current 2 – AC current sensor 2 input from a SERVER with an input such as found on a R4ADI.
• AC Current 3 – Not used
• Volts – The measurement of the voltage powering the SERVER.
• Current – On “S” models, this is the current consumed by the SERVER.
• Int. Temp – Temperature from the board mounted sensor.
• Ext. Temp – Temperature from the “S” model SERVER.
• R. Humidity – % Relative Humidity from the “S” model SERVER.
• MMA X – The X axis accelerometer data from the “S” model SERVER.
• MMA Y – The Y axis accelerometer data from the “S” model SERVER.
• MMA Z – The Z axis accelerometer data from the “S” model SERVER. - ការបង្ហាញ - ការជ្រើសរើសនេះអនុញ្ញាតឱ្យអ្នកផ្លាស់ប្តូរប្រភេទការបង្ហាញដែលបានប្រើ។ អ្នកអាចជ្រើសរើស៖
1. Dot – A single dot with the value in the middle. This can be used for State. You can make a dumb indicator by changing the color of the Dot based on the value. The label is under the Dot.
2. Values – Displays the Corrected Value with the Label in a box directly below it.
3. Meter – This Meter has configurable scale based on the Min/Max values and arcs can be colored per the Color ranges. The Label is displayed within the Meter.
4. VBar – Also based on the Min/Max values for the scale and the bar changes color based on the values in the Color ranges. - Relay – Enter a Relay number here. If it is a local relay it will show Green or RED depending if it is on or off.
By clicking on it the relay will turn on and off. The name comes from the relay settings page. This may be useful if you want to turn the subject of a display on and off. Any relay can be used on any input and each may be reused for any other input. - តម្លៃ - ទាំងនេះគឺជាតម្លៃអប្បបរមា/អតិបរមាដែលប្រើសម្រាប់ការបង្ហាញ។ វាមានប្រយោជន៍ក្នុងការការពារ Meter ពីការបញ្ចប់របស់វា ឬកំណត់តម្លៃរបស់ VBar ។ នេះគឺជាតម្លៃបន្ទាប់ពីអ្នកកែតម្រូវ។ ប្រព័ន្ធមិនអាចបង្ហាញតម្លៃលើសពី Max បានទេ ដូច្នេះត្រូវប្រាកដថាវាត្រូវបានកំណត់យ៉ាងតិចទៅ 1។
- លឿង / ក្រហម / បៃតង - មានបីពណ៌ដែលអាចត្រូវបានប្រើដើម្បីកំណត់ការបង្ហាញបន្ថែមទៀត។ កំណត់ជួរនៃពណ៌ទាំងនេះដើម្បីកំណត់ពណ៌មួយទៅនឹងតម្លៃបង្ហាញ។ នេះគឺជាតម្លៃបន្ទាប់ពីអ្នកកែតម្រូវ។ ចំណាំថាប្រសិនបើអ្នកកំពុងប្រើប្រភេទរដ្ឋ អ្នកប្រហែលជាចង់កំណត់ RED = ពី 0 ដល់ 0, បៃតង = ពី 1 ដល់ 1 និងពណ៌លឿង = ពី 2 ទៅ 2។ ដោយសាររដ្ឋមួយតែងតែជា 1 ឬ 0 វានឹងការពារព័ត៌មានមិនច្បាស់លាស់ និង ការពារមិនឱ្យប្រើពណ៌លឿង។ អ្នកអាចជ្រើសរើសពណ៌ពីរដែលអ្នកចូលចិត្តសម្រាប់ប្រភេទរដ្ឋ។

Tasks Page
The TASKS page displays the automatic events that can be programmed into the SERVER. You can schedule up to 16 events in the SERVER. These are constructed as IF … THEN statements. In addition, the IF term can have 2 elements (IF a, AND/OR/NOT b … THEN c). This provides a simple to program and powerful way to take advantage of the data acquired by the SERVER. The Tasks page shows you an overview of configured tasks. You can click the dot in the State column to turn a task on or off indicated by a green dot for ON, and a red dot for OFF. To edit or create a task, click the Edit icon to the right of the task line. This will take you to the Set Schedule page detailed in the next section.

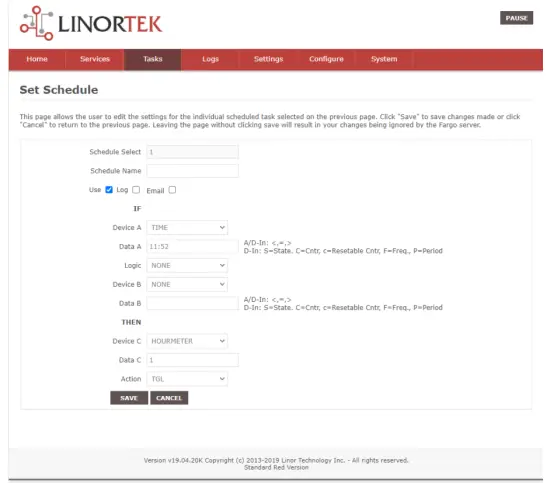
Set Schedule Page
The SET SCHEDULE page allows you to create time and logic-based events that will occur automatically if the conditions are met.
- Schedule Select – Determined by clicking on a schedule line from the previous page.
- Schedule Name – Enter a 15-character Schedule Name.
- USE – In order for a Schedule line to be active you must select the USE button. If there is an error detected in entering Schedule data, the USE box will automatically uncheck.
- LOG - ជ្រើសរើសកំណត់ហេតុសម្រាប់ធាតុនេះដើម្បីបង្ហាញនៅក្នុងកំណត់ហេតុប្រព័ន្ធរាល់ពេលដែលវាត្រូវបានប្រតិបត្តិ។
- Email – Click Email to automatically send an email when this schedule is executed.
- Device A – Select Device A for the first term in the IF statement from the drop box.
- Data A – Select Data A for the above device. Depending on the device selected, the Data used for testing may have special properties. See the list below for Data that may be entered. If an error is detected indata entry when the “Save” button is pushed, the USE box will uncheck and the Data box containing the error will be highlighted.
• Minute – Enter: mm
• Hour – Enter: hh (use 24-hour system)
• Day – Enter: dd
• DayofWeek – Enter: Sunday = 1, Monday = 2, Tuesday = 3, Wednesday = 4, Thursday = 5, Friday = 6, Saturday = 7, Weekday = 8, Weekend = 9
• Time – Enter: hh:mm (use leading zeros, seconds are ignored) (use 24 hour system) ex:07:30 or 14:05
• Date – Enter: yy/mm/dd (use leading zeros) ex: 20/01/10 for January 10, 2020
• Relay – Enter: Relay number and (+ or -), ex: 01+ for Relay 1 ON or 01- for Relay 1 OFF
• Button – Enter: + or – (for ON or OFF respectively)
• Flag – Enter: Flag number(opt.+), or Flag number (for ON or OFF respectively)
• Temp – Enter: >, = or < value; exampកម្រិត:> 40 (អង្សាសេជានិច្ច)
• Volts – Enter: >, = or < value; exampឡេ៖ <១០
• Analog – Analog input. Enter an input number and >, = or < and value. Example: 3<123 (This value is raw data value prior to any Corrector used by the input display page.)
• Digital – Digital input. Enter Input Number, Type, >, =, or < and value; example: 1F>7500 (This value is the raw data value prior to any Corrector used on the display page). Type can be (case sensitive):
• S State (On/Off)
• C Non-resettable counter
• c Resettable counter (lower case ‘c’)
• F Frequency in 1/1000 seconds
• P Period in 1/1000 seconds - តក្កវិជ្ជា - រៀបចំការប្រៀបធៀបតក្កវិជ្ជារវាងឧបករណ៍ A និងឧបករណ៍ B ។
• AND – True if: Device A is true AND Device B is true
• OR – True if: Device A is true OR Device B is true
• NOT – True if: Device A is true and Device B is NOT true - Device B – Select Device B for testing from the drop box.
- ទិន្នន័យ B - ជ្រើសរើសទិន្នន័យ B សម្រាប់ឧបករណ៍ខាងលើ។ អាស្រ័យលើឧបករណ៍ដែលបានជ្រើសរើស ទិន្នន័យដែលបានប្រើសម្រាប់ការធ្វើតេស្តអាចមានលក្ខណៈសម្បត្តិពិសេស។ សូមមើលបញ្ជីខាងលើ។
- ឧបករណ៍ C - គឺជាអ្វីដែលត្រូវគ្រប់គ្រង។
- ទិន្នន័យ C – កំណត់ទ្រព្យសម្បត្តិសម្រាប់ឧបករណ៍ C. វាក្យសម្ព័ន្ធត្រូវបានប្រើដូចខាងក្រោម៖
• RELAY – These are relays on this SERVER. You can set up to four per schedule. Enter separated by commas, for exampលេ “1,2,3,4”
• FLAG – This is a storage flag that can be used to make more complex schedules. There are 8 flags that can be turned on or off.
• REMOTE – Refers to a remote SERVER unit. When these conditions are met, this SERVER will send a command to control a remote SERVER. The Data field for a remote unit should be in the format,
“REMOTE UNIT NUMBER, REMOTE UNIT RELAY”. For exampលេ "3,5" ។ ម៉ាស៊ីនមេពីចម្ងាយទាំងនេះត្រូវតែកំណត់អត្តសញ្ញាណនៅក្នុងទំព័រ កំណត់រចនាសម្ព័ន្ធ/ការកំណត់ឧបករណ៍ពីចម្ងាយ។
• COUNTER – Adds count to digital input counter – set as 1 or 2 depending on which digital input is counting
• BLUE LED – No data.
• eMAIL – Will send eMail, no data.
• NOTIFY – Will send notification to Kodalert, set 1- 8 for Settings/Alarm Notification number. (Not Implemented) - សកម្មភាព – អ្វីដែលត្រូវធ្វើជាមួយឧបករណ៍ C. ជម្រើសគឺ៖
• ON – Turns device ON
• OFF – Turns device OFF
• TGL – Toggles state of Device C
• RESET – Resets CounterR

ទំព័រកំណត់ហេតុ
The Logs tab displays over 10,000 entries from actions taken by the SERVER or by users themselves. This feature allows several actions for the convenience of displaying and collecting data from the SERVER.
- The checkboxes above the date allow the user to filter logs from different sources. To filter out logs you do not wish to see from a certain source simply uncheck the box.
- Each log has a reference number and a time and date attached in a “yyyy/mm/dd” and “hh:mm:ss” format. Afterwards is the event displayed.
- To scroll through the logs, use the arrows to the right-hand side, where the horizonal line and arrow brings you to the start or end, the double arrow moves up or down a page, and the single arrow moves up or down a single log.
- To refresh the logs manually click the REFRESH button below the Log Details.
- To download the Log Details, click the DOWNLOAD button below the Log Details, this allows you to save the logs as a separate file.
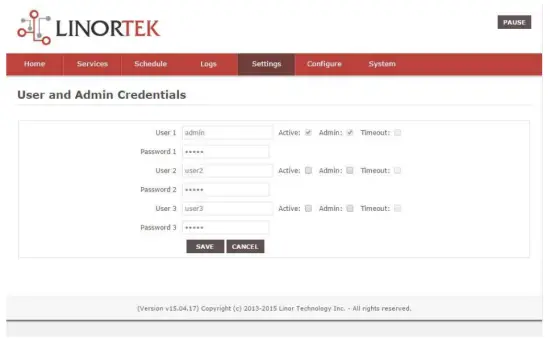
ទំព័របញ្ជាក់អត្តសញ្ញាណអ្នកប្រើប្រាស់ និងអ្នកគ្រប់គ្រង
Use this page from the Settings drop down menu. Here you can set up to 3 users for your SERVER system. As a default only User 1 is Active. Here you can:
- User Name and Password – Each user has their own credentials. As a default these are set toadmin/admin, user2/user2 and user3/user3 for Users 1, 2 and 3 respectively. The passwords are never displayed. ចំណាំ៖ when you reset the password, it must be less than 13-character.
- សកម្ម – ត្រូវតែត្រូវបានពិនិត្យសម្រាប់អ្នកប្រើប្រាស់នេះដើម្បីចូល អ្នកមិនអាចបិទអ្នកប្រើប្រាស់ 1 បានទេ។
- អ្នកគ្រប់គ្រង - មានតែអ្នកគ្រប់គ្រងប៉ុណ្ណោះដែលអាចរក្សាទុកទិន្នន័យនៅក្នុងទំព័រភាគច្រើន។ វាការពារ SERVER របស់អ្នកពីការផ្លាស់ប្តូរដោយមនុស្សដែលគ្មានការអនុញ្ញាត។
- អស់ពេល - មិនបានបើកនៅពេលនេះទេ។
ទំព័រពេលវេលា/កាលបរិច្ឆេទ
ប្រើទំព័រនេះពីម៉ឺនុយទម្លាក់ចុះការកំណត់។ ទំព័រនេះអនុញ្ញាតឱ្យអ្នករៀបចំប្រព័ន្ធពេលវេលា និងកាលបរិច្ឆេទ។
- Time – Set time using an hh:mm:ss format.
- កាលបរិច្ឆេទ - កំណត់កាលបរិច្ឆេទដោយប្រើទម្រង់ yy/mm/dd ។
- Time Zone – Set desired time zone 5 for EST, 8 for PST, you can now add a :mm for setting part hour, for example, 5:30 គឺជាតំបន់ពេលវេលានៅ 5 ម៉ោង 30 នាទី។
- ប្រើពេលសន្សំពន្លឺថ្ងៃ - ជ្រើសរើសដើម្បីកែតម្រូវពេលវេលាប្រព័ន្ធរបស់អ្នកដោយស្វ័យប្រវត្តិនៅថ្ងៃសន្សំពន្លឺថ្ងៃ។ (មិនត្រឹមត្រូវក្នុងតំបន់ពេលវេលាទាំងអស់។ )
- ប្រើពេលវេលា MIL - ជ្រើសរើសដើម្បីប្រើទម្រង់ 24 ម៉ោង។
- Use NTP Update – Select to synchronize SERVER time with NTP server
- NTP Web គេហទំព័រ - នេះគឺជាម៉ាស៊ីនមេ NTP ដែលបានជ្រើសរើសសម្រាប់ការអាប់ដេត។
- ចន្លោះពេល NTP - ចន្លោះពេលរវាងការអាប់ដេតគិតជានាទី។
- Log NTP Event – Normally NTP exceptions will be logged, select this option to Log every NTP event. (May be useful in debugging.)

ទំព័រការកំណត់
Access this page from the Settings dropdown menu. Select these settings to enable various features in the SERVER
- Use Active Main – No longer used. (Select PAUSE to go inactive.)
- ទាមទារការចូល – ប្រសិនបើមិនបានជ្រើសរើស SERVER នឹងអនុញ្ញាតឱ្យចូលប្រើទាំងអស់ដោយគ្មានព័ត៌មានបញ្ជាក់អត្តសញ្ញាណ។
- Use IP Ranges – Not Implemented.
- Use RESTFUL IP Ranges – Not implemented.
- Use Remote IP Ranges – Not implemented.
- ប្រើការផ្ទៀងផ្ទាត់ RESTful - ទាមទារឈ្មោះអ្នកប្រើប្រាស់ និងពាក្យសម្ងាត់សម្រាប់ RESTful ។
- ពង្រីកជួរបញ្ជូនត - បើកការបញ្ជូនតចំនួន 8 ។
- ប្រើប៊ូតុងវិទ្យុបញ្ជូនបន្ត - ប្រសិនបើកំណត់ នៅពេលដែលការបញ្ជូនតមួយត្រូវបានបើក នោះឧបករណ៍ផ្សេងទៀតទាំងអស់ត្រូវបានបិទ។
- SSL Port No. – Not supported – For future use.
- ប្រើអ៊ីមែលប្រព័ន្ធ - បើកសារអ៊ីមែលបន្ថែម។
- ប្រើ Fahrenheit - ជ្រើសរើស អង្សាសេ ឬ Fahrenheit ។
- PGM Dynamic Relays – Changes properties of relays in task schedule.
- CLR PGMs on Start – Reinitialize tasks on start up.
- RTC Temperature Compensation – All Koda boards can add Temperature and Humidity sensor.
- ប្រើ AM2302 – ប្រើឧបករណ៍ចាប់សញ្ញាសីតុណ្ហភាព និងសំណើម AM2302 (លក់ដោយឡែកពីគ្នា)។
- Java Report – Send data to HourCollector app over ethernet (only for IoTMeter)
- Use Metric – Not supported – For future use.
- UART Usage – Enter “Audio” for Netbell-NTG, “Clock” for Netbell clock.
- Switch Bypass (1/2) – Ignores physical inputs if set. For example, in a Koda 200 board, you want to ignore input 1 switch, check Switch Bypass 1
- Setting 19 – Not supported – For future use
- ប្រើអូឌីយ៉ូ File System – Activate SD Card reader for Netbell-NTG
- WiFi Report – Enable data transfer over WiFi (WiFi IoTMeter only)
- Active Landing Page – Not supported – For future use.
- . Invert Relay Control – The relay is set to NO by default. By checking this box the relay will be inverted to NC.
- Setting 24 – Not supported – For future use.

ទំព័រ DNS ថាមវន្ត
Access this page from the Configure dropdown menu. From this page you can assign dynamic DNS settings. This page, along with proper port forwarding through the router, can enable global access to a device behind a NAT router or firewall. You will need to assign a static IP address and port number (see Network Config Page on page 25) and port the IP address on your router (refer to your router’s user manual). An internet IP address will have to be hosted in order to access your SERVER from the internet. Currently the only IP hosting service supported is provided by DynDNS (https://dyn.com)
- ប្រើ DDNS - បើកសេវាកម្មនេះ។
- សេវាកម្ម DDNS - ជ្រើសរើសសេវាកម្មពីប្រអប់ទម្លាក់។ បច្ចុប្បន្ននេះសេវាកម្មតែមួយគត់ដែលគាំទ្រគឺ DynDNS
- ឈ្មោះអ្នកប្រើ - នេះសំដៅទៅលើគណនីដែលបានបង្កើតឡើងនៅសេវាកម្ម DDNS ។
- ពាក្យសម្ងាត់ - ពាក្យសម្ងាត់សម្រាប់ការចូលប្រើនៅសេវាកម្ម DDNS ។
- Host – This is the IP name registered at the DDNS service for rerouting to this SERVER

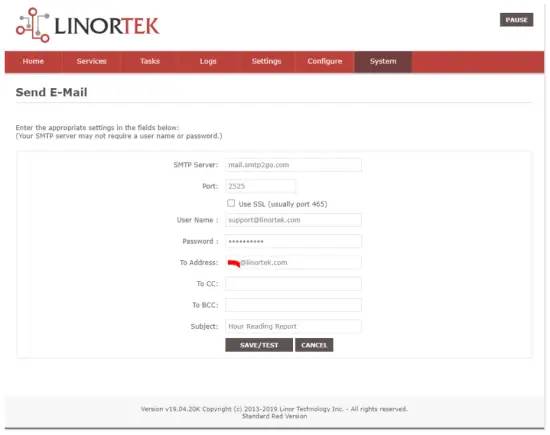
ទំព័រដំឡើងអ៊ីមែល
រៀបចំគណនីអ៊ីមែលសម្រាប់ SERVER ដើម្បីប្រើក្នុងការផ្ញើសារអ៊ីមែលពីម៉ូឌុលផ្សេងៗ។ ចូលប្រើទំព័រនេះពីផ្ទាំងកំណត់រចនាសម្ព័ន្ធ។
ចំណាំ៖ This unit is NOT compatible with SSL/TLS, there are 3rd party SMTP delivery servers which do not require SSL and can be used. For instructions on how to use a 3rd party SMTP delivery service, please refer to Appendix 1 at the end of this manual).
- ម៉ាស៊ីនមេ SMTP - បញ្ចូលម៉ាស៊ីនមេសំបុត្រចេញដែលអ្នកចង់ប្រើ។
- ច្រក - នេះគឺជាច្រកនៅលើម៉ាស៊ីនមេនោះ។ អ្នកអាចរកមើលសេវាសំបុត្ររបស់អ្នកតាមអ៊ីនធឺណិតសម្រាប់ព័ត៌មាននេះ ក៏ដូចជាកន្លែងដំឡើងផ្សេងទៀត។
- ប្រើ SSL – ទុកវាចោលដោយមិនធីកនៅពេលអ្នកប្រើម៉ាស៊ីនមេ SMTP ភាគីទីបី។
- ឈ្មោះអ្នកប្រើ - ឈ្មោះគណនីអ៊ីមែលរបស់អ្នក។
- ពាក្យសម្ងាត់ - ពាក្យសម្ងាត់គណនីអ៊ីមែល។
- To Address – Enter up to 3 address for this email set up. An addressee, a CC and a BC.
- ប្រធានបទ - បន្ទាត់ប្រធានបទនៃបឋមកថាអ៊ីមែល។

ទំព័រកំណត់រចនាសម្ព័ន្ធបណ្តាញ
Access this page from the Configure dropdown menu. This page allows the configuration of the SERVER’s network settings.
ប្រយ័ត្ន៖ Incorrect settings may cause the board to lose network connectivity. In order to access a device in your network remotely you must PORT the device. This tells your router that information coming in should be sent to a specific device on your network.
- MAC Address – This is a unique MAC address that is assigned to this product at time of assembly. It cannot be altered.
- ឈ្មោះម៉ាស៊ីន - នេះគឺជាឈ្មោះ Netbios ដែលអង្គភាពនេះអាចត្រូវបានអាសយដ្ឋាននៅក្នុងបណ្តាញមួយចំនួន។ វាក៏អាចបង្ហាញនៅក្នុងបញ្ជីជួលរ៉ោតទ័ររបស់អ្នកផងដែរ។ វាបង្កើតកន្លែងមានប្រយោជន៍ក្នុងការដាក់ឈ្មោះ SERVER របស់អ្នក ហើយបង្ហាញនៅលើទំព័រដើម និងនៅលើ Discoverer ។
- លេខច្រក - វាក្លាយជាផ្នែកមួយនៃអាសយដ្ឋាន IP ហើយចាំបាច់សម្រាប់ការចូលប្រើអ៊ីនធឺណិត។ ប្រសិនបើវាមិនត្រូវបានកំណត់ទេ SERVER លំនាំដើមទៅលេខច្រក 80 ។
- IP Address – Typically you only change the last group of numbers. If you change this IP address make sure to reserve this IP on your router and no other devices are using this IP address or you may not be able to reach this SERVER. If this happens you may need to Restore Defaults using the push button method.
- ច្រកផ្លូវ - ជាធម្មតារ៉ោតទ័រនៅលើបណ្តាញ TCP/IP របស់អ្នកដែលបម្រើជាចំណុចចូលដំណើរការទៅកាន់ ISP របស់អ្នក។
- Subnet Mask - លេខ 32 ប៊ីតដែលបិទបាំងអាសយដ្ឋាន IP ហើយបែងចែកអាសយដ្ឋាន IP ទៅជាអាសយដ្ឋានបណ្តាញ និងអាសយដ្ឋានម៉ាស៊ីន។ គ្រាន់តែទុកវានៅ 255.255.255.0
- DNS បឋម - DNS ចម្បង។
- DNS ទីពីរ - DNS ទីពីរ។

ទំព័រកំណត់រចនាសម្ព័ន្ធជួរ IP
Access this page from the Configure dropdown menu. Use these security settings to select a range of IP address that will be allowed to access the SERVER.CAUTION: Incorrect settings may cause the board to lose network connectivity. Not implemented on this SERVER.
ទំព័រឧបករណ៍ពីចម្ងាយ
Access this page from the Configure dropdown menu. These settings allow the SERVER to remotely control the relays on another SERVER. This is done by selecting the Remote Device in the Schedule program or by setting up a relay as a REMOTE. There are 8 possible REMOTE locations.
ប្រយ័ត្ន៖ ការកំណត់មិនត្រឹមត្រូវនឹងធ្វើឱ្យក្តារបាត់បង់ការភ្ជាប់ពីចម្ងាយរបស់វា។
- ឈ្មោះឧបករណ៍ - បញ្ចូលឈ្មោះអត្ថបទសម្រាប់ឧបករណ៍នេះសម្រាប់ជាឯកសារយោងនាពេលអនាគត។
- អាសយដ្ឋាន IP - អាសយដ្ឋាន IP របស់ឧបករណ៍ពីចម្ងាយ រួមទាំងលេខច្រក។
- ឈ្មោះអ្នកប្រើ - ប្រើក្នុងការផ្ទៀងផ្ទាត់មូលដ្ឋាន។
- Password – Used in Basic Authentication.

Kodalert Page
Not Yet Implemented. Access this page from the Configure dropdown menu. Kodalert provides an interface for alerts of Internet connected devices. Kodalert is a cloud based, open platform monitoring and alert system for the Internet of Things in your physical world. Any Thing that can send an email or TCP messages including our SERVERS, other manufactures devices and people using email can use Kodalert. It can work for multiple remote locations, alert multiple users instantly using the rules you setup by text, email, smart phone Apps push notification or audible alarm instantly when something happens.
- លេខជូនដំណឹង
- សាកល្បង
- ប្រើ
- ក្បួន
In the Alarm Notification page, you can change the state (on/off) of the relay by clicking the green circle in the state column. Push the EDIT icon to change the Alarm’s settings.

លក្ខណៈបច្ចេកទេស
FARGO R8G2
- 10M/100M RJ45 Internet interface with connection and activity LEDs
- 8 Relay outputs, 1FORMC 48 Volt Max (24VAC/DC 3A)
- Status LEDs (pulse, bootloader, and locate)
- Ethernet Bootloader (for server hardware code upgrade)
- PoE or 12VDC @500mA (nominal)
- Web interface w/basic authentication
- On board temperature sensor and voltagឧបករណ៍ចាប់សញ្ញាអ៊ី
Reset /Locate pushbutton (blue LED) - Working Temperature from 0 to +70 Celsius
- Storage Temperature from 40 to +125 Celsius
- Humidity from 10% to 80% noncondensing
- Dimensions 74mm x 100mm x 20mm, mounting holes 64mm x 92mm Ф 3.2mm 4 places
- ពិធីការដែលគាំទ្រ៖ HTTP/SMTP/SNTP
FARGO R4G2
- 10M/100M RJ45 Internet interface with connection and activity LEDs
- 4 1FormC relays 48 Volt Max (24VAC/DC 3A)
- 2 optically isolated digital inputs, 12V 1mA or pulldown switch selectable, 2 conductor screw terminal connectors for each.
- 2 Analog 0-5VDC Inputs 30mA 3.3VDC power source PTC protected. 3 conductor screw terminal connectors for each (3.3VDC, input, ground) (R4ADI only)
- 2 Current sensor inputs. 3.5mm stereo jack connector for each (R4ADI only)
- Status LEDs (pulse, bootloader, and locate)
- Ethernet Bootloader (for server hardware code upgrade
- POE or 12VDC @500mA (nominal)
- Web interface w/basic authentication
- On board temperature sensor and voltagឧបករណ៍ចាប់សញ្ញាអ៊ី
- Reset/Locate pushbutton
- Working Temperature from 0 to +70 Celsius
- Storage Temperature from 40 to +125 Celsius
- Humidity from 10% to 80% noncondensing
- Dimensions 74mm x 100mm x 20mm, mounting holes 64mm x 92mm Ф 3.2mm 4 places
- ពិធីការដែលគាំទ្រ៖ HTTP/SMTP/SNTP
KODA100
- 10M/100M RJ45 Internet interface with connection and activity LEDs
- 2 1-Form-A relay 48VAC@8A Max
- 2 optically isolated digital inputs, 12V 1mA or pulldown switch selectable
- Status LEDs (pulse, bootloader, and locate)
- Ethernet Bootloader (for server hardware code upgrade)
- POE or 12VDC @500mA (nominal)
- Web interface w/basic authentication
- On board temperature sensor and voltagឧបករណ៍ចាប់សញ្ញាអ៊ី
- Reset/Locate pushbutton (blue LED)
- Working temperature from 0 to +70 Celsius
- Storage temperature from 40 to +125 Celsius
- Humidity from 10% to 80% noncondensing
- វិមាត្រ: 70mm x 100mm x 25mm
- ពិធីការដែលគាំទ្រ៖ HTTP/SMTP/SNTP
KOD200
- 10M/100M RJ45 Internet interface with connection and activity LEDs
- 4 1FormA relays 48 Volt Max 1A dry contact or drive 10V ±10% 50mA to external devices
- 2 optically isolated digital inputs, 12V 1mA or pulldown switch selectable
- Status LEDs (pulse, bootloader, and locate)
- Ethernet Bootloader (for server hardware code upgrade)
- POE or 12VDC @500mA (nominal)
- Web interface w/basic authentication
- On board temperature sensor and voltagឧបករណ៍ចាប់សញ្ញាអ៊ី
- Reset/Locate pushbutton (blue LED)
- Working Temperature from 0 to +70 Celsius
- Storage Temperature from 40 to +125 Celsius
- Humidity from 10% to 80% noncondensing
- វិមាត្រ: 70mm x 100mm x 25mm
- ពិធីការដែលគាំទ្រ៖ HTTP/SMTP/SNTP
ប្លង់យោងក្តារ
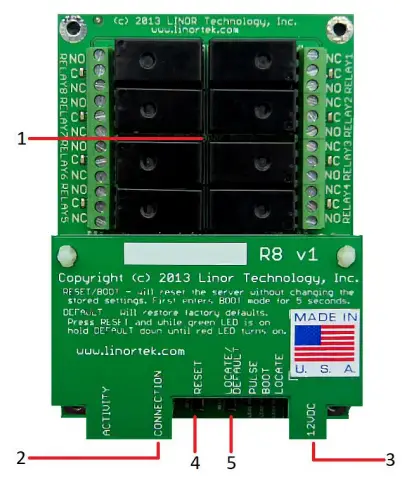
Fargo R8
- 8 Relay outputs, 1FORMC 48 Volt Max (24VAC/DC 3A)
- ឧបករណ៍ភ្ជាប់ Rj45
- ឧបករណ៍ភ្ជាប់ថាមពល (12VDC)
- ប៊ូតុងកំណត់ឡើងវិញ
- កំណត់ទីតាំងប៊ូតុង
Fargo R4
- 3.5mm Inputs for AC Current Sensor (R4ADI Only)
- Analog Inputs (R4ADI Only)
- 4 Relay outputs, 1FORMC 48 Volt Max (24VAC/DC 3A)
- ការបញ្ចូលឌីជីថល
- Digital Input Switches (Input 1 on right.
Up: Pullup, Down: Isolated) - ឧបករណ៍ភ្ជាប់ Rj45
- ប៊ូតុងកំណត់ឡើងវិញ
- កំណត់ទីតាំងប៊ូតុង
- ឧបករណ៍ភ្ជាប់ថាមពល (12VDC)

កូដា ១៦
- Digital Inputs (#1 on the left) 5VDC-48VDC (12VDC-48VDC must use the external resistor)
- Relay Outputs (#1 is on the right) 8A@48VAC Max
- Digital Input Switches (IN 1 on left. UP: Isolated, Down: Pullup)
- ប៊ូតុងកំណត់ឡើងវិញ
- ប៊ូតុងផ្ទុកឡើងវិញ (បើក LED ពណ៌ខៀវ - កំណត់អត្តសញ្ញាណនៅលើ Discoverer)
- ឧបករណ៍ភ្ជាប់ Rj45
- ឧបករណ៍ភ្ជាប់ថាមពល (12VDC)
- ឧបករណ៍ភ្ជាប់ USB Mini សម្រាប់ឧបករណ៍ចាប់សញ្ញាសីតុណ្ហភាព/សំណើម (លក់ដាច់ដោយឡែក)

កូដា ១៦
- Digital Inputs (#1 on the left) 5VDC-48VDC (12VDC-48VDC must use the external resistor)
- Relay Outputs (#1 is on left) 48 Volt Max 1A dry contact or drive 10V ±10% 50mA
- Digital Input Switches (IN 1 on left. UP: Isolated, Down: Pullup)
- Relay Switches (Up for dry contact, down for 10V/50mA)
- ប៊ូតុងកំណត់ឡើងវិញ
- ប៊ូតុងផ្ទុកឡើងវិញ (បើក LED ពណ៌ខៀវ - កំណត់អត្តសញ្ញាណនៅលើ Discoverer)
- ឧបករណ៍ភ្ជាប់ Rj45
- ឧបករណ៍ភ្ជាប់ថាមពល (12VDC)
- ឧបករណ៍ភ្ជាប់ USB Mini សម្រាប់ឧបករណ៍ចាប់សញ្ញាសីតុណ្ហភាព/សំណើម (លក់ដាច់ដោយឡែក)

កំណត់រោងចក្រឡើងវិញ
To perform a factory Reset, push the Reset button. When the green LED turns on, push and hold the Reload button until the flashing red LED turns off and then turns on solid. Refer to Board Reference Layout section for the button locations on your device.
This user-manual supplements the documentation for the following Linortek products:
- Netbell-2
- Netbell-8
- Netbell-K (and variants)
- iTrixx-NHM
For more information, documentation and how-to videos, visit https://www.linortek.com/downloads/
ឯកសារនេះអាចរកបាននៅ www.linortek.com/downloads/documentations/
ប្រសិនបើអ្នកត្រូវការជំនួយជាមួយឧបករណ៍របស់អ្នក សូមចូលទៅកាន់ www.linortek.com/technical-support
ក្រុមហ៊ុន Linor Technology, Inc.
ព័ត៌មានអាចផ្លាស់ប្តូរដោយគ្មានការជូនដំណឹង។
ឧបសម្ព័ន្ធ ១
របៀបផ្ញើអ៊ីមែល SSL ដោយប្រើសេវាកម្ម SMTP ភាគីទី 3 សម្រាប់ឧបករណ៍ Linortek Fargo និង Koda
តាមលំនាំដើម ឧបករណ៍ Koda/Fargo ប្រើម៉ាស៊ីនមេអ៊ីមែលដែលមិនមែនជា SSL SMTP ។ ប៉ុន្តែភាគច្រើននៃម៉ាស៊ីនមេអ៊ីមែលសព្វថ្ងៃនេះបានប្តូរទៅពិធីការសុវត្ថិភាព SSL មានម៉ាស៊ីនមេចែកចាយ SMTP ភាគីទី 3 ដែលមិនត្រូវការ SSL ហើយអាចប្រើបាន។ មានអ្នកផ្តល់សេវាអ៊ីម៉ែល SMTP ជាច្រើននៅលើទីផ្សារ។ យើងប្រើ SMTP2GO ជាអតីតampដើម្បីបង្ហាញពីដំណើរការរៀបចំ។ SMTP2GO អាចប្រើដោយឥតគិតថ្លៃជាមួយនឹងអ៊ីមែលរហូតដល់ 1000 ក្នុងមួយខែ។ ដើម្បីប្រើ SMTP2GO សូមចូលទៅកាន់៖ https://www.smtp2go.com/ .
ជំហានទី 1. បង្កើតគណនី SMTP2GO ។
ដើម្បីបង្កើតគណនីដោយគ្រាន់តែចុចលើ "ចុះឈ្មោះ" ជ្រើសរើស "1K Emails" នៅលើមាត្រដ្ឋាន ហើយជ្រើសរើស "គម្រោងឥតគិតថ្លៃ" (ប្រសិនបើអ្នកត្រូវការផ្ញើអ៊ីមែលច្រើនជាង 1000 ក្នុងមួយខែ សូមជ្រើសរើសគម្រោងដែលបំពេញតាមតម្រូវការរបស់អ្នក។)

ដើម្បីបង្កើតគណនីនៅលើ SMTP2GO អាសយដ្ឋានអ៊ីមែលសាជីវកម្មនឹងត្រូវការ។ សេវាអ៊ីមែលឥតគិតថ្លៃដូចជា Gmail ឬ Yahoo នឹងមិនអនុញ្ញាតឱ្យអ្នកបន្តទេ។ បន្ទាប់ពីបើកដំណើរការគណនី SMTP2GO របស់អ្នក អ្នកត្រូវបន្ថែមអ្នកប្រើប្រាស់។
ជំហានទី 2. បន្ថែមអ្នកប្រើប្រាស់។
អ្នកប្រើប្រាស់ដែលអ្នកបង្កើតនៅលើ SMTP2GO នឹងក្លាយជាម៉ាស៊ីនមេសំបុត្រចេញ នៅពេលអ្នកដំឡើងឧបករណ៍ Fargo/Koda ដើម្បីផ្ញើរបាយការណ៍អ៊ីមែល សូមប្រាកដថាម៉ាស៊ីនមេអ៊ីមែលសាជីវកម្មរបស់អ្នកនឹងមិនរារាំងអ៊ីមែលទេ ប្រសិនបើអ្នកប្រើគណនីអ៊ីមែលឥតគិតថ្លៃដូចជា Yahoo ឬ Gmail ដើម្បី បន្ថែមអ្នកប្រើប្រាស់នៅទីនេះ។
ចូលទៅកាន់គណនី SMTP2GO របស់អ្នក នៅផ្នែកខាងឆ្វេងនៃម៉ឺនុយជ្រើសរើស "ការកំណត់" > "អ្នកប្រើប្រាស់ SMTP" ចុចលើ "បន្ថែមអ្នកប្រើប្រាស់ SMTP" ហើយបំពេញទម្រង់បែបបទ។
 បន្ទាប់ពីអ្នកប្រើប្រាស់ត្រូវបានបញ្ចូលទៅក្នុងគណនី SMTP2GO របស់អ្នក វានឹងបង្ហាញព័ត៌មានដែលអ្នកត្រូវការដើម្បីរៀបចំការជូនដំណឹងតាមអ៊ីមែលនៅលើឧបករណ៍ Fargo/Koda របស់អ្នក។

ជំហានទី 3. កំណត់រចនាសម្ព័ន្ធឧបករណ៍ Linortek ។
បន្ទាប់ពីអ្នកបានបង្កើតគណនីមួយ និងបានបន្ថែមអ្នកប្រើចូលទៅកាន់ឧបករណ៍ Linortek របស់អ្នក រុករកទៅកាន់ Configure – ទំព័ររៀបចំអ៊ីមែល ដើម្បីដំឡើងការជូនដំណឹងតាមអ៊ីមែល៖
- ម៉ាស៊ីនមេ SMTP - បញ្ចូលម៉ាស៊ីនមេសំបុត្រចេញដែលអ្នកចង់ប្រើវាជា mail.smtp2go.com នៅក្នុងអតីតរបស់យើងampលេ
- ច្រក - នេះគឺជាច្រកនៅលើម៉ាស៊ីនមេនោះ។ ច្រក SMTP គឺ 2525 នៅក្នុងអតីតរបស់យើង។ampលេ
- ប្រើ SSL – ទុកវាចោលដោយមិនធីកនៅពេលអ្នកប្រើម៉ាស៊ីនមេ SMTP ភាគីទីបី។
- ឈ្មោះអ្នកប្រើ - ឈ្មោះអ្នកប្រើពី SMTP2GO នៅពេលដែលយើងបង្កើតអ្នកប្រើប្រាស់ក្នុងជំហានមុន។
- ពាក្យសម្ងាត់ - ពាក្យសម្ងាត់របស់អ្នកប្រើពី SMTP2GO នៅពេលដែលយើងបង្កើតអ្នកប្រើប្រាស់ក្នុងជំហានមុន។
- ទៅអាសយដ្ឋាន - បញ្ចូលអាសយដ្ឋានរហូតដល់ 3 សម្រាប់ការដំឡើងអ៊ីមែលនេះ។ អ្នកទទួលសំបុត្រ CC និង BC ។
- ប្រធានបទ - បន្ទាត់ប្រធានបទនៃបឋមកថាអ៊ីមែល។
ដរាបណាអ្នកចុច “Save/Test” ឧបករណ៍នឹងផ្ញើអ៊ីមែលសាកល្បងដោយស្វ័យប្រវត្តិ។ សូមពិនិត្យមើល Junk/Other Folder ដើម្បីស្វែងរកវា ប្រសិនបើវាមិននៅក្នុង Inbox folder។
ជំហាន 4. កំណត់ភារកិច្ចសម្រាប់ការជូនដំណឹងតាមអ៊ីមែលដោយស្វ័យប្រវត្តិ។
You should be able to receive email notifications for various events from the Fargo/Koda boards at this point. If you need to receive condition logic notification, you can use our condition logic configuration to setup such report. To setup the logic condition report notification, go to Tasks page on your Fargo/Koda device, click the Edit icon of a Schedule. For details of how to create a logic-based event, please refer to the Set Schedule Page on the Fargo/Koda User Manual, which can be downloaded here:
https://www.linortek.com/download/fargo%20g2_koda%20downloads/fargo%20g2_koda%20documentation/Fargo-G2-and-Koda-User-Manual.pdf
ក្នុងនេះ សample យើងនឹងប្រើឧបករណ៍ Network Hour Meter ជាអតីតample សម្រាប់របៀបទទួលរបាយការណ៍តាមអ៊ីមែលជារៀងរាល់ថ្ងៃនៅម៉ោង 11:52 ព្រឹក។
ដរាបណាលក្ខខណ្ឌទាំងអស់នៃកិច្ចការត្រូវបានបំពេញ អ្នកនឹងទទួលបានអ៊ីមែលខាងក្រោម៖
Hour Reading Report
![]() support@linortek.com
support@linortek.com
Mon 4/11/2022 11:52 AM
To: Liyu Nalven
HM 1, my machine, is at 000242.01 hrs.
Reply Forward
![]()
ឯកសារ/ធនធាន
 |
LINORTEK Fargo G2 TCP/IP Web ឧបករណ៍បញ្ជាបញ្ជូនតដែលមានមូលដ្ឋាន [pdf] សៀវភៅណែនាំអ្នកប្រើប្រាស់ Fargo G2, Koda, Fargo G2 TCP-IP Web Based Relay Controller, Web Based Relay Controller, Based Relay Controller, Relay Controller |