![]() Fargo G2 and Koda User Manual
Fargo G2 and Koda User Manual
www.linortek.com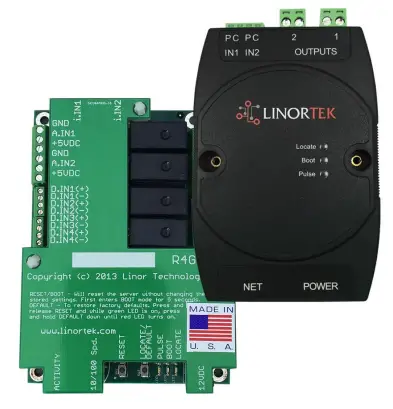 For Fargo G2, Koda
ทีซีพี/ไอพี Web ตัวควบคุมรีเลย์แบบใช้พื้นฐาน
รอบ C 04/2022
Fargo G2 TCP/IP Web ตัวควบคุมรีเลย์แบบใช้พื้นฐาน
Thank you for purchasing a Linortek Fargo G2 or Koda TCP/IP Controller. There are many devices that can be controlled by the FARGO/KODA Web Relay Controller. FARGO/KODA Web Controller can be used in such applications as (but not limited to): Lights, security, sprinkler systems, access control, industrial equipment, building automation, HVAC, and many more. Please refer to the Board Reference Layouts on page 29 for input and output specifications on your controller to verify they are suitable to your needs.
คู่มือนี้ครอบคลุมถึง:
- FARGO R8 G2
- FARGO R4DI G2
- FARGO R4ADI G2
- โคดะ 100
- KODA200
These will be referred to as SERVER hereafter. When there are differences or additional features they will be noted in the text.
สำหรับวิดีโอคำแนะนำ คำถามที่พบบ่อย และข้อมูลติดต่อสำหรับทีมสนับสนุนด้านเทคนิคของเรา โปรดไปที่: https://www.linortek.com/technical-support
การรับประกันแบบจำกัดหนึ่งปีของ LINORTEK
Consumer law: For consumers who are covered by consumer protection laws or regulations in their country of residence (“Consumer Law”), the benefits provided in this Linortek One-Year Limited Warranty (“Linortek Limited Warranty”) are in addition to and not instead of the rights provided by Consumer Law and it does not exclude, limit or suspend your rights arising from Consumer Law. You should consult the proper authorities in your country of residence for further information about these rights
ภาระผูกพันในการรับประกันของ Linortek สำหรับผลิตภัณฑ์ฮาร์ดแวร์นี้ (“ผลิตภัณฑ์”) ถูกจำกัดตามเงื่อนไขที่กำหนดไว้ด้านล่าง:
Linor Technology, Inc. (“Linortek”) warrants this product against defects in materials and workmanship for a period of ONE (1) YEAR from the date of retail purchase by the original end-user purchaser (“Warranty Period”) when used in accordance with the operating instructions. A copy of a retail receipt is required as proof of purchase. If a hardware defect arises and a valid claim is received within the Warranty Period, at its option and to the extent permitted by law, Linortek will either (1) repair the hardware defect at no charge, using new or refurbished replacement parts, (2) exchange the product with a product that is new or which has been manufactured from new or serviceable used parts and is at least functionally equivalent to the original product, or (3) refund the purchase price of the product. When a refund is given, the product for which the refund is provided must be returned to Linortek and becomes Linortek’s property.
การรับประกันข้างต้นขึ้นอยู่กับ (i) การเรียกร้องเป็นลายลักษณ์อักษรโดยทันทีของผู้ซื้อ และ (ii) การให้โอกาส Linortek เพื่อตรวจสอบและทดสอบผลิตภัณฑ์ที่อ้างว่ามีข้อบกพร่องอย่างทันท่วงที การตรวจสอบดังกล่าวอาจเกิดขึ้นในสถานที่ของผู้ซื้อ และ/หรือ Linortek อาจขอคืนผลิตภัณฑ์โดยผู้ซื้อเป็นผู้รับผิดชอบค่าใช้จ่าย อย่างไรก็ตาม Linortek จะไม่รับผิดชอบต่อการบรรจุ การตรวจสอบ หรือค่าแรงที่เกี่ยวข้องกับการส่งคืนผลิตภัณฑ์ จะไม่มีการยอมรับผลิตภัณฑ์สำหรับบริการรับประกันที่ไม่ได้มาพร้อมกับหมายเลขการอนุมัติการคืนสินค้า (RMA#) ที่ออกโดย Linortek
ข้อยกเว้นและข้อจำกัด
การรับประกันแบบจำกัดนี้ไม่รวมถึงความเสียหายที่เกิดจากการใช้งานในทางที่ผิด การใช้ผิดวิธี การละเลย ไฟไหม้หรือสาเหตุภายนอกอื่นๆ อุบัติเหตุ การดัดแปลง การซ่อมแซม หรือสาเหตุอื่นๆ ที่ไม่ใช่ข้อบกพร่องในด้านวัสดุและฝีมือการผลิต ซอฟต์แวร์ที่จำหน่ายโดย Linortek โดยมีหรือไม่มีชื่อแบรนด์ Linortek ซึ่งรวมถึงแต่ไม่จำกัดเพียงซอฟต์แวร์ระบบ ("ซอฟต์แวร์") ไม่อยู่ภายใต้การรับประกันแบบจำกัดนี้ การใช้งานและสิทธิ์ของคุณที่เกี่ยวข้องกับซอฟต์แวร์อยู่ภายใต้ข้อตกลงสิทธิ์การใช้งานสำหรับผู้ใช้ Linortek ซึ่งคุณสามารถหาได้ที่นี่: https://www.linortek.com/end-user-licenseagreement/. Linortek จะไม่รับผิดชอบต่อความเสียหายที่เกิดขึ้นจากการไม่ปฏิบัติตามคำแนะนำที่เกี่ยวข้องกับการใช้ผลิตภัณฑ์ เพื่อให้มั่นใจว่าสอดคล้องกับข้อจำกัดในการใช้งาน ผู้ซื้อควรอ้างอิงคู่มือการใช้งาน [ที่ให้มาพร้อมกับผลิตภัณฑ์] แบตเตอรี่ไม่รวมอยู่ในการรับประกัน
ภายในขอบเขตสูงสุดที่อนุญาต การรับประกันแบบจำกัดนี้และการเยียวยาที่กำหนดไว้ข้างต้นถือเป็นเอกสิทธิ์และแทนที่การรับประกัน การเยียวยา และเงื่อนไขอื่น ๆ ทั้งหมด และ Linortek ขอปฏิเสธการรับประกันตามกฎหมายหรือโดยนัยทั้งหมดโดยเฉพาะ รวมถึงแต่ไม่จำกัดเพียงการรับประกันความสามารถในการค้าขาย ความเหมาะสมสำหรับวัตถุประสงค์เฉพาะ การไม่ละเมิด ตราบเท่าที่การรับประกันดังกล่าวไม่สามารถปฏิเสธความรับผิดชอบได้ การรับประกันดังกล่าวทั้งหมดจะถูกจำกัดตามระยะเวลาของการรับประกันแบบจำกัดของ LINORTEK ตามขอบเขตที่กฎหมายอนุญาต และการเยียวยาจะจำกัดอยู่ที่การซ่อมแซม เปลี่ยนใหม่ หรือการคืนเงินตามที่กำหนดโดย LINORTEK ขึ้นอยู่กับดุลยพินิจของตนแต่เพียงผู้เดียว บางรัฐ (ประเทศและจังหวัด) ไม่อนุญาตให้มีข้อจำกัดเกี่ยวกับระยะเวลาการรับประกันหรือเงื่อนไขโดยนัยที่อาจคงอยู่ ดังนั้นข้อจำกัดที่อธิบายไว้ข้างต้นอาจไม่มีผลกับคุณ การรับประกันนี้ให้สิทธิ์ตามกฎหมายเฉพาะแก่คุณ และคุณยังอาจมีสิทธิ์อื่นๆ ที่แตกต่างกันไปในแต่ละรัฐ (หรือตามประเทศหรือจังหวัด) การรับประกันแบบจำกัดนี้อยู่ภายใต้และตีความภายใต้กฎหมายของประเทศสหรัฐอเมริกา
การปฏิเสธความรับผิดชอบ
- อ่านคำแนะนำ – อ่านคำแนะนำด้านความปลอดภัยและการใช้งานทั้งหมดก่อนใช้งานผลิตภัณฑ์
- เก็บรักษาคำแนะนำ – เก็บรักษาคำแนะนำด้านความปลอดภัยและการใช้งานเพื่อใช้อ้างอิงในอนาคต
- ปฏิบัติตามคำเตือน – ปฏิบัติตามคำเตือนทั้งหมดเกี่ยวกับผลิตภัณฑ์และในคู่มือการใช้งาน
- ปฏิบัติตามคำแนะนำ – ปฏิบัติตามคำแนะนำการใช้งานและการใช้งานทั้งหมด
- การทำความสะอาด – ถอดปลั๊กผลิตภัณฑ์ออกจากแหล่งจ่ายไฟก่อนทำความสะอาด ห้ามใช้น้ำยาทำความสะอาดของเหลวหรือน้ำยาทำความสะอาดสเปรย์ ใช้โฆษณาamp ผ้าสำหรับทำความสะอาดตัวเครื่องเท่านั้น
- ไฟล์แนบ – อย่าใช้ไฟล์แนบเว้นแต่ Linortek แนะนำเป็นพิเศษ การใช้สิ่งที่แนบมาที่เข้ากันไม่ได้หรือไม่เหมาะสมอาจเป็นอันตรายได้
- อุปกรณ์เสริม – ห้ามวางผลิตภัณฑ์นี้บนขาตั้ง ขาตั้งกล้อง ตัวยึด หรือฐานติดตั้งที่ไม่มั่นคง ผลิตภัณฑ์อาจตกลงมา ทำให้เกิดการบาดเจ็บสาหัสต่อบุคคล และความเสียหายร้ายแรงต่อผลิตภัณฑ์ ใช้เฉพาะกับขาตั้ง ขาตั้งกล้อง ขายึด หรือฐานยึดที่ผู้ผลิตแนะนำ หรือจำหน่ายพร้อมกับผลิตภัณฑ์เท่านั้น ปฏิบัติตามคำแนะนำของผู้ผลิตเมื่อติดตั้งผลิตภัณฑ์ และใช้เฉพาะอุปกรณ์เสริมสำหรับติดตั้งที่ผู้ผลิตแนะนำเท่านั้น ระมัดระวังเมื่อใช้อุปกรณ์และรถเข็นร่วมกัน การหยุดอย่างรวดเร็ว การใช้แรงมากเกินไป และพื้นผิวที่ไม่เรียบอาจทำให้ชุดเครื่องและรถเข็นพลิกคว่ำได้
- การระบายอากาศ – ช่องเปิดในตัวเครื่อง (ถ้ามี) มีไว้สำหรับระบายอากาศและเพื่อให้มั่นใจว่าผลิตภัณฑ์ทำงานได้อย่างน่าเชื่อถือและเพื่อป้องกันไม่ให้เกิดความร้อนสูงเกินไป อย่าปิดกั้นหรือปิดช่องเปิดเหล่านี้ ห้ามวางผลิตภัณฑ์นี้ในการติดตั้งในตัว เว้นแต่จะมีการระบายอากาศที่เหมาะสมหรือปฏิบัติตามคำแนะนำของ Linortek
- แหล่งพลังงาน – ใช้งานผลิตภัณฑ์นี้จากประเภทแหล่งพลังงานที่ระบุไว้ในคู่มือการใช้งานหรือบนฉลากผลิตภัณฑ์เท่านั้น
หากคุณไม่แน่ใจเกี่ยวกับประเภทของแหล่งจ่ายไฟที่คุณวางแผนจะใช้ ให้ปรึกษาตัวแทนจำหน่ายเครื่องใช้ไฟฟ้าหรือบริษัทไฟฟ้าในพื้นที่ โดยการใช้แหล่งพลังงานประเภทอื่นนอกเหนือจากที่ระบุไว้ในคู่มือการใช้งานหรือฉลากทำเครื่องหมายจะทำให้การรับประกันเป็นโมฆะ สำหรับผลิตภัณฑ์ที่ตั้งใจให้ทำงานโดยใช้พลังงานจากแบตเตอรี่หรือแหล่งอื่น โปรดดูคู่มือการใช้งาน [ที่มาพร้อมกับผลิตภัณฑ์] - การต่อสายดินหรือโพลาไรซ์ – ผลิตภัณฑ์นี้อาจติดตั้งปลั๊กสายไฟกระแสสลับแบบโพลาไรซ์ (ปลั๊กที่มีใบมีดหนึ่งกว้างกว่าอีกข้างหนึ่ง) ปลั๊กนี้จะเสียบเข้ากับเต้ารับได้ทางเดียวเท่านั้น นี่คือคุณลักษณะด้านความปลอดภัย หากคุณไม่สามารถเสียบปลั๊กเข้ากับเต้ารับได้จนสุด ให้ลองกลับปลั๊ก หากปลั๊กยังคงไม่พอดี แสดงว่าเต้ารับของคุณไม่รองรับปลั๊ก ติดต่อช่างไฟฟ้าของคุณเพื่อเปลี่ยนเต้ารับที่เข้ากันได้ อย่าบังคับปลั๊กให้พอดีกับเต้ารับที่เข้ากันไม่ได้ หรือพยายามทำลายจุดประสงค์ด้านความปลอดภัยของปลั๊ก อีกทางหนึ่ง ผลิตภัณฑ์นี้อาจติดตั้งปลั๊กชนิดต่อสายดิน 3 สาย ปลั๊กที่มีขาที่สาม (ต่อสายดิน) ปลั๊กนี้จะพอดีกับเต้ารับไฟฟ้าแบบต่อสายดินเท่านั้น นี่คือคุณลักษณะด้านความปลอดภัย อย่าบังคับปลั๊กให้พอดีกับเต้ารับที่เข้ากันไม่ได้ หรือพยายามทำลายจุดประสงค์ด้านความปลอดภัยของปลั๊ก หากเต้ารับของคุณไม่รองรับปลั๊ก โปรดติดต่อช่างไฟฟ้าของคุณเพื่อเปลี่ยนเต้ารับเป็นเต้ารับที่เข้ากันได้
- การป้องกันสายไฟ - เดินสายไฟเพื่อไม่ให้เดินหรือหนีบโดยสิ่งของที่วางทับหรือทับ โดยให้ความสนใจเป็นพิเศษกับสายไฟและปลั๊ก เต้ารับที่สะดวก และจุดที่สายไฟออกจากเครื่อง .
- สายไฟ – ห้ามวางระบบภายนอกอาคารในบริเวณใกล้กับสายไฟเหนือศีรษะ หรือไฟหรือวงจรไฟฟ้าอื่นๆ หรือบริเวณที่อาจตกลงไปในสายไฟหรือวงจรดังกล่าว เมื่อติดตั้งระบบภายนอกอาคาร ให้ใช้ความระมัดระวังอย่างยิ่งยวดเพื่อมิให้สัมผัสกับสายไฟหรือวงจรดังกล่าว เนื่องจากอาจถึงแก่ชีวิตได้
- โอเวอร์โหลด – ห้ามใช้ไฟเกินเต้ารับและสายไฟต่อเนื่องจากอาจทำให้เกิดไฟไหม้หรือไฟฟ้าช็อตได้
- วัตถุและของเหลวที่เข้า - ห้ามดันวัตถุใดๆ เข้าไปในผลิตภัณฑ์นี้ผ่านช่องเปิด เนื่องจากอาจสัมผัสกับของเหลวอันตรายได้tagจุด e หรือชิ้นส่วนลัดวงจรซึ่งอาจทำให้เกิดไฟไหม้หรือไฟฟ้าช็อตได้ ห้ามทำของเหลวหกใส่ผลิตภัณฑ์
- การให้บริการ – อย่าพยายามให้บริการผลิตภัณฑ์นี้ด้วยตนเองเนื่องจากการเปิดหรือถอดฝาครอบอาจทำให้คุณตกอยู่ในอันตรายได้tage หรืออันตรายอื่นๆ อ้างถึงการบริการทั้งหมดของผลิตภัณฑ์กับ Linortek
- บริการที่ต้องได้รับความเสียหาย – ถอดปลั๊กผลิตภัณฑ์ออกจากเต้าเสียบและติดต่อฝ่ายบริการลูกค้าของ Linortek ภายใต้เงื่อนไขต่อไปนี้:
ก. เมื่อสายไฟหรือปลั๊กไฟชำรุด
ข. หากของเหลวหกหรือวัตถุตกบนผลิตภัณฑ์
ค. หากผลิตภัณฑ์โดนฝนหรือน้ำ
ง. หากผลิตภัณฑ์ไม่ทำงานตามปกติโดยปฏิบัติตามคำแนะนำในการใช้งาน [รวมอยู่ในผลิตภัณฑ์] ปรับเฉพาะส่วนควบคุมที่อยู่ภายใต้คู่มือการใช้งานเท่านั้น เนื่องจากการปรับส่วนควบคุมอื่นๆ ที่ไม่เหมาะสมอาจส่งผลให้เกิดความเสียหาย และมักจะต้องอาศัยการทำงานอย่างหนักโดยช่างผู้ชำนาญการเพื่อให้ผลิตภัณฑ์กลับสู่การทำงานตามปกติ
จ. หากสินค้าตกหล่นหรือตู้ได้รับความเสียหาย
ฉ. หากผลิตภัณฑ์แสดงการเปลี่ยนแปลงประสิทธิภาพอย่างชัดเจน - ชิ้นส่วนอะไหล่ – หากจำเป็นต้องเปลี่ยนอะไหล่ ต้องมี Low-Voltage ช่างไฟฟ้าเปลี่ยนโดยใช้เฉพาะส่วนที่ผู้ผลิตกำหนดเท่านั้น การทดแทนโดยไม่ได้รับอนุญาตอาจส่งผลให้เกิดไฟไหม้ ไฟฟ้าช็อต หรืออันตรายอื่นๆ สามารถดูอะไหล่ได้ที่ https://www.linortek.com/store/
- การตรวจสอบความปลอดภัย – เมื่อทำการซ่อมบำรุงหรือซ่อมแซมผลิตภัณฑ์เสร็จสิ้นแล้ว ให้ขอให้ช่างบริการทำการตรวจสอบความปลอดภัยเพื่อพิจารณาว่าผลิตภัณฑ์อยู่ในสภาพการทำงานที่เหมาะสม
- Coax Grounding – หากระบบสายเคเบิลภายนอกเชื่อมต่อกับผลิตภัณฑ์ ตรวจสอบให้แน่ใจว่าระบบสายเคเบิลต่อลงดินแล้ว รุ่นในสหรัฐอเมริกาเท่านั้น–มาตรา 810 ของรหัสไฟฟ้าแห่งชาติ ANSI/NFPA No.70-1981 ให้ข้อมูลเกี่ยวกับการลงกราวด์ที่เหมาะสมของส่วนยึดและโครงสร้างรองรับ การต่อสายดินของโคแอกซ์กับผลิตภัณฑ์ปล่อย ขนาดของตัวนำกราวด์ ตำแหน่ง ของผลิตภัณฑ์จำหน่าย การเชื่อมต่อกับอิเล็กโทรดกราวด์ และข้อกำหนดสำหรับอิเล็กโทรดกราวด์
- ฟ้าผ่า – สำหรับการปกป้องเพิ่มเติมของผลิตภัณฑ์นี้ในระหว่างที่เกิดพายุฝนฟ้าคะนอง หรือก่อนปล่อยทิ้งไว้โดยไม่มีใครดูแลและไม่ได้ใช้งานเป็นเวลานาน ให้ถอดปลั๊กออกจากเต้ารับที่ผนังและถอดระบบสายเคเบิลออก ซึ่งจะช่วยป้องกันความเสียหายที่เกิดกับผลิตภัณฑ์อันเนื่องมาจากฟ้าผ่าและไฟกระชากของสายไฟ
- การใช้งานกลางแจ้ง - ผลิตภัณฑ์นี้ไม่กันน้ำและไม่ควรปล่อยให้เปียก อย่าให้โดนฝนหรือของเหลวประเภทอื่น
อย่าออกไปนอกประตูข้ามคืนเพราะอาจเกิดการควบแน่นได้ - ขณะเปลี่ยนแบตเตอรี่ ฟิวส์หรือจัดการผลิตภัณฑ์ระดับบอร์ด ให้ระมัดระวังการคายประจุไฟฟ้าสถิตซึ่งอาจทำให้อุปกรณ์อิเล็กทรอนิกส์เสียหายได้ ทางที่ดีควรใช้ม้านั่งบริการอิเล็กทรอนิกส์ที่มีการต่อสายดิน หากไม่สามารถใช้ได้ คุณสามารถระบายออกได้โดยการสัมผัสอุปกรณ์โลหะหรือท่อ ขณะเปลี่ยนแบตเตอรี่หรือฟิวส์ห้ามสัมผัส i) สายไฟอื่นนอกเหนือจากสายแบตเตอรี่ และ ii) แผงวงจรพิมพ์
การจำกัดความรับผิด
IN NO EVENT WILL LINOR TECHNOLOGY BE LIABLE, WHETHER IN CONTRACT, TORT, OR OTHERWISE, FOR ANY INCIDENTAL, SPECIAL, INDIRECT, CONSEQUENTIAL OR PUNITIVE DAMAGES, INCLUDING, BUT NOT LIMITED TO, DAMAGES FOR ANY LOSS OF USE, LOSS OF TIME, INCONVENIENCE, COMMERCIAL LOSS, OR LOST PROFITS, SAVINGS, OR REVENUES TO THE FULL EXTENT SUCH MAY BE DISCLAIMED BY LAW. DISCLAIMER FOR CRITICAL APPLICATIONS
ผลิตภัณฑ์นี้ไม่ได้มีวัตถุประสงค์หรือได้รับอนุญาตสำหรับผลิตภัณฑ์ช่วยชีวิตหรือเพื่อการใช้งานอื่นๆ ที่ความล้มเหลวอาจทำให้เกิดการบาดเจ็บหรือเสียชีวิตได้ หากคุณหรือลูกค้าของคุณใช้หรืออนุญาตให้ใช้ผลิตภัณฑ์นี้สำหรับการใช้โดยไม่ได้ตั้งใจหรือไม่ได้รับอนุญาต คุณตกลงที่จะชดใช้ค่าเสียหายอย่างเต็มที่กับ Linor Technology และบริษัทในเครือ และเจ้าหน้าที่ พนักงาน และผู้จัดจำหน่ายของแต่ละคน จากความรับผิดทั้งหมดที่เกี่ยวข้องกับการใช้งานดังกล่าว ซึ่งรวมถึง ค่าทนายความและค่าใช้จ่าย
ประกาศเพิ่มเติมสำหรับการจำกัดการใช้งาน
เว้นแต่จะระบุไว้อย่างเฉพาะเจาะจง ผลิตภัณฑ์ของเราไม่ได้ออกแบบมาเพื่อสลับสาย voltage (110V ขึ้นไป) อุปกรณ์ เพื่อควบคุมอุปกรณ์ที่ทำงานที่ line voltagช่างไฟฟ้าที่มีคุณสมบัติต้องติดตั้งอุปกรณ์ตัวกลาง เช่น รีเลย์ เมื่อเลือกอุปกรณ์ที่จะควบคุม ควรเลือกระดับเสียงต่ำtage ควบคุมเช่นโซลินอยด์ 24VAC เพื่อควบคุมการไหลของน้ำ เฉพาะช่างไฟฟ้าที่ผ่านการรับรองเท่านั้นที่สามารถต่อสายไฟได้tagอีอุปกรณ์ นอกจากนี้ ต้องปฏิบัติตามรหัสท้องถิ่น ซึ่งรวมถึงแต่ไม่จำกัดเพียงขนาดสายไฟและตัวเรือนที่เหมาะสม Linortek ไม่มีส่วนรับผิดชอบต่ออันตรายต่อผู้ใช้หรือบุคคลที่สามสำหรับการใช้ผลิตภัณฑ์ของเราอย่างไม่เหมาะสม ความรับผิดนี้ยังคงอยู่กับผู้ใช้ Linortek จะไม่รับผิดชอบต่อความเสียหายต่ออุปกรณ์อันเนื่องมาจากการใช้ผลิตภัณฑ์ของเราอย่างไม่เหมาะสม
รีเลย์ VOLTAGข้อมูลจำเพาะ
โปรดใช้ความระมัดระวังเมื่อเชื่อมต่ออุปกรณ์กับวงจรไฟฟ้าหรืออุปกรณ์อื่นๆ นี้ web คอนโทรลเลอร์ไม่ได้ออกแบบมาเพื่อเชื่อมต่อกับ vol . ใด ๆtage greater than 48V. Utilizing this arrangement, should allow you to virtually control anything. It is important that you use licensed electricians and comply with electrical codes that are applicable to your location. These codes exist for your safety, as well as the safety of others. Linortek assumes no responsibility for any harm or damage resulting from a failure adhere to local laws, ordinances or regulations or failure to follow specified instructions for installation and product usage.
ข้อตกลงสิทธิ์การใช้งานสำหรับผู้ใช้สำหรับซอฟต์แวร์และเอกสาร Linortek
ข้อตกลงสิทธิ์การใช้งานสำหรับผู้ใช้ปลายทาง (“EULA”) นี้เป็นข้อตกลงทางกฎหมายระหว่างคุณ (บุคคลหรือนิติบุคคลเดียว) กับ Linor Technology, Inc. (“Linortek” หรือ “เรา” หรือ “พวกเรา”) ที่ควบคุมการใช้ซอฟต์แวร์ของคุณ และเอกสารประกอบ (“ซอฟต์แวร์”) ที่ฝังอยู่ในหรือเกี่ยวข้องกับชุดผลิตภัณฑ์ Fargo, Koda, Netbell, IoTMeter และ iTrixx (“ผลิตภัณฑ์ Linortek”)
EULA นี้ไม่ได้ควบคุมการใช้งาน Linortek . ของคุณ webเว็บไซต์หรือผลิตภัณฑ์ Linortek (ยกเว้นซอฟต์แวร์) การใช้ Linortek . ของคุณ webเว็บไซต์ถูกควบคุมโดย Linortek webข้อกำหนดในการให้บริการของไซต์และนโยบายความเป็นส่วนตัวของ Linortek ซึ่งสามารถดูได้ที่:
http://www.linortek.com/terms-and-conditions [การซื้อผลิตภัณฑ์ Linortek ของคุณ (ไม่รวมซอฟต์แวร์) อยู่ภายใต้การรับประกันแบบจำกัดของ Linortek ซึ่งสามารถดูได้ที่ https://www.linortek.com/linortek-one-year-limited-warranty/
This EULA governs your access and use of the Software. This EULA gives you specific legal rights, and you may also have other legal rights in addition, which vary from jurisdiction to jurisdiction. The disclaimers, exclusions, and limitations of liability under
this EULA will not apply to the extent prohibited or limited by applicable law. Some jurisdictions do not allow the exclusion of implied warranties or the exclusion or limitation of incidental or consequential damages or other rights, so those provisions of this EULA may not apply to you.
โดยการติดตั้ง เข้าถึง คัดลอกและ/หรือใช้งานซอฟต์แวร์หรือเอกสารประกอบ แสดงว่าคุณตกลงที่จะผูกพันตามข้อกำหนดและเงื่อนไขของ EULA นี้ในนามของตัวคุณเองหรือหน่วยงานที่คุณเป็นตัวแทนที่เกี่ยวข้องกับการติดตั้ง การเข้าถึง การคัดลอกและ/หรือ ใช้. คุณรับรองและรับประกันว่า (i) คุณมีสิทธิ์ อำนาจ และความสามารถในการยอมรับและยอมรับข้อกำหนดของ EULA นี้ในนามของตัวคุณเองหรือหน่วยงานที่คุณเป็นตัวแทน (ii) คุณมีอายุเพียงพอตามกฎหมายในเขตอำนาจศาลที่พำนักของคุณ , (iii) คุณไม่ได้อยู่ในประเทศที่อยู่ภายใต้การคว่ำบาตรของรัฐบาลสหรัฐฯ หรือที่รัฐบาลสหรัฐฯ กำหนดให้เป็นประเทศ "สนับสนุนผู้ก่อการร้าย"; และ (ii) คุณไม่ได้อยู่ในรายชื่อบุคคลที่ต้องห้ามหรือถูกจำกัดของรัฐบาลสหรัฐฯ
หากคุณไม่ประสงค์ที่จะผูกพันตามข้อกำหนดของ EULA นี้ คุณจะไม่สามารถติดตั้ง เข้าถึง คัดลอก หรือใช้ซอฟต์แวร์ในทางใดๆ ได้ (ไม่ว่าจะติดตั้งไว้ล่วงหน้าบนอุปกรณ์ที่คุณซื้อหรือไม่ก็ตาม)
- อนุญาตให้ใช้ซอฟต์แวร์/ใบอนุญาตซอฟต์แวร์
ภายใต้ข้อกำหนดของ EULA นี้ Linortek ให้สิทธิ์แก่คุณอย่างจำกัด เพิกถอนได้ ไม่เฉพาะตัว ไม่สามารถให้อนุญาตช่วง ไม่สามารถโอนสิทธิ์ได้ และอนุญาตให้ (a) ดาวน์โหลด ติดตั้ง และดำเนินการสำเนาซอฟต์แวร์หนึ่งชุด ในรูปแบบโค้ดอ็อบเจ็กต์ที่ปฏิบัติการได้ เฉพาะในผลิตภัณฑ์ Linortek ที่คุณเป็นเจ้าของหรือควบคุมเท่านั้น และเพื่อ (b) ใช้ซอฟต์แวร์เฉพาะในส่วนที่เกี่ยวข้องกับผลิตภัณฑ์ Linortek ตามวัตถุประสงค์การใช้งานตามที่อธิบายไว้ใน Linortek webเว็บไซต์ (แต่ละ 1(a) และ 1(b) a “การใช้งานที่ได้รับอนุญาต” และเรียกรวมกันว่า “การใช้งานที่ได้รับอนุญาต”) - ข้อจำกัดในการใช้ซอฟต์แวร์ของคุณ
คุณตกลงที่จะไม่และไม่อนุญาตให้ผู้อื่นใช้ซอฟต์แวร์เพื่อวัตถุประสงค์อื่นนอกเหนือจากการใช้งานที่ได้รับอนุญาตตามที่อธิบายไว้ในส่วนที่ 1 ข้างต้น ซึ่งหมายความว่า เหนือสิ่งอื่นใด คุณไม่สามารถ:
(ก) แก้ไข ดัดแปลง ดัดแปลง ดัดแปลง แปล ทำผลงานลอกเลียนแบบ ถอดประกอบ วิศวกรรมย้อนกลับ หรือรวบรวมส่วนใดส่วนหนึ่งของซอฟต์แวร์ (ยกเว้นในขอบเขตที่กฎหมายบังคับใช้ห้ามการจำกัดดังกล่าวเป็นพิเศษเพื่อวัตถุประสงค์ในการทำงานร่วมกัน ซึ่งในกรณีนี้ คุณตกลง เพื่อติดต่อ Linortek ก่อนและให้โอกาส Linortek ในการสร้างการเปลี่ยนแปลงดังกล่าวตามความจำเป็นเพื่อวัตถุประสงค์ในการทำงานร่วมกัน)
(b) อนุญาต มอบหมาย แจกจ่าย ส่ง ขาย ให้เช่า โฮสต์ จ้างภายนอก เปิดเผยหรือใช้ซอฟต์แวร์เพื่อวัตถุประสงค์ทางการค้าใดๆ หรือทำให้ซอฟต์แวร์พร้อมใช้งานสำหรับบุคคลที่สาม
(c) อนุญาตให้บุคคลที่สามใช้ซอฟต์แวร์ในนามของหรือเพื่อประโยชน์ของบุคคลที่สาม;
(d) ใช้ส่วนหนึ่งส่วนใดของซอฟต์แวร์บนอุปกรณ์หรือคอมพิวเตอร์ใดๆ นอกเหนือจากผลิตภัณฑ์ Linortek ที่คุณเป็นเจ้าของหรือควบคุม
(จ) ใช้ซอฟต์แวร์ในทางใด ๆ ที่ละเมิดกฎหมายท้องถิ่น ระดับประเทศ หรือระหว่างประเทศที่เกี่ยวข้อง; หรือ
(f) remove or alter any labels, symbols, legends or proprietary notices, including but not limited to any copyright, trademark, logo in the Software. You may not disclose the results of any performance or functional evaluation of anyof the Software to any third party without the prior written consent of Linortek for each such release. - อัปเดต
Linortek อาจพัฒนาการอัปเดต อัปเกรด แพตช์ แก้ไขข้อบกพร่อง และการแก้ไขอื่นๆ เป็นครั้งคราว (“อัปเดต”) เพื่อปรับปรุงประสิทธิภาพของซอฟต์แวร์ เว้นแต่จะระบุไว้เป็นอย่างอื่นใน Linortek webเว็บไซต์ การอัปเดตเหล่านี้จะมอบให้คุณโดยไม่เสียค่าใช้จ่าย การอัปเดตเหล่านี้อาจได้รับการติดตั้งโดยอัตโนมัติโดยไม่ต้องแจ้งให้คุณทราบ การใช้ซอฟต์แวร์แสดงว่าคุณยินยอมให้มีการอัปเดตอัตโนมัติด้วย หากคุณไม่ตกลงตามนี้ คุณจะไม่สามารถติดตั้ง เข้าถึง คัดลอก หรือใช้ซอฟต์แวร์ในทางใดๆ ได้ - ความเป็นเจ้าของ
The Software is licensed to you and not sold. Linortek reserves all rights to the Software and any Updates not expressly granted herein. The Software and Linortek Products are protected by copyright, trademark and other intellectual property laws andtreaties. Linortek and its licensors own the title, copyright, trademarks and other intellectual property rights in the Software.
You are not granted any rights to Linortek’s trademarks or service marks. There are no implied licenses in this EULA. - การสิ้นสุด
This EULA is effective from the date you first use the Software and will continue for as long as you own the Linortek Product associated with it or until you or Linortek terminate this agreement under this section. You may terminate this EULA at any time upon written notice to Linortek at the address provided below. Linortek may terminate this EULA at any time if you fail to comply with any of the terms in this agreement. The license granted in this EULA terminates immediately when the agreement terminates. Upon termination, you must stop using the Linortek Product and the Software and you must delete all copies of the
Software. The terms of Sections 2 will still remain in effect after the agreement terminates. - คำปฏิเสธการรับประกัน
EXTENT PERMITTED BY APPLICABLE LAW, LINORTEK PROVIDES THE SOFTWARE “AS-IS” AND DISCLAIMS ALL WARRANTIES AND CONDITIONS, WHETHER EXPRESS, IMPLIED, OR STATUTORY, INCLUDING THE WARRANTIES OF MERCHANTABILITY, FITNESS FOR A PARTICULAR PURPOSE, TITLE, QUIET ENJOYMENT, ACCURACY, AND NON-INFRINGEMENT OF THIRD-PARTY RIGHTS. LINORTEK DOES NOT GUARANTEE ANY SPECIFIC RESULTS FROM THE USE OF THE SOFTWARE. LINORTEK MAKES NO WARRANTY THAT THE SOFTWARE WILL BE UNINTERRUPTED, FREE OF VIRUSES OR OTHER HARMFUL CODE, TIMELY, SECURE, OR ERROR-FREE. YOU USE THE SOFTWARE AND THE LINORTEK PRODUCT AT YOUR OWN DISCRETION AND RISK. YOU WILL BE SOLELY RESPONSIBLE FOR (AND LINORTEK DISCLAIMS) ANY AND ALL LOSS, LIABILITY, OR DAMAGES RESULTING FROM YOUR USE OF THE SOFTWARE
AND LINORTEK PRODUCT. - การจำกัดความรับผิดชอบ
ไม่มีข้อความใดใน EULA นี้และโดยเฉพาะอย่างยิ่งในข้อ “ข้อจำกัดความรับผิด” นี้ที่จะพยายามยกเว้นความรับผิดที่ไม่สามารถยกเว้นได้ภายใต้กฎหมายที่บังคับใช้
ในขอบเขตสูงสุดที่อนุญาตโดยกฎหมายที่บังคับใช้ นอกเหนือจากการปฏิเสธการรับประกันข้างต้น ไม่ว่าในกรณีใด (A) LINORTEK จะไม่รับผิดต่อความเสียหายที่เป็นผลสืบเนื่อง ที่เป็นแบบอย่าง พิเศษ หรือโดยบังเอิญ ซึ่งรวมถึงความเสียหายต่อความเสียหายใดๆ ก็ตาม จากหรือเกี่ยวข้องกับผลิตภัณฑ์หรือซอฟต์แวร์ แม้ว่า LINORTEK รู้หรือควรทราบถึงความเป็นไปได้ของความเสียหายดังกล่าว และ (B) ความรับผิดสะสมทั้งหมดของ LINORTEK ที่เกิดขึ้นจากหรือเกี่ยวข้องกับผลิตภัณฑ์และซอฟต์แวร์ จะถูกจำกัดในจำนวนเงินไม่เกินจำนวนเงินที่คุณจ่ายจริงให้กับ LINORTEK และตัวแทนจำหน่ายที่ได้รับอนุญาตของ LINORTEK หรือตัวแทนขายสำหรับผลิตภัณฑ์หรือบริการที่ออกใน 6 เดือนก่อนหน้า (ถ้ามี) ข้อจำกัดนี้เป็นแบบสะสมและจะไม่เพิ่มขึ้นหากมีเหตุการณ์หรือการอ้างสิทธิ์มากกว่าหนึ่งเหตุการณ์ LINORTEK ขอปฏิเสธความรับผิดทั้งหมดของผู้อนุญาตและผู้จัดหาสินค้าของ LINORTEK - การปฏิบัติตามกฎหมายการส่งออก
คุณรับทราบว่าซอฟต์แวร์และเทคโนโลยีที่เกี่ยวข้องอยู่ภายใต้กฎหมายควบคุมการส่งออกของสหรัฐอเมริกา เขตอำนาจศาลการส่งออกของสหรัฐอเมริกา และอาจอยู่ภายใต้กฎระเบียบการส่งออกหรือนำเข้าในประเทศอื่น ๆ คุณตกลงที่จะปฏิบัติตามกฎหมายและข้อบังคับระหว่างประเทศและระดับชาติที่บังคับใช้กับซอฟต์แวร์อย่างเคร่งครัด รวมถึงกฎระเบียบด้านการบริหารการส่งออกของสหรัฐอเมริกา ตลอดจนข้อจำกัดสำหรับผู้ใช้ปลายทาง การใช้งานปลายทาง และปลายทางที่ออกโดยสหรัฐอเมริกาและรัฐบาลอื่น ๆ คุณรับทราบว่าคุณมีความรับผิดชอบในการได้รับอนุญาตในการส่งออก ส่งออกซ้ำ หรือนำเข้าซอฟต์แวร์และเทคโนโลยีที่เกี่ยวข้อง ตามที่จำเป็น
คุณจะชดใช้ค่าเสียหายและถือว่า Linortek พ้นจากการเรียกร้อง ความสูญเสีย ความรับผิด ความเสียหาย ค่าปรับ บทลงโทษ ต้นทุนและค่าใช้จ่ายใดๆ และทั้งหมด (รวมถึงค่าธรรมเนียมทนายความ) ที่เกิดขึ้นจากหรือเกี่ยวข้องกับการฝ่าฝืนภาระผูกพันของคุณภายใต้หัวข้อนี้ - งานที่มอบหมาย.
คุณไม่สามารถมอบหมายสิทธิ์หรือภาระผูกพันใด ๆ ของคุณภายใต้ EULA นี้ และความพยายามใด ๆ ในการโอนจะถือเป็นโมฆะและไม่มีผล - ประกาศ.
Linortek อาจแจ้งให้คุณทราบเกี่ยวกับ EULA นี้โดยใช้อีเมลและที่อยู่ที่คุณให้ไว้เมื่อคุณลงทะเบียนกับ Linortek - การสละสิทธิ์
เพื่อให้มีผลบังคับใช้ การสละสิทธิ์ใดๆ และทั้งหมดโดย Linortek จะต้องทำเป็นลายลักษณ์อักษรและลงนามโดยตัวแทน Linortek ที่ได้รับอนุญาต ความล้มเหลวอื่น ๆ ของ Linortek ในการบังคับใช้ข้อกำหนดใด ๆ ในที่นี้จะไม่ถือว่าเป็นการสละสิทธิ์ - แยกกัน
บทบัญญัติใดๆ ของ EULA นี้ที่พบว่าไม่สามารถบังคับใช้ได้จะถูกแก้ไขและตีความเพื่อให้บรรลุวัตถุประสงค์ของข้อกำหนดนั้นในขอบเขตสูงสุดที่เป็นไปได้ภายใต้กฎหมายที่บังคับใช้ และข้อกำหนดที่เหลือทั้งหมดจะยังคงมีผลบังคับอย่างสมบูรณ์ - กฎหมายที่บังคับใช้; สถานที่
You agree that this EULA, and any claim, dispute, action, cause of action, issue, or request for relief arising out of or relating to this EULA, will be governed by the laws of the state of North Carolina, U.S.A., without regard to conflicts of laws principles, provided that if you reside in a country that will not apply U.S. law to disputes related to these terms, then the laws of your country will apply. You also agree that the United Nations Convention on Contracts for the International Sale of Goods shall not
apply. You agree that regardless of any statute or law to the contrary, any cause of action against us arising out of or related to the Linortek webไซต์ ซอฟต์แวร์ หรือผลิตภัณฑ์ Linortek จะต้องเริ่มดำเนินการภายในหนึ่ง (1) ปีหลังจากที่สาเหตุของการดำเนินการเกิดขึ้น หรือสาเหตุของการกระทำดังกล่าวจะถูกระงับอย่างถาวร การดำเนินการหรือการดำเนินการใดๆ ที่เกี่ยวข้องกับ EULA นี้จะต้องถูกนำขึ้นศาลรัฐบาลกลางหรือศาลของรัฐที่ตั้งอยู่ในเมืองราลี รัฐนอร์ทแคโรไลนา และแต่ละฝ่ายจะต้องยื่นคำร้องต่อเขตอำนาจศาลและสถานที่ของศาลดังกล่าวโดยไม่สามารถเพิกถอนได้ในการเรียกร้องหรือข้อพิพาทดังกล่าว ยกเว้น Linortek อาจขอคำสั่งห้าม บรรเทาทุกข์ในศาลใด ๆ ที่มีเขตอำนาจศาลในการปกป้องทรัพย์สินทางปัญญาของตน - คำเตือนข้อเสนอ 65 ของแคลิฟอร์เนีย
 คำเตือน: ผลิตภัณฑ์นี้อาจทำให้คุณสัมผัสสารเคมีต่างๆ รวมถึงตะกั่ว ซึ่งรัฐแคลิฟอร์เนียทราบว่าก่อให้เกิดมะเร็ง สำหรับข้อมูลเพิ่มเติม โปรดไปที่ www.P65Warnings.ca.gov
การเริ่มต้น
The Fargo SERVER is what is called a “bare board” product and is supplied without a housing. It operates on low voltage; however you need to use simple handling precautions to prevent damage to the circuits. All electronics are susceptible to electrostatic discharge. This high voltage “shock” can permanently damage your device. Before handling the product, you should touch a surface such as a grounded workbench or table. It is also best to handle the device from its edges. If you notice that your chair or clothes often cause static discharges, you must exercise extra caution. The unit is supplied with four rubber feet which keeps the bottom of the board from coming into contact with the surface you put it on. Be careful not to let metal objects, such as screw drivers or hardware, come in contact with the bottom of this product. The board can be mounted on a panel using stand offs and #4 hardware. The mounting holes are connected to the GROUND signal. The SERVER unit is a self-contained web server configured with various input and output circuits. Although the relays are rated for higher voltagเช่น ผลิตภัณฑ์นี้ไม่ได้ออกแบบมาเพื่อใช้งานที่ line voltages. You should never use voltages through the SERVER product exceeding 48 volts. IT IS NOT SAFE.
The KODA SERVER is a housed unit with a DIN rail mountable enclosure that can be snapped onto a DIN rail or attached to any flat surface such as a wall or under a counter. KODA 100 has two relays (48VAC@1A), KODA 200 has four relays which can drive 10V 50mA to external devices. The unit is supplied with a DIN Rail mountable enclosure with removable terminal connectors for easy installation. The KODA SERVER can be mounted on a panel or on the wall using the DIN rail mount clip. The removable wire terminal connectors simplify field installation and allow for easy troubleshooting and maintenance: the unit can be removed from the system without disturbing the system wiring.
การเดินสายไฟเซิร์ฟเวอร์
บันทึก: For a diagram showing the location of all connectors on your SERVER referenced in this section, please see the section – Board Layout Reference.
คำเตือน: หน่วยเหล่านี้แยกภาคพื้นดิน เชื่อมต่อเสมอเพื่อให้วงจรจ่ายไฟเชื่อมต่อกับหน่วยเซิร์ฟเวอร์เท่านั้น
อย่าใช้การเชื่อมต่อกราวด์ภายนอก การกระทำดังกล่าวอาจทำให้เซิร์ฟเวอร์หรืออุปกรณ์ต้นทาง POE เสียหายได้
- Place the unit on a table or bench being careful not to let any metal objects come into contact with the bottom of the circuit board (Fargo Only).
- Connect the 12VDC power supply to a suitable AC outlet and plug the barrel connector into the SERVER at the location labelled “12VDC/POWER”. Alternatively, you may also use POE. At this point the GREEN/Boot LED should come on and start flashing indicating the SERVER is operating and is in the “Bootload Mode”. This mode allows the user to update the server software that is used on the unit. After about 5 seconds, the GREEN LED will go off and the RED LED will start blinking once per second indicating the SERVER is operating in “Server Mode” and is accessible on a network utilizing TCP/IP protocols.
คำเตือน: เมื่อคุณใช้สวิตช์เครือข่าย POE อย่าใช้แหล่งจ่ายไฟ 12VDC เพื่อจ่ายพลังงานให้กับเซิร์ฟเวอร์ในเวลาเดียวกัน จะทำให้บอร์ดเสียหาย - Plug an Ethernet cable into the RJ45/NET connector. The “Connection” LED will come on if a 100MHz network is available, otherwise it will remain off and the “Activity” LED should start blinking indicating network activity. Fargo G2 Relay Connections
There are 8 relays on the FARGO R8 and 4 on the FARGO R4. These are dry contact relays. These units are designed for only low voltage ควบคุมและไม่ควรมีปริมาตรtage applied to the relay greater than 48 volts. This is for your safety as well as to stay within the parameters of the parts and circuit board design. The relays have 3 terminals labelled NO, C and NC which stand for Normally Open, Common and Normally Closed. When activated, the relay moves the connection from CNC to CNO. If you want to make a connection when the relay is activated, connect your wires between C and NO. When the relay is activated C and NO will be connected together. If you want to break a circuit when the relay is activated, make your connections to C and NC. When the relay is activated the circuit will be broken (or open)
Koda Relay Connection
There are 2 relays on the KODA 100. The KODA 100 has 2 removable 2 position connectors (1 for each relay) and are simply numbered “1” and “2”. These relays are normally open.
There are 4 relays on the KODA 200. The KODA 200 has 1 removable 8 position connector. Each relay has a “+” connection and a numbered connection. The relays may be set to supply about 10VDC by selecting “+V” on the setting switch (see Board Layout Reference page 29) or set to dry contact DC on the switch. If “+V” is selected then the voltage will be present on the “+” terminal and the numbered terminal is the return. Otherwise, a normally open dry contact exists across the “+” and numbered connection. KODA 100/200 is designed for only low voltage ควบคุมและไม่ควรมีปริมาตรtage นำไปใช้กับรีเลย์ที่มากกว่า 48 โวลต์ ทั้งนี้เพื่อความปลอดภัยของคุณและเพื่อให้อยู่ในพารามิเตอร์ของชิ้นส่วนและการออกแบบแผงวงจร

![]() ไม่ว่าในกรณีใดๆ เทคโนโลยีของ LINOR จะไม่ต้องรับผิดไม่ว่าจะในสัญญา การละเมิด หรือมิฉะนั้น สำหรับความเสียหายโดยบังเอิญ พิเศษ ทางอ้อม เป็นผลสืบเนื่องหรือการลงโทษ รวมถึงแต่ไม่จำกัดเพียง ความเสียหายสำหรับการสูญเสียเวลา , การสูญเสียทางการค้า หรือการสูญเสียผลกำไร เงินออม หรือรายได้ในขอบเขตเต็มจำนวนที่อาจถูกปฏิเสธโดยกฎหมาย
ไม่ว่าในกรณีใดๆ เทคโนโลยีของ LINOR จะไม่ต้องรับผิดไม่ว่าจะในสัญญา การละเมิด หรือมิฉะนั้น สำหรับความเสียหายโดยบังเอิญ พิเศษ ทางอ้อม เป็นผลสืบเนื่องหรือการลงโทษ รวมถึงแต่ไม่จำกัดเพียง ความเสียหายสำหรับการสูญเสียเวลา , การสูญเสียทางการค้า หรือการสูญเสียผลกำไร เงินออม หรือรายได้ในขอบเขตเต็มจำนวนที่อาจถูกปฏิเสธโดยกฎหมาย
ประกาศเพิ่มเติมสำหรับการจำกัดการใช้งาน
ผลิตภัณฑ์นี้ไม่ได้ออกแบบมาเพื่อสลับสาย vol . เว้นแต่จะระบุไว้โดยเฉพาะtagอี อุปกรณ์ ข้อจำกัดนี้รวมถึงผลิตภัณฑ์ FARGO และ KODA ทั้งหมด เพื่อควบคุมอุปกรณ์ที่ทำงานที่ line voltagที่ผู้ใช้ต้องติดตั้งและอุปกรณ์ตัวกลาง เช่น รีเลย์
เมื่อเดินสาย voltage อุปกรณ์ที่ใช้อุปกรณ์ตัวกลาง คุณต้องเป็นช่างไฟฟ้าที่ผ่านการรับรองหรือใช้บริการของช่างไฟฟ้าที่ผ่านการรับรอง นอกจากนี้ ต้องปฏิบัติตามรหัสท้องถิ่น ซึ่งรวมถึงแต่ไม่จำกัดเพียงขนาดเกจลวดและตัวเรือนที่เหมาะสม
Linortek cannot assume any responsibility for harm to the user or third parties for improperly using our Fargo/Koda products. This liability remains with the user. Linortek cannot assume any responsibility for damage to the device for improperly using our SERVER product.
For relay specifications, please see Board Reference Layout page 29
Digital Input Connections (Fargo R4 and Koda)
The digital inputs allow the SERVER to detect an external on/off state of a sensor. With this information the SERVER can display whether an input is on or off, count events in a resettable or non-resettable counter, and calculate the frequency (such as for use as a tachometer) or the period of the input. There are two modes of operation for the digital inputs – PULL UP and ISOLATED.
a) PULL UP mode connects a 1K resistor to an internal voltage ช่วยให้คุณสามารถใช้สวิตช์ธรรมดา (เช่น สวิตช์ประตูแม่เหล็ก) ข้ามขั้วต่อ 1 และ 2 ซึ่งเมื่อสวิตช์ถูกเปิดใช้งาน สัญญาณจะถูกส่งไปยังอินพุต
b) ISOLATED mode allows you to directly drive the SERVER’s optoisolator with an external voltagแม้ว่าตัวต้านทาน 1K ภายใน เล่มนี้tage อาจอยู่ในช่วง 5V ถึง 24V โดยจ่ายไฟขั้นต่ำ 2mA หรือสูงสุด 30mA ให้กับไดโอดออปโตอิเลเตอร์ ไม่มีการเชื่อมต่อภายในอื่นใดกับเล่มนี้tage so it is an isolated input. Please note, when connecting a 12VDC-¬24VDC circuit to the input, an external resistor (can be provided at request, 2.2k ohm 0.5watt) must be used.
These modes are selected by the switch on the SERVER (see Board Layout Reference page 29) marked ISO and PU for isolated and pull up respectively. These are set at the factory to ISO by default.
Wiring a push button: For distances up to 500 feet, a 20 AWG shielded wire is suitable for wiring a push button. If the distance between the push button and the controller extends up to 5,000 feet, use a 16 AWG shielded cable instead. Keep in mind that longer cable runs are more susceptible to signal interference.
คำเตือน: If you intend to use isolated mode, verify that the input switch is set to ISO before applying an external voltagอี การกระทำอย่างอื่นอาจทำให้เซิร์ฟเวอร์หรืออุปกรณ์ต้นกำเนิด POE เสียหายได้
Analog Input Connections (Fargo R4ADI)
The analog inputs allow the SERVER to read the value of external equipment. There are 2 analog inputs.
For AC current monitoring, use one of the two 3.5mm stereo inputs to interface with a current sensor.
แผงขั้วต่ออินพุตแบบอะนาล็อก 2 แผงเชื่อมต่อกับเซ็นเซอร์กระแส 0-5V แบบไม่แยกส่วน ซึ่งอาจเชื่อมต่อกับอุปกรณ์หลากหลาย เช่น เซ็นเซอร์อุณหภูมิหรือความดัน SERVER มีการเชื่อมต่อกราวด์และกำลังไฟ เพื่อให้สามารถวัดได้โดยไม่ต้องมีปริมาตรภายนอกtage references. You should use a sensor that is isolated so that that it makes no connection to a remote ground. See drawing under Board Reference Layout page 29.
Accessing your SERVER
เมื่อเซิร์ฟเวอร์ของคุณเปิดอยู่และเชื่อมต่อกับเครือข่ายแล้ว เซิร์ฟเวอร์จะได้รับที่อยู่ IP โดยอัตโนมัติผ่าน DHCP ตราบใดที่เราเตอร์ของคุณได้รับการกำหนดค่าให้ทำเช่นนั้น หากต้องการเชื่อมต่อ ให้ป้อนที่อยู่ IP ลงในของคุณ web browser. This will take you to your SERVER’s landing page. To log in, click the Log In button on the top right of the page. Your browser will prompt you to enter your username and password. By default, these credentials are both set to admin. To find your SERVER’s IP address, see below.
ค้นหาที่อยู่ IP ของคุณด้วย Linortek Discoverer
โปรแกรม Discoverer จะค้นหาเซิร์ฟเวอร์ของคุณโดยอัตโนมัติ Discoverer เป็นโปรแกรม Java และจำเป็นต้องติดตั้ง Java Runtime เพื่อใช้คุณสมบัตินี้ Java สามารถพบได้ที่นี่: http://java.com/en/download/index.jsp.
หากต้องการดาวน์โหลดโปรแกรม Discover โปรดไปที่: https://www.linortek.com/downloads/supportprogramming/
ขอแนะนำให้ใช้เบราว์เซอร์ Chrome และ Firefox โปรดทราบ: หากคุณต้องการใช้ Internet Explorer Internet Explorer จะบันทึก Linortek Discoverer เป็น Zip file โดยค่าเริ่มต้น. ในการใช้ Discoverer คุณจะต้องเลือกบันทึกเป็นและเปลี่ยนชื่อ file เป็น Linortek Discoverer.jar เมื่อคุณดาวน์โหลด
เมื่อดาวน์โหลดโปรแกรม Discover บางครั้งคุณจะเห็นข้อความเตือนแบบป๊อปอัป ขึ้นอยู่กับการตั้งค่าความปลอดภัยของเบราว์เซอร์ของคุณ โดยถามว่าคุณต้องการเก็บหรือยกเลิกโปรแกรมนี้ file, please click the Keep button as this is a Java program, and it won’t harm your computer.
เมื่อ Discoverer พบอุปกรณ์ของคุณแล้ว อุปกรณ์จะแสดง:
- ที่อยู่ IP
- ชื่อโฮสต์
- ที่อยู่ MAC
- ข้อมูลอื่นๆ:
ก. ไฟ LED สีฟ้า (หากเปิดอยู่)
ข. ชื่อผลิตภัณฑ์
ค. การแก้ไขซอฟต์แวร์เซิร์ฟเวอร์
ง. หมายเลขพอร์ต (ถ้าโอน)

คลิกอุปกรณ์ที่คุณต้องการใช้ที่แสดงบนโปรแกรม Discoverer เพื่อเปิดใช้ SERVER web pages in your browser. Click the Login button on the homepage. The default username/password is: admin/admin. You may change these as you desire or disable this feature in the settings menu.
Connecting your SERVER Directly to Your PC
You can also plug your SERVER directly to your PC if there is no network connection available. If you plug your SERVER into your PC’s Ethernet port it will use the default IP address: 169.254.1.1 unless you have previously configured your SERVER to use a static IP. Enter 169.254.1.1 into your web browser to connect. No internet connection is required. Once configured, you can then install your SERVER where you desired.
การกำหนดค่าเซิร์ฟเวอร์
การเข้าสู่ระบบ
Once you have entered the IP address and port number, if set, the Login page will open. This page shows the name of this server which you may change in Configure/Network Config.
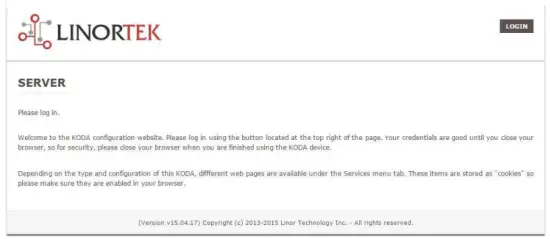
This page is static with no background activity and is a useful place to park if you are not using the SERVER and do not want to close the connection.
By pressing LOGIN, you will be asked for your username and password. These credentials will be retained by the browser until the browser is closed. You can disable the password requirement in Settings page. See section page 21.
หน้าแรก
เมื่อป้อนข้อมูลรับรองการเข้าสู่ระบบแล้ว คุณจะถูกนำไปยังหน้าหลักของแอปพลิเคชัน หน้าแรกหรือหน้าดัชนีจะแสดงข้อมูลระบบบางส่วนและให้ความสามารถในการค้นหาอุปกรณ์ทางกายภาพหากอยู่ในพื้นที่ร่วมกับผู้อื่น ดูรายการด้านล่างสำหรับคำอธิบาย

- TIME – Displayed along with the day of the week. This time may be set to be in a 12 hour format with AM/PM indicator or 24 hour format.
- DATE – วันที่ปัจจุบันจะแสดงที่นี่
- โวลต์ – เล่มtage ที่บอร์ดจะปรากฏขึ้น สิ่งนี้อาจมีประโยชน์หากเซิร์ฟเวอร์ขับเคลื่อนพร้อมกับอุปกรณ์อื่นๆ ฉบับที่ 1tage variance can be noted. Fargo and Koda servers have an input voltage range of 1248vDC.
- TEMPERATURE – Temperature on the board is displayed. This display may be either °C or °F. This temperature will be affected by the heat generated by SERVER itself so it will always be slightly higher than ambient temperature.
- ไฟ LED – มีไฟ LED 3 ดวงแสดงอยู่ ไฟ LED สีแดงคือชีพจรของระบบ สิ่งนี้ควรกะพริบประมาณหนึ่งครั้งต่อวินาทีตราบใดที่เซิร์ฟเวอร์ยังทำงานอยู่ ไฟ LED สีเขียวใช้สำหรับตัวเลือก bootloader และโดยทั่วไปจะไม่สามารถมองเห็นได้บน webเว็บไซต์. ไฟ LED สีฟ้าสามารถคลิกได้ และคุณสามารถเปิดและปิดได้จากสิ่งนี้ web หน้าหนังสือ. สิ่งนี้มีประโยชน์สำหรับการค้นหาอุปกรณ์ทางกายภาพหากใช้งานกับยูนิตอื่นที่คล้ายคลึงกัน เนื่องจากอุปกรณ์จะส่องสว่างบนยูนิตที่สิ่งนี้ web เชื่อมต่อเบราว์เซอร์แล้ว โปรแกรม Discoverer จะแจ้งให้ทราบด้วยว่าไฟ LED สีฟ้าเปิดอยู่หรือไม่ ซึ่งมักเรียกกันว่าฟังก์ชัน "ค้นหา"
การบริการ
แท็บบริการเป็นแบบไดนามิกและจะเปลี่ยนแปลงขึ้นอยู่กับการกำหนดค่าเซิร์ฟเวอร์ของคุณ นี่คือที่ที่คุณสามารถควบคุมอินพุต เอาท์พุต เซ็นเซอร์ และการควบคุมพิเศษอื่นๆ
In/Out or Relays Page
Depending on which SERVER you are using, the first page on the SERVICES tab will be either In/Out or Relays.
In/Out has the relay controls and the input controls on one page, while Relays only has the relay controls.
รีเลย์ควบคุม
An In/Out page is displayed below. Some relay control pages have 2, 4 or 8 relays displayed. Each relay has a number, in this case 1 to 4.

The State LED shows whether the relay is on or off indicated by GREEN and RED respectively. This icon is clickable to manually control the corresponding relay. Each relay can have a Name as well as identifiers for the Normally Open, Common and Normally Closed connections.
มีไฟ LED แสดงสถานะสี่ดวงที่แสดง:
- Email – If an email is to be sent when this relay is switched on/off
- พัลส์ – หากรีเลย์นี้ถูกตั้งค่าด้วยตัวคูณความกว้างพัลส์และตัวคูณความกว้างพัลส์ (ระยะเวลา) – ดูส่วนถัดไปสำหรับข้อมูลเพิ่มเติม
- Sched. – If there is a schedule created in the Tasks page (see page 15) set to automatically trigger this relay.
- ตั้งเวลา - หากตั้งค่าพัลส์และรีเลย์นี้เปิดใช้งานอยู่ LED ตั้งเวลาจะเปลี่ยนเป็นสีแดงแสดงว่ารีเลย์กำลังทำงานกับตัวจับเวลา
Click the Edit Icon to edit the controls for the corresponding relay. This will take you to the Set Relay page (see page 11).
ข้อมูลอินพุต
The In/Out or Inputs page (depending on your SERVER) will display information from each input. The SERVERs have a combination of inputs. The Fargo R4DI has four digital inputs, The R4ADI has, four digital inputs, four analog inputs. The KODA SERVER has two digital inputs.
At the top of each input is a label (ex: DIN 1, AIN 2) specifying whether it is a digital input (DIN) or analog input (AIN) as well as the input number. This label will turn green when the input is enabled. Inside the box will be any display configured from the Set Input page (see page 12 for digital input, page 14 for analog input). A red dot in the lower-left corner indicating the state of a linked relay (if any), will turn green when the linked relay is activated.
Finally, an Edit icon in the lower-right corner of the box to edit the corresponding input. This will take you to the Set Digital Input or Set Analog Input page (page 12 or page 14).
Set Relay Page
หน้า SET RELAY ช่วยให้คุณสามารถตั้งค่าคุณสมบัติต่างๆ ที่เกี่ยวข้องกับรีเลย์ได้
- Relay Select – The Relay that you are editing (identified by the line on which you clicked the Edit icon on the RELAY page).
- Name – Enter a 15-character Relay Name. This and the following 3 fields may be used for any identifying information desired.
- NO Name – Enter a 7-character name for the Normally Open (NO) connection.
- Com Name – Enter a 7-character name for the Common (COM) connection.
- NC Name – Enter a 7-character name for the Normally Closed (NC) connection.
- Pulse Width – When you control the relay it turns on or off. You may control it for a timed turned on period by entering a Pulse Width when 0 means there is no timed event and a number represents duration of the pulse. The maximum number you can enter here is 4 digits, ie. 1234.
- ตัวคูณความกว้างพัลส์ – หากต้องการกำหนดความยาวพัลส์เพิ่มเติม ให้เลือกตัวคูณความกว้างพัลส์เพื่อกำหนดความกว้างพัลส์เพิ่มเติม คุณสามารถเลือก:
• ไม่มี
• mS (Millisecond, 1/1000 second)
• Sec (Seconds)
• Min (Minutes) - ประเภทรีเลย์ – เซิร์ฟเวอร์สามารถเข้าถึงรีเลย์ทางกายภาพบนเซิร์ฟเวอร์หรือโดยใช้วิธีการอื่น คุณสามารถเลือก:
• Normal – relay physically on the SERVER
• Latched – not currently supported
• Remote – a relay on another SERVER accessed over the network
• Zigbee – a relay at a remote device accessed over an RF system
• Normal and Remote – both relays activated
• Normal and Zigbee – both relays activated - รหัสสถานที่ – นี่คือตัวเลขที่ระบุสถานที่ห่างไกล
- รีเลย์ที่ตำแหน่ง - ตัวเลขที่แสดงถึงรีเลย์หรืออุปกรณ์ที่ตำแหน่ง
- ส่งอีเมล – สามารถตั้งโปรแกรมเซิร์ฟเวอร์ให้ส่งอีเมลได้หากรีเลย์เปิดหรือปิดอยู่

ตั้งค่าหน้าอินพุตดิจิตอล
สามารถตั้งค่าอินพุตดิจิตอลเพื่อให้อ่านข้อมูลได้หลากหลายโดยใช้ประเภทการแสดงผลที่หลากหลาย นอกเหนือจากการแสดงข้อมูลอินพุตแล้ว คุณยังสามารถตั้งชื่อจอแสดงผลและเชื่อมโยงรีเลย์เข้ากับจอแสดงผลได้ รีเลย์นี้จะเปลี่ยนจากสีเขียวเป็นสีแดงเมื่อเปลี่ยนจากเปิดเป็นปิดและคลิกได้เพื่อควบคุม เมื่อคลิกที่ไอคอนแก้ไขดินสอ คุณสามารถแก้ไขการตั้งค่าสำหรับการป้อนข้อมูลนี้ได้:
- Digital Input Selected – The Digital Input that you are editing (identified by the line on which you clicked the Edit icon).
- ชื่อ – คุณสามารถตั้งชื่อให้มีความยาว 15 อักขระสำหรับอินพุตนี้ได้ ชื่อนี้จะอยู่ในแถบที่ด้านบนของจอแสดงผล
- ป้ายกำกับ – ตั้งค่าป้ายกำกับ 7 ตัวอักษรซึ่งจะแสดงบนจอแสดงผลที่ใช้งานจริง
- ตัวแก้ไข – การใช้ฟิลด์นี้คุณสามารถเพิ่ม ลบ คูณ หรือหารค่าก่อนที่ค่าจะแสดงบนเพจที่แสดง นี่คือตัวแก้ไข 2 ค่าโดยแต่ละค่าจะถูกคั่นด้วยอักขระเว้นวรรคตัวเดียว (เช่น “+2, -2, *3, /3”)
- ใช้ – ตั้งค่าอินพุตนี้ให้ใช้งานได้ เปลี่ยนตัวระบุหมายเลขอินพุตเป็นสีเขียว ควรสังเกตว่าเมื่อใช้อินพุตจะใช้เวลา CPU และทรัพยากรอื่น ๆ ขึ้นอยู่กับประเภทของอินพุต แม้ว่าอินพุตทั้งหมดอาจทำงานพร้อมกัน แต่ขอแนะนำให้เปิดเฉพาะที่คุณต้องการใช้เท่านั้น
- ประเภท – ข้อมูลอินพุตสามารถใช้เพื่อคำนวณช่วงของผลลัพธ์ได้ คุณสามารถเลือก:
• State – This is useful for knowing if an input is on or off, like a door switch being on or off.
• CounterNR – This is a non-resettable counter.
• CounterR – This is a resettable counter.
• Frequency – Counts the frequency of an input in KHz (kilo hertz or1/1000 seconds). This could be useful in displaying a tachometer where 60Hz = 1 R.P.M.
• Period – in 1/1000 seconds an input in kHz (milliseconds or1/1000 seconds). This would be useful for measuring timed events. - จอแสดงผล – การเลือกนี้ช่วยให้คุณเปลี่ยนประเภทการแสดงผลที่ใช้ได้ คุณสามารถเลือก:
• Dot – A single dot with the value in the middle. This can be used for State. You can make a dumb indicator by changing the color of the Dot based on the value. The label is under the Dot.
• Values – Displays the Corrected Value with the Label in a box directly below it.
• Meter – This Meter has configurable scale based on the Min/Max values and arcs can be colored per the Color ranges. The Label is displayed within the Meter.
• VBar – Also based on the Min/Max values for the scale and the bar changes color based on the values in the Color ranges. - Relay L/T – Enter a Relay number here. If it is a local relay it will show GREEN or RED depending if it is on or off. By clicking on it the relay will turn on and off. The name comes from the relay settings page. This may be useful if you want to turn the subject of a display on and off. Any relay can be used on any input and each may be reused for any other input. Adding an L after the relay number (ex: 2L) will link the state of the input to the state of the relay. This is an easy and immediate way to have an input follow the relay. Adding a T after the relay number will trigger the relay to the state of the input. This is an easy and immediate way to have a relay follow the input.
- Command Z/N/I – This field is used for issuing various commands to the Digital Input controller: Z Zero the resettable counter. N Leave the input as Normal. I Invert the input.
- Value – These are Min/Max values used for the display. This is useful for preventing a Meter from going past its end or setting the value of a VBar. This is the Value after the Corrector. The system cannot display a value past Max, so be sure this is at least set to 1.
- เหลือง/แดง/เขียว – มีสามสีที่สามารถใช้เพื่อกำหนดการแสดงผลเพิ่มเติมได้ กำหนดช่วงของสีเหล่านี้เพื่อกำหนดสีให้กับค่าที่แสดง นี่คือค่าที่อยู่หลัง Corrector โปรดทราบว่าหากคุณใช้ประเภทสถานะ คุณอาจต้องการกำหนด RED = จาก 0 ถึง 0, GREEN = จาก 1 ถึง 1 และ YELLOW = จาก 2 ถึง 2 เนื่องจากสถานะจะเป็น 1 หรือ 0 เสมอ สิ่งนี้จะป้องกันข้อมูลที่คลุมเครือและ ป้องกันไม่ให้ใช้สีเหลือง คุณสามารถเลือกสองสีใดก็ได้ที่คุณต้องการสำหรับประเภทรัฐ

Set Analog Input Page
สามารถตั้งค่าอินพุตแบบอะนาล็อกเพื่อให้อ่านข้อมูลได้หลากหลายโดยใช้ประเภทการแสดงผลที่หลากหลาย นอกเหนือจากการแสดงข้อมูลอินพุตแล้ว คุณยังสามารถตั้งชื่อจอแสดงผลและเชื่อมโยงรีเลย์เข้ากับจอแสดงผลได้ รีเลย์นี้จะเปลี่ยนจากสีเขียวเป็นสีแดงเมื่อเปลี่ยนจากเปิดเป็นปิดและคลิกได้เพื่อควบคุม
- Analog Input Selected – The Analog Input that you are editing (identified by the line on which you clicked the Edit icon).
- ชื่อ – คุณสามารถตั้งชื่อให้มีความยาว 15 อักขระสำหรับอินพุตนี้ได้ ชื่อนี้จะอยู่ในแถบที่ด้านบนของจอแสดงผล
- ป้ายกำกับ – ตั้งค่าป้ายกำกับ 7 ตัวอักษรซึ่งจะแสดงบนจอแสดงผลที่ใช้งานจริง
- ตัวแก้ไข – การใช้ฟิลด์นี้คุณสามารถเพิ่ม ลบ คูณ หรือหารค่าก่อนที่ค่าจะแสดงบนเพจที่แสดง นี่คือตัวแก้ไข 2 ค่าโดยแต่ละค่าจะถูกคั่นด้วยอักขระเว้นวรรคตัวเดียว (เช่น “+2, -2, *3, /3”)
- USE – Sets this input to active. Turns the input number indicator to GREEN. It should be noted that when in use the input consumes CPU time and other resources depending on its type. Although all inputs may be active at the same time, it is recommended to turn on only those you want to use.
- ประเภท – ข้อมูลอินพุตสามารถใช้เพื่อคำนวณช่วงของผลลัพธ์ได้ คุณสามารถเลือก:
• Analog 1 – Analog 1 input from a SERVER with an input such as found on a R4ADI.
• Analog 2 – Analog 2 input from a SERVER with an input such as found on a R4ADI.
• AC Current 1 – AC current sensor 1 input from a SERVER with an input such as found on a R4ADI.
• AC Current 2 – AC current sensor 2 input from a SERVER with an input such as found on a R4ADI.
• AC Current 3 – Not used
• Volts – The measurement of the voltage powering the SERVER.
• Current – On “S” models, this is the current consumed by the SERVER.
• Int. Temp – Temperature from the board mounted sensor.
• Ext. Temp – Temperature from the “S” model SERVER.
• R. Humidity – % Relative Humidity from the “S” model SERVER.
• MMA X – The X axis accelerometer data from the “S” model SERVER.
• MMA Y – The Y axis accelerometer data from the “S” model SERVER.
• MMA Z – The Z axis accelerometer data from the “S” model SERVER. - จอแสดงผล – การเลือกนี้ช่วยให้คุณเปลี่ยนประเภทการแสดงผลที่ใช้ได้ คุณสามารถเลือก:
1. Dot – A single dot with the value in the middle. This can be used for State. You can make a dumb indicator by changing the color of the Dot based on the value. The label is under the Dot.
2. Values – Displays the Corrected Value with the Label in a box directly below it.
3. Meter – This Meter has configurable scale based on the Min/Max values and arcs can be colored per the Color ranges. The Label is displayed within the Meter.
4. VBar – Also based on the Min/Max values for the scale and the bar changes color based on the values in the Color ranges. - Relay – Enter a Relay number here. If it is a local relay it will show Green or RED depending if it is on or off.
By clicking on it the relay will turn on and off. The name comes from the relay settings page. This may be useful if you want to turn the subject of a display on and off. Any relay can be used on any input and each may be reused for any other input. - ค่า – ค่าเหล่านี้เป็นค่าต่ำสุด/สูงสุดที่ใช้สำหรับการแสดงผล สิ่งนี้มีประโยชน์ในการป้องกันไม่ให้มิเตอร์ผ่านไปจนสุดหรือตั้งค่าของ VBar นี่คือค่าที่อยู่หลัง Corrector ระบบไม่สามารถแสดงค่าเกิน Max ได้ ดังนั้นโปรดตรวจสอบให้แน่ใจว่าค่านี้ตั้งค่าไว้ที่ 1 เป็นอย่างน้อย
- เหลือง/แดง/เขียว – มีสามสีที่สามารถใช้เพื่อกำหนดการแสดงผลเพิ่มเติมได้ กำหนดช่วงของสีเหล่านี้เพื่อกำหนดสีให้กับค่าที่แสดง นี่คือค่าที่อยู่หลัง Corrector โปรดทราบว่าหากคุณใช้ประเภทสถานะ คุณอาจต้องการกำหนด RED = จาก 0 ถึง 0, GREEN = จาก 1 ถึง 1 และ YELLOW = จาก 2 ถึง 2 เนื่องจากสถานะจะเป็น 1 หรือ 0 เสมอ สิ่งนี้จะป้องกันข้อมูลที่คลุมเครือและ ป้องกันไม่ให้ใช้สีเหลือง คุณสามารถเลือกสองสีใดก็ได้ที่คุณต้องการสำหรับประเภทรัฐ

Tasks Page
The TASKS page displays the automatic events that can be programmed into the SERVER. You can schedule up to 16 events in the SERVER. These are constructed as IF … THEN statements. In addition, the IF term can have 2 elements (IF a, AND/OR/NOT b … THEN c). This provides a simple to program and powerful way to take advantage of the data acquired by the SERVER. The Tasks page shows you an overview of configured tasks. You can click the dot in the State column to turn a task on or off indicated by a green dot for ON, and a red dot for OFF. To edit or create a task, click the Edit icon to the right of the task line. This will take you to the Set Schedule page detailed in the next section.

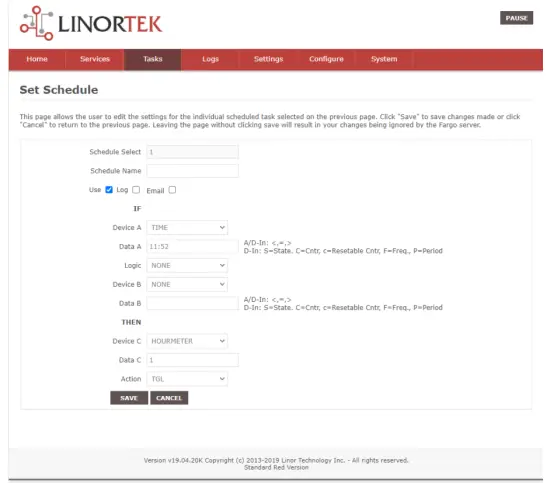
Set Schedule Page
The SET SCHEDULE page allows you to create time and logic-based events that will occur automatically if the conditions are met.
- Schedule Select – Determined by clicking on a schedule line from the previous page.
- Schedule Name – Enter a 15-character Schedule Name.
- USE – In order for a Schedule line to be active you must select the USE button. If there is an error detected in entering Schedule data, the USE box will automatically uncheck.
- บันทึก – เลือกบันทึกสำหรับรายการนี้เพื่อให้ปรากฏในบันทึกของระบบทุกครั้งที่มีการดำเนินการ
- Email – Click Email to automatically send an email when this schedule is executed.
- Device A – Select Device A for the first term in the IF statement from the drop box.
- Data A – Select Data A for the above device. Depending on the device selected, the Data used for testing may have special properties. See the list below for Data that may be entered. If an error is detected indata entry when the “Save” button is pushed, the USE box will uncheck and the Data box containing the error will be highlighted.
• Minute – Enter: mm
• Hour – Enter: hh (use 24-hour system)
• Day – Enter: dd
• DayofWeek – Enter: Sunday = 1, Monday = 2, Tuesday = 3, Wednesday = 4, Thursday = 5, Friday = 6, Saturday = 7, Weekday = 8, Weekend = 9
• Time – Enter: hh:mm (use leading zeros, seconds are ignored) (use 24 hour system) ex:07:30 or 14:05
• Date – Enter: yy/mm/dd (use leading zeros) ex: 20/01/10 for January 10, 2020
• Relay – Enter: Relay number and (+ or -), ex: 01+ for Relay 1 ON or 01- for Relay 1 OFF
• Button – Enter: + or – (for ON or OFF respectively)
• Flag – Enter: Flag number(opt.+), or Flag number (for ON or OFF respectively)
• Temp – Enter: >, = or < value; example: >40 (องศา C เสมอ)
• Volts – Enter: >, = or < value; exampเลอ: <10
• Analog – Analog input. Enter an input number and >, = or < and value. Example: 3<123 (This value is raw data value prior to any Corrector used by the input display page.)
• Digital – Digital input. Enter Input Number, Type, >, =, or < and value; example: 1F>7500 (This value is the raw data value prior to any Corrector used on the display page). Type can be (case sensitive):
• S State (On/Off)
• C Non-resettable counter
• c Resettable counter (lower case ‘c’)
• F Frequency in 1/1000 seconds
• P Period in 1/1000 seconds - ลอจิก – ตั้งค่าการเปรียบเทียบลอจิกระหว่างอุปกรณ์ A และอุปกรณ์ B
• AND – True if: Device A is true AND Device B is true
• OR – True if: Device A is true OR Device B is true
• NOT – True if: Device A is true and Device B is NOT true - Device B – Select Device B for testing from the drop box.
- ข้อมูล B – เลือกข้อมูล B สำหรับอุปกรณ์ด้านบน ขึ้นอยู่กับอุปกรณ์ที่เลือก ข้อมูลที่ใช้สำหรับการทดสอบอาจมีคุณสมบัติพิเศษ ดูรายการด้านบน.
- อุปกรณ์ C – คือสิ่งที่ต้องควบคุม
- ข้อมูล C – ตั้งค่าคุณสมบัติสำหรับอุปกรณ์ C ใช้ไวยากรณ์ดังนี้:
• RELAY – These are relays on this SERVER. You can set up to four per schedule. Enter separated by commas, for exampเลอ “1,2,3,4”
• FLAG – This is a storage flag that can be used to make more complex schedules. There are 8 flags that can be turned on or off.
• REMOTE – Refers to a remote SERVER unit. When these conditions are met, this SERVER will send a command to control a remote SERVER. The Data field for a remote unit should be in the format,
“REMOTE UNIT NUMBER, REMOTE UNIT RELAY”. For exampเลอ, “3,5”. ต้องระบุเซิร์ฟเวอร์ระยะไกลเหล่านี้ในหน้ากำหนดค่า/การกำหนดค่าอุปกรณ์ระยะไกล
• COUNTER – Adds count to digital input counter – set as 1 or 2 depending on which digital input is counting
• BLUE LED – No data.
• eMAIL – Will send eMail, no data.
• NOTIFY – Will send notification to Kodalert, set 1- 8 for Settings/Alarm Notification number. (Not Implemented) - การดำเนินการ – จะทำอย่างไรกับอุปกรณ์ C ตัวเลือกคือ:
• ON – Turns device ON
• OFF – Turns device OFF
• TGL – Toggles state of Device C
• RESET – Resets CounterR

หน้าบันทึก
The Logs tab displays over 10,000 entries from actions taken by the SERVER or by users themselves. This feature allows several actions for the convenience of displaying and collecting data from the SERVER.
- The checkboxes above the date allow the user to filter logs from different sources. To filter out logs you do not wish to see from a certain source simply uncheck the box.
- Each log has a reference number and a time and date attached in a “yyyy/mm/dd” and “hh:mm:ss” format. Afterwards is the event displayed.
- To scroll through the logs, use the arrows to the right-hand side, where the horizonal line and arrow brings you to the start or end, the double arrow moves up or down a page, and the single arrow moves up or down a single log.
- To refresh the logs manually click the REFRESH button below the Log Details.
- To download the Log Details, click the DOWNLOAD button below the Log Details, this allows you to save the logs as a separate file.
หน้าข้อมูลประจำตัวผู้ใช้และผู้ดูแลระบบ
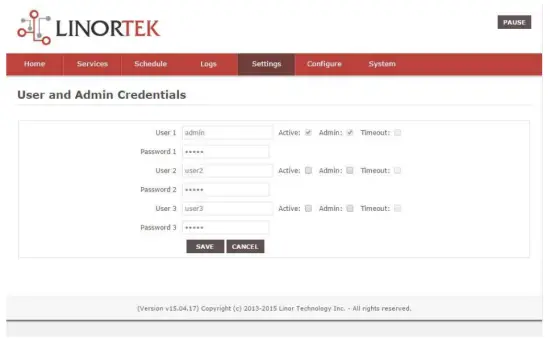
Use this page from the Settings drop down menu. Here you can set up to 3 users for your SERVER system. As a default only User 1 is Active. Here you can:
- User Name and Password – Each user has their own credentials. As a default these are set toadmin/admin, user2/user2 and user3/user3 for Users 1, 2 and 3 respectively. The passwords are never displayed. บันทึก: when you reset the password, it must be less than 13-character.
- ใช้งานอยู่ – ต้องตรวจสอบเพื่อให้ผู้ใช้รายนี้ลงชื่อเข้าใช้ คุณไม่สามารถปิดใช้งานผู้ใช้ 1 ได้
- ผู้ดูแลระบบ – มีเพียงผู้ดูแลระบบเท่านั้นที่สามารถบันทึกข้อมูลในเพจส่วนใหญ่ได้ สิ่งนี้จะช่วยปกป้องเซิร์ฟเวอร์ของคุณจากการถูกเปลี่ยนแปลงโดยบุคคลที่ไม่ได้รับอนุญาต
- หมดเวลา - ไม่ได้เปิดใช้งานในขณะนี้
หน้าเวลา/วันที่
ใช้หน้านี้จากเมนูแบบเลื่อนลงการตั้งค่า หน้านี้ใช้สำหรับตั้งค่าระบบเวลาและวันที่
- Time – Set time using an hh:mm:ss format.
- วันที่ – ตั้งค่าวันที่โดยใช้รูปแบบ ปปป/ดด/วว
- Time Zone – Set desired time zone 5 for EST, 8 for PST, you can now add a :mm for setting part hour, for example, 5:30 เป็นเขตเวลาที่ 5 ชั่วโมง 30 นาที
- ใช้เวลาออมแสง – เลือกเพื่อปรับเวลาระบบของคุณโดยอัตโนมัติในวันออมแสง (ไม่แม่นยำในทุกโซนเวลา)
- ใช้เวลา MIL – เลือกใช้รูปแบบ 24 ชั่วโมง
- Use NTP Update – Select to synchronize SERVER time with NTP server
- เอ็นทีพี Web ไซต์ – นี่คือเซิร์ฟเวอร์ NTP ที่เลือกสำหรับการอัพเดต
- ช่วงเวลา NTP - ช่วงเวลาระหว่างการอัปเดตในหน่วยนาที
- Log NTP Event – Normally NTP exceptions will be logged, select this option to Log every NTP event. (May be useful in debugging.)

หน้าการตั้งค่า
Access this page from the Settings dropdown menu. Select these settings to enable various features in the SERVER
- Use Active Main – No longer used. (Select PAUSE to go inactive.)
- ต้องเข้าสู่ระบบ - หากไม่ได้เลือก เซิร์ฟเวอร์จะอนุญาตการเข้าถึงทั้งหมดโดยไม่มีข้อมูลประจำตัว
- Use IP Ranges – Not Implemented.
- Use RESTFUL IP Ranges – Not implemented.
- Use Remote IP Ranges – Not implemented.
- ใช้การรับรองความถูกต้อง RESTful - ต้องมีชื่อผู้ใช้และรหัสผ่านสำหรับ RESTful
- ขยายช่วงรีเลย์ - เปิดใช้งานรีเลย์ 8 ตัว
- ใช้ปุ่มวิทยุรีเลย์ - หากตั้งค่าไว้ เมื่อรีเลย์ตัวหนึ่งเปิดอยู่ รีเลย์อื่นๆ ทั้งหมดจะถูกปิด
- SSL Port No. – Not supported – For future use.
- ใช้อีเมลของระบบ – เปิดใช้งานข้อความอีเมลเพิ่มเติม
- ใช้ฟาเรนไฮต์ – เลือกเซลเซียสหรือฟาเรนไฮต์
- PGM Dynamic Relays – Changes properties of relays in task schedule.
- CLR PGMs on Start – Reinitialize tasks on start up.
- RTC Temperature Compensation – All Koda boards can add Temperature and Humidity sensor.
- ใช้ AM2302 – ใช้เซ็นเซอร์อุณหภูมิและความชื้น AM2302 (แยกจำหน่าย)
- Java Report – Send data to HourCollector app over ethernet (only for IoTMeter)
- Use Metric – Not supported – For future use.
- UART Usage – Enter “Audio” for Netbell-NTG, “Clock” for Netbell clock.
- Switch Bypass (1/2) – Ignores physical inputs if set. For example, in a Koda 200 board, you want to ignore input 1 switch, check Switch Bypass 1
- Setting 19 – Not supported – For future use
- ใช้เสียง File System – Activate SD Card reader for Netbell-NTG
- WiFi Report – Enable data transfer over WiFi (WiFi IoTMeter only)
- Active Landing Page – Not supported – For future use.
- . Invert Relay Control – The relay is set to NO by default. By checking this box the relay will be inverted to NC.
- Setting 24 – Not supported – For future use.

หน้า DNS แบบไดนามิก
Access this page from the Configure dropdown menu. From this page you can assign dynamic DNS settings. This page, along with proper port forwarding through the router, can enable global access to a device behind a NAT router or firewall. You will need to assign a static IP address and port number (see Network Config Page on page 25) and port the IP address on your router (refer to your router’s user manual). An internet IP address will have to be hosted in order to access your SERVER from the internet. Currently the only IP hosting service supported is provided by DynDNS (https://dyn.com)
- ใช้ DDNS – เปิดใช้งานบริการนี้
- บริการ DDNS – เลือกบริการจากกล่องดรอปบ็อกซ์ ปัจจุบันบริการที่รองรับเพียงอย่างเดียวคือ DynDNS
- ชื่อผู้ใช้ – หมายถึงบัญชีที่ตั้งค่าไว้ที่บริการ DDNS
- รหัสผ่าน – รหัสผ่านสำหรับเข้าใช้บริการ DDNS
- Host – This is the IP name registered at the DDNS service for rerouting to this SERVER

หน้าการตั้งค่าอีเมล
ตั้งค่าบัญชีอีเมลสำหรับ SERVER เพื่อใช้ในการส่งข้อความอีเมลจากโมดูลต่างๆ เข้าถึงหน้านี้จากแท็บกำหนดค่า
บันทึก: This unit is NOT compatible with SSL/TLS, there are 3rd party SMTP delivery servers which do not require SSL and can be used. For instructions on how to use a 3rd party SMTP delivery service, please refer to Appendix 1 at the end of this manual).
- เซิร์ฟเวอร์ SMTP – ป้อนเซิร์ฟเวอร์เมลขาออกที่คุณต้องการใช้
- พอร์ต – นี่คือพอร์ตบนเซิร์ฟเวอร์นั้น คุณสามารถค้นหาบริการอีเมลของคุณทางออนไลน์เพื่อดูข้อมูลนี้รวมถึงฟิลด์การตั้งค่าอื่นๆ
- ใช้ SSL – ปล่อยว่างไว้เมื่อคุณใช้เซิร์ฟเวอร์ SMTP บุคคลที่สาม
- ชื่อผู้ใช้ – ชื่อบัญชีอีเมลของคุณ
- รหัสผ่าน – รหัสผ่านบัญชีอีเมล
- To Address – Enter up to 3 address for this email set up. An addressee, a CC and a BC.
- หัวเรื่อง – บรรทัดหัวเรื่องของหัวเรื่องอีเมล

หน้าการกำหนดค่าเครือข่าย
Access this page from the Configure dropdown menu. This page allows the configuration of the SERVER’s network settings.
คำเตือน: Incorrect settings may cause the board to lose network connectivity. In order to access a device in your network remotely you must PORT the device. This tells your router that information coming in should be sent to a specific device on your network.
- MAC Address – This is a unique MAC address that is assigned to this product at time of assembly. It cannot be altered.
- ชื่อโฮสต์ – นี่คือชื่อ Netbios ที่หน่วยนี้อาจถูกระบุในเครือข่ายบางเครือข่าย ชื่อนี้อาจปรากฏในไดเร็กทอรีเช่าของเราเตอร์ของคุณ ชื่อนี้มีประโยชน์ในการตั้งชื่อเซิร์ฟเวอร์ของคุณและปรากฏบนโฮมเพจและบน Discoverer
- หมายเลขพอร์ต – หมายเลขพอร์ตนี้จะเป็นส่วนหนึ่งของที่อยู่ IP และจำเป็นสำหรับการเข้าถึงอินเทอร์เน็ต หากไม่ได้ตั้งค่านี้ เซิร์ฟเวอร์จะตั้งค่าหมายเลขพอร์ตเป็น 80 ตามค่าเริ่มต้น
- IP Address – Typically you only change the last group of numbers. If you change this IP address make sure to reserve this IP on your router and no other devices are using this IP address or you may not be able to reach this SERVER. If this happens you may need to Restore Defaults using the push button method.
- เกตเวย์ – โดยทั่วไปคือเราเตอร์บนเครือข่าย TCP/IP ของคุณ ซึ่งทำหน้าที่เป็นจุดเชื่อมต่อกับ ISP ของคุณ
- Subnet Mask – ตัวเลข 32 บิตที่ปกปิดที่อยู่ IP และแบ่งที่อยู่ IP ออกเป็นที่อยู่เครือข่ายและที่อยู่โฮสต์ เพียงปล่อยไว้ที่ 255.255.255.0
- DNS หลัก – DNS หลัก
- DNS รอง – DNS รอง

หน้าการกำหนดค่าช่วง IP
Access this page from the Configure dropdown menu. Use these security settings to select a range of IP address that will be allowed to access the SERVER.CAUTION: Incorrect settings may cause the board to lose network connectivity. Not implemented on this SERVER.
หน้าอุปกรณ์ระยะไกล
Access this page from the Configure dropdown menu. These settings allow the SERVER to remotely control the relays on another SERVER. This is done by selecting the Remote Device in the Schedule program or by setting up a relay as a REMOTE. There are 8 possible REMOTE locations.
คำเตือน: การตั้งค่าที่ไม่ถูกต้องจะทำให้บอร์ดขาดการเชื่อมต่อระยะไกล
- ชื่ออุปกรณ์ – ป้อนชื่อข้อความสำหรับอุปกรณ์นี้เพื่อใช้อ้างอิงในอนาคต
- ที่อยู่ IP – ที่อยู่ IP ของอุปกรณ์ระยะไกลรวมถึงหมายเลขพอร์ต
- ชื่อผู้ใช้ – ใช้ในการรับรองความถูกต้องขั้นพื้นฐาน
- Password – Used in Basic Authentication.

Kodalert Page
Not Yet Implemented. Access this page from the Configure dropdown menu. Kodalert provides an interface for alerts of Internet connected devices. Kodalert is a cloud based, open platform monitoring and alert system for the Internet of Things in your physical world. Any Thing that can send an email or TCP messages including our SERVERS, other manufactures devices and people using email can use Kodalert. It can work for multiple remote locations, alert multiple users instantly using the rules you setup by text, email, smart phone Apps push notification or audible alarm instantly when something happens.
- หมายเลขแจ้งเตือน
- ทดสอบ
- ใช้
- กฎ
In the Alarm Notification page, you can change the state (on/off) of the relay by clicking the green circle in the state column. Push the EDIT icon to change the Alarm’s settings.

ข้อมูลจำเพาะ
FARGO R8G2
- 10M/100M RJ45 Internet interface with connection and activity LEDs
- 8 Relay outputs, 1FORMC 48 Volt Max (24VAC/DC 3A)
- Status LEDs (pulse, bootloader, and locate)
- Ethernet Bootloader (for server hardware code upgrade)
- PoE or 12VDC @500mA (nominal)
- Web interface w/basic authentication
- On board temperature sensor and voltage เซ็นเซอร์
Reset /Locate pushbutton (blue LED) - Working Temperature from 0 to +70 Celsius
- Storage Temperature from 40 to +125 Celsius
- Humidity from 10% to 80% noncondensing
- Dimensions 74mm x 100mm x 20mm, mounting holes 64mm x 92mm Ф 3.2mm 4 places
- โปรโตคอลที่รองรับ: HTTP/SMTP/SNTP
FARGO R4G2
- 10M/100M RJ45 Internet interface with connection and activity LEDs
- 4 1FormC relays 48 Volt Max (24VAC/DC 3A)
- 2 optically isolated digital inputs, 12V 1mA or pulldown switch selectable, 2 conductor screw terminal connectors for each.
- 2 Analog 0-5VDC Inputs 30mA 3.3VDC power source PTC protected. 3 conductor screw terminal connectors for each (3.3VDC, input, ground) (R4ADI only)
- 2 Current sensor inputs. 3.5mm stereo jack connector for each (R4ADI only)
- Status LEDs (pulse, bootloader, and locate)
- Ethernet Bootloader (for server hardware code upgrade
- POE or 12VDC @500mA (nominal)
- Web interface w/basic authentication
- On board temperature sensor and voltage เซ็นเซอร์
- Reset/Locate pushbutton
- Working Temperature from 0 to +70 Celsius
- Storage Temperature from 40 to +125 Celsius
- Humidity from 10% to 80% noncondensing
- Dimensions 74mm x 100mm x 20mm, mounting holes 64mm x 92mm Ф 3.2mm 4 places
- โปรโตคอลที่รองรับ: HTTP/SMTP/SNTP
KODA100
- 10M/100M RJ45 Internet interface with connection and activity LEDs
- 2 1-Form-A relay 48VAC@8A Max
- 2 optically isolated digital inputs, 12V 1mA or pulldown switch selectable
- Status LEDs (pulse, bootloader, and locate)
- Ethernet Bootloader (for server hardware code upgrade)
- POE or 12VDC @500mA (nominal)
- Web interface w/basic authentication
- On board temperature sensor and voltage เซ็นเซอร์
- Reset/Locate pushbutton (blue LED)
- Working temperature from 0 to +70 Celsius
- Storage temperature from 40 to +125 Celsius
- Humidity from 10% to 80% noncondensing
- ขนาด : 70มม. x 100มม. x 25มม.
- โปรโตคอลที่รองรับ: HTTP/SMTP/SNTP
KOD200
- 10M/100M RJ45 Internet interface with connection and activity LEDs
- 4 1FormA relays 48 Volt Max 1A dry contact or drive 10V ±10% 50mA to external devices
- 2 optically isolated digital inputs, 12V 1mA or pulldown switch selectable
- Status LEDs (pulse, bootloader, and locate)
- Ethernet Bootloader (for server hardware code upgrade)
- POE or 12VDC @500mA (nominal)
- Web interface w/basic authentication
- On board temperature sensor and voltage เซ็นเซอร์
- Reset/Locate pushbutton (blue LED)
- Working Temperature from 0 to +70 Celsius
- Storage Temperature from 40 to +125 Celsius
- Humidity from 10% to 80% noncondensing
- ขนาด : 70มม. x 100มม. x 25มม.
- โปรโตคอลที่รองรับ: HTTP/SMTP/SNTP
เค้าโครงอ้างอิงของบอร์ด
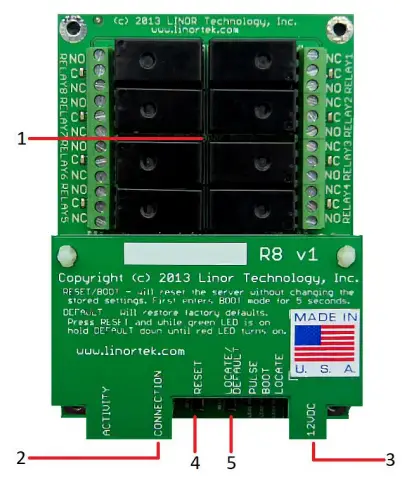
Fargo R8
- 8 Relay outputs, 1FORMC 48 Volt Max (24VAC/DC 3A)
- ขั้วต่อ RJ45
- ขั้วต่อเพาเวอร์ (12VDC)
- ปุ่มรีเซ็ต
- ค้นหาปุ่ม
Fargo R4
- 3.5mm Inputs for AC Current Sensor (R4ADI Only)
- Analog Inputs (R4ADI Only)
- 4 Relay outputs, 1FORMC 48 Volt Max (24VAC/DC 3A)
- อินพุตดิจิตอล
- Digital Input Switches (Input 1 on right.
Up: Pullup, Down: Isolated) - ขั้วต่อ RJ45
- ปุ่มรีเซ็ต
- ค้นหาปุ่ม
- ขั้วต่อเพาเวอร์ (12VDC)

โคดา 100
- Digital Inputs (#1 on the left) 5VDC-48VDC (12VDC-48VDC must use the external resistor)
- Relay Outputs (#1 is on the right) 8A@48VAC Max
- Digital Input Switches (IN 1 on left. UP: Isolated, Down: Pullup)
- ปุ่มรีเซ็ต
- ปุ่มโหลดซ้ำ (เปิดไฟ LED สีฟ้า – ระบุบน Discoverer)
- ขั้วต่อ RJ45
- ขั้วต่อเพาเวอร์ (12VDC)
- ขั้วต่อ USB ขนาดเล็กสำหรับเซ็นเซอร์อุณหภูมิ/ความชื้น (แยกจำหน่าย)

โคดา 200
- Digital Inputs (#1 on the left) 5VDC-48VDC (12VDC-48VDC must use the external resistor)
- Relay Outputs (#1 is on left) 48 Volt Max 1A dry contact or drive 10V ±10% 50mA
- Digital Input Switches (IN 1 on left. UP: Isolated, Down: Pullup)
- Relay Switches (Up for dry contact, down for 10V/50mA)
- ปุ่มรีเซ็ต
- ปุ่มโหลดซ้ำ (เปิดไฟ LED สีฟ้า – ระบุบน Discoverer)
- ขั้วต่อ RJ45
- ขั้วต่อเพาเวอร์ (12VDC)
- ขั้วต่อ USB ขนาดเล็กสำหรับเซ็นเซอร์อุณหภูมิ/ความชื้น (แยกจำหน่าย)

รีเซ็ตเป็นค่าโรงงาน
To perform a factory Reset, push the Reset button. When the green LED turns on, push and hold the Reload button until the flashing red LED turns off and then turns on solid. Refer to Board Reference Layout section for the button locations on your device.
This user-manual supplements the documentation for the following Linortek products:
- เน็ตเบล-2
- เน็ตเบล-8
- Netbell-K (and variants)
- iTrixx-NHM
For more information, documentation and how-to videos, visit https://www.linortek.com/downloads/
เอกสารนี้สามารถพบได้ที่ www.linortek.com/downloads/documentations/
หากคุณต้องการความช่วยเหลือเกี่ยวกับอุปกรณ์ของคุณ โปรดไปที่ www.linortek.com/technical-support
ไลเนอร์ เทคโนโลยี อิงค์
ข้อมูลอาจเปลี่ยนแปลงได้โดยไม่ต้องแจ้งให้ทราบ
ภาคผนวก 1
วิธีการส่งอีเมล SSL โดยใช้บริการ SMTP บุคคลที่สามสำหรับอุปกรณ์ Linortek Fargo และ Koda
ตามค่าเริ่มต้น อุปกรณ์ Koda/Fargo จะใช้เซิร์ฟเวอร์อีเมลที่ไม่ใช่ SSL SMTP แต่เซิร์ฟเวอร์อีเมลส่วนใหญ่ในปัจจุบันได้เปลี่ยนไปใช้โปรโตคอลความปลอดภัย SSL มีเซิร์ฟเวอร์การส่ง SMTP บุคคลที่สามซึ่งไม่ต้องการ SSL และสามารถใช้ได้ มีผู้ให้บริการอีเมล SMTP จำนวนมากในตลาด เราใช้ SMTP3GO เป็นอดีตampเพื่อแสดงขั้นตอนการตั้งค่า SMTP2GO ใช้งานได้ฟรีกับอีเมลมากถึง 1000 ฉบับ/เดือน หากต้องการใช้ SMTP2GO โปรดไปที่: https://www.smtp2go.com/ .
ขั้นตอนที่ 1 สร้างบัญชี SMTP2GO
ในการสร้างบัญชี เพียงคลิกที่ "ลงทะเบียน" เลือก "อีเมล 1K" ตามมาตราส่วน และเลือก "แผนฟรี" (หากคุณต้องการส่งอีเมลมากกว่า 1000 ฉบับต่อเดือน ให้เลือกแผนที่ตรงกับความต้องการของคุณ)

ในการสร้างบัญชีบน SMTP2GO จำเป็นต้องใช้ที่อยู่อีเมลของบริษัท บริการอีเมลฟรี เช่น Gmail หรือ Yahoo จะไม่ยอมให้คุณดำเนินการต่อ หลังจากเปิดใช้งานบัญชี SMTP2GO ของคุณ คุณต้องเพิ่มผู้ใช้
ขั้นตอนที่ 2 เพิ่มผู้ใช้
ผู้ใช้ที่คุณสร้างบน SMTP2GO จะเป็นเซิร์ฟเวอร์อีเมลขาออกเมื่อคุณตั้งค่าอุปกรณ์ Fargo/Koda เพื่อส่งรายงานทางอีเมล โปรดตรวจสอบให้แน่ใจว่าเซิร์ฟเวอร์อีเมลของบริษัทของคุณจะไม่บล็อกอีเมลหากคุณใช้บัญชีอีเมลฟรี เช่น Yahoo หรือ Gmail เพิ่มผู้ใช้ที่นี่
เข้าสู่ระบบบัญชี SMTP2GO ของคุณ ที่เมนูด้านซ้าย เลือก "การตั้งค่า" > "ผู้ใช้ SMTP" คลิกที่ "เพิ่มผู้ใช้ SMTP" และกรอกแบบฟอร์ม
 หลังจากที่เพิ่มผู้ใช้ในบัญชี SMTP2GO แล้ว ระบบจะแสดงข้อมูลที่คุณต้องการเพื่อตั้งค่าการแจ้งเตือนทางอีเมลบนอุปกรณ์ Fargo/Koda ของคุณ

ขั้นตอนที่ 3 กำหนดค่าอุปกรณ์ Linortek
หลังจากที่คุณสร้างบัญชีและเพิ่มผู้ใช้แล้ว ให้เข้าสู่ระบบอุปกรณ์ Linortek ของคุณ ไปที่หน้ากำหนดค่า – ตั้งค่าอีเมล เพื่อตั้งค่าการแจ้งเตือนทางอีเมล:
- เซิร์ฟเวอร์ SMTP – ป้อนเซิร์ฟเวอร์อีเมลขาออกที่คุณต้องการใช้ นั่นคือ mail.smtp2go.com ในอดีตของเราampเล.
- พอร์ต – นี่คือพอร์ตบนเซิร์ฟเวอร์นั้น พอร์ต SMTP คือ 2525 ในex .ของเราampเล.
- ใช้ SSL – ปล่อยว่างไว้เมื่อคุณใช้เซิร์ฟเวอร์ SMTP บุคคลที่สาม
- ชื่อผู้ใช้ – ชื่อผู้ใช้จาก SMTP2GO เมื่อเราสร้างผู้ใช้ในขั้นตอนก่อนหน้า
- รหัสผ่าน – รหัสผ่านของผู้ใช้จาก SMTP2GO เมื่อเราสร้างผู้ใช้ในขั้นตอนก่อนหน้า
- To Address – ป้อนที่อยู่สำหรับตั้งค่าอีเมลนี้ได้สูงสุด 3 รายการ ผู้รับ CC และ BC
- หัวเรื่อง – บรรทัดหัวเรื่องของหัวเรื่องอีเมล
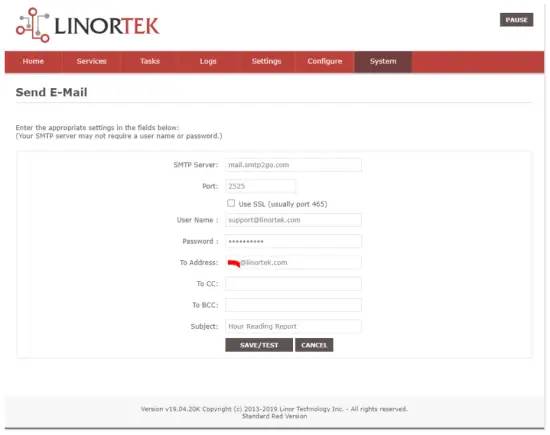
ทันทีที่คุณกด "บันทึก/ทดสอบ" อุปกรณ์จะส่งอีเมลทดสอบโดยอัตโนมัติ โปรดตรวจสอบโฟลเดอร์ Junk/Other หากไม่พบในโฟลเดอร์ Inbox
ขั้นตอนที่ 4 ตั้งค่างานสำหรับการแจ้งเตือนทางอีเมลอัตโนมัติ
You should be able to receive email notifications for various events from the Fargo/Koda boards at this point. If you need to receive condition logic notification, you can use our condition logic configuration to setup such report. To setup the logic condition report notification, go to Tasks page on your Fargo/Koda device, click the Edit icon of a Schedule. For details of how to create a logic-based event, please refer to the Set Schedule Page on the Fargo/Koda User Manual, which can be downloaded here:
https://www.linortek.com/download/fargo%20g2_koda%20downloads/fargo%20g2_koda%20documentation/Fargo-G2-and-Koda-User-Manual.pdf
ในนี้สample เราจะใช้อุปกรณ์ Network Hour Meter เป็นตัวอย่างampสำหรับวิธีรับรายงานทางอีเมลทุกวันเวลา 11:52 น.
ทันทีที่ตรงตามเงื่อนไขทั้งหมดของงาน คุณจะได้รับอีเมลต่อไปนี้:
Hour Reading Report
![]() support@linortek.com
support@linortek.com
Mon 4/11/2022 11:52 AM
To: Liyu Nalven
HM 1, my machine, is at 000242.01 hrs.
Reply Forward
![]()
เอกสาร / แหล่งข้อมูล
 |
ลิโนเทค ฟาร์โก จี2 TCP/IP Web ตัวควบคุมรีเลย์แบบใช้พื้นฐาน [พีดีเอฟ] คู่มือการใช้งาน Fargo G2, Koda, Fargo G2 TCP-IP Web Based Relay Controller, Web Based Relay Controller, Based Relay Controller, Relay Controller |