![]() Fargo G2 and Koda User Manual
Fargo G2 and Koda User Manual
www.linortek.com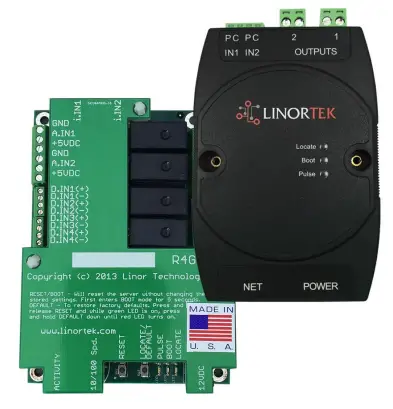 For Fargo G2, Koda
TCP/IP Web Cuntrollore di relè basatu annantu à u
Rev C 04/2022
Fargo G2 TCP/IP Web Cuntrollore di relè basatu annantu à u
Thank you for purchasing a Linortek Fargo G2 or Koda TCP/IP Controller. There are many devices that can be controlled by the FARGO/KODA Web Relay Controller. FARGO/KODA Web Controller can be used in such applications as (but not limited to): Lights, security, sprinkler systems, access control, industrial equipment, building automation, HVAC, and many more. Please refer to the Board Reference Layouts on page 29 for input and output specifications on your controller to verify they are suitable to your needs.
Stu manuale copre:
- FARGO R8 G2
- FARGO R4DI G2
- FARGO R4ADI G2
- KODA 100
- KODA200
These will be referred to as SERVER hereafter. When there are differences or additional features they will be noted in the text.
Per video istruttivi, FAQ è informazioni di cuntattu per u nostru squadra di supportu tecnicu, visitate: https://www.linortek.com/technical-support
LINORTEK GARANTIA LIMITATA DI UN ANNU
Consumer law: For consumers who are covered by consumer protection laws or regulations in their country of residence (“Consumer Law”), the benefits provided in this Linortek One-Year Limited Warranty (“Linortek Limited Warranty”) are in addition to and not instead of the rights provided by Consumer Law and it does not exclude, limit or suspend your rights arising from Consumer Law. You should consult the proper authorities in your country of residence for further information about these rights
L'obblighi di garanzia di Linortek per stu pruduttu hardware ("Prodottu") sò limitati à i termini stabiliti quì sottu:
Linor Technology, Inc. (“Linortek”) warrants this product against defects in materials and workmanship for a period of ONE (1) YEAR from the date of retail purchase by the original end-user purchaser (“Warranty Period”) when used in accordance with the operating instructions. A copy of a retail receipt is required as proof of purchase. If a hardware defect arises and a valid claim is received within the Warranty Period, at its option and to the extent permitted by law, Linortek will either (1) repair the hardware defect at no charge, using new or refurbished replacement parts, (2) exchange the product with a product that is new or which has been manufactured from new or serviceable used parts and is at least functionally equivalent to the original product, or (3) refund the purchase price of the product. When a refund is given, the product for which the refund is provided must be returned to Linortek and becomes Linortek’s property.
La garantie qui précède est assujettie à (i) réclamation écrite prompte de l'Acheteur et (ii) fourniture en temps opportun à Linortek d'une occasion d'inspecter et de tester le Produit réclamé défectueux. Tale ispezione pò esse in i locali di u Cumpratore è / o Linortek pò dumandà u ritornu di u Prodottu à spese di u Cumpratore. Tuttavia, Linortek ùn serà micca rispunsevule per l'imballu, l'ispezione o i costi di travagliu in cunnessione cù u ritornu di u pruduttu. Nisun pruduttu serà accettatu per u serviziu di garanzia chì ùn hè micca accumpagnatu da un numeru d'Autorizazione di Ritornu di Merchandise (RMA#) emessu da Linortek.
ESCLUSIONI E LIMITAZIONI
Questa Garanzia Limitata esclude i danni derivanti da abusu, misu, negligenza, incendi o altre cause esterne, accidenti, mudificazioni, riparazioni o altre cause chì ùn sò micca difetti in i materiali è a manufatti. U software distribuitu da Linortek cù o senza u nome di marca Linortek cumpresu, ma micca limitatu à u software di u sistema ("Software") ùn hè micca coperto da questa Garanzia Limitata. U vostru usu è i diritti assuciati cù u Software sò guvernati da l'Accordu di Licenza di l'Usuariu Finale di Linortek chì pudete truvà quì: https://www.linortek.com/end-user-licenseagreement/. Linortek ùn hè micca rispunsevule per i danni derivanti da a mancanza di seguità l'istruzzioni relative à l'usu di u pruduttu. Per assicurà a cunfurmità cù e limitazioni di u funziunamentu, u Cumpratore deve riferite à u manuale di struzzioni [furnitu cù u pruduttu]. Batterie ùn sò micca incluse in a Garanzia.
À LA MASSIMA MESSA PERMESSA, QUESTA GARANZIA LIMITATA È I RIMEDI DESCRITTI SOPRA SONT ESCLUSIVI E IN LUOGO DI TUTTE L'ALTRE GARANZIE, RIMEDI E CONDIZIONI, E LINORTEK DECLINA SPECIFICAMENTE TUTTE LE GARANZIE STATUTARI O IMPLICITE, LE GARANZIE LIMITATE, LE GARANZIE LIMITATE, LE GARANZIE LIMITATE, LE GARANZIE LIMITATE IDONETE PER UN PUBLIC PARTICULARI, NON-INFRING. QUANTU TALI GARANZIE NON POSSONO ESSERE DECLINATE, TALI GARANZIE SERRANNO LIMITATE IN DURATA A DURATA DI A GARANZIA LIMITATA DI LINORTEK E U RIMIDURU SERA LIMITATA À A REPARAZIONE, SOSTITUZIONE O RIMBORSO COME DETERMINATA DA LINORTEK. IN A SOLA DISCREZIONE. ALCUNI STATI (PAESI E PROVINCIA) NON PERMETTENU LIMITAZIONI SULLA TEMPA UNA GARANTIA O CONDIZIONE IMPLICITA POSSIBILE DURARE, PER QUE E LIMITAZIONI DESCRITTE SOPRA POSSIBILI NON APPLICATE A VOI. STA GARANTIA TI DONNA DIRITTI LEGALI SPECIFICI, È POTETE ANCHE AVERI DIRITTI CHE VARIAN DA STATI A STATI (O PER PAESE O PROVINCIA). STA GARANTIA LIMITATA HÈ GUVERNATA DA E CONSTRUITA SOTTU A LEGI DI I STATI UNITI.
Disclaimers
- Leghjite l'Istruzzioni - Leghjite tutte l'istruzzioni di sicurezza è di funziunamentu prima di usà u pruduttu.
- Mantene l'istruzzioni - Mantene l'istruzzioni di sicurezza è di funziunamentu per riferimentu futuru.
- Heed Warnings - Aderite à tutti i avvisi nantu à u pruduttu è in l'istruzzioni di u funziunamentu.
- Segui l'istruzzioni - Segui tutte l'istruzzioni di u funziunamentu è l'usu.
- Pulizia - Scollega u pruduttu da a putenza prima di pulisce. Ùn aduprate micca detergenti liquidi o pulitori aerosol. Utilizà l'annunziuamp tela solu per a pulizia di l'involucro.
- Attachments - Ùn aduprate micca annessi salvu chì sò specificamente cunsigliatu da Linortek. L'usu di accessori incompatibili o altrimenti inadatti pò esse periculosu.
- Accessori - Ùn mette micca stu pruduttu nantu à un stand inestable, tripode, supportu o muntagna. U pruduttu pò cascà, causannu ferite seriu à una persona è dannu seriu à u pruduttu. Aduprà solu cù un stand, tripode, supportu, o muntagna cunsigliatu da u fabricatore, o vendutu cù u pruduttu. Segui l'istruzzioni di u fabricatore quandu monte u pruduttu, è utilizate solu l'accessori di muntatura cunsigliatu da u fabricatore. Attenti quandu utilizate una combinazione di l'apparechju è u carrettu. Arrestamenti rapidi, forza eccessiva è superfici irregolari ponu causà a cumminazione di l'apparechju è u carrettu.
- Ventilazione - Apertura in l'involucro, se ci hè, sò furnite per a ventilazione è per assicurà un funziunamentu affidabile di u pruduttu è per pruteggià da u surriscaldamentu. Ùn bluccà o copre queste aperture. Ùn mette micca stu pruduttu in una installazione integrata, salvu chì una ventilazione curretta ùn hè furnita o chì l'istruzzioni di Linortek sò state rispettate.
- Fonti d'energia - Operate stu pruduttu solu da u tipu di fonte di energia indicata in u manuale d'istruzzioni o nantu à l'etichetta di u produttu.
Se ùn site micca sicuru di u tippu di alimentazione chì pensa à aduprà, cunsultate u vostru rivenditore di l'apparechju o a cumpagnia di energia lucale - basta chì l'usu di qualsiasi tipu di fonte di energia diversa da quella indicata in u manuale d'istruzzioni o l'etichetta di marcatura annullerà ogni garanzia. Per i prudutti destinati à funziunà da l'energia di a bateria, o altre fonti, riferite à l'istruzzioni di u funziunamentu [inclusi cù u pruduttu]. - Messa à terra o polarizazione - Stu pruduttu pò esse equipatu di un plug in corrente alternata polarizzata (un plug chì hà una lama più larga di l'altru). Stu plug si mette in a presa di corrente solu un modu. Questa hè una funzione di sicurità. Se ùn pudete micca inserisce u plug cumpletamente in a presa, pruvate à invierte u plug. Se u plug ùn si mette sempre, hè perchè a vostra presa hè incompatibile cù u plug. Cuntattate u vostru electricista per rimpiazzà a vostra presa cù una cumpatibile. Ùn forzà micca u plug à mette in una presa incompatibile o altrimenti pruvate à scunfighja u scopu di sicurezza di u plug. In alternativa, stu pruduttu pò esse equipatu cun un plug di 3 fili à terra, un plug chì hà un terzu pin (di messa a terra). Stu plug si mette solu in una presa di corrente di tippu di terra. Questa hè una funzione di sicurità. Ùn forzà micca u plug à mette in una presa incompatibile o altrimenti pruvate à scunfighja u scopu di sicurezza di u plug. Se a vostra presa hè incompatibile cù u plug, cuntattate u vostru electricista per rimpiazzà a vostra presa cù una cumpatibile.
- Prutezzione di u Cord di Alimentazione - Instrada i cordi di l'alimentazione in modu chì ùn sia micca prubabilmente marchjatu o pizzicatu da l'articuli posti sopra o contr'à elli, fendu una attenzione particulari à i cordi è i tappi, i recipienti di cunvenzione, è u puntu induve i cordi escenu da l'apparechju. .
- Linee elettriche - Ùn mette micca un sistema all'apertu in ogni locu vicinu à e linee elettriche sopraelevate o altre luci elettriche o circuiti di energia, o induve pò cascà in tali linee elettriche o circuiti. Quandu si stallanu un sistema esterno, aduprate una cura estrema per impediscenu di toccu tali linee elettriche o circuiti chì u cuntattu cù elli puderia esse fatale.
- Overloading - Ùn sovraccaricate i punti di vendita è i cordoni di estensione perchè questu pò causà focu o scossa elettrica.
- Ingressu di l'ughjettu è di u liquidu - Ùn spinghje mai oggetti di ogni tipu in stu pruduttu attraversu aperture perchè ponu toccu volti periculosi.tage punti o parti curtite chì ponu causà incendi o scossa elettrica. Ùn mai versà liquidu di ogni tipu nantu à u pruduttu.
- Manutenzione - Ùn pruvate micca di riservà stu pruduttu sè stessu, postu chì l'apertura o l'eliminazione di i coperchi pò esse espunutu à volti periculosi.tage o altri periculi. Riferite tutti i servizii di serviziu di u pruduttu à Linortek.
- Dannu chì richiede u serviziu - Scollega u pruduttu da a presa è riferite u serviziu à l'Assistenza Clienti Linortek in e seguenti cundizioni:
a. Quandu u cordone di alimentazione o u plug hè dannatu.
b. Se u liquidu hè stata spulsata, o l'uggetti sò cascati nantu à u pruduttu.
c. Se u pruduttu hè statu espostu à a pioggia o à l'acqua.
d. Se u pruduttu ùn funziona micca nurmale seguitu l'istruzzioni di u funziunamentu [inclusi cù u pruduttu]. Aghjustate solu quelli cuntrolli chì sò cuparti da l'istruzzioni di u funziunamentu, cum'è un aghjustamentu impropriu di altri cuntrolli pò risultà in danni è spessu necessitanu un travagliu estensivu da un tecnicu qualificatu per restaurà u pruduttu à u so funziunamentu normale.
e. Se u pruduttu hè statu abbandunatu o u cabinet hè statu dannighjatu.
f. Se u pruduttu mostra un cambiamentu distintu in u rendiment. - Replacement Parts - Se i pezzi di sustituzione sò necessarii, avè un Low-Voltage L'électricien les remplacera à l'aide d'une seule pièce spécifiée par le fabricant. Sustituzioni micca autorizate ponu esse u focu, scossa elettrica o altri periculi. I pezzi di rimpiazzamentu ponu esse truvati à https://www.linortek.com/store/
- Verificazione di Sicurezza - Dopu à a fine di qualsiasi serviziu o riparazione di stu pruduttu, dumandate à u tecnicu di serviziu di fà cuntrolli di sicurezza per stabilisce chì u pruduttu hè in cundizione operativa curretta.
- Coax Grounding - Se un sistema di cable esterno hè cunnessu à u pruduttu, assicuratevi chì u sistema di cable hè in terra. Modelli USA solu-Section 810 di u National Electrical Code, ANSI / NFPA No.70-1981, furnisce infurmazioni in quantu à a messa à terra curretta di a muntagna è a struttura di supportu, a messa in terra di u coaxial à un pruduttu di scaricamentu, a dimensione di i cunduttori di terra, u locu. di u pruduttu di scaricamentu, a cunnessione à l'elettrodi di terra, è i requisiti per l'elettrodu di terra.
- Lightning - Per una prutezzione supplementaria di stu pruduttu durante una tempesta di fulmini, o prima di lascià inutilmente è inutilizatu per longu periodi di tempu, scollegallu da a presa di u muru è disconnect u sistema di cable. Questu impediscenu i danni à u pruduttu per via di i lampi è di e surge di a linea elettrica.
- Usu all'apertu - Stu pruduttu ùn hè micca impermeabile è ùn deve esse permessu di bagnà. Ùn espone micca à a pioggia o à altri tipi di liquidu.
Ùn lasciate micca fora di a porta per a notte perchè a condensazione pò accade. - Mentre cambiate batterie, fusibili o manighjà un pruduttu à livellu di bordu, fate attenzione à scariche elettrostatiche chì ponu dannà i dispositi elettronici. Hè megliu aduprà un bancu di serviziu di l'elettronica in terra. Se questu ùn hè micca dispunibule, pudete scaricate toccu un attellu metallicu o una pipa. Mentre cambiate e batterie o i fusibles, ùn toccate i) i fili altri chì i fili di a batteria è ii) u circuitu stampatu.
LIMITAZIONE DI RESPONSABILITÀ
IN NO EVENT WILL LINOR TECHNOLOGY BE LIABLE, WHETHER IN CONTRACT, TORT, OR OTHERWISE, FOR ANY INCIDENTAL, SPECIAL, INDIRECT, CONSEQUENTIAL OR PUNITIVE DAMAGES, INCLUDING, BUT NOT LIMITED TO, DAMAGES FOR ANY LOSS OF USE, LOSS OF TIME, INCONVENIENCE, COMMERCIAL LOSS, OR LOST PROFITS, SAVINGS, OR REVENUES TO THE FULL EXTENT SUCH MAY BE DISCLAIMED BY LAW. DISCLAIMER FOR CRITICAL APPLICATIONS
Stu pruduttu ùn hè micca destinatu o autorizatu per un pruduttu di sustegnu di vita o per altri usi per i quali un fallimentu puderia causà ferite persunale o morte. Se voi o i vostri clienti usanu o permettenu l'usu di stu pruduttu per tali usi micca intenzionati o micca autorizati, accettate di indemnizà cumplettamente Linor Technology è i so affiliati, è l'ufficiali, l'impiegati è i distributori di ognuna, da ogni responsabilità ligata à tali usu, cumprese onorari e spese di avvocati.
ULTERIOR AVVISU PER A LIMITAZIONE D'USU
A menu chì ùn hè specificamente dichjaratu, i nostri prudutti ùn sò micca pensati per cambià a linea voltage (110V è sopra) dispusitivi. Per cuntrullà u dispusitivu chì operanu à linea voltagHè un electricista qualificatu DEVE installà un dispositivu intermediariu cum'è un relay. Quandu sceglie i dispusitivi à cuntrullà, hè megliu à sceglie vol bassutage cuntrolli cum'è un solenoide 24VAC à u cuntrollu di u flussu d'acqua. Solu elettricisti qualificati ponu cablare una linea voltage dispusitivu. Inoltre, i codici lucali devenu esse seguiti cumpresi, ma senza limitazione, a dimensione di calibre di filu è l'alloghju adattatu. Linortek ùn assume micca rispunsabilità per dannu à l'utilizatori o terze parti per l'usu impropriu di i nostri Prodotti. Sta responsabilità resta cù l'utilizatori. Linortek ùn assume micca rispunsabilità per i danni à u dispusitivu per via di l'usu impropriu di i nostri Prodotti.
RELÈ VOLTAGE SPECIFICATIONS
Per piacè aduprate cun prudenza quandu cunnetta i dispositi à i circuiti elettrici o altri equipaghji. Questu web U controller ùn hè micca pensatu per cunnette à qualsiasi voltage greater than 48V. Utilizing this arrangement, should allow you to virtually control anything. It is important that you use licensed electricians and comply with electrical codes that are applicable to your location. These codes exist for your safety, as well as the safety of others. Linortek assumes no responsibility for any harm or damage resulting from a failure adhere to local laws, ordinances or regulations or failure to follow specified instructions for installation and product usage.
Accordu di Licenza di l'Usuariu Finale per u Software è a Documentazione Linortek
Questu Accordu di Licenza d'Usuariu Finale ("EULA") hè un accordu legale trà VOI (una persona o una sola entità) è Linor Technology, Inc. ("Linortek" o "noi" o "noi") chì guverna u vostru usu di u software. è a documentazione ("Software") integrata o assuciata cù a serie di prudutti Fargo, Koda, Netbell, IoTMeter è iTrixx ("Produtti Linortek").
Stu EULA ùn guverna micca u vostru usu di u Linortek websitu o i Prodotti Linortek (esclusu u Software). U vostru usu di u Linortek webu situ hè guvernatu da Linortek webi termini di serviziu di u situ è a pulitica di privacy di Linortek chì si trova à:
http://www.linortek.com/terms-and-conditions [A vostra compra di Prodotti Linortek (escludendu u Software) hè guvernata da a garanzia limitata Linortek, chì pò esse truvata in https://www.linortek.com/linortek-one-year-limited-warranty/
This EULA governs your access and use of the Software. This EULA gives you specific legal rights, and you may also have other legal rights in addition, which vary from jurisdiction to jurisdiction. The disclaimers, exclusions, and limitations of liability under
this EULA will not apply to the extent prohibited or limited by applicable law. Some jurisdictions do not allow the exclusion of implied warranties or the exclusion or limitation of incidental or consequential damages or other rights, so those provisions of this EULA may not apply to you.
Installendu, accede, copià è / o utilizendu u Software o a documentazione accettate di esse ligatu da i termini è e cundizioni di stu EULA in nome di sè stessu o di l'entità chì rapprisente in cunnessione cù tale installazione, accessu, copia è / o usu. Ripresentate è garantite chì (i) avete u dirittu, l'autorità è a capacità d'accettà è d'accettà i termini di stu EULA in nome di sè stessu o di l'entità chì rapprisenta (ii) avete l'età legale sufficiente in a vostra ghjuridizione di residenza. , (iii) ùn site micca situatu in un paese chì hè sottumessu à un embargo di u Guvernu di i Stati Uniti, o chì hè statu designatu da u Guvernu di i Stati Uniti cum'è un "paese di sustegnu di u terrorista"; è (ii) ùn avete micca listatu in alcuna lista di u guvernu di i Stati Uniti di partiti pruibiti o ristretti.
Se ùn vulete micca esse ligatu da i termini di stu EULA, ùn pudete micca installà, accede, copià o aduprà u Software in ogni modu (sia o micca preinstallatu in un dispositivu chì avete acquistatu).
- Usu permessu di Software / Licenza di Software.
Sughjettu à i termini di stu EULA, Linortek vi cuncede un dirittu limitatu, revocabile, micca esclusivu, non sublicensable, non trasferibile è una licenza per (a) scaricà, installà è eseguisce una copia di u Software, in forma di codice d'ughjettu eseguibile. solu, solu nantu à u Prodottu Linortek chì pussede o cuntrolla è per (b) aduprà u Software solu in cunnessione cù u Prodottu Linortek in cunfurmità cù u so usu destinatu cum'è deskrittu nantu à u Linortek. websitu (ognuna di 1 (a) è 1 (b) un "Usu permessu" è cullettivu "Usi permessi"). - Restrizioni à u vostru Usu di u Software.
Accettate micca, è micca permette à l'altri di utilizà u Software per qualsiasi scopu altru ch'è l'Usi Permessi descritti in a Sezione 1 sopra. Questu significa, trà altre cose, ùn pudete micca:
(a) edità, altere, mudificà, adattà, traduzzione, fà opere derivate, smontate, ingegneria inversa o compilazione inversa di qualsiasi parte di u Software (eccettu in a misura chì e leggi applicabili pruibiscenu in particulare tali restrizioni per scopi di interoperabilità, in quale casu accettate per cuntattà prima Linortek è furnisce Linortek l'uppurtunità di creà tali cambiamenti chì sò necessarii per scopi di interoperabilità);
(b) licenzia, assignà, distribuisce, trasmette, vende, affittu, ospitu, outsourcing, divulgate o altrimenti aduprà u Software per qualsiasi scopu cummerciale o rende Software dispunibule à qualsiasi terzu;
(c) permette à qualsiasi terzu di utilizà u Software in nome di o per u benefiziu di qualsiasi terzu;
(d) aduprate ogni parte di u Software in qualsiasi dispositivu o computer altru ch'è u Prodottu Linortek chì avete o cuntrullate;
(e) aduprà u Software in ogni modu chì viola qualsiasi lege locale, naziunale o internaziunale applicabile; o
(f) remove or alter any labels, symbols, legends or proprietary notices, including but not limited to any copyright, trademark, logo in the Software. You may not disclose the results of any performance or functional evaluation of anyof the Software to any third party without the prior written consent of Linortek for each such release. - Aghjurnamenti.
Linortek pò di tantu in tantu sviluppà aghjurnamenti, aghjurnamenti, patches, correzioni di bug è altre mudificazioni ("Aggiornamenti") per migliurà u rendiment di u Software. Salvu chì altrimenti furnitu nantu à u Linortek websitu, sti Updates vi sarà furnitu gratuitamente. Queste aghjurnamenti ponu esse installati automaticamente senza avvisu. Utilizendu u Software, accunsentite ancu à l'aghjurnamenti automatichi. Se ùn avete micca d'accordu à questu ùn pudete micca installà, accede, copià o aduprà u Software in ogni modu. - Pruprietà.
The Software is licensed to you and not sold. Linortek reserves all rights to the Software and any Updates not expressly granted herein. The Software and Linortek Products are protected by copyright, trademark and other intellectual property laws andtreaties. Linortek and its licensors own the title, copyright, trademarks and other intellectual property rights in the Software.
You are not granted any rights to Linortek’s trademarks or service marks. There are no implied licenses in this EULA. - Terminazione.
This EULA is effective from the date you first use the Software and will continue for as long as you own the Linortek Product associated with it or until you or Linortek terminate this agreement under this section. You may terminate this EULA at any time upon written notice to Linortek at the address provided below. Linortek may terminate this EULA at any time if you fail to comply with any of the terms in this agreement. The license granted in this EULA terminates immediately when the agreement terminates. Upon termination, you must stop using the Linortek Product and the Software and you must delete all copies of the
Software. The terms of Sections 2 will still remain in effect after the agreement terminates. - Disclaimer di Garanzia.
EXTENT PERMITTED BY APPLICABLE LAW, LINORTEK PROVIDES THE SOFTWARE “AS-IS” AND DISCLAIMS ALL WARRANTIES AND CONDITIONS, WHETHER EXPRESS, IMPLIED, OR STATUTORY, INCLUDING THE WARRANTIES OF MERCHANTABILITY, FITNESS FOR A PARTICULAR PURPOSE, TITLE, QUIET ENJOYMENT, ACCURACY, AND NON-INFRINGEMENT OF THIRD-PARTY RIGHTS. LINORTEK DOES NOT GUARANTEE ANY SPECIFIC RESULTS FROM THE USE OF THE SOFTWARE. LINORTEK MAKES NO WARRANTY THAT THE SOFTWARE WILL BE UNINTERRUPTED, FREE OF VIRUSES OR OTHER HARMFUL CODE, TIMELY, SECURE, OR ERROR-FREE. YOU USE THE SOFTWARE AND THE LINORTEK PRODUCT AT YOUR OWN DISCRETION AND RISK. YOU WILL BE SOLELY RESPONSIBLE FOR (AND LINORTEK DISCLAIMS) ANY AND ALL LOSS, LIABILITY, OR DAMAGES RESULTING FROM YOUR USE OF THE SOFTWARE
AND LINORTEK PRODUCT. - Limitazione di Responsabilità.
Nunda in questu EULA è in particulare in questa clausola di "Limitazione di Responsabilità" ùn pruverà à escludiri a responsabilità chì ùn pò micca esse esclusa da a lege applicabile.
NELLA MASSIMA MESSA PERMESSA DA A LEGGE APPLICABILE, IN OLTRE A ESCLUSIONI DI GARANZIA SOPRA, IN NESSUN CASU (A) LINORTEK SERA RESPONSABILE PER QUALSIASI DANNI CONSEGUENTI, ESEMPLARI, SPECIALI O INCIDENTALI, INCLUSI DANNI, DANNI PER PERDITA. DA O RELATIVI À I PRODOTTI O U SOFTWARE, ANCHE SE LINORTEK SAVA O AVERIA AVERA SUSCUTU DI A POSSIBILITÀ DI TALI DANNI, È (B) A RESPONSABILITÀ CUMULATA TOTALE DI LINORTEK DERIVATA DA O RELATA À I PRODOTTI, CONTRACT E SOFTWER SARÀ LIMITATA À UNA QUANTITÀ MAI SUPERA L'IMPORTU VERAMENTE PAGATA DA VOI A LINORTEK E À U DISTRIBUTORE AUTORIZZATA O RAPPRESENTANTE DI VENDITA DI LINORTEK PER I PRODOTTI O SERVIZI AT ISSUE IN I 6 MESI PRECEDENTI (SE CESSUNA). STA LIMITAZIONE È CUMULATIVA È ÙN SERA AUMENTATA PER L'ESISTE DI PIÙ DI UN INCIDENTE O RECLAMAZIONE. LINORTEK DECLINA OGNI RESPONSABILITÀ DI OGNI TIPI DI LICENZIANTI E FORNITORI DI LINORTEK. - Cunfurmità cù e Liggi d'Esportazione.
Ricunnosce chì u Software è a tecnulugia cunnessa sò sottumessi à e lege di cuntrollu di l'esportazione di i Stati Uniti, a ghjuridizione di l'esportazione di i Stati Uniti è pò esse sottumessi à e regulazioni d'esportazione o impurtazione in altri paesi. Accettate di rispettà strettamente tutte e leggi è e regulazioni internaziunali è naziunali applicabili chì si applicanu à u Software, cumpresi i Regolamenti di l'Amministrazione di l'Esportazione di i Stati Uniti, è e restrizioni di l'utilizatori finali, di l'usu finale è di destinazione emesse da i Stati Uniti è altri guverni. Ricunnosce chì avete a rispunsabilità di ottene l'autorizazione per esportà, riesporta o impurtà u Software è a tecnulugia ligata, cum'è pò esse necessariu.
Indemnizà è mantene Linortek innocu da qualsiasi rivendicazione, perdite, passività, danni, ammende, penalità, costi è spese (cumprese onorari di l'avucatu) derivanti da o in relazione à qualsiasi violazione da voi di e vostre obbligazioni in questa sezione. - Assegnazione.
Ùn pudete micca assignà alcunu di i vostri diritti o obbligazioni sottu à stu EULA, è ogni tentativu di assignà serà nudu è senza effettu. - Avvisi.
Linortek pò furnisce qualsiasi avvisu à voi in relazione à questu EULA utilizendu l'email è l'indirizzu chì avete furnitu quandu avete registratu cù Linortek. - Rinuncia
Per esse efficaci, tutte e rinunzii di Linortek quì sottu devenu esse scritte è firmate da un rappresentante autorizatu di Linortek. Ogni altru fallimentu di Linortek per rinfurzà qualsiasi termini quì sottu ùn serà micca cunsideratu una rinuncia. - Severabilità.
Ogni disposizione di questa EULA chì hè stata trovata inapplicabile serà editata è interpretata per rializà l'ugettivi di quella disposizione in u più altu pussibule sottu a lege applicabile è tutte e disposizioni restanti resteranu in piena forza è effettu. - Legge chì guverna; Locu.
You agree that this EULA, and any claim, dispute, action, cause of action, issue, or request for relief arising out of or relating to this EULA, will be governed by the laws of the state of North Carolina, U.S.A., without regard to conflicts of laws principles, provided that if you reside in a country that will not apply U.S. law to disputes related to these terms, then the laws of your country will apply. You also agree that the United Nations Convention on Contracts for the International Sale of Goods shall not
apply. You agree that regardless of any statute or law to the contrary, any cause of action against us arising out of or related to the Linortek website, u Software o i Prodotti Linortek deve principià in un (1) annu dopu chì a causa di l'azzione accrue o tale causa di l'azzione serà permanentemente impedita. Ogni azione o procedimentu in relazione à questu EULA deve esse purtatu in un tribunale federale o statale situatu in Raleigh, Carolina di u Nordu è ogni parte si sottumette irrevocabilmente à a ghjuridizione è u locu di tali tribunale in ogni pretesa o disputa, salvu chì Linortek pò dumandà ingiuntiva. sollievu in ogni tribunale chì hà ghjuridizione per prutege a so pruprietà intellettuale. - Pruposta di California 65 Avvertimentu.
 ATTENZIONE: Stu pruduttu pò espose à i chimichi cumpresi u piombo, chì hè cunnisciutu da u Statu di California per causà cancer. Per più infurmazione, andate à www.P65Warnings.ca.gov.
Cuminciatu
The Fargo SERVER is what is called a “bare board” product and is supplied without a housing. It operates on low voltage; however you need to use simple handling precautions to prevent damage to the circuits. All electronics are susceptible to electrostatic discharge. This high voltage “shock” can permanently damage your device. Before handling the product, you should touch a surface such as a grounded workbench or table. It is also best to handle the device from its edges. If you notice that your chair or clothes often cause static discharges, you must exercise extra caution. The unit is supplied with four rubber feet which keeps the bottom of the board from coming into contact with the surface you put it on. Be careful not to let metal objects, such as screw drivers or hardware, come in contact with the bottom of this product. The board can be mounted on a panel using stand offs and #4 hardware. The mounting holes are connected to the GROUND signal. The SERVER unit is a self-contained web server configured with various input and output circuits. Although the relays are rated for higher voltages, stu pruduttu ùn hè micca pensatu per l'usu in linea voltages. You should never use voltages through the SERVER product exceeding 48 volts. IT IS NOT SAFE.
The KODA SERVER is a housed unit with a DIN rail mountable enclosure that can be snapped onto a DIN rail or attached to any flat surface such as a wall or under a counter. KODA 100 has two relays (48VAC@1A), KODA 200 has four relays which can drive 10V 50mA to external devices. The unit is supplied with a DIN Rail mountable enclosure with removable terminal connectors for easy installation. The KODA SERVER can be mounted on a panel or on the wall using the DIN rail mount clip. The removable wire terminal connectors simplify field installation and allow for easy troubleshooting and maintenance: the unit can be removed from the system without disturbing the system wiring.
Wiring u Server
Nota: For a diagram showing the location of all connectors on your SERVER referenced in this section, please see the section – Board Layout Reference.
Attenzione: Queste unità sò isolate in terra. Cunnette sempre cusì chì u loop di alimentazione hè cunnessu solu à l'unità SERVER.
Ùn aduprate micca cunnessione di terra esterna. Fate cusì pò dannà u SERVER o l'apparechju di origine POE.
- Place the unit on a table or bench being careful not to let any metal objects come into contact with the bottom of the circuit board (Fargo Only).
- Connect the 12VDC power supply to a suitable AC outlet and plug the barrel connector into the SERVER at the location labelled “12VDC/POWER”. Alternatively, you may also use POE. At this point the GREEN/Boot LED should come on and start flashing indicating the SERVER is operating and is in the “Bootload Mode”. This mode allows the user to update the server software that is used on the unit. After about 5 seconds, the GREEN LED will go off and the RED LED will start blinking once per second indicating the SERVER is operating in “Server Mode” and is accessible on a network utilizing TCP/IP protocols.
ATTENZIONE: QUANDU UTILIZZA POE NETWORK SWITCH, ÙN UTILIZZA L'ALIMENTAZIONE 12VDC PER POWER U SERVER À LESSESSU TEMPU, DANNU A TABELLA. - Plug an Ethernet cable into the RJ45/NET connector. The “Connection” LED will come on if a 100MHz network is available, otherwise it will remain off and the “Activity” LED should start blinking indicating network activity. Fargo G2 Relay Connections
There are 8 relays on the FARGO R8 and 4 on the FARGO R4. These are dry contact relays. These units are designed for only low voltage cuntrollu è ùn deve avè un voltage applied to the relay greater than 48 volts. This is for your safety as well as to stay within the parameters of the parts and circuit board design. The relays have 3 terminals labelled NO, C and NC which stand for Normally Open, Common and Normally Closed. When activated, the relay moves the connection from CNC to CNO. If you want to make a connection when the relay is activated, connect your wires between C and NO. When the relay is activated C and NO will be connected together. If you want to break a circuit when the relay is activated, make your connections to C and NC. When the relay is activated the circuit will be broken (or open)
Koda Relay Connection
There are 2 relays on the KODA 100. The KODA 100 has 2 removable 2 position connectors (1 for each relay) and are simply numbered “1” and “2”. These relays are normally open.
There are 4 relays on the KODA 200. The KODA 200 has 1 removable 8 position connector. Each relay has a “+” connection and a numbered connection. The relays may be set to supply about 10VDC by selecting “+V” on the setting switch (see Board Layout Reference page 29) or set to dry contact DC on the switch. If “+V” is selected then the voltage will be present on the “+” terminal and the numbered terminal is the return. Otherwise, a normally open dry contact exists across the “+” and numbered connection. KODA 100/200 is designed for only low voltage cuntrollu è ùn deve avè un voltage appiicata à u relay più di 48 volts. Questu hè per a vostra sicurità è per stà in i paràmetri di e parti è u disignu di u circuitu.

![]() IN NESSUN CASU LINOR TECHNOLOGY SERÀ RESPONSABILE, SIA IN CONTRATTU, TORT, O ALTRE, PER QUALSIASI DANNI ACCIDENTALI, SPECIALI, INDIRETTI, CONSEGUENTI O PUNITIVI, INCLUSI, MA NON LIMITATI, DANNI PER QUALSIASI PERDITA D'USO, PERDITA DI TEMPO , PERDITA COMMERCIALE, O PROFITS PERDUTI, RISPARMIO, O RIVENTU SULLA MESSA SULLA TALE PUBBLI ESSERE DISCLAMED PER LEGGE.
IN NESSUN CASU LINOR TECHNOLOGY SERÀ RESPONSABILE, SIA IN CONTRATTU, TORT, O ALTRE, PER QUALSIASI DANNI ACCIDENTALI, SPECIALI, INDIRETTI, CONSEGUENTI O PUNITIVI, INCLUSI, MA NON LIMITATI, DANNI PER QUALSIASI PERDITA D'USO, PERDITA DI TEMPO , PERDITA COMMERCIALE, O PROFITS PERDUTI, RISPARMIO, O RIVENTU SULLA MESSA SULLA TALE PUBBLI ESSERE DISCLAMED PER LEGGE.
ULTERIOR AVVISU PER A LIMITAZIONE D'USU
A menu chì ùn hè specificamente dichjaratu, stu pruduttu ùn hè micca cuncepitu per cambià a linea voltage dispusitivi. Questa limitazione include tutti i prudutti FARGO E KODA. Per cuntrullà u dispusitivu chì operanu à linea voltagL'utilizatore deve installà è un dispositivu intermediariu cum'è un relay.
Quandu cablassi una linea voltagU dispusitivu chì utilizeghja un dispositivu intermediariu, devi esse sia un electricista qualificatu, sia aduprà i servizii di un electricista qualificatu. Inoltre, i codici lucali devenu esse seguiti cumpresi, ma senza limitazione, a dimensione di calibre di filu è l'alloghju adattatu.
Linortek cannot assume any responsibility for harm to the user or third parties for improperly using our Fargo/Koda products. This liability remains with the user. Linortek cannot assume any responsibility for damage to the device for improperly using our SERVER product.
For relay specifications, please see Board Reference Layout page 29
Digital Input Connections (Fargo R4 and Koda)
The digital inputs allow the SERVER to detect an external on/off state of a sensor. With this information the SERVER can display whether an input is on or off, count events in a resettable or non-resettable counter, and calculate the frequency (such as for use as a tachometer) or the period of the input. There are two modes of operation for the digital inputs – PULL UP and ISOLATED.
a) PULL UP mode connects a 1K resistor to an internal voltage chì vi permette di utilizà un interruttore simplice (cum'è un interruttore di porta magneticu) attraversu i terminali 1 è 2. Questu quandu u cambiamentu hè attivatu un signalu hè mandatu à l'input.
b) ISOLATED mode allows you to directly drive the SERVER’s optoisolator with an external voltagè ancu una resistenza interna 1K. Stu voltage pò esse in a gamma di 5V à 24V chì furnisce un minimu di 2mA o un massimu di 30mA à u diodu optoisolator. Ùn ci hè micca una altra cunnessione interna à questu voltage so it is an isolated input. Please note, when connecting a 12VDC-¬24VDC circuit to the input, an external resistor (can be provided at request, 2.2k ohm 0.5watt) must be used.
These modes are selected by the switch on the SERVER (see Board Layout Reference page 29) marked ISO and PU for isolated and pull up respectively. These are set at the factory to ISO by default.
Wiring a push button: For distances up to 500 feet, a 20 AWG shielded wire is suitable for wiring a push button. If the distance between the push button and the controller extends up to 5,000 feet, use a 16 AWG shielded cable instead. Keep in mind that longer cable runs are more susceptible to signal interference.
Attenzione: If you intend to use isolated mode, verify that the input switch is set to ISO before applying an external voltage. Fate altrimenti pò dannà u SERVER o u dispositivu d'origine POE.
Analog Input Connections (Fargo R4ADI)
The analog inputs allow the SERVER to read the value of external equipment. There are 2 analog inputs.
For AC current monitoring, use one of the two 3.5mm stereo inputs to interface with a current sensor.
I blocchi terminali di input analogicu 2 sò cunnessi à sensori di corrente 0-5V non isolati chì ponu esse cunnessi à una varietà di dispusitivi cum'è sensori di temperatura o di pressione. U SERVER furnisce una cunnessione di terra è putenza per chì e misurazioni ponu esse fatte senza voltage references. You should use a sensor that is isolated so that that it makes no connection to a remote ground. See drawing under Board Reference Layout page 29.
Accessing your SERVER
Una volta chì u vostru SERVER hè alimentatu è cunnessu à a reta, uttene automaticamente un indirizzu IP via DHCP, sempre chì u vostru router hè cunfiguratu per fà. Per cunnette, entre l'indirizzu IP in u vostru web browser. This will take you to your SERVER’s landing page. To log in, click the Log In button on the top right of the page. Your browser will prompt you to enter your username and password. By default, these credentials are both set to admin. To find your SERVER’s IP address, see below.
Truvà u vostru indirizzu IP cù Linortek Discoverer
U prugramma Discoverer localizà automaticamente u vostru SERVER. U Discoverer hè un prugramma Java, è richiede Java Runtime per esse installatu per utilizà sta funzione. Java pò esse truvatu quì: http://java.com/en/download/index.jsp.
Per scaricà u prugramma Discover, andate à: https://www.linortek.com/downloads/supportprogramming/
L'usu di i navigatori Chrome è Firefox hè cunsigliatu. Per piacè nutate: Se preferite aduprà Internet Explorer, Internet Explorer salva Linortek Discoverer cum'è Zip file per difettu. In ordine per aduprà u Discoverer, vi tuccherà à sceglie Salvà cum'è è rinominà u file cum'è Linortek Discoverer.jar quandu scaricate.
Quandu scaricate u prugramma Discover, qualchì volta vi vede un missaghju popup d'avvertimentu sicondu i paràmetri di sicurezza di u vostru navigatore, dumandendu se vulete mantene o scartà questu. file, please click the Keep button as this is a Java program, and it won’t harm your computer.
Una volta Discoverer localizza u vostru dispositivu, mostrarà:
- Indirizzu IP
- Nome host
- Indirizzu MAC
- Altre informazioni:
a. LED blu (se hè accesa)
b. Nome di u produttu
c. Revisione di u Software di u Servitore
d. Numero di portu (se portatu)

Cliccate nant'à u dispusitivu vo vulete aduprà mustratu nant'à u prugrammu Discoverer à lanciari u SERVER web pages in your browser. Click the Login button on the homepage. The default username/password is: admin/admin. You may change these as you desire or disable this feature in the settings menu.
Connecting your SERVER Directly to Your PC
You can also plug your SERVER directly to your PC if there is no network connection available. If you plug your SERVER into your PC’s Ethernet port it will use the default IP address: 169.254.1.1 unless you have previously configured your SERVER to use a static IP. Enter 169.254.1.1 into your web browser to connect. No internet connection is required. Once configured, you can then install your SERVER where you desired.
Cunfigurazione di u servitore
Logging In
Once you have entered the IP address and port number, if set, the Login page will open. This page shows the name of this server which you may change in Configure/Network Config.
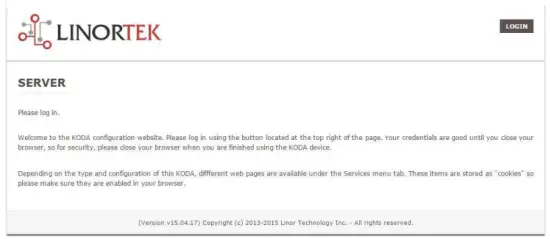
This page is static with no background activity and is a useful place to park if you are not using the SERVER and do not want to close the connection.
By pressing LOGIN, you will be asked for your username and password. These credentials will be retained by the browser until the browser is closed. You can disable the password requirement in Settings page. See section page 21.
Pagina di casa
Una volta chì e vostre credenziali di login sò inserite, sarete reindirizzatu à a pagina principale di l'applicazione. A pagina Home o Index mostra una parte di l'infurmazioni di u sistema è offre a capacità di localizà u dispusitivu fisicu s'ellu si trova in una zona cù l'altri. Vede a lista sottu per a descrizzione.

- TIME – Displayed along with the day of the week. This time may be set to be in a 12 hour format with AM/PM indicator or 24 hour format.
- DATE - A data attuale hè visualizata quì.
- VOLTS - Voltage à u bordu hè visualizatu. Questu pò esse utile se u SERVER hè alimentatu cù altri equipaghji, voltage variance can be noted. Fargo and Koda servers have an input voltage range of 1248vDC.
- TEMPERATURE – Temperature on the board is displayed. This display may be either °C or °F. This temperature will be affected by the heat generated by SERVER itself so it will always be slightly higher than ambient temperature.
- LED - Ci sò 3 LED affissati. U LED RED hè u pulse di u sistema. Questu deve lampassi una volta per seconda sempre chì u servitore hè in esecuzione. U LED VERDE hè utilizatu per l'opzioni di bootloader è generalmente ùn hè micca visibile nantu à u websitu. U LED BLU hè clicable è pudete accende è spegne da questu web pagina. Questu hè utile per localizà u dispositivu fisicamente s'ellu hè in usu cù altre unità simili, postu chì s'illuminarà nantu à l'unità à quale questu. web u navigatore hè cunnessu. U prugramma Discoverer vi dinù nutari s'è u LED BLU hè on. Questu hè spessu chjamatu funzione "Locate".
servizii
A tabulazione di servizii hè dinamica è cambierà secondu a cunfigurazione di u vostru servitore. Questu hè induve pudete cuntrullà l'inputs, outputs, sensors è altri cuntrolli di specialità.
In/Out or Relays Page
Depending on which SERVER you are using, the first page on the SERVICES tab will be either In/Out or Relays.
In/Out has the relay controls and the input controls on one page, while Relays only has the relay controls.
Cuntrollu di relè
An In/Out page is displayed below. Some relay control pages have 2, 4 or 8 relays displayed. Each relay has a number, in this case 1 to 4.

The State LED shows whether the relay is on or off indicated by GREEN and RED respectively. This icon is clickable to manually control the corresponding relay. Each relay can have a Name as well as identifiers for the Normally Open, Common and Normally Closed connections.
Ci sò quattru LED di status chì mostranu:
- Email – If an email is to be sent when this relay is switched on/off
- Pulse - Se stu Relay hè stabilitu cù un multiplicatore di larghezza di impulsu è di larghezza di impulsu (durata) - vede a sezione dopu per più infurmazione
- Sched. – If there is a schedule created in the Tasks page (see page 15) set to automatically trigger this relay.
- Timed - Se l'impulsu hè stabilitu è questu relé hè attivatu, u LED Timed diventerà rossu chì mostra chì u relé hè attualmente operatu nantu à un timer.
Click the Edit Icon to edit the controls for the corresponding relay. This will take you to the Set Relay page (see page 11).
Inputs
The In/Out or Inputs page (depending on your SERVER) will display information from each input. The SERVERs have a combination of inputs. The Fargo R4DI has four digital inputs, The R4ADI has, four digital inputs, four analog inputs. The KODA SERVER has two digital inputs.
At the top of each input is a label (ex: DIN 1, AIN 2) specifying whether it is a digital input (DIN) or analog input (AIN) as well as the input number. This label will turn green when the input is enabled. Inside the box will be any display configured from the Set Input page (see page 12 for digital input, page 14 for analog input). A red dot in the lower-left corner indicating the state of a linked relay (if any), will turn green when the linked relay is activated.
Finally, an Edit icon in the lower-right corner of the box to edit the corresponding input. This will take you to the Set Digital Input or Set Analog Input page (page 12 or page 14).
Set Relay Page
A pagina SET RELAY permette di stabilisce diverse proprietà pertinenti à u Relay.
- Relay Select – The Relay that you are editing (identified by the line on which you clicked the Edit icon on the RELAY page).
- Name – Enter a 15-character Relay Name. This and the following 3 fields may be used for any identifying information desired.
- NO Name – Enter a 7-character name for the Normally Open (NO) connection.
- Com Name – Enter a 7-character name for the Common (COM) connection.
- NC Name – Enter a 7-character name for the Normally Closed (NC) connection.
- Pulse Width – When you control the relay it turns on or off. You may control it for a timed turned on period by entering a Pulse Width when 0 means there is no timed event and a number represents duration of the pulse. The maximum number you can enter here is 4 digits, ie. 1234.
- Pulse Width Multiplier - Per definisce ulteriormente a durata di l'impulsu, selezziunate un Pulse Width Multiplier per definisce ulteriormente a larghezza di l'impulsu. Pudete sceglie:
• Nimu
• mS (Millisecond, 1/1000 second)
• Sec (Seconds)
• Min (Minutes) - Relay Type - u SERVER pò accede à i relè fisicamente nantu à u SERVER o utilizendu altri mezi. Pudete sceglie:
• Normal – relay physically on the SERVER
• Latched – not currently supported
• Remote – a relay on another SERVER accessed over the network
• Zigbee – a relay at a remote device accessed over an RF system
• Normal and Remote – both relays activated
• Normal and Zigbee – both relays activated - Location ID - questu hè un numeru chì identifica un locu remoto
- Relay at Location - un numeru chì rapprisenta u relay o u dispusitivu in u Location
- Mandate Email - u SERVER pò esse programatu per mandà un Email se u relay hè attivatu o disattivatu.

Imposta a pagina di input digitale
L'Ingressi Digitali ponu esse configurati per furnisce diverse letture nantu à l'usu di una gamma di tipi di visualizazione. In più di vede i dati di input, pudete chjamà a visualizazione è associà un relay cun ella. Stu relé cambierà da u Verde à u ROSSU mentre passa da l'accennu à l'off, è hè clicable per cuntrullà. Facendu clic nantu à l'icona di editazione di u lapis, pudete edità i paràmetri per questu input:
- Digital Input Selected – The Digital Input that you are editing (identified by the line on which you clicked the Edit icon).
- Nome - Pudete stabilisce un nome di 15 caratteri per questu input. Stu nomu va in a barra in cima di u display.
- Etichetta - Definite una etichetta di 7 caratteri chì hè visualizata nantu à a visualizazione attiva attuale.
- Correttore - Utilizendu stu campu pudete aghjunghje, sottrae, multiplicà, o dividite un valore prima chì u valore hè mostratu nantu à a pagina di visualizazione. Il s'agit d'un correcteur à 2 valeurs, chacun étant séparé par un seul caractère d'espace. (ie. "+2, -2, *3, /3")
- USE - Pone stu input à attivu. Turna l'indicatore di u numeru di input in verde. Hè devi esse nutatu chì quandu in usu l'input consuma u tempu di CPU è altre risorse secondu u so tipu. Ancu s'è tutti l'inputs ponu esse attivu à u stessu tempu, hè cunsigliatu per accende solu quelli chì vulete usà.
- Tipu - I dati di input pò esse usatu per calculà una gamma di risultati. Pudete sceglie:
• State – This is useful for knowing if an input is on or off, like a door switch being on or off.
• CounterNR – This is a non-resettable counter.
• CounterR – This is a resettable counter.
• Frequency – Counts the frequency of an input in KHz (kilo hertz or1/1000 seconds). This could be useful in displaying a tachometer where 60Hz = 1 R.P.M.
• Period – in 1/1000 seconds an input in kHz (milliseconds or1/1000 seconds). This would be useful for measuring timed events. - Display - Questa selezzione permette di cambià u tipu di visualizazione utilizatu. Pudete sceglie:
• Dot – A single dot with the value in the middle. This can be used for State. You can make a dumb indicator by changing the color of the Dot based on the value. The label is under the Dot.
• Values – Displays the Corrected Value with the Label in a box directly below it.
• Meter – This Meter has configurable scale based on the Min/Max values and arcs can be colored per the Color ranges. The Label is displayed within the Meter.
• VBar – Also based on the Min/Max values for the scale and the bar changes color based on the values in the Color ranges. - Relay L/T – Enter a Relay number here. If it is a local relay it will show GREEN or RED depending if it is on or off. By clicking on it the relay will turn on and off. The name comes from the relay settings page. This may be useful if you want to turn the subject of a display on and off. Any relay can be used on any input and each may be reused for any other input. Adding an L after the relay number (ex: 2L) will link the state of the input to the state of the relay. This is an easy and immediate way to have an input follow the relay. Adding a T after the relay number will trigger the relay to the state of the input. This is an easy and immediate way to have a relay follow the input.
- Command Z/N/I – This field is used for issuing various commands to the Digital Input controller: Z Zero the resettable counter. N Leave the input as Normal. I Invert the input.
- Value – These are Min/Max values used for the display. This is useful for preventing a Meter from going past its end or setting the value of a VBar. This is the Value after the Corrector. The system cannot display a value past Max, so be sure this is at least set to 1.
- Yellow / Red / Green - Ci sò trè culori chì ponu esse utilizati per definisce più una visualizazione. Definite a gamma di sti culori per definisce un culore à u valore di visualizazione. Questu hè u Valore dopu à u Correttore. Nota chì sè vo site cù un tipu di Statu, pudete vulete assignà RED = Da 0 à 0, VERDE = Da 1 à 1 è GIALLO = Da 2 à 2. Siccomu un Statu hè sempre o 1 o 0, questu impedisce l'infurmazioni ambigue è impediscenu l'usu di u culore GIALLO. Pudete selezziunà ogni dui culori chì ti piace per un tipu di Statu.

Set Analog Input Page
L'Ingressi Analogici ponu esse configurati per furnisce diverse letture nantu à l'usu di una gamma di tipi di visualizazione. In più di vede i dati di input, pudete chjamà a visualizazione è associà un relay cun ella. Stu relé cambierà da u Verde à u ROSSU mentre passa da l'accennu à l'off, è hè clicable per cuntrullà.
- Analog Input Selected – The Analog Input that you are editing (identified by the line on which you clicked the Edit icon).
- Nome - Pudete stabilisce un nome di 15 caratteri per questu input. Stu nomu va in a barra in cima di u display.
- Etichetta - Definite una etichetta di 7 caratteri chì hè visualizata nantu à a visualizazione attiva attuale.
- Correttore - Utilizendu stu campu pudete aghjunghje, sottrae, multiplicà, o dividite un valore prima chì u valore hè mostratu nantu à a pagina di visualizazione. Il s'agit d'un correcteur à 2 valeurs, chacun étant séparé par un seul caractère d'espace. (ie. "+2, -2, *3, /3")
- USE – Sets this input to active. Turns the input number indicator to GREEN. It should be noted that when in use the input consumes CPU time and other resources depending on its type. Although all inputs may be active at the same time, it is recommended to turn on only those you want to use.
- Tipu - I dati di input pò esse usatu per calculà una gamma di risultati. Pudete sceglie:
• Analog 1 – Analog 1 input from a SERVER with an input such as found on a R4ADI.
• Analog 2 – Analog 2 input from a SERVER with an input such as found on a R4ADI.
• AC Current 1 – AC current sensor 1 input from a SERVER with an input such as found on a R4ADI.
• AC Current 2 – AC current sensor 2 input from a SERVER with an input such as found on a R4ADI.
• AC Current 3 – Not used
• Volts – The measurement of the voltage powering the SERVER.
• Current – On “S” models, this is the current consumed by the SERVER.
• Int. Temp – Temperature from the board mounted sensor.
• Ext. Temp – Temperature from the “S” model SERVER.
• R. Humidity – % Relative Humidity from the “S” model SERVER.
• MMA X – The X axis accelerometer data from the “S” model SERVER.
• MMA Y – The Y axis accelerometer data from the “S” model SERVER.
• MMA Z – The Z axis accelerometer data from the “S” model SERVER. - Display - Questa selezzione permette di cambià u tipu di visualizazione utilizatu. Pudete sceglie:
1. Dot – A single dot with the value in the middle. This can be used for State. You can make a dumb indicator by changing the color of the Dot based on the value. The label is under the Dot.
2. Values – Displays the Corrected Value with the Label in a box directly below it.
3. Meter – This Meter has configurable scale based on the Min/Max values and arcs can be colored per the Color ranges. The Label is displayed within the Meter.
4. VBar – Also based on the Min/Max values for the scale and the bar changes color based on the values in the Color ranges. - Relay – Enter a Relay number here. If it is a local relay it will show Green or RED depending if it is on or off.
By clicking on it the relay will turn on and off. The name comes from the relay settings page. This may be useful if you want to turn the subject of a display on and off. Any relay can be used on any input and each may be reused for any other input. - Valore - Quessi sò i valori Min / Max utilizati per a visualizazione. Questu hè utile per impedisce à un Meter di passà a so fine o stabilisce u valore di un VBar. Questu hè u Valore dopu à u Correttore. U sistema ùn pò micca visualizà un valore passatu Max, cusì assicuratevi chì questu hè almenu stabilitu à 1.
- Yellow / Red / Green - Ci sò trè culori chì ponu esse utilizati per definisce più una visualizazione. Definite a gamma di sti culori per definisce un culore à u valore di visualizazione. Questu hè u Valore dopu à u Correttore. Nota chì sè vo site cù un tipu di Statu, pudete vulete assignà RED = Da 0 à 0, VERDE = Da 1 à 1 è GIALLO = Da 2 à 2. Siccomu un Statu hè sempre o 1 o 0, questu impedisce l'infurmazioni ambigue è impediscenu l'usu di u culore GIALLO. Pudete selezziunà ogni dui culori chì ti piace per un tipu di Statu.

Tasks Page
The TASKS page displays the automatic events that can be programmed into the SERVER. You can schedule up to 16 events in the SERVER. These are constructed as IF … THEN statements. In addition, the IF term can have 2 elements (IF a, AND/OR/NOT b … THEN c). This provides a simple to program and powerful way to take advantage of the data acquired by the SERVER. The Tasks page shows you an overview of configured tasks. You can click the dot in the State column to turn a task on or off indicated by a green dot for ON, and a red dot for OFF. To edit or create a task, click the Edit icon to the right of the task line. This will take you to the Set Schedule page detailed in the next section.

Set Schedule Page
The SET SCHEDULE page allows you to create time and logic-based events that will occur automatically if the conditions are met.
- Schedule Select – Determined by clicking on a schedule line from the previous page.
- Schedule Name – Enter a 15-character Schedule Name.
- USE – In order for a Schedule line to be active you must select the USE button. If there is an error detected in entering Schedule data, the USE box will automatically uncheck.
- LOG - Selezziunate u logu per questu articulu per apparisce in u logu di u sistema ogni volta chì hè eseguitu.
- Email – Click Email to automatically send an email when this schedule is executed.
- Device A – Select Device A for the first term in the IF statement from the drop box.
- Data A – Select Data A for the above device. Depending on the device selected, the Data used for testing may have special properties. See the list below for Data that may be entered. If an error is detected indata entry when the “Save” button is pushed, the USE box will uncheck and the Data box containing the error will be highlighted.
• Minute – Enter: mm
• Hour – Enter: hh (use 24-hour system)
• Day – Enter: dd
• DayofWeek – Enter: Sunday = 1, Monday = 2, Tuesday = 3, Wednesday = 4, Thursday = 5, Friday = 6, Saturday = 7, Weekday = 8, Weekend = 9
• Time – Enter: hh:mm (use leading zeros, seconds are ignored) (use 24 hour system) ex:07:30 or 14:05
• Date – Enter: yy/mm/dd (use leading zeros) ex: 20/01/10 for January 10, 2020
• Relay – Enter: Relay number and (+ or -), ex: 01+ for Relay 1 ON or 01- for Relay 1 OFF
• Button – Enter: + or – (for ON or OFF respectively)
• Flag – Enter: Flag number(opt.+), or Flag number (for ON or OFF respectively)
• Temp – Enter: >, = or < value; example: > 40 (sempre gradi C)
• Volts – Enter: >, = or < value; example: <10
• Analog – Analog input. Enter an input number and >, = or < and value. Example: 3<123 (This value is raw data value prior to any Corrector used by the input display page.)
• Digital – Digital input. Enter Input Number, Type, >, =, or < and value; example: 1F>7500 (This value is the raw data value prior to any Corrector used on the display page). Type can be (case sensitive):
• S State (On/Off)
• C Non-resettable counter
• c Resettable counter (lower case ‘c’)
• F Frequency in 1/1000 seconds
• P Period in 1/1000 seconds - Logica - Configurate un paragone logicu trà u Dispositivu A è u Dispositivu B.
• AND – True if: Device A is true AND Device B is true
• OR – True if: Device A is true OR Device B is true
• NOT – True if: Device A is true and Device B is NOT true - Device B – Select Device B for testing from the drop box.
- Dati B - Selezziunà Dati B per u dispusitivu sopra. Sicondu u dispusitivu sceltu, i dati utilizati per a prova pò avè pruprietà speciale. Vede a lista sopra.
- Dispositivu C - hè ciò chì cuntrullà.
- Dati C - Set a pruprietà per u Dispositivu C. A sintassi hè aduprata cum'è seguente:
• RELAY – These are relays on this SERVER. You can set up to four per schedule. Enter separated by commas, for example "1,2,3,4"
• FLAG – This is a storage flag that can be used to make more complex schedules. There are 8 flags that can be turned on or off.
• REMOTE – Refers to a remote SERVER unit. When these conditions are met, this SERVER will send a command to control a remote SERVER. The Data field for a remote unit should be in the format,
“REMOTE UNIT NUMBER, REMOTE UNIT RELAY”. For example, "3,5". Questi SERVER remoti deve esse identificati in a pagina Configure / Remote Device Config.
• COUNTER – Adds count to digital input counter – set as 1 or 2 depending on which digital input is counting
• BLUE LED – No data.
• eMAIL – Will send eMail, no data.
• NOTIFY – Will send notification to Kodalert, set 1- 8 for Settings/Alarm Notification number. (Not Implemented) - Azzione - Cosa fà cù u Dispositivu C. Opzioni sò:
• ON – Turns device ON
• OFF – Turns device OFF
• TGL – Toggles state of Device C
• RESET – Resets CounterR

Pagina di logs
The Logs tab displays over 10,000 entries from actions taken by the SERVER or by users themselves. This feature allows several actions for the convenience of displaying and collecting data from the SERVER.
- The checkboxes above the date allow the user to filter logs from different sources. To filter out logs you do not wish to see from a certain source simply uncheck the box.
- Each log has a reference number and a time and date attached in a “yyyy/mm/dd” and “hh:mm:ss” format. Afterwards is the event displayed.
- To scroll through the logs, use the arrows to the right-hand side, where the horizonal line and arrow brings you to the start or end, the double arrow moves up or down a page, and the single arrow moves up or down a single log.
- To refresh the logs manually click the REFRESH button below the Log Details.
- To download the Log Details, click the DOWNLOAD button below the Log Details, this allows you to save the logs as a separate file.
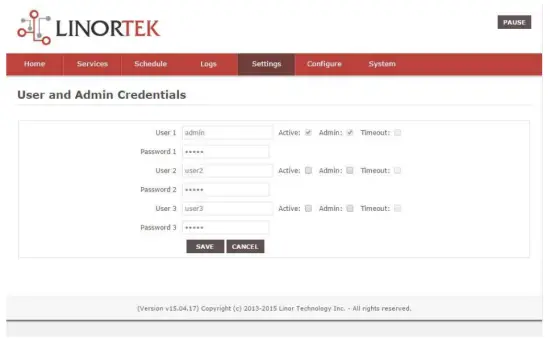
Pagina di credenziali d'utilizatore è amministratore
Use this page from the Settings drop down menu. Here you can set up to 3 users for your SERVER system. As a default only User 1 is Active. Here you can:
- User Name and Password – Each user has their own credentials. As a default these are set toadmin/admin, user2/user2 and user3/user3 for Users 1, 2 and 3 respectively. The passwords are never displayed. Nota: when you reset the password, it must be less than 13-character.
- Attivu - Deve esse verificatu per questu utilizatore per firmà, ùn pudete micca disattivà l'Usuariu 1.
- Admin - Solu l'amministratore pò salvà dati in a maiò parte di e pagine. Questu prutege u vostru SERVER da esse cambiatu da una persona micca autorizata.
- Timeout - Ùn hè micca attivatu à questu mumentu.
Pagina Ora / Data
Aduprate sta pagina da u menù a tendina Settings. Sta pagina permette di stallà u sistema di data è ora.
- Time – Set time using an hh:mm:ss format.
- Data - Imposta a data cù un furmatu aa/mm/dd.
- Time Zone – Set desired time zone 5 for EST, 8 for PST, you can now add a :mm for setting part hour, for example, 5:30 hè un fusu orariu à 5 ore è 30 minuti.
- Aduprà l'ora di l'ora di u ghjornu - Selezziunate per aghjustà automaticamente l'ora di u vostru sistema in u ghjornu di u ghjornu di u ghjornu. (Micca precisa in tutti i fusi orari).
- Use MIL Time - Selezziunate per utilizà u furmatu di 24 ore.
- Use NTP Update – Select to synchronize SERVER time with NTP server
- NTP Web Site - Questu hè u servitore NTP sceltu per l'aghjurnamenti.
- NTP Interval - Intervallu di tempu trà l'aghjurnamenti in minuti.
- Log NTP Event – Normally NTP exceptions will be logged, select this option to Log every NTP event. (May be useful in debugging.)

Pagina di paràmetri
Access this page from the Settings dropdown menu. Select these settings to enable various features in the SERVER
- Use Active Main – No longer used. (Select PAUSE to go inactive.)
- Richiede Login - Se micca sceltu u SERVER permetterà tutti l'accessu senza credenziali.
- Use IP Ranges – Not Implemented.
- Use RESTFUL IP Ranges – Not implemented.
- Use Remote IP Ranges – Not implemented.
- Utilizà l'autenticazione RESTful - Richiede nome d'utilizatore è password per RESTful.
- Estendi a gamma di relè - Permette 8 relè.
- Utilizà i Pulsanti di Radio Relay - Se stabilitu, quandu un relay hè attivatu, tutti l'altri sò disattivati.
- SSL Port No. – Not supported – For future use.
- Aduprà e-mail di u Sistema - Permette i missaghji email supplementari.
- Aduprà Fahrenheit - Sceglie Celsius o Fahrenheit.
- PGM Dynamic Relays – Changes properties of relays in task schedule.
- CLR PGMs on Start – Reinitialize tasks on start up.
- RTC Temperature Compensation – All Koda boards can add Temperature and Humidity sensor.
- Aduprate AM2302 - Aduprate AM2302 Sensor di temperatura è umidità (vendutu separatamente).
- Java Report – Send data to HourCollector app over ethernet (only for IoTMeter)
- Use Metric – Not supported – For future use.
- UART Usage – Enter “Audio” for Netbell-NTG, “Clock” for Netbell clock.
- Switch Bypass (1/2) – Ignores physical inputs if set. For example, in a Koda 200 board, you want to ignore input 1 switch, check Switch Bypass 1
- Setting 19 – Not supported – For future use
- Aduprà Audio File System – Activate SD Card reader for Netbell-NTG
- WiFi Report – Enable data transfer over WiFi (WiFi IoTMeter only)
- Active Landing Page – Not supported – For future use.
- . Invert Relay Control – The relay is set to NO by default. By checking this box the relay will be inverted to NC.
- Setting 24 – Not supported – For future use.

Pagina DNS dinamica
Access this page from the Configure dropdown menu. From this page you can assign dynamic DNS settings. This page, along with proper port forwarding through the router, can enable global access to a device behind a NAT router or firewall. You will need to assign a static IP address and port number (see Network Config Page on page 25) and port the IP address on your router (refer to your router’s user manual). An internet IP address will have to be hosted in order to access your SERVER from the internet. Currently the only IP hosting service supported is provided by DynDNS (https://dyn.com)
- Utilizà DDNS - Permette stu serviziu.
- Serviziu DDNS - Selezziunate un serviziu da a casella di goccia. Attualmente l'unicu serviziu supportatu hè DynDNS
- Nome d'Usuariu - Questu si riferisce à u contu stabilitu in u serviziu DDNS.
- Password - Password per accede à u serviziu DDNS.
- Host – This is the IP name registered at the DDNS service for rerouting to this SERVER

Pagina di configurazione di e-mail
Configurate un contu di e-mail per u SERVER per usà in l'inviu di messagi email da diversi moduli. Accede à sta pagina da a tabulazione Configurazione.
Nota: This unit is NOT compatible with SSL/TLS, there are 3rd party SMTP delivery servers which do not require SSL and can be used. For instructions on how to use a 3rd party SMTP delivery service, please refer to Appendix 1 at the end of this manual).
- Servitore SMTP - Inserite u servitore di mail in uscita chì vulete usà.
- Port - Questu hè u portu in quellu servitore. Pudete cercà u vostru serviziu di mail in ligna per questa infurmazione è ancu l'altri campi di stallazione.
- Aduprate SSL - Lasciate micca marcatu quandu utilizate u servitore SMTP di terzu partitu.
- User Name - U vostru nome di u vostru contu email.
- Password - Password di u contu email.
- To Address – Enter up to 3 address for this email set up. An addressee, a CC and a BC.
- Subject - Subject line of the email header.

Pagina di cunfigurazione di a rete
Access this page from the Configure dropdown menu. This page allows the configuration of the SERVER’s network settings.
ATTENZIONE: Incorrect settings may cause the board to lose network connectivity. In order to access a device in your network remotely you must PORT the device. This tells your router that information coming in should be sent to a specific device on your network.
- MAC Address – This is a unique MAC address that is assigned to this product at time of assembly. It cannot be altered.
- Host Name - Questu hè un nome Netbios à quale sta unità pò esse indirizzata in alcune rete. Puderà ancu apparisce in u cartulare di affittu di u vostru router. Face un locu utile per nome u vostru SERVER è apparisce nantu à a Home page è in u Discoverer.
- Port Number - Questu diventa parte di l'indirizzu IP è hè necessariu per l'accessu à Internet. Se questu ùn hè micca stabilitu, u SERVER hè predeterminatu à un numeru di portu di 80.
- IP Address – Typically you only change the last group of numbers. If you change this IP address make sure to reserve this IP on your router and no other devices are using this IP address or you may not be able to reach this SERVER. If this happens you may need to Restore Defaults using the push button method.
- Gateway - Tipicamente un router in a vostra reta TCP / IP chì serve cum'è un puntu d'accessu à u vostru ISP.
- Subnet Mask - Un numeru di 32-bit chì maschera un indirizzu IP, è divide l'indirizzu IP in indirizzu di rete è indirizzu host. Basta lascià à 255.255.255.0
- DNS primariu - Un DNS primariu.
- DNS secundariu - Un DNS secundariu.

Pagina di cunfigurazione IP Range
Access this page from the Configure dropdown menu. Use these security settings to select a range of IP address that will be allowed to access the SERVER.CAUTION: Incorrect settings may cause the board to lose network connectivity. Not implemented on this SERVER.
Pagina Dispositivi Remoti
Access this page from the Configure dropdown menu. These settings allow the SERVER to remotely control the relays on another SERVER. This is done by selecting the Remote Device in the Schedule program or by setting up a relay as a REMOTE. There are 8 possible REMOTE locations.
ATTENZIONE: I paràmetri incorretti pruvucanu chì u bordu perde a so cunnessione remota.
- Device Name - Inserite un nome di testu per stu dispusitivu per riferimentu futuru.
- Indirizzu IP - L'indirizzu IP di u dispositivu remotu cumpresu un numeru di portu.
- Nome d'utilizatore - Adupratu in l'autentificazione basica.
- Password – Used in Basic Authentication.

Kodalert Page
Not Yet Implemented. Access this page from the Configure dropdown menu. Kodalert provides an interface for alerts of Internet connected devices. Kodalert is a cloud based, open platform monitoring and alert system for the Internet of Things in your physical world. Any Thing that can send an email or TCP messages including our SERVERS, other manufactures devices and people using email can use Kodalert. It can work for multiple remote locations, alert multiple users instantly using the rules you setup by text, email, smart phone Apps push notification or audible alarm instantly when something happens.
- Numeru d'alerta
- Testu
- Aduprà
- Regula
In the Alarm Notification page, you can change the state (on/off) of the relay by clicking the green circle in the state column. Push the EDIT icon to change the Alarm’s settings.

Specificazioni
FARGO R8G2
- 10M/100M RJ45 Internet interface with connection and activity LEDs
- 8 Relay outputs, 1FORMC 48 Volt Max (24VAC/DC 3A)
- Status LEDs (pulse, bootloader, and locate)
- Ethernet Bootloader (for server hardware code upgrade)
- PoE or 12VDC @500mA (nominal)
- Web interface w/basic authentication
- On board temperature sensor and voltagsensore
Reset /Locate pushbutton (blue LED) - Working Temperature from 0 to +70 Celsius
- Storage Temperature from 40 to +125 Celsius
- Humidity from 10% to 80% noncondensing
- Dimensions 74mm x 100mm x 20mm, mounting holes 64mm x 92mm Ф 3.2mm 4 places
- Protocolli supportati: HTTP/SMTP/SNTP
FARGO R4G2
- 10M/100M RJ45 Internet interface with connection and activity LEDs
- 4 1FormC relays 48 Volt Max (24VAC/DC 3A)
- 2 optically isolated digital inputs, 12V 1mA or pulldown switch selectable, 2 conductor screw terminal connectors for each.
- 2 Analog 0-5VDC Inputs 30mA 3.3VDC power source PTC protected. 3 conductor screw terminal connectors for each (3.3VDC, input, ground) (R4ADI only)
- 2 Current sensor inputs. 3.5mm stereo jack connector for each (R4ADI only)
- Status LEDs (pulse, bootloader, and locate)
- Ethernet Bootloader (for server hardware code upgrade
- POE or 12VDC @500mA (nominal)
- Web interface w/basic authentication
- On board temperature sensor and voltagsensore
- Reset/Locate pushbutton
- Working Temperature from 0 to +70 Celsius
- Storage Temperature from 40 to +125 Celsius
- Humidity from 10% to 80% noncondensing
- Dimensions 74mm x 100mm x 20mm, mounting holes 64mm x 92mm Ф 3.2mm 4 places
- Protocolli supportati: HTTP/SMTP/SNTP
KODA100
- 10M/100M RJ45 Internet interface with connection and activity LEDs
- 2 1-Form-A relay 48VAC@8A Max
- 2 optically isolated digital inputs, 12V 1mA or pulldown switch selectable
- Status LEDs (pulse, bootloader, and locate)
- Ethernet Bootloader (for server hardware code upgrade)
- POE or 12VDC @500mA (nominal)
- Web interface w/basic authentication
- On board temperature sensor and voltagsensore
- Reset/Locate pushbutton (blue LED)
- Working temperature from 0 to +70 Celsius
- Storage temperature from 40 to +125 Celsius
- Humidity from 10% to 80% noncondensing
- Dimensioni: 70 mm x 100 mm x 25 mm
- Protocolli supportati: HTTP/SMTP/SNTP
KOD200
- 10M/100M RJ45 Internet interface with connection and activity LEDs
- 4 1FormA relays 48 Volt Max 1A dry contact or drive 10V ±10% 50mA to external devices
- 2 optically isolated digital inputs, 12V 1mA or pulldown switch selectable
- Status LEDs (pulse, bootloader, and locate)
- Ethernet Bootloader (for server hardware code upgrade)
- POE or 12VDC @500mA (nominal)
- Web interface w/basic authentication
- On board temperature sensor and voltagsensore
- Reset/Locate pushbutton (blue LED)
- Working Temperature from 0 to +70 Celsius
- Storage Temperature from 40 to +125 Celsius
- Humidity from 10% to 80% noncondensing
- Dimensioni: 70 mm x 100 mm x 25 mm
- Protocolli supportati: HTTP/SMTP/SNTP
Disposizione di Riferimentu di u Bordu
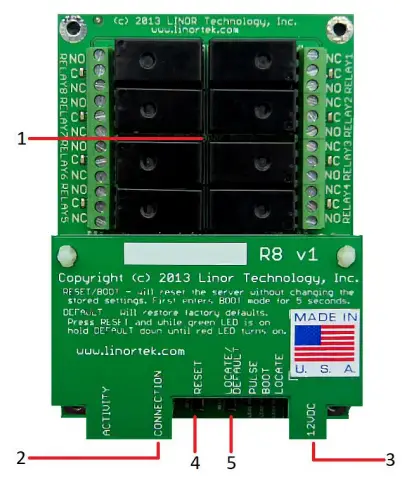
Fargo R8
- 8 Relay outputs, 1FORMC 48 Volt Max (24VAC/DC 3A)
- Connettore Rj45
- Connettore d'alimentazione (12VDC)
- Reset Button
- Locate Button
Fargo R4
- 3.5mm Inputs for AC Current Sensor (R4ADI Only)
- Analog Inputs (R4ADI Only)
- 4 Relay outputs, 1FORMC 48 Volt Max (24VAC/DC 3A)
- Ingressi digitali
- Digital Input Switches (Input 1 on right.
Up: Pullup, Down: Isolated) - Connettore Rj45
- Reset Button
- Locate Button
- Connettore d'alimentazione (12VDC)

Koda 100
- Digital Inputs (#1 on the left) 5VDC-48VDC (12VDC-48VDC must use the external resistor)
- Relay Outputs (#1 is on the right) 8A@48VAC Max
- Digital Input Switches (IN 1 on left. UP: Isolated, Down: Pullup)
- Reset Button
- Pulsante Reload (accende LED blu - identifica in Discoverer)
- Connettore Rj45
- Connettore d'alimentazione (12VDC)
- Mini connecteur USB pour capteur de température/humidité (vendu séparément)

Koda 200
- Digital Inputs (#1 on the left) 5VDC-48VDC (12VDC-48VDC must use the external resistor)
- Relay Outputs (#1 is on left) 48 Volt Max 1A dry contact or drive 10V ±10% 50mA
- Digital Input Switches (IN 1 on left. UP: Isolated, Down: Pullup)
- Relay Switches (Up for dry contact, down for 10V/50mA)
- Reset Button
- Pulsante Reload (accende LED blu - identifica in Discoverer)
- Connettore Rj45
- Connettore d'alimentazione (12VDC)
- Mini connecteur USB pour capteur de température/humidité (vendu séparément)

Reset di fabbrica
To perform a factory Reset, push the Reset button. When the green LED turns on, push and hold the Reload button until the flashing red LED turns off and then turns on solid. Refer to Board Reference Layout section for the button locations on your device.
This user-manual supplements the documentation for the following Linortek products:
- Netbell-2
- Netbell-8
- Netbell-K (and variants)
- iTrixx-NHM
For more information, documentation and how-to videos, visit https://www.linortek.com/downloads/
Stu documentu pò esse trovu à www.linortek.com/downloads/documentations/
Sè avete bisognu di assistenza cù u vostru dispositivu visitate www.linortek.com/technical-support
Linor Technology, Inc.
L'infurmazioni sottumessi à cambià senza avvisu.
Appendice 1
Cumu mandà e-mail SSL Utilizendu un serviziu SMTP di terzu partitu per i dispositi Linortek Fargo è Koda
Per automaticamente, i dispositi Koda / Fargo utilizanu servitori di email SMTP non SSL. Ma a maiò parte di i servitori di e-mail oghje anu cambiatu à u protocolu di sicurezza SSL, ci sò servitori di spedizione SMTP di terzu partitu chì ùn necessitanu micca SSL è ponu esse utilizati. Ci hè una mansa di fornitori di serviziu di e-mail SMTP in u mercatu. Avemu aduprà SMTP3GO cum'è example per dimustrà u prucessu di stallazione. SMTP2GO hè liberu d'utilizà finu à 1000 emails / mese. Per utilizà SMTP2GO, visitate: https://www.smtp2go.com/ .
Step 1. Crea u contu SMTP2GO.
Per creà un contu, basta à cliccà nantu à "Iscriviti", sceglite "1K Emails" nantu à a scala, è sceglite "Piano gratuitu" (Se avete bisognu di mandà più di 1000 emails per mese, selezziunate u pianu chì risponde à i vostri bisogni).

Per creà un contu in SMTP2GO, serà necessariu un indirizzu email corporativu. U serviziu di e-mail gratuitu cum'è Gmail o Yahoo ùn vi permette micca di cuntinuà. Dopu avè attivatu u vostru contu SMTP2GO, avete bisognu di aghjunghje un utilizatore.
Passu 2. Aghjunghjite un utilizatore.
L'utilizatore chì create nantu à SMTP2GO, serà u servitore di posta in uscita quandu cunfigurate u dispositivu Fargo/Koda per mandà rapporti di e-mail, assicuratevi chì u vostru servitore di e-mail di a corporazione ùn bluccarà micca l'e-mail se utilizate un contu di e-mail gratuitu cum'è Yahoo o Gmail. aghjunghje un utilizatore quì.
Login à u vostru contu SMTP2GO, nant'à u menù latu manca sceglie "Settings"> "SMTP Users", Cliccate nant'à "Add SMTP user" è compie u furmulariu.
 Dopu chì l'utilizatore hè aghjuntu à u vostru contu SMTP2GO, mostrarà l'infurmazioni chì avete bisognu à stallà a notificazione email in i vostri dispositi Fargo / Koda.

Step 3. Configurate u dispusitivu Linortek.
Dopu avè creatu un contu è aghjustatu un utilizatore, accede à u vostru dispositivu Linortek, andate à Configurazione - Pagina di configurazione di e-mail per cunfigurà a notificazione per e-mail:
- Servitore SMTP - Inserite u servitore di mail in uscita chì vulete usà, hè mail.smtp2go.com in u nostru example.
- Port - Questu hè u portu in quellu servitore. U portu SMTP hè 2525 in u nostru example.
- Aduprate SSL - Lasciate micca marcatu quandu utilizate u servitore SMTP di terzu partitu.
- User Name - U nome d'utilizatore da SMTP2GO quandu avemu creatu un utilizatore in u passu precedente.
- Password - A password di l'utilizatore da SMTP2GO quandu avemu creatu un utilizatore in u passu precedente.
- À l'indirizzu - Inserite finu à 3 indirizzi per questa cunfigurazione email. Un destinatariu, un CC è un BC.
- Subject - Subject line of the email header.
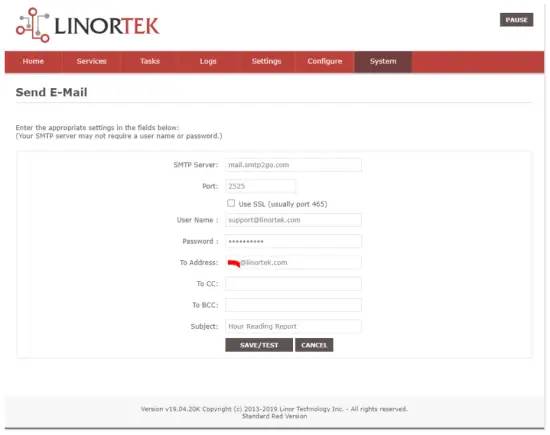
Appena tu culpisce "Salvà / Test", u dispusitivu manda automaticamente u mail di prova. Per piacè verificate u cartulare Junk / Other per truvà lu s'ellu ùn hè micca in u cartulare Inbox.
Passu 4. Stallà u compitu per notificazioni Email autumàticu.
You should be able to receive email notifications for various events from the Fargo/Koda boards at this point. If you need to receive condition logic notification, you can use our condition logic configuration to setup such report. To setup the logic condition report notification, go to Tasks page on your Fargo/Koda device, click the Edit icon of a Schedule. For details of how to create a logic-based event, please refer to the Set Schedule Page on the Fargo/Koda User Manual, which can be downloaded here:
https://www.linortek.com/download/fargo%20g2_koda%20downloads/fargo%20g2_koda%20documentation/Fargo-G2-and-Koda-User-Manual.pdf
In questu sample Avemu aduprà u dispusitivu Network Hour Meter cum'è example per cumu riceve rapporti email ogni ghjornu à 11:52 am.
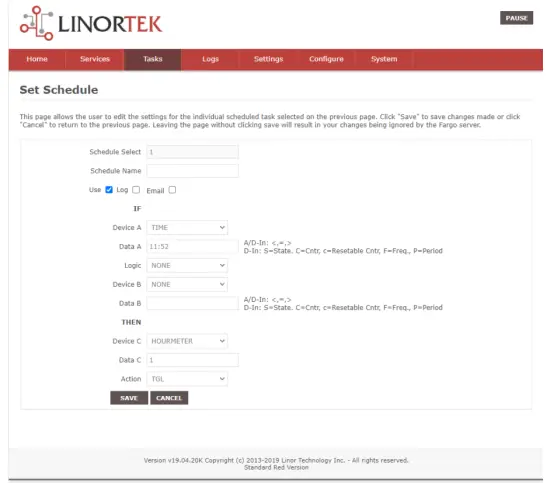
Appena tutte e cundizioni di u compitu sò scontri, riceve u seguente email:
Hour Reading Report
![]() support@linortek.com
support@linortek.com
Mon 4/11/2022 11:52 AM
To: Liyu Nalven
HM 1, my machine, is at 000242.01 hrs.
Reply Forward
![]()
Documenti / Risorse
 |
LINORTEK Fargo G2 TCP/IP Web Cuntrollore di relè basatu annantu à u [pdfManuale d'usu Fargo G2, Koda, Fargo G2 TCP-IP Web Based Relay Controller, Web Based Relay Controller, Based Relay Controller, Relay Controller |