![]() Fargo G2 and Koda User Manual
Fargo G2 and Koda User Manual
www.linortek.com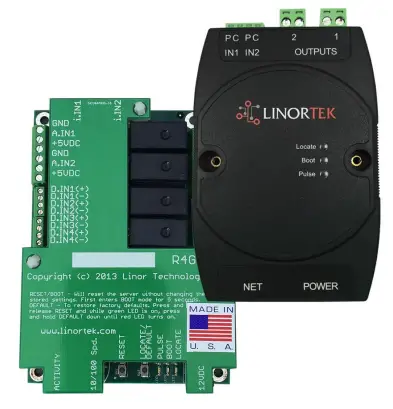 For Fargo G2, Koda
بروتوكول التحكم في الإرسال/بروتوكول الإنترنت Web وحدة تحكم التتابع القائمة على
القس ج 04/2022
Fargo G2 TCP/IP Web وحدة تحكم التتابع القائمة على
Thank you for purchasing a Linortek Fargo G2 or Koda TCP/IP Controller. There are many devices that can be controlled by the FARGO/KODA Web Relay Controller. FARGO/KODA Web Controller can be used in such applications as (but not limited to): Lights, security, sprinkler systems, access control, industrial equipment, building automation, HVAC, and many more. Please refer to the Board Reference Layouts on page 29 for input and output specifications on your controller to verify they are suitable to your needs.
يغطي هذا الدليل ما يلي:
- FARGO R8 G2
- FARGO R4DI G2
- FARGO R4ADI G2
- كودا 100
- KODA200
These will be referred to as SERVER hereafter. When there are differences or additional features they will be noted in the text.
للحصول على مقاطع فيديو تعليمية والأسئلة الشائعة ومعلومات الاتصال الخاصة بفريق الدعم الفني لدينا ، يرجى زيارة: https://www.linortek.com/technical-support
ضمان LINORTEK المحدود لمدة عام واحد
Consumer law: For consumers who are covered by consumer protection laws or regulations in their country of residence (“Consumer Law”), the benefits provided in this Linortek One-Year Limited Warranty (“Linortek Limited Warranty”) are in addition to and not instead of the rights provided by Consumer Law and it does not exclude, limit or suspend your rights arising from Consumer Law. You should consult the proper authorities in your country of residence for further information about these rights
تقتصر التزامات ضمان Linortek لمنتج الجهاز هذا ("المنتج") على الشروط الموضحة أدناه:
Linor Technology, Inc. (“Linortek”) warrants this product against defects in materials and workmanship for a period of ONE (1) YEAR from the date of retail purchase by the original end-user purchaser (“Warranty Period”) when used in accordance with the operating instructions. A copy of a retail receipt is required as proof of purchase. If a hardware defect arises and a valid claim is received within the Warranty Period, at its option and to the extent permitted by law, Linortek will either (1) repair the hardware defect at no charge, using new or refurbished replacement parts, (2) exchange the product with a product that is new or which has been manufactured from new or serviceable used parts and is at least functionally equivalent to the original product, or (3) refund the purchase price of the product. When a refund is given, the product for which the refund is provided must be returned to Linortek and becomes Linortek’s property.
يخضع الضمان السابق إلى (1) مطالبة مكتوبة سريعة من المشتري و(2) توفير فرصة لشركة Linortek في الوقت المناسب لفحص واختبار المنتج المزعوم أنه معيب. قد يتم هذا الفحص في مقر المشتري و/أو يجوز لشركة Linortek طلب إعادة المنتج على نفقة المشتري. ومع ذلك، لن تكون شركة Linortek مسؤولة عن تكاليف التعبئة أو الفحص أو العمالة فيما يتعلق بإرجاع المنتج. لن يتم قبول أي منتج لخدمة الضمان غير مصحوبًا برقم ترخيص إرجاع البضائع (RMA#) الصادر عن Linortek.
الاستثناءات والقيود
يستثني هذا الضمان المحدود الضرر الناتج عن إساءة الاستخدام أو سوء الاستخدام أو الإهمال أو الحريق أو لأسباب خارجية أخرى أو حوادث أو تعديلات أو إصلاحات أو أسباب أخرى ليست عيوبًا في المواد والتصنيع. لا يغطي هذا الضمان المحدود البرامج التي يتم توزيعها بواسطة Linortek مع أو بدون اسم العلامة التجارية Linortek بما في ذلك ، على سبيل المثال لا الحصر ، برنامج النظام ("البرنامج"). يخضع استخدامك وحقوقك المرتبطة بالبرنامج لاتفاقية ترخيص المستخدم النهائي Linortek والتي يمكنك العثور عليها هنا: https://www.linortek.com/end-user-licenseagreement/. Linortek ليست مسؤولة عن الأضرار الناشئة عن عدم اتباع التعليمات المتعلقة باستخدام المنتج. لضمان التوافق مع قيود التشغيل ، يجب على المشتري الرجوع إلى دليل التعليمات [المرفق مع المنتج]. لا يشمل الضمان البطاريات.
إلى الحد الأقصى المسموح به، يعتبر هذا الضمان المحدود والتعويضات المنصوص عليها أعلاه حصريًا وبدلاً من جميع الضمانات والتعويضات والشروط الأخرى، وتخلي شركة LINORTK مسؤوليتها على وجه التحديد عن جميع الضمانات القانونية أو الضمنية، بما في ذلك على سبيل المثال لا الحصر، الضمان. معايير القابلية للتسويق، الملاءمة لغرض معين، عدم الانتهاك. بقدر ما لا يمكن التنازل عن هذه الضمانات، يجب أن تكون جميع هذه الضمانات، إلى الحد الذي يسمح به القانون، محدودة بمدة ضمان شركة LINORTK المحدودة ويكون التعويض مقتصرًا على الإصلاح أو الاستبدال أو استرداد الأموال على النحو الذي تحدده شركة LINORTK حسب تقديرها الوحيد. لا تسمح بعض الولايات (البلدان والمقاطعات) بفرض قيود على مدة استمرار الضمان أو الشرط الضمني، لذا قد لا تنطبق عليك القيود الموضحة أعلاه. يمنحك هذا الضمان حقوقًا قانونية محددة، وقد يكون لديك أيضًا حقوق أخرى تختلف من ولاية إلى أخرى (أو حسب البلد أو المقاطعة). يخضع هذا الضمان المحدود ويفسر بموجب قوانين الولايات المتحدة.
إخلاء المسؤولية
- اقرأ التعليمات - اقرأ جميع تعليمات السلامة والتشغيل قبل تشغيل المنتج.
- تعليمات الاحتفاظ - احتفظ بتعليمات السلامة والتشغيل للرجوع إليها في المستقبل.
- التحذيرات - التزم بجميع التحذيرات الموجودة على المنتج وفي تعليمات التشغيل.
- اتبع التعليمات - اتبع جميع تعليمات التشغيل والاستخدام.
- التنظيف - افصل المنتج عن الطاقة قبل التنظيف. لا تستخدم المنظفات أو منظفات يتم رشها السائل. استخدم الإعلانamp قطعة قماش لتنظيف العلبة فقط.
- المرفقات - لا تستخدم المرفقات إلا إذا أوصى بها Linortek على وجه التحديد. قد يكون استخدام المرفقات غير المتوافقة أو غير المناسبة أمرًا خطيرًا.
- الملحقات - لا تضع هذا المنتج على حامل أو حامل ثلاثي القوائم أو حامل أو حامل غير مستقر. قد يسقط المنتج ، مما يتسبب في إصابة الشخص بجروح خطيرة وإلحاق أضرار جسيمة بالمنتج. استخدم فقط مع حامل أو حامل ثلاثي القوائم أو حامل أو حامل موصى به من قبل الشركة المصنعة أو يتم بيعه مع المنتج. اتبع تعليمات الشركة المصنعة عند تركيب المنتج ، واستخدم فقط ملحقات التثبيت الموصى بها من قبل الشركة المصنعة. كن حذرًا عند استخدام مجموعة الأجهزة والعربة. قد يؤدي التوقف السريع والقوة المفرطة والأسطح غير المستوية إلى انقلاب الجهاز والعربة.
- التهوية - يتم توفير الفتحات الموجودة في العلبة ، إن وجدت ، للتهوية ولضمان التشغيل الموثوق للمنتج وحمايته من السخونة الزائدة. لا تسد أو تغطي هذه الفتحات. لا تضع هذا المنتج في مكان مدمج ما لم يتم توفير التهوية المناسبة أو الالتزام بتعليمات Linortek.
- مصادر الطاقة - قم بتشغيل هذا المنتج فقط من نوع مصدر الطاقة المشار إليه في دليل التعليمات أو على ملصق المنتج.
إذا لم تكن متأكدًا من نوع مصدر الطاقة الذي تخطط لاستخدامه، فاستشر وكيل الأجهزة أو شركة الطاقة المحلية - بشرط أن يؤدي استخدام أي نوع مصدر طاقة بخلاف ما هو مذكور في دليل التعليمات أو الملصق إلى إبطال أي ضمان. بالنسبة للمنتجات المعدة للعمل بطاقة البطارية، أو مصادر أخرى، راجع تعليمات التشغيل [المرفقة مع المنتج]. - التأريض أو الاستقطاب - قد يكون هذا المنتج مزودًا بقابس خط تيار متناوب مستقطب (قابس به شفرة واحدة أعرض من الأخرى). يتناسب هذا القابس مع منفذ الطاقة بطريقة واحدة فقط. هذه هي ميزة السلامة. إذا لم تتمكن من إدخال القابس بالكامل في المنفذ ، فحاول عكس القابس. إذا كان القابس لا يزال غير مناسب ، فذلك لأن المنفذ الخاص بك غير متوافق مع القابس. اتصل بالكهربائي لاستبدال المنفذ الخاص بك بآخر متوافق. لا تجبر القابس على إدخاله في مأخذ غير متوافق أو حاول بطريقة أخرى إبطال غرض الأمان الخاص بالقابس. بالتناوب ، قد يكون هذا المنتج مزودًا بمقبس من نوع تأريض بثلاثة أسلاك ، وقابس به دبوس ثالث (أرضي). سيتناسب هذا القابس فقط مع منفذ طاقة من النوع الأرضي. هذه هي ميزة السلامة. لا تجبر القابس على إدخاله في مأخذ غير متوافق أو حاول بطريقة أخرى إبطال غرض الأمان الخاص بالقابس. إذا كان المنفذ الخاص بك غير متوافق مع القابس ، فاتصل بالكهربائي لاستبدال مقبسك بآخر متوافق.
- حماية سلك الطاقة - قم بتوجيه أسلاك إمداد الطاقة بحيث لا يُحتمل السير عليها أو الضغط عليها بواسطة عناصر موضوعة عليها أو ضدها ، مع إيلاء اهتمام خاص للأسلاك والمقابس ومآخذ الراحة ونقطة خروج الأسلاك من الجهاز .
- خطوط الطاقة - لا تضع نظامًا خارجيًا في أي مكان بالقرب من خطوط الطاقة الكهربائية العلوية أو غيرها من دوائر الإضاءة أو الطاقة الكهربائية ، أو حيث يمكن أن يقع في خطوط أو دوائر الطاقة هذه. عند تركيب نظام خارجي ، توخ الحذر الشديد لتجنب لمس خطوط أو دوائر الطاقة هذه لأن الاتصال بها قد يكون مميتًا.
- التحميل الزائد - لا تفرط في تحميل المنافذ وأسلاك التمديد لأن ذلك قد يتسبب في نشوب حريق أو حدوث صدمة كهربائية.
- دخول الأشياء والسوائل - لا تقم أبدًا بدفع أي نوع من الأشياء إلى هذا المنتج من خلال الفتحات لأنها قد تلامس جزيئات خطيرةtagالنقاط الإلكترونية أو الأجزاء القصيرة التي يمكن أن تتسبب في نشوب حريق أو حدوث صدمة كهربائية. لا تسكب أبدًا أي نوع من السوائل على المنتج.
- الصيانة - لا تحاول تقديم الخدمة لهذا المنتج بنفسك لأن فتح الأغطية أو إزالتها قد يعرضك لمجلد خطيرtagه أو غيرها من المخاطر. قم بإحالة جميع خدمات المنتج إلى Linortek.
- الخدمة التي تتطلب تلفًا - افصل المنتج من المنفذ وقم بإحالة الصيانة إلى دعم عملاء Linortek وفقًا للشروط التالية:
أ. عند تلف سلك أو قابس إمداد الطاقة.
ب. إذا انسكب سائل أو سقطت أشياء على المنتج.
ج. إذا تعرض المنتج للمطر أو الماء.
د. إذا كان المنتج لا يعمل بشكل طبيعي باتباع تعليمات التشغيل [المضمنة مع المنتج]. قم بضبط عناصر التحكم التي تغطيها تعليمات التشغيل فقط ، حيث قد يؤدي التعديل غير المناسب لعناصر التحكم الأخرى إلى حدوث تلف وغالبًا ما يتطلب عملاً مكثفًا بواسطة فني مؤهل لإعادة المنتج إلى التشغيل الطبيعي.
ه. في حالة سقوط المنتج أو تعرض الهيكل للتلف.
F. إذا أظهر المنتج تغييرًا واضحًا في الأداء. - قطع الغيار - إذا كانت قطع الغيار ضرورية ، فاحصل على حجم منخفضtagاستبدلها كهربائي باستخدام الجزء المحدد من قبل الشركة المصنعة فقط. قد تؤدي البدائل غير المصرح بها إلى نشوب حريق أو حدوث صدمة كهربائية أو مخاطر أخرى. يمكن العثور على قطع الغيار في https://www.linortek.com/store/
- فحص السلامة - بعد الانتهاء من أي خدمة أو إصلاح لهذا المنتج، اطلب من فني الخدمة إجراء فحوصات السلامة لتحديد ما إذا كان المنتج في حالة تشغيل سليمة.
- Coax Grounding - إذا تم توصيل نظام كبل خارجي بالمنتج ، فتأكد من تأريض نظام الكابلات. موديلات الولايات المتحدة الأمريكية فقط - القسم 810 من الكود الوطني للكهرباء ، ANSI / NFPA No.70-1981 ، يوفر معلومات فيما يتعلق بالتأريض المناسب للتركيب والهيكل الداعم ، وتأريض المحاور لمنتج التفريغ ، وحجم موصلات التأريض ، والموقع منتج التفريغ والتوصيل بأقطاب التأريض ومتطلبات قطب التأريض.
- البرق - لمزيد من الحماية لهذا المنتج أثناء عاصفة رعدية ، أو قبل تركه دون رقابة وغير مستخدم لفترات طويلة من الوقت ، افصله من مقبس الحائط وافصل نظام الكابلات. سيؤدي ذلك إلى منع تلف المنتج بسبب الصواعق والارتفاعات المفاجئة في خط الطاقة.
- الاستخدام الخارجي - هذا المنتج ليس مقاومًا للماء ولا ينبغي السماح له بالتبلل. لا تعرض للمطر أو أنواع أخرى من السوائل.
لا تترك خارج الأبواب طوال الليل حيث قد يحدث التكثيف. - أثناء تغيير البطاريات أو الصمامات أو التعامل مع منتج على مستوى اللوحة ، احذر من التفريغ الكهروستاتيكي الذي يمكن أن يتلف الأجهزة الإلكترونية. من الأفضل استخدام مقعد خدمة إلكتروني مؤرض. إذا لم يكن هذا متاحًا ، يمكنك تفريغ نفسك عن طريق لمس جهاز معدني أو أنبوب. أثناء تغيير البطاريات أو الصمامات ، لا تلمس i) أي أسلاك بخلاف أسلاك البطارية و ii) لوحة الدوائر المطبوعة.
حدود المسؤولية
IN NO EVENT WILL LINOR TECHNOLOGY BE LIABLE, WHETHER IN CONTRACT, TORT, OR OTHERWISE, FOR ANY INCIDENTAL, SPECIAL, INDIRECT, CONSEQUENTIAL OR PUNITIVE DAMAGES, INCLUDING, BUT NOT LIMITED TO, DAMAGES FOR ANY LOSS OF USE, LOSS OF TIME, INCONVENIENCE, COMMERCIAL LOSS, OR LOST PROFITS, SAVINGS, OR REVENUES TO THE FULL EXTENT SUCH MAY BE DISCLAIMED BY LAW. DISCLAIMER FOR CRITICAL APPLICATIONS
هذا المنتج غير مخصص أو مصرح به لمنتج دعم الحياة أو للاستخدامات الأخرى التي قد يتسبب عطل فيها في إصابة شخصية أو الوفاة. إذا استخدمت أنت أو عملاؤك هذا المنتج أو سمحت باستخدامه لمثل هذه الاستخدامات غير المقصودة أو غير المصرح بها ، فإنك توافق على تعويض شركة Linor Technology والشركات التابعة لها والمسؤولين والموظفين والموزعين بشكل كامل من جميع المسؤوليات المتعلقة بهذا الاستخدام ، بما في ذلك أتعاب المحاماة وتكاليفها.
إشعار آخر حول تقييد الاستخدام
ما لم يُذكر على وجه التحديد ، لم يتم تصميم منتجاتنا لتبديل حجم الخطtagالأجهزة الإلكترونية (110 فولت وما فوق). للتحكم في الجهاز الذي يعمل على الخط المجلدtagيجب على كهربائي مؤهل تركيب جهاز وسيط مثل المرحل. عند اختيار الأجهزة للتحكم ، من الأفضل تحديد حجم منخفضtagأدوات التحكم الإلكترونية مثل الملف اللولبي 24VAC للتحكم في تدفق المياه. يمكن للكهربائيين المؤهلين فقط توصيل الخط بالحجم الكبيرtagالجهاز الإلكتروني. بالإضافة إلى ذلك ، يجب اتباع الرموز المحلية بما في ذلك على سبيل المثال لا الحصر حجم مقياس الأسلاك والمبيت المناسب. لا تتحمل Linortek أي مسؤولية عن الضرر الذي يلحق بالمستخدم أو الأطراف الثالثة بسبب الاستخدام غير الصحيح لمنتجاتنا. تبقى هذه المسؤولية على عاتق المستخدم. لا تتحمل Linortek أي مسؤولية عن الأضرار التي تلحق بالجهاز بسبب الاستخدام غير الصحيح لمنتجاتنا.
تتابع المجلدTAGالمواصفات E
يرجى توخي الحذر عند توصيل الأجهزة بالدوائر الكهربائية أو غيرها من المعدات. هذه web لم يتم تصميم وحدة التحكم للاتصال بأي مجلدtage greater than 48V. Utilizing this arrangement, should allow you to virtually control anything. It is important that you use licensed electricians and comply with electrical codes that are applicable to your location. These codes exist for your safety, as well as the safety of others. Linortek assumes no responsibility for any harm or damage resulting from a failure adhere to local laws, ordinances or regulations or failure to follow specified instructions for installation and product usage.
اتفاقية ترخيص المستخدم النهائي لبرامج Linortek والوثائق
اتفاقية ترخيص المستخدم النهائي ("EULA") هي اتفاقية قانونية بينك (فرد أو كيان فردي) وشركة Linor Technology، Inc. ("Linortek" أو "نحن" أو "نحن") التي تحكم استخدامك للبرنامج والوثائق ("البرامج") المضمنة في أو المرتبطة بسلسلة منتجات Fargo و Koda و Netbell و IoTMeter و iTrixx ("منتجات Linortek").
لا تحكم اتفاقية ترخيص المستخدم النهائي (EULA) استخدامك لـ Linortek webالموقع أو منتجات Linortek (باستثناء البرامج). استخدامك لـ Linortek webيخضع موقع Linortek webيمكن العثور على شروط خدمة الموقع وسياسة خصوصية Linortek على:
http://www.linortek.com/terms-and-conditions [شرائك لمنتجات Linortek (باستثناء البرنامج) يحكمه ضمان Linortek المحدود ، والذي يمكن العثور عليه في https://www.linortek.com/linortek-one-year-limited-warranty/
This EULA governs your access and use of the Software. This EULA gives you specific legal rights, and you may also have other legal rights in addition, which vary from jurisdiction to jurisdiction. The disclaimers, exclusions, and limitations of liability under
this EULA will not apply to the extent prohibited or limited by applicable law. Some jurisdictions do not allow the exclusion of implied warranties or the exclusion or limitation of incidental or consequential damages or other rights, so those provisions of this EULA may not apply to you.
من خلال تثبيت البرنامج أو الوثائق والوصول إليه ونسخه و / أو استخدامه ، فإنك توافق على الالتزام بشروط وأحكام اتفاقية ترخيص المستخدم النهائي هذه نيابة عنك أو عن الكيان الذي تمثله فيما يتعلق بهذا التثبيت و / أو الوصول و / أو النسخ و / أو استعمال. أنت تقر وتضمن أنه (XNUMX) لديك الحق والسلطة والقدرة على قبول شروط اتفاقية ترخيص المستخدم النهائي هذه والموافقة عليها نيابة عنك أو عن الكيان الذي تمثله (XNUMX) أنك تبلغ من العمر القانوني الكافي في نطاق اختصاص إقامتك ، (XNUMX) لم تكن مقيمًا في بلد خاضع لحظر تفرضه حكومة الولايات المتحدة ، أو تم تحديده من قبل حكومة الولايات المتحدة كدولة "داعمة للإرهاب" ؛ و (XNUMX) لم تكن مدرجًا في أي قائمة حكومية أمريكية للأطراف المحظورة أو المحظورة.
إذا كنت لا ترغب في الالتزام بشروط اتفاقية ترخيص المستخدم النهائي ، فلا يجوز لك تثبيت البرنامج أو الوصول إليه أو نسخه أو استخدامه بأي طريقة (سواء كان مثبتًا مسبقًا على جهاز اشتريته أم لا).
- الاستخدام المسموح به لترخيص البرنامج / البرنامج.
وفقًا لشروط اتفاقية ترخيص المستخدم النهائي هذه ، تمنحك Linortek حقًا محدودًا وقابل للإلغاء وغير حصري وغير قابل للترخيص من الباطن وغير قابل للتحويل وترخيصًا لـ (أ) تنزيل نسخة واحدة من البرنامج وتثبيتها وتنفيذها ، في نموذج رمز كائن قابل للتنفيذ فقط ، فقط على منتج Linortek الذي تملكه أو تتحكم فيه و (ب) استخدام البرنامج فقط فيما يتعلق بمنتج Linortek وفقًا للاستخدام المقصود كما هو موضح في Linortek webالموقع (كل من 1 (أ) و 1 (ب) أ "الاستخدام المسموح به" وإجمالاً "الاستخدامات المسموح بها"). - القيود المفروضة على استخدامك للبرنامج.
أنت توافق على عدم ، وعدم السماح للآخرين ، باستخدام البرنامج لأي غرض بخلاف الاستخدامات المسموح بها الموضحة في القسم 1 أعلاه. وهذا يعني ، من بين أشياء أخرى ، أنه لا يجوز لك:
(أ) تحرير أو تغيير أو تعديل أو تكييف أو ترجمة أو عمل أعمال مشتقة أو تفكيك أو هندسة عكسية أو تجميع عكسي لأي جزء من البرنامج (باستثناء الحد الذي تحظر فيه القوانين المعمول بها بشكل خاص مثل هذا التقييد لأغراض التشغيل البيني ، وفي هذه الحالة توافق على للاتصال أولاً بـ Linortek وإعطاء Linortek فرصة لإجراء التغييرات اللازمة لأغراض التشغيل البيني) ؛
(ب) الترخيص أو التنازل أو التوزيع أو الإرسال أو البيع أو الإيجار أو الاستضافة أو الاستعانة بمصادر خارجية أو الكشف عن البرنامج أو استخدامه بأي شكل آخر لأي غرض تجاري أو إتاحة البرنامج لأي طرف ثالث ؛
(ج) السماح لأي طرف ثالث باستخدام البرنامج نيابة عن أو لصالح أي طرف ثالث ؛
(د) استخدام أي جزء من البرنامج على أي جهاز أو كمبيوتر بخلاف منتج Linortek الذي تملكه أو تتحكم فيه ؛
(هـ) استخدام البرنامج بأي طريقة تنتهك أي قانون محلي أو وطني أو دولي معمول به ؛ أو
(f) remove or alter any labels, symbols, legends or proprietary notices, including but not limited to any copyright, trademark, logo in the Software. You may not disclose the results of any performance or functional evaluation of anyof the Software to any third party without the prior written consent of Linortek for each such release. - التحديثات.
قد تقوم Linortek من وقت لآخر بتطوير تحديثات وترقيات وتصحيحات وإصلاحات للأخطاء وتعديلات أخرى ("التحديثات") لتحسين أداء البرنامج. باستثناء ما هو منصوص عليه في Linortek webالموقع ، سيتم توفير هذه التحديثات لك مجانًا. قد يتم تثبيت هذه التحديثات تلقائيًا دون إخطارك. باستخدام البرنامج ، فإنك توافق أيضًا على التحديثات التلقائية. إذا كنت لا توافق على هذا ، فلا يجوز لك تثبيت البرنامج أو الوصول إليه أو نسخه أو استخدامه بأي شكل من الأشكال. - ملكية.
The Software is licensed to you and not sold. Linortek reserves all rights to the Software and any Updates not expressly granted herein. The Software and Linortek Products are protected by copyright, trademark and other intellectual property laws andtreaties. Linortek and its licensors own the title, copyright, trademarks and other intellectual property rights in the Software.
You are not granted any rights to Linortek’s trademarks or service marks. There are no implied licenses in this EULA. - إنهاء.
This EULA is effective from the date you first use the Software and will continue for as long as you own the Linortek Product associated with it or until you or Linortek terminate this agreement under this section. You may terminate this EULA at any time upon written notice to Linortek at the address provided below. Linortek may terminate this EULA at any time if you fail to comply with any of the terms in this agreement. The license granted in this EULA terminates immediately when the agreement terminates. Upon termination, you must stop using the Linortek Product and the Software and you must delete all copies of the
Software. The terms of Sections 2 will still remain in effect after the agreement terminates. - الضمان تنويه.
EXTENT PERMITTED BY APPLICABLE LAW, LINORTEK PROVIDES THE SOFTWARE “AS-IS” AND DISCLAIMS ALL WARRANTIES AND CONDITIONS, WHETHER EXPRESS, IMPLIED, OR STATUTORY, INCLUDING THE WARRANTIES OF MERCHANTABILITY, FITNESS FOR A PARTICULAR PURPOSE, TITLE, QUIET ENJOYMENT, ACCURACY, AND NON-INFRINGEMENT OF THIRD-PARTY RIGHTS. LINORTEK DOES NOT GUARANTEE ANY SPECIFIC RESULTS FROM THE USE OF THE SOFTWARE. LINORTEK MAKES NO WARRANTY THAT THE SOFTWARE WILL BE UNINTERRUPTED, FREE OF VIRUSES OR OTHER HARMFUL CODE, TIMELY, SECURE, OR ERROR-FREE. YOU USE THE SOFTWARE AND THE LINORTEK PRODUCT AT YOUR OWN DISCRETION AND RISK. YOU WILL BE SOLELY RESPONSIBLE FOR (AND LINORTEK DISCLAIMS) ANY AND ALL LOSS, LIABILITY, OR DAMAGES RESULTING FROM YOUR USE OF THE SOFTWARE
AND LINORTEK PRODUCT. - حدود المسؤولية.
لا شيء في اتفاقية ترخيص المستخدم النهائي هذه وعلى وجه الخصوص ضمن بند "تحديد المسؤولية" هذا يجب أن يحاول استبعاد المسؤولية التي لا يمكن استبعادها بموجب القانون المعمول به.
إلى الحد الأقصى الذي يسمح به القانون المعمول به ، بالإضافة إلى إخلاء المسؤولية عن الضمان أعلاه ، لن تكون (أ) LINORTEK مسؤولة بأي حال من الأحوال عن أي أضرار تبعية أو نموذجية أو خاصة أو عرضية ، بما في ذلك الأضرار أو الأضرار ، بما في ذلك الخسائر. من أو فيما يتعلق بالمنتجات أو البرامج ، حتى إذا كانت شركة LINORTEK على علم أو يجب أن تكون على علم بإمكانية حدوث مثل هذه الأضرار ، و (ب) المسؤولية التراكمية الإجمالية لشركة LINORTEK الناشئة عن أو المتعلقة بالمنتجات والبرامج الأخرى يجب أن يقتصر على مبلغ لا يتجاوز المبلغ الذي دفعته فعليًا إلى الموزع المعتمد لشركة LINORTEK و LINORTEK أو ممثل المبيعات للمنتجات أو الخدمات قيد الإصدار في الأشهر الستة السابقة (إن وجدت). هذا القيد تراكمي ولن يزداد بسبب وجود أكثر من حادثة أو مطالبة واحدة. تُخلي LINORTEK مسؤوليتها من أي نوع من موردي ومُرخصي LINORTEK. - الامتثال لقوانين التصدير.
أنت تقر بأن البرنامج والتكنولوجيا ذات الصلة تخضع لقوانين مراقبة الصادرات الأمريكية، وولاية التصدير الأمريكية، وقد تخضع للوائح التصدير أو الاستيراد في بلدان أخرى. أنت توافق على الالتزام الصارم بجميع القوانين واللوائح الدولية والوطنية المعمول بها والتي تنطبق على البرنامج، بما في ذلك لوائح إدارة التصدير الأمريكية بالإضافة إلى قيود المستخدم النهائي والاستخدام النهائي والوجهة الصادرة عن الولايات المتحدة والحكومات الأخرى. أنت تقر بأنك تتحمل مسؤولية الحصول على ترخيص لتصدير أو إعادة تصدير أو استيراد البرنامج والتكنولوجيا ذات الصلة، حسب الاقتضاء.
سوف تقوم بتعويض شركة Linortek وحمايتها من أي وجميع المطالبات والخسائر والالتزامات والأضرار والغرامات والعقوبات والتكاليف والنفقات (بما في ذلك أتعاب المحاماة) الناشئة عن أو المتعلقة بأي خرق من جانبك لالتزاماتك بموجب هذا القسم. - تكليف.
لا يجوز لك التنازل عن أي من حقوقك أو التزاماتك بموجب اتفاقية ترخيص المستخدم النهائي هذه ، وستكون أي محاولة للتنازل باطلة وبدون تأثير. - الإشعارات.
قد تقدم Linortek أي إشعار لك متعلق باتفاقية ترخيص المستخدم النهائي EULA باستخدام البريد الإلكتروني والعنوان اللذين قدمتهما عند التسجيل في Linortek. - التنازل
لكي تكون سارية المفعول ، يجب أن تكون جميع التنازلات المقدمة من Linortek أدناه مكتوبة وموقعة من قبل ممثل Linortek المعتمد. أي فشل آخر لشركة Linortek في تنفيذ أي بند أدناه لن يُعتبر تنازلاً. - قابلية.
سيتم تعديل وتفسير أي بند من أحكام اتفاقية ترخيص المستخدم النهائي هذه والذي يتبين أنه غير قابل للتنفيذ لتحقيق أهداف هذا الحكم إلى أقصى حد ممكن بموجب القانون المعمول به وستظل جميع الأحكام المتبقية سارية المفعول والتأثير الكامل. - القانون الذي يحكم؛ مكان.
You agree that this EULA, and any claim, dispute, action, cause of action, issue, or request for relief arising out of or relating to this EULA, will be governed by the laws of the state of North Carolina, U.S.A., without regard to conflicts of laws principles, provided that if you reside in a country that will not apply U.S. law to disputes related to these terms, then the laws of your country will apply. You also agree that the United Nations Convention on Contracts for the International Sale of Goods shall not
apply. You agree that regardless of any statute or law to the contrary, any cause of action against us arising out of or related to the Linortek webيجب أن يبدأ الموقع أو البرنامج أو منتجات Linortek في غضون عام واحد (1) بعد استحقاق سبب الدعوى أو أن يتم إبطال سبب الدعوى نهائيًا. يجب رفع أي إجراء أو إجراء يتعلق باتفاقية ترخيص المستخدم النهائي (EULA) أمام محكمة فيدرالية أو محكمة تابعة للولاية تقع في رالي بولاية نورث كارولينا ، ويخضع كل طرف بشكل لا رجوع فيه إلى الاختصاص القضائي ومكان أي محكمة من هذا القبيل في أي مطالبة أو نزاع من هذا القبيل ، باستثناء أن لينورتيك قد يطلب أمرًا زجريًا الإغاثة في أي محكمة لها ولاية قضائية لحماية ملكيتها الفكرية. - اقتراح كاليفورنيا 65 تحذير.
 تحذير: يمكن أن يعرضك هذا المنتج للمواد الكيميائية بما في ذلك الرصاص، وهو معروف في ولاية كاليفورنيا بأنه يسبب السرطان. لمزيد من المعلومات، انتقل إلى www.P65Warnings.ca.gov.
ابدء
The Fargo SERVER is what is called a “bare board” product and is supplied without a housing. It operates on low voltage; however you need to use simple handling precautions to prevent damage to the circuits. All electronics are susceptible to electrostatic discharge. This high voltage “shock” can permanently damage your device. Before handling the product, you should touch a surface such as a grounded workbench or table. It is also best to handle the device from its edges. If you notice that your chair or clothes often cause static discharges, you must exercise extra caution. The unit is supplied with four rubber feet which keeps the bottom of the board from coming into contact with the surface you put it on. Be careful not to let metal objects, such as screw drivers or hardware, come in contact with the bottom of this product. The board can be mounted on a panel using stand offs and #4 hardware. The mounting holes are connected to the GROUND signal. The SERVER unit is a self-contained web server configured with various input and output circuits. Although the relays are rated for higher voltages ، هذا المنتج غير مصمم للاستخدام في line voltages. You should never use voltages through the SERVER product exceeding 48 volts. IT IS NOT SAFE.
The KODA SERVER is a housed unit with a DIN rail mountable enclosure that can be snapped onto a DIN rail or attached to any flat surface such as a wall or under a counter. KODA 100 has two relays (48VAC@1A), KODA 200 has four relays which can drive 10V 50mA to external devices. The unit is supplied with a DIN Rail mountable enclosure with removable terminal connectors for easy installation. The KODA SERVER can be mounted on a panel or on the wall using the DIN rail mount clip. The removable wire terminal connectors simplify field installation and allow for easy troubleshooting and maintenance: the unit can be removed from the system without disturbing the system wiring.
الأسلاك الخادم
ملحوظة: For a diagram showing the location of all connectors on your SERVER referenced in this section, please see the section – Board Layout Reference.
حذر: هذه الوحدات معزولة عن الأرض. قم بالاتصال دائمًا بحيث تكون حلقة الطاقة متصلة فقط بوحدة الخادم.
لا تستخدم التوصيلات الأرضية الخارجية. قد يؤدي القيام بذلك إلى إتلاف الجهاز الأصلي للخادم أو POE.
- Place the unit on a table or bench being careful not to let any metal objects come into contact with the bottom of the circuit board (Fargo Only).
- Connect the 12VDC power supply to a suitable AC outlet and plug the barrel connector into the SERVER at the location labelled “12VDC/POWER”. Alternatively, you may also use POE. At this point the GREEN/Boot LED should come on and start flashing indicating the SERVER is operating and is in the “Bootload Mode”. This mode allows the user to update the server software that is used on the unit. After about 5 seconds, the GREEN LED will go off and the RED LED will start blinking once per second indicating the SERVER is operating in “Server Mode” and is accessible on a network utilizing TCP/IP protocols.
حذر: عند استخدام مفتاح شبكة POE ، لا تستخدم مصدر طاقة 12VDC لتزويد الخادم بالطاقة في نفس الوقت ، فسيؤدي ذلك إلى إتلاف اللوحة. - Plug an Ethernet cable into the RJ45/NET connector. The “Connection” LED will come on if a 100MHz network is available, otherwise it will remain off and the “Activity” LED should start blinking indicating network activity. Fargo G2 Relay Connections
There are 8 relays on the FARGO R8 and 4 on the FARGO R4. These are dry contact relays. These units are designed for only low voltagالتحكم الإلكتروني ويجب ألا يحتوي على مجلدtage applied to the relay greater than 48 volts. This is for your safety as well as to stay within the parameters of the parts and circuit board design. The relays have 3 terminals labelled NO, C and NC which stand for Normally Open, Common and Normally Closed. When activated, the relay moves the connection from CNC to CNO. If you want to make a connection when the relay is activated, connect your wires between C and NO. When the relay is activated C and NO will be connected together. If you want to break a circuit when the relay is activated, make your connections to C and NC. When the relay is activated the circuit will be broken (or open)
Koda Relay Connection
There are 2 relays on the KODA 100. The KODA 100 has 2 removable 2 position connectors (1 for each relay) and are simply numbered “1” and “2”. These relays are normally open.
There are 4 relays on the KODA 200. The KODA 200 has 1 removable 8 position connector. Each relay has a “+” connection and a numbered connection. The relays may be set to supply about 10VDC by selecting “+V” on the setting switch (see Board Layout Reference page 29) or set to dry contact DC on the switch. If “+V” is selected then the voltage will be present on the “+” terminal and the numbered terminal is the return. Otherwise, a normally open dry contact exists across the “+” and numbered connection. KODA 100/200 is designed for only low voltagالتحكم الإلكتروني ويجب ألا يحتوي على مجلدtagيتم تطبيقه على المرحل الذي يزيد عن 48 فولت. وهذا من أجل سلامتك وكذلك للبقاء ضمن معايير الأجزاء وتصميم لوحة الدائرة.

![]() لن تكون شركة LINOR مسؤولة بأي حال من الأحوال ، سواء في العقد أو الضرر أو غير ذلك ، عن أي أضرار عرضية أو خاصة أو غير مباشرة أو تبعية أو عقابية ، بما في ذلك ، على سبيل المثال لا الحصر ، الأضرار الناتجة عن أي خسارة في الاستخدام أو فقدان الوقت أو الخسائر التجارية أو الأرباح المفقودة أو المدخرات أو الإيرادات إلى الحد الكامل التي يجوز إخلاء المسؤولية عنها بموجب القانون.
لن تكون شركة LINOR مسؤولة بأي حال من الأحوال ، سواء في العقد أو الضرر أو غير ذلك ، عن أي أضرار عرضية أو خاصة أو غير مباشرة أو تبعية أو عقابية ، بما في ذلك ، على سبيل المثال لا الحصر ، الأضرار الناتجة عن أي خسارة في الاستخدام أو فقدان الوقت أو الخسائر التجارية أو الأرباح المفقودة أو المدخرات أو الإيرادات إلى الحد الكامل التي يجوز إخلاء المسؤولية عنها بموجب القانون.
إشعار آخر حول تقييد الاستخدام
ما لم يذكر على وجه التحديد ، هذا المنتج غير مصمم لتبديل حجم الخطtagالأجهزة الإلكترونية. يشمل هذا القيد جميع منتجات FARGO و KODA. للتحكم في الجهاز الذي يعمل على الخط المجلدtagيجب أن يقوم المستخدم بتثبيت جهاز وسيط مثل المرحل.
عند توصيل الأسلاك بخط المجلدtagإذا كان الجهاز يستخدم جهازًا وسيطًا، فيجب أن تكون إما كهربائيًا مؤهلاً أو تستخدم خدمات كهربائي مؤهل. بالإضافة إلى ذلك، يجب اتباع القوانين المحلية بما في ذلك، على سبيل المثال لا الحصر، حجم مقياس السلك والمكان المناسب.
Linortek cannot assume any responsibility for harm to the user or third parties for improperly using our Fargo/Koda products. This liability remains with the user. Linortek cannot assume any responsibility for damage to the device for improperly using our SERVER product.
For relay specifications, please see Board Reference Layout page 29
Digital Input Connections (Fargo R4 and Koda)
The digital inputs allow the SERVER to detect an external on/off state of a sensor. With this information the SERVER can display whether an input is on or off, count events in a resettable or non-resettable counter, and calculate the frequency (such as for use as a tachometer) or the period of the input. There are two modes of operation for the digital inputs – PULL UP and ISOLATED.
a) PULL UP mode connects a 1K resistor to an internal voltage مما يسمح لك باستخدام مفتاح بسيط (مثل مفتاح الباب المغناطيسي) عبر المحطتين 1 و2. وهذا عندما يتم تنشيط المفتاح، يتم إرسال إشارة إلى الإدخال.
b) ISOLATED mode allows you to directly drive the SERVER’s optoisolator with an external voltagعلى الرغم من المقاوم الداخلي 1K. هذا المجلدtagقد يكون e في نطاق 5 فولت إلى 24 فولت، مما يوفر ما لا يقل عن 2 مللي أمبير أو بحد أقصى 30 مللي أمبير للصمام الثنائي للعازل الضوئي. لا يوجد اتصال داخلي آخر بهذا المجلدtage so it is an isolated input. Please note, when connecting a 12VDC-¬24VDC circuit to the input, an external resistor (can be provided at request, 2.2k ohm 0.5watt) must be used.
These modes are selected by the switch on the SERVER (see Board Layout Reference page 29) marked ISO and PU for isolated and pull up respectively. These are set at the factory to ISO by default.
Wiring a push button: For distances up to 500 feet, a 20 AWG shielded wire is suitable for wiring a push button. If the distance between the push button and the controller extends up to 5,000 feet, use a 16 AWG shielded cable instead. Keep in mind that longer cable runs are more susceptible to signal interference.
حذر: If you intend to use isolated mode, verify that the input switch is set to ISO before applying an external voltagه. قد يؤدي القيام بخلاف ذلك إلى إتلاف الخادم أو جهاز إنشاء POE.
Analog Input Connections (Fargo R4ADI)
The analog inputs allow the SERVER to read the value of external equipment. There are 2 analog inputs.
For AC current monitoring, use one of the two 3.5mm stereo inputs to interface with a current sensor.
يتم توصيل كتلتي طرفية الإدخال التناظرية بأجهزة استشعار تيار غير معزولة بجهد 2-0 فولت والتي يمكن توصيلها بمجموعة متنوعة من الأجهزة مثل أجهزة استشعار درجة الحرارة أو الضغط. يوفر الخادم اتصالاً أرضيًا وطاقيًا بحيث يمكن إجراء القياسات بدون حجم خارجيtage references. You should use a sensor that is isolated so that that it makes no connection to a remote ground. See drawing under Board Reference Layout page 29.
Accessing your SERVER
بمجرد تشغيل الخادم الخاص بك وتوصيله بالشبكة، سيحصل تلقائيًا على عنوان IP عبر DHCP طالما تم تكوين جهاز التوجيه الخاص بك للقيام بذلك. للاتصال، أدخل عنوان IP الخاص بك web browser. This will take you to your SERVER’s landing page. To log in, click the Log In button on the top right of the page. Your browser will prompt you to enter your username and password. By default, these credentials are both set to admin. To find your SERVER’s IP address, see below.
العثور على عنوان IP الخاص بك مع Linortek Discoverer
سيقوم برنامج Discoverer تلقائيًا بتحديد موقع الخادم الخاص بك. إن Discoverer هو برنامج Java، ويتطلب تثبيت Java Runtime لاستخدام هذه الميزة. جافا يمكن العثور عليها هنا: http://java.com/en/download/index.jsp.
لتنزيل برنامج Discover ، يرجى الانتقال إلى: https://www.linortek.com/downloads/supportprogramming/
يوصى باستخدام متصفحي Chrome و Firefox. يرجى ملاحظة ما يلي: إذا كنت تفضل استخدام Internet Explorer ، فإن Internet Explorer يحفظ Linortek Discoverer كملف Zip file بشكل افتراضي. لاستخدام Discoverer ، ستحتاج إلى تحديد حفظ باسم وإعادة تسمية ملف file باسم Linortek Discoverer.jar عند التنزيل.
عند تنزيل برنامج Discover، سترى أحيانًا رسالة تحذير منبثقة بناءً على إعدادات أمان المتصفح لديك، تسألك عما إذا كنت تريد الاحتفاظ بهذا البرنامج أو التخلص منه file, please click the Keep button as this is a Java program, and it won’t harm your computer.
بمجرد تحديد Discoverer لجهازك ، سيعرض:
- عنوان IP
- اسم المضيف
- عنوان MAC
- معلومات أخرى:
أ. LED أزرق (إذا كان مضاءً)
ب. اسم المنتج
ج. مراجعة برنامج الخادم
د. رقم المنفذ (إذا تم نقله)

انقر فوق الجهاز الذي تريد استخدامه الموضح في برنامج Discoverer لبدء تشغيل الخادم web pages in your browser. Click the Login button on the homepage. The default username/password is: admin/admin. You may change these as you desire or disable this feature in the settings menu.
Connecting your SERVER Directly to Your PC
You can also plug your SERVER directly to your PC if there is no network connection available. If you plug your SERVER into your PC’s Ethernet port it will use the default IP address: 169.254.1.1 unless you have previously configured your SERVER to use a static IP. Enter 169.254.1.1 into your web browser to connect. No internet connection is required. Once configured, you can then install your SERVER where you desired.
تكوين الخادم
تسجيل الدخول
Once you have entered the IP address and port number, if set, the Login page will open. This page shows the name of this server which you may change in Configure/Network Config.
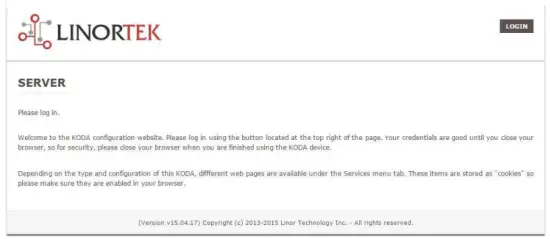
This page is static with no background activity and is a useful place to park if you are not using the SERVER and do not want to close the connection.
By pressing LOGIN, you will be asked for your username and password. These credentials will be retained by the browser until the browser is closed. You can disable the password requirement in Settings page. See section page 21.
الصفحة الرئيسية
بمجرد إدخال بيانات اعتماد تسجيل الدخول الخاصة بك، سيتم إعادة توجيهك إلى الصفحة الرئيسية للتطبيق. تعرض الصفحة الرئيسية أو صفحة الفهرس بعض معلومات النظام وتوفر القدرة على تحديد موقع الجهاز الفعلي إذا كان موجودًا في منطقة بها أشخاص آخرون. انظر القائمة أدناه للحصول على الوصف.

- TIME – Displayed along with the day of the week. This time may be set to be in a 12 hour format with AM/PM indicator or 24 hour format.
- التاريخ - يتم عرض التاريخ الحالي هنا.
- فولت – المجلدtagيتم عرض البريد على اللوحة. قد يكون هذا مفيدًا إذا كان الخادم مزودًا بالطاقة مع معدات أخرى، المجلدtage variance can be noted. Fargo and Koda servers have an input voltage range of 1248vDC.
- TEMPERATURE – Temperature on the board is displayed. This display may be either °C or °F. This temperature will be affected by the heat generated by SERVER itself so it will always be slightly higher than ambient temperature.
- مصابيح LED - هناك 3 مصابيح LED معروضة. مؤشر LED الأحمر هو نبض النظام. يجب أن يومض هذا مرة واحدة في الثانية تقريبًا طالما أن الخادم قيد التشغيل. يتم استخدام مؤشر LED الأخضر لخيارات أداة تحميل التشغيل ولا يكون مرئيًا بشكل عام على الجهاز webموقع. مصباح LED الأزرق قابل للنقر ويمكنك تشغيله وإيقاف تشغيله من خلاله web صفحة. يعد هذا مفيدًا لتحديد موقع الجهاز فعليًا إذا كان قيد الاستخدام مع وحدات أخرى مماثلة لأنه سيضيء على الوحدة التي يتصل بها هذا web المتصفح متصل. سيلاحظ برنامج Discoverer أيضًا ما إذا كان مؤشر LED الأزرق قيد التشغيل. يُشار إلى هذا غالبًا بوظيفة "تحديد الموقع".
خدمات
علامة التبويب "الخدمات" ديناميكية وستتغير وفقًا لتكوين الخادم الخاص بك. هذا هو المكان الذي يمكنك فيه التحكم في المدخلات والمخرجات وأجهزة الاستشعار وعناصر التحكم المتخصصة الأخرى.
In/Out or Relays Page
Depending on which SERVER you are using, the first page on the SERVICES tab will be either In/Out or Relays.
In/Out has the relay controls and the input controls on one page, while Relays only has the relay controls.
التحكم في التتابع
An In/Out page is displayed below. Some relay control pages have 2, 4 or 8 relays displayed. Each relay has a number, in this case 1 to 4.

The State LED shows whether the relay is on or off indicated by GREEN and RED respectively. This icon is clickable to manually control the corresponding relay. Each relay can have a Name as well as identifiers for the Normally Open, Common and Normally Closed connections.
هناك أربعة مصابيح LED للحالة تظهر:
- Email – If an email is to be sent when this relay is switched on/off
- النبض - إذا تم ضبط هذا التتابع مع عرض النبض ومضاعف عرض النبض (المدة) - راجع القسم التالي لمزيد من المعلومات
- Sched. – If there is a schedule created in the Tasks page (see page 15) set to automatically trigger this relay.
- موقوت - إذا تم ضبط النبض وتم تنشيط هذا المرحل، سيتحول مؤشر LED الموقوت إلى اللون الأحمر ليوضح أن المرحل يعمل حاليًا على مؤقت.
Click the Edit Icon to edit the controls for the corresponding relay. This will take you to the Set Relay page (see page 11).
المدخلات
The In/Out or Inputs page (depending on your SERVER) will display information from each input. The SERVERs have a combination of inputs. The Fargo R4DI has four digital inputs, The R4ADI has, four digital inputs, four analog inputs. The KODA SERVER has two digital inputs.
At the top of each input is a label (ex: DIN 1, AIN 2) specifying whether it is a digital input (DIN) or analog input (AIN) as well as the input number. This label will turn green when the input is enabled. Inside the box will be any display configured from the Set Input page (see page 12 for digital input, page 14 for analog input). A red dot in the lower-left corner indicating the state of a linked relay (if any), will turn green when the linked relay is activated.
Finally, an Edit icon in the lower-right corner of the box to edit the corresponding input. This will take you to the Set Digital Input or Set Analog Input page (page 12 or page 14).
Set Relay Page
تسمح لك صفحة SET RELAY بتعيين خصائص مختلفة تتعلق بالمرحل.
- Relay Select – The Relay that you are editing (identified by the line on which you clicked the Edit icon on the RELAY page).
- Name – Enter a 15-character Relay Name. This and the following 3 fields may be used for any identifying information desired.
- NO Name – Enter a 7-character name for the Normally Open (NO) connection.
- Com Name – Enter a 7-character name for the Common (COM) connection.
- NC Name – Enter a 7-character name for the Normally Closed (NC) connection.
- Pulse Width – When you control the relay it turns on or off. You may control it for a timed turned on period by entering a Pulse Width when 0 means there is no timed event and a number represents duration of the pulse. The maximum number you can enter here is 4 digits, ie. 1234.
- مضاعف عرض النبض - لتحديد طول النبضة بشكل أكبر، حدد مضاعف عرض النبضة لتحديد عرض النبضة بشكل أكبر. يمكنك الاختيار:
• لا شيء
• mS (Millisecond, 1/1000 second)
• Sec (Seconds)
• Min (Minutes) - نوع الترحيل - يمكن للخادم الوصول إلى المرحلات فعليًا على الخادم أو باستخدام وسائل أخرى. يمكنك اختيار:
• Normal – relay physically on the SERVER
• Latched – not currently supported
• Remote – a relay on another SERVER accessed over the network
• Zigbee – a relay at a remote device accessed over an RF system
• Normal and Remote – both relays activated
• Normal and Zigbee – both relays activated - معرف الموقع - هذا رقم يحدد موقعًا بعيدًا
- المرحل في الموقع - رقم يمثل المرحل أو الجهاز في الموقع
- إرسال بريد إلكتروني - يمكن برمجة الخادم لإرسال بريد إلكتروني في حالة تشغيل المرحل أو إيقاف تشغيله.

تعيين صفحة الإدخال الرقمي
يمكن ضبط المدخلات الرقمية لتوفير قراءات متنوعة حول استخدام مجموعة من أنواع العرض. بالإضافة إلى عرض بيانات الإدخال، يمكنك تسمية العرض بالإضافة إلى ربط المرحل به. سيتغير هذا التتابع من اللون الأخضر إلى اللون الأحمر أثناء انتقاله من وضع التشغيل إلى وضع الإيقاف بالإضافة إلى إمكانية النقر عليه للتحكم فيه. من خلال النقر على أيقونة تحرير القلم الرصاص، يمكنك تعديل إعدادات هذا الإدخال:
- Digital Input Selected – The Digital Input that you are editing (identified by the line on which you clicked the Edit icon).
- الاسم - يمكنك تعيين اسم مكون من 15 حرفًا لهذا الإدخال. يظهر هذا الاسم في الشريط الموجود أعلى الشاشة.
- التسمية - قم بتعيين تسمية مكونة من 7 أحرف يتم عرضها على الشاشة النشطة الفعلية.
- المصحح – باستخدام هذا الحقل، يمكنك إضافة قيمة أو طرحها أو ضربها أو قسمتها قبل أن تظهر القيمة على صفحة العرض. هذا مصحح ذو قيمتين يتم فصل كل منهما بمسافة واحدة. (على سبيل المثال "+2، -2، *2، /3")
- الاستخدام – يضبط هذا الإدخال على الوضع النشط. يحول مؤشر رقم الإدخال إلى اللون الأخضر. تجدر الإشارة إلى أنه عند الاستخدام، يستهلك الإدخال وقت وحدة المعالجة المركزية والموارد الأخرى حسب نوعه. على الرغم من أن جميع المدخلات قد تكون نشطة في نفس الوقت، فمن المستحسن تشغيل المدخلات التي تريد استخدامها فقط.
- النوع - يمكن استخدام بيانات الإدخال لحساب نطاق من النتائج. يمكنك اختيار:
• State – This is useful for knowing if an input is on or off, like a door switch being on or off.
• CounterNR – This is a non-resettable counter.
• CounterR – This is a resettable counter.
• Frequency – Counts the frequency of an input in KHz (kilo hertz or1/1000 seconds). This could be useful in displaying a tachometer where 60Hz = 1 R.P.M.
• Period – in 1/1000 seconds an input in kHz (milliseconds or1/1000 seconds). This would be useful for measuring timed events. - العرض - يتيح لك هذا التحديد تغيير نوع العرض المستخدم. يمكنك الاختيار:
• Dot – A single dot with the value in the middle. This can be used for State. You can make a dumb indicator by changing the color of the Dot based on the value. The label is under the Dot.
• Values – Displays the Corrected Value with the Label in a box directly below it.
• Meter – This Meter has configurable scale based on the Min/Max values and arcs can be colored per the Color ranges. The Label is displayed within the Meter.
• VBar – Also based on the Min/Max values for the scale and the bar changes color based on the values in the Color ranges. - Relay L/T – Enter a Relay number here. If it is a local relay it will show GREEN or RED depending if it is on or off. By clicking on it the relay will turn on and off. The name comes from the relay settings page. This may be useful if you want to turn the subject of a display on and off. Any relay can be used on any input and each may be reused for any other input. Adding an L after the relay number (ex: 2L) will link the state of the input to the state of the relay. This is an easy and immediate way to have an input follow the relay. Adding a T after the relay number will trigger the relay to the state of the input. This is an easy and immediate way to have a relay follow the input.
- Command Z/N/I – This field is used for issuing various commands to the Digital Input controller: Z Zero the resettable counter. N Leave the input as Normal. I Invert the input.
- Value – These are Min/Max values used for the display. This is useful for preventing a Meter from going past its end or setting the value of a VBar. This is the Value after the Corrector. The system cannot display a value past Max, so be sure this is at least set to 1.
- أصفر/أحمر/أخضر - هناك ثلاثة ألوان يمكن استخدامها لتعريف الشاشة بشكل أكبر. قم بتعيين نطاق هذه الألوان لتحديد لون لقيمة العرض. هذه هي القيمة بعد المصحح. لاحظ أنه إذا كنت تستخدم نوع الحالة، فقد ترغب في تعيين الأحمر = من 0 إلى 0، والأخضر = من 1 إلى 1، والأصفر = من 2 إلى 2. وبما أن الحالة تكون دائمًا إما 1 أو 0، فإن هذا سيمنع المعلومات الغامضة و منع استخدام اللون الأصفر. يمكنك تحديد أي لونين تريدهما لنوع الحالة.

Set Analog Input Page
يمكن ضبط المدخلات التناظرية لتوفير قراءات متنوعة حول استخدام مجموعة من أنواع العرض. بالإضافة إلى عرض بيانات الإدخال، يمكنك تسمية العرض بالإضافة إلى ربط المرحل به. سيتغير هذا التتابع من اللون الأخضر إلى اللون الأحمر أثناء انتقاله من وضع التشغيل إلى وضع الإيقاف بالإضافة إلى إمكانية النقر عليه للتحكم فيه.
- Analog Input Selected – The Analog Input that you are editing (identified by the line on which you clicked the Edit icon).
- الاسم - يمكنك تعيين اسم مكون من 15 حرفًا لهذا الإدخال. يظهر هذا الاسم في الشريط الموجود أعلى الشاشة.
- التسمية - قم بتعيين تسمية مكونة من 7 أحرف يتم عرضها على الشاشة النشطة الفعلية.
- المصحح – باستخدام هذا الحقل، يمكنك إضافة قيمة أو طرحها أو ضربها أو قسمتها قبل أن تظهر القيمة على صفحة العرض. هذا مصحح ذو قيمتين يتم فصل كل منهما بمسافة واحدة. (على سبيل المثال "+2، -2، *2، /3")
- USE – Sets this input to active. Turns the input number indicator to GREEN. It should be noted that when in use the input consumes CPU time and other resources depending on its type. Although all inputs may be active at the same time, it is recommended to turn on only those you want to use.
- النوع - يمكن استخدام بيانات الإدخال لحساب نطاق من النتائج. يمكنك اختيار:
• Analog 1 – Analog 1 input from a SERVER with an input such as found on a R4ADI.
• Analog 2 – Analog 2 input from a SERVER with an input such as found on a R4ADI.
• AC Current 1 – AC current sensor 1 input from a SERVER with an input such as found on a R4ADI.
• AC Current 2 – AC current sensor 2 input from a SERVER with an input such as found on a R4ADI.
• AC Current 3 – Not used
• Volts – The measurement of the voltage powering the SERVER.
• Current – On “S” models, this is the current consumed by the SERVER.
• Int. Temp – Temperature from the board mounted sensor.
• Ext. Temp – Temperature from the “S” model SERVER.
• R. Humidity – % Relative Humidity from the “S” model SERVER.
• MMA X – The X axis accelerometer data from the “S” model SERVER.
• MMA Y – The Y axis accelerometer data from the “S” model SERVER.
• MMA Z – The Z axis accelerometer data from the “S” model SERVER. - العرض - يتيح لك هذا التحديد تغيير نوع العرض المستخدم. يمكنك الاختيار:
1. Dot – A single dot with the value in the middle. This can be used for State. You can make a dumb indicator by changing the color of the Dot based on the value. The label is under the Dot.
2. Values – Displays the Corrected Value with the Label in a box directly below it.
3. Meter – This Meter has configurable scale based on the Min/Max values and arcs can be colored per the Color ranges. The Label is displayed within the Meter.
4. VBar – Also based on the Min/Max values for the scale and the bar changes color based on the values in the Color ranges. - Relay – Enter a Relay number here. If it is a local relay it will show Green or RED depending if it is on or off.
By clicking on it the relay will turn on and off. The name comes from the relay settings page. This may be useful if you want to turn the subject of a display on and off. Any relay can be used on any input and each may be reused for any other input. - القيمة - هذه هي قيم الحد الأدنى/الحد الأقصى المستخدمة للعرض. يعد هذا مفيدًا لمنع جهاز القياس من تجاوز نهايته أو تحديد قيمة VBar. هذه هي القيمة بعد المصحح. لا يمكن للنظام عرض قيمة تتجاوز الحد الأقصى لذا تأكد من ضبطها على الأقل على 1.
- أصفر/أحمر/أخضر - هناك ثلاثة ألوان يمكن استخدامها لتعريف الشاشة بشكل أكبر. قم بتعيين نطاق هذه الألوان لتحديد لون لقيمة العرض. هذه هي القيمة بعد المصحح. لاحظ أنه إذا كنت تستخدم نوع الحالة، فقد ترغب في تعيين الأحمر = من 0 إلى 0، والأخضر = من 1 إلى 1، والأصفر = من 2 إلى 2. وبما أن الحالة تكون دائمًا إما 1 أو 0، فإن هذا سيمنع المعلومات الغامضة و منع استخدام اللون الأصفر. يمكنك تحديد أي لونين تريدهما لنوع الحالة.

Tasks Page
The TASKS page displays the automatic events that can be programmed into the SERVER. You can schedule up to 16 events in the SERVER. These are constructed as IF … THEN statements. In addition, the IF term can have 2 elements (IF a, AND/OR/NOT b … THEN c). This provides a simple to program and powerful way to take advantage of the data acquired by the SERVER. The Tasks page shows you an overview of configured tasks. You can click the dot in the State column to turn a task on or off indicated by a green dot for ON, and a red dot for OFF. To edit or create a task, click the Edit icon to the right of the task line. This will take you to the Set Schedule page detailed in the next section.

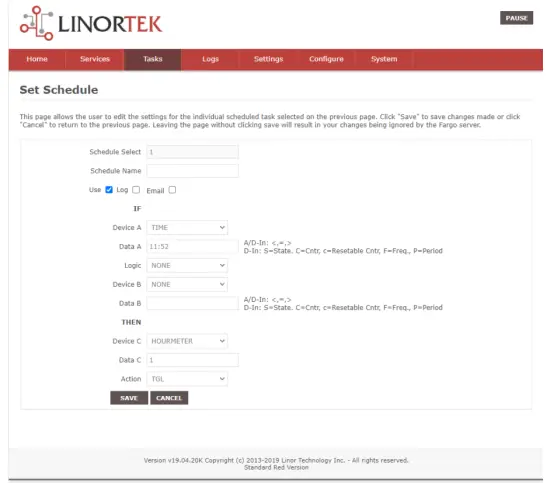
Set Schedule Page
The SET SCHEDULE page allows you to create time and logic-based events that will occur automatically if the conditions are met.
- Schedule Select – Determined by clicking on a schedule line from the previous page.
- Schedule Name – Enter a 15-character Schedule Name.
- USE – In order for a Schedule line to be active you must select the USE button. If there is an error detected in entering Schedule data, the USE box will automatically uncheck.
- السجل - حدد السجل ليظهر هذا العنصر في سجل النظام في كل مرة يتم تنفيذه.
- Email – Click Email to automatically send an email when this schedule is executed.
- Device A – Select Device A for the first term in the IF statement from the drop box.
- Data A – Select Data A for the above device. Depending on the device selected, the Data used for testing may have special properties. See the list below for Data that may be entered. If an error is detected indata entry when the “Save” button is pushed, the USE box will uncheck and the Data box containing the error will be highlighted.
• Minute – Enter: mm
• Hour – Enter: hh (use 24-hour system)
• Day – Enter: dd
• DayofWeek – Enter: Sunday = 1, Monday = 2, Tuesday = 3, Wednesday = 4, Thursday = 5, Friday = 6, Saturday = 7, Weekday = 8, Weekend = 9
• Time – Enter: hh:mm (use leading zeros, seconds are ignored) (use 24 hour system) ex:07:30 or 14:05
• Date – Enter: yy/mm/dd (use leading zeros) ex: 20/01/10 for January 10, 2020
• Relay – Enter: Relay number and (+ or -), ex: 01+ for Relay 1 ON or 01- for Relay 1 OFF
• Button – Enter: + or – (for ON or OFF respectively)
• Flag – Enter: Flag number(opt.+), or Flag number (for ON or OFF respectively)
• Temp – Enter: >, = or < value; exampلو: >40 (دائما درجة مئوية)
• Volts – Enter: >, = or < value; exampلو: <10
• Analog – Analog input. Enter an input number and >, = or < and value. Example: 3<123 (This value is raw data value prior to any Corrector used by the input display page.)
• Digital – Digital input. Enter Input Number, Type, >, =, or < and value; example: 1F>7500 (This value is the raw data value prior to any Corrector used on the display page). Type can be (case sensitive):
• S State (On/Off)
• C Non-resettable counter
• c Resettable counter (lower case ‘c’)
• F Frequency in 1/1000 seconds
• P Period in 1/1000 seconds - المنطق - قم بإعداد مقارنة منطقية بين الجهاز "أ" والجهاز "ب".
• AND – True if: Device A is true AND Device B is true
• OR – True if: Device A is true OR Device B is true
• NOT – True if: Device A is true and Device B is NOT true - Device B – Select Device B for testing from the drop box.
- البيانات ب - حدد البيانات ب للجهاز أعلاه. اعتمادًا على الجهاز المحدد، قد تحتوي البيانات المستخدمة للاختبار على خصائص خاصة. انظر القائمة أعلاه.
- الجهاز C – هو ما يجب التحكم فيه.
- البيانات ج - تعيين الخاصية للجهاز ج. يتم استخدام بناء الجملة على النحو التالي:
• RELAY – These are relays on this SERVER. You can set up to four per schedule. Enter separated by commas, for example "1,2,3,4"
• FLAG – This is a storage flag that can be used to make more complex schedules. There are 8 flags that can be turned on or off.
• REMOTE – Refers to a remote SERVER unit. When these conditions are met, this SERVER will send a command to control a remote SERVER. The Data field for a remote unit should be in the format,
“REMOTE UNIT NUMBER, REMOTE UNIT RELAY”. For exampلو "3,5،XNUMX". يجب تحديد هذه الخوادم البعيدة في صفحة تكوين/تكوين الجهاز البعيد.
• COUNTER – Adds count to digital input counter – set as 1 or 2 depending on which digital input is counting
• BLUE LED – No data.
• eMAIL – Will send eMail, no data.
• NOTIFY – Will send notification to Kodalert, set 1- 8 for Settings/Alarm Notification number. (Not Implemented) - الإجراء - ما يجب فعله بالجهاز C. الخيارات هي:
• ON – Turns device ON
• OFF – Turns device OFF
• TGL – Toggles state of Device C
• RESET – Resets CounterR

صفحة السجلات
The Logs tab displays over 10,000 entries from actions taken by the SERVER or by users themselves. This feature allows several actions for the convenience of displaying and collecting data from the SERVER.
- The checkboxes above the date allow the user to filter logs from different sources. To filter out logs you do not wish to see from a certain source simply uncheck the box.
- Each log has a reference number and a time and date attached in a “yyyy/mm/dd” and “hh:mm:ss” format. Afterwards is the event displayed.
- To scroll through the logs, use the arrows to the right-hand side, where the horizonal line and arrow brings you to the start or end, the double arrow moves up or down a page, and the single arrow moves up or down a single log.
- To refresh the logs manually click the REFRESH button below the Log Details.
- To download the Log Details, click the DOWNLOAD button below the Log Details, this allows you to save the logs as a separate file.
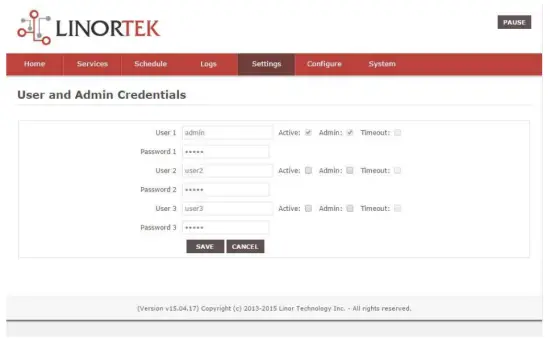
صفحة بيانات اعتماد المستخدم والمسؤول
استخدم هذه الصفحة من قائمة الإعدادات المنسدلة. هنا يمكنك إعداد ما يصل إلى ثلاثة مستخدمين لنظام الخادم الخاص بك. افتراضيًا، يكون المستخدم 3 فقط هو النشط. هنا يمكنك:
- User Name and Password – Each user has their own credentials. As a default these are set toadmin/admin, user2/user2 and user3/user3 for Users 1, 2 and 3 respectively. The passwords are never displayed. ملحوظة: when you reset the password, it must be less than 13-character.
- نشط – يجب التحقق من قيام هذا المستخدم بتسجيل الدخول، ولا يمكنك إلغاء تنشيط المستخدم 1.
- المسؤول – يمكن للمسؤول فقط حفظ البيانات في معظم الصفحات. وهذا يحمي الخادم الخاص بك من التغيير بواسطة شخص غير مصرح له.
- المهلة - غير ممكّنة في الوقت الحالي.
صفحة الوقت/التاريخ
استخدم هذه الصفحة من القائمة المنسدلة "الإعدادات". تسمح لك هذه الصفحة بإعداد نظام الوقت والتاريخ.
- Time – Set time using an hh:mm:ss format.
- التاريخ - اضبط التاريخ باستخدام تنسيق yy/mm/dd.
- Time Zone – Set desired time zone 5 for EST, 8 for PST, you can now add a :mm for setting part hour, for example، 5:30 هي منطقة زمنية عند 5 ساعات و30 دقيقة.
- استخدام التوقيت الصيفي – حدد لضبط وقت النظام تلقائيًا في يوم التوقيت الصيفي. (غير دقيق في جميع المناطق الزمنية.)
- استخدم وقت MIL – حدد لاستخدام تنسيق 24 ساعة.
- Use NTP Update – Select to synchronize SERVER time with NTP server
- برنامج إن تي بي Web الموقع - هذا هو خادم NTP المحدد للتحديثات.
- الفاصل الزمني لـ NTP – الفاصل الزمني بين التحديثات بالدقائق.
- Log NTP Event – Normally NTP exceptions will be logged, select this option to Log every NTP event. (May be useful in debugging.)

صفحة الإعدادات
Access this page from the Settings dropdown menu. Select these settings to enable various features in the SERVER
- Use Active Main – No longer used. (Select PAUSE to go inactive.)
- يتطلب تسجيل الدخول - إذا لم يتم تحديده، فسيسمح الخادم بالوصول بالكامل دون بيانات اعتماد.
- Use IP Ranges – Not Implemented.
- Use RESTFUL IP Ranges – Not implemented.
- Use Remote IP Ranges – Not implemented.
- استخدم مصادقة RESTful - اطلب اسم المستخدم وكلمة المرور لـ RESTful.
- تمديد نطاق التتابع - تمكين 8 مرحلات.
- استخدام أزرار راديو الترحيل - إذا تم ضبطها، فعند تشغيل أحد المرحلات، يتم إيقاف تشغيل جميع المرحلات الأخرى.
- SSL Port No. – Not supported – For future use.
- استخدام رسائل البريد الإلكتروني للنظام - لتمكين رسائل البريد الإلكتروني الإضافية.
- استخدام فهرنهايت – لتحديد درجة مئوية أو فهرنهايت.
- PGM Dynamic Relays – Changes properties of relays in task schedule.
- CLR PGMs on Start – Reinitialize tasks on start up.
- RTC Temperature Compensation – All Koda boards can add Temperature and Humidity sensor.
- استخدم AM2302 - استخدم مستشعر درجة الحرارة والرطوبة AM2302 (يباع بشكل منفصل).
- Java Report – Send data to HourCollector app over ethernet (only for IoTMeter)
- Use Metric – Not supported – For future use.
- UART Usage – Enter “Audio” for Netbell-NTG, “Clock” for Netbell clock.
- Switch Bypass (1/2) – Ignores physical inputs if set. For example, in a Koda 200 board, you want to ignore input 1 switch, check Switch Bypass 1
- Setting 19 – Not supported – For future use
- استخدم الصوت File System – Activate SD Card reader for Netbell-NTG
- WiFi Report – Enable data transfer over WiFi (WiFi IoTMeter only)
- Active Landing Page – Not supported – For future use.
- . Invert Relay Control – The relay is set to NO by default. By checking this box the relay will be inverted to NC.
- Setting 24 – Not supported – For future use.

صفحة DNS الديناميكية
Access this page from the Configure dropdown menu. From this page you can assign dynamic DNS settings. This page, along with proper port forwarding through the router, can enable global access to a device behind a NAT router or firewall. You will need to assign a static IP address and port number (see Network Config Page on page 25) and port the IP address on your router (refer to your router’s user manual). An internet IP address will have to be hosted in order to access your SERVER from the internet. Currently the only IP hosting service supported is provided by DynDNS (https://dyn.com)
- استخدم DDNS – لتمكين هذه الخدمة.
- خدمة DDNS – حدد خدمة من المربع المنسدل. الخدمة الوحيدة المدعومة حاليًا هي DynDNS
- اسم المستخدم - يشير هذا إلى الحساب الذي تم إعداده في خدمة DDNS.
- كلمة المرور - كلمة المرور للوصول إلى خدمة DDNS.
- Host – This is the IP name registered at the DDNS service for rerouting to this SERVER

صفحة إعداد البريد الإلكتروني
قم بإعداد حساب بريد إلكتروني للخادم لاستخدامه في إرسال رسائل البريد الإلكتروني من وحدات مختلفة. قم بالوصول إلى هذه الصفحة من علامة التبويب "تكوين".
ملحوظة: This unit is NOT compatible with SSL/TLS, there are 3rd party SMTP delivery servers which do not require SSL and can be used. For instructions on how to use a 3rd party SMTP delivery service, please refer to Appendix 1 at the end of this manual).
- خادم SMTP – أدخل خادم البريد الصادر الذي تريد استخدامه.
- المنفذ - هذا هو المنفذ الموجود على ذلك الخادم. يمكنك البحث عن خدمة البريد الخاصة بك عبر الإنترنت للحصول على هذه المعلومات بالإضافة إلى حقول الإعداد الأخرى.
- استخدام SSL - اتركه بدون تحديد عند استخدام خادم SMTP لجهة خارجية.
- اسم المستخدم - اسم حساب البريد الإلكتروني الخاص بك.
- كلمة المرور - كلمة مرور حساب البريد الإلكتروني.
- To Address – Enter up to 3 address for this email set up. An addressee, a CC and a BC.
- الموضوع - سطر الموضوع في رأس البريد الإلكتروني.

صفحة تكوين الشبكة
Access this page from the Configure dropdown menu. This page allows the configuration of the SERVER’s network settings.
حذر: Incorrect settings may cause the board to lose network connectivity. In order to access a device in your network remotely you must PORT the device. This tells your router that information coming in should be sent to a specific device on your network.
- MAC Address – This is a unique MAC address that is assigned to this product at time of assembly. It cannot be altered.
- اسم المضيف – هذا هو اسم NetBios الذي قد يتم به توجيه هذه الوحدة في بعض الشبكات. وقد يظهر أيضًا في دليل التأجير الخاص بالموجه. وهو مكان مفيد لتسمية الخادم الخاص بك ويظهر على الصفحة الرئيسية وعلى Discoverer.
- رقم المنفذ – يصبح هذا جزءًا من عنوان IP وهو ضروري للوصول إلى الإنترنت. إذا لم يتم تعيين هذا، فإن الخادم يستخدم افتراضيًا رقم منفذ 80.
- IP Address – Typically you only change the last group of numbers. If you change this IP address make sure to reserve this IP on your router and no other devices are using this IP address or you may not be able to reach this SERVER. If this happens you may need to Restore Defaults using the push button method.
- البوابة – عادةً ما تكون عبارة عن جهاز توجيه على شبكة TCP/IP الخاصة بك يعمل كنقطة وصول إلى مزود خدمة الإنترنت الخاص بك.
- قناع الشبكة الفرعية – رقم مكون من 32 بتًا يخفي عنوان IP، ويقسم عنوان IP إلى عنوان شبكة وعنوان مضيف. اتركه على 255.255.255.0
- DNS الأساسي – DNS الأساسي.
- DNS الثانوي – DNS الثانوي.

صفحة تكوين نطاق IP
Access this page from the Configure dropdown menu. Use these security settings to select a range of IP address that will be allowed to access the SERVER.CAUTION: Incorrect settings may cause the board to lose network connectivity. Not implemented on this SERVER.
صفحة الأجهزة البعيدة
Access this page from the Configure dropdown menu. These settings allow the SERVER to remotely control the relays on another SERVER. This is done by selecting the Remote Device in the Schedule program or by setting up a relay as a REMOTE. There are 8 possible REMOTE locations.
حذر: ستؤدي الإعدادات غير الصحيحة إلى فقدان اللوحة لاتصالاتها عن بعد.
- اسم الجهاز – أدخل اسمًا نصيًا لهذا الجهاز للرجوع إليه في المستقبل.
- عنوان IP – عنوان IP للجهاز البعيد بما في ذلك رقم المنفذ.
- اسم المستخدم – يُستخدم في المصادقة الأساسية.
- Password – Used in Basic Authentication.

Kodalert Page
Not Yet Implemented. Access this page from the Configure dropdown menu. Kodalert provides an interface for alerts of Internet connected devices. Kodalert is a cloud based, open platform monitoring and alert system for the Internet of Things in your physical world. Any Thing that can send an email or TCP messages including our SERVERS, other manufactures devices and people using email can use Kodalert. It can work for multiple remote locations, alert multiple users instantly using the rules you setup by text, email, smart phone Apps push notification or audible alarm instantly when something happens.
- رقم التنبيه
- امتحان
- يستخدم
- قاعدة
In the Alarm Notification page, you can change the state (on/off) of the relay by clicking the green circle in the state column. Push the EDIT icon to change the Alarm’s settings.

تحديد
FARGO R8G2
- 10M/100M RJ45 Internet interface with connection and activity LEDs
- 8 Relay outputs, 1FORMC 48 Volt Max (24VAC/DC 3A)
- Status LEDs (pulse, bootloader, and locate)
- Ethernet Bootloader (for server hardware code upgrade)
- PoE or 12VDC @500mA (nominal)
- Web interface w/basic authentication
- On board temperature sensor and voltagجهاز الاستشعار الإلكتروني
Reset /Locate pushbutton (blue LED) - Working Temperature from 0 to +70 Celsius
- Storage Temperature from 40 to +125 Celsius
- Humidity from 10% to 80% noncondensing
- Dimensions 74mm x 100mm x 20mm, mounting holes 64mm x 92mm Ф 3.2mm 4 places
- البروتوكولات المدعومة: HTTP/SMTP/SNTP
FARGO R4G2
- 10M/100M RJ45 Internet interface with connection and activity LEDs
- 4 1FormC relays 48 Volt Max (24VAC/DC 3A)
- 2 optically isolated digital inputs, 12V 1mA or pulldown switch selectable, 2 conductor screw terminal connectors for each.
- 2 Analog 0-5VDC Inputs 30mA 3.3VDC power source PTC protected. 3 conductor screw terminal connectors for each (3.3VDC, input, ground) (R4ADI only)
- 2 Current sensor inputs. 3.5mm stereo jack connector for each (R4ADI only)
- Status LEDs (pulse, bootloader, and locate)
- Ethernet Bootloader (for server hardware code upgrade
- POE or 12VDC @500mA (nominal)
- Web interface w/basic authentication
- On board temperature sensor and voltagجهاز الاستشعار الإلكتروني
- Reset/Locate pushbutton
- Working Temperature from 0 to +70 Celsius
- Storage Temperature from 40 to +125 Celsius
- Humidity from 10% to 80% noncondensing
- Dimensions 74mm x 100mm x 20mm, mounting holes 64mm x 92mm Ф 3.2mm 4 places
- البروتوكولات المدعومة: HTTP/SMTP/SNTP
KODA100
- 10M/100M RJ45 Internet interface with connection and activity LEDs
- 2 1-Form-A relay 48VAC@8A Max
- 2 optically isolated digital inputs, 12V 1mA or pulldown switch selectable
- Status LEDs (pulse, bootloader, and locate)
- Ethernet Bootloader (for server hardware code upgrade)
- POE or 12VDC @500mA (nominal)
- Web interface w/basic authentication
- On board temperature sensor and voltagجهاز الاستشعار الإلكتروني
- Reset/Locate pushbutton (blue LED)
- Working temperature from 0 to +70 Celsius
- Storage temperature from 40 to +125 Celsius
- Humidity from 10% to 80% noncondensing
- الأبعاد: 70 مم × 100 مم × 25 مم
- البروتوكولات المدعومة: HTTP/SMTP/SNTP
KOD200
- 10M/100M RJ45 Internet interface with connection and activity LEDs
- 4 1FormA relays 48 Volt Max 1A dry contact or drive 10V ±10% 50mA to external devices
- 2 optically isolated digital inputs, 12V 1mA or pulldown switch selectable
- Status LEDs (pulse, bootloader, and locate)
- Ethernet Bootloader (for server hardware code upgrade)
- POE or 12VDC @500mA (nominal)
- Web interface w/basic authentication
- On board temperature sensor and voltagجهاز الاستشعار الإلكتروني
- Reset/Locate pushbutton (blue LED)
- Working Temperature from 0 to +70 Celsius
- Storage Temperature from 40 to +125 Celsius
- Humidity from 10% to 80% noncondensing
- الأبعاد: 70 مم × 100 مم × 25 مم
- البروتوكولات المدعومة: HTTP/SMTP/SNTP
تخطيط مرجع المجلس
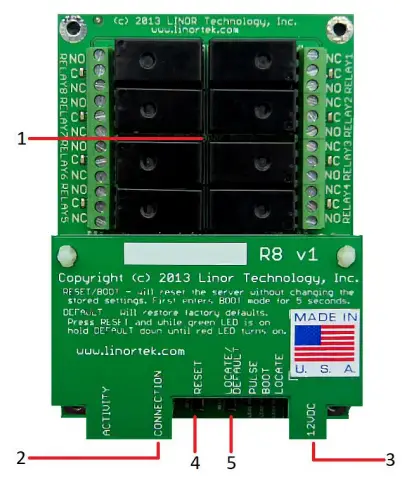
Fargo R8
- 8 Relay outputs, 1FORMC 48 Volt Max (24VAC/DC 3A)
- موصل Rj45
- موصل الطاقة (12VDC)
- زر إعادة الضبط
- حدد موقع الزر
Fargo R4
- 3.5mm Inputs for AC Current Sensor (R4ADI Only)
- Analog Inputs (R4ADI Only)
- 4 Relay outputs, 1FORMC 48 Volt Max (24VAC/DC 3A)
- المدخلات الرقمية
- Digital Input Switches (Input 1 on right.
Up: Pullup, Down: Isolated) - موصل Rj45
- زر إعادة الضبط
- حدد موقع الزر
- موصل الطاقة (12VDC)

كودا 100
- Digital Inputs (#1 on the left) 5VDC-48VDC (12VDC-48VDC must use the external resistor)
- Relay Outputs (#1 is on the right) 8A@48VAC Max
- Digital Input Switches (IN 1 on left. UP: Isolated, Down: Pullup)
- زر إعادة الضبط
- زر إعادة التحميل (يضيء مؤشر LED الأزرق - يحدد في Discoverer)
- موصل Rj45
- موصل الطاقة (12VDC)
- موصل USB صغير لمستشعر درجة الحرارة / الرطوبة (يُباع بشكل منفصل)

كودا 200
- Digital Inputs (#1 on the left) 5VDC-48VDC (12VDC-48VDC must use the external resistor)
- Relay Outputs (#1 is on left) 48 Volt Max 1A dry contact or drive 10V ±10% 50mA
- Digital Input Switches (IN 1 on left. UP: Isolated, Down: Pullup)
- Relay Switches (Up for dry contact, down for 10V/50mA)
- زر إعادة الضبط
- زر إعادة التحميل (يضيء مؤشر LED الأزرق - يحدد في Discoverer)
- موصل Rj45
- موصل الطاقة (12VDC)
- موصل USB صغير لمستشعر درجة الحرارة / الرطوبة (يُباع بشكل منفصل)

إعادة ضبط المصنع
To perform a factory Reset, push the Reset button. When the green LED turns on, push and hold the Reload button until the flashing red LED turns off and then turns on solid. Refer to Board Reference Layout section for the button locations on your device.
This user-manual supplements the documentation for the following Linortek products:
- نتبل -2
- نتبل -8
- Netbell-K (and variants)
- iTrixx-NHM
For more information, documentation and how-to videos, visit https://www.linortek.com/downloads/
يمكن العثور على هذا المستند في www.linortek.com/downloads/documentations/
إذا كنت بحاجة إلى مساعدة مع جهازك يرجى زيارة www.linortek.com/technical-support
Linor Technology، Inc.
المعلومات عرضة للتغيير دون إشعار مسبق.
الملحق 1
كيفية إرسال رسائل بريد إلكتروني عبر بروتوكول SSL باستخدام خدمة SMTP تابعة لجهة خارجية لأجهزة Linortek Fargo و Koda
بشكل افتراضي ، تستخدم أجهزة Koda / Fargo خوادم بريد SMTP غير SSL. لكن معظم خوادم البريد الإلكتروني قد تحولت اليوم إلى بروتوكول أمان SSL ، وهناك خوادم تسليم SMTP تابعة لجهات خارجية لا تتطلب SSL ويمكن استخدامها. هناك الكثير من مزودي خدمة البريد الإلكتروني SMTP في السوق. نحن نستخدم SMTP3GO كسابقample لإثبات عملية الإعداد. SMTP2GO مجاني للاستخدام مع ما يصل إلى 1000 بريد إلكتروني شهريًا. لاستخدام SMTP2GO ، يرجى زيارة: https://www.smtp2go.com/ .
الخطوة 1. قم بإنشاء حساب SMTP2GO.
لإنشاء حساب ، ما عليك سوى النقر فوق "تسجيل" ، واختيار "1K Emails" على المقياس ، واختيار "خطة مجانية" (إذا كنت بحاجة إلى إرسال أكثر من 1000 بريد إلكتروني شهريًا ، فحدد الخطة التي تلبي متطلباتك.)

لإنشاء حساب على SMTP2GO ، ستكون هناك حاجة إلى عنوان بريد إلكتروني للشركة. خدمة البريد الإلكتروني المجانية مثل Gmail أو Yahoo لن تسمح لك بالمتابعة. بعد تنشيط حساب SMTP2GO الخاص بك ، تحتاج إلى إضافة مستخدم.
الخطوة 2. إضافة مستخدم.
المستخدم الذي تقوم بإنشائه على SMTP2GO ، سيكون خادم البريد الصادر عندما تقوم بإعداد جهاز Fargo / Koda لإرسال تقارير البريد الإلكتروني ، يرجى التأكد من أن خادم البريد الإلكتروني الخاص بالشركة لن يحظر رسائل البريد الإلكتروني إذا كنت تستخدم حساب بريد إلكتروني مجاني مثل Yahoo أو Gmail أضف مستخدم هنا.
قم بتسجيل الدخول إلى حساب SMTP2GO الخاص بك ، في القائمة اليسرى ، اختر "إعدادات"> "مستخدمو SMTP" ، وانقر فوق "إضافة مستخدم SMTP" واملأ النموذج.
 بعد إضافة المستخدم إلى حساب SMTP2GO الخاص بك ، سيعرض المعلومات التي تحتاجها لإعداد إشعار البريد الإلكتروني على أجهزة Fargo / Koda الخاصة بك.

الخطوة 3. تكوين جهاز Linortek.
بعد إنشاء حساب وإضافة مستخدم ، قم بتسجيل الدخول إلى جهاز Linortek الخاص بك ، وانتقل إلى تكوين - صفحة إعداد البريد الإلكتروني لإعداد إشعار البريد الإلكتروني:
- خادم SMTP - أدخل خادم البريد الصادر الذي تريد استخدامه ، وهو mail.smtp2go.com في السابقampليه.
- المنفذ - هذا هو المنفذ الموجود على ذلك الخادم. منفذ SMTP هو 2525 في منطقتنا السابقةampليه.
- استخدام SSL - اتركه بدون تحديد عند استخدام خادم SMTP لجهة خارجية.
- اسم المستخدم - اسم المستخدم من SMTP2GO عندما أنشأنا مستخدمًا في الخطوة السابقة.
- كلمة المرور - كلمة مرور المستخدم من SMTP2GO عندما أنشأنا مستخدمًا في الخطوة السابقة.
- إلى العنوان - أدخل ما يصل إلى 3 عناوين لإعداد هذا البريد الإلكتروني. المرسل إليه ، و CC و BC.
- الموضوع - سطر الموضوع في رأس البريد الإلكتروني.
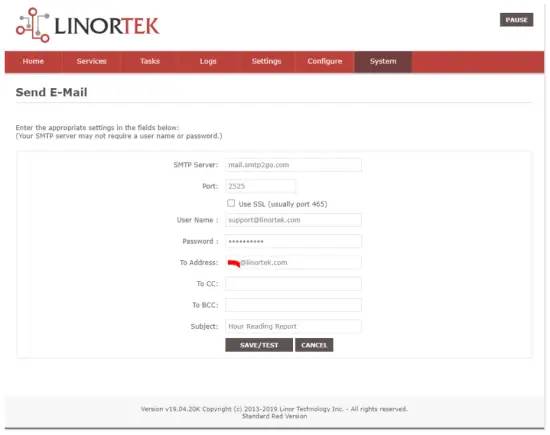
بمجرد الضغط على "حفظ / اختبار" ، يرسل الجهاز تلقائيًا البريد الإلكتروني التجريبي. يرجى التحقق من مجلد Junk / Other للعثور عليه إذا لم يكن في مجلد Inbox.
الخطوة 4. قم بتعيين مهمة إشعارات البريد الإلكتروني التلقائية.
You should be able to receive email notifications for various events from the Fargo/Koda boards at this point. If you need to receive condition logic notification, you can use our condition logic configuration to setup such report. To setup the logic condition report notification, go to Tasks page on your Fargo/Koda device, click the Edit icon of a Schedule. For details of how to create a logic-based event, please refer to the Set Schedule Page on the Fargo/Koda User Manual, which can be downloaded here:
https://www.linortek.com/download/fargo%20g2_koda%20downloads/fargo%20g2_koda%20documentation/Fargo-G2-and-Koda-User-Manual.pdf
في هذهample سنستخدم جهاز Network Hour Meter (عداد ساعات الشبكة) على سبيل المثالample لمعرفة كيفية تلقي تقارير البريد الإلكتروني كل يوم الساعة 11:52 صباحًا.
بمجرد استيفاء جميع شروط المهمة ، ستتلقى البريد الإلكتروني التالي:
Hour Reading Report
![]() support@linortek.com
support@linortek.com
Mon 4/11/2022 11:52 AM
To: Liyu Nalven
HM 1, my machine, is at 000242.01 hrs.
Reply Forward
![]()
المستندات / الموارد
 |
LINORTEK Fargo G2 TCP/IP Web وحدة تحكم التتابع القائمة على [بي دي اف] دليل المستخدم Fargo G2, Koda, Fargo G2 TCP-IP Web Based Relay Controller, Web Based Relay Controller, Based Relay Controller, Relay Controller |