![]() Fargo G2 and Koda User Manual
Fargo G2 and Koda User Manual
www.linortek.com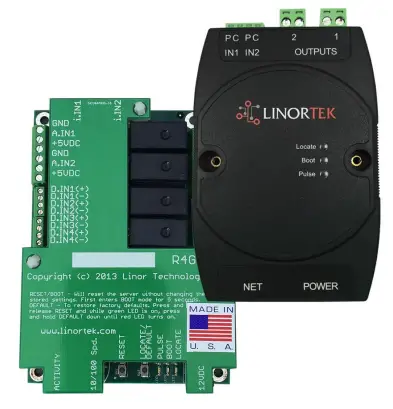 For Fargo G2, Koda
TCP/IP Web Based Relay Controller
રેવ સી 04/2022
Fargo G2 TCP/IP Web Based Relay Controller
Thank you for purchasing a Linortek Fargo G2 or Koda TCP/IP Controller. There are many devices that can be controlled by the FARGO/KODA Web Relay Controller. FARGO/KODA Web Controller can be used in such applications as (but not limited to): Lights, security, sprinkler systems, access control, industrial equipment, building automation, HVAC, and many more. Please refer to the Board Reference Layouts on page 29 for input and output specifications on your controller to verify they are suitable to your needs.
આ માર્ગદર્શિકા આવરી લે છે:
- FARGO R8 G2
- FARGO R4DI G2
- FARGO R4ADI G2
- કોડા 100
- KODA200
These will be referred to as SERVER hereafter. When there are differences or additional features they will be noted in the text.
સૂચનાત્મક વિડિઓઝ, FAQ અને અમારી તકનીકી સપોર્ટ ટીમ માટે સંપર્ક માહિતી માટે, કૃપા કરીને મુલાકાત લો: https://www.linortek.com/technical-support
લિનોર્ટેક એક વર્ષની મર્યાદિત વોરંટી
Consumer law: For consumers who are covered by consumer protection laws or regulations in their country of residence (“Consumer Law”), the benefits provided in this Linortek One-Year Limited Warranty (“Linortek Limited Warranty”) are in addition to and not instead of the rights provided by Consumer Law and it does not exclude, limit or suspend your rights arising from Consumer Law. You should consult the proper authorities in your country of residence for further information about these rights
આ હાર્ડવેર પ્રોડક્ટ ("ઉત્પાદન") માટે લિનોર્ટેકની વોરંટી જવાબદારીઓ નીચે દર્શાવેલ શરતો સુધી મર્યાદિત છે:
Linor Technology, Inc. (“Linortek”) warrants this product against defects in materials and workmanship for a period of ONE (1) YEAR from the date of retail purchase by the original end-user purchaser (“Warranty Period”) when used in accordance with the operating instructions. A copy of a retail receipt is required as proof of purchase. If a hardware defect arises and a valid claim is received within the Warranty Period, at its option and to the extent permitted by law, Linortek will either (1) repair the hardware defect at no charge, using new or refurbished replacement parts, (2) exchange the product with a product that is new or which has been manufactured from new or serviceable used parts and is at least functionally equivalent to the original product, or (3) refund the purchase price of the product. When a refund is given, the product for which the refund is provided must be returned to Linortek and becomes Linortek’s property.
આગળની વોરંટી ખરીદનારના (i) પ્રોમ્પ્ટ લેખિત દાવાને આધીન છે અને (ii) ખામીયુક્ત હોવાનો દાવો કરેલ ઉત્પાદનનું નિરીક્ષણ અને પરીક્ષણ કરવાની તકની Linortek ને સમયસર જોગવાઈ. આવી તપાસ ખરીદનારના પરિસરમાં હોઈ શકે છે અને/અથવા લિનોર્ટેક ખરીદનારના ખર્ચે ઉત્પાદન પરત કરવાની વિનંતી કરી શકે છે. જો કે, ઉત્પાદનના વળતરના સંબંધમાં પેકિંગ, નિરીક્ષણ અથવા મજૂરી ખર્ચ માટે Linortek જવાબદાર રહેશે નહીં. લિનોર્ટેક દ્વારા જારી કરાયેલ રીટર્ન મર્ચેન્ડાઈઝ ઓથોરાઈઝેશન નંબર (RMA#) સાથે ન હોય તેવી કોઈપણ પ્રોડક્ટ વોરંટી સેવા માટે સ્વીકારવામાં આવશે નહીં.
બાકાત અને મર્યાદાઓ
આ મર્યાદિત વોરંટી દુરુપયોગ, દુરુપયોગ, ઉપેક્ષા, આગ અથવા અન્ય બાહ્ય કારણો, અકસ્માત, ફેરફારો, સમારકામ અથવા સામગ્રી અને કારીગરીમાં ખામી ન હોય તેવા અન્ય કારણોથી થતા નુકસાનને બાકાત રાખે છે. Linortek દ્વારા Linortek બ્રાન્ડ નામ સાથે અથવા તેના વિના વિતરિત કરાયેલ સૉફ્ટવેર આ મર્યાદિત વૉરંટી હેઠળ આવરી લેવામાં આવતું નથી. સૉફ્ટવેર સાથે સંકળાયેલ તમારો ઉપયોગ અને અધિકારો લિનોર્ટેક એન્ડ યુઝર લાયસન્સ કરાર દ્વારા સંચાલિત થાય છે જે તમે અહીં જોઈ શકો છો: https://www.linortek.com/end-user-licenseagreement/. ઉત્પાદનના ઉપયોગને લગતી સૂચનાઓનું પાલન કરવામાં નિષ્ફળતાને કારણે થતા નુકસાન માટે Linortek જવાબદાર નથી. ઓપરેટિંગ મર્યાદાઓ સાથે સુસંગતતાની ખાતરી કરવા માટે, ખરીદદારે સૂચના માર્ગદર્શિકા [ઉત્પાદન સાથે પ્રદાન કરેલ] નો સંદર્ભ લેવો જોઈએ. વોરંટીમાં બેટરીનો સમાવેશ થતો નથી.
મહત્તમ મર્યાદા સુધી, આ મર્યાદિત વોરંટી અને ઉપર દર્શાવેલ ઉપાયો વિશિષ્ટ છે અને અન્ય તમામ વોરંટી, ઉપાયો અને શરતો, અને બિનસલાહભર્યા છે વ્યાપારીતાની વોરંટી સહિત, પરંતુ આટલા સુધી મર્યાદિત નથી, વિશિષ્ટ હેતુ માટે યોગ્યતા, બિન-ઉલ્લંઘન. અત્યાર સુધી આવી વોરંટીઓ અસ્વીકાર કરી શકાતી નથી, આવી તમામ વોરંટી, કાયદા દ્વારા મંજૂર કરવામાં આવેલી મર્યાદા સુધી, લિનોર્ટેક લિમિટેડની મર્યાદા સુધી મર્યાદિત રહેશે લિનોર્ટેક દ્વારા નિર્ધારિત તરીકે જોડી, બદલી અથવા રિફંડ તેની સંપૂર્ણ વિવેકબુદ્ધિમાં. કેટલાંક રાજ્યો (દેશો અને પ્રાંતો) ગર્ભિત વોરંટી અથવા શરત કેટલા સમય સુધી ટકી શકે તેની મર્યાદાઓને મંજૂરી આપતા નથી, તેથી ઉપર વર્ણવેલ મર્યાદાઓ તમને લાગુ ન પડે. આ વોરંટી તમને ચોક્કસ કાનૂની અધિકારો આપે છે, અને તમારી પાસે અન્ય અધિકારો પણ હોઈ શકે છે જે રાજ્યથી રાજ્ય (અથવા દેશ અથવા પ્રાંત દ્વારા) અલગ અલગ હોય છે. આ મર્યાદિત વોરંટી યુનાઇટેડ સ્ટેટ્સના કાયદાઓ દ્વારા સંચાલિત અને ઘડવામાં આવે છે.
અસ્વીકરણ
- સૂચનાઓ વાંચો - ઉત્પાદન ચલાવતા પહેલા તમામ સલામતી અને ઓપરેટિંગ સૂચનાઓ વાંચો.
- સૂચનાઓ જાળવી રાખો - ભવિષ્યના સંદર્ભ માટે સલામતી અને સંચાલન સૂચનાઓ જાળવી રાખો.
- ચેતવણીઓ પર ધ્યાન આપો - ઉત્પાદન પર અને ઑપરેટિંગ સૂચનાઓમાંની બધી ચેતવણીઓનું પાલન કરો.
- સૂચનાઓનું પાલન કરો - તમામ ઓપરેટિંગ અને ઉપયોગ સૂચનાઓને અનુસરો.
- સફાઈ - સફાઈ કરતા પહેલા ઉત્પાદનને પાવરમાંથી અનપ્લગ કરો. લિક્વિડ ક્લીનર્સ અથવા એરોસોલ ક્લીનર્સનો ઉપયોગ કરશો નહીં. જાહેરાતનો ઉપયોગ કરોamp માત્ર બિડાણ સાફ કરવા માટે કાપડ.
- જોડાણો - જોડાણોનો ઉપયોગ કરશો નહીં સિવાય કે તે લિનોર્ટેક દ્વારા ખાસ ભલામણ કરવામાં આવે. અસંગત અથવા અન્યથા અયોગ્ય જોડાણોનો ઉપયોગ કરવો જોખમી હોઈ શકે છે.
- એસેસરીઝ - આ ઉત્પાદનને અસ્થિર સ્ટેન્ડ, ત્રપાઈ, કૌંસ અથવા માઉન્ટ પર મૂકશો નહીં. ઉત્પાદન પડી શકે છે, જેના કારણે વ્યક્તિને ગંભીર ઈજા થઈ શકે છે અને ઉત્પાદનને ગંભીર નુકસાન થઈ શકે છે. ઉત્પાદક દ્વારા ભલામણ કરેલ સ્ટેન્ડ, ટ્રાઈપોડ, કૌંસ અથવા માઉન્ટ સાથે જ ઉપયોગ કરો અથવા ઉત્પાદન સાથે વેચવામાં આવે છે. ઉત્પાદનને માઉન્ટ કરતી વખતે ઉત્પાદકની સૂચનાઓનું પાલન કરો અને ઉત્પાદક દ્વારા ભલામણ કરેલ માઉન્ટિંગ એસેસરીઝનો જ ઉપયોગ કરો. ઉપકરણ અને કાર્ટ સંયોજનનો ઉપયોગ કરતી વખતે સાવચેત રહો. ઝડપી સ્ટોપ, અતિશય બળ અને અસમાન સપાટીઓ ઉપકરણ અને કાર્ટ સંયોજનને ઉથલાવી શકે છે.
- વેન્ટિલેશન - વેન્ટિલેશન માટે અને ઉત્પાદનની વિશ્વસનીય કામગીરી સુનિશ્ચિત કરવા અને તેને વધુ ગરમ થવાથી બચાવવા માટે બિડાણમાં ખુલ્લી જગ્યાઓ, જો કોઈ હોય તો પૂરી પાડવામાં આવે છે. આ ઓપનિંગ્સને અવરોધિત અથવા કવર કરશો નહીં. જ્યાં સુધી યોગ્ય વેન્ટિલેશન પૂરું પાડવામાં ન આવે અથવા લિનોર્ટેકની સૂચનાઓનું પાલન ન કરવામાં આવ્યું હોય ત્યાં સુધી આ ઉત્પાદનને બિલ્ટ-ઇન ઇન્સ્ટોલેશનમાં ન મૂકો.
- પાવર સ્ત્રોતો - સૂચના માર્ગદર્શિકામાં અથવા ઉત્પાદન લેબલ પર દર્શાવેલ પાવર સ્ત્રોતના પ્રકારથી જ આ ઉત્પાદનનું સંચાલન કરો.
જો તમે કયા પ્રકારના પાવર સપ્લાયનો ઉપયોગ કરવાની યોજના ઘડી રહ્યા છો તેના વિશે તમને ખાતરી ન હોય, તો તમારા એપ્લાયન્સ ડીલર અથવા સ્થાનિક પાવર કંપનીનો સંપર્ક કરો - જો કે સૂચના મેન્યુઅલ અથવા માર્કિંગ લેબલમાં દર્શાવેલ સિવાયના કોઈપણ પાવર સ્ત્રોતનો ઉપયોગ કોઈપણ વોરંટી રદબાતલ કરશે. બૅટરી પાવર અથવા અન્ય સ્રોતોમાંથી ઑપરેટ કરવાના હેતુવાળા ઉત્પાદનો માટે, ઑપરેટિંગ સૂચનાઓ [ઉત્પાદન સાથે સમાવિષ્ટ] નો સંદર્ભ લો. - ગ્રાઉન્ડિંગ અથવા ધ્રુવીકરણ - આ ઉત્પાદન પોલરાઇઝ્ડ વૈકલ્પિક-વર્તમાન લાઇન પ્લગથી સજ્જ હોઈ શકે છે (એક પ્લગ જેમાં એક બ્લેડ બીજા કરતાં પહોળી હોય છે). આ પ્લગ પાવર આઉટલેટમાં માત્ર એક જ રીતે ફિટ થશે. આ એક સેફ્ટી ફીચર છે. જો તમે આઉટલેટમાં પ્લગને સંપૂર્ણપણે દાખલ કરવામાં અસમર્થ છો, તો પ્લગને ઉલટાવીને પ્રયાસ કરો. જો પ્લગ હજુ પણ ફિટ થવામાં નિષ્ફળ જાય તો તેનું કારણ એ છે કે તમારું આઉટલેટ પ્લગ સાથે અસંગત છે. તમારા આઉટલેટને એક સુસંગત સાથે બદલવા માટે તમારા ઇલેક્ટ્રિશિયનનો સંપર્ક કરો. પ્લગને અસંગત આઉટલેટમાં ફિટ કરવા દબાણ કરશો નહીં અથવા અન્યથા પ્લગના સલામતી હેતુને હરાવવાનો પ્રયાસ કરશો નહીં. વૈકલ્પિક રીતે, આ ઉત્પાદન 3-વાયર ગ્રાઉન્ડિંગ-પ્રકારના પ્લગથી સજ્જ હોઈ શકે છે, એક પ્લગ જેમાં ત્રીજી (ગ્રાઉન્ડિંગ) પિન હોય છે. આ પ્લગ માત્ર ગ્રાઉન્ડિંગ પ્રકારના પાવર આઉટલેટમાં જ ફિટ થશે. આ એક સેફ્ટી ફીચર છે. પ્લગને અસંગત આઉટલેટમાં ફિટ કરવા દબાણ કરશો નહીં અથવા અન્યથા પ્લગના સલામતી હેતુને હરાવવાનો પ્રયાસ કરશો નહીં. જો તમારું આઉટલેટ પ્લગ સાથે અસંગત હોય, તો તમારા આઉટલેટને સુસંગત સાથે બદલવા માટે તમારા ઇલેક્ટ્રિશિયનનો સંપર્ક કરો.
- પાવર-કોર્ડ પ્રોટેક્શન - રૂટ પાવર સપ્લાય કોર્ડ જેથી તેઓ પર અથવા તેની સામે મૂકવામાં આવેલી વસ્તુઓ દ્વારા ચાલવા અથવા પિંચ કરવામાં આવે તેવી શક્યતા ન હોય, કોર્ડ અને પ્લગ, સગવડતા રીસેપ્ટેકલ્સ અને જ્યાંથી કોર્ડ ઉપકરણમાંથી બહાર નીકળે છે તેના પર ખાસ ધ્યાન આપવું. .
- પાવર લાઇન્સ - ઓવરહેડ પાવર લાઇન અથવા અન્ય ઇલેક્ટ્રિક લાઇટ અથવા પાવર સર્કિટની નજીકમાં અથવા જ્યાં તે આવી પાવર લાઇન અથવા સર્કિટમાં આવી શકે છે ત્યાં આઉટડોર સિસ્ટમ મૂકશો નહીં. આઉટડોર સિસ્ટમ ઇન્સ્ટોલ કરતી વખતે, આવી પાવર લાઇન અથવા સર્કિટને સ્પર્શ ન કરવા માટે ખૂબ કાળજી રાખો કારણ કે તેમની સાથેનો સંપર્ક જીવલેણ હોઈ શકે છે.
- ઓવરલોડિંગ - આઉટલેટ્સ અને એક્સ્ટેંશન કોર્ડને ઓવરલોડ કરશો નહીં કારણ કે આ આગ અથવા ઇલેક્ટ્રિક શોકનું કારણ બની શકે છે.
- ઑબ્જેક્ટ અને લિક્વિડ એન્ટ્રી - આ પ્રોડક્ટમાં કોઈપણ પ્રકારની ઑબ્જેક્ટને ખુલ્લા દ્વારા ક્યારેય દબાણ કરશો નહીં કારણ કે તે ખતરનાક વોલ્યુમને સ્પર્શ કરી શકે છેtage પોઈન્ટ અથવા શોર્ટ-આઉટ ભાગો જે આગ અથવા ઇલેક્ટ્રિક શોકનું કારણ બની શકે છે. ઉત્પાદન પર કોઈપણ પ્રકારનું પ્રવાહી ક્યારેય ન ફેલાવો.
- સેવા આપવી - આ ઉત્પાદનની જાતે સેવા કરવાનો પ્રયાસ કરશો નહીં કારણ કે કવર ખોલવા અથવા દૂર કરવાથી તમને જોખમી વોલ્યુમ સામે આવી શકે છે.tage અથવા અન્ય જોખમો. લિનોર્ટેકને પ્રોડક્ટની તમામ સર્વિસનો સંદર્ભ લો.
- સેવા જરૂરી નુકસાન - આઉટલેટમાંથી ઉત્પાદનને અનપ્લગ કરો અને નીચેની શરતો હેઠળ લિનોર્ટેક ગ્રાહક સપોર્ટને સેવાનો સંદર્ભ લો:
a જ્યારે પાવર-સપ્લાય કોર્ડ અથવા પ્લગને નુકસાન થાય છે.
b જો પ્રવાહી છલકાઈ ગયું હોય, અથવા વસ્તુઓ ઉત્પાદન પર પડી હોય.
સી. જો ઉત્પાદન વરસાદ અથવા પાણીના સંપર્કમાં આવ્યું છે.
ડી. જો ઉત્પાદન ઑપરેટિંગ સૂચનાઓ [ઉત્પાદન સાથે સમાવિષ્ટ] અનુસરીને સામાન્ય રીતે કામ કરતું નથી. ફક્ત તે જ નિયંત્રણોને સમાયોજિત કરો કે જે ઓપરેટિંગ સૂચનાઓ દ્વારા આવરી લેવામાં આવ્યા છે, કારણ કે અન્ય નિયંત્રણોના અયોગ્ય ગોઠવણથી નુકસાન થઈ શકે છે અને ઉત્પાદનને તેના સામાન્ય કાર્યમાં પુનઃસ્થાપિત કરવા માટે ઘણીવાર યોગ્ય ટેકનિશિયન દ્વારા વ્યાપક કાર્યની જરૂર પડશે.
ઇ. જો ઉત્પાદન છોડવામાં આવ્યું છે અથવા કેબિનેટને નુકસાન થયું છે.
f જો ઉત્પાદન પ્રદર્શનમાં વિશિષ્ટ ફેરફાર દર્શાવે છે. - રિપ્લેસમેન્ટ પાર્ટ્સ - જો રિપ્લેસમેન્ટ પાર્ટ્સ જરૂરી હોય, તો લો-વોલ રાખોtage ઇલેક્ટ્રિશિયન ઉત્પાદક દ્વારા નિર્દિષ્ટ કરેલા ભાગનો ઉપયોગ કરીને તેમને બદલો. અનધિકૃત અવેજીમાં આગ, ઇલેક્ટ્રિક આંચકો અથવા અન્ય જોખમો પરિણમી શકે છે. રિપ્લેસમેન્ટ ભાગો પર મળી શકે છે https://www.linortek.com/store/
- સલામતી તપાસ - આ ઉત્પાદનની કોઈપણ સેવા અથવા સમારકામ પૂર્ણ થયા પછી, ઉત્પાદન યોગ્ય સંચાલન સ્થિતિમાં છે તે નિર્ધારિત કરવા માટે સેવા ટેકનિશિયનને સલામતી તપાસ કરવા માટે કહો.
- કોક્સ ગ્રાઉન્ડિંગ - જો બહારની કેબલ સિસ્ટમ ઉત્પાદન સાથે જોડાયેલ હોય, તો ખાતરી કરો કે કેબલ સિસ્ટમ ગ્રાઉન્ડેડ છે. માત્ર યુએસએ મોડેલો- નેશનલ ઇલેક્ટ્રિકલ કોડની કલમ 810, ANSI/NFPA નંબર 70-1981, માઉન્ટ અને સપોર્ટિંગ સ્ટ્રક્ચરનું યોગ્ય ગ્રાઉન્ડિંગ, ડિસ્ચાર્જ પ્રોડક્ટને કોક્સનું ગ્રાઉન્ડિંગ, ગ્રાઉન્ડિંગ કંડક્ટરનું કદ, સ્થાન સંબંધિત માહિતી પ્રદાન કરે છે. ડિસ્ચાર્જ ઉત્પાદન, ગ્રાઉન્ડિંગ ઇલેક્ટ્રોડ સાથે જોડાણ અને ગ્રાઉન્ડિંગ ઇલેક્ટ્રોડ માટેની આવશ્યકતાઓ.
- લાઈટનિંગ - વીજળીના તોફાન દરમિયાન આ ઉત્પાદનના વધારાના રક્ષણ માટે, અથવા તેને લાંબા સમય સુધી ધ્યાન વિના અને બિનઉપયોગી છોડતા પહેલા, તેને દિવાલના આઉટલેટમાંથી અનપ્લગ કરો અને કેબલ સિસ્ટમને ડિસ્કનેક્ટ કરો. આ લાઈટનિંગ અને પાવર-લાઈન ઉછાળાને કારણે ઉત્પાદનને થતા નુકસાનને અટકાવશે.
- આઉટડોર ઉપયોગ - આ ઉત્પાદન વોટરપ્રૂફ નથી અને તેને ભીનું થવા દેવું જોઈએ નહીં. વરસાદ અથવા અન્ય પ્રકારના પ્રવાહીના સંપર્કમાં આવશો નહીં.
રાતોરાત ઘરની બહાર ન નીકળો કારણ કે ઘનીકરણ થઈ શકે છે. - બૅટરી બદલતી વખતે, ફ્યુઝ અથવા બોર્ડ લેવલની પ્રોડક્ટને હેન્ડલ કરતી વખતે ઇલેક્ટ્રોસ્ટેટિક ડિસ્ચાર્જથી સાવચેત રહો જે ઇલેક્ટ્રોનિક ઉપકરણોને નુકસાન પહોંચાડી શકે છે. ગ્રાઉન્ડેડ ઇલેક્ટ્રોનિક્સ સર્વિસ બેન્ચનો ઉપયોગ કરવો શ્રેષ્ઠ છે. જો આ ઉપલબ્ધ ન હોય તો તમે ધાતુના ઉપકરણ અથવા પાઇપને સ્પર્શ કરીને તમારી જાતને ડિસ્ચાર્જ કરી શકો છો. બેટરી અથવા ફ્યુઝ બદલતી વખતે i) બેટરીના વાયર સિવાયના કોઈપણ વાયર અને ii) પ્રિન્ટેડ સર્કિટ બોર્ડને સ્પર્શ કરશો નહીં.
જવાબદારીની મર્યાદા
IN NO EVENT WILL LINOR TECHNOLOGY BE LIABLE, WHETHER IN CONTRACT, TORT, OR OTHERWISE, FOR ANY INCIDENTAL, SPECIAL, INDIRECT, CONSEQUENTIAL OR PUNITIVE DAMAGES, INCLUDING, BUT NOT LIMITED TO, DAMAGES FOR ANY LOSS OF USE, LOSS OF TIME, INCONVENIENCE, COMMERCIAL LOSS, OR LOST PROFITS, SAVINGS, OR REVENUES TO THE FULL EXTENT SUCH MAY BE DISCLAIMED BY LAW. DISCLAIMER FOR CRITICAL APPLICATIONS
આ પ્રોડક્ટ લાઇફ સપોર્ટ પ્રોડક્ટ અથવા અન્ય ઉપયોગો માટે હેતુપૂર્વક અથવા અધિકૃત નથી કે જેના માટે નિષ્ફળતા વ્યક્તિગત ઇજા અથવા મૃત્યુનું કારણ બની શકે છે. જો તમે અથવા તમારા ગ્રાહકો આવા અનિચ્છનીય અથવા અનધિકૃત ઉપયોગો માટે આ ઉત્પાદનનો ઉપયોગ કરો છો અથવા પરવાનગી આપો છો, તો તમે લિનોર ટેક્નોલોજી અને તેના આનુષંગિકો, અને દરેકના અધિકારીઓ, કર્મચારીઓ અને વિતરકોને આવા ઉપયોગથી સંબંધિત તમામ જવાબદારીઓમાંથી સંપૂર્ણ રીતે વળતર આપવા માટે સંમત થાઓ છો, જેમાં વકીલોની ફી અને ખર્ચ.
ઉપયોગની મર્યાદા માટે વધુ સૂચના
જ્યાં સુધી વિશિષ્ટ રીતે જણાવ્યું ન હોય, અમારી પ્રોડક્ટ્સ લાઇન વોલ્યુમ સ્વિચ કરવા માટે ડિઝાઇન કરવામાં આવી નથીtage (110V અને તેથી વધુ) ઉપકરણો. લાઇન વોલ પર કામ કરતા ઉપકરણને નિયંત્રિત કરવા માટેtagએક લાયક ઇલેક્ટ્રિશિયન માટે મધ્યસ્થી ઉપકરણ જેમ કે રિલે ઇન્સ્ટોલ કરવું આવશ્યક છે. નિયંત્રિત કરવા માટે ઉપકરણો પસંદ કરતી વખતે, નીચા વોલ્યુમ પસંદ કરવાનું શ્રેષ્ઠ છેtage નિયંત્રણો જેમ કે 24VAC સોલેનોઇડથી પાણીના પ્રવાહ નિયંત્રણ. માત્ર લાયકાત ધરાવતા ઇલેક્ટ્રિશિયન જ લાઇન વોલને વાયર કરી શકે છેtage ઉપકરણ. વધુમાં, સ્થાનિક કોડનું પાલન કરવું આવશ્યક છે, જેમાં વાયર ગેજનું કદ અને યોગ્ય આવાસનો સમાવેશ થાય છે પરંતુ તે પૂરતો મર્યાદિત નથી. લિનોર્ટેક અમારા ઉત્પાદનોનો અયોગ્ય ઉપયોગ કરવા બદલ વપરાશકર્તા અથવા તૃતીય પક્ષોને નુકસાન પહોંચાડવા માટે કોઈ જવાબદારી લેતું નથી. આ જવાબદારી વપરાશકર્તાની રહે છે. લિનોર્ટેક અમારા ઉત્પાદનોનો અયોગ્ય ઉપયોગ કરવાને કારણે ઉપકરણને થતા નુકસાન માટે કોઈ જવાબદારી લેતું નથી.
રિલે વોલTAGઇ સ્પષ્ટીકરણો
ઉપકરણોને ઇલેક્ટ્રિકલ સર્કિટ અથવા અન્ય સાધનો સાથે કનેક્ટ કરતી વખતે કૃપા કરીને સાવચેતી રાખો. આ web નિયંત્રક કોઈપણ વોલ્યુમ સાથે જોડાવા માટે રચાયેલ નથીtage greater than 48V. Utilizing this arrangement, should allow you to virtually control anything. It is important that you use licensed electricians and comply with electrical codes that are applicable to your location. These codes exist for your safety, as well as the safety of others. Linortek assumes no responsibility for any harm or damage resulting from a failure adhere to local laws, ordinances or regulations or failure to follow specified instructions for installation and product usage.
Linortek સોફ્ટવેર અને દસ્તાવેજીકરણ માટે અંતિમ વપરાશકર્તા લાઇસન્સ કરાર
આ અંતિમ-વપરાશકર્તા લાઇસન્સ કરાર (“EULA”) એ તમારી (વ્યક્તિગત અથવા એકલ એન્ટિટી) અને Linor Technology, Inc. (“Linortek” અથવા “we” અથવા “us”) વચ્ચેનો કાનૂની કરાર છે જે તમારા સૉફ્ટવેરના ઉપયોગને નિયંત્રિત કરે છે. અને દસ્તાવેજીકરણ (“સોફ્ટવેર”) એમ્બેડેડ અથવા ફાર્ગો, કોડા, નેટબેલ, IoTMeter, અને iTrixx શ્રેણીના ઉત્પાદનો (“Linortek Products”) સાથે સંકળાયેલ છે.
આ EULA તમારા લિનોર્ટેકના ઉપયોગને નિયંત્રિત કરતું નથી webસાઇટ અથવા લિનોર્ટેક પ્રોડક્ટ્સ (સોફ્ટવેર સિવાય). લિનોર્ટેકનો તમારો ઉપયોગ webસાઇટ લિનોર્ટેક દ્વારા સંચાલિત થાય છે webસાઇટની સેવાની શરતો અને Linortek ગોપનીયતા નીતિ જે અહીં મળી શકે છે:
http://www.linortek.com/terms-and-conditions [લિનોર્ટેક પ્રોડક્ટ્સની તમારી ખરીદી (સૉફ્ટવેર સિવાય) લિનોર્ટેક મર્યાદિત વૉરંટી દ્વારા સંચાલિત થાય છે, જે અહીં મળી શકે છે https://www.linortek.com/linortek-one-year-limited-warranty/
This EULA governs your access and use of the Software. This EULA gives you specific legal rights, and you may also have other legal rights in addition, which vary from jurisdiction to jurisdiction. The disclaimers, exclusions, and limitations of liability under
this EULA will not apply to the extent prohibited or limited by applicable law. Some jurisdictions do not allow the exclusion of implied warranties or the exclusion or limitation of incidental or consequential damages or other rights, so those provisions of this EULA may not apply to you.
સૉફ્ટવેર અથવા દસ્તાવેજીકરણને ઇન્સ્ટોલ કરીને, ઍક્સેસ કરીને, કૉપિ કરીને અને/અથવા ઉપયોગ કરીને તમે તમારા અથવા તમારા વતી આ EULA ના નિયમો અને શરતોથી બંધાયેલા રહેવા માટે સંમત થાઓ છો કે જે તમે આવા ઇન્સ્ટોલેશન, ઍક્સેસ, કૉપિ અને/અથવા સંબંધમાં પ્રતિનિધિત્વ કરો છો. વાપરવુ. તમે પ્રતિનિધિત્વ કરો છો અને બાંયધરી આપો છો કે (i) તમારી પાસે તમારા અથવા તમે જે એન્ટિટીનું પ્રતિનિધિત્વ કરો છો તેના વતી આ EULA ની શરતોને સ્વીકારવાનો અને સંમત કરવાનો તમારી પાસે અધિકાર, સત્તા અને ક્ષમતા છે (ii) તમે તમારા નિવાસસ્થાનના અધિકારક્ષેત્રમાં પૂરતી કાનૂની વયના છો , (iii) તમે એવા દેશમાં સ્થિત નથી કે જે યુએસ સરકારના પ્રતિબંધને આધીન હોય, અથવા જેને યુએસ સરકાર દ્વારા "આતંકવાદને ટેકો આપતા" દેશ તરીકે નિયુક્ત કરવામાં આવ્યા હોય; અને (ii) તમે પ્રતિબંધિત અથવા પ્રતિબંધિત પક્ષોની કોઈપણ યુએસ સરકારની સૂચિમાં સૂચિબદ્ધ નથી.
જો તમે આ EULA ની શરતોથી બંધાયેલા રહેવા માંગતા ન હોવ તો તમે કોઈપણ રીતે સૉફ્ટવેરને ઇન્સ્ટોલ, ઍક્સેસ, કૉપિ અથવા ઉપયોગ કરી શકશો નહીં (તમે ખરીદેલ ઉપકરણ પર પ્રી-ઇન્સ્ટોલ કરેલ હોય કે ન હોય).
- સૉફ્ટવેર/સોફ્ટવેર લાયસન્સનો ઉપયોગ કરવાની પરવાનગી.
આ EULA ની શરતોને આધીન, Linortek તમને એક્ઝિક્યુટેબલ ઑબ્જેક્ટ કોડ ફોર્મમાં (a) સૉફ્ટવેરની એક કૉપિ ડાઉનલોડ, ઇન્સ્ટોલ અને એક્ઝિક્યુટ કરવા માટે મર્યાદિત, રદ કરી શકાય તેવા, બિન-વિશિષ્ટ, બિન-સબલાઈસન્સપાત્ર, બિન-તબદીલીપાત્ર અધિકાર અને લાઇસન્સ આપે છે. ફક્ત, ફક્ત લિનોર્ટેક પ્રોડક્ટ પર કે જેની તમે માલિકી ધરાવો છો અથવા તેને નિયંત્રિત કરો છો અને (b) લિનોર્ટેક પર વર્ણવ્યા મુજબ તેના હેતુપૂર્વકના ઉપયોગને અનુરૂપ સૉફ્ટવેરનો ઉપયોગ ફક્ત લિનોર્ટેક પ્રોડક્ટના સંબંધમાં કરો. webસાઇટ (દરેક 1(a) અને 1(b) એક "પરમિશન કરેલ ઉપયોગ" અને સામૂહિક રીતે "પરમિશન કરેલ ઉપયોગો"). - સૉફ્ટવેરના તમારા ઉપયોગ પર પ્રતિબંધો.
તમે ઉપરના વિભાગ 1 માં વર્ણવેલ અનુમતિ આપેલા ઉપયોગો સિવાયના કોઈપણ હેતુ માટે સૉફ્ટવેરનો ઉપયોગ કરવા માટે અન્ય લોકોને પરવાનગી ન આપવા માટે સંમત થાઓ છો. આનો અર્થ છે, અન્ય વસ્તુઓની સાથે, તમે આ કરી શકતા નથી:
(a) સૉફ્ટવેરના કોઈપણ ભાગને સંપાદિત કરો, બદલો, સંશોધિત કરો, અનુકૂલન કરો, અનુવાદ કરો, વ્યુત્પન્ન કાર્યો કરો, ડિસએસેમ્બલ કરો, રિવર્સ એન્જિનિયર કરો અથવા રિવર્સ કમ્પાઇલ કરો (સિવાય કે લાગુ પડતા કાયદાઓ આંતર-કાર્યક્ષમતા હેતુઓ માટે આવા પ્રતિબંધને ખાસ પ્રતિબંધિત કરે છે, જે કિસ્સામાં તમે સંમત થાઓ છો સૌપ્રથમ લિનોર્ટેકનો સંપર્ક કરવા અને લિનોર્ટેકને ઇન્ટરઓપરેબિલિટી હેતુઓ માટે જરૂરી એવા ફેરફારો કરવાની તક પૂરી પાડવા માટે);
(b) લાયસન્સ, સોંપણી, વિતરણ, ટ્રાન્સમિટ, વેચાણ, ભાડે, હોસ્ટ, આઉટસોર્સ, જાહેર કરવું અથવા અન્યથા કોઈપણ વ્યવસાયિક હેતુ માટે સૉફ્ટવેરનો ઉપયોગ કરવો અથવા કોઈપણ તૃતીય પક્ષને સૉફ્ટવેર ઉપલબ્ધ કરાવવું;
(c) કોઈપણ તૃતીય પક્ષને કોઈપણ તૃતીય પક્ષ વતી અથવા તેના લાભ માટે સૉફ્ટવેરનો ઉપયોગ કરવાની મંજૂરી આપો;
(d) તમે જે લિનોર્ટેક પ્રોડક્ટની માલિકી ધરાવો છો અથવા નિયંત્રિત કરો છો તે સિવાયના કોઈપણ ઉપકરણ અથવા કમ્પ્યુટર પર સૉફ્ટવેરના કોઈપણ ભાગનો ઉપયોગ કરો;
(e) કોઈપણ લાગુ પડતા સ્થાનિક, રાષ્ટ્રીય અથવા આંતરરાષ્ટ્રીય કાયદાનો ભંગ કરતી કોઈપણ રીતે સૉફ્ટવેરનો ઉપયોગ કરો; અથવા
(f) remove or alter any labels, symbols, legends or proprietary notices, including but not limited to any copyright, trademark, logo in the Software. You may not disclose the results of any performance or functional evaluation of anyof the Software to any third party without the prior written consent of Linortek for each such release. - અપડેટ્સ.
Linortek સમય સમય પર અપડેટ્સ, અપગ્રેડ, પેચ, બગ ફિક્સેસ અને અન્ય ફેરફારો ("અપડેટ્સ") સોફ્ટવેરના પ્રદર્શનને બહેતર બનાવવા માટે વિકસાવી શકે છે. સિવાય કે Linortek પર અન્યથા પૂરી પાડવામાં આવેલ છે webસાઇટ, આ અપડેટ્સ તમને મફતમાં આપવામાં આવશે. આ અપડેટ્સ તમને સૂચના આપ્યા વિના આપમેળે ઇન્સ્ટોલ થઈ શકે છે. સૉફ્ટવેરનો ઉપયોગ કરીને, તમે સ્વચાલિત અપડેટ્સ માટે પણ સંમતિ આપો છો. જો તમે આ સાથે સંમત ન હોવ તો તમે કોઈપણ રીતે સૉફ્ટવેરને ઇન્સ્ટોલ, ઍક્સેસ, કૉપિ અથવા ઉપયોગ કરી શકશો નહીં. - માલિકી.
The Software is licensed to you and not sold. Linortek reserves all rights to the Software and any Updates not expressly granted herein. The Software and Linortek Products are protected by copyright, trademark and other intellectual property laws andtreaties. Linortek and its licensors own the title, copyright, trademarks and other intellectual property rights in the Software.
You are not granted any rights to Linortek’s trademarks or service marks. There are no implied licenses in this EULA. - સમાપ્તિ.
This EULA is effective from the date you first use the Software and will continue for as long as you own the Linortek Product associated with it or until you or Linortek terminate this agreement under this section. You may terminate this EULA at any time upon written notice to Linortek at the address provided below. Linortek may terminate this EULA at any time if you fail to comply with any of the terms in this agreement. The license granted in this EULA terminates immediately when the agreement terminates. Upon termination, you must stop using the Linortek Product and the Software and you must delete all copies of the
Software. The terms of Sections 2 will still remain in effect after the agreement terminates. - વોરંટી અસ્વીકરણ.
EXTENT PERMITTED BY APPLICABLE LAW, LINORTEK PROVIDES THE SOFTWARE “AS-IS” AND DISCLAIMS ALL WARRANTIES AND CONDITIONS, WHETHER EXPRESS, IMPLIED, OR STATUTORY, INCLUDING THE WARRANTIES OF MERCHANTABILITY, FITNESS FOR A PARTICULAR PURPOSE, TITLE, QUIET ENJOYMENT, ACCURACY, AND NON-INFRINGEMENT OF THIRD-PARTY RIGHTS. LINORTEK DOES NOT GUARANTEE ANY SPECIFIC RESULTS FROM THE USE OF THE SOFTWARE. LINORTEK MAKES NO WARRANTY THAT THE SOFTWARE WILL BE UNINTERRUPTED, FREE OF VIRUSES OR OTHER HARMFUL CODE, TIMELY, SECURE, OR ERROR-FREE. YOU USE THE SOFTWARE AND THE LINORTEK PRODUCT AT YOUR OWN DISCRETION AND RISK. YOU WILL BE SOLELY RESPONSIBLE FOR (AND LINORTEK DISCLAIMS) ANY AND ALL LOSS, LIABILITY, OR DAMAGES RESULTING FROM YOUR USE OF THE SOFTWARE
AND LINORTEK PRODUCT. - જવાબદારીની મર્યાદા.
આ EULA માં અને ખાસ કરીને આ "જવાબદારીની મર્યાદા" કલમની અંદર કંઈપણ જવાબદારીને બાકાત રાખવાનો પ્રયાસ કરશે નહીં જેને લાગુ કાયદા હેઠળ બાકાત કરી શકાય નહીં.
લાગુ કાયદા દ્વારા મહત્તમ હદ સુધી, ઉપરોક્ત વોરંટી અસ્વીકરણ ઉપરાંત, કોઈ પણ સંજોગોમાં (ક) લિનોર્ટેક કોઈપણ પરિણામલક્ષી, અનુકરણીય, વિશેષ અથવા આકસ્મિક નુકસાન માટે જવાબદાર રહેશે, જેમાં ખોવાયેલા ડેટા અથવા ખોવાયેલા નફા માટેના કોઈપણ નુકસાનનો સમાવેશ થાય છે ઉત્પાદનો અથવા સૉફ્ટવેરથી અથવા તેનાથી સંબંધિત, જો લિનોર્ટેક આવા નુકસાનની સંભાવના જાણતો હોય અથવા જાણતો હોય તો પણ, અને (બી) લિનોર્ટેકની કુલ સંચિત સંચિત ટ્રાન્ઝેબિલિટી સંબંધિત જવાબદારીઓ સાથે સંબંધિત જવાબદારીઓ સંબંધિત (તમે લિનોર્ટેક અને લિનોર્ટેકના અધિકૃત વિતરક અથવા વેચાણ પ્રતિનિધિઓને ઉત્પાદનો અથવા સેવા આપનાર 6 માટે વાસ્તવમાં ચૂકવેલ રકમ કરતાં વધી ન જાય તે રકમ સુધી મર્યાદિત રહેશે). આ મર્યાદા સંચિત છે અને એક કરતાં વધુ ઘટનાઓ અથવા દાવાઓના અસ્તિત્વ દ્વારા તેમાં વધારો થશે નહીં. LINORTEK LINORTEK ના લાઇસન્સર્સ અને સપ્લાયર્સની કોઈપણ પ્રકારની તમામ જવાબદારીને અસ્વીકાર કરે છે. - નિકાસ કાયદાઓનું પાલન.
તમે સ્વીકારો છો કે સૉફ્ટવેર અને સંબંધિત તકનીક યુએસ નિકાસ નિયંત્રણ કાયદા યુએસ નિકાસ અધિકારક્ષેત્રને આધીન છે અને અન્ય દેશોમાં નિકાસ અથવા આયાત નિયમોને આધીન હોઈ શકે છે. તમે યુએસ એક્સપોર્ટ એડમિનિસ્ટ્રેશન રેગ્યુલેશન્સ તેમજ યુ.એસ. અને અન્ય સરકારો દ્વારા જારી કરાયેલ અંતિમ-વપરાશકર્તા, અંતિમ-ઉપયોગ અને ગંતવ્ય પ્રતિબંધો સહિત, સોફ્ટવેર પર લાગુ થતા તમામ આંતરરાષ્ટ્રીય અને રાષ્ટ્રીય કાયદાઓ અને નિયમોનું સખતપણે પાલન કરવા માટે સંમત થાઓ છો. તમે સ્વીકારો છો કે સૉફ્ટવેર અને સંબંધિત તકનીકને નિકાસ કરવા, ફરીથી નિકાસ કરવા અથવા આયાત કરવા માટે અધિકૃતતા મેળવવાની જવાબદારી તમારી પાસે છે, જે જરૂરી હોય.
તમે લિનોર્ટેકને કોઈપણ અને તમામ દાવાઓ, નુકસાન, જવાબદારીઓ, નુકસાની, દંડ, દંડ, ખર્ચ અને ખર્ચ (વકીલની ફી સહિત)થી અથવા આ વિભાગ હેઠળની તમારી જવાબદારીઓના તમારા દ્વારા થતા કોઈપણ ઉલ્લંઘનથી સંબંધિત નુકસાનની ભરપાઈ કરશો અને પકડી રાખશો. - સોંપણી.
તમે આ EULA હેઠળ તમારા કોઈપણ અધિકારો અથવા જવાબદારીઓ સોંપી શકશો નહીં, અને સોંપવાનો કોઈપણ પ્રયાસ રદબાતલ અને અસર વિના રહેશે. - નોટિસ.
Linortek તમે Linortek સાથે રજીસ્ટર કરાવ્યું હોય ત્યારે આપેલા ઈમેલ અને સરનામાનો ઉપયોગ કરીને આ EULA થી સંબંધિત કોઈપણ સૂચના આપી શકે છે. - માફી
અસરકારક બનવા માટે, લિનોર્ટેક દ્વારા કોઈપણ અને તમામ માફી અધિકૃત લિનોર્ટેક પ્રતિનિધિ દ્વારા લેખિતમાં અને સહી થયેલ હોવી જોઈએ. આ હેઠળની કોઈપણ મુદતનો અમલ કરવામાં Linortek ની અન્ય કોઈપણ નિષ્ફળતાને માફી ગણવામાં આવશે નહીં. - ગંભીરતા.
આ EULA ની કોઈપણ જોગવાઈ જે અમલમાં ન આવી શકે તેવી જણાઈ છે તે જોગવાઈના ઉદ્દેશ્યોને લાગુ કાયદા હેઠળ શક્ય તેટલી મહત્તમ હદ સુધી પૂર્ણ કરવા માટે સંપાદિત અને અર્થઘટન કરવામાં આવશે અને બાકીની બધી જોગવાઈઓ સંપૂર્ણ બળ અને અસરમાં રહેશે. - સંચાલિત કાયદો; સ્થળ.
You agree that this EULA, and any claim, dispute, action, cause of action, issue, or request for relief arising out of or relating to this EULA, will be governed by the laws of the state of North Carolina, U.S.A., without regard to conflicts of laws principles, provided that if you reside in a country that will not apply U.S. law to disputes related to these terms, then the laws of your country will apply. You also agree that the United Nations Convention on Contracts for the International Sale of Goods shall not
apply. You agree that regardless of any statute or law to the contrary, any cause of action against us arising out of or related to the Linortek webસાઇટ, સૉફ્ટવેર અથવા લિનોર્ટેક પ્રોડક્ટ્સ ક્રિયાના કારણ ઉપાર્જિત થયા પછી એક (1) વર્ષની અંદર શરૂ થવી જોઈએ અથવા ક્રિયાના આવા કારણને કાયમી ધોરણે પ્રતિબંધિત કરવામાં આવશે. આ EULA ને લગતી કોઈપણ કાર્યવાહી અથવા કાર્યવાહી રેલે, નોર્થ કેરોલિનામાં સ્થિત ફેડરલ અથવા રાજ્ય કોર્ટમાં લાવવામાં આવવી જોઈએ અને દરેક પક્ષ આવા કોઈપણ દાવા અથવા વિવાદમાં આવી કોઈપણ અદાલતના અધિકારક્ષેત્ર અને સ્થળને અટલ રીતે સબમિટ કરે છે, સિવાય કે લિનોર્ટેક મનાઈ હુકમ માંગી શકે. તેની બૌદ્ધિક સંપત્તિના રક્ષણ માટે અધિકારક્ષેત્ર ધરાવતી કોઈપણ અદાલતમાં રાહત. - કેલિફોર્નિયા પ્રસ્તાવ 65 ચેતવણી.
 ચેતવણી: આ ઉત્પાદન તમને લીડ સહિતના રસાયણોના સંપર્કમાં લાવી શકે છે, જે કેલિફોર્નિયા રાજ્યમાં કેન્સરનું કારણ બને છે. વધુ માહિતી માટે, www.P65Warnings.ca.gov પર જાઓ.
શરૂઆત કરવી
The Fargo SERVER is what is called a “bare board” product and is supplied without a housing. It operates on low voltage; however you need to use simple handling precautions to prevent damage to the circuits. All electronics are susceptible to electrostatic discharge. This high voltage “shock” can permanently damage your device. Before handling the product, you should touch a surface such as a grounded workbench or table. It is also best to handle the device from its edges. If you notice that your chair or clothes often cause static discharges, you must exercise extra caution. The unit is supplied with four rubber feet which keeps the bottom of the board from coming into contact with the surface you put it on. Be careful not to let metal objects, such as screw drivers or hardware, come in contact with the bottom of this product. The board can be mounted on a panel using stand offs and #4 hardware. The mounting holes are connected to the GROUND signal. The SERVER unit is a self-contained web server configured with various input and output circuits. Although the relays are rated for higher voltages, આ ઉત્પાદન લાઇન વોલ્યુમ પર ઉપયોગ માટે રચાયેલ નથીtages. You should never use voltages through the SERVER product exceeding 48 volts. IT IS NOT SAFE.
The KODA SERVER is a housed unit with a DIN rail mountable enclosure that can be snapped onto a DIN rail or attached to any flat surface such as a wall or under a counter. KODA 100 has two relays (48VAC@1A), KODA 200 has four relays which can drive 10V 50mA to external devices. The unit is supplied with a DIN Rail mountable enclosure with removable terminal connectors for easy installation. The KODA SERVER can be mounted on a panel or on the wall using the DIN rail mount clip. The removable wire terminal connectors simplify field installation and allow for easy troubleshooting and maintenance: the unit can be removed from the system without disturbing the system wiring.
સર્વર વાયરિંગ
નોંધ: For a diagram showing the location of all connectors on your SERVER referenced in this section, please see the section – Board Layout Reference.
સાવધાન: આ એકમો ગ્રાઉન્ડ આઇસોલેટેડ છે. હંમેશા કનેક્ટ કરો જેથી પાવર લૂપ ફક્ત SERVER યુનિટ સાથે જોડાયેલ હોય.
બાહ્ય ગ્રાઉન્ડ કનેક્શનનો ઉપયોગ કરશો નહીં. આમ કરવાથી SERVER અથવા POE મૂળ ઉપકરણને નુકસાન થઈ શકે છે.
- Place the unit on a table or bench being careful not to let any metal objects come into contact with the bottom of the circuit board (Fargo Only).
- Connect the 12VDC power supply to a suitable AC outlet and plug the barrel connector into the SERVER at the location labelled “12VDC/POWER”. Alternatively, you may also use POE. At this point the GREEN/Boot LED should come on and start flashing indicating the SERVER is operating and is in the “Bootload Mode”. This mode allows the user to update the server software that is used on the unit. After about 5 seconds, the GREEN LED will go off and the RED LED will start blinking once per second indicating the SERVER is operating in “Server Mode” and is accessible on a network utilizing TCP/IP protocols.
સાવધાન: જ્યારે તમે POE નેટવર્ક સ્વીચનો ઉપયોગ કરો છો, ત્યારે તે જ સમયે સર્વરને પાવર આપવા માટે 12VDC પાવર સપ્લાયનો ઉપયોગ કરશો નહીં, તે બોર્ડને નુકસાન પહોંચાડશે. - Plug an Ethernet cable into the RJ45/NET connector. The “Connection” LED will come on if a 100MHz network is available, otherwise it will remain off and the “Activity” LED should start blinking indicating network activity. Fargo G2 Relay Connections
There are 8 relays on the FARGO R8 and 4 on the FARGO R4. These are dry contact relays. These units are designed for only low voltage નિયંત્રણ અને વોલ્યુમ હોવું જોઈએ નહીંtage applied to the relay greater than 48 volts. This is for your safety as well as to stay within the parameters of the parts and circuit board design. The relays have 3 terminals labelled NO, C and NC which stand for Normally Open, Common and Normally Closed. When activated, the relay moves the connection from CNC to CNO. If you want to make a connection when the relay is activated, connect your wires between C and NO. When the relay is activated C and NO will be connected together. If you want to break a circuit when the relay is activated, make your connections to C and NC. When the relay is activated the circuit will be broken (or open)
Koda Relay Connection
There are 2 relays on the KODA 100. The KODA 100 has 2 removable 2 position connectors (1 for each relay) and are simply numbered “1” and “2”. These relays are normally open.
There are 4 relays on the KODA 200. The KODA 200 has 1 removable 8 position connector. Each relay has a “+” connection and a numbered connection. The relays may be set to supply about 10VDC by selecting “+V” on the setting switch (see Board Layout Reference page 29) or set to dry contact DC on the switch. If “+V” is selected then the voltage will be present on the “+” terminal and the numbered terminal is the return. Otherwise, a normally open dry contact exists across the “+” and numbered connection. KODA 100/200 is designed for only low voltage નિયંત્રણ અને વોલ્યુમ હોવું જોઈએ નહીંtage 48 વોલ્ટથી વધુ રિલે પર લાગુ. આ તમારી સલામતી માટે તેમજ ભાગો અને સર્કિટ બોર્ડ ડિઝાઇનના પરિમાણોમાં રહેવા માટે છે.

![]() કોઈ પણ સંજોગોમાં LINOR ટેકનૉલોજી જવાબદાર રહેશે નહીં, પછી ભલે તે કરારમાં હોય, ટોર્ટ હોય, અથવા અન્યથા, કોઈપણ આકસ્મિક, વિશેષ, પરોક્ષ, પરિણામી અથવા શિક્ષાત્મક નુકસાનો માટે, આકસ્મિક, બિનઅનુકૂળતા સહિત, , વાણિજ્યિક નુકસાન, અથવા નફો, બચત અથવા સંપૂર્ણ હદ સુધીની આવક કાયદા દ્વારા અસ્વીકારવામાં આવી શકે છે.
કોઈ પણ સંજોગોમાં LINOR ટેકનૉલોજી જવાબદાર રહેશે નહીં, પછી ભલે તે કરારમાં હોય, ટોર્ટ હોય, અથવા અન્યથા, કોઈપણ આકસ્મિક, વિશેષ, પરોક્ષ, પરિણામી અથવા શિક્ષાત્મક નુકસાનો માટે, આકસ્મિક, બિનઅનુકૂળતા સહિત, , વાણિજ્યિક નુકસાન, અથવા નફો, બચત અથવા સંપૂર્ણ હદ સુધીની આવક કાયદા દ્વારા અસ્વીકારવામાં આવી શકે છે.
ઉપયોગની મર્યાદા માટે વધુ સૂચના
જ્યાં સુધી વિશિષ્ટ રીતે જણાવ્યું ન હોય ત્યાં સુધી, આ ઉત્પાદન લાઇન વોલ્યુમ સ્વિચ કરવા માટે બનાવવામાં આવ્યું નથીtage ઉપકરણો. આ મર્યાદામાં તમામ ફાર્ગો અને કોડા ઉત્પાદનોનો સમાવેશ થાય છે. લાઇન વોલ પર કામ કરતા ઉપકરણને નિયંત્રિત કરવા માટેtagવપરાશકર્તાએ રિલે જેવા મધ્યસ્થી ઉપકરણને ઇન્સ્ટોલ કરવું જોઈએ.
જ્યારે લાઇન વોલ વાયરિંગtagમધ્યસ્થી ઉપકરણનો ઉપયોગ કરીને e ઉપકરણ, તમારે કાં તો લાયકાત ધરાવતા ઇલેક્ટ્રિશિયન હોવું જોઈએ અથવા લાયકાત ધરાવતા ઇલેક્ટ્રિશિયનની સેવાઓનો ઉપયોગ કરવો જોઈએ. વધુમાં, સ્થાનિક કોડનું પાલન કરવું આવશ્યક છે, જેમાં વાયર ગેજનું કદ અને યોગ્ય આવાસનો સમાવેશ થાય છે, પરંતુ તેના સુધી મર્યાદિત નથી.
Linortek cannot assume any responsibility for harm to the user or third parties for improperly using our Fargo/Koda products. This liability remains with the user. Linortek cannot assume any responsibility for damage to the device for improperly using our SERVER product.
For relay specifications, please see Board Reference Layout page 29
Digital Input Connections (Fargo R4 and Koda)
The digital inputs allow the SERVER to detect an external on/off state of a sensor. With this information the SERVER can display whether an input is on or off, count events in a resettable or non-resettable counter, and calculate the frequency (such as for use as a tachometer) or the period of the input. There are two modes of operation for the digital inputs – PULL UP and ISOLATED.
a) PULL UP mode connects a 1K resistor to an internal voltage તમને ટર્મિનલ 1 અને 2 પર એક સરળ સ્વીચ (જેમ કે ચુંબકીય દરવાજા સ્વીચ) નો ઉપયોગ કરવાની મંજૂરી આપે છે. આ જ્યારે સ્વીચ સક્રિય થાય છે ત્યારે ઇનપુટ પર સિગ્નલ મોકલવામાં આવે છે.
b) ISOLATED mode allows you to directly drive the SERVER’s optoisolator with an external voltage છતાં આંતરિક 1K રેઝિસ્ટર. આ વોલ્યુમtage 5V થી 24V ની રેન્જમાં હોઈ શકે છે જે ઓપ્ટોઈસોલેટર ડાયોડને ઓછામાં ઓછું 2mA અથવા વધુમાં વધુ 30mA પૂરું પાડે છે. આ વોલ્યુમ સાથે અન્ય કોઈ આંતરિક જોડાણ નથીtage so it is an isolated input. Please note, when connecting a 12VDC-¬24VDC circuit to the input, an external resistor (can be provided at request, 2.2k ohm 0.5watt) must be used.
These modes are selected by the switch on the SERVER (see Board Layout Reference page 29) marked ISO and PU for isolated and pull up respectively. These are set at the factory to ISO by default.
Wiring a push button: For distances up to 500 feet, a 20 AWG shielded wire is suitable for wiring a push button. If the distance between the push button and the controller extends up to 5,000 feet, use a 16 AWG shielded cable instead. Keep in mind that longer cable runs are more susceptible to signal interference.
સાવધાન: If you intend to use isolated mode, verify that the input switch is set to ISO before applying an external voltagઇ. અન્યથા કરવાથી SERVER અથવા POE મૂળ ઉપકરણને નુકસાન થઈ શકે છે.
Analog Input Connections (Fargo R4ADI)
The analog inputs allow the SERVER to read the value of external equipment. There are 2 analog inputs.
For AC current monitoring, use one of the two 3.5mm stereo inputs to interface with a current sensor.
2 એનાલોગ ઇનપુટ ટર્મિનલ બ્લોક્સ બિન-અલગ 0-5V વર્તમાન સેન્સર્સ સાથે જોડાયેલા છે જે તાપમાન અથવા દબાણ સેન્સર જેવા વિવિધ ઉપકરણો સાથે જોડાયેલા હોઈ શકે છે. સર્વર ગ્રાઉન્ડ અને પાવર કનેક્શન પૂરું પાડે છે જેથી બાહ્ય વોલ્યુમ વિના માપન કરી શકાયtage references. You should use a sensor that is isolated so that that it makes no connection to a remote ground. See drawing under Board Reference Layout page 29.
Accessing your SERVER
એકવાર તમારું સર્વર ચાલુ થઈ જાય અને નેટવર્ક સાથે કનેક્ટ થઈ જાય, જ્યાં સુધી તમારું રાઉટર આમ કરવા માટે ગોઠવેલું હોય ત્યાં સુધી તે આપમેળે DHCP દ્વારા IP સરનામું મેળવશે. કનેક્ટ કરવા માટે, તમારામાં IP સરનામું દાખલ કરો web browser. This will take you to your SERVER’s landing page. To log in, click the Log In button on the top right of the page. Your browser will prompt you to enter your username and password. By default, these credentials are both set to admin. To find your SERVER’s IP address, see below.
Linortek Discoverer સાથે તમારું IP સરનામું શોધવું
ડિસ્કવરર પ્રોગ્રામ આપમેળે તમારા સર્વરને શોધી કાઢશે. ડિસ્કવરર એ જાવા પ્રોગ્રામ છે, અને આ સુવિધાનો ઉપયોગ કરવા માટે જાવા રનટાઇમ ઇન્સ્ટોલ કરવું જરૂરી છે. જાવા અહીં મળી શકે છે: http://java.com/en/download/index.jsp.
ડિસ્કવર પ્રોગ્રામ ડાઉનલોડ કરવા માટે, કૃપા કરીને આના પર જાઓ: https://www.linortek.com/downloads/supportprogramming/
Chrome અને Firefox બ્રાઉઝરનો ઉપયોગ કરવાની ભલામણ કરવામાં આવે છે. મહેરબાની કરીને નોંધ કરો: જો તમે ઈન્ટરનેટ એક્સપ્લોરરનો ઉપયોગ કરવાનું પસંદ કરો છો, તો ઈન્ટરનેટ એક્સપ્લોરર લિનોર્ટેક ડિસ્કવરરને ઝિપ તરીકે સાચવે છે file મૂળભૂત રીતે. ડિસ્કવરરનો ઉપયોગ કરવા માટે, તમારે આ તરીકે સાચવો પસંદ કરવું પડશે અને તેનું નામ બદલવું પડશે file જ્યારે તમે ડાઉનલોડ કરો ત્યારે Linortek Discoverer.jar તરીકે.
ડિસ્કવર પ્રોગ્રામ ડાઉનલોડ કરતી વખતે, કેટલીકવાર તમને તમારી બ્રાઉઝર સુરક્ષા સેટિંગ્સના આધારે પોપઅપ ચેતવણી સંદેશ દેખાશે, જે પૂછશે કે શું તમે આને રાખવા અથવા કાઢી નાખવા માંગો છો. file, please click the Keep button as this is a Java program, and it won’t harm your computer.
એકવાર ડિસ્કવરર તમારા ઉપકરણને શોધી કાઢે, તે પ્રદર્શિત કરશે:
- IP સરનામું
- યજમાનનું નામ
- MAC સરનામું
- અન્ય માહિતી:
a વાદળી એલઇડી (જો ચાલુ હોય તો)
b ઉત્પાદન નામ
c સર્વર સોફ્ટવેર પુનરાવર્તન
ડી. પોર્ટ નંબર (જો પોર્ટ કરેલ હોય તો)

સર્વર શરૂ કરવા માટે તમે ડિસ્કવરર પ્રોગ્રામ પર બતાવેલ ઉપકરણનો ઉપયોગ કરવા માંગો છો તેને ક્લિક કરો web pages in your browser. Click the Login button on the homepage. The default username/password is: admin/admin. You may change these as you desire or disable this feature in the settings menu.
Connecting your SERVER Directly to Your PC
You can also plug your SERVER directly to your PC if there is no network connection available. If you plug your SERVER into your PC’s Ethernet port it will use the default IP address: 169.254.1.1 unless you have previously configured your SERVER to use a static IP. Enter 169.254.1.1 into your web browser to connect. No internet connection is required. Once configured, you can then install your SERVER where you desired.
સર્વર રૂપરેખાંકન
લૉગ ઇન
Once you have entered the IP address and port number, if set, the Login page will open. This page shows the name of this server which you may change in Configure/Network Config.
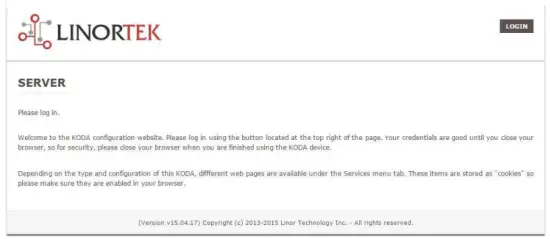
This page is static with no background activity and is a useful place to park if you are not using the SERVER and do not want to close the connection.
By pressing LOGIN, you will be asked for your username and password. These credentials will be retained by the browser until the browser is closed. You can disable the password requirement in Settings page. See section page 21.
હોમ પેજ
એકવાર તમારા લૉગિન ઓળખપત્રો દાખલ થઈ જાય, પછી તમને એપ્લિકેશનના મુખ્ય પૃષ્ઠ પર રીડાયરેક્ટ કરવામાં આવશે. હોમ અથવા ઇન્ડેક્સ પેજ સિસ્ટમની કેટલીક માહિતી દર્શાવે છે અને જો તે અન્ય લોકો સાથેના વિસ્તારમાં હોય તો ભૌતિક ઉપકરણને શોધવાની ક્ષમતા પ્રદાન કરે છે. વર્ણન માટે નીચેની સૂચિ જુઓ.

- TIME – Displayed along with the day of the week. This time may be set to be in a 12 hour format with AM/PM indicator or 24 hour format.
- તારીખ - વર્તમાન તારીખ અહીં પ્રદર્શિત થાય છે.
- VOLTS - વોલ્યુમtagબોર્ડ પર e દર્શાવેલ છે. આ ઉપયોગી થઈ શકે છે જો સર્વર અન્ય સાધનો સાથે સંચાલિત હોય, વોલ્યુમtage variance can be noted. Fargo and Koda servers have an input voltage range of 1248vDC.
- TEMPERATURE – Temperature on the board is displayed. This display may be either °C or °F. This temperature will be affected by the heat generated by SERVER itself so it will always be slightly higher than ambient temperature.
- LEDs - ત્યાં 3 LEDs પ્રદર્શિત થાય છે. RED LED એ સિસ્ટમ પલ્સ છે. જ્યાં સુધી સર્વર ચાલી રહ્યું છે ત્યાં સુધી આ પ્રતિ સેકન્ડમાં લગભગ એક વાર ઝબકવું જોઈએ. GREEN LED નો ઉપયોગ બુટલોડર વિકલ્પો માટે થાય છે અને તે સામાન્ય રીતે પર દેખાતું નથી webસાઇટ BLUE LED ક્લિક કરી શકાય તેવું છે અને તમે તેને આનાથી ચાલુ અને બંધ કરી શકો છો web પાનું. ઉપકરણને ભૌતિક રીતે શોધવા માટે આ ઉપયોગી છે જો તે અન્ય સમાન એકમો સાથે ઉપયોગમાં લેવાતું હોય કારણ કે તે એકમ પર પ્રકાશિત થશે જ્યાં આ web બ્રાઉઝર જોડાયેલ છે. ડિસ્કવરર પ્રોગ્રામ એ પણ નોંધ કરશે કે શું વાદળી LED ચાલુ છે. આને ઘણીવાર "લોકેટ" ફંક્શન તરીકે ઓળખવામાં આવે છે.
સેવાઓ
સેવાઓ ટેબ ગતિશીલ છે અને તમારા સર્વરની ગોઠવણીના આધારે બદલાશે. આ તે છે જ્યાં તમે ઇનપુટ્સ, આઉટપુટ, સેન્સર્સ અને અન્ય વિશેષતા નિયંત્રણોને નિયંત્રિત કરી શકો છો.
In/Out or Relays Page
Depending on which SERVER you are using, the first page on the SERVICES tab will be either In/Out or Relays.
In/Out has the relay controls and the input controls on one page, while Relays only has the relay controls.
રિલે નિયંત્રણ
An In/Out page is displayed below. Some relay control pages have 2, 4 or 8 relays displayed. Each relay has a number, in this case 1 to 4.

The State LED shows whether the relay is on or off indicated by GREEN and RED respectively. This icon is clickable to manually control the corresponding relay. Each relay can have a Name as well as identifiers for the Normally Open, Common and Normally Closed connections.
ત્યાં ચાર સ્ટેટસ એલઈડી છે જે દર્શાવે છે:
- Email – If an email is to be sent when this relay is switched on/off
- પલ્સ - જો આ રિલે પલ્સ પહોળાઈ અને પલ્સ પહોળાઈ ગુણક (અવધિ) સાથે સેટ કરેલ હોય તો - વધુ માહિતી માટે આગળનો વિભાગ જુઓ
- Sched. – If there is a schedule created in the Tasks page (see page 15) set to automatically trigger this relay.
- ટાઇમ્ડ - જો પલ્સ સેટ કરેલ હોય અને આ રિલે સક્રિય થાય, તો ટાઇમ્ડ LED લાલ થઈ જશે જે દર્શાવે છે કે રિલે હાલમાં ટાઈમર પર કાર્યરત છે.
Click the Edit Icon to edit the controls for the corresponding relay. This will take you to the Set Relay page (see page 11).
ઇનપુટ્સ
The In/Out or Inputs page (depending on your SERVER) will display information from each input. The SERVERs have a combination of inputs. The Fargo R4DI has four digital inputs, The R4ADI has, four digital inputs, four analog inputs. The KODA SERVER has two digital inputs.
At the top of each input is a label (ex: DIN 1, AIN 2) specifying whether it is a digital input (DIN) or analog input (AIN) as well as the input number. This label will turn green when the input is enabled. Inside the box will be any display configured from the Set Input page (see page 12 for digital input, page 14 for analog input). A red dot in the lower-left corner indicating the state of a linked relay (if any), will turn green when the linked relay is activated.
Finally, an Edit icon in the lower-right corner of the box to edit the corresponding input. This will take you to the Set Digital Input or Set Analog Input page (page 12 or page 14).
Set Relay Page
SET RELAY પૃષ્ઠ તમને રિલે સંબંધિત વિવિધ ગુણધર્મોને સેટ કરવાની મંજૂરી આપે છે.
- Relay Select – The Relay that you are editing (identified by the line on which you clicked the Edit icon on the RELAY page).
- Name – Enter a 15-character Relay Name. This and the following 3 fields may be used for any identifying information desired.
- NO Name – Enter a 7-character name for the Normally Open (NO) connection.
- Com Name – Enter a 7-character name for the Common (COM) connection.
- NC Name – Enter a 7-character name for the Normally Closed (NC) connection.
- Pulse Width – When you control the relay it turns on or off. You may control it for a timed turned on period by entering a Pulse Width when 0 means there is no timed event and a number represents duration of the pulse. The maximum number you can enter here is 4 digits, ie. 1234.
- પલ્સ પહોળાઈ ગુણક - પલ્સ લંબાઈને વધુ વ્યાખ્યાયિત કરવા માટે પલ્સ પહોળાઈને વધુ વ્યાખ્યાયિત કરવા માટે પલ્સ પહોળાઈ ગુણક પસંદ કરો. તમે પસંદ કરી શકો છો:
• કોઈ નહીં
• mS (Millisecond, 1/1000 second)
• Sec (Seconds)
• Min (Minutes) - રિલે પ્રકાર - સર્વર સર્વર પર અથવા અન્ય માધ્યમોનો ઉપયોગ કરીને રિલેને ભૌતિક રીતે ઍક્સેસ કરી શકે છે. તમે પસંદ કરી શકો છો:
• Normal – relay physically on the SERVER
• Latched – not currently supported
• Remote – a relay on another SERVER accessed over the network
• Zigbee – a relay at a remote device accessed over an RF system
• Normal and Remote – both relays activated
• Normal and Zigbee – both relays activated - સ્થાન ID - આ એક નંબર છે જે દૂરસ્થ સ્થાનને ઓળખે છે
- સ્થાન પર રિલે – સ્થાન પર રિલે અથવા ઉપકરણનું પ્રતિનિધિત્વ કરતી સંખ્યા
- ઇમેઇલ મોકલો - જો રિલે ચાલુ અથવા બંધ હોય તો સર્વરને ઇમેઇલ મોકલવા માટે પ્રોગ્રામ કરી શકાય છે.

ડિજિટલ ઇનપુટ પૃષ્ઠ સેટ કરો
ડિસ્પ્લે પ્રકારોની શ્રેણીનો ઉપયોગ કરીને વિવિધ રીડઆઉટ્સ પ્રદાન કરવા માટે ડિજિટલ ઇનપુટ્સ સેટ કરી શકાય છે. ઇનપુટ ડેટા પ્રદર્શિત કરવા ઉપરાંત, તમે ડિસ્પ્લેને નામ આપી શકો છો તેમજ તેની સાથે રિલેને સાંકળી શકો છો. આ રિલે લીલાથી લાલમાં બદલાશે કારણ કે તે આગળથી બંધ તરફ જાય છે તેમજ તેને નિયંત્રિત કરવા માટે ક્લિક કરી શકાય છે. પેન્સિલ સંપાદિત કરો આયકન પર ક્લિક કરીને, તમે આ ઇનપુટ માટે સેટિંગ્સને સંપાદિત કરી શકો છો:
- Digital Input Selected – The Digital Input that you are editing (identified by the line on which you clicked the Edit icon).
- નામ - તમે આ ઇનપુટ માટે 15-અક્ષરનું નામ સેટ કરી શકો છો. આ નામ ડિસ્પ્લેની ટોચ પર બારમાં જાય છે.
- લેબલ - 7-અક્ષરનું લેબલ સેટ કરો જે વાસ્તવિક સક્રિય ડિસ્પ્લે પર પ્રદર્શિત થાય છે.
- સુધારક - આ ફીલ્ડનો ઉપયોગ કરીને તમે ડિસ્પ્લે પૃષ્ઠ પર મૂલ્ય દર્શાવવામાં આવે તે પહેલાં મૂલ્ય ઉમેરી, બાદબાકી, ગુણાકાર અથવા વિભાજીત કરી શકો છો. આ 2-મૂલ્ય સુધારક છે જેમાં દરેકને એક જ સ્પેસ અક્ષર દ્વારા અલગ કરવામાં આવે છે. (એટલે કે. “+2, -2, *3, /3”)
- ઉપયોગ કરો - આ ઇનપુટને સક્રિય પર સેટ કરે છે. ઇનપુટ નંબર સૂચકને લીલામાં ફેરવે છે. એ નોંધવું જોઈએ કે જ્યારે ઇનપુટ ઉપયોગમાં લેવાય છે ત્યારે તેના પ્રકાર પર આધાર રાખીને CPU સમય અને અન્ય સંસાધનો વાપરે છે. જો કે તમામ ઇનપુટ્સ એક જ સમયે સક્રિય હોઈ શકે છે, તે ફક્ત તે જ ચાલુ કરવાની ભલામણ કરવામાં આવે છે જેનો તમે ઉપયોગ કરવા માંગો છો.
- પ્રકાર - પરિણામોની શ્રેણીની ગણતરી કરવા માટે ઇનપુટ ડેટાનો ઉપયોગ કરી શકાય છે. તમે પસંદ કરી શકો છો:
• State – This is useful for knowing if an input is on or off, like a door switch being on or off.
• CounterNR – This is a non-resettable counter.
• CounterR – This is a resettable counter.
• Frequency – Counts the frequency of an input in KHz (kilo hertz or1/1000 seconds). This could be useful in displaying a tachometer where 60Hz = 1 R.P.M.
• Period – in 1/1000 seconds an input in kHz (milliseconds or1/1000 seconds). This would be useful for measuring timed events. - ડિસ્પ્લે - આ પસંદગી તમને ઉપયોગમાં લેવાતા ડિસ્પ્લે પ્રકારને બદલવા દે છે. તમે પસંદ કરી શકો છો:
• Dot – A single dot with the value in the middle. This can be used for State. You can make a dumb indicator by changing the color of the Dot based on the value. The label is under the Dot.
• Values – Displays the Corrected Value with the Label in a box directly below it.
• Meter – This Meter has configurable scale based on the Min/Max values and arcs can be colored per the Color ranges. The Label is displayed within the Meter.
• VBar – Also based on the Min/Max values for the scale and the bar changes color based on the values in the Color ranges. - Relay L/T – Enter a Relay number here. If it is a local relay it will show GREEN or RED depending if it is on or off. By clicking on it the relay will turn on and off. The name comes from the relay settings page. This may be useful if you want to turn the subject of a display on and off. Any relay can be used on any input and each may be reused for any other input. Adding an L after the relay number (ex: 2L) will link the state of the input to the state of the relay. This is an easy and immediate way to have an input follow the relay. Adding a T after the relay number will trigger the relay to the state of the input. This is an easy and immediate way to have a relay follow the input.
- Command Z/N/I – This field is used for issuing various commands to the Digital Input controller: Z Zero the resettable counter. N Leave the input as Normal. I Invert the input.
- Value – These are Min/Max values used for the display. This is useful for preventing a Meter from going past its end or setting the value of a VBar. This is the Value after the Corrector. The system cannot display a value past Max, so be sure this is at least set to 1.
- પીળો/લાલ/લીલો - ત્યાં ત્રણ રંગો છે જેનો ઉપયોગ ડિસ્પ્લેને વધુ વ્યાખ્યાયિત કરવા માટે થઈ શકે છે. ડિસ્પ્લે મૂલ્યમાં રંગને વ્યાખ્યાયિત કરવા માટે આ રંગોની શ્રેણી સેટ કરો. આ સુધારક પછીનું મૂલ્ય છે. નોંધ કરો કે જો તમે રાજ્યના પ્રકારનો ઉપયોગ કરી રહ્યાં હોવ તો તમે RED = 0 થી 0 સુધી, GREEN = 1 થી 1 અને YELLOW = 2 થી 2 સુધી સોંપી શકો છો. કારણ કે રાજ્ય હંમેશા 1 અથવા 0 હોય છે આ અસ્પષ્ટ માહિતીને અટકાવશે અને પીળા રંગનો ઉપયોગ થતો અટકાવો. તમે રાજ્ય પ્રકાર માટે તમને ગમે તે કોઈપણ બે રંગો પસંદ કરી શકો છો.

Set Analog Input Page
એનાલોગ ઇનપુટ્સ ડિસ્પ્લે પ્રકારોની શ્રેણીનો ઉપયોગ કરીને વિવિધ રીડઆઉટ્સ પ્રદાન કરવા માટે સેટ કરી શકાય છે. ઇનપુટ ડેટા પ્રદર્શિત કરવા ઉપરાંત, તમે ડિસ્પ્લેને નામ આપી શકો છો તેમજ તેની સાથે રિલેને સાંકળી શકો છો. આ રિલે લીલાથી લાલમાં બદલાશે કારણ કે તે આગળથી બંધ તરફ જાય છે તેમજ તેને નિયંત્રિત કરવા માટે ક્લિક કરી શકાય છે.
- Analog Input Selected – The Analog Input that you are editing (identified by the line on which you clicked the Edit icon).
- નામ - તમે આ ઇનપુટ માટે 15-અક્ષરનું નામ સેટ કરી શકો છો. આ નામ ડિસ્પ્લેની ટોચ પર બારમાં જાય છે.
- લેબલ - 7-અક્ષરનું લેબલ સેટ કરો જે વાસ્તવિક સક્રિય ડિસ્પ્લે પર પ્રદર્શિત થાય છે.
- સુધારક - આ ફીલ્ડનો ઉપયોગ કરીને તમે ડિસ્પ્લે પૃષ્ઠ પર મૂલ્ય દર્શાવવામાં આવે તે પહેલાં મૂલ્ય ઉમેરી, બાદબાકી, ગુણાકાર અથવા વિભાજીત કરી શકો છો. આ 2-મૂલ્ય સુધારક છે જેમાં દરેકને એક જ સ્પેસ અક્ષર દ્વારા અલગ કરવામાં આવે છે. (એટલે કે. “+2, -2, *3, /3”)
- USE – Sets this input to active. Turns the input number indicator to GREEN. It should be noted that when in use the input consumes CPU time and other resources depending on its type. Although all inputs may be active at the same time, it is recommended to turn on only those you want to use.
- પ્રકાર - પરિણામોની શ્રેણીની ગણતરી કરવા માટે ઇનપુટ ડેટાનો ઉપયોગ કરી શકાય છે. તમે પસંદ કરી શકો છો:
• Analog 1 – Analog 1 input from a SERVER with an input such as found on a R4ADI.
• Analog 2 – Analog 2 input from a SERVER with an input such as found on a R4ADI.
• AC Current 1 – AC current sensor 1 input from a SERVER with an input such as found on a R4ADI.
• AC Current 2 – AC current sensor 2 input from a SERVER with an input such as found on a R4ADI.
• AC Current 3 – Not used
• Volts – The measurement of the voltage powering the SERVER.
• Current – On “S” models, this is the current consumed by the SERVER.
• Int. Temp – Temperature from the board mounted sensor.
• Ext. Temp – Temperature from the “S” model SERVER.
• R. Humidity – % Relative Humidity from the “S” model SERVER.
• MMA X – The X axis accelerometer data from the “S” model SERVER.
• MMA Y – The Y axis accelerometer data from the “S” model SERVER.
• MMA Z – The Z axis accelerometer data from the “S” model SERVER. - ડિસ્પ્લે - આ પસંદગી તમને ઉપયોગમાં લેવાતા ડિસ્પ્લે પ્રકારને બદલવા દે છે. તમે પસંદ કરી શકો છો:
1. Dot – A single dot with the value in the middle. This can be used for State. You can make a dumb indicator by changing the color of the Dot based on the value. The label is under the Dot.
2. Values – Displays the Corrected Value with the Label in a box directly below it.
3. Meter – This Meter has configurable scale based on the Min/Max values and arcs can be colored per the Color ranges. The Label is displayed within the Meter.
4. VBar – Also based on the Min/Max values for the scale and the bar changes color based on the values in the Color ranges. - Relay – Enter a Relay number here. If it is a local relay it will show Green or RED depending if it is on or off.
By clicking on it the relay will turn on and off. The name comes from the relay settings page. This may be useful if you want to turn the subject of a display on and off. Any relay can be used on any input and each may be reused for any other input. - મૂલ્ય - આ ડિસ્પ્લે માટે વપરાતા ન્યૂનતમ/મહત્તમ મૂલ્યો છે. મીટરને તેના અંતથી આગળ જતા અટકાવવા અથવા VBar ની કિંમત સેટ કરવા માટે આ ઉપયોગી છે. આ સુધારક પછીનું મૂલ્ય છે. સિસ્ટમ મહત્તમ કરતાં પહેલાંનું મૂલ્ય પ્રદર્શિત કરી શકતી નથી તેથી ખાતરી કરો કે આ ઓછામાં ઓછું 1 પર સેટ છે.
- પીળો/લાલ/લીલો - ત્યાં ત્રણ રંગો છે જેનો ઉપયોગ ડિસ્પ્લેને વધુ વ્યાખ્યાયિત કરવા માટે થઈ શકે છે. ડિસ્પ્લે મૂલ્યમાં રંગને વ્યાખ્યાયિત કરવા માટે આ રંગોની શ્રેણી સેટ કરો. આ સુધારક પછીનું મૂલ્ય છે. નોંધ કરો કે જો તમે રાજ્યના પ્રકારનો ઉપયોગ કરી રહ્યાં હોવ તો તમે RED = 0 થી 0 સુધી, GREEN = 1 થી 1 અને YELLOW = 2 થી 2 સુધી સોંપી શકો છો. કારણ કે રાજ્ય હંમેશા 1 અથવા 0 હોય છે આ અસ્પષ્ટ માહિતીને અટકાવશે અને પીળા રંગનો ઉપયોગ થતો અટકાવો. તમે રાજ્ય પ્રકાર માટે તમને ગમે તે કોઈપણ બે રંગો પસંદ કરી શકો છો.

Tasks Page
The TASKS page displays the automatic events that can be programmed into the SERVER. You can schedule up to 16 events in the SERVER. These are constructed as IF … THEN statements. In addition, the IF term can have 2 elements (IF a, AND/OR/NOT b … THEN c). This provides a simple to program and powerful way to take advantage of the data acquired by the SERVER. The Tasks page shows you an overview of configured tasks. You can click the dot in the State column to turn a task on or off indicated by a green dot for ON, and a red dot for OFF. To edit or create a task, click the Edit icon to the right of the task line. This will take you to the Set Schedule page detailed in the next section.

Set Schedule Page
The SET SCHEDULE page allows you to create time and logic-based events that will occur automatically if the conditions are met.
- Schedule Select – Determined by clicking on a schedule line from the previous page.
- Schedule Name – Enter a 15-character Schedule Name.
- USE – In order for a Schedule line to be active you must select the USE button. If there is an error detected in entering Schedule data, the USE box will automatically uncheck.
- LOG - આ આઇટમ જ્યારે પણ એક્ઝિક્યુટ થાય ત્યારે સિસ્ટમ લોગમાં દેખાય તે માટે લોગ પસંદ કરો.
- Email – Click Email to automatically send an email when this schedule is executed.
- Device A – Select Device A for the first term in the IF statement from the drop box.
- Data A – Select Data A for the above device. Depending on the device selected, the Data used for testing may have special properties. See the list below for Data that may be entered. If an error is detected indata entry when the “Save” button is pushed, the USE box will uncheck and the Data box containing the error will be highlighted.
• Minute – Enter: mm
• Hour – Enter: hh (use 24-hour system)
• Day – Enter: dd
• DayofWeek – Enter: Sunday = 1, Monday = 2, Tuesday = 3, Wednesday = 4, Thursday = 5, Friday = 6, Saturday = 7, Weekday = 8, Weekend = 9
• Time – Enter: hh:mm (use leading zeros, seconds are ignored) (use 24 hour system) ex:07:30 or 14:05
• Date – Enter: yy/mm/dd (use leading zeros) ex: 20/01/10 for January 10, 2020
• Relay – Enter: Relay number and (+ or -), ex: 01+ for Relay 1 ON or 01- for Relay 1 OFF
• Button – Enter: + or – (for ON or OFF respectively)
• Flag – Enter: Flag number(opt.+), or Flag number (for ON or OFF respectively)
• Temp – Enter: >, = or < value; example: >40 (હંમેશા ડિગ્રી સે.)
• Volts – Enter: >, = or < value; example: <10
• Analog – Analog input. Enter an input number and >, = or < and value. Example: 3<123 (This value is raw data value prior to any Corrector used by the input display page.)
• Digital – Digital input. Enter Input Number, Type, >, =, or < and value; example: 1F>7500 (This value is the raw data value prior to any Corrector used on the display page). Type can be (case sensitive):
• S State (On/Off)
• C Non-resettable counter
• c Resettable counter (lower case ‘c’)
• F Frequency in 1/1000 seconds
• P Period in 1/1000 seconds - તર્ક - ઉપકરણ A અને ઉપકરણ B વચ્ચે તર્કની તુલના સેટ કરો.
• AND – True if: Device A is true AND Device B is true
• OR – True if: Device A is true OR Device B is true
• NOT – True if: Device A is true and Device B is NOT true - Device B – Select Device B for testing from the drop box.
- ડેટા B - ઉપરોક્ત ઉપકરણ માટે ડેટા B પસંદ કરો. પસંદ કરેલ ઉપકરણના આધારે પરીક્ષણ માટે ઉપયોગમાં લેવાતા ડેટામાં વિશિષ્ટ ગુણધર્મો હોઈ શકે છે. ઉપરની યાદી જુઓ.
- ઉપકરણ C - જે નિયંત્રિત કરવું તે છે.
- ડેટા C - ઉપકરણ C માટે પ્રોપર્ટી સેટ કરો. સિન્ટેક્સનો ઉપયોગ નીચે પ્રમાણે થાય છે:
• RELAY – These are relays on this SERVER. You can set up to four per schedule. Enter separated by commas, for example "1,2,3,4"
• FLAG – This is a storage flag that can be used to make more complex schedules. There are 8 flags that can be turned on or off.
• REMOTE – Refers to a remote SERVER unit. When these conditions are met, this SERVER will send a command to control a remote SERVER. The Data field for a remote unit should be in the format,
“REMOTE UNIT NUMBER, REMOTE UNIT RELAY”. For example, “3,5”. આ રિમોટ સર્વર્સને પૃષ્ઠ રૂપરેખાંકિત/રીમોટ ઉપકરણ રૂપરેખામાં ઓળખવામાં આવશ્યક છે.
• COUNTER – Adds count to digital input counter – set as 1 or 2 depending on which digital input is counting
• BLUE LED – No data.
• eMAIL – Will send eMail, no data.
• NOTIFY – Will send notification to Kodalert, set 1- 8 for Settings/Alarm Notification number. (Not Implemented) - ક્રિયા - ઉપકરણ C સાથે શું કરવું. વિકલ્પો છે:
• ON – Turns device ON
• OFF – Turns device OFF
• TGL – Toggles state of Device C
• RESET – Resets CounterR

લોગ પેજ
The Logs tab displays over 10,000 entries from actions taken by the SERVER or by users themselves. This feature allows several actions for the convenience of displaying and collecting data from the SERVER.
- The checkboxes above the date allow the user to filter logs from different sources. To filter out logs you do not wish to see from a certain source simply uncheck the box.
- Each log has a reference number and a time and date attached in a “yyyy/mm/dd” and “hh:mm:ss” format. Afterwards is the event displayed.
- To scroll through the logs, use the arrows to the right-hand side, where the horizonal line and arrow brings you to the start or end, the double arrow moves up or down a page, and the single arrow moves up or down a single log.
- To refresh the logs manually click the REFRESH button below the Log Details.
- To download the Log Details, click the DOWNLOAD button below the Log Details, this allows you to save the logs as a separate file.
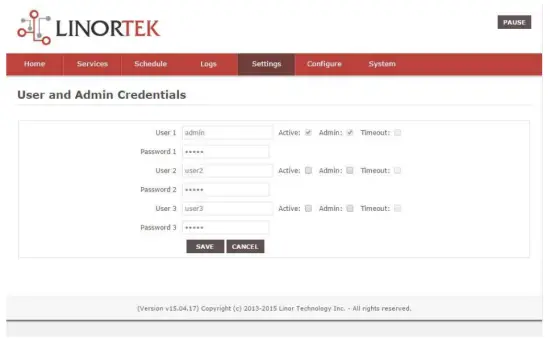
વપરાશકર્તા અને એડમિન ઓળખપત્ર પૃષ્ઠ
Use this page from the Settings drop down menu. Here you can set up to 3 users for your SERVER system. As a default only User 1 is Active. Here you can:
- User Name and Password – Each user has their own credentials. As a default these are set toadmin/admin, user2/user2 and user3/user3 for Users 1, 2 and 3 respectively. The passwords are never displayed. નોંધ: when you reset the password, it must be less than 13-character.
- સક્રિય - આ વપરાશકર્તાને સાઇન ઇન કરવા માટે તપાસવું આવશ્યક છે, તમે વપરાશકર્તા 1 ને નિષ્ક્રિય કરી શકતા નથી.
- એડમિન - મોટાભાગના પેજમાં માત્ર એડમિન જ ડેટા સેવ કરી શકે છે. આ તમારા સર્વરને અનધિકૃત વ્યક્તિ દ્વારા બદલવાથી સુરક્ષિત કરે છે.
- સમયસમાપ્ત - આ સમયે સક્ષમ નથી.
સમય/તારીખ પૃષ્ઠ
સેટિંગ્સ ડ્રોપડાઉન મેનૂમાંથી આ પૃષ્ઠનો ઉપયોગ કરો. આ પૃષ્ઠ તમને સમય અને તારીખ સિસ્ટમ સેટ કરવાની મંજૂરી આપે છે.
- Time – Set time using an hh:mm:ss format.
- તારીખ - yy/mm/dd ફોર્મેટનો ઉપયોગ કરીને તારીખ સેટ કરો.
- Time Zone – Set desired time zone 5 for EST, 8 for PST, you can now add a :mm for setting part hour, for example, 5:30 એ 5 કલાક અને 30 મિનિટનો સમય ઝોન છે.
- ડેલાઇટ સેવિંગ્સ ટાઇમનો ઉપયોગ કરો - ડેલાઇટ સેવિંગ્સ ડે પર તમારા સિસ્ટમનો સમય આપોઆપ એડજસ્ટ કરવા માટે પસંદ કરો. (તમામ સમય ઝોનમાં ચોક્કસ નથી.)
- MIL સમયનો ઉપયોગ કરો - 24-કલાક ફોર્મેટનો ઉપયોગ કરવા માટે પસંદ કરો.
- Use NTP Update – Select to synchronize SERVER time with NTP server
- NTP Web સાઇટ - અપડેટ્સ માટે આ પસંદ કરેલ NTP સર્વર છે.
- NTP અંતરાલ - મિનિટમાં અપડેટ્સ વચ્ચેનો સમય અંતરાલ.
- Log NTP Event – Normally NTP exceptions will be logged, select this option to Log every NTP event. (May be useful in debugging.)

સેટિંગ્સ પૃષ્ઠ
Access this page from the Settings dropdown menu. Select these settings to enable various features in the SERVER
- Use Active Main – No longer used. (Select PAUSE to go inactive.)
- લૉગિન જરૂરી છે - જો પસંદ કરેલ ન હોય તો સર્વર ઓળખપત્રો વિના તમામ ઍક્સેસની મંજૂરી આપશે.
- Use IP Ranges – Not Implemented.
- Use RESTFUL IP Ranges – Not implemented.
- Use Remote IP Ranges – Not implemented.
- RESTful પ્રમાણીકરણનો ઉપયોગ કરો - RESTful માટે વપરાશકર્તાનામ અને પાસવર્ડની જરૂર છે.
- રિલે રેન્જ વિસ્તૃત કરો - 8 રિલેને સક્ષમ કરે છે.
- રિલે રેડિયો બટનોનો ઉપયોગ કરો - જો સેટ કરો, જ્યારે એક રિલે ચાલુ હોય, ત્યારે બાકીના બધા બંધ થઈ જાય છે.
- SSL Port No. – Not supported – For future use.
- સિસ્ટમ ઇમેઇલ્સનો ઉપયોગ કરો - વધારાના ઇમેઇલ સંદેશાઓને સક્ષમ કરે છે.
- ફેરનહીટનો ઉપયોગ કરો - સેલ્સિયસ અથવા ફેરનહીટ પસંદ કરે છે.
- PGM Dynamic Relays – Changes properties of relays in task schedule.
- CLR PGMs on Start – Reinitialize tasks on start up.
- RTC Temperature Compensation – All Koda boards can add Temperature and Humidity sensor.
- AM2302 નો ઉપયોગ કરો - AM2302 તાપમાન અને ભેજ સેન્સરનો ઉપયોગ કરો (અલગથી વેચાય છે).
- Java Report – Send data to HourCollector app over ethernet (only for IoTMeter)
- Use Metric – Not supported – For future use.
- UART Usage – Enter “Audio” for Netbell-NTG, “Clock” for Netbell clock.
- Switch Bypass (1/2) – Ignores physical inputs if set. For example, in a Koda 200 board, you want to ignore input 1 switch, check Switch Bypass 1
- Setting 19 – Not supported – For future use
- ઓડિયો વાપરો File System – Activate SD Card reader for Netbell-NTG
- WiFi Report – Enable data transfer over WiFi (WiFi IoTMeter only)
- Active Landing Page – Not supported – For future use.
- . Invert Relay Control – The relay is set to NO by default. By checking this box the relay will be inverted to NC.
- Setting 24 – Not supported – For future use.

ડાયનેમિક DNS પૃષ્ઠ
Access this page from the Configure dropdown menu. From this page you can assign dynamic DNS settings. This page, along with proper port forwarding through the router, can enable global access to a device behind a NAT router or firewall. You will need to assign a static IP address and port number (see Network Config Page on page 25) and port the IP address on your router (refer to your router’s user manual). An internet IP address will have to be hosted in order to access your SERVER from the internet. Currently the only IP hosting service supported is provided by DynDNS (https://dyn.com)
- DDNS નો ઉપયોગ કરો - આ સેવાને સક્ષમ કરે છે.
- DDNS સેવા - ડ્રોપ બોક્સમાંથી સેવા પસંદ કરો. હાલમાં એકમાત્ર સપોર્ટેડ સેવા DynDNS છે
- વપરાશકર્તા નામ - આ DDNS સેવા પર સેટઅપ કરેલ એકાઉન્ટનો સંદર્ભ આપે છે.
- પાસવર્ડ - DDNS સેવા પર ઍક્સેસ માટે પાસવર્ડ.
- Host – This is the IP name registered at the DDNS service for rerouting to this SERVER

ઇમેઇલ સેટઅપ પૃષ્ઠ
વિવિધ મોડ્યુલોમાંથી ઈમેલ સંદેશા મોકલવા માટે સર્વર માટે ઈમેલ એકાઉન્ટ સેટઅપ કરો. રૂપરેખાંકિત ટેબમાંથી આ પૃષ્ઠને ઍક્સેસ કરો.
નોંધ: This unit is NOT compatible with SSL/TLS, there are 3rd party SMTP delivery servers which do not require SSL and can be used. For instructions on how to use a 3rd party SMTP delivery service, please refer to Appendix 1 at the end of this manual).
- SMTP સર્વર - તમે ઉપયોગ કરવા માંગો છો તે આઉટગોઇંગ મેઇલ સર્વર દાખલ કરો.
- પોર્ટ - આ તે સર્વર પરનું પોર્ટ છે. તમે આ માહિતી તેમજ અન્ય સેટઅપ ફીલ્ડ્સ માટે તમારી મેઈલ સેવાને ઓનલાઈન જોઈ શકો છો.
- SSL નો ઉપયોગ કરો - જ્યારે તમે તૃતીય પક્ષ SMTP સર્વરનો ઉપયોગ કરો ત્યારે તેને અનચેક છોડો.
- વપરાશકર્તા નામ - તમારું ઇમેઇલ એકાઉન્ટ નામ.
- પાસવર્ડ - ઇમેઇલ એકાઉન્ટ પાસવર્ડ.
- To Address – Enter up to 3 address for this email set up. An addressee, a CC and a BC.
- વિષય - ઇમેઇલ હેડરની વિષય રેખા.

નેટવર્ક રૂપરેખાંકન પૃષ્ઠ
Access this page from the Configure dropdown menu. This page allows the configuration of the SERVER’s network settings.
સાવધાન: Incorrect settings may cause the board to lose network connectivity. In order to access a device in your network remotely you must PORT the device. This tells your router that information coming in should be sent to a specific device on your network.
- MAC Address – This is a unique MAC address that is assigned to this product at time of assembly. It cannot be altered.
- યજમાનનું નામ - આ એક Netbios નામ છે જેના પર આ એકમને કેટલાક નેટવર્ક્સમાં સંબોધવામાં આવી શકે છે. તે તમારા રાઉટરની લીઝ ડિરેક્ટરીમાં પણ દેખાઈ શકે છે. તે તમારા સર્વરને નામ આપવા માટે ઉપયોગી સ્થળ બનાવે છે અને હોમ પેજ અને ડિસ્કવરર પર દેખાય છે.
- પોર્ટ નંબર - આ IP એડ્રેસનો ભાગ બની જાય છે અને ઈન્ટરનેટ એક્સેસ માટે જરૂરી છે. જો આ સેટ કરેલ નથી, તો સર્વર 80 ના પોર્ટ નંબર પર ડિફોલ્ટ થાય છે.
- IP Address – Typically you only change the last group of numbers. If you change this IP address make sure to reserve this IP on your router and no other devices are using this IP address or you may not be able to reach this SERVER. If this happens you may need to Restore Defaults using the push button method.
- ગેટવે - સામાન્ય રીતે તમારા TCP/IP નેટવર્ક પરનું રાઉટર જે તમારા ISP માટે એક્સેસ પોઈન્ટ તરીકે કામ કરે છે.
- સબનેટ માસ્ક - એક 32-બીટ નંબર જે IP એડ્રેસને માસ્ક કરે છે અને IP એડ્રેસને નેટવર્ક એડ્રેસ અને હોસ્ટ એડ્રેસમાં વિભાજિત કરે છે. ફક્ત તેને 255.255.255.0 પર છોડી દો
- પ્રાથમિક DNS - પ્રાથમિક DNS.
- ગૌણ DNS - ગૌણ DNS.

IP રેંજ રૂપરેખાંકન પૃષ્ઠ
Access this page from the Configure dropdown menu. Use these security settings to select a range of IP address that will be allowed to access the SERVER.CAUTION: Incorrect settings may cause the board to lose network connectivity. Not implemented on this SERVER.
દૂરસ્થ ઉપકરણો પૃષ્ઠ
Access this page from the Configure dropdown menu. These settings allow the SERVER to remotely control the relays on another SERVER. This is done by selecting the Remote Device in the Schedule program or by setting up a relay as a REMOTE. There are 8 possible REMOTE locations.
સાવધાન: ખોટી સેટિંગ્સને કારણે બોર્ડ તેના રિમોટ કનેક્શન્સ ગુમાવશે.
- ઉપકરણનું નામ - ભવિષ્યના સંદર્ભ માટે આ ઉપકરણ માટે ટેક્સ્ટ નામ દાખલ કરો.
- IP સરનામું - પોર્ટ નંબર સહિત દૂરસ્થ ઉપકરણનું IP સરનામું.
- વપરાશકર્તા નામ - મૂળભૂત પ્રમાણીકરણમાં વપરાય છે.
- Password – Used in Basic Authentication.

Kodalert Page
Not Yet Implemented. Access this page from the Configure dropdown menu. Kodalert provides an interface for alerts of Internet connected devices. Kodalert is a cloud based, open platform monitoring and alert system for the Internet of Things in your physical world. Any Thing that can send an email or TCP messages including our SERVERS, other manufactures devices and people using email can use Kodalert. It can work for multiple remote locations, alert multiple users instantly using the rules you setup by text, email, smart phone Apps push notification or audible alarm instantly when something happens.
- ચેતવણી નંબર
- ટેસ્ટ
- ઉપયોગ કરો
- નિયમ
In the Alarm Notification page, you can change the state (on/off) of the relay by clicking the green circle in the state column. Push the EDIT icon to change the Alarm’s settings.

વિશિષ્ટતાઓ
FARGO R8G2
- 10M/100M RJ45 Internet interface with connection and activity LEDs
- 8 Relay outputs, 1FORMC 48 Volt Max (24VAC/DC 3A)
- Status LEDs (pulse, bootloader, and locate)
- Ethernet Bootloader (for server hardware code upgrade)
- PoE or 12VDC @500mA (nominal)
- Web interface w/basic authentication
- On board temperature sensor and voltagઇ સેન્સર
Reset /Locate pushbutton (blue LED) - Working Temperature from 0 to +70 Celsius
- Storage Temperature from 40 to +125 Celsius
- Humidity from 10% to 80% noncondensing
- Dimensions 74mm x 100mm x 20mm, mounting holes 64mm x 92mm Ф 3.2mm 4 places
- સપોર્ટેડ પ્રોટોકોલ્સ: HTTP/SMTP/SNTP
FARGO R4G2
- 10M/100M RJ45 Internet interface with connection and activity LEDs
- 4 1FormC relays 48 Volt Max (24VAC/DC 3A)
- 2 optically isolated digital inputs, 12V 1mA or pulldown switch selectable, 2 conductor screw terminal connectors for each.
- 2 Analog 0-5VDC Inputs 30mA 3.3VDC power source PTC protected. 3 conductor screw terminal connectors for each (3.3VDC, input, ground) (R4ADI only)
- 2 Current sensor inputs. 3.5mm stereo jack connector for each (R4ADI only)
- Status LEDs (pulse, bootloader, and locate)
- Ethernet Bootloader (for server hardware code upgrade
- POE or 12VDC @500mA (nominal)
- Web interface w/basic authentication
- On board temperature sensor and voltagઇ સેન્સર
- Reset/Locate pushbutton
- Working Temperature from 0 to +70 Celsius
- Storage Temperature from 40 to +125 Celsius
- Humidity from 10% to 80% noncondensing
- Dimensions 74mm x 100mm x 20mm, mounting holes 64mm x 92mm Ф 3.2mm 4 places
- સપોર્ટેડ પ્રોટોકોલ્સ: HTTP/SMTP/SNTP
KODA100
- 10M/100M RJ45 Internet interface with connection and activity LEDs
- 2 1-Form-A relay 48VAC@8A Max
- 2 optically isolated digital inputs, 12V 1mA or pulldown switch selectable
- Status LEDs (pulse, bootloader, and locate)
- Ethernet Bootloader (for server hardware code upgrade)
- POE or 12VDC @500mA (nominal)
- Web interface w/basic authentication
- On board temperature sensor and voltagઇ સેન્સર
- Reset/Locate pushbutton (blue LED)
- Working temperature from 0 to +70 Celsius
- Storage temperature from 40 to +125 Celsius
- Humidity from 10% to 80% noncondensing
- પરિમાણો: 70mm x 100mm x 25mm
- સપોર્ટેડ પ્રોટોકોલ્સ: HTTP/SMTP/SNTP
KOD200
- 10M/100M RJ45 Internet interface with connection and activity LEDs
- 4 1FormA relays 48 Volt Max 1A dry contact or drive 10V ±10% 50mA to external devices
- 2 optically isolated digital inputs, 12V 1mA or pulldown switch selectable
- Status LEDs (pulse, bootloader, and locate)
- Ethernet Bootloader (for server hardware code upgrade)
- POE or 12VDC @500mA (nominal)
- Web interface w/basic authentication
- On board temperature sensor and voltagઇ સેન્સર
- Reset/Locate pushbutton (blue LED)
- Working Temperature from 0 to +70 Celsius
- Storage Temperature from 40 to +125 Celsius
- Humidity from 10% to 80% noncondensing
- પરિમાણો: 70mm x 100mm x 25mm
- સપોર્ટેડ પ્રોટોકોલ્સ: HTTP/SMTP/SNTP
બોર્ડ સંદર્ભ લેઆઉટ
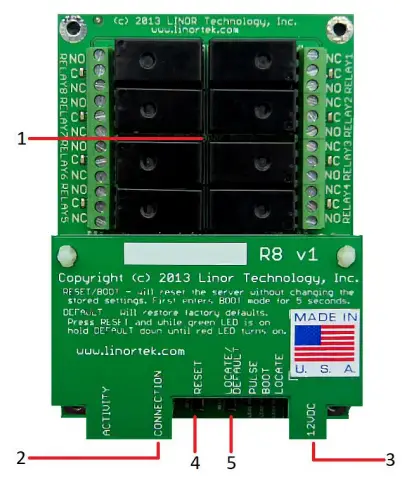
Fargo R8
- 8 Relay outputs, 1FORMC 48 Volt Max (24VAC/DC 3A)
- Rj45 કનેક્ટર
- પાવર કનેક્ટર (12VDC)
- રીસેટ બટન
- બટન શોધો
Fargo R4
- 3.5mm Inputs for AC Current Sensor (R4ADI Only)
- Analog Inputs (R4ADI Only)
- 4 Relay outputs, 1FORMC 48 Volt Max (24VAC/DC 3A)
- ડિજિટલ ઇનપુટ્સ
- Digital Input Switches (Input 1 on right.
Up: Pullup, Down: Isolated) - Rj45 કનેક્ટર
- રીસેટ બટન
- બટન શોધો
- પાવર કનેક્ટર (12VDC)

કોડા 100
- Digital Inputs (#1 on the left) 5VDC-48VDC (12VDC-48VDC must use the external resistor)
- Relay Outputs (#1 is on the right) 8A@48VAC Max
- Digital Input Switches (IN 1 on left. UP: Isolated, Down: Pullup)
- રીસેટ બટન
- ફરીથી લોડ કરો બટન (વાદળી એલઇડી ચાલુ કરે છે - ડિસ્કવરર પર ઓળખે છે)
- Rj45 કનેક્ટર
- પાવર કનેક્ટર (12VDC)
- તાપમાન/ભેજ સેન્સર માટે યુએસબી મિની કનેક્ટર (અલગથી વેચાય છે)

કોડા 200
- Digital Inputs (#1 on the left) 5VDC-48VDC (12VDC-48VDC must use the external resistor)
- Relay Outputs (#1 is on left) 48 Volt Max 1A dry contact or drive 10V ±10% 50mA
- Digital Input Switches (IN 1 on left. UP: Isolated, Down: Pullup)
- Relay Switches (Up for dry contact, down for 10V/50mA)
- રીસેટ બટન
- ફરીથી લોડ કરો બટન (વાદળી એલઇડી ચાલુ કરે છે - ડિસ્કવરર પર ઓળખે છે)
- Rj45 કનેક્ટર
- પાવર કનેક્ટર (12VDC)
- તાપમાન/ભેજ સેન્સર માટે યુએસબી મિની કનેક્ટર (અલગથી વેચાય છે)

ફેક્ટરી રીસેટ
To perform a factory Reset, push the Reset button. When the green LED turns on, push and hold the Reload button until the flashing red LED turns off and then turns on solid. Refer to Board Reference Layout section for the button locations on your device.
This user-manual supplements the documentation for the following Linortek products:
- નેટબેલ-2
- નેટબેલ-8
- Netbell-K (and variants)
- iTrixx-NHM
For more information, documentation and how-to videos, visit https://www.linortek.com/downloads/
આ દસ્તાવેજ પર મળી શકે છે www.linortek.com/downloads/documentations/
જો તમને તમારા ઉપકરણ સાથે સહાયની જરૂર હોય, તો કૃપા કરીને મુલાકાત લો www.linortek.com/technical-support
લિનોર ટેકનોલોજી, ઇન્ક.
સૂચના વગર માહિતી બદલવા માટે વિષય.
પરિશિષ્ટ 1
લિનોર્ટેક ફાર્ગો અને કોડા ઉપકરણો માટે તૃતીય પક્ષ SMTP સેવાનો ઉપયોગ કરીને SSL ઇમેઇલ્સ કેવી રીતે મોકલવી
મૂળભૂત રીતે, કોડા/ફાર્ગો ઉપકરણો નોન-SSL SMTP ઈમેલ સર્વર્સનો ઉપયોગ કરે છે. પરંતુ આજે મોટાભાગના ઇમેઇલ સર્વર્સ SSL સુરક્ષા પ્રોટોકોલ પર સ્વિચ થયા છે, ત્યાં 3જી પાર્ટી SMTP ડિલિવરી સર્વર્સ છે જેને SSL ની જરૂર નથી અને તેનો ઉપયોગ કરી શકાય છે. બજારમાં ઘણા બધા SMTP ઇમેઇલ સેવા પ્રદાતાઓ છે. અમે ભૂતપૂર્વ તરીકે SMTP2GO નો ઉપયોગ કરીએ છીએampસેટઅપ પ્રક્રિયા દર્શાવવા માટે. SMTP2GO 1000 જેટલા ઇમેઇલ્સ/મહિના સાથે વાપરવા માટે મફત છે. SMTP2GO નો ઉપયોગ કરવા માટે, કૃપા કરીને મુલાકાત લો: https://www.smtp2go.com/ .
પગલું 1. SMTP2GO એકાઉન્ટ બનાવો.
એકાઉન્ટ બનાવવા માટે ફક્ત "સાઇન અપ" પર ક્લિક કરો, સ્કેલ પર "1K ઇમેઇલ્સ" પસંદ કરો અને "ફ્રી પ્લાન" પસંદ કરો (જો તમારે દર મહિને 1000 થી વધુ ઇમેઇલ્સ મોકલવાની જરૂર હોય, તો તમારી જરૂરિયાતોને પૂર્ણ કરતી યોજના પસંદ કરો.)

SMTP2GO પર એકાઉન્ટ બનાવવા માટે, કોર્પોરેટ ઈમેલ એડ્રેસની જરૂર પડશે. Gmail અથવા Yahoo જેવી મફત ઇમેઇલ સેવા તમને ચાલુ રાખવા દેશે નહીં. તમારું SMTP2GO એકાઉન્ટ સક્રિય કર્યા પછી, તમારે વપરાશકર્તા ઉમેરવાની જરૂર છે.
પગલું 2. વપરાશકર્તા ઉમેરો.
તમે SMTP2GO પર જે વપરાશકર્તા બનાવશો, તે આઉટગોઇંગ મેઇલ સર્વર હશે જ્યારે તમે ઇમેલ રિપોર્ટ્સ મોકલવા માટે ફાર્ગો/કોડા ડિવાઇસ સેટઅપ કરો છો, કૃપા કરીને ખાતરી કરો કે તમારું કોર્પોરેશન ઇમેઇલ સર્વર ઇમેઇલ્સને અવરોધિત કરશે નહીં જો તમે મફત ઇમેઇલ એકાઉન્ટ જેમ કે Yahoo અથવા Gmail નો ઉપયોગ કરો છો. અહીં વપરાશકર્તા ઉમેરો.
તમારા SMTP2GO એકાઉન્ટમાં લૉગિન કરો, ડાબી બાજુના મેનૂ પર “સેટિંગ્સ” > “SMTP વપરાશકર્તાઓ” પસંદ કરો, “એસએમટીપી વપરાશકર્તા ઉમેરો” પર ક્લિક કરો અને ફોર્મ ભરો.
 તમારા SMTP2GO એકાઉન્ટમાં વપરાશકર્તા ઉમેરાયા પછી, તે તમારા ફાર્ગો/કોડા ઉપકરણો પર ઈમેલ સૂચના સેટ કરવા માટે જરૂરી માહિતી પ્રદર્શિત કરશે.

પગલું 3. લિનોર્ટેક ઉપકરણને ગોઠવો.
તમે એકાઉન્ટ બનાવ્યા પછી અને વપરાશકર્તા ઉમેર્યા પછી, તમારા Linortek ઉપકરણ પર લૉગિન કરો, ગોઠવણી પર નેવિગેટ કરો - ઇમેઇલ સૂચના સેટઅપ કરવા માટે સેટઅપ પૃષ્ઠ ઇમેઇલ કરો:
- SMTP સર્વર – તમે ઉપયોગ કરવા માંગો છો તે આઉટગોઇંગ મેઇલ સર્વર દાખલ કરો, તે અમારા ભૂતપૂર્વમાં mail.smtp2go.com છેample
- પોર્ટ - આ તે સર્વર પરનું પોર્ટ છે. અમારા ભૂતપૂર્વમાં SMTP પોર્ટ 2525 છેample
- SSL નો ઉપયોગ કરો - જ્યારે તમે તૃતીય પક્ષ SMTP સર્વરનો ઉપયોગ કરો ત્યારે તેને અનચેક છોડો.
- વપરાશકર્તા નામ - SMTP2GO નું વપરાશકર્તા નામ જ્યારે અમે પહેલાના પગલામાં વપરાશકર્તા બનાવ્યો હતો.
- પાસવર્ડ - SMTP2GO માંથી વપરાશકર્તાનો પાસવર્ડ જ્યારે અમે પહેલાના પગલામાં વપરાશકર્તા બનાવ્યો હતો.
- સરનામું - આ ઇમેઇલ સેટઅપ માટે 3 જેટલા સરનામાં દાખલ કરો. એક સરનામું, એક CC અને BC.
- વિષય - ઇમેઇલ હેડરની વિષય રેખા.
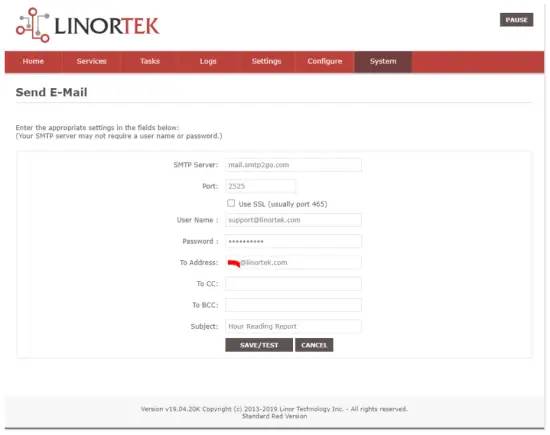
જલદી તમે "સાચવો/ટેસ્ટ" દબાવો, ઉપકરણ આપમેળે પરીક્ષણ ઇમેઇલ મોકલે છે. જો તે ઇનબૉક્સ ફોલ્ડરમાં ન હોય તો તેને શોધવા માટે કૃપા કરીને જંક/અન્ય ફોલ્ડર તપાસો.
પગલું 4. સ્વયંસંચાલિત ઇમેઇલ સૂચનાઓ માટે કાર્ય સેટ કરો.
You should be able to receive email notifications for various events from the Fargo/Koda boards at this point. If you need to receive condition logic notification, you can use our condition logic configuration to setup such report. To setup the logic condition report notification, go to Tasks page on your Fargo/Koda device, click the Edit icon of a Schedule. For details of how to create a logic-based event, please refer to the Set Schedule Page on the Fargo/Koda User Manual, which can be downloaded here:
https://www.linortek.com/download/fargo%20g2_koda%20downloads/fargo%20g2_koda%20documentation/Fargo-G2-and-Koda-User-Manual.pdf
આમાં એસample અમે નેટવર્ક અવર મીટર ઉપકરણનો ઉપયોગ ભૂતપૂર્વ તરીકે કરીશુંampદરરોજ સવારે 11:52 વાગ્યે ઈમેલ રિપોર્ટ્સ કેવી રીતે પ્રાપ્ત કરવા તે માટે.
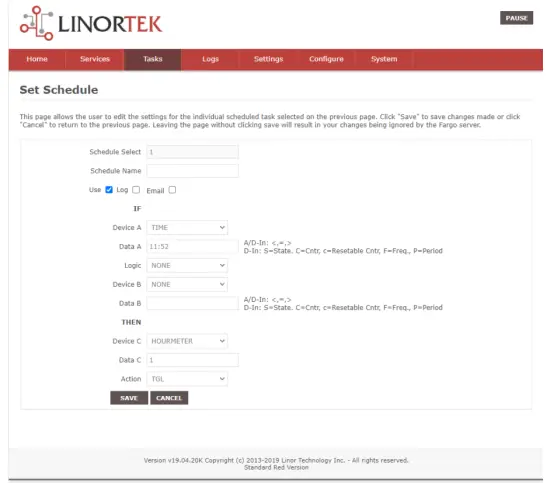
જલદી જ કાર્યની બધી શરતો પૂરી થાય છે, તમને નીચેનો ઇમેઇલ મળે છે:
Hour Reading Report
![]() support@linortek.com
support@linortek.com
Mon 4/11/2022 11:52 AM
To: Liyu Nalven
HM 1, my machine, is at 000242.01 hrs.
Reply Forward
![]()
દસ્તાવેજો / સંસાધનો
 |
LINORTEK Fargo G2 TCP/IP Web Based Relay Controller [પીડીએફ] વપરાશકર્તા માર્ગદર્શિકા Fargo G2, Koda, Fargo G2 TCP-IP Web Based Relay Controller, Web Based Relay Controller, Based Relay Controller, Relay Controller |