![]() Fargo G2 and Koda User Manual
Fargo G2 and Koda User Manual
www.linortek.com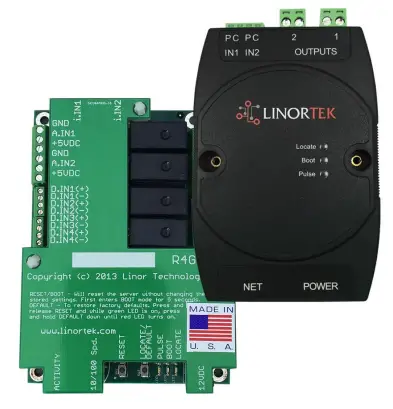 For Fargo G2, Koda
Protokol TCP/IP Web Pengontrol Relai Berbasis
Wahyu C 04/2022
Fargo G2 TCP/IP Web Pengontrol Relai Berbasis
Thank you for purchasing a Linortek Fargo G2 or Koda TCP/IP Controller. There are many devices that can be controlled by the FARGO/KODA Web Relay Controller. FARGO/KODA Web Controller can be used in such applications as (but not limited to): Lights, security, sprinkler systems, access control, industrial equipment, building automation, HVAC, and many more. Please refer to the Board Reference Layouts on page 29 for input and output specifications on your controller to verify they are suitable to your needs.
Manual ini mencakup:
- FARGO R8 G2
- FARGO R4DI G2
- FARGO R4ADI G2
- KODE 100
- KODA200
These will be referred to as SERVER hereafter. When there are differences or additional features they will be noted in the text.
Untuk video instruksional, FAQ, dan informasi kontak untuk tim dukungan teknis kami, silakan kunjungi: https://www.linortek.com/technical-support
GARANSI TERBATAS SATU TAHUN LINORTEK
Consumer law: For consumers who are covered by consumer protection laws or regulations in their country of residence (“Consumer Law”), the benefits provided in this Linortek One-Year Limited Warranty (“Linortek Limited Warranty”) are in addition to and not instead of the rights provided by Consumer Law and it does not exclude, limit or suspend your rights arising from Consumer Law. You should consult the proper authorities in your country of residence for further information about these rights
Kewajiban garansi Linortek untuk produk perangkat keras ini (“Produk”) terbatas pada ketentuan yang ditetapkan di bawah ini:
Linor Technology, Inc. (“Linortek”) warrants this product against defects in materials and workmanship for a period of ONE (1) YEAR from the date of retail purchase by the original end-user purchaser (“Warranty Period”) when used in accordance with the operating instructions. A copy of a retail receipt is required as proof of purchase. If a hardware defect arises and a valid claim is received within the Warranty Period, at its option and to the extent permitted by law, Linortek will either (1) repair the hardware defect at no charge, using new or refurbished replacement parts, (2) exchange the product with a product that is new or which has been manufactured from new or serviceable used parts and is at least functionally equivalent to the original product, or (3) refund the purchase price of the product. When a refund is given, the product for which the refund is provided must be returned to Linortek and becomes Linortek’s property.
Garansi di atas tunduk pada (i) klaim tertulis yang cepat dari Pembeli dan (ii) pemberian tepat waktu kepada Linortek tentang kesempatan untuk memeriksa dan menguji Produk yang diklaim cacat. Pemeriksaan tersebut dapat dilakukan di tempat Pembeli dan/atau Linortek dapat meminta pengembalian Produk atas biaya Pembeli. Namun, Linortek tidak bertanggung jawab atas biaya pengepakan, inspeksi, atau tenaga kerja sehubungan dengan pengembalian Produk. Produk tidak akan diterima untuk layanan garansi yang tidak disertai dengan nomor Otorisasi Pengembalian Barang (RMA#) yang dikeluarkan oleh Linortek.
PENGECUALIAN DAN BATASAN
Garansi Terbatas ini tidak termasuk kerusakan akibat penyalahgunaan, penyalahgunaan, pengabaian, kebakaran atau penyebab eksternal lainnya, kecelakaan, modifikasi, perbaikan atau penyebab lain yang bukan merupakan cacat bahan dan pengerjaan. Perangkat lunak yang didistribusikan oleh Linortek dengan atau tanpa nama merek Linortek termasuk, namun tidak terbatas pada, perangkat lunak sistem (“Perangkat Lunak”) tidak tercakup dalam Jaminan Terbatas ini. Penggunaan dan hak Anda yang terkait dengan Perangkat Lunak diatur oleh Perjanjian Lisensi Pengguna Akhir Linortek yang dapat Anda temukan di sini: https://www.linortek.com/end-user-licenseagreement/. Linortek tidak bertanggung jawab atas kerusakan yang timbul dari kegagalan mengikuti instruksi yang berkaitan dengan penggunaan produk. Untuk memastikan kesesuaian dengan batasan pengoperasian, Pembeli harus mengacu pada instruksi manual [disediakan dengan produk]. Baterai tidak termasuk dalam Garansi.
SEJAUH DIIZINKAN, JAMINAN TERBATAS INI DAN PERBAIKAN YANG TERCANTUM DI ATAS BERADALAH EKSKLUSIF DAN PENGGANTI SEMUA JAMINAN, PERBAIKAN, DAN KETENTUAN LAINNYA, DAN LINORTEK SECARA KHUSUS MENYANGKAL SEMUA JAMINAN HUKUM ATAU TERSIRAT, TERMASUK NAMUN TIDAK TERBATAS PADA, JAMINAN DAPAT DIPERDAGANGKAN, KESESUAIAN UNTUK TUJUAN TERTENTU, NON-PELANGGARAN. SELAMA JAMINAN TERSEBUT TIDAK DAPAT DIABAIKAN, SEMUA JAMINAN TERSEBUT, SEJAUH DIIZINKAN OLEH HUKUM, DIBATASI DALAM JANGKA WAKTU JAMINAN TERBATAS LINORTEK DAN PERBAIKAN AKAN TERBATAS PADA PERBAIKAN, PENGGANTI ATAU PENGEMBALIAN DANA SEPERTI YANG DITENTUKAN OLEH LINORTEK DALAM KEBIJAKSANAANNYA. BEBERAPA NEGARA BAGIAN (NEGARA DAN PROVINSI) TIDAK MENGIZINKAN PEMBATASAN BERAPA LAMA JAMINAN ATAU KETENTUAN TERSIRAT DAPAT BERLAKU, SEHINGGA PEMBATASAN YANG DIJELASKAN DI ATAS MUNGKIN TIDAK BERLAKU BAGI ANDA. GARANSI INI MEMBERI ANDA HAK HUKUM KHUSUS, DAN ANDA JUGA MUNGKIN MEMILIKI HAK LAIN YANG BERBEDA-BEDA DARI NEGARA YANG LAIN (ATAU MENURUT NEGARA ATAU PROVINSI). GARANSI TERBATAS INI DIATUR OLEH DAN DIANGGAP BERDASARKAN HUKUM AMERIKA SERIKAT.
Penafian
- Baca Petunjuk – Baca semua petunjuk keselamatan dan pengoperasian sebelum mengoperasikan produk.
- Simpan Instruksi – Simpan instruksi keselamatan dan pengoperasian untuk referensi di masa mendatang.
- Perhatikan Peringatan – Patuhi semua peringatan pada produk dan petunjuk pengoperasian.
- Ikuti Petunjuk – Ikuti semua petunjuk pengoperasian dan penggunaan.
- Pembersihan – Cabut produk dari daya sebelum dibersihkan. Jangan gunakan pembersih cair atau pembersih aerosol. Gunakan iklanamp kain untuk membersihkan kandang saja.
- Lampiran – Jangan gunakan lampiran kecuali secara khusus direkomendasikan oleh Linortek. Menggunakan lampiran yang tidak kompatibel atau tidak cocok dapat berbahaya.
- Aksesori – Jangan letakkan produk ini di atas dudukan, tripod, braket, atau dudukan yang tidak stabil. Produk dapat jatuh, menyebabkan cedera serius pada seseorang dan kerusakan serius pada produk. Gunakan hanya dengan dudukan, tripod, braket, atau dudukan yang direkomendasikan oleh pabrikan, atau dijual bersama produk. Ikuti petunjuk pabrikan saat memasang produk, dan hanya gunakan aksesori pemasangan yang direkomendasikan oleh pabrikan. Berhati-hatilah saat menggunakan kombinasi alat dan kereta. Berhenti cepat, tenaga yang berlebihan, dan permukaan yang tidak rata dapat menyebabkan kombinasi alat dan kereta terbalik.
- Ventilasi – Bukaan di dalam enklosur, jika ada, disediakan untuk ventilasi dan untuk memastikan pengoperasian produk yang andal dan untuk melindunginya dari panas berlebih. Jangan menghalangi atau menutupi bukaan ini. Jangan letakkan produk ini dalam instalasi built-in kecuali tersedia ventilasi yang memadai atau petunjuk Linortek telah dipatuhi.
- Sumber Listrik – Operasikan produk ini hanya dari jenis sumber listrik yang tertera dalam instruksi manual atau pada label produk.
Jika Anda tidak yakin dengan jenis catu daya yang akan Anda gunakan, konsultasikan dengan dealer peralatan atau perusahaan listrik setempat – dengan ketentuan bahwa penggunaan jenis sumber listrik apa pun selain yang ditunjukkan dalam buku petunjuk atau label penandaan akan membatalkan jaminan apa pun. Untuk produk yang dimaksudkan untuk dioperasikan dengan daya baterai, atau sumber lain, lihat petunjuk pengoperasian [disertakan dengan produk]. - Pembumian atau Polarisasi – Produk ini mungkin dilengkapi dengan colokan saluran arus bolak-balik terpolarisasi (colokan yang satu bilahnya lebih lebar dari bilah lainnya). Steker ini akan masuk ke stopkontak hanya satu arah. Ini adalah fitur keamanan. Jika Anda tidak dapat memasukkan steker sepenuhnya ke stopkontak, coba balikkan steker. Jika steker masih tidak dapat dipasang, itu karena stopkontak Anda tidak kompatibel dengan steker. Hubungi teknisi listrik Anda untuk mengganti stopkontak Anda dengan stopkontak yang kompatibel. Jangan paksa steker untuk masuk ke stopkontak yang tidak kompatibel atau mencoba menggagalkan tujuan keselamatan steker. Sebagai alternatif, produk ini mungkin dilengkapi dengan steker tipe pengardean 3-kawat, steker yang memiliki pin (pembumian) ketiga. Steker ini hanya akan masuk ke stopkontak tipe pembumian. Ini adalah fitur keamanan. Jangan paksa steker untuk masuk ke stopkontak yang tidak kompatibel atau mencoba menggagalkan tujuan keselamatan steker. Jika stopkontak Anda tidak kompatibel dengan stekernya, hubungi teknisi listrik Anda untuk mengganti stopkontak Anda dengan stopkontak yang kompatibel.
- Perlindungan Kabel Daya – Rutekan kabel catu daya agar tidak terinjak atau terjepit oleh benda yang diletakkan di atas atau di sampingnya, dengan memperhatikan kabel dan steker, stopkontak praktis, dan titik di mana kabel keluar dari peralatan .
- Saluran Listrik – Jangan letakkan sistem luar ruangan di sekitar saluran listrik di atas kepala atau lampu listrik atau sirkuit daya lainnya, atau di tempat yang dapat jatuh ke saluran atau sirkuit listrik tersebut. Saat memasang sistem luar ruangan, berhati-hatilah agar tidak menyentuh kabel atau sirkuit listrik karena kontak dengannya dapat berakibat fatal.
- Beban berlebih – Jangan membebani stopkontak dan kabel ekstensi karena dapat menyebabkan kebakaran atau sengatan listrik.
- Masuknya Benda dan Cairan – Jangan sekali-kali memasukkan benda apa pun ke dalam produk ini melalui celah karena dapat menyentuh cairan yang berbahaya.tage titik atau bagian yang korsleting yang dapat menyebabkan kebakaran atau sengatan listrik. Jangan pernah menumpahkan cairan apapun pada produk.
- Servis – Jangan coba menyervis produk ini sendiri karena membuka atau melepas penutup dapat membuat Anda terkena volume yang berbahayatage atau bahaya lainnya. Rujuk semua servis produk ke Linortek.
- Servis yang Memerlukan Kerusakan – Cabut produk dari stopkontak dan rujuk servis ke Dukungan Pelanggan Linortek dalam kondisi berikut:
sebuah. Saat kabel atau steker catu daya rusak.
b. Jika cairan tumpah, atau benda jatuh ke produk.
c. Jika produk terkena hujan atau air.
d. Jika produk tidak beroperasi secara normal dengan mengikuti petunjuk pengoperasian [disertakan dengan produk]. Sesuaikan hanya kontrol yang tercakup dalam petunjuk pengoperasian, karena penyesuaian kontrol lain yang tidak tepat dapat mengakibatkan kerusakan dan sering kali memerlukan pekerjaan ekstensif oleh teknisi yang berkualifikasi untuk mengembalikan produk ke pengoperasian normal.
e. Jika produk terjatuh atau kabinetnya rusak.
F. Jika produk menunjukkan perubahan kinerja yang berbeda. - Suku Cadang Pengganti – Jika suku cadang pengganti diperlukan, gunakan Volt Rendahtage Tukang listrik menggantinya hanya dengan menggunakan suku cadang yang ditentukan oleh pabrikan. Penggantian yang tidak sah dapat mengakibatkan kebakaran, sengatan listrik, atau bahaya lainnya. Suku cadang pengganti dapat ditemukan di https://www.linortek.com/store/
- Pemeriksaan Keamanan – Setelah menyelesaikan servis atau perbaikan apa pun pada produk ini, mintalah teknisi servis untuk melakukan pemeriksaan keamanan guna memastikan bahwa produk berada dalam kondisi pengoperasian yang tepat.
- Pengardean Coax – Jika sistem kabel luar terhubung ke produk, pastikan sistem kabel diarde. Model AS saja–Bagian 810 dari Kode Kelistrikan Nasional, ANSI/NFPA No.70-1981, memberikan informasi sehubungan dengan pembumian yang tepat dari dudukan dan struktur pendukung, pembumian coax ke produk pelepasan, ukuran konduktor pembumian, lokasi produk pelepasan, koneksi ke elektroda pembumian, dan persyaratan untuk elektroda pembumian.
- Petir – Untuk perlindungan tambahan pada produk ini selama badai petir, atau sebelum meninggalkannya tanpa pengawasan dan tidak digunakan dalam waktu lama, cabut stekernya dari stopkontak dan cabut sistem kabel. Ini akan mencegah kerusakan pada produk karena petir dan lonjakan saluran listrik.
- Penggunaan di Luar Ruangan - Produk ini tidak tahan air dan tidak boleh basah. Jangan sampai terkena hujan atau jenis cairan lainnya.
Jangan tinggalkan di luar ruangan semalaman karena kondensasi dapat terjadi. - Saat mengganti baterai, sekering, atau menangani produk tingkat papan, berhati-hatilah terhadap pelepasan muatan listrik statis yang dapat merusak perangkat elektronik. Yang terbaik adalah menggunakan bangku servis elektronik yang diarde. Jika ini tidak tersedia, Anda dapat melepaskan diri dengan menyentuh alat atau pipa logam. Saat mengganti baterai atau sekering, jangan menyentuh i) kabel apa pun selain kabel baterai dan ii) papan sirkuit tercetak.
BATASAN TANGGUNG JAWAB
IN NO EVENT WILL LINOR TECHNOLOGY BE LIABLE, WHETHER IN CONTRACT, TORT, OR OTHERWISE, FOR ANY INCIDENTAL, SPECIAL, INDIRECT, CONSEQUENTIAL OR PUNITIVE DAMAGES, INCLUDING, BUT NOT LIMITED TO, DAMAGES FOR ANY LOSS OF USE, LOSS OF TIME, INCONVENIENCE, COMMERCIAL LOSS, OR LOST PROFITS, SAVINGS, OR REVENUES TO THE FULL EXTENT SUCH MAY BE DISCLAIMED BY LAW. DISCLAIMER FOR CRITICAL APPLICATIONS
Produk ini tidak dimaksudkan atau diizinkan untuk produk pendukung kehidupan atau untuk penggunaan lain yang kegagalannya dapat menyebabkan cedera atau kematian. Jika Anda atau pelanggan Anda menggunakan atau mengizinkan penggunaan produk ini untuk penggunaan yang tidak diinginkan atau tidak sah tersebut, Anda setuju untuk sepenuhnya mengganti kerugian Linor Technology dan afiliasinya, dan pejabat, karyawan, dan distributor masing-masing, dari semua kewajiban yang terkait dengan penggunaan tersebut, termasuk biaya dan biaya pengacara.
PEMBERITAHUAN LEBIH LANJUT UNTUK PEMBATASAN PENGGUNAAN
Kecuali dinyatakan secara khusus, Produk kami TIDAK dirancang untuk mengganti volume salurantagperangkat e (110V ke atas). Untuk mengontrol perangkat yang beroperasi pada line voltagadalah teknisi listrik yang berkualifikasi HARUS memasang perangkat perantara seperti relai. Saat memilih perangkat untuk dikontrol, yang terbaik adalah memilih vol . rendahtage kontrol seperti solenoid 24VAC ke kontrol aliran air. Hanya teknisi listrik yang memenuhi syarat yang dapat menyambungkan voltase salurantagperangkat. Selain itu, kode lokal harus diikuti termasuk tetapi tidak terbatas pada ukuran pengukur kawat dan rumah yang sesuai. Linortek tidak bertanggung jawab atas kerugian bagi pengguna atau pihak ketiga karena menggunakan Produk kami secara tidak semestinya. Tanggung jawab ini tetap ada pada pengguna. Linortek tidak bertanggung jawab atas kerusakan perangkat karena penggunaan Produk kami secara tidak benar.
VOLUME RELAYTAGE SPESIFIKASI
Harap berhati-hati saat menghubungkan perangkat ke sirkuit listrik atau peralatan lainnya. Ini web pengontrol TIDAK dirancang untuk terhubung ke volume apa puntage greater than 48V. Utilizing this arrangement, should allow you to virtually control anything. It is important that you use licensed electricians and comply with electrical codes that are applicable to your location. These codes exist for your safety, as well as the safety of others. Linortek assumes no responsibility for any harm or damage resulting from a failure adhere to local laws, ordinances or regulations or failure to follow specified instructions for installation and product usage.
Perjanjian Lisensi Pengguna Akhir untuk Perangkat Lunak dan Dokumentasi Linortek
Perjanjian Lisensi Pengguna Akhir (“EULA”) ini adalah perjanjian hukum antara ANDA (individu atau entitas tunggal) dan Linor Technology, Inc. (“Linortek” atau “kami” atau “kami”) yang mengatur penggunaan perangkat lunak oleh Anda dan dokumentasi (“Perangkat Lunak”) yang disematkan di atau terkait dengan rangkaian produk Fargo, Koda, Netbell, IoTMeter, dan iTrixx (“Produk Linortek”).
EULA ini tidak mengatur penggunaan Linortek websitus atau Produk Linortek (tidak termasuk Perangkat Lunak). Anda menggunakan Linortek websitus diatur oleh Linortek webpersyaratan layanan situs dan kebijakan privasi Linortek yang dapat ditemukan di:
http://www.linortek.com/terms-and-conditions [Pembelian Produk Linortek Anda (tidak termasuk Perangkat Lunak) diatur oleh garansi terbatas Linortek, yang dapat ditemukan di https://www.linortek.com/linortek-one-year-limited-warranty/
This EULA governs your access and use of the Software. This EULA gives you specific legal rights, and you may also have other legal rights in addition, which vary from jurisdiction to jurisdiction. The disclaimers, exclusions, and limitations of liability under
this EULA will not apply to the extent prohibited or limited by applicable law. Some jurisdictions do not allow the exclusion of implied warranties or the exclusion or limitation of incidental or consequential damages or other rights, so those provisions of this EULA may not apply to you.
Dengan menginstal, mengakses, menyalin dan/atau menggunakan Perangkat Lunak atau dokumentasi, Anda setuju untuk terikat oleh syarat dan ketentuan EULA ini atas nama Anda sendiri atau entitas yang Anda wakili sehubungan dengan instalasi, akses, penyalinan, dan/atau menggunakan. Anda menyatakan dan menjamin bahwa (i) Anda memiliki hak, wewenang, dan kapasitas untuk menerima dan menyetujui persyaratan EULA ini atas nama Anda sendiri atau entitas yang Anda wakili (ii) Anda cukup umur secara hukum di yurisdiksi tempat tinggal Anda , (iii) Anda tidak berada di negara yang terkena embargo Pemerintah AS, atau yang telah ditetapkan oleh Pemerintah AS sebagai negara “pendukung teroris”; dan (ii) Anda tidak terdaftar dalam daftar pihak yang dilarang atau dibatasi oleh Pemerintah AS.
Jika Anda tidak ingin terikat dengan ketentuan EULA ini, Anda tidak boleh menginstal, mengakses, menyalin, atau menggunakan Perangkat Lunak dengan cara apa pun (baik yang telah diinstal sebelumnya pada perangkat yang telah Anda beli atau tidak).
- Penggunaan Perangkat Lunak/Lisensi Perangkat Lunak yang Diizinkan.
Tunduk pada persyaratan EULA ini, Linortek memberi Anda hak dan lisensi terbatas, dapat dibatalkan, non-eksklusif, tidak dapat disublisensikan, tidak dapat dialihkan untuk (a) mengunduh, menginstal, dan menjalankan satu salinan Perangkat Lunak, dalam bentuk kode objek yang dapat dieksekusi hanya, semata-mata pada Produk Linortek yang Anda miliki atau kendalikan dan untuk (b) menggunakan Perangkat Lunak semata-mata sehubungan dengan Produk Linortek sesuai dengan tujuan penggunaannya sebagaimana dijelaskan pada Linortek websitus (masing-masing dari 1(a) dan 1(b) "Penggunaan yang Diizinkan" dan secara kolektif "Penggunaan yang Diizinkan"). - Pembatasan Penggunaan Perangkat Lunak oleh Anda.
Anda setuju untuk tidak, dan tidak mengizinkan orang lain untuk, menggunakan Perangkat Lunak untuk tujuan apa pun selain Penggunaan yang Diizinkan yang dijelaskan dalam Bagian 1 di atas. Ini berarti, antara lain, Anda tidak boleh:
(a) mengedit, mengubah, memodifikasi, mengadaptasi, menerjemahkan, membuat karya turunan dari, membongkar, merekayasa balik, atau mengkompilasi balik bagian mana pun dari Perangkat Lunak (kecuali sejauh undang-undang yang berlaku secara khusus melarang pembatasan tersebut untuk tujuan interoperabilitas, dalam hal ini Anda setuju untuk terlebih dahulu menghubungi Linortek dan memberikan Linortek kesempatan untuk membuat perubahan yang diperlukan untuk tujuan interoperabilitas);
(b) melisensikan, menetapkan, mendistribusikan, mentransmisikan, menjual, menyewakan, menyelenggarakan, mengalihdayakan, mengungkapkan, atau menggunakan Perangkat Lunak untuk tujuan komersial apa pun atau menyediakan Perangkat Lunak untuk pihak ketiga mana pun;
(c) mengizinkan pihak ketiga mana pun untuk menggunakan Perangkat Lunak atas nama atau untuk kepentingan pihak ketiga mana pun;
(d) menggunakan bagian apa pun dari Perangkat Lunak pada perangkat atau komputer apa pun selain Produk Linortek yang Anda miliki atau kendalikan;
(e) menggunakan Perangkat Lunak dengan cara apa pun yang melanggar hukum lokal, nasional, atau internasional yang berlaku; atau
(f) remove or alter any labels, symbols, legends or proprietary notices, including but not limited to any copyright, trademark, logo in the Software. You may not disclose the results of any performance or functional evaluation of anyof the Software to any third party without the prior written consent of Linortek for each such release. - Pembaruan.
Linortek dapat dari waktu ke waktu mengembangkan pembaruan, peningkatan, patch, perbaikan bug, dan modifikasi lainnya (“Pembaruan”) untuk meningkatkan kinerja Perangkat Lunak. Kecuali ditentukan lain pada Linortek websitus, Pembaruan ini akan diberikan kepada Anda secara gratis. Pembaruan ini dapat diinstal secara otomatis tanpa pemberitahuan kepada Anda. Dengan menggunakan Perangkat Lunak, Anda juga menyetujui Pembaruan otomatis. Jika Anda tidak setuju dengan ini, Anda tidak boleh menginstal, mengakses, menyalin, atau menggunakan Perangkat Lunak dengan cara apa pun. - Kepemilikan.
The Software is licensed to you and not sold. Linortek reserves all rights to the Software and any Updates not expressly granted herein. The Software and Linortek Products are protected by copyright, trademark and other intellectual property laws andtreaties. Linortek and its licensors own the title, copyright, trademarks and other intellectual property rights in the Software.
You are not granted any rights to Linortek’s trademarks or service marks. There are no implied licenses in this EULA. - Penghentian.
This EULA is effective from the date you first use the Software and will continue for as long as you own the Linortek Product associated with it or until you or Linortek terminate this agreement under this section. You may terminate this EULA at any time upon written notice to Linortek at the address provided below. Linortek may terminate this EULA at any time if you fail to comply with any of the terms in this agreement. The license granted in this EULA terminates immediately when the agreement terminates. Upon termination, you must stop using the Linortek Product and the Software and you must delete all copies of the
Software. The terms of Sections 2 will still remain in effect after the agreement terminates. - Penafian Garansi.
EXTENT PERMITTED BY APPLICABLE LAW, LINORTEK PROVIDES THE SOFTWARE “AS-IS” AND DISCLAIMS ALL WARRANTIES AND CONDITIONS, WHETHER EXPRESS, IMPLIED, OR STATUTORY, INCLUDING THE WARRANTIES OF MERCHANTABILITY, FITNESS FOR A PARTICULAR PURPOSE, TITLE, QUIET ENJOYMENT, ACCURACY, AND NON-INFRINGEMENT OF THIRD-PARTY RIGHTS. LINORTEK DOES NOT GUARANTEE ANY SPECIFIC RESULTS FROM THE USE OF THE SOFTWARE. LINORTEK MAKES NO WARRANTY THAT THE SOFTWARE WILL BE UNINTERRUPTED, FREE OF VIRUSES OR OTHER HARMFUL CODE, TIMELY, SECURE, OR ERROR-FREE. YOU USE THE SOFTWARE AND THE LINORTEK PRODUCT AT YOUR OWN DISCRETION AND RISK. YOU WILL BE SOLELY RESPONSIBLE FOR (AND LINORTEK DISCLAIMS) ANY AND ALL LOSS, LIABILITY, OR DAMAGES RESULTING FROM YOUR USE OF THE SOFTWARE
AND LINORTEK PRODUCT. - Batasan Tanggung Jawab.
Tidak ada dalam EULA ini dan khususnya dalam klausul "Batasan Tanggung Jawab" ini yang berusaha untuk mengecualikan tanggung jawab yang tidak dapat dikecualikan berdasarkan hukum yang berlaku.
SEJAUH DIIZINKAN OLEH UNDANG-UNDANG YANG BERLAKU, SEBAGAI PENAFIAN JAMINAN DI ATAS, DALAM HAL APAPUN (A) LINORTEK TIDAK BERTANGGUNG JAWAB ATAS KERUSAKAN KONSEKUENSIAL, CONTOH, KHUSUS, ATAU INSIDENTAL, ATAS KERUSAKAN LOSTENTAL, TERMASUK A DARI ATAU TERKAIT DENGAN PRODUK ATAU PERANGKAT LUNAK, BAHKAN JIKA LINORTEK MENGETAHUI ATAU SEHARUSNYA MENGETAHUI KEMUNGKINAN KERUSAKAN TERSEBUT, DAN (B) TOTAL TANGGUNG JAWAB KUMULATIF LINORTEK YANG TIMBUL DARI ATAU TERKAIT DENGAN PRODUK DAN PERANGKAT LUNAK LAINNYA HARUS DIBATASI PADA JUMLAH YANG TIDAK PERNAH MELEBIHI JUMLAH YANG SEBENARNYA DIBAYARKAN OLEH ANDA KEPADA DISTRIBUTOR RESMI LINORTEK ATAU PERWAKILAN PENJUALAN UNTUK PRODUK ATAU LAYANAN YANG DITERBITKAN DALAM 6 BULAN SEBELUMNYA (JIKA ADA). BATASAN INI KUMULATIF DAN TIDAK AKAN MENINGKAT DENGAN ADANYA LEBIH DARI SATU KEJADIAN ATAU KLAIM. LINORTEK MENYANGKAL SEMUA TANGGUNG JAWAB APAPUN PEMBERI LISENSI DAN PEMASOK LINORTEK. - Kepatuhan dengan Hukum Ekspor.
Anda mengakui bahwa Perangkat Lunak dan teknologi terkait tunduk pada undang-undang pengendalian ekspor AS, yurisdiksi ekspor AS dan mungkin tunduk pada peraturan ekspor atau impor di negara lain. Anda setuju untuk secara ketat mematuhi semua undang-undang dan peraturan internasional dan nasional yang berlaku pada Perangkat Lunak, termasuk Peraturan Administrasi Ekspor AS serta pembatasan pengguna akhir, penggunaan akhir, dan tujuan yang dikeluarkan oleh pemerintah AS dan lainnya. Anda mengakui bahwa Anda mempunyai tanggung jawab untuk mendapatkan otorisasi untuk mengekspor, mengekspor kembali, atau mengimpor Perangkat Lunak dan teknologi terkait, sebagaimana mungkin diperlukan.
Anda akan mengganti kerugian dan membebaskan Linortek dari setiap dan semua klaim, kerugian, kewajiban, kerusakan, denda, penalti, biaya dan pengeluaran (termasuk biaya pengacara) yang timbul dari atau terkait dengan pelanggaran oleh Anda atas kewajiban Anda berdasarkan bagian ini. - Penugasan.
Anda tidak boleh mengalihkan hak atau kewajiban Anda berdasarkan EULA ini, dan segala upaya untuk mengalihkan akan batal dan tanpa efek. - Pemberitahuan.
Linortek dapat memberikan pemberitahuan apa pun kepada Anda terkait EULA ini menggunakan email dan alamat yang Anda berikan saat mendaftar di Linortek. - Pengabaian
Agar efektif, setiap dan semua pengesampingan oleh Linortek di bawah ini harus dibuat secara tertulis dan ditandatangani oleh perwakilan Linortek yang berwenang. Kegagalan Linortek lainnya untuk menegakkan ketentuan apa pun di bawah ini tidak akan dianggap sebagai pengesampingan. - Keterpisahan.
Ketentuan apa pun dari EULA ini yang ditemukan tidak dapat diterapkan akan diedit dan ditafsirkan untuk mencapai tujuan ketentuan tersebut semaksimal mungkin berdasarkan hukum yang berlaku dan semua ketentuan lainnya akan tetap memiliki kekuatan dan efek penuh. - Peraturan pemerintah; Lokasi.
You agree that this EULA, and any claim, dispute, action, cause of action, issue, or request for relief arising out of or relating to this EULA, will be governed by the laws of the state of North Carolina, U.S.A., without regard to conflicts of laws principles, provided that if you reside in a country that will not apply U.S. law to disputes related to these terms, then the laws of your country will apply. You also agree that the United Nations Convention on Contracts for the International Sale of Goods shall not
apply. You agree that regardless of any statute or law to the contrary, any cause of action against us arising out of or related to the Linortek websitus, Perangkat Lunak atau Produk Linortek harus dimulai dalam waktu satu (1) tahun setelah penyebab tindakan timbul atau penyebab tindakan tersebut akan dilarang secara permanen. Setiap tindakan atau proses yang berkaitan dengan EULA ini harus dibawa ke pengadilan federal atau negara bagian yang berlokasi di Raleigh, North Carolina dan masing-masing pihak secara tidak dapat ditarik kembali tunduk pada yurisdiksi dan tempat pengadilan tersebut dalam setiap klaim atau perselisihan tersebut, kecuali bahwa Linortek dapat meminta ganti rugi bantuan di pengadilan mana pun yang memiliki yurisdiksi untuk melindungi kekayaan intelektualnya. - Peringatan Proposisi California 65.
 PERINGATAN: Produk ini dapat membuat Anda terpapar bahan kimia termasuk timbal, yang di Negara Bagian California diketahui menyebabkan kanker. Untuk informasi lebih lanjut, kunjungi www.P65Warnings.ca.gov.
Memulai
The Fargo SERVER is what is called a “bare board” product and is supplied without a housing. It operates on low voltage; however you need to use simple handling precautions to prevent damage to the circuits. All electronics are susceptible to electrostatic discharge. This high voltage “shock” can permanently damage your device. Before handling the product, you should touch a surface such as a grounded workbench or table. It is also best to handle the device from its edges. If you notice that your chair or clothes often cause static discharges, you must exercise extra caution. The unit is supplied with four rubber feet which keeps the bottom of the board from coming into contact with the surface you put it on. Be careful not to let metal objects, such as screw drivers or hardware, come in contact with the bottom of this product. The board can be mounted on a panel using stand offs and #4 hardware. The mounting holes are connected to the GROUND signal. The SERVER unit is a self-contained web server configured with various input and output circuits. Although the relays are rated for higher voltages, produk ini tidak dirancang untuk digunakan pada baris voltages. You should never use voltages through the SERVER product exceeding 48 volts. IT IS NOT SAFE.
The KODA SERVER is a housed unit with a DIN rail mountable enclosure that can be snapped onto a DIN rail or attached to any flat surface such as a wall or under a counter. KODA 100 has two relays (48VAC@1A), KODA 200 has four relays which can drive 10V 50mA to external devices. The unit is supplied with a DIN Rail mountable enclosure with removable terminal connectors for easy installation. The KODA SERVER can be mounted on a panel or on the wall using the DIN rail mount clip. The removable wire terminal connectors simplify field installation and allow for easy troubleshooting and maintenance: the unit can be removed from the system without disturbing the system wiring.
Pengkabelan Server
Catatan: For a diagram showing the location of all connectors on your SERVER referenced in this section, please see the section – Board Layout Reference.
Peringatan: Unit-unit ini terisolasi dari tanah. Selalu sambungkan sehingga power loop hanya terhubung ke unit SERVER.
JANGAN gunakan sambungan ground eksternal. Melakukan hal tersebut dapat merusak perangkat asal SERVER atau POE.
- Place the unit on a table or bench being careful not to let any metal objects come into contact with the bottom of the circuit board (Fargo Only).
- Connect the 12VDC power supply to a suitable AC outlet and plug the barrel connector into the SERVER at the location labelled “12VDC/POWER”. Alternatively, you may also use POE. At this point the GREEN/Boot LED should come on and start flashing indicating the SERVER is operating and is in the “Bootload Mode”. This mode allows the user to update the server software that is used on the unit. After about 5 seconds, the GREEN LED will go off and the RED LED will start blinking once per second indicating the SERVER is operating in “Server Mode” and is accessible on a network utilizing TCP/IP protocols.
PERINGATAN: KETIKA ANDA MENGGUNAKAN POE NETWORK SWITCH, JANGAN GUNAKAN POWER SUPPLY 12VDC UNTUK MENDAPATKAN SERVER SECARA SAMA, AKAN MERUSAK BOARD. - Plug an Ethernet cable into the RJ45/NET connector. The “Connection” LED will come on if a 100MHz network is available, otherwise it will remain off and the “Activity” LED should start blinking indicating network activity. Fargo G2 Relay Connections
There are 8 relays on the FARGO R8 and 4 on the FARGO R4. These are dry contact relays. These units are designed for only low voltage kontrol dan tidak boleh memiliki voltage applied to the relay greater than 48 volts. This is for your safety as well as to stay within the parameters of the parts and circuit board design. The relays have 3 terminals labelled NO, C and NC which stand for Normally Open, Common and Normally Closed. When activated, the relay moves the connection from CNC to CNO. If you want to make a connection when the relay is activated, connect your wires between C and NO. When the relay is activated C and NO will be connected together. If you want to break a circuit when the relay is activated, make your connections to C and NC. When the relay is activated the circuit will be broken (or open)
Koda Relay Connection
There are 2 relays on the KODA 100. The KODA 100 has 2 removable 2 position connectors (1 for each relay) and are simply numbered “1” and “2”. These relays are normally open.
There are 4 relays on the KODA 200. The KODA 200 has 1 removable 8 position connector. Each relay has a “+” connection and a numbered connection. The relays may be set to supply about 10VDC by selecting “+V” on the setting switch (see Board Layout Reference page 29) or set to dry contact DC on the switch. If “+V” is selected then the voltage will be present on the “+” terminal and the numbered terminal is the return. Otherwise, a normally open dry contact exists across the “+” and numbered connection. KODA 100/200 is designed for only low voltage kontrol dan tidak boleh memiliki voltage diterapkan pada relai yang lebih besar dari 48 volt. Hal ini demi keselamatan Anda serta tetap berada dalam parameter komponen dan desain papan sirkuit.

![]() DALAM HAL APAPUN, LINOR TECHNOLOGY TIDAK AKAN BERTANGGUNG JAWAB, BAIK DALAM KONTRAK, TORT, ATAU LAINNYA, ATAS KERUSAKAN INSIDENTAL, KHUSUS, TIDAK LANGSUNG, KONSEKUENSIAL ATAU HUKUMAN, TERMASUK, NAMUN TIDAK TERBATAS PADA, KERUSAKAN ATAS WAKTU , KEHILANGAN KOMERSIAL, ATAU KEHILANGAN KEUNTUNGAN, TABUNGAN, ATAU PENDAPATAN SEJAUH DAPAT DIABAIKAN OLEH HUKUM.
DALAM HAL APAPUN, LINOR TECHNOLOGY TIDAK AKAN BERTANGGUNG JAWAB, BAIK DALAM KONTRAK, TORT, ATAU LAINNYA, ATAS KERUSAKAN INSIDENTAL, KHUSUS, TIDAK LANGSUNG, KONSEKUENSIAL ATAU HUKUMAN, TERMASUK, NAMUN TIDAK TERBATAS PADA, KERUSAKAN ATAS WAKTU , KEHILANGAN KOMERSIAL, ATAU KEHILANGAN KEUNTUNGAN, TABUNGAN, ATAU PENDAPATAN SEJAUH DAPAT DIABAIKAN OLEH HUKUM.
PEMBERITAHUAN LEBIH LANJUT UNTUK PEMBATASAN PENGGUNAAN
Kecuali dinyatakan secara khusus, produk ini TIDAK dirancang untuk mengganti voltase salurantagperangkat. Batasan ini mencakup semua produk FARGO DAN KODA. Untuk mengontrol perangkat yang beroperasi pada line voltages pengguna HARUS menginstal dan perangkat perantara seperti relay.
Saat memasang kabel voltase salurantagJika perangkat menggunakan perangkat perantara, Anda HARUS menjadi teknisi listrik yang berkualifikasi atau menggunakan layanan teknisi listrik yang berkualifikasi. Selain itu, peraturan setempat harus dipatuhi termasuk, namun tidak terbatas pada, ukuran kawat dan wadah yang sesuai.
Linortek cannot assume any responsibility for harm to the user or third parties for improperly using our Fargo/Koda products. This liability remains with the user. Linortek cannot assume any responsibility for damage to the device for improperly using our SERVER product.
For relay specifications, please see Board Reference Layout page 29
Digital Input Connections (Fargo R4 and Koda)
The digital inputs allow the SERVER to detect an external on/off state of a sensor. With this information the SERVER can display whether an input is on or off, count events in a resettable or non-resettable counter, and calculate the frequency (such as for use as a tachometer) or the period of the input. There are two modes of operation for the digital inputs – PULL UP and ISOLATED.
a) PULL UP mode connects a 1K resistor to an internal voltage memungkinkan Anda untuk menggunakan sakelar sederhana (seperti sakelar pintu magnetis) di terminal 1 dan 2. Ketika sakelar ini diaktifkan, sinyal dikirim ke input.
b) ISOLATED mode allows you to directly drive the SERVER’s optoisolator with an external voltage meskipun resistor 1K internal. volume initage mungkin berada dalam kisaran 5V hingga 24V yang menyuplai minimal 2mA atau maksimum 30mA ke dioda optoisolator. Tidak ada hubungan internal lain dengan vol initage so it is an isolated input. Please note, when connecting a 12VDC-¬24VDC circuit to the input, an external resistor (can be provided at request, 2.2k ohm 0.5watt) must be used.
These modes are selected by the switch on the SERVER (see Board Layout Reference page 29) marked ISO and PU for isolated and pull up respectively. These are set at the factory to ISO by default.
Wiring a push button: For distances up to 500 feet, a 20 AWG shielded wire is suitable for wiring a push button. If the distance between the push button and the controller extends up to 5,000 feet, use a 16 AWG shielded cable instead. Keep in mind that longer cable runs are more susceptible to signal interference.
Peringatan: If you intend to use isolated mode, verify that the input switch is set to ISO before applying an external voltage. Melakukan sebaliknya dapat merusak perangkat asal SERVER atau POE.
Analog Input Connections (Fargo R4ADI)
The analog inputs allow the SERVER to read the value of external equipment. There are 2 analog inputs.
For AC current monitoring, use one of the two 3.5mm stereo inputs to interface with a current sensor.
2 blok terminal input analog dihubungkan ke sensor arus 0-5V non-terisolasi yang dapat dihubungkan ke berbagai perangkat seperti sensor suhu atau tekanan. SERVER menyediakan koneksi ground dan daya sehingga pengukuran dapat dilakukan tanpa vol eksternaltage references. You should use a sensor that is isolated so that that it makes no connection to a remote ground. See drawing under Board Reference Layout page 29.
Accessing your SERVER
Setelah SERVER Anda dihidupkan dan terhubung ke jaringan, maka secara otomatis akan mendapatkan alamat IP melalui DHCP selama router Anda dikonfigurasi untuk melakukannya. Untuk terhubung, masukkan alamat IP ke Anda web browser. This will take you to your SERVER’s landing page. To log in, click the Log In button on the top right of the page. Your browser will prompt you to enter your username and password. By default, these credentials are both set to admin. To find your SERVER’s IP address, see below.
Menemukan Alamat IP Anda dengan Linortek Discoverer
Program Discoverer akan secara otomatis menemukan SERVER Anda. Discoverer adalah program Java, dan memerlukan instalasi Java Runtime untuk menggunakan fitur ini. Java dapat ditemukan di sini: http://java.com/en/download/index.jsp.
Untuk mengunduh program Discover, silakan kunjungi: https://www.linortek.com/downloads/supportprogramming/
Penggunaan browser Chrome & Firefox dianjurkan. Harap diperhatikan: Jika Anda lebih suka menggunakan Internet Explorer, Internet Explorer menyimpan Linortek Discoverer sebagai Zip file secara default. Untuk menggunakan Penemu, Anda harus memilih Simpan sebagai dan ganti nama file sebagai Linortek Discoverer.jar saat Anda mengunduh.
Saat mengunduh program Discover, terkadang Anda akan melihat pesan peringatan popup tergantung pada pengaturan keamanan browser Anda, menanyakan apakah Anda ingin menyimpan atau membuangnya file, please click the Keep button as this is a Java program, and it won’t harm your computer.
Setelah Penemu menemukan perangkat Anda, itu akan menampilkan:
- Alamat IP
- Nama Tuan Rumah
- Alamat MAC
- Info Lainnya:
sebuah. LED Biru (jika menyala)
b. Nama Produk
c. Revisi Perangkat Lunak Server
d. Nomor Port (Jika porting)

Klik perangkat yang ingin Anda gunakan yang ditampilkan pada program Discoverer untuk meluncurkan SERVER web pages in your browser. Click the Login button on the homepage. The default username/password is: admin/admin. You may change these as you desire or disable this feature in the settings menu.
Connecting your SERVER Directly to Your PC
You can also plug your SERVER directly to your PC if there is no network connection available. If you plug your SERVER into your PC’s Ethernet port it will use the default IP address: 169.254.1.1 unless you have previously configured your SERVER to use a static IP. Enter 169.254.1.1 into your web browser to connect. No internet connection is required. Once configured, you can then install your SERVER where you desired.
Konfigurasi Server
Masuk
Once you have entered the IP address and port number, if set, the Login page will open. This page shows the name of this server which you may change in Configure/Network Config.
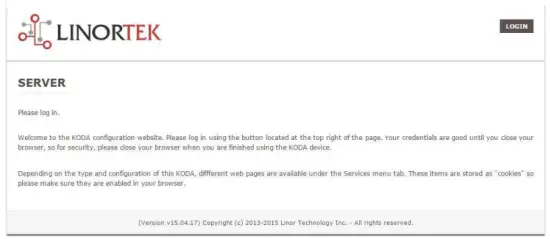
This page is static with no background activity and is a useful place to park if you are not using the SERVER and do not want to close the connection.
By pressing LOGIN, you will be asked for your username and password. These credentials will be retained by the browser until the browser is closed. You can disable the password requirement in Settings page. See section page 21.
Halaman Depan
Setelah kredensial login Anda dimasukkan, Anda akan diarahkan ke halaman utama aplikasi. Halaman Beranda atau Indeks menampilkan beberapa informasi sistem dan menawarkan kemampuan untuk menemukan lokasi perangkat fisik jika berada di area yang sama dengan perangkat lain. Lihat daftar di bawah untuk deskripsi.

- TIME – Displayed along with the day of the week. This time may be set to be in a 12 hour format with AM/PM indicator or 24 hour format.
- TANGGAL – Tanggal saat ini ditampilkan di sini.
- VOLT – Jiltage di papan ditampilkan. Ini mungkin berguna jika SERVER diberi daya bersama dengan peralatan lainnya, voltage variance can be noted. Fargo and Koda servers have an input voltage range of 1248vDC.
- TEMPERATURE – Temperature on the board is displayed. This display may be either °C or °F. This temperature will be affected by the heat generated by SERVER itself so it will always be slightly higher than ambient temperature.
- LED – Ada 3 LED yang ditampilkan. LED MERAH adalah pulsa sistem. Ini akan berkedip sekitar sekali per detik selama server berjalan. LED HIJAU digunakan untuk opsi bootloader dan umumnya tidak terlihat di weblokasi. LED BIRU dapat diklik dan Anda dapat menyalakan dan mematikannya dari sini web halaman. Ini berguna untuk menemukan lokasi perangkat secara fisik jika sedang digunakan dengan unit serupa lainnya karena akan menerangi unit yang dituju. web peramban terhubung. Program Discoverer juga akan mencatat jika LED BIRU menyala. Ini sering disebut sebagai fungsi “Temukan”.
Layanan
Tab Layanan bersifat dinamis dan akan berubah tergantung pada konfigurasi server Anda. Di sinilah Anda dapat mengontrol input, output, sensor, dan kontrol khusus lainnya.
In/Out or Relays Page
Depending on which SERVER you are using, the first page on the SERVICES tab will be either In/Out or Relays.
In/Out has the relay controls and the input controls on one page, while Relays only has the relay controls.
Kontrol Relai
An In/Out page is displayed below. Some relay control pages have 2, 4 or 8 relays displayed. Each relay has a number, in this case 1 to 4.

The State LED shows whether the relay is on or off indicated by GREEN and RED respectively. This icon is clickable to manually control the corresponding relay. Each relay can have a Name as well as identifiers for the Normally Open, Common and Normally Closed connections.
Ada empat LED status yang menunjukkan:
- Email – If an email is to be sent when this relay is switched on/off
- Pulsa – Jika Relai ini diatur dengan lebar pulsa dan pengali lebar pulsa (durasi) – lihat bagian selanjutnya untuk informasi lebih lanjut
- Sched. – If there is a schedule created in the Tasks page (see page 15) set to automatically trigger this relay.
- Jangka Waktu – Jika pulsa diatur dan relai ini diaktifkan, LED Jangka Waktu akan berubah menjadi merah yang menunjukkan relai sedang beroperasi pada pengatur waktu.
Click the Edit Icon to edit the controls for the corresponding relay. This will take you to the Set Relay page (see page 11).
Masukan
The In/Out or Inputs page (depending on your SERVER) will display information from each input. The SERVERs have a combination of inputs. The Fargo R4DI has four digital inputs, The R4ADI has, four digital inputs, four analog inputs. The KODA SERVER has two digital inputs.
At the top of each input is a label (ex: DIN 1, AIN 2) specifying whether it is a digital input (DIN) or analog input (AIN) as well as the input number. This label will turn green when the input is enabled. Inside the box will be any display configured from the Set Input page (see page 12 for digital input, page 14 for analog input). A red dot in the lower-left corner indicating the state of a linked relay (if any), will turn green when the linked relay is activated.
Finally, an Edit icon in the lower-right corner of the box to edit the corresponding input. This will take you to the Set Digital Input or Set Analog Input page (page 12 or page 14).
Set Relay Page
Halaman SET RELAY memungkinkan Anda mengatur berbagai properti yang berkaitan dengan Relay.
- Relay Select – The Relay that you are editing (identified by the line on which you clicked the Edit icon on the RELAY page).
- Name – Enter a 15-character Relay Name. This and the following 3 fields may be used for any identifying information desired.
- NO Name – Enter a 7-character name for the Normally Open (NO) connection.
- Com Name – Enter a 7-character name for the Common (COM) connection.
- NC Name – Enter a 7-character name for the Normally Closed (NC) connection.
- Pulse Width – When you control the relay it turns on or off. You may control it for a timed turned on period by entering a Pulse Width when 0 means there is no timed event and a number represents duration of the pulse. The maximum number you can enter here is 4 digits, ie. 1234.
- Pengganda Lebar Pulsa – Untuk menentukan lebih jauh panjang pulsa, pilih Pengganda Lebar Pulsa untuk menentukan lebih lanjut lebar pulsa. Anda dapat memilih:
• Tidak ada
• mS (Millisecond, 1/1000 second)
• Sec (Seconds)
• Min (Minutes) - Jenis Relay – SERVER dapat mengakses relay secara fisik di SERVER atau menggunakan cara lain. Anda dapat memilih:
• Normal – relay physically on the SERVER
• Latched – not currently supported
• Remote – a relay on another SERVER accessed over the network
• Zigbee – a relay at a remote device accessed over an RF system
• Normal and Remote – both relays activated
• Normal and Zigbee – both relays activated - ID Lokasi – ini adalah nomor yang mengidentifikasi lokasi terpencil
- Relai di Lokasi – nomor yang mewakili relai atau perangkat di Lokasi
- Kirim Email – SERVER dapat diprogram untuk mengirim Email jika relai dihidupkan atau dimatikan.

Setel Halaman Masukan Digital
Input Digital dapat diatur untuk memberikan berbagai pembacaan menggunakan berbagai jenis tampilan. Selain menampilkan data masukan, Anda dapat memberi nama tampilan serta mengaitkan relai dengannya. Relai ini akan berubah dari Hijau ke MERAH seiring berjalannya waktu dari hidup ke mati serta dapat diklik untuk mengontrolnya. Dengan mengklik ikon edit pensil, Anda dapat mengedit pengaturan untuk masukan ini:
- Digital Input Selected – The Digital Input that you are editing (identified by the line on which you clicked the Edit icon).
- Nama – Anda dapat menetapkan nama 15 karakter untuk masukan ini. Nama ini terdapat pada bilah di bagian atas layar.
- Label – Mengatur label 7 karakter yang ditampilkan pada tampilan aktif sebenarnya.
- Korektor – Dengan menggunakan bidang ini Anda dapat menambah, mengurangi, mengalikan, atau membagi suatu nilai sebelum nilai tersebut ditampilkan pada halaman tampilan. Ini adalah korektor 2 nilai yang masing-masing dipisahkan oleh satu karakter spasi. (yaitu “+2, -2, *3, /3”)
- GUNAKAN – Mengatur input ini menjadi aktif. Mengubah indikator angka masukan menjadi hijau. Perlu dicatat bahwa saat digunakan, input menghabiskan waktu CPU dan sumber daya lainnya tergantung pada jenisnya. Meskipun semua input mungkin aktif pada saat yang sama, disarankan untuk mengaktifkan hanya input yang ingin Anda gunakan.
- Jenis – Data masukan dapat digunakan untuk menghitung rentang hasil. Anda dapat memilih:
• State – This is useful for knowing if an input is on or off, like a door switch being on or off.
• CounterNR – This is a non-resettable counter.
• CounterR – This is a resettable counter.
• Frequency – Counts the frequency of an input in KHz (kilo hertz or1/1000 seconds). This could be useful in displaying a tachometer where 60Hz = 1 R.P.M.
• Period – in 1/1000 seconds an input in kHz (milliseconds or1/1000 seconds). This would be useful for measuring timed events. - Tampilan – Pilihan ini memungkinkan Anda mengubah jenis tampilan yang digunakan. Anda dapat memilih:
• Dot – A single dot with the value in the middle. This can be used for State. You can make a dumb indicator by changing the color of the Dot based on the value. The label is under the Dot.
• Values – Displays the Corrected Value with the Label in a box directly below it.
• Meter – This Meter has configurable scale based on the Min/Max values and arcs can be colored per the Color ranges. The Label is displayed within the Meter.
• VBar – Also based on the Min/Max values for the scale and the bar changes color based on the values in the Color ranges. - Relay L/T – Enter a Relay number here. If it is a local relay it will show GREEN or RED depending if it is on or off. By clicking on it the relay will turn on and off. The name comes from the relay settings page. This may be useful if you want to turn the subject of a display on and off. Any relay can be used on any input and each may be reused for any other input. Adding an L after the relay number (ex: 2L) will link the state of the input to the state of the relay. This is an easy and immediate way to have an input follow the relay. Adding a T after the relay number will trigger the relay to the state of the input. This is an easy and immediate way to have a relay follow the input.
- Command Z/N/I – This field is used for issuing various commands to the Digital Input controller: Z Zero the resettable counter. N Leave the input as Normal. I Invert the input.
- Value – These are Min/Max values used for the display. This is useful for preventing a Meter from going past its end or setting the value of a VBar. This is the Value after the Corrector. The system cannot display a value past Max, so be sure this is at least set to 1.
- Kuning/Merah/Hijau – Ada tiga warna yang dapat digunakan untuk lebih menentukan tampilan. Atur rentang warna ini untuk menentukan warna pada Nilai tampilan. Ini adalah Nilai setelah Korektor. Perhatikan bahwa jika Anda menggunakan tipe Negara, Anda mungkin ingin menetapkan MERAH = Dari 0 hingga 0, HIJAU = Dari 1 hingga 1 dan KUNING = Dari 2 hingga 2. Karena suatu Negara selalu bernilai 1 atau 0, hal ini akan mencegah informasi yang ambigu dan mencegah penggunaan warna KUNING. Anda dapat memilih dua warna apa pun yang Anda suka untuk tipe Negara Bagian.

Set Analog Input Page
Input Analog dapat diatur untuk memberikan berbagai pembacaan menggunakan berbagai jenis tampilan. Selain menampilkan data masukan, Anda dapat memberi nama tampilan serta mengaitkan relai dengannya. Relai ini akan berubah dari Hijau ke MERAH seiring berjalannya waktu dari hidup ke mati serta dapat diklik untuk mengontrolnya.
- Analog Input Selected – The Analog Input that you are editing (identified by the line on which you clicked the Edit icon).
- Nama – Anda dapat menetapkan nama 15 karakter untuk masukan ini. Nama ini terdapat pada bilah di bagian atas layar.
- Label – Mengatur label 7 karakter yang ditampilkan pada tampilan aktif sebenarnya.
- Korektor – Dengan menggunakan bidang ini Anda dapat menambah, mengurangi, mengalikan, atau membagi suatu nilai sebelum nilai tersebut ditampilkan pada halaman tampilan. Ini adalah korektor 2 nilai yang masing-masing dipisahkan oleh satu karakter spasi. (yaitu “+2, -2, *3, /3”)
- USE – Sets this input to active. Turns the input number indicator to GREEN. It should be noted that when in use the input consumes CPU time and other resources depending on its type. Although all inputs may be active at the same time, it is recommended to turn on only those you want to use.
- Jenis – Data masukan dapat digunakan untuk menghitung rentang hasil. Anda dapat memilih:
• Analog 1 – Analog 1 input from a SERVER with an input such as found on a R4ADI.
• Analog 2 – Analog 2 input from a SERVER with an input such as found on a R4ADI.
• AC Current 1 – AC current sensor 1 input from a SERVER with an input such as found on a R4ADI.
• AC Current 2 – AC current sensor 2 input from a SERVER with an input such as found on a R4ADI.
• AC Current 3 – Not used
• Volts – The measurement of the voltage powering the SERVER.
• Current – On “S” models, this is the current consumed by the SERVER.
• Int. Temp – Temperature from the board mounted sensor.
• Ext. Temp – Temperature from the “S” model SERVER.
• R. Humidity – % Relative Humidity from the “S” model SERVER.
• MMA X – The X axis accelerometer data from the “S” model SERVER.
• MMA Y – The Y axis accelerometer data from the “S” model SERVER.
• MMA Z – The Z axis accelerometer data from the “S” model SERVER. - Tampilan – Pilihan ini memungkinkan Anda mengubah jenis tampilan yang digunakan. Anda dapat memilih:
1. Dot – A single dot with the value in the middle. This can be used for State. You can make a dumb indicator by changing the color of the Dot based on the value. The label is under the Dot.
2. Values – Displays the Corrected Value with the Label in a box directly below it.
3. Meter – This Meter has configurable scale based on the Min/Max values and arcs can be colored per the Color ranges. The Label is displayed within the Meter.
4. VBar – Also based on the Min/Max values for the scale and the bar changes color based on the values in the Color ranges. - Relay – Enter a Relay number here. If it is a local relay it will show Green or RED depending if it is on or off.
By clicking on it the relay will turn on and off. The name comes from the relay settings page. This may be useful if you want to turn the subject of a display on and off. Any relay can be used on any input and each may be reused for any other input. - Nilai – Ini adalah nilai Min/Maks yang digunakan untuk tampilan. Hal ini berguna untuk mencegah Meter melewati akhir atau mengatur nilai VBar. Ini adalah Nilai setelah Korektor. Sistem tidak dapat menampilkan nilai yang melebihi Maks, jadi pastikan nilai ini setidaknya disetel ke 1.
- Kuning/Merah/Hijau – Ada tiga warna yang dapat digunakan untuk lebih menentukan tampilan. Atur rentang warna ini untuk menentukan warna pada Nilai tampilan. Ini adalah Nilai setelah Korektor. Perhatikan bahwa jika Anda menggunakan tipe Negara, Anda mungkin ingin menetapkan MERAH = Dari 0 hingga 0, HIJAU = Dari 1 hingga 1 dan KUNING = Dari 2 hingga 2. Karena suatu Negara selalu bernilai 1 atau 0, hal ini akan mencegah informasi yang ambigu dan mencegah penggunaan warna KUNING. Anda dapat memilih dua warna apa pun yang Anda suka untuk tipe Negara Bagian.

Tasks Page
The TASKS page displays the automatic events that can be programmed into the SERVER. You can schedule up to 16 events in the SERVER. These are constructed as IF … THEN statements. In addition, the IF term can have 2 elements (IF a, AND/OR/NOT b … THEN c). This provides a simple to program and powerful way to take advantage of the data acquired by the SERVER. The Tasks page shows you an overview of configured tasks. You can click the dot in the State column to turn a task on or off indicated by a green dot for ON, and a red dot for OFF. To edit or create a task, click the Edit icon to the right of the task line. This will take you to the Set Schedule page detailed in the next section.

Set Schedule Page
The SET SCHEDULE page allows you to create time and logic-based events that will occur automatically if the conditions are met.
- Schedule Select – Determined by clicking on a schedule line from the previous page.
- Schedule Name – Enter a 15-character Schedule Name.
- USE – In order for a Schedule line to be active you must select the USE button. If there is an error detected in entering Schedule data, the USE box will automatically uncheck.
- LOG – Pilih log agar item ini muncul di log sistem setiap kali dijalankan.
- Email – Click Email to automatically send an email when this schedule is executed.
- Device A – Select Device A for the first term in the IF statement from the drop box.
- Data A – Select Data A for the above device. Depending on the device selected, the Data used for testing may have special properties. See the list below for Data that may be entered. If an error is detected indata entry when the “Save” button is pushed, the USE box will uncheck and the Data box containing the error will be highlighted.
• Minute – Enter: mm
• Hour – Enter: hh (use 24-hour system)
• Day – Enter: dd
• DayofWeek – Enter: Sunday = 1, Monday = 2, Tuesday = 3, Wednesday = 4, Thursday = 5, Friday = 6, Saturday = 7, Weekday = 8, Weekend = 9
• Time – Enter: hh:mm (use leading zeros, seconds are ignored) (use 24 hour system) ex:07:30 or 14:05
• Date – Enter: yy/mm/dd (use leading zeros) ex: 20/01/10 for January 10, 2020
• Relay – Enter: Relay number and (+ or -), ex: 01+ for Relay 1 ON or 01- for Relay 1 OFF
• Button – Enter: + or – (for ON or OFF respectively)
• Flag – Enter: Flag number(opt.+), or Flag number (for ON or OFF respectively)
• Temp – Enter: >, = or < value; example: >40 (selalu derajat C)
• Volts – Enter: >, = or < value; example: <10
• Analog – Analog input. Enter an input number and >, = or < and value. Example: 3<123 (This value is raw data value prior to any Corrector used by the input display page.)
• Digital – Digital input. Enter Input Number, Type, >, =, or < and value; example: 1F>7500 (This value is the raw data value prior to any Corrector used on the display page). Type can be (case sensitive):
• S State (On/Off)
• C Non-resettable counter
• c Resettable counter (lower case ‘c’)
• F Frequency in 1/1000 seconds
• P Period in 1/1000 seconds - Logika – Mengatur perbandingan Logika antara Perangkat A dan Perangkat B.
• AND – True if: Device A is true AND Device B is true
• OR – True if: Device A is true OR Device B is true
• NOT – True if: Device A is true and Device B is NOT true - Device B – Select Device B for testing from the drop box.
- Data B – Pilih Data B untuk perangkat di atas. Tergantung pada perangkat yang dipilih, Data yang digunakan untuk pengujian mungkin memiliki properti khusus. Lihat daftar di atas.
- Perangkat C – adalah apa yang harus dikontrol.
- Data C – Mengatur properti untuk Perangkat C. Sintaks yang digunakan sebagai berikut:
• RELAY – These are relays on this SERVER. You can set up to four per schedule. Enter separated by commas, for exampdi "1,2,3,4"
• FLAG – This is a storage flag that can be used to make more complex schedules. There are 8 flags that can be turned on or off.
• REMOTE – Refers to a remote SERVER unit. When these conditions are met, this SERVER will send a command to control a remote SERVER. The Data field for a remote unit should be in the format,
“REMOTE UNIT NUMBER, REMOTE UNIT RELAY”. For exampyaitu, “3,5”. SERVER jarak jauh ini harus diidentifikasi di halaman Konfigurasi/Konfigurasi Perangkat Jarak Jauh.
• COUNTER – Adds count to digital input counter – set as 1 or 2 depending on which digital input is counting
• BLUE LED – No data.
• eMAIL – Will send eMail, no data.
• NOTIFY – Will send notification to Kodalert, set 1- 8 for Settings/Alarm Notification number. (Not Implemented) - Tindakan – Apa yang harus dilakukan dengan Perangkat C. Pilihannya adalah:
• ON – Turns device ON
• OFF – Turns device OFF
• TGL – Toggles state of Device C
• RESET – Resets CounterR

Halaman Log
The Logs tab displays over 10,000 entries from actions taken by the SERVER or by users themselves. This feature allows several actions for the convenience of displaying and collecting data from the SERVER.
- The checkboxes above the date allow the user to filter logs from different sources. To filter out logs you do not wish to see from a certain source simply uncheck the box.
- Each log has a reference number and a time and date attached in a “yyyy/mm/dd” and “hh:mm:ss” format. Afterwards is the event displayed.
- To scroll through the logs, use the arrows to the right-hand side, where the horizonal line and arrow brings you to the start or end, the double arrow moves up or down a page, and the single arrow moves up or down a single log.
- To refresh the logs manually click the REFRESH button below the Log Details.
- To download the Log Details, click the DOWNLOAD button below the Log Details, this allows you to save the logs as a separate file.
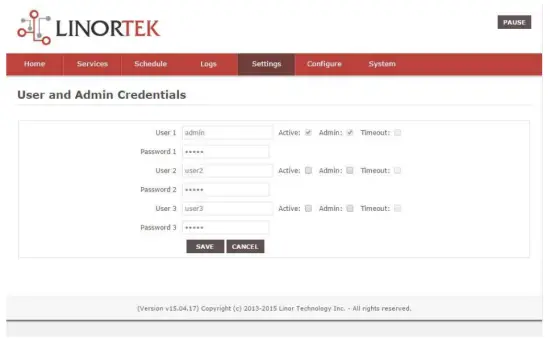
Halaman Kredensial Pengguna dan Admin
Use this page from the Settings drop down menu. Here you can set up to 3 users for your SERVER system. As a default only User 1 is Active. Here you can:
- User Name and Password – Each user has their own credentials. As a default these are set toadmin/admin, user2/user2 and user3/user3 for Users 1, 2 and 3 respectively. The passwords are never displayed. Catatan: when you reset the password, it must be less than 13-character.
- Aktif – Harus dicentang agar pengguna ini dapat masuk, Anda tidak dapat menonaktifkan Pengguna 1.
- Admin – Hanya admin yang dapat menyimpan data di sebagian besar halaman. Ini melindungi SERVER Anda agar tidak diubah oleh orang yang tidak berwenang.
- Batas Waktu – Tidak diaktifkan saat ini.
Halaman Waktu/Tanggal
Gunakan halaman ini dari menu tarik-turun Pengaturan. Halaman ini memungkinkan Anda mengatur sistem waktu dan tanggal.
- Time – Set time using an hh:mm:ss format.
- Tanggal – Tetapkan tanggal menggunakan format yy/mm/dd.
- Time Zone – Set desired time zone 5 for EST, 8 for PST, you can now add a :mm for setting part hour, for example, 5:30 adalah zona waktu pada 5 jam 30 menit.
- Gunakan Waktu Musim Panas – Pilih untuk menyesuaikan waktu sistem Anda secara otomatis pada hari musim panas. (Tidak akurat di semua zona waktu.)
- Gunakan Waktu MIL – Pilih untuk menggunakan format 24 jam.
- Use NTP Update – Select to synchronize SERVER time with NTP server
- NTP Web Situs – Ini adalah server NTP yang dipilih untuk pembaruan.
- Interval NTP – Interval waktu antar pembaruan dalam hitungan menit.
- Log NTP Event – Normally NTP exceptions will be logged, select this option to Log every NTP event. (May be useful in debugging.)

Halaman Pengaturan
Access this page from the Settings dropdown menu. Select these settings to enable various features in the SERVER
- Use Active Main – No longer used. (Select PAUSE to go inactive.)
- Memerlukan Login – Jika tidak dipilih, SERVER akan mengizinkan semua akses tanpa kredensial.
- Use IP Ranges – Not Implemented.
- Use RESTFUL IP Ranges – Not implemented.
- Use Remote IP Ranges – Not implemented.
- Gunakan Otentikasi RESTful – Memerlukan nama pengguna dan kata sandi untuk RESTful.
- Perluas Jangkauan Relai – Mengaktifkan 8 relai.
- Gunakan Tombol Radio Relai – Jika diatur, ketika satu relai dihidupkan, semua relai lainnya akan mati.
- SSL Port No. – Not supported – For future use.
- Gunakan email Sistem – Mengaktifkan pesan email tambahan.
- Gunakan Fahrenheit – Memilih Celcius atau Fahrenheit.
- PGM Dynamic Relays – Changes properties of relays in task schedule.
- CLR PGMs on Start – Reinitialize tasks on start up.
- RTC Temperature Compensation – All Koda boards can add Temperature and Humidity sensor.
- Gunakan AM2302 – Gunakan sensor Suhu dan Kelembaban AM2302 (dijual terpisah).
- Java Report – Send data to HourCollector app over ethernet (only for IoTMeter)
- Use Metric – Not supported – For future use.
- UART Usage – Enter “Audio” for Netbell-NTG, “Clock” for Netbell clock.
- Switch Bypass (1/2) – Ignores physical inputs if set. For example, in a Koda 200 board, you want to ignore input 1 switch, check Switch Bypass 1
- Setting 19 – Not supported – For future use
- Gunakan Audio File System – Activate SD Card reader for Netbell-NTG
- WiFi Report – Enable data transfer over WiFi (WiFi IoTMeter only)
- Active Landing Page – Not supported – For future use.
- . Invert Relay Control – The relay is set to NO by default. By checking this box the relay will be inverted to NC.
- Setting 24 – Not supported – For future use.

Halaman DNS Dinamis
Access this page from the Configure dropdown menu. From this page you can assign dynamic DNS settings. This page, along with proper port forwarding through the router, can enable global access to a device behind a NAT router or firewall. You will need to assign a static IP address and port number (see Network Config Page on page 25) and port the IP address on your router (refer to your router’s user manual). An internet IP address will have to be hosted in order to access your SERVER from the internet. Currently the only IP hosting service supported is provided by DynDNS (https://dyn.com)
- Gunakan DDNS – Mengaktifkan layanan ini.
- Layanan DDNS – Pilih layanan dari drop box. Saat ini satu-satunya layanan yang didukung adalah DynDNS
- Nama Pengguna – Ini mengacu pada akun yang dibuat di Layanan DDNS.
- Kata Sandi – Kata sandi untuk akses pada layanan DDNS.
- Host – This is the IP name registered at the DDNS service for rerouting to this SERVER

Halaman Pengaturan Email
Siapkan akun email untuk SERVER untuk digunakan dalam mengirim pesan email dari berbagai modul. Akses halaman ini dari tab Konfigurasi.
Catatan: This unit is NOT compatible with SSL/TLS, there are 3rd party SMTP delivery servers which do not require SSL and can be used. For instructions on how to use a 3rd party SMTP delivery service, please refer to Appendix 1 at the end of this manual).
- Server SMTP – Masukkan server email keluar yang ingin Anda gunakan.
- Pelabuhan – Ini adalah port di server itu. Anda dapat mencari layanan email Anda secara online untuk informasi ini serta bidang pengaturan lainnya.
- Gunakan SSL – Biarkan tidak dicentang saat Anda menggunakan server SMTP pihak ketiga.
- Nama Pengguna – Nama akun email Anda.
- Kata Sandi – Kata sandi akun email.
- To Address – Enter up to 3 address for this email set up. An addressee, a CC and a BC.
- Subjek – Baris subjek dari header email.

Halaman Konfigurasi Jaringan
Access this page from the Configure dropdown menu. This page allows the configuration of the SERVER’s network settings.
PERINGATAN: Incorrect settings may cause the board to lose network connectivity. In order to access a device in your network remotely you must PORT the device. This tells your router that information coming in should be sent to a specific device on your network.
- MAC Address – This is a unique MAC address that is assigned to this product at time of assembly. It cannot be altered.
- Nama Host – Ini adalah nama Netbios yang dapat digunakan untuk alamat unit ini di beberapa jaringan. Nama ini juga dapat muncul di direktori sewa router Anda. Nama ini berguna untuk memberi nama SERVER Anda dan muncul di halaman Beranda dan di Discoverer.
- Nomor Port – Ini menjadi bagian dari alamat IP dan diperlukan untuk akses Internet. Jika ini tidak ditetapkan, SERVER akan menggunakan nomor port 80 secara default.
- IP Address – Typically you only change the last group of numbers. If you change this IP address make sure to reserve this IP on your router and no other devices are using this IP address or you may not be able to reach this SERVER. If this happens you may need to Restore Defaults using the push button method.
- Gateway – Biasanya berupa router pada jaringan TCP/IP yang berfungsi sebagai titik akses ke ISP Anda.
- Subnet Mask – Angka 32-bit yang menutupi alamat IP, dan membagi alamat IP menjadi alamat jaringan dan alamat host. Biarkan saja di 255.255.255.0
- DNS Primer – DNS primer.
- DNS Sekunder – DNS sekunder.

Halaman Konfigurasi Rentang IP
Access this page from the Configure dropdown menu. Use these security settings to select a range of IP address that will be allowed to access the SERVER.CAUTION: Incorrect settings may cause the board to lose network connectivity. Not implemented on this SERVER.
Halaman Perangkat Jarak Jauh
Access this page from the Configure dropdown menu. These settings allow the SERVER to remotely control the relays on another SERVER. This is done by selecting the Remote Device in the Schedule program or by setting up a relay as a REMOTE. There are 8 possible REMOTE locations.
PERINGATAN: Pengaturan yang salah akan menyebabkan board kehilangan koneksi jarak jauhnya.
- Nama Perangkat – Masukkan nama teks untuk perangkat ini untuk referensi di masa mendatang.
- Alamat IP – Alamat IP perangkat jarak jauh termasuk nomor port.
- Nama Pengguna – Digunakan dalam Otentikasi Dasar.
- Password – Used in Basic Authentication.

Kodalert Page
Not Yet Implemented. Access this page from the Configure dropdown menu. Kodalert provides an interface for alerts of Internet connected devices. Kodalert is a cloud based, open platform monitoring and alert system for the Internet of Things in your physical world. Any Thing that can send an email or TCP messages including our SERVERS, other manufactures devices and people using email can use Kodalert. It can work for multiple remote locations, alert multiple users instantly using the rules you setup by text, email, smart phone Apps push notification or audible alarm instantly when something happens.
- Nomor Peringatan
- Tes
- Menggunakan
- Aturan
In the Alarm Notification page, you can change the state (on/off) of the relay by clicking the green circle in the state column. Push the EDIT icon to change the Alarm’s settings.

Spesifikasi
FARGO R8G2
- 10M/100M RJ45 Internet interface with connection and activity LEDs
- 8 Relay outputs, 1FORMC 48 Volt Max (24VAC/DC 3A)
- Status LEDs (pulse, bootloader, and locate)
- Ethernet Bootloader (for server hardware code upgrade)
- PoE or 12VDC @500mA (nominal)
- Web interface w/basic authentication
- On board temperature sensor and voltagsensor
Reset /Locate pushbutton (blue LED) - Working Temperature from 0 to +70 Celsius
- Storage Temperature from 40 to +125 Celsius
- Humidity from 10% to 80% noncondensing
- Dimensions 74mm x 100mm x 20mm, mounting holes 64mm x 92mm Ф 3.2mm 4 places
- Protokol yang Didukung: HTTP/SMTP/SNTP
FARGO R4G2
- 10M/100M RJ45 Internet interface with connection and activity LEDs
- 4 1FormC relays 48 Volt Max (24VAC/DC 3A)
- 2 optically isolated digital inputs, 12V 1mA or pulldown switch selectable, 2 conductor screw terminal connectors for each.
- 2 Analog 0-5VDC Inputs 30mA 3.3VDC power source PTC protected. 3 conductor screw terminal connectors for each (3.3VDC, input, ground) (R4ADI only)
- 2 Current sensor inputs. 3.5mm stereo jack connector for each (R4ADI only)
- Status LEDs (pulse, bootloader, and locate)
- Ethernet Bootloader (for server hardware code upgrade
- POE or 12VDC @500mA (nominal)
- Web interface w/basic authentication
- On board temperature sensor and voltagsensor
- Reset/Locate pushbutton
- Working Temperature from 0 to +70 Celsius
- Storage Temperature from 40 to +125 Celsius
- Humidity from 10% to 80% noncondensing
- Dimensions 74mm x 100mm x 20mm, mounting holes 64mm x 92mm Ф 3.2mm 4 places
- Protokol yang Didukung: HTTP/SMTP/SNTP
KODA100
- 10M/100M RJ45 Internet interface with connection and activity LEDs
- 2 1-Form-A relay 48VAC@8A Max
- 2 optically isolated digital inputs, 12V 1mA or pulldown switch selectable
- Status LEDs (pulse, bootloader, and locate)
- Ethernet Bootloader (for server hardware code upgrade)
- POE or 12VDC @500mA (nominal)
- Web interface w/basic authentication
- On board temperature sensor and voltagsensor
- Reset/Locate pushbutton (blue LED)
- Working temperature from 0 to +70 Celsius
- Storage temperature from 40 to +125 Celsius
- Humidity from 10% to 80% noncondensing
- Dimensi: 70mm x 100mm x 25mm
- Protokol yang Didukung: HTTP/SMTP/SNTP
KOD200
- 10M/100M RJ45 Internet interface with connection and activity LEDs
- 4 1FormA relays 48 Volt Max 1A dry contact or drive 10V ±10% 50mA to external devices
- 2 optically isolated digital inputs, 12V 1mA or pulldown switch selectable
- Status LEDs (pulse, bootloader, and locate)
- Ethernet Bootloader (for server hardware code upgrade)
- POE or 12VDC @500mA (nominal)
- Web interface w/basic authentication
- On board temperature sensor and voltagsensor
- Reset/Locate pushbutton (blue LED)
- Working Temperature from 0 to +70 Celsius
- Storage Temperature from 40 to +125 Celsius
- Humidity from 10% to 80% noncondensing
- Dimensi: 70mm x 100mm x 25mm
- Protokol yang Didukung: HTTP/SMTP/SNTP
Tata Letak Referensi Papan
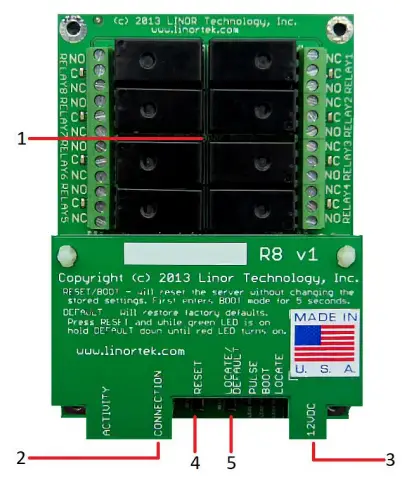
Fargo R8
- 8 Relay outputs, 1FORMC 48 Volt Max (24VAC/DC 3A)
- Konektor Rj45
- Konektor Daya (12VDC)
- Tombol Reset
- Temukan Tombol
Fargo R4
- 3.5mm Inputs for AC Current Sensor (R4ADI Only)
- Analog Inputs (R4ADI Only)
- 4 Relay outputs, 1FORMC 48 Volt Max (24VAC/DC 3A)
- Masukan Digital
- Digital Input Switches (Input 1 on right.
Up: Pullup, Down: Isolated) - Konektor Rj45
- Tombol Reset
- Temukan Tombol
- Konektor Daya (12VDC)

Kode 100
- Digital Inputs (#1 on the left) 5VDC-48VDC (12VDC-48VDC must use the external resistor)
- Relay Outputs (#1 is on the right) 8A@48VAC Max
- Digital Input Switches (IN 1 on left. UP: Isolated, Down: Pullup)
- Tombol Reset
- Tombol Muat Ulang (menyalakan LED biru – mengidentifikasi pada Penemu)
- Konektor Rj45
- Konektor Daya (12VDC)
- Konektor Mini USB untuk Sensor Suhu/Kelembaban (dijual terpisah)

Kode 200
- Digital Inputs (#1 on the left) 5VDC-48VDC (12VDC-48VDC must use the external resistor)
- Relay Outputs (#1 is on left) 48 Volt Max 1A dry contact or drive 10V ±10% 50mA
- Digital Input Switches (IN 1 on left. UP: Isolated, Down: Pullup)
- Relay Switches (Up for dry contact, down for 10V/50mA)
- Tombol Reset
- Tombol Muat Ulang (menyalakan LED biru – mengidentifikasi pada Penemu)
- Konektor Rj45
- Konektor Daya (12VDC)
- Konektor Mini USB untuk Sensor Suhu/Kelembaban (dijual terpisah)

Reset Pabrik
To perform a factory Reset, push the Reset button. When the green LED turns on, push and hold the Reload button until the flashing red LED turns off and then turns on solid. Refer to Board Reference Layout section for the button locations on your device.
This user-manual supplements the documentation for the following Linortek products:
- Netbell-2
- Netbell-8
- Netbell-K (and variants)
- iTrixx-NHM
For more information, documentation and how-to videos, visit https://www.linortek.com/downloads/
Dokumen ini dapat ditemukan di www.linortek.com/downloads/documentations/
Jika Anda memerlukan bantuan dengan perangkat Anda, silakan kunjungi www.linortek.com/technical-support
Teknologi Linor, Inc.
Informasi dapat berubah tanpa pemberitahuan.
Lampiran 1
Cara Mengirim Email SSL Menggunakan Layanan SMTP Pihak Ketiga untuk Perangkat Linortek Fargo dan Koda
Secara default, perangkat Koda/Fargo menggunakan server email SMTP non-SSL. Tetapi sebagian besar server email saat ini telah beralih ke protokol keamanan SSL, ada server pengiriman SMTP pihak ke-3 yang tidak memerlukan SSL dan dapat digunakan. Ada banyak penyedia layanan email SMTP di pasar. Kami menggunakan SMTP2GO sebagai mantanample untuk mendemonstrasikan proses pengaturan. SMTP2GO gratis untuk digunakan hingga 1000 email/bulan. Untuk menggunakan SMTP2GO, silakan kunjungi: https://www.smtp2go.com/ .
Langkah 1. Buat akun SMTP2GO.
Untuk membuat akun cukup klik "Daftar", pilih "1K Email" pada skala, dan pilih "Paket gratis" (Jika Anda perlu mengirim lebih dari 1000 email per bulan, pilih paket yang memenuhi kebutuhan Anda.)

Untuk membuat akun di SMTP2GO, diperlukan alamat email perusahaan. Layanan email gratis seperti Gmail atau Yahoo tidak akan membiarkan Anda melanjutkan. Setelah mengaktifkan akun SMTP2GO Anda, Anda perlu menambahkan pengguna.
Langkah 2. Tambahkan pengguna.
Pengguna yang Anda buat di SMTP2GO, akan menjadi server surat Keluar ketika Anda mengatur perangkat Fargo/Koda untuk mengirim laporan email, pastikan server email perusahaan Anda tidak akan memblokir email jika Anda menggunakan akun email gratis seperti Yahoo atau Gmail untuk tambahkan pengguna di sini.
Masuk ke akun SMTP2GO Anda, di menu sebelah kiri pilih "Pengaturan"> "Pengguna SMTP", Klik "Tambah pengguna SMTP" dan isi formulir.
 Setelah pengguna ditambahkan ke akun SMTP2GO Anda, itu akan menampilkan informasi yang Anda butuhkan untuk mengatur pemberitahuan email di perangkat Fargo/Koda Anda.

Langkah 3. Konfigurasikan perangkat Linortek.
Setelah Anda membuat akun dan menambahkan pengguna, masuk ke perangkat Linortek Anda, navigasikan ke Konfigurasi – Halaman pengaturan email untuk mengatur Pemberitahuan email:
- Server SMTP – Masukkan server surat keluar yang ingin Anda gunakan, itu mail.smtp2go.com di ex kamiampsaya.
- Port – Ini adalah port pada server tersebut. Port SMTP adalah 2525 di exampsaya.
- Gunakan SSL – Biarkan tidak dicentang saat Anda menggunakan server SMTP pihak ketiga.
- Nama Pengguna – Nama pengguna dari SMTP2GO saat kami membuat pengguna di langkah sebelumnya.
- Password – Kata sandi pengguna dari SMTP2GO saat kami membuat pengguna di langkah sebelumnya.
- Ke Alamat – Masukkan hingga 3 alamat untuk pengaturan email ini. Penerima, CC dan BC.
- Subjek – Baris subjek dari header email.
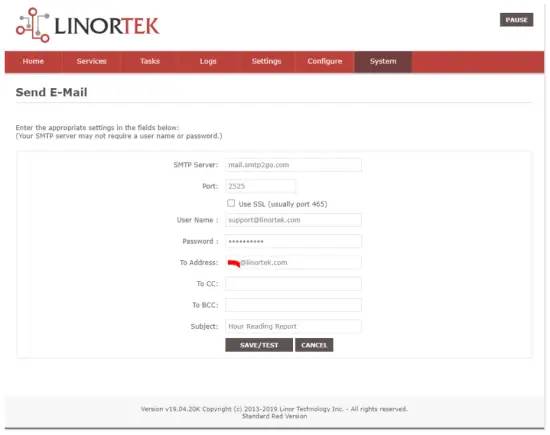
Segera setelah Anda menekan "Simpan/Uji", perangkat secara otomatis mengirimkan email pengujian. Silakan periksa folder Sampah/Lainnya untuk menemukannya jika tidak ada di folder Kotak Masuk.
Langkah 4. Atur tugas untuk pemberitahuan Email otomatis.
You should be able to receive email notifications for various events from the Fargo/Koda boards at this point. If you need to receive condition logic notification, you can use our condition logic configuration to setup such report. To setup the logic condition report notification, go to Tasks page on your Fargo/Koda device, click the Edit icon of a Schedule. For details of how to create a logic-based event, please refer to the Set Schedule Page on the Fargo/Koda User Manual, which can be downloaded here:
https://www.linortek.com/download/fargo%20g2_koda%20downloads/fargo%20g2_koda%20documentation/Fargo-G2-and-Koda-User-Manual.pdf
Pada s iniample Kami akan menggunakan perangkat Network Hour Meter sebagai example untuk cara menerima laporan email setiap hari pada pukul 11:52.
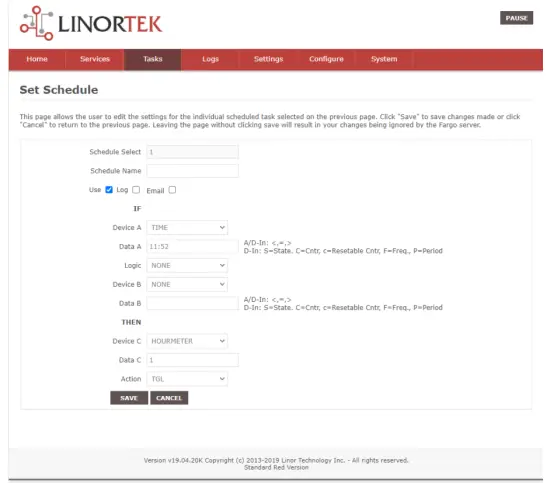
Segera setelah semua kondisi tugas terpenuhi, Anda mendapatkan email berikut:
Hour Reading Report
![]() dukungan@linortek.com
dukungan@linortek.com
Mon 4/11/2022 11:52 AM
To: Liyu Nalven
HM 1, my machine, is at 000242.01 hrs.
Reply Forward
![]()
Dokumen / Sumber Daya
 |
LINORTEK Fargo G2 TCP/IP Web Pengontrol Relai Berbasis [Bahasa Indonesia:] Panduan Pengguna Fargo G2, Koda, Fargo G2 TCP-IP Web Based Relay Controller, Web Based Relay Controller, Based Relay Controller, Relay Controller |