![]() Fargo G2 and Koda User Manual
Fargo G2 and Koda User Manual
www.linortek.com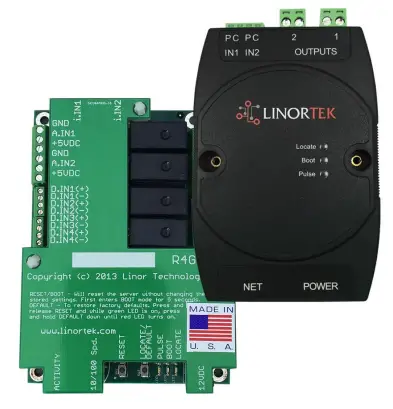 For Fargo G2, Koda
TCP/IP Web Հիմք ընդունող ռելեային կառավարիչ
Rev C 04/2022
Fargo G2 TCP/IP Web Հիմք ընդունող ռելեային կառավարիչ
Thank you for purchasing a Linortek Fargo G2 or Koda TCP/IP Controller. There are many devices that can be controlled by the FARGO/KODA Web Relay Controller. FARGO/KODA Web Controller can be used in such applications as (but not limited to): Lights, security, sprinkler systems, access control, industrial equipment, building automation, HVAC, and many more. Please refer to the Board Reference Layouts on page 29 for input and output specifications on your controller to verify they are suitable to your needs.
Այս ձեռնարկը ներառում է.
- FARGO R8 G2
- FARGO R4DI G2
- FARGO R4ADI G2
- ԿՈԴ 100
- KODA200
These will be referred to as SERVER hereafter. When there are differences or additional features they will be noted in the text.
Ուսումնական տեսանյութերի, ՀՏՀ-ների և մեր տեխնիկական աջակցության թիմի կոնտակտային տեղեկատվության համար այցելեք՝ https://www.linortek.com/technical-support
LINORTEK ՄԵԿ ՏԱՐԻ ՍԱՀՄԱՆԱՓԱԿ ԵՐԱՇԽԻՔ
Consumer law: For consumers who are covered by consumer protection laws or regulations in their country of residence (“Consumer Law”), the benefits provided in this Linortek One-Year Limited Warranty (“Linortek Limited Warranty”) are in addition to and not instead of the rights provided by Consumer Law and it does not exclude, limit or suspend your rights arising from Consumer Law. You should consult the proper authorities in your country of residence for further information about these rights
Linortek-ի երաշխիքային պարտավորությունները այս ապարատային արտադրանքի («Ապրանք») համար սահմանափակվում են ստորև նշված պայմաններով.
Linor Technology, Inc. (“Linortek”) warrants this product against defects in materials and workmanship for a period of ONE (1) YEAR from the date of retail purchase by the original end-user purchaser (“Warranty Period”) when used in accordance with the operating instructions. A copy of a retail receipt is required as proof of purchase. If a hardware defect arises and a valid claim is received within the Warranty Period, at its option and to the extent permitted by law, Linortek will either (1) repair the hardware defect at no charge, using new or refurbished replacement parts, (2) exchange the product with a product that is new or which has been manufactured from new or serviceable used parts and is at least functionally equivalent to the original product, or (3) refund the purchase price of the product. When a refund is given, the product for which the refund is provided must be returned to Linortek and becomes Linortek’s property.
Վերոնշյալ երաշխիքը ենթակա է Գնորդի (i) արագ գրավոր պահանջի և (ii) Linortek-ին ժամանակին տրամադրելու հնարավորություն՝ ստուգելու և փորձարկելու այն Ապրանքը, որը պնդում է, որ թերի է: Նման ստուգումը կարող է լինել Գնորդի տարածքում և/կամ Linortek-ը կարող է պահանջել Ապրանքի վերադարձ Գնորդի հաշվին: Այնուամենայնիվ, Linortek-ը պատասխանատվություն չի կրում Ապրանքի վերադարձի հետ կապված փաթեթավորման, ստուգման կամ աշխատանքային ծախսերի համար: Ոչ մի ապրանք չի ընդունվում երաշխիքային սպասարկման համար, որը չի ուղեկցվում Linortek-ի կողմից տրված Վերադարձի ապրանքի թույլտվության համարով (RMA#):
ԲԱՑԱՌՈՒՄՆԵՐ ԵՎ ՍԱՀՄԱՆԱՓԱԿՈՒՄՆԵՐ
Այս Սահմանափակ երաշխիքը բացառում է չարաշահման, չարաշահման, անտեսման, հրդեհի կամ այլ արտաքին պատճառների, դժբախտ պատահարների, փոփոխությունների, վերանորոգման կամ այլ պատճառների հետևանքով առաջացած վնասները, որոնք չեն հանդիսանում նյութերի և աշխատանքի թերություններ: Linortek-ի կողմից տարածված ծրագրակազմը Linortek ապրանքանիշի անունով կամ առանց դրա, ներառյալ, բայց չսահմանափակվելով համակարգային ծրագրակազմով («Ծրագրաշար») չի ծածկվում սույն Սահմանափակ երաշխիքով: Ձեր օգտագործումը և Ծրագրային ապահովման հետ կապված իրավունքները կարգավորվում են Linortek վերջնական օգտագործողի լիցենզիայի համաձայնագրով, որը կարող եք գտնել այստեղ՝ https://www.linortek.com/end-user-licenseagreement/. Linortek-ը պատասխանատվություն չի կրում արտադրանքի օգտագործման հետ կապված հրահանգներին չհետևելու հետևանքով առաջացած վնասի համար: Գործառնական սահմանափակումներին համապատասխանությունն ապահովելու համար Գնորդը պետք է դիմի հրահանգների ձեռնարկին [տրամադրված ապրանքի հետ]: Մարտկոցները ներառված չեն երաշխիքի մեջ:
ԱՅՍ ՍԱՀՄԱՆԱՓԱԿ ԵՐԱՇԽԻՔԸ ԵՎ ՎԵՐՈՎ ՍՏԵՂԾՎԱԾ ՄԻՋՈՑՆԵՐԸ ԲԱՑԱՌԻԿ ԵՆ ԵՎ ԲՈԼՈՐ ՄՅՈՒՍ ԵՐԱՇԽԻՔՆԵՐԻ, ՄԻՋՈՑՆԵՐԻ ԵՎ ՊԱՅՄԱՆՆԵՐԻ ԵՎ ՊԱՅՄԱՆԱԿԱՆ ՊԱՅՄԱՆՆԵՐԻ ՓՈԽԱՐԻՆ. ՆԵՐԱՌՅԱԼ ԲԱՅՑ ՉՍԱՀՄԱՆԱՓԱԿՎԵԼՈՎ ԱՊՐԱՆՔԱՅԻՆ ԵՐԱՇԽԻՔՆԵՐԸ, ՊԱՏՐԱՍՏՎԱԾ ՀԱՏՈՒԿ ՆՊԱՏԱԿԻ ՀԱՄԱՐ, ՉԻՐԱՎՈՒՆՔ. ՈՐՊԵՍ ԱՅԴ ԵՐԱՇԽԻՔՆԵՐԸ ՉԵՆ ԿԱՐԵԼԻ ՀՐԱԺԱՐՎԵԼ, ԲՈԼՈՐ ՆՄԱՆ ԵՐԱՇԽԻՔՆԵՐԸ ՕՐԵՆՔՈՎ թույլատրված չափով ՍԱՀՄԱՆԱՓԱԿՎՈՒՄ ԵՆ LINORTEK-ի ՍԱՀՄԱՆԱՓԱԿ ԵՐԱՇԽԻՔԻ ԵՎ ՊԱՇՏՊԱՆՈՒԹՅԱՆ ՏԵՂԵԿԱՏՎՈՒԹՅԱՄԲ ՀԻՄՆԱԴՐԱՄ, ՈՐՊԵՍ ՈՐՈՇԵԼ Է ԼԻՆՈՐՏԵԿԸ ԻՐ ՄԻԱՅՆ հայեցողությամբ: ՈՐՈՇ ՆԱԽԱԳԻԾՆԵՐ (ԵՐԿՐՆԵՐ ԵՎ ԳԱՎԱՌՆԵՐ) ՉԵՆ ԹՈՒՅԼԱՏՎՈՒՄ ՍԱՀՄԱՆԱՓԱԿՈՒՄՆԵՐ, թե ՈՐՔԱՆ ՏԵՂ ԿԱՐՈՂ Է ԳՈՐԾԵԼ ՆԿԽԻՐԱԾ ԵՐԱՇԽԻՔԸ ԿԱՄ ՊԱՅՄԱՆԸ, ՈՒՐԵՎ ՎԵՐՈՎ ՆԿԱՐԱԳՐՎԱԾ ՍԱՀՄԱՆԱՓԱԿՈՒՄՆԵՐԸ ԿԱՐՈՂ ԵՆ ՉՎԵՐԱԲԵՐԵԼ ՁԵԶ ՎԵՐՋ: ԱՅՍ ԵՐԱՇԽԻՔԸ ՁԵԶ ՀԱՏՈՒԿ ԻՐԱՎԱԿԱՆ ԻՐԱՎՈՒՆՔՆԵՐ Է ՏԱԼԻՍ, ԵՎ ԴՈՒ ԿԱՐՈՂ ԵՔ ՈՒՆԵՆԱԼ ԱՅԼ ԻՐԱՎՈՒՆՔՆԵՐ, ՈՐՈՆՔ ՏԱՐԲԵՐՎՈՒՄ ԵՆ ՆԱԽԱԳԾԻՑ ՊԱՇՏՊԱՆ (ԿԱՄ ԸՍՏ ԵՐԿՐԻ ԿԱՄ ԳԱՎԱՌԻ): ԱՅՍ ՍԱՀՄԱՆԱՓԱԿ ԵՐԱՇԽԻՔԸ ԿԱՌԱՎԱՐՎՈՒՄ ԵՎ ՄԻԱՑՅԱԼ ՆԱԽԱԳԱՀՆԵՐԻ ՕՐԵՆՔՆԵՐՈՎ:
Հրաժարումներ
- Կարդացեք հրահանգները – նախքան արտադրանքը շահագործելը կարդացեք անվտանգության և շահագործման բոլոր հրահանգները:
- Պահպանեք հրահանգները – Պահպանեք անվտանգության և շահագործման հրահանգները հետագա հղումների համար:
- Ուշադրություն դարձրեք նախազգուշացումներին. հետևեք արտադրանքի վերաբերյալ բոլոր նախազգուշացումներին և շահագործման հրահանգներին:
- Հետևեք հրահանգներին – Հետևեք շահագործման և օգտագործման բոլոր հրահանգներին:
- Մաքրում – Մաքրումից առաջ անջատեք արտադրանքը հոսանքից: Մի օգտագործեք հեղուկ մաքրող կամ աերոզոլային մաքրող միջոցներ: Օգտագործեք գովազդըamp կտոր միայն պարիսպը մաքրելու համար:
- Հավելվածներ – Մի օգտագործեք հավելվածներ, եթե դրանք հատուկ առաջարկված չեն Linortek-ի կողմից: Անհամատեղելի կամ այլ կերպ ոչ պիտանի կցորդների օգտագործումը կարող է վտանգավոր լինել:
- Աքսեսուարներ – Մի դրեք այս ապրանքը անկայուն հենարանի, եռոտանի, փակագծի կամ ամրակի վրա: Արտադրանքը կարող է ընկնել՝ պատճառելով մարդուն լուրջ վնասվածք և լուրջ վնաս հասցնել արտադրանքին: Օգտագործեք միայն արտադրողի կողմից առաջարկված կամ ապրանքի հետ վաճառվող տակդիրի, եռոտանի, փակագծի կամ ամրակի հետ: Արտադրանքը մոնտաժելիս հետևեք արտադրողի հրահանգներին և օգտագործեք միայն արտադրողի կողմից առաջարկվող մոնտաժային պարագաներ: Զգույշ եղեք սարքի և սայլի համադրություն օգտագործելիս: Արագ կանգառները, ավելորդ ուժը և անհարթ մակերեսները կարող են հանգեցնել սարքի և սայլի համակցության շրջվելու:
- Օդափոխում – Խցիկի բացվածքները, եթե այդպիսիք կան, նախատեսված են օդափոխության և արտադրանքի հուսալի շահագործումն ապահովելու և այն գերտաքացումից պաշտպանելու համար: Մի փակեք կամ մի փակեք այս բացվածքները: Մի տեղադրեք այս ապրանքը ներկառուցված տեղադրման մեջ, քանի դեռ պատշաճ օդափոխություն չի ապահովվել կամ Linortek-ի հրահանգները չեն պահպանվել:
- Էլեկտրաէներգիայի աղբյուրներ – Օգտագործեք այս արտադրանքը միայն սնուցման աղբյուրի տեսակից, որը նշված է հրահանգների ձեռնարկում կամ արտադրանքի պիտակի վրա:
Եթե վստահ չեք էլեկտրամատակարարման տեսակի մեջ, որը նախատեսում եք օգտագործել, դիմեք ձեր սարքավորման վաճառողին կամ տեղական էլեկտրաէներգիայի ընկերությանը, պայմանով, որ սնուցման աղբյուրի այլ տեսակի օգտագործումը, քան նշված է հրահանգների ձեռնարկում կամ մակնշման պիտակում, կզրկվի երաշխիքից: Ապրանքների համար, որոնք նախատեսված են մարտկոցից կամ այլ աղբյուրներից աշխատելու համար, տես գործառնական հրահանգները [ներառված է արտադրանքի հետ]: - Հողանցում կամ բևեռացում – Այս արտադրանքը կարող է հագեցած լինել բևեռացված փոփոխական հոսանքի գծի խրոցակով (խցան, որն ունի մեկ սայր մյուսից ավելի լայն): Այս վարդակից տեղավորվում է հոսանքի վարդակից միայն մեկ ճանապարհով: Սա անվտանգության հատկանիշ է: Եթե չեք կարողանում խրոցը ամբողջությամբ մտցնել վարդակից, փորձեք հետ շրջել վարդակից: Եթե խրոցը դեռ չի տեղավորվում, դա այն պատճառով է, որ ձեր վարդակից անհամատեղելի է վարդակից: Կապվեք ձեր էլեկտրիկի հետ՝ ձեր վարդակից փոխարինելու համար, որը համատեղելի է: Մի ստիպեք խրոցը տեղավորվել անհամատեղելի վարդակից կամ այլ կերպ մի փորձեք խափանել խրոցակի անվտանգության նպատակը: Որպես այլընտրանք, այս արտադրանքը կարող է հագեցած լինել 3 լարով հողակցման տիպի խրոցակով, երրորդ (հողանցող) խրոցակով: Այս խրոցը կտեղավորվի միայն հողակցման տիպի հոսանքի վարդակից: Սա անվտանգության հատկանիշ է: Մի ստիպեք խրոցը տեղավորվել անհամատեղելի վարդակից կամ այլ կերպ մի փորձեք խափանել խրոցակի անվտանգության նպատակը: Եթե ձեր վարդակից անհամատեղելի է վարդակից, դիմեք ձեր էլեկտրիկին՝ ձեր վարդակից փոխարինելու համար, որը համատեղելի է:
- Էլեկտրահաղորդման լարերի պաշտպանություն – ուղղեք հոսանքի լարերը այնպես, որ դրանք չքայլվեն կամ սեղմվեն դրանց վրա կամ դեմ դրված իրերի կողմից՝ հատուկ ուշադրություն դարձնելով լարերին և վարդակներին, հարմարվող անոթներին և այն կետին, որտեղ լարերը դուրս են գալիս սարքից: .
- Էլեկտրահաղորդման գծեր – Մի դրեք բացօթյա համակարգը օդային էլեկտրահաղորդման գծերի կամ այլ էլեկտրական լույսերի կամ հոսանքի սխեմաների մոտակայքում, կամ որտեղ այն կարող է ընկնել նման հոսանքի գծերի կամ սխեմաների մեջ: Բացօթյա համակարգ տեղադրելիս չափազանց զգույշ եղեք, որպեսզի չդիպչեք նման հոսանքի գծերին կամ սխեմաներին, քանի որ դրանց հետ շփումը կարող է մահացու լինել:
- Գերբեռնվածություն – Մի ծանրաբեռնեք վարդակները և երկարացման լարերը, քանի որ դա կարող է առաջացնել հրդեհ կամ էլեկտրական ցնցում:
- Օբյեկտների և հեղուկների մուտքը – Երբեք որևէ տեսակի առարկաներ մի մղեք այս արտադրանքի մեջ բացվածքների միջով, քանի որ դրանք կարող են դիպչել վտանգավոր ծավալինtagե կետեր կամ կարճատև մասեր, որոնք կարող են առաջացնել հրդեհ կամ էլեկտրական ցնցում: Երբեք որևէ տեսակի հեղուկ մի թափեք արտադրանքի վրա:
- Սպասարկում – Մի փորձեք ինքներդ սպասարկել այս ապրանքը, քանի որ կափարիչները բացելը կամ հեռացնելը կարող է ձեզ վտանգ ներկայացնելtagե կամ այլ վտանգներ: Ապրանքի ամբողջ սպասարկումը ուղղեք Linortek-ին:
- Վնաս պահանջող ծառայություն – Անջատեք արտադրանքը վարդակից և սպասարկումը ուղարկեք Linortek Հաճախորդների սպասարկման կենտրոն հետևյալ պայմաններով.
ա. Երբ սնուցման լարը կամ վարդակից վնասված է:
բ. Եթե հեղուկը թափվել է, կամ առարկաները ընկել են արտադրանքի վրա:
գ Եթե ապրանքը ենթարկվել է անձրևի կամ ջրի:
դ. Եթե ապրանքը նորմալ չի գործում՝ հետևելով շահագործման հրահանգներին [ներառված է արտադրանքի հետ]: Կարգավորեք միայն այն հսկիչները, որոնք ծածկված են գործառնական ցուցումներով, քանի որ այլ կարգավորիչների ոչ պատշաճ կարգավորումը կարող է հանգեցնել վնասի և հաճախ պահանջում է որակյալ տեխնիկի լայնածավալ աշխատանք՝ արտադրանքը իր բնականոն աշխատանքին վերականգնելու համար:
ե. Եթե ապրանքը գցվել է կամ պահարանը վնասվել է:
զ. Եթե ապրանքը ցուցադրում է կատարողականի հստակ փոփոխություն: - Փոխարինվող մասեր – Եթե անհրաժեշտ է փոխարինող մասեր, ունենաք ցածր ծավալtage Էլեկտրիկը փոխարինում է դրանք՝ օգտագործելով միայն արտադրողի կողմից նշված հատվածը: Չթույլատրված փոխարինումները կարող են հանգեցնել հրդեհի, էլեկտրական ցնցումների կամ այլ վտանգների: Փոխարինման մասերը կարող եք գտնել այստեղ https://www.linortek.com/store/
- Անվտանգության ստուգում – Այս ապրանքի ցանկացած սպասարկման կամ վերանորոգման ավարտից հետո սպասարկողին խնդրեք կատարել անվտանգության ստուգումներ՝ պարզելու համար, որ արտադրանքը գտնվում է պատշաճ աշխատանքային վիճակում:
- Coax հիմնավորում – Եթե արտաքին մալուխային համակարգը միացված է արտադրանքին, համոզվեք, որ մալուխային համակարգը հիմնավորված է: Միայն ԱՄՆ-ի մոդելները – Ազգային Էլեկտրական օրենսգրքի 810-րդ բաժինը, ANSI/NFPA No.70-1981, տեղեկատվություն է տրամադրում մոնտաժի և աջակցող կառուցվածքի պատշաճ հիմնավորման, արտահոսքի արտադրանքի վրա կոաքսի հիմնավորման, հողակցիչների չափերի, գտնվելու վայրի վերաբերյալ: լիցքաթափման արտադրանքի, հողակցման էլեկտրոդների հետ կապի և հիմնավորող էլեկտրոդի պահանջները:
- Կայծակ – Կայծակի փոթորկի ժամանակ այս ապրանքի լրացուցիչ պաշտպանության համար կամ երկար ժամանակ առանց հսկողության և չօգտագործման թողնելուց առաջ, անջատեք այն պատի վարդակից և անջատեք մալուխային համակարգը: Սա թույլ կտա կանխել արտադրանքի վնասը կայծակի և էլեկտրահաղորդման լարերի ալիքների պատճառով:
- Բացօթյա օգտագործում – Այս ապրանքը ջրակայուն չէ և չպետք է թրջվի: Մի ենթարկվեք անձրևի կամ այլ տեսակի հեղուկների:
Մի գիշերվա ընթացքում դուրս մի թողեք դրսում, քանի որ կարող է առաջանալ խտացում: - Մարտկոցներ, ապահովիչներ կամ տախտակի մակարդակով արտադրանքի հետ աշխատելիս զգույշ եղեք էլեկտրաստատիկ լիցքաթափումից, որը կարող է վնասել էլեկտրոնային սարքերը: Ավելի լավ է օգտագործել հիմնավորված էլեկտրոնիկայի սպասարկման նստարան: Եթե դա հասանելի չէ, կարող եք լիցքաթափվել՝ դիպչելով մետաղական սարքին կամ խողովակին: Մարտկոցները կամ ապահովիչները փոխելիս մի դիպչեք i) մարտկոցի լարերից բացի այլ լարերին և ii) տպագիր տպատախտակին:
ՊԱՏԱՍԽԱՆԱՏՎՈՒԹՅԱՆ ՍԱՀՄԱՆԱՓԱԿՈՒՄ
IN NO EVENT WILL LINOR TECHNOLOGY BE LIABLE, WHETHER IN CONTRACT, TORT, OR OTHERWISE, FOR ANY INCIDENTAL, SPECIAL, INDIRECT, CONSEQUENTIAL OR PUNITIVE DAMAGES, INCLUDING, BUT NOT LIMITED TO, DAMAGES FOR ANY LOSS OF USE, LOSS OF TIME, INCONVENIENCE, COMMERCIAL LOSS, OR LOST PROFITS, SAVINGS, OR REVENUES TO THE FULL EXTENT SUCH MAY BE DISCLAIMED BY LAW. DISCLAIMER FOR CRITICAL APPLICATIONS
Այս արտադրանքը նախատեսված կամ լիազորված չէ կենսաապահովման արտադրանքի կամ այլ օգտագործման համար, որոնց ձախողումը կարող է առաջացնել անձնական վնասվածք կամ մահ: Եթե դուք կամ ձեր հաճախորդները օգտագործում եք կամ թույլ եք տալիս օգտագործել այս ապրանքը նման չնախատեսված կամ չարտոնված օգտագործման համար, դուք համաձայնում եք լիովին փոխհատուցել Linor Technology-ին և նրա դուստր ձեռնարկություններին, ինչպես նաև յուրաքանչյուրի սպաներին, աշխատակիցներին և դիստրիբյուտորներին նման օգտագործման հետ կապված ողջ պատասխանատվությունից, ներառյալ. փաստաբանների վճարները և ծախսերը.
ՕԳՏԱԳՈՐԾՄԱՆ ՍԱՀՄԱՆԱՓԱԿՄԱՆ ՀԱՄԱԼԻՍ ԾԱՆՈՒՑՈՒՄ
Եթե հատուկ նշված չէ, մեր Ապրանքները նախատեսված չեն գիծը փոխելու համարtage (110V և բարձր) սարքեր: Սարքը կառավարելու համար, որը գործում է գծի voltagՈրակավորված էլեկտրիկը ՊԱՐՏԱԴԻՐ է տեղադրել այնպիսի միջնորդ սարք, ինչպիսին է ռելեը: Կառավարման սարքեր ընտրելիս լավագույնն է ընտրել ցածր ծավալըtagԷլեկտրոնային կարգավորիչներ, ինչպիսիք են 24VAC էլեկտրամագնիսական սարքը ջրի հոսքի վերահսկման համար: Միայն որակավորված էլեկտրիկները կարող են լարել գծի ծավալըtagե սարք. Բացի այդ, պետք է հետևել տեղական ծածկագրերին, ներառյալ, բայց չսահմանափակվելով մետաղալարերի չափի չափով և հարմար բնակարանով: Linortek-ը պատասխանատվություն չի կրում օգտագործողին կամ երրորդ անձանց վնասելու համար՝ մեր Ապրանքները ոչ պատշաճ օգտագործելու համար: Այս պարտավորությունը մնում է օգտագործողի վրա: Linortek-ը պատասխանատվություն չի կրում մեր Ապրանքների ոչ պատշաճ օգտագործման պատճառով սարքին հասցված վնասի համար:
ՌԵԼԵ ՀԱՏTAGE Տեխնիկական պայմաններ
Սարքերը էլեկտրական սխեմաներին կամ այլ սարքավորումներին միացնելիս խնդրում ենք զգույշ լինել: Սա web կարգավորիչը նախատեսված չէ որևէ ծավալի միանալու համարtage greater than 48V. Utilizing this arrangement, should allow you to virtually control anything. It is important that you use licensed electricians and comply with electrical codes that are applicable to your location. These codes exist for your safety, as well as the safety of others. Linortek assumes no responsibility for any harm or damage resulting from a failure adhere to local laws, ordinances or regulations or failure to follow specified instructions for installation and product usage.
Վերջնական օգտատիրոջ լիցենզիայի պայմանագիր Linortek ծրագրային ապահովման և փաստաթղթերի համար
Այս վերջնական օգտագործողի լիցենզիայի պայմանագիրը («EULA») իրավական համաձայնագիր է ՁԵՐ (անհատ կամ առանձին կազմակերպություն) և Linor Technology, Inc.-ի («Linortek» կամ «մենք» կամ «մեզ») միջև, որը կարգավորում է ձեր կողմից ծրագրաշարի օգտագործումը: և փաստաթղթեր («Ծրագրաշար»), որոնք ներկառուցված են կամ կապված են Fargo, Koda, Netbell, IoTMeter և iTrixx արտադրանքների շարքերում («Linortek Products»):
Այս EULA-ն չի կարգավորում ձեր Linortek-ի օգտագործումը webկայք կամ Linortek Ապրանքներ (բացառությամբ Ծրագրային ապահովման): Ձեր կողմից Linortek-ի օգտագործումը webկայքը կառավարվում է Linortek-ի կողմից webկայքի ծառայության պայմանները և Linortek-ի գաղտնիության քաղաքականությունը, որը կարելի է գտնել հետևյալ հասցեով՝
http://www.linortek.com/terms-and-conditions [Linortek Ապրանքների ձեր գնումը (բացառությամբ Ծրագրային ապահովման) կարգավորվում է Linortek-ի սահմանափակ երաշխիքով, որը կարող եք գտնել այստեղ՝ https://www.linortek.com/linortek-one-year-limited-warranty/
This EULA governs your access and use of the Software. This EULA gives you specific legal rights, and you may also have other legal rights in addition, which vary from jurisdiction to jurisdiction. The disclaimers, exclusions, and limitations of liability under
this EULA will not apply to the extent prohibited or limited by applicable law. Some jurisdictions do not allow the exclusion of implied warranties or the exclusion or limitation of incidental or consequential damages or other rights, so those provisions of this EULA may not apply to you.
Տեղադրելով, մուտք գործելով, պատճենելով և/կամ օգտագործելով Ծրագրային ապահովումը կամ փաստաթղթերը, դուք համաձայնում եք պարտավորված լինել սույն EULA-ի դրույթներով և պայմաններով ձեր անունից կամ այն կազմակերպության անունից, որը դուք ներկայացնում եք՝ կապված նման տեղադրման, մուտքի, պատճենման և/կամ օգտագործել. Դուք ներկայացնում և երաշխավորում եք, որ (i) ունեք իրավունք, իրավասություն և կարողություն՝ ընդունելու և համաձայնելու սույն EULA-ի պայմանները ձեր անունից կամ այն կազմակերպության, որը ներկայացնում եք (ii) դուք բավարար չափով չափահաս եք ձեր բնակության իրավասության մեջ: , (iii) դուք գտնվում եք մի երկրում, որը ենթակա է ԱՄՆ կառավարության էմբարգոյի, կամ որը ԱՄՆ կառավարության կողմից նշանակվել է որպես «ահաբեկիչներին աջակցող» երկիր. և (ii) դուք նշված չեք ԱՄՆ կառավարության արգելված կամ սահմանափակված կողմերի ցանկում:
Եթե դուք չեք ցանկանում պարտավորված լինել այս EULA-ի պայմաններով, դուք չեք կարող որևէ կերպ տեղադրել, մուտք գործել, պատճենել կամ օգտագործել Ծրագրաշարը (անկախ այն բանից, թե նախապես տեղադրված է ձեր գնած սարքում, թե ոչ):
- Ծրագրային ապահովման/ծրագրային ապահովման լիցենզիայի թույլատրված օգտագործում:
Ելնելով սույն EULA-ի պայմաններից՝ Linortek-ը ձեզ տրամադրում է սահմանափակ, չեղյալ համարվող, ոչ բացառիկ, չենթալիցենզավորվող, չփոխանցվող իրավունք և լիցենզիա՝ (ա) ներբեռնելու, տեղադրելու և գործարկելու Ծրագրաշարի մեկ օրինակ՝ գործարկվող օբյեկտի կոդի ձևով։ միայն, բացառապես այն Linortek արտադրանքի վրա, որը դուք պատկանում կամ վերահսկում եք, և (b) օգտագործել Ծրագրաշարը բացառապես Linortek Ապրանքի հետ կապված՝ դրա նախատեսված օգտագործմանը համապատասխան, ինչպես նկարագրված է Linortek-ում։ webկայք (1(ա) և 1(բ)-ից յուրաքանչյուրը «Թույլատրված օգտագործում» և միասին «Թույլատրված օգտագործում»): - Ծրագրաշարի օգտագործման սահմանափակումներ:
Դուք համաձայնում եք չօգտագործել և թույլ չտալ ուրիշներին օգտագործել Ծրագրաշարը որևէ այլ նպատակի համար, բացառությամբ վերը Բաժին 1-ում նկարագրված Թույլատրված Օգտագործումների: Սա նշանակում է, ի թիվս այլ բաների, դուք չեք կարող.
(ա) խմբագրել, փոփոխել, փոփոխել, հարմարեցնել, թարգմանել, կատարել ածանցյալ աշխատանքներ, ապամոնտաժել, հակադարձել ինժեներ կամ հակադարձ կազմել Ծրագրաշարի որևէ մաս (բացառությամբ այն մասի, երբ կիրառելի օրենքները հատուկ արգելում են նման սահմանափակումը փոխգործունակության նպատակներով, որի դեպքում դուք համաձայն եք. նախ կապ հաստատել Linortek-ի հետ և Linortek-ին հնարավորություն տալ ստեղծել այնպիսի փոփոխություններ, որոնք անհրաժեշտ են փոխգործունակության նպատակների համար).
(բ) լիցենզավորել, հատկացնել, տարածել, փոխանցել, վաճառել, վարձակալել, հյուրընկալել, աութսորսինգ, բացահայտել կամ այլ կերպ օգտագործել Ծրագրաշարը որևէ առևտրային նպատակով կամ հասանելի դարձնել Ծրագրաշարը ցանկացած երրորդ կողմի.
(գ) թույլատրել ցանկացած երրորդ կողմի օգտագործել Ծրագրաշարը որևէ երրորդ կողմի անունից կամ ի շահ:
(դ) օգտագործել Ծրագրաշարի ցանկացած մասը ցանկացած սարքի կամ համակարգչի վրա, բացի Linortek Ապրանքից, որը դուք պատկանում կամ վերահսկում եք.
(ե) օգտագործել Ծրագրային ապահովումը ցանկացած կերպ, որը խախտում է ցանկացած կիրառելի տեղական, ազգային կամ միջազգային իրավունք. կամ
(f) remove or alter any labels, symbols, legends or proprietary notices, including but not limited to any copyright, trademark, logo in the Software. You may not disclose the results of any performance or functional evaluation of anyof the Software to any third party without the prior written consent of Linortek for each such release. - Թարմացումներ.
Linortek-ը կարող է ժամանակ առ ժամանակ մշակել թարմացումներ, արդիականացումներ, պատչեր, վրիպակների շտկում և այլ փոփոխություններ («Թարմացումներ»)՝ բարելավելու Ծրագրաշարի աշխատանքը: Բացառությամբ Linortek-ում այլ բան նախատեսված չէ webկայք, այս Թարմացումները ձեզ կտրամադրվեն անվճար: Այս թարմացումները կարող են ավտոմատ կերպով տեղադրվել առանց ձեզ ծանուցման: Օգտագործելով Ծրագրաշարը՝ դուք նաև համաձայնում եք ավտոմատ թարմացումներին: Եթե դուք համաձայն չեք սրան, դուք չեք կարող որևէ կերպ տեղադրել, մուտք գործել, պատճենել կամ օգտագործել Ծրագրաշարը: - Սեփականություն.
The Software is licensed to you and not sold. Linortek reserves all rights to the Software and any Updates not expressly granted herein. The Software and Linortek Products are protected by copyright, trademark and other intellectual property laws andtreaties. Linortek and its licensors own the title, copyright, trademarks and other intellectual property rights in the Software.
You are not granted any rights to Linortek’s trademarks or service marks. There are no implied licenses in this EULA. - Դադարեցում.
This EULA is effective from the date you first use the Software and will continue for as long as you own the Linortek Product associated with it or until you or Linortek terminate this agreement under this section. You may terminate this EULA at any time upon written notice to Linortek at the address provided below. Linortek may terminate this EULA at any time if you fail to comply with any of the terms in this agreement. The license granted in this EULA terminates immediately when the agreement terminates. Upon termination, you must stop using the Linortek Product and the Software and you must delete all copies of the
Software. The terms of Sections 2 will still remain in effect after the agreement terminates. - Երաշխիքից հրաժարում:
EXTENT PERMITTED BY APPLICABLE LAW, LINORTEK PROVIDES THE SOFTWARE “AS-IS” AND DISCLAIMS ALL WARRANTIES AND CONDITIONS, WHETHER EXPRESS, IMPLIED, OR STATUTORY, INCLUDING THE WARRANTIES OF MERCHANTABILITY, FITNESS FOR A PARTICULAR PURPOSE, TITLE, QUIET ENJOYMENT, ACCURACY, AND NON-INFRINGEMENT OF THIRD-PARTY RIGHTS. LINORTEK DOES NOT GUARANTEE ANY SPECIFIC RESULTS FROM THE USE OF THE SOFTWARE. LINORTEK MAKES NO WARRANTY THAT THE SOFTWARE WILL BE UNINTERRUPTED, FREE OF VIRUSES OR OTHER HARMFUL CODE, TIMELY, SECURE, OR ERROR-FREE. YOU USE THE SOFTWARE AND THE LINORTEK PRODUCT AT YOUR OWN DISCRETION AND RISK. YOU WILL BE SOLELY RESPONSIBLE FOR (AND LINORTEK DISCLAIMS) ANY AND ALL LOSS, LIABILITY, OR DAMAGES RESULTING FROM YOUR USE OF THE SOFTWARE
AND LINORTEK PRODUCT. - Պատասխանատվության սահմանափակում.
Սույն EULA-ի և, մասնավորապես, «Պատասխանատվության սահմանափակման» դրույթի մեջ ոչինչ չպետք է փորձի բացառել պատասխանատվությունը, որը չի կարող բացառվել կիրառելի օրենսդրության համաձայն:
ԿԻՐԱՌՈՂ ՕՐԵՆՔՈՎ թույլատրված առավելագույն չափով, Ի լրումն վերը նշված ԵՐԱՇԽԻՔԻ ՀՐԱԺԵՇՏՈՒՄՆԵՐԻ, ՈՉ ԴԵՊՔՈՒՄ ԼԻՆՈՐՏԵԿԸ ՊԱՏԱՍԽԱՆԱՏՎՈՒԹՅՈՒՆ ՉԻ ՊԱՏԱՍԽԱՆԱՏՎԻ ՈՐԵՎԷ ՀԵՏԵՎԱՆԱԿԱՆ, ՕՐԻՆԱԿԱՆ, ԱՌԱՋՆՈՐԴ, ԱՌԱՋՆՈՐԴ, ԱՌԱՆՁՆԱՀԱՏՈՒԿ, ԱՊՐԱՆՔՆԵՐԻՑ ԿԱՄ ԾՐԱԳՐԱԿԱՆ ԾՐԱԳՐԵՐԻՑ ԿԱՄ ԿԱՊՎԱԾ ԵՆ, ՆՈՒԻԿ ԵԹԵ ԼԻՆՈՐՏԵԿԸ ԳԻՏԵՐ ԿԱՄ ՊԵՏՔ Է ԻՄԱՆԱԼ ՆՄԱՆ ՎՆԱՍՆԵՐԻ ՀՆԱՐԱՎՈՐՈՒԹՅԱՆ ՄԱՍԻՆ, ԵՎ (Բ) LINORTEK-Ի ԸՆԴՀԱՆՈՒՐ ԱՎԵԼԻ ԱՎԵԼԻ ԱՎԵԼԻ ԿԱՑՈՒԹՅԱՆ ԵՎ ԱՎԵԼԻ ԱՎԵԼԻ ԱՎԵԼԻ ԿԱՑՈՒԹՅԱՆ ԱՅԼ ԱՄԵՆ ՊԱՏԱՍԽԱՆՈՒԹՅԱՆ ՄԱՍԻՆ: ՊԵՏՔ Է ՍԱՀՄԱՆԱՓԱԿՎԻ ԳՈՒՄԱՐՈՎ, ՈՐ ԵՐԲԵՔ ՉԳԵՐԱՑՆԻ LINORTEK-ին և LINORTEK-ի լիազորված դիստրիբյուտորին կամ ՎԱՃԱՌՔԻ ՆԵՐԿԱՅԱՑՈՒՑՉԻՆ, ՈՐ ՉԷ ԳԵՐԱԶՄԱՑՆԻ ԻՐԱԿԱՆՈՒՄ ՁԵՐ ԿՈՂՄԻՑ ՎՃԱՐՎԱԾ ԳՈՒՄԱՐԸ ԱՊՐԱՆՔՆԵՐԻ ԿԱՄ ԾԱՌԱՅՈՒԹՅՈՒՆՆԵՐԻ ՀԱՄԱՐ: ԱՅՍ ՍԱՀՄԱՆԱՓԱԿՈՒՄԸ ԿՈՄՈՒԼԱՑԻԱ Է ԵՎ ՉԻ ԱՃԵԼՈՒ ՄԵԿԻՑ ԱՎԵԼԻ ԴԵՊՔԵՐԻ ԿԱՄ ՊԱՀԱՆՋՆԵՐԻ ԳՈՅՈՒԹՅԱՆ ՀԱՄԱՐ: LINORTEK-ը ՀՐԱԺԵՇՏՈՒՄ Է ԱՄԵՆ ՊԱՏԱՍԽԱՆԱՏՎՈՒԹՅՈՒՆԸ ԼԻՆՈՐՏԵԿ-Ի ՑԱՆԿԱՑԱԾ ԼԻՑԵՆԶԱՏՈՐՆԵՐԻ ԵՎ ՄԱՏԱԿԱՐԱՐՈՂՆԵՐԻ ՀԱՄԱՐ: - Համապատասխանություն արտահանման օրենքներին:
Դուք ընդունում եք, որ Ծրագրային ապահովումը և հարակից տեխնոլոգիաները ենթակա են ԱՄՆ արտահանման վերահսկման օրենսդրության՝ ԱՄՆ արտահանման իրավասությանը և կարող են ենթակա լինել այլ երկրներում արտահանման կամ ներմուծման կանոնակարգերի: Դուք համաձայնում եք խստորեն պահպանել բոլոր կիրառելի միջազգային և ազգային օրենքներն ու կանոնակարգերը, որոնք վերաբերում են Ծրագրային ապահովմանը, ներառյալ ԱՄՆ արտահանման կառավարման կանոնակարգերը, ինչպես նաև ԱՄՆ և այլ կառավարությունների կողմից թողարկված վերջնական օգտագործողի, վերջնական օգտագործման և նպատակակետի սահմանափակումները: Դուք ընդունում եք, որ պատասխանատվություն եք կրում ծրագրային ապահովման և հարակից տեխնոլոգիաների արտահանման, վերաարտահանման կամ ներմուծման թույլտվություն ստանալու համար, ինչպես կարող է պահանջվել:
Դուք կփոխհատուցեք և կպահեք Linortek-ին անվնաս ցանկացած և բոլոր պահանջներից, կորուստներից, պարտավորություններից, վնասներից, տուգանքներից, տույժերից, ծախսերից և ծախսերից (ներառյալ փաստաբանական վճարները), որոնք բխում են կամ առնչվում են ձեր կողմից այս բաժնի պարտավորությունների որևէ խախտման հետ: - Հանձնարարություն.
Դուք չեք կարող վերագրել ձեր որևէ իրավունք կամ պարտավորություն՝ համաձայն այս EULA-ի, և հանձնելու ցանկացած փորձ անվավեր և անհետևանք կլինի: - Ծանուցումներ.
Linortek-ը կարող է ձեզ տրամադրել ցանկացած ծանուցում այս EULA-ի հետ կապված՝ օգտագործելով էլ.փոստը և հասցեն, որոնք դուք տրամադրել եք Linortek-ում գրանցվելիս: - Հրաժարում
Արդյունավետ լինելու համար Linortek-ի կողմից սույնով նախատեսված ցանկացած և բոլոր հրաժարումները պետք է գրավոր լինեն և ստորագրվեն Linortek-ի լիազորված ներկայացուցչի կողմից: Linortek-ի կողմից սույն կետով նախատեսված որևէ դրույթի կիրառման ցանկացած այլ ձախողում չի համարվի հրաժարում: - Հաստատելիություն:
Սույն EULA-ի ցանկացած դրույթ, որը կհամարվի անիրագործելի, կխմբագրվի և կմեկնաբանվի՝ կիրառելի օրենսդրության համաձայն առավելագույնս հնարավոր չափով հասնելու այդ դրույթի նպատակներին, իսկ մնացած բոլոր դրույթները կմնան լիարժեք ուժի մեջ և ուժի մեջ կմնան: - Կառավարող օրենք; Վայրը.
You agree that this EULA, and any claim, dispute, action, cause of action, issue, or request for relief arising out of or relating to this EULA, will be governed by the laws of the state of North Carolina, U.S.A., without regard to conflicts of laws principles, provided that if you reside in a country that will not apply U.S. law to disputes related to these terms, then the laws of your country will apply. You also agree that the United Nations Convention on Contracts for the International Sale of Goods shall not
apply. You agree that regardless of any statute or law to the contrary, any cause of action against us arising out of or related to the Linortek webկայքը, ծրագրաշարը կամ Linortek-ի արտադրանքը պետք է գործարկվեն մեկ (1) տարվա ընթացքում այն բանից հետո, երբ գործի պատճառը կհայտնվի, կամ գործողության նման պատճառն ընդմիշտ կասեցվի: Սույն EULA-ի հետ կապված ցանկացած հայց կամ վարույթ պետք է հարուցվի դաշնային կամ նահանգային դատարանում, որը գտնվում է Հյուսիսային Կարոլինայում, և յուրաքանչյուր կողմ անդառնալիորեն ենթարկվում է ցանկացած նման դատարանի իրավասությանը և վայրին ցանկացած նման հայցով կամ վեճով, բացառությամբ այն, որ Linortek-ը կարող է դատական կարգով պահանջել: ազատում ցանկացած դատարանում, որն իրավասու է պաշտպանել իր մտավոր սեփականությունը: - Կալիֆորնիայի առաջարկ 65 Զգուշացում.
 ԶԳՈՒՇԱՑՈՒՄ. Այս ապրանքը կարող է ձեզ ենթարկել քիմիական նյութերի, այդ թվում՝ կապարի, որը հայտնի է Կալիֆորնիայի նահանգին քաղցկեղ առաջացնելու համար: Լրացուցիչ տեղեկությունների համար այցելեք www.P65Warnings.ca.gov:
Սկսել
The Fargo SERVER is what is called a “bare board” product and is supplied without a housing. It operates on low voltage; however you need to use simple handling precautions to prevent damage to the circuits. All electronics are susceptible to electrostatic discharge. This high voltage “shock” can permanently damage your device. Before handling the product, you should touch a surface such as a grounded workbench or table. It is also best to handle the device from its edges. If you notice that your chair or clothes often cause static discharges, you must exercise extra caution. The unit is supplied with four rubber feet which keeps the bottom of the board from coming into contact with the surface you put it on. Be careful not to let metal objects, such as screw drivers or hardware, come in contact with the bottom of this product. The board can be mounted on a panel using stand offs and #4 hardware. The mounting holes are connected to the GROUND signal. The SERVER unit is a self-contained web server configured with various input and output circuits. Although the relays are rated for higher voltages, այս արտադրանքը նախատեսված չէ օգտագործման համար տող voltages. You should never use voltages through the SERVER product exceeding 48 volts. IT IS NOT SAFE.
The KODA SERVER is a housed unit with a DIN rail mountable enclosure that can be snapped onto a DIN rail or attached to any flat surface such as a wall or under a counter. KODA 100 has two relays (48VAC@1A), KODA 200 has four relays which can drive 10V 50mA to external devices. The unit is supplied with a DIN Rail mountable enclosure with removable terminal connectors for easy installation. The KODA SERVER can be mounted on a panel or on the wall using the DIN rail mount clip. The removable wire terminal connectors simplify field installation and allow for easy troubleshooting and maintenance: the unit can be removed from the system without disturbing the system wiring.
Սերվերի միացում
Նշում. For a diagram showing the location of all connectors on your SERVER referenced in this section, please see the section – Board Layout Reference.
Զգուշացում. Այս միավորները գետնից մեկուսացված են: Միշտ միացրեք այնպես, որ հոսանքի հանգույցը միացված լինի միայն ՍԵՐՎԵՐԻ միավորին:
Մի օգտագործեք արտաքին հողային միացումներ: Այդպես վարվելը կարող է վնասել ՍԵՐՎԵՐԻ կամ POE սկզբնավորման սարքը:
- Place the unit on a table or bench being careful not to let any metal objects come into contact with the bottom of the circuit board (Fargo Only).
- Connect the 12VDC power supply to a suitable AC outlet and plug the barrel connector into the SERVER at the location labelled “12VDC/POWER”. Alternatively, you may also use POE. At this point the GREEN/Boot LED should come on and start flashing indicating the SERVER is operating and is in the “Bootload Mode”. This mode allows the user to update the server software that is used on the unit. After about 5 seconds, the GREEN LED will go off and the RED LED will start blinking once per second indicating the SERVER is operating in “Server Mode” and is accessible on a network utilizing TCP/IP protocols.
ՈՒՇԱԴՐՈՒԹՅՈՒՆ. ԵՐԲ ՕԳՏԱԳՈՐԾՈՒՄ ԵՔ POE NETWORK SWITCH-ը, ՄԻ ՕԳՏԱԳՈՐԾԵՔ 12VDC Էլեկտրամատակարարումը ՍԵՐՎԵՐԸ ՍԵՐՎԵՐԸ ՍԵՌՎԵՐԸ ՍԱՐԿԱՑՆԵԼՈՒ ՄԻԱԺԱՄԱՆԱԿԱՆ ԺԱՄԱՆԱԿ ՍՏԱՑՆԵԼՈՒ ՀԱՄԱՐ, ԱՅՆ ԿՎՆԱՍԻ ԲԱԼԱՏԸ: - Plug an Ethernet cable into the RJ45/NET connector. The “Connection” LED will come on if a 100MHz network is available, otherwise it will remain off and the “Activity” LED should start blinking indicating network activity. Fargo G2 Relay Connections
There are 8 relays on the FARGO R8 and 4 on the FARGO R4. These are dry contact relays. These units are designed for only low voltage վերահսկում և չպետք է ունենա հատորtage applied to the relay greater than 48 volts. This is for your safety as well as to stay within the parameters of the parts and circuit board design. The relays have 3 terminals labelled NO, C and NC which stand for Normally Open, Common and Normally Closed. When activated, the relay moves the connection from CNC to CNO. If you want to make a connection when the relay is activated, connect your wires between C and NO. When the relay is activated C and NO will be connected together. If you want to break a circuit when the relay is activated, make your connections to C and NC. When the relay is activated the circuit will be broken (or open)
Koda Relay Connection
There are 2 relays on the KODA 100. The KODA 100 has 2 removable 2 position connectors (1 for each relay) and are simply numbered “1” and “2”. These relays are normally open.
There are 4 relays on the KODA 200. The KODA 200 has 1 removable 8 position connector. Each relay has a “+” connection and a numbered connection. The relays may be set to supply about 10VDC by selecting “+V” on the setting switch (see Board Layout Reference page 29) or set to dry contact DC on the switch. If “+V” is selected then the voltage will be present on the “+” terminal and the numbered terminal is the return. Otherwise, a normally open dry contact exists across the “+” and numbered connection. KODA 100/200 is designed for only low voltage վերահսկում և չպետք է ունենա հատորtage կիրառվում է 48 վոլտ-ից ավելի ռելեի վրա: Սա ձեր անվտանգության, ինչպես նաև մասերի և տպատախտակի դիզայնի պարամետրերի մեջ մնալու համար է:

![]() ՈՉ ՄԻ ԴԵՊՔՈՒՄ LINOR TECHNOLOGY-ն ՊԱՏԱՍԽԱՆԱՏՎՈՒԹՅՈՒՆ ՉԻ ՊԱՏԱՍԽԱՆԱՏՎԻ ՊԱՅՄԱՆԱԳՐԻ, ԴԱՇԽԱՏԱՆՔԻ, ԿԱՄ ՀԱԿԱՌԱԿԻՑ ՈՐԵՎԷ ՊԱՏԱՀԱԿԱՆ, ՀԱՏՈՒԿ, ԱՆՈՒՂՂԱԿԻ, ՀԵՏԵՎԱՆԱԿԱՆ ԿԱՄ ՊԱՏԻԺԱԿԱՆ ՎՆԱՍՆԵՐԻ ՀԱՄԱՐ, ՆԵՐԱՌՅԱԼ, ԱՆՀԱՄԱՍՆԱԿԱՆ, ԱՆԺԱՄԱԿԱՆ, ԱՆՎՏԱՆԳ ՎՆԱՍՆԵՐԻ ՀԱՄԱՐ: , ԱՌԵՎՏՐԱՅԻՆ ԿՈՐՈՒՍՏԸ ԿԱՄ ԿՈՐՍՎԱԾ ՇԱՀՈՒՅԹՆԵՐԸ, ԽՆԱՅՈՎՆԵՐԸ ԿԱՄ ԵԿԱՄՈՒՏՆԵՐԸ ԱՄԲՈՂՋ ՉԱՓՈՎ, ՆՐԱՆՔ ՕՐԵՆՔՈՎ ԿԱՐՈՂ ԵՆ ՀՐԱԺԱՐՎԵԼ:
ՈՉ ՄԻ ԴԵՊՔՈՒՄ LINOR TECHNOLOGY-ն ՊԱՏԱՍԽԱՆԱՏՎՈՒԹՅՈՒՆ ՉԻ ՊԱՏԱՍԽԱՆԱՏՎԻ ՊԱՅՄԱՆԱԳՐԻ, ԴԱՇԽԱՏԱՆՔԻ, ԿԱՄ ՀԱԿԱՌԱԿԻՑ ՈՐԵՎԷ ՊԱՏԱՀԱԿԱՆ, ՀԱՏՈՒԿ, ԱՆՈՒՂՂԱԿԻ, ՀԵՏԵՎԱՆԱԿԱՆ ԿԱՄ ՊԱՏԻԺԱԿԱՆ ՎՆԱՍՆԵՐԻ ՀԱՄԱՐ, ՆԵՐԱՌՅԱԼ, ԱՆՀԱՄԱՍՆԱԿԱՆ, ԱՆԺԱՄԱԿԱՆ, ԱՆՎՏԱՆԳ ՎՆԱՍՆԵՐԻ ՀԱՄԱՐ: , ԱՌԵՎՏՐԱՅԻՆ ԿՈՐՈՒՍՏԸ ԿԱՄ ԿՈՐՍՎԱԾ ՇԱՀՈՒՅԹՆԵՐԸ, ԽՆԱՅՈՎՆԵՐԸ ԿԱՄ ԵԿԱՄՈՒՏՆԵՐԸ ԱՄԲՈՂՋ ՉԱՓՈՎ, ՆՐԱՆՔ ՕՐԵՆՔՈՎ ԿԱՐՈՂ ԵՆ ՀՐԱԺԱՐՎԵԼ:
ՕԳՏԱԳՈՐԾՄԱՆ ՍԱՀՄԱՆԱՓԱԿՄԱՆ ՀԱՄԱԼԻՍ ԾԱՆՈՒՑՈՒՄ
Եթե հատուկ նշված չէ, այս արտադրանքը նախատեսված չէ գիծը փոխելու համարtage սարքեր. Այս սահմանափակումը ներառում է FARGO և KODA-ի բոլոր ապրանքները: Սարքը կառավարելու համար, որը գործում է գծի voltagՕգտագործողը ՊԵՏՔ է տեղադրել և միջնորդ սարք, ինչպիսին է ռելեը:
Երբ էլեկտրագծերի մի գծի voltagԷլեկտրոնային սարք, որն օգտագործում է միջնորդ սարք, դուք պետք է կամ որակավորված էլեկտրիկ լինեք կամ օգտվեք որակավորված էլեկտրիկի ծառայություններից: Բացի այդ, պետք է հետևել տեղական ծածկագրերին, ներառյալ, բայց չսահմանափակվելով դրանցով, մետաղալարերի չափի և հարմար բնակարանով:
Linortek cannot assume any responsibility for harm to the user or third parties for improperly using our Fargo/Koda products. This liability remains with the user. Linortek cannot assume any responsibility for damage to the device for improperly using our SERVER product.
For relay specifications, please see Board Reference Layout page 29
Digital Input Connections (Fargo R4 and Koda)
The digital inputs allow the SERVER to detect an external on/off state of a sensor. With this information the SERVER can display whether an input is on or off, count events in a resettable or non-resettable counter, and calculate the frequency (such as for use as a tachometer) or the period of the input. There are two modes of operation for the digital inputs – PULL UP and ISOLATED.
a) PULL UP mode connects a 1K resistor to an internal voltage, որը թույլ է տալիս օգտագործել հասարակ անջատիչ (օրինակ՝ դռան մագնիսական անջատիչ) 1 և 2 տերմինալներում: Սա, երբ անջատիչը միացված է, ազդանշան է ուղարկվում մուտքին:
b) ISOLATED mode allows you to directly drive the SERVER’s optoisolator with an external voltagթեև ներքին 1K ռեզիստոր: Այս հատորtage-ը կարող է լինել 5 Վ-ից մինչև 24 Վ տիրույթում, որը մատակարարում է նվազագույնը 2 մԱ կամ առավելագույնը 30 մԱ օպտոիզոլատորի դիոդին: Այլ ներքին կապ չկա այս հատորինtage so it is an isolated input. Please note, when connecting a 12VDC-¬24VDC circuit to the input, an external resistor (can be provided at request, 2.2k ohm 0.5watt) must be used.
These modes are selected by the switch on the SERVER (see Board Layout Reference page 29) marked ISO and PU for isolated and pull up respectively. These are set at the factory to ISO by default.
Wiring a push button: For distances up to 500 feet, a 20 AWG shielded wire is suitable for wiring a push button. If the distance between the push button and the controller extends up to 5,000 feet, use a 16 AWG shielded cable instead. Keep in mind that longer cable runs are more susceptible to signal interference.
Զգուշացում. If you intend to use isolated mode, verify that the input switch is set to ISO before applying an external voltagե. Այլ կերպ վարվելը կարող է վնասել ՍԵՐՎԵՐԸ կամ POE սկզբնավորող սարքը:
Analog Input Connections (Fargo R4ADI)
The analog inputs allow the SERVER to read the value of external equipment. There are 2 analog inputs.
For AC current monitoring, use one of the two 3.5mm stereo inputs to interface with a current sensor.
Անալոգային մուտքային տերմինալների 2 բլոկները միացված են ոչ մեկուսացված 0-5V հոսանքի սենսորներին, որոնք կարող են միացված լինել տարբեր սարքերի, ինչպիսիք են ջերմաստիճանի կամ ճնշման սենսորները: ՍԵՐՎԵՐն ապահովում է հողի և հոսանքի միացում, որպեսզի չափումները հնարավոր լինեն առանց արտաքին ծավալիtage references. You should use a sensor that is isolated so that that it makes no connection to a remote ground. See drawing under Board Reference Layout page 29.
Accessing your SERVER
Երբ ձեր ՍԵՐՎԵՐԸ միացված է և միացված է ցանցին, այն ավտոմատ կերպով կստանա IP հասցե DHCP-ի միջոցով, քանի դեռ ձեր երթուղիչը կազմաձևված է դրա համար: Միանալու համար մուտքագրեք IP հասցեն ձեր մեջ web browser. This will take you to your SERVER’s landing page. To log in, click the Log In button on the top right of the page. Your browser will prompt you to enter your username and password. By default, these credentials are both set to admin. To find your SERVER’s IP address, see below.
Գտեք ձեր IP հասցեն Linortek Discoverer-ի միջոցով
Discoverer ծրագիրը ավտոմատ կերպով կգտնի ձեր ՍԵՐՎԵՐԸ: Discoverer-ը Java ծրագիր է, և այս գործառույթն օգտագործելու համար պահանջվում է Java Runtime-ի տեղադրում: Java-ն կարելի է գտնել այստեղ՝ http://java.com/en/download/index.jsp.
Discover ծրագիրը ներբեռնելու համար այցելեք՝ https://www.linortek.com/downloads/supportprogramming/
Խորհուրդ է տրվում օգտագործել Chrome և Firefox բրաուզերներ: Խնդրում ենք նկատի ունենալ. Եթե նախընտրում եք օգտագործել Internet Explorer-ը, Internet Explorer-ը պահպանում է Linortek Discoverer-ը որպես Zip file ըստ նախնականի. Discoverer-ն օգտագործելու համար դուք պետք է ընտրեք Save as և վերանվանեք այն file որպես Linortek Discoverer.jar, երբ ներբեռնում եք:
Discover ծրագիրը ներբեռնելիս երբեմն կտեսնեք թռուցիկ նախազգուշական հաղորդագրություն՝ կախված ձեր բրաուզերի անվտանգության կարգավորումներից, որում հարցնում եք՝ ցանկանում եք պահպանել կամ չեղարկել սա։ file, please click the Keep button as this is a Java program, and it won’t harm your computer.
Երբ Discoverer-ը գտնի ձեր սարքը, այն կցուցադրի.
- IP հասցե
- Հյուրընկալողի անունը
- MAC հասցե
- Այլ տեղեկություններ.
ա. Կապույտ LED (եթե միացված է)
բ. ապրանքային անուն
գ. Սերվերի ծրագրակազմի վերանայում
դ. Նավահանգստի համարը (եթե տեղափոխվում է)

Սեղմեք այն սարքը, որը ցանկանում եք օգտագործել, որը ցուցադրված է Discoverer ծրագրում՝ ՍԵՐՎԵՐԸ գործարկելու համար web pages in your browser. Click the Login button on the homepage. The default username/password is: admin/admin. You may change these as you desire or disable this feature in the settings menu.
Connecting your SERVER Directly to Your PC
You can also plug your SERVER directly to your PC if there is no network connection available. If you plug your SERVER into your PC’s Ethernet port it will use the default IP address: 169.254.1.1 unless you have previously configured your SERVER to use a static IP. Enter 169.254.1.1 into your web browser to connect. No internet connection is required. Once configured, you can then install your SERVER where you desired.
Սերվերի կոնֆիգուրացիա
Մուտք գործել
Once you have entered the IP address and port number, if set, the Login page will open. This page shows the name of this server which you may change in Configure/Network Config.
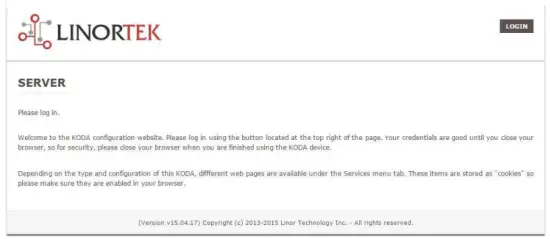
This page is static with no background activity and is a useful place to park if you are not using the SERVER and do not want to close the connection.
By pressing LOGIN, you will be asked for your username and password. These credentials will be retained by the browser until the browser is closed. You can disable the password requirement in Settings page. See section page 21.
Գլխավոր Էջ
Ձեր մուտքի հավատարմագրերը մուտքագրվելուց հետո դուք կվերահղվեք հավելվածի գլխավոր էջ: «Տուն» կամ «Ինդեքս» էջը ցուցադրում է համակարգի որոշ տեղեկություններ և հնարավորություն է տալիս գտնել ֆիզիկական սարքը, եթե այն գտնվում է ուրիշների հետ տարածքում: Նկարագրության համար տես ստորև բերված ցանկը:

- TIME – Displayed along with the day of the week. This time may be set to be in a 12 hour format with AM/PM indicator or 24 hour format.
- DATE – Ընթացիկ ամսաթիվը ցուցադրվում է այստեղ:
- VOLTS – Voltage տախտակի վրա ցուցադրվում է: Սա կարող է օգտակար լինել, եթե ՍԵՐՎԵՐԸ սնուցվում է այլ սարքավորումների հետ միասին, հատtage variance can be noted. Fargo and Koda servers have an input voltage range of 1248vDC.
- TEMPERATURE – Temperature on the board is displayed. This display may be either °C or °F. This temperature will be affected by the heat generated by SERVER itself so it will always be slightly higher than ambient temperature.
- LED-ներ – Ցուցադրվում են 3 LED: ԿԱՐՄԻՐ LED-ը համակարգի զարկերակն է: Սա պետք է թարթվի վայրկյանում մեկ անգամ, քանի դեռ սերվերը աշխատում է: ԿԱՆԱՉ LED-ն օգտագործվում է bootloader-ի ընտրանքների համար և սովորաբար տեսանելի չէ դրա վրա webկայք։ BLUE LED-ը սեղմելի է, և դուք կարող եք միացնել և անջատել այն այստեղից web էջ. Սա օգտակար է սարքը ֆիզիկապես տեղորոշելու համար, եթե այն օգտագործվում է այլ նմանատիպ միավորների հետ, քանի որ այն կլուսավորվի այն միավորի վրա, որտեղ սա web բրաուզերը միացված է: Discoverer ծրագիրը նաև կնշի, թե արդյոք միացված է ԿԱՊՈՒՅՏ LED-ը: Սա հաճախ կոչվում է «Տեղադրել» գործառույթ:
Ծառայություններ
Ծառայություններ ներդիրը դինամիկ է և կփոխվի՝ կախված ձեր սերվերի կազմաձևից: Այստեղ դուք կարող եք կառավարել մուտքերը, ելքերը, սենսորները և այլ մասնագիտացված հսկիչները:
In/Out or Relays Page
Depending on which SERVER you are using, the first page on the SERVICES tab will be either In/Out or Relays.
In/Out has the relay controls and the input controls on one page, while Relays only has the relay controls.
Ռելեի հսկողություն
An In/Out page is displayed below. Some relay control pages have 2, 4 or 8 relays displayed. Each relay has a number, in this case 1 to 4.

The State LED shows whether the relay is on or off indicated by GREEN and RED respectively. This icon is clickable to manually control the corresponding relay. Each relay can have a Name as well as identifiers for the Normally Open, Common and Normally Closed connections.
Կան չորս կարգավիճակի լուսադիոդներ, որոնք ցույց են տալիս.
- Email – If an email is to be sent when this relay is switched on/off
- Զարկերակ – Եթե այս ռելեը դրված է զարկերակային լայնության և զարկերակային լայնության բազմապատկիչով (տեւողությունը), տես հաջորդ բաժինը լրացուցիչ տեղեկությունների համար
- Sched. – If there is a schedule created in the Tasks page (see page 15) set to automatically trigger this relay.
- Ժամկետային – Եթե զարկերակը միացված է, և այս ռելեն ակտիվացված է, ժամանակի լուսադիոդը կարմիր կդառնա՝ ցույց տալով, որ ռելեն այժմ աշխատում է ժմչփի վրա:
Click the Edit Icon to edit the controls for the corresponding relay. This will take you to the Set Relay page (see page 11).
Մուտքագրումներ
The In/Out or Inputs page (depending on your SERVER) will display information from each input. The SERVERs have a combination of inputs. The Fargo R4DI has four digital inputs, The R4ADI has, four digital inputs, four analog inputs. The KODA SERVER has two digital inputs.
At the top of each input is a label (ex: DIN 1, AIN 2) specifying whether it is a digital input (DIN) or analog input (AIN) as well as the input number. This label will turn green when the input is enabled. Inside the box will be any display configured from the Set Input page (see page 12 for digital input, page 14 for analog input). A red dot in the lower-left corner indicating the state of a linked relay (if any), will turn green when the linked relay is activated.
Finally, an Edit icon in the lower-right corner of the box to edit the corresponding input. This will take you to the Set Digital Input or Set Analog Input page (page 12 or page 14).
Set Relay Page
SET RELAY էջը թույլ է տալիս սահմանել ռելեին վերաբերող տարբեր հատկություններ:
- Relay Select – The Relay that you are editing (identified by the line on which you clicked the Edit icon on the RELAY page).
- Name – Enter a 15-character Relay Name. This and the following 3 fields may be used for any identifying information desired.
- NO Name – Enter a 7-character name for the Normally Open (NO) connection.
- Com Name – Enter a 7-character name for the Common (COM) connection.
- NC Name – Enter a 7-character name for the Normally Closed (NC) connection.
- Pulse Width – When you control the relay it turns on or off. You may control it for a timed turned on period by entering a Pulse Width when 0 means there is no timed event and a number represents duration of the pulse. The maximum number you can enter here is 4 digits, ie. 1234.
- Զարկերակային լայնության բազմապատկիչ – Իմպուլսի երկարությունը հետագայում որոշելու համար ընտրեք զարկերակային լայնության բազմապատկիչ՝ զարկերակային լայնությունը հետագայում որոշելու համար: Դուք կարող եք ընտրել.
• Ոչ ոք
• mS (Millisecond, 1/1000 second)
• Sec (Seconds)
• Min (Minutes) - Ռելեի տեսակը – ՍԵՐՎԵՐԸ կարող է մուտք գործել ռելեներ ֆիզիկապես ՍԵՐՎԵՐԻ վրա կամ օգտագործելով այլ միջոցներ: Դուք կարող եք ընտրել.
• Normal – relay physically on the SERVER
• Latched – not currently supported
• Remote – a relay on another SERVER accessed over the network
• Zigbee – a relay at a remote device accessed over an RF system
• Normal and Remote – both relays activated
• Normal and Zigbee – both relays activated - Տեղադրության ID – սա հեռավոր գտնվելու վայրի նույնականացնող թիվ է
- Ռելե գտնվելու վայրում – թիվ, որը ներկայացնում է ռելեը կամ սարքը գտնվելու վայրում
- Ուղարկել էլ.

Սահմանել թվային մուտքագրման էջը
Թվային մուտքերը կարող են սահմանվել այնպես, որ տրամադրեն տարբեր ընթերցումներ՝ օգտագործելով մի շարք ցուցադրման տեսակներ: Բացի մուտքային տվյալները ցուցադրելուց, դուք կարող եք անվանել էկրանը, ինչպես նաև կապել ռելեի հետ: Այս ռելեը կփոխվի Կանաչից ԿԱՐՄԻՐԻ, քանի որ այն անցնում է միացումից անջատված, ինչպես նաև կտտացնում է այն կառավարելու համար: Սեղմելով խմբագրել մատիտի պատկերակը, կարող եք խմբագրել այս մուտքագրման կարգավորումները.
- Digital Input Selected – The Digital Input that you are editing (identified by the line on which you clicked the Edit icon).
- Անուն – Դուք կարող եք սահմանել 15 նիշանոց անուն այս մուտքագրման համար: Այս անունը դրվում է էկրանի վերևի բարում:
- Պիտակ – Սահմանեք 7 նիշանոց պիտակ, որը կցուցադրվի իրական ակտիվ էկրանին:
- Ուղղիչ – Օգտագործելով այս դաշտը, դուք կարող եք ավելացնել, հանել, բազմապատկել կամ բաժանել արժեքը, նախքան արժեքը ցուցադրվող էջում: Սա 2 արժեքի ուղղիչ է, որոնցից յուրաքանչյուրն առանձնացված է մեկ բացատ նիշով: (այսինքն՝ «+2, -2, *3, /3»)
- USE – Սահմանում է այս մուտքագրումը որպես ակտիվ: Մուտքային թվի ցուցիչը դարձնում է կանաչ: Պետք է նշել, որ օգտագործման ժամանակ մուտքագրումը սպառում է պրոցեսորի ժամանակը և այլ ռեսուրսներ՝ կախված դրա տեսակից: Թեև բոլոր մուտքերը կարող են միաժամանակ ակտիվ լինել, խորհուրդ է տրվում միացնել միայն նրանք, որոնք ցանկանում եք օգտագործել:
- Տեսակ – Մուտքային տվյալները կարող են օգտագործվել արդյունքների մի շարք հաշվարկելու համար: Դուք կարող եք ընտրել.
• State – This is useful for knowing if an input is on or off, like a door switch being on or off.
• CounterNR – This is a non-resettable counter.
• CounterR – This is a resettable counter.
• Frequency – Counts the frequency of an input in KHz (kilo hertz or1/1000 seconds). This could be useful in displaying a tachometer where 60Hz = 1 R.P.M.
• Period – in 1/1000 seconds an input in kHz (milliseconds or1/1000 seconds). This would be useful for measuring timed events. - Ցուցադրում – Այս ընտրությունը թույլ է տալիս փոխել օգտագործվող ցուցադրման տեսակը: Դուք կարող եք ընտրել.
• Dot – A single dot with the value in the middle. This can be used for State. You can make a dumb indicator by changing the color of the Dot based on the value. The label is under the Dot.
• Values – Displays the Corrected Value with the Label in a box directly below it.
• Meter – This Meter has configurable scale based on the Min/Max values and arcs can be colored per the Color ranges. The Label is displayed within the Meter.
• VBar – Also based on the Min/Max values for the scale and the bar changes color based on the values in the Color ranges. - Relay L/T – Enter a Relay number here. If it is a local relay it will show GREEN or RED depending if it is on or off. By clicking on it the relay will turn on and off. The name comes from the relay settings page. This may be useful if you want to turn the subject of a display on and off. Any relay can be used on any input and each may be reused for any other input. Adding an L after the relay number (ex: 2L) will link the state of the input to the state of the relay. This is an easy and immediate way to have an input follow the relay. Adding a T after the relay number will trigger the relay to the state of the input. This is an easy and immediate way to have a relay follow the input.
- Command Z/N/I – This field is used for issuing various commands to the Digital Input controller: Z Zero the resettable counter. N Leave the input as Normal. I Invert the input.
- Value – These are Min/Max values used for the display. This is useful for preventing a Meter from going past its end or setting the value of a VBar. This is the Value after the Corrector. The system cannot display a value past Max, so be sure this is at least set to 1.
- Դեղին/Կարմիր/Կանաչ – Կան երեք գույներ, որոնք կարող են օգտագործվել էկրանի հետագա սահմանման համար: Սահմանեք այս գույների տիրույթը՝ ցուցադրման արժեքին գույնը սահմանելու համար: Սա ուղղիչից հետո արժեքն է: Նկատի ունեցեք, որ եթե դուք օգտագործում եք վիճակի տեսակ, կարող եք նշանակել ԿԱՐՄԻՐ = 0-ից 0, ԿԱՆԱՉ = 1-ից 1-ը և ԴԵՂԻՆ = 2-ից 2-ը: Քանի որ վիճակը միշտ կամ 1 կամ 0 է, դա կկանխի երկիմաստ տեղեկատվություն և կանխել ԴԵՂԻՆ գույնի օգտագործումը: Դուք կարող եք ընտրել ցանկացած երկու գույն, որը ցանկանում եք պետության տեսակի համար:

Set Analog Input Page
Անալոգային մուտքերը կարող են սահմանվել, որպեսզի տրամադրեն տարբեր ընթերցումներ՝ օգտագործելով մի շարք ցուցադրման տեսակներ: Բացի մուտքային տվյալները ցուցադրելուց, դուք կարող եք անվանել էկրանը, ինչպես նաև կապել ռելեի հետ: Այս ռելեը կփոխվի Կանաչից ԿԱՐՄԻՐ, քանի որ այն անցնում է միացումից անջատված, ինչպես նաև կտտացնում է այն կառավարելու համար:
- Analog Input Selected – The Analog Input that you are editing (identified by the line on which you clicked the Edit icon).
- Անուն – Դուք կարող եք սահմանել 15 նիշանոց անուն այս մուտքագրման համար: Այս անունը դրվում է էկրանի վերևի բարում:
- Պիտակ – Սահմանեք 7 նիշանոց պիտակ, որը կցուցադրվի իրական ակտիվ էկրանին:
- Ուղղիչ – Օգտագործելով այս դաշտը, դուք կարող եք ավելացնել, հանել, բազմապատկել կամ բաժանել արժեքը, նախքան արժեքը ցուցադրվող էջում: Սա 2 արժեքի ուղղիչ է, որոնցից յուրաքանչյուրն առանձնացված է մեկ բացատ նիշով: (այսինքն՝ «+2, -2, *3, /3»)
- USE – Sets this input to active. Turns the input number indicator to GREEN. It should be noted that when in use the input consumes CPU time and other resources depending on its type. Although all inputs may be active at the same time, it is recommended to turn on only those you want to use.
- Տեսակ – Մուտքային տվյալները կարող են օգտագործվել արդյունքների մի շարք հաշվարկելու համար: Դուք կարող եք ընտրել.
• Analog 1 – Analog 1 input from a SERVER with an input such as found on a R4ADI.
• Analog 2 – Analog 2 input from a SERVER with an input such as found on a R4ADI.
• AC Current 1 – AC current sensor 1 input from a SERVER with an input such as found on a R4ADI.
• AC Current 2 – AC current sensor 2 input from a SERVER with an input such as found on a R4ADI.
• AC Current 3 – Not used
• Volts – The measurement of the voltage powering the SERVER.
• Current – On “S” models, this is the current consumed by the SERVER.
• Int. Temp – Temperature from the board mounted sensor.
• Ext. Temp – Temperature from the “S” model SERVER.
• R. Humidity – % Relative Humidity from the “S” model SERVER.
• MMA X – The X axis accelerometer data from the “S” model SERVER.
• MMA Y – The Y axis accelerometer data from the “S” model SERVER.
• MMA Z – The Z axis accelerometer data from the “S” model SERVER. - Ցուցադրում – Այս ընտրությունը թույլ է տալիս փոխել օգտագործվող ցուցադրման տեսակը: Դուք կարող եք ընտրել.
1. Dot – A single dot with the value in the middle. This can be used for State. You can make a dumb indicator by changing the color of the Dot based on the value. The label is under the Dot.
2. Values – Displays the Corrected Value with the Label in a box directly below it.
3. Meter – This Meter has configurable scale based on the Min/Max values and arcs can be colored per the Color ranges. The Label is displayed within the Meter.
4. VBar – Also based on the Min/Max values for the scale and the bar changes color based on the values in the Color ranges. - Relay – Enter a Relay number here. If it is a local relay it will show Green or RED depending if it is on or off.
By clicking on it the relay will turn on and off. The name comes from the relay settings page. This may be useful if you want to turn the subject of a display on and off. Any relay can be used on any input and each may be reused for any other input. - Արժեք – Սրանք նվազագույն/Մաքս արժեքներ են, որոնք օգտագործվում են ցուցադրման համար: Սա օգտակար է կանխելու համար, որ մետրը անցնի իր վերջը կամ սահմանի VBar-ի արժեքը: Սա ուղղիչից հետո արժեքն է: Համակարգը չի կարող ցուցադրել Max-ից անցած արժեք, այնպես որ համոզվեք, որ սա առնվազն 1 է:
- Դեղին/Կարմիր/Կանաչ – Կան երեք գույներ, որոնք կարող են օգտագործվել էկրանի հետագա սահմանման համար: Սահմանեք այս գույների տիրույթը՝ ցուցադրման արժեքին գույնը սահմանելու համար: Սա ուղղիչից հետո արժեքն է: Նկատի ունեցեք, որ եթե դուք օգտագործում եք վիճակի տեսակ, կարող եք նշանակել ԿԱՐՄԻՐ = 0-ից 0, ԿԱՆԱՉ = 1-ից 1-ը և ԴԵՂԻՆ = 2-ից 2-ը: Քանի որ վիճակը միշտ կամ 1 կամ 0 է, դա կկանխի երկիմաստ տեղեկատվություն և կանխել ԴԵՂԻՆ գույնի օգտագործումը: Դուք կարող եք ընտրել ցանկացած երկու գույն, որը ցանկանում եք պետության տեսակի համար:

Tasks Page
The TASKS page displays the automatic events that can be programmed into the SERVER. You can schedule up to 16 events in the SERVER. These are constructed as IF … THEN statements. In addition, the IF term can have 2 elements (IF a, AND/OR/NOT b … THEN c). This provides a simple to program and powerful way to take advantage of the data acquired by the SERVER. The Tasks page shows you an overview of configured tasks. You can click the dot in the State column to turn a task on or off indicated by a green dot for ON, and a red dot for OFF. To edit or create a task, click the Edit icon to the right of the task line. This will take you to the Set Schedule page detailed in the next section.

Set Schedule Page
The SET SCHEDULE page allows you to create time and logic-based events that will occur automatically if the conditions are met.
- Schedule Select – Determined by clicking on a schedule line from the previous page.
- Schedule Name – Enter a 15-character Schedule Name.
- USE – In order for a Schedule line to be active you must select the USE button. If there is an error detected in entering Schedule data, the USE box will automatically uncheck.
- LOG – Ընտրեք գրանցամատյան, որպեսզի այս տարրը հայտնվի համակարգի գրանցամատյանում ամեն անգամ, երբ այն կատարվի:
- Email – Click Email to automatically send an email when this schedule is executed.
- Device A – Select Device A for the first term in the IF statement from the drop box.
- Data A – Select Data A for the above device. Depending on the device selected, the Data used for testing may have special properties. See the list below for Data that may be entered. If an error is detected indata entry when the “Save” button is pushed, the USE box will uncheck and the Data box containing the error will be highlighted.
• Minute – Enter: mm
• Hour – Enter: hh (use 24-hour system)
• Day – Enter: dd
• DayofWeek – Enter: Sunday = 1, Monday = 2, Tuesday = 3, Wednesday = 4, Thursday = 5, Friday = 6, Saturday = 7, Weekday = 8, Weekend = 9
• Time – Enter: hh:mm (use leading zeros, seconds are ignored) (use 24 hour system) ex:07:30 or 14:05
• Date – Enter: yy/mm/dd (use leading zeros) ex: 20/01/10 for January 10, 2020
• Relay – Enter: Relay number and (+ or -), ex: 01+ for Relay 1 ON or 01- for Relay 1 OFF
• Button – Enter: + or – (for ON or OFF respectively)
• Flag – Enter: Flag number(opt.+), or Flag number (for ON or OFF respectively)
• Temp – Enter: >, = or < value; example: >40 (միշտ C աստիճան)
• Volts – Enter: >, = or < value; example: <10
• Analog – Analog input. Enter an input number and >, = or < and value. Example: 3<123 (This value is raw data value prior to any Corrector used by the input display page.)
• Digital – Digital input. Enter Input Number, Type, >, =, or < and value; example: 1F>7500 (This value is the raw data value prior to any Corrector used on the display page). Type can be (case sensitive):
• S State (On/Off)
• C Non-resettable counter
• c Resettable counter (lower case ‘c’)
• F Frequency in 1/1000 seconds
• P Period in 1/1000 seconds - Տրամաբանություն – Ստեղծեք տրամաբանական համեմատություն Սարքի A և B սարքի միջև:
• AND – True if: Device A is true AND Device B is true
• OR – True if: Device A is true OR Device B is true
• NOT – True if: Device A is true and Device B is NOT true - Device B – Select Device B for testing from the drop box.
- Տվյալներ B – Ընտրեք Տվյալներ B վերը նշված սարքի համար: Կախված ընտրված սարքից, փորձարկման համար օգտագործվող տվյալները կարող են ունենալ հատուկ հատկություններ: Տես վերը նշված ցանկը:
- Սարքը C – այն է, ինչ պետք է վերահսկել:
- Տվյալներ C – Սահմանել հատկությունը Device C-ի համար: Շարահյուսությունն օգտագործվում է հետևյալ կերպ.
• RELAY – These are relays on this SERVER. You can set up to four per schedule. Enter separated by commas, for example «1,2,3,4»
• FLAG – This is a storage flag that can be used to make more complex schedules. There are 8 flags that can be turned on or off.
• REMOTE – Refers to a remote SERVER unit. When these conditions are met, this SERVER will send a command to control a remote SERVER. The Data field for a remote unit should be in the format,
“REMOTE UNIT NUMBER, REMOTE UNIT RELAY”. For example, «3,5». Այս հեռավոր ՍԵՐՎԵՐՆԵՐԸ պետք է նույնականացվեն Configure/Remote Device Config էջում:
• COUNTER – Adds count to digital input counter – set as 1 or 2 depending on which digital input is counting
• BLUE LED – No data.
• eMAIL – Will send eMail, no data.
• NOTIFY – Will send notification to Kodalert, set 1- 8 for Settings/Alarm Notification number. (Not Implemented) - Գործողություն – Ինչ անել C սարքի հետ: Ընտրանքներն են.
• ON – Turns device ON
• OFF – Turns device OFF
• TGL – Toggles state of Device C
• RESET – Resets CounterR

Տեղեկամատյանների էջ
The Logs tab displays over 10,000 entries from actions taken by the SERVER or by users themselves. This feature allows several actions for the convenience of displaying and collecting data from the SERVER.
- The checkboxes above the date allow the user to filter logs from different sources. To filter out logs you do not wish to see from a certain source simply uncheck the box.
- Each log has a reference number and a time and date attached in a “yyyy/mm/dd” and “hh:mm:ss” format. Afterwards is the event displayed.
- To scroll through the logs, use the arrows to the right-hand side, where the horizonal line and arrow brings you to the start or end, the double arrow moves up or down a page, and the single arrow moves up or down a single log.
- To refresh the logs manually click the REFRESH button below the Log Details.
- To download the Log Details, click the DOWNLOAD button below the Log Details, this allows you to save the logs as a separate file.
Օգտագործողի և ադմինիստրատորի հավատարմագրերի էջ
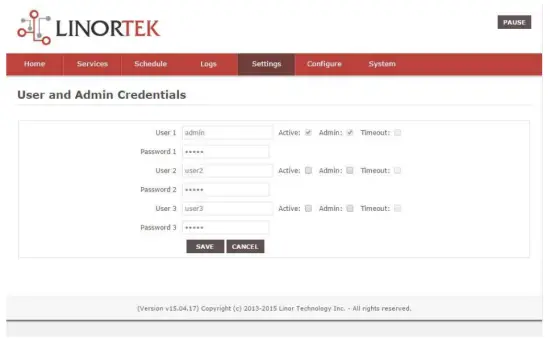
Use this page from the Settings drop down menu. Here you can set up to 3 users for your SERVER system. As a default only User 1 is Active. Here you can:
- User Name and Password – Each user has their own credentials. As a default these are set toadmin/admin, user2/user2 and user3/user3 for Users 1, 2 and 3 respectively. The passwords are never displayed. Նշում. when you reset the password, it must be less than 13-character.
- Ակտիվ – Պետք է ստուգվի, որպեսզի այս օգտվողը մուտք գործի, դուք չեք կարող անջատել Օգտատեր 1-ը:
- Ադմինիստրատոր – Միայն ադմինիստրատորը կարող է տվյալները պահպանել էջերի մեծ մասում: Սա պաշտպանում է ձեր ՍԵՐՎԵՐԸ չլիազորված անձի կողմից փոխվելուց:
- Ժամկետը – այս պահին միացված չէ:
Ժամ/ամսաթիվ էջ
Օգտագործեք այս էջը Կարգավորումների բացվող ընտրացանկից: Այս էջը թույլ է տալիս կարգավորել ժամերի և ամսաթվերի համակարգը:
- Time – Set time using an hh:mm:ss format.
- Ամսաթիվ – Սահմանեք ամսաթիվը՝ օգտագործելով yy/mm/dd ձևաչափը:
- Time Zone – Set desired time zone 5 for EST, 8 for PST, you can now add a :mm for setting part hour, for example, 5:30-ը ժամային գոտի է 5 ժամ 30 րոպե:
- Օգտագործեք ամառային ժամանակը – Ընտրեք՝ ավտոմատ կերպով կարգավորելու ձեր համակարգի ժամը ամառային օրը: (Ճշգրիտ չէ բոլոր ժամային գոտիներում):
- Օգտագործեք MIL Time – Ընտրեք 24-ժամյա ձևաչափն օգտագործելու համար:
- Use NTP Update – Select to synchronize SERVER time with NTP server
- NTP Web Կայք – Սա ընտրված NTP սերվերն է թարմացումների համար:
- NTP ընդմիջում – Թարմացումների միջև ընկած ժամանակահատվածը րոպեներով:
- Log NTP Event – Normally NTP exceptions will be logged, select this option to Log every NTP event. (May be useful in debugging.)

Կարգավորումների էջ
Access this page from the Settings dropdown menu. Select these settings to enable various features in the SERVER
- Use Active Main – No longer used. (Select PAUSE to go inactive.)
- Պահանջում է մուտք գործել – Եթե ընտրված չէ, ՍԵՐՎԵՐԸ թույլ կտա բոլոր մուտքն առանց հավատարմագրերի:
- Use IP Ranges – Not Implemented.
- Use RESTFUL IP Ranges – Not implemented.
- Use Remote IP Ranges – Not implemented.
- Օգտագործեք RESTful Authentication – Պահանջեք օգտվողի անուն և գաղտնաբառ RESTful-ի համար:
- Ընդլայնել ռելեների տիրույթը – Միացնում է 8 ռելե:
- Օգտագործեք ռելե ռադիո կոճակներ – Եթե միացված է, երբ մեկ ռելեը միացված է, մնացած բոլորն անջատված են:
- SSL Port No. – Not supported – For future use.
- Օգտագործեք համակարգի էլ. նամակները – Միացնում է լրացուցիչ էլփոստի հաղորդագրությունները:
- Օգտագործեք Fahrenheit - Ընտրում է Celsius կամ Fahrenheit:
- PGM Dynamic Relays – Changes properties of relays in task schedule.
- CLR PGMs on Start – Reinitialize tasks on start up.
- RTC Temperature Compensation – All Koda boards can add Temperature and Humidity sensor.
- Օգտագործեք AM2302 – Օգտագործեք AM2302 ջերմաստիճանի և խոնավության սենսոր (վաճառվում է առանձին):
- Java Report – Send data to HourCollector app over ethernet (only for IoTMeter)
- Use Metric – Not supported – For future use.
- UART Usage – Enter “Audio” for Netbell-NTG, “Clock” for Netbell clock.
- Switch Bypass (1/2) – Ignores physical inputs if set. For example, in a Koda 200 board, you want to ignore input 1 switch, check Switch Bypass 1
- Setting 19 – Not supported – For future use
- Օգտագործեք աուդիո File System – Activate SD Card reader for Netbell-NTG
- WiFi Report – Enable data transfer over WiFi (WiFi IoTMeter only)
- Active Landing Page – Not supported – For future use.
- . Invert Relay Control – The relay is set to NO by default. By checking this box the relay will be inverted to NC.
- Setting 24 – Not supported – For future use.

Դինամիկ DNS էջ
Access this page from the Configure dropdown menu. From this page you can assign dynamic DNS settings. This page, along with proper port forwarding through the router, can enable global access to a device behind a NAT router or firewall. You will need to assign a static IP address and port number (see Network Config Page on page 25) and port the IP address on your router (refer to your router’s user manual). An internet IP address will have to be hosted in order to access your SERVER from the internet. Currently the only IP hosting service supported is provided by DynDNS (https://dyn.com)
- Օգտագործեք DDNS – Միացնում է այս ծառայությունը:
- DDNS ծառայություն – Ընտրեք ծառայություն բացվող տուփից: Ներկայումս միակ աջակցվող ծառայությունը DynDNS-ն է
- Օգտվողի անուն – Սա վերաբերում է DDNS ծառայությունում ստեղծված հաշվին:
- Գաղտնաբառ – Գաղտնաբառ՝ DDNS ծառայության մուտք գործելու համար:
- Host – This is the IP name registered at the DDNS service for rerouting to this SERVER

Էլփոստի տեղադրման էջ
Ստեղծեք էլփոստի հաշիվ ՍԵՐՎԵՐԻ համար՝ օգտագործելու տարբեր մոդուլներից էլ. Մուտք գործեք այս էջը «Կարգավորել» ներդիրից:
Նշում. This unit is NOT compatible with SSL/TLS, there are 3rd party SMTP delivery servers which do not require SSL and can be used. For instructions on how to use a 3rd party SMTP delivery service, please refer to Appendix 1 at the end of this manual).
- SMTP սերվեր – Մուտքագրեք ելքային փոստի սերվերը, որը ցանկանում եք օգտագործել:
- Պորտ – Սա այդ սերվերի նավահանգիստն է: Այս տեղեկատվության, ինչպես նաև կարգավորումների այլ դաշտերի համար կարող եք առցանց փնտրել ձեր փոստային ծառայությունը:
- Օգտագործեք SSL – Թողեք այն չստուգված, երբ օգտագործում եք երրորդ կողմի SMTP սերվեր:
- Օգտվողի անունը – Ձեր էլփոստի հաշվի անունը:
- Գաղտնաբառ - էլփոստի հաշվի գաղտնաբառը:
- To Address – Enter up to 3 address for this email set up. An addressee, a CC and a BC.
- Թեմա – էլփոստի վերնագրի թեմայի տող:

Ցանցի կազմաձևման էջ
Access this page from the Configure dropdown menu. This page allows the configuration of the SERVER’s network settings.
ՈՒՇԱԴՐՈՒԹՅՈՒՆ. Incorrect settings may cause the board to lose network connectivity. In order to access a device in your network remotely you must PORT the device. This tells your router that information coming in should be sent to a specific device on your network.
- MAC Address – This is a unique MAC address that is assigned to this product at time of assembly. It cannot be altered.
- Host Name – Սա Netbios անուն է, որով այս միավորը կարող է հասցեագրվել որոշ ցանցերում: Այն կարող է հայտնվել նաև ձեր երթուղիչի վարձակալության գրացուցակում: Այն օգտակար տեղ է ձեր ՍԵՐՎԵՐ անվանելու համար և հայտնվում է Գլխավոր էջում և Discoverer-ում:
- Port Number – Սա դառնում է IP հասցեի մի մասը և անհրաժեշտ է ինտերնետ մուտք գործելու համար: Եթե սա կարգավորված չէ, ապա ՍԵՐՎԵՐԸ լռելյայն սահմանում է 80 պորտի համարը:
- IP Address – Typically you only change the last group of numbers. If you change this IP address make sure to reserve this IP on your router and no other devices are using this IP address or you may not be able to reach this SERVER. If this happens you may need to Restore Defaults using the push button method.
- Gateway – Սովորաբար երթուղիչ ձեր TCP/IP ցանցում, որը ծառայում է որպես մուտքի կետ ձեր ISP-ին:
- Ենթացանցի դիմակ – 32-բիթանոց թիվ, որը քողարկում է IP հասցեն և IP հասցեն բաժանում է ցանցի հասցեի և հյուրընկալողի հասցեի: Պարզապես թողեք այն 255.255.255.0 համարով
- Առաջնային DNS – Առաջնային DNS:
- Երկրորդական DNS – Երկրորդական DNS:

IP տիրույթի կազմաձևման էջ
Access this page from the Configure dropdown menu. Use these security settings to select a range of IP address that will be allowed to access the SERVER.CAUTION: Incorrect settings may cause the board to lose network connectivity. Not implemented on this SERVER.
Հեռակա սարքերի էջ
Access this page from the Configure dropdown menu. These settings allow the SERVER to remotely control the relays on another SERVER. This is done by selecting the Remote Device in the Schedule program or by setting up a relay as a REMOTE. There are 8 possible REMOTE locations.
ՈՒՇԱԴՐՈՒԹՅՈՒՆ. Սխալ կարգավորումները կհանգեցնեն, որ տախտակը կկորցնի իր հեռակա կապերը:
- Սարքի անուն – Մուտքագրեք տեքստային անուն այս սարքի համար հետագա հղումների համար:
- IP հասցե – Հեռավոր սարքի IP հասցեն, ներառյալ պորտի համարը:
- Օգտվողի անուն – Օգտագործվում է հիմնական իսկորոշման մեջ:
- Password – Used in Basic Authentication.

Kodalert Page
Not Yet Implemented. Access this page from the Configure dropdown menu. Kodalert provides an interface for alerts of Internet connected devices. Kodalert is a cloud based, open platform monitoring and alert system for the Internet of Things in your physical world. Any Thing that can send an email or TCP messages including our SERVERS, other manufactures devices and people using email can use Kodalert. It can work for multiple remote locations, alert multiple users instantly using the rules you setup by text, email, smart phone Apps push notification or audible alarm instantly when something happens.
- Զգուշացման համարը
- Փորձարկում
- Օգտագործեք
- Կանոն
In the Alarm Notification page, you can change the state (on/off) of the relay by clicking the green circle in the state column. Push the EDIT icon to change the Alarm’s settings.

Տեխնիկական պայմաններ
FARGO R8G2
- 10M/100M RJ45 Internet interface with connection and activity LEDs
- 8 Relay outputs, 1FORMC 48 Volt Max (24VAC/DC 3A)
- Status LEDs (pulse, bootloader, and locate)
- Ethernet Bootloader (for server hardware code upgrade)
- PoE or 12VDC @500mA (nominal)
- Web interface w/basic authentication
- On board temperature sensor and voltage սենսոր
Reset /Locate pushbutton (blue LED) - Working Temperature from 0 to +70 Celsius
- Storage Temperature from 40 to +125 Celsius
- Humidity from 10% to 80% noncondensing
- Dimensions 74mm x 100mm x 20mm, mounting holes 64mm x 92mm Ф 3.2mm 4 places
- Աջակցվող արձանագրություններ՝ HTTP/SMTP/SNTP
FARGO R4G2
- 10M/100M RJ45 Internet interface with connection and activity LEDs
- 4 1FormC relays 48 Volt Max (24VAC/DC 3A)
- 2 optically isolated digital inputs, 12V 1mA or pulldown switch selectable, 2 conductor screw terminal connectors for each.
- 2 Analog 0-5VDC Inputs 30mA 3.3VDC power source PTC protected. 3 conductor screw terminal connectors for each (3.3VDC, input, ground) (R4ADI only)
- 2 Current sensor inputs. 3.5mm stereo jack connector for each (R4ADI only)
- Status LEDs (pulse, bootloader, and locate)
- Ethernet Bootloader (for server hardware code upgrade
- POE or 12VDC @500mA (nominal)
- Web interface w/basic authentication
- On board temperature sensor and voltage սենսոր
- Reset/Locate pushbutton
- Working Temperature from 0 to +70 Celsius
- Storage Temperature from 40 to +125 Celsius
- Humidity from 10% to 80% noncondensing
- Dimensions 74mm x 100mm x 20mm, mounting holes 64mm x 92mm Ф 3.2mm 4 places
- Աջակցվող արձանագրություններ՝ HTTP/SMTP/SNTP
KODA100
- 10M/100M RJ45 Internet interface with connection and activity LEDs
- 2 1-Form-A relay 48VAC@8A Max
- 2 optically isolated digital inputs, 12V 1mA or pulldown switch selectable
- Status LEDs (pulse, bootloader, and locate)
- Ethernet Bootloader (for server hardware code upgrade)
- POE or 12VDC @500mA (nominal)
- Web interface w/basic authentication
- On board temperature sensor and voltage սենսոր
- Reset/Locate pushbutton (blue LED)
- Working temperature from 0 to +70 Celsius
- Storage temperature from 40 to +125 Celsius
- Humidity from 10% to 80% noncondensing
- Չափերը՝ 70 մմ x 100 մմ x 25 մմ
- Աջակցվող արձանագրություններ՝ HTTP/SMTP/SNTP
ԿՈԴ200
- 10M/100M RJ45 Internet interface with connection and activity LEDs
- 4 1FormA relays 48 Volt Max 1A dry contact or drive 10V ±10% 50mA to external devices
- 2 optically isolated digital inputs, 12V 1mA or pulldown switch selectable
- Status LEDs (pulse, bootloader, and locate)
- Ethernet Bootloader (for server hardware code upgrade)
- POE or 12VDC @500mA (nominal)
- Web interface w/basic authentication
- On board temperature sensor and voltage սենսոր
- Reset/Locate pushbutton (blue LED)
- Working Temperature from 0 to +70 Celsius
- Storage Temperature from 40 to +125 Celsius
- Humidity from 10% to 80% noncondensing
- Չափերը՝ 70 մմ x 100 մմ x 25 մմ
- Աջակցվող արձանագրություններ՝ HTTP/SMTP/SNTP
Տախտակի տեղեկանքի դասավորությունը
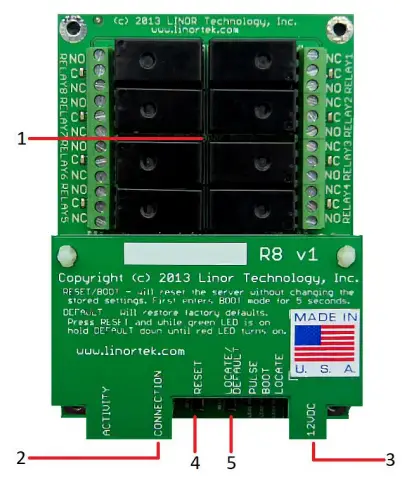
Fargo R8
- 8 Relay outputs, 1FORMC 48 Volt Max (24VAC/DC 3A)
- Rj45 միակցիչ
- Էլեկտրաէներգիայի միակցիչ (12VDC)
- Վերականգնել կոճակը
- Տեղադրել կոճակը
Fargo R4
- 3.5mm Inputs for AC Current Sensor (R4ADI Only)
- Analog Inputs (R4ADI Only)
- 4 Relay outputs, 1FORMC 48 Volt Max (24VAC/DC 3A)
- Թվային մուտքեր
- Digital Input Switches (Input 1 on right.
Up: Pullup, Down: Isolated) - Rj45 միակցիչ
- Վերականգնել կոճակը
- Տեղադրել կոճակը
- Էլեկտրաէներգիայի միակցիչ (12VDC)

Կոդ 100
- Digital Inputs (#1 on the left) 5VDC-48VDC (12VDC-48VDC must use the external resistor)
- Relay Outputs (#1 is on the right) 8A@48VAC Max
- Digital Input Switches (IN 1 on left. UP: Isolated, Down: Pullup)
- Վերականգնել կոճակը
- Վերբեռնման կոճակ (միացնում է կապույտ լուսադիոդը – նույնականացվում է Discoverer-ում)
- Rj45 միակցիչ
- Էլեկտրաէներգիայի միակցիչ (12VDC)
- USB մինի միակցիչ ջերմաստիճանի/խոնավության սենսորի համար (վաճառվում է առանձին)

Կոդ 200
- Digital Inputs (#1 on the left) 5VDC-48VDC (12VDC-48VDC must use the external resistor)
- Relay Outputs (#1 is on left) 48 Volt Max 1A dry contact or drive 10V ±10% 50mA
- Digital Input Switches (IN 1 on left. UP: Isolated, Down: Pullup)
- Relay Switches (Up for dry contact, down for 10V/50mA)
- Վերականգնել կոճակը
- Վերբեռնման կոճակ (միացնում է կապույտ լուսադիոդը – նույնականացվում է Discoverer-ում)
- Rj45 միակցիչ
- Էլեկտրաէներգիայի միակցիչ (12VDC)
- USB մինի միակցիչ ջերմաստիճանի/խոնավության սենսորի համար (վաճառվում է առանձին)

Գործարանային վերակայում
To perform a factory Reset, push the Reset button. When the green LED turns on, push and hold the Reload button until the flashing red LED turns off and then turns on solid. Refer to Board Reference Layout section for the button locations on your device.
This user-manual supplements the documentation for the following Linortek products:
- Netbell-2
- Netbell-8
- Netbell-K (and variants)
- iTrixx-NHM
For more information, documentation and how-to videos, visit https://www.linortek.com/downloads/
Այս փաստաթուղթը կարելի է գտնել այստեղ www.linortek.com/downloads/documentations/
Եթե ձեր սարքի հետ կապված օգնության կարիք ունեք, այցելեք www.linortek.com/technical-support
Linor Technology, Inc.
Տեղեկությունները ենթակա են փոփոխման առանց ծանուցման:
Հավելված 1
Ինչպես ուղարկել SSL նամակներ՝ օգտագործելով երրորդ կողմի SMTP ծառայությունը Linortek Fargo և Koda սարքերի համար
Լռելյայնորեն, Koda/Fargo սարքերն օգտագործում են ոչ SSL SMTP էլփոստի սերվերներ: Բայց այսօր էլփոստի սերվերների մեծ մասն անցել է SSL անվտանգության արձանագրության, կան երրորդ կողմի SMTP առաքման սերվերներ, որոնք չեն պահանջում SSL և կարող են օգտագործվել: Շուկայում կան բազմաթիվ SMTP էլփոստի ծառայություններ մատուցողներ: Մենք օգտագործում ենք SMTP3GO որպես նախկինample ցուցադրելու տեղադրման գործընթացը: SMTP2GO-ն անվճար է օգտագործել մինչև 1000 էլ. SMTP2GO-ն օգտագործելու համար այցելեք՝ https://www.smtp2go.com/ .
Քայլ 1. Ստեղծեք SMTP2GO հաշիվը:
Հաշիվ ստեղծելու համար պարզապես սեղմեք «Գրանցվել», ընտրեք «1K Emails» սանդղակի վրա և ընտրեք «Անվճար պլան» (եթե ձեզ անհրաժեշտ է ամսական 1000-ից ավելի էլ-նամակ ուղարկել, ընտրեք այն պլանը, որը համապատասխանում է ձեր պահանջներին):

SMTP2GO-ում հաշիվ ստեղծելու համար անհրաժեշտ կլինի կորպորատիվ էլփոստի հասցե: Անվճար էլփոստի ծառայությունները, ինչպիսիք են Gmail-ը կամ Yahoo-ն, ձեզ թույլ չեն տա շարունակել: Ձեր SMTP2GO հաշիվն ակտիվացնելուց հետո անհրաժեշտ է օգտատեր ավելացնել:
Քայլ 2. Ավելացրեք օգտվող:
SMTP2GO-ում ձեր ստեղծած օգտատերը կլինի ելքային փոստի սերվերը, երբ դուք կարգավորեք Fargo/Koda սարքը էլփոստի հաշվետվություններ ուղարկելու համար: Խնդրում ենք համոզվել, որ ձեր կորպորացիայի էլփոստի սերվերը չի արգելափակի նամակները, եթե դուք օգտագործում եք անվճար էլփոստի հաշիվ, ինչպիսիք են Yahoo-ն կամ Gmail-ը: օգտատեր ավելացնել այստեղ:
Մուտք գործեք ձեր SMTP2GO հաշիվ, ձախ կողմում ընտրեք «Կարգավորումներ» > «SMTP օգտվողներ», սեղմեք «Ավելացնել SMTP օգտվող» և լրացրեք ձևը:
 Այն բանից հետո, երբ օգտվողը ավելացվի ձեր SMTP2GO հաշվին, այն կցուցադրի այն տեղեկատվությունը, որն անհրաժեշտ է ձեր Fargo/Koda սարքերում էլփոստի ծանուցումը կարգավորելու համար:

Քայլ 3. Կարգավորեք Linortek սարքը:
Հաշիվ ստեղծելուց և օգտատեր ավելացնելուց հետո մուտք գործեք ձեր Linortek սարք, նավարկեք Կարգավորել – Էլփոստի տեղադրման էջ՝ էլփոստի ծանուցումը կարգավորելու համար.
- SMTP սերվեր – Մուտքագրեք ելքային փոստի սերվերը, որը ցանկանում եք օգտագործել, դա mail.smtp2go.com է մեր նախկինում:ampլե.
- Պորտ – Սա այդ սերվերի նավահանգիստն է: SMTP նավահանգիստը մեր նախկինում 2525 էampլե.
- Օգտագործեք SSL – Թողեք այն չստուգված, երբ օգտագործում եք երրորդ կողմի SMTP սերվեր:
- Օգտվողի անուն – Օգտվողի անունը SMTP2GO-ից, երբ մենք օգտատեր ստեղծեցինք նախորդ քայլում:
- Գաղտնաբառ – Օգտատիրոջ գաղտնաբառը SMTP2GO-ից, երբ մենք օգտատեր ենք ստեղծել նախորդ քայլում:
- Դեպի Հասցե – Մուտքագրեք մինչև 3 հասցե այս էլփոստի տեղադրման համար: Հասցեատեր, ՍԴ և մ.թ.ա.
- Թեմա – էլփոստի վերնագրի թեմայի տող:
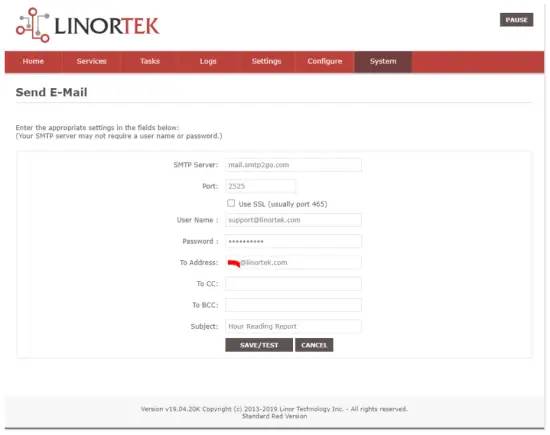
Հենց որ սեղմում եք «Պահպանել/Փորձարկել», սարքն ավտոմատ կերպով ուղարկում է փորձնական էլ. Խնդրում ենք ստուգել Junk/Other թղթապանակը՝ այն գտնելու համար, եթե այն Inbox պանակում չէ:
Քայլ 4. Նախադրեք էլփոստի ավտոմատ ծանուցումների առաջադրանքը:
You should be able to receive email notifications for various events from the Fargo/Koda boards at this point. If you need to receive condition logic notification, you can use our condition logic configuration to setup such report. To setup the logic condition report notification, go to Tasks page on your Fargo/Koda device, click the Edit icon of a Schedule. For details of how to create a logic-based event, please refer to the Set Schedule Page on the Fargo/Koda User Manual, which can be downloaded here:
https://www.linortek.com/download/fargo%20g2_koda%20downloads/fargo%20g2_koda%20documentation/Fargo-G2-and-Koda-User-Manual.pdf
Այս սample Մենք կօգտագործենք Ցանցային ժամաչափ սարքը որպես օրինակample, թե ինչպես ստանալ էլփոստի հաշվետվություններ ամեն օր ժամը 11:52-ին:
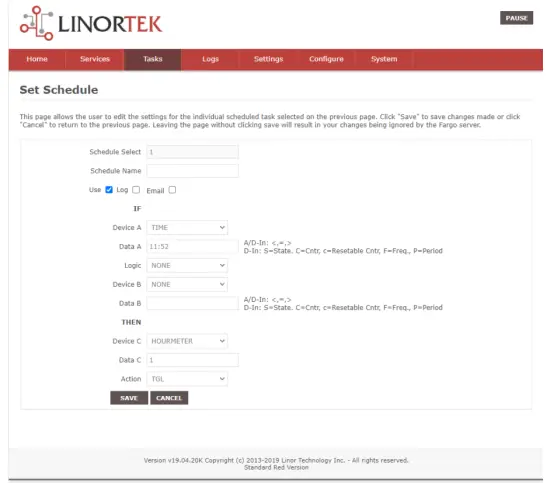
Հենց առաջադրանքի բոլոր պայմանները կատարվեն, դուք ստանում եք հետևյալ էլ.
Hour Reading Report
![]() support@linortek.com
support@linortek.com
Mon 4/11/2022 11:52 AM
To: Liyu Nalven
HM 1, my machine, is at 000242.01 hrs.
Reply Forward
![]()
Փաստաթղթեր / ռեսուրսներ
 |
LINORTEK Fargo G2 TCP/IP Web Հիմք ընդունող ռելեային կառավարիչ [pdf] Օգտագործողի ձեռնարկ Fargo G2, Koda, Fargo G2 TCP-IP Web Based Relay Controller, Web Based Relay Controller, Based Relay Controller, Relay Controller |