![]() Fargo G2 and Koda User Manual
Fargo G2 and Koda User Manual
www.linortek.com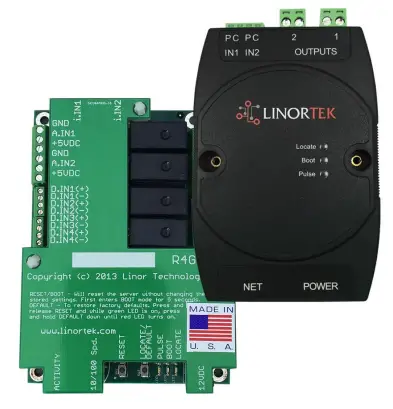 For Fargo G2, Koda
TCP/IP Web کنترلکننده رله مبتنی بر
Rev C 04/2022
Fargo G2 TCP/IP Web کنترلکننده رله مبتنی بر
Thank you for purchasing a Linortek Fargo G2 or Koda TCP/IP Controller. There are many devices that can be controlled by the FARGO/KODA Web Relay Controller. FARGO/KODA Web Controller can be used in such applications as (but not limited to): Lights, security, sprinkler systems, access control, industrial equipment, building automation, HVAC, and many more. Please refer to the Board Reference Layouts on page 29 for input and output specifications on your controller to verify they are suitable to your needs.
این راهنما شامل موارد زیر است:
- FARGO R8 G2
- FARGO R4DI G2
- FARGO R4ADI G2
- KODA 100
- KODA200
These will be referred to as SERVER hereafter. When there are differences or additional features they will be noted in the text.
برای ویدیوهای آموزشی، سوالات متداول و اطلاعات تماس با تیم پشتیبانی فنی ما، لطفاً از: https://www.linortek.com/technical-support
LINORTEK گارانتی یک ساله محدود
Consumer law: For consumers who are covered by consumer protection laws or regulations in their country of residence (“Consumer Law”), the benefits provided in this Linortek One-Year Limited Warranty (“Linortek Limited Warranty”) are in addition to and not instead of the rights provided by Consumer Law and it does not exclude, limit or suspend your rights arising from Consumer Law. You should consult the proper authorities in your country of residence for further information about these rights
تعهدات گارانتی Linortek برای این محصول سخت افزاری ("محصول") محدود به شرایط ذکر شده در زیر است:
Linor Technology, Inc. (“Linortek”) warrants this product against defects in materials and workmanship for a period of ONE (1) YEAR from the date of retail purchase by the original end-user purchaser (“Warranty Period”) when used in accordance with the operating instructions. A copy of a retail receipt is required as proof of purchase. If a hardware defect arises and a valid claim is received within the Warranty Period, at its option and to the extent permitted by law, Linortek will either (1) repair the hardware defect at no charge, using new or refurbished replacement parts, (2) exchange the product with a product that is new or which has been manufactured from new or serviceable used parts and is at least functionally equivalent to the original product, or (3) refund the purchase price of the product. When a refund is given, the product for which the refund is provided must be returned to Linortek and becomes Linortek’s property.
ضمانت نامه فوق منوط به (i) ادعای کتبی فوری خریدار و (ii) ارائه به موقع به Linortek از فرصتی برای بازرسی و آزمایش محصول ادعا شده معیوب است. چنین بازرسی ممکن است در محل خریدار باشد و/یا Linortek ممکن است درخواست بازگرداندن محصول را با هزینه خریدار کند. با این حال، Linortek مسئولیتی در قبال هزینه های بسته بندی، بازرسی یا نیروی کار در ارتباط با بازگشت محصول ندارد. هیچ محصولی برای خدمات گارانتی که با شماره مجوز بازگشت کالا (RMA#) صادر شده توسط Linortek همراه نباشد پذیرفته نمی شود.
استثناها و محدودیت ها
این گارانتی محدود آسیب های ناشی از سوء استفاده، استفاده نادرست، بی توجهی، آتش سوزی یا سایر علل خارجی، تصادف، اصلاحات، تعمیرات یا سایر دلایلی را که نقص در مواد و کار نیست را شامل نمی شود. نرم افزار توزیع شده توسط Linortek با یا بدون نام تجاری Linortek شامل، اما نه محدود به نرم افزار سیستم ("نرم افزار") تحت این ضمانت محدود نمی باشد. استفاده و حقوق مرتبط با نرم افزار توسط قرارداد مجوز کاربر نهایی Linortek کنترل می شود که می توانید در اینجا بیابید: https://www.linortek.com/end-user-licenseagreement/. Linortek مسئولیتی در قبال آسیب های ناشی از عدم رعایت دستورالعمل های مربوط به استفاده از محصول ندارد. برای اطمینان از انطباق با محدودیت های عملیاتی، خریدار باید به دفترچه راهنمای دستورالعمل [ارائه شده با محصول] مراجعه کند. باتری ها شامل گارانتی نمی شوند.
تا حد حداکثر مجاز، این ضمانت محدود و راه حل های ذکر شده در بالا انحصاری و به جای سایر ضمانت ها، راه حل ها، و شرایط، و تمام موارد ضمانت نامه، و LINORTEK به طور کامل مشخص است. شامل، اما نه محدود به، ضمانتهای تجارت، تناسب برای یک هدف خاص، عدم نقض. تا آنجا که چنین ضمانتهایی را نمیتوان سلب مسئولیت کرد، تمام این ضمانتها، تا حدی که قانون اجازه میدهد، به مدت زمان ضمانت محدود LINORTEK محدود میشود. همانطور که توسط LINORTEK تعیین شده است به صلاحدید خود. برخی از ایالتها (کشورها و استانها) محدودیتهایی را در مورد مدت زمان ماندگاری یک ضمانت یا شرایط ضمنی اجازه نمیدهند، بنابراین محدودیتهای توصیفشده در بالا ممکن است در مورد شما اعمال نشود. این ضمانت نامه حقوق قانونی خاصی به شما می دهد، و همچنین ممکن است حقوق دیگری داشته باشید که از ایالتی به ایالت دیگر (یا بر اساس کشور یا استان) متفاوت است. این ضمانت محدود تحت قوانین ایالات متحده است.
سلب مسئولیت
- دستورالعمل ها را بخوانید - قبل از کار با محصول، تمام دستورالعمل های ایمنی و عملکرد را بخوانید.
- دستورالعمل ها را حفظ کنید - دستورالعمل های ایمنی و عملکرد را برای مراجعات بعدی حفظ کنید.
- به هشدارها توجه کنید - به تمام هشدارهای روی محصول و دستورالعمل های عملیاتی توجه کنید.
- دستورالعمل ها را دنبال کنید - تمام دستورالعمل های عملکرد و استفاده را دنبال کنید.
- تمیز کردن - قبل از تمیز کردن محصول را از برق جدا کنید. از پاک کننده های مایع یا پاک کننده های اسپریی استفاده نکنید. از تبلیغ استفاده کنیدamp پارچه فقط برای تمیز کردن محفظه.
- پیوست ها – از پیوست ها استفاده نکنید مگر اینکه به طور خاص توسط Linortek توصیه شده باشند. استفاده از پیوست های ناسازگار یا نامناسب می تواند خطرناک باشد.
- لوازم جانبی - این محصول را روی پایه، سه پایه، براکت یا پایه ناپایدار قرار ندهید. ممکن است محصول سقوط کند و باعث آسیب جدی به شخص و آسیب جدی به محصول شود. فقط با پایه، سه پایه، براکت یا پایه توصیه شده توسط سازنده یا فروخته شده همراه با محصول استفاده کنید. هنگام نصب محصول از دستورالعمل های سازنده پیروی کنید و فقط از لوازم نصب توصیه شده توسط سازنده استفاده کنید. هنگام استفاده از ترکیب دستگاه و گاری محتاط باشید. توقف سریع، نیروی بیش از حد و سطوح ناهموار ممکن است باعث واژگونی ترکیب دستگاه و چرخ دستی شود.
- تهویه - در محفظه، در صورت وجود، منافذی برای تهویه و اطمینان از عملکرد مطمئن محصول و محافظت از آن در برابر گرمای بیش از حد در نظر گرفته شده است. این منافذ را مسدود یا نپوشانید. این محصول را در محل نصب داخلی قرار ندهید مگر اینکه تهویه مناسب ارائه شود یا دستورالعمل های Linortek رعایت شده باشد.
- منابع برق - این محصول را فقط از نوع منبع تغذیه که در دفترچه راهنمای دستورالعمل یا روی برچسب محصول ذکر شده است، استفاده کنید.
اگر از نوع منبع تغذیه ای که قصد استفاده از آن را دارید مطمئن نیستید، با فروشنده لوازم خانگی یا شرکت برق محلی خود مشورت کنید - مشروط بر اینکه استفاده از هر نوع منبع تغذیه غیر از آنچه در دفترچه راهنمای دستورالعمل یا برچسب نشان داده شده است، ضمانت نامه را از بین می برد. برای محصولاتی که از باتری یا منابع دیگر کار میکنند، به دستورالعملهای عملیاتی [همراه با محصول] مراجعه کنید. - زمین یا پلاریزاسیون - این محصول ممکن است مجهز به دوشاخه خط جریان متناوب پلاریزه باشد (دوشاخه ای که یک تیغه پهن تر از دیگری دارد). این دوشاخه فقط از یک جهت در پریز برق قرار می گیرد. این یکی از ویژگی های ایمنی است. اگر نمی توانید دوشاخه را به طور کامل در پریز قرار دهید، سعی کنید دوشاخه را برعکس کنید. اگر دوشاخه باز هم جا نمی شود به این دلیل است که پریز شما با دوشاخه سازگار نیست. با برق خود تماس بگیرید تا پریز برق شما را با پریز سازگار جایگزین کند. دوشاخه را مجبور نکنید تا در پریزهای ناسازگار قرار بگیرد یا سعی نکنید هدف ایمنی دوشاخه را از بین ببرید. متناوباً، این محصول ممکن است مجهز به دوشاخه ارتینگ سه سیمه باشد، دوشاخه ای که دارای پین سوم (زمین) باشد. این دوشاخه فقط در یک پریز برق از نوع زمینی قرار می گیرد. این یکی از ویژگی های ایمنی است. دوشاخه را مجبور نکنید تا در پریزهای ناسازگار قرار بگیرد یا سعی نکنید هدف ایمنی دوشاخه را از بین ببرید. اگر پریز شما با دوشاخه ناسازگار است، با برق خود تماس بگیرید تا پریز شما را با پریز سازگار تعویض کند.
- محافظت از سیم برق - کابل های منبع تغذیه را طوری هدایت کنید که احتمال راه رفتن یا گیرکردن وسایلی که روی آنها یا روی آنها قرار داده شده وجود نداشته باشد. .
- خطوط برق - یک سیستم در فضای باز را در مجاورت خطوط برق هوایی یا سایر چراغ های برق یا مدارهای برق یا جایی که ممکن است در چنین خطوط برق یا مدارهایی بیفتد، قرار ندهید. هنگام نصب یک سیستم در فضای باز، مراقب باشید تا از دست زدن به چنین خطوط برق یا مدارهایی جلوگیری کنید زیرا تماس با آنها ممکن است کشنده باشد.
- بارگذاری بیش از حد - پریزها و سیم های داخلی را بیش از حد بار نکنید زیرا ممکن است باعث آتش سوزی یا برق گرفتگی شود.
- ورود اشیا و مایعات - هرگز اشیاء از هر نوعی را از طریق منافذ به داخل این محصول فشار ندهید زیرا ممکن است با حجم خطرناک برخورد کنند.tagنقاط e یا قطعات کوتاه شده که می توانند باعث آتش سوزی یا برق گرفتگی شوند. هرگز هیچ مایعی از هیچ نوعی روی این محصول نریزید.
- سرویس - سعی نکنید خودتان این محصول را سرویس کنید زیرا باز کردن یا برداشتن درپوش ها ممکن است شما را در معرض حجم خطرناکی قرار دهد.tage یا سایر خطرات. کلیه سرویس های محصول را به Linortek ارجاع دهید.
- خدمات مورد نیاز آسیب - محصول را از پریز برق جدا کرده و تحت شرایط زیر به پشتیبانی مشتری Linortek ارجاع دهید:
آ. وقتی سیم منبع تغذیه یا دوشاخه آسیب دیده است.
ب اگر مایع ریخته شده باشد یا اشیایی روی محصول افتاده باشد.
ج اگر محصول در معرض باران یا آب قرار گرفته باشد.
د اگر محصول به طور معمول با پیروی از دستورالعمل های عملیاتی [همراه با محصول] کار نمی کند. فقط آن دسته از کنترلهایی را تنظیم کنید که توسط دستورالعملهای عملیاتی پوشش داده شدهاند، زیرا تنظیم نادرست سایر کنترلها ممکن است منجر به آسیب شود و اغلب نیاز به کار گسترده توسط یک تکنسین مجرب برای بازگرداندن محصول به عملکرد عادی آن دارد.
ه در صورت افتادن محصول یا خراب شدن کابینت.
f. اگر محصول تغییر مشخصی در عملکرد نشان دهد. - قطعات تعویضی – در صورت نیاز به تعویض قطعات، یک قطعه کم حجم داشته باشیدtage برقکار آنها را تنها با استفاده از قسمتی که سازنده تعیین کرده است تعویض کند. تعویض های غیرمجاز ممکن است منجر به آتش سوزی، برق گرفتگی یا سایر خطرات شود. قطعات جایگزین را می توان در پیدا کرد https://www.linortek.com/store/
- بررسی ایمنی – پس از اتمام هر گونه سرویس یا تعمیر این محصول، از تکنسین سرویس بخواهید تا بررسی های ایمنی را انجام دهد تا مشخص شود که محصول در شرایط عملکرد مناسب است.
- اتصال زمین کواکسی - اگر یک سیستم کابل خارجی به محصول متصل است، مطمئن شوید که سیستم کابل به زمین متصل است. فقط مدلهای ایالات متحده – بخش 810 کد ملی برق، ANSI/NFPA شماره 70-1981، اطلاعاتی را در رابطه با اتصال زمین مناسب پایه و سازه نگهدارنده، اتصال زمین کواکس به محصول تخلیه، اندازه هادیهای اتصال زمین، مکان ارائه میکند. محصول تخلیه، اتصال به الکترودهای اتصال به زمین، و الزامات برای الکترود اتصال به زمین.
- رعد و برق – برای محافظت بیشتر از این محصول در هنگام طوفان رعد و برق یا قبل از اینکه آن را بدون مراقبت و بدون استفاده برای مدت طولانی رها کنید، آن را از پریز جدا کرده و سیستم کابلی را جدا کنید. این کار از آسیب دیدن محصول در اثر صاعقه و برق گرفتگی جلوگیری می کند.
- استفاده در فضای باز – این محصول ضد آب نیست و نباید اجازه داد خیس شود. در معرض باران یا دیگر انواع مایعات قرار نگیرید.
یک شبه بیرون از در نگذارید زیرا ممکن است متراکم شود. - هنگام تعویض باتری ها، فیوزها یا دست زدن به یک محصول سطح برد، مراقب تخلیه الکترواستاتیکی باشید که می تواند به دستگاه های الکترونیکی آسیب برساند. بهتر است از یک میز خدمات الکترونیکی متصل به زمین استفاده کنید. اگر این در دسترس نیست، می توانید خود را با دست زدن به یک وسیله فلزی یا لوله تخلیه کنید. در هنگام تعویض باتری ها یا فیوزها، i) هیچ سیمی غیر از سیم باتری و ب) برد مدار چاپی را لمس نکنید.
محدودیت مسئولیت
IN NO EVENT WILL LINOR TECHNOLOGY BE LIABLE, WHETHER IN CONTRACT, TORT, OR OTHERWISE, FOR ANY INCIDENTAL, SPECIAL, INDIRECT, CONSEQUENTIAL OR PUNITIVE DAMAGES, INCLUDING, BUT NOT LIMITED TO, DAMAGES FOR ANY LOSS OF USE, LOSS OF TIME, INCONVENIENCE, COMMERCIAL LOSS, OR LOST PROFITS, SAVINGS, OR REVENUES TO THE FULL EXTENT SUCH MAY BE DISCLAIMED BY LAW. DISCLAIMER FOR CRITICAL APPLICATIONS
این محصول برای محصول پشتیبانی از زندگی یا سایر کاربردهایی که خرابی آنها می تواند باعث آسیب شخصی یا مرگ شود در نظر گرفته نشده است. اگر شما یا مشتریانتان از این محصول برای چنین استفادههای ناخواسته یا غیرمجاز استفاده کنید یا اجازه استفاده از آن را بدهید، موافقت میکنید که شرکت Linor Technology و شرکتهای وابسته به آن، و افسران، کارمندان و توزیعکنندگان هر کدام را از کلیه مسئولیتهای مرتبط با این استفاده، از جمله غرامت کامل غرامت میگیرید. هزینه ها و هزینه های وکلا
اطلاعیه بیشتر برای محدودیت استفاده
مگر اینکه به طور خاص بیان شود، محصولات ما برای تغییر خط تولید طراحی نشده اندtagدستگاه های e (110 ولت و بالاتر). برای کنترل دستگاهی که در خط خط کار می کندtagیک برقکار واجد شرایط باید یک وسیله واسطه مانند رله نصب کند. هنگام انتخاب دستگاه هایی برای کنترل، بهتر است حجم کم را انتخاب کنیدtage کنترل هایی مانند شیر برقی 24VAC به کنترل جریان آب. فقط برقکارهای واجد شرایط می توانند سیم ولتاژ خط را سیم کشی کنندtagدستگاه e. علاوه بر این، کدهای محلی باید رعایت شود که شامل اندازه گیج سیم و مسکن مناسب اما محدود به آن نمی شود. Linortek هیچ مسئولیتی در قبال آسیب رساندن به کاربر یا اشخاص ثالث به دلیل استفاده نادرست از محصولات ما ندارد. این مسئولیت با کاربر باقی می ماند. Linortek هیچ مسئولیتی در قبال آسیب دیدن دستگاه به دلیل استفاده نادرست از محصولات ما ندارد.
رله VOLTAGE مشخصات
لطفاً هنگام اتصال دستگاه ها به مدارهای الکتریکی یا سایر تجهیزات احتیاط کنید. این web کنترلر برای اتصال به هیچ ولوم طراحی نشده استtage greater than 48V. Utilizing this arrangement, should allow you to virtually control anything. It is important that you use licensed electricians and comply with electrical codes that are applicable to your location. These codes exist for your safety, as well as the safety of others. Linortek assumes no responsibility for any harm or damage resulting from a failure adhere to local laws, ordinances or regulations or failure to follow specified instructions for installation and product usage.
قرارداد مجوز کاربر نهایی برای نرم افزار و اسناد Linortek
این قرارداد مجوز کاربر نهایی ("EULA") یک توافق نامه حقوقی بین شما (یک شخص یا نهاد واحد) و شرکت Linor Technology ("Linortek" یا "ما" یا "ما") است که بر استفاده شما از نرم افزار حاکم است. و اسناد ("نرم افزار") تعبیه شده یا مرتبط با سری محصولات Fargo، Koda، Netbell، IoTMeter و iTrixx ("محصولات Linortek").
این EULA بر استفاده شما از Linortek حاکم نیست webسایت یا محصولات Linortek (به استثنای نرم افزار). استفاده شما از Linortek webسایت توسط Linortek اداره می شود webشرایط خدمات سایت و خط مشی رازداری Linortek که در آدرس زیر قابل مشاهده است:
http://www.linortek.com/terms-and-conditions [خرید شما از محصولات Linortek (به استثنای نرم افزار) تحت ضمانت محدود Linortek است که می توانید آن را در https://www.linortek.com/linortek-one-year-limited-warranty/
This EULA governs your access and use of the Software. This EULA gives you specific legal rights, and you may also have other legal rights in addition, which vary from jurisdiction to jurisdiction. The disclaimers, exclusions, and limitations of liability under
this EULA will not apply to the extent prohibited or limited by applicable law. Some jurisdictions do not allow the exclusion of implied warranties or the exclusion or limitation of incidental or consequential damages or other rights, so those provisions of this EULA may not apply to you.
با نصب، دسترسی، کپی و/یا استفاده از نرم افزار یا اسناد، موافقت می کنید که از طرف خود یا نهادی که نمایندگی آن را در ارتباط با چنین نصب، دسترسی، کپی و/یا نمایندگی می کنید، به شرایط و ضوابط این EULA متعهد باشید. استفاده کنید. شما نشان می دهید و تضمین می کنید که (XNUMX) شما از حق، اختیار و ظرفیت پذیرش و موافقت با شرایط این EULA از طرف خود یا نهادی که نماینده آن هستید را دارید (XNUMX) در حوزه قضایی محل اقامت خود در سن قانونی کافی هستید. ، (iii) شما در کشوری قرار ندارید که تحت تحریم دولت ایالات متحده است یا توسط دولت ایالات متحده به عنوان کشور "حامی تروریسم" تعیین شده است. و (ii) در هیچ یک از فهرست های دولت ایالات متحده از احزاب ممنوعه یا محدود فهرست نشده اید.
اگر نمیخواهید به شرایط این EULA پایبند باشید، نمیتوانید به هیچ وجه نرمافزار را نصب، دسترسی، کپی یا استفاده کنید (خواه از قبل روی دستگاهی که خریداری کردهاید نصب شده باشد یا نباشد).
- استفاده مجاز از نرم افزار / مجوز نرم افزار.
با توجه به شرایط این EULA، Linortek به شما یک حق و مجوز محدود، قابل فسخ، غیر انحصاری، غیرقابل صدور مجوز فرعی، غیرقابل انتقال و مجوز برای (الف) دانلود، نصب و اجرای یک نسخه از نرم افزار، به شکل کد شیء اجرایی می دهد. فقط، فقط بر روی محصول Linortek که مالک یا کنترل آن هستید و (ب) از نرم افزار صرفاً در ارتباط با محصول Linortek مطابق با استفاده مورد نظر آن همانطور که در Linortek توضیح داده شده است استفاده کنید. webسایت (هر یک از 1(a) و 1(b) "استفاده مجاز" و در مجموع "استفاده های مجاز"). - محدودیت در استفاده شما از نرم افزار.
شما موافقت میکنید که از نرمافزار برای اهدافی غیر از استفادههای مجاز که در بخش 1 در بالا توضیح داده شده است استفاده نکنید و به دیگران اجازه ندهید. این بدان معنی است که، در میان چیزهای دیگر، شما ممکن است:
(الف) ویرایش، تغییر، اصلاح، انطباق، ترجمه، ساخت آثار مشتق شده، جداسازی، مهندسی معکوس یا کامپایل معکوس هر بخشی از نرم افزار (به جز در حدی که قوانین قابل اجرا به طور خاص چنین محدودیتی را برای اهداف قابلیت همکاری منع می کند، در این صورت شما موافقت می کنید. ابتدا با Linortek تماس بگیرید و فرصتی را برای Linortek فراهم کنید تا تغییراتی را که برای اهداف قابلیت همکاری لازم است ایجاد کند.
(ب) مجوز، واگذاری، توزیع، انتقال، فروش، اجاره، میزبانی، برون سپاری، افشای یا استفاده دیگر از نرم افزار برای هر هدف تجاری یا در دسترس قرار دادن نرم افزار برای هر شخص ثالث؛
(ج) به هر شخص ثالثی اجازه می دهد از نرم افزار به نمایندگی یا به نفع هر شخص ثالثی استفاده کند.
(د) از هر بخشی از نرم افزار در هر دستگاه یا رایانه ای غیر از محصول Linortek که مالک یا کنترل آن هستید استفاده کنید.
(ه) از نرم افزار به هر طریقی استفاده کنید که هر گونه قوانین محلی، ملی یا بین المللی قابل اجرا را نقض کند. یا
(f) remove or alter any labels, symbols, legends or proprietary notices, including but not limited to any copyright, trademark, logo in the Software. You may not disclose the results of any performance or functional evaluation of anyof the Software to any third party without the prior written consent of Linortek for each such release. - به روز رسانی ها
Linortek ممکن است گهگاه بهروزرسانیها، ارتقاها، وصلهها، رفع اشکالها و سایر تغییرات ("به روز رسانی") را برای بهبود عملکرد نرمافزار توسعه دهد. به جز مواردی که در Linortek درج شده است webسایت، این به روز رسانی ها به صورت رایگان در اختیار شما قرار می گیرد. این بهروزرسانیها ممکن است بهطور خودکار بدون اطلاع شما نصب شوند. با استفاده از نرم افزار، شما همچنین با به روز رسانی خودکار موافقت می کنید. اگر با این موافق نیستید، نمی توانید به هیچ وجه نرم افزار را نصب، دسترسی، کپی یا استفاده کنید. - مالکیت.
The Software is licensed to you and not sold. Linortek reserves all rights to the Software and any Updates not expressly granted herein. The Software and Linortek Products are protected by copyright, trademark and other intellectual property laws andtreaties. Linortek and its licensors own the title, copyright, trademarks and other intellectual property rights in the Software.
You are not granted any rights to Linortek’s trademarks or service marks. There are no implied licenses in this EULA. - فسخ.
This EULA is effective from the date you first use the Software and will continue for as long as you own the Linortek Product associated with it or until you or Linortek terminate this agreement under this section. You may terminate this EULA at any time upon written notice to Linortek at the address provided below. Linortek may terminate this EULA at any time if you fail to comply with any of the terms in this agreement. The license granted in this EULA terminates immediately when the agreement terminates. Upon termination, you must stop using the Linortek Product and the Software and you must delete all copies of the
Software. The terms of Sections 2 will still remain in effect after the agreement terminates. - سلب مسئولیت گارانتی.
EXTENT PERMITTED BY APPLICABLE LAW, LINORTEK PROVIDES THE SOFTWARE “AS-IS” AND DISCLAIMS ALL WARRANTIES AND CONDITIONS, WHETHER EXPRESS, IMPLIED, OR STATUTORY, INCLUDING THE WARRANTIES OF MERCHANTABILITY, FITNESS FOR A PARTICULAR PURPOSE, TITLE, QUIET ENJOYMENT, ACCURACY, AND NON-INFRINGEMENT OF THIRD-PARTY RIGHTS. LINORTEK DOES NOT GUARANTEE ANY SPECIFIC RESULTS FROM THE USE OF THE SOFTWARE. LINORTEK MAKES NO WARRANTY THAT THE SOFTWARE WILL BE UNINTERRUPTED, FREE OF VIRUSES OR OTHER HARMFUL CODE, TIMELY, SECURE, OR ERROR-FREE. YOU USE THE SOFTWARE AND THE LINORTEK PRODUCT AT YOUR OWN DISCRETION AND RISK. YOU WILL BE SOLELY RESPONSIBLE FOR (AND LINORTEK DISCLAIMS) ANY AND ALL LOSS, LIABILITY, OR DAMAGES RESULTING FROM YOUR USE OF THE SOFTWARE
AND LINORTEK PRODUCT. - محدودیت مسئولیت.
هیچ چیزی در این EULA و به ویژه در این بند "محدودیت مسئولیت" نباید مسئولیتی را حذف کند که تحت قانون قابل اجرا نمی تواند مستثنی شود.
تا حداکثر میزان مجاز توسط قانون قابل اجرا، علاوه بر سلب مسئولیت ضمانتنامه فوق، در هیچ موردی، LINORTEK در قبال هیچیک از موارد تبعی، نمونهای، بینظیر، استثنایی، فوقالعاده، مسئول نخواهد بود. از محصولات یا نرم افزار یا مربوط به آن، حتی اگر LINORTEK از احتمال چنین آسیب هایی می دانست یا می بایست می دانست، و (ب) کل LINORTEK یا بیشتر و بیشتر از دیگر تعهدات و تعهدات متداول تر باید محدود به مبلغی باشد که هرگز از مبلغی که واقعاً توسط شما به LINORTEK و توزیع کننده یا نماینده فروش مجاز LINORTEK برای محصولات یا خدمات ارائه شده در این شرکت پرداخت می شود تجاوز نمی کند. این محدودیت تجمعی است و با وجود بیش از یک حادثه یا ادعا افزایش نخواهد یافت. LINORTEK از هرگونه مسئولیتی در قبال هر نوع مجوز دهنده و تامین کنندگان LINORTEK خودداری می کند. - رعایت قوانین صادرات
شما تصدیق میکنید که نرمافزار و فنآوری مربوطه تابع قوانین کنترل صادرات ایالات متحده در حوزه صلاحیت صادرات ایالات متحده است و ممکن است مشمول مقررات صادرات یا واردات در کشورهای دیگر باشد. شما موافقت میکنید که کاملاً از کلیه قوانین و مقررات بینالمللی و ملی قابل اعمال مربوط به نرمافزار، از جمله مقررات اداره صادرات ایالات متحده و همچنین محدودیتهای کاربر نهایی، استفاده نهایی و مقصد صادر شده توسط ایالات متحده و سایر دولتها، پیروی کنید. شما تصدیق می کنید که مسئولیت دریافت مجوز صادرات، صادرات مجدد، یا وارد کردن نرم افزار و فناوری مربوطه را در صورت نیاز دارید.
شما Linortek را از هرگونه ادعا، ضرر، تعهد، خسارت، جریمه، جریمه، هزینه و هزینه (از جمله حق الوکاله) که ناشی از یا مربوط به نقض تعهدات خود در این بخش باشد، جبران کرده و بی ضرر نگه دارید. - تکلیف.
شما نمی توانید هیچ یک از حقوق یا تعهدات خود را تحت این EULA واگذار کنید و هرگونه تلاش برای واگذاری بی اثر و بی اثر خواهد بود. - اطلاعیه ها
Linortek ممکن است با استفاده از ایمیل و آدرسی که هنگام ثبت نام در Linortek ارائه کرده اید، هرگونه اطلاعیه مرتبط با این EULA را به شما ارائه دهد. - چشم پوشی
برای مؤثر بودن، تمام معافیتهای Linortek طبق این قانون باید کتبی باشد و توسط نماینده مجاز Linortek امضا شده باشد. هر گونه شکست دیگر Linortek در اجرای هر یک از شرایط مندرج در این بخش، چشم پوشی تلقی نخواهد شد. - قابلیت تحمل
هر ماده ای از این EULA که غیرقابل اجرا تشخیص داده شود، به گونه ای ویرایش و تفسیر خواهد شد که اهداف آن ماده را تا حد ممکن تحت قوانین قابل اجرا انجام دهد و تمام مقررات باقی مانده به قوت خود باقی خواهد ماند. - قانون حاکم؛ محل.
You agree that this EULA, and any claim, dispute, action, cause of action, issue, or request for relief arising out of or relating to this EULA, will be governed by the laws of the state of North Carolina, U.S.A., without regard to conflicts of laws principles, provided that if you reside in a country that will not apply U.S. law to disputes related to these terms, then the laws of your country will apply. You also agree that the United Nations Convention on Contracts for the International Sale of Goods shall not
apply. You agree that regardless of any statute or law to the contrary, any cause of action against us arising out of or related to the Linortek webسایت، نرمافزار یا محصولات Linortek باید در عرض یک (1) سال پس از ایجاد علت اقدام شروع شود یا این دلیل اقدام برای همیشه منع شود. هرگونه اقدام یا دادرسی مربوط به این EULA باید در یک دادگاه فدرال یا ایالتی واقع در رالی، کارولینای شمالی مطرح شود و هر یک از طرفین به طور غیرقابل برگشتی به صلاحیت و محل رسیدگی هر یک از این دادگاه ها در چنین ادعا یا اختلافی تسلیم می شوند، به استثنای اینکه Linortek ممکن است درخواست حکم کند. معافیت در هر دادگاهی که صلاحیت حفاظت از مالکیت معنوی خود را دارد. - اخطار پیشنهاد 65 کالیفرنیا.
 هشدار: این محصول می تواند شما را در معرض مواد شیمیایی از جمله سرب قرار دهد که در ایالت کالیفرنیا به عنوان عامل سرطان شناخته شده است. برای اطلاعات بیشتر، به www.P65Warnings.ca.gov مراجعه کنید.
شروع به کار
The Fargo SERVER is what is called a “bare board” product and is supplied without a housing. It operates on low voltage; however you need to use simple handling precautions to prevent damage to the circuits. All electronics are susceptible to electrostatic discharge. This high voltage “shock” can permanently damage your device. Before handling the product, you should touch a surface such as a grounded workbench or table. It is also best to handle the device from its edges. If you notice that your chair or clothes often cause static discharges, you must exercise extra caution. The unit is supplied with four rubber feet which keeps the bottom of the board from coming into contact with the surface you put it on. Be careful not to let metal objects, such as screw drivers or hardware, come in contact with the bottom of this product. The board can be mounted on a panel using stand offs and #4 hardware. The mounting holes are connected to the GROUND signal. The SERVER unit is a self-contained web server configured with various input and output circuits. Although the relays are rated for higher voltages، این محصول برای استفاده در خط تولید طراحی نشده استtages. You should never use voltages through the SERVER product exceeding 48 volts. IT IS NOT SAFE.
The KODA SERVER is a housed unit with a DIN rail mountable enclosure that can be snapped onto a DIN rail or attached to any flat surface such as a wall or under a counter. KODA 100 has two relays (48VAC@1A), KODA 200 has four relays which can drive 10V 50mA to external devices. The unit is supplied with a DIN Rail mountable enclosure with removable terminal connectors for easy installation. The KODA SERVER can be mounted on a panel or on the wall using the DIN rail mount clip. The removable wire terminal connectors simplify field installation and allow for easy troubleshooting and maintenance: the unit can be removed from the system without disturbing the system wiring.
سیم کشی سرور
توجه: For a diagram showing the location of all connectors on your SERVER referenced in this section, please see the section – Board Layout Reference.
احتیاط: این واحدها از زمین جدا شده اند. همیشه طوری وصل کنید که حلقه برق فقط به واحد سرور متصل باشد.
از اتصالات زمین خارجی استفاده نکنید. انجام این کار ممکن است به دستگاه مبدأ سرور یا POE آسیب برساند.
- Place the unit on a table or bench being careful not to let any metal objects come into contact with the bottom of the circuit board (Fargo Only).
- Connect the 12VDC power supply to a suitable AC outlet and plug the barrel connector into the SERVER at the location labelled “12VDC/POWER”. Alternatively, you may also use POE. At this point the GREEN/Boot LED should come on and start flashing indicating the SERVER is operating and is in the “Bootload Mode”. This mode allows the user to update the server software that is used on the unit. After about 5 seconds, the GREEN LED will go off and the RED LED will start blinking once per second indicating the SERVER is operating in “Server Mode” and is accessible on a network utilizing TCP/IP protocols.
احتیاط: هنگامی که از سوئیچ شبکه POE استفاده می کنید، از منبع تغذیه 12VDC برای برق رسانی همزمان سرور استفاده نکنید، این به برد آسیب می رساند. - Plug an Ethernet cable into the RJ45/NET connector. The “Connection” LED will come on if a 100MHz network is available, otherwise it will remain off and the “Activity” LED should start blinking indicating network activity. Fargo G2 Relay Connections
There are 8 relays on the FARGO R8 and 4 on the FARGO R4. These are dry contact relays. These units are designed for only low voltage کنترل دارد و نباید voltage applied to the relay greater than 48 volts. This is for your safety as well as to stay within the parameters of the parts and circuit board design. The relays have 3 terminals labelled NO, C and NC which stand for Normally Open, Common and Normally Closed. When activated, the relay moves the connection from CNC to CNO. If you want to make a connection when the relay is activated, connect your wires between C and NO. When the relay is activated C and NO will be connected together. If you want to break a circuit when the relay is activated, make your connections to C and NC. When the relay is activated the circuit will be broken (or open)
Koda Relay Connection
There are 2 relays on the KODA 100. The KODA 100 has 2 removable 2 position connectors (1 for each relay) and are simply numbered “1” and “2”. These relays are normally open.
There are 4 relays on the KODA 200. The KODA 200 has 1 removable 8 position connector. Each relay has a “+” connection and a numbered connection. The relays may be set to supply about 10VDC by selecting “+V” on the setting switch (see Board Layout Reference page 29) or set to dry contact DC on the switch. If “+V” is selected then the voltage will be present on the “+” terminal and the numbered terminal is the return. Otherwise, a normally open dry contact exists across the “+” and numbered connection. KODA 100/200 is designed for only low voltage کنترل دارد و نباید voltage روی رله بیشتر از 48 ولت اعمال می شود. این برای ایمنی شما و همچنین ماندن در پارامترهای طراحی قطعات و برد مدار است.

![]() در هیچ موردی LINOR TECHNOLOGY خواه در قرارداد، ظلم، یا در غیر این صورت، در قبال هر گونه خسارت تصادفی، خاص، غیرمستقیم، تبعی یا کیفری، از جمله خسارتهای ناخواسته، غیرمنتظره، زمانی، غیرمستقیم، مسئول نخواهد بود. ، زیان تجاری، یا سود از دست رفته، پس انداز یا درآمد تا حد کامل ممکن است از نظر قانون سلب مسئولیت شود.
در هیچ موردی LINOR TECHNOLOGY خواه در قرارداد، ظلم، یا در غیر این صورت، در قبال هر گونه خسارت تصادفی، خاص، غیرمستقیم، تبعی یا کیفری، از جمله خسارتهای ناخواسته، غیرمنتظره، زمانی، غیرمستقیم، مسئول نخواهد بود. ، زیان تجاری، یا سود از دست رفته، پس انداز یا درآمد تا حد کامل ممکن است از نظر قانون سلب مسئولیت شود.
اطلاعیه بیشتر برای محدودیت استفاده
مگر اینکه به طور خاص بیان شده باشد، این محصول برای تغییر خط تولید طراحی نشده استtagدستگاه های الکترونیکی این محدودیت شامل تمام محصولات FARGO و KODA می شود. برای کنترل دستگاهی که در خط خط کار می کندtagکاربر باید دستگاه واسطه ای مانند رله را نصب کند.
هنگام سیم کشی یک خط جلدtagE دستگاه با استفاده از دستگاه واسطه، شما باید یا یک برقکار ماهر باشید یا از خدمات یک برقکار واجد شرایط استفاده کنید. علاوه بر این، کدهای محلی باید رعایت شود، از جمله، اما نه محدود به، اندازه گیج سیم و مسکن مناسب.
Linortek cannot assume any responsibility for harm to the user or third parties for improperly using our Fargo/Koda products. This liability remains with the user. Linortek cannot assume any responsibility for damage to the device for improperly using our SERVER product.
For relay specifications, please see Board Reference Layout page 29
Digital Input Connections (Fargo R4 and Koda)
The digital inputs allow the SERVER to detect an external on/off state of a sensor. With this information the SERVER can display whether an input is on or off, count events in a resettable or non-resettable counter, and calculate the frequency (such as for use as a tachometer) or the period of the input. There are two modes of operation for the digital inputs – PULL UP and ISOLATED.
a) PULL UP mode connects a 1K resistor to an internal voltage به شما این امکان را می دهد که از یک کلید ساده (مانند کلید مغناطیسی درب) در ترمینال های 1 و 2 استفاده کنید. هنگامی که سوئیچ فعال می شود سیگنالی به ورودی ارسال می شود.
b) ISOLATED mode allows you to directly drive the SERVER’s optoisolator with an external voltagبا وجود یک مقاومت داخلی 1K. این جلدtage ممکن است در محدوده 5 ولت تا 24 ولت باشد و حداقل 2 میلی آمپر یا حداکثر 30 میلی آمپر را به دیود اپتوایزولاتور تامین کند. هیچ ارتباط داخلی دیگری با این جلد وجود نداردtage so it is an isolated input. Please note, when connecting a 12VDC-¬24VDC circuit to the input, an external resistor (can be provided at request, 2.2k ohm 0.5watt) must be used.
These modes are selected by the switch on the SERVER (see Board Layout Reference page 29) marked ISO and PU for isolated and pull up respectively. These are set at the factory to ISO by default.
Wiring a push button: For distances up to 500 feet, a 20 AWG shielded wire is suitable for wiring a push button. If the distance between the push button and the controller extends up to 5,000 feet, use a 16 AWG shielded cable instead. Keep in mind that longer cable runs are more susceptible to signal interference.
احتیاط: If you intend to use isolated mode, verify that the input switch is set to ISO before applying an external voltagه. در غیر این صورت ممکن است به دستگاه مبدأ سرور یا POE آسیب برساند.
Analog Input Connections (Fargo R4ADI)
The analog inputs allow the SERVER to read the value of external equipment. There are 2 analog inputs.
For AC current monitoring, use one of the two 3.5mm stereo inputs to interface with a current sensor.
2 بلوک ترمینال ورودی آنالوگ به سنسورهای جریان 0-5 ولت غیر ایزوله متصل می شوند که ممکن است به دستگاه های مختلفی مانند سنسورهای دما یا فشار متصل شوند. SERVER اتصال زمین و برق را فراهم می کند تا اندازه گیری ها بدون ولتاژ خارجی انجام شوندtage references. You should use a sensor that is isolated so that that it makes no connection to a remote ground. See drawing under Board Reference Layout page 29.
Accessing your SERVER
هنگامی که سرور شما روشن شد و به شبکه متصل شد، تا زمانی که روتر شما برای انجام این کار پیکربندی شده باشد، به طور خودکار یک آدرس IP از طریق DHCP دریافت می کند. برای اتصال، آدرس IP را در خود وارد کنید web browser. This will take you to your SERVER’s landing page. To log in, click the Log In button on the top right of the page. Your browser will prompt you to enter your username and password. By default, these credentials are both set to admin. To find your SERVER’s IP address, see below.
پیدا کردن آدرس IP خود با Linortek Discoverer
برنامه Discoverer به طور خودکار مکان سرور شما را پیدا می کند. Discoverer یک برنامه جاوا است و برای استفاده از این ویژگی نیاز به نصب Java Runtime دارد. جاوا را می توانید در اینجا پیدا کنید: http://java.com/en/download/index.jsp.
برای دانلود برنامه Discover به آدرس زیر مراجعه کنید: https://www.linortek.com/downloads/supportprogramming/
استفاده از مرورگرهای کروم و فایرفاکس توصیه می شود. لطفاً توجه داشته باشید: اگر ترجیح می دهید از اینترنت اکسپلورر استفاده کنید، اینترنت اکسپلورر Linortek Discoverer را به صورت Zip ذخیره می کند file به صورت پیش فرض. برای استفاده از Discoverer، باید Save as را انتخاب کرده و نام آن را تغییر دهید file به عنوان Linortek Discoverer.jar هنگام دانلود.
هنگام دانلود برنامه Discover، گاهی اوقات بسته به تنظیمات امنیتی مرورگر خود، یک پیام هشدار دهنده ظاهر میشوید که از شما میپرسد آیا میخواهید آن را نگه دارید یا نادیده بگیرید. file, please click the Keep button as this is a Java program, and it won’t harm your computer.
هنگامی که Discoverer دستگاه شما را پیدا کرد، نمایش داده می شود:
- آدرس IP
- نام میزبان
- آدرس مک
- اطلاعات دیگر:
آ. LED آبی (در صورت روشن بودن)
ب نام محصول
ج. ویرایش نرم افزار سرور
د شماره پورت (در صورت انتقال)

روی دستگاهی که میخواهید از آن در برنامه Discoverer برای راهاندازی سرور استفاده کنید، کلیک کنید web pages in your browser. Click the Login button on the homepage. The default username/password is: admin/admin. You may change these as you desire or disable this feature in the settings menu.
Connecting your SERVER Directly to Your PC
You can also plug your SERVER directly to your PC if there is no network connection available. If you plug your SERVER into your PC’s Ethernet port it will use the default IP address: 169.254.1.1 unless you have previously configured your SERVER to use a static IP. Enter 169.254.1.1 into your web browser to connect. No internet connection is required. Once configured, you can then install your SERVER where you desired.
پیکربندی سرور
ورود به سیستم
Once you have entered the IP address and port number, if set, the Login page will open. This page shows the name of this server which you may change in Configure/Network Config.
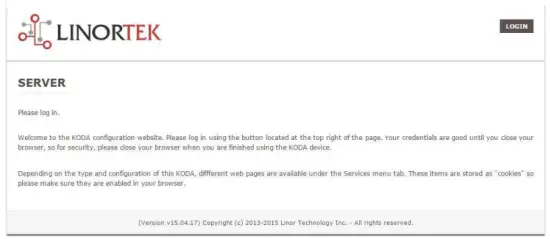
This page is static with no background activity and is a useful place to park if you are not using the SERVER and do not want to close the connection.
By pressing LOGIN, you will be asked for your username and password. These credentials will be retained by the browser until the browser is closed. You can disable the password requirement in Settings page. See section page 21.
صفحه اصلی
پس از وارد کردن اطلاعات ورود به سیستم، به صفحه اصلی برنامه هدایت خواهید شد. صفحه Home یا Index برخی از اطلاعات سیستم را نشان میدهد و توانایی مکان یابی دستگاه فیزیکی را در صورتی که در منطقهای با دیگران باشد، ارائه میدهد. برای توضیحات به لیست زیر مراجعه کنید

- TIME – Displayed along with the day of the week. This time may be set to be in a 12 hour format with AM/PM indicator or 24 hour format.
- DATE - تاریخ فعلی در اینجا نمایش داده می شود.
- ولت - جلدtage در تابلو نمایش داده می شود. این ممکن است مفید باشد اگر سرور همراه با تجهیزات دیگر، جلدtage variance can be noted. Fargo and Koda servers have an input voltage range of 1248vDC.
- TEMPERATURE – Temperature on the board is displayed. This display may be either °C or °F. This temperature will be affected by the heat generated by SERVER itself so it will always be slightly higher than ambient temperature.
- LED - 3 LED نمایش داده می شود. LED قرمز پالس سیستم است. تا زمانی که سرور در حال اجرا است، باید در هر ثانیه یک بار چشمک بزند. LED سبز برای گزینه های بوت لودر استفاده می شود و به طور کلی روی آن قابل مشاهده نیست webسایت. LED BLUE قابل کلیک است و می توانید آن را روشن و خاموش کنید web صفحه این برای مکان یابی فیزیکی دستگاه مفید است، در صورتی که با واحدهای مشابه دیگر استفاده شود، زیرا بر روی واحدی که به آن web مرورگر متصل است. برنامه Discoverer همچنین متوجه روشن بودن LED BLUE می شود. این اغلب به عنوان یک تابع "محل" نامیده می شود.
خدمات
تب Services پویا است و بسته به پیکربندی سرور شما تغییر خواهد کرد. این جایی است که می توانید ورودی ها، خروجی ها، سنسورها و سایر کنترل های تخصصی را کنترل کنید.
In/Out or Relays Page
Depending on which SERVER you are using, the first page on the SERVICES tab will be either In/Out or Relays.
In/Out has the relay controls and the input controls on one page, while Relays only has the relay controls.
کنترل رله
An In/Out page is displayed below. Some relay control pages have 2, 4 or 8 relays displayed. Each relay has a number, in this case 1 to 4.

The State LED shows whether the relay is on or off indicated by GREEN and RED respectively. This icon is clickable to manually control the corresponding relay. Each relay can have a Name as well as identifiers for the Normally Open, Common and Normally Closed connections.
چهار LED وضعیت وجود دارد که نشان می دهد:
- Email – If an email is to be sent when this relay is switched on/off
- پالس - اگر این رله با عرض پالس و ضرب کننده عرض پالس (مدت زمان) تنظیم شده باشد - برای اطلاعات بیشتر به بخش بعدی مراجعه کنید.
- Sched. – If there is a schedule created in the Tasks page (see page 15) set to automatically trigger this relay.
- زمانبندی شده - اگر پالس تنظیم شده باشد و این رله فعال باشد، LED زمانبندی شده قرمز میشود و نشان میدهد که رله در حال حاضر روی تایمر کار میکند.
Click the Edit Icon to edit the controls for the corresponding relay. This will take you to the Set Relay page (see page 11).
ورودی ها
The In/Out or Inputs page (depending on your SERVER) will display information from each input. The SERVERs have a combination of inputs. The Fargo R4DI has four digital inputs, The R4ADI has, four digital inputs, four analog inputs. The KODA SERVER has two digital inputs.
At the top of each input is a label (ex: DIN 1, AIN 2) specifying whether it is a digital input (DIN) or analog input (AIN) as well as the input number. This label will turn green when the input is enabled. Inside the box will be any display configured from the Set Input page (see page 12 for digital input, page 14 for analog input). A red dot in the lower-left corner indicating the state of a linked relay (if any), will turn green when the linked relay is activated.
Finally, an Edit icon in the lower-right corner of the box to edit the corresponding input. This will take you to the Set Digital Input or Set Analog Input page (page 12 or page 14).
Set Relay Page
صفحه SET RELAY به شما امکان می دهد تا ویژگی های مختلف مربوط به رله را تنظیم کنید.
- Relay Select – The Relay that you are editing (identified by the line on which you clicked the Edit icon on the RELAY page).
- Name – Enter a 15-character Relay Name. This and the following 3 fields may be used for any identifying information desired.
- NO Name – Enter a 7-character name for the Normally Open (NO) connection.
- Com Name – Enter a 7-character name for the Common (COM) connection.
- NC Name – Enter a 7-character name for the Normally Closed (NC) connection.
- Pulse Width – When you control the relay it turns on or off. You may control it for a timed turned on period by entering a Pulse Width when 0 means there is no timed event and a number represents duration of the pulse. The maximum number you can enter here is 4 digits, ie. 1234.
- ضرب کننده عرض پالس - برای تعریف بیشتر طول پالس، یک ضرب کننده عرض پالس را انتخاب کنید تا عرض پالس را بیشتر تعریف کنید. می توانید انتخاب کنید:
• هیچکدام
• mS (Millisecond, 1/1000 second)
• Sec (Seconds)
• Min (Minutes) - نوع رله - سرور می تواند به رله ها به صورت فیزیکی روی سرور یا با استفاده از وسایل دیگر دسترسی داشته باشد. شما می توانید انتخاب کنید:
• Normal – relay physically on the SERVER
• Latched – not currently supported
• Remote – a relay on another SERVER accessed over the network
• Zigbee – a relay at a remote device accessed over an RF system
• Normal and Remote – both relays activated
• Normal and Zigbee – both relays activated - شناسه مکان - این عددی است که یک مکان راه دور را شناسایی می کند
- رله در مکان - عددی که نشان دهنده رله یا دستگاه در مکان است
- ارسال ایمیل – سرور را می توان طوری برنامه ریزی کرد که در صورت روشن یا خاموش بودن رله، یک ایمیل ارسال کند.

تنظیم صفحه ورودی دیجیتال
ورودی های دیجیتال را می توان به گونه ای تنظیم کرد که با استفاده از طیف وسیعی از انواع نمایشگر، بازخوانی های مختلفی ارائه دهد. علاوه بر نمایش داده های ورودی، می توانید نمایشگر را نامگذاری کنید و همچنین یک رله را با آن مرتبط کنید. این رله زمانی که از روشن به خاموش می رود از سبز به قرمز تغییر می کند و همچنین برای کنترل آن قابل کلیک است. با کلیک بر روی نماد ویرایش مداد، می توانید تنظیمات این ورودی را ویرایش کنید:
- Digital Input Selected – The Digital Input that you are editing (identified by the line on which you clicked the Edit icon).
- نام - می توانید یک نام 15 نویسه ای برای این ورودی تنظیم کنید. این نام در نوار بالای صفحه نمایش داده می شود.
- برچسب - یک برچسب 7 نویسه ای تنظیم کنید که در صفحه نمایش فعال واقعی نمایش داده شود.
- تصحیح کننده - با استفاده از این فیلد می توانید مقداری را قبل از نمایش مقدار در صفحه نمایش اضافه، تفریق، ضرب یا تقسیم کنید. این یک تصحیح کننده 2 مقدار است که هر کدام با یک کاراکتر فاصله از هم جدا می شوند. (یعنی "+2، -2، *3، /3")
- USE – این ورودی را روی فعال تنظیم می کند. نشانگر عدد ورودی را سبز می کند. لازم به ذکر است که در هنگام استفاده، ورودی بسته به نوع آن، زمان CPU و سایر منابع را مصرف می کند. اگرچه ممکن است همه ورودیها همزمان فعال باشند، توصیه میشود فقط ورودیهایی را که میخواهید استفاده کنید روشن کنید.
- نوع - داده های ورودی را می توان برای محاسبه طیف وسیعی از نتایج استفاده کرد. شما می توانید انتخاب کنید:
• State – This is useful for knowing if an input is on or off, like a door switch being on or off.
• CounterNR – This is a non-resettable counter.
• CounterR – This is a resettable counter.
• Frequency – Counts the frequency of an input in KHz (kilo hertz or1/1000 seconds). This could be useful in displaying a tachometer where 60Hz = 1 R.P.M.
• Period – in 1/1000 seconds an input in kHz (milliseconds or1/1000 seconds). This would be useful for measuring timed events. - نمایش - این انتخاب به شما امکان می دهد نوع نمایشگر استفاده شده را تغییر دهید. می توانید انتخاب کنید:
• Dot – A single dot with the value in the middle. This can be used for State. You can make a dumb indicator by changing the color of the Dot based on the value. The label is under the Dot.
• Values – Displays the Corrected Value with the Label in a box directly below it.
• Meter – This Meter has configurable scale based on the Min/Max values and arcs can be colored per the Color ranges. The Label is displayed within the Meter.
• VBar – Also based on the Min/Max values for the scale and the bar changes color based on the values in the Color ranges. - Relay L/T – Enter a Relay number here. If it is a local relay it will show GREEN or RED depending if it is on or off. By clicking on it the relay will turn on and off. The name comes from the relay settings page. This may be useful if you want to turn the subject of a display on and off. Any relay can be used on any input and each may be reused for any other input. Adding an L after the relay number (ex: 2L) will link the state of the input to the state of the relay. This is an easy and immediate way to have an input follow the relay. Adding a T after the relay number will trigger the relay to the state of the input. This is an easy and immediate way to have a relay follow the input.
- Command Z/N/I – This field is used for issuing various commands to the Digital Input controller: Z Zero the resettable counter. N Leave the input as Normal. I Invert the input.
- Value – These are Min/Max values used for the display. This is useful for preventing a Meter from going past its end or setting the value of a VBar. This is the Value after the Corrector. The system cannot display a value past Max, so be sure this is at least set to 1.
- زرد/قرمز/سبز – سه رنگ وجود دارد که می توان از آنها برای تعریف بیشتر نمایشگر استفاده کرد. محدوده این رنگ ها را تنظیم کنید تا یک رنگ برای مقدار نمایشگر تعریف شود. این مقدار بعد از اصلاح کننده است. توجه داشته باشید که اگر از نوع State استفاده می کنید، ممکن است بخواهید قرمز = از 0 تا 0، سبز = از 1 به 1 و زرد = از 2 تا 2 را اختصاص دهید. از آنجایی که یک حالت همیشه یا 1 یا 0 است، از اطلاعات مبهم جلوگیری می کند و جلوگیری از استفاده از رنگ زرد شما می توانید هر دو رنگی را که دوست دارید برای یک نوع State انتخاب کنید.

Set Analog Input Page
ورودی های آنالوگ را می توان طوری تنظیم کرد که با استفاده از طیف وسیعی از انواع نمایشگر، بازخوانی های مختلفی ارائه دهد. علاوه بر نمایش داده های ورودی، می توانید نمایشگر را نامگذاری کنید و همچنین یک رله را با آن مرتبط کنید. این رله زمانی که از روشن به خاموش می رود از سبز به قرمز تغییر می کند و همچنین برای کنترل آن قابل کلیک است.
- Analog Input Selected – The Analog Input that you are editing (identified by the line on which you clicked the Edit icon).
- نام - می توانید یک نام 15 نویسه ای برای این ورودی تنظیم کنید. این نام در نوار بالای صفحه نمایش داده می شود.
- برچسب - یک برچسب 7 نویسه ای تنظیم کنید که در صفحه نمایش فعال واقعی نمایش داده شود.
- تصحیح کننده - با استفاده از این فیلد می توانید مقداری را قبل از نمایش مقدار در صفحه نمایش اضافه، تفریق، ضرب یا تقسیم کنید. این یک تصحیح کننده 2 مقدار است که هر کدام با یک کاراکتر فاصله از هم جدا می شوند. (یعنی "+2، -2، *3، /3")
- USE – Sets this input to active. Turns the input number indicator to GREEN. It should be noted that when in use the input consumes CPU time and other resources depending on its type. Although all inputs may be active at the same time, it is recommended to turn on only those you want to use.
- نوع - داده های ورودی را می توان برای محاسبه طیف وسیعی از نتایج استفاده کرد. شما می توانید انتخاب کنید:
• Analog 1 – Analog 1 input from a SERVER with an input such as found on a R4ADI.
• Analog 2 – Analog 2 input from a SERVER with an input such as found on a R4ADI.
• AC Current 1 – AC current sensor 1 input from a SERVER with an input such as found on a R4ADI.
• AC Current 2 – AC current sensor 2 input from a SERVER with an input such as found on a R4ADI.
• AC Current 3 – Not used
• Volts – The measurement of the voltage powering the SERVER.
• Current – On “S” models, this is the current consumed by the SERVER.
• Int. Temp – Temperature from the board mounted sensor.
• Ext. Temp – Temperature from the “S” model SERVER.
• R. Humidity – % Relative Humidity from the “S” model SERVER.
• MMA X – The X axis accelerometer data from the “S” model SERVER.
• MMA Y – The Y axis accelerometer data from the “S” model SERVER.
• MMA Z – The Z axis accelerometer data from the “S” model SERVER. - نمایش - این انتخاب به شما امکان می دهد نوع نمایشگر استفاده شده را تغییر دهید. می توانید انتخاب کنید:
1. Dot – A single dot with the value in the middle. This can be used for State. You can make a dumb indicator by changing the color of the Dot based on the value. The label is under the Dot.
2. Values – Displays the Corrected Value with the Label in a box directly below it.
3. Meter – This Meter has configurable scale based on the Min/Max values and arcs can be colored per the Color ranges. The Label is displayed within the Meter.
4. VBar – Also based on the Min/Max values for the scale and the bar changes color based on the values in the Color ranges. - Relay – Enter a Relay number here. If it is a local relay it will show Green or RED depending if it is on or off.
By clicking on it the relay will turn on and off. The name comes from the relay settings page. This may be useful if you want to turn the subject of a display on and off. Any relay can be used on any input and each may be reused for any other input. - مقدار – این مقادیر حداقل/حداکثری هستند که برای نمایشگر استفاده میشوند. این برای جلوگیری از عبور متر از انتهای خود یا تنظیم مقدار VBar مفید است. این مقدار بعد از اصلاح کننده است. سیستم نمی تواند مقداری بالاتر از حداکثر نمایش دهد، بنابراین مطمئن شوید که حداقل روی 1 تنظیم شده است.
- زرد/قرمز/سبز – سه رنگ وجود دارد که می توان از آنها برای تعریف بیشتر نمایشگر استفاده کرد. محدوده این رنگ ها را تنظیم کنید تا یک رنگ برای مقدار نمایشگر تعریف شود. این مقدار بعد از اصلاح کننده است. توجه داشته باشید که اگر از نوع State استفاده می کنید، ممکن است بخواهید قرمز = از 0 تا 0، سبز = از 1 به 1 و زرد = از 2 تا 2 را اختصاص دهید. از آنجایی که یک حالت همیشه یا 1 یا 0 است، از اطلاعات مبهم جلوگیری می کند و جلوگیری از استفاده از رنگ زرد شما می توانید هر دو رنگی را که دوست دارید برای یک نوع State انتخاب کنید.

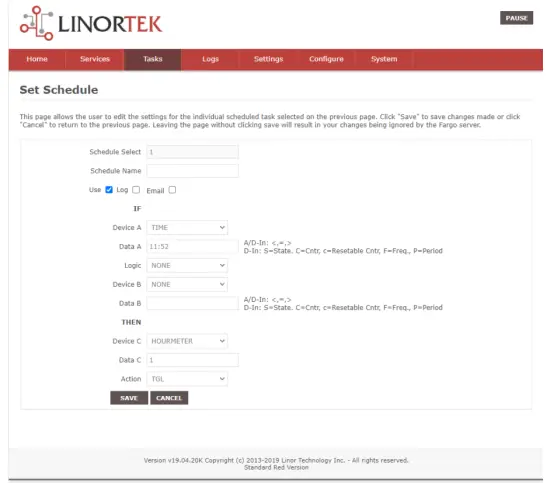
Tasks Page
The TASKS page displays the automatic events that can be programmed into the SERVER. You can schedule up to 16 events in the SERVER. These are constructed as IF … THEN statements. In addition, the IF term can have 2 elements (IF a, AND/OR/NOT b … THEN c). This provides a simple to program and powerful way to take advantage of the data acquired by the SERVER. The Tasks page shows you an overview of configured tasks. You can click the dot in the State column to turn a task on or off indicated by a green dot for ON, and a red dot for OFF. To edit or create a task, click the Edit icon to the right of the task line. This will take you to the Set Schedule page detailed in the next section.

Set Schedule Page
The SET SCHEDULE page allows you to create time and logic-based events that will occur automatically if the conditions are met.
- Schedule Select – Determined by clicking on a schedule line from the previous page.
- Schedule Name – Enter a 15-character Schedule Name.
- USE – In order for a Schedule line to be active you must select the USE button. If there is an error detected in entering Schedule data, the USE box will automatically uncheck.
- LOG - گزارش را انتخاب کنید تا این مورد هر بار که اجرا می شود در گزارش سیستم ظاهر شود.
- Email – Click Email to automatically send an email when this schedule is executed.
- Device A – Select Device A for the first term in the IF statement from the drop box.
- Data A – Select Data A for the above device. Depending on the device selected, the Data used for testing may have special properties. See the list below for Data that may be entered. If an error is detected indata entry when the “Save” button is pushed, the USE box will uncheck and the Data box containing the error will be highlighted.
• Minute – Enter: mm
• Hour – Enter: hh (use 24-hour system)
• Day – Enter: dd
• DayofWeek – Enter: Sunday = 1, Monday = 2, Tuesday = 3, Wednesday = 4, Thursday = 5, Friday = 6, Saturday = 7, Weekday = 8, Weekend = 9
• Time – Enter: hh:mm (use leading zeros, seconds are ignored) (use 24 hour system) ex:07:30 or 14:05
• Date – Enter: yy/mm/dd (use leading zeros) ex: 20/01/10 for January 10, 2020
• Relay – Enter: Relay number and (+ or -), ex: 01+ for Relay 1 ON or 01- for Relay 1 OFF
• Button – Enter: + or – (for ON or OFF respectively)
• Flag – Enter: Flag number(opt.+), or Flag number (for ON or OFF respectively)
• Temp – Enter: >, = or < value; example: > 40 (همیشه درجه سانتیگراد)
• Volts – Enter: >, = or < value; example: <10
• Analog – Analog input. Enter an input number and >, = or < and value. Example: 3<123 (This value is raw data value prior to any Corrector used by the input display page.)
• Digital – Digital input. Enter Input Number, Type, >, =, or < and value; example: 1F>7500 (This value is the raw data value prior to any Corrector used on the display page). Type can be (case sensitive):
• S State (On/Off)
• C Non-resettable counter
• c Resettable counter (lower case ‘c’)
• F Frequency in 1/1000 seconds
• P Period in 1/1000 seconds - منطق - یک مقایسه منطقی بین دستگاه A و دستگاه B تنظیم کنید.
• AND – True if: Device A is true AND Device B is true
• OR – True if: Device A is true OR Device B is true
• NOT – True if: Device A is true and Device B is NOT true - Device B – Select Device B for testing from the drop box.
- داده B – داده B را برای دستگاه فوق انتخاب کنید. بسته به دستگاه انتخاب شده، داده های مورد استفاده برای آزمایش ممکن است ویژگی های خاصی داشته باشند. لیست بالا را ببینید.
- دستگاه C – چیزی است که باید کنترل شود.
- داده C - ویژگی Set برای دستگاه C. Syntax به صورت زیر استفاده می شود:
• RELAY – These are relays on this SERVER. You can set up to four per schedule. Enter separated by commas, for example "1,2,3,4،XNUMX،XNUMX،XNUMX"
• FLAG – This is a storage flag that can be used to make more complex schedules. There are 8 flags that can be turned on or off.
• REMOTE – Refers to a remote SERVER unit. When these conditions are met, this SERVER will send a command to control a remote SERVER. The Data field for a remote unit should be in the format,
“REMOTE UNIT NUMBER, REMOTE UNIT RELAY”. For example، "3,5،XNUMX". این سرورهای راه دور باید در صفحه Configure/Remote Device Config شناسایی شوند.
• COUNTER – Adds count to digital input counter – set as 1 or 2 depending on which digital input is counting
• BLUE LED – No data.
• eMAIL – Will send eMail, no data.
• NOTIFY – Will send notification to Kodalert, set 1- 8 for Settings/Alarm Notification number. (Not Implemented) - اقدام – با دستگاه C چه باید کرد. گزینهها عبارتند از:
• ON – Turns device ON
• OFF – Turns device OFF
• TGL – Toggles state of Device C
• RESET – Resets CounterR

صفحه گزارش ها
The Logs tab displays over 10,000 entries from actions taken by the SERVER or by users themselves. This feature allows several actions for the convenience of displaying and collecting data from the SERVER.
- The checkboxes above the date allow the user to filter logs from different sources. To filter out logs you do not wish to see from a certain source simply uncheck the box.
- Each log has a reference number and a time and date attached in a “yyyy/mm/dd” and “hh:mm:ss” format. Afterwards is the event displayed.
- To scroll through the logs, use the arrows to the right-hand side, where the horizonal line and arrow brings you to the start or end, the double arrow moves up or down a page, and the single arrow moves up or down a single log.
- To refresh the logs manually click the REFRESH button below the Log Details.
- To download the Log Details, click the DOWNLOAD button below the Log Details, this allows you to save the logs as a separate file.
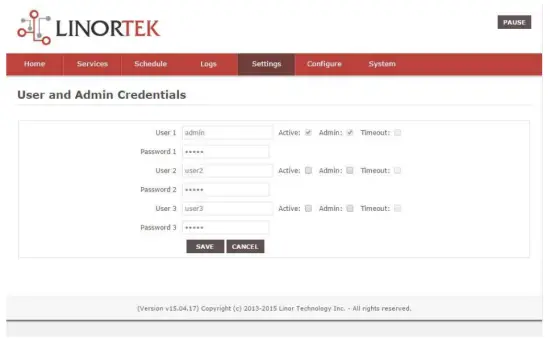
صفحه مشخصات کاربر و مدیر
Use this page from the Settings drop down menu. Here you can set up to 3 users for your SERVER system. As a default only User 1 is Active. Here you can:
- User Name and Password – Each user has their own credentials. As a default these are set toadmin/admin, user2/user2 and user3/user3 for Users 1, 2 and 3 respectively. The passwords are never displayed. توجه: when you reset the password, it must be less than 13-character.
- فعال - برای ورود این کاربر باید بررسی شود، نمی توانید کاربر 1 را غیرفعال کنید.
- مدیر - فقط مدیر می تواند داده ها را در بیشتر صفحات ذخیره کند. این سرور شما را از تغییر توسط افراد غیرمجاز محافظت می کند.
- مهلت زمانی - در حال حاضر فعال نیست.
صفحه زمان/تاریخ
از این صفحه از منوی کشویی تنظیمات استفاده کنید. این صفحه به شما اجازه می دهد تا سیستم زمان و تاریخ را تنظیم کنید.
- Time – Set time using an hh:mm:ss format.
- تاریخ – تاریخ را با استفاده از قالب yy/mm/dd تنظیم کنید.
- Time Zone – Set desired time zone 5 for EST, 8 for PST, you can now add a :mm for setting part hour, for example، 5:30 یک منطقه زمانی در 5 ساعت و 30 دقیقه است.
- استفاده از ساعت تابستانی - برای تنظیم خودکار زمان سیستم خود در روز تابستانی انتخاب کنید. (در همه مناطق زمانی دقیق نیست.)
- استفاده از زمان MIL - برای استفاده از قالب 24 ساعته انتخاب کنید.
- Use NTP Update – Select to synchronize SERVER time with NTP server
- NTP Web سایت – این سرور NTP انتخاب شده برای به روز رسانی است.
- فاصله NTP - فاصله زمانی بین به روز رسانی ها بر حسب دقیقه.
- Log NTP Event – Normally NTP exceptions will be logged, select this option to Log every NTP event. (May be useful in debugging.)

صفحه تنظیمات
Access this page from the Settings dropdown menu. Select these settings to enable various features in the SERVER
- Use Active Main – No longer used. (Select PAUSE to go inactive.)
- نیاز به ورود - اگر انتخاب نشده باشد، سرور به همه دسترسی ها بدون اعتبار اجازه می دهد.
- Use IP Ranges – Not Implemented.
- Use RESTFUL IP Ranges – Not implemented.
- Use Remote IP Ranges – Not implemented.
- از احراز هویت RESTful استفاده کنید - برای RESTful به نام کاربری و رمز عبور نیاز دارید.
- گسترش محدوده رله - 8 رله را فعال می کند.
- از دکمه های رادیویی رله استفاده کنید - در صورت تنظیم، وقتی یک رله روشن است، بقیه رله ها خاموش می شوند.
- SSL Port No. – Not supported – For future use.
- استفاده از ایمیل های سیستمی - پیام های ایمیل اضافی را فعال می کند.
- از فارنهایت استفاده کنید - درجه سانتیگراد یا فارنهایت را انتخاب می کند.
- PGM Dynamic Relays – Changes properties of relays in task schedule.
- CLR PGMs on Start – Reinitialize tasks on start up.
- RTC Temperature Compensation – All Koda boards can add Temperature and Humidity sensor.
- از AM2302 استفاده کنید - از سنسور دما و رطوبت AM2302 استفاده کنید (فروش جداگانه).
- Java Report – Send data to HourCollector app over ethernet (only for IoTMeter)
- Use Metric – Not supported – For future use.
- UART Usage – Enter “Audio” for Netbell-NTG, “Clock” for Netbell clock.
- Switch Bypass (1/2) – Ignores physical inputs if set. For example, in a Koda 200 board, you want to ignore input 1 switch, check Switch Bypass 1
- Setting 19 – Not supported – For future use
- از صدا استفاده کنید File System – Activate SD Card reader for Netbell-NTG
- WiFi Report – Enable data transfer over WiFi (WiFi IoTMeter only)
- Active Landing Page – Not supported – For future use.
- . Invert Relay Control – The relay is set to NO by default. By checking this box the relay will be inverted to NC.
- Setting 24 – Not supported – For future use.

صفحه DNS پویا
Access this page from the Configure dropdown menu. From this page you can assign dynamic DNS settings. This page, along with proper port forwarding through the router, can enable global access to a device behind a NAT router or firewall. You will need to assign a static IP address and port number (see Network Config Page on page 25) and port the IP address on your router (refer to your router’s user manual). An internet IP address will have to be hosted in order to access your SERVER from the internet. Currently the only IP hosting service supported is provided by DynDNS (https://dyn.com)
- از DDNS استفاده کنید - این سرویس را فعال می کند.
- سرویس DDNS - یک سرویس را از کادر دراپ انتخاب کنید. در حال حاضر تنها سرویس پشتیبانی شده DynDNS است
- نام کاربری - این به حساب تنظیم شده در سرویس DDNS اشاره دارد.
- رمز عبور - رمز عبور برای دسترسی در سرویس DDNS.
- Host – This is the IP name registered at the DDNS service for rerouting to this SERVER

صفحه راه اندازی ایمیل
یک حساب ایمیل برای سرور تنظیم کنید تا از آن در ارسال پیام های ایمیل از ماژول های مختلف استفاده کند. از تب Configure به این صفحه دسترسی پیدا کنید.
توجه: This unit is NOT compatible with SSL/TLS, there are 3rd party SMTP delivery servers which do not require SSL and can be used. For instructions on how to use a 3rd party SMTP delivery service, please refer to Appendix 1 at the end of this manual).
- سرور SMTP - سرور ایمیل خروجی را که می خواهید استفاده کنید وارد کنید.
- پورت – این پورت روی آن سرور است. برای این اطلاعات و همچنین سایر فیلدهای راه اندازی، می توانید سرویس پست الکترونیکی خود را به صورت آنلاین جستجو کنید.
- از SSL استفاده کنید – هنگامی که از سرور SMTP شخص ثالث استفاده می کنید، آن را بدون علامت بگذارید.
- نام کاربری - نام حساب ایمیل شما.
- رمز عبور - رمز عبور حساب ایمیل.
- To Address – Enter up to 3 address for this email set up. An addressee, a CC and a BC.
- موضوع - خط موضوع هدر ایمیل.

صفحه پیکربندی شبکه
Access this page from the Configure dropdown menu. This page allows the configuration of the SERVER’s network settings.
احتیاط: Incorrect settings may cause the board to lose network connectivity. In order to access a device in your network remotely you must PORT the device. This tells your router that information coming in should be sent to a specific device on your network.
- MAC Address – This is a unique MAC address that is assigned to this product at time of assembly. It cannot be altered.
- نام میزبان – این یک نام Netbios است که ممکن است در برخی از شبکه ها به این واحد آدرس داده شود. همچنین ممکن است در فهرست اجاره روتر شما ظاهر شود. این یک مکان مفید برای نامگذاری سرور شما است و در صفحه اصلی و در Discoverer ظاهر می شود.
- شماره پورت - این قسمتی از آدرس IP می شود و برای دسترسی به اینترنت ضروری است. اگر این تنظیم نشده باشد، سرور به طور پیش فرض شماره پورت 80 را انتخاب می کند.
- IP Address – Typically you only change the last group of numbers. If you change this IP address make sure to reserve this IP on your router and no other devices are using this IP address or you may not be able to reach this SERVER. If this happens you may need to Restore Defaults using the push button method.
- دروازه – معمولاً یک روتر در شبکه TCP/IP شما که به عنوان نقطه دسترسی به ISP شما عمل می کند.
- Subnet Mask - یک عدد 32 بیتی که یک آدرس IP را پنهان می کند و آدرس IP را به آدرس شبکه و آدرس میزبان تقسیم می کند. فقط آن را در 255.255.255.0 بگذارید
- DNS اولیه - یک DNS اولیه.
- DNS ثانویه - یک DNS ثانویه.

صفحه پیکربندی محدوده IP
Access this page from the Configure dropdown menu. Use these security settings to select a range of IP address that will be allowed to access the SERVER.CAUTION: Incorrect settings may cause the board to lose network connectivity. Not implemented on this SERVER.
صفحه دستگاه های راه دور
Access this page from the Configure dropdown menu. These settings allow the SERVER to remotely control the relays on another SERVER. This is done by selecting the Remote Device in the Schedule program or by setting up a relay as a REMOTE. There are 8 possible REMOTE locations.
احتیاط: تنظیمات نادرست باعث می شود که برد اتصالات راه دور خود را از دست بدهد.
- نام دستگاه – یک نام متنی برای این دستگاه برای مراجعات بعدی وارد کنید.
- آدرس IP - آدرس IP دستگاه راه دور شامل شماره پورت.
- نام کاربری – مورد استفاده در احراز هویت اولیه.
- Password – Used in Basic Authentication.

Kodalert Page
Not Yet Implemented. Access this page from the Configure dropdown menu. Kodalert provides an interface for alerts of Internet connected devices. Kodalert is a cloud based, open platform monitoring and alert system for the Internet of Things in your physical world. Any Thing that can send an email or TCP messages including our SERVERS, other manufactures devices and people using email can use Kodalert. It can work for multiple remote locations, alert multiple users instantly using the rules you setup by text, email, smart phone Apps push notification or audible alarm instantly when something happens.
- شماره هشدار
- تست کنید
- استفاده کنید
- قانون
In the Alarm Notification page, you can change the state (on/off) of the relay by clicking the green circle in the state column. Push the EDIT icon to change the Alarm’s settings.

مشخصات
FARGO R8G2
- 10M/100M RJ45 Internet interface with connection and activity LEDs
- 8 Relay outputs, 1FORMC 48 Volt Max (24VAC/DC 3A)
- Status LEDs (pulse, bootloader, and locate)
- Ethernet Bootloader (for server hardware code upgrade)
- PoE or 12VDC @500mA (nominal)
- Web interface w/basic authentication
- On board temperature sensor and voltagسنسور الکترونیکی
Reset /Locate pushbutton (blue LED) - Working Temperature from 0 to +70 Celsius
- Storage Temperature from 40 to +125 Celsius
- Humidity from 10% to 80% noncondensing
- Dimensions 74mm x 100mm x 20mm, mounting holes 64mm x 92mm Ф 3.2mm 4 places
- پروتکل های پشتیبانی شده: HTTP/SMTP/SNTP
FARGO R4G2
- 10M/100M RJ45 Internet interface with connection and activity LEDs
- 4 1FormC relays 48 Volt Max (24VAC/DC 3A)
- 2 optically isolated digital inputs, 12V 1mA or pulldown switch selectable, 2 conductor screw terminal connectors for each.
- 2 Analog 0-5VDC Inputs 30mA 3.3VDC power source PTC protected. 3 conductor screw terminal connectors for each (3.3VDC, input, ground) (R4ADI only)
- 2 Current sensor inputs. 3.5mm stereo jack connector for each (R4ADI only)
- Status LEDs (pulse, bootloader, and locate)
- Ethernet Bootloader (for server hardware code upgrade
- POE or 12VDC @500mA (nominal)
- Web interface w/basic authentication
- On board temperature sensor and voltagسنسور الکترونیکی
- Reset/Locate pushbutton
- Working Temperature from 0 to +70 Celsius
- Storage Temperature from 40 to +125 Celsius
- Humidity from 10% to 80% noncondensing
- Dimensions 74mm x 100mm x 20mm, mounting holes 64mm x 92mm Ф 3.2mm 4 places
- پروتکل های پشتیبانی شده: HTTP/SMTP/SNTP
KODA100
- 10M/100M RJ45 Internet interface with connection and activity LEDs
- 2 1-Form-A relay 48VAC@8A Max
- 2 optically isolated digital inputs, 12V 1mA or pulldown switch selectable
- Status LEDs (pulse, bootloader, and locate)
- Ethernet Bootloader (for server hardware code upgrade)
- POE or 12VDC @500mA (nominal)
- Web interface w/basic authentication
- On board temperature sensor and voltagسنسور الکترونیکی
- Reset/Locate pushbutton (blue LED)
- Working temperature from 0 to +70 Celsius
- Storage temperature from 40 to +125 Celsius
- Humidity from 10% to 80% noncondensing
- ابعاد: 70mm x 100mm x 25mm
- پروتکل های پشتیبانی شده: HTTP/SMTP/SNTP
KOD200
- 10M/100M RJ45 Internet interface with connection and activity LEDs
- 4 1FormA relays 48 Volt Max 1A dry contact or drive 10V ±10% 50mA to external devices
- 2 optically isolated digital inputs, 12V 1mA or pulldown switch selectable
- Status LEDs (pulse, bootloader, and locate)
- Ethernet Bootloader (for server hardware code upgrade)
- POE or 12VDC @500mA (nominal)
- Web interface w/basic authentication
- On board temperature sensor and voltagسنسور الکترونیکی
- Reset/Locate pushbutton (blue LED)
- Working Temperature from 0 to +70 Celsius
- Storage Temperature from 40 to +125 Celsius
- Humidity from 10% to 80% noncondensing
- ابعاد: 70mm x 100mm x 25mm
- پروتکل های پشتیبانی شده: HTTP/SMTP/SNTP
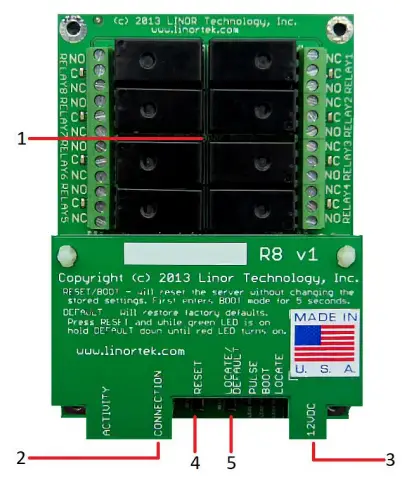
چیدمان مرجع تابلو
Fargo R8
- 8 Relay outputs, 1FORMC 48 Volt Max (24VAC/DC 3A)
- رابط Rj45
- کانکتور برق (12VDC)
- دکمه تنظیم مجدد
- دکمه را پیدا کنید
Fargo R4
- 3.5mm Inputs for AC Current Sensor (R4ADI Only)
- Analog Inputs (R4ADI Only)
- 4 Relay outputs, 1FORMC 48 Volt Max (24VAC/DC 3A)
- ورودی های دیجیتال
- Digital Input Switches (Input 1 on right.
Up: Pullup, Down: Isolated) - رابط Rj45
- دکمه تنظیم مجدد
- دکمه را پیدا کنید
- کانکتور برق (12VDC)

کدا 100
- Digital Inputs (#1 on the left) 5VDC-48VDC (12VDC-48VDC must use the external resistor)
- Relay Outputs (#1 is on the right) 8A@48VAC Max
- Digital Input Switches (IN 1 on left. UP: Isolated, Down: Pullup)
- دکمه تنظیم مجدد
- دکمه بارگذاری مجدد (LED آبی را روشن می کند - در Discoverer شناسایی می شود)
- رابط Rj45
- کانکتور برق (12VDC)
- کانکتور USB Mini برای سنسور دما/رطوبت (فروش جداگانه)

کدا 200
- Digital Inputs (#1 on the left) 5VDC-48VDC (12VDC-48VDC must use the external resistor)
- Relay Outputs (#1 is on left) 48 Volt Max 1A dry contact or drive 10V ±10% 50mA
- Digital Input Switches (IN 1 on left. UP: Isolated, Down: Pullup)
- Relay Switches (Up for dry contact, down for 10V/50mA)
- دکمه تنظیم مجدد
- دکمه بارگذاری مجدد (LED آبی را روشن می کند - در Discoverer شناسایی می شود)
- رابط Rj45
- کانکتور برق (12VDC)
- کانکتور USB Mini برای سنسور دما/رطوبت (فروش جداگانه)

تنظیم مجدد کارخانه
To perform a factory Reset, push the Reset button. When the green LED turns on, push and hold the Reload button until the flashing red LED turns off and then turns on solid. Refer to Board Reference Layout section for the button locations on your device.
This user-manual supplements the documentation for the following Linortek products:
- نت بل-2
- نت بل-8
- Netbell-K (and variants)
- iTrixx-NHM
For more information, documentation and how-to videos, visit https://www.linortek.com/downloads/
این سند را می توان در یافت www.linortek.com/downloads/documentations/
اگر در مورد دستگاه خود به کمک نیاز دارید، لطفاً مراجعه کنید www.linortek.com/technical-support
Linor Technology, Inc.
اطلاعات ممکن است بدون اطلاع قبلی تغییر کند.
پیوست 1
نحوه ارسال ایمیل های SSL با استفاده از سرویس SMTP شخص ثالث برای دستگاه های Linortek Fargo و Koda
به طور پیش فرض، دستگاه های Koda/Fargo از سرورهای ایمیل غیر SSL SMTP استفاده می کنند. اما اکثر سرورهای ایمیل امروزی به پروتکل امنیتی SSL تغییر وضعیت داده اند، سرورهای تحویل SMTP شخص ثالث وجود دارند که نیازی به SSL ندارند و می توان از آنها استفاده کرد. ارائه دهندگان خدمات ایمیل SMTP زیادی در بازار وجود دارد. ما از SMTP3GO به عنوان نمونه قبلی استفاده می کنیمample برای نشان دادن فرآیند راه اندازی. SMTP2GO برای استفاده با حداکثر 1000 ایمیل در ماه رایگان است. برای استفاده از SMTP2GO، لطفاً به این آدرس مراجعه کنید: https://www.smtp2go.com/ .
مرحله 1. حساب SMTP2GO را ایجاد کنید.
برای ایجاد یک حساب کاربری کافی است روی "ثبت نام" کلیک کنید، "1K ایمیل" را در مقیاس انتخاب کنید، و "طرح رایگان" را انتخاب کنید (اگر نیاز به ارسال بیش از 1000 ایمیل در ماه دارید، طرحی را انتخاب کنید که نیازهای شما را برآورده کند.)

برای ایجاد یک حساب کاربری در SMTP2GO، یک آدرس ایمیل شرکتی مورد نیاز است. سرویس ایمیل رایگان مانند جیمیل یا یاهو به شما اجازه ادامه کار را نمی دهد. پس از فعال کردن حساب SMTP2GO خود، باید یک کاربر اضافه کنید.
مرحله 2. یک کاربر اضافه کنید.
زمانی که دستگاه Fargo/Koda را برای ارسال گزارش های ایمیل تنظیم می کنید، کاربری که در SMTP2GO ایجاد می کنید، سرور ایمیل خروجی خواهد بود، لطفاً مطمئن شوید که سرور ایمیل شرکت شما ایمیل ها را مسدود نمی کند اگر از حساب ایمیل رایگان مانند Yahoo یا Gmail استفاده می کنید. یک کاربر در اینجا اضافه کنید
وارد حساب کاربری SMTP2GO خود شوید، در منوی سمت چپ، «تنظیمات» > «کاربران SMTP» را انتخاب کنید، روی «افزودن کاربر SMTP» کلیک کنید و فرم را پر کنید.
 پس از اینکه کاربر به حساب SMTP2GO شما اضافه شد، اطلاعاتی را که برای تنظیم اعلان ایمیل در دستگاه های Fargo/Koda شما نیاز دارید نمایش می دهد.

مرحله 3. دستگاه Linortek را پیکربندی کنید.
پس از ایجاد یک حساب کاربری و افزودن یک کاربر، وارد دستگاه Linortek خود شوید، برای تنظیم اعلان ایمیل به تنظیمات - صفحه تنظیم ایمیل بروید:
- سرور SMTP - سرور ایمیل خروجی را که می خواهید استفاده کنید وارد کنید، این mail.smtp2go.com در سابق ما است.ampله
- پورت – این پورت روی آن سرور است. پورت SMTP در سابق ما 2525 استampله
- از SSL استفاده کنید – هنگامی که از سرور SMTP شخص ثالث استفاده می کنید، آن را بدون علامت بگذارید.
- نام کاربری – نام کاربری از SMTP2GO زمانی که کاربر را در مرحله قبل ایجاد کردیم.
- رمز عبور - رمز عبور کاربر از SMTP2GO زمانی که کاربر را در مرحله قبل ایجاد کردیم.
- به آدرس - حداکثر 3 آدرس را برای تنظیم این ایمیل وارد کنید. یک مخاطب، یک CC و یک BC.
- موضوع - خط موضوع هدر ایمیل.
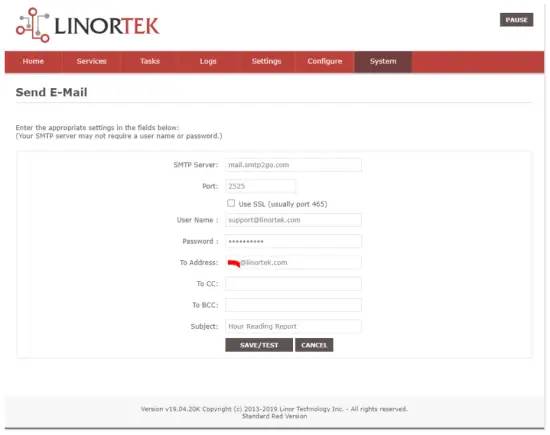
به محض ضربه زدن به "ذخیره/تست"، دستگاه به طور خودکار ایمیل آزمایشی را ارسال می کند. لطفاً پوشه Junk/Other را بررسی کنید تا اگر در پوشه Inbox نیست، آن را پیدا کنید.
مرحله 4. وظیفه اعلان های ایمیل خودکار را تنظیم کنید.
You should be able to receive email notifications for various events from the Fargo/Koda boards at this point. If you need to receive condition logic notification, you can use our condition logic configuration to setup such report. To setup the logic condition report notification, go to Tasks page on your Fargo/Koda device, click the Edit icon of a Schedule. For details of how to create a logic-based event, please refer to the Set Schedule Page on the Fargo/Koda User Manual, which can be downloaded here:
https://www.linortek.com/download/fargo%20g2_koda%20downloads/fargo%20g2_koda%20documentation/Fargo-G2-and-Koda-User-Manual.pdf
در این سample ما از دستگاه شبکه ساعت سنج به عنوان نمونه استفاده خواهیم کردampبرای نحوه دریافت گزارش های ایمیل هر روز در ساعت 11:52 صبح.
به محض برآورده شدن تمام شرایط کار، ایمیل زیر را دریافت می کنید:
Hour Reading Report
![]() support@linortek.com
support@linortek.com
Mon 4/11/2022 11:52 AM
To: Liyu Nalven
HM 1, my machine, is at 000242.01 hrs.
Reply Forward
![]()
اسناد / منابع
 |
لینورتک فارگو G2 TCP/IP Web کنترلکننده رله مبتنی بر [pdf] دفترچه راهنمای کاربر Fargo G2, Koda, Fargo G2 TCP-IP Web Based Relay Controller, Web Based Relay Controller, Based Relay Controller, Relay Controller |