![]() Fargo G2 and Koda User Manual
Fargo G2 and Koda User Manual
www.linortek.com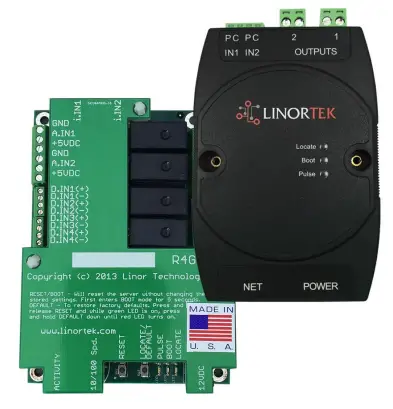 For Fargo G2, Koda
TCP/IP Web Kontroler releja na bazi
Rev C 04/2022
Fargo G2 TCP/IP Web Kontroler releja na bazi
Thank you for purchasing a Linortek Fargo G2 or Koda TCP/IP Controller. There are many devices that can be controlled by the FARGO/KODA Web Relay Controller. FARGO/KODA Web Controller can be used in such applications as (but not limited to): Lights, security, sprinkler systems, access control, industrial equipment, building automation, HVAC, and many more. Please refer to the Board Reference Layouts on page 29 for input and output specifications on your controller to verify they are suitable to your needs.
Ovaj priručnik pokriva:
- FARGO R8 G2
- FARGO R4DI G2
- FARGO R4ADI G2
- KODA 100
- KODA200
These will be referred to as SERVER hereafter. When there are differences or additional features they will be noted in the text.
Za video instrukcije, često postavljana pitanja i kontakt informacije za naš tim za tehničku podršku, posjetite: https://www.linortek.com/technical-support
LINORTEK JEDNOGODIŠNJA OGRANIČENA GARANCIJA
Consumer law: For consumers who are covered by consumer protection laws or regulations in their country of residence (“Consumer Law”), the benefits provided in this Linortek One-Year Limited Warranty (“Linortek Limited Warranty”) are in addition to and not instead of the rights provided by Consumer Law and it does not exclude, limit or suspend your rights arising from Consumer Law. You should consult the proper authorities in your country of residence for further information about these rights
Linortek-ove garancijske obaveze za ovaj hardverski proizvod (“Proizvod”) ograničene su na uslove navedene u nastavku:
Linor Technology, Inc. (“Linortek”) warrants this product against defects in materials and workmanship for a period of ONE (1) YEAR from the date of retail purchase by the original end-user purchaser (“Warranty Period”) when used in accordance with the operating instructions. A copy of a retail receipt is required as proof of purchase. If a hardware defect arises and a valid claim is received within the Warranty Period, at its option and to the extent permitted by law, Linortek will either (1) repair the hardware defect at no charge, using new or refurbished replacement parts, (2) exchange the product with a product that is new or which has been manufactured from new or serviceable used parts and is at least functionally equivalent to the original product, or (3) refund the purchase price of the product. When a refund is given, the product for which the refund is provided must be returned to Linortek and becomes Linortek’s property.
Navedena garancija podliježe kupčevom (i) brzom pismenom zahtjevu i (ii) blagovremenom pružanju mogućnosti Linorteku da pregleda i testira Proizvod za koji se tvrdi da je neispravan. Takva inspekcija može biti u prostorijama Kupca i/ili Linortek može zatražiti povrat proizvoda o trošku Kupca. Međutim, Linortek neće biti odgovoran za troškove pakovanja, pregleda ili rada u vezi sa vraćanjem Proizvoda. Nijedan proizvod neće biti prihvaćen za servisiranje pod jamstvom koji nije popraćen brojem ovlaštenja za povrat robe (RMA#) koji je izdao Linortek.
ISKLJUČENJA I OGRANIČENJA
Ova Ograničena garancija isključuje štetu nastalu zbog zloupotrebe, pogrešne upotrebe, zanemarivanja, požara ili drugih vanjskih uzroka, nezgoda, modifikacija, popravki ili drugih uzroka koji nisu nedostaci u materijalu i izradi. Softver koji distribuira Linortek sa ili bez brenda Linortek, uključujući, ali ne ograničavajući se na sistemski softver (“Softver”), nije pokriven ovom Ograničenom garancijom. Vaše korištenje i prava povezana sa Softverom regulirani su Linortekovim Ugovorom o licenciranju krajnjeg korisnika koji možete pronaći ovdje: https://www.linortek.com/end-user-licenseagreement/. Linortek nije odgovoran za štetu nastalu zbog nepoštovanja uputstava koja se odnose na upotrebu proizvoda. Kako bi osigurao usklađenost s radnim ograničenjima, Kupac bi trebao pogledati uputstvo za upotrebu [isporučeno uz proizvod]. Baterije nisu uključene u garanciju.
U MAKSIMALNOM DOZVOLJENOM MJERU, OVA OGRANIČENA GARANCIJA I GORE NAVEDENI LIJEKOVI SU ISKLJUČIVI I ZAMJESTO SVIH OSTALIH GARANCIJA, PRAVNIH LIJEKOVA I USLOVA, A LINORTEK KOJI SE POSEBNO ODRIČAVA OT LIMITED NA, GARANCIJE ZA PRODAJU, PRIKLADNOST ZA ODREĐENU SVRHU, NEKRŠENJE PRAVA. U onoj meri u kojoj se TAKVE GARANCIJE NE MOGU ODRICATI, SVE TAKVE GARANCIJE ĆE, U MJERI KOJE JE DOZVOLJENO ZAKONOM, BITI OGRANIČENE U TRAJANJU NA TRAJANJE LINORTEK OGRANIČENE GARANCIJE, I DA SE ODNOSI DA SE ODNOSI NA REMED. LINORTEK PO SVOJOJ ODLUČIVANJU. NEKE DRŽAVE (DRŽAVE I POKRAJINE) NE DOZVOLJAVAJU OGRANIČAVANJE KOLIKO DA TRAJE IMPLICIRANA GARANCIJA ILI USLOVI, TAKO DA SE GORE OPISANA OGRANIČENJA MOŽDA NE ODNOSE NA VAS. OVA GARANCIJA VAM DAJE POSEBNA ZAKONSKA PRAVA, A MOŽETE IMATI I DRUGA PRAVA KOJA SE RAZLIKUJU OD DRŽAVE DO DRŽAVE (ILI PO DRŽAVI ILI POKRAJINI). OVU OGRANIČENU GARANCIJU UREĐUJU I TIMA SE ZAKONI SJEDINJENIH DRŽAVA.
Odricanje od odgovornosti
- Pročitajte uputstva – Pročitajte sva uputstva za bezbednost i rad pre upotrebe proizvoda.
- Sačuvajte uputstva – Sačuvajte uputstva za bezbednost i rad za buduću upotrebu.
- Obratite pažnju na upozorenja – Pridržavajte se svih upozorenja na proizvodu iu uputstvu za upotrebu.
- Slijedite upute – Slijedite sva uputstva za upotrebu i upotrebu.
- Čišćenje – Isključite proizvod iz struje prije čišćenja. Nemojte koristiti tečna sredstva za čišćenje ili sredstva za čišćenje u obliku aerosola. Koristi oglasamp krpa samo za čišćenje kućišta.
- Prilozi – Nemojte koristiti dodatke osim ako ih Linortek izričito ne preporuči. Korištenje nekompatibilnih ili na drugi način neprikladnih dodataka može biti opasno.
- Dodatna oprema – Ne postavljajte ovaj proizvod na nestabilno postolje, stativ, držač ili nosač. Proizvod može pasti, uzrokujući ozbiljne ozljede osobe i ozbiljno oštećenje proizvoda. Koristite samo sa postoljem, tronošcem, držačem ili nosačem koje preporučuje proizvođač ili se prodaje uz proizvod. Slijedite upute proizvođača prilikom montaže proizvoda i koristite samo pribor za montažu koji preporučuje proizvođač. Budite oprezni kada koristite kombinaciju uređaja i kolica. Brza zaustavljanja, prekomjerna sila i neravne površine mogu uzrokovati prevrtanje kombinacije uređaja i kolica.
- Ventilacija – Otvori u kućištu, ako ih ima, predviđeni su za ventilaciju i osiguravanje pouzdanog rada proizvoda i zaštitu od pregrijavanja. Nemojte blokirati ili prekrivati ove otvore. Nemojte postavljati ovaj proizvod u ugrađenu instalaciju osim ako nije osigurana odgovarajuća ventilacija ili ako se pridržavate uputa Linorteka.
- Izvori napajanja – Koristite ovaj proizvod samo iz izvora napajanja koji je naveden u uputstvu za upotrebu ili na etiketi proizvoda.
Ako niste sigurni koji tip napajanja namjeravate koristiti, obratite se prodavaču uređaja ili lokalnoj elektroenergetskoj kompaniji – pod uvjetom da korištenje bilo kojeg tipa izvora napajanja osim navedenog u uputstvu za upotrebu ili naljepnici s oznakom poništava bilo kakvu garanciju. Za proizvode namijenjene radu na baterijsko napajanje ili iz drugih izvora, pogledajte upute za uporabu [priloženo uz proizvod]. - Uzemljenje ili polarizacija – Ovaj proizvod može biti opremljen polariziranim utikačem naizmjenične struje (utikač čiji je jedan nož širi od drugog). Ovaj utikač će se uklopiti u utičnicu samo na jedan način. Ovo je sigurnosna funkcija. Ako ne možete do kraja umetnuti utikač u utičnicu, pokušajte obrnuti utikač. Ako utikač i dalje ne stane, to je zato što vaša utičnica nije kompatibilna s utikačem. Obratite se svom električaru da zamijeni vašu utičnicu kompatibilnom. Nemojte prisiljavati utikač da stane u nekompatibilnu utičnicu ili na drugi način pokušavajte narušiti sigurnosnu svrhu utikača. Alternativno, ovaj proizvod može biti opremljen sa 3-žičnim utikačem za uzemljenje, pri čemu utikač ima treći (za uzemljenje) pin. Ovaj utikač može stati samo u utičnicu sa uzemljenjem. Ovo je sigurnosna funkcija. Nemojte prisiljavati utikač da stane u nekompatibilnu utičnicu ili na drugi način pokušavajte narušiti sigurnosnu svrhu utikača. Ako vaša utičnica nije kompatibilna s utikačem, obratite se svom električaru da zamijeni vašu utičnicu onom koja je kompatibilna.
- Zaštita kablova za napajanje – Kablove za napajanje provucite tako da nije verovatno da će po njima hodati ili ih priklještiti predmeti postavljeni na ili uz njih, obraćajući posebnu pažnju na kablove i utikače, praktične utičnice i mesto gde kablovi izlaze iz uređaja .
- Električni vodovi – Ne postavljajte vanjski sistem bilo gdje u blizini nadzemnih dalekovoda ili drugih električnih svjetala ili strujnih kola, ili gdje može pasti u takve dalekovode ili strujne krugove. Prilikom instaliranja vanjskog sistema, budite izuzetno oprezni da ne dodirnete takve vodove ili strujne krugove jer kontakt s njima može biti fatalan.
- Preopterećenje – Nemojte preopteretiti utičnice i produžne kablove jer to može uzrokovati požar ili strujni udar.
- Ulazak predmeta i tečnosti – Nikada nemojte gurati predmete bilo koje vrste u ovaj proizvod kroz otvore jer mogu dodirnuti opasan volumentagtačke ili delovi u kratkom spoju koji mogu izazvati požar ili strujni udar. Nikada ne prosipajte tečnost bilo koje vrste po proizvodu.
- Servisiranje – Ne pokušavajte sami da servisirate ovaj proizvod jer otvaranje ili skidanje poklopaca može da vas izloži opasnomtage ili druge opasnosti. Sve servisiranje proizvoda prepustite Linorteku.
- Oštećenje koje zahtijeva servis – Isključite proizvod iz utičnice i obratite se Linortek korisničkoj podršci za servis pod sljedećim uvjetima:
a. Kada je kabl za napajanje ili utikač oštećen.
b. Ako je prolivena tečnost ili su predmeti pali na proizvod.
c. Ako je proizvod bio izložen kiši ili vodi.
d. Ako proizvod ne radi normalno slijedeći upute za uporabu [priloženo uz proizvod]. Podesite samo one kontrole koje su pokrivene uputstvima za upotrebu, jer nepravilno podešavanje drugih kontrola može dovesti do oštećenja i često će zahtevati opsežan rad kvalifikovanog tehničara kako bi se proizvod vratio u normalan rad.
e. Ako je proizvod pao ili je kućište oštećeno.
f. Ako proizvod pokazuje izrazitu promjenu u performansama. - Zamjenski dijelovi – Ako su zamjenski dijelovi potrebni, imajte Low-Voltage Električar ih zamijeni samo dijelom koje je odredio proizvođač. Neovlaštene zamjene mogu dovesti do požara, strujnog udara ili drugih opasnosti. Zamjenske dijelove možete pronaći na https://www.linortek.com/store/
- Sigurnosna provjera – Po završetku bilo kojeg servisa ili popravke ovog proizvoda, zamolite servisera da izvrši sigurnosne provjere kako bi se utvrdilo da je proizvod u ispravnom radnom stanju.
- Koaksijalno uzemljenje – Ako je spoljni kablovski sistem povezan na proizvod, proverite da li je kablovski sistem uzemljen. Samo za modele za SAD – Odjeljak 810 Nacionalnog električnog kodeksa, ANSI/NFPA br. 70-1981, pruža informacije u vezi s pravilnom uzemljenjem nosača i noseće konstrukcije, uzemljenjem koaksijalne struje na proizvod pražnjenja, veličinom vodiča za uzemljenje, lokacijom proizvoda pražnjenja, spajanja na elektrode za uzemljenje i zahtjeva za elektrodu za uzemljenje.
- Grom – Za dodatnu zaštitu ovog proizvoda tokom oluje sa grmljavinom, ili pre nego što ga ostavite bez nadzora i nekorištenja tokom dužeg vremenskog perioda, isključite ga iz zidne utičnice i isključite kablovski sistem. To će spriječiti oštećenje proizvoda uslijed udara groma i strujnih udara.
- Upotreba na otvorenom – Ovaj proizvod nije vodootporan i ne smije se dozvoliti da se smoči. Ne izlažite ga kiši ili drugim vrstama tečnosti.
Ne ostavljajte preko noći na otvorenom jer može doći do kondenzacije. - Dok mijenjate baterije, osigurače ili rukujete proizvodom na nivou ploče, pazite na elektrostatičko pražnjenje koje može oštetiti elektronske uređaje. Najbolje je koristiti uzemljeni servis elektronike. Ako ovo nije dostupno, možete se isprazniti dodirom metalnog uređaja ili cijevi. Prilikom mijenjanja baterija ili osigurača ne dirajte i) nikakve žice osim žica baterije i ii) štampanu ploču.
OGRANIČENJE ODGOVORNOSTI
IN NO EVENT WILL LINOR TECHNOLOGY BE LIABLE, WHETHER IN CONTRACT, TORT, OR OTHERWISE, FOR ANY INCIDENTAL, SPECIAL, INDIRECT, CONSEQUENTIAL OR PUNITIVE DAMAGES, INCLUDING, BUT NOT LIMITED TO, DAMAGES FOR ANY LOSS OF USE, LOSS OF TIME, INCONVENIENCE, COMMERCIAL LOSS, OR LOST PROFITS, SAVINGS, OR REVENUES TO THE FULL EXTENT SUCH MAY BE DISCLAIMED BY LAW. DISCLAIMER FOR CRITICAL APPLICATIONS
Ovaj proizvod nije namijenjen niti odobren za proizvod za održavanje života ili za druge upotrebe za koje kvar može uzrokovati tjelesne ozljede ili smrt. Ako vi ili vaši kupci koristite ili dozvolite upotrebu ovog proizvoda za takve nenamjerne ili neovlaštene upotrebe, slažete se da ćete u potpunosti obeštetiti Linor Technology i njene podružnice, te službenike, zaposlenike i distributere svakog od njih, od svake odgovornosti u vezi s takvom upotrebom, uključujući advokatske naknade i troškovi.
DALJE OBAVIJEST O OGRANIČENJU UPOTREBE
Osim ako nije izričito navedeno, naši proizvodi NISU dizajnirani za promjenu linije voltage (110V i više) uređaja. Za upravljanje uređajem koji radi na liniji voltagKvalificirani električar MORA instalirati posrednički uređaj kao što je relej. Prilikom odabira uređaja za upravljanje, najbolje je odabrati low voltage kontrole kao što je 24VAC solenoid za kontrolu protoka vode. Samo kvalificirani električari smiju spajati liniju voltage uređaj. Pored toga, moraju se poštovati lokalni zakoni uključujući, ali ne ograničavajući se na veličinu žice i odgovarajuće kućište. Linortek ne preuzima nikakvu odgovornost za štetu nanesenu korisniku ili trećim stranama zbog nepropisne upotrebe naših proizvoda. Ova odgovornost ostaje na korisniku. Linortek ne preuzima odgovornost za štetu na uređaju zbog nepravilne upotrebe naših proizvoda.
RELAY VOLTAGE SPECIFIKACIJE
Budite oprezni kada povezujete uređaje na električna kola ili drugu opremu. Ovo web kontroler NIJE dizajniran za povezivanje na bilo koji voltage greater than 48V. Utilizing this arrangement, should allow you to virtually control anything. It is important that you use licensed electricians and comply with electrical codes that are applicable to your location. These codes exist for your safety, as well as the safety of others. Linortek assumes no responsibility for any harm or damage resulting from a failure adhere to local laws, ordinances or regulations or failure to follow specified instructions for installation and product usage.
Ugovor o licenci krajnjeg korisnika za Linortek softver i dokumentaciju
Ovaj Ugovor o licenci s krajnjim korisnikom („EULA“) je pravni ugovor između VAS (pojedinca ili jednog subjekta) i Linor Technology, Inc. („Linortek“ ili „mi“ ili „nas“) koji reguliše vašu upotrebu softvera i dokumentaciju (“Softver”) ugrađen ili povezan sa Fargo, Koda, Netbell, IoTMeter i iTrixx serijom proizvoda (“Linortek proizvodi”).
Ovaj EULA ne reguliše vašu upotrebu Linorteka webstranice ili Linortek proizvode (isključujući softver). Vaša upotreba Linorteka websajtom upravlja Linortek webUvjeti korištenja stranice i Linortek politika privatnosti koja se može naći na:
http://www.linortek.com/terms-and-conditions [Vaša kupovina Linortek proizvoda (osim softvera) podliježe ograničenom jamstvom Linortek, koje se može naći na https://www.linortek.com/linortek-one-year-limited-warranty/
This EULA governs your access and use of the Software. This EULA gives you specific legal rights, and you may also have other legal rights in addition, which vary from jurisdiction to jurisdiction. The disclaimers, exclusions, and limitations of liability under
this EULA will not apply to the extent prohibited or limited by applicable law. Some jurisdictions do not allow the exclusion of implied warranties or the exclusion or limitation of incidental or consequential damages or other rights, so those provisions of this EULA may not apply to you.
Instaliranjem, pristupom, kopiranjem i/ili korištenjem Softvera ili dokumentacije slažete se da ćete biti vezani odredbama i uslovima ove EULA u svoje ime ili u ime entiteta koji predstavljate u vezi sa takvom instalacijom, pristupom, kopiranjem i/ili koristiti. Izjavljujete i jamčite da (i) imate pravo, ovlaštenje i kapacitet da prihvatite i pristanete na uslove ove EULA u svoje ime ili u ime subjekta koji predstavljate (ii) da ste punoljetni u svojoj jurisdikciji prebivališta , (iii) da se ne nalazite u zemlji koja je pod embargom Vlade SAD ili koju je Vlada SAD označila kao zemlju koja „podržava teroriste“; i (ii) niste navedeni ni na jednoj listi zabranjenih ili ograničenih strana Vlade SAD.
Ako ne želite da budete vezani uslovima ove EULA, ne smijete instalirati, pristupati, kopirati ili koristiti Softver na bilo koji način (bez obzira da li je unaprijed instaliran na uređaju koji ste kupili).
- Dozvoljena upotreba softvera/softverske licence.
U skladu sa uslovima ove EULA, Linortek vam daje ograničeno, opozivo, neekskluzivno, neprenosivo pravo i licencu za (a) preuzimanje, instaliranje i izvršavanje jedne kopije Softvera, u obliku izvršnog objektnog koda samo, isključivo na Linortek proizvodu koji posjedujete ili kontrolirate i da (b) koristite Softver isključivo u vezi s Linortek proizvodom u skladu s njegovom namjeravanom upotrebom kako je opisano na Linortek-u websajt (svaki od 1(a) i 1(b) je „Dozvoljena upotreba” i zajedno „Dozvoljena upotreba”). - Ograničenja vaše upotrebe softvera.
Saglasni ste da nećete i da nećete dozvoliti drugima da koriste Softver u bilo koju drugu svrhu osim u Dozvoljene upotrebe opisane u Odjeljku 1 iznad. To, između ostalog, znači da ne smijete:
(a) uređivati, mijenjati, modificirati, prilagođavati, prevoditi, praviti izvedene radove, rastavljati, obrnuti inženjering ili obrnuto kompajlirati bilo koji dio Softvera (osim u mjeri u kojoj primjenjivi zakoni posebno zabranjuju takvo ograničenje u svrhe interoperabilnosti, u kom slučaju se slažete da prvo kontaktiraju Linortek i daju Linorteku priliku da kreira promene koje su potrebne u svrhu interoperabilnosti);
(b) licencirati, dodeljivati, distribuirati, prenositi, prodavati, iznajmljivati, hostovati, eksternalizovati, otkrivati ili na drugi način koristiti Softver u bilo koju komercijalnu svrhu ili učiniti Softver dostupnim bilo kojoj trećoj strani;
(c) dozvoliti bilo kojoj trećoj strani da koristi Softver u ime ili u korist bilo koje treće strane;
(d) koristiti bilo koji dio Softvera na bilo kojem uređaju ili računaru osim Linortek proizvoda koji posjedujete ili kontrolirate;
(e) koristiti Softver na bilo koji način koji krši bilo koji primjenjiv lokalni, nacionalni ili međunarodni zakon; ili
(f) remove or alter any labels, symbols, legends or proprietary notices, including but not limited to any copyright, trademark, logo in the Software. You may not disclose the results of any performance or functional evaluation of anyof the Software to any third party without the prior written consent of Linortek for each such release. - Ažuriranja.
Linortek može s vremena na vrijeme razviti ažuriranja, nadogradnje, zakrpe, ispravke grešaka i druge modifikacije (“Ažuriranja”) kako bi poboljšala performanse Softvera. Osim ako je drugačije navedeno na Linorteku webstranice, ova ažuriranja će vam biti dostavljena besplatno. Ova ažuriranja mogu biti automatski instalirana bez vašeg obavještenja. Korištenjem Softvera pristajete i na automatska ažuriranja. Ako se ne slažete s ovim, ne smijete instalirati, pristupati, kopirati ili koristiti Softver ni na koji način. - Vlasništvo.
The Software is licensed to you and not sold. Linortek reserves all rights to the Software and any Updates not expressly granted herein. The Software and Linortek Products are protected by copyright, trademark and other intellectual property laws andtreaties. Linortek and its licensors own the title, copyright, trademarks and other intellectual property rights in the Software.
You are not granted any rights to Linortek’s trademarks or service marks. There are no implied licenses in this EULA. - Raskid.
This EULA is effective from the date you first use the Software and will continue for as long as you own the Linortek Product associated with it or until you or Linortek terminate this agreement under this section. You may terminate this EULA at any time upon written notice to Linortek at the address provided below. Linortek may terminate this EULA at any time if you fail to comply with any of the terms in this agreement. The license granted in this EULA terminates immediately when the agreement terminates. Upon termination, you must stop using the Linortek Product and the Software and you must delete all copies of the
Software. The terms of Sections 2 will still remain in effect after the agreement terminates. - Odricanje od odgovornosti.
EXTENT PERMITTED BY APPLICABLE LAW, LINORTEK PROVIDES THE SOFTWARE “AS-IS” AND DISCLAIMS ALL WARRANTIES AND CONDITIONS, WHETHER EXPRESS, IMPLIED, OR STATUTORY, INCLUDING THE WARRANTIES OF MERCHANTABILITY, FITNESS FOR A PARTICULAR PURPOSE, TITLE, QUIET ENJOYMENT, ACCURACY, AND NON-INFRINGEMENT OF THIRD-PARTY RIGHTS. LINORTEK DOES NOT GUARANTEE ANY SPECIFIC RESULTS FROM THE USE OF THE SOFTWARE. LINORTEK MAKES NO WARRANTY THAT THE SOFTWARE WILL BE UNINTERRUPTED, FREE OF VIRUSES OR OTHER HARMFUL CODE, TIMELY, SECURE, OR ERROR-FREE. YOU USE THE SOFTWARE AND THE LINORTEK PRODUCT AT YOUR OWN DISCRETION AND RISK. YOU WILL BE SOLELY RESPONSIBLE FOR (AND LINORTEK DISCLAIMS) ANY AND ALL LOSS, LIABILITY, OR DAMAGES RESULTING FROM YOUR USE OF THE SOFTWARE
AND LINORTEK PRODUCT. - Ograničenje odgovornosti.
Ništa u ovom EULA, a posebno u ovoj klauzuli o „ograničenju odgovornosti“ ne pokušava da isključi odgovornost koja se ne može isključiti prema važećem zakonu.
U MAKSIMALNOJ MERI KOJI JE DOZVOLJENO VAŽEĆIM ZAKONOM, PORED GORNJEG ODRICANJA GARANCIJE, NI U KOJEM SLUČAJU (A) LINORTEK NEĆE BITI ODGOVORAN ZA BILO KAKVE POSLJEDIČNE, PRIMJERNE, POSEBNE, POSEBNE DATKE ILI KOJE SE ODNOSE IZ PROIZVODA ILI SOFTVERA ILI KOJI SE ODNOSE NA PROIZVODE ILI SOFTVER, ČAK I AKO JE LINORTEK ZNAO ILI TREBAO DA ZNA ZA MOGUĆNOST TAKVE ŠTETE, I (B) UKUPNU KUMULATIVNU ODGOVORNOST LINORTEK-a KOJA PROISTAKLA IZ DRUGIH PROIZVODA ILI U VEZI SA TRA, U VEZI SA NJEGOM, BIĆE OGRANIČEN NA IZNOS KOJI NIKAD NE PREMA IZNOSU KOJI STE STVARNO PLAĆALI LINORTEKU I LINORTEKOVOM OVLAŠĆENOM DISTRIBUTERU ILI PRODAJNOM PREDSTAVNIKU ZA PROIZVODE ILI USLUGE KOJI SU KOJI JE PRETHODNI 6.). OVO OGRANIČENJE JE KUMULATIVNO I NEĆE SE POVEĆATI POSTOJANJEM VIŠE OD JEDNOG INCIDENTA ILI ZAHTJEVA. LINORTEK SE ODRIČE SVAKE ODGOVORNOSTI BILO KOJE VRSTE LINORTEKOVIH LICENCE I DOBAVLJAČA. - Usklađenost sa izvoznim zakonima.
Prihvaćate da Softver i srodna tehnologija podliježu zakonima o kontroli izvoza SAD-a, izvoznoj jurisdikciji SAD-a i da mogu biti predmet izvoznih ili uvoznih propisa u drugim zemljama. Slažete se da ćete se striktno pridržavati svih primjenjivih međunarodnih i nacionalnih zakona i propisa koji se primjenjuju na Softver, uključujući propise američke izvozne administracije, kao i ograničenja krajnjeg korisnika, krajnje upotrebe i odredišta koja su izdale američke i druge vlade. Potvrđujete da imate odgovornost da dobijete ovlašćenje za izvoz, ponovni izvoz ili uvoz Softvera i povezane tehnologije, prema potrebi.
Vi ćete nadoknaditi i zaštititi Linortek od svih potraživanja, gubitaka, obaveza, šteta, novčanih kazni, kazni, troškova i izdataka (uključujući advokatske honorare) koji proizlaze iz ili se odnose na bilo koje kršenje vaših obaveza prema ovom odjeljku. - Zadatak.
Ne možete ustupiti nijedno od svojih prava ili obaveza prema ovom EULA-u, a svaki pokušaj ustupanja bit će nevažeći i bez efekta. - Obavještenja.
Linortek vam može dati bilo kakvo obavještenje u vezi s ovim EULA-om koristeći e-poštu i adresu koje ste naveli kada ste se registrirali kod Linorteka. - Odricanje
Da bi bila efektivna, svako odricanje Linorteka prema ovom ugovoru mora biti u pisanom obliku i potpisano od strane ovlaštenog predstavnika Linorteka. Svaki drugi propust Linorteka da izvrši bilo koju odredbu ovog Ugovora neće se smatrati odricanjem. - Severability.
Svaka odredba ove EULA za koju se utvrdi da je neprovediva biće uređena i tumačena kako bi se postigli ciljevi te odredbe u najvećoj mogućoj mjeri prema važećem zakonu, a sve preostale odredbe će ostati na punoj snazi i djelovanju. - Uređuju prava; Mjesto održavanja.
You agree that this EULA, and any claim, dispute, action, cause of action, issue, or request for relief arising out of or relating to this EULA, will be governed by the laws of the state of North Carolina, U.S.A., without regard to conflicts of laws principles, provided that if you reside in a country that will not apply U.S. law to disputes related to these terms, then the laws of your country will apply. You also agree that the United Nations Convention on Contracts for the International Sale of Goods shall not
apply. You agree that regardless of any statute or law to the contrary, any cause of action against us arising out of or related to the Linortek webweb-mjestu, softver ili Linortek proizvodi moraju započeti u roku od jedne (1) godine nakon nastanka razloga za tužbu ili će se takav razlog za djelovanje trajno zabraniti. Bilo koja radnja ili postupak u vezi s ovim EULA-om mora se pokrenuti na saveznom ili državnom sudu koji se nalazi u Raleighu, Sjeverna Karolina i svaka strana se neopozivo podvrgava jurisdikciji i mjestu održavanja bilo kojeg takvog suda u bilo kojem takvom zahtjevu ili sporu, osim što Linortek može tražiti zabranu pomoć u bilo kom sudu koji je nadležan za zaštitu svoje intelektualne svojine. - Kalifornijski prijedlog 65 Upozorenje.
 UPOZORENJE: Ovaj proizvod vas može izložiti hemikalijama, uključujući olovo, za koje je u državi Kalifornija poznato da uzrokuje rak. Za više informacija idite na www.P65Warnings.ca.gov.
Getting Started
The Fargo SERVER is what is called a “bare board” product and is supplied without a housing. It operates on low voltage; however you need to use simple handling precautions to prevent damage to the circuits. All electronics are susceptible to electrostatic discharge. This high voltage “shock” can permanently damage your device. Before handling the product, you should touch a surface such as a grounded workbench or table. It is also best to handle the device from its edges. If you notice that your chair or clothes often cause static discharges, you must exercise extra caution. The unit is supplied with four rubber feet which keeps the bottom of the board from coming into contact with the surface you put it on. Be careful not to let metal objects, such as screw drivers or hardware, come in contact with the bottom of this product. The board can be mounted on a panel using stand offs and #4 hardware. The mounting holes are connected to the GROUND signal. The SERVER unit is a self-contained web server configured with various input and output circuits. Although the relays are rated for higher voltages, ovaj proizvod nije dizajniran za upotrebu na liniji voltages. You should never use voltages through the SERVER product exceeding 48 volts. IT IS NOT SAFE.
The KODA SERVER is a housed unit with a DIN rail mountable enclosure that can be snapped onto a DIN rail or attached to any flat surface such as a wall or under a counter. KODA 100 has two relays (48VAC@1A), KODA 200 has four relays which can drive 10V 50mA to external devices. The unit is supplied with a DIN Rail mountable enclosure with removable terminal connectors for easy installation. The KODA SERVER can be mounted on a panel or on the wall using the DIN rail mount clip. The removable wire terminal connectors simplify field installation and allow for easy troubleshooting and maintenance: the unit can be removed from the system without disturbing the system wiring.
Povezivanje servera
Napomena: For a diagram showing the location of all connectors on your SERVER referenced in this section, please see the section – Board Layout Reference.
Oprez: Ove jedinice su izolovane od zemlje. Uvijek povežite tako da je strujna petlja spojena samo na SERVER jedinicu.
NEMOJTE koristiti eksterne priključke za uzemljenje. To može oštetiti SERVER ili POE uređaj.
- Place the unit on a table or bench being careful not to let any metal objects come into contact with the bottom of the circuit board (Fargo Only).
- Connect the 12VDC power supply to a suitable AC outlet and plug the barrel connector into the SERVER at the location labelled “12VDC/POWER”. Alternatively, you may also use POE. At this point the GREEN/Boot LED should come on and start flashing indicating the SERVER is operating and is in the “Bootload Mode”. This mode allows the user to update the server software that is used on the unit. After about 5 seconds, the GREEN LED will go off and the RED LED will start blinking once per second indicating the SERVER is operating in “Server Mode” and is accessible on a network utilizing TCP/IP protocols.
OPREZ: KADA KORISTITE POE MREŽNI PREKIDAČ, NEMOJTE KORISTITI NAPAJANJE OD 12VDC ZA NAPAJANJE SERVERA U ISTO VRIJEME, TO ĆE OŠTETITI PLOČU. - Plug an Ethernet cable into the RJ45/NET connector. The “Connection” LED will come on if a 100MHz network is available, otherwise it will remain off and the “Activity” LED should start blinking indicating network activity. Fargo G2 Relay Connections
There are 8 relays on the FARGO R8 and 4 on the FARGO R4. These are dry contact relays. These units are designed for only low voltage kontrolu i ne bi trebalo da ima voltage applied to the relay greater than 48 volts. This is for your safety as well as to stay within the parameters of the parts and circuit board design. The relays have 3 terminals labelled NO, C and NC which stand for Normally Open, Common and Normally Closed. When activated, the relay moves the connection from CNC to CNO. If you want to make a connection when the relay is activated, connect your wires between C and NO. When the relay is activated C and NO will be connected together. If you want to break a circuit when the relay is activated, make your connections to C and NC. When the relay is activated the circuit will be broken (or open)
Koda Relay Connection
There are 2 relays on the KODA 100. The KODA 100 has 2 removable 2 position connectors (1 for each relay) and are simply numbered “1” and “2”. These relays are normally open.
There are 4 relays on the KODA 200. The KODA 200 has 1 removable 8 position connector. Each relay has a “+” connection and a numbered connection. The relays may be set to supply about 10VDC by selecting “+V” on the setting switch (see Board Layout Reference page 29) or set to dry contact DC on the switch. If “+V” is selected then the voltage will be present on the “+” terminal and the numbered terminal is the return. Otherwise, a normally open dry contact exists across the “+” and numbered connection. KODA 100/200 is designed for only low voltage kontrolu i ne bi trebalo da ima voltage primijenjen na relej veći od 48 volti. Ovo je za vašu sigurnost, kao i da ostanete u okviru parametara dijelova i dizajna ploče.

![]() LINOR TEHNOLOGIJA NI U KOJEM SLUČAJU NEĆE BITI ODGOVORNA, BILO U UGOVORU, DELEKTU ILI NA DRUGIM, ZA BILO KAKVE SLUČAJNE, POSEBNE, INDIREKTNE, POSLEDIČNE ILI KAZNENE ŠTETE, UKLJUČUJUĆI, ALI NE UKLJUČUJUĆI, ALI NE OGRANIČENO, NA NEOGRANIČENO, NA , KOMERCIJALNI GUBITAK ILI GUBITAK DOBITAKA, UŠTEDE ILI PRIHODA U PUNOM MJERU KOJI SE MOŽE ODRICATI ZAKONOM.
LINOR TEHNOLOGIJA NI U KOJEM SLUČAJU NEĆE BITI ODGOVORNA, BILO U UGOVORU, DELEKTU ILI NA DRUGIM, ZA BILO KAKVE SLUČAJNE, POSEBNE, INDIREKTNE, POSLEDIČNE ILI KAZNENE ŠTETE, UKLJUČUJUĆI, ALI NE UKLJUČUJUĆI, ALI NE OGRANIČENO, NA NEOGRANIČENO, NA , KOMERCIJALNI GUBITAK ILI GUBITAK DOBITAKA, UŠTEDE ILI PRIHODA U PUNOM MJERU KOJI SE MOŽE ODRICATI ZAKONOM.
DALJE OBAVIJEST O OGRANIČENJU UPOTREBE
Osim ako nije izričito navedeno, ovaj proizvod NIJE dizajniran za promjenu volumena linijetage uređaje. Ovo ograničenje uključuje sve FARGO I KODA proizvode. Za upravljanje uređajem koji radi na liniji voltagKorisnik MORA instalirati i posrednički uređaj kao što je relej.
Prilikom ožičenja linije voltage uređaj koji koristi posrednički uređaj, MORATE ili biti kvalifikovani električar ili koristiti usluge kvalifikovanog električara. Pored toga, moraju se poštovati lokalni zakoni uključujući, ali ne ograničavajući se na, veličinu žice i odgovarajuće kućište.
Linortek cannot assume any responsibility for harm to the user or third parties for improperly using our Fargo/Koda products. This liability remains with the user. Linortek cannot assume any responsibility for damage to the device for improperly using our SERVER product.
For relay specifications, please see Board Reference Layout page 29
Digital Input Connections (Fargo R4 and Koda)
The digital inputs allow the SERVER to detect an external on/off state of a sensor. With this information the SERVER can display whether an input is on or off, count events in a resettable or non-resettable counter, and calculate the frequency (such as for use as a tachometer) or the period of the input. There are two modes of operation for the digital inputs – PULL UP and ISOLATED.
a) PULL UP mode connects a 1K resistor to an internal voltage koji vam omogućava da koristite jednostavan prekidač (kao što je magnetni prekidač za vrata) preko terminala 1 i 2. Kada je prekidač aktiviran, signal se šalje na ulaz.
b) ISOLATED mode allows you to directly drive the SERVER’s optoisolator with an external voltage kroz interni 1K otpornik. Ovaj voltage može biti u rasponu od 5V do 24V opskrbljujući diodu optoizolatora minimalno 2mA ili maksimalno 30mA. Nema druge interne veze sa ovom tomtage so it is an isolated input. Please note, when connecting a 12VDC-¬24VDC circuit to the input, an external resistor (can be provided at request, 2.2k ohm 0.5watt) must be used.
These modes are selected by the switch on the SERVER (see Board Layout Reference page 29) marked ISO and PU for isolated and pull up respectively. These are set at the factory to ISO by default.
Wiring a push button: For distances up to 500 feet, a 20 AWG shielded wire is suitable for wiring a push button. If the distance between the push button and the controller extends up to 5,000 feet, use a 16 AWG shielded cable instead. Keep in mind that longer cable runs are more susceptible to signal interference.
Oprez: If you intend to use isolated mode, verify that the input switch is set to ISO before applying an external voltage. U suprotnom možete oštetiti SERVER ili POE uređaj.
Analog Input Connections (Fargo R4ADI)
The analog inputs allow the SERVER to read the value of external equipment. There are 2 analog inputs.
For AC current monitoring, use one of the two 3.5mm stereo inputs to interface with a current sensor.
2 analogna ulazna terminala su povezana na neizolovane 0-5V strujne senzore koji mogu biti povezani na razne uređaje kao što su senzori temperature ili pritiska. SERVER obezbeđuje uzemljenje i priključak za napajanje tako da se merenja mogu vršiti bez eksterne voltage references. You should use a sensor that is isolated so that that it makes no connection to a remote ground. See drawing under Board Reference Layout page 29.
Accessing your SERVER
Kada se vaš SERVER uključi i poveže na mrežu, automatski će dobiti IP adresu putem DHCP-a sve dok je vaš ruter konfiguriran za to. Za povezivanje unesite IP adresu u svoju web browser. This will take you to your SERVER’s landing page. To log in, click the Log In button on the top right of the page. Your browser will prompt you to enter your username and password. By default, these credentials are both set to admin. To find your SERVER’s IP address, see below.
Pronalaženje vaše IP adrese uz Linortek Discoverer
Program Discoverer će automatski locirati vaš SERVER. Discoverer je Java program i zahtijeva instaliranje Java Runtime za korištenje ove funkcije. Java se može naći ovdje: http://java.com/en/download/index.jsp.
Za preuzimanje programa Discover, idite na: https://www.linortek.com/downloads/supportprogramming/
Preporučuje se korištenje preglednika Chrome i Firefox. Napomena: Ako više volite da koristite Internet Explorer, Internet Explorer sprema Linortek Discoverer kao Zip file po defaultu. Da biste koristili Discoverer, morat ćete odabrati Sačuvaj kao i preimenovati file kao Linortek Discoverer.jar kada preuzmete.
Prilikom preuzimanja programa Discover, ponekad ćete vidjeti iskačuću poruku upozorenja, ovisno o sigurnosnim postavkama vašeg pretraživača, s pitanjem želite li ovo zadržati ili odbaciti file, please click the Keep button as this is a Java program, and it won’t harm your computer.
Kada Discoverer locira vaš uređaj, prikazat će se:
- IP adresa
- Ime domaćina
- MAC adresa
- Ostale informacije:
a. Plava LED (ako je uključena)
b. ime proizvoda
c. Revizija serverskog softvera
d. Broj porta (ako se prenese)

Kliknite na uređaj koji želite da koristite prikazan na programu Discoverer da pokrenete SERVER web pages in your browser. Click the Login button on the homepage. The default username/password is: admin/admin. You may change these as you desire or disable this feature in the settings menu.
Connecting your SERVER Directly to Your PC
You can also plug your SERVER directly to your PC if there is no network connection available. If you plug your SERVER into your PC’s Ethernet port it will use the default IP address: 169.254.1.1 unless you have previously configured your SERVER to use a static IP. Enter 169.254.1.1 into your web browser to connect. No internet connection is required. Once configured, you can then install your SERVER where you desired.
Konfiguracija servera
Prijava
Once you have entered the IP address and port number, if set, the Login page will open. This page shows the name of this server which you may change in Configure/Network Config.
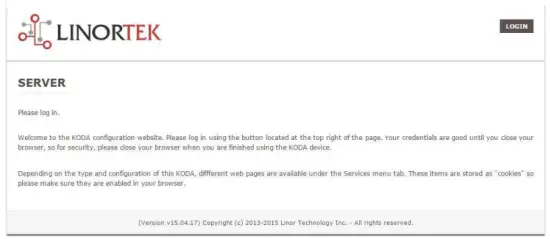
This page is static with no background activity and is a useful place to park if you are not using the SERVER and do not want to close the connection.
By pressing LOGIN, you will be asked for your username and password. These credentials will be retained by the browser until the browser is closed. You can disable the password requirement in Settings page. See section page 21.
Početna stranica
Nakon što unesete svoje akreditive za prijavu, bit ćete preusmjereni na glavnu stranicu aplikacije. Početna ili Indeksna stranica prikazuje neke informacije o sistemu i nudi mogućnost lociranja fizičkog uređaja ako se nalazi u području s drugima. Pogledajte listu ispod za opis.

- TIME – Displayed along with the day of the week. This time may be set to be in a 12 hour format with AM/PM indicator or 24 hour format.
- DATUM – Ovdje je prikazan trenutni datum.
- VOLTS – Voltage na tabli se prikazuje. Ovo može biti korisno ako se SERVER napaja zajedno sa drugom opremom, voltage variance can be noted. Fargo and Koda servers have an input voltage range of 1248vDC.
- TEMPERATURE – Temperature on the board is displayed. This display may be either °C or °F. This temperature will be affected by the heat generated by SERVER itself so it will always be slightly higher than ambient temperature.
- LED diode – Prikazane su 3 LED diode. CRVENA LED dioda je sistemski puls. Ovo bi trebalo da treperi otprilike jednom u sekundi sve dok server radi. ZELENA LED dioda se koristi za opcije pokretačkog programa i općenito nije vidljiva na website. PLAVA LED dioda se može kliknuti i možete je uključiti i isključiti iz ovoga web stranica. Ovo je korisno za fizičko lociranje uređaja ako se koristi s drugim sličnim jedinicama jer će svijetliti na jedinici kojoj je ovo web pretraživač je povezan. Program Discoverer će također primijetiti da li je PLAVA LED dioda uključena. Ovo se često naziva funkcijom “Lociranje”.
Usluge
Kartica Usluge je dinamička i mijenjat će se ovisno o konfiguraciji vašeg servera. Ovdje možete kontrolirati ulaze, izlaze, senzore i druge posebne kontrole.
In/Out or Relays Page
Depending on which SERVER you are using, the first page on the SERVICES tab will be either In/Out or Relays.
In/Out has the relay controls and the input controls on one page, while Relays only has the relay controls.
Relay Control
An In/Out page is displayed below. Some relay control pages have 2, 4 or 8 relays displayed. Each relay has a number, in this case 1 to 4.

The State LED shows whether the relay is on or off indicated by GREEN and RED respectively. This icon is clickable to manually control the corresponding relay. Each relay can have a Name as well as identifiers for the Normally Open, Common and Normally Closed connections.
Postoje četiri statusne LED diode koje prikazuju:
- Email – If an email is to be sent when this relay is switched on/off
- Puls – Ako je ovaj relej postavljen na širinu impulsa i množitelj širine impulsa (trajanje) – pogledajte sljedeći odjeljak za više informacija
- Sched. – If there is a schedule created in the Tasks page (see page 15) set to automatically trigger this relay.
- Timed – Ako je puls podešen i ovaj relej je aktiviran, LED dioda Timed će postati crvena pokazujući da relej trenutno radi na tajmeru.
Click the Edit Icon to edit the controls for the corresponding relay. This will take you to the Set Relay page (see page 11).
Inputs
The In/Out or Inputs page (depending on your SERVER) will display information from each input. The SERVERs have a combination of inputs. The Fargo R4DI has four digital inputs, The R4ADI has, four digital inputs, four analog inputs. The KODA SERVER has two digital inputs.
At the top of each input is a label (ex: DIN 1, AIN 2) specifying whether it is a digital input (DIN) or analog input (AIN) as well as the input number. This label will turn green when the input is enabled. Inside the box will be any display configured from the Set Input page (see page 12 for digital input, page 14 for analog input). A red dot in the lower-left corner indicating the state of a linked relay (if any), will turn green when the linked relay is activated.
Finally, an Edit icon in the lower-right corner of the box to edit the corresponding input. This will take you to the Set Digital Input or Set Analog Input page (page 12 or page 14).
Set Relay Page
Stranica SET RELAY vam omogućava da postavite različita svojstva koja se odnose na relej.
- Relay Select – The Relay that you are editing (identified by the line on which you clicked the Edit icon on the RELAY page).
- Name – Enter a 15-character Relay Name. This and the following 3 fields may be used for any identifying information desired.
- NO Name – Enter a 7-character name for the Normally Open (NO) connection.
- Com Name – Enter a 7-character name for the Common (COM) connection.
- NC Name – Enter a 7-character name for the Normally Closed (NC) connection.
- Pulse Width – When you control the relay it turns on or off. You may control it for a timed turned on period by entering a Pulse Width when 0 means there is no timed event and a number represents duration of the pulse. The maximum number you can enter here is 4 digits, ie. 1234.
- Multiplikator širine impulsa – Da biste dalje definirali dužinu impulsa, odaberite množitelj širine impulsa da biste dodatno definirali širinu impulsa. Možete odabrati:
• Ništa
• mS (Millisecond, 1/1000 second)
• Sec (Seconds)
• Min (Minutes) - Tip releja – SERVER može pristupiti relejima fizički na SERVERU ili pomoću drugih sredstava. Možete odabrati:
• Normal – relay physically on the SERVER
• Latched – not currently supported
• Remote – a relay on another SERVER accessed over the network
• Zigbee – a relay at a remote device accessed over an RF system
• Normal and Remote – both relays activated
• Normal and Zigbee – both relays activated - ID lokacije – ovo je broj koji identificira udaljenu lokaciju
- Relej na lokaciji – broj koji predstavlja relej ili uređaj na lokaciji
- Pošalji e-poštu – SERVER se može programirati da pošalje e-poštu ako je relej uključen ili isključen.

Podesite stranicu za digitalni ulaz
Digitalni ulazi se mogu podesiti tako da obezbeđuju različita očitavanja pri korišćenju niza tipova prikaza. Pored prikaza ulaznih podataka, možete imenovati displej, kao i povezati relej sa njim. Ovaj relej će se mijenjati iz zelene u CRVENU kako prelazi iz uključenja u isključeno, kao i na nju se može kliknuti za kontrolu. Klikom na ikonu za uređivanje olovke, možete urediti postavke za ovaj unos:
- Digital Input Selected – The Digital Input that you are editing (identified by the line on which you clicked the Edit icon).
- Ime – Možete postaviti ime od 15 znakova za ovaj ulaz. Ovo ime se nalazi u traci na vrhu ekrana.
- Oznaka – Postavite oznaku od 7 znakova koja se prikazuje na stvarno aktivnom ekranu.
- Korektor – Koristeći ovo polje možete dodavati, oduzimati, množiti ili dijeliti vrijednost prije nego što se vrijednost prikaže na stranici za prikaz. Ovo je korektor sa 2 vrijednosti sa svakim odvojenim jednim razmakom. (tj. “+2, -2, *3, /3”)
- USE – Postavlja ovaj ulaz na aktivan. Okreće indikator broja unosa u zeleno. Treba napomenuti da kada se koristi ulaz troši CPU vrijeme i druge resurse ovisno o svom tipu. Iako svi ulazi mogu biti aktivni u isto vrijeme, preporučuje se da uključite samo one koje želite koristiti.
- Vrsta – Ulazni podaci se mogu koristiti za izračunavanje raspona rezultata. Možete odabrati:
• State – This is useful for knowing if an input is on or off, like a door switch being on or off.
• CounterNR – This is a non-resettable counter.
• CounterR – This is a resettable counter.
• Frequency – Counts the frequency of an input in KHz (kilo hertz or1/1000 seconds). This could be useful in displaying a tachometer where 60Hz = 1 R.P.M.
• Period – in 1/1000 seconds an input in kHz (milliseconds or1/1000 seconds). This would be useful for measuring timed events. - Displej – Ovaj izbor vam omogućava da promenite tip ekrana koji se koristi. Možete odabrati:
• Dot – A single dot with the value in the middle. This can be used for State. You can make a dumb indicator by changing the color of the Dot based on the value. The label is under the Dot.
• Values – Displays the Corrected Value with the Label in a box directly below it.
• Meter – This Meter has configurable scale based on the Min/Max values and arcs can be colored per the Color ranges. The Label is displayed within the Meter.
• VBar – Also based on the Min/Max values for the scale and the bar changes color based on the values in the Color ranges. - Relay L/T – Enter a Relay number here. If it is a local relay it will show GREEN or RED depending if it is on or off. By clicking on it the relay will turn on and off. The name comes from the relay settings page. This may be useful if you want to turn the subject of a display on and off. Any relay can be used on any input and each may be reused for any other input. Adding an L after the relay number (ex: 2L) will link the state of the input to the state of the relay. This is an easy and immediate way to have an input follow the relay. Adding a T after the relay number will trigger the relay to the state of the input. This is an easy and immediate way to have a relay follow the input.
- Command Z/N/I – This field is used for issuing various commands to the Digital Input controller: Z Zero the resettable counter. N Leave the input as Normal. I Invert the input.
- Value – These are Min/Max values used for the display. This is useful for preventing a Meter from going past its end or setting the value of a VBar. This is the Value after the Corrector. The system cannot display a value past Max, so be sure this is at least set to 1.
- Žuta/crvena/zelena – postoje tri boje koje se mogu koristiti za dalje definiranje prikaza. Podesite raspon ovih boja da biste definirali boju na vrijednost prikaza. Ovo je vrijednost nakon korektora. Imajte na umu da ako koristite tip države, možda ćete htjeti dodijeliti CRVENO = Od 0 do 0, ZELENO = Od 1 do 1 i ŽUTO = Od 2 do 2. Pošto je država uvijek ili 1 ili 0, to će spriječiti dvosmislene informacije i spriječiti korištenje ŽUTE boje. Možete odabrati bilo koje dvije boje koje želite za tip države.

Set Analog Input Page
Analogni ulazi se mogu podesiti da obezbede različita očitavanja o korišćenju niza tipova prikaza. Pored prikaza ulaznih podataka, možete imenovati displej, kao i povezati relej sa njim. Ovaj relej će se mijenjati iz zelene u CRVENU kako prelazi iz uključenja u isključeno, kao i na nju se može kliknuti za kontrolu.
- Analog Input Selected – The Analog Input that you are editing (identified by the line on which you clicked the Edit icon).
- Ime – Možete postaviti ime od 15 znakova za ovaj ulaz. Ovo ime se nalazi u traci na vrhu ekrana.
- Oznaka – Postavite oznaku od 7 znakova koja se prikazuje na stvarno aktivnom ekranu.
- Korektor – Koristeći ovo polje možete dodavati, oduzimati, množiti ili dijeliti vrijednost prije nego što se vrijednost prikaže na stranici za prikaz. Ovo je korektor sa 2 vrijednosti sa svakim odvojenim jednim razmakom. (tj. “+2, -2, *3, /3”)
- USE – Sets this input to active. Turns the input number indicator to GREEN. It should be noted that when in use the input consumes CPU time and other resources depending on its type. Although all inputs may be active at the same time, it is recommended to turn on only those you want to use.
- Vrsta – Ulazni podaci se mogu koristiti za izračunavanje raspona rezultata. Možete odabrati:
• Analog 1 – Analog 1 input from a SERVER with an input such as found on a R4ADI.
• Analog 2 – Analog 2 input from a SERVER with an input such as found on a R4ADI.
• AC Current 1 – AC current sensor 1 input from a SERVER with an input such as found on a R4ADI.
• AC Current 2 – AC current sensor 2 input from a SERVER with an input such as found on a R4ADI.
• AC Current 3 – Not used
• Volts – The measurement of the voltage powering the SERVER.
• Current – On “S” models, this is the current consumed by the SERVER.
• Int. Temp – Temperature from the board mounted sensor.
• Ext. Temp – Temperature from the “S” model SERVER.
• R. Humidity – % Relative Humidity from the “S” model SERVER.
• MMA X – The X axis accelerometer data from the “S” model SERVER.
• MMA Y – The Y axis accelerometer data from the “S” model SERVER.
• MMA Z – The Z axis accelerometer data from the “S” model SERVER. - Displej – Ovaj izbor vam omogućava da promenite tip ekrana koji se koristi. Možete odabrati:
1. Dot – A single dot with the value in the middle. This can be used for State. You can make a dumb indicator by changing the color of the Dot based on the value. The label is under the Dot.
2. Values – Displays the Corrected Value with the Label in a box directly below it.
3. Meter – This Meter has configurable scale based on the Min/Max values and arcs can be colored per the Color ranges. The Label is displayed within the Meter.
4. VBar – Also based on the Min/Max values for the scale and the bar changes color based on the values in the Color ranges. - Relay – Enter a Relay number here. If it is a local relay it will show Green or RED depending if it is on or off.
By clicking on it the relay will turn on and off. The name comes from the relay settings page. This may be useful if you want to turn the subject of a display on and off. Any relay can be used on any input and each may be reused for any other input. - Vrijednost – Ovo su minimalne/maksimalne vrijednosti koje se koriste za prikaz. Ovo je korisno za sprječavanje da mjerač pređe kraj ili postavljanje vrijednosti VBar-a. Ovo je vrijednost nakon korektora. Sistem ne može prikazati vrijednost koja prelazi maksimalnu vrijednost, stoga se uvjerite da je ovo barem postavljeno na 1.
- Žuta/crvena/zelena – postoje tri boje koje se mogu koristiti za dalje definiranje prikaza. Podesite raspon ovih boja da biste definirali boju na vrijednost prikaza. Ovo je vrijednost nakon korektora. Imajte na umu da ako koristite tip države, možda ćete htjeti dodijeliti CRVENO = Od 0 do 0, ZELENO = Od 1 do 1 i ŽUTO = Od 2 do 2. Pošto je država uvijek ili 1 ili 0, to će spriječiti dvosmislene informacije i spriječiti korištenje ŽUTE boje. Možete odabrati bilo koje dvije boje koje želite za tip države.

Tasks Page
The TASKS page displays the automatic events that can be programmed into the SERVER. You can schedule up to 16 events in the SERVER. These are constructed as IF … THEN statements. In addition, the IF term can have 2 elements (IF a, AND/OR/NOT b … THEN c). This provides a simple to program and powerful way to take advantage of the data acquired by the SERVER. The Tasks page shows you an overview of configured tasks. You can click the dot in the State column to turn a task on or off indicated by a green dot for ON, and a red dot for OFF. To edit or create a task, click the Edit icon to the right of the task line. This will take you to the Set Schedule page detailed in the next section.

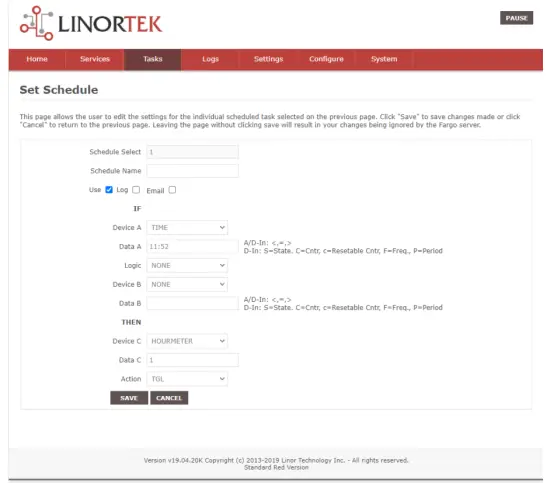
Set Schedule Page
The SET SCHEDULE page allows you to create time and logic-based events that will occur automatically if the conditions are met.
- Schedule Select – Determined by clicking on a schedule line from the previous page.
- Schedule Name – Enter a 15-character Schedule Name.
- USE – In order for a Schedule line to be active you must select the USE button. If there is an error detected in entering Schedule data, the USE box will automatically uncheck.
- LOG – Odaberite dnevnik da bi se ova stavka pojavila u sistemskom dnevniku svaki put kada se izvrši.
- Email – Click Email to automatically send an email when this schedule is executed.
- Device A – Select Device A for the first term in the IF statement from the drop box.
- Data A – Select Data A for the above device. Depending on the device selected, the Data used for testing may have special properties. See the list below for Data that may be entered. If an error is detected indata entry when the “Save” button is pushed, the USE box will uncheck and the Data box containing the error will be highlighted.
• Minute – Enter: mm
• Hour – Enter: hh (use 24-hour system)
• Day – Enter: dd
• DayofWeek – Enter: Sunday = 1, Monday = 2, Tuesday = 3, Wednesday = 4, Thursday = 5, Friday = 6, Saturday = 7, Weekday = 8, Weekend = 9
• Time – Enter: hh:mm (use leading zeros, seconds are ignored) (use 24 hour system) ex:07:30 or 14:05
• Date – Enter: yy/mm/dd (use leading zeros) ex: 20/01/10 for January 10, 2020
• Relay – Enter: Relay number and (+ or -), ex: 01+ for Relay 1 ON or 01- for Relay 1 OFF
• Button – Enter: + or – (for ON or OFF respectively)
• Flag – Enter: Flag number(opt.+), or Flag number (for ON or OFF respectively)
• Temp – Enter: >, = or < value; examptemperatura: >40 (uvijek stepeni C)
• Volts – Enter: >, = or < value; example: <10
• Analog – Analog input. Enter an input number and >, = or < and value. Example: 3<123 (This value is raw data value prior to any Corrector used by the input display page.)
• Digital – Digital input. Enter Input Number, Type, >, =, or < and value; example: 1F>7500 (This value is the raw data value prior to any Corrector used on the display page). Type can be (case sensitive):
• S State (On/Off)
• C Non-resettable counter
• c Resettable counter (lower case ‘c’)
• F Frequency in 1/1000 seconds
• P Period in 1/1000 seconds - Logika – Postavite logičko poređenje između uređaja A i uređaja B.
• AND – True if: Device A is true AND Device B is true
• OR – True if: Device A is true OR Device B is true
• NOT – True if: Device A is true and Device B is NOT true - Device B – Select Device B for testing from the drop box.
- Podaci B – Odaberite Podaci B za gornji uređaj. Ovisno o odabranom uređaju, podaci koji se koriste za testiranje mogu imati posebna svojstva. Vidi gornju listu.
- Uređaj C – je ono što treba kontrolisati.
- Podaci C – Postavi svojstvo za uređaj C. Sintaksa se koristi na sljedeći način:
• RELAY – These are relays on this SERVER. You can set up to four per schedule. Enter separated by commas, for example “1,2,3,4”
• FLAG – This is a storage flag that can be used to make more complex schedules. There are 8 flags that can be turned on or off.
• REMOTE – Refers to a remote SERVER unit. When these conditions are met, this SERVER will send a command to control a remote SERVER. The Data field for a remote unit should be in the format,
“REMOTE UNIT NUMBER, REMOTE UNIT RELAY”. For example, “3,5”. Ovi udaljeni SERVERI moraju biti identificirani na stranici Konfiguracija/Konfiguracija udaljenog uređaja.
• COUNTER – Adds count to digital input counter – set as 1 or 2 depending on which digital input is counting
• BLUE LED – No data.
• eMAIL – Will send eMail, no data.
• NOTIFY – Will send notification to Kodalert, set 1- 8 for Settings/Alarm Notification number. (Not Implemented) - Akcija – Šta učiniti s uređajem C. Opcije su:
• ON – Turns device ON
• OFF – Turns device OFF
• TGL – Toggles state of Device C
• RESET – Resets CounterR

Logs Page
The Logs tab displays over 10,000 entries from actions taken by the SERVER or by users themselves. This feature allows several actions for the convenience of displaying and collecting data from the SERVER.
- The checkboxes above the date allow the user to filter logs from different sources. To filter out logs you do not wish to see from a certain source simply uncheck the box.
- Each log has a reference number and a time and date attached in a “yyyy/mm/dd” and “hh:mm:ss” format. Afterwards is the event displayed.
- To scroll through the logs, use the arrows to the right-hand side, where the horizonal line and arrow brings you to the start or end, the double arrow moves up or down a page, and the single arrow moves up or down a single log.
- To refresh the logs manually click the REFRESH button below the Log Details.
- To download the Log Details, click the DOWNLOAD button below the Log Details, this allows you to save the logs as a separate file.
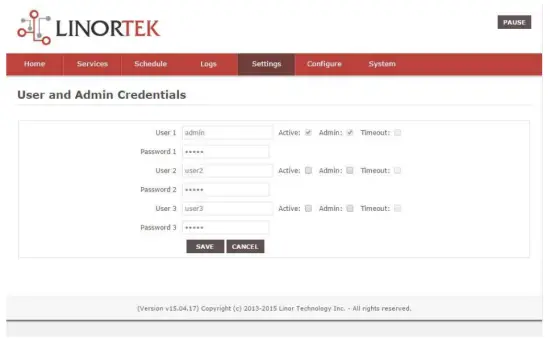
Stranica sa akreditivima korisnika i administratora
Use this page from the Settings drop down menu. Here you can set up to 3 users for your SERVER system. As a default only User 1 is Active. Here you can:
- User Name and Password – Each user has their own credentials. As a default these are set toadmin/admin, user2/user2 and user3/user3 for Users 1, 2 and 3 respectively. The passwords are never displayed. Napomena: when you reset the password, it must be less than 13-character.
- Aktivan – Mora biti označeno da bi se ovaj korisnik prijavio, ne možete deaktivirati korisnika 1.
- Administrator – Samo administrator može sačuvati podatke na većini stranica. Ovo štiti vaš SERVER od promjene od strane neovlaštene osobe.
- Vremensko ograničenje – nije omogućeno u ovom trenutku.
Stranica Vreme/Datum
Koristite ovu stranicu iz padajućeg menija Postavke. Ova stranica vam omogućava da podesite sistem vremena i datuma.
- Time – Set time using an hh:mm:ss format.
- Datum – Podesite datum koristeći format yy/mm/dd.
- Time Zone – Set desired time zone 5 for EST, 8 for PST, you can now add a :mm for setting part hour, for example, 5:30 je vremenska zona na 5 sati i 30 minuta.
- Koristi ljetno računanje vremena – Odaberite za automatsko podešavanje vašeg sistemskog vremena na dan ljetnog računanja vremena. (Nije tačno u svim vremenskim zonama.)
- Koristi MIL vrijeme – Odaberite za korištenje 24-časovnog formata.
- Use NTP Update – Select to synchronize SERVER time with NTP server
- NTP Web Site – Ovo je odabrani NTP server za ažuriranja.
- NTP interval – vremenski interval između ažuriranja u minutama.
- Log NTP Event – Normally NTP exceptions will be logged, select this option to Log every NTP event. (May be useful in debugging.)

Stranica postavki
Access this page from the Settings dropdown menu. Select these settings to enable various features in the SERVER
- Use Active Main – No longer used. (Select PAUSE to go inactive.)
- Zahtijevaj prijavu – Ako nije odabrano, SERVER će dozvoliti sav pristup bez vjerodajnica.
- Use IP Ranges – Not Implemented.
- Use RESTFUL IP Ranges – Not implemented.
- Use Remote IP Ranges – Not implemented.
- Koristi RESTful autentifikaciju – Zahtijevajte korisničko ime i lozinku za RESTful.
- Proširi raspon releja – Omogućuje 8 releja.
- Koristi radio dugmad za relej – ako je postavljeno, kada je jedan relej uključen, svi ostali se isključuju.
- SSL Port No. – Not supported – For future use.
- Koristi sistemske e-poruke – Omogućuje dodatne poruke e-pošte.
- Koristi Fahrenheit – Odabire Celzijus ili Farenhajt.
- PGM Dynamic Relays – Changes properties of relays in task schedule.
- CLR PGMs on Start – Reinitialize tasks on start up.
- RTC Temperature Compensation – All Koda boards can add Temperature and Humidity sensor.
- Koristite AM2302 – Koristite AM2302 senzor temperature i vlažnosti (prodaje se zasebno).
- Java Report – Send data to HourCollector app over ethernet (only for IoTMeter)
- Use Metric – Not supported – For future use.
- UART Usage – Enter “Audio” for Netbell-NTG, “Clock” for Netbell clock.
- Switch Bypass (1/2) – Ignores physical inputs if set. For example, in a Koda 200 board, you want to ignore input 1 switch, check Switch Bypass 1
- Setting 19 – Not supported – For future use
- Koristi audio File System – Activate SD Card reader for Netbell-NTG
- WiFi Report – Enable data transfer over WiFi (WiFi IoTMeter only)
- Active Landing Page – Not supported – For future use.
- . Invert Relay Control – The relay is set to NO by default. By checking this box the relay will be inverted to NC.
- Setting 24 – Not supported – For future use.

Dinamička DNS stranica
Access this page from the Configure dropdown menu. From this page you can assign dynamic DNS settings. This page, along with proper port forwarding through the router, can enable global access to a device behind a NAT router or firewall. You will need to assign a static IP address and port number (see Network Config Page on page 25) and port the IP address on your router (refer to your router’s user manual). An internet IP address will have to be hosted in order to access your SERVER from the internet. Currently the only IP hosting service supported is provided by DynDNS (https://dyn.com)
- Koristi DDNS – Omogućava ovu uslugu.
- DDNS usluga – Odaberite uslugu iz padajućeg okvira. Trenutno jedina podržana usluga je DynDNS
- Korisničko ime – Ovo se odnosi na nalog postavljen na DDNS servisu.
- Lozinka – Lozinka za pristup DDNS servisu.
- Host – This is the IP name registered at the DDNS service for rerouting to this SERVER

Stranica za podešavanje e-pošte
Podesite nalog e-pošte za SERVER koji će koristiti u slanju e-poruka iz različitih modula. Pristupite ovoj stranici sa kartice Konfiguracija.
Napomena: This unit is NOT compatible with SSL/TLS, there are 3rd party SMTP delivery servers which do not require SSL and can be used. For instructions on how to use a 3rd party SMTP delivery service, please refer to Appendix 1 at the end of this manual).
- SMTP server – Unesite server za odlaznu poštu koji želite da koristite.
- Port – Ovo je port na tom serveru. Ove informacije, kao i druga polja za podešavanje, možete potražiti na mreži.
- Koristi SSL – ostavite ga neoznačenim kada koristite SMTP server treće strane.
- Korisničko ime – Ime vašeg naloga e-pošte.
- Lozinka – Lozinka naloga e-pošte.
- To Address – Enter up to 3 address for this email set up. An addressee, a CC and a BC.
- Predmet – Predmet u zaglavlju e-pošte.

Stranica za konfiguraciju mreže
Access this page from the Configure dropdown menu. This page allows the configuration of the SERVER’s network settings.
OPREZ: Incorrect settings may cause the board to lose network connectivity. In order to access a device in your network remotely you must PORT the device. This tells your router that information coming in should be sent to a specific device on your network.
- MAC Address – This is a unique MAC address that is assigned to this product at time of assembly. It cannot be altered.
- Ime hosta – Ovo je Netbios ime na koje se ova jedinica može adresirati u nekim mrežama. Može se pojaviti i u imeniku zakupa vašeg rutera. To je korisno mjesto za imenovanje vašeg SERVERA i pojavljuje se na početnoj stranici i na Discoverer-u.
- Broj porta – Ovo postaje dio IP adrese i neophodno je za pristup Internetu. Ako ovo nije postavljeno, SERVER podrazumevano postavlja broj porta 80.
- IP Address – Typically you only change the last group of numbers. If you change this IP address make sure to reserve this IP on your router and no other devices are using this IP address or you may not be able to reach this SERVER. If this happens you may need to Restore Defaults using the push button method.
- Gateway – Obično ruter na vašoj TCP/IP mreži koji služi kao pristupna tačka vašem ISP-u.
- Subnet Mask – 32-bitni broj koji maskira IP adresu i dijeli IP adresu na mrežnu adresu i adresu hosta. Samo ga ostavite na 255.255.255.0
- Primarni DNS – primarni DNS.
- Sekundarni DNS – Sekundarni DNS.

Stranica za konfiguraciju IP opsega
Access this page from the Configure dropdown menu. Use these security settings to select a range of IP address that will be allowed to access the SERVER.CAUTION: Incorrect settings may cause the board to lose network connectivity. Not implemented on this SERVER.
Stranica udaljenih uređaja
Access this page from the Configure dropdown menu. These settings allow the SERVER to remotely control the relays on another SERVER. This is done by selecting the Remote Device in the Schedule program or by setting up a relay as a REMOTE. There are 8 possible REMOTE locations.
OPREZ: Neispravne postavke će uzrokovati da ploča izgubi svoje udaljene veze.
- Naziv uređaja – Unesite tekstualni naziv za ovaj uređaj za buduću upotrebu.
- IP adresa – IP adresa udaljenog uređaja uključujući broj porta.
- Korisničko ime – Koristi se u osnovnoj autentifikaciji.
- Password – Used in Basic Authentication.

Kodalert Page
Not Yet Implemented. Access this page from the Configure dropdown menu. Kodalert provides an interface for alerts of Internet connected devices. Kodalert is a cloud based, open platform monitoring and alert system for the Internet of Things in your physical world. Any Thing that can send an email or TCP messages including our SERVERS, other manufactures devices and people using email can use Kodalert. It can work for multiple remote locations, alert multiple users instantly using the rules you setup by text, email, smart phone Apps push notification or audible alarm instantly when something happens.
- Broj upozorenja
- Test
- Koristi
- Pravilo
In the Alarm Notification page, you can change the state (on/off) of the relay by clicking the green circle in the state column. Push the EDIT icon to change the Alarm’s settings.

Specifikacije
FARGO R8G2
- 10M/100M RJ45 Internet interface with connection and activity LEDs
- 8 Relay outputs, 1FORMC 48 Volt Max (24VAC/DC 3A)
- Status LEDs (pulse, bootloader, and locate)
- Ethernet Bootloader (for server hardware code upgrade)
- PoE or 12VDC @500mA (nominal)
- Web interface w/basic authentication
- On board temperature sensor and voltagsenzor
Reset /Locate pushbutton (blue LED) - Working Temperature from 0 to +70 Celsius
- Storage Temperature from 40 to +125 Celsius
- Humidity from 10% to 80% noncondensing
- Dimensions 74mm x 100mm x 20mm, mounting holes 64mm x 92mm Ф 3.2mm 4 places
- Podržani protokoli: HTTP/SMTP/SNTP
FARGO R4G2
- 10M/100M RJ45 Internet interface with connection and activity LEDs
- 4 1FormC relays 48 Volt Max (24VAC/DC 3A)
- 2 optically isolated digital inputs, 12V 1mA or pulldown switch selectable, 2 conductor screw terminal connectors for each.
- 2 Analog 0-5VDC Inputs 30mA 3.3VDC power source PTC protected. 3 conductor screw terminal connectors for each (3.3VDC, input, ground) (R4ADI only)
- 2 Current sensor inputs. 3.5mm stereo jack connector for each (R4ADI only)
- Status LEDs (pulse, bootloader, and locate)
- Ethernet Bootloader (for server hardware code upgrade
- POE or 12VDC @500mA (nominal)
- Web interface w/basic authentication
- On board temperature sensor and voltagsenzor
- Reset/Locate pushbutton
- Working Temperature from 0 to +70 Celsius
- Storage Temperature from 40 to +125 Celsius
- Humidity from 10% to 80% noncondensing
- Dimensions 74mm x 100mm x 20mm, mounting holes 64mm x 92mm Ф 3.2mm 4 places
- Podržani protokoli: HTTP/SMTP/SNTP
KODA100
- 10M/100M RJ45 Internet interface with connection and activity LEDs
- 2 1-Form-A relay 48VAC@8A Max
- 2 optically isolated digital inputs, 12V 1mA or pulldown switch selectable
- Status LEDs (pulse, bootloader, and locate)
- Ethernet Bootloader (for server hardware code upgrade)
- POE or 12VDC @500mA (nominal)
- Web interface w/basic authentication
- On board temperature sensor and voltagsenzor
- Reset/Locate pushbutton (blue LED)
- Working temperature from 0 to +70 Celsius
- Storage temperature from 40 to +125 Celsius
- Humidity from 10% to 80% noncondensing
- Dimenzije: 70mm x 100mm x 25mm
- Podržani protokoli: HTTP/SMTP/SNTP
KOD200
- 10M/100M RJ45 Internet interface with connection and activity LEDs
- 4 1FormA relays 48 Volt Max 1A dry contact or drive 10V ±10% 50mA to external devices
- 2 optically isolated digital inputs, 12V 1mA or pulldown switch selectable
- Status LEDs (pulse, bootloader, and locate)
- Ethernet Bootloader (for server hardware code upgrade)
- POE or 12VDC @500mA (nominal)
- Web interface w/basic authentication
- On board temperature sensor and voltagsenzor
- Reset/Locate pushbutton (blue LED)
- Working Temperature from 0 to +70 Celsius
- Storage Temperature from 40 to +125 Celsius
- Humidity from 10% to 80% noncondensing
- Dimenzije: 70mm x 100mm x 25mm
- Podržani protokoli: HTTP/SMTP/SNTP
Referentni raspored ploče
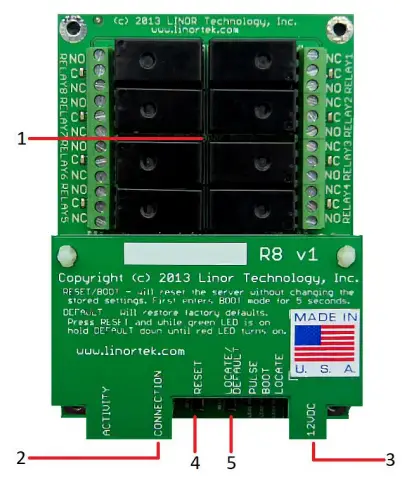
Fargo R8
- 8 Relay outputs, 1FORMC 48 Volt Max (24VAC/DC 3A)
- Rj45 konektor
- Konektor za napajanje (12VDC)
- Reset dugme
- Locirajte dugme
Fargo R4
- 3.5mm Inputs for AC Current Sensor (R4ADI Only)
- Analog Inputs (R4ADI Only)
- 4 Relay outputs, 1FORMC 48 Volt Max (24VAC/DC 3A)
- Digitalni ulazi
- Digital Input Switches (Input 1 on right.
Up: Pullup, Down: Isolated) - Rj45 konektor
- Reset dugme
- Locirajte dugme
- Konektor za napajanje (12VDC)

Koda 100
- Digital Inputs (#1 on the left) 5VDC-48VDC (12VDC-48VDC must use the external resistor)
- Relay Outputs (#1 is on the right) 8A@48VAC Max
- Digital Input Switches (IN 1 on left. UP: Isolated, Down: Pullup)
- Reset dugme
- Taster za ponovno učitavanje (uključuje plavu LED diodu – identifikuje na Discoverer-u)
- Rj45 konektor
- Konektor za napajanje (12VDC)
- USB mini konektor za senzor temperature/vlažnosti (prodaje se zasebno)

Koda 200
- Digital Inputs (#1 on the left) 5VDC-48VDC (12VDC-48VDC must use the external resistor)
- Relay Outputs (#1 is on left) 48 Volt Max 1A dry contact or drive 10V ±10% 50mA
- Digital Input Switches (IN 1 on left. UP: Isolated, Down: Pullup)
- Relay Switches (Up for dry contact, down for 10V/50mA)
- Reset dugme
- Taster za ponovno učitavanje (uključuje plavu LED diodu – identifikuje na Discoverer-u)
- Rj45 konektor
- Konektor za napajanje (12VDC)
- USB mini konektor za senzor temperature/vlažnosti (prodaje se zasebno)

Factory Reset
To perform a factory Reset, push the Reset button. When the green LED turns on, push and hold the Reload button until the flashing red LED turns off and then turns on solid. Refer to Board Reference Layout section for the button locations on your device.
This user-manual supplements the documentation for the following Linortek products:
- Netbell-2
- Netbell-8
- Netbell-K (and variants)
- iTrixx-NHM
For more information, documentation and how-to videos, visit https://www.linortek.com/downloads/
Ovaj dokument se može naći na adresi www.linortek.com/downloads/documentations/
Ako vam je potrebna pomoć s vašim uređajem, posjetite www.linortek.com/technical-support
Linor Technology, Inc.
Informacije su podložne promjenama bez prethodne najave.
Dodatak 1
Kako slati SSL e-poštu koristeći SMTP uslugu treće strane za Linortek Fargo i Koda uređaje
Koda/Fargo uređaji prema zadanim postavkama koriste ne-SSL SMTP servere e-pošte. Ali većina servera e-pošte danas je prešla na SSL sigurnosni protokol, postoje SMTP serveri za isporuku treće strane koji ne zahtijevaju SSL i mogu se koristiti. Na tržištu postoji mnogo provajdera SMTP usluga e-pošte. Koristimo SMTP3GO kao exampda demonstriramo proces postavljanja. SMTP2GO je besplatan za korištenje sa do 1000 e-poruka mjesečno. Za korištenje SMTP2GO posjetite: https://www.smtp2go.com/ .
Korak 1. Kreirajte SMTP2GO nalog.
Za kreiranje naloga jednostavno kliknite na “Prijavi se”, na skali odaberite “1K e-poruka” i odaberite “Besplatan plan” (Ako trebate slati više od 1000 e-poruka mjesečno, odaberite plan koji zadovoljava vaše zahtjeve.)

Za kreiranje naloga na SMTP2GO, bit će potrebna korporativna adresa e-pošte. Besplatne usluge e-pošte kao što su Gmail ili Yahoo neće vam dozvoliti da nastavite. Nakon aktivacije vašeg SMTP2GO naloga, potrebno je da dodate korisnika.
Korak 2. Dodajte korisnika.
Korisnik kojeg kreirate na SMTP2GO će biti server odlazne pošte kada postavite Fargo/Koda uređaj za slanje izvještaja e-poštom, molimo provjerite da vaš korporativni server e-pošte neće blokirati e-poštu ako koristite besplatni račun e-pošte kao što je Yahoo ili Gmail za dodajte korisnika ovdje.
Prijavite se na svoj SMTP2GO nalog, na lijevom bočnom meniju odaberite “Postavke” > “SMTP korisnici”, kliknite na “Dodaj SMTP korisnika” i popunite obrazac.
 Nakon što je korisnik dodan na vaš SMTP2GO nalog, on će prikazati informacije koje su vam potrebne za postavljanje obavještenja putem e-pošte na vašim Fargo/Koda uređajima.

Korak 3. Konfigurirajte Linortek uređaj.
Nakon što ste kreirali račun i dodali korisnika, prijavite se na svoj Linortek uređaj, idite na Konfiguriraj – stranicu za postavljanje e-pošte da postavite obavještenje putem e-pošte:
- SMTP server – Unesite server odlazne pošte koji želite da koristite, to je mail.smtp2go.com u našem bivšemample.
- Port – Ovo je port na tom serveru. SMTP port je 2525 u našem bivšemample.
- Koristi SSL – ostavite ga neoznačenim kada koristite SMTP server treće strane.
- Korisničko ime – Korisničko ime iz SMTP2GO kada smo kreirali korisnika u prethodnom koraku.
- Lozinka – lozinka korisnika sa SMTP2GO kada smo kreirali korisnika u prethodnom koraku.
- Na adresu – Unesite do 3 adrese za ovu postavku e-pošte. Adresar, CC i BC.
- Predmet – Predmet u zaglavlju e-pošte.
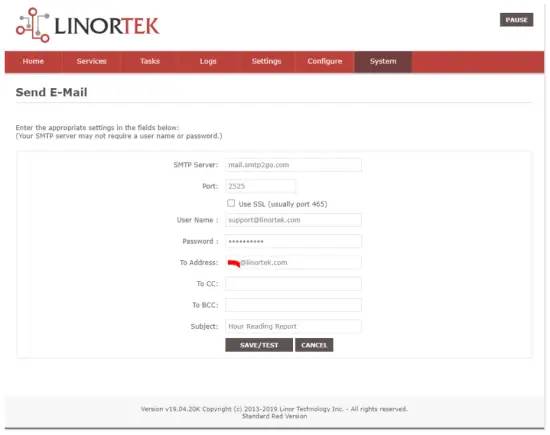
Čim pritisnete „Sačuvaj/Testiraj“, uređaj automatski šalje probni email. Molimo provjerite folder Nevrijeme/Ostalo da ga pronađete ako se ne nalazi u folderu Inbox.
Korak 4. Postavite zadatak za automatska obavještenja putem e-pošte.
You should be able to receive email notifications for various events from the Fargo/Koda boards at this point. If you need to receive condition logic notification, you can use our condition logic configuration to setup such report. To setup the logic condition report notification, go to Tasks page on your Fargo/Koda device, click the Edit icon of a Schedule. For details of how to create a logic-based event, please refer to the Set Schedule Page on the Fargo/Koda User Manual, which can be downloaded here:
https://www.linortek.com/download/fargo%20g2_koda%20downloads/fargo%20g2_koda%20documentation/Fargo-G2-and-Koda-User-Manual.pdf
U ovom sample Koristićemo uređaj Network Hour Meter kao primerample za primanje izvještaja putem e-pošte svaki dan u 11:52.
Čim se ispune svi uslovi zadatka, dobićete sledeću e-poštu:
Hour Reading Report
![]() support@linortek.com
support@linortek.com
Mon 4/11/2022 11:52 AM
To: Liyu Nalven
HM 1, my machine, is at 000242.01 hrs.
Reply Forward
![]()
Dokumenti / Resursi
 |
LINORTEK Fargo G2 TCP/IP Web Kontroler releja na bazi [pdf] Korisnički priručnik Fargo G2, Koda, Fargo G2 TCP-IP Web Based Relay Controller, Web Based Relay Controller, Based Relay Controller, Relay Controller |