![]() Fargo G2 and Koda User Manual
Fargo G2 and Koda User Manual
www.linortek.com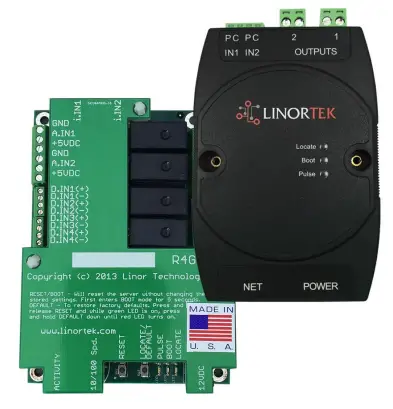 For Fargo G2, Koda
TCP/IP Web Batay sa Relay Controller
Rev C 04/2022
Fargo G2 TCP/IP Web Batay sa Relay Controller
Thank you for purchasing a Linortek Fargo G2 or Koda TCP/IP Controller. There are many devices that can be controlled by the FARGO/KODA Web Relay Controller. FARGO/KODA Web Controller can be used in such applications as (but not limited to): Lights, security, sprinkler systems, access control, industrial equipment, building automation, HVAC, and many more. Please refer to the Board Reference Layouts on page 29 for input and output specifications on your controller to verify they are suitable to your needs.
Ang manwal na ito ay sumasaklaw sa:
- FARGO R8 G2
- FARGO R4DI G2
- FARGO R4ADI G2
- KODA 100
- KODA200
These will be referred to as SERVER hereafter. When there are differences or additional features they will be noted in the text.
Para sa mga video sa pagtuturo, FAQ at impormasyon sa pakikipag-ugnayan para sa aming technical support team, pakibisita ang: https://www.linortek.com/technical-support
LINORTEK ONE-YEAR LIMITED WARRANTY
Consumer law: For consumers who are covered by consumer protection laws or regulations in their country of residence (“Consumer Law”), the benefits provided in this Linortek One-Year Limited Warranty (“Linortek Limited Warranty”) are in addition to and not instead of the rights provided by Consumer Law and it does not exclude, limit or suspend your rights arising from Consumer Law. You should consult the proper authorities in your country of residence for further information about these rights
Ang mga obligasyon sa warranty ng Linortek para sa produktong hardware na ito (“Produkto”) ay limitado sa mga tuntuning itinakda sa ibaba:
Linor Technology, Inc. (“Linortek”) warrants this product against defects in materials and workmanship for a period of ONE (1) YEAR from the date of retail purchase by the original end-user purchaser (“Warranty Period”) when used in accordance with the operating instructions. A copy of a retail receipt is required as proof of purchase. If a hardware defect arises and a valid claim is received within the Warranty Period, at its option and to the extent permitted by law, Linortek will either (1) repair the hardware defect at no charge, using new or refurbished replacement parts, (2) exchange the product with a product that is new or which has been manufactured from new or serviceable used parts and is at least functionally equivalent to the original product, or (3) refund the purchase price of the product. When a refund is given, the product for which the refund is provided must be returned to Linortek and becomes Linortek’s property.
Ang nabanggit na warranty ay napapailalim sa (i) agarang nakasulat na pag-claim ng Mamimili at (ii) napapanahong probisyon sa Linortek ng pagkakataong siyasatin at subukan ang Produktong inaangkin na may depekto. Ang nasabing inspeksyon ay maaaring nasa lugar ng Mamimili at/o maaaring hilingin ng Linortek na ibalik ang Produkto sa gastos ng Mamimili. Gayunpaman, hindi mananagot ang Linortek para sa pag-iimpake, inspeksyon, o mga gastos sa paggawa kaugnay ng pagbabalik ng Produkto. Walang Produkto ang dapat tanggapin para sa serbisyo ng warranty na hindi sinamahan ng Return Merchandise Authorization number (RMA#) na ibinigay ng Linortek.
MGA EKSKLUSYON AT LIMITASYON
Ang Limitadong Warranty na ito ay hindi kasama ang pinsalang dulot ng pang-aabuso, maling paggamit, pagpapabaya, sunog o iba pang panlabas na dahilan, aksidente, pagbabago, pagkukumpuni o iba pang dahilan na hindi mga depekto sa mga materyales at pagkakagawa. Ang software na ipinamahagi ng Linortek na mayroon o wala ang pangalan ng tatak ng Linortek kasama, ngunit hindi limitado sa software ng system (“Software”) ay hindi saklaw sa ilalim ng Limitadong Warranty na ito. Ang iyong paggamit at mga karapatan na nauugnay sa Software ay pinamamahalaan ng Linortek End User License Agreement na makikita mo dito: https://www.linortek.com/end-user-licenseagreement/. Walang pananagutan ang Linortek para sa pinsalang dulot ng hindi pagsunod sa mga tagubilin na may kaugnayan sa paggamit ng produkto. Upang matiyak ang pagsunod sa mga limitasyon sa pagpapatakbo, dapat sumangguni ang Mamimili sa manual ng pagtuturo [na ibinigay kasama ng produkto]. Ang mga baterya ay hindi kasama sa Warranty.
HANGGANG SA MAXIMUM NA PINAHIHINTULUTAN, ANG LIMITADO NA WARRANTY NA ITO AT ANG MGA REMEDYANG ITINAKDA SA ITAAS AY EKSKLUSIBO AT HALIP SA LAHAT NG IBA PANG WARRANTY, REMEDY, AT KONDISYON, AT LINORTEK ESPESYAL NA TINANGGITAN ANG LAHAT NG STATUTORY O IMPLIED WARRANTIES, NOTIMPLIED WARRANTIES, NOTIMPLIED WARRANTIES. KAANGKUPAN PARA SA ISANG PARTIKULAR NA LAYUNIN, HINDI PAGLABAG. HANGGANG ANG MGA GANITONG WARRANTY AY HINDI MATATANGGI, LAHAT NG GANITONG MGA WARRANTY AY, SA SAKOT NA PINAHIHINTULUTAN NG BATAS, AY LIMITADO SA DURATION SA tagal NG LINORTEK LIMITED WARRANTY AT ANG REMEDY AY LIMITADO SA PAG-AYOS, PAGPAPALIT ASIP NA I-REFUND. SA SARILING PAGPAPAHALAGA NITO. ILANG ESTADO (BANSA AT LALAWIGAN) AY HINDI PAHIHINTAYIN ANG MGA LIMITASYON SA KUNG GAANO KAtagal MAAARING MAGTATAGAL ANG ISANG IPINAHIWATIG NA WARRANTY O KONDISYON, KAYA ANG MGA LIMITASYON NA INILALARAWAN SA ITAAS AY MAAARING HINDI UMAPAT SA IYO. ANG WARRANTY NA ITO ay NAGBIBIGAY SA IYO NG MGA TIYAK NA LEGAL NA KARAPATAN, AT MAAARING MAYROON KA RIN IBANG KARAPATAN NA NAG-IIBA MULA SA ESTADO SA ESTADO (O NG BANSA O PROBINSYA). ANG LIMITADONG WARRANTY NA ITO AY PINAPAMAHALAAN NG AT ITINUTURO SA ILALIM NG MGA BATAS NG ESTADOS UNIDOS.
Mga Disclaimer
- Basahin ang Mga Tagubilin – Basahin ang lahat ng mga tagubilin sa kaligtasan at pagpapatakbo bago gamitin ang produkto.
- Panatilihin ang Mga Tagubilin - Panatilihin ang kaligtasan at mga tagubilin sa pagpapatakbo para sa sanggunian sa hinaharap.
- Pakinggan ang Mga Babala – Sumunod sa lahat ng babala sa produkto at sa mga tagubilin sa pagpapatakbo.
- Sundin ang Mga Tagubilin – Sundin ang lahat ng mga tagubilin sa pagpapatakbo at paggamit.
- Paglilinis – Tanggalin sa saksakan ang produkto sa kuryente bago linisin. Huwag gumamit ng mga liquid cleaner o aerosol cleaner. Gumamit ng adamp tela para sa paglilinis ng enclosure lamang.
- Mga Attachment – Huwag gumamit ng mga attachment maliban kung partikular na inirerekomenda ng Linortek ang mga ito. Ang paggamit ng hindi tugma o kung hindi man ay hindi angkop na mga attachment ay maaaring mapanganib.
- Mga Accessory – Huwag ilagay ang produktong ito sa hindi matatag na stand, tripod, bracket, o mount. Maaaring mahulog ang produkto, na magdulot ng malubhang pinsala sa isang tao at malubhang pinsala sa produkto. Gamitin lamang gamit ang stand, tripod, bracket, o mount na inirerekomenda ng tagagawa, o ibinebenta kasama ng produkto. Sundin ang mga tagubilin ng tagagawa kapag ini-mount ang produkto, at gumamit lamang ng mga mounting accessory na inirerekomenda ng tagagawa. Maging maingat kapag gumagamit ng kumbinasyon ng appliance at cart. Ang mabilis na paghinto, sobrang lakas, at hindi pantay na ibabaw ay maaaring maging sanhi ng pagbaligtad ng kumbinasyon ng appliance at cart.
- Bentilasyon – Ang mga pagbubukas sa enclosure, kung mayroon man, ay ibinibigay para sa bentilasyon at upang matiyak ang maaasahang operasyon ng produkto at upang maprotektahan ito mula sa sobrang init. Huwag harangan o takpan ang mga bakanteng ito. Huwag ilagay ang produktong ito sa isang built-in na instalasyon maliban kung ang wastong bentilasyon ay ibinigay o ang mga tagubilin ng Linortek ay sinunod.
- Mga Pinagmumulan ng Power – Patakbuhin lamang ang produktong ito mula sa uri ng power source na nakasaad sa manual ng pagtuturo o sa label ng produkto.
Kung hindi ka sigurado sa uri ng power supply na plano mong gamitin, kumonsulta sa iyong dealer ng appliance o lokal na kumpanya ng kuryente – sa kondisyon na ang paggamit ng anumang uri ng pinagmumulan ng kuryente maliban sa ipinahiwatig sa manual ng pagtuturo o label ng pagmamarka ay mawawalan ng anumang warranty. Para sa mga produktong nilalayong gumana mula sa lakas ng baterya, o iba pang mapagkukunan, sumangguni sa mga tagubilin sa pagpapatakbo [kasama sa produkto]. - Grounding o Polarization – Ang produktong ito ay maaaring nilagyan ng polarized alternating-current line plug (isang plug na may isang blade na mas malawak kaysa sa isa). Ang plug na ito ay kakasya sa saksakan ng kuryente sa isang paraan lamang. Ito ay isang tampok na pangkaligtasan. Kung hindi mo maipasok nang buo ang plug sa outlet, subukang baligtarin ang plug. Kung hindi pa rin magkasya ang plug, ito ay dahil hindi tugma ang iyong outlet sa plug. Makipag-ugnayan sa iyong electrician upang palitan ang iyong outlet ng isa na tugma. Huwag pilitin na magkasya ang plug sa isang hindi tugmang outlet o kung hindi man ay subukang talunin ang layuning pangkaligtasan ng plug. Bilang kahalili, ang produktong ito ay maaaring nilagyan ng 3-wire grounding-type na plug, isang plug na may ikatlong (grounding) pin. Ang plug na ito ay kakasya lamang sa isang grounding-type na power outlet. Ito ay isang tampok na pangkaligtasan. Huwag pilitin na magkasya ang plug sa isang hindi tugmang outlet o kung hindi man ay subukang talunin ang layuning pangkaligtasan ng plug. Kung ang iyong outlet ay hindi tugma sa plug, makipag-ugnayan sa iyong electrician upang palitan ang iyong outlet ng isa na tugma.
- Proteksyon ng Power-Cord – Iruta ang mga kurdon ng power supply upang hindi sila maipit o maipit ng mga bagay na nakalagay sa ibabaw o laban sa kanila, na binibigyang pansin ang mga cord at plugs, convenience receptacles, at ang punto kung saan lalabas ang mga cord mula sa appliance. .
- Mga Linya ng Koryente – Huwag maglagay ng panlabas na sistema saanman sa paligid ng mga linya ng kuryente sa itaas o iba pang ilaw ng kuryente o mga circuit ng kuryente, o kung saan maaari itong mahulog sa naturang mga linya ng kuryente o circuit. Kapag nag-i-install ng panlabas na sistema, gumamit ng labis na pag-iingat upang maiwasan ang paghawak sa mga naturang linya ng kuryente o mga circuit dahil maaaring nakamamatay ang pakikipag-ugnay sa mga ito.
- Overloading – Huwag mag-overload sa mga saksakan at extension cord dahil maaari itong magdulot ng sunog o electric shock.
- Object at Liquid Entry – Huwag kailanman itulak ang anumang uri ng mga bagay sa produktong ito sa pamamagitan ng mga butas dahil maaaring mahawakan ng mga ito ang mapanganib na voltage point o short-out na bahagi na maaaring magdulot ng sunog o electric shock. Huwag kailanman magtapon ng anumang uri ng likido sa produkto.
- Pagseserbisyo – Huwag subukang i-serve mo ang produktong ito dahil ang pagbubukas o pag-alis ng mga takip ay maaaring maglantad sa iyo sa mapanganib na vol.tage o iba pang mga panganib. I-refer ang lahat ng servicing ng produkto sa Linortek.
- Serbisyong Nangangailangan ng Pinsala – I-unplug ang produkto mula sa outlet at i-refer ang serbisyo sa Linortek Customer Support sa ilalim ng mga sumusunod na kundisyon:
a. Kapag nasira ang kurdon o plug ng power-supply.
b. Kung ang likido ay natapon, o ang mga bagay ay nahulog sa produkto.
c. Kung ang produkto ay tumambad sa ulan o tubig.
d. Kung ang produkto ay hindi gumagana nang normal sa pamamagitan ng pagsunod sa mga tagubilin sa pagpapatakbo [kasama sa produkto]. Isaayos lamang ang mga kontrol na nasasaklaw ng mga tagubilin sa pagpapatakbo, dahil ang hindi wastong pagsasaayos ng iba pang mga kontrol ay maaaring magresulta sa pagkasira at kadalasang mangangailangan ng malawak na trabaho ng isang kwalipikadong technician upang maibalik ang produkto sa normal nitong operasyon.
e. Kung ang produkto ay nahulog o ang cabinet ay nasira.
f. Kung ang produkto ay nagpapakita ng natatanging pagbabago sa pagganap. - Mga Kapalit na Bahagi – Kung kailangan ang mga kapalit na bahagi, magkaroon ng Low-Voltage Pinapalitan sila ng Electrician gamit lamang ang bahaging tinukoy ng tagagawa. Ang mga hindi awtorisadong pagpapalit ay maaaring magresulta sa sunog, electric shock o iba pang mga panganib. Ang mga kapalit na bahagi ay matatagpuan sa https://www.linortek.com/store/
- Pagsusuri sa Kaligtasan – Kapag natapos ang anumang serbisyo o pag-aayos sa produktong ito, hilingin sa technician ng serbisyo na magsagawa ng mga pagsusuri sa kaligtasan upang matukoy na ang produkto ay nasa wastong kondisyon ng pagpapatakbo.
- Coax Grounding – Kung ang isang panlabas na cable system ay konektado sa produkto, siguraduhin na ang cable system ay grounded. Mga modelo ng USA lamang–Ang Seksyon 810 ng National Electrical Code, ANSI/NFPA No.70-1981, ay nagbibigay ng impormasyon tungkol sa wastong pag-ground ng mount at sumusuportang istraktura, pag-ground ng coax sa isang discharge na produkto, laki ng mga grounding conductor, lokasyon ng discharge na produkto, koneksyon sa grounding electrodes, at mga kinakailangan para sa grounding electrode.
- Kidlat – Para sa karagdagang proteksyon ng produktong ito sa panahon ng bagyo ng kidlat, o bago ito iwanang hindi nag-aalaga at hindi ginagamit sa mahabang panahon, tanggalin ito sa saksakan sa saksakan sa dingding at idiskonekta ang cable system. Pipigilan nito ang pagkasira ng produkto dahil sa kidlat at mga paggulong ng linya ng kuryente.
- Panlabas na Paggamit – Ang produktong ito ay hindi waterproof at hindi dapat hayaang mabasa. Huwag ilantad sa ulan o iba pang uri ng likido.
Huwag mag-iwan sa labas ng pinto nang magdamag dahil maaaring mangyari ang condensation. - Habang nagpapalit ng mga baterya, nag-fuse o humahawak ng isang board level na produkto, mag-ingat sa electrostatic discharge na maaaring makapinsala sa mga electronic device. Pinakamainam na gumamit ng isang grounded electronics service bench. Kung hindi ito available, maaari mong ilabas ang iyong sarili sa pamamagitan ng pagpindot sa isang metal na appliance o pipe. Habang pinapalitan ang mga baterya o piyus ay huwag hawakan i) anumang mga wire maliban sa mga wire ng baterya at ii) ang naka-print na circuit board.
LIMITASYON NG PANANAGUTAN
IN NO EVENT WILL LINOR TECHNOLOGY BE LIABLE, WHETHER IN CONTRACT, TORT, OR OTHERWISE, FOR ANY INCIDENTAL, SPECIAL, INDIRECT, CONSEQUENTIAL OR PUNITIVE DAMAGES, INCLUDING, BUT NOT LIMITED TO, DAMAGES FOR ANY LOSS OF USE, LOSS OF TIME, INCONVENIENCE, COMMERCIAL LOSS, OR LOST PROFITS, SAVINGS, OR REVENUES TO THE FULL EXTENT SUCH MAY BE DISCLAIMED BY LAW. DISCLAIMER FOR CRITICAL APPLICATIONS
Ang produktong ito ay hindi nilayon o pinahintulutan para sa produktong pangsuporta sa buhay o para sa iba pang gamit kung saan ang pagkabigo ay maaaring magdulot ng personal na pinsala o kamatayan. Kung ikaw o ang iyong mga customer ay gumagamit o pinahihintulutan ang paggamit ng produktong ito para sa gayong hindi sinasadya o hindi awtorisadong paggamit, sumasang-ayon kang ganap na bayaran ang Linor Technology at ang mga kaakibat nito, at ang mga opisyal, empleyado at distributor ng bawat isa, mula sa lahat ng pananagutan na nauugnay sa naturang paggamit, kabilang ang bayad at gastos ng mga abogado.
KARAGDAGANG PAUNAWA PARA SA LIMITASYON NG PAGGAMIT
Maliban kung partikular na nakasaad, ang aming Mga Produkto ay HINDI idinisenyo upang lumipat ng linya voltage (110V at mas mataas) na mga device. Upang kontrolin ang aparato na gumagana sa linya voltagang isang kwalipikadong electrician ay DAPAT mag-install ng intermediary device gaya ng relay. Kapag pumipili ng mga device na kontrolin, pinakamahusay na pumili ng mababang voltage control gaya ng 24VAC solenoid to water flow control. Ang mga kwalipikadong elektrisyan lamang ang maaaring mag-wire ng isang linya voltage device. Bukod pa rito, dapat sundin ang mga lokal na code kasama ngunit hindi limitado sa sukat ng wire gauge at angkop na pabahay. Walang pananagutan ang Linortek para sa pinsala sa gumagamit o mga ikatlong partido para sa hindi wastong paggamit sa aming Mga Produkto. Ang pananagutan na ito ay nananatili sa gumagamit. Walang pananagutan ang Linortek para sa pinsala sa device dahil sa hindi wastong paggamit sa aming Mga Produkto.
Relay VOLTAGE MGA ESPISIPIKASYON
Mangyaring mag-ingat kapag kumukonekta ng mga device sa mga de-koryenteng circuit o iba pang kagamitan. Ito web ang controller ay HINDI idinisenyo upang kumonekta sa anumang voltage greater than 48V. Utilizing this arrangement, should allow you to virtually control anything. It is important that you use licensed electricians and comply with electrical codes that are applicable to your location. These codes exist for your safety, as well as the safety of others. Linortek assumes no responsibility for any harm or damage resulting from a failure adhere to local laws, ordinances or regulations or failure to follow specified instructions for installation and product usage.
Kasunduan sa Lisensya ng End-User para sa Linortek Software and Documentation
Ang End-User License Agreement (“EULA”) ay isang legal na kasunduan sa pagitan MO (isang indibidwal o nag-iisang entity) at Linor Technology, Inc. (“Linortek” o “kami” o “kami”) na namamahala sa iyong paggamit ng software at dokumentasyon (“Software”) na naka-embed sa o nauugnay sa serye ng mga produkto ng Fargo, Koda, Netbell, IoTMeter, at iTrixx (“Linortek Products”).
Hindi pinamamahalaan ng EULA na ito ang iyong paggamit ng Linortek website o ang Linortek Products (hindi kasama ang Software). Ang iyong paggamit ng Linortek webAng site ay pinamamahalaan ng Linortek webmga tuntunin ng serbisyo ng site at ang patakaran sa privacy ng Linortek na makikita sa:
http://www.linortek.com/terms-and-conditions [Ang iyong pagbili ng Mga Produktong Linortek (hindi kasama ang Software) ay pinamamahalaan ng limitadong warranty ng Linortek, na makikita sa https://www.linortek.com/linortek-one-year-limited-warranty/
This EULA governs your access and use of the Software. This EULA gives you specific legal rights, and you may also have other legal rights in addition, which vary from jurisdiction to jurisdiction. The disclaimers, exclusions, and limitations of liability under
this EULA will not apply to the extent prohibited or limited by applicable law. Some jurisdictions do not allow the exclusion of implied warranties or the exclusion or limitation of incidental or consequential damages or other rights, so those provisions of this EULA may not apply to you.
Sa pamamagitan ng pag-install, pag-access, pagkopya at/o paggamit ng Software o dokumentasyon ay sumasang-ayon kang sumailalim sa mga tuntunin at kundisyon ng EULA na ito sa ngalan ng iyong sarili o ng entity na iyong kinakatawan kaugnay ng naturang pag-install, pag-access, pagkopya at/o gamitin. Kinakatawan at ginagarantiyahan mo na (i) mayroon kang karapatan, awtoridad, at kapasidad na tanggapin at sumang-ayon sa mga tuntunin ng EULA na ito sa ngalan ng iyong sarili o ng entity na kinakatawan mo (ii) ikaw ay nasa sapat na legal na edad sa iyong hurisdiksyon ng paninirahan , (iii) wala ka sa isang bansang napapailalim sa embargo ng US Government, o na itinalaga ng US Government bilang isang "terorista na sumusuporta" na bansa; at (ii) hindi ka nakalista sa alinmang listahan ng US Government ng mga ipinagbabawal o pinaghihigpitang partido.
Kung ayaw mong mapasailalim sa mga tuntunin ng EULA na ito, hindi mo maaaring i-install, i-access, kopyahin o gamitin ang Software sa anumang paraan (na-pre-install man o hindi sa isang device na iyong binili).
- Pinahihintulutang Paggamit ng Software/ Software License.
Alinsunod sa mga tuntunin ng EULA na ito, binibigyan ka ng Linortek ng limitado, maaaring bawiin, hindi eksklusibo, hindi nasu-sublicens, hindi naililipat na karapatan at lisensya upang (a) mag-download, mag-install at magsagawa ng isang kopya ng Software, sa executable object code form lamang, sa Produktong Linortek na pagmamay-ari mo o kontrolado mo at para (b) gamitin ang Software na may kaugnayan lamang sa Produktong Linortek alinsunod sa nilalayon nitong paggamit tulad ng inilarawan sa Linortek website (bawat isa sa 1(a) at 1(b) isang "Pinapahintulutang Paggamit" at sama-samang "Mga Pinahihintulutang Paggamit"). - Mga Paghihigpit sa Iyong Paggamit ng Software.
Sumasang-ayon ka na hindi, at hindi pahintulutan ang iba na, gamitin ang Software para sa anumang layunin maliban sa Mga Pinahihintulutang Paggamit na inilarawan sa Seksyon 1 sa itaas. Nangangahulugan ito, bukod sa iba pang mga bagay, hindi mo maaaring:
(a) i-edit, baguhin, baguhin, iakma, isalin, gumawa ng mga derivative na gawa ng, i-disassemble, i-reverse engineer o i-reverse compile ang anumang bahagi ng Software (maliban sa lawak ng mga naaangkop na batas na espesyal na nagbabawal sa naturang paghihigpit para sa mga layunin ng interoperability, kung saan sumasang-ayon ka makipag-ugnayan muna kay Linortek at bigyan ng pagkakataon si Linortek na gumawa ng mga pagbabagong kinakailangan para sa mga layunin ng interoperability);
(b) lisensya, magtalaga, mamahagi, magpadala, magbenta, magrenta, mag-host, mag-outsource, magbunyag o kung hindi man ay gamitin ang Software para sa anumang komersyal na layunin o gawing available ang Software sa anumang third party;
(c) payagan ang sinumang ikatlong partido na gamitin ang Software sa ngalan ng o para sa kapakinabangan ng anumang ikatlong partido;
(d) gumamit ng anumang bahagi ng Software sa anumang device o computer maliban sa Linortek Product na pagmamay-ari o kontrol mo;
(e) gamitin ang Software sa anumang paraan na lumalabag sa anumang naaangkop na lokal, pambansa o internasyonal na batas; o
(f) remove or alter any labels, symbols, legends or proprietary notices, including but not limited to any copyright, trademark, logo in the Software. You may not disclose the results of any performance or functional evaluation of anyof the Software to any third party without the prior written consent of Linortek for each such release. - Mga update.
Maaaring pana-panahong bumuo ang Linortek ng mga update, upgrade, patch, pag-aayos ng bug at iba pang mga pagbabago (“Mga Update”) upang mapabuti ang pagganap ng Software. Maliban kung itinatadhana sa Linortek website, ang mga Update na ito ay ibibigay sa iyo nang walang bayad. Ang Mga Update na ito ay maaaring awtomatikong mai-install nang walang abiso sa iyo. Sa paggamit ng Software, pumapayag ka rin sa mga awtomatikong Update. Kung hindi ka sumasang-ayon dito, hindi mo maaaring i-install, i-access, kopyahin o gamitin ang Software sa anumang paraan. - Pagmamay-ari.
The Software is licensed to you and not sold. Linortek reserves all rights to the Software and any Updates not expressly granted herein. The Software and Linortek Products are protected by copyright, trademark and other intellectual property laws andtreaties. Linortek and its licensors own the title, copyright, trademarks and other intellectual property rights in the Software.
You are not granted any rights to Linortek’s trademarks or service marks. There are no implied licenses in this EULA. - Pagwawakas.
This EULA is effective from the date you first use the Software and will continue for as long as you own the Linortek Product associated with it or until you or Linortek terminate this agreement under this section. You may terminate this EULA at any time upon written notice to Linortek at the address provided below. Linortek may terminate this EULA at any time if you fail to comply with any of the terms in this agreement. The license granted in this EULA terminates immediately when the agreement terminates. Upon termination, you must stop using the Linortek Product and the Software and you must delete all copies of the
Software. The terms of Sections 2 will still remain in effect after the agreement terminates. - Disclaimer ng Warranty.
EXTENT PERMITTED BY APPLICABLE LAW, LINORTEK PROVIDES THE SOFTWARE “AS-IS” AND DISCLAIMS ALL WARRANTIES AND CONDITIONS, WHETHER EXPRESS, IMPLIED, OR STATUTORY, INCLUDING THE WARRANTIES OF MERCHANTABILITY, FITNESS FOR A PARTICULAR PURPOSE, TITLE, QUIET ENJOYMENT, ACCURACY, AND NON-INFRINGEMENT OF THIRD-PARTY RIGHTS. LINORTEK DOES NOT GUARANTEE ANY SPECIFIC RESULTS FROM THE USE OF THE SOFTWARE. LINORTEK MAKES NO WARRANTY THAT THE SOFTWARE WILL BE UNINTERRUPTED, FREE OF VIRUSES OR OTHER HARMFUL CODE, TIMELY, SECURE, OR ERROR-FREE. YOU USE THE SOFTWARE AND THE LINORTEK PRODUCT AT YOUR OWN DISCRETION AND RISK. YOU WILL BE SOLELY RESPONSIBLE FOR (AND LINORTEK DISCLAIMS) ANY AND ALL LOSS, LIABILITY, OR DAMAGES RESULTING FROM YOUR USE OF THE SOFTWARE
AND LINORTEK PRODUCT. - Limitasyon ng Pananagutan.
Wala sa EULA na ito at lalo na sa loob ng sugnay na "Limitasyon ng Pananagutan" na ito ay dapat magtangkang magbukod ng pananagutan na hindi maaaring ibukod sa ilalim ng naaangkop na batas.
HANGGANG SA MAXIMUM EXTENT NA PINAHIHINTULUTAN NG NAAANGKOP NA BATAS, BUKOD SA ITAAS NA MGA DISCLAIMER NG WARRANTY, SA KAHIT KAHIT HINDI AY (A) LINORTEK AY MANANAGOT PARA SA ANUMANG KAHITANG, HALIMBAWA, ESPESYAL, O INCIDENTAL NA MGA PINSALA, KASAMA ANG ANUMANG MGA PINSALA, KASAMA ANG ANUMANG MGA PINSALA. MULA O KAUGNAY SA MGA PRODUKTO O SOFTWARE, KAHIT ALAM O DAPAT ALAM NG LINORTEK ANG POSIBILIDAD NG GANITONG MGA PINSALA, AT (B) ANG KABUUANG CUMULATIVE na PANANAGUTAN NG LINORTEK NA NAGMULA O KAUGNAY SA MGA PRODUKTO AT SA IBA PANG SOFTWARE, CONTRACTURE, CONTRAC. AY LIMITADO SA HALAGA NA HINDI HIGIT NA HINDI HIGIT SA HALAGANG TOTOONG BAYAD MO SA LINORTEK AT SA AUTHORIZED DISTRIBUTOR O SALES REPRESENTATIVE NG LINORTEK PARA SA MGA PRODUKTO O SERBISYO NA NAG-ISSUE SA NAkaraang 6 na buwan (KUNG MERON). ANG LIMITASYON NA ITO AY COMULATIVE AT HINDI DATAAS SA PAGKAKAROON NG HIGIT SA ISANG INSIDENTE O CLAIM. TINATAWALAN NG LINORTEK ANG LAHAT NG PANANAGUTAN NG ANUMANG URI NG MGA LICENSOR AT SUPPLIER NG LINORTEK. - Pagsunod sa Mga Batas sa Pag-export.
Kinikilala mo na ang Software at kaugnay na teknolohiya ay napapailalim sa mga batas sa kontrol sa pag-export ng US na nasasakupan ng pag-export ng US at maaaring sumailalim sa mga regulasyon sa pag-export o pag-import sa ibang mga bansa. Sumasang-ayon kang mahigpit na sumunod sa lahat ng naaangkop na internasyonal at pambansang batas at regulasyon na nalalapat sa Software, kabilang ang US Export Administration Regulations pati na rin ang end-user, end-use, at destination restrictions na ibinigay ng US at iba pang gobyerno. Kinikilala mo na mayroon kang responsibilidad na kumuha ng awtorisasyon upang i-export, muling i-export, o i-import ang Software at kaugnay na teknolohiya, gaya ng maaaring kailanganin.
Babayaran mo at ipapawalang-bisa ang Linortek mula sa anuman at lahat ng paghahabol, pagkalugi, pananagutan, pinsala, multa, multa, gastos at gastos (kabilang ang mga bayad sa abogado) na nagmumula sa o nauugnay sa anumang paglabag mo sa iyong mga obligasyon sa ilalim ng seksyong ito. - Takdang-aralin.
Hindi mo maaaring italaga ang alinman sa iyong mga karapatan o obligasyon sa ilalim ng EULA na ito, at ang anumang pagtatangkang magtalaga ay magiging walang bisa at walang bisa. - Mga paunawa.
Maaaring magbigay ang Linortek ng anumang abiso sa iyo na may kaugnayan sa EULA na ito gamit ang email at address na ibinigay mo noong nagparehistro ka sa Linortek. - Waiver
Upang maging epektibo, anuman at lahat ng waiver ng Linortek sa ilalim nito ay dapat na nakasulat at nilagdaan ng isang awtorisadong kinatawan ng Linortek. Anumang iba pang kabiguan ng Linortek na ipatupad ang anumang termino sa ilalim nito ay hindi ituring na isang waiver. - Pagkakahiwalay.
Anumang probisyon ng EULA na ito na mapapatunayang hindi maipapatupad ay ie-edit at bibigyang-kahulugan upang maisakatuparan ang mga layunin ng probisyong iyon sa pinakamaraming lawak na posible sa ilalim ng naaangkop na batas at lahat ng natitirang mga probisyon ay mananatiling ganap na may bisa at bisa. - Namamahalang batas; Venue.
You agree that this EULA, and any claim, dispute, action, cause of action, issue, or request for relief arising out of or relating to this EULA, will be governed by the laws of the state of North Carolina, U.S.A., without regard to conflicts of laws principles, provided that if you reside in a country that will not apply U.S. law to disputes related to these terms, then the laws of your country will apply. You also agree that the United Nations Convention on Contracts for the International Sale of Goods shall not
apply. You agree that regardless of any statute or law to the contrary, any cause of action against us arising out of or related to the Linortek website, ang Software o ang Mga Produktong Linortek ay dapat magsimula sa loob ng isang (1) taon pagkatapos na maipon ang sanhi ng pagkilos o ang naturang dahilan ng pagkilos ay dapat na permanenteng hadlangan. Ang anumang aksyon o paglilitis na may kaugnayan sa EULA na ito ay dapat dalhin sa isang pederal o pang-estadong hukuman na matatagpuan sa Raleigh, North Carolina at ang bawat partido ay hindi na mababawi na sumusumite sa hurisdiksyon at lugar ng anumang naturang hukuman sa anumang naturang paghahabol o pagtatalo, maliban na ang Linortek ay maaaring humingi ng injunctive kaluwagan sa alinmang korte na may hurisdiksyon upang protektahan ang intelektwal na ari-arian nito. - Babala ng Proposisyon 65 ng California.
 BABALA: Ang produktong ito ay maaaring maglantad sa iyo sa mga kemikal kabilang ang tingga, na kilala sa Estado ng California upang maging sanhi ng kanser. Para sa karagdagang impormasyon, pumunta sa www.P65Warnings.ca.gov.
Pagsisimula
The Fargo SERVER is what is called a “bare board” product and is supplied without a housing. It operates on low voltage; however you need to use simple handling precautions to prevent damage to the circuits. All electronics are susceptible to electrostatic discharge. This high voltage “shock” can permanently damage your device. Before handling the product, you should touch a surface such as a grounded workbench or table. It is also best to handle the device from its edges. If you notice that your chair or clothes often cause static discharges, you must exercise extra caution. The unit is supplied with four rubber feet which keeps the bottom of the board from coming into contact with the surface you put it on. Be careful not to let metal objects, such as screw drivers or hardware, come in contact with the bottom of this product. The board can be mounted on a panel using stand offs and #4 hardware. The mounting holes are connected to the GROUND signal. The SERVER unit is a self-contained web server configured with various input and output circuits. Although the relays are rated for higher voltages, ang produktong ito ay hindi idinisenyo para gamitin sa line voltages. You should never use voltages through the SERVER product exceeding 48 volts. IT IS NOT SAFE.
The KODA SERVER is a housed unit with a DIN rail mountable enclosure that can be snapped onto a DIN rail or attached to any flat surface such as a wall or under a counter. KODA 100 has two relays (48VAC@1A), KODA 200 has four relays which can drive 10V 50mA to external devices. The unit is supplied with a DIN Rail mountable enclosure with removable terminal connectors for easy installation. The KODA SERVER can be mounted on a panel or on the wall using the DIN rail mount clip. The removable wire terminal connectors simplify field installation and allow for easy troubleshooting and maintenance: the unit can be removed from the system without disturbing the system wiring.
Pag-wire sa Server
Tandaan: For a diagram showing the location of all connectors on your SERVER referenced in this section, please see the section – Board Layout Reference.
Pag-iingat: Ang mga unit na ito ay ground isolated. Palaging kumonekta upang ang power loop ay konektado lamang sa SERVER unit.
HUWAG gumamit ng mga panlabas na koneksyon sa lupa. Ang paggawa nito ay maaaring makapinsala sa SERVER o POE na pinanggagalingan ng device.
- Place the unit on a table or bench being careful not to let any metal objects come into contact with the bottom of the circuit board (Fargo Only).
- Connect the 12VDC power supply to a suitable AC outlet and plug the barrel connector into the SERVER at the location labelled “12VDC/POWER”. Alternatively, you may also use POE. At this point the GREEN/Boot LED should come on and start flashing indicating the SERVER is operating and is in the “Bootload Mode”. This mode allows the user to update the server software that is used on the unit. After about 5 seconds, the GREEN LED will go off and the RED LED will start blinking once per second indicating the SERVER is operating in “Server Mode” and is accessible on a network utilizing TCP/IP protocols.
MAG-INGAT: KAPAG GINAMIT MO ANG POE NETWORK SWITCH, HUWAG GAMITIN ANG 12VDC POWER SUPPLY PARA SA SABAY NA POWER ANG SERVER, MASASARA NITO ANG BOARD. - Plug an Ethernet cable into the RJ45/NET connector. The “Connection” LED will come on if a 100MHz network is available, otherwise it will remain off and the “Activity” LED should start blinking indicating network activity. Fargo G2 Relay Connections
There are 8 relays on the FARGO R8 and 4 on the FARGO R4. These are dry contact relays. These units are designed for only low voltage kontrol at hindi dapat magkaroon ng voltage applied to the relay greater than 48 volts. This is for your safety as well as to stay within the parameters of the parts and circuit board design. The relays have 3 terminals labelled NO, C and NC which stand for Normally Open, Common and Normally Closed. When activated, the relay moves the connection from CNC to CNO. If you want to make a connection when the relay is activated, connect your wires between C and NO. When the relay is activated C and NO will be connected together. If you want to break a circuit when the relay is activated, make your connections to C and NC. When the relay is activated the circuit will be broken (or open)
Koda Relay Connection
There are 2 relays on the KODA 100. The KODA 100 has 2 removable 2 position connectors (1 for each relay) and are simply numbered “1” and “2”. These relays are normally open.
There are 4 relays on the KODA 200. The KODA 200 has 1 removable 8 position connector. Each relay has a “+” connection and a numbered connection. The relays may be set to supply about 10VDC by selecting “+V” on the setting switch (see Board Layout Reference page 29) or set to dry contact DC on the switch. If “+V” is selected then the voltage will be present on the “+” terminal and the numbered terminal is the return. Otherwise, a normally open dry contact exists across the “+” and numbered connection. KODA 100/200 is designed for only low voltage kontrol at hindi dapat magkaroon ng voltage inilapat sa relay na higit sa 48 volts. Ito ay para sa iyong kaligtasan pati na rin upang manatili sa loob ng mga parameter ng mga bahagi at disenyo ng circuit board.

![]() HINDI MANANAGOT ANG LINOR TECHNOLOGY, SA KONTRATA MAN, TORT, O IBA PA, PARA SA ANUMANG INSIDENTAL, ESPESYAL, INDIRECT, HINUNGDAN O PUNITIVE DAMAGES, KASAMA, PERO HINDI LIMITADO SA, MGA PINSALA PARA SA ANUMANG PAGKAWALA NG PAGGAMIT,, , COMMERCIAL LOSS, O LOW PROFITS, SAVINGS, O KITA HANGGANG SA BUONG SAKLAT NA ITO AY MAAARING TANGGILAN NG BATAS.
HINDI MANANAGOT ANG LINOR TECHNOLOGY, SA KONTRATA MAN, TORT, O IBA PA, PARA SA ANUMANG INSIDENTAL, ESPESYAL, INDIRECT, HINUNGDAN O PUNITIVE DAMAGES, KASAMA, PERO HINDI LIMITADO SA, MGA PINSALA PARA SA ANUMANG PAGKAWALA NG PAGGAMIT,, , COMMERCIAL LOSS, O LOW PROFITS, SAVINGS, O KITA HANGGANG SA BUONG SAKLAT NA ITO AY MAAARING TANGGILAN NG BATAS.
KARAGDAGANG PAUNAWA PARA SA LIMITASYON NG PAGGAMIT
Maliban kung partikular na nakasaad, ang produktong ito ay HINDI idinisenyo upang lumipat ng linya voltage device. Kasama sa limitasyong ito ang lahat ng produkto ng FARGO AT KODA. Upang kontrolin ang aparato na gumagana sa linya voltagang user ay DAPAT mag-install at intermediary device gaya ng relay.
Kapag nag-wire ng isang linya voltage device na gumagamit ng intermediary device, DAPAT kang maging isang kwalipikadong electrician o gumamit ng mga serbisyo ng isang kwalipikadong electrician. Bukod pa rito, dapat sundin ang mga lokal na code kasama, ngunit hindi limitado sa, sukat ng wire gauge at angkop na pabahay.
Linortek cannot assume any responsibility for harm to the user or third parties for improperly using our Fargo/Koda products. This liability remains with the user. Linortek cannot assume any responsibility for damage to the device for improperly using our SERVER product.
For relay specifications, please see Board Reference Layout page 29
Digital Input Connections (Fargo R4 and Koda)
The digital inputs allow the SERVER to detect an external on/off state of a sensor. With this information the SERVER can display whether an input is on or off, count events in a resettable or non-resettable counter, and calculate the frequency (such as for use as a tachometer) or the period of the input. There are two modes of operation for the digital inputs – PULL UP and ISOLATED.
a) PULL UP mode connects a 1K resistor to an internal voltage nagbibigay-daan sa iyong gumamit ng simpleng switch (tulad ng magnetic door switch) sa mga terminal 1 at 2. Ito kapag ang switch ay na-activate ang isang signal ay ipinapadala sa input.
b) ISOLATED mode allows you to directly drive the SERVER’s optoisolator with an external voltage kahit na isang panloob na 1K risistor. Itong voltage ay maaaring nasa hanay na 5V hanggang 24V na nagbibigay ng minimum na 2mA o maximum na 30mA sa optoisolator diode. Walang ibang panloob na koneksyon sa vol na itotage so it is an isolated input. Please note, when connecting a 12VDC-¬24VDC circuit to the input, an external resistor (can be provided at request, 2.2k ohm 0.5watt) must be used.
These modes are selected by the switch on the SERVER (see Board Layout Reference page 29) marked ISO and PU for isolated and pull up respectively. These are set at the factory to ISO by default.
Wiring a push button: For distances up to 500 feet, a 20 AWG shielded wire is suitable for wiring a push button. If the distance between the push button and the controller extends up to 5,000 feet, use a 16 AWG shielded cable instead. Keep in mind that longer cable runs are more susceptible to signal interference.
Pag-iingat: If you intend to use isolated mode, verify that the input switch is set to ISO before applying an external voltage. Ang paggawa ng iba ay maaaring makapinsala sa SERVER o POE na pinanggagalingan ng device.
Analog Input Connections (Fargo R4ADI)
The analog inputs allow the SERVER to read the value of external equipment. There are 2 analog inputs.
For AC current monitoring, use one of the two 3.5mm stereo inputs to interface with a current sensor.
Ang 2 analog input terminal block ay konektado sa hindi nakahiwalay na 0-5V na kasalukuyang sensor na maaaring konektado sa iba't ibang device gaya ng temperatura o pressure sensor. Ang SERVER ay nagbibigay ng koneksyon sa lupa at kapangyarihan upang ang mga sukat ay maaaring gawin nang walang panlabas na voltage references. You should use a sensor that is isolated so that that it makes no connection to a remote ground. See drawing under Board Reference Layout page 29.
Accessing your SERVER
Kapag ang iyong SERVER ay naka-on at nakakonekta sa network, awtomatiko itong makakakuha ng IP address sa pamamagitan ng DHCP hangga't ang iyong router ay na-configure na gawin ito. Upang kumonekta, ilagay ang IP address sa iyong web browser. This will take you to your SERVER’s landing page. To log in, click the Log In button on the top right of the page. Your browser will prompt you to enter your username and password. By default, these credentials are both set to admin. To find your SERVER’s IP address, see below.
Paghahanap ng iyong IP Address gamit ang Linortek Discoverer
Awtomatikong hahanapin ng Discoverer program ang iyong SERVER. Ang Discoverer ay isang Java program, at nangangailangan ng Java Runtime na mai-install upang magamit ang feature na ito. Ang Java ay matatagpuan dito: http://java.com/en/download/index.jsp.
Upang i-download ang Discover program, mangyaring pumunta sa: https://www.linortek.com/downloads/supportprogramming/
Inirerekomenda ang paggamit ng mga browser ng Chrome at Firefox. Pakitandaan: Kung mas gusto mong gumamit ng Internet Explorer, sine-save ng Internet Explorer ang Linortek Discoverer bilang isang Zip file bilang default. Upang magamit ang Discoverer, kakailanganin mong piliin ang I-save bilang at palitan ang pangalan ng file bilang Linortek Discoverer.jar kapag nag-download ka.
Kapag nagda-download ng Discover program, minsan makakakita ka ng popup na mensahe ng babala depende sa mga setting ng seguridad ng iyong browser, na nagtatanong kung gusto mong panatilihin o itapon ito. file, please click the Keep button as this is a Java program, and it won’t harm your computer.
Kapag nahanap na ng Discoverer ang iyong device, ipapakita nito ang:
- IP Address
- Pangalan ng host
- MAC Address
- Iba pang Impormasyon:
a. Asul na LED (kung naka-on)
b. pangalan ng Produkto
c. Pagbabago ng Software ng Server
d. Numero ng Port (Kung naka-port)

I-click ang device na gusto mong gamitin na ipinapakita sa Discoverer program para ilunsad ang SERVER web pages in your browser. Click the Login button on the homepage. The default username/password is: admin/admin. You may change these as you desire or disable this feature in the settings menu.
Connecting your SERVER Directly to Your PC
You can also plug your SERVER directly to your PC if there is no network connection available. If you plug your SERVER into your PC’s Ethernet port it will use the default IP address: 169.254.1.1 unless you have previously configured your SERVER to use a static IP. Enter 169.254.1.1 into your web browser to connect. No internet connection is required. Once configured, you can then install your SERVER where you desired.
Configuration ng Server
Nagla-log In
Once you have entered the IP address and port number, if set, the Login page will open. This page shows the name of this server which you may change in Configure/Network Config.
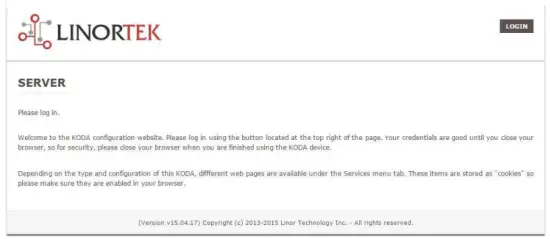
This page is static with no background activity and is a useful place to park if you are not using the SERVER and do not want to close the connection.
By pressing LOGIN, you will be asked for your username and password. These credentials will be retained by the browser until the browser is closed. You can disable the password requirement in Settings page. See section page 21.
Home Page
Kapag naipasok na ang iyong mga kredensyal sa pag-log in, ire-redirect ka sa pangunahing pahina ng application. Ang Home o Index page ay nagpapakita ng ilan sa impormasyon ng system at nag-aalok ng kakayahang hanapin ang pisikal na device kung ito ay nasa isang lugar kasama ng iba. Tingnan ang listahan sa ibaba para sa paglalarawan.

- TIME – Displayed along with the day of the week. This time may be set to be in a 12 hour format with AM/PM indicator or 24 hour format.
- DATE – Ang kasalukuyang petsa ay ipinapakita dito.
- VOLTS – Voltage sa board ay ipinapakita. Ito ay maaaring maging kapaki-pakinabang kung ang SERVER ay pinapagana kasama ng iba pang kagamitan, voltage variance can be noted. Fargo and Koda servers have an input voltage range of 1248vDC.
- TEMPERATURE – Temperature on the board is displayed. This display may be either °C or °F. This temperature will be affected by the heat generated by SERVER itself so it will always be slightly higher than ambient temperature.
- LEDs – Mayroong 3 LED na ipinapakita. Ang RED LED ay ang pulso ng system. Dapat itong kumurap nang halos isang beses bawat segundo hangga't tumatakbo ang server. Ang GREEN LED ay ginagamit para sa mga opsyon sa bootloader at sa pangkalahatan ay hindi makikita sa weblugar. Ang BLUE LED ay naki-click at maaari mo itong i-on at i-off mula dito web pahina. Ito ay kapaki-pakinabang para sa pisikal na paghahanap ng device kung ito ay ginagamit kasama ng iba pang katulad na mga unit dahil ito ay mag-iilaw sa unit kung saan ito web nakakonekta ang browser. Mapapansin din ng Discoverer program kung naka-on ang BLUE LED. Ito ay madalas na tinutukoy bilang isang function na "Locate".
Mga serbisyo
Ang tab na Mga Serbisyo ay dynamic at magbabago depende sa configuration ng iyong server. Dito mo makokontrol ang mga input, output, sensor at iba pang espesyal na kontrol.
In/Out or Relays Page
Depending on which SERVER you are using, the first page on the SERVICES tab will be either In/Out or Relays.
In/Out has the relay controls and the input controls on one page, while Relays only has the relay controls.
Kontrol ng Relay
An In/Out page is displayed below. Some relay control pages have 2, 4 or 8 relays displayed. Each relay has a number, in this case 1 to 4.

The State LED shows whether the relay is on or off indicated by GREEN and RED respectively. This icon is clickable to manually control the corresponding relay. Each relay can have a Name as well as identifiers for the Normally Open, Common and Normally Closed connections.
Mayroong apat na status LED na nagpapakita ng:
- Email – If an email is to be sent when this relay is switched on/off
- Pulse – Kung ang Relay na ito ay nakatakda na may pulse width at pulse width multiplier (tagal) – tingnan ang susunod na seksyon para sa higit pang impormasyon
- Sched. – If there is a schedule created in the Tasks page (see page 15) set to automatically trigger this relay.
- Nag-time – Kung naka-set ang pulso at na-activate ang relay na ito, magiging pula ang Timed LED na nagpapakitang kasalukuyang gumagana ang relay sa isang timer.
Click the Edit Icon to edit the controls for the corresponding relay. This will take you to the Set Relay page (see page 11).
Mga input
The In/Out or Inputs page (depending on your SERVER) will display information from each input. The SERVERs have a combination of inputs. The Fargo R4DI has four digital inputs, The R4ADI has, four digital inputs, four analog inputs. The KODA SERVER has two digital inputs.
At the top of each input is a label (ex: DIN 1, AIN 2) specifying whether it is a digital input (DIN) or analog input (AIN) as well as the input number. This label will turn green when the input is enabled. Inside the box will be any display configured from the Set Input page (see page 12 for digital input, page 14 for analog input). A red dot in the lower-left corner indicating the state of a linked relay (if any), will turn green when the linked relay is activated.
Finally, an Edit icon in the lower-right corner of the box to edit the corresponding input. This will take you to the Set Digital Input or Set Analog Input page (page 12 or page 14).
Set Relay Page
Ang pahina ng SET RELAY ay nagpapahintulot sa iyo na magtakda ng iba't ibang mga katangian na nauukol sa Relay.
- Relay Select – The Relay that you are editing (identified by the line on which you clicked the Edit icon on the RELAY page).
- Name – Enter a 15-character Relay Name. This and the following 3 fields may be used for any identifying information desired.
- NO Name – Enter a 7-character name for the Normally Open (NO) connection.
- Com Name – Enter a 7-character name for the Common (COM) connection.
- NC Name – Enter a 7-character name for the Normally Closed (NC) connection.
- Pulse Width – When you control the relay it turns on or off. You may control it for a timed turned on period by entering a Pulse Width when 0 means there is no timed event and a number represents duration of the pulse. The maximum number you can enter here is 4 digits, ie. 1234.
- Pulse Width Multiplier – Upang higit pang tukuyin ang haba ng pulso pumili ng Pulse Width Multiplier upang higit pang tukuyin ang lapad ng pulso. Maaari mong piliin ang:
• Wala
• mS (Millisecond, 1/1000 second)
• Sec (Seconds)
• Min (Minutes) - Uri ng Relay – maaaring ma-access ng SERVER ang mga relay nang pisikal sa SERVER o gamit ang ibang paraan. Maaari mong piliin ang:
• Normal – relay physically on the SERVER
• Latched – not currently supported
• Remote – a relay on another SERVER accessed over the network
• Zigbee – a relay at a remote device accessed over an RF system
• Normal and Remote – both relays activated
• Normal and Zigbee – both relays activated - Location ID – ito ay isang numerong nagpapakilala sa isang malayong lokasyon
- Relay sa Lokasyon – isang numero na kumakatawan sa relay o device sa Lokasyon
- Magpadala ng Email - ang SERVER ay maaaring i-program upang magpadala ng isang Email kung ang relay ay naka-on o naka-off.

Itakda ang Digital Input Page
Ang Mga Digital na Input ay maaaring itakda upang magbigay ng iba't ibang mga readout sa paggamit ng isang hanay ng mga uri ng display. Bilang karagdagan sa pagpapakita ng input data, maaari mong pangalanan ang display pati na rin iugnay ang isang relay dito. Magbabago ang relay na ito mula Berde patungong RED habang nagpapatuloy ito mula sa on to off pati na rin naki-click upang kontrolin ito. Sa pamamagitan ng pag-click sa icon ng pag-edit ng lapis, maaari mong i-edit ang mga setting para sa input na ito:
- Digital Input Selected – The Digital Input that you are editing (identified by the line on which you clicked the Edit icon).
- Pangalan – Maaari kang magtakda ng 15-character na pangalan para sa input na ito. Napupunta ang pangalang ito sa bar sa itaas ng display.
- Label – Magtakda ng 7-character na label na ipinapakita sa aktwal na aktibong display.
- Corrector – Gamit ang field na ito maaari kang magdagdag, magbawas, mag-multiply, o maghati ng value bago ipakita ang value sa display page. Ito ay isang 2-value corrector na ang bawat isa ay pinaghihiwalay ng isang character na espasyo. (ibig sabihin, “+2, -2, *3, /3”)
- USE – Itinatakda ang input na ito sa aktibo. Ginagawang berde ang indicator ng input number. Dapat tandaan na kapag ginagamit ang input ay kumonsumo ng oras ng CPU at iba pang mapagkukunan depende sa uri nito. Bagama't ang lahat ng mga input ay maaaring maging aktibo sa parehong oras, inirerekumenda na i-on lamang ang mga nais mong gamitin.
- Uri - Ang data ng input ay maaaring gamitin upang kalkulahin ang isang hanay ng mga resulta. Maaari mong piliin ang:
• State – This is useful for knowing if an input is on or off, like a door switch being on or off.
• CounterNR – This is a non-resettable counter.
• CounterR – This is a resettable counter.
• Frequency – Counts the frequency of an input in KHz (kilo hertz or1/1000 seconds). This could be useful in displaying a tachometer where 60Hz = 1 R.P.M.
• Period – in 1/1000 seconds an input in kHz (milliseconds or1/1000 seconds). This would be useful for measuring timed events. - Display – Hinahayaan ka ng pagpipiliang ito na baguhin ang uri ng display na ginamit. Maaari mong piliin ang:
• Dot – A single dot with the value in the middle. This can be used for State. You can make a dumb indicator by changing the color of the Dot based on the value. The label is under the Dot.
• Values – Displays the Corrected Value with the Label in a box directly below it.
• Meter – This Meter has configurable scale based on the Min/Max values and arcs can be colored per the Color ranges. The Label is displayed within the Meter.
• VBar – Also based on the Min/Max values for the scale and the bar changes color based on the values in the Color ranges. - Relay L/T – Enter a Relay number here. If it is a local relay it will show GREEN or RED depending if it is on or off. By clicking on it the relay will turn on and off. The name comes from the relay settings page. This may be useful if you want to turn the subject of a display on and off. Any relay can be used on any input and each may be reused for any other input. Adding an L after the relay number (ex: 2L) will link the state of the input to the state of the relay. This is an easy and immediate way to have an input follow the relay. Adding a T after the relay number will trigger the relay to the state of the input. This is an easy and immediate way to have a relay follow the input.
- Command Z/N/I – This field is used for issuing various commands to the Digital Input controller: Z Zero the resettable counter. N Leave the input as Normal. I Invert the input.
- Value – These are Min/Max values used for the display. This is useful for preventing a Meter from going past its end or setting the value of a VBar. This is the Value after the Corrector. The system cannot display a value past Max, so be sure this is at least set to 1.
- Yellow/Red/Green – May tatlong kulay na maaaring gamitin para mas tukuyin ang isang display. Itakda ang hanay ng mga kulay na ito upang tukuyin ang isang kulay sa Display Value. Ito ang Halaga pagkatapos ng Corrector. Tandaan na kung gumagamit ka ng isang uri ng Estado ay maaaring gusto mong magtalaga ng RED = Mula 0 hanggang 0, BERDE = Mula 1 hanggang 1 at DILAW = Mula 2 hanggang 2. Dahil ang isang Estado ay palaging alinman sa 1 o 0 ay mapipigilan nito ang hindi maliwanag na impormasyon at maiwasan ang paggamit ng kulay DILAW. Maaari kang pumili ng anumang dalawang kulay na gusto mo para sa isang uri ng Estado.

Set Analog Input Page
Ang mga Analog Input ay maaaring itakda upang magbigay ng iba't ibang mga readout sa paggamit ng isang hanay ng mga uri ng display. Bilang karagdagan sa pagpapakita ng input data, maaari mong pangalanan ang display pati na rin iugnay ang isang relay dito. Magbabago ang relay na ito mula Berde patungong RED habang nagpapatuloy ito mula sa on to off pati na rin naki-click upang kontrolin ito.
- Analog Input Selected – The Analog Input that you are editing (identified by the line on which you clicked the Edit icon).
- Pangalan – Maaari kang magtakda ng 15-character na pangalan para sa input na ito. Napupunta ang pangalang ito sa bar sa itaas ng display.
- Label – Magtakda ng 7-character na label na ipinapakita sa aktwal na aktibong display.
- Corrector – Gamit ang field na ito maaari kang magdagdag, magbawas, mag-multiply, o maghati ng value bago ipakita ang value sa display page. Ito ay isang 2-value corrector na ang bawat isa ay pinaghihiwalay ng isang character na espasyo. (ibig sabihin, “+2, -2, *3, /3”)
- USE – Sets this input to active. Turns the input number indicator to GREEN. It should be noted that when in use the input consumes CPU time and other resources depending on its type. Although all inputs may be active at the same time, it is recommended to turn on only those you want to use.
- Uri - Ang data ng input ay maaaring gamitin upang kalkulahin ang isang hanay ng mga resulta. Maaari mong piliin ang:
• Analog 1 – Analog 1 input from a SERVER with an input such as found on a R4ADI.
• Analog 2 – Analog 2 input from a SERVER with an input such as found on a R4ADI.
• AC Current 1 – AC current sensor 1 input from a SERVER with an input such as found on a R4ADI.
• AC Current 2 – AC current sensor 2 input from a SERVER with an input such as found on a R4ADI.
• AC Current 3 – Not used
• Volts – The measurement of the voltage powering the SERVER.
• Current – On “S” models, this is the current consumed by the SERVER.
• Int. Temp – Temperature from the board mounted sensor.
• Ext. Temp – Temperature from the “S” model SERVER.
• R. Humidity – % Relative Humidity from the “S” model SERVER.
• MMA X – The X axis accelerometer data from the “S” model SERVER.
• MMA Y – The Y axis accelerometer data from the “S” model SERVER.
• MMA Z – The Z axis accelerometer data from the “S” model SERVER. - Display – Hinahayaan ka ng pagpipiliang ito na baguhin ang uri ng display na ginamit. Maaari mong piliin ang:
1. Dot – A single dot with the value in the middle. This can be used for State. You can make a dumb indicator by changing the color of the Dot based on the value. The label is under the Dot.
2. Values – Displays the Corrected Value with the Label in a box directly below it.
3. Meter – This Meter has configurable scale based on the Min/Max values and arcs can be colored per the Color ranges. The Label is displayed within the Meter.
4. VBar – Also based on the Min/Max values for the scale and the bar changes color based on the values in the Color ranges. - Relay – Enter a Relay number here. If it is a local relay it will show Green or RED depending if it is on or off.
By clicking on it the relay will turn on and off. The name comes from the relay settings page. This may be useful if you want to turn the subject of a display on and off. Any relay can be used on any input and each may be reused for any other input. - Halaga – Ito ang mga Min/Max na halaga na ginagamit para sa display. Ito ay kapaki-pakinabang para sa pagpigil sa isang Metro na lumampas sa dulo nito o pagtatakda ng halaga ng isang VBar. Ito ang Halaga pagkatapos ng Corrector. Hindi makakapagpakita ang system ng value na lampas sa Max kaya siguraduhing nakatakda man lang ito sa 1.
- Yellow/Red/Green – May tatlong kulay na maaaring gamitin para mas tukuyin ang isang display. Itakda ang hanay ng mga kulay na ito upang tukuyin ang isang kulay sa Display Value. Ito ang Halaga pagkatapos ng Corrector. Tandaan na kung gumagamit ka ng isang uri ng Estado ay maaaring gusto mong magtalaga ng RED = Mula 0 hanggang 0, BERDE = Mula 1 hanggang 1 at DILAW = Mula 2 hanggang 2. Dahil ang isang Estado ay palaging alinman sa 1 o 0 ay mapipigilan nito ang hindi maliwanag na impormasyon at maiwasan ang paggamit ng kulay DILAW. Maaari kang pumili ng anumang dalawang kulay na gusto mo para sa isang uri ng Estado.

Tasks Page
The TASKS page displays the automatic events that can be programmed into the SERVER. You can schedule up to 16 events in the SERVER. These are constructed as IF … THEN statements. In addition, the IF term can have 2 elements (IF a, AND/OR/NOT b … THEN c). This provides a simple to program and powerful way to take advantage of the data acquired by the SERVER. The Tasks page shows you an overview of configured tasks. You can click the dot in the State column to turn a task on or off indicated by a green dot for ON, and a red dot for OFF. To edit or create a task, click the Edit icon to the right of the task line. This will take you to the Set Schedule page detailed in the next section.

Set Schedule Page
The SET SCHEDULE page allows you to create time and logic-based events that will occur automatically if the conditions are met.
- Schedule Select – Determined by clicking on a schedule line from the previous page.
- Schedule Name – Enter a 15-character Schedule Name.
- USE – In order for a Schedule line to be active you must select the USE button. If there is an error detected in entering Schedule data, the USE box will automatically uncheck.
- LOG – Piliin ang log para sa item na ito na lumabas sa system log tuwing ito ay isasagawa.
- Email – Click Email to automatically send an email when this schedule is executed.
- Device A – Select Device A for the first term in the IF statement from the drop box.
- Data A – Select Data A for the above device. Depending on the device selected, the Data used for testing may have special properties. See the list below for Data that may be entered. If an error is detected indata entry when the “Save” button is pushed, the USE box will uncheck and the Data box containing the error will be highlighted.
• Minute – Enter: mm
• Hour – Enter: hh (use 24-hour system)
• Day – Enter: dd
• DayofWeek – Enter: Sunday = 1, Monday = 2, Tuesday = 3, Wednesday = 4, Thursday = 5, Friday = 6, Saturday = 7, Weekday = 8, Weekend = 9
• Time – Enter: hh:mm (use leading zeros, seconds are ignored) (use 24 hour system) ex:07:30 or 14:05
• Date – Enter: yy/mm/dd (use leading zeros) ex: 20/01/10 for January 10, 2020
• Relay – Enter: Relay number and (+ or -), ex: 01+ for Relay 1 ON or 01- for Relay 1 OFF
• Button – Enter: + or – (for ON or OFF respectively)
• Flag – Enter: Flag number(opt.+), or Flag number (for ON or OFF respectively)
• Temp – Enter: >, = or < value; example: >40 (laging degrees C)
• Volts – Enter: >, = or < value; example: <10
• Analog – Analog input. Enter an input number and >, = or < and value. Example: 3<123 (This value is raw data value prior to any Corrector used by the input display page.)
• Digital – Digital input. Enter Input Number, Type, >, =, or < and value; example: 1F>7500 (This value is the raw data value prior to any Corrector used on the display page). Type can be (case sensitive):
• S State (On/Off)
• C Non-resettable counter
• c Resettable counter (lower case ‘c’)
• F Frequency in 1/1000 seconds
• P Period in 1/1000 seconds - Logic – Mag-set up ng Logic na paghahambing sa pagitan ng Device A at Device B.
• AND – True if: Device A is true AND Device B is true
• OR – True if: Device A is true OR Device B is true
• NOT – True if: Device A is true and Device B is NOT true - Device B – Select Device B for testing from the drop box.
- Data B – Piliin ang Data B para sa device sa itaas. Depende sa napiling device, ang Data na ginamit para sa pagsubok ay maaaring may mga espesyal na katangian. Tingnan ang listahan sa itaas.
- Device C – ay kung ano ang dapat kontrolin.
- Data C – Itakda ang property para sa Device C. Ginagamit ang syntax bilang mga sumusunod:
• RELAY – These are relays on this SERVER. You can set up to four per schedule. Enter separated by commas, for exampsa "1,2,3,4"
• FLAG – This is a storage flag that can be used to make more complex schedules. There are 8 flags that can be turned on or off.
• REMOTE – Refers to a remote SERVER unit. When these conditions are met, this SERVER will send a command to control a remote SERVER. The Data field for a remote unit should be in the format,
“REMOTE UNIT NUMBER, REMOTE UNIT RELAY”. For example, “3,5”. Dapat matukoy ang mga malayuang SERVER na ito sa page na Configure/Remote Device Config.
• COUNTER – Adds count to digital input counter – set as 1 or 2 depending on which digital input is counting
• BLUE LED – No data.
• eMAIL – Will send eMail, no data.
• NOTIFY – Will send notification to Kodalert, set 1- 8 for Settings/Alarm Notification number. (Not Implemented) - Pagkilos – Ano ang gagawin sa Device C. Ang mga opsyon ay:
• ON – Turns device ON
• OFF – Turns device OFF
• TGL – Toggles state of Device C
• RESET – Resets CounterR

Pahina ng Log
The Logs tab displays over 10,000 entries from actions taken by the SERVER or by users themselves. This feature allows several actions for the convenience of displaying and collecting data from the SERVER.
- The checkboxes above the date allow the user to filter logs from different sources. To filter out logs you do not wish to see from a certain source simply uncheck the box.
- Each log has a reference number and a time and date attached in a “yyyy/mm/dd” and “hh:mm:ss” format. Afterwards is the event displayed.
- To scroll through the logs, use the arrows to the right-hand side, where the horizonal line and arrow brings you to the start or end, the double arrow moves up or down a page, and the single arrow moves up or down a single log.
- To refresh the logs manually click the REFRESH button below the Log Details.
- To download the Log Details, click the DOWNLOAD button below the Log Details, this allows you to save the logs as a separate file.
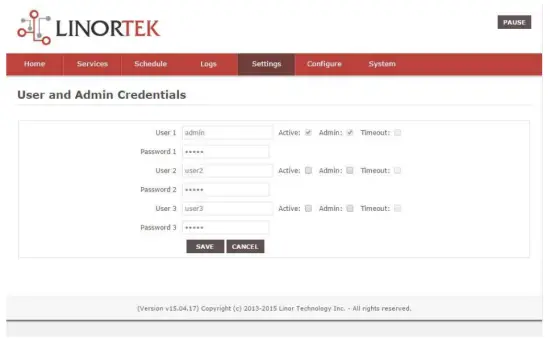
Page ng Mga Kredensyal ng User at Admin
Use this page from the Settings drop down menu. Here you can set up to 3 users for your SERVER system. As a default only User 1 is Active. Here you can:
- User Name and Password – Each user has their own credentials. As a default these are set toadmin/admin, user2/user2 and user3/user3 for Users 1, 2 and 3 respectively. The passwords are never displayed. Tandaan: when you reset the password, it must be less than 13-character.
- Aktibo - Dapat suriin para sa user na ito upang mag-sign on, hindi mo maaaring i-deactivate ang User 1.
- Admin – Admin lang ang makakapag-save ng data sa karamihan ng mga page. Pinoprotektahan nito ang iyong SERVER mula sa pagbabago ng isang hindi awtorisadong tao.
- Timeout – Hindi pinagana sa ngayon.
Pahina ng Oras/Petsa
Gamitin ang pahinang ito mula sa dropdown na menu ng Mga Setting. Binibigyang-daan ka ng page na ito na i-set up ang sistema ng oras at petsa.
- Time – Set time using an hh:mm:ss format.
- Petsa – Itakda ang petsa gamit ang yy/mm/dd na format.
- Time Zone – Set desired time zone 5 for EST, 8 for PST, you can now add a :mm for setting part hour, for example, 5:30 ay isang time zone sa 5 oras at 30 minuto.
- Gamitin ang Daylight Savings Time – Piliin upang awtomatikong ayusin ang oras ng iyong system sa daylight savings day. (Hindi tumpak sa lahat ng time zone.)
- Gamitin ang Oras ng MIL - Piliin upang gumamit ng 24 na oras na format.
- Use NTP Update – Select to synchronize SERVER time with NTP server
- NTP Web Site – Ito ang napiling NTP server para sa mga update.
- Interval ng NTP – Interval ng oras sa pagitan ng mga update sa ilang minuto.
- Log NTP Event – Normally NTP exceptions will be logged, select this option to Log every NTP event. (May be useful in debugging.)

Page ng Mga Setting
Access this page from the Settings dropdown menu. Select these settings to enable various features in the SERVER
- Use Active Main – No longer used. (Select PAUSE to go inactive.)
- Nangangailangan ng Pag-login - Kung hindi napili ang SERVER ay magbibigay-daan sa lahat ng pag-access nang walang mga kredensyal.
- Use IP Ranges – Not Implemented.
- Use RESTFUL IP Ranges – Not implemented.
- Use Remote IP Ranges – Not implemented.
- Gumamit ng RESTful Authentication – Mangailangan ng username at password para sa RESTful.
- Palawakin ang Saklaw ng Relay – Pinapagana ang 8 relay.
- Gumamit ng Relay Radio Buttons – Kung nakatakda, kapag ang isang relay ay naka-on, lahat ng iba ay naka-off.
- SSL Port No. – Not supported – For future use.
- Gamitin ang mga email ng System – Pinapagana ang mga karagdagang mensaheng email.
- Gamitin ang Fahrenheit – Pinipili ang Celsius o Fahrenheit.
- PGM Dynamic Relays – Changes properties of relays in task schedule.
- CLR PGMs on Start – Reinitialize tasks on start up.
- RTC Temperature Compensation – All Koda boards can add Temperature and Humidity sensor.
- Gumamit ng AM2302 – Gumamit ng AM2302 Temperature and Humidity sensor (ibinebenta nang hiwalay).
- Java Report – Send data to HourCollector app over ethernet (only for IoTMeter)
- Use Metric – Not supported – For future use.
- UART Usage – Enter “Audio” for Netbell-NTG, “Clock” for Netbell clock.
- Switch Bypass (1/2) – Ignores physical inputs if set. For example, in a Koda 200 board, you want to ignore input 1 switch, check Switch Bypass 1
- Setting 19 – Not supported – For future use
- Gamitin ang Audio File System – Activate SD Card reader for Netbell-NTG
- WiFi Report – Enable data transfer over WiFi (WiFi IoTMeter only)
- Active Landing Page – Not supported – For future use.
- . Invert Relay Control – The relay is set to NO by default. By checking this box the relay will be inverted to NC.
- Setting 24 – Not supported – For future use.

Dynamic na DNS Page
Access this page from the Configure dropdown menu. From this page you can assign dynamic DNS settings. This page, along with proper port forwarding through the router, can enable global access to a device behind a NAT router or firewall. You will need to assign a static IP address and port number (see Network Config Page on page 25) and port the IP address on your router (refer to your router’s user manual). An internet IP address will have to be hosted in order to access your SERVER from the internet. Currently the only IP hosting service supported is provided by DynDNS (https://dyn.com)
- Gamitin ang DDNS - Pinapagana ang serbisyong ito.
- Serbisyo ng DDNS – Pumili ng serbisyo mula sa drop box. Sa kasalukuyan ang tanging sinusuportahang serbisyo ay DynDNS
- User Name – Ito ay tumutukoy sa account na naka-set up sa DDNS Service.
- Password – Password para sa pag-access sa serbisyo ng DDNS.
- Host – This is the IP name registered at the DDNS service for rerouting to this SERVER

Pahina ng Pag-setup ng Email
Mag-set up ng email account para sa SERVER na gagamitin sa pagpapadala ng mga email message mula sa iba't ibang module. I-access ang pahinang ito mula sa tab na I-configure.
Tandaan: This unit is NOT compatible with SSL/TLS, there are 3rd party SMTP delivery servers which do not require SSL and can be used. For instructions on how to use a 3rd party SMTP delivery service, please refer to Appendix 1 at the end of this manual).
- SMTP Server – Ipasok ang papalabas na mail server na gusto mong gamitin.
- Port – Ito ang port sa server na iyon. Maaari mong hanapin ang iyong serbisyo sa mail online para sa impormasyong ito pati na rin ang iba pang mga set up na field.
- Gamitin ang SSL – Iwanan itong walang check kapag gumamit ka ng 3rd party na SMTP server.
- User Name – Pangalan ng iyong email account.
- Password – Password ng email account.
- To Address – Enter up to 3 address for this email set up. An addressee, a CC and a BC.
- Paksa – Linya ng paksa ng header ng email.

Pahina ng Configuration ng Network
Access this page from the Configure dropdown menu. This page allows the configuration of the SERVER’s network settings.
MAG-INGAT: Incorrect settings may cause the board to lose network connectivity. In order to access a device in your network remotely you must PORT the device. This tells your router that information coming in should be sent to a specific device on your network.
- MAC Address – This is a unique MAC address that is assigned to this product at time of assembly. It cannot be altered.
- Pangalan ng Host - Ito ay isang pangalan ng Netbios kung saan maaaring matugunan ang unit na ito sa ilang network. Maaari rin itong lumitaw sa direktoryo ng pagpapaupa ng iyong router. Gumagawa ito ng isang kapaki-pakinabang na lugar upang pangalanan ang iyong SERVER at lalabas sa Home page at sa Discoverer.
- Numero ng Port – Nagiging bahagi ito ng IP address at kinakailangan para sa pag-access sa Internet. Kung hindi ito nakatakda, ang SERVER ay magde-default sa isang port number na 80.
- IP Address – Typically you only change the last group of numbers. If you change this IP address make sure to reserve this IP on your router and no other devices are using this IP address or you may not be able to reach this SERVER. If this happens you may need to Restore Defaults using the push button method.
- Gateway – Karaniwang isang router sa iyong TCP/IP network na nagsisilbing access point sa iyong ISP.
- Subnet Mask – Isang 32-bit na numero na nagtatakip sa isang IP address, at hinahati ang IP address sa network address at host address. Iwanan lang ito sa 255.255.255.0
- Pangunahing DNS – Isang pangunahing DNS.
- Pangalawang DNS – Isang pangalawang DNS.

Pahina ng Configuration ng Saklaw ng IP
Access this page from the Configure dropdown menu. Use these security settings to select a range of IP address that will be allowed to access the SERVER.CAUTION: Incorrect settings may cause the board to lose network connectivity. Not implemented on this SERVER.
Pahina ng Mga Remote na Device
Access this page from the Configure dropdown menu. These settings allow the SERVER to remotely control the relays on another SERVER. This is done by selecting the Remote Device in the Schedule program or by setting up a relay as a REMOTE. There are 8 possible REMOTE locations.
MAG-INGAT: Ang mga maling setting ay magiging sanhi ng pagkawala ng mga remote na koneksyon sa board.
- Pangalan ng Device – Maglagay ng text name para sa device na ito para sa sanggunian sa hinaharap.
- IP Address – Ang IP address ng remote device kasama ang isang port number.
- User Name – Ginamit sa Basic Authentication.
- Password – Used in Basic Authentication.

Kodalert Page
Not Yet Implemented. Access this page from the Configure dropdown menu. Kodalert provides an interface for alerts of Internet connected devices. Kodalert is a cloud based, open platform monitoring and alert system for the Internet of Things in your physical world. Any Thing that can send an email or TCP messages including our SERVERS, other manufactures devices and people using email can use Kodalert. It can work for multiple remote locations, alert multiple users instantly using the rules you setup by text, email, smart phone Apps push notification or audible alarm instantly when something happens.
- Numero ng Alerto
- Pagsubok
- Gamitin
- Panuntunan
In the Alarm Notification page, you can change the state (on/off) of the relay by clicking the green circle in the state column. Push the EDIT icon to change the Alarm’s settings.

Mga pagtutukoy
FARGO R8G2
- 10M/100M RJ45 Internet interface with connection and activity LEDs
- 8 Relay outputs, 1FORMC 48 Volt Max (24VAC/DC 3A)
- Status LEDs (pulse, bootloader, and locate)
- Ethernet Bootloader (for server hardware code upgrade)
- PoE or 12VDC @500mA (nominal)
- Web interface w/basic authentication
- On board temperature sensor and voltagat sensor
Reset /Locate pushbutton (blue LED) - Working Temperature from 0 to +70 Celsius
- Storage Temperature from 40 to +125 Celsius
- Humidity from 10% to 80% noncondensing
- Dimensions 74mm x 100mm x 20mm, mounting holes 64mm x 92mm Ф 3.2mm 4 places
- Mga Sinusuportahang Protocol: HTTP/SMTP/SNTP
FARGO R4G2
- 10M/100M RJ45 Internet interface with connection and activity LEDs
- 4 1FormC relays 48 Volt Max (24VAC/DC 3A)
- 2 optically isolated digital inputs, 12V 1mA or pulldown switch selectable, 2 conductor screw terminal connectors for each.
- 2 Analog 0-5VDC Inputs 30mA 3.3VDC power source PTC protected. 3 conductor screw terminal connectors for each (3.3VDC, input, ground) (R4ADI only)
- 2 Current sensor inputs. 3.5mm stereo jack connector for each (R4ADI only)
- Status LEDs (pulse, bootloader, and locate)
- Ethernet Bootloader (for server hardware code upgrade
- POE or 12VDC @500mA (nominal)
- Web interface w/basic authentication
- On board temperature sensor and voltagat sensor
- Reset/Locate pushbutton
- Working Temperature from 0 to +70 Celsius
- Storage Temperature from 40 to +125 Celsius
- Humidity from 10% to 80% noncondensing
- Dimensions 74mm x 100mm x 20mm, mounting holes 64mm x 92mm Ф 3.2mm 4 places
- Mga Sinusuportahang Protocol: HTTP/SMTP/SNTP
KODA100
- 10M/100M RJ45 Internet interface with connection and activity LEDs
- 2 1-Form-A relay 48VAC@8A Max
- 2 optically isolated digital inputs, 12V 1mA or pulldown switch selectable
- Status LEDs (pulse, bootloader, and locate)
- Ethernet Bootloader (for server hardware code upgrade)
- POE or 12VDC @500mA (nominal)
- Web interface w/basic authentication
- On board temperature sensor and voltagat sensor
- Reset/Locate pushbutton (blue LED)
- Working temperature from 0 to +70 Celsius
- Storage temperature from 40 to +125 Celsius
- Humidity from 10% to 80% noncondensing
- Mga sukat: 70mm x 100mm x 25mm
- Mga Sinusuportahang Protocol: HTTP/SMTP/SNTP
KOD200
- 10M/100M RJ45 Internet interface with connection and activity LEDs
- 4 1FormA relays 48 Volt Max 1A dry contact or drive 10V ±10% 50mA to external devices
- 2 optically isolated digital inputs, 12V 1mA or pulldown switch selectable
- Status LEDs (pulse, bootloader, and locate)
- Ethernet Bootloader (for server hardware code upgrade)
- POE or 12VDC @500mA (nominal)
- Web interface w/basic authentication
- On board temperature sensor and voltagat sensor
- Reset/Locate pushbutton (blue LED)
- Working Temperature from 0 to +70 Celsius
- Storage Temperature from 40 to +125 Celsius
- Humidity from 10% to 80% noncondensing
- Mga sukat: 70mm x 100mm x 25mm
- Mga Sinusuportahang Protocol: HTTP/SMTP/SNTP
Layout ng Sanggunian ng Lupon
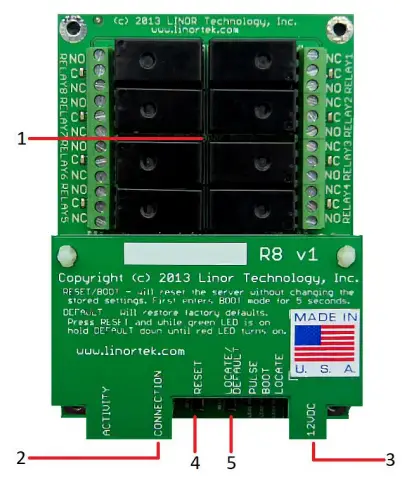
Fargo R8
- 8 Relay outputs, 1FORMC 48 Volt Max (24VAC/DC 3A)
- Konektor ng Rj45
- Power Connector (12VDC)
- I-reset ang Pindutan
- Hanapin ang Button
Fargo R4
- 3.5mm Inputs for AC Current Sensor (R4ADI Only)
- Analog Inputs (R4ADI Only)
- 4 Relay outputs, 1FORMC 48 Volt Max (24VAC/DC 3A)
- Mga Digital na Input
- Digital Input Switches (Input 1 on right.
Up: Pullup, Down: Isolated) - Konektor ng Rj45
- I-reset ang Pindutan
- Hanapin ang Button
- Power Connector (12VDC)

Koda 100
- Digital Inputs (#1 on the left) 5VDC-48VDC (12VDC-48VDC must use the external resistor)
- Relay Outputs (#1 is on the right) 8A@48VAC Max
- Digital Input Switches (IN 1 on left. UP: Isolated, Down: Pullup)
- I-reset ang Pindutan
- I-reload ang Pindutan (i-on ang asul na LED – kinikilala sa Discoverer)
- Konektor ng Rj45
- Power Connector (12VDC)
- USB Mini Connector para sa Temperature/Humidity Sensor (ibinebenta nang hiwalay)

Koda 200
- Digital Inputs (#1 on the left) 5VDC-48VDC (12VDC-48VDC must use the external resistor)
- Relay Outputs (#1 is on left) 48 Volt Max 1A dry contact or drive 10V ±10% 50mA
- Digital Input Switches (IN 1 on left. UP: Isolated, Down: Pullup)
- Relay Switches (Up for dry contact, down for 10V/50mA)
- I-reset ang Pindutan
- I-reload ang Pindutan (i-on ang asul na LED – kinikilala sa Discoverer)
- Konektor ng Rj45
- Power Connector (12VDC)
- USB Mini Connector para sa Temperature/Humidity Sensor (ibinebenta nang hiwalay)

Factory Reset
To perform a factory Reset, push the Reset button. When the green LED turns on, push and hold the Reload button until the flashing red LED turns off and then turns on solid. Refer to Board Reference Layout section for the button locations on your device.
This user-manual supplements the documentation for the following Linortek products:
- Netbell-2
- Netbell-8
- Netbell-K (and variants)
- iTrixx-NHM
For more information, documentation and how-to videos, visit https://www.linortek.com/downloads/
Ang dokumentong ito ay matatagpuan sa www.linortek.com/downloads/documentations/
Kung kailangan mo ng tulong sa iyong device mangyaring bumisita www.linortek.com/technical-support
Linor Technology, Inc.
Maaaring magbago ang impormasyon nang walang abiso.
Appendix 1
Paano Magpadala ng Mga SSL Email Gamit ang 3rd Party SMTP Service para sa Linortek Fargo at Koda Device
Bilang default, ang mga Koda/Fargo device ay gumagamit ng mga non-SSL SMTP na email server. Ngunit karamihan sa mga email server ngayon ay lumipat sa SSL security protocol, may mga 3rd party na SMTP delivery server na hindi nangangailangan ng SSL at maaaring gamitin. Mayroong maraming mga SMTP email service provider sa merkado. Ginagamit namin ang SMTP2GO bilang example upang ipakita ang proseso ng pag-set up. Ang SMTP2GO ay libre gamitin nang hanggang 1000 emails/buwan. Upang gamitin ang SMTP2GO, pakibisita ang: https://www.smtp2go.com/ .
Hakbang 1. Lumikha ng SMTP2GO account.
Upang lumikha ng isang account, i-click lamang ang "Mag-sign up", piliin ang "1K Emails" sa sukat, at piliin ang "Libreng plano" (Kung kailangan mong magpadala ng higit sa 1000 mga email bawat buwan, piliin ang plano na nakakatugon sa iyong mga kinakailangan.)

Upang lumikha ng isang account sa SMTP2GO, isang pangkumpanyang email address ang kakailanganin. Hindi ka hahayaang magpatuloy ng libreng serbisyo sa email gaya ng Gmail o Yahoo. Pagkatapos i-activate ang iyong SMTP2GO account, kailangan mong magdagdag ng user.
Hakbang 2. Magdagdag ng user.
Ang user na gagawin mo sa SMTP2GO, ay magiging Outgoing mail server kapag na-setup mo ang Fargo/Koda device para magpadala ng mga ulat sa email, pakitiyak na hindi haharangin ng iyong corporation email server ang mga email kung gagamit ka ng libreng email account tulad ng Yahoo o Gmail para sa magdagdag ng user dito.
Mag-login sa iyong SMTP2GO account, sa kaliwang bahagi ng menu piliin ang "Mga Setting" > "Mga Gumagamit ng SMTP", Mag-click sa "Magdagdag ng user ng SMTP" at punan ang form.
 Pagkatapos maidagdag ang user sa iyong SMTP2GO account, ipapakita nito ang impormasyong kailangan mo para i-setup ang email notification sa iyong Fargo/Koda device.

Hakbang 3. I-configure ang Linortek device.
Pagkatapos mong gumawa ng account at magdagdag ng user, mag-login sa iyong Linortek device, mag-navigate sa I-configure – page ng pag-setup ng email para i-setup ang notification sa email:
- SMTP Server – Ipasok ang papalabas na mail server na gusto mong gamitin, ito ay mail.smtp2go.com sa aming example.
- Port – Ito ang port sa server na iyon. Ang SMTP port ay 2525 sa aming example.
- Gamitin ang SSL – Iwanan itong walang check kapag gumamit ka ng 3rd party na SMTP server.
- User Name – Ang username mula sa SMTP2GO noong gumawa kami ng user sa nakaraang hakbang.
- Password – Ang password ng user mula sa SMTP2GO noong gumawa kami ng user sa nakaraang hakbang.
- To Address – Maglagay ng hanggang 3 address para sa email set up na ito. Isang addressee, isang CC at isang BC.
- Paksa – Linya ng paksa ng header ng email.
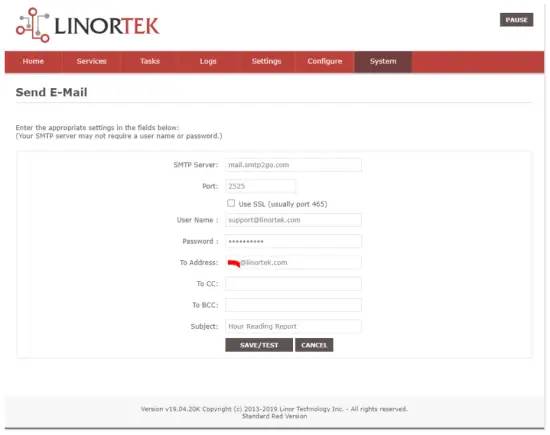
Sa sandaling pindutin mo ang "I-save/Subukan", awtomatikong ipapadala ng device ang pansubok na email. Pakisuri ang Junk/Iba pang folder upang mahanap ito kung wala ito sa folder ng Inbox.
Hakbang 4. Itakda ang gawain para sa mga awtomatikong notification sa Email.
You should be able to receive email notifications for various events from the Fargo/Koda boards at this point. If you need to receive condition logic notification, you can use our condition logic configuration to setup such report. To setup the logic condition report notification, go to Tasks page on your Fargo/Koda device, click the Edit icon of a Schedule. For details of how to create a logic-based event, please refer to the Set Schedule Page on the Fargo/Koda User Manual, which can be downloaded here:
https://www.linortek.com/download/fargo%20g2_koda%20downloads/fargo%20g2_koda%20documentation/Fargo-G2-and-Koda-User-Manual.pdf
Sa sampGagamitin namin ang Network Hour Meter device bilang example para sa kung paano makatanggap ng mga ulat sa email araw-araw sa 11:52am.
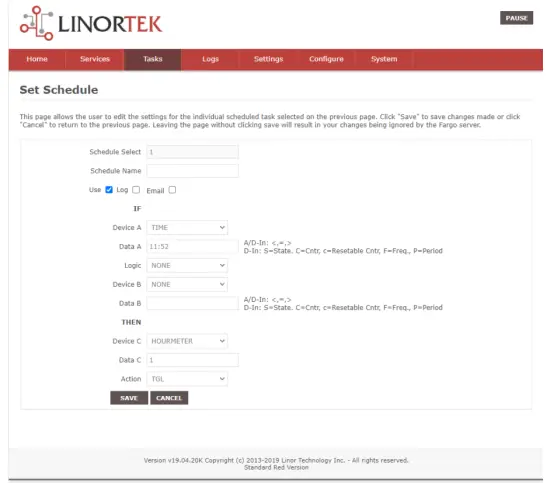
Sa sandaling matugunan ang lahat ng kundisyon ng gawain, makukuha mo ang sumusunod na email:
Hour Reading Report
![]() support@linortek.com
support@linortek.com
Mon 4/11/2022 11:52 AM
To: Liyu Nalven
HM 1, my machine, is at 000242.01 hrs.
Reply Forward
![]()
Mga Dokumento / Mga Mapagkukunan
 |
LINORTEK Fargo G2 TCP/IP Web Batay sa Relay Controller [pdf] User Manual Fargo G2, Koda, Fargo G2 TCP-IP Web Based Relay Controller, Web Based Relay Controller, Based Relay Controller, Relay Controller |