![]() Fargo G2 and Koda User Manual
Fargo G2 and Koda User Manual
www.linortek.com For Fargo G2, Koda
TCP/IP Web Relės valdiklis
C red. 04-2022
Fargo G2 TCP/IP Web Relės valdiklis
Thank you for purchasing a Linortek Fargo G2 or Koda TCP/IP Controller. There are many devices that can be controlled by the FARGO/KODA Web Relay Controller. FARGO/KODA Web Controller can be used in such applications as (but not limited to): Lights, security, sprinkler systems, access control, industrial equipment, building automation, HVAC, and many more. Please refer to the Board Reference Layouts on page 29 for input and output specifications on your controller to verify they are suitable to your needs.
Šis vadovas apima:
- FARGO R8 G2
- FARGO R4DI G2
- FARGO R4ADI G2
- KODA 100
- KODA200
These will be referred to as SERVER hereafter. When there are differences or additional features they will be noted in the text.
Jei reikia mokomųjų vaizdo įrašų, DUK ir techninės pagalbos komandos kontaktinės informacijos, apsilankykite: https://www.linortek.com/technical-support
LINORTEK VIENERIŲ METŲ GARANTIJA
Consumer law: For consumers who are covered by consumer protection laws or regulations in their country of residence (“Consumer Law”), the benefits provided in this Linortek One-Year Limited Warranty (“Linortek Limited Warranty”) are in addition to and not instead of the rights provided by Consumer Law and it does not exclude, limit or suspend your rights arising from Consumer Law. You should consult the proper authorities in your country of residence for further information about these rights
Linortek garantijos įsipareigojimai šiam techninės įrangos produktui (toliau – Gaminys) yra apriboti toliau nurodytomis sąlygomis:
Linor Technology, Inc. (“Linortek”) warrants this product against defects in materials and workmanship for a period of ONE (1) YEAR from the date of retail purchase by the original end-user purchaser (“Warranty Period”) when used in accordance with the operating instructions. A copy of a retail receipt is required as proof of purchase. If a hardware defect arises and a valid claim is received within the Warranty Period, at its option and to the extent permitted by law, Linortek will either (1) repair the hardware defect at no charge, using new or refurbished replacement parts, (2) exchange the product with a product that is new or which has been manufactured from new or serviceable used parts and is at least functionally equivalent to the original product, or (3) refund the purchase price of the product. When a refund is given, the product for which the refund is provided must be returned to Linortek and becomes Linortek’s property.
Pirmiau nurodyta garantija priklauso nuo Pirkėjo (i) greitos rašytinės pretenzijos ir (ii) laiku suteikiant Linortek galimybę apžiūrėti ir išbandyti gaminį, kuris, kaip teigiama, turi defektų. Toks patikrinimas gali būti Pirkėjo patalpose ir/arba Linortek gali reikalauti grąžinti Prekę Pirkėjo sąskaita. Tačiau Linortek neprisiima atsakomybės už pakavimą, patikrinimą ar darbo išlaidas, susijusias su Produkto grąžinimu. Jokiam gaminiui nepriimamas garantinis aptarnavimas, jei nėra Linortek išduoto grąžinimo leidimo numerio (RMA#).
IŠIMTYS IR APRIBOJIMAI
Ši ribota garantija neapima žalos, atsiradusios dėl piktnaudžiavimo, netinkamo naudojimo, aplaidumo, gaisro ar kitų išorinių priežasčių, nelaimingų atsitikimų, modifikacijų, remonto ar kitų priežasčių, kurios nėra medžiagų ir gamybos defektai. Ši ribota garantija netaikoma programinei įrangai, kurią „Linortek“ platina su Linortek prekės ženklu arba be jo, įskaitant, bet tuo neapsiribojant, sistemos programinę įrangą („Programinė įranga“). Jūsų naudojimą ir su programine įranga susijusias teises reglamentuoja Linortek galutinio vartotojo licencijos sutartis, kurią galite rasti čia: https://www.linortek.com/end-user-licenseagreement/. Linortek neatsako už žalą, atsiradusią nesilaikant su gaminio naudojimu susijusių instrukcijų. Siekdamas užtikrinti, kad būtų laikomasi eksploatavimo apribojimų, Pirkėjas turėtų vadovautis naudojimo instrukcija [pateikta kartu su gaminiu]. Baterijos neįeina į garantiją.
IKI DIDŽIAUSIAI LEIDŽIAMOSIOS DĖLĖS ŠI RIBOTA GARANTIJA IR AUKŠČIAU NUSTATYTOS GYNIMO PRIEMONĖS YRA IŠSIMTINĖS IR VIETOJE VISAS KITAS GARANTIJAS, GYNIMO PRIEMONES IR SĄLYGAS, IR LINORTEK SPECIALIAI NERIBOTŲ, NERIBOTŲ, NERIBOTŲ, NEPRIVALOMA ATSAKOMYBĖS. PARDAVIMO GARANTIJOS, TINKAMUMAS TAM TOKIAM TIKSLUI, NEPAŽEIDIMAS. Tiek, kiek tokios garantijos negali būti atsisakytos, visos tokios garantijos turi būti apribotos pagal įstatymų leidimą, iki „Liforek Limited“ garantijos trukmės, o prisiminimas apsiriboja remontu, pakeitimu ar grąžinimu, kaip nustatyta „Laidortek“ SAVO NUOMONĖS. KAI KURIOS VALSTYBĖS (ŠALYS IR PROVINCIJOS) NEGALIMA APRIBOTI NUMANOMOS GARANTIJOS AR SĄLYGOS TAUKO TAUKO APRIBOJIMŲ, TODĖL AUKŠČIAU APRAŠYTI APRIBOJIMAI JUMS GALI NETAIKOTI. ŠI GARANTIJA JUMS SUTEIKIA KONKREČIAS TEISINĖS TEISĖS, TAIP PAT GALITE TURĖTI KITŲ TEISĖS, KURIAS SKIRIASI KITOSE VALSTYBĖSE (ARBA PAGAL ŠALIS AR PROVINCIJAS). ŠIĄ RIBOTĄ GARANTIJĄ REKOMENDUOJA IR AIŠKINA JUNGTINĖS AMERIKOS VALSTIJOS ĮSTATYMAI.
Atsisakymas
- Perskaitykite instrukcijas – prieš naudodami gaminį perskaitykite visas saugos ir naudojimo instrukcijas.
- Išsaugokite instrukcijas – saugos ir naudojimo instrukcijas išsaugokite ateičiai.
- Atkreipkite dėmesį į įspėjimus – laikykitės visų įspėjimų, esančių ant gaminio ir naudojimo instrukcijose.
- Vadovaukitės instrukcijomis – laikykitės visų naudojimo ir naudojimo instrukcijų.
- Valymas – prieš valydami gaminį atjunkite nuo maitinimo šaltinio. Nenaudokite skystų valiklių ar aerozolinių valiklių. Naudokite skelbimąamp šluoste, skirta tik korpuso valymui.
- Priedai – nenaudokite priedų, nebent juos specialiai rekomenduoja Linortek. Nesuderinamų ar kitaip netinkamų priedų naudojimas gali būti pavojingas.
- Priedai – nedėkite šio gaminio ant nestabilaus stovo, trikojo, laikiklio ar laikiklio. Gaminys gali nukristi ir rimtai sužaloti žmogų ir rimtai sugadinti gaminį. Naudokite tik su stovu, trikoju, laikikliu ar laikikliu, rekomenduojamu gamintojo arba parduodamu kartu su gaminiu. Montuodami gaminį laikykitės gamintojo nurodymų ir naudokite tik gamintojo rekomenduojamus tvirtinimo priedus. Būkite atsargūs naudodami prietaiso ir vežimėlio derinį. Dėl greito sustojimo, per didelės jėgos ir nelygių paviršių prietaisas ir vežimėlio derinys gali apvirsti.
- Vėdinimas – angos korpuse, jei yra, yra skirtos vėdinimui ir patikimam gaminio veikimui užtikrinti bei apsaugoti nuo perkaitimo. Neužblokuokite ir neuždenkite šių angų. Nestatykite šio gaminio į įmontuotą instaliaciją, nebent yra užtikrintas tinkamas vėdinimas arba laikomasi Linortek nurodymų.
- Maitinimo šaltiniai – naudokite šį gaminį tik iš tokio maitinimo šaltinio tipo, nurodyto naudojimo vadove arba gaminio etiketėje.
Jei nesate tikri, kokio tipo maitinimo šaltinį ketinate naudoti, pasitarkite su prietaiso pardavėju arba vietine elektros tiekimo įmone – su sąlyga, kad naudojant kitokio tipo maitinimo šaltinį, nei nurodyta naudojimo instrukcijoje arba ženklinimo etiketėje, garantija negalios. Apie gaminius, skirtus veikti iš akumuliatoriaus arba kitų šaltinių, skaitykite naudojimo instrukcijoje [pridedama prie gaminio]. - Įžeminimas arba poliarizacija – Šiame gaminyje gali būti poliarizuotos kintamosios srovės linijos kištukas (kištukas, kurio viena mentė platesnė už kitą). Šis kištukas į maitinimo lizdą tilps tik vienu būdu. Tai saugos funkcija. Jei negalite iki galo įkišti kištuko į elektros lizdą, pabandykite kištuką pakeisti atvirkščiai. Jei kištukas vis tiek netinka, taip yra todėl, kad jūsų lizdas nesuderinamas su kištuku. Kreipkitės į elektriką, kad pakeistumėte kištukinį lizdą suderinamu. Nespauskite kištuko jėga, kad jis tilptų į nesuderinamą lizdą ir kitaip nemėginkite pažeisti kištuko saugos tikslo. Arba šiame gaminyje gali būti 3 laidų įžeminimo kištukas, kištukas su trečiuoju (įžeminimo) kištuku. Šis kištukas tilps tik į įžeminimo tipo maitinimo lizdą. Tai saugos funkcija. Nespauskite kištuko jėga, kad jis tilptų į nesuderinamą lizdą ir kitaip nemėginkite pažeisti kištuko saugos tikslo. Jei jūsų lizdas nesuderinamas su kištuku, susisiekite su elektriku, kad pakeistumėte kištukinį lizdą suderinamu.
- Maitinimo laido apsauga – nutieskite maitinimo laidus taip, kad ant jų nebūtų galima užeiti ir nesuspaustų ant jų arba ant jų pastatytų daiktų, ypatingą dėmesį skirdami laidus ir kištukus, patogias lizdas ir vietą, kur laidai išeina iš prietaiso. .
- Maitinimo linijos – nestatykite lauko sistemos niekur šalia oro linijų ar kitų elektros šviesos ar maitinimo grandinių arba ten, kur ji gali įkristi į tokias elektros linijas ar grandines. Įrengdami lauko sistemą būkite ypač atsargūs, kad neliestumėte tokių elektros linijų ar grandinių, nes kontaktas su jais gali būti mirtinas.
- Perkrova – Neperkraukite lizdų ir ilgintuvų, nes tai gali sukelti gaisrą arba elektros smūgį.
- Daiktų ir skysčių patekimas – Niekada nespauskite jokių daiktų į šį gaminį per angas, nes jie gali liesti pavojingą tūrįtage taškai arba trumpai sutrūkinėja dalys, kurios gali sukelti gaisrą arba elektros smūgį. Niekada ant gaminio neišpilkite jokio skysčio.
- Aptarnavimas – nemėginkite patys atlikti šio gaminio techninės priežiūros, nes atidarius arba nuėmus dangtelius gali kilti pavojustage ar kitų pavojų. Dėl visų gaminio priežiūros darbų kreipkitės į Linortek.
- Pažeidimams reikalinga techninė priežiūra – Ištraukite gaminį iš elektros lizdo ir kreipkitės į Linortek klientų aptarnavimo tarnybą šiomis sąlygomis:
a. Kai pažeistas maitinimo laidas arba kištukas.
b. Jei išsiliejo skystis arba ant gaminio nukrito daiktai.
c. Jei gaminys buvo veikiamas lietaus ar vandens.
d. Jei gaminys neveikia normaliai, vadovaujantis naudojimo instrukcijomis [pridedama prie gaminio]. Sureguliuokite tik tuos valdiklius, kurie nurodyti naudojimo instrukcijoje, nes netinkamai sureguliavus kitus valdiklius galima sugadinti ir dažnai prireiks daug kvalifikuoto techniko darbo, kad gaminys veiktų normaliai.
e. Jei produktas buvo numestas arba sugadinta spintelė.
f. Jei produkto veikimas aiškiai pasikeitė. - Atsarginės dalys – jei reikia pakeisti dalių, turėkite žemo tūriotage Elektrikas pakeis jas naudodamas tik gamintojo nurodytas dalis. Neleistini keitimai gali sukelti gaisrą, elektros smūgį ar kitus pavojus. Atsargines dalis galite rasti adresu https://www.linortek.com/store/
- Saugos patikrinimas – Baigę bet kokią šio gaminio techninę priežiūrą ar remontą, paprašykite techninės priežiūros techniko atlikti saugos patikrinimus, kad nustatytų, ar gaminys tinkamai veikia.
- Koaksialinis įžeminimas – jei prie gaminio prijungta išorinė kabelių sistema, įsitikinkite, kad kabelių sistema yra įžeminta. Tik JAV modeliai – Nacionalinio elektros kodekso ANSI/NFPA Nr.810-70 1981 skirsnyje pateikiama informacija apie tinkamą laikiklio ir atraminės konstrukcijos įžeminimą, koaksializacijos į iškrovimo gaminį įžeminimą, įžeminimo laidų dydį, vietą išlydžio gaminio, prijungimo prie įžeminimo elektrodų ir reikalavimų įžeminimo elektrodui.
- Žaibas – norėdami papildomai apsaugoti šį gaminį per žaibišką audrą arba prieš palikdami jį be priežiūros ir nenaudojamą ilgam laikui, atjunkite jį nuo sieninio elektros lizdo ir atjunkite kabelių sistemą. Taip išvengsite gaminio sugadinimo dėl žaibo ir elektros linijos viršįtampių.
- Naudojimas lauke – šis gaminys nėra atsparus vandeniui ir neturėtų būti sušlapęs. Saugokite nuo lietaus ar kitų skysčių.
Nepalikite per naktį lauke, nes gali susidaryti kondensatas. - Keisdami baterijas, saugiklius arba dirbdami su plokštės lygiu gaminiu būkite atsargūs dėl elektrostatinės iškrovos, kuri gali sugadinti elektroninius prietaisus. Geriausia naudoti įžemintą elektronikos aptarnavimo stendą. Jei to neturite, galite išsikrauti patys liesdami metalinį prietaisą ar vamzdį. Keisdami baterijas arba saugiklius nelieskite i) jokių kitų laidų, išskyrus akumuliatoriaus laidus ir ii) spausdintinės plokštės.
ATSAKOMYBĖS APRIBOJIMAS
IN NO EVENT WILL LINOR TECHNOLOGY BE LIABLE, WHETHER IN CONTRACT, TORT, OR OTHERWISE, FOR ANY INCIDENTAL, SPECIAL, INDIRECT, CONSEQUENTIAL OR PUNITIVE DAMAGES, INCLUDING, BUT NOT LIMITED TO, DAMAGES FOR ANY LOSS OF USE, LOSS OF TIME, INCONVENIENCE, COMMERCIAL LOSS, OR LOST PROFITS, SAVINGS, OR REVENUES TO THE FULL EXTENT SUCH MAY BE DISCLAIMED BY LAW. DISCLAIMER FOR CRITICAL APPLICATIONS
Šis gaminys nėra skirtas gyvybei palaikyti ar kitiems tikslams, kurių gedimas gali sukelti sužalojimą arba mirtį. Jei jūs arba jūsų klientai naudojate arba leidžiate naudoti šį gaminį tokiais netyčiniais ar neleistinais tikslais, jūs sutinkate visiškai atleisti „Linor Technology“ ir jos filialus bei kiekvieno pareigūnus, darbuotojus ir platintojus nuo visos su tokiu naudojimu susijusios atsakomybės, įskaitant advokatų honorarai ir išlaidos.
TOLESNIS PRANEŠIMAS DĖL NAUDOJIMO APRIBOJIMO
Jei nenurodyta konkrečiai, mūsų gaminiai NĖRA skirti perjungti linijai tūrįtage (110 V ir daugiau) įrenginiai. Norėdami valdyti įrenginį, kuris veikia linijoje voltagKvalifikuotas elektrikas PRIVALO sumontuoti tarpinį įrenginį, pvz., relę. Renkantis įrenginius, kuriuos norite valdyti, geriausia pasirinkti žemą tūrįtage valdikliai, tokie kaip 24 VAC solenoidas į vandens srauto valdymą. Tik kvalifikuoti elektrikai gali prijungti laidustage įrenginį. Be to, reikia laikytis vietinių kodų, įskaitant, bet neapsiribojant, vielos gabarito dydį ir tinkamą korpusą. Linortek neprisiima atsakomybės už žalą vartotojui ar trečiosioms šalims dėl netinkamo mūsų gaminių naudojimo. Ši atsakomybė lieka vartotojui. Linortek neprisiima atsakomybės už įrenginio sugadinimą, atsiradusį dėl netinkamo gaminių naudojimo.
RELĖS VOLTAGE SPECIFIKACIJOS
Būkite atsargūs prijungdami prietaisus prie elektros grandinių ar kitos įrangos. Tai web valdiklis NĖRA skirtas prisijungti prie bet kokio tūriotage greater than 48V. Utilizing this arrangement, should allow you to virtually control anything. It is important that you use licensed electricians and comply with electrical codes that are applicable to your location. These codes exist for your safety, as well as the safety of others. Linortek assumes no responsibility for any harm or damage resulting from a failure adhere to local laws, ordinances or regulations or failure to follow specified instructions for installation and product usage.
Linortek programinės įrangos ir dokumentacijos galutinio vartotojo licencijos sutartis
Ši galutinio vartotojo licencijos sutartis („EULA“) yra teisinė sutartis tarp JŪSŲ (asmens arba atskiro subjekto) ir „Linor Technology, Inc.“ („Linortek“ arba „mes“ arba „mes“), kuri reglamentuoja jūsų naudojimąsi programine įranga. ir dokumentacija („Programinė įranga“), įterpta arba susijusi su „Fargo“, „Koda“, „Netbell“, „IoTMeter“ ir „iTrixx“ produktų serijomis („Linortek produktai“).
Ši EULA nereglamentuoja jūsų naudojimosi Linortek websvetainėje arba Linortek Produktai (išskyrus Programinę įrangą). Jūsų naudojimasis Linortek websvetainę valdo Linortek websvetainės paslaugų teikimo sąlygos ir Linortek privatumo politika, kurią galite rasti adresu:
http://www.linortek.com/terms-and-conditions [Jūsų Linortek produktų (išskyrus programinę įrangą) pirkimui taikoma ribota Linortek garantija, kurią galite rasti adresu https://www.linortek.com/linortek-one-year-limited-warranty/
This EULA governs your access and use of the Software. This EULA gives you specific legal rights, and you may also have other legal rights in addition, which vary from jurisdiction to jurisdiction. The disclaimers, exclusions, and limitations of liability under
this EULA will not apply to the extent prohibited or limited by applicable law. Some jurisdictions do not allow the exclusion of implied warranties or the exclusion or limitation of incidental or consequential damages or other rights, so those provisions of this EULA may not apply to you.
Įdiegdami, pasiekdami, kopijuodami ir (arba) naudodami programinę įrangą ar dokumentaciją, sutinkate laikytis šios GVLS sąlygų savo arba subjekto, kuriam atstovaujate dėl tokio diegimo, prieigos, kopijavimo ir (arba) vardu. naudoti. Jūs pareiškiate ir garantuojate, kad (i) turite teisę, įgaliojimus ir gebėjimą priimti ir sutikti su šios GVLS sąlygomis savo arba subjekto, kuriam atstovaujate, vardu (ii) esate sulaukęs tinkamo amžiaus savo gyvenamosios vietos jurisdikcijoje. , (iii) nesate šalyje, kuriai taikomas JAV vyriausybės embargas arba kurią JAV vyriausybė nurodė kaip „teroristus remiančią“ šalį; ir (ii) nesate įtrauktas į jokį JAV vyriausybės draudžiamų ar ribojamų šalių sąrašą.
Jei nenorite laikytis šios GVLS sąlygų, jokiu būdu negalite įdiegti, pasiekti, kopijuoti ar naudoti Programinės įrangos (nesvarbu, ar ji iš anksto įdiegta jūsų įsigytame įrenginyje, ar ne).
- Leidžiamas programinės įrangos naudojimas / programinės įrangos licencija.
Pagal šios GVLS sąlygas, Linortek suteikia jums ribotą, atšaukiamą, neišskirtinę, ne sublicencijuojamą, neperleidžiamą teisę ir licenciją (a) atsisiųsti, įdiegti ir vykdyti vieną Programinės įrangos kopiją vykdomojo objekto kodo forma. tik su Linortek gaminiu, kuris jums priklauso arba kurį valdote, ir (b) naudoti programinę įrangą tik kartu su Linortek gaminiu pagal numatytą naudojimą, kaip aprašyta Linortek. websvetainė (kiekvienas iš 1 (a) ir 1 (b) yra „Leidžiamas naudojimas“ ir kartu „Leidžiamas naudojimas“). - Programinės įrangos naudojimo apribojimai.
Jūs sutinkate nenaudoti programinės įrangos ir neleisti kitiems naudoti Programinės įrangos jokiais kitais tikslais, išskyrus Leidžiamus naudojimo būdus, aprašytus 1 skyriuje. Tai reiškia, be kita ko, negalite:
(a) redaguoti, keisti, modifikuoti, pritaikyti, versti, nedaryti išvestinių darbų, išardyti, apgręžti ar kompiliuoti bet kurią Programinės įrangos dalį (išskyrus tuos atvejus, kai taikomi įstatymai draudžia tokius apribojimus sąveikos tikslais, tokiu atveju sutinkate pirmiausia susisiekti su Linortek ir suteikti Linortek galimybę atlikti tokius pakeitimus, kurių reikia sąveikos tikslams);
(b) licencijuoti, priskirti, platinti, perduoti, parduoti, nuomoti, priglobti, perduoti, atskleisti ar kitaip naudoti Programinę įrangą bet kokiais komerciniais tikslais arba padaryti Programinę įrangą prieinamą bet kuriai trečiajai šaliai;
(c) leisti bet kuriai trečiajai šaliai naudoti Programinę įrangą bet kurios trečiosios šalies vardu arba jos naudai;
(d) naudoti bet kurią Programinės įrangos dalį bet kuriame įrenginyje ar kompiuteryje, išskyrus Linortek produktą, kuris jums priklauso arba kurį valdote;
(e) naudoti Programinę įrangą bet kokiu būdu, kuris pažeidžia taikomus vietinius, nacionalinius ar tarptautinius įstatymus; arba
(f) remove or alter any labels, symbols, legends or proprietary notices, including but not limited to any copyright, trademark, logo in the Software. You may not disclose the results of any performance or functional evaluation of anyof the Software to any third party without the prior written consent of Linortek for each such release. - Atnaujinimai.
„Linortek“ gali retkarčiais kurti naujinimus, patobulinimus, pataisymus, klaidų pataisymus ir kitus pakeitimus („Atnaujinimai“), kad pagerintų Programinės įrangos veikimą. Išskyrus atvejus, kai Linortek nurodyta kitaip websvetainėje, šie Atnaujinimai jums bus pateikti nemokamai. Šie naujinimai gali būti automatiškai įdiegti be įspėjimo. Naudodami programinę įrangą taip pat sutinkate su automatiniais atnaujinimais. Jei nesutinkate su tuo, negalite jokiu būdu įdiegti, pasiekti, kopijuoti ar naudoti Programinės įrangos. - Nuosavybė.
The Software is licensed to you and not sold. Linortek reserves all rights to the Software and any Updates not expressly granted herein. The Software and Linortek Products are protected by copyright, trademark and other intellectual property laws andtreaties. Linortek and its licensors own the title, copyright, trademarks and other intellectual property rights in the Software.
You are not granted any rights to Linortek’s trademarks or service marks. There are no implied licenses in this EULA. - Nutraukimas.
This EULA is effective from the date you first use the Software and will continue for as long as you own the Linortek Product associated with it or until you or Linortek terminate this agreement under this section. You may terminate this EULA at any time upon written notice to Linortek at the address provided below. Linortek may terminate this EULA at any time if you fail to comply with any of the terms in this agreement. The license granted in this EULA terminates immediately when the agreement terminates. Upon termination, you must stop using the Linortek Product and the Software and you must delete all copies of the
Software. The terms of Sections 2 will still remain in effect after the agreement terminates. - Garantijos atsisakymas.
EXTENT PERMITTED BY APPLICABLE LAW, LINORTEK PROVIDES THE SOFTWARE “AS-IS” AND DISCLAIMS ALL WARRANTIES AND CONDITIONS, WHETHER EXPRESS, IMPLIED, OR STATUTORY, INCLUDING THE WARRANTIES OF MERCHANTABILITY, FITNESS FOR A PARTICULAR PURPOSE, TITLE, QUIET ENJOYMENT, ACCURACY, AND NON-INFRINGEMENT OF THIRD-PARTY RIGHTS. LINORTEK DOES NOT GUARANTEE ANY SPECIFIC RESULTS FROM THE USE OF THE SOFTWARE. LINORTEK MAKES NO WARRANTY THAT THE SOFTWARE WILL BE UNINTERRUPTED, FREE OF VIRUSES OR OTHER HARMFUL CODE, TIMELY, SECURE, OR ERROR-FREE. YOU USE THE SOFTWARE AND THE LINORTEK PRODUCT AT YOUR OWN DISCRETION AND RISK. YOU WILL BE SOLELY RESPONSIBLE FOR (AND LINORTEK DISCLAIMS) ANY AND ALL LOSS, LIABILITY, OR DAMAGES RESULTING FROM YOUR USE OF THE SOFTWARE
AND LINORTEK PRODUCT. - Atsakomybės apribojimas.
Jokia šios GVLS nuostata ir ypač šioje „Atsakomybės apribojimo“ pastraipoje nebandoma panaikinti atsakomybės, kurios negalima atmesti pagal taikomus įstatymus.
IKI DIDŽIAUSIOS TAIKOMOS TEISĖS LEIDŽIAMO DYDŽIO, BE ANKSČIAU ANKSČIAU ANKSČIAU ANKSČIŲ GARANTIJOS ATSAKOMYBĖS ATSAKOMYBĖS, JOKIU ATVEJU (A) LINORTEK NEBUS ATSAKO UŽ JOKIUS NESELINIUS, PAvyzdinius, SPECIALUS ATSAKOMYBĘ, ARBA ATTIKRINIMUS ATSITIKTINIUS SUŽAIDIMUS. NUO PRODUKTŲ AR PROGRAMINĖS ĮRANGOS ARBA SUSIJUSI SU JOMIS, NET JEI LINORTEK ŽINOJO AR TURĖJO ŽINOTI APIE TOKIOS ŽALOS GALIMYBĘ, IR (B) LINORTEK BENDRA, KUMULIATINĖ ATSAKOMYBĖ IR KITŲ PRODUKTŲ ARBA ATSAKOMYBĖS ATSAKOMYBĖ BŪS APRIBOTA SUMA, KURI NIEKADA NETURIŲ SUMA, KURI TIKRAI MOKĖJATE „LINORTEK“ IR „LINORTEK“ Įgaliotajam PLATINTOJUI AR PARDAVIMO ATSTOVUI UŽ ANKSČIAU ANKSČIAUSIAI IŠLEIDUSIUS PRODUKTUS AR PASLAUGAS (6 mėn.). ŠIS APRIBOJIMAS BENDRAVAS IR NEBUS DIDĖJIS DĖL DAUGIAU NEI VIENO ĮVYKIŲ AR PAREIŠKIMO. LINORTEK ATSISAKO JOKIOS LINORTEK LICENCIJOS GALĖJŲ IR TIEKĖJŲ ATSAKOMYBĖS. - Eksporto įstatymų laikymasis.
Jūs pripažįstate, kad Programinei įrangai ir susijusiai technologijai gali būti taikomi JAV eksporto kontrolės įstatymai, JAV eksporto jurisdikcija ir kitų šalių eksporto ar importo taisyklės. Jūs sutinkate griežtai laikytis visų taikomų tarptautinių ir nacionalinių įstatymų ir taisyklių, taikomų Programinei įrangai, įskaitant JAV eksporto administravimo reglamentus, taip pat JAV ir kitų vyriausybių nustatytus galutinio vartotojo, galutinio naudojimo ir paskirties apribojimus. Jūs pripažįstate, kad turite teisę gauti leidimą eksportuoti, reeksportuoti arba importuoti Programinę įrangą ir susijusias technologijas, jei to gali prireikti.
Atlyginsite Linortek nuostolius ir atlaikysite visus reikalavimus, nuostolius, įsipareigojimus, žalą, baudas, netesybas, išlaidas ir išlaidas (įskaitant advokato honorarus), atsirandančius dėl bet kokio šioje dalyje nurodytų įsipareigojimų pažeidimo arba su juo susijusių. - Užduotis.
Jūs negalite perleisti jokių savo teisių ar įsipareigojimų pagal šią GVLS, o bet koks bandymas perleisti bus negaliojantis ir neturės galios. - Pranešimai.
„Linortek“ gali pateikti jums bet kokį pranešimą, susijusį su šia EULA, naudodamas el. pašto adresą ir adresą, kurį nurodėte registruodamiesi „Linortek“. - Atsisakymas
Kad būtų veiksmingi, visi Linortek atsisakymai turi būti pateikti raštu ir pasirašyti įgalioto Linortek atstovo. Bet koks kitas Linortek nesugebėjimas įgyvendinti bet kokios čia nurodytos sąlygos nebus laikomas atsisakymu. - Atskyrimas
Bet kuri šios GVLS nuostata, kuri bus pripažinta neįgyvendinama, bus redaguojama ir aiškinama taip, kad būtų kuo geriau pasiekti tos nuostatos tikslai pagal galiojančius įstatymus, o visos likusios nuostatos galios ir galios. - Reglamentuojantys teisės aktai; Vieta.
You agree that this EULA, and any claim, dispute, action, cause of action, issue, or request for relief arising out of or relating to this EULA, will be governed by the laws of the state of North Carolina, U.S.A., without regard to conflicts of laws principles, provided that if you reside in a country that will not apply U.S. law to disputes related to these terms, then the laws of your country will apply. You also agree that the United Nations Convention on Contracts for the International Sale of Goods shall not
apply. You agree that regardless of any statute or law to the contrary, any cause of action against us arising out of or related to the Linortek websvetainėje, programinė įranga arba „Linortek“ produktai turi būti pradėti naudoti per vienerius (1) metus nuo ieškinio pagrindo atsiradimo arba toks veiksmas bus uždraustas visam laikui. Bet koks ieškinys arba procesas, susijęs su šia EULA, turi būti pareikštas federaliniame ar valstijos teisme, esančiame Rolyje, Šiaurės Karolinoje, ir kiekviena šalis neatšaukiamai pasiduoda bet kurio tokio teismo jurisdikcijai ir vietai, nagrinėjant bet kurį tokį ieškinį ar ginčą, išskyrus tai, kad Linortek gali prašyti uždraudimo. bet kuriame teisme, turinčiame jurisdikciją apsaugoti savo intelektinę nuosavybę. - Kalifornijos 65 pasiūlymo įspėjimas.
 ĮSPĖJIMAS: Šis produktas gali paveikti jus su cheminėmis medžiagomis, įskaitant šviną, kuris Kalifornijos valstijoje, kaip žinoma, sukelia vėžį. Norėdami gauti daugiau informacijos, eikite į www.P65Warnings.ca.gov.
Darbo pradžia
The Fargo SERVER is what is called a “bare board” product and is supplied without a housing. It operates on low voltage; however you need to use simple handling precautions to prevent damage to the circuits. All electronics are susceptible to electrostatic discharge. This high voltage “shock” can permanently damage your device. Before handling the product, you should touch a surface such as a grounded workbench or table. It is also best to handle the device from its edges. If you notice that your chair or clothes often cause static discharges, you must exercise extra caution. The unit is supplied with four rubber feet which keeps the bottom of the board from coming into contact with the surface you put it on. Be careful not to let metal objects, such as screw drivers or hardware, come in contact with the bottom of this product. The board can be mounted on a panel using stand offs and #4 hardware. The mounting holes are connected to the GROUND signal. The SERVER unit is a self-contained web server configured with various input and output circuits. Although the relays are rated for higher voltagtaip, šis gaminys nėra skirtas naudoti linijoje voltages. You should never use voltages through the SERVER product exceeding 48 volts. IT IS NOT SAFE.
The KODA SERVER is a housed unit with a DIN rail mountable enclosure that can be snapped onto a DIN rail or attached to any flat surface such as a wall or under a counter. KODA 100 has two relays (48VAC@1A), KODA 200 has four relays which can drive 10V 50mA to external devices. The unit is supplied with a DIN Rail mountable enclosure with removable terminal connectors for easy installation. The KODA SERVER can be mounted on a panel or on the wall using the DIN rail mount clip. The removable wire terminal connectors simplify field installation and allow for easy troubleshooting and maintenance: the unit can be removed from the system without disturbing the system wiring.
Serverio prijungimas
Pastaba: For a diagram showing the location of all connectors on your SERVER referenced in this section, please see the section – Board Layout Reference.
Atsargiai: Šie įrenginiai yra izoliuoti nuo žemės. Visada prijunkite taip, kad maitinimo kilpa būtų prijungta tik prie SERVER įrenginio.
NENAUDOKITE išorinių įžeminimo jungčių. Taip galite sugadinti SERVER arba POE pradinį įrenginį.
- Place the unit on a table or bench being careful not to let any metal objects come into contact with the bottom of the circuit board (Fargo Only).
- Connect the 12VDC power supply to a suitable AC outlet and plug the barrel connector into the SERVER at the location labelled “12VDC/POWER”. Alternatively, you may also use POE. At this point the GREEN/Boot LED should come on and start flashing indicating the SERVER is operating and is in the “Bootload Mode”. This mode allows the user to update the server software that is used on the unit. After about 5 seconds, the GREEN LED will go off and the RED LED will start blinking once per second indicating the SERVER is operating in “Server Mode” and is accessible on a network utilizing TCP/IP protocols.
ATSARGIAI: NAUDOJANT POE TINKLO JUNGIKLIU, NENAUDOKITE 12VDC MAITINIMO TIE pat metu SERVERIUI MAITINTI, JIS SUgadins plokštę. - Plug an Ethernet cable into the RJ45/NET connector. The “Connection” LED will come on if a 100MHz network is available, otherwise it will remain off and the “Activity” LED should start blinking indicating network activity. Fargo G2 Relay Connections
There are 8 relays on the FARGO R8 and 4 on the FARGO R4. These are dry contact relays. These units are designed for only low voltage valdymas ir neturėtų turėti ttage applied to the relay greater than 48 volts. This is for your safety as well as to stay within the parameters of the parts and circuit board design. The relays have 3 terminals labelled NO, C and NC which stand for Normally Open, Common and Normally Closed. When activated, the relay moves the connection from CNC to CNO. If you want to make a connection when the relay is activated, connect your wires between C and NO. When the relay is activated C and NO will be connected together. If you want to break a circuit when the relay is activated, make your connections to C and NC. When the relay is activated the circuit will be broken (or open)
Koda Relay Connection
There are 2 relays on the KODA 100. The KODA 100 has 2 removable 2 position connectors (1 for each relay) and are simply numbered “1” and “2”. These relays are normally open.
There are 4 relays on the KODA 200. The KODA 200 has 1 removable 8 position connector. Each relay has a “+” connection and a numbered connection. The relays may be set to supply about 10VDC by selecting “+V” on the setting switch (see Board Layout Reference page 29) or set to dry contact DC on the switch. If “+V” is selected then the voltage will be present on the “+” terminal and the numbered terminal is the return. Otherwise, a normally open dry contact exists across the “+” and numbered connection. KODA 100/200 is designed for only low voltage valdymas ir neturėtų turėti ttage įjungta į relę, didesnę nei 48 voltų. Tai skirta jūsų saugumui ir tam, kad neviršytumėte dalių ir plokštės dizaino parametrų.

![]() JOKIU ATVEJŲ LINOR TECHNOLOGY NEBUS ATSAKINGA, AR SUTARTIES SUTEIKIMO, DElikto AR KITU KITU būdu, UŽ JOKIĄ ATSITITINKĄ, SPECIALIĄ, NETIESIOGINĘ, ATLIEKAMĄ ARBA BAUSTAMĄ ŽALĄ, ĮSKAITANT, BET NEAPribojamą, NAUDOJIMĄ, NAUDOJIMĄ, NAUDOJIMĄ, KONSTRUKCIJĄ. , KOMERCINIAI NUOSTOLIAI AR PRAGAUTAS PELNAS, SAUPYMĖS ARBA PAJAMOS VISAI TOKIŲ MAŽŲ GALI BŪTI ATSAKOMYBĖS ĮSTATYMAI.
JOKIU ATVEJŲ LINOR TECHNOLOGY NEBUS ATSAKINGA, AR SUTARTIES SUTEIKIMO, DElikto AR KITU KITU būdu, UŽ JOKIĄ ATSITITINKĄ, SPECIALIĄ, NETIESIOGINĘ, ATLIEKAMĄ ARBA BAUSTAMĄ ŽALĄ, ĮSKAITANT, BET NEAPribojamą, NAUDOJIMĄ, NAUDOJIMĄ, NAUDOJIMĄ, KONSTRUKCIJĄ. , KOMERCINIAI NUOSTOLIAI AR PRAGAUTAS PELNAS, SAUPYMĖS ARBA PAJAMOS VISAI TOKIŲ MAŽŲ GALI BŪTI ATSAKOMYBĖS ĮSTATYMAI.
TOLESNIS PRANEŠIMAS DĖL NAUDOJIMO APRIBOJIMO
Jei nenurodyta konkrečiai, šis gaminys NĖRA skirtas perjungti linijos tūrįtage prietaisai. Šis apribojimas apima visus FARGO IR KODA produktus. Norėdami valdyti įrenginį, kuris veikia linijoje voltages vartotojas PRIVALO įdiegti ir tarpinį įrenginį, pvz., relę.
Sujungdami liniją ttagJei naudojate tarpinį įrenginį, PRIVALOTE būti kvalifikuotas elektrikas arba naudotis kvalifikuoto elektriko paslaugomis. Be to, reikia laikytis vietinių kodų, įskaitant, bet neapsiribojant, vielos gabarito dydį ir tinkamą korpusą.
Linortek cannot assume any responsibility for harm to the user or third parties for improperly using our Fargo/Koda products. This liability remains with the user. Linortek cannot assume any responsibility for damage to the device for improperly using our SERVER product.
For relay specifications, please see Board Reference Layout page 29
Digital Input Connections (Fargo R4 and Koda)
The digital inputs allow the SERVER to detect an external on/off state of a sensor. With this information the SERVER can display whether an input is on or off, count events in a resettable or non-resettable counter, and calculate the frequency (such as for use as a tachometer) or the period of the input. There are two modes of operation for the digital inputs – PULL UP and ISOLATED.
a) PULL UP mode connects a 1K resistor to an internal voltage leidžia naudoti paprastą jungiklį (pvz., magnetinį durų jungiklį) per 1 ir 2 gnybtus. Kai jungiklis suaktyvinamas, į įvestį siunčiamas signalas.
b) ISOLATED mode allows you to directly drive the SERVER’s optoisolator with an external voltage nors vidinis 1K rezistorius. Šis ttage gali būti nuo 5 V iki 24 V, tiekiant mažiausiai 2 mA arba daugiausiai 30 mA optoizoliatoriaus diodui. Kito vidinio ryšio su šiuo ttage so it is an isolated input. Please note, when connecting a 12VDC-¬24VDC circuit to the input, an external resistor (can be provided at request, 2.2k ohm 0.5watt) must be used.
These modes are selected by the switch on the SERVER (see Board Layout Reference page 29) marked ISO and PU for isolated and pull up respectively. These are set at the factory to ISO by default.
Wiring a push button: For distances up to 500 feet, a 20 AWG shielded wire is suitable for wiring a push button. If the distance between the push button and the controller extends up to 5,000 feet, use a 16 AWG shielded cable instead. Keep in mind that longer cable runs are more susceptible to signal interference.
Atsargiai: If you intend to use isolated mode, verify that the input switch is set to ISO before applying an external voltage. Priešingu atveju galite sugadinti SERVER arba POE pradinį įrenginį.
Analog Input Connections (Fargo R4ADI)
The analog inputs allow the SERVER to read the value of external equipment. There are 2 analog inputs.
For AC current monitoring, use one of the two 3.5mm stereo inputs to interface with a current sensor.
2 analoginės įvesties gnybtų blokai yra prijungti prie neizoliuotų 0–5 V srovės jutiklių, kurie gali būti prijungti prie įvairių įrenginių, tokių kaip temperatūros ar slėgio jutikliai. SERVERIS suteikia įžeminimo ir maitinimo jungtį, kad būtų galima atlikti matavimus be išorinio tūriotage references. You should use a sensor that is isolated so that that it makes no connection to a remote ground. See drawing under Board Reference Layout page 29.
Accessing your SERVER
Kai jūsų SERVERIS bus įjungtas ir prijungtas prie tinklo, jis automatiškai gaus IP adresą per DHCP tol, kol jūsų maršrutizatorius bus sukonfigūruotas taip. Norėdami prisijungti, įveskite savo IP adresą web browser. This will take you to your SERVER’s landing page. To log in, click the Log In button on the top right of the page. Your browser will prompt you to enter your username and password. By default, these credentials are both set to admin. To find your SERVER’s IP address, see below.
Savo IP adreso radimas su Linortek Discoverer
„Discoverer“ programa automatiškai suras jūsų SERVERĮ. „Discoverer“ yra „Java“ programa, todėl norint naudoti šią funkciją reikia įdiegti „Java Runtime“. Java galite rasti čia: http://java.com/en/download/index.jsp.
Norėdami atsisiųsti „Discover“ programą, eikite į: https://www.linortek.com/downloads/supportprogramming/
Rekomenduojama naudoti „Chrome“ ir „Firefox“ naršykles. Atkreipkite dėmesį: jei norite naudoti „Internet Explorer“, „Internet Explorer“ išsaugo „Linortek Discoverer“ kaip ZIP failą file pagal nutylėjimą. Norėdami naudoti „Discoverer“, turėsite pasirinkti Įrašyti kaip ir pervardyti file kaip Linortek Discoverer.jar, kai atsisiunčiate.
Atsisiųsdami programą „Discover“, kartais matysite iššokantį įspėjamąjį pranešimą, priklausomai nuo jūsų naršyklės saugos nustatymų, klausiantį, ar norite tai palikti, ar išmesti. file, please click the Keep button as this is a Java program, and it won’t harm your computer.
Kai „Discoverer“ suras jūsų įrenginį, jame bus rodoma:
- IP adresas
- Pagrindinio kompiuterio pavadinimas
- MAC adresas
- Kita informacija:
a. Mėlynas šviesos diodas (jei įjungtas)
b. produkto pavadinimas
c. Serverio programinės įrangos peržiūra
d. Prievado numeris (jei perkeltas)

Spustelėkite norimą naudoti įrenginį, rodomą „Discoverer“ programoje, kad paleistumėte SERVERĮ web pages in your browser. Click the Login button on the homepage. The default username/password is: admin/admin. You may change these as you desire or disable this feature in the settings menu.
Connecting your SERVER Directly to Your PC
You can also plug your SERVER directly to your PC if there is no network connection available. If you plug your SERVER into your PC’s Ethernet port it will use the default IP address: 169.254.1.1 unless you have previously configured your SERVER to use a static IP. Enter 169.254.1.1 into your web browser to connect. No internet connection is required. Once configured, you can then install your SERVER where you desired.
Serverio konfigūracija
Prisijungimas
Once you have entered the IP address and port number, if set, the Login page will open. This page shows the name of this server which you may change in Configure/Network Config.
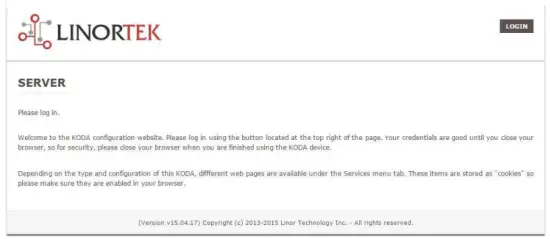
This page is static with no background activity and is a useful place to park if you are not using the SERVER and do not want to close the connection.
By pressing LOGIN, you will be asked for your username and password. These credentials will be retained by the browser until the browser is closed. You can disable the password requirement in Settings page. See section page 21.
Pagrindinis puslapis
Įvedę prisijungimo duomenis, būsite nukreipti į pagrindinį programos puslapį. Pagrindiniame arba rodyklės puslapyje rodoma tam tikra sistemos informacija ir siūloma galimybė rasti fizinį įrenginį, jei jis yra kitoje srityje. Aprašymą rasite žemiau esančiame sąraše.

- TIME – Displayed along with the day of the week. This time may be set to be in a 12 hour format with AM/PM indicator or 24 hour format.
- DATE – čia rodoma dabartinė data.
- VOLTS – ttagRodomas e prie lentos. Tai gali būti naudinga, jei SERVERIS maitinamas kartu su kita įranga, ttage variance can be noted. Fargo and Koda servers have an input voltage range of 1248vDC.
- TEMPERATURE – Temperature on the board is displayed. This display may be either °C or °F. This temperature will be affected by the heat generated by SERVER itself so it will always be slightly higher than ambient temperature.
- Šviesos diodai – Rodomi 3 šviesos diodai. RAUDONAS šviesos diodas yra sistemos impulsas. Kol serveris veikia, jis turėtų mirksėti maždaug kartą per sekundę. ŽALIAS šviesos diodas naudojamas įkrovos įkroviklio parinktims ir paprastai nėra matomas websvetainę. MĖLYNĄ šviesos diodą galima spustelėti, todėl galite jį įjungti ir išjungti web puslapį. Tai naudinga nustatant įrenginio fizinę vietą, jei jis bus naudojamas su kitais panašiais įrenginiais, nes jis užsidegs ant įrenginio, kuriam šis web naršyklė prijungta. „Discoverer“ programa taip pat pastebės, ar dega MĖLYNAS šviesos diodas. Tai dažnai vadinama „Locate“ funkcija.
Paslaugos
Skirtukas Paslaugos yra dinamiškas ir keisis priklausomai nuo jūsų serverio konfigūracijos. Čia galite valdyti įvestis, išėjimus, jutiklius ir kitus specialius valdiklius.
In/Out or Relays Page
Depending on which SERVER you are using, the first page on the SERVICES tab will be either In/Out or Relays.
In/Out has the relay controls and the input controls on one page, while Relays only has the relay controls.
Relės valdymas
An In/Out page is displayed below. Some relay control pages have 2, 4 or 8 relays displayed. Each relay has a number, in this case 1 to 4.

The State LED shows whether the relay is on or off indicated by GREEN and RED respectively. This icon is clickable to manually control the corresponding relay. Each relay can have a Name as well as identifiers for the Normally Open, Common and Normally Closed connections.
Yra keturi būsenos šviesos diodai, kurie rodo:
- Email – If an email is to be sent when this relay is switched on/off
- Impulsas – jei ši relė nustatyta su impulso pločio ir impulso pločio daugikliu (trukmė) – daugiau informacijos rasite kitame skyriuje
- Sched. – If there is a schedule created in the Tasks page (see page 15) set to automatically trigger this relay.
- Laikinas – jei nustatytas impulsas ir ši relė suaktyvinta, laikmačio šviesos diodas užsidegs raudonai, rodydamas, kad relė šiuo metu veikia pagal laikmatį.
Click the Edit Icon to edit the controls for the corresponding relay. This will take you to the Set Relay page (see page 11).
Įėjimai
The In/Out or Inputs page (depending on your SERVER) will display information from each input. The SERVERs have a combination of inputs. The Fargo R4DI has four digital inputs, The R4ADI has, four digital inputs, four analog inputs. The KODA SERVER has two digital inputs.
At the top of each input is a label (ex: DIN 1, AIN 2) specifying whether it is a digital input (DIN) or analog input (AIN) as well as the input number. This label will turn green when the input is enabled. Inside the box will be any display configured from the Set Input page (see page 12 for digital input, page 14 for analog input). A red dot in the lower-left corner indicating the state of a linked relay (if any), will turn green when the linked relay is activated.
Finally, an Edit icon in the lower-right corner of the box to edit the corresponding input. This will take you to the Set Digital Input or Set Analog Input page (page 12 or page 14).
Set Relay Page
Puslapyje SET RELAY galite nustatyti įvairias su rele susijusias savybes.
- Relay Select – The Relay that you are editing (identified by the line on which you clicked the Edit icon on the RELAY page).
- Name – Enter a 15-character Relay Name. This and the following 3 fields may be used for any identifying information desired.
- NO Name – Enter a 7-character name for the Normally Open (NO) connection.
- Com Name – Enter a 7-character name for the Common (COM) connection.
- NC Name – Enter a 7-character name for the Normally Closed (NC) connection.
- Pulse Width – When you control the relay it turns on or off. You may control it for a timed turned on period by entering a Pulse Width when 0 means there is no timed event and a number represents duration of the pulse. The maximum number you can enter here is 4 digits, ie. 1234.
- Impulso pločio daugiklis – norėdami toliau apibrėžti impulso ilgį, pasirinkite impulso pločio daugiklį, kad toliau apibrėžtumėte impulso plotį. Galite pasirinkti:
• Nė vienas
• mS (Millisecond, 1/1000 second)
• Sec (Seconds)
• Min (Minutes) - Relės tipas – SERVERIS gali pasiekti reles fiziškai SERVERYJE arba naudodamas kitas priemones. Galite pasirinkti:
• Normal – relay physically on the SERVER
• Latched – not currently supported
• Remote – a relay on another SERVER accessed over the network
• Zigbee – a relay at a remote device accessed over an RF system
• Normal and Remote – both relays activated
• Normal and Zigbee – both relays activated - Vietos ID – tai numeris, identifikuojantis nutolusią vietą
- Relė Vietoje – skaičius, nurodantis relę arba įrenginį Vietoje
- Siųsti el. laišką – SERVERĮ galima užprogramuoti siųsti el. laišką, jei relė įjungta arba išjungta.

Nustatykite skaitmeninės įvesties puslapį
Skaitmeninius įėjimus galima nustatyti taip, kad būtų pateikti įvairūs rodmenys naudojant įvairius ekrano tipus. Be įvesties duomenų rodymo, galite pavadinti ekraną, taip pat susieti su juo relę. Ši relė pasikeis iš žalios į RAUDONĄ, kai bus įjungta ir išjungta, taip pat ją galima spustelėti, kad ją valdytumėte. Spustelėję redagavimo pieštuko piktogramą galite redaguoti šios įvesties nustatymus:
- Digital Input Selected – The Digital Input that you are editing (identified by the line on which you clicked the Edit icon).
- Pavadinimas – šiai įvestiei galite nustatyti 15 simbolių pavadinimą. Šis pavadinimas rodomas juostoje ekrano viršuje.
- Etiketė – nustatykite 7 simbolių etiketę, kuri bus rodoma faktiniame aktyviame ekrane.
- Korektorius – naudodami šį lauką galite pridėti, atimti, dauginti arba padalyti reikšmę prieš tai, kai ji bus rodoma ekrano puslapyje. Tai yra 2 reikšmių korektorius, kiekvienas atskirtas vienu tarpo ženklu. (ty „+2, -2, *3, /3“)
- USE – nustato šią įvestį į aktyvią. Įvesties numerio indikatorius tampa žalias. Reikėtų pažymėti, kad naudojant įvestį sunaudojama procesoriaus laikas ir kiti ištekliai, priklausomai nuo jo tipo. Nors visi įėjimai gali būti aktyvūs vienu metu, rekomenduojama įjungti tik tuos, kuriuos norite naudoti.
- Tipas – įvesties duomenis galima naudoti rezultatų diapazonui apskaičiuoti. Galite pasirinkti:
• State – This is useful for knowing if an input is on or off, like a door switch being on or off.
• CounterNR – This is a non-resettable counter.
• CounterR – This is a resettable counter.
• Frequency – Counts the frequency of an input in KHz (kilo hertz or1/1000 seconds). This could be useful in displaying a tachometer where 60Hz = 1 R.P.M.
• Period – in 1/1000 seconds an input in kHz (milliseconds or1/1000 seconds). This would be useful for measuring timed events. - Ekranas – šis pasirinkimas leidžia pakeisti naudojamo ekrano tipą. Galite pasirinkti:
• Dot – A single dot with the value in the middle. This can be used for State. You can make a dumb indicator by changing the color of the Dot based on the value. The label is under the Dot.
• Values – Displays the Corrected Value with the Label in a box directly below it.
• Meter – This Meter has configurable scale based on the Min/Max values and arcs can be colored per the Color ranges. The Label is displayed within the Meter.
• VBar – Also based on the Min/Max values for the scale and the bar changes color based on the values in the Color ranges. - Relay L/T – Enter a Relay number here. If it is a local relay it will show GREEN or RED depending if it is on or off. By clicking on it the relay will turn on and off. The name comes from the relay settings page. This may be useful if you want to turn the subject of a display on and off. Any relay can be used on any input and each may be reused for any other input. Adding an L after the relay number (ex: 2L) will link the state of the input to the state of the relay. This is an easy and immediate way to have an input follow the relay. Adding a T after the relay number will trigger the relay to the state of the input. This is an easy and immediate way to have a relay follow the input.
- Command Z/N/I – This field is used for issuing various commands to the Digital Input controller: Z Zero the resettable counter. N Leave the input as Normal. I Invert the input.
- Value – These are Min/Max values used for the display. This is useful for preventing a Meter from going past its end or setting the value of a VBar. This is the Value after the Corrector. The system cannot display a value past Max, so be sure this is at least set to 1.
- Geltona/raudona/žalia – yra trys spalvos, kurias galima naudoti norint toliau apibrėžti ekraną. Nustatykite šių spalvų diapazoną, kad apibrėžtumėte ekrano reikšmės spalvą. Tai yra vertė po korektorius. Atminkite, kad jei naudojate būsenos tipą, galbūt norėsite priskirti RAUDONĄ = nuo 0 iki 0, ŽALIA = nuo 1 iki 1 ir GELTONA = nuo 2 iki 2. Kadangi būsena visada yra 1 arba 0, tai padės išvengti dviprasmiškos informacijos ir neleiskite naudoti GELTONOS spalvos. Valstybės tipui galite pasirinkti bet kurias dvi jums patinkančias spalvas.

Set Analog Input Page
Analoginius įėjimus galima nustatyti taip, kad būtų pateikti įvairūs rodmenys naudojant įvairius ekrano tipus. Be įvesties duomenų rodymo, galite pavadinti ekraną, taip pat susieti su juo relę. Ši relė pasikeis iš žalios į RAUDONĄ, kai bus įjungta ir išjungta, taip pat ją galima spustelėti, kad ją valdytumėte.
- Analog Input Selected – The Analog Input that you are editing (identified by the line on which you clicked the Edit icon).
- Pavadinimas – šiai įvestiei galite nustatyti 15 simbolių pavadinimą. Šis pavadinimas rodomas juostoje ekrano viršuje.
- Etiketė – nustatykite 7 simbolių etiketę, kuri bus rodoma faktiniame aktyviame ekrane.
- Korektorius – naudodami šį lauką galite pridėti, atimti, dauginti arba padalyti reikšmę prieš tai, kai ji bus rodoma ekrano puslapyje. Tai yra 2 reikšmių korektorius, kiekvienas atskirtas vienu tarpo ženklu. (ty „+2, -2, *3, /3“)
- USE – Sets this input to active. Turns the input number indicator to GREEN. It should be noted that when in use the input consumes CPU time and other resources depending on its type. Although all inputs may be active at the same time, it is recommended to turn on only those you want to use.
- Tipas – įvesties duomenis galima naudoti rezultatų diapazonui apskaičiuoti. Galite pasirinkti:
• Analog 1 – Analog 1 input from a SERVER with an input such as found on a R4ADI.
• Analog 2 – Analog 2 input from a SERVER with an input such as found on a R4ADI.
• AC Current 1 – AC current sensor 1 input from a SERVER with an input such as found on a R4ADI.
• AC Current 2 – AC current sensor 2 input from a SERVER with an input such as found on a R4ADI.
• AC Current 3 – Not used
• Volts – The measurement of the voltage powering the SERVER.
• Current – On “S” models, this is the current consumed by the SERVER.
• Int. Temp – Temperature from the board mounted sensor.
• Ext. Temp – Temperature from the “S” model SERVER.
• R. Humidity – % Relative Humidity from the “S” model SERVER.
• MMA X – The X axis accelerometer data from the “S” model SERVER.
• MMA Y – The Y axis accelerometer data from the “S” model SERVER.
• MMA Z – The Z axis accelerometer data from the “S” model SERVER. - Ekranas – šis pasirinkimas leidžia pakeisti naudojamo ekrano tipą. Galite pasirinkti:
1. Dot – A single dot with the value in the middle. This can be used for State. You can make a dumb indicator by changing the color of the Dot based on the value. The label is under the Dot.
2. Values – Displays the Corrected Value with the Label in a box directly below it.
3. Meter – This Meter has configurable scale based on the Min/Max values and arcs can be colored per the Color ranges. The Label is displayed within the Meter.
4. VBar – Also based on the Min/Max values for the scale and the bar changes color based on the values in the Color ranges. - Relay – Enter a Relay number here. If it is a local relay it will show Green or RED depending if it is on or off.
By clicking on it the relay will turn on and off. The name comes from the relay settings page. This may be useful if you want to turn the subject of a display on and off. Any relay can be used on any input and each may be reused for any other input. - Reikšmė – tai minimalios/maksimalios reikšmės, naudojamos ekrane. Tai naudinga norint užkirsti kelią matuokliui peržengti savo pabaigą arba nustatyti VBar reikšmę. Tai yra vertė po korektorius. Sistema negali rodyti vertės, viršijančios maksimalų dydį, todėl įsitikinkite, kad ji nustatyta bent į 1.
- Geltona/raudona/žalia – yra trys spalvos, kurias galima naudoti norint toliau apibrėžti ekraną. Nustatykite šių spalvų diapazoną, kad apibrėžtumėte ekrano reikšmės spalvą. Tai yra vertė po korektorius. Atminkite, kad jei naudojate būsenos tipą, galbūt norėsite priskirti RAUDONĄ = nuo 0 iki 0, ŽALIA = nuo 1 iki 1 ir GELTONA = nuo 2 iki 2. Kadangi būsena visada yra 1 arba 0, tai padės išvengti dviprasmiškos informacijos ir neleiskite naudoti GELTONOS spalvos. Valstybės tipui galite pasirinkti bet kurias dvi jums patinkančias spalvas.

Tasks Page
The TASKS page displays the automatic events that can be programmed into the SERVER. You can schedule up to 16 events in the SERVER. These are constructed as IF … THEN statements. In addition, the IF term can have 2 elements (IF a, AND/OR/NOT b … THEN c). This provides a simple to program and powerful way to take advantage of the data acquired by the SERVER. The Tasks page shows you an overview of configured tasks. You can click the dot in the State column to turn a task on or off indicated by a green dot for ON, and a red dot for OFF. To edit or create a task, click the Edit icon to the right of the task line. This will take you to the Set Schedule page detailed in the next section.

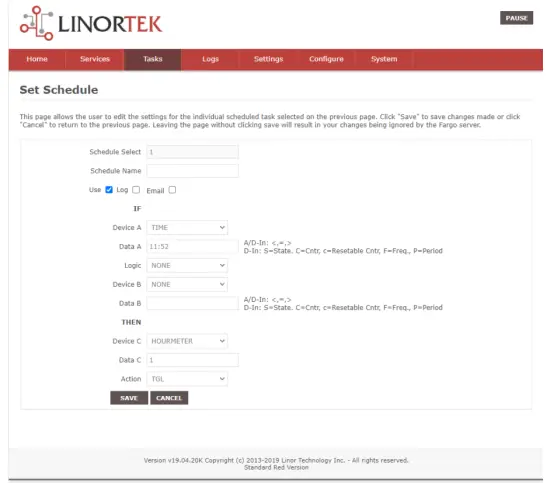
Set Schedule Page
The SET SCHEDULE page allows you to create time and logic-based events that will occur automatically if the conditions are met.
- Schedule Select – Determined by clicking on a schedule line from the previous page.
- Schedule Name – Enter a 15-character Schedule Name.
- USE – In order for a Schedule line to be active you must select the USE button. If there is an error detected in entering Schedule data, the USE box will automatically uncheck.
- LOG – pasirinkite žurnalą, kad šis elementas būtų rodomas sistemos žurnale kiekvieną kartą, kai jis vykdomas.
- Email – Click Email to automatically send an email when this schedule is executed.
- Device A – Select Device A for the first term in the IF statement from the drop box.
- Data A – Select Data A for the above device. Depending on the device selected, the Data used for testing may have special properties. See the list below for Data that may be entered. If an error is detected indata entry when the “Save” button is pushed, the USE box will uncheck and the Data box containing the error will be highlighted.
• Minute – Enter: mm
• Hour – Enter: hh (use 24-hour system)
• Day – Enter: dd
• DayofWeek – Enter: Sunday = 1, Monday = 2, Tuesday = 3, Wednesday = 4, Thursday = 5, Friday = 6, Saturday = 7, Weekday = 8, Weekend = 9
• Time – Enter: hh:mm (use leading zeros, seconds are ignored) (use 24 hour system) ex:07:30 or 14:05
• Date – Enter: yy/mm/dd (use leading zeros) ex: 20/01/10 for January 10, 2020
• Relay – Enter: Relay number and (+ or -), ex: 01+ for Relay 1 ON or 01- for Relay 1 OFF
• Button – Enter: + or – (for ON or OFF respectively)
• Flag – Enter: Flag number(opt.+), or Flag number (for ON or OFF respectively)
• Temp – Enter: >, = or < value; example: >40 (visada C laipsnių)
• Volts – Enter: >, = or < value; example: <10
• Analog – Analog input. Enter an input number and >, = or < and value. Example: 3<123 (This value is raw data value prior to any Corrector used by the input display page.)
• Digital – Digital input. Enter Input Number, Type, >, =, or < and value; example: 1F>7500 (This value is the raw data value prior to any Corrector used on the display page). Type can be (case sensitive):
• S State (On/Off)
• C Non-resettable counter
• c Resettable counter (lower case ‘c’)
• F Frequency in 1/1000 seconds
• P Period in 1/1000 seconds - Logika – nustatykite įrenginio A ir įrenginio B loginį palyginimą.
• AND – True if: Device A is true AND Device B is true
• OR – True if: Device A is true OR Device B is true
• NOT – True if: Device A is true and Device B is NOT true - Device B – Select Device B for testing from the drop box.
- Data B – pasirinkite Data B aukščiau nurodytam įrenginiui. Priklausomai nuo pasirinkto įrenginio, testavimui naudojami duomenys gali turėti specialių savybių. Žiūrėkite aukščiau esantį sąrašą.
- Įrenginys C – ką reikia valdyti.
- Data C – nustatyti įrenginio C ypatybę. Sintaksė naudojama taip:
• RELAY – These are relays on this SERVER. You can set up to four per schedule. Enter separated by commas, for examp„1,2,3,4“
• FLAG – This is a storage flag that can be used to make more complex schedules. There are 8 flags that can be turned on or off.
• REMOTE – Refers to a remote SERVER unit. When these conditions are met, this SERVER will send a command to control a remote SERVER. The Data field for a remote unit should be in the format,
“REMOTE UNIT NUMBER, REMOTE UNIT RELAY”. For example, „3,5“. Šie nuotoliniai serveriai turi būti identifikuoti puslapyje Configure/Remote Device Config.
• COUNTER – Adds count to digital input counter – set as 1 or 2 depending on which digital input is counting
• BLUE LED – No data.
• eMAIL – Will send eMail, no data.
• NOTIFY – Will send notification to Kodalert, set 1- 8 for Settings/Alarm Notification number. (Not Implemented) - Veiksmas – ką daryti su įrenginiu C. Galimos parinktys:
• ON – Turns device ON
• OFF – Turns device OFF
• TGL – Toggles state of Device C
• RESET – Resets CounterR

Žurnalų puslapis
The Logs tab displays over 10,000 entries from actions taken by the SERVER or by users themselves. This feature allows several actions for the convenience of displaying and collecting data from the SERVER.
- The checkboxes above the date allow the user to filter logs from different sources. To filter out logs you do not wish to see from a certain source simply uncheck the box.
- Each log has a reference number and a time and date attached in a “yyyy/mm/dd” and “hh:mm:ss” format. Afterwards is the event displayed.
- To scroll through the logs, use the arrows to the right-hand side, where the horizonal line and arrow brings you to the start or end, the double arrow moves up or down a page, and the single arrow moves up or down a single log.
- To refresh the logs manually click the REFRESH button below the Log Details.
- To download the Log Details, click the DOWNLOAD button below the Log Details, this allows you to save the logs as a separate file.
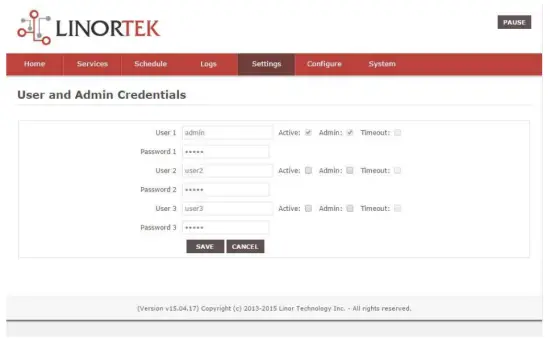
Vartotojo ir administratoriaus kredencialų puslapis
Use this page from the Settings drop down menu. Here you can set up to 3 users for your SERVER system. As a default only User 1 is Active. Here you can:
- User Name and Password – Each user has their own credentials. As a default these are set toadmin/admin, user2/user2 and user3/user3 for Users 1, 2 and 3 respectively. The passwords are never displayed. Pastaba: when you reset the password, it must be less than 13-character.
- Aktyvus – turi būti pažymėta, kad šis vartotojas galėtų prisijungti, negalite išjungti 1 vartotojo.
- Administratorius – tik administratorius gali išsaugoti duomenis daugumoje puslapių. Tai apsaugo jūsų SERVERĮ, kad jį nepakeistų neįgaliotas asmuo.
- Timeout – šiuo metu neįjungta.
Laiko / datos puslapis
Naudokite šį puslapį iš išskleidžiamojo meniu Nustatymai. Šiame puslapyje galite nustatyti laiko ir datos sistemą.
- Time – Set time using an hh:mm:ss format.
- Data – nustatykite datą naudodami formatą yy/mm/dd.
- Time Zone – Set desired time zone 5 for EST, 8 for PST, you can now add a :mm for setting part hour, for example, 5:30 yra laiko juosta 5 valandos ir 30 minučių.
- Naudoti vasaros laiką – pasirinkite, jei norite automatiškai reguliuoti sistemos laiką per vasaros laiką. (Ne visose laiko juostose tiksliai.)
- Naudoti MIL laiką – pasirinkite, jei norite naudoti 24 valandų formatą.
- Use NTP Update – Select to synchronize SERVER time with NTP server
- NTP Web Svetainė – tai pasirinktas NTP serveris naujinimams.
- NTP intervalas – laiko intervalas tarp atnaujinimų minutėmis.
- Log NTP Event – Normally NTP exceptions will be logged, select this option to Log every NTP event. (May be useful in debugging.)

Nustatymų puslapis
Access this page from the Settings dropdown menu. Select these settings to enable various features in the SERVER
- Use Active Main – No longer used. (Select PAUSE to go inactive.)
- Reikalauti prisijungti – jei nepasirinkta, SERVERIS leis bet kokią prieigą be kredencialų.
- Use IP Ranges – Not Implemented.
- Use RESTFUL IP Ranges – Not implemented.
- Use Remote IP Ranges – Not implemented.
- Naudokite RESTful autentifikavimą – reikalauti RESTful vartotojo vardo ir slaptažodžio.
- Išplėsti relės diapazoną – įjungia 8 reles.
- Naudoti relės radijo mygtukus – jei nustatyta, įjungus vieną relę, išjungiamos visos kitos.
- SSL Port No. – Not supported – For future use.
- Naudoti sistemos el. laiškus – įjungiami papildomi el. pašto pranešimai.
- Naudoti pagal Farenheitą – pasirenkamas Celsijaus arba Farenheito laipsnis.
- PGM Dynamic Relays – Changes properties of relays in task schedule.
- CLR PGMs on Start – Reinitialize tasks on start up.
- RTC Temperature Compensation – All Koda boards can add Temperature and Humidity sensor.
- Naudokite AM2302 – naudokite AM2302 temperatūros ir drėgmės jutiklį (parduodamas atskirai).
- Java Report – Send data to HourCollector app over ethernet (only for IoTMeter)
- Use Metric – Not supported – For future use.
- UART Usage – Enter “Audio” for Netbell-NTG, “Clock” for Netbell clock.
- Switch Bypass (1/2) – Ignores physical inputs if set. For example, in a Koda 200 board, you want to ignore input 1 switch, check Switch Bypass 1
- Setting 19 – Not supported – For future use
- Naudokite garso įrašą File System – Activate SD Card reader for Netbell-NTG
- WiFi Report – Enable data transfer over WiFi (WiFi IoTMeter only)
- Active Landing Page – Not supported – For future use.
- . Invert Relay Control – The relay is set to NO by default. By checking this box the relay will be inverted to NC.
- Setting 24 – Not supported – For future use.

Dinaminis DNS puslapis
Access this page from the Configure dropdown menu. From this page you can assign dynamic DNS settings. This page, along with proper port forwarding through the router, can enable global access to a device behind a NAT router or firewall. You will need to assign a static IP address and port number (see Network Config Page on page 25) and port the IP address on your router (refer to your router’s user manual). An internet IP address will have to be hosted in order to access your SERVER from the internet. Currently the only IP hosting service supported is provided by DynDNS (https://dyn.com)
- Naudoti DDNS – įgalina šią paslaugą.
- DDNS paslauga – išskleidžiamajame laukelyje pasirinkite paslaugą. Šiuo metu vienintelė palaikoma paslauga yra DynDNS
- Vartotojo vardas – tai reiškia DDNS tarnyboje nustatytą paskyrą.
- Slaptažodis – prisijungimo prie DDNS paslaugos slaptažodis.
- Host – This is the IP name registered at the DDNS service for rerouting to this SERVER

Pašto nustatymo puslapis
Nustatykite el. pašto paskyrą, skirtą SERVERIUI, kad ji būtų naudojama siunčiant el. laiškus iš įvairių modulių. Pasiekite šį puslapį iš skirtuko Konfigūruoti.
Pastaba: This unit is NOT compatible with SSL/TLS, there are 3rd party SMTP delivery servers which do not require SSL and can be used. For instructions on how to use a 3rd party SMTP delivery service, please refer to Appendix 1 at the end of this manual).
- SMTP serveris – įveskite siunčiamo pašto serverį, kurį norite naudoti.
- Prievadas – tai serverio prievadas. Šios informacijos ir kitų sąrankos laukų galite ieškoti savo pašto paslaugoje internete.
- Naudoti SSL – palikite jį nepažymėtą, kai naudojate trečiosios šalies SMTP serverį.
- Vartotojo vardas – Jūsų el. pašto paskyros pavadinimas.
- Slaptažodis – el. pašto paskyros slaptažodis.
- To Address – Enter up to 3 address for this email set up. An addressee, a CC and a BC.
- Tema – el. laiško antraštės temos eilutė.

Tinklo konfigūracijos puslapis
Access this page from the Configure dropdown menu. This page allows the configuration of the SERVER’s network settings.
ATSARGIAI: Incorrect settings may cause the board to lose network connectivity. In order to access a device in your network remotely you must PORT the device. This tells your router that information coming in should be sent to a specific device on your network.
- MAC Address – This is a unique MAC address that is assigned to this product at time of assembly. It cannot be altered.
- Pagrindinio kompiuterio pavadinimas – tai „Netbios“ pavadinimas, kuriuo kai kuriuose tinkluose gali būti adresuojamas šis įrenginys. Jis taip pat gali būti rodomas jūsų maršrutizatoriaus nuomos kataloge. Tai naudinga vieta pavadinti SERVERĮ ir rodoma pagrindiniame puslapyje bei „Discoverer“.
- Prievado numeris – jis tampa IP adreso dalimi ir būtinas norint prisijungti prie interneto. Jei tai nenustatyta, SERVER numatytasis prievado numeris yra 80.
- IP Address – Typically you only change the last group of numbers. If you change this IP address make sure to reserve this IP on your router and no other devices are using this IP address or you may not be able to reach this SERVER. If this happens you may need to Restore Defaults using the push button method.
- Šliuzas – paprastai maršrutizatorius jūsų TCP/IP tinkle, kuris naudojamas kaip jūsų IPT prieigos taškas.
- Potinklio kaukė – 32 bitų skaičius, kuris užmaskuoja IP adresą ir padalija IP adresą į tinklo adresą ir pagrindinio kompiuterio adresą. Tiesiog palikite 255.255.255.0
- Pirminis DNS – pirminis DNS.
- Antrinis DNS – antrinis DNS.

IP diapazono konfigūracijos puslapis
Access this page from the Configure dropdown menu. Use these security settings to select a range of IP address that will be allowed to access the SERVER.CAUTION: Incorrect settings may cause the board to lose network connectivity. Not implemented on this SERVER.
Nuotolinių įrenginių puslapis
Access this page from the Configure dropdown menu. These settings allow the SERVER to remotely control the relays on another SERVER. This is done by selecting the Remote Device in the Schedule program or by setting up a relay as a REMOTE. There are 8 possible REMOTE locations.
ATSARGIAI: Dėl neteisingų nustatymų plokštė praras nuotolinius ryšius.
- Įrenginio pavadinimas – įveskite šio įrenginio tekstinį pavadinimą, kad galėtumėte pasinaudoti ateityje.
- IP adresas – nuotolinio įrenginio IP adresas, įskaitant prievado numerį.
- Vartotojo vardas – naudojamas atliekant pagrindinį autentifikavimą.
- Password – Used in Basic Authentication.

Kodalert Page
Not Yet Implemented. Access this page from the Configure dropdown menu. Kodalert provides an interface for alerts of Internet connected devices. Kodalert is a cloud based, open platform monitoring and alert system for the Internet of Things in your physical world. Any Thing that can send an email or TCP messages including our SERVERS, other manufactures devices and people using email can use Kodalert. It can work for multiple remote locations, alert multiple users instantly using the rules you setup by text, email, smart phone Apps push notification or audible alarm instantly when something happens.
- Įspėjimo numeris
- Testas
- Naudokite
- Taisyklė
In the Alarm Notification page, you can change the state (on/off) of the relay by clicking the green circle in the state column. Push the EDIT icon to change the Alarm’s settings.

Specifikacijos
FARGO R8G2
- 10M/100M RJ45 Internet interface with connection and activity LEDs
- 8 Relay outputs, 1FORMC 48 Volt Max (24VAC/DC 3A)
- Status LEDs (pulse, bootloader, and locate)
- Ethernet Bootloader (for server hardware code upgrade)
- PoE or 12VDC @500mA (nominal)
- Web interface w/basic authentication
- On board temperature sensor and voltage jutiklis
Reset /Locate pushbutton (blue LED) - Working Temperature from 0 to +70 Celsius
- Storage Temperature from 40 to +125 Celsius
- Humidity from 10% to 80% noncondensing
- Dimensions 74mm x 100mm x 20mm, mounting holes 64mm x 92mm Ф 3.2mm 4 places
- Palaikomi protokolai: HTTP/SMTP/SNTP
FARGO R4G2
- 10M/100M RJ45 Internet interface with connection and activity LEDs
- 4 1FormC relays 48 Volt Max (24VAC/DC 3A)
- 2 optically isolated digital inputs, 12V 1mA or pulldown switch selectable, 2 conductor screw terminal connectors for each.
- 2 Analog 0-5VDC Inputs 30mA 3.3VDC power source PTC protected. 3 conductor screw terminal connectors for each (3.3VDC, input, ground) (R4ADI only)
- 2 Current sensor inputs. 3.5mm stereo jack connector for each (R4ADI only)
- Status LEDs (pulse, bootloader, and locate)
- Ethernet Bootloader (for server hardware code upgrade
- POE or 12VDC @500mA (nominal)
- Web interface w/basic authentication
- On board temperature sensor and voltage jutiklis
- Reset/Locate pushbutton
- Working Temperature from 0 to +70 Celsius
- Storage Temperature from 40 to +125 Celsius
- Humidity from 10% to 80% noncondensing
- Dimensions 74mm x 100mm x 20mm, mounting holes 64mm x 92mm Ф 3.2mm 4 places
- Palaikomi protokolai: HTTP/SMTP/SNTP
KODA100
- 10M/100M RJ45 Internet interface with connection and activity LEDs
- 2 1-Form-A relay 48VAC@8A Max
- 2 optically isolated digital inputs, 12V 1mA or pulldown switch selectable
- Status LEDs (pulse, bootloader, and locate)
- Ethernet Bootloader (for server hardware code upgrade)
- POE or 12VDC @500mA (nominal)
- Web interface w/basic authentication
- On board temperature sensor and voltage jutiklis
- Reset/Locate pushbutton (blue LED)
- Working temperature from 0 to +70 Celsius
- Storage temperature from 40 to +125 Celsius
- Humidity from 10% to 80% noncondensing
- Matmenys: 70 mm x 100 mm x 25 mm
- Palaikomi protokolai: HTTP/SMTP/SNTP
KOD200
- 10M/100M RJ45 Internet interface with connection and activity LEDs
- 4 1FormA relays 48 Volt Max 1A dry contact or drive 10V ±10% 50mA to external devices
- 2 optically isolated digital inputs, 12V 1mA or pulldown switch selectable
- Status LEDs (pulse, bootloader, and locate)
- Ethernet Bootloader (for server hardware code upgrade)
- POE or 12VDC @500mA (nominal)
- Web interface w/basic authentication
- On board temperature sensor and voltage jutiklis
- Reset/Locate pushbutton (blue LED)
- Working Temperature from 0 to +70 Celsius
- Storage Temperature from 40 to +125 Celsius
- Humidity from 10% to 80% noncondensing
- Matmenys: 70 mm x 100 mm x 25 mm
- Palaikomi protokolai: HTTP/SMTP/SNTP
Lentos nuorodų išdėstymas
Fargo R8
- 8 Relay outputs, 1FORMC 48 Volt Max (24VAC/DC 3A)
- Rj45 jungtis
- Maitinimo jungtis (12VDC)
- Atkūrimo mygtukas
- Raskite mygtuką

Fargo R4
- 3.5mm Inputs for AC Current Sensor (R4ADI Only)
- Analog Inputs (R4ADI Only)
- 4 Relay outputs, 1FORMC 48 Volt Max (24VAC/DC 3A)
- Skaitmeniniai įėjimai
- Digital Input Switches (Input 1 on right.
Up: Pullup, Down: Isolated) - Rj45 jungtis
- Atkūrimo mygtukas
- Raskite mygtuką
- Maitinimo jungtis (12VDC)

Koda 100
- Digital Inputs (#1 on the left) 5VDC-48VDC (12VDC-48VDC must use the external resistor)
- Relay Outputs (#1 is on the right) 8A@48VAC Max
- Digital Input Switches (IN 1 on left. UP: Isolated, Down: Pullup)
- Atkūrimo mygtukas
- Perkrovimo mygtukas (įsijungia mėlynas šviesos diodas – identifikuoja „Discoverer“)
- Rj45 jungtis
- Maitinimo jungtis (12VDC)
- Mini USB jungtis, skirta temperatūros / drėgmės jutikliui (parduodama atskirai)

Koda 200
- Digital Inputs (#1 on the left) 5VDC-48VDC (12VDC-48VDC must use the external resistor)
- Relay Outputs (#1 is on left) 48 Volt Max 1A dry contact or drive 10V ±10% 50mA
- Digital Input Switches (IN 1 on left. UP: Isolated, Down: Pullup)
- Relay Switches (Up for dry contact, down for 10V/50mA)
- Atkūrimo mygtukas
- Perkrovimo mygtukas (įsijungia mėlynas šviesos diodas – identifikuoja „Discoverer“)
- Rj45 jungtis
- Maitinimo jungtis (12VDC)
- Mini USB jungtis, skirta temperatūros / drėgmės jutikliui (parduodama atskirai)

Atstatyti gamyklinius nustatymus
To perform a factory Reset, push the Reset button. When the green LED turns on, push and hold the Reload button until the flashing red LED turns off and then turns on solid. Refer to Board Reference Layout section for the button locations on your device.
This user-manual supplements the documentation for the following Linortek products:
- Netbell-2
- Netbell-8
- Netbell-K (and variants)
- iTrixx-NHM
For more information, documentation and how-to videos, visit https://www.linortek.com/downloads/
Šį dokumentą galite rasti adresu www.linortek.com/downloads/documentations/
Jei jums reikia pagalbos dėl įrenginio, apsilankykite www.linortek.com/technical-support
Linor Technology, Inc.
Informacija gali būti keičiama be įspėjimo.
1 priedas
Kaip siųsti SSL el. laiškus naudojant trečiosios šalies SMTP paslaugą „Linortek Fargo“ ir „Koda“ įrenginiams
Pagal numatytuosius nustatymus „Koda“ / „Fargo“ įrenginiai naudoja ne SSL SMTP el. pašto serverius. Tačiau dauguma el. pašto serverių šiandien perėjo prie SSL saugos protokolo, yra trečiųjų šalių SMTP pristatymo serverių, kuriems nereikia SSL ir kuriuos galima naudoti. Rinkoje yra daug SMTP el. pašto paslaugų teikėjų. SMTP3GO naudojame kaip buvample parodyti nustatymo procesą. SMTP2GO galima nemokamai naudoti su iki 1000 el. laiškų per mėnesį. Norėdami naudoti SMTP2GO, apsilankykite: https://www.smtp2go.com/ .
1 veiksmas. Sukurkite SMTP2GO paskyrą.
Norėdami sukurti paskyrą, tiesiog spustelėkite „Registruotis“, skalėje pasirinkite „1K el. laiškų“ ir pasirinkite „Nemokamas planas“ (jei jums reikia išsiųsti daugiau nei 1000 el. laiškų per mėnesį, pasirinkite planą, atitinkantį jūsų reikalavimus.)

Norint sukurti paskyrą SMTP2GO, reikės įmonės el. pašto adreso. Nemokamos el. pašto paslaugos, tokios kaip „Gmail“ ar „Yahoo“, neleis tęsti. Suaktyvinę SMTP2GO paskyrą, turite pridėti vartotoją.
2 veiksmas. Pridėkite vartotoją.
Vartotojas, kurį sukuriate SMTP2GO, bus siunčiamo pašto serveris, kai nustatysite Fargo / Koda įrenginį siųsti el. pašto ataskaitas. Įsitikinkite, kad jūsų įmonės el. pašto serveris neužblokuos el. laiškų, jei naudosite nemokamą el. pašto paskyrą, pvz., Yahoo ar Gmail. pridėti vartotoją čia.
Prisijunkite prie savo SMTP2GO paskyros, kairiajame meniu pasirinkite „Nustatymai“ > „SMTP vartotojai“, spustelėkite „Pridėti SMTP vartotoją“ ir užpildykite formą.
 Kai vartotojas bus pridėtas prie jūsų SMTP2GO paskyros, jame bus rodoma informacija, kurios reikia norint nustatyti el. pašto pranešimą jūsų Fargo / Koda įrenginiuose.

3 veiksmas. Sukonfigūruokite Linortek įrenginį.
Sukūrę paskyrą ir pridėję vartotoją, prisijunkite prie savo Linortek įrenginio, eikite į Konfigūruoti – el. pašto sąrankos puslapį, kad nustatytumėte el. pašto pranešimą:
- SMTP serveris – įveskite siunčiamo pašto serverį, kurį norite naudoti, tai yra mail.smtp2go.com mūsų buvusiojeample.
- Prievadas – tai serverio prievadas. Mūsų ex. SMTP prievadas yra 2525ample.
- Naudoti SSL – palikite jį nepažymėtą, kai naudojate trečiosios šalies SMTP serverį.
- Vartotojo vardas – vartotojo vardas iš SMTP2GO, kai sukūrėme vartotoją atlikdami ankstesnį veiksmą.
- Slaptažodis – vartotojo slaptažodis iš SMTP2GO, kai sukūrėme vartotoją atlikdami ankstesnį veiksmą.
- Į adresą – įveskite iki 3 šio el. pašto adresų. Adresatas, CC ir BC.
- Tema – el. laiško antraštės temos eilutė.
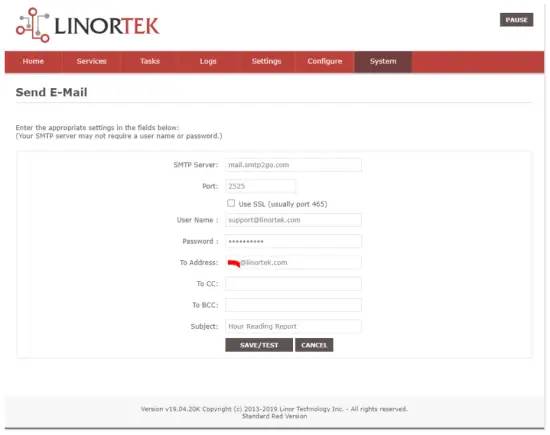
Kai tik paspausite „Išsaugoti/Test“, įrenginys automatiškai išsiųs bandomąjį el. laišką. Patikrinkite aplanką „Šlamštas / kita“, kad jį rastumėte, jei jo nėra aplanke Gautieji.
4 veiksmas. Nustatykite automatinių pranešimų el. paštu užduotį.
You should be able to receive email notifications for various events from the Fargo/Koda boards at this point. If you need to receive condition logic notification, you can use our condition logic configuration to setup such report. To setup the logic condition report notification, go to Tasks page on your Fargo/Koda device, click the Edit icon of a Schedule. For details of how to create a logic-based event, please refer to the Set Schedule Page on the Fargo/Koda User Manual, which can be downloaded here:
https://www.linortek.com/download/fargo%20g2_koda%20downloads/fargo%20g2_koda%20documentation/Fargo-G2-and-Koda-User-Manual.pdf
Šiame sample Mes naudosime Network Hour Meter įrenginį kaip buvample, kaip gauti ataskaitas el. paštu kiekvieną dieną 11:52 val.
Kai tik bus įvykdytos visos užduoties sąlygos, gausite šį el. laišką:
Hour Reading Report
![]() support@linortek.com
support@linortek.com
Mon 4/11/2022 11:52 AM
To: Liyu Nalven
HM 1, my machine, is at 000242.01 hrs.
Reply Forward
![]()
Dokumentai / Ištekliai
 |
LINORTEK Fargo G2 TCP/IP Web Relės valdiklis [pdf] Naudotojo vadovas Fargo G2, Koda, Fargo G2 TCP-IP Web Based Relay Controller, Web Based Relay Controller, Based Relay Controller, Relay Controller |