ProPlex Codeclock Timecode Display and Distribution Device

Во текот наview
TMB authorizes its customers to download and print this electronically published manual for professional use only.
TMB забранува репродукција, измена или дистрибуција на овој документ за какви било други цели, без изречна писмена согласност.
TMB има доверба во точноста на информациите за документот овде, но не презема никаква одговорност или одговорност за каква било загуба што настанала како директен или индиректен резултат на грешки или исклучувања, без разлика дали е случајно или која било друга причина.
ОПИС НА ПРОИЗВОДОТ
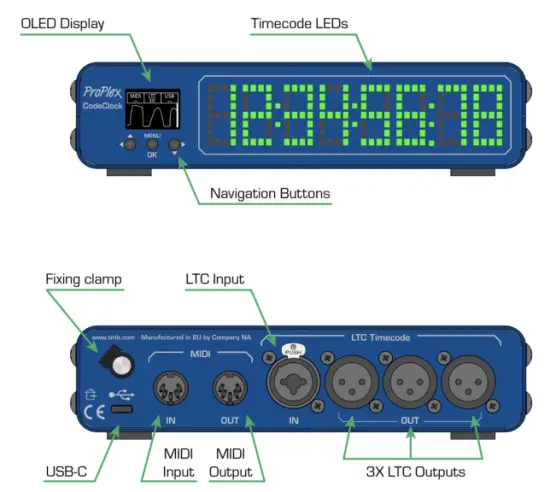
The ProPlex CodeClock is a member of our LTC Device system, which is designed to generate, distribute and monitor timecode. Our rugged, compact mini-enclosure design is perfect for desktop programmers to throw in bag while also being flexible enough to install in a rack with an optional RackMount Kit. With custom color selection on a clean dot-matrix display, the CodeClock is the ultimate tool to synchronize and monitor timecode streams.
ГЛАВНИ КАРАКТЕРИСТИКИ
- Large RGB LED matrix clock displays time and changes color depending on status
- Receives timecode over LTC (XLR3), MIDI (DIN), or USB MIDI
- Redistributes selected timecode over LTC outputs
- 3x Neutrik XLR3 outputs are transformer-isolated and have adjustable level (-18dBu to +6dBu)
- OLED control panel with an intuitive user interface and waveform display
- Built-in timecode generator capable of running at any standard framerate
- Compact, lightweight, rugged, reliable. Backpack friendly
- Available rackmount kit options
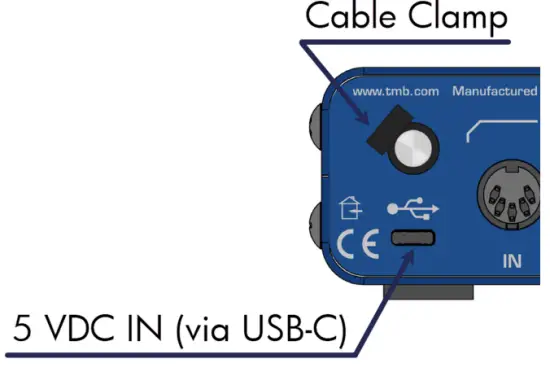
- Powered via USB-C. Cable retainer prevents accidental disconnection
ШИФЕРИ ЗА НАРАЧКИ
| БРОЕВИ ДЕЛ | PROUDCT NAME |
| PPCODECLME | PROPLEX CODECLOCK TIMECODE DEVICE |
| PP1RMKITSS | PROPLEX 1U RACKMOUNT KIT, SMALL, SINGLE |
| PP1RMKITSD | PROPLEX 1U RACKMOUNT KIT, SMALL, DUAL |
| PP1RMKITS+MD | PROPLEX 1U DUAL COMBINATION SMALL + MEDIUM |
ГОТОВ МОДЕЛОТVIEW
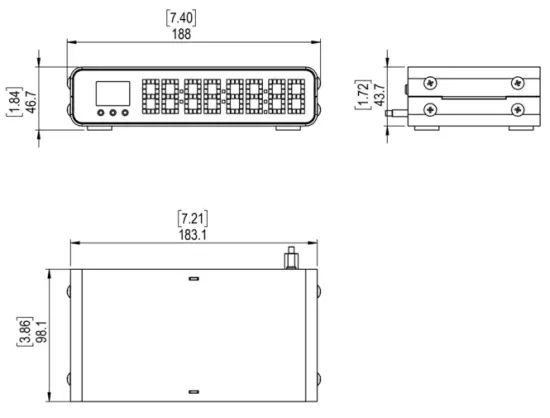
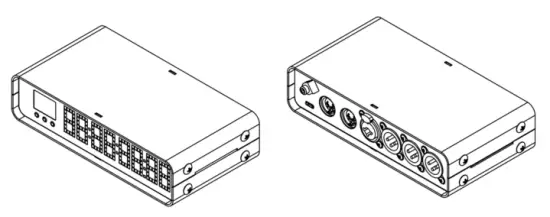
FULL DIMENSIONAL WIREFRAME DRAWINGS
ПОСТАВУВАЊЕ
Безбедносни мерки на претпазливост
Ве молиме внимателно прочитајте ги овие упатства.
Ова упатство за употреба содржи важни информации за инсталацијата, употребата и одржувањето на овој производ.
- Осигурајте се дека уредот е поврзан со соодветен волтажен сигналtage, и таа линија томtage не е повисоко од она што е наведено во спецификациите на уредот
- Осигурајте се дека нема запаливи материјали близу до уредот додека работите
- Секогаш користете безбедносен кабел кога закачувате светилка над главата
- Секогаш исклучувајте го од изворот на енергија пред сервисирање или замена на осигурувачот (доколку е применливо)
- Максималната амбиентална температура (Ta) е 40°C (104°F). Не го користете уредот на температури над оваа номинална вредност.
- Во случај на сериозен проблем со работата, веднаш престанете да го користите уредот. Поправките мора да ги врши обучен, овластен персонал. Контактирајте го најблискиот овластен центар за техничка помош. Треба да се користат само OEM резервни делови.
- Не го поврзувајте уредот со затемнувач на светлина
- Уверете се дека кабелот за напојување никогаш не е свиткан или оштетен
- Никогаш не го исклучувајте кабелот за напојување со влечење или притискање на кабелот
ВНИМАНИЕ! There are no user-serviceable parts inside the unit. Do not open the housing or attempt any repairs yourself. In the unlikely event your unit may require service, please see the limited warranty information at the end of this document
ОТПАКУВАЊЕ
Upon receipt of the unit, carefully unpack the carton and check the contents to ensure that all parts are present and in good condition. Notify the shipper immediately and retain packing material for inspection if any parts appear to be damaged from shipping or if the carton itself shows signs of mishandling. Save the carton and all packing materials. If a unit must be returned to the factory, it is important that it be returned in the original factory box and packing.
ШТО Е ВКЛУЧЕНО
- ProPlex CodeClock
- USB-C кабел
- Држач за кабел clamp
- QR Code downloads card
БАРАЊА ЗА МОЌНОСТ
The ProPlex CodeClock is powered via USB-C cable connected to any standard 5 VDC wall charger or computer USB port The included cable retainer is a threaded insert which attaches to the USB-C cable. It provides some strain relief and helps prevent accidental disconnection
ИНСТАЛАЦИЈА
The ProPlex CodeClock enclosure was designed with the touring programmer in mind. We wanted these devices to be lightweight, packable and stackable – so we fitted them with oversized rubber feet to keep them stationary on most surfaces
These units are also compatible with Small RackMount Kits should they need to be semi-permanently mounted for touring applications
RACKMOUNT INSTALLATION INSTRUCTIONS
ProPlex RackMount Kits are available for both Single-Unit and Dual-Unit mounting configurations
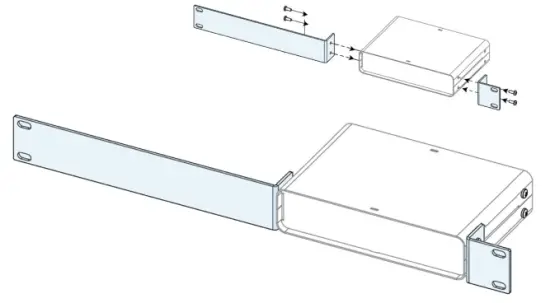
To fasten the rack ears or joiners to the ProPlex PortableMount chassis, you must remove the two chassis screws on each side at the front of the chassis. These same screws are used to securely fasten the RackMount ears and joiners to the chassis
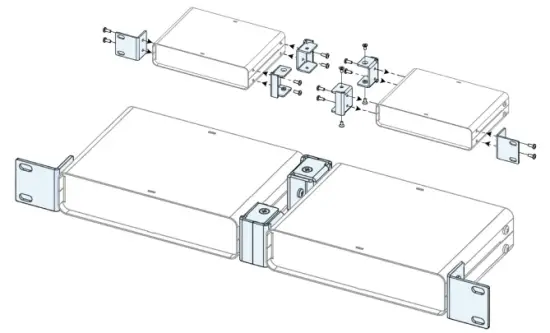
For dual-unit configurations, both sets of front and rear chassis screws will be used

ВАЖНО: Be sure to reinsert the screws into the unit after ears have been removed. Store RackMount Kit in a safe location until needed again. Spare screws are available from TMB if needed
RACKMOUNT INSTALLATION INSTRUCTIONS
The Single-Unit Small RackMount Kit is comprised of two rack ears, ONE long and ONE short. The diagram below depicts the completed installation of the RackMount Kit. These rack ears are designed to be symmetrical, so that the short and long ears can be interchangeable
The Dual-Unit Small RackMount Kit has TWO short rack ears plus TWO joiners. The diagram below depicts the completed installation of the RackMount Kit. This configuration requires the TWO center joiners attached at both front and rear
INSTALLING THE DUAL JOINERS
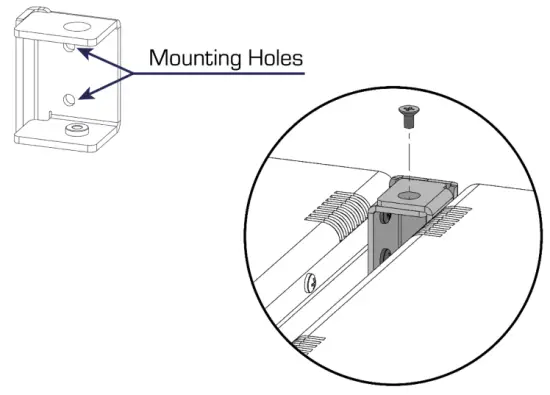
The Dual-Unit Small RackMount Kit includes FOUR joining links and FOUR countersunk flat head screws. These links are designed to nest into each other and are secured with the included screws and threaded holes.
Each link piece is identical. Simply rotate the joining link and line up the installation holes to install on either the left or right side of the corresponding unit.
ОПЕРАЦИЈА
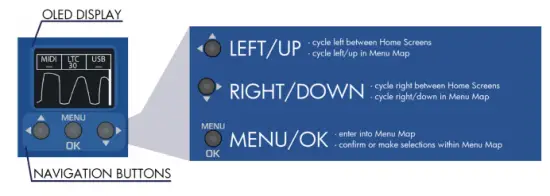
The ProPlex CodeBride can be easily configured with the onboard OLED Display and navigation buttons on the front of the unit
МАПА НА МЕНИ
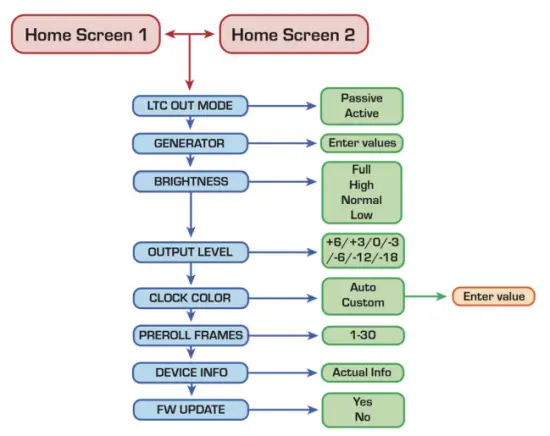
ДОМАШЕН ЕКРАН
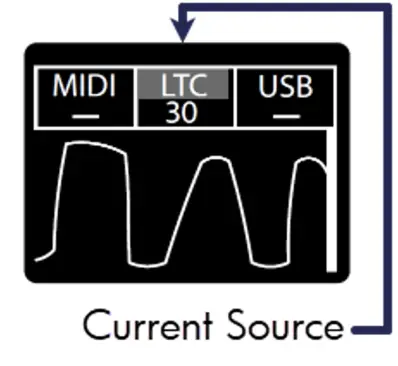
The CodeClock has 2 HOME SCREENS that display different parameters of incoming timecode streams. Cycle between these screens by pressing either the![]() копче
копче
Почетен екран 1
The formats and rates of incoming timecode streams show at the top of the screen with the current active source highlighted.
The Oscillogram and voltage level bar underneath indicate signal level from incoming LTC source only
Забелешка: Ideally the LTC IN steam should resemble a square wave with high output level. If level is too low, try increasing the volume at the source to improve the signal
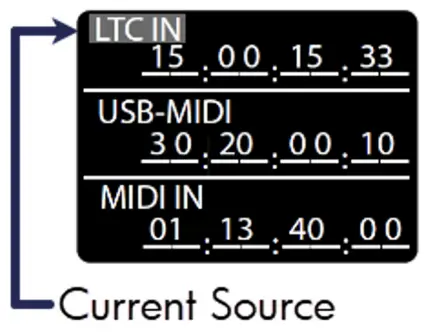
Почетен екран 2
This screen displays all sources of timecode that the CodeClock can detect
Whichever source is considered active will be highlighted with a blinking background
Главно мени
The Main Menu can be accessed by pressing the ![]() button and majority of options can be exited via the
button and majority of options can be exited via the![]() копче
копче
Scroll with the ![]() button and confirm selection with the
button and confirm selection with the![]() копче.
копче.
Забелешка: Not all menus will fit on the device screen so you will need to scroll to access some menus. The right side of most menu screens will will display a scroll bar which will help indicate the depth of scroll navigation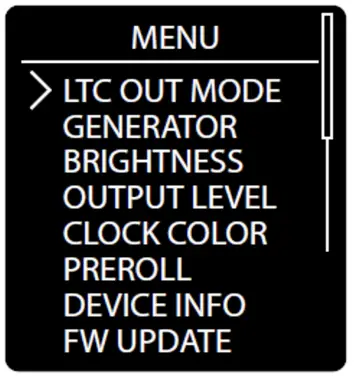
LTC Output Mode
Indicates how LTC timecode is redistributed
Пасивен режим: Incoming LTC is physically connected to LTC OUT ports through relay and signal is not altered
Активен режим: LTC timecode has regenerated timing and signal level
Користете ![]() then to confirm selection with the
then to confirm selection with the![]() button to cycle between modes. The asterisk indicator will denote the currently selected output level
button to cycle between modes. The asterisk indicator will denote the currently selected output level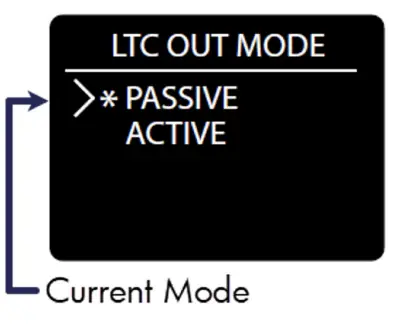 Генератор на временски кодови
The CodeClock can generate clean, high output LTC out of the three isolated XLR3 ports (located on the rear of each unit)
Користете го![]() button, then confirm selection with the
button, then confirm selection with the ![]() button to cycle between the various generator options
button to cycle between the various generator options
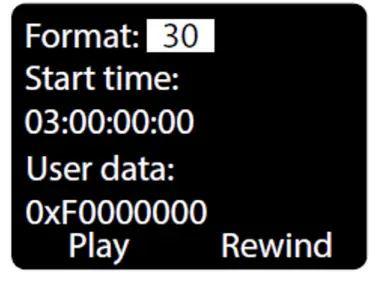
Формат: Select between different industry standard FPS rates 23.976, 24, 25, 29.97ND, 29.97DF, and 30 FPS
Време на започнување: Specify a start time of HH:MM:SS:FF using navigation buttons
Кориснички податоци: specify user data in 0x00000000 hex format Play, Pause, Rewind: user playback controls for generated timecode.
Забелешка: you must remain on this screen to continuously use the LTC generator. If you exit this screen, the generator will stop automatically, and the current source will change over to the next active source
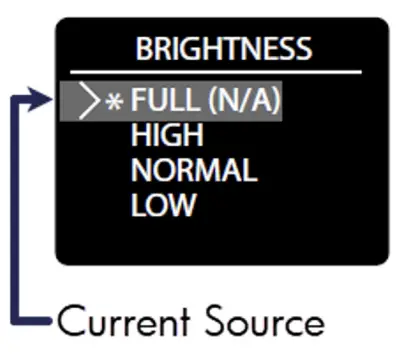
Осветленост на екранот
There are 4 Brightness settings for the segment display:
FULL HIGH NORMAL LOW
Користете го ![]() button, then confirm with the
button, then confirm with the![]() button to choose between the various levels. The asterisk indicator will denote the current screen level
button to choose between the various levels. The asterisk indicator will denote the current screen level
Излезно ниво
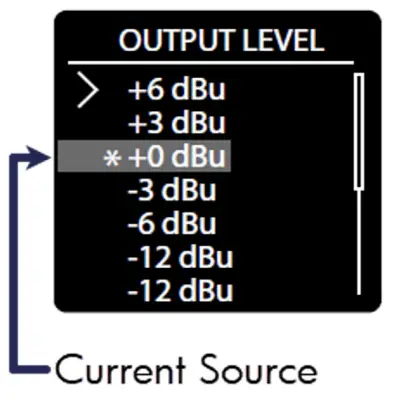
Boost or cut the output level from +6 dBu to -12 dBu. Everything outputting via the two isolated XLR3 ports is affected by this level change. This includes:
- Излез на генератор
- Re-transmitted timecode formats from other inputs
Користете го ![]() button, then confirm with the
button, then confirm with the ![]() button to choose between the various output levels. The asterisk indicator will denote the currently selected output level
button to choose between the various output levels. The asterisk indicator will denote the currently selected output level
Боја на часовникот
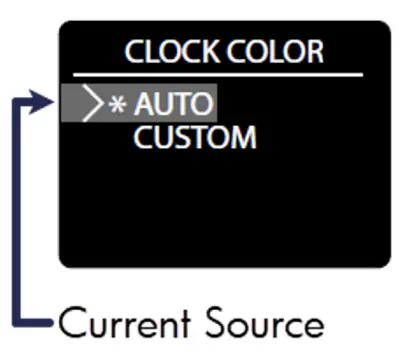
The CodeClock allows the user to customize the display color of the RGB segments or use our ‘auto’ display
Користете го ![]() button, then confirm with the
button, then confirm with the ![]() button to choose between the two color modes. The asterisk indicator will denote the currently selected mode
button to choose between the two color modes. The asterisk indicator will denote the currently selected mode
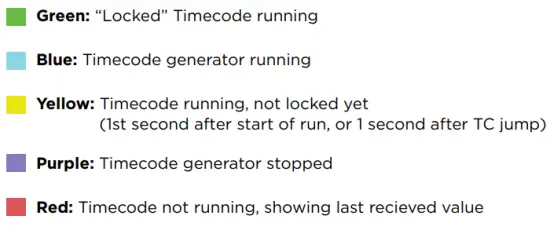
Автоматска боја: Clock color will change the display color depending on the state of the signal
Клуч за боја:
Прилагодена боја
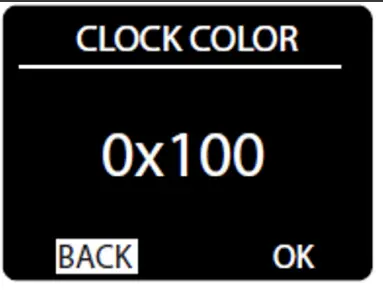
User can customize the RGB color with hex digit values
- Користете
 to select and highlight a digit, then press
 за да го потврдите изборот
 - Потоа користете
 to change value (from 0-F) and press
 повторно за да заштедите.
 - As you alter the value, you should see the clock color intensity change in response to your edit
- RGB intensity values are represented by the format: 0x (r-value) (g-value) (b-value)
- Where 0xF00 is full red, 0x0F0 is full green and 0x00F is full blue
- When the desired color is displayed, highlight the OK button on screen and press
 да заштедите
Pre-roll Frames
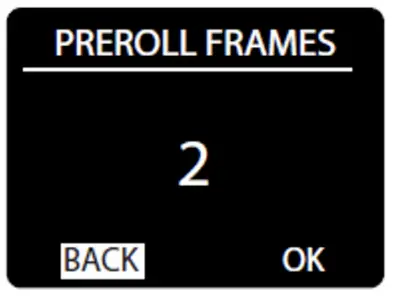
Pre-roll is the number of valid frames needed to consider the timecode source to be valid and begin forwarding it to the outputs
Користете го![]() button to highlight the Pre-roll value, then press
button to highlight the Pre-roll value, then press![]() the button to edit
the button to edit
Користете го ![]() button to set the Pre-roll frames (1-30) and to
button to set the Pre-roll frames (1-30) and to![]() save the value
save the value
Забелешка: Active streams will always show the incoming LTC stream starting from the 1st received frame, regardless of Pre-roll settings
Информации за уредот
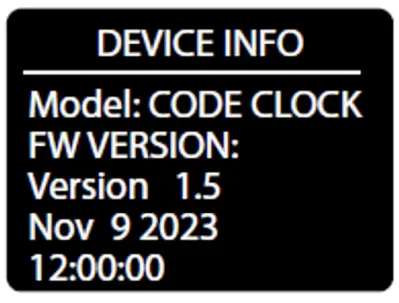
Device Info displays status information of the unit.
The information displayed is:
Име на уред
Верзија FW
FW Build date
Притиснете![]() да излезете
да излезете
Ажурирач на фирмвер
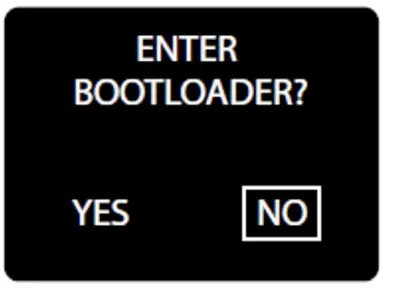
Користете го![]() button to highlight YES, then press
button to highlight YES, then press![]() the button to enter Bootloader mode. The CodeClock screen should display a note to
the button to enter Bootloader mode. The CodeClock screen should display a note to
“Use USB to Update Firmware” to let you know it is ready
Now the device should respond to updates sent from the Tiva Programmer software – visit tmb.com или е-пошта techsupport@tmb.com for information on currently available updates and further instructions
Забелешка: In the case of entering the bootloader accidentally, you must power cycle the device to exit and return to normal operation
Пасивна операција
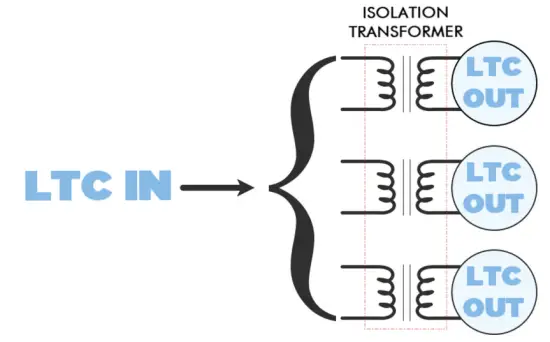
CodeClock is capable of passive operation, where no power is needed
to pass LTC through from the input to the outputs. We designed CodeClock so that each output uses an isolation transformer to help stabilize passive operation.
Isolation helps to avoid ground loops and other potential signal noise issues between the source and receiver, and among receivers.
However, the implementation of these transformers introduces an attenuation (insertion loss) to the signal at < 1dB typical to 2dB max
This additional signal level loss is normally insignificant and should cause no issue in most cases. BUT if the LTC signal was low to begin with, then the signal might attenuate to a level where it stops working.
Attenuation Recommendations
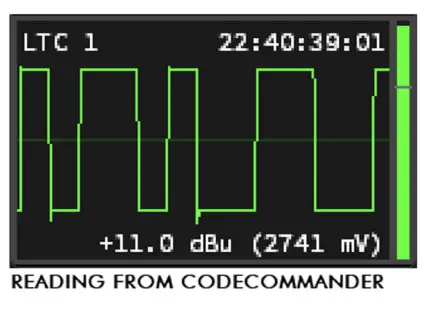
We always recommended having good headroom when working with timecode. LTC should not be sinusoidal like audio – rather, it is a digital signal that is encoded in a square audio wave
When visualizing LTC, you would generally want to see a high-amplitude square-wave with steep ascents
One fundamental difference between audio and LTC is the acceptable signal level. A “clipped” or overloaded signal is usually something to avoid in audio signals, but it may actually be necessary for accurate LTC timecode synchronization
The goal is to have incoming LTC at 0dBu (775mV), which is also the default output level for active CodeClock and the other LTC family devices
If the incoming LTC signal is low, you may need to boost the level of the sound card in the system. How much may depend on the source
Laptop sound cards
- Built-in sound laptop sound cards are usually unbalanced and often require an adapter from mini-jack to XLR – this results in loss around- 10dBu (316mV)
- It is essential to have PC volume at 100% to avoid sync issues with receives
Professional sound cards
- Pro equipment generally has a much higher output level – usually 70-80%is sufficient for normal operation with LTC
The final recommendation is to always use high-quality cables and adapters. Damaged cables or adapters can unintentionally cause more signal attenuation and lead to issues with LTC stability
ЧИСТЕЊЕ И ОДРЖУВАЊЕ
Dust build-up in connector ports can cause performance issues and can potentially lead to further damage during normal wear and tear
CodeClock devices need occasional cleaning to maintain best performance, especially units used in harsher environmental conditions
THE FOLLOWING ARE GENERAL CLEANING GUIDELINES:
- Always disconnect from power before attempting any cleaning
- Wait until unit has cooled and discharged completely before cleaning
- Use vacuum or dry compressed air to remove dust/debris in and around connectors
- Use a soft towel or brush to wipe and buff the chassis body
- To clean the navigation screen, apply isopropyl alcohol with a soft lens cleaning tissue or lint free cotton
- Alcohol pads and q-tips may help remove any grime and residue from navigation buttons
ВАЖНО:
Be sure all surfaces are dry before attempting to power on again
ТЕХНИЧКИ СПЕЦИФИКАЦИИ
| Број на дел | PPCODECLME |
|
Конектор за напојување |
USB-C Connector with cable retainer to prevent accidental power disconnection. Also transmits and receives USB MIDI. |
| MIDI Input Connector | DIN 5-Pin Female |
| MIDI Output Connector | DIN 5-Pin Female |
| LTC Input Connector | Neutrik™ Combination 3-Pin XLR and 1/4” TRS female |
| LTC Output Connectors | Neutrik™ 3-Pin XLR Male |
| Оперативен волtage | 5 VDC |
| Потрошувачка на енергија | 4.5 W Макс. |
| Работна температура. | TBA |
| Димензии (ВxШxД) | 1.72 x 7.22 x 4.42 во [43.7 x 183.5 x 112.3 mm] |
| Тежина | 1.4 фунти. [0.64 кг] |
| Тежина на испорака | 1.6 фунти. [0.73 кг] |
ИНФОРМАЦИИ ЗА ОГРАНИЧЕНА ГАРАНЦИЈА
Уредите за дистрибуција на податоци ProPlex имаат гаранција од TMB за неисправни материјали или изработка во период од две (2) години од датумот на оригиналната продажба од TMB.
Гаранцијата на TMB ќе биде ограничена на поправка или замена на кој било дел што ќе се покаже дека е неисправен и за кој е поднесено барање до TMB пред истекот на важечките гарантни периоди.
Оваа Ограничена гаранција е неважечка доколку дефектите на Производот се резултат на:
- Отворање на куќиштето, поправка или прилагодување од кој било друг освен TMB или лица конкретно овластени од TMB
- Несреќа, физичка злоупотреба, погрешно ракување или погрешна примена на производот.
- Штета поради гром, земјотрес, поплава, тероризам, војна или Божји чин.
TMB нема да преземе одговорност за потрошениот труд или употребените материјали за замена и/или поправка на Производот без претходно писмено одобрение од TMB. Секоја поправка на Производот на терен и сите поврзани трошоци за работна сила, мора однапред да бидат одобрени од TMB. Трошоците за товар за поправки со гаранција се поделени 50/50: Клиентот плаќа за испраќање неисправен производ до TMB; TMB плаќа за испорака на поправен производ, копнен товар, назад до клиентот.
Оваа гаранција не покрива последователни штети или трошоци од кој било вид.
A Return Merchandise Authorization (RMA) Number must be obtained from TMB prior to return of any defective merchandise for warranty or non-warranty repair. For repair enquiries, please contact TMB via email at TechSupport@tmb.com или јавете се на телефон во која било од нашите локации подолу:
ТМБ САД
527 Park Ave.
Сан Фернандо, Калифорнија 91340
Соединетите Американски Држави
Тел: +1 818.899.8818
ТМБ Велика Британија
21 Армстронг Веј
Southall, UB2 4SD
Англија
Тел: +44 (0)20.8574.9700
You may also contact TMB directly via email at TechSupport@tmb.com
ПОСТАПКА НА ВРАЌАЊЕ
Ве молиме контактирајте го TMB и побарајте билет за поправка и број за авторизација за враќање на стока пред да ги испратите артиклите за поправка. Бидете подготвени да го наведете бројот на моделот, серискиот број и краток опис на причината за враќањето, како и адресата за враќање и информациите за контакт. Откако ќе се обработи билетот за поправка, бројот на RMA и упатствата за враќање ќе бидат испратени преку е-пошта до контактот на file.
Јасно означете го секој пакет за испорака со ATTN: RMA#. Ве молиме вратете ја опремата однапред платена и во оригиналното пакување секогаш кога е можно. НЕ вклучувајте кабли или додатоци (освен ако не е поинаку препорачано). Доколку оригиналното пакување не е достапно, осигурајте се дека правилно сте ја спакувале и заштитиле опремата. TMB не е одговорен за каква било штета при испорака што произлегува од несоодветно пакување од страна на испраќачот.
Повик за товар tags Нема да се издаде потврда за испорака на поправки до TMB, но TMB ќе го плати превозот за враќање на клиентот ако поправката се квалификува за гарантен сервис. Поправките надвор од гаранцијата ќе бидат предмет на процес на понуда од страна на техничарот назначен за поправката. Сите поврзани трошоци за делови, работна сила и враќање на испорака мора да бидат одобрени во писмена форма пред да може да се заврши каква било работа.
TMB го задржува правото да го користи сопственото дискреционо право да поправи или замени производ(и) и да го утврди гарантниот статус на која било опрема.
КОНТАКТ ИНФОРМАЦИИ
ШТАБОТ НА ЛОС АНЏЕЛЕС
527 Парк Авенија | San Fernando, CA 91340, USA Тел: +1 818.899.8818 | Факс: +1 818.899.8813 sales@tmb.com
TMB 24/7 ТЕХНИЧКА ПОДДРШКА
САД/Канада: +1.818.794.1286
Бесплатен патарина: 1.877.862.3833 (1.877.TMB.DUDE) UK: +44 (0)20.8574.9739
Бесплатен патарина: 0800.652.5418
techsupport@tmb.com
LOS ANGELES +1 818.899.8818 LONDON +44 (0)20.8574.9700 NEW YORK +1 201.896.8600 BEIJING +86 10.8492.1587 CANADA +1 519.538.0888 RIGA +371 6389 8886
Компанија со целосна услуга која обезбедува техничка поддршка, услуги за клиентите и следење.
Providing products and services for the industrial, entertainment, architectural, installation, defense, broadcast, research, telecommunications, and signage industries.Servicing the global market from offices in Los Angeles, London, New York, Toronto, Riga and Beijing.
Документи / ресурси
 |
ProPlex Codeclock Timecode Display and Distribution Device [pdf] Упатство за користење Codeclock Timecode Display and Distribution Device, Timecode Display and Distribution Device, Display and Distribution Device, Distribution Device |
