ProPlex Codeclock Tiidkoade werjaan en distribúsjeapparaat
Oerview
TMB autorisearret har klanten om dizze elektroanysk publisearre hantlieding allinich te downloaden en te printsjen foar profesjoneel gebrûk.
TMB ferbiedt reproduksje, wiziging of distribúsje fan dit dokumint foar oare doelen, sûnder útdruklike skriftlike tastimming.
TMB hat betrouwen yn 'e krektens fan' e dokumintynformaasje hjiryn, mar nimt gjin ferantwurdlikens of oanspraaklikens foar elk ferlies dat plakfynt as in direkt of yndirekt gefolch fan flaters of útslutingen, itsij troch ûngelok of in oare oarsaak.
PRODUCT DESCRIPTION
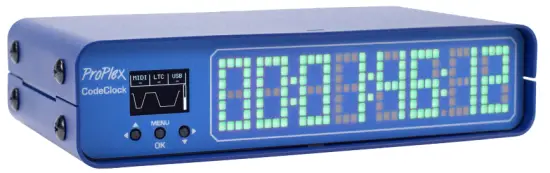
De ProPlex CodeClock is in lid fan ús LTC Device-systeem, dat ûntworpen is om tiidkoade te generearjen, te fersprieden en te kontrolearjen. Us robuuste, kompakte mini-behuizingûntwerp is perfekt foar buroblêdprogrammeurs om yn 'e tas te smiten, wylst it ek fleksibel genôch is om te ynstallearjen yn in rek mei in opsjonele RackMount Kit. Mei oanpaste kleurseleksje op in skjinne dot-matrix-display is de CodeClock it ultime ark om tiidkoadestreams te syngronisearjen en te kontrolearjen.
MAIN FEATURES
- Grutte RGB LED-matrixklok toant tiid en feroaret fan kleur ôfhinklik fan status
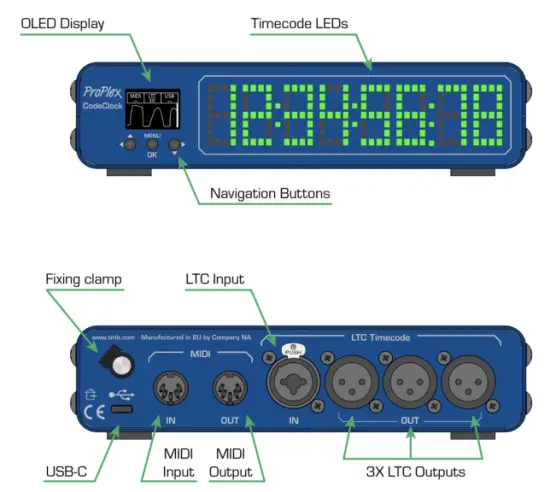
- Untfangt tiidkoade oer LTC (XLR3), MIDI (DIN), of USB MIDI
- Ferdielt selektearre tiidkoade oer LTC-útfier
- 3x Neutrik XLR3-útgongen binne transformator-isolearre en hawwe in ferstelber nivo (-18dBu oant +6dBu)
- OLED-kontrôlepaniel mei in yntuïtive brûkersynterface en golffoarmwerjefte
- Ynboude tiidkoadegenerator dy't by steat is om te rinnen op elke standert framerate
- Kompakt, lichtgewicht, robuust, betrouber. Rêchsekfreonlik.
- Beskikbere rackmount-kitopsjes
- Oandreaun fia USB-C. Kabelbefestiging foarkomt tafallige ûntkoppeling
BESTELLINGSKODES
| PART NUMMER | PRODUKTNAMME |
| PPCODECLME | PROPLEX KODEKLOK TIIDKODE-APPARAAT |
| PP1RMKITSS | PROPLEX 1U RACKMOUNT KIT, LYTS, INKEL |
| PP1RMKITSD | PROPLEX 1U RACKMOUNT KIT, LYTS, DUBBEL |
| PP1RMKITS+MD | PROPLEX 1U DUBBELE KOMBINAASJE LYTS + MEDIUM |
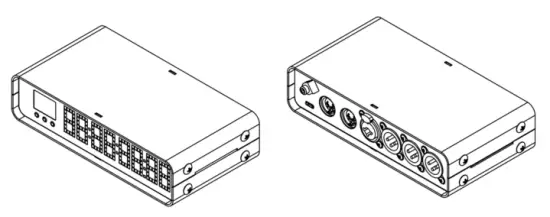
MODEL OVERVIEW
FOLLE DIMENSJONELE WIREFRAME-TEKENINGEN
OPSETTE
Feiligens foarsoarchsmaatregels
Lês asjebleaft dizze ynstruksjes foarsichtich.
Dizze brûkershantlieding befettet wichtige ynformaasje oer de ynstallaasje, it gebrûk en it ûnderhâld fan dit produkt.
- Soargje derfoar dat it apparaat ferbûn is mei it juste folumetage, en dat line voltage is net heger as dat oanjûn yn 'e spesifikaasjes fan it apparaat
- Soargje derfoar dat d'r gjin brânbere materialen by de ienheid binne by it wurk
- Brûk altyd in feilichheidskabel by it ophingjen fan in armatuur boppe jo holle
- Altyd de stroomboarne loskeppelje foardat jo ûnderhâld dogge of in zekering ferfange (as fan tapassing)
- De maksimale omjouwingstemperatuer (Ta) is 40 °C (104 °F). Brûk it apparaat net by temperatueren boppe dizze wurdearring.
- Yn gefal fan in serieus probleem mei de wurking, stopje it gebrûk fan it apparaat fuortendaliks. Reparaasjes moatte útfierd wurde troch oplaat, autorisearre personiel. Nim kontakt op mei it tichtste autorisearre technyske helpsintrum. Allinnich OEM-reserveûnderdielen moatte brûkt wurde.
- Ferbine it apparaat net mei in dimmerpakket
- Soargje derfoar dat it netsnoer nea krimpt of skansearre is
- Meitsje it netsnoer noait los troch oan it snoer te lûken of te lûken
FOARSICHTIGENS! Der binne gjin ûnderdielen yn it apparaat dy't troch de brûker ûnderhâlden wurde kinne. Iepenje de behuizing net en besykje sels gjin reparaasjes te dwaan. Yn it ûnwierskynlike gefal dat jo apparaat ûnderhâld nedich hat, sjoch dan de ynformaasje oer beheinde garânsje oan 'e ein fan dit dokumint.
ÚTPAKKJE
Nei ûntfangst fan it apparaat, pak de doaze foarsichtich út en kontrolearje de ynhâld om te soargjen dat alle ûnderdielen oanwêzich binne en yn goede steat binne. Ynformearje de ferstjoerder fuortendaliks en bewarje it ferpakkingsmateriaal foar ynspeksje as ûnderdielen skansearre lykje te wêzen troch ferstjoering of as de doaze sels tekens fan ferkeard gebrûk fertoant. Bewarje de doaze en alle ferpakkingsmaterialen. As in ienheid werom nei de fabryk moat, is it wichtich dat it weromjûn wurdt yn 'e orizjinele fabryksdoaze en ferpakking.
WAT IS INKLUDERD
- ProPlex Koadeklok
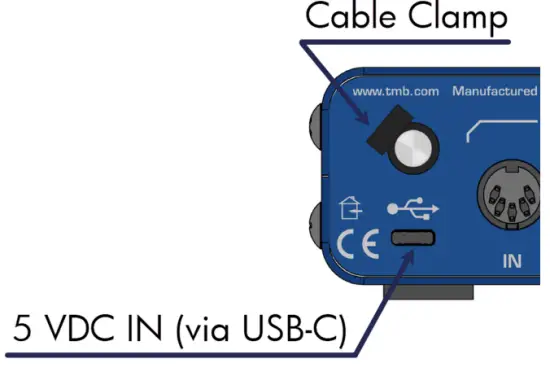
- USB-C-kab
- Kabelklemmer clamp
- QR-koade downloadkaart
POWER EISEN
De ProPlex CodeClock wurdt oandreaun fia in USB-C-kabel dy't ferbûn is mei elke standert 5 VDC-muorrelader of in USB-poarte fan in kompjûter. De ynbegrepen kabelbefestiging is in skroefdraadynfoegsel dat oan 'e USB-C-kabel fêstmakke wurdt. It biedt wat trekûntlasting en helpt tafallich loskeppeljen te foarkommen.
YNSTALLAASJE
De ProPlex CodeClock-behuizing is ûntworpen mei de reizgjende programmeur yn gedachten. Wy woenen dat dizze apparaten lichtgewicht, ynpakber en stapelber wiene - dus hawwe wy se foarsjoen fan grutte rubberen fuotten om se stasjonêr te hâlden op de measte oerflakken.
Dizze ienheden binne ek kompatibel mei lytse rackmount-kits as se semi-permanint monteard wurde moatte foar toerapplikaasjes.
YNSTRUKSJES FOAR RACKMOUNT YNSTALLAASJE
ProPlex RackMount Kits binne beskikber foar sawol Single-Unit as Dual-Unit montagekonfiguraasjes.
Om de rack-earen of ferbinings oan it ProPlex PortableMount-chassis te befestigjen, moatte jo de twa chassis-skroeven oan elke kant oan 'e foarkant fan it chassis fuortsmite. Dizzeselde skroeven wurde brûkt om de RackMount-earen en ferbinings feilich oan it chassis te befestigjen.
Foar konfiguraasjes mei dûbele ienheden sille beide sets foar- en efterchassisskroeven brûkt wurde
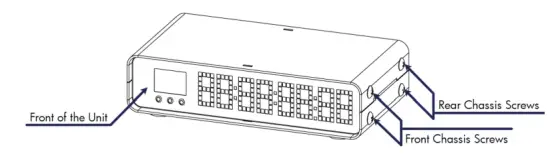
BELANGRYKSoargje derfoar dat jo de skroeven wer yn it apparaat draaie nei't de earen fuorthelle binne. Bewarje de RackMount Kit op in feilich plak oant jo it wer nedich binne. Reserveskroeven binne te krijen by TMB as it nedich is.
YNSTRUKSJES FOAR RACKMOUNT YNSTALLAASJE
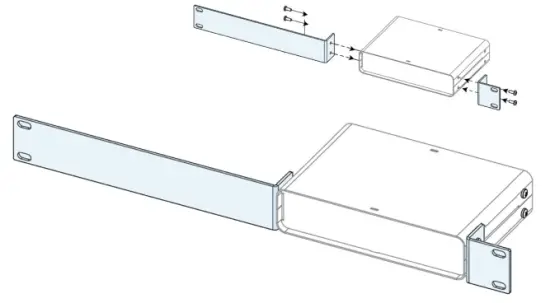
De lytse rackmount-kit foar ien ienheid bestiet út twa rackearen, IEN lang en IEN koart. It diagram hjirûnder lit de foltôge ynstallaasje fan 'e rackmount-kit sjen. Dizze rackearen binne ûntworpen om symmetrysk te wêzen, sadat de koarte en lange earen útwikselber binne.
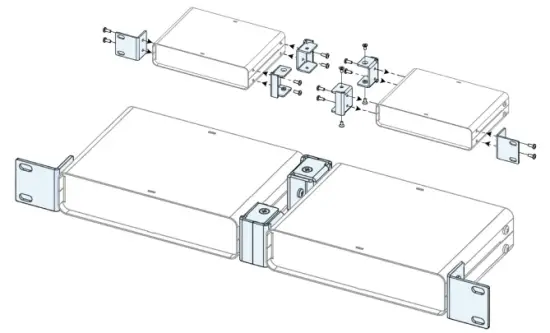
De lytse rackmount-kit mei twa ienheden hat twa koarte rackearen plus twa ferbinings. It ûndersteande diagram lit de foltôge ynstallaasje fan 'e rackmount-kit sjen. Dizze konfiguraasje fereasket de twa sintrale ferbinings dy't sawol oan 'e foar- as efterkant befestige binne.
DE DUBBELE JOINERS YNSTALLEARJE
De lytse rackmount-kit mei dûbele ienheid befettet fjouwer ferbiningsskelpen en fjouwer fersonke platte kopskroeven. Dizze keppelings binne ûntworpen om yn elkoar te nestelen en wurde befeilige mei de ynbegrepen skroeven en skroefdraadgatten.
Elk ferbiningsstik is identyk. Draaie gewoan de ferbiningsskeakel en rjochtsje de ynstallaasjegatten op elkoar om te ynstallearjen oan 'e lofter- of rjochterkant fan' e oerienkommende ienheid.

OPERAASJE
De ProPlex CodeBride kin maklik konfigurearre wurde mei it ynboude OLED-display en navigaasjeknoppen oan 'e foarkant fan it apparaat.
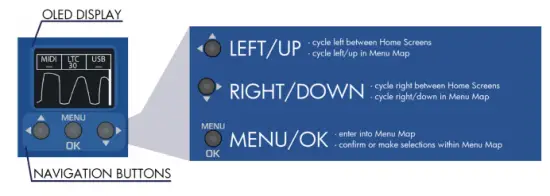
MENU MAP
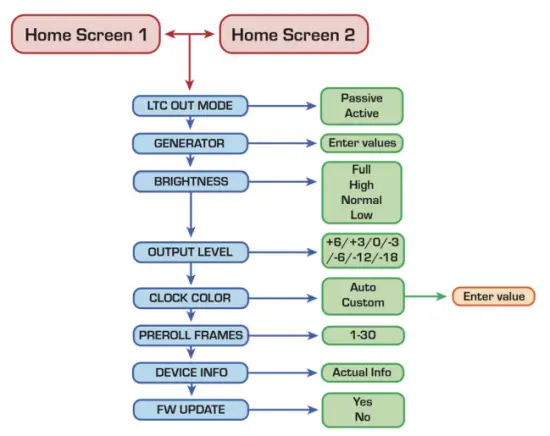
HJEMSKERM
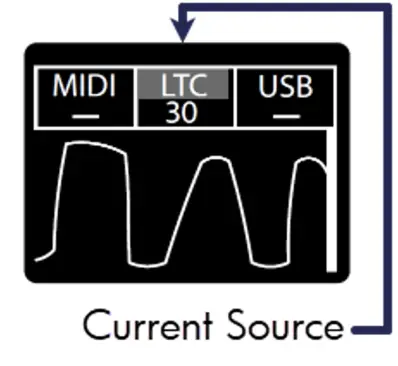
De CodeClock hat 2 STARTSKERMEN dy't ferskillende parameters fan ynkommende tiidkoadestreams werjaan. Sykje tusken dizze skermen troch op de![]() knop
knop
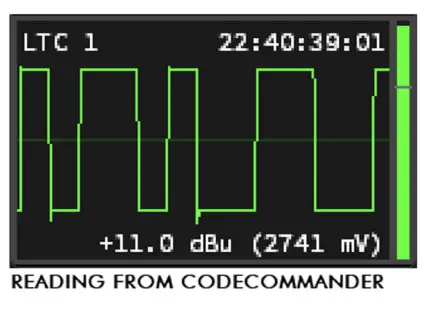
Thússkerm 1
De formaten en tariven fan ynkommende tiidkoadestreams wurde boppe oan it skerm werjûn mei de op it stuit aktive boarne markearre.
It Oscillogram en folumetagDe nivobalke hjirûnder jout allinich it sinjaalnivo fan 'e ynkommende LTC-boarne oan
Noat: Ideaallik soe de LTC IN-stoom lykje moatte op in fjouwerkante weach mei in heech útfiernivo. As it nivo te leech is, besykje dan it folume by de boarne te ferheegjen om it sinjaal te ferbetterjen.
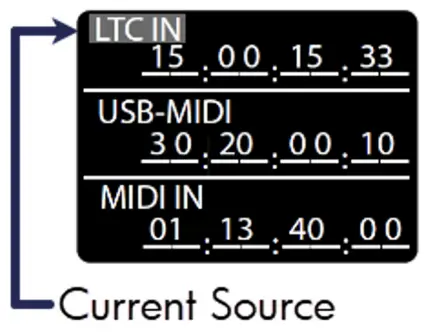
Thússkerm 2
Dit skerm toant alle boarnen fan tiidkoade dy't de CodeClock kin detektearje
Hokker boarne as aktyf beskôge wurdt, sil markearre wurde mei in knipperjende eftergrûn
Haadmenu
It haadmenu kin tagonklik makke wurde troch op de ![]() knop en de measte opsjes kinne wurde ferlitten fia de
knop en de measte opsjes kinne wurde ferlitten fia de![]() knop
knop
Skrolje mei de ![]() knop en befêstigje de seleksje mei de
knop en befêstigje de seleksje mei de![]() knop.
knop.
Noat: Net alle menu's passe op it skerm fan it apparaat, dus jo moatte rôlje om tagong te krijen ta guon menu's. Oan 'e rjochterkant fan 'e measte menuskermen sil in rôlbalke werjûn wurde dy't helpt om de djipte fan 'e rôlnavigaasje oan te jaan.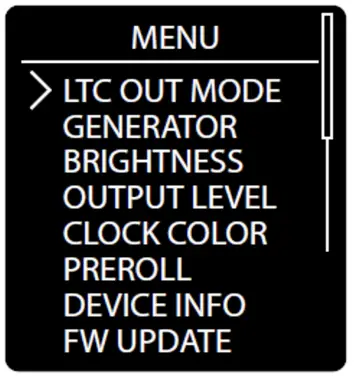
LTC-útfiermodus
Jout oan hoe't LTC-tiidkoade opnij ferdield wurdt
Passive modus: Ynkommende LTC is fysyk ferbûn mei LTC OUT-poarten fia relais en it sinjaal wurdt net feroare
Aktive modus: LTC-tiidkoade hat timing en sinjaalnivo opnij ynsteld
Gebrûk ![]() dan om de seleksje te befêstigjen mei de
dan om de seleksje te befêstigjen mei de![]() knop om tusken modi te wikseljen. De asterisk-yndikator sil it op it stuit selektearre útfiernivo oanjaan
knop om tusken modi te wikseljen. De asterisk-yndikator sil it op it stuit selektearre útfiernivo oanjaan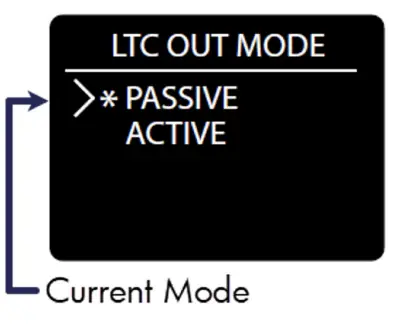 Timecode Generator
De CodeClock kin skjinne, hege útfier LTC generearje út 'e trije isolearre XLR3-poarten (oan 'e efterkant fan elke ienheid)
Brûk de![]() knop, befêstigje dan de seleksje mei de
knop, befêstigje dan de seleksje mei de ![]() knop om te wikseljen tusken de ferskate generatoropsjes
knop om te wikseljen tusken de ferskate generatoropsjes
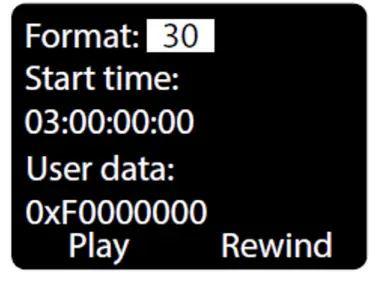
Formaat: Kies tusken ferskate standert FPS-tariven yn 'e yndustry: 23.976, 24, 25, 29.97ND, 29.97DF, en 30 FPS
Begjintiid: Jou in begjintiid op fan HH:MM:SS:FF mei de navigaasjeknoppen
Brûkersgegevens: spesifisearje brûkersgegevens yn 0x00000000 hex-formaat Ofspylje, Pauze, Weromspoelen: brûkersôfspielkontrôles foar generearre tiidkoade.
Noat: Jo moatte op dit skerm bliuwe om de LTC-generator kontinu te brûken. As jo dit skerm ferlitte, sil de generator automatysk stopje, en de hjoeddeiske boarne sil oerskeakelje nei de folgjende aktive boarne.
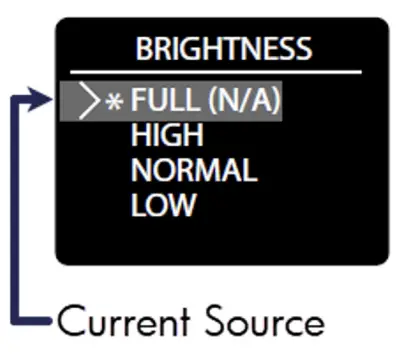
Skermhelderheid
Der binne 4 helderheidsynstellingen foar it segmintdisplay:
FOL HECH NORMAAL LECH
Brûk de ![]() knop, befêstigje dan mei de
knop, befêstigje dan mei de![]() knop om te kiezen tusken de ferskate nivo's. De asterisk-yndikator sil it aktuele skermnivo oanjaan
knop om te kiezen tusken de ferskate nivo's. De asterisk-yndikator sil it aktuele skermnivo oanjaan
Utfier nivo
Ferheegje of ferminderje it útfiernivo fan +6 dBu nei -12 dBu. Alles dat fia de twa isolearre XLR3-poarten wurdt útfierd, wurdt beynfloede troch dizze nivoferoaring. Dit omfettet:
- Generator útfier
- Opnij oerdroegen tiidkoadeformaten fan oare ynfier
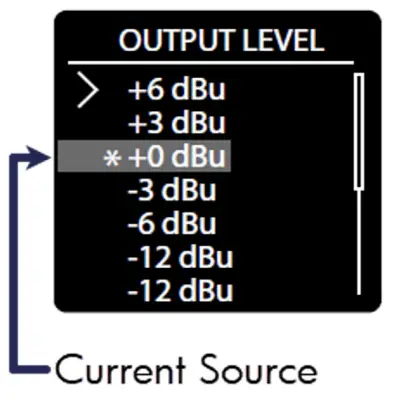
Brûk de ![]() knop, befêstigje dan mei de
knop, befêstigje dan mei de ![]() knop om te kiezen tusken de ferskate útfiernivo's. De asterisk-yndikator sil it op it stuit selektearre útfiernivo oanjaan
knop om te kiezen tusken de ferskate útfiernivo's. De asterisk-yndikator sil it op it stuit selektearre útfiernivo oanjaan
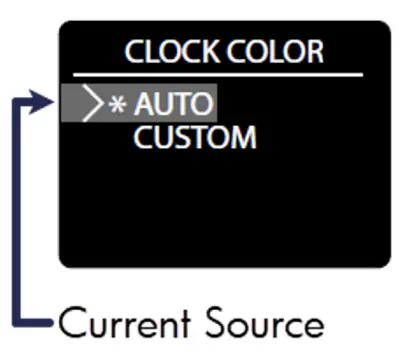
Klok Kleur
Mei de CodeClock kin de brûker de werjeftekleur fan 'e RGB-segminten oanpasse of ús 'auto' werjefte brûke
Brûk de ![]() knop, befêstigje dan mei de
knop, befêstigje dan mei de ![]() knop om te kiezen tusken de twa kleurmodi. De asterisk-yndikator sil de op it stuit selektearre modus oanjaan
knop om te kiezen tusken de twa kleurmodi. De asterisk-yndikator sil de op it stuit selektearre modus oanjaan
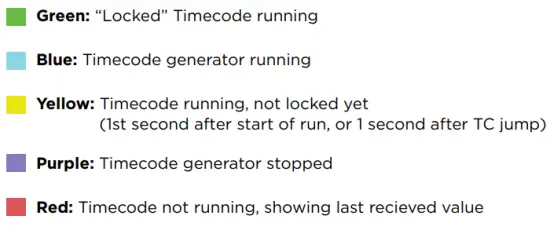
Auto kleur: De kleur fan 'e klok sil de kleur fan it display feroarje ôfhinklik fan 'e steat fan it sinjaal
Kleurkaai:
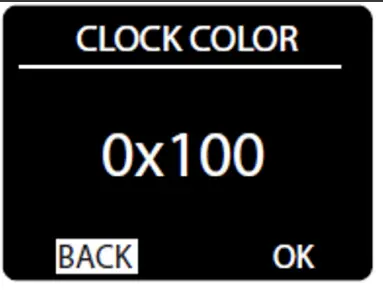
Oanpaste kleur
Brûker kin de RGB-kleur oanpasse mei heksadesimale sifers
- Gebrûk
 om in sifer te selektearjen en te markearjen, druk dan op
 om seleksje te befêstigjen
 - Brûk dan om de wearde te feroarjen (fan 0-F) en druk op wer te rêden.
- As jo de wearde feroarje, moatte jo sjen dat de kleurintensiteit fan 'e klok feroaret as reaksje op jo bewurking
- RGB-yntensiteitswearden wurde fertsjintwurdige troch it formaat: 0x (r-wearde) (g-wearde) (b-wearde)
- Wêr't 0xF00 folslein read is, 0x0F0 folslein grien is en 0x00F folslein blau is
- As de winske kleur werjûn wurdt, markearje dan de knop OK op it skerm en druk op te bewarjen
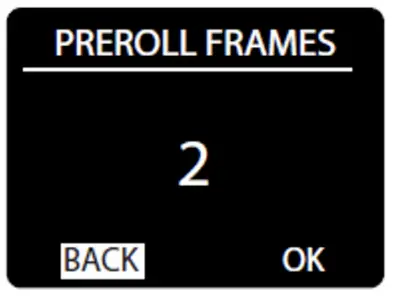
Pre-roll Frames
Pre-roll is it oantal jildige frames dat nedich is om de tiidkoadeboarne as jildich te beskôgjen en te begjinnen mei it trochstjoeren nei de útfier.
Brûk de![]() knop om de Preroll-wearde te markearjen, druk dan op
knop om de Preroll-wearde te markearjen, druk dan op![]() de knop om te bewurkjen
de knop om te bewurkjen
Brûk de ![]() knop om de Pre-roll frames (1-30) yn te stellen en om
knop om de Pre-roll frames (1-30) yn te stellen en om![]() bewarje de wearde
bewarje de wearde
Noat: Aktive streams sille altyd de ynkommende LTC-stream sjen litte begjinnend fan it 1e ûntfongen frame, nettsjinsteande de ynstellings foar pre-roll.
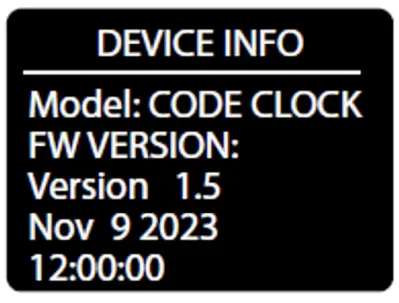
Apparaat ynformaasje
Apparaatynformaasje toant statusynformaasje fan it apparaat.
De werjûne ynformaasje is:
Apparaat Namme
FW ferzje
FW-boudatum
Parse![]() útgean
útgean
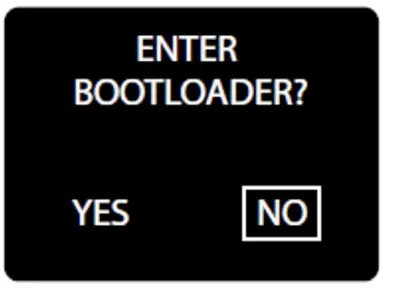
Firmware updater
Brûk de![]() knop om JA te markearjen, druk dan op
knop om JA te markearjen, druk dan op![]() de knop om de Bootloader-modus yn te gean. It CodeClock-skerm moat in notysje werjaan om
de knop om de Bootloader-modus yn te gean. It CodeClock-skerm moat in notysje werjaan om
"Brûk USB om Firmware by te wurkjen" om jo te litten witte dat it klear is
No moat it apparaat reagearje op updates dy't ferstjoerd wurde fan 'e Tiva Programmer-software - besykje tmb.com of email techsupport@tmb.com foar ynformaasje oer op it stuit beskikbere updates en fierdere ynstruksjes
Noat: Yn it gefal dat jo per ongelok de bootloader yngeane, moatte jo it apparaat útskeakelje en wer starte om te sluten en werom te gean nei normale operaasje.
Passive operaasje
CodeClock is by steat ta passive operaasje, wêr't gjin stroom nedich is
om LTC troch te jaan fan 'e ynfier nei de útfier. Wy hawwe CodeClock sa ûntwurpen dat elke útfier in isolaasjetransformator brûkt om passive operaasje te stabilisearjen.
Isolaasje helpt om grûnlussen en oare potinsjele problemen mei sinjaalrûs tusken de boarne en ûntfanger, en tusken ûntfangers, te foarkommen.
De ymplemintaasje fan dizze transformators yntrodusearret lykwols in ferswakking (ynfoegingsferlies) oan it sinjaal by < 1dB typysk oant 2dB maksimaal

Dit ekstra ferlies fan sinjaalnivo is normaal ûnbelangryk en moat yn 'e measte gefallen gjin probleem feroarsaakje. MAR as it LTC-sinjaal yn it earstoan leech wie, dan kin it sinjaal ferswakje nei in nivo wêr't it ophâldt mei wurkjen.
Oanbefellings foar ferswakking
Wy hawwe altyd oanrikkemandearre om goede headroom te hawwen by it wurkjen mei tiidkoade. LTC moat net sinusfoarmich wêze lykas audio - it is leaver in digitaal sinjaal dat kodearre is yn in fjouwerkante audioweach.
By it visualisearjen fan LTC wolle jo oer it algemien in hege-amplitude fjouwerkante weach mei steile beklimmingen
Ien fûneminteel ferskil tusken audio en LTC is it akseptabele sinjaalnivo. In "ôfsnien" of oerladen sinjaal is meastal wat om te foarkommen yn audiosignalen, mar it kin eins needsaaklik wêze foar krekte LTC-tiidkoadesynchronisaasje.
It doel is om ynkommende LTC te hawwen op 0dBu (775mV), wat ek it standertútfiernivo is foar aktive CodeClock en de oare LTC-famyljeapparaten.
As it ynkommende LTC-sinjaal leech is, moatte jo miskien it nivo fan 'e lûdkaart yn it systeem ferheegje. Hoefolle kin ôfhingje fan 'e boarne.
Laptop-lûdskaarten
- Ynboude lûdskaarten foar laptops binne meastentiids net lykwichtich en fereaskje faak in adapter fan mini-jack nei XLR - dit resulteart yn ferlies fan sawat 10dBu (316mV)
- It is essensjeel om PC-folume op 100% te hawwen om syngronisaasjeproblemen mei ûntfangsten te foarkommen.
Profesjonele lûdkaarten
- Profesjonele apparatuer hat oer it algemien in folle heger útfiernivo - meastentiids is 70-80% genôch foar normale operaasje mei LTC
De lêste oanbefelling is om altyd kabels en adapters fan hege kwaliteit te brûken. Beskeadige kabels of adapters kinne ûnbedoeld mear sinjaalferswakking feroarsaakje en liede ta problemen mei LTC-stabiliteit.
CLEANING EN Ûnderhâld
Stofopbou yn ferbiningsporten kin prestaasjeproblemen feroarsaakje en kin potinsjeel liede ta fierdere skea by normale slijtage.
CodeClock-apparaten moatte sa no en dan skjinmakke wurde om de bêste prestaasjes te behâlden, foaral apparaten dy't brûkt wurde yn hurdere omjouwingsomstannichheden.
DE FOLGJENDE BINNE ALGEMENE REINIGINGSRICHTLINEN:
- Skeakelje altyd de stroom út foardat jo besykje skjin te meitsjen
- Wachtsje oant it apparaat ôfkuolle en folslein ûntladen is foardat jo it skjinmeitsje
- Brûk stofzuiger of droege komprimearre lucht om stof/pún yn en om ferbiningen te ferwiderjen
- Brûk in sêfte handoek of boarstel om it chassis ôf te feegjen en te poetsen
- Om it navigaasjeskerm skjin te meitsjen, tapasse isopropylalkohol mei in sêft lensreinigingsdoekje of pluisfrije katoenen doek.
- Alkoholdoekjes en wattenstaafjes kinne helpe om smoargens en resten fan navigaasjeknoppen te ferwiderjen.
BELANGRYK:
Soargje derfoar dat alle oerflakken droech binne foardat jo besykje it opnij oan te setten
TECHNISCHE SPESIFIKASJES
| Part Number | PPCODECLME |
|
Power Connector |
USB-C-ferbining mei kabelbefestiging om tafallige stroomûnderbrekking te foarkommen. Stjoert en ûntfangt ek USB MIDI. |
| MIDI-ynfierferbining | DIN 5-pins wyfke |
| MIDI-útfierferbining | DIN 5-pins wyfke |
| LTC-ynfierferbining | Neutrik™ kombinaasje 3-pins XLR en 1/4” TRS froulike |
| LTC-útfierferbiningen | Neutrik™ 3-pins XLR-mantsje |
| Operaasje Voltage | 5 vdc |
| Stromferbrûk | 4.5 W Maks. |
| Operating Temp. | TBA |
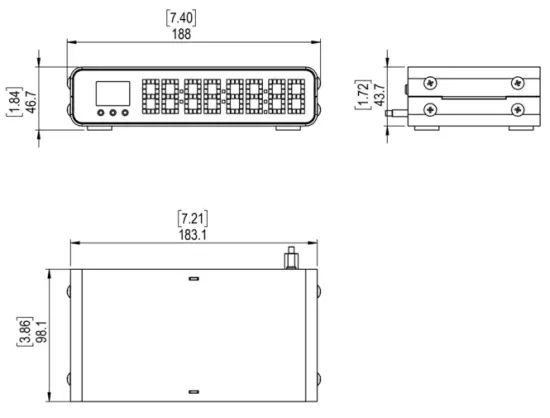
| Ofmjittings (HxWxD) | 1.72 x 7.22 x 4.42 yn [43.7 x 183.5 x 112.3 mm] |
| Gewicht | 1.4 lbs. [0.64 kg] |
| Shipping Gewicht | 1.6 lbs. [0.73 kg] |
LIMITED GARANTIE YNFORMAASJE
ProPlex Data Distribution Devices wurde garandearre troch TMB tsjin defekt materialen of fakmanskip foar in perioade fan twa (2) jier fanôf de datum fan oarspronklike ferkeap troch TMB.
De garânsje fan TMB sil beheind wêze ta de reparaasje of ferfanging fan elk diel dat defekt blykt te wêzen en dêr't in claim foar wurdt yntsjinne by TMB foar it ferrinnen fan 'e jildende garânsjeperioaden.
Dizze beheinde garânsje is ûnjildich as de defekten fan it produkt it gefolch binne fan:
- It iepenjen fan de behuizing, reparaasje, of oanpassing troch immen oars as TMB of persoanen spesifyk autorisearre troch TMB
- Accident, fysyk misbrûk, mishanneling, of ferkearde tapassing fan it produkt.
- Skea troch bliksem, ierdbeving, oerstreaming, terrorisme, oarloch, of hanneling fan God.
TMB sil gjin ferantwurdlikens oannimme foar alle wurkferbrûk, of brûkte materialen, om it Produkt te ferfangen en/of te reparearjen sûnder de foarôfgeande skriftlike autorisaasje fan TMB. Elke reparaasje fan it Produkt op it fjild, en alle byhearrende arbeidskosten, moatte foarôf wurde autorisearre troch TMB. Frachtkosten op garânsje reparaasjes wurde split 50/50: Klant betellet in skip defect produkt oan TMB; TMB betellet foar it ferstjoeren fan reparearre produkt, grûnfracht, werom nei klant.
Dizze garânsje dekt gjin gefolchskea of kosten fan hokker soart dan ek.
In Return Merchandise Authorization (RMA)-nûmer moat fan TMB krigen wurde foardat defekte guod weromjûn wurde kin foar reparaasje ûnder of bûten garânsje. Foar fragen oer reparaasje kinne jo kontakt opnimme mei TMB fia e-post op TechSupport@tmb.com of belje op ien fan ús lokaasjes hjirûnder:
TMB US
527 Park Ave.
San Fernando, CA 91340
Feriene Steaten
Tel: +1 818.899.8818
TMB UK
21 Armstrong Way
Súdal, UB2 4SD
Ingelân
Tel: +44 (0)20.8574.9700
Jo kinne ek direkt kontakt opnimme mei TMB fia e-post op TechSupport@tmb.com
RETURN PROSEDURE
Nim kontakt op mei TMB en freegje in reparaasjeticket en Return Merchandise Authorization Number oan foardat jo items ferstjoere foar reparaasje. Wês ree om it modelnûmer, serienûmer en in koarte beskriuwing fan 'e oarsaak fan' e retour te jaan, lykas it retouradres en kontaktgegevens. Sadree't in reparaasjeticket ferwurke is, wurde it RMA-nûmer en de retourynstruksjes fia e-post nei de kontaktpersoan stjoerd. file.
Markearje alle ferstjoerpakketten dúdlik mei ATTN: RMA#. Stjoer apparatuer asjebleaft foarôf betelle en yn 'e orizjinele ferpakking werom, as it mooglik is. Foegje GEEN kabels of accessoires ta (útsein as oars oanjûn). As de orizjinele ferpakking net beskikber is, soargje derfoar dat jo alle apparatuer goed ynpakke en beskermje. TMB is net oanspraaklik foar ferstjoerskea dy't ûntstiet troch ûnfoldwaande ferpakking troch de stjoerder.
Frachtoprop tags sil net útjûn wurde foar it ferstjoeren fan reparaasjes nei TMB, mar TMB sil de frachtkosten foar it werombringen nei de klant betelje as de reparaasje yn oanmerking komt foar garânsjetsjinst. Reparaasjes bûten garânsje sille in offerteproses ûndergean troch de technikus dy't oan 'e reparaasje tawiisd is. Alle assosjearre kosten foar ûnderdielen, arbeid en weromferstjoering moatte skriftlik autorisearre wurde foardat wurk foltôge wurde kin.
TMB behâldt him it rjocht foar om nei eigen goedtinken produkt(en) te reparearjen of te ferfangen en de garânsjestatus fan apparatuer te bepalen.
KONTAKT YNFORMAASJE
LOS ANGELES HAADKANTIER
527 Park Avenue | San Fernando, CA 91340, Feriene Steaten Tel: +1 818.899.8818 | Fax: +1 818.899.8813 sales@tmb.com
TMB 24/7 TECH SUPPORT
FS/Kanada: +1.818.794.1286
Toll Free: 1.877.862.3833 (1.877.TMB.DUDE) Feriene Keninkryk: +44 (0)20.8574.9739
Toll Free: 0800.652.5418
techsupport@tmb.com
LOS ANGELES +1 818.899.8818 LONDEN +44 (0)20.8574.9700 NEW YORK +1 201.896.8600 PEKING +86 10.8492.1587 KANADA +1 519.538.0888 RIGA +371 6389 8886
In bedriuw mei folsleine tsjinst dat technyske stipe, klanttsjinst en follow-up leveret.
Leveret produkten en tsjinsten foar de yndustriële, ferdivedaasje-, arsjitektuer-, ynstallaasje-, definsje-, útstjoer-, ûndersyks-, telekommunikaasje- en signage-yndustry. Tsjinje de wrâldwide merk fanút kantoaren yn Los Angeles, Londen, New York, Toronto, Riga en Peking.
Dokuminten / Resources
 |
ProPlex Codeclock Tiidkoade werjaan en distribúsjeapparaat [pdf] Brûkershânlieding Kodeklok Tiidkoade Werjaan- en Distribúsjeapparaat, Tiidkoade Werjaan- en Distribúsjeapparaat, Werjaan- en Distribúsjeapparaat, Distribúsjeapparaat |