scheppach C-PHTS410-X Cordless Multi-Function Device

Specifications
- Art.Nr.: 5912404900
- AusgabeNr.: 5912404900_0602
- Rev.Nr.: 03/05/2024
- Model: C-PHTS410-X
Product Information
The C-PHTS410-X is a cordless multi-function device designed for various gardening tasks. It comes with interchangeable tools for hedge trimming and pruning.
Introduction
Before operating the device, carefully read and follow the user manual and safety instructions provided.
Product Description
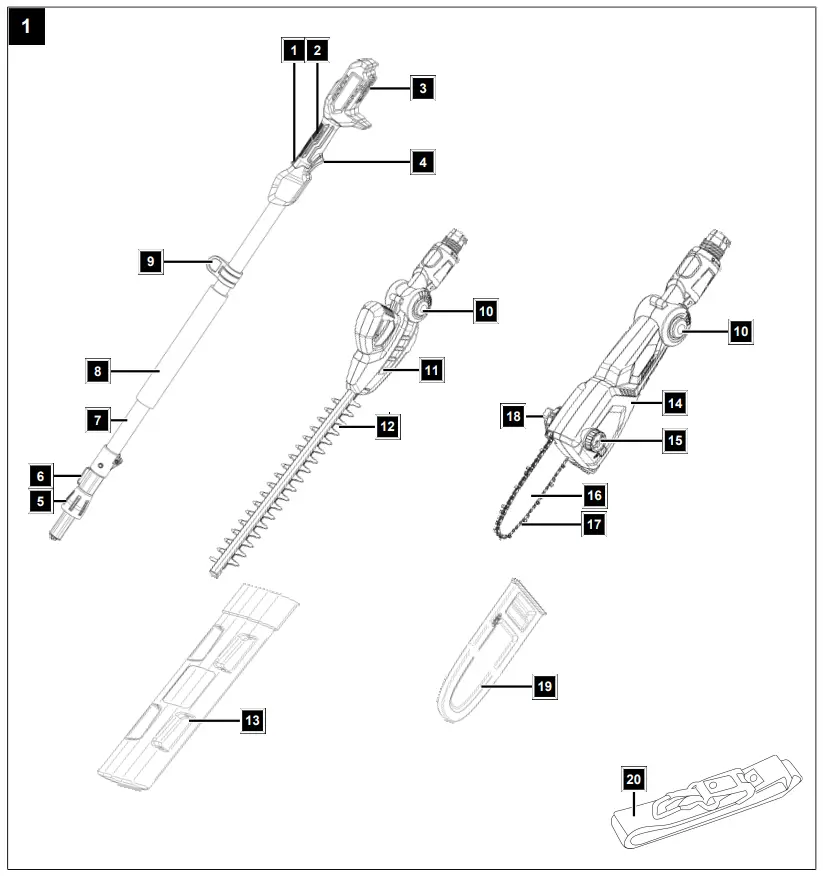
- 1. Power switch lock
- 2. Rear handle
- 3. Battery compartment
Delivery Content
The package includes the following items:
- 1 x Hedge trimmer tool
- 1 x Blade guard
- 1 x Pruning tool
Product Assembly
Ensure the product is assembled as per the instructions providedin the manual. Only mount the product on the included motor head.
Safety Instructions
For safe operation, follow these guidelines:
- Wear protective eyewear, helmet, gloves, and sturdy footwear.
- Maintain a safe distance from others and electrical lines.
FAQs
Q: Is the battery included with the product?
A: The battery is not included in the package and needs to be purchased separately.
Q: Can the device be used for trimming both hedges and trees?
A: Yes, the device comes with interchangeable tools for hedge trimming and pruning tasks.
The product may only be fitted to the motor head supplied.
Hedge trimmer
This hedge trimmer is intended for cutting hedges, bushes and shrubs.
Pole-mounted pruner (chainsaw with telescopic handle):
The pole-mounted pruner is intended for branch removal work. It is not suitable for extensive sawing work and felling trees as well as sawing materials other than wood.
The product may only be used in the intended manner. Any use beyond this is improper. The user/operator, not the manufacturer, is responsible for damages or injuries of any type resulting from this.
An element of the intended use is also the observance of the safety instructions, as well as the assembly instructions and operating information in the operating manual.
Persons who operate and maintain the product must be familiar with the manual and must be informed about potential dangers.
The liability of the manufacturer and resulting damages are excluded in the event of modifications of the product.
The product may only be operated with original parts and original accessories from the manufacturer.
The safety, operating and maintenance specifications of the manufacturer, as well as the dimensions specified in the technical data, must be observed.
Please note that our products were not designed with the intention of use for commercial or industrial purposes. We assume no guarantee if the product is used in commercial or industrial applications, or for equivalent work.
Explanation of the signal words in the operating manual
DANGER
Signal word to indicate an imminently hazardous situation which, if not avoided, will result in death or serious injury.
WARNING
Signal word to indicate a potentially hazardous situation which, if not avoided, could result in death or serious injury.
CAUTION
Signal word to indicate a potentially hazardous situation which, if not avoided, could result in minor or moderate injury.
www.scheppach.com
GB | 25
ATTENTION
Signal word to indicate a potentially hazardous situation which, if not avoided, could result in product or property damage.
5 Safety instructions
Save all warnings and instructions for future reference.
The term “power tool” in the warnings refers to your mains-operated (corded) power tool or battery-operated (cordless) power tool.
WARNING
Read all safety warnings, instructions, illustrations and specifications provided with this power tool.
Failure to follow all instructions listed below may result in electric shock, fire and/or serious injury.
1) Work area safety
a) Keep your work area clean and well-lit. Cluttered or dark areas invite accidents.
b) Do not operate power tools in explosive atmospheres, such as in the presence of flammable liquids, gases or dust. Power tools create sparks which may ignite the dust or fumes.
c) Keep children and bystanders away while operating a power tool. Distractions can cause you to lose control.
2) Electrical safety
a) The connection plug of the electric tool must fit into the socket. Never modify the plug in any way. Do not use any adapter plugs with earthed (grounded) power tools. Unmodified plugs and matching outlets will reduce risk of electric shock.
b) Avoid body contact with earthed or grounded surfaces, such as pipes, radiators, ranges and refrigerators. There is an increased risk of electric shock if your body is earthed or grounded.
c) Do not expose power tools to rain or wet conditions. Water entering a power tool will increase the risk of electric shock.
d) Do not abuse the cord. Never use the cord for carrying, pulling or unplugging the power tool. Keep cord away from heat, oil, sharp edges or moving parts. Damaged or entangled cords increase the risk of electric shock.
e) When operating a power tool outdoors, use an extension cord suitable for outdoor use. Use of a cord suitable for outdoor use reduces the risk of electric shock.
f) If operating a power tool in a damp location is unavoidable, use a residual current device (RCD) protected supply. Use of an RCD reduces the risk of electric shock.
3) Personal safety
a) Stay alert, watch what you are doing and use common sense when operating a power tool. Do not use a power tool while you are tired or under the influence of drugs, alcohol or medication. A moment of inattention while operating power tools may result in serious personal injury.
b) Wear personal protective equipment and always safety goggles. Protective equipment such as a dust mask, non-skid safety shoes, safety helmet or hearing protection used for appropriate conditions will reduce personal injuries.
c) Prevent unintentional starting. Ensure the switch is in the off-position before connecting to power source and/or rechargeable battery, picking up or carrying the tool. Carrying power tools with your finger on the switch or energising power tools that have the switch on invites accidents.
d) Remove any adjusting tools or spanners/keys before turning the power tool on. A wrench or a key left attached to a rotating part of the power tool may result in personal injury.
e) Avoid abnormal postures. Keep proper footing and balance at all times. This enables better control of the power tool in unexpected situations.
f) Dress properly. Do not wear loose clothing or jewellery. Keep your hair and clothing away from moving parts. Loose clothes, jewellery or long hair can be caught in moving parts.
g) If devices are provided for the connection of dust extraction and collection facilities, ensure these are connected and properly used. Use of dust extraction can reduce dust-related hazards.
h) Do not let familiarity gained from frequent use of tools allow you to become complacent and ignore tool safety principles. A careless action can cause severe injury within a fraction of a second.
4) Power tool use and care
a) Do not force the power tool. Use the correct power tool for your application. The correct power tool will do the job better and safer at the rate for which it was designed.
b) Do not use the power tool if the switch does not turn it on and off. Any power tool that cannot be controlled with the switch is dangerous and must be repaired.
c) Disconnect the plug from the power source and/or remove the battery pack, if detachable, from the power tool before making any adjustments, changing accessories, or storing power tools. Such precautionary measures reduce the risk of starting the power tool accidentally.
d) Store idle power tools out of the reach of children and do not allow persons unfamiliar with the power tool or these instructions to operate the power tool. Power tools are dangerous in the hands of untrained users.

e) Maintain power tools and attachments. Check for misalignment or binding of moving parts, breakage of parts and any other condition that may affect the power tool’s operation. If damaged, have the power tool repaired before use. Many accidents are caused by poorly maintained power tools.
f) Keep cutting tools sharp and clean. Properly maintained cutting tools with sharp cutting edges are less likely to bind and are easier to control.
g) Use electric tools, insertion tools, etc. according to these instructions. Take into account the working conditions and the work to be performed. Use of the power tool for operations different from those intended could result in a hazardous situation.
h) Keep handles and grasping surfaces dry, clean and free from oil and grease. Slippery handles and grasping surfaces do not allow for safe handling and control of the tool in unexpected situations.
5) Battery tool use and care
a) Only charge the batteries with battery chargers recommended by the manufacturer. A battery charger that is suitable for a particular type of battery poses a fire hazard when used with other batteries.
b) Only use the batteries in power tools that are designed for them. The use of other batteries can lead to injuries and a risk of fire.
c) Keep the unused battery away from paper clips, coins, keys, nails, screws or other small metal objects that could cause a short-circuit between the contacts. A short-circuit between the contacts of the battery could result in burns or fires.
d) Liquid may leak from the battery if used incorrectly. Avoid contact with it. In case of accidental contact, rinse with water. If the liquid gets into your eyes, seek additional medical attention. Leaking battery fluid may cause skin irritation or burns.
e) Do not use a damaged or modified battery. Damaged or modified batteries can behave unpredictably and cause fire, explosion or injury.
f) Do not expose a battery to fire or excessive temperatures. Fire or temperatures above 130°C may cause an explosion.
g) Follow all charging instructions and never charge the battery or rechargeable tool outside the temperature range specified in the operating manual. Incorrect charging or charging outside the approved temperature range can destroy the battery and increase the risk of fire.
6) Service
a) Only have your power tool repaired by qualified specialists and only with original spare parts. This will ensure that the safety of the power tool is maintained.
b) Never attempt to service damaged batteries. Any type of battery maintenance shall be carried out only by the manufacturer or an authorised customer service centre.
General safety instructions
a) Stay alert, watch what you are doing and use common sense when operating a power tool. Do not use a power tool while you are tired or under the influence of drugs, alcohol or medication. A moment of inattention while operating power tools may result in serious personal injury.
b) National regulations may restrict the use of the product.
c) Take regular breaks and move your hands to promote circulation.
d) Always hold the product tight with both hands during work. Make sure that you have a secure footing.
5.2 Safety instructions for hedge trimmers
a) Do not use the hedge trimmer in bad weather conditions, especially when there is a risk of lightning. This decreases the risk of being struck by lightning.
b) Keep all power cords and cables away from cutting area. Power cords or cables may be hidden in hedges or bushes and can be accidentally cut by the blade.
c) Hold the hedge trimmer by insulated gripping surfaces only, because the blade may contact hidden wiring or its own cord. Blades contacting a “live” wire may make exposed metal parts of the hedge trimmer “live” and could give the operator an electric shock.
d) Keep all parts of the body away from the blade. Do not remove cut material or hold material to be cut when blades are moving. Blades continue to move after the switch is turned off. A moment of inattention while operating the hedge trimmer may result in serious personal injury.
e) Make sure all switches are off and the battery is removed before removing trapped clippings or servicing the product. Unexpected actuation of the hedge trimmer while clearing jammed material or servicing may result in serious personal injury.
f) Carry the hedge trimmer by the handle with the blade stopped and taking care not to operate any power switch. Proper carrying of the hedge trimmer will decrease the risk of inadvertent starting and resultant personal injury from the blades.
g) When transporting or storing the hedge trimmer, always use the blade cover. Proper handling of the hedge trimmer will decrease the risk of personal injury from the blades.
5.2.1 Pole hedge trimmer safety warnings
a) Always use head protection when operating the pole hedge trimmer overhead. Falling debris can result in serious personal injury.
b) Always use two hands when operating the pole hedge trimmer. Hold the pole hedge trimmer with both hands to avoid loss of control.
c) To reduce the risk of electrocution, never use the pole hedge trimmer near any electrical power lines. Contact with or use near power lines may cause serious injury or electric shock resulting in death.
5.2.2 Additional safety instructions
a) Always wear safety gloves, safety goggles, hearing protection, sturdy shoes and long trousers when working with this product.
b) The hedge trimmer is intended for work where the operator stands on the ground and not on a ladder or other unstable standing surface.
c) Electrical hazard, remain at least 10 m from overhead wires.
d) Do not attempt to loosen a jammed/blocked cutter bar until you have switched off the product and removed the battery. There is a danger of injury!
e) The blades must be checked regularly for wear and have them resharpened. Blunt blades overload the product. Any resulting damage is not covered by the warranty.
f) If you are interrupted while working with the product, first finish the current operation and then switch off the product.
g) Store idle power tools out of the reach of children and do not allow persons unfamiliar with the power tool or these instructions to operate the power tool. Power tools are dangerous in the hands of untrained users.
5.3 Safety warnings for pole-mounted pruner
CAUTION
Keep your hands away from the tool attachment when the product is in operation.
5.3.1 Personal safety
a) Never use the Product while standing on a ladder.
b) Do not lean too far forwards when using the product. Always make sure you have a firm footing and keep your balance at all times. Use the carrying strap in the scope of delivery to distribute the weight evenly across the body.
c) Do not stand under the branches you wish to cut off to avoid injury from fallen branches. Also watch out for branches springing back to avoid injury. Work at an angle of approx. 60°.
d) Be aware that the device may kick back.
e) Attach the chain guard during transport and storage.
f) Prevent the product being unintentionally started up.
g) Store the product out of the reach of children.
h) Never permit other persons who are not familiar with these operating instructions to use the product.
i) Check whether the set of blade and saw chain stops turning when the engine is idling.
j) Check the product for loose fastening elements and damaged parts.
k) National regulations may restrict the use of the product.
l) It is necessary to conduct daily inspections before use and after dropping or other impacts to determine any significant damage or defects.
m) Always wear sturdy footwear and long trousers when operating the product. Do not operate the product barefoot or in open sandals. Avoid wearing loose-fitting clothing or clothing with hanging strings or ties.
n) Do not use the product while tired or under the influence of drugs, alcohol or medication. Do not use products if you are tired.
o) Keep the product, the set of blade and saw chain and the cutting set guard in good working order.
5.3.2 Additional safety instructions
a) Always wear safety gloves, safety goggles, hearing protection, sturdy shoes and long trousers when working with this product.
b) Keep the product away from rain and moisture. Water penetrating the product increases the risk of an electric shock.
c) Before use, check the safety status of the product, especially the guide bar and the saw chain.
d) Electrical hazard, remain at least 10 m from overhead wires.
5.3.3 Use and handling
a) Never start the product before the guide bar, saw chain and chain cover are correctly fitted.
b) Do not cut wood lying on the ground or try to saw roots protruding from the ground. In any case, make sure the saw chain does not come into contact with the soil, otherwise the saw chain will dull immediately.
c) If you accidentally touch a solid object with the product, switch off the engine immediately and inspect the product for any damage.
d) Take regular breaks and move your hands to promote circulation.
e) If the product is shut down for maintenance, inspection or storage, turn off the engine, remove the battery and ensure that all rotating parts have stopped. Allow the product to cool down before checking, adjusting, etc.
f) Maintain the product carefully. Check for misalignment or binding of moving parts, breakage of parts and any other condition that may affect the product’s operation. Have damaged parts repaired before using the product. Many accidents are caused by poorly maintained products.
g) Keep cutting tools sharp and clean. Properly maintained cutting tools with sharp cutting edges are less likely to bind and are easier to control.
h) Only have your power tool repaired by qualified specialists and only with original spare parts. This will ensure that the safety of the power tool is maintained.
Residual risks
The product has been built according to state-of-theart and the recognised technical safety rules. However, individual residual risks can arise during operation.
· Cutting injuries.
28 | GB
www.scheppach.com
· Damage to eyes if the stipulated eye protection is not worn.
· Damage to hearing if the stipulated hearing protection is not worn.
· Residual risks can be minimised if the “Safety Instructions” and the “Intended Use” together with the operating manual as a whole are observed.
· Use the product in the way that is recommended in this operating manual. This is how to ensure that your product provides optimum performance.
· Furthermore, despite all precautions having been met, some non-obvious residual risks may still remain.
WARNING
This power tool generates an electromagnetic field during operation. This field can impair active or passive medical implants under certain circumstances. In order to prevent the risk of serious or deadly injuries, we recommend that persons with medical implants consult with their physician and the manufacturer of the medical implant prior to operating the power tool.
WARNING
In case of extended working periods, the operating personnel may suffer circulatory disturbances in their hands (vibration white finger) due to vibrations.
Raynaud’s syndrome is a vascular disease that causes the small blood vessels on the fingers and toes to cramp in spasms. The affected areas are no longer supplied with sufficient blood and therefore appear extremely pale. The frequent use of vibrating products can cause nerve damage in people whose circulation is impaired (e.g. smokers, diabetics).
If you notice unusual adverse effects, stop working immediately and seek medical advice.
ATTENTION
The product is part of the 20V IXES series and may only be operated with batteries of this series. Batteries may only be charged with battery chargers of this series. Observe the manufacturer’s instructions.
WARNING
Follow the safety and charging instructions and correct usage given in the instruction manual of your 20V IXES Series battery and charger. A detailed description of the charging process and further information are provided in this separate manual.
6 Technical data
Cordless hedge trimmer Motor voltage: Type of motor: Weight (without battery and tool attachment):
C-PHTS410-X 20 V
Brush motor 1.1 kg
Hedge trimmer cutting data: Cutting length:
410 mm
Cutting diameter: Angle adjustment:
16 mm 11 steps (90° – 240°)
Cutting speed: Overall length:
2400 rpm 2.6 m
Weight (drive and tool attachment, without battery):
Pole-mounted pruner cutting data:
Guide rail length
Cutting length:
2.95 kg
8″ 180 mm
Cutting speed: Guide rail type:
4.5 m/s ZLA08-33-507P
Saw chain pitch:
3/8″ / 9.525 mm
Saw chain type:
3/8.050x33DL
Drive link thickness:
0.05″ / 1.27 mm
Oil tank content: Angle adjustment:
100 ml 4 steps (135° – 180°)
Overall length:
Weight (drive and tool attachment, without battery):
2.35 m 3.0 kg
Subject to technical changes! Noise and vibration
WARNING
Noise can have serious effects on your health. If the machine noise exceeds 85 dB, please wear suitable hearing protection for you and persons in the vicinity.
The noise and vibration values have been determined in accordance with EN 62841-1/EN ISO 3744:2010.
Noise data
Hedge trimmer:
Hedge trimmer sound pressure LpA Sound power LwA Measurement uncertainty KpA Pole-mounted pruner:
81.0 dB 89.0 dB
3 dB
Pole-mounted pruner sound pressure LpA Sound power LwA Measurement uncertainty KwA Vibration parameters
77.8 dB 87.8 dB
3 dB
Hedge trimmer: Vibration ah front handle Vibration ah rear handle Measurement uncertainty K
3.04 m/s2 2.69 m/s2
1.5 m/s2
Pole-mounted pruner: Vibration ah front handle Vibration ah rear handle Measurement uncertainty K
2.55 m/s2 2.48 m/s2
1.5 m/s2
www.scheppach.com
GB | 29
The total vibration emission values specified and the device emissions values specified have been measured in accordance with a standardised test procedure and can be used for comparison of one electric tool with another.
The total noise emission values specified and the total vibration emission values specified can also be used for an initial estimation of the load.
WARNING
The noise emission values and vibration emission value can vary from the specified values during the actual use of the power tool, depending on the type and the manner in which the electric tool is used, and in particular the type of workpiece being processed.
Try to keep the stress as low as possible. For example: Limit working time. In doing so, all parts of the operating cycle must be taken into account (such as times in which the power tool is switched off or times in which it is switched on, but is not running under a load).
7 Unpacking
WARNING
The product and the packaging material are not children’s toys!
Do not let children play with plastic bags, films or small parts! There is a danger of choking or suffocating!
· Open the packaging and carefully remove the product.
· Remove the packaging material, as well as the packaging and transport safety devices (if present).
· Check whether the scope of delivery is complete.
· Check the product and accessory parts for transport damage. Immediately report any damage to the transport company that delivered the Product. Later claims will not be recognised.
· If possible, keep the packaging until the expiry of the warranty period.
· Familiarise yourself with the product by means of the operating manual before using for the first time.
· With accessories as well as wearing parts and replacement parts use only original parts. Spare parts can be obtained from your specialist dealer.
· When ordering please provide our article number as well as type and year of manufacture for the product.
8 Assembly
DANGER
Danger of injury!
If an incompletely assembled product is used, serious injuries can be caused.
Do not use the product until it has been fully fitted.
Before each use, carry out a visual inspection to check that the product is complete and does not contain any damaged or worn components. Safety and protective devices must be intact.
WARNING
Danger of injury! Remove the battery from the power tool before carrying out any work on the power tool (e.g. maintenance, tool change, etc.) and when transporting and storing it. There is a risk of injury if the on/off switch is operated unintentionally.
WARNING
Always make sure that the tool attachment is fitted correctly!
· Place the product on a level, even surface.
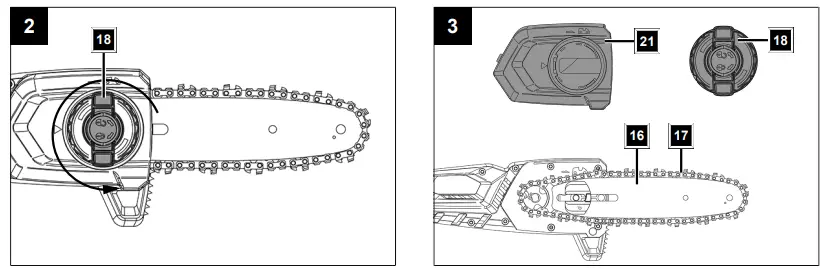
8.1 Fit the chainsaw guide bar (16) and saw chain (17) (Fig. 2-6)
WARNING
Danger of injury when handling the saw chain or the blade! Wear cut-resistant gloves.
ATTENTION
Blunt blades overload the product! Do not use the product if the cutters are faulty or heavily worn.
Notes: · A new saw chain stretches and needs to be re-tensioned more often. Check and adjust the chain tension regularly after each cut.
· Only use saw chains and blades designed for this product.
CAUTION
An incorrectly installed saw chain leads to uncontrolled cutting behaviour by the product!
When fitting the saw chain, observe the prescribed running direction!
To fit the saw chain, it may be necessary to tilt the chainsaw to the side.
1. Turn the chain tensioning wheel (18) anti-clockwise, so that the chain cover (21) is removed.
2. Lay out the saw chain (17) in a loop so that the cutting edges are aligned clockwise. Use the symbols (arrows) above the saw chain (17) as a guide for aligning the saw chain (17).
3. Place the saw chain (17) in the groove of the chainsaw guide bar (16).
4. Fit the chainsaw guide bar (16) onto the guide pin (23) and the stud bolt (24). The guide pin (23) and the stud bolt (24) must be in the elongated hole on the chainsaw guide bar (16).
5. Guide the saw chain (17) around the chain wheel (22) and check the alignment of the saw chain (17).
6. Fit the chain cover (21) back on. Make sure that the groove on the sprocket cover (21) sits in the recess on the motor housing.
30 | GB
www.scheppach.com
7. Tighten the chain tensioning wheel (18) clockwise hand-tight.
8. Recheck the seating of the saw chain (17) and tension the saw chain (17) as described under 8.2.
8.2 Tensioning the saw chain (17) (Fig. 6, 7)
WARNING
Risk of injury from the saw chain jumping off!
An insufficiently tensioned saw chain can come off during operation and cause injuries.
Check the saw chain tension frequently.
The chain tension is too low if the drive links come out of the groove on the underside of the guide rail.
Adjust the tension of the saw chain properly if the saw chain tension is too low.
1. Turn the chain tensioning wheel (18) clockwise to tension the saw chain (17). The saw chain (17) must not sag, although it should be possible to pull it 1-2 millimetres away from the chainsaw guide bar (16) in the centre of the guide bar.
2. Turn the saw chain (17) by hand, to check it runs freely. It must glide freely in the chainsaw guide bar (16).
The saw chain is correctly tensioned when it does not sag on the chainsaw guide bar and can be pulled all the way round with a gloved hand. When pulling on the saw chain with 9 N (approx. 1 kg) tractive force, the saw chain and chainsaw guide bar must not be more than 2 mm apart.
Notes:
· The tension of a new chain must be checked after a few minutes in operation, and adjusted if necessary.
· The tensioning of the saw chain should be carried out in a clean place free from sawdust and the like.
· Correct tensioning of the saw chain is for the safety of the user and reduces or prevents wear and chain damage.
· We recommend that the user check the chain tension before starting work for the first time. The saw chain is correctly tensioned when it does not sag on the underside of the guide bar and can be pulled all the way round with a gloved hand.
ATTENTION
When working with the saw, the saw chain heats up and expands slightly as a result. This “stretching” is to be expected especially with new saw chains.
9 Before commissioning
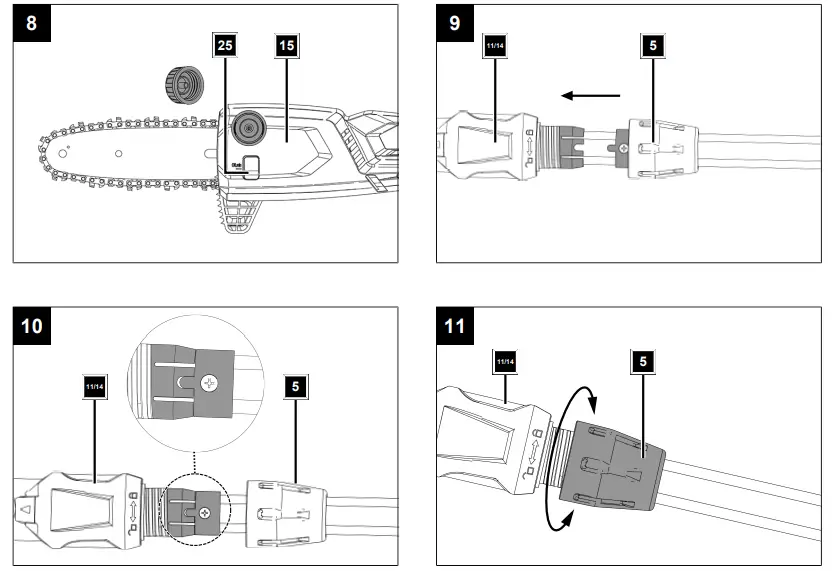
9.1 Topping up saw chain oil (Fig. 8)
ATTENTION
Product damage! If the product is operated without oil or with too little oil or with used oil, this can lead to product damage.
Fill with oil before starting the machine. The product is delivered without oil.
Do not use used oil!
Check the oil level every time you change the battery.
ATTENTION
Environmental damage!
Spilled oil can pollute the environment permanently. The liquid is highly toxic and can quickly lead to water pollution.
Fill/empty oil only on level, paved surfaces.
Use a filling nozzle or funnel.
Collect drained oil in a suitable container.
Wipe up spilled oil carefully immediately and dispose of the cloth according to local regulations.
Dispose of oil as per local regulations.
The chain tension and chain lubrication have a considerable influence on the service life of the saw chain.
The saw chain will be lubricated automatically while the product is running. To lubricate the saw chain sufficiently, there must always be enough saw chain oil in the oil tank. Check the amount of oil remaining in the oil tank at regular intervals.
Notes:
* = not included in the scope of delivery!
· The cover is equipped with an anti-loss device.
· Only add environmentally friendly, good quality chain lubricating oil* (per RAL-UZ 48) to the chain saw.
· Ensure that the cover of the oil tank is in place and closed before switching on the product.
1. Open the oil tank (15). To do this, unscrew the oil tank cap (15) anti-clockwise.
2. To prevent oil from leaking, use a funnel*.
3. Carefully add the chain lubricating oil* until it reaches the top mark on the oil level indicator (25). Oil tank capacity: max. 100 ml.
4. Screw the cover of the oil tank (15) clockwise to close the oil tank (15).
5. Wipe up any spilled oil carefully immediately and dispose of the cloth* according to local regulations.
6. To check the product lubrication, hold the chainsaw with the saw chain over a sheet of paper and give it full throttle for a few seconds. You can see on the paper whether the chain lubrication is working.
www.scheppach.com
GB | 31
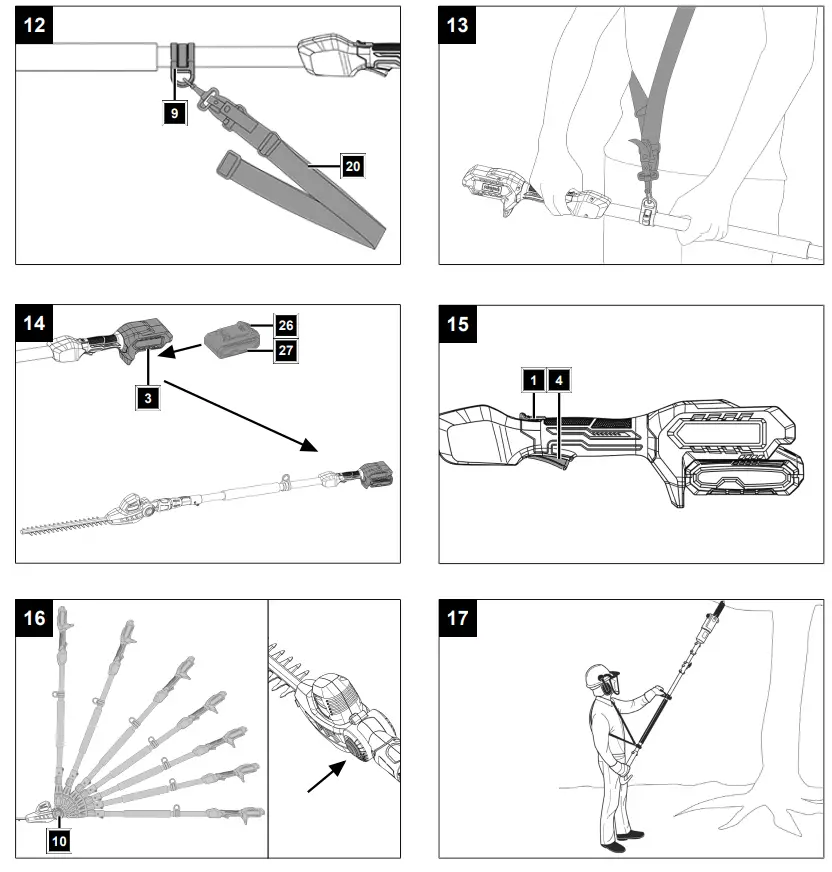
9.2 Fitting the tool attachment (11/14) onto the telescopic tube (7) (Fig. 9-11)
1. Attach the desired tool attachment (11/14) to the telescopic tube (7), paying attention to the position of the tongue and groove.
2. The tool attachment (11/14) is secured by tightening the locking nut (5).
9.3 Adjusting the telescopic handle height (Fig. 1)
The telescopic tube (7) can be infinitely adjusted using the locking mechanism (6).
1. Loosen the lock (6) on the telescopic tube (7).
2. Change the telescopic tube length by pushing or pulling.
3. Tighten the lock (6) again to fix the desired working length of the telescopic tube (7).
9.4 Adjusting the cutting angle (Fig. 1, 16)
You can also work in inaccessible areas by changing the cutting angle.
1. Press the two locking buttons (10) on the hedge trimmer tool attachment (11) or the pole-mounted pruner tool attachment (14).
2. Adjust the inclination of the motor housing in the locking steps. The locking steps integrated in the motor housing secure the tool attachment (11/14) and prevent it shifting unintentionally.
Hedge trimmer (11):
Cutting angle positions 1 11
Pole-mounted pruner (14):
Cutting angle positions 1 4
9.5 Fitting the shoulder strap (20) (Fig. 12, 13)
WARNING
Danger of injury! Always wear a shoulder strap when working. Always switch the product off before loosening the shoulder strap.
1. Clip the shoulder strap (20) into the carrying eye (9).
2. Place the shoulder strap (20) over the shoulder.
3. Adjust the belt length such that the carrying eye (9) is at hip height.
9.6 Inserting/removing the battery (27) into/from the battery mount (3) (Fig. 14)
CAUTION
Danger of injury! Do not insert the battery until the battery-powered tool is ready for use.
Inserting the battery 1. Push the battery (27) into the battery mount (3). The
battery (27) clicks into place audibly. Removing the battery 1. Press the unlocking button (26) of the battery (27) and
remove the battery (27) from the battery mount (3).
10 Operation
ATTENTION
Always make sure the product is fully assembled before commissioning!
WARNING
Danger of injury! The on/off switch and the safety switch must not be locked! Do not work with the product if the switches are
damaged. The on/off switch and the safety switch must switch off the product when released. Make sure the product is in working order before each use.
WARNING
Electric shock and damage to the product possible! Contact with a live cable during cutting can result in electric shock. Cutting into foreign objects can cause damage to the cutter bar. Scan hedges and bushes for hidden objects, such
as live wires, wire fences and plant supports, before cutting
ATTENTION
Make sure that the ambient temperature does not exceed 50°C and does not fall below -20°C during work.
ATTENTION
The product is part of the 20V IXES series and may only be operated with batteries of this series. Batteries may only be charged with battery chargers of this series. Observe the manufacturer’s instructions.
DANGER
Danger of injury! If the product is jammed, do not try to pull the product out by using force. Switch off the engine. Use a lever arm or wedge to get the product free.
CAUTION
After switching off, the product will run on. Wait until the product has come to a complete stop.
32 | GB
www.scheppach.com
10.1 Switching the product on/off and operating it (Fig. 1, 15)
WARNING
Danger of injury due to kickback! Never use the product one-handed!
Notes: The speed can be steplessly controlled by the on/off switch. The further you press the on/off switch, the higher the speed.
Before switching on, make sure that the product does not touch any objects.
When using the hedge trimmer (11): 1. Pull the blade guard (13) off the cutter bar (12).
When using the pole-mounted pruner (14): 1. Check that there is saw chain oil in the oil tank (15).
2. Fill in saw chain oil before the oil tank (15) is empty, as described under 9.1.
3. Pull the blade and chain guard (19) off the chainsaw guide bar (13).
Switching on 1. Hold the front grip (8) with your left hand and the rear
grip (2) with your right hand. Thumb and fingers must firmly grasp the grips (2/8).
2. Bring your body and arms into a position in which you can absorb the kickback forces.
3. Press the switch-on lock (1) on the rear grip (2) with your thumb.
4. Press and hold the switch lock (1).
5. To switch on the product, push the on/off switch (4).
6. Release the switch lock (1).
Note: It is not necessary to keep the switch lock pressed after starting the product. The switch lock is intended to prevent accidental starting of the product.
Switching off 1. To switch it off, simply release the on/off switch (4).
2. Put on the supplied guide bar and chain guard (19) or the cutter bar guard (13) after each instance of working with the product.
10.2 Overload protection
In the event of overloading, the battery will switch itself off. After a cool-down period (time varies), the product can be switched back on again.
11 Working instructions
DANGER
Danger of injury!
This section examines the basic working technique for using the product. The information provided here does not replace the many years of training and experience of a specialist. Avoid any work that you are not adequately qualified for! Careless use of the product can lead to serious injuries and even death!
CAUTION
After switching off, the product will run on. Wait until the product has come to a complete stop.
Notes:
Before switching on, make sure that the product does not touch any objects.
Some noise pollution from this product is unavoidable. Postpone noisy work to approved and designated times. If necessary, adhere to rest periods.
Only process free, flat surfaces with the tool attachment.
Carefully inspect the area to be cut and remove all foreign objects.
Avoid bumping into stones, metal or other obstacles.
The tool attachment could be damaged and there is a risk of kickback.
· Wear prescribed protective equipment.
· Ensure that other people remain at a safe distance from your workspace. Anyone who enters the workspace must wear personal protective equipment. Fragments of the workpiece or broken accessory tools can fly off and cause injury even outside the immediate working area.
· If a foreign object is hit, switch off the product immediately and remove the battery. Inspect the product for damage and perform the required repairs before starting again and working with the product. If the product begins to experience exceptionally strong vibrations, switch it off immediately and check it.
· Hold the power tool by the insulated handles when you are carrying out work in which the accessory tool may come into contact with concealed power cables. Contact with a live wire may make exposed metal parts of the power tool live and could give the operator an electric shock.
· Do not use the product in a thunderstorm – Danger of lightning strike!
· Check the product for obvious defects such as loose, worn or damaged parts before each use.
· Switch on the product and only then approach the material to be processed.
· Do not exert excessive pressure on the product. Let the product do the work.
· Always hold the product tight with both hands during work. Make sure that you have a secure footing.
· Avoid abnormal postures.
www.scheppach.com
GB | 33
· Check that the shoulder strap is in a comfortable position to make it easier for you to hold the product.
11.1 Hedge trimmer
11.1.1 Cutting techniques · Cut out thick branches beforehand with pruning shears.
· The double-sided cutter bar allows cutting in both directions, or using a pendulum movement, swinging the trimmer back and forth.
· When cutting vertically, move the product smoothly forwards or up and down in an arc.
· When cutting horizontally, move the product in a crescent shape towards the edge of the hedge so that cut branches fall to the ground.
· To get long straight lines, it is advisable to stretch guide strings.
11.1.2 Pruned hedges It is advisable to cut hedges in a trapezoidal shape to prevent the lower branches from becoming bare. This corresponds to natural plant growth and allows hedges to thrive. When pruning, only the new annual shoots are reduced, so that a dense branching and a good screen is formed.
· Trim the sides of a hedge first. To do this, move the product with the direction of growth from bottom to top. If you cut from the top down, thinner branches move outwards and this can create thin spots or holes.
· Then cut the top edge straight, roof-shaped or round, depending on your taste.
· Trim even young plants to the desired shape. The main shoot should remain undamaged until the hedge has reached the planned height. All other shoots are cut in half.
11.1.3 Cut at the right time · Leaf hedge: June and October
· Conifer hedge: April and August
· Fast growing hedge: around every 6 weeks from May
Pay attention to nesting birds in the hedge. Delay the hedge cut or leave this area out if this is the case.
11.2 Pole-mounted pruner
DANGER
Danger of injury! If the product is jammed, do not try to pull the product out by using force.
Switch off the engine.
Use a lever arm or wedge to get the product free.
DANGER
Watch out for falling branches and do not trip.
· The saw chain should have reached maximum speed before you start sawing.
· You have better control when you saw with the underside of the bar (with a pulling chain).
· The saw chain must not touch the ground or any other object during or after sawing.
· Ensure that the saw chain does not become jammed in the saw cut. The branch must not break or splinter.
· Also observe the precautions against kick-back (see safety instructions).
· Remove the branches hanging downwards by making the cut above the branch.
· Branched boughs are cut to length individually.
11.2.1 Cutting techniques
WARNING
Never stand directly under the branch that you want to saw off!
Possible risk of injury caused by falling branches and catapulting pieces of wood. In general, it is recommended to position the product at an angle of 60° to the branch. Hold the product firmly with both hands during the cutting process and always ensure that you are in a balanced position and have a good stance.
Sawing off small branches (Fig. 18):
Place the stop surface of the saw against the branch to avoid jerky movements of the saw when starting the cut. Guide the saw through the branch with light pressure from top to bottom. Make sure that the branch does not break through prematurely if you have misjudged its size and weight.
Sawing off in sections (Fig. 19):
Saw off large or long branches in sections so that you have control over the impact location.
· Saw off the lower branches on the tree first to make it easier for the cut branches to fall.
· Once the cut has been completed, the weight of the saw increases abruptly for the operator, as the saw is no longer supported on the branch. There is a risk of losing control of the product.
· Only pull the saw out of the cut with the saw chain running to prevent it from jamming.
· Do not saw with the tip of the tool attachment.
· Do not saw into the bulging branch base, as this will prevent the tree from healing.
11.3 After use
· Always switch the product off before placing it down and wait until the product has come to a standstill.
· Remove the battery.
· Put on the supplied guide bar and chain guard or the cutter bar guard after each instance of working with the product.
· Allow the product to cool.
34 | GB
www.scheppach.com
12 Cleaning
WARNING
Have maintenance and repair tasks that are not described in this operating manual, carried out by a specialist workshop. Use only original spare parts.
There is a risk of accident! Always perform maintenance and cleaning work with the battery removed. There is a danger of injury! Let the product cool down before all maintenance and cleaning tasks. Elements of the engine are hot. There is a danger of injury and burning!
The product can start unexpectedly and cause injuries.
Remove the battery.
Allow the product to cool down.
Remove the tool attachment.
WARNING
Danger of injury when handling the saw chain or the blade!
Wear cut-resistant gloves.
1. Wait until all moving parts have come to a standstill.
2. We recommend that you clean the product directly after every use.
3. Keep handles and grasping surfaces dry, clean and free from oil and grease. Slippery handles and grasping surfaces do not allow for safe handling and control of the tool in unexpected situations.
4. If necessary, clean the handles with a damp cloth* washed in soapy water.
5. Never immerse the product in water or other liquids for cleaning.
6. Do not splash the product with water.
7. Keep protective devices, air vents and the motor housing as free of dust and dirt as possible. Rub the product clean with a clean cloth* or blow it off with compressed air* at low pressure. We recommend that you clean the product directly after every use.
8. Ventilation openings must always be free.
9. Do not use any cleaning products or solvents; they could attack the plastic parts of the product. Make sure that no water can penetrate the product interior.
12.1 Hedge trimmer
1. Clean the cutter bar with an oily cloth after each use.
2. Oil the cutter bar after each use with the oil can or a spray.
12.2 Pole-mounted pruner
1. Use a brush* or hand brush* to clean the saw chain and no liquids.
2. Clean the groove of the chainsaw guide bar using a brush or compressed air.
3. Clean the chain sprocket.
13 Maintenance
WARNING
Have maintenance and repair tasks that are not described in this operating manual, carried out by a specialist workshop. Use only original spare parts.
There is a risk of accident! Always perform maintenance and cleaning work with the battery removed. There is a danger of injury! Let the product cool down before all maintenance and cleaning tasks. Elements of the engine are hot. There is a danger of injury and burning!
The product can start unexpectedly and cause injuries.
Remove the battery.
Allow the product to cool down.
Remove the tool attachment.
· Check the product for obvious defects such as loose, worn or damaged
Documents / Resources
 |
scheppach C-PHTS410-X Cordless Multi Function Device [pdf] Instruction Manual C-PHTS410-X, C-PHTS410-X Cordless Multi Function Device, C-PHTS410-X, Cordless Multi Function Device, Multi Function Device, Function Device, Device |