GENIE KP2 Universal Intellicode Keypad

BABALA
|
|
|
|
|
Ang Moving DOOR AY MAAARING MAGDAHILAN NG MALubhang pinsala o KAMATAYAN.
|

ALAM MO BAGO KA MAGSIMULA
- Ang 'Opener' ay tumutukoy sa device na naka-mount sa kisame o dingding malapit sa spring bar ng pinto ng garahe.
- Kumpletuhin ang programming bago i-mount ang keypad.
- Ang keypad ay nananatiling maliwanag at aktibo sa loob ng 15 segundo pagkatapos ng matagumpay na pagpasok ng PIN. Ang anumang pagpindot sa pindutan ay magpapagana sa opener sa panahong ito.
- Pindutin ang 7 at 9 na mga key nang sabay upang tapusin kaagad ang isang sequence at i-off ang backlighting.
- Model GK2-R holds 3 PINs total. Model GK2-P holds 6 PINs total.
PROGRAM PIN TO OPENER
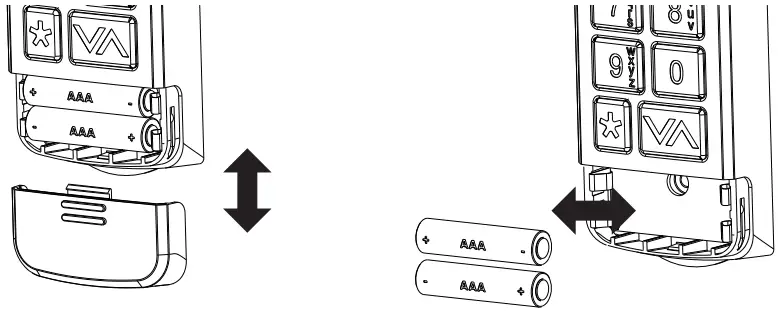
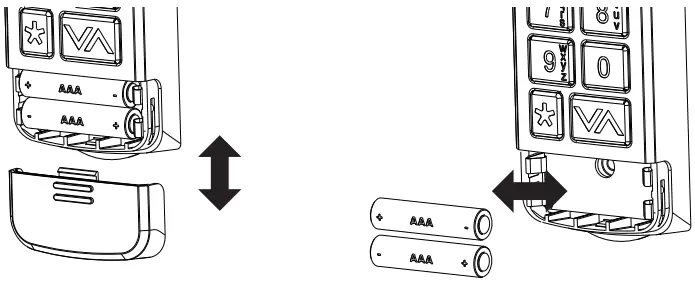
- Alisin ang tab ng baterya mula sa kompartamento ng baterya.
- ON OPENER: Find button pad to begin programming mode.
- If you have a program (PRGM) or SET button (1), press and hold down until the LED turns blue, then release. The purple LED begins flashing.
- If you have a LEARN CODE button (2), press and hold down until the red LED begins flashing, then release.
TANDAAN: Nag-time out ang programming window sa 30 segundo.

- ON KEYPAD: Press and hold (STAR key) until green LED lights (@ 5 sec or less), then release. LED begins flashing.
- ON KEYPAD: Enter desired PIN (3-8 digits) and, with keypad at arms length away from opener, press UP/DOWN key once every two seconds until the opener operates. (Program window ends 15 seconds after last button press).
- Kapag naka-OFF ang backlight, SUBUKAN ang iyong PIN upang makumpleto ang pag-setup.
- Programming a single garage door opener is complete. For additional openers, repeat above steps for each.
PANGKALAHATANG OPERASYON
- Ipasok ang kasalukuyang PIN ng napiling pinto.
- Pindutin at bitawan ang UP/DOWN key. Ang opener ay gagana.
PAG-MOUNTING NG KEYPAD
Keypad MUST be mounted within sight of the garage door (s) at least 5 feet above floor and clear of any moving door parts.
- Alisin ang takip ng baterya at mga baterya.
- Mag-drill ng isang 3/32 "pilot hole para sa itaas na mounting screw.
- Isama ang isinama na tornilyo sa butas ng piloto, na nag-iiwan ng 1/8 "agwat sa pagitan ng ulo ng tornilyo at dingding.
- Ikabit ang slotted mount sa likod ng keypad sa ibabaw ng turnilyo.

- Markahan at mag-drill ng isang 3/32 "pilot hole para sa ilalim na tornilyo at i-secure ang keypad sa dingding. (Huwag labis na higpitan).
- Muling i-install ang mga baterya.

KARAGDAGANG MGA TAMPOK at SETTING
Baguhin ang isang kasalukuyang PIN:
- Ipasok ang kasalukuyang PIN ng napiling pinto.
- Press and hold (STAR key) until red LED flashes (@ 5 sec), then release.
- Ipasok ang BAGONG PIN para sa napiling pinto (3-8 digit).
- Press and release (STAR key) one time. LED flashes two times to confirm.
- PIN has been changed and previous PIN will no longer operate the opener.
Magtakda ng pansamantalang PIN:
- Ipasok ang kasalukuyang PIN ng napiling pinto.
- Press and hold the (STAR key) until green LED turns SOLID (@ 10 sec), then release.
- Ilagay ang PANSAMANTALA PIN (3-8 digit).
- Press and release (STAR key) one time. LED flashes two times to confirm.
- Temporary PIN is active until the existing PIN is used again.
I-clear ang isang PIN sa isang pagkakataon:
- Press and hold (STAR key) until red LED flashes (@ 10 sec), then release.
- Ilagay ang PIN na gusto mong tanggalin.
- Press and release (STAR key) one time. LED flashes two times to confirm.
- This PIN has been cleared from the keypad.
I-clear ang lahat ng PIN at setting:
- Press and hold (STAR key) until red LED turns SOLID (@ 20 sec), then release. LED flashes two times to confirm.
- Keypad is reset to factory default.
1-Button close feature:
Gumagana ang feature na ito sa mga opener na ginawa noong Hulyo 2025 o mas bago. Kung pinindot ang UP/DOWN key kapag naka-off ang mga backlight ng keypad, MAGSASARA ang anumang pinto na wala pa sa pababang limitasyon nito. NAKA-ON ang default na setting.
Para i-ON/OFF ang feature para sa LAHAT ng pinto, ulitin ang prosesong ito:
- Pindutin nang matagal ang 1 at 9 na key nang sabay hanggang sa kumikislap ang asul na LED.
- If the LED flashes 4 times, the feature is off.
- If the LED flashes 2 times, the feature is on.
Upang I-ON/I-OFF SA PIN, ulitin ang prosesong ito:
- Enter PIN, then press and release (STAR key) two times.
- If the LED flashes 4 times, the feature is off.
- If the LED flashes 2 times, the feature is on.
Tampok ng Lockout:
Pagkatapos ng 10 magkasunod na maling pagsubok na PIN, magla-lock ang keypad sa loob ng 5 minuto. Upang maibalik ang paggana, maghintay ng 5 minuto o alisin at muling ipasok ang mga baterya. NAKA-OFF ang default na setting.
Upang i-ON/I-OFF, ulitin ang prosesong ito:
- Enter valid (non-temporary) PIN, then press and release the (STAR key) one time. Press and hold the 5 & 9 keys at the same time until blue LED flashes, then release.
- If the LED flashes 4 times, the feature is off.
- If the LED flashes 2 times, the feature is on.
MABABANG BAterya/PALITAN NG BAterya
Ang isang solong pulang LED (o walang backlighting) ay nagpapahiwatig na ang mga baterya ay kailangang palitan.
Hindi mawawala ang programming sa panahon ng pagpapalit ng baterya.
- Alisin ang (2) AAA na mga baterya at palitan ng mga bagong baterya na may parehong uri.
Suriin ang tamang direksyon ng (+) at (-) na mga terminal. Ang mga rechargeable na baterya ay HINDI inirerekomenda. - Baguhin ang mga baterya taun-taon para sa pinakamahusay na pagganap.
Gumamit ng mga de-kalidad na baterya. Huwag paghaluin ang luma at bagong mga baterya. Huwag paghaluin ang alkaline, standard (carbon-zinc), o rechargeable (nickel-acmium) na mga baterya.
Pahayag ng FCC / IC
This equipment contains licence-exempt transmitter(s)/receiver(s) that comply with Part 15 of the FCC Rules, ICES-003 Class B specifications, and ISED Canada’s licence-exempt RSS(s). Operation is subject to the following two conditions:
- ang device na ito ay maaaring hindi magdulot ng mapaminsalang interference, at.
- dapat tanggapin ng device na ito ang anumang interference na natanggap, kabilang ang interference na maaaring magdulot ng hindi gustong operasyon.
Changes or modifications not expressly approved by the party responsible for compliance could void the user’s authority to operate the equipment. This equipment complies with the RF exposure limits established by the FCC and ISED for an uncontrolled environment. Compliance with SAR requirements has been demonstrated through calculations, confirming that the RF exposure remains below the applicable threshold for use with 0 mm separation from the body.
SUPORTA NG CUSTOMER
Intellicode® Keypad
Para sa tulong, makipag-ugnayan sa pamamagitan ng telepono o website
Chat: 1-800-354-3643
www.geniecompany.com
©2025 The Genie Company
One Door Drive, Mt. Hope, OH 44660, USA
1-taong warranty, bisitahin www.geniecompany.com para sa mga detalye.
Pat. www.geniecompany.com

Mga Dokumento / Mga Mapagkukunan
 |
GENIE KP2 Universal Intellicode Keypad [pdf] Manwal ng May-ari KP2, KP2 Universal Intellicode Keypad, Universal Intellicode Keypad, Intellicode Keypad, Keypad |