GENIE KP2 유니버설 인텔리코드 키패드

경고
|
|
|
|
|
문을 움직이면 심각한 부상이나 사망을 초래할 수 있습니다.
|

시작하기 전에 알아두세요
- '오프너'는 차고문 스프링 바 근처 천장이나 벽에 장착된 장치를 말합니다.
- 키패드를 장착하기 전에 프로그래밍을 완료하세요.
- PIN 입력이 완료되면 키패드가 15초 동안 켜지고 활성화됩니다. 이 시간 동안 아무 버튼이나 누르면 오프너가 활성화됩니다.
- 7과 9 키를 동시에 누르면 시퀀스가 즉시 종료되고 백라이트가 꺼집니다.
- Model GK2-R holds 3 PINs total. Model GK2-P holds 6 PINs total.
오프너에 핀 프로그래밍
- 배터리 칸에서 배터리 탭을 제거하세요.
- ON OPENER: Find button pad to begin programming mode.
- If you have a program (PRGM) or SET button (1), press and hold down until the LED turns blue, then release. The purple LED begins flashing.
- If you have a LEARN CODE button (2), press and hold down until the red LED begins flashing, then release.
메모: 프로그래밍 창은 30초 후에 시간 초과됩니다.

- ON 키패드: Press and hold (STAR key) until green LED lights (@ 5 sec or less), then release. LED begins flashing.
- ON 키패드: Enter desired PIN (3-8 digits) and, with keypad at arms length away from opener, press UP/DOWN key once every two seconds until the opener operates. (Program window ends 15 seconds after last button press).
- 백라이트가 꺼지면 PIN을 테스트하여 설정을 완료하세요.
- Programming a single garage door opener is complete. For additional openers, repeat above steps for each.
일반 운영
- 선택한 문의 현재 PIN을 입력하세요.
- 위/아래 키를 눌렀다 놓으면 오프너가 작동합니다.
키패드 장착
Keypad MUST be mounted within sight of the garage door (s) at least 5 feet above floor and clear of any moving door parts.
- 배터리 커버와 배터리를 제거합니다.
- 상단 장착 나사용 3/32” 파일럿 구멍을 뚫습니다.
- 포함된 나사를 파일럿 구멍에 설치하고 나사 머리와 벽 사이에 1/8” 간격을 두십시오.
- 나사 위에 키패드 후면의 슬롯형 마운트를 연결합니다.

- 바닥 나사용 3/32” 파일럿 구멍을 표시하고 드릴로 뚫고 키패드를 벽에 고정합니다. (과도하게 조이지 마십시오).
- 배터리를 다시 설치하세요.

추가 기능 및 설정
기존 PIN 변경:
- 선택한 문의 현재 PIN을 입력하세요.
- Press and hold (STAR key) until red LED flashes (@ 5 sec), then release.
- 선택한 문에 대한 새 PIN(3~8자리)을 입력하세요.
- Press and release (STAR key) one time. LED flashes two times to confirm.
- PIN has been changed and previous PIN will no longer operate the opener.
임시 PIN 설정:
- 선택한 문의 현재 PIN을 입력하세요.
- Press and hold the (STAR key) until green LED turns SOLID (@ 10 sec), then release.
- 임시 PIN(3~8자리)을 입력하세요.
- Press and release (STAR key) one time. LED flashes two times to confirm.
- Temporary PIN is active until the existing PIN is used again.
한 번에 하나의 PIN을 지우세요:
- Press and hold (STAR key) until red LED flashes (@ 10 sec), then release.
- 삭제하려는 PIN을 입력하세요.
- Press and release (STAR key) one time. LED flashes two times to confirm.
- This PIN has been cleared from the keypad.
모든 PIN 및 설정을 지웁니다.
- Press and hold (STAR key) until red LED turns SOLID (@ 20 sec), then release. LED flashes two times to confirm.
- Keypad is reset to factory default.
1-버튼 닫기 기능:
이 기능은 2025년 XNUMX월 이후에 출시된 도어록에서 작동합니다. 키패드 백라이트가 꺼져 있을 때 위/아래 키를 누르면, 아직 닫히지 않은 문이 닫힙니다. 기본 설정은 켜짐입니다.
모든 도어의 기능을 켜거나 끄려면 다음 과정을 반복하세요.
- 파란색 LED가 깜박일 때까지 1과 9 키를 동시에 길게 누릅니다.
- If the LED flashes 4 times, the feature is off.
- If the LED flashes 2 times, the feature is on.
PIN으로 켜기/끄기를 하려면 다음 과정을 반복하세요.
- Enter PIN, then press and release (STAR key) two times.
- If the LED flashes 4 times, the feature is off.
- If the LED flashes 2 times, the feature is on.
잠금 기능:
PIN을 10회 연속 잘못 입력하면 키패드가 5분간 잠깁니다. 기능을 복구하려면 5분간 기다리거나 배터리를 분리했다가 다시 삽입하세요. 기본 설정은 OFF입니다.
켜기/끄기를 하려면 다음 과정을 반복하세요.
- Enter valid (non-temporary) PIN, then press and release the (STAR key) one time. Press and hold the 5 & 9 keys at the same time until blue LED flashes, then release.
- If the LED flashes 4 times, the feature is off.
- If the LED flashes 2 times, the feature is on.
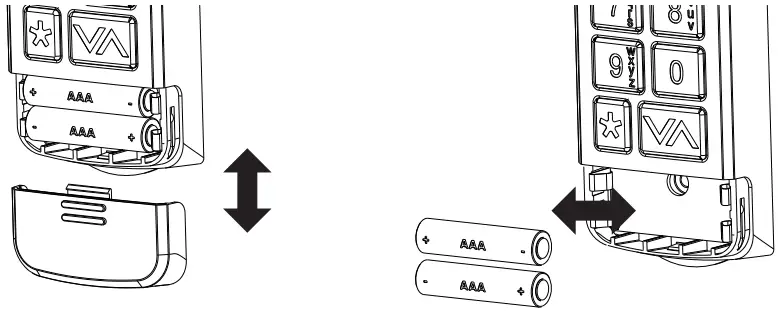
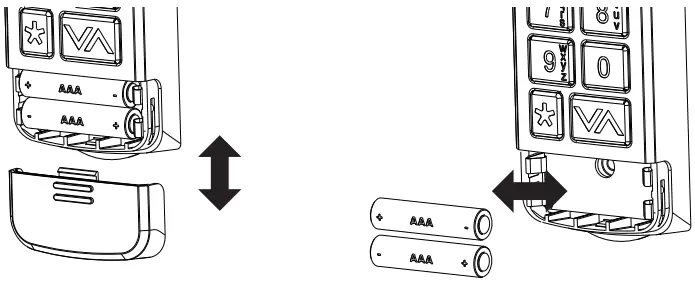
배터리 부족/배터리 교체
빨간색 LED가 하나 켜지거나 백라이트가 없는 경우 배터리를 교체해야 함을 나타냅니다.
배터리 교체 중에 프로그래밍이 손실되지 않습니다.
- (2) AAA 배터리를 제거하고 동일한 유형의 새 배터리로 교체하십시오.
(+) 및 (-) 단자의 방향이 올바른지 확인하세요. 충전식 배터리는 권장하지 않습니다. - 최상의 성능을 위해 매년 배터리를 교체하세요.
고품질 배터리를 사용하세요. 오래된 배터리와 새 배터리를 섞어 사용하지 마세요. 알카라인 배터리, 일반 배터리(탄소-아연 배터리), 충전식 배터리(니켈-아연 배터리)를 섞어 사용하지 마세요.
FCC/IC 성명
This equipment contains licence-exempt transmitter(s)/receiver(s) that comply with Part 15 of the FCC Rules, ICES-003 Class B specifications, and ISED Canada’s licence-exempt RSS(s). Operation is subject to the following two conditions:
- 이 장치는 유해한 간섭을 일으키지 않을 수 있습니다.
- 이 장치는 원치 않는 작동을 일으킬 수 있는 간섭을 포함하여 수신되는 모든 간섭을 수용해야 합니다.
Changes or modifications not expressly approved by the party responsible for compliance could void the user’s authority to operate the equipment. This equipment complies with the RF exposure limits established by the FCC and ISED for an uncontrolled environment. Compliance with SAR requirements has been demonstrated through calculations, confirming that the RF exposure remains below the applicable threshold for use with 0 mm separation from the body.
고객 지원
Intellicode® Keypad
도움이 필요하면 전화로 문의하거나 web대지
채팅: 1-800-354-3643
www.geniecompany.com
©2025 지니컴퍼니
원 도어 드라이브, 마운트 호프, 오하이오 44660, 미국
1년 보증, 방문하세요 www.geniecompany.com 자세한 내용은.
가볍게 두드리기. www.geniecompany.com

문서 / 리소스
 |
GENIE KP2 유니버설 인텔리코드 키패드 [PDF 파일] 사용 설명서 KP2, KP2 Universal Intellicode Keypad, Universal Intellicode Keypad, Intellicode Keypad, Keypad |