Teclado universal Intellicode GENIE KP2

ADVERTENCIA
|
|
|
|
|
MOVER LA PUERTA PUEDE CAUSAR LESIONES GRAVES O LA MUERTE.
|
CONOZCA ANTES DE EMPEZAR
- 'Abridor' se refiere al dispositivo montado en el techo o la pared cerca de la barra de resorte de la puerta del garaje.
- Complete la programación antes de montar el teclado.
- El teclado permanece encendido y activo durante 15 segundos tras introducir el PIN. Cualquier pulsación de botón activará el abridor durante este tiempo.
- Presione las teclas 7 y 9 al mismo tiempo para finalizar inmediatamente una secuencia y apagar la retroiluminación.
- Model GK2-R holds 3 PINs total. Model GK2-P holds 6 PINs total.
PROGRAMAR PIN AL ABRIDOR
- Retire la pestaña de la batería del compartimiento de la batería.
- ON OPENER: Find button pad to begin programming mode.
- If you have a program (PRGM) or SET button (1), press and hold down until the LED turns blue, then release. The purple LED begins flashing.
- If you have a LEARN CODE button (2), press and hold down until the red LED begins flashing, then release.
NOTA: La ventana de programación expira a los 30 segundos.

- ON TECLADO: Press and hold (STAR key) until green LED lights (@ 5 sec or less), then release. LED begins flashing.
- ON TECLADO: Enter desired PIN (3-8 digits) and, with keypad at arms length away from opener, press UP/DOWN key once every two seconds until the opener operates. (Program window ends 15 seconds after last button press).
- Una vez que la retroiluminación se apague, PRUEBE su PIN para completar la configuración.
- Programming a single garage door opener is complete. For additional openers, repeat above steps for each.
FUNCIONAMIENTO GENERAL
- Introduzca el PIN actual de la puerta seleccionada.
- Presione y suelte la tecla ARRIBA/ABAJO. El abridor funcionará.
MONTAJE DEL TECLADO
Keypad MUST be mounted within sight of the garage door (s) at least 5 feet above floor and clear of any moving door parts.
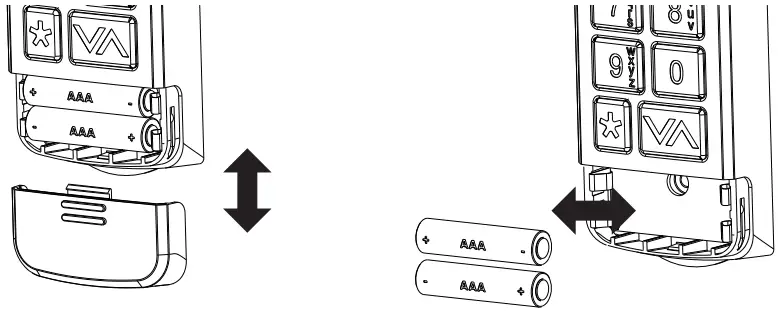
- Retire la tapa de la batería y las baterías.

- Taladre un orificio piloto de 3/32 ”para el tornillo de montaje superior.
- Instale el tornillo incluido en el orificio piloto, dejando un espacio de 1/8 ”entre la cabeza del tornillo y la pared.
- Enganche el montaje ranurado en la parte posterior del teclado sobre el tornillo.

- Marque y taladre un orificio piloto de 3/32 ”para el tornillo inferior y asegure el teclado a la pared. (No apriete demasiado).
- Reinstale las baterías.

FUNCIONES Y CONFIGURACIONES ADICIONALES
Cambiar un PIN existente:
- Introduzca el PIN actual de la puerta seleccionada.
- Press and hold (STAR key) until red LED flashes (@ 5 sec), then release.
- Introduzca el NUEVO PIN para la puerta seleccionada (3-8 dígitos).
- Press and release (STAR key) one time. LED flashes two times to confirm.
- PIN has been changed and previous PIN will no longer operate the opener.
Establecer un PIN temporal:
- Introduzca el PIN actual de la puerta seleccionada.
- Press and hold the (STAR key) until green LED turns SOLID (@ 10 sec), then release.
- Introduzca el PIN TEMPORAL (3-8 dígitos).
- Press and release (STAR key) one time. LED flashes two times to confirm.
- Temporary PIN is active until the existing PIN is used again.
Borrar un PIN a la vez:
- Press and hold (STAR key) until red LED flashes (@ 10 sec), then release.
- Introduzca el PIN que desea eliminar.
- Press and release (STAR key) one time. LED flashes two times to confirm.
- This PIN has been cleared from the keypad.
Borrar todos los PIN y configuraciones:
- Press and hold (STAR key) until red LED turns SOLID (@ 20 sec), then release. LED flashes two times to confirm.
- Keypad is reset to factory default.
Función de cierre con 1 botón:
Esta función funciona en abridores fabricados a partir de julio de 2025. Si se pulsa la tecla ARRIBA/ABAJO con la retroiluminación del teclado apagada, cualquier puerta que no esté en su límite inferior se cerrará. La configuración predeterminada es ACTIVADA.
Para activar o desactivar la función para TODAS las puertas, repita este proceso:
- Mantenga presionadas las teclas 1 y 9 al mismo tiempo hasta que el LED azul parpadee.
- If the LED flashes 4 times, the feature is off.
- If the LED flashes 2 times, the feature is on.
Para activar o desactivar mediante PIN, repita este proceso:
- Enter PIN, then press and release (STAR key) two times.
- If the LED flashes 4 times, the feature is off.
- If the LED flashes 2 times, the feature is on.
Función de bloqueo:
Tras 10 intentos de PIN incorrectos consecutivos, el teclado se bloquea durante 5 minutos. Para restablecer la función, espere 5 minutos o retire y vuelva a colocar las pilas. La configuración predeterminada es DESACTIVADO.
Para encender/apagar, repita este proceso:
- Enter valid (non-temporary) PIN, then press and release the (STAR key) one time. Press and hold the 5 & 9 keys at the same time until blue LED flashes, then release.
- If the LED flashes 4 times, the feature is off.
- If the LED flashes 2 times, the feature is on.
BATERÍA BAJA/REEMPLAZO DE BATERÍA
Un solo LED rojo (o sin retroiluminación) indica que es necesario reemplazar las baterías.
La programación no se perderá durante el cambio de batería.
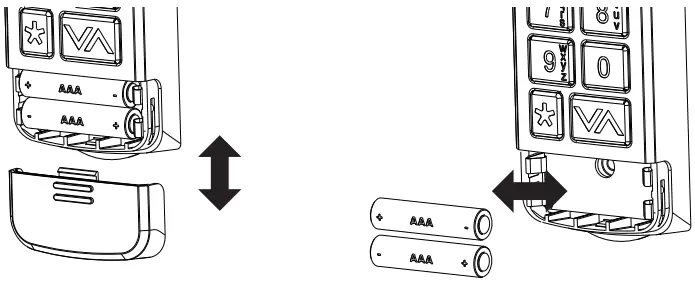
- Retire (2) baterías AAA y reemplácelas con baterías nuevas del mismo tipo.
Verifique la dirección correcta de los terminales (+) y (-). NO se recomiendan baterías recargables. - Cambie las baterías anualmente para obtener un mejor rendimiento.

Utilice pilas de calidad. No mezcle pilas nuevas y usadas. No mezcle pilas alcalinas, estándar (carbono-zinc) ni recargables (níquel-amonio).
DECLARACIÓN FCC / IC
This equipment contains licence-exempt transmitter(s)/receiver(s) that comply with Part 15 of the FCC Rules, ICES-003 Class B specifications, and ISED Canada’s licence-exempt RSS(s). Operation is subject to the following two conditions:
- este dispositivo no puede causar interferencia dañina, y.
- Este dispositivo debe aceptar cualquier interferencia recibida, incluida aquella que pueda provocar un funcionamiento no deseado.
Changes or modifications not expressly approved by the party responsible for compliance could void the user’s authority to operate the equipment. This equipment complies with the RF exposure limits established by the FCC and ISED for an uncontrolled environment. Compliance with SAR requirements has been demonstrated through calculations, confirming that the RF exposure remains below the applicable threshold for use with 0 mm separation from the body.
ATENCIÓN AL CLIENTE
Teclado Intellicode®
Para obtener ayuda, comuníquese por teléfono o websitio
Charlar: 1-800-354-3643
Www.geniecompany.com
©2025 La Compañía Genio
One Door Drive, Mt. Hope, OH 44660, EE. UU.
Garantía de 1 año, visite Www.geniecompany.com Para más detalles.
Pat. Www.geniecompany.com

Documentos / Recursos
 |
Teclado universal Intellicode GENIE KP2 [pdf] Manual del propietario KP2, teclado universal Intellicode KP2, teclado universal Intellicode, teclado Intellicode, teclado |
