Tastiera Intellicode Universale GENIE KP2

ATTENZIONE
|
|
|
|
|
A PORTA MUSCIANA PUDE CAUZZÀ GRAZIE O MORTI.
|
SAPÈ PRIMA DI CUMINCIÀ
- «Apritore» si riferisce à u dispusitivu muntatu nantu à u tettu o u muru vicinu à a barra à molla di a porta di u garage.
- Complete programming before mounting keypad.
- U tastieru ferma accesu è attivu per 15 secondi dopu à un inserimentu PIN riesciutu. Ogni pressione di buttone attiverà l'apriporta durante questu tempu.
- Appughjà i tasti 7 è 9 à tempu per finisce subitu una sequenza è spegne a retroilluminazione.
- Model GK2-R holds 3 PINs total. Model GK2-P holds 6 PINs total.
PROGRAMMA U PIN À L'APRITORE
- Eliminate a linguetta di a batteria da u compartimentu di a batteria.
- ON OPENER: Find button pad to begin programming mode.
- If you have a program (PRGM) or SET button (1), press and hold down until the LED turns blue, then release. The purple LED begins flashing.
- If you have a LEARN CODE button (2), press and hold down until the red LED begins flashing, then release.
NOTA: A finestra di prugrammazione scade à 30 secondi.

- ON TASTIERA: Press and hold (STAR key) until green LED lights (@ 5 sec or less), then release. LED begins flashing.
- ON TASTIERA: Enter desired PIN (3-8 digits) and, with keypad at arms length away from opener, press UP/DOWN key once every two seconds until the opener operates. (Program window ends 15 seconds after last button press).
- Una volta chì a retroilluminazione si spegne, PROVATE u vostru PIN per compie a cunfigurazione.
- Programming a single garage door opener is complete. For additional openers, repeat above steps for each.
OPERAZIONE GENERALE
- Enter current PIN of selected door.
- Appughjà è liberà u tastu UP/DOWN. L'apritore si metterà in funzione.
MONTAGNA U TASTIERA
Keypad MUST be mounted within sight of the garage door (s) at least 5 feet above floor and clear of any moving door parts.
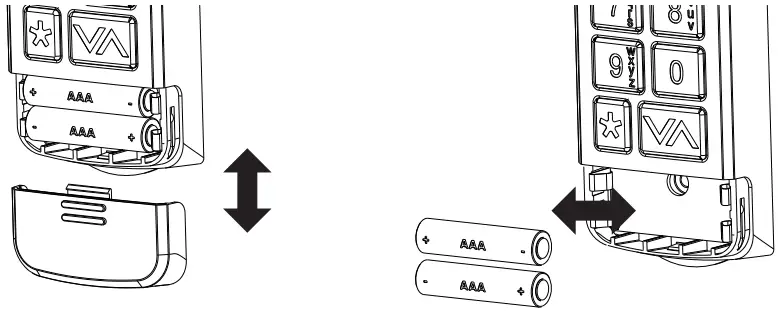
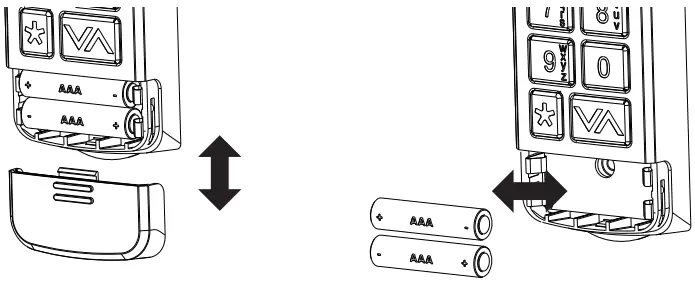
- Cacciate u coperchio è e batterie.

- Praticate un foru pilotu di 3/32 "per a vite di montaggio superiore.
- Installa a vite inclusa in u foru pilotu, lascendu un spaziu di 1/8 "trà a testa di a vite è u muru.
- Attaccà u supportu slotted in u spinu di u teclatu nantu à a vite.

- Marcate è fate un foru pilotu di 3/32 "per a vite inferiore è assicurate u tastieru à u muru. (Ùn stringhje micca eccessivamente).
- Reinstallà e batterie.

FUNZIONI È IMPOSTAZIONI AGGIUNTIVE
Cambià un PIN esistente:
- Enter current PIN of selected door.
- Press and hold (STAR key) until red LED flashes (@ 5 sec), then release.
- Inserite u NOVU PIN per a porta selezziunata (3-8 cifre).
- Press and release (STAR key) one time. LED flashes two times to confirm.
- PIN has been changed and previous PIN will no longer operate the opener.
Imposta un PIN temporaneo:
- Enter current PIN of selected door.
- Press and hold the (STAR key) until green LED turns SOLID (@ 10 sec), then release.
- Enter TEMPORARY PIN (3-8 digits).
- Press and release (STAR key) one time. LED flashes two times to confirm.
- Temporary PIN is active until the existing PIN is used again.
Sguassà un PIN à a volta:
- Press and hold (STAR key) until red LED flashes (@ 10 sec), then release.
- Enter the PIN you want to delete.
- Press and release (STAR key) one time. LED flashes two times to confirm.
- This PIN has been cleared from the keypad.
Sguassà tutti i PIN è i paràmetri:
- Press and hold (STAR key) until red LED turns SOLID (@ 20 sec), then release. LED flashes two times to confirm.
- Keypad is reset to factory default.
Funzione di chjusura cù 1 buttone:
Questa funzione funziona nantu à l'apriporta fabbricati in lugliu 2025 o dopu. Sè u tastu UP/DOWN hè premutu quandu a retroilluminazione di a tastiera hè spenta, qualsiasi porta chì ùn hè micca digià à u so limite inferiore SI CHIUDERÀ. L'impostazione predefinita hè ON.
Per attivà/disattivà a funzione per TUTTE e porte, ripetite stu prucessu:
- Appughjà è tene premuti i tasti 1 è 9 à u listessu tempu finu à chì u LED blu lampeggi.
- If the LED flashes 4 times, the feature is off.
- If the LED flashes 2 times, the feature is on.
Per attivà/disattivà cù u PIN, ripetite stu prucessu:
- Enter PIN, then press and release (STAR key) two times.
- If the LED flashes 4 times, the feature is off.
- If the LED flashes 2 times, the feature is on.
Funzione di bloccu:
After 10 wrong PIN attempts in a row, the keypad locks for 5 minutes. To restore function, wait 5 minutes or remove and reinsert the batteries. Default setting is OFF.
To turn ON/OFF, repeat this process:
- Enter valid (non-temporary) PIN, then press and release the (STAR key) one time. Press and hold the 5 & 9 keys at the same time until blue LED flashes, then release.
- If the LED flashes 4 times, the feature is off.
- If the LED flashes 2 times, the feature is on.
BATTERIA BASSA / SOSTITUZIONE DI BATTERIA
A single red LED (or no backlighting) indicates batteries need to be replaced.
A prugrammazione ùn serà micca persa durante u cambiamentu di a bateria.
- Eliminate (2) batterie AAA è rimpiazzatele cù batterie nove di u listessu tipu.
Verificate a direzzione curretta di i terminali (+) è (-). E batterie ricaricabili ùn sò micca cunsigliate. - Cambiate e batterie una volta à l'annu per ottene e migliori prestazioni.

Aduprate batterie di qualità. Ùn mischiate micca batterie vechje è nove. Ùn mischiate micca batterie alcaline, standard (carboniu-zincu) o ricaricabili (nickel-acmium).
DICHIARAZIONE FCC / IC
This equipment contains licence-exempt transmitter(s)/receiver(s) that comply with Part 15 of the FCC Rules, ICES-003 Class B specifications, and ISED Canada’s licence-exempt RSS(s). Operation is subject to the following two conditions:
- stu dispusitivu ùn pò causari interferenza dannusu, è.
- stu dispusitivu deve accettà ogni interferenza ricevuta, cumpresi interferenza chì pò causà operazione indesiderata.
Changes or modifications not expressly approved by the party responsible for compliance could void the user’s authority to operate the equipment. This equipment complies with the RF exposure limits established by the FCC and ISED for an uncontrolled environment. Compliance with SAR requirements has been demonstrated through calculations, confirming that the RF exposure remains below the applicable threshold for use with 0 mm separation from the body.
SUPPORTU CLIENTI
Intellicode® Keypad
Per aiutu, cuntattate per telefonu o websitu
Chat: 1-800-354-3643
www.geniecompany.com
© 2025 The Genie Company
Una Porta Drive, Mt. Hope, OH 44660, Stati Uniti
Garanzia di 1 annu, visitate www.geniecompany.com per i dettagli.
Pat. www.geniecompany.com

Documenti / Risorse
 |
Tastiera Intellicode Universale GENIE KP2 [pdfManuale di u pruprietariu KP2, KP2 Universal Intellicode Keypad, Universal Intellicode Keypad, Intellicode Keypad, Keypad |
