GENIE KP2 યુનિવર્સલ ઇન્ટેલીકોડ કીપેડ

ચેતવણી
|
|
|
|
|
દરવાજા ખસેડવાથી ગંભીર ઈજા કે મૃત્યુ થઈ શકે છે.
|

શરૂ કરતા પહેલા જાણો
- 'ઓપનર' એ ગેરેજ દરવાજાના સ્પ્રિંગ બાર પાસે છત અથવા દિવાલ પર લગાવેલા ઉપકરણનો ઉલ્લેખ કરે છે.
- કીપેડ લગાવતા પહેલા પ્રોગ્રામિંગ પૂર્ણ કરો.
- સફળ પિન એન્ટ્રી પછી કીપેડ 15 સેકન્ડ સુધી પ્રકાશિત અને સક્રિય રહે છે. આ સમય દરમિયાન કોઈપણ બટન દબાવવાથી ઓપનર સક્રિય થઈ જશે.
- ક્રમ તરત જ સમાપ્ત કરવા અને બેકલાઇટિંગ બંધ કરવા માટે 7 અને 9 કી એક જ સમયે દબાવો.
- Model GK2-R holds 3 PINs total. Model GK2-P holds 6 PINs total.
પ્રોગ્રામ પિન ટુ ઓપનર
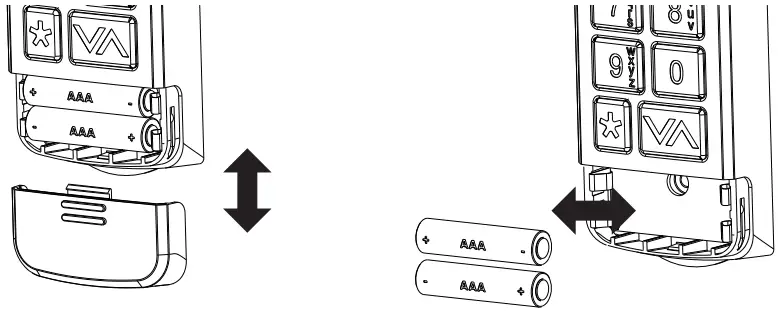
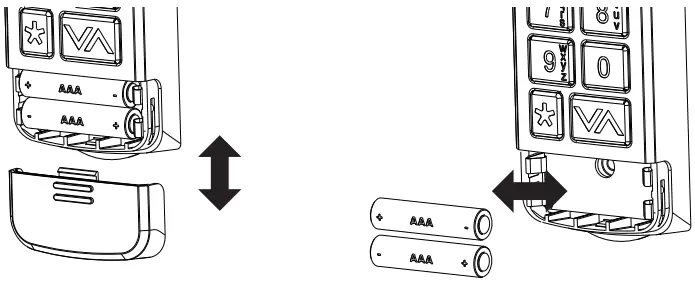
- બેટરી કમ્પાર્ટમેન્ટમાંથી બેટરી ટેબ દૂર કરો.
- ON OPENER: Find button pad to begin programming mode.
- If you have a program (PRGM) or SET button (1), press and hold down until the LED turns blue, then release. The purple LED begins flashing.
- If you have a LEARN CODE button (2), press and hold down until the red LED begins flashing, then release.
નોંધ: પ્રોગ્રામિંગ વિન્ડો 30 સેકન્ડે સમાપ્ત થાય છે.

- ON કીપેડ: Press and hold (STAR key) until green LED lights (@ 5 sec or less), then release. LED begins flashing.
- ON કીપેડ: Enter desired PIN (3-8 digits) and, with keypad at arms length away from opener, press UP/DOWN key once every two seconds until the opener operates. (Program window ends 15 seconds after last button press).
- એકવાર બેકલાઇટિંગ બંધ થઈ જાય, પછી સેટઅપ પૂર્ણ કરવા માટે તમારા પિનનું પરીક્ષણ કરો.
- Programming a single garage door opener is complete. For additional openers, repeat above steps for each.
સામાન્ય કામગીરી
- પસંદ કરેલા દરવાજાનો વર્તમાન પિન દાખલ કરો.
- ઉપર/નીચે કી દબાવો અને છોડો. ઓપનર કાર્ય કરશે.
કીપેડ માઉન્ટ કરવાનું
Keypad MUST be mounted within sight of the garage door (s) at least 5 feet above floor and clear of any moving door parts.
- બેટરી કવર અને બેટરી દૂર કરો.
- ટોચની માઉન્ટિંગ સ્ક્રૂ માટે 3/32 "પાયલોટ છિદ્ર ડ્રિલ કરો.
- સ્ક્રુ હેડ અને દિવાલ વચ્ચે 1/8 ”ગેપ છોડીને, પાયલોટ હોલમાં સમાવેલ સ્ક્રુ ઇન્સ્ટોલ કરો.
- સ્ક્રુ પર કીપેડની પાછળના ભાગમાં સ્લોટેડ માઉન્ટને હૂક કરો.

- નીચે સ્ક્રુ માટે 3/32 ”પાયલોટ હોલ માર્ક કરો અને ડ્રિલ કરો અને દિવાલ પર કીપેડ સુરક્ષિત કરો. (વધારે કડક ન કરો).
- બેટરીઓ ફરીથી ઇન્સ્ટોલ કરો.

વધારાની સુવિધાઓ અને સેટિંગ્સ
હાલનો PIN બદલો:
- પસંદ કરેલા દરવાજાનો વર્તમાન પિન દાખલ કરો.
- Press and hold (STAR key) until red LED flashes (@ 5 sec), then release.
- પસંદ કરેલા દરવાજા માટે નવો પિન દાખલ કરો (3-8 અંકો).
- Press and release (STAR key) one time. LED flashes two times to confirm.
- PIN has been changed and previous PIN will no longer operate the opener.
કામચલાઉ પિન સેટ કરો:
- પસંદ કરેલા દરવાજાનો વર્તમાન પિન દાખલ કરો.
- Press and hold the (STAR key) until green LED turns SOLID (@ 10 sec), then release.
- ટેમ્પરરી પિન (૩-૮ અંકો) દાખલ કરો.
- Press and release (STAR key) one time. LED flashes two times to confirm.
- Temporary PIN is active until the existing PIN is used again.
એક સમયે એક પિન સાફ કરો:
- Press and hold (STAR key) until red LED flashes (@ 10 sec), then release.
- તમે જે પિન ડિલીટ કરવા માંગો છો તે દાખલ કરો.
- Press and release (STAR key) one time. LED flashes two times to confirm.
- This PIN has been cleared from the keypad.
બધા પિન અને સેટિંગ્સ સાફ કરો:
- Press and hold (STAR key) until red LED turns SOLID (@ 20 sec), then release. LED flashes two times to confirm.
- Keypad is reset to factory default.
૧-બટન બંધ કરવાની સુવિધા:
આ સુવિધા જુલાઈ 2025 કે તે પછીના ઓપનર પર કામ કરે છે. જો કીપેડ બેકલાઇટ બંધ હોય ત્યારે ઉપર/નીચે કી દબાવવામાં આવે, તો કોઈપણ દરવાજો જે પહેલાથી જ તેની ડાઉન લિમિટ પર નથી તે બંધ થઈ જશે. ડિફોલ્ટ સેટિંગ ચાલુ છે.
બધા દરવાજા માટે સુવિધા ચાલુ/બંધ કરવા માટે, આ પ્રક્રિયાને પુનરાવર્તિત કરો:
- વાદળી LED ફ્લેશ થાય ત્યાં સુધી 1 અને 9 કી એક જ સમયે દબાવી રાખો.
- If the LED flashes 4 times, the feature is off.
- If the LED flashes 2 times, the feature is on.
પિન દ્વારા ચાલુ/બંધ કરવા માટે, આ પ્રક્રિયાને પુનરાવર્તિત કરો:
- Enter PIN, then press and release (STAR key) two times.
- If the LED flashes 4 times, the feature is off.
- If the LED flashes 2 times, the feature is on.
લોકઆઉટ સુવિધા:
સતત ૧૦ ખોટા PIN પ્રયાસો પછી, કીપેડ ૫ મિનિટ માટે લોક થઈ જાય છે. કાર્ય પુનઃસ્થાપિત કરવા માટે, ૫ મિનિટ રાહ જુઓ અથવા બેટરી કાઢીને ફરીથી દાખલ કરો. ડિફોલ્ટ સેટિંગ બંધ છે.
ચાલુ/બંધ કરવા માટે, આ પ્રક્રિયાને પુનરાવર્તિત કરો:
- Enter valid (non-temporary) PIN, then press and release the (STAR key) one time. Press and hold the 5 & 9 keys at the same time until blue LED flashes, then release.
- If the LED flashes 4 times, the feature is off.
- If the LED flashes 2 times, the feature is on.
ઓછી બેટરી/બેટરી રિપ્લેસમેન્ટ
એક લાલ LED (અથવા બેકલાઇટિંગ નહીં) સૂચવે છે કે બેટરી બદલવાની જરૂર છે.
બેટરી ફેરફાર દરમિયાન પ્રોગ્રામિંગ ખોવાઈ જશે નહીં.
- (2) AAA બેટરીઓ દૂર કરો અને તે જ પ્રકારની નવી બેટરીઓથી બદલો.
(+) અને (-) ટર્મિનલ્સની યોગ્ય દિશા તપાસો. રિચાર્જેબલ બેટરીઓની ભલામણ કરવામાં આવતી નથી. - શ્રેષ્ઠ કામગીરી માટે વાર્ષિક ધોરણે બેટરી બદલો.
ગુણવત્તાયુક્ત બેટરીનો ઉપયોગ કરો. જૂની અને નવી બેટરીઓનું મિશ્રણ કરશો નહીં. આલ્કલાઇન, સ્ટાન્ડર્ડ (કાર્બન-ઝીંક), અથવા રિચાર્જેબલ (નિકલ-એક્મિયમ) બેટરીઓનું મિશ્રણ કરશો નહીં.
FCC/IC સ્ટેટમેન્ટ
This equipment contains licence-exempt transmitter(s)/receiver(s) that comply with Part 15 of the FCC Rules, ICES-003 Class B specifications, and ISED Canada’s licence-exempt RSS(s). Operation is subject to the following two conditions:
- આ ઉપકરણ હાનિકારક હસ્તક્ષેપનું કારણ બની શકશે નહીં, અને.
- આ ઉપકરણે પ્રાપ્ત થયેલ કોઈપણ દખલને સ્વીકારવી આવશ્યક છે, જેમાં દખલગીરીનો સમાવેશ થાય છે જે અનિચ્છનીય કામગીરીનું કારણ બની શકે છે.
Changes or modifications not expressly approved by the party responsible for compliance could void the user’s authority to operate the equipment. This equipment complies with the RF exposure limits established by the FCC and ISED for an uncontrolled environment. Compliance with SAR requirements has been demonstrated through calculations, confirming that the RF exposure remains below the applicable threshold for use with 0 mm separation from the body.
ગ્રાહક આધાર
ઇન્ટેલિકોડ® કીપેડ
મદદ માટે, ફોન દ્વારા સંપર્ક કરો અથવા webસાઇટ
ચેટ: 1-800-354-3643
www.geniecompany.com
©2025 ધ જેની કંપની
વન ડોર ડ્રાઇવ, માઉન્ટ હોપ, OH 44660, યુએસએ
૧ વર્ષની વોરંટી, મુલાકાત લો www.geniecompany.com વિગતો માટે.
પેટ. www.geniecompany.com

દસ્તાવેજો / સંસાધનો
 |
GENIE KP2 યુનિવર્સલ ઇન્ટેલીકોડ કીપેડ [પીડીએફ] માલિકનું માર્ગદર્શિકા KP2, KP2 યુનિવર્સલ ઇન્ટેલિકોડ કીપેડ, યુનિવર્સલ ઇન્ટેલિકોડ કીપેડ, ઇન્ટેલિકોડ કીપેડ, કીપેડ |