GENIE KP2 Universal Intellicode Keypad

WARNING
|
|
|
|
|
MOVING DOOR CAN CAUSE SERIOUS INJURY OR DEATH.
|

KNOW BEFORE YOU BEGIN
- ‘Opener’ refers to the device mounted on the ceiling or wall near the garage door’s spring bar.
- Complete programming before mounting keypad.
- Keypad remains lit and active for 15 seconds after a successful PIN entry. Any button press will activate the opener during this time.
- Press the 7 & 9 keys at the same time to immediately end a sequence and turn the backlighting off.
- Model GK2-R holds 3 PINs total. Model GK2-P holds 6 PINs total.
PROGRAM PIN TO OPENER
- Remove battery tab from battery compartment.
- ON OPENER: Find button pad to begin programming mode.
- If you have a program (PRGM) or SET button (1), press and hold down until the LED turns blue, then release. The purple LED begins flashing.
- If you have a LEARN CODE button (2), press and hold down until the red LED begins flashing, then release.
NOTE: Programming window times out at 30 seconds.

- ON KEYPAD: Press and hold (STAR key) until green LED lights (@ 5 sec or less), then release. LED begins flashing.
- ON KEYPAD: Enter desired PIN (3-8 digits) and, with keypad at arms length away from opener, press UP/DOWN key once every two seconds until the opener operates. (Program window ends 15 seconds after last button press).
- Once backlighting turns OFF, TEST your PIN to complete setup.
- Programming a single garage door opener is complete. For additional openers, repeat above steps for each.
GENERAL OPERATION
- Enter current PIN of selected door.
- Press and release UP/DOWN key. Opener will operate.
MOUNTING THE KEYPAD
Keypad MUST be mounted within sight of the garage door (s) at least 5 feet above floor and clear of any moving door parts.
- Remove battery cover and batteries.
- Drill a 3/32” pilot hole for the top mounting screw.
- Install included screw into pilot hole, leaving 1/8” gap between the screw head and wall.
- Hook the slotted mount on back of keypad over the screw.

- Mark and drill a 3/32” pilot hole for the bottom screw and secure keypad to the wall. (Do not over-tighten).
- Reinstall batteries.

ADDITIONAL FEATURES & SETTINGS
Change an existing PIN:
- Enter current PIN of selected door.
- Press and hold (STAR key) until red LED flashes (@ 5 sec), then release.
- Enter NEW PIN for selected door (3-8 digits).
- Press and release (STAR key) one time. LED flashes two times to confirm.
- PIN has been changed and previous PIN will no longer operate the opener.
Set a temporary PIN:
- Enter current PIN of selected door.
- Press and hold the (STAR key) until green LED turns SOLID (@ 10 sec), then release.
- Enter TEMPORARY PIN (3-8 digits).
- Press and release (STAR key) one time. LED flashes two times to confirm.
- Temporary PIN is active until the existing PIN is used again.
Clear one PIN at a time:
- Press and hold (STAR key) until red LED flashes (@ 10 sec), then release.
- Enter the PIN you want to delete.
- Press and release (STAR key) one time. LED flashes two times to confirm.
- This PIN has been cleared from the keypad.
Clear all PINS and settings:
- Press and hold (STAR key) until red LED turns SOLID (@ 20 sec), then release. LED flashes two times to confirm.
- Keypad is reset to factory default.
1-Button close feature:
This feature works on openers made July 2025 or later. If UP/DOWN key is pressed when keypad backlights are off, any door that is not already at its down limit WILL CLOSE. Default setting is ON.
To turn feature ON/OFF for ALL doors, repeat this process:
- Press and hold the 1 & 9 keys at the same time until the blue LED flashes.
- If the LED flashes 4 times, the feature is off.
- If the LED flashes 2 times, the feature is on.
To turn ON/OFF BY PIN, repeat this process:
- Enter PIN, then press and release (STAR key) two times.
- If the LED flashes 4 times, the feature is off.
- If the LED flashes 2 times, the feature is on.
Lockout feature:
After 10 wrong PIN attempts in a row, the keypad locks for 5 minutes. To restore function, wait 5 minutes or remove and reinsert the batteries. Default setting is OFF.
To turn ON/OFF, repeat this process:
- Enter valid (non-temporary) PIN, then press and release the (STAR key) one time. Press and hold the 5 & 9 keys at the same time until blue LED flashes, then release.
- If the LED flashes 4 times, the feature is off.
- If the LED flashes 2 times, the feature is on.
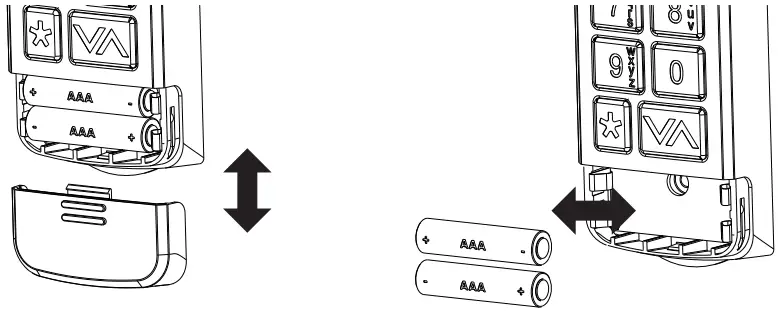
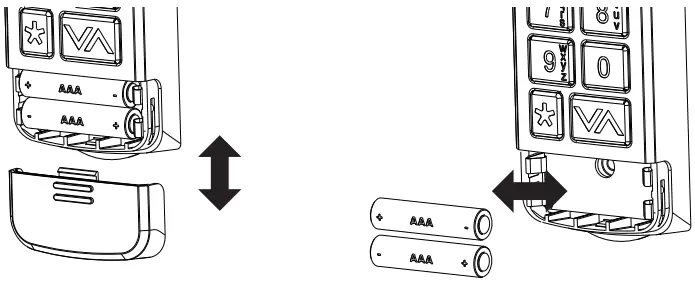
LOW BATTERY/BATTERY REPLACEMENT
A single red LED (or no backlighting) indicates batteries need to be replaced.
Programming will not be lost during battery change.
- Remove (2) AAA batteries and replace with new batteries of same type.
Check for proper direction of (+) and (-) terminals. Rechargeable batteries are NOT recommended. - Change batteries on a yearly basis for best performance.
Use quality batteries. Do not mix old and new battteries. Do not mix alkaline, standard (carbon-zinc), or rechargeable (nickel-acmium) batteries.
FCC/IC STATEMENT
This equipment contains licence-exempt transmitter(s)/receiver(s) that comply with Part 15 of the FCC Rules, ICES-003 Class B specifications, and ISED Canada’s licence-exempt RSS(s). Operation is subject to the following two conditions:
- this device may not cause harmful interference, and.
- this device must accept any interference received, including interference that may cause undesired operation.
Changes or modifications not expressly approved by the party responsible for compliance could void the user’s authority to operate the equipment. This equipment complies with the RF exposure limits established by the FCC and ISED for an uncontrolled environment. Compliance with SAR requirements has been demonstrated through calculations, confirming that the RF exposure remains below the applicable threshold for use with 0 mm separation from the body.
CUSTOMER SUPPORT
Intellicode® Keypad
For help, reach out by phone or website
Chat: 1-800-354-3643
www.geniecompany.com
©2025 The Genie Company
One Door Drive, Mt. Hope, OH 44660, USA
1-year warranty, visit www.geniecompany.com for details.
Pat. www.geniecompany.com

Documents / Resources
 |
GENIE KP2 Universal Intellicode Keypad [pdf] Owner's Manual KP2, KP2 Universal Intellicode Keypad, Universal Intellicode Keypad, Intellicode Keypad, Keypad |