![]() PandarView 2
PandarView 2
Point Cloud
Visualization Software
User Manual
PandarView 2 Point Cloud Visualization Software
www.hesaitech.com
 HESAI Wechat
http://weixin.qq.com/r/Fzns9IXEl9jorcGX92wF
Doc Version: PV2-en-230710
About This Manual
■ Using This Manual
- Make sure to read through this user manual before your first use and follow the instructions herein when you operate the product. Failure to comply with the instructions may result in product damage, property loss, personal injuries, and/or a breach of warranty.
- This user manual does not contain information on product certifications. Please check the certification marks on the product’s bottom plate and read through the corresponding certification warnings.
- If you incorporate this lidar product into your product(s), you are required to provide this user manual (or the means to access this user manual) to the intended users of your product(s)
- This lidar product is intended as a component of an end product. It shall be evaluated in end product according to relevant standards.
■ Access to This Manual
To obtain the latest version:
- Visit the Download page of Hesai’s official website: https://www.hesaitech.com/en/download
- Or contact your sales representative at Hesai
- Or contact Hesai’s technical support team: service@hesaitech.com
■ Technical Support
If your question is not addressed in this user manual, please contact us at:
service@hesaitech.com
www.hesaitech.com/en/support
https://github.com/HesaiTechnology (Please leave your questions under the corresponding GitHub projects.)
■ Legends
![]() Warnings: instructions that must be followed to ensure safe and proper use of the product.
Warnings: instructions that must be followed to ensure safe and proper use of the product.
![]() Notes: additional information that may be helpful.
Notes: additional information that may be helpful.
Introduction
PandarView 2 is a second-generation software that records and displays point cloud data from Hesai lidars, available in:
- 64-bit Windows 10
- Ubuntu 16.04/18.04/20.04
![]() If your computer uses AMD graphics card and runs on Ubuntu-20.04, please download the graphics driver that support Ubuntu-20.04 from AMD’s official website. For additional instructions, please contact Hesai technical support.
If your computer uses AMD graphics card and runs on Ubuntu-20.04, please download the graphics driver that support Ubuntu-20.04 from AMD’s official website. For additional instructions, please contact Hesai technical support.
This manual describes PandarView 2.0.101. Supported product models:
| Pandar40 Pandar40M Pandar40P Pandar64 |
Pandar128E3X | PandarQT QT128C2X |
PandarXT PandarXT-16 XT32M2X |
AT128E2X | FT120 |
Installation
Download the installation files from Hesai’s official website, or contact technical support: www.hesaitech.com/en/download
| System | Installation Files |
| Windows | PandarView_Release_Win64_V2.x.xx.msi |
| Ubuntu | PandarView_Release_Ubuntu_V2.x.xx.bin |
![]() In Ubuntu, run PandarView.sh in a file path that only contains ASCII characters.
In Ubuntu, run PandarView.sh in a file path that only contains ASCII characters.
The software interface is divided into four sections, as shown below (details may be different).
“About” in the menu bar shows the software version.
Check Live Point Cloud
To receive data on your PC, set the PC’s IP address to 192.168.1.100 and subnet mask to 255.255.255.0
| For Ubuntu: | For Windows: |
| Input this ifconfig command in the terminal: ~$ sudo ifconfig enp0s20f0u2 192.168.1.100 (replace enp0s20f0u2 with the local Ethernet port name) |
Open the Network Sharing Center, click on “Ethernet” In the “Ethernet Status” box, click on “Properties” Double-click on “Internet Protocol Version 4 (TCP/IPv4)” Configure the IP address to 192.168.1.100 and subnet mask to 255.255.255.0 |
3.1 Cybersecurity Configuration
For the product models supporting Cybersecurity, ![]() (Cybersecurity) will appear in the toolbar.
(Cybersecurity) will appear in the toolbar.
Users may select one of the three modes:
■ TLS Mode
In TLS Mode, PandarView 2 automatically retrieves the lidar unit’s correction files using PTCS (PTC over TLS) commands.
| Security page of web control | Turn ON the Cyber Security Master Switch. |
| Select TLS for PTC Connection. | |
| PandarView 2 | Select TLS for PTC Connection. |
| Click the “CA CRT” button and specify the file path of Hesai’s CA certificate chain (Hesai_Ca_Chain.crt). |
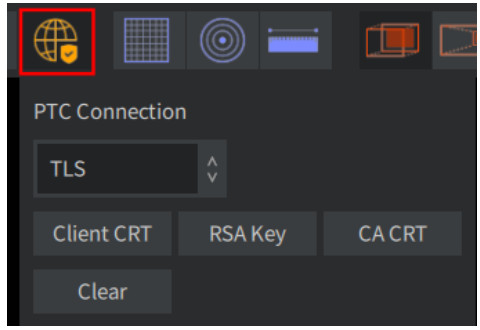
■ mTLS Mode
In mTLS Mode, PandarView 2 automatically retrieves the lidar unit’s correction files using PTCS commands.
| Security page of web control | Turn ON the Cyber Security Master Switch. |
| Select mTLS for PTC Connection; upload user CA certificate chain. | |
| PandarView 2 | Select mTLS for PTC Connection. |
| Click the “CA CRT” button; specify the file path of Hesai CA certificate chain (Hesai_Ca_Chain.crt). | |
| Click the “Client CRT” button; specify the file path of user end-entity certificate. | |
| Click the “RSA Key” button; specify the file path of the user private key (corresponding to user end-entity certificate). |
![]() The “Clear” button removes the specified file paths for CA CRT, Client CRT, and RSA Key.
The “Clear” button removes the specified file paths for CA CRT, Client CRT, and RSA Key.
■ Cybersecurity OFF
In this mode, PandarView 2 automatically retrieves the lidar unit’s correction files using PTC commands.
| Security page of web control | Turn OFF the Cyber Security Master Switch |
| PandarView 2 | Select Non-TLS for PTC Connection |
3.2 Receive Live Data
- Toolbar:
 (Listen Net)
 - In the pop-up dialog box:
| Product Model | Default |
| Host Address | Any |
| UDP Port | Should be the same as “Lidar Destination Port” in the Settings page of web control. 2368 by default. |
| PTC Port | Used for transmitting PTC commands. 9347 by default. |
| Multicast IP | In multicast mode, check the checkbox and specify a multicast group |
| IPv6 Domain | Only supported on certain product models |
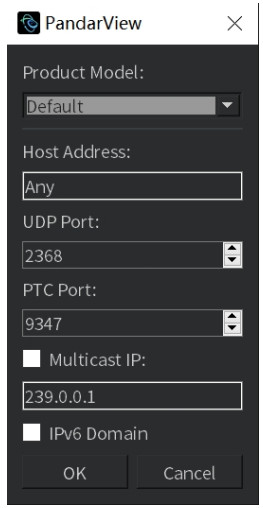
![]() While receiving live data:
While receiving live data:
- Users can export the angle correction file and the firing time correction file, see Section 5.1 (Point Cloud Correction).
 (Live Streaming) button in the console allows the minimum-latency streaming of live data.
![]()
3.3 Record Live Data
Click ![]() (Record) in the console and specify a file directory. Click “Save” to begin recording a .pcap file.
(Record) in the console and specify a file directory. Click “Save” to begin recording a .pcap file.
![]() When naming .pcap files in Ubuntu, include the filename extension (.pcap).
When naming .pcap files in Ubuntu, include the filename extension (.pcap).
Play Back Point Cloud
4.1 Open a .PCAP File
- Click
 (Open File) in the toolbar and select a .pcap file in the pop-up window.
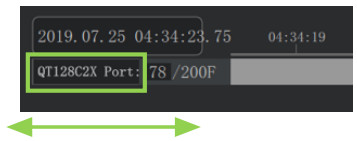
Alternatively, drag a .pcap file into PandarView 2. - When loading is complete, a point cloud track will appear in the console.

![]() Notes
Notes
- Only support the tcpdump pcap format.
- Only support one point cloud track at a time: when receiving live data or opening a new .pcap file, the previous track will be automatically deleted.
- Large .pcap files may take a while to load. While loading, click (Live Streaming) to play point cloud data at once.
- If the lidar product model and port number are not displayed in full, scroll the mouse wheel.
4.2 Play Control 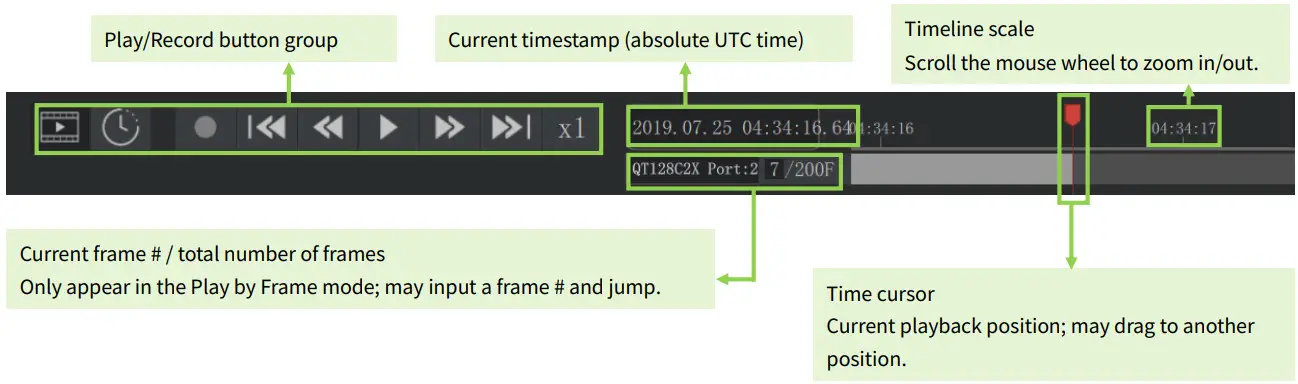
| Button | Description |
 |
Left: play by frame (default) Right: play by time |
 |
Jump to the beginning or the end of the file |
 |
Left: adjust the rewinding speed (1x, 1/2x, 1/4x, 1/8x, …, 1/64x) Right: adjust the forwarding speed (1x, 2x, 4x, 8x, …, 64x) |
 |
Left: after loading a file, click to play. Right: while playing a file, click to pause. |
 |
Display the current speed |
| While loading a file, click to play at once. (This button disappears when loading is complete.) When receiving live data, click to stream with minimum latency. |
Correction and Configuration
When checking live point cloud or playing back recorded point cloud, correction files and configuration files may be used.
5.1 Point Cloud Correction
| Angle Correction | Correct the azimuth and elevation data. See Section 1.3 (Channel Distribution) in the lidar user manual. |
| Firetime Correction | For certain product models: correct the azimuth of point cloud data according to the firing time of each channel. |
| Distance Correction | For certain product models: correct the distance data. |
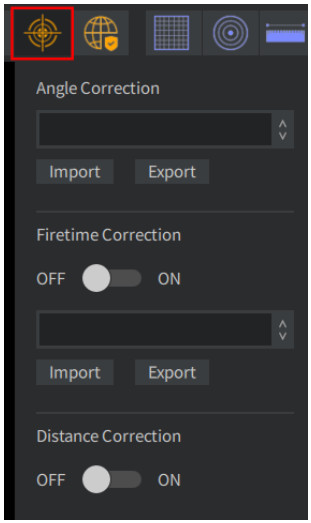
Click ![]() (Correction) in the toolbar:
(Correction) in the toolbar:
| Type of Correction | Description |
| Angle Correction | When checking live point cloud: • PandarView 2 automatically retrieves the correction file of this lidar unit. When playing back recorded point cloud: • PandarView 2 automatically uploads the general correction file for this product model. • For best display, click “Import” and select the correction file of this lidar unit. |
| Firetime Correction | QT128C2X: • When checking live point cloud: PandarView 2 automatically retrieves the correction file of this lidar unit; switch to ON and begin correction. • When playing back recorded point cloud: PandarView 2 automatically uploads a general correction file for this product model; switch to ON and begin correction. Other product models: • Switch to ON, click “Import” and select the correction file of this lidar unit. • If the lidar unit’s correction file is not available locally, switch to ON and select a general correction file for this product model in the drop-down menu. |
| Distance Correction | Switch to ON. |
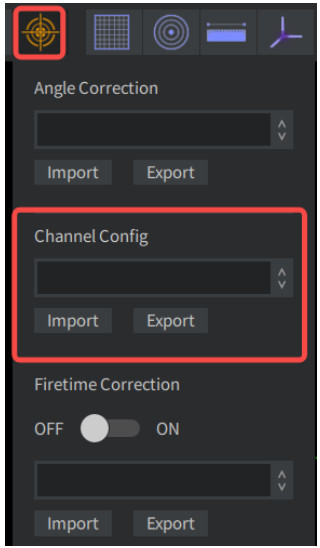
5.2 Channel Configuration
A channel configuration file selects a subset from all the available channels of a lidar, defines the number of blocks in a Point Cloud Data Packet, and specifies the channels to be stored in each block.
Only available for QT128C2X:
- When checking live point cloud: PandarView 2 automatically retrieves the channel configuration file of this lidar unit.
- When playing back recorded point cloud: click
 (Correction) in the toolbar, click “Import” in the Channel Config section, and select the channel configuration file of this lidar unit.
5.3 File Import and Export
File import
- When checking live point cloud, the “Export” button can be used to download the correction or configuration files of this lidar unit.
- When naming these files in Ubuntu, make sure to include the filename extension (.dat for the angle correction files of the AT family, and .csv for the others).
File export
- The imported correction or configuration files are added to the bottom of the drop-down menu.
- If you no longer need those files, you may delete them from the following path (effective after restarting PandarView 2): Documents\PandarViewDataFiles\csv
Other Features
6.1 Mouse Shortcuts
| Left-Button Drag | Rotate the point cloud |
| Right-Button Drag | Zoom in/out: dragging left for zooming out, and right for zooming in |
| Scroll the Wheel | Zoom in/out: scrolling down for zooming out, and up for zooming in |
| Press the Wheel and Drag | Pan the view |
| Shift & Left-Button Drag | Spin the point cloud around the viewing direction (the direction from the viewpoint to the origin of coordinates) |
| Shift & Right-Button Drag | Pan the view |
6.2 Point Cloud Tracks
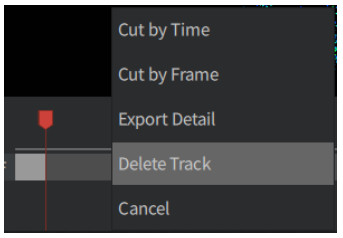
Right-click on a point cloud track:
| Cut by Time | Specify the starting/end timestamps, cut the current track, and save to a new .pcap file. |
| Cut by Frame | Specify the starting/end frames, cut the current track, and save to a new .pcap file. |
| Export Detail | After selecting an area of points (see Section 6.3 Toolbar – Point Selection and Data Table), specify the starting/end frames and export the corresponding point cloud data to .csv files. · Use · When naming these files in Ubuntu, make sure to include the filename extension (.csv). |
| Delete Track | Delete the current track. |
| Cancel | Close the right-click menu. |
6.3 Toolbar
If the PandarView 2 window is too narrow to display the toolbar in full, scroll the mouse wheel to view all the buttons.
■ Coordinate Grids, Coordinate System, and Distance Measurement 
| Button Name | Function |
| Cartesian | Show/hide the grids with 30 m spacing |
| Polar | Show/hide the equidistant circles with 10 m spacing |
| Ruler | Left-Button drag to measure the distance between two points |
| Coordinates | Show the rectangular coordinate system |
■ Projection Modes
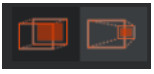
| Button Name | Function |
| Orthographic Projection | – |
| Perspective Projection | – |
■ Point of View and Spinning
| Button Name | Function |
| Front/Back/Left/Right/Top | – |
| Spin | Spin the viewing direction (the direction from the viewpoint to the origin of coordinates) around the Z-axis |
■ Channel Selection 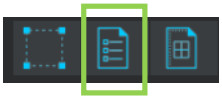
Click ![]() (Channels) to view or change the currently displayed channels.
(Channels) to view or change the currently displayed channels.
Display or hide channels
- Check/Uncheck the boxes on the left of each channel to display/hide its point cloud data.
- By default, all channels are displayed.
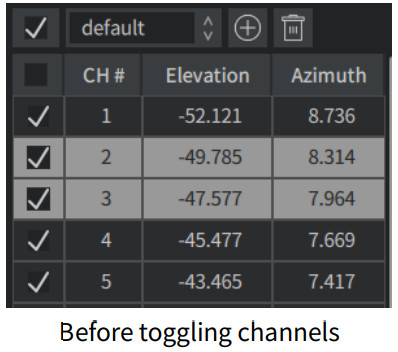
Select and toggle channels
- Click on a channel (excluding the area of its checkbox) to select and highlight this channel.
- Hold down Shift while clicking to select multiple neighboring channels.
- Hold down Ctrl while clicking to select multiple separate channels.
- Click
 (Toggle Selected Channels) in the top-left corner to toggle the selected channels between checked and unchecked.
Save channel groups
- Click
 to save the checked channels as a configuration and name it.
 - Previously saved configurations exist after restarting PandarView 2 and can be selected in the
 drop-down menu.
 - To delete the currently selected configuration, click
 .
.
■ Point Selection and Data Table
Click ![]() (Select) and drag the mouse to highlight an area of points.
(Select) and drag the mouse to highlight an area of points.
Click ![]() (Spread Sheet) to view the data of the highlighted points, as shown below.
(Spread Sheet) to view the data of the highlighted points, as shown below. 
When double-clicking a field heading multiple times, the following actions are performed one at a time:
- Adapt the column width to the field name
(Alternatively, place the mouse cursor between two headings so that the cursor becomes a left-right arrow; drag the mouse to adjust the column width.) - Sort this field by ascending order. An up arrow
 will appear on the right.
 - Sort this field by descending order. A down arrow
 will appear on the right.
 - Cancel the sort.
The button group on the top-left corner:

| Select All | Click to display the data of all points in this frame. Click again to display only the data of the selected points. |
| Export Points Info | Export the current data table to a .csv file. |
| Save Column Order | Save the current field order. This setting remains effective after restarting PandarView 2. |
The fields in the data table are defined below:
| Ch | Channel # |
| AziCorr | Azimuth corrected by the angle correction file |
| Dist | Distance |
| Rfl | Reflectivity |
| Azi | Azimuth (current reference angle of the rotor) |
| Ele | Elevation |
| t | Timestamp |
| Field | For AT family product models: the Mirror Surface on which this measurement is made. Fields 1/2/3 correspond to Mirror Surfaces 0/1/2, respectively. |
| AziState | Azimuth State Used for calculating the firing time offset of each channel; only for certain lidar models. |
| confidence | Confidence |
■ Other Display Controls 
| Button Name | Function |
| Filter | Define the range of point cloud display. |
| Laser Tracing | Show the laser beams of this lidar unit. |
| State Info | Display status information at the bottom-left corner of the point cloud display area, such as Motor Speed, Return Mode, and the name of the .PCAP file. |
| Dump PCD | Dump the current frame into a .pcd (Point Cloud Data) file and specify the file location. |
| Color Map | Set the color scheme of point cloud display. |
| Point Size | Set the display size of data points. |
| Return Mode | Select the returns to be displayed. |
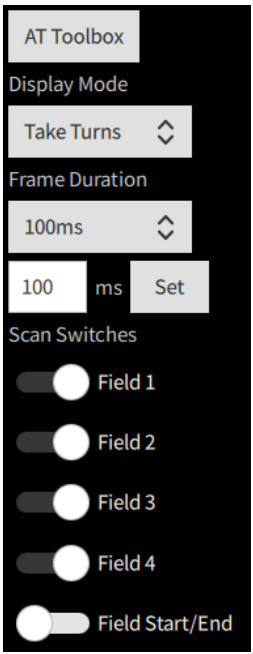
■ AT Family Toolbox
For product models that belong the AT family. 
| Display Mode | Take Turns (default): the measurements from Mirror Surfaces 0/1/2 are output to Frames 0/1/2, respectively. The frames are not stitched. Combination: the measurements from Mirror Surfaces 0/1/2 are output to one frame. That is, three frames are stitched as one. Tradition: the measurements from Mirror Surfaces 0/1/2 are output to one frame according to their encoder angles in Point Cloud Data Packets. No angle correction is performed. |
| Frame Duration | Time window for point cloud display Under play-by-time mode (see Section 4.2 Play Control), all the data points within this time window will be displayed. |
| Scan Switches | To display or hide the measurements from each mirror surface. Fields 1/2/3 correspond to Mirror Surfaces 0/1/2, respectively. Field 4 is not used. |
| Field Start/End | Not yet supported |
Troubleshooting
In case the following procedures cannot solve the problem, please contact Hesai technical support.
| Symptoms | Points to Check |
| Lidar motor is running, but no output data is received, neither on Wireshark nor on PandarView. | Verify that: · Ethernet cable is properly connected (by unplugging and plugging again); · Lidar’s Destination IP is correctly set on the Settings page of web control; · horizontal FOV is properly set on the Azimuth FOV page of web control; · firmware version of the sensor is correctly shown on the Upgrade page of web control; · Lidar is emitting laser light. This can be checked by using an infrared camera, an infrared sensor card, or a phone camera without infrared filter. Power on again to check if the symptom persists. |
| Can receive data on Wireshark but not on PandarView. | Verify that: · the Lidar Destination Port is set correctly on the Settings page of web control · PC’s firewall is disabled, or that PandarView is added to the firewall exceptions · if VLAN is enabled, the PC’s VLAN ID is the same with the lidar’s · the latest PandarView version (see the Download page of Hesai’s official website or contact Hesai technical support) is installed on the PC Power on again to check if the symptom persists. |
Appendix I Legal Notice
Copyright 2021 by Hesai Technology. All rights reserved. Use or reproduction of this manual in parts or its entirety without the authorization of Hesai is prohibited.
Hesai Technology makes no representations or warranties, either expressed or implied, with respect to the contents hereof and specifically disclaims any warranties, merchantability, or fitness for any particular purpose. Further, Hesai Technology reserves the right to revise this publication and to make changes from time to time in the contents hereof without obligation to notify any person of such revision or changes.
HESAI and HESAI logo are registered trademarks of Hesai Technology. All other trademarks, service marks, and company names in this manual or on Hesai’s official website are properties of their respective owners.
The software included in this product contains copyright that is registered under Hesai Technology. Any third party is not permitted, except as expressly permitted by licensor or expressly required by applicable law, to decompile, reverse engineer, disassemble, modify, rent, lease, loan, distribute, sublicense, create derivative works based on the whole or any part of the software.
Hesai Product Warranty Service Manual is on the Warranty Policy page of Hesai’s official website: https://www.hesaitech.com/en/legal/warranty
Hesai Technology Co., Ltd.
Phone: +86 400 805 1233
Website: www.hesaitech.com
Address: Building L2, Hongqiao World Centre, Shanghai, China
Business Email: info@hesaitech.com
Service Email: service@hesaitech.com