Bastl Instruments v1.1 MIDI Looping მოწყობილობის მომხმარებლის სახელმძღვანელო
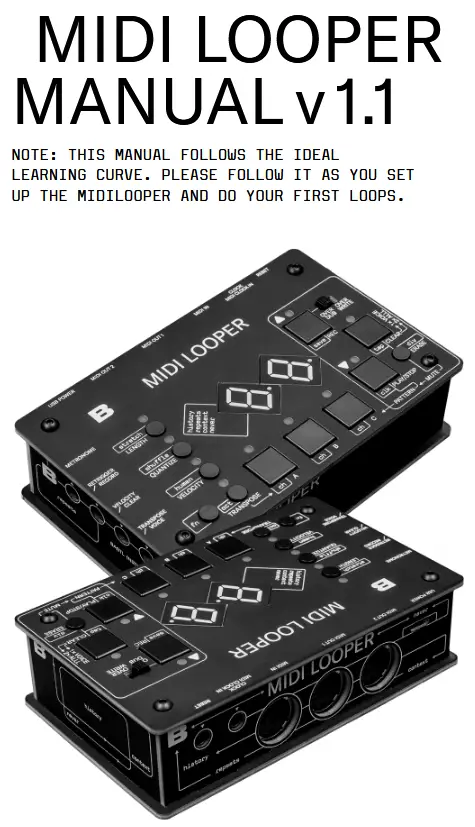
შესავალი
Midilooper არის მოწყობილობა, რომელიც უსმენს MIDI შეტყობინებებს (აკონტროლებს ინფორმაციას ნოტების, დინამიკის და სხვა პარამეტრების შესახებ) და ამუშავებს მათ ისევე, როგორც აუდიო ლუპერი ამუშავებს აუდიოს ფრაგმენტებს. თუმცა, MIDI შეტყობინებების ციკლები რჩება მართვის დომენში, რაც ნიშნავს, რომ მათზე შეიძლება მოხდეს სხვა მრავალი პროცესი - ტემბრის მოდულაცია, კონვერტის რეგულირება და ა.შ.
Since looping is one of the fastest and most intuitive ways of music-making, we made the controls of the Midilooper quickly accessible to encourage uninterrupted flow.
Midilooper can be synchronized either by MIDI clock or analog clock, or it can also run on its own clock (tap tempo/free running).
Midilooper-ს აქვს 3 ხმა, რომელთაგან თითოეულის მინიჭება შესაძლებელია სხვადასხვა MIDI არხზე, რაც საშუალებას აძლევს მას აკონტროლოს და გაიმეოროს 3 სხვადასხვა მოწყობილობა. თითოეული ხმის ინდივიდუალურად ჩაწერა, დადუმება, ოვერდუბირება ან გასუფთავება შესაძლებელია.
Midilooper also offers some basic processing of the recorded information: transposition, velocity locking and shifting, quantization, shuffle, humanization (random variations of velocity), adjusting the length of the loop, or doubling and halving of the playback speed.
Midilooper also offers some basic processing of the recorded information: transposition, velocity locking and shifting, quantization, shuffle, humanization (random variations of velocity), adjusting the length of the loop, or doubling and halving of the playback speed.
MIDI LOOPER V 1.0 ამოიცნობს და იწერს შემდეგი ტიპის შეტყობინებებს:

კითხულობს და აანალიზებს რეალურ დროში გაგზავნილ შეტყობინებებს (მათ არ აქვთ MIDI არხი)
დაყენება
Midilooper უსმენს ყველა MIDI არხს და გადაამისამართებს MIDI შეტყობინებებს მხოლოდ იმ MIDI არხზე, რომელიც მინიჭებულია არჩეულ ხმაზე. ხმის ასარჩევად გამოიყენეთ ღილაკები A, B, C.

საწყისი კავშირი
- Connect any keyboard or controller that outputs MIDI to the MIDI Input of the Midilooper.
- Connect the MIDI Out of Midilooper to any synth or sound module that receives MIDI.
- (optional) Connect MIDI Out 2 of the Midilooper to another synth
- Connect USB power to Midilooper
რჩევა: იმის სანახავად, იღებთ თუ არა MIDI ინფორმაციას, ეკრანზე პირველი წერტილი ციმციმებს (მხოლოდ მაშინ, როდესაც პლეერი გაჩერებულია).

MIDI არხების დაყენება
You should know
In button combinations these buttons act as arrows:
REC = UP
PLAY/STOP = DOWN
Voice buttons A, B, and C select the voice. Select voice A by pressing the button and set up its output MIDI channel by holding FN+A+UP/DOWN. The display will show the MIDI channel number. Set the MIDI input channel on your synth to the same channel. If done correctly, playing notes on your keyboard should play these notes on your synth. If it does not, check the connections, power and MIDI channel settings on both the Midilooper, and your synth. Follow the same procedure for setting up voice B and C.
რჩევა: ამ ეტაპზე შეიძლება ასევე დაგჭირდეთ თქვენს ვოიკებს სტატიკური ოქტავის ოფსეტის დამატება (თითოეული სინთეზატორის დაკვრა შეიძლება სხვადასხვა ოქტავაში გსურდეთ). ამისათვის დააჭირეთ FN+TRANSPOSE+VOICE+UP/DOWN
Getting MIDI feedback?
MIDI feedback can occur in some synths when using MIDI In and MIDI Out on the synth. Try disabling MIDI Thru and Local Control on the synth. In case you cannot or don’t want to do some of these you can activate the MIDI feedback filter on the Midilooper. While selecting the MIDI channel on the voice that is feedbacking, press the CLEAR button. This will turn on the MIDI FEEDBACK FILTER or in other words: disable the live playback on that particular channel, and only looped material will play back. Changing to any other MIDI channel will reset this feature to its initial off state.

დაუკავშირდით და აირჩიეთ თქვენი საათის წყარო
There are several options of clocking the Midilooper.
You can select the clock source by FN+PLAY/STOP. The selection cycles in the following order:
- MIDI Clock on MIDI Input (display arrow pointing to MIDI In)
- Analog clock on Clock Input (REC LED On)*
- MIDI Clock on Clock Input (REC LED blinking) – you might need MIDI to mini jack adaptor to use this option**
- Tap tempo (Clear LED On) – tempo set by FN+CLEAR = TAP
- Free running (Clear LED blinking) – no clock needed! The tempo is set by the length of the initial recording (as with audio loopers)
- USB Midi – display says UB and LENGTH Led lights up
* If you are using an analog clock, you might want to adjust the DIVIDER.
** Beware that there are incompatible versions of the standard MIDI connector (5pin DIN) to 3,5mm (⅛ inch) TRS MIDI jacks adapters on the market. The variants developed during a period before standardisation of the minijack MIDI (around mid 2018). We comply with the standard specified by midi.org.
რჩევა: იმის სანახავად, აქტიურია თუ არა თქვენი საათი, შეგიძლიათ დააკვირდეთ ეკრანზე მეორე წერტილს, სანამ პლეერი გაჩერებულია.
დამატებითი კავშირები
Metronome Out – headphones metronome output.
გადატვირთვა – makes the Midilooper go to the first step.
CVs or Pedals – 3 jack inputs which can be either used as CV inputs or as pedal inputs to control the Midilooper interface. The CVs can influence one, two or all voices.
ხმოვანი სიგნალისთვის CV აქტიურია თუ არა, 5 წამის განმავლობაში დააჭირეთ ხმოვან ღილაკს და შემდეგ გამოიყენეთ:
QUANTIZE button to activate the RETRIGGER
VELOCITY button to activate VELOCITY CV
TRANSPOSE button to active TRANSPOSE CV
თუ არცერთი ხმა არ არის დაყენებული CV-ის მისაღებად ამ კონკრეტულ ჯეკზე, ჯეკი იმოქმედებს როგორც პედლის შემავალი სიგნალი.
RETRIGGER input will act as RECORD button
VELOCITY input will act as CLEAR button
TRANSPOSE input will cycle thru the voices
TIP: YOU CAN CONNECT ANY SUSTAIN TYPE PEDAL TO CONTROL THE RECORD BUTTON, CLEAR BUTTON OR THE VOICE SELECTION. YOU MIGHT NEED TO USE AN ADAPTER TO MAKE IT 3.5MM ( ”) INSTEAD OF THE MORE STANDARD 6.3MM (¼”).THE INPUTS RESPOND TO A CONTACT BETWEEN THE TIP AND THE SLEEVE. YOU CAN ALSO BUILD YOUR OWN PEDAL BY PUTTING ANY BUTTON CONTACT BETWEEN THE TIP AND THE SLEEVE OF THE JACK CONNECTOR. IT ONLY DETECTS TIP-SLEEVE CONTACT.
Connect Midilooper to your computer with a USB cable and look for it in your Midi devices. It is a class compliant USB Midi device so it will not need drivers on most computers. Use USB as input for the Midilooper for looping, use it to sync the Midilooper.
Midilooper also mirrors its output to USB so you can play your software synths.
შენიშვნა: MIDILOOPER არ არის USB ჰოსტი, თქვენ არ შეგიძლიათ USB MIDI კონტროლერის MIDILOOPER-ში შეერთება. USB MIDI ნიშნავს, რომ MIDILOOPER თქვენს კომპიუტერში გამოჩნდება, როგორც MIDI მოწყობილობა.

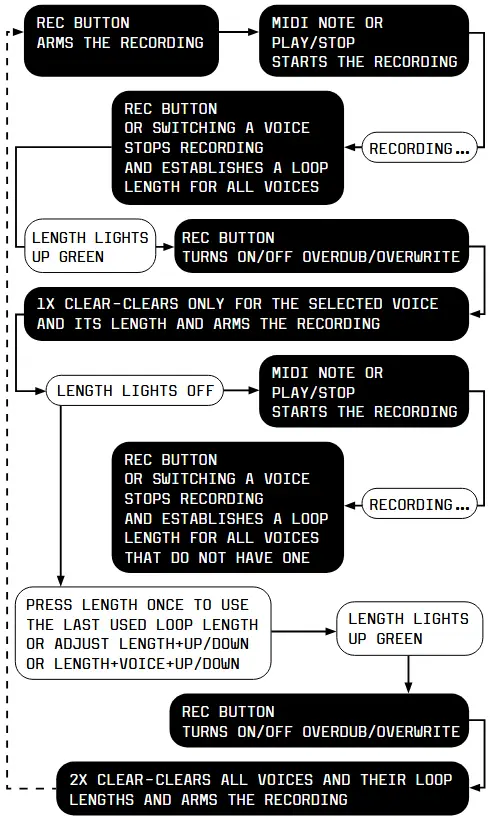
ციკლი
ჩაწერის საწყისი ციკლი
Press the RECORD button to “arm” the recording. The recording will start with the first received MIDI Note or as soon as you press the PLAY/STOP button.
To finish the loop press the RECORD button again at the end of the phrase. Now the LENGTH LED will light up green to indicate you have established a loop length. The length establishes itself automatically for all the voices.
You can change the length for each voice individually, or use the CLEAR function to establish the length by recording (see further).
გადაწერა / გადაწერა
საწყისი ჩაწერის დასრულების შემდეგ, შეგიძლიათ შეცვალოთ ხმა და ჩაწეროთ ციკლი სხვა ინსტრუმენტისთვის, ან შეგიძლიათ დაამატოთ ფენები იმავე ხმას. OVERDUB რეჟიმში ჩამრთველით ჩაწერა გააგრძელებს ახალი ფენების დამატებას. თუმცა, OVERWRITE რეჟიმში, თავდაპირველად ჩაწერილი მასალა წაიშლება, როგორც კი მინიმუმ ერთი ნოტი შეინარჩუნებს და ჩაიწერება.
წაშლა
ჩაწერილი ინფორმაციის წასაშლელად დაკვრის დროს გამოიყენეთ ERASE ღილაკი, მხოლოდ მაშინ, როდესაც ERASE ღილაკს დაჭერა გეჭირებათ. მუშაობს არჩეული ხმისთვის.
ციკლის გასუფთავება და ახლის შექმნა
არჩეული ხმის ციკლის გასასუფთავებლად ერთხელ დააჭირეთ CLEAR ღილაკს. ეს წაშლის მთელ ჩაწერილ მასალას და ციკლის ხანგრძლივობასაც გადააყენებს. გასუფთავების ოპერაცია ასევე „ჩართავს“ ჩანაწერს.
ორჯერ დააწკაპუნეთ CLEAR ღილაკზე ყველა ხმის გასასუფთავებლად, ციკლის სიგრძის გადასაყენებლად, პლეერის შესაჩერებლად და ჩანაწერის ჩასართავად. ეს მაკრო ერთი ჟესტით მოამზადებს Midilooper-ს ახალი ციკლისთვის.
ციკლის დიაგრამა
დადუმება
ხმების გამორთვისა და ჩასართავად დააჭირეთ ღილაკს CLEAR და შემდეგ დააჭირეთ თითოეულ ხმოვან ღილაკს.
შაბლონის შერჩევა
სამივე ხმის ჩაწერილი ციკლები წარმოადგენს ნიმუშს. 3 სხვადასხვა ნიმუშს შორის გადასასვლელად, დააჭირეთ დაკვრის ღილაკს და დააჭირეთ ხმის ღილაკს სამი ნიმუშიდან ერთ-ერთის ასარჩევად. არსებობს სამი ნიმუშის ოთხი ჯგუფი და სხვადასხვა ნიმუშთა ჯგუფზე წვდომისთვის დააჭირეთ ოთხი პატარა ღილაკიდან ერთ-ერთს (LENGTH, QUANTIZE, VELOCITY, TRANSPOSE) და ამავდროულად დააჭირეთ დაკვრის ღილაკს.

შენახვის ნიმუშები
ყველა შაბლონის შესანახად დააჭირეთ FN+REC. შაბლონები ინახება შემდეგი პარამეტრებით: კვანტიზაცია, არევა, ჰუმანიზაცია, სიჩქარე, სიგრძე, გაჭიმვა. ყველა სხვა გლობალური პარამეტრი ავტომატურად ინახება (საათის შერჩევა, MIDI არხები და ა.შ.).
გაუქმება
CLEAR-ისა და REC-ის დაჭერით გადართვა ხდება UNdo-სა და REdo-ს შორის. შესაძლოა შეცდომები დაუშვათ და თუ ასე მოხდა, არსებობს Undo ფუნქცია, რომელიც გიშველით. Undo-ს გამოყენებით უკან აბრუნებს ბოლო მოქმედებას. იქნება ეს ჩაწერა, წაშლა თუ წაშლა. REdo უკან აბრუნებს ბოლო UND-ს, რათა თქვენც შეძლოთ ამ ფუნქციის უფრო კრეატიულად გამოყენება. მაგალითად,ampახალი ოვერდაბის ფენის დასამატებლად, წაშალეთ იგი და ხელახლა დაამატეთ.
მარყუჟების მოდიფიკაცია
სიგრძე
The LENGTH of your loop can be changed either globally: LENGTH+UP/DOWN or per voice: LENGTH+VOICE+UP/DOWN. The display will show how long the loop is (in beats). Adjusting Length will change in increments of 4 beats 1 bar.
To make finer increments TAP and HOLD LENGHT + UP/DOWN to change the Length in increments of +/- 1.
საწყისი ციკლის ჩაწერა ყოველთვის კვანტიზაციას უკეთებს ციკლის სიგრძეს ზოლამდე (4 დარტყმა). ჩაწერილი ციკლის სიგრძე შეიძლება იყოს 256 დარტყმაზე მეტი. მხოლოდ ეკრანზე არ შეიძლება ამაზე მეტი რიცხვის ჩვენება. LENGTH-ზე დაჭერით საწყისი ციკლის დამყარების გარეშე (LENGTH ნათურა გამორთულია) აიღებს ბოლოს გამოყენებულ სიგრძეს და დააყენებთ მას.

QUANTIZE
Quantize თქვენს ჩაწერილ მასალას ბადესთან ასწორებს. ჩართეთ ან გამორთეთ ის QUANTIZE ღილაკზე ერთი დაჭერით.
The amount of QUANTIZE can be changed either globally: QUANTIZE+UP/DOWN
or per voice: QUANTIZE+VOICE+UP/DOWN.
The number on the display represents the type of grid to which the recorded material will be quantized.

სიჩქარე
Activating VELOCITY will filter the velocity of all recorded notes and make it a static value.
The value of VELOCITY can be changed either globally: VELOCITY+UP/DOWN,
or per voice: VELOCITY+VOICE+UP/DOWN.
Tip: If you go with velocity below “00” you will get to “NO” for “normal” or “no-change” of velocity. This way, only certain voices can be affected by VELOCITY.
TRANSPOSE
In Transpose mode, the recorded material can be transposed via live input on your keyboard. The Transpose mode is accessed by pressing the TRANSPOSE button and exited by pressing any of the voice buttons.
To select which voices are affected by the Transpose mode hold down TRANSPOSE and press the voice buttons to activate/ deactivate its effect per voice.
Transposition will apply relatively to a root note. To select the root note, hold the TRANSPOSE button and play a MIDI Note via the MIDI Input (DOTS will light up on the display to indicate that the root note has been set).
When the root note has been selected, pressing notes on the keyboard will be transposing recorded material for the selected voices relative to the root note. The last pressed note will stay in effect.
Exiting the Transpose mode will remove the transposition but the root note will be remembered.
შენიშვნა: ტრანსპოზიციის რეჟიმის ასამოქმედებლად, საჭიროა მინიმუმ ერთი ხმის გააქტიურება და ძირითადი ნოტის არჩევა.
გაჭიმვა
Stretch can make the recorded loop play at quarter, third, half, double, triple or quadruple speed.
Press: FN+LENGTH+UP/DOWN to change the stretch.
It applies only to the selected voice and it will become active at the moment you release the buttons.
SHUFFLE
Shuffle-ი გარკვეულ მე-16 ნოტებს სვინგის ეფექტის მისაღწევად შეფერხებებს უმატებს. არევის რაოდენობის დასარეგულირებლად დააჭირეთ: FN+QUANTIZE+UP/DOWN. დადებითი მნიშვნელობები ყოველ მეორე მე-16 ნოტს გარკვეული პროცენტით აფერხებს.tage to achieve a swing effect. Negative values add respective amounts of random timing delays to all sent MIDI messages to achieve a more human timing feel.
It applies only to the selected voice and is rendered after the Quantize.
ჰუმანიზაცია
ჰუმანიზაცია შემთხვევით ცვლის დაკრული MIDI ნოტების სიჩქარეს. შეასრულეთ: FN+VELOCITY+UP/DOWN ჰუმანიზაციის სხვადასხვა დონის დასაყენებლად.
The higher the amount, the more the VELOCITY gets randomly affected.
It applies only to the selected voice and is rendered after the Quantize.
ოქტავე
You might also want to add a static octave offset to your voices. Each synth can play in a different octave, or you might want to change this performatively.
Perform: FN+TRANSPOSE+VOICE+UP/DOWN to change the Octave offset per voice.
გარე კონტროლი
RETRIGGER
Retrigger შეყვანა გადატვირთავს კონვერტებს Note Off-ისა და Note On-ის თანმიმდევრული გაგზავნით ხანგრძლივი ნოტებისთვის და მოკლე Note On-ისა და Note Off-ის გაგზავნით ლეგატოში დაკრული ნოტების ბოლო ნაკრებისთვის. ეს ეხება ყველა ნოტს, რომელიც ლეგატოში შესრულდა მათი გაშვების შემდეგაც კი. „legato-ში დაკრული“ ნიშნავს, რომ სანამ ერთი ნოტის ბოლოს მეორის დასაწყისს გადაფარავთ, ან სანამ ყველა ნოტს არ გაუშვებთ, Midilooper დაიმახსოვრებს ყველა ამ ნოტს, როგორც ლეგატოში დაკრულს. მარტივად რომ ვთქვათ, თუ დაუკრავთ და გაუშვებთ აკორდს და შემდეგ გამოიყენებთ Retrigger-ს - ეს ნოტები ხელახლა ჩაირთვება. Retrigger-ის გამოყენება შესაძლებელია ერთ, ორ ან ყველა ხმაზე. იხილეთ დამატებითი კავშირები CV შეყვანების მინიჭების შესახებ.
VELOCITY CV
The Velocity CV input adds to the Velocity value of the live-played, recorder or retriggered notes. This can be used in conjunction with the Velocity feature or simply to add accents to certain notes. The Velocity CV can be applied to one, two, or all voices.
See Further Connections on how to assign the CV inputs.
CV-ის ტრანსპოზიცია
The Transpose CV input adds to the Note value of the recorded material. The input is scaled volt per octave. This can be used in conjunction with the Transpose or Octave feature.
The Transpose CV can be applied to one, two, or all voices.
See Further Connections on how to assign the CV inputs.
გადატვირთვა
გადატვირთვის შეყვანა Midilooper-ს პირველ ნაბიჯზე გადაიყვანს. თუმცა, ის ნაბიჯს არ დაუკრავს. პირველ ნაბიჯს მხოლოდ არჩეული საათის წყაროს საათი დაუკრავს.
ᲒᲐᲛᲧᲝᲤᲘ
ეს პარამეტრი საშუალებას გაძლევთ გაზარდოთ/შეამციროთ შემავალი ტემპი ანალოგური საათის შეყვანიდან. გამყოფის შესაცვლელად დააჭირეთ FN+ERASE+UP/DOWN-ს. ყველაზე გავრცელებული ტაქტი ყოველი მე-16 ნოტია, თუმცა, ის ასევე შეიძლება იყოს უფრო სწრაფი, როგორიცაა 32-ე ნოტი, ან უფრო ნელი, როგორიცაა მე-8 ან მე-4 ნოტი. ეკრანზე გამოჩნდება არჩეული რიცხვი. როდესაც არჩეულია „01“, დამკვრელი წინ წაიწევს მხოლოდ ანალოგური საათის იმპულსების მიხედვით. გამოიყენეთ ეს პარამეტრი, როდესაც არარეგულარულ ტაქტიკასთან მუშაობთ.

შენიშვნა: ანალოგური საათი შინაგანად გაუმჯობესებულია MIDI სიხშირემდე (24 PPQN = იმპულსი კვარტალში) და გამყოფის დაყენება კიდევ უფრო მეტ გავლენას მოახდენს კვანტიზაციისა და სხვა დროზე დაფუძნებული პარამეტრების ქცევაზე.
დამატებითი ინფორმაციისთვის იხილეთ „დაკავშირება“ და აირჩიეთ საათის წყარო.
პედლის კონტროლი
The user interface can be controlled by foot pedals.
See Further Connections on how to use external pedals.
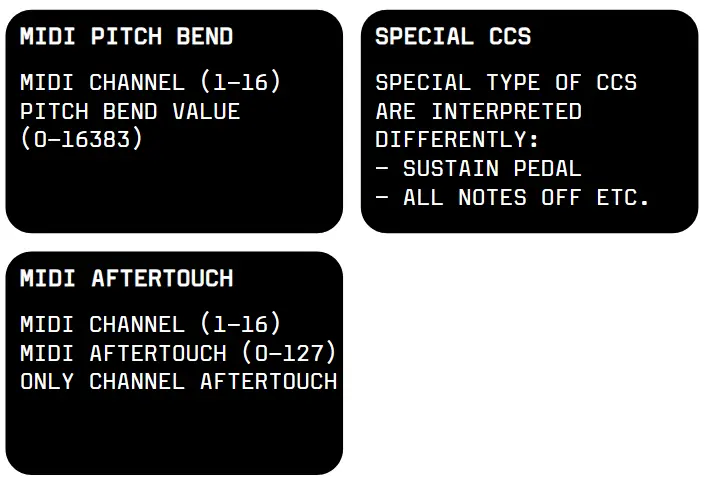
მარყუჟული CC-ები და PITCH BEND და AFTERTOUCH
Control Change and Pitch Bend and Aftertouch (channel) messages can be recorded and looped as well. As with MIDI Notes, the Midilooper will listen to these on all channels and forward them / play them back only on the channels assigned to its voices. The overdub/overwrite mode does not apply to these messages.
Once the first CC of a certain number is received, the Midilooper will remember when it was tweaked, and it will start recording the loop for this CC number. Once it finishes the loop and comes to the same position in the loop as the first CC of that number, it will stop recording the CC and will start the playback of the recorded values.
After that point, any newly arriving CC will act as the first CC and will start the recording until a full loop is reached.
ეს პარალელურად ვრცელდება ყველა CC ნომერზე (გარდა სპეციალური CC-ებისა: sustain pedal, all notes off და ა.შ.).
რჩევა: დაკვრა/გაჩერება+გასუფთავება = მხოლოდ არჩეული ხმის CCS-ების გასუფთავება.
Pitch Bend-ისა და Aftertouch-ის ჩაწერის ლოგიკა იგივეა, რაც CC-ების.
პროგრამული უზრუნველყოფის განახლება
The firmware version is shown on the display in two following frames when you start up the device.
If shown as F1 and then 0.0 read it as Firmware 1.0.0
The latest firmware can be found here:
https://bastl-instruments.github.io/midilooper/
პროგრამული უზრუნველყოფის განახლებისთვის მიჰყევით ამ პროცედურას:
- Hold down the Velocity button while connecting the Midilooper to your computer via USB
- The display shows “UP” as for firmware update mode, and MIDILOOPER will show up as an external DISC on your computer (mass storage device)
- ჩამოტვირთეთ უახლესი firmware file
(file სახელი midilooper_mass_storage.uf2) - დააკოპირეთ ეს file თქვენს კომპიუტერზე არსებულ MIDILOOPER დისკზე (Velocity LED დაიწყებს ციმციმს წარმატების დასადასტურებლად)
- Safely remove (eject) the MIDILOOPER disc from your computer, but do NOT disconnect the USB cable!
- Press the Velocity Button to start the firmware update (the LEDs around the Velocity button will blink, and the device will start up with the new firmware – check the firmware version on the display on startup)
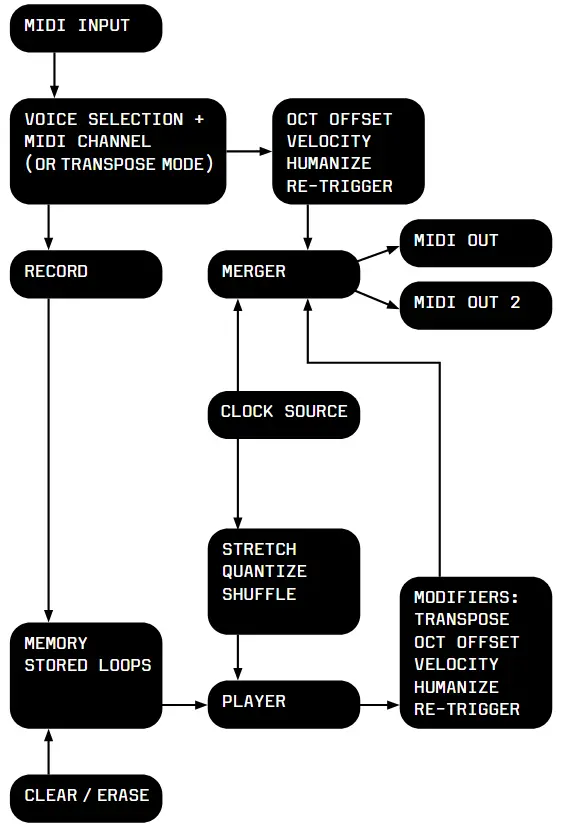
MIDI იმპლემენტაციის სქემა
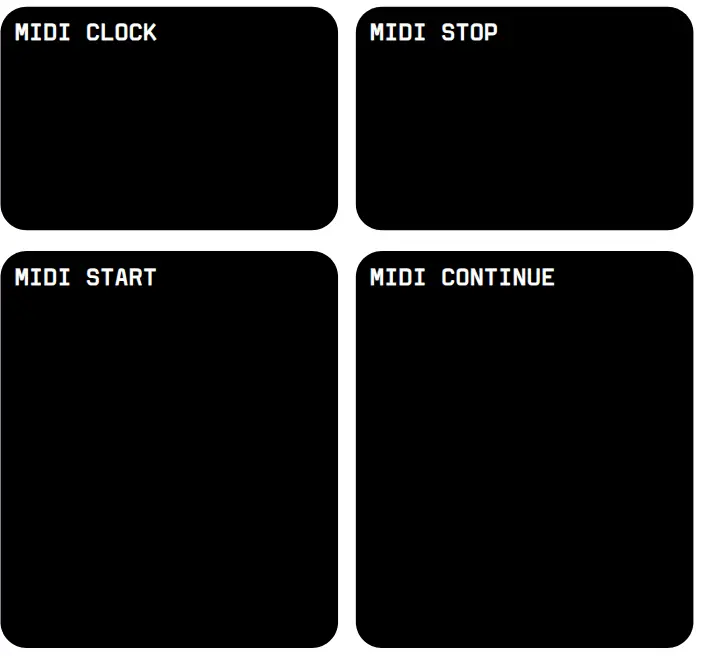
იღებს
On all channels:
Note On, Note Off
მოედანი ბენდი
CC (64=sustain)
Channel mode messages:
ყველა შენიშვნა გამორთულია
MIDI Real Time Messages:
Clock, Start, Stop, Continue
გადაცემები
On selected channels:
Note On, Note Off
მოედანი ბენდი
CC
MIDI Real Time Messages:
Clock, Start, Stop, Continue
MIDI THRU
MIDI რეალურ დროში შეტყობინებების MIDI მეშვეობით – მხოლოდ მაშინ, როდესაც საათის წყაროდ არჩეულია MIDI საათი.
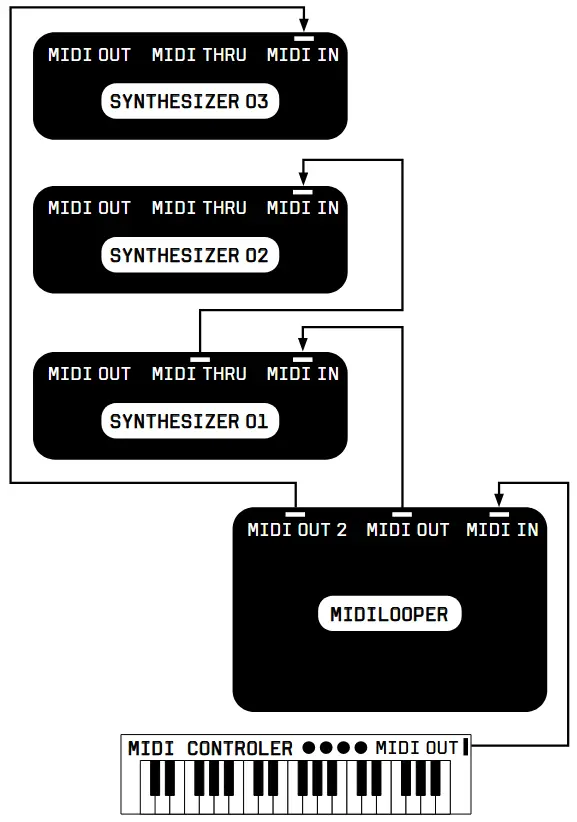
SETUP EXAMPLE
SETUP EXAMPLE 01
NO CLOCK SOURCE – FREE RUNNING MODE
LOOPING MIDI FROM A MIDI CONTROLLER
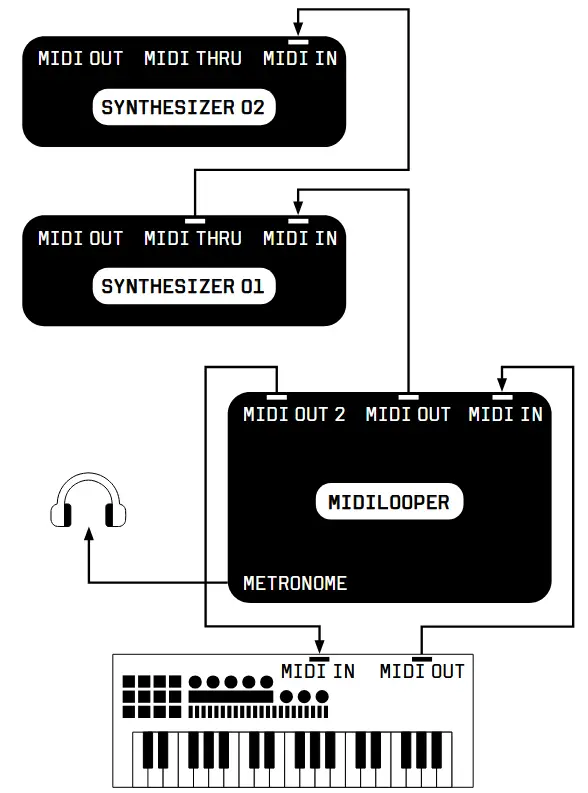
SETUP EXAMPLE 02
SYNCED BY MIDI CLOCK
LOOPING MIDI FROM MORE COMPLEX INSTRUMENT LISTENING TO METRONOME ON HEADPHONES
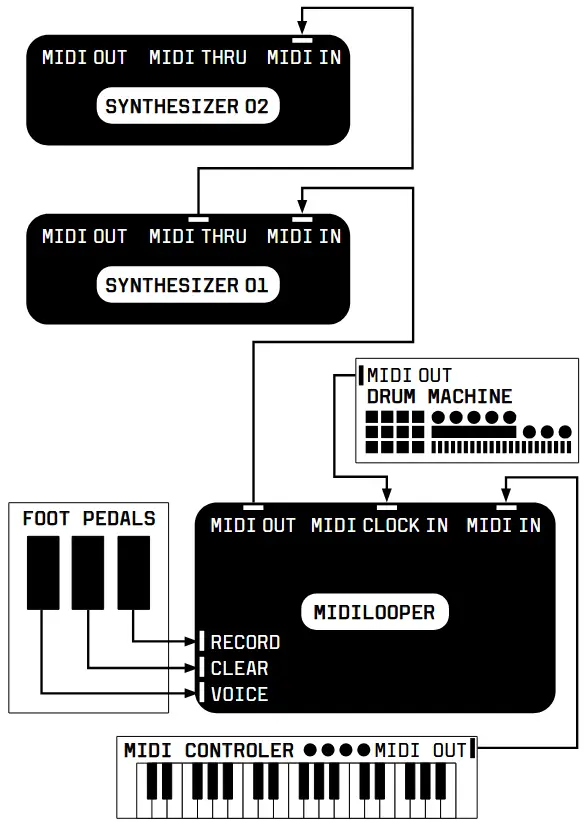
SETUP EXAMPLE 03
SYNCED TO DRUM MACHINE VIA MIDI CLOCK (VIA TRS JACK)
LOOPING MIDI FROM A MIDICONTROLLER
CONTROLLING LOOPER WITH FOOTPEDALS
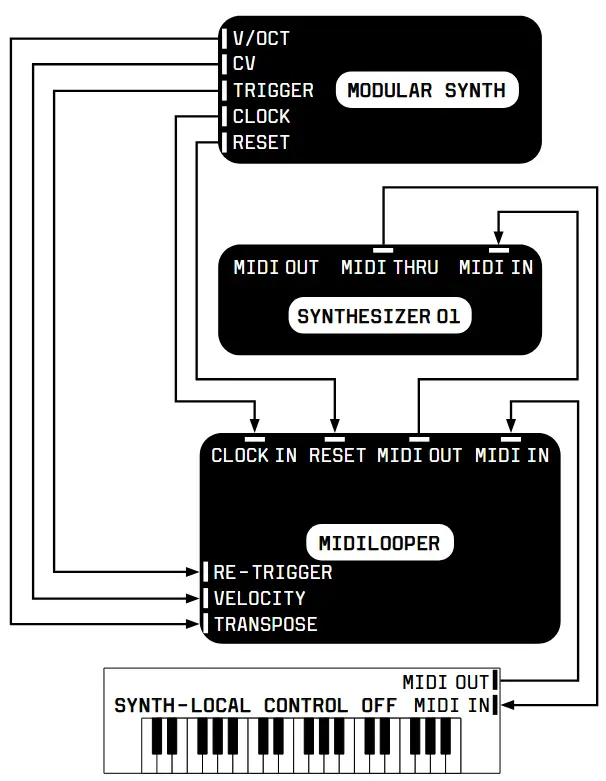
SETUP EXAMPLE 04
SYNCED TO ANALOG CLOCK FROM MODULAR SYNTHESIZER
LOOPING MIDI FROM A KEYBOARD SYNTH
CONTROLLED BY CVS AND TRIGGERS FROM A MODULAR SYNTH
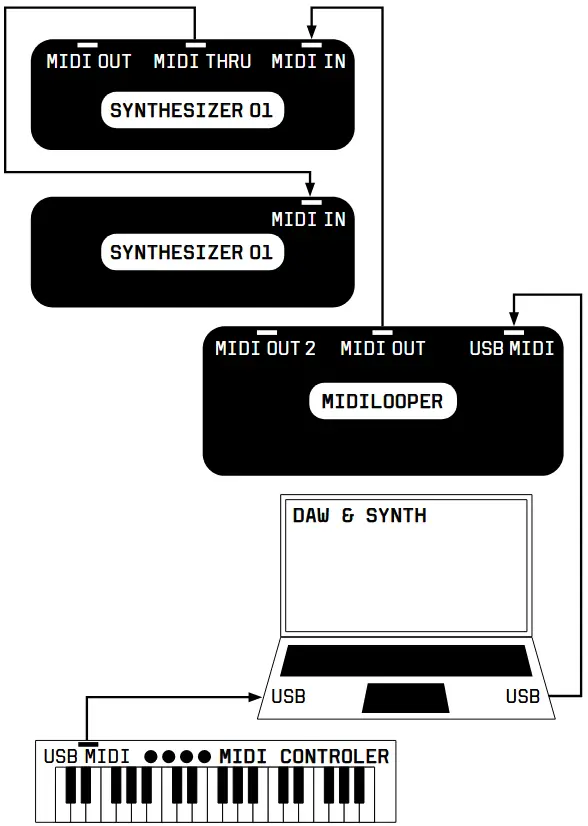
SETUP EXAMPLE 05
SYNCED BY USB MIDI CLOCK
LOOPING MIDI FROM LAPTOP
LISTENING TO METRONOME ON HEADPHONES
გადადით www.bastl-instruments.com for more info and video tutorials.
დოკუმენტები / რესურსები
 |
Bastl Instruments v1.1 MIDI Looping მოწყობილობა [pdf] მომხმარებლის სახელმძღვანელო v1.1, v1.1 MIDI რიპინგი მოწყობილობა, v1.1, MIDI რიპინგი მოწყობილობა, რიპინგი მოწყობილობა, მოწყობილობა |