Manuel d'utilisation du périphérique de boucle MIDI Bastl Instruments v1.1
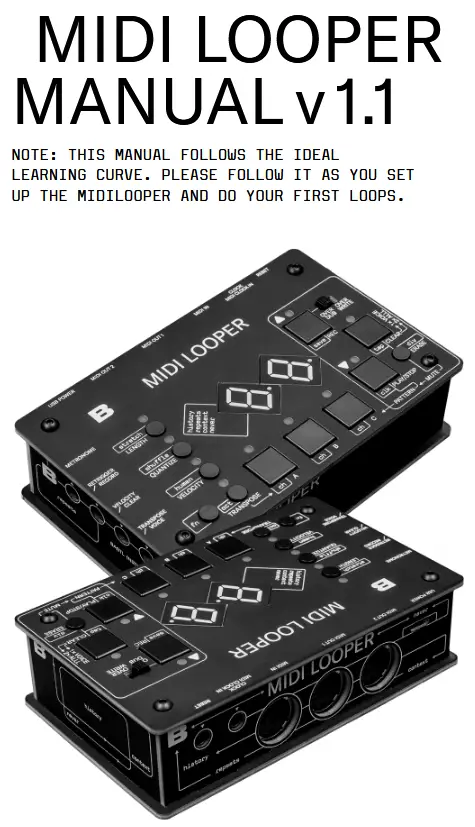
INTRODUCTION
Midilooper is a device that listens to MIDI messages (control information about notes, dynamics and other parameters) and loops them in a similar way an audio looper would loop pieces of audio. However, loops of MIDI messages remain in the control domain, which means a lot of other processes can happen on top of them – timbre modulation, envelope adjustments etc.
Since looping is one of the fastest and most intuitive ways of music-making, we made the controls of the Midilooper quickly accessible to encourage uninterrupted flow.
Midilooper can be synchronized either by MIDI clock or analog clock, or it can also run on its own clock (tap tempo/free running).
Midilooper has 3 voices that can each be assigned to a different MIDI channel, allowing it to control and loop 3 different pieces of gear. Each voice can be individually recorded, muted, overdubbed, or cleared.
Midilooper also offers some basic processing of the recorded information: transposition, velocity locking and shifting, quantization, shuffle, humanization (random variations of velocity), adjusting the length of the loop, or doubling and halving of the playback speed.
Midilooper also offers some basic processing of the recorded information: transposition, velocity locking and shifting, quantization, shuffle, humanization (random variations of velocity), adjusting the length of the loop, or doubling and halving of the playback speed.
MIDI LOOPER V 1.0 RECONNAÎT ET ENREGISTRE CES TYPES DE MESSAGES :

LIT ET INTERPRÈTE LES MESSAGES EN TEMPS RÉEL (ILS N'ONT PAS DE CANAL MIDI)
MISE EN PLACE
Midilooper écoute tous les canaux MIDI et transmet les messages MIDI uniquement sur le canal MIDI attribué à la voix sélectionnée. Utilisez les boutons A, B et C pour sélectionner une voix.

CONNEXION INITIALE
- Connectez n'importe quel clavier ou contrôleur qui émet du MIDI à l'entrée MIDI du Midilooper.
- Connectez la sortie MIDI de Midilooper à n'importe quel synthétiseur ou module de son qui reçoit MIDI.
- (optional) Connect MIDI Out 2 of the Midilooper to another synth
- Connect USB power to Midilooper
CONSEIL : POUR VOIR SI VOUS RECEVEZ DES INFORMATIONS MIDI, LE PREMIER POINT SUR L'ÉCRAN CLIGNOTE (UNIQUEMENT LORSQUE LE LECTEUR EST ARRÊTÉ).

RÉGLER LES CANAUX MIDI
Tu devrais savoir
Dans les combinaisons de boutons, ces boutons agissent comme des flèches :
REC = HAUT
PLAY/STOP = BAS
Voice buttons A, B, and C select the voice. Select voice A by pressing the button and set up its output MIDI channel by holding FN+A+UP/DOWN. The display will show the MIDI channel number. Set the MIDI input channel on your synth to the same channel. If done correctly, playing notes on your keyboard should play these notes on your synth. If it does not, check the connections, power and MIDI channel settings on both the Midilooper, and your synth. Follow the same procedure for setting up voice B and C.
TIP: AT THIS POINT YOU MIGHT ALSO WANT TO ADD STATIC OCTAVE OFFSET TO YOUR VOICES (EACH SYNTH YOU MIGHT WANT PLAYING IN A DIFFERENT OCTAVE). TO DO THAT, PRESS FN+TRANSPOSE+VOICE+UP/DOWN
Vous recevez un retour MIDI ?
Sur certains synthétiseurs, un retour MIDI peut se produire lors de l'utilisation des entrées et sorties MIDI. Essayez de désactiver les fonctions MIDI Thru et Local Control. Si vous ne pouvez pas ou ne souhaitez pas effectuer ces opérations, vous pouvez activer le filtre de retour MIDI sur le Midilooper. Tout en sélectionnant le canal MIDI de la voix concernée, appuyez sur le bouton CLEAR. Cela activera le filtre de retour MIDI, c'est-à-dire désactivera la lecture en direct sur ce canal, et seule la boucle sera lue. Changer de canal MIDI réinitialise cette fonctionnalité.

CONNECTEZ ET SÉLECTIONNEZ VOTRE SOURCE D'HORLOGE
Il existe plusieurs options pour synchroniser le Midilooper.
Vous pouvez sélectionner la source d'horloge en appuyant sur FN+LECTURE/STOP. La sélection s'effectue dans l'ordre suivant :
- Horloge MIDI sur l'entrée MIDI (flèche d'affichage pointant vers l'entrée MIDI)
- Horloge analogique sur l'entrée d'horloge (LED REC allumée)*
- Horloge MIDI sur entrée horloge (LED REC clignotante) – vous aurez peut-être besoin d'un adaptateur MIDI vers mini-jack pour utiliser cette option**
- Tap tempo (LED Clear allumée) – tempo défini par FN+CLEAR = TAP
- Fonctionnement libre (LED clignotante) – pas besoin d'horloge ! Le tempo est déterminé par la durée de l'enregistrement initial (comme pour les loopers audio).
- USB Midi – l'écran affiche UB et la LED LENGTH s'allume
* If you are using an analog clock, you might want to adjust the DIVIDER.
** Beware that there are incompatible versions of the standard MIDI connector (5pin DIN) to 3,5mm (⅛ inch) TRS MIDI jacks adapters on the market. The variants developed during a period before standardisation of the minijack MIDI (around mid 2018). We comply with the standard specified by midi.org.
TIP: TO SEE WHETHER YOUR CLOCK IS ACTIVE, YOU CAN MONITOR THE SECOND DOT ON THE DISPLAY WHILE THE PLAYER IS STOPPED.
AUTRES CONNEXIONS
Metronome Out – headphones metronome output.
Réinitialiser dans – makes the Midilooper go to the first step.
CVs or Pedals – 3 jack inputs which can be either used as CV inputs or as pedal inputs to control the Midilooper interface. The CVs can influence one, two or all voices.
To select if CV is active for a voice hold the voice button for 5 seconds and then use:
QUANTIZE button to activate the RETRIGGER
VELOCITY button to activate VELOCITY CV
TRANSPOSE button to active TRANSPOSE CV
Si aucune des voix n'est configurée pour recevoir CV sur cette prise particulière, la prise agira comme une entrée de pédale.
RETRIGGER input will act as RECORD button
VELOCITY input will act as CLEAR button
TRANSPOSE input will cycle thru the voices
TIP: YOU CAN CONNECT ANY SUSTAIN TYPE PEDAL TO CONTROL THE RECORD BUTTON, CLEAR BUTTON OR THE VOICE SELECTION. YOU MIGHT NEED TO USE AN ADAPTER TO MAKE IT 3.5MM ( ”) INSTEAD OF THE MORE STANDARD 6.3MM (¼”).THE INPUTS RESPOND TO A CONTACT BETWEEN THE TIP AND THE SLEEVE. YOU CAN ALSO BUILD YOUR OWN PEDAL BY PUTTING ANY BUTTON CONTACT BETWEEN THE TIP AND THE SLEEVE OF THE JACK CONNECTOR. IT ONLY DETECTS TIP-SLEEVE CONTACT.
Connectez le Midilooper à votre ordinateur avec un câble USB et recherchez-le dans vos périphériques MIDI. Ce périphérique USB MIDI compatible ne nécessite aucun pilote sur la plupart des ordinateurs. Utilisez l'entrée USB pour le Midilooper et pour le synchroniser.
Midilooper reflète également sa sortie sur USB afin que vous puissiez jouer vos synthétiseurs logiciels.
REMARQUE : MIDILOOPER N'EST PAS UN HÔTE USB. VOUS NE POUVEZ PAS BRANCHER DE CONTRÔLEUR MIDI USB SUR LE MIDILOOPER. USB MIDI SIGNIFIE QUE MIDILOOPER S'AFFICHERA COMME UN PÉRIPHÉRIQUE MIDI SUR VOTRE ORDINATEUR.

BOUCLE
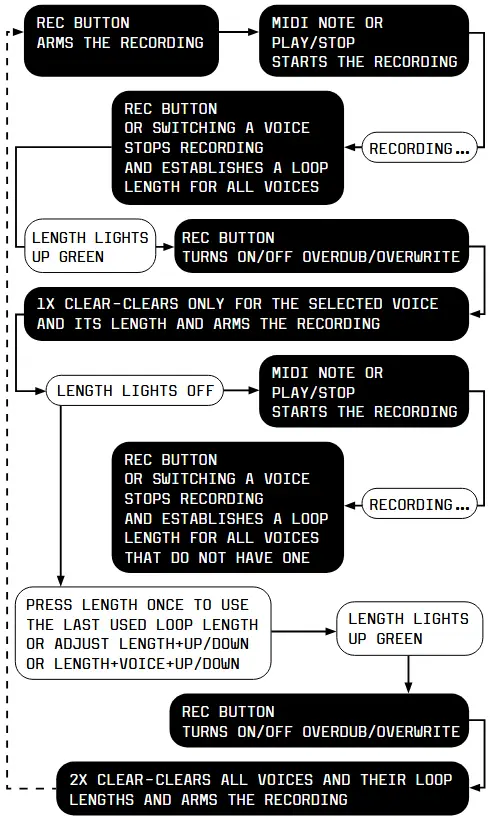
ENREGISTREMENT DE LA BOUCLE INITIALE
Appuyez sur le bouton ENREGISTREMENT pour activer l'enregistrement. L'enregistrement démarrera à la première note MIDI reçue ou dès que vous appuierez sur le bouton LECTURE/ARRÊT.
Pour terminer la boucle, appuyez à nouveau sur le bouton RECORD à la fin de la phrase. La LED LENGTH s'allumera alors en vert, indiquant que la longueur de la boucle est définie. La longueur est automatiquement définie pour toutes les voix.
Vous pouvez modifier la longueur de chaque voix individuellement ou utiliser la fonction CLEAR pour établir la longueur par enregistrement (voir plus loin).
SURIMPRESSION / RÉÉCRITURE
Once the initial recording has been completed you can either switch the voice and record a loop for a different instrument, or you can add layers to the same voice. Recording with the switch in OVERDUB mode will keep adding new layers. However, in OVERWRITE mode, the initially recorded material will be deleted as soon as at least one note is held and recorded.
EFFACER
Utilisez le bouton ERASE pendant la lecture pour supprimer les informations enregistrées uniquement si le bouton ERASE est maintenu enfoncé. Fonctionne pour la voix sélectionnée.
EFFACER UNE BOUCLE ET EN CRÉER UNE NOUVELLE
Pour effacer la boucle d'une voix sélectionnée, appuyez une fois sur le bouton CLEAR. Cela supprimera tout le contenu enregistré et réinitialisera la longueur de la boucle. L'effacement activera également l'enregistrement.
Double-cliquez sur le bouton CLEAR pour effacer toutes les voix, réinitialiser la durée des boucles, arrêter le lecteur et activer l'enregistrement. Cette macro préparera le Midilooper pour une nouvelle boucle en un seul geste.
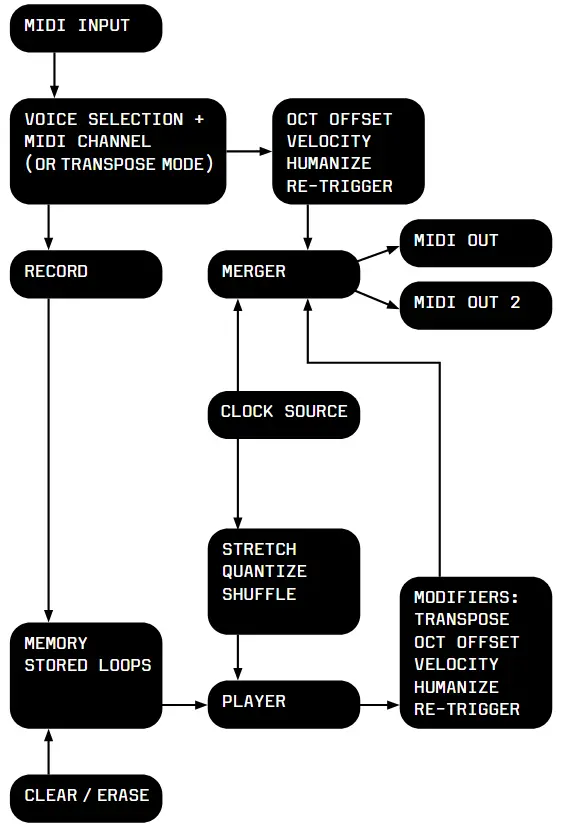
ORGANIGRAMME DE FLUX EN BOUCLE
MUTE
Hold the CLEAR button and press the individual voice buttons to MUTE and UNMUTE the voices.
SÉLECTION DE MOTIFS
Les boucles enregistrées pour les trois voix forment un motif. Pour passer d'un motif à l'autre, maintenez le bouton PLAY enfoncé et appuyez sur l'un des boutons de voix pour sélectionner l'un des trois motifs. Il existe quatre groupes de trois motifs. Pour accéder à un groupe de motifs différent, appuyez sur l'un des quatre petits boutons (LONGUEUR, QUANTIFICATION, VÉLOCITÉ, TRANSPOSITION) tout en maintenant le bouton PLAY enfoncé.

SAUVEGARDER LES MODÈLES
Pour enregistrer tous les patterns, appuyez sur FN+REC. Les patterns sont enregistrés avec les paramètres suivants : quantification, mélange, humanisation, vélocité, durée, étirement. Tous les autres paramètres globaux sont enregistrés automatiquement (sélection d'horloge, canaux MIDI, etc.).
ANNULER
Maintenir la touche CLEAR et appuyer sur REC permet de basculer entre ANNULER et RÉTABLIR. Des erreurs peuvent survenir, et si elles se produisent, une annulation vous sauve. Annuler annule la dernière action, qu'il s'agisse d'un enregistrement, d'un effacement ou d'un effacement. Rétabloquer annule la dernière annulation, vous permettant ainsi d'utiliser cette fonctionnalité de manière plus créative. Par exempleamppour ajouter une nouvelle couche de surimpression, supprimez-la et ajoutez-la à nouveau.
MODIFICATION DES BOUCLES
LONGUEUR
La longueur de votre boucle peut être modifiée globalement : LONGUEUR + HAUT/BAS, ou par voix : LONGUEUR + VOIX + HAUT/BAS. L'écran affiche la longueur de la boucle (en temps). Le réglage de la longueur se fait par incréments de 4 temps par mesure.
To make finer increments TAP and HOLD LENGHT + UP/DOWN to change the Length in increments of +/- 1.
Recording the initial loop will always quantize the loop length to a bar (4 beats). Recorded Looplength could be longer than 256 beats. Only the display cannot display more numbers than that. Pressing the LENGTH without initial loop established (LENGTH light off) will take the last used Length and set it.

QUANTIFIER
Quantize aligns your recorded material to the grid. Turn it ON or OFF by a single press of the QUANTIZE button.
The amount of QUANTIZE can be changed either globally: QUANTIZE+UP/DOWN
or per voice: QUANTIZE+VOICE+UP/DOWN.
Le numéro sur l'écran représente le type de grille sur laquelle le matériel enregistré sera quantifié.

VITESSE
L'activation de VELOCITY filtrera la vélocité de toutes les notes enregistrées et en fera une valeur statique.
The value of VELOCITY can be changed either globally: VELOCITY+UP/DOWN,
or per voice: VELOCITY+VOICE+UP/DOWN.
Astuce : Si vous utilisez une vélocité inférieure à « 00 », vous obtiendrez « NO » pour une vélocité « normale » ou « sans changement ». Ainsi, seules certaines voix peuvent être affectées par la vélocité.
TRANSPOSER
En mode Transposition, le contenu enregistré peut être transposé via une saisie en direct sur votre clavier. Pour accéder au mode Transposition, appuyez sur le bouton TRANSPOSE et pour le quitter, appuyez sur l'un des boutons vocaux.
To select which voices are affected by the Transpose mode hold down TRANSPOSE and press the voice buttons to activate/ deactivate its effect per voice.
La transposition s'applique par rapport à la note fondamentale. Pour sélectionner la note fondamentale, maintenez le bouton TRANSPOSE enfoncé et jouez une note MIDI via l'entrée MIDI (des points s'allument à l'écran pour indiquer que la note fondamentale a été définie).
Une fois la note fondamentale sélectionnée, appuyer sur les touches du clavier transposera le son enregistré pour les voix sélectionnées par rapport à la note fondamentale. La dernière note enfoncée restera active.
Quitter le mode Transposition supprimera la transposition mais la note fondamentale sera mémorisée.
REMARQUE : POUR QUE LE MODE TRANSPOSITION PRENNE EFFET, AU MOINS UNE DES VOIX DOIT ÊTRE ACTIVÉE ET LA NOTE FONDATEUR DOIT ÊTRE SÉLECTIONNÉE.
EXTENSIBLE
L'étirement peut faire jouer la boucle enregistrée à un quart, un tiers, une moitié, un double, un triple ou un quadruple de la vitesse.
Appuyez sur : FN+LONGUEUR+HAUT/BAS pour modifier l'étirement.
It applies only to the selected voice and it will become active at the moment you release the buttons.
MÉLANGER
Shuffle adds delays to certain 16th notes to achieve a swing effect. Press: FN+QUANTIZE+UP/DOWN to adjust the amount of Shuffle. Positive values delay every second 16th note by a set percentage to achieve a swing effect. Negative values add respective amounts of random timing delays to all sent MIDI messages to achieve a more human timing feel.
Il s'applique uniquement à la voix sélectionnée et est rendu après la quantification.
HUMANISER
Humanize randomly alters the velocity of played MIDI notes. Perform: FN+VELOCITY+UP/DOWN to set different amounts of Humanize.
The higher the amount, the more the VELOCITY gets randomly affected.
Il s'applique uniquement à la voix sélectionnée et est rendu après la quantification.
OCTAVE
Vous pouvez également ajouter un décalage d'octave statique à vos voix. Chaque synthétiseur peut jouer dans une octave différente, ou vous pouvez modifier ce décalage de manière performative.
Exécutez : FN+TRANSPOSE+VOICE+UP/DOWN pour modifier le décalage d'octave par voix.
CONTRÔLE EXTERNE
DÉCLENCHEUR
The Retrigger input will reset envelopes by sending Note Off and Note On in successive order for sustained notes and short Note On and Note Off for the last set of notes played in legato. This will apply to all the notes that have been played in legato even after they are released. “Played in legato” means that as long as you keep overlaying the end of one note with the beginning of another, or until you release all notes, the Midilooper will remember all these notes as played in legato. Simply put, if you play and release a chord and then apply the Retrigger – those notes will be retriggered. The Retrigger can be applied to one, two, or all voices. See Further Connections on how to assign the CV inputs.
CV DE VITESSE
The Velocity CV input adds to the Velocity value of the live-played, recorder or retriggered notes. This can be used in conjunction with the Velocity feature or simply to add accents to certain notes. The Velocity CV can be applied to one, two, or all voices.
Voir Autres connexions pour savoir comment attribuer les entrées CV.
TRANSPOSER CV
L'entrée CV de transposition ajoute la valeur de note du signal enregistré. L'entrée est échelonnée en volts par octave. Elle peut être utilisée conjointement avec les fonctions Transposition ou Octave.
The Transpose CV can be applied to one, two, or all voices.
Voir Autres connexions pour savoir comment attribuer les entrées CV.
RÉINITIALISER
The Reset input will make the Midilooper go to the first step. It will not play the step, however. Only the clock of the selected clock source will play the first step.
DIVISEUR
Cette option vous permet d'augmenter ou de diminuer le tempo d'entrée depuis l'horloge analogique. Appuyez sur FN+ERASE+UP/DOWN pour modifier le diviseur. L'horloge la plus courante est toutes les doubles croches, mais elle peut aussi être plus rapide, comme les triples croches, ou plus lente, comme les croches ou les noires. L'écran affiche le numéro sélectionné. Lorsque « 16 » est sélectionné, le lecteur avance uniquement par impulsion d'horloge analogique. Utilisez cette option si vous travaillez avec une horloge irrégulière.

NOTE: THE ANALOG CLOCK IS INTERNALLY UPSCALED TO MIDI CLOCK (24 PPQN = PULSES PER QUARTER NOTE) AND SETTING THE DIVIDER WILL FURTHER INFLUENCE THE BEHAVIOUR OF QUANTIZE AND OTHER TIME-BASED SETTINGS.
Consultez Connecter et sélectionner votre source d'horloge pour plus d'informations.
COMMANDE PAR PÉDALE
The user interface can be controlled by foot pedals.
See Further Connections on how to use external pedals.
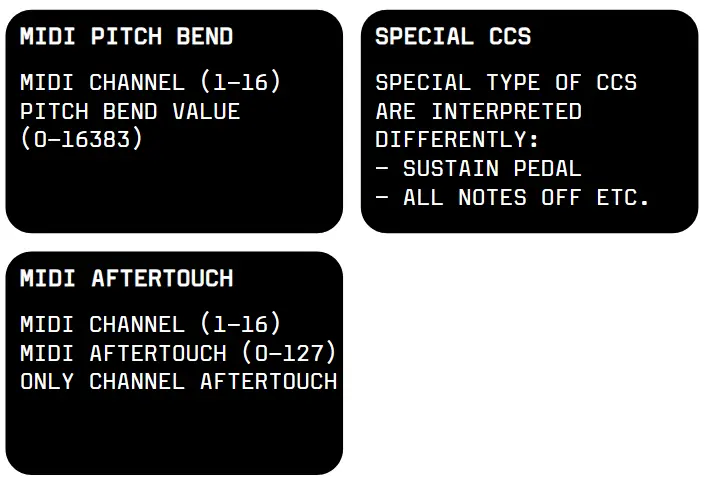
BOUCLES CC ET PITCH BEND ET AFTERTOUCH
Control Change and Pitch Bend and Aftertouch (channel) messages can be recorded and looped as well. As with MIDI Notes, the Midilooper will listen to these on all channels and forward them / play them back only on the channels assigned to its voices. The overdub/overwrite mode does not apply to these messages.
Once the first CC of a certain number is received, the Midilooper will remember when it was tweaked, and it will start recording the loop for this CC number. Once it finishes the loop and comes to the same position in the loop as the first CC of that number, it will stop recording the CC and will start the playback of the recorded values.
After that point, any newly arriving CC will act as the first CC and will start the recording until a full loop is reached.
Ceci s'applique en parallèle à tous les numéros CC (à l'exception des CC spéciaux : pédale de sustain, toutes les notes désactivées, etc.).
CONSEIL : PLAY/STOP+CLEAR = EFFACER UNIQUEMENT LES CCS POUR LA VOIX SÉLECTIONNÉE.
La logique de l'enregistrement Pitch Bend et Aftertouch est la même que celle des CC.
MISE À JOUR DU MICROLOGICIEL
The firmware version is shown on the display in two following frames when you start up the device.
If shown as F1 and then 0.0 read it as Firmware 1.0.0
The latest firmware can be found here:
https://bastl-instruments.github.io/midilooper/
Pour mettre à jour le firmware suivez cette procédure :
- Maintenez le bouton Velocity enfoncé tout en connectant le Midilooper à votre ordinateur via USB
- The display shows “UP” as for firmware update mode, and MIDILOOPER will show up as an external DISC on your computer (mass storage device)
- Téléchargez le dernier firmware file
(file name midilooper_mass_storage.uf2) - Copiez ceci file to the MIDILOOPER disc on your computer (Velocity LED will start blinking to confirm success)
- Retirez (éjectez) en toute sécurité le disque MIDILOOPER de votre ordinateur, mais ne déconnectez PAS le câble USB !
- Press the Velocity Button to start the firmware update (the LEDs around the Velocity button will blink, and the device will start up with the new firmware – check the firmware version on the display on startup)
TABLEAU DE MISE EN UVRE MIDI
REÇOIT
Sur toutes les chaînes :
Note On, Note Off
Pitch Bend
CC (64=sustain)
Messages du mode canal :
Toutes les notes désactivées
Messages MIDI en temps réel :
Horloge, Démarrer, Arrêter, Continuer
TRANSMET
Sur certaines chaînes :
Note On, Note Off
Pitch Bend
CC
Messages MIDI en temps réel :
Horloge, Démarrer, Arrêter, Continuer
MIDI À TRAVERS
MIDI Thru des messages MIDI en temps réel – uniquement lorsque l'horloge MIDI est sélectionnée comme source d'horloge.
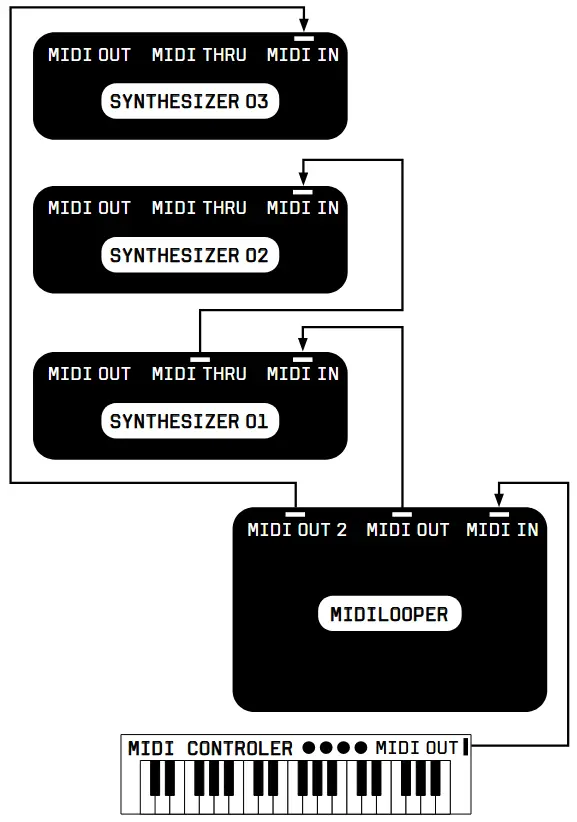
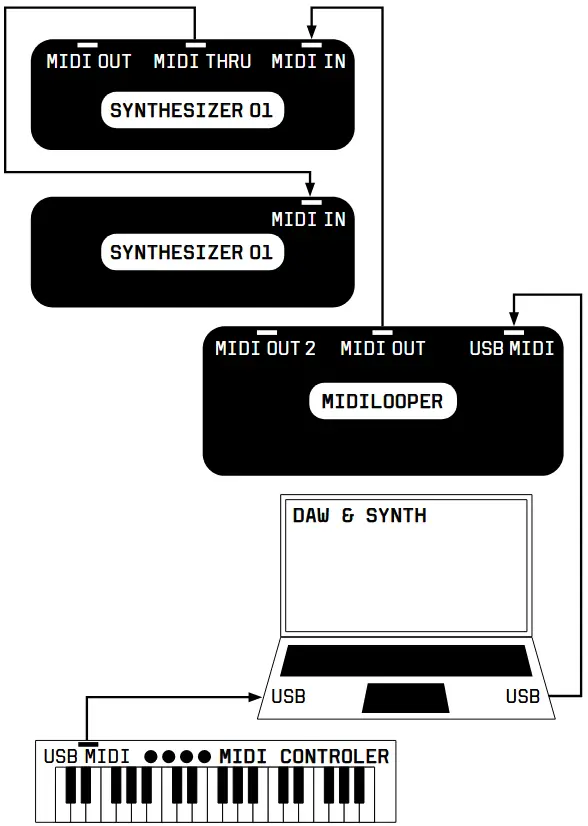
CONFIGURATION EXAMPLE
CONFIGURATION EXAMPLE 01
NO CLOCK SOURCE – FREE RUNNING MODE
LOOPING MIDI FROM A MIDI CONTROLLER
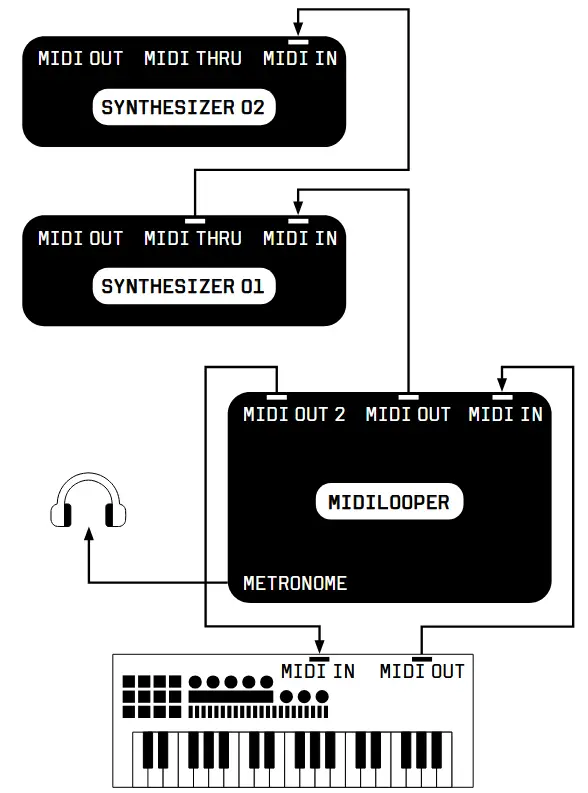
CONFIGURATION EXAMPLE 02
SYNCED BY MIDI CLOCK
LOOPING MIDI FROM MORE COMPLEX INSTRUMENT LISTENING TO METRONOME ON HEADPHONES
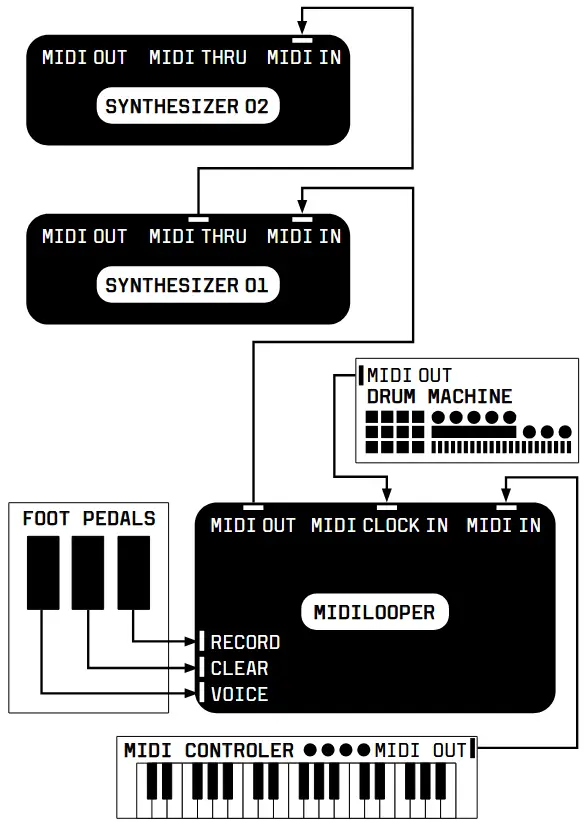
CONFIGURATION EXAMPLE 03
SYNCED TO DRUM MACHINE VIA MIDI CLOCK (VIA TRS JACK)
LOOPING MIDI FROM A MIDICONTROLLER
CONTROLLING LOOPER WITH FOOTPEDALS
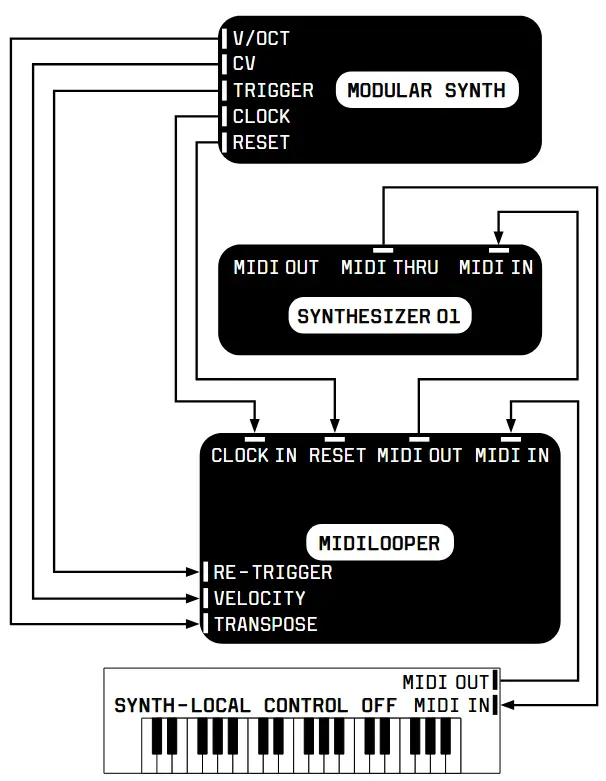
CONFIGURATION EXAMPLE 04
SYNCED TO ANALOG CLOCK FROM MODULAR SYNTHESIZER
LOOPING MIDI FROM A KEYBOARD SYNTH
CONTROLLED BY CVS AND TRIGGERS FROM A MODULAR SYNTH
CONFIGURATION EXAMPLE 05
SYNCED BY USB MIDI CLOCK
LOOPING MIDI FROM LAPTOP
LISTENING TO METRONOME ON HEADPHONES
Aller à www.bastl-instruments.com pour plus d'informations et de tutoriels vidéo.
Documents / Ressources
 |
Bastl Instruments v1.1 MIDI Looping Device [pdf] Manuel de l'utilisateur v1.1, v1.1 MIDI Looping Device, v1.1, MIDI Looping Device, Looping Device, Device |