ProPlex CodeBridge TimeCode Or Midi Over Ethernet
- A TMB autoriza seus clientes a baixar e imprimir este manual publicado eletronicamente somente para uso profissional.
- A TMB proíbe a reprodução, modificação ou distribuição deste documento para quaisquer outros fins, sem consentimento expresso por escrito.
- Specifications are subject to change without notice. The information in this document supersedes all previously supplied information before the effective date listed below. TMB has confidence in the accuracy of the document information herein but assumes no responsibility or liability for any loss occurring as a direct or indirect result of errors or exclusions whether by accident or any other cause.
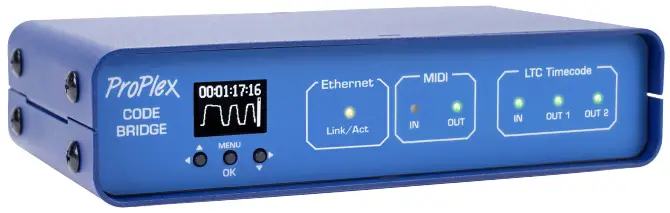
The ProPlex CodeBridge is a member of our LTC Device system which is designed to generate, distribute and monitor timecode. Our rugged, compact mini-enclosure design is perfect for desktop programmers to throw in bag while also being flexible enough to install in a rack with an optional RackMount Kit. Drop a CodeBridge anywhere you need to share a fully synchronized timecode stream between multiple departments and other TMB LTC devices on the network.
PRINCIPAIS CARACTERÍSTICAS
- Theoretically unlimited number of CodeBridges possible on the same network
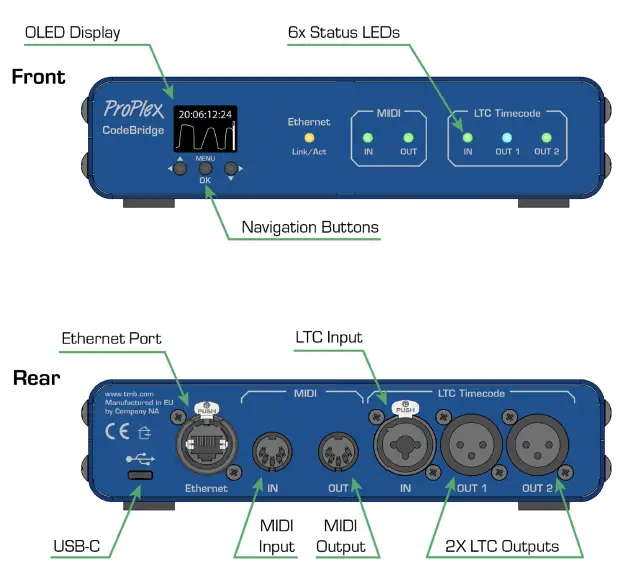
- OLED control panel with intuitive user interface and LTC clock, oscilloscope, and level display
- Remote access and configuration via ProPlex Software GUI* or built-in web página
- Interface options include the ability to name and select between multiple CodeBridge sources*
- Two transformer-isolated XLR3 LTC outputs. Adjustable output level (-18dBu to +6dBu)
- Front panel status LEDs for Ethernet, MIDI and LTC
- Compacto, leve, robusto e confiável. Compatível com mochilas.
- Opções de kit de montagem em rack disponíveis
- Redundant power – USB-C and PoE
*RTP MIDI, ProPlex Software functionality and naming and selecting of sources will be added in future firmware updates
CÓDIGOS DE PEDIDO
| PAPEL NÚMEROS | NOME DO PRODUTO |
| PPCODEBLME | PROPLEX CODEBRIDGE |
| PP1RMKITSS | 1U RACKMOUNT KIT, SMALL, SINGLE |
| PP1RMKITSD | 1U RACKMOUNT KIT, SMALL, DUAL |
| PP1RMKITS+MD | PROPLEX 1U DUPLA COMBINAÇÃO PEQUENA + MÉDIA |
MODELO ACIMAVIEW
DESENHOS DE WIREFRAME DIMENSIONAIS COMPLETOS


CONFIGURAR
Precauções de segurança
Leia estas instruções com atenção.
Este guia do usuário contém informações importantes sobre a instalação, uso e manutenção deste produto
- Certifique-se de que o dispositivo esteja conectado ao volume adequadotage, e essa linha voltage não é maior do que o indicado nas especificações do dispositivo
- Certifique-se de que não haja materiais inflamáveis perto da unidade durante a operação
- Sempre use um cabo de segurança ao pendurar o aparelho no alto
- Sempre desconecte da fonte de alimentação antes de realizar manutenção ou substituição de fusível (se aplicável)
- A temperatura ambiente máxima (Ta) é de 40°C (104°F). Não opere a unidade em temperaturas acima desta classificação.
- Em caso de problemas operacionais graves, interrompa o uso do aparelho imediatamente. Os reparos devem ser realizados por pessoal treinado e autorizado. Entre em contato com a assistência técnica autorizada mais próxima. Utilize somente peças de reposição originais.
- Não conecte o dispositivo a um dimmer
- Certifique-se de que o cabo de alimentação nunca esteja dobrado ou danificado
- Nunca desconecte o cabo de alimentação puxando ou puxando o cabo
CUIDADO! There are no user serviceable parts inside the unit. Do not open the housing or attempt any repairs yourself. In the unlikely event your unit may require service, please see the limited warranty information at the end of this document
DESEMBALAGEM
Ao receber a unidade, desembale cuidadosamente a caixa e verifique o conteúdo para garantir que todas as peças estejam presentes e em boas condições. Notifique o remetente imediatamente e guarde a embalagem para inspeção caso alguma peça pareça danificada durante o transporte ou se a própria caixa apresentar sinais de manuseio incorreto. Guarde a caixa e todos os materiais de embalagem. Se uma unidade precisar ser devolvida à fábrica, é importante que ela seja devolvida na caixa e embalagem originais de fábrica.
O QUE ESTÁ INCLUÍDO
- ProPlex CodeBridge
- Cabo USB-C
- Retentor de cabo clamp
- Cartão de download de código QR
REQUISITOS DE ENERGIA
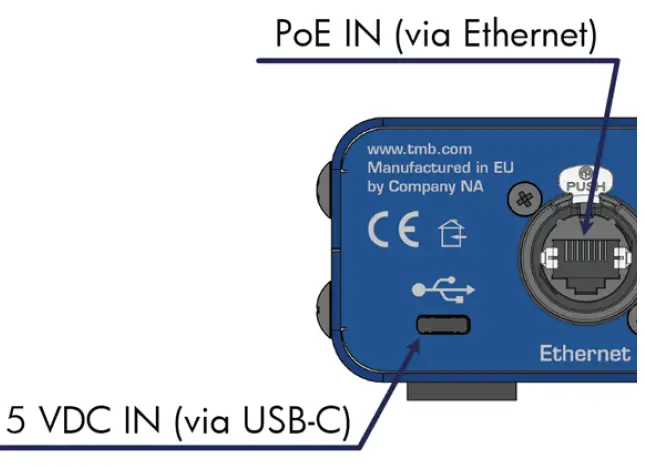
The ProPlex CodeBridge has redundant power connections.
- Power the device via a USB-C cable connected to any standard 5 VDC wall charger or computer USB port
- Supply Power over Ethernet (PoE) by connecting the CodeBridge Ethernet port to any PoE enabled switch or injector.
In some cases, you may want to utilize both connections. Units powered via PoE allow access to the web browser via any computer connected to the same network. Additionally, all connected CodeBridge devices will share stream data via Ethernet. USB-C connections allow for MTC data communication as well as power-IN.
INSTALAÇÃO
The ProPlex CodeClock enclosure was designed with the touring programmer in mind. We wanted these devices to be lightweight, packable and stackable – so we fitted them with oversized rubber feet to keep them stationary on most surfaces These units are also compatible with Small RackMount Kits should they need to be semi-permanently mounted for touring applications
INSTRUÇÕES DE INSTALAÇÃO PARA MONTAGEM EM RACK
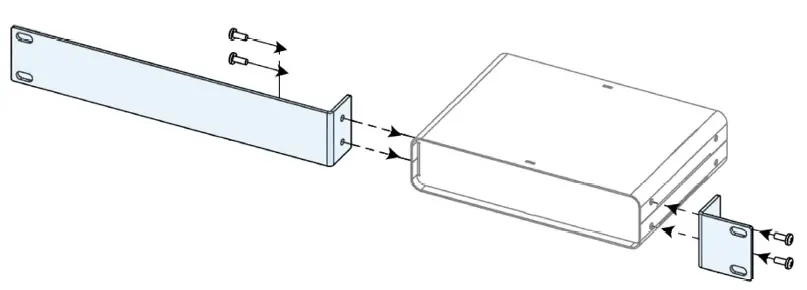
ProPlex RackMount Kits are available for both Single-Unit and Dual-Unit mounting configurations To fasten the rack ears or joiners to the ProPlex PortableMount chassis, you must remove the two chassis screws on each side at the front of the chassis. These same screws are used to securely fasten the RackMount ears and joiners to the chassis For dual-unit configurations, both sets of front and rear chassis screws will be used
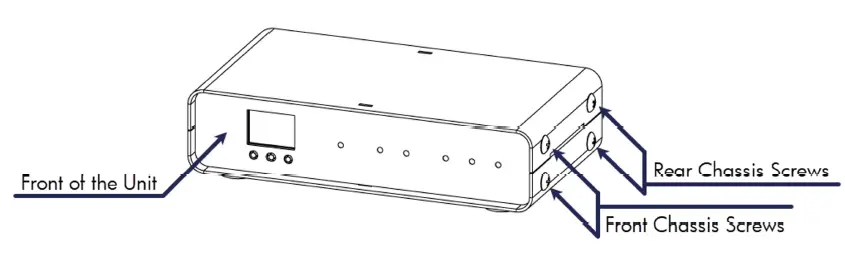
IMPORTANTE : Be sure to reinsert the screws into the unit after ears have been removed. Store RackMount Kit in a safe location until needed again. Spare screws are available from TMB if needed
INSTRUÇÕES DE INSTALAÇÃO PARA MONTAGEM EM RACK
O Kit de Montagem em Rack Pequeno de Unidade Única é composto por duas alças de rack, UMA longa e UMA curta. O diagrama abaixo ilustra a instalação completa do Kit de Montagem em Rack. Essas alças de rack são projetadas para serem simétricas, de modo que as alças curta e longa possam ser intercambiáveis.
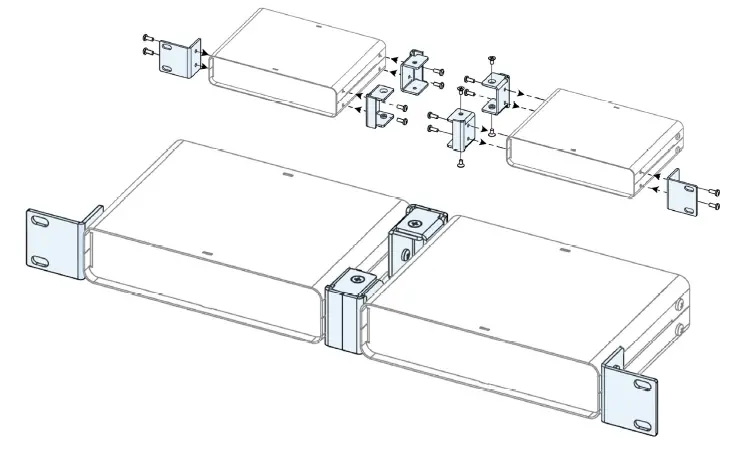
O Kit de Montagem em Rack Pequeno de Unidade Dupla possui DUAS abas curtas para rack e DUAS uniões. O diagrama abaixo ilustra a instalação completa do Kit de Montagem em Rack. Esta configuração requer as DUAS uniões centrais fixadas na parte frontal e traseira.
INSTALAÇÃO DOS UNIORES DUPLOS
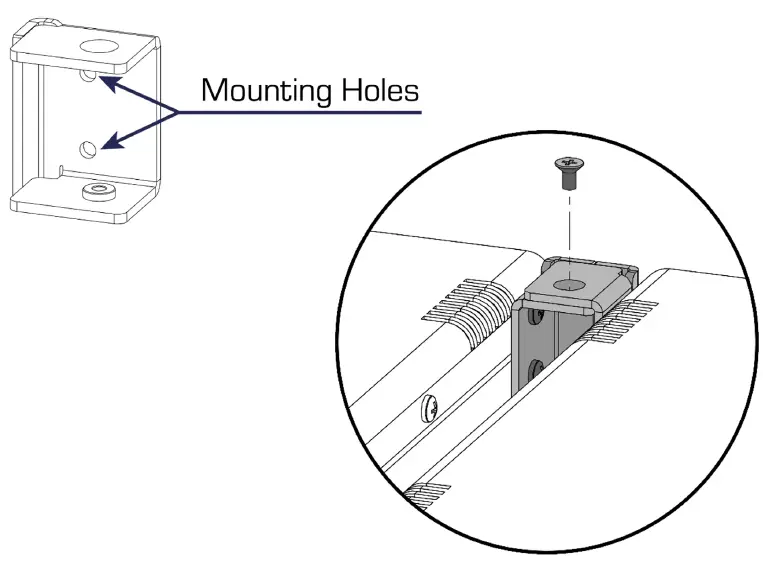
The Dual-Unit Small RackMount Kit includes FOUR joining links and FOUR countersunk flat head screws. These links are designed to nest into each other and are secured with the included screws and threaded holes. Each link piece is identical. Simply rotate the joining link and line up the installation holes to install on either the left or right side of the corresponding unit.
OPERAÇÃO
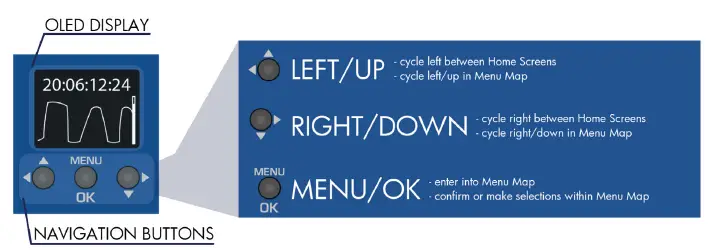
O ProPlex CodeBride pode ser facilmente configurado com o display OLED integrado e os botões de navegação na parte frontal da unidade
TELAS INICIAIS
The CodeBridge has 3 separate HOME SCREENS that display different parameters of incoming timecode streams. Cycle between these screens by pressing either the  botão
botão
- Tela inicial 1
The incoming LTC IN stream is displayed at the top of the screen while the bottom area shows oscillogram and voltage level bar to indicate signal level from the LTC source only
Note: Ideally the LTC IN steam should resemble a square wave with high output level. If level is too low, try increasing the volume at the source to improve the signal - Tela inicial 2
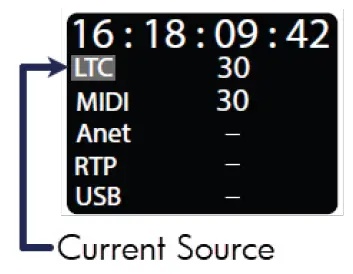
This screen displays all sources of timecode that the CodeBridge can detect
The topmost source is the current active source which is retransmitted further from output connections. Whichever source is active will be highlighted with a blinking background

Tela inicial 3
The third screen displays format information on all detected streams Like Home Screen 2, the top-most source is the current active source which is retransmitted further from output connections. Whichever source is active will be highlighted with a blinking background
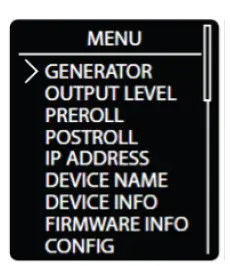
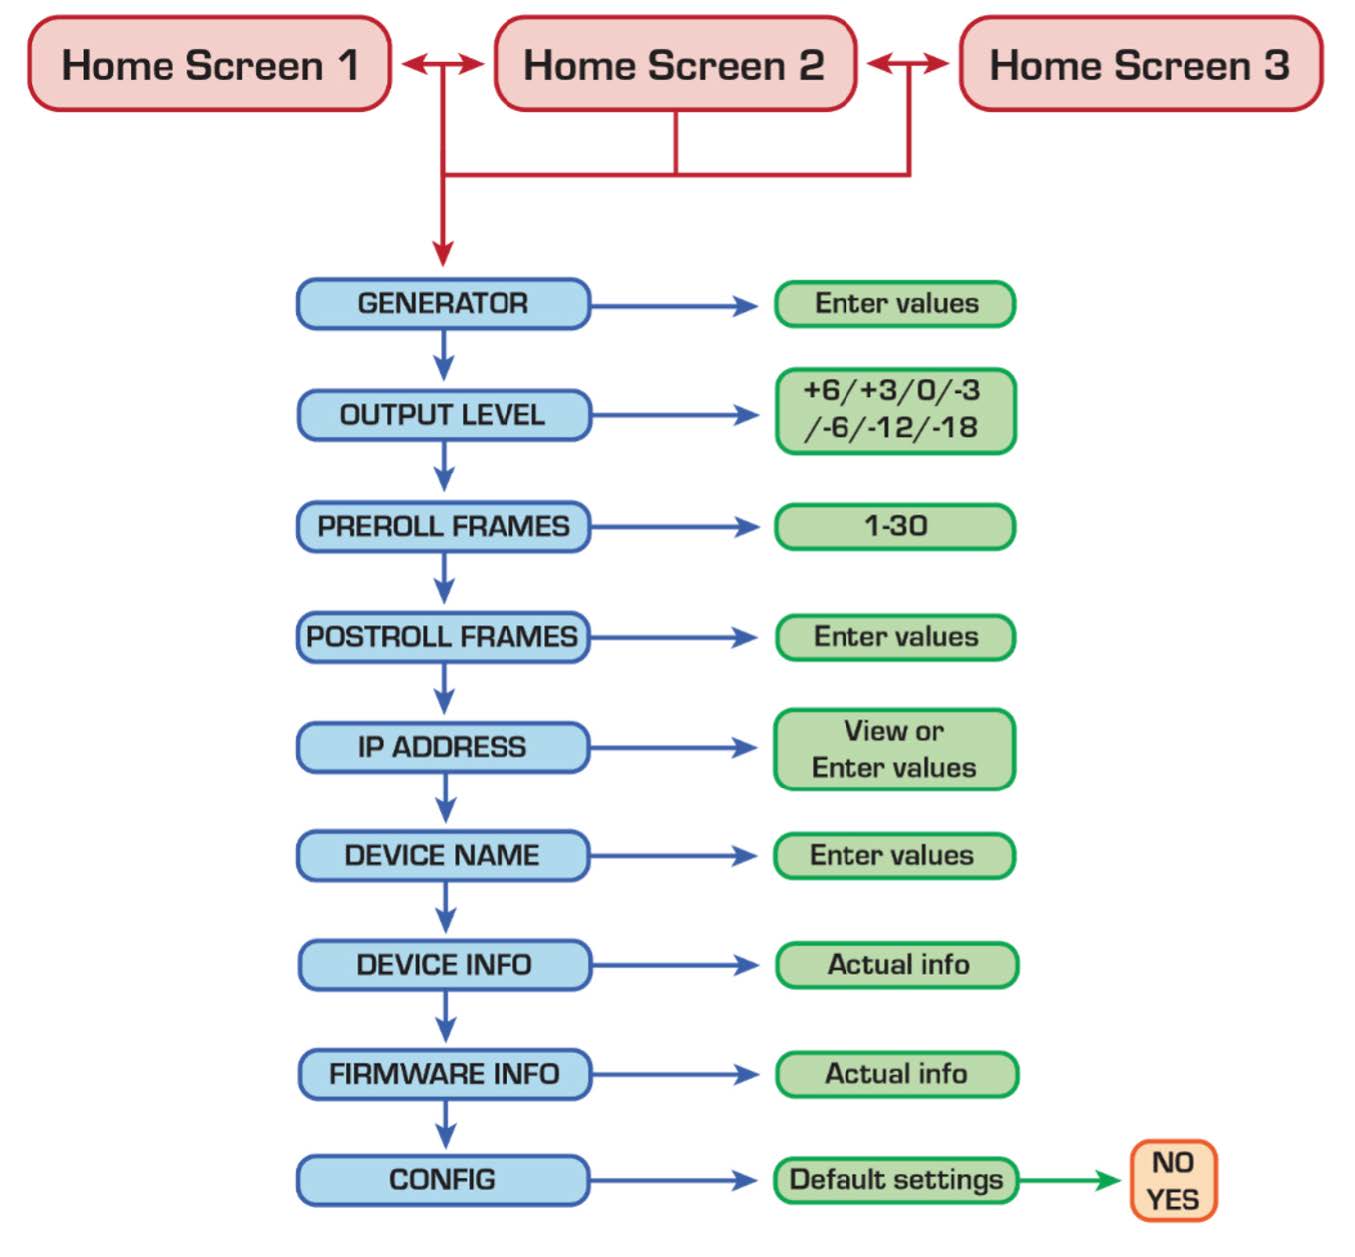
Menu principal
O Menu Principal pode ser acessado pressionando a tecla ![]() button and majority of options can be exited via the button Scroll with the botão e confirme a seleção com o
button and majority of options can be exited via the button Scroll with the botão e confirme a seleção com o ![]() botão.
botão.
Observação: Nem todos os menus cabem na tela do dispositivo, então você precisará rolar para acessar alguns menus. O lado direito da maioria das telas de menu exibirá uma barra de rolagem que ajudará a indicar a profundidade da navegação.
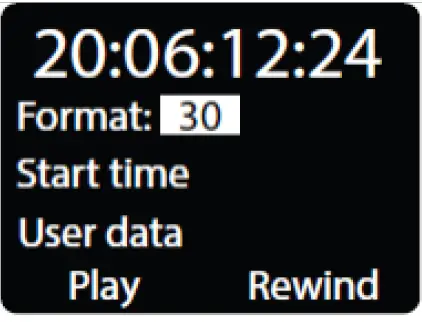
Gerador de timecode
The CodeBridge can generate clean, high output LTC out of the two isolated XLR3 ports (located on the rear of each unit)
Use o botão e, em seguida, confirme a seleção com o ![]() botão para alternar entre as várias opções do gerador
botão para alternar entre as várias opções do gerador
- Format: Select between different industry standard FPS rates 23.976, 24, 25, 29.97ND, 29.97DF, and 30 FPS. If the selected format is compatible with MTC or Art-Net timecode, it will also be transmitted through that respective interface port (MIDI OUT or Ethernet ports)
- Start Time: Specify a start time of HH:MM:SS:FF using navigation buttons
- User Data: Specify user data in 0x00000000 hex format
- Play, Pause, Rewind: User playback controls for generated timecode.
Observação: Você deve permanecer nesta tela para usar continuamente o gerador LTC. Se você sair desta tela, o gerador parará automaticamente e a fonte atual mudará para a próxima fonte ativa.
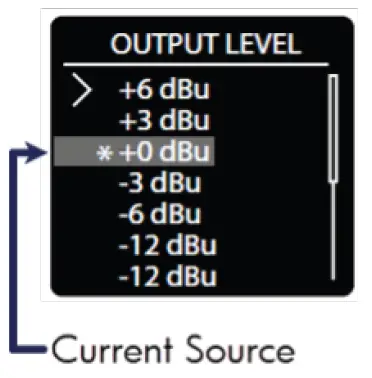
Nível de saída
Boost or cut the output level from +6 dBu to -12 dBu. Everything outputting via the two isolated XLR3 ports is affected by this level change.
Isso inclui:
- Saída do gerador
- Formatos de código de tempo retransmitidos de outras entradas
Use obotão e, em seguida, confirme a seleção com o![]() button to cycle between the various output levels. The asterisk indicator will denote the currently selected output level
button to cycle between the various output levels. The asterisk indicator will denote the currently selected output level
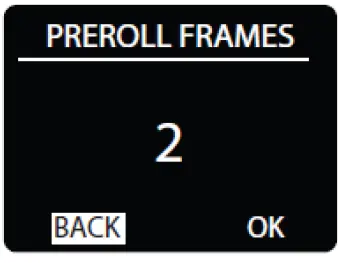
Molduras pré-enroladas
- Pré-rolagem é o número de quadros válidos necessários para considerar a fonte do código de tempo como válida e começar a encaminhá-la para as saídas
- Usar
 the button to highlight the Pre-roll value, then press
  button to edit
 - Use o button to set the Pre-roll frames (1-30) and to save the value
Observação: The active stream display will always show incoming LTC stream starting from the 1st received frame regardless of Pre-roll settings
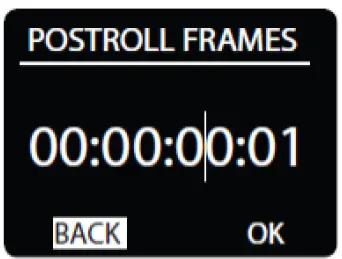
Post-roll Frames
- Post-roll frames help correct erroneous or dropped frames in a timecode source
- When a stream is stopped for any reason, the transmission will continue until a count equivalent to the Post-roll frames setting is reached
- If an erratic source issue resolved within the Post-roll window, the device will continue streaming timecode without interruption
- Use the button to highlight the Post-roll value, then press button to edit. Use to select a value place in HH:MM:SS:FF format
- Press button to edit each value as needed, using or to change the count. Press after editing to save each value and repeat to edit the next.
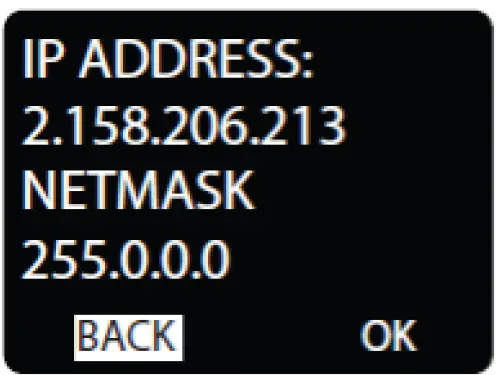
Endereço IP
- View set the IP Address and Netmask of the unit
Note: This is the address used to access the CodeBridge Web Browser. This is mainly used to monitor and update each unit with future firmware releases - Use the button to highlight, then press button to edit either IP Address or Netmask
- Usar to select a value in x.x.x.x format. Press to edit, using to change each value and again to save. Repeat to edit each octet
Nome do dispositivo
Create a custom name for the device
 Retrocesso
 Change to UPPERCASE
 Mover o cursor
- 123 Number editor
- – Add a space
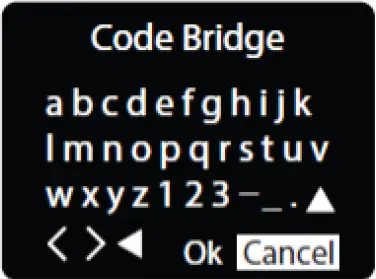
- Usar to select and highlight an editing tool or a letter, then press para confirmar a seleção
- Highlight the 123 menu and press to input a numerical character.
- Usar to select 0-9 and press again to confirm selection and type the character in the name field
- When name editing is complete, highlight OK and press para salvar e sair
Informações do dispositivo
Device Info displays status information of the unit. The information displayed is:
- Nome do dispositivo
- Endereço IP
- Máscara de rede
- Endereço MAC
Imprensa ![]() sair
sair 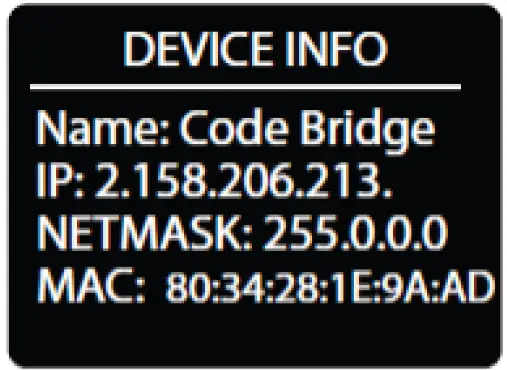
Informações de firmware
Firmware Info displays status information of the unit. The information displayed is
- Número da versão
- Data de construção
- Tempo de construção
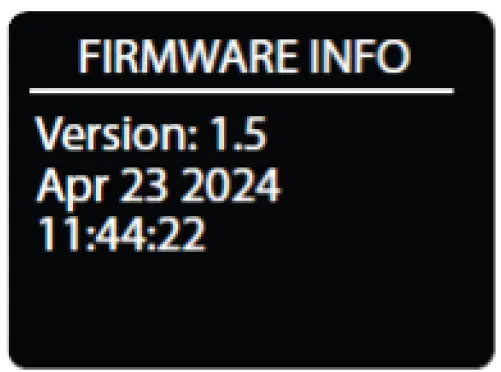 Imprensa
![]() sair
sair
MAPA DO MENU
INDICADORES LED DE STATUS
MIDl IN:
 Receives timecode
 Receives data which is not timecode
MEIO FORA:
- Transmits timecode from source
 Transmits timecode, postroll is running
- Transmits data which is not timecode
LTC ENTRADA:
- Receives timecode, but 1 second has not passed without errors or jumps in timecode
- Receives timecode without jumps or errors for more than 1 second
 Timecode was received, but is not received at the moment
SAÍDA LTC:
- Transmits timecode, postroll is running
 Transmits timecode, internal generator is running
- Transmits timecode for more than 1 second
- Transmits timecode, but 1 second has not passed from start of transmission
WEB NAVEGADOR
Any networked computer can access the CodeBridge Web Navegador
Locate the IP address of the unit (instructions above) then type the IP address into the address bar of your favorite browser. You should be presented with the following landing page:
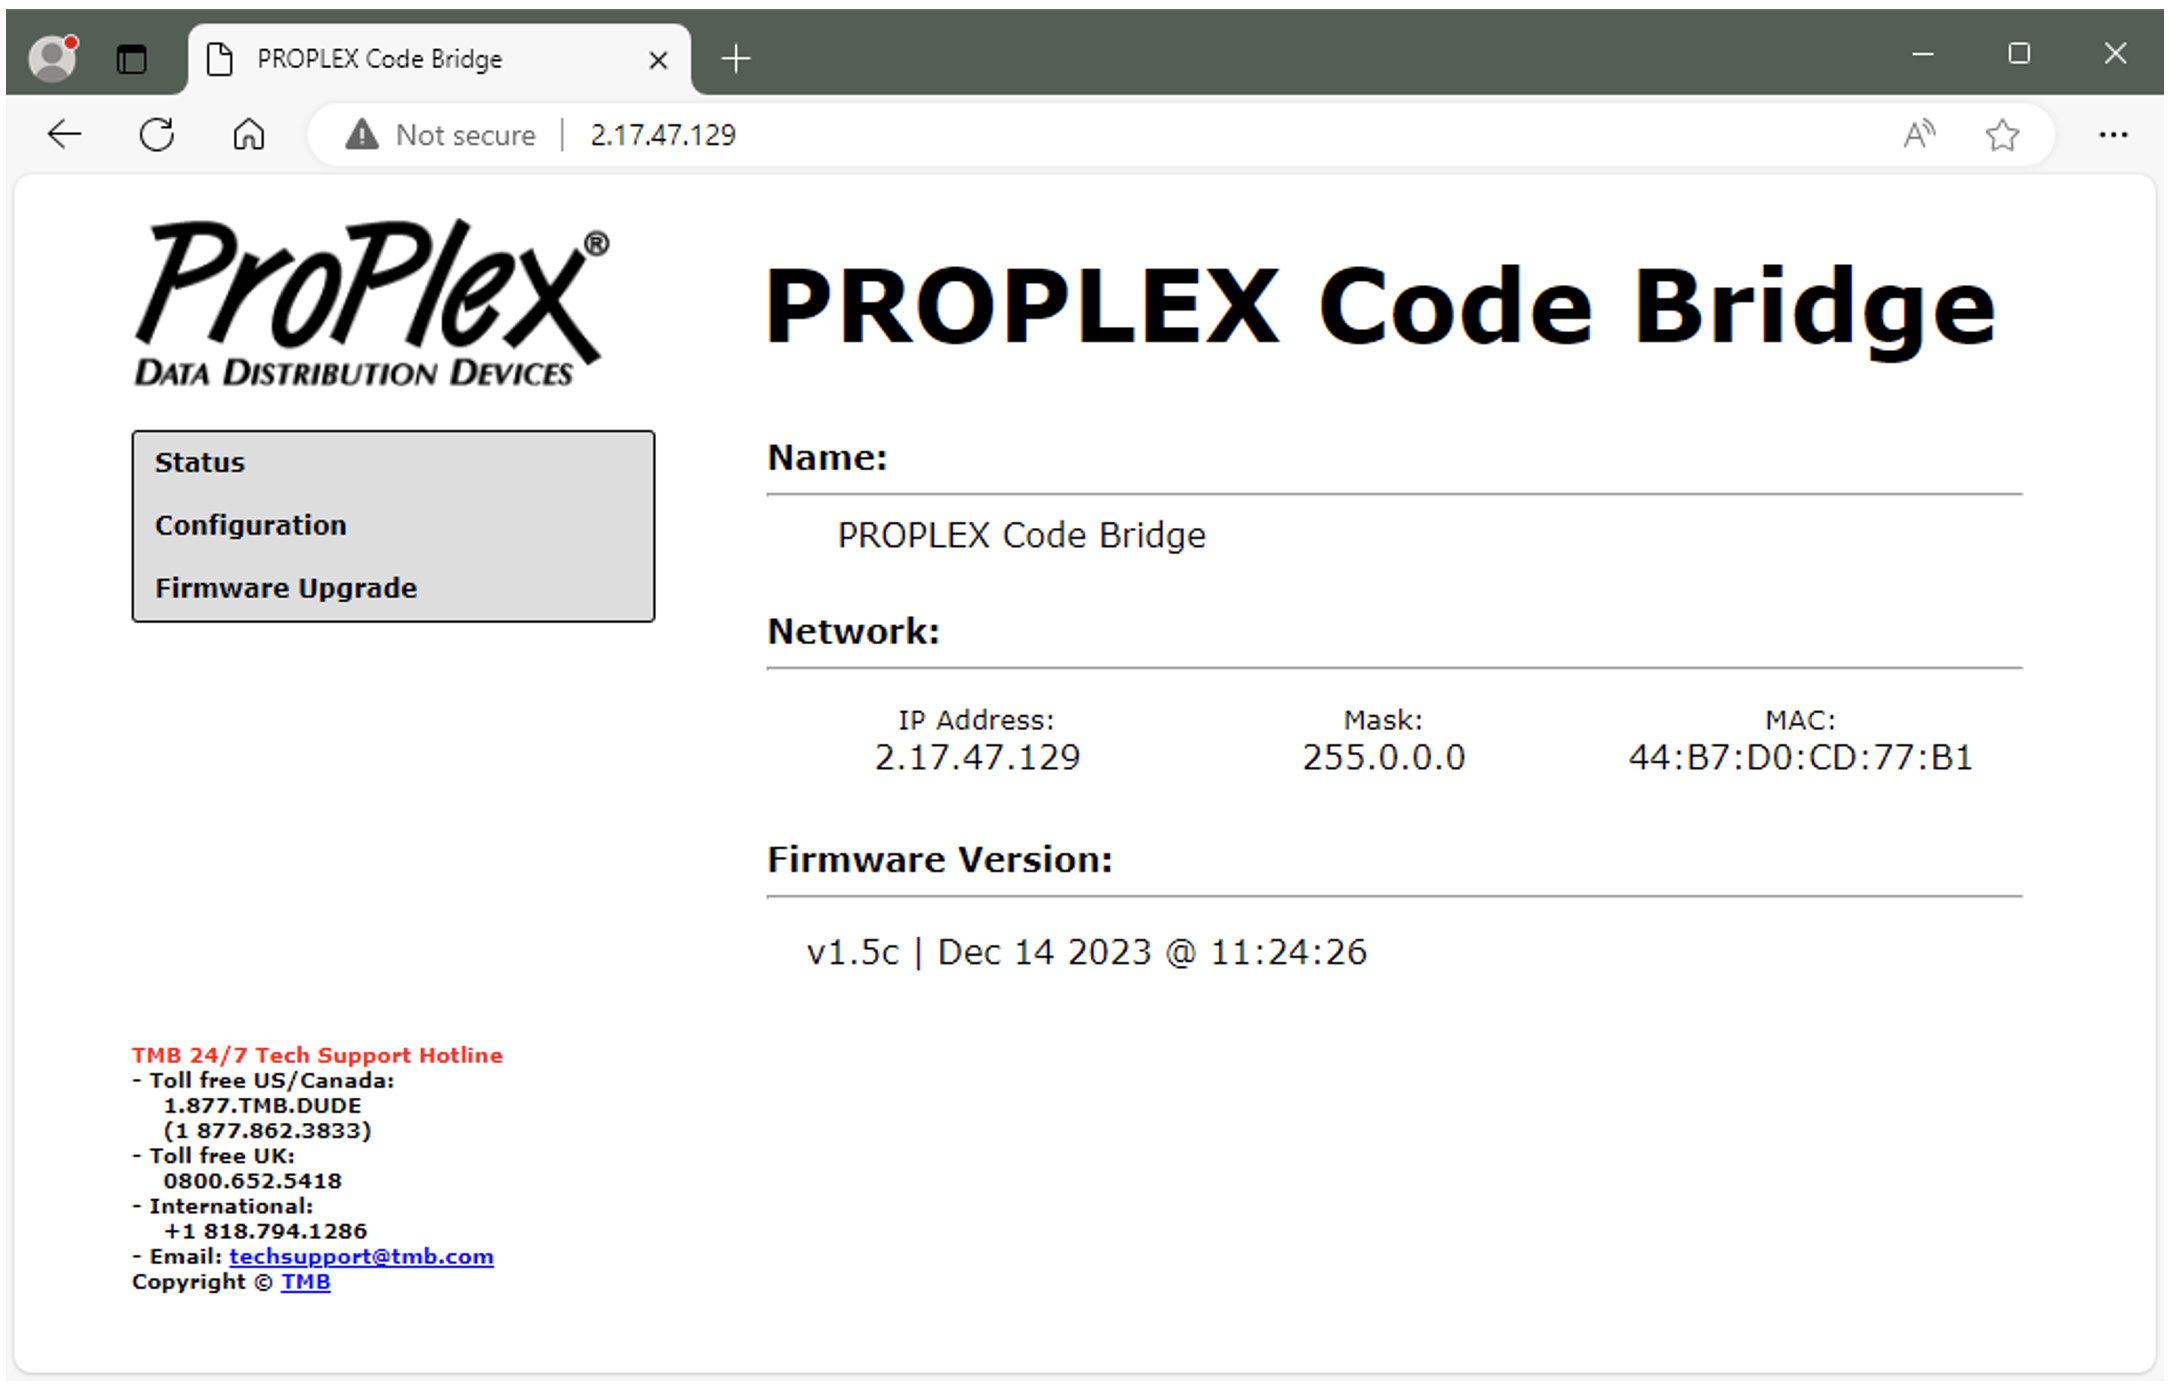
Note: computer or laptop should be in the same network range – 2.X.X.X
ATUALIZAÇÕES DE FIRMWARE
Occasionally we will release firmware updates that contain new features or bug fixes. Firmware for all ProPlex units is available via the TMB Cloud
Um link para o TMB Cloud está no menu Recursos em nosso site principal website https://tmb.com/
To update, download the new firmware.bin file to your desktop. Then upload through the “Firmware Upgrade” menu via the Web Navegador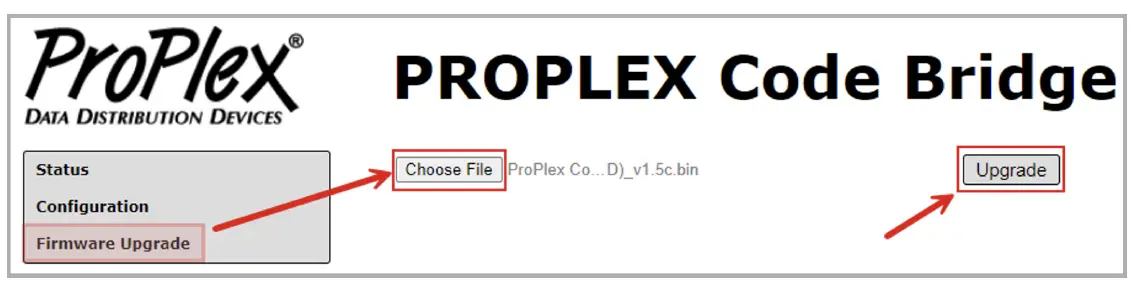
LIMPEZA E MANUTENÇÃO
Dust build-up in connector ports can cause performance issues and can potentially lead to further damage during normal wear and tear CodeClock devices need occasional cleaning to maintain best performance, especially units used in harsher environmental conditions
AS SEGUINTES SÃO DIRETRIZES GERAIS DE LIMPEZA:
- Desligue sempre da energia antes de tentar qualquer limpeza
- Aguarde até que a unidade esfrie e descarregue completamente antes de limpar
- Use vácuo ou ar comprimido seco para remover poeira/detritos dentro e ao redor dos conectores
- Use uma toalha macia ou escova para limpar e polir o corpo do chassi
- Para limpar a tela de navegação, aplique álcool isopropílico com um lenço macio para limpeza de lentes ou algodão sem fiapos.
- Almofadas com álcool e cotonetes podem ajudar a remover qualquer sujeira e resíduos dos botões de navegação
IMPORTANTE:
Certifique-se de que todas as superfícies estejam secas antes de tentar ligar novamente
ESPECIFICAÇÕES TÉCNICAS
| Número da peça | PPCODEBLME |
| Conector de energia | USB-C |
| Ethernet (& PoE in) Connector | Neutrik EtherCON™ RJ45 |
| Conector de entrada MIDI | DIN 5 pinos fêmea |
| Conector de saída MIDI | DIN 5 pinos fêmea |
| Conector de entrada LTC | Neutrik™ Combinação XLR de 3 pinos e TRS fêmea de 1/4” |
| Conectores de saída LTC | Neutrik™ XLR macho de 3 pinos |
| Vol operacionaltage | 5 VDC USB-C or 48 VDC PoE |
| Consumo de energia | A confirmar |
| Temperatura de operação. | A confirmar |
| Dimensões (AxLxP) | 1.72 x 7.22 x 4.42 pol. [43.7 x 183.5 x 112.3 mm] |
| Peso | 1.2 libras. [0.54kg] |
| Peso de envio | 1.4 libras. [0.64kg] |
INFORMAÇÕES SOBRE GARANTIA LIMITADA
Os Dispositivos de Distribuição de Dados ProPlex são garantidos pela TMB contra defeitos de fabricação ou materiais por um período de dois (2) anos a partir da data de venda original pela TMB. A garantia da TMB será restrita ao reparo ou substituição de qualquer peça que se mostre defeituosa e para a qual uma reclamação seja apresentada à TMB antes do término dos períodos de garantia aplicáveis.
Esta garantia limitada será anulada se os defeitos do produto forem o resultado de:
- Abertura da caixa, reparo ou ajuste por qualquer pessoa que não seja TMB ou pessoas especificamente autorizadas por TMB
- Acidente, abuso físico, manuseio incorreto ou aplicação incorreta do produto.
- Danos causados por raios, terremotos, inundações, terrorismo, guerra ou ação divina.
TMB will not assume responsibility for any labor expended, or materials used, to replace and/or repair the Product without TMB’s prior written authorization. Any repair of the Product in the field, and any associated labor charges, must be authorized in advance by TMB. Freight costs on warranty repairs are split 50/50: Customer pays to ship defective product to TMB; TMB pays to ship repaired product, ground freight, back to Customer. This warranty does not cover consequential damages or costs of any kind.
Um número de Autorização de Devolução de Mercadoria (RMA) deve ser obtido da TMB antes da devolução de qualquer mercadoria defeituosa para reparo em garantia ou fora da garantia. Para dúvidas sobre reparos, entre em contato com a TMB por e-mail: Suporte Técnico@tmb.com ou ligue para qualquer um dos nossos locais abaixo:
TMB EUA
- Avenida Parque 527
- São Fernando, CA 91340
- Estados Unidos
- Telefone: +1 818.899.8818
- TMB Reino Unido
- 21 Caminho Armstrong
- Southall, UB2 4SD
Inglaterra
- Telefone: +44 (0)20.8574.9700
- You may also contact TMB directly via
- e-mail em Suporte Técnico@tmb.com
PROCEDIMENTO DE DEVOLUÇÃO
Entre em contato com a TMB e solicite um tíquete de reparo e um Número de Autorização de Devolução de Mercadoria antes de enviar os itens para reparo. Esteja preparado para fornecer o número do modelo, o número de série e uma breve descrição do motivo da devolução, bem como o endereço de entrega da devolução e as informações de contato. Assim que o tíquete de reparo for processado, o número de RMA e as instruções de devolução serão enviados por e-mail para o contato no endereço file.
Clearly label any shipping package(s) with ATTN: RMA#. Please return equipment prepaid and in the original packaging whenever possible. DO NOT include cables or accessories (unless advised otherwise). If original packaging is not available, be sure to properly pack and protect any equipment. TMB is not liable for any shipping damage resulting from inadequate packaging by the sender. Freight call tags will not be issued for shipping repairs to TMB, but TMB will pay the freight for return to the customer if the repair qualifies for warranty service. Non-warranty repairs will undergo a quotation process by the technician assigned to the repair. All associated costs for parts, labor and return shipping must be authorized in writing before any work can be completed. TMB reserves the right to use its own discretion to repair or replace product(s) and determine the warranty status of any equipment.
INFORMAÇÕES DE CONTATO
SEDE DE LOS ANGELES
527 Park Avenue | San Fernando, CA 91340, EUA
- Telefone: +1 818.899.8818
- Fax: + 1 818.899.8813 vendas@tmb.com
- SUPORTE TÉCNICO TMB 24/7
- EUA / Canadá: +1.818.794.1286
- Ligação gratuita: 1.877.862.3833 (1.877.TMB.DUDE)
- Reino Unido: +44 (0) 20.8574.9739
- Toll Free: 0800.652.5418 techsupport@tmb.com
- SUPORTE TÉCNICO TMB 24/7
EUA / Canadá: +1.818.794.1286
Ligação gratuita: 1.877.862.3833 (1.877.TMB.DUDE) - Reino Unido: +44 (0) 20.8574.9739
- Toll Free: 0800.652.5418
- techsupport@tmb.com
Uma empresa de serviço completo que fornece suporte técnico, atendimento ao cliente e acompanhamento.
Providing products and services for the industrial, entertainment, architectural, installation, defense, broadcast, research, telecommunications, and signage industries. Los Angeles, London, New York, Toronto, Riga and Beijing.
Effective 11 July 2025. © Copyright 2025, TMB. All rights reserved
Perguntas frequentes
Q: Are spare screws available for the RackMount Kit?
A: Yes, spare screws are available from TMB if needed. Contact customer support for assistance with spare parts.
Documentos / Recursos
 |
ProPlex CodeBridge TimeCode Or Midi Over Ethernet [pdf] Manual do Usuário CodeBridge TimeCode Or Midi Over Ethernet, CodeBridge, TimeCode Or Midi Over Ethernet, Midi Over Ethernet, Over Ethernet, Ethernet |