Představení produktu
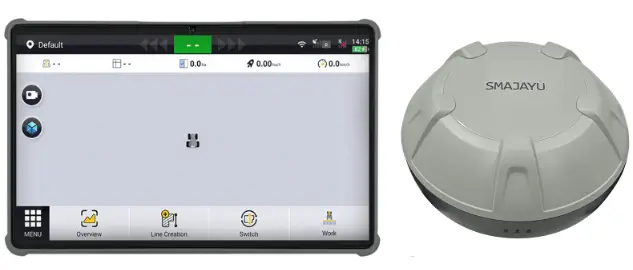
Agricultural Guidance System a kit that uses the PPP, SBAS, or RTK positioning technology to provide precise positioning and guidance for manual driving. By providing operation path planning and real-time navigation, Agricultural Guidance System helps agricultural machinery operators work with a higher accuracy. This system consists of a terminal, a GNSS receiver, and wiring harnesses. The terminal is installed with SMAJAYU · own navigation software.
Příprava před instalací
Bezpečnostní pokyny
Před instalací si pozorně přečtěte bezpečnostní pokyny v této příručce, abyste předešli poškození osob a zařízení.
Poznámka that the following safety advice cannot cover all possible dangerous situations.
Instalace
- Neinstalujte zařízení v prostředí s vysokou teplotou, silným prachem, škodlivými plyny, hořlavinami, výbušninami, elektromagnetickým rušením (např.ample, around large radar stations, transmitting stations, and substations). unstable voltages, velké vibrace a silný hluk.
- Neinstalujte zařízení na místa, kde se může hromadit voda, prosakovat, kapat a kondenzovat.
Demontáž
- After installation, do not frequently disassemble the equipment; otherwise, the equipment can be damaged.
- Before disassembly, turn off all power supplies and disconnect the cable from the battery to avoid equipment damage.
Electrical Operations
- Elektrické operace musí provádět kvalifikovaný personál v souladu s místními zákony a předpisy.
- Pečlivě zkontrolujte pracovní oblast, zda neobsahuje potenciální nebezpečí, jako je mokrá půda.
- Před instalací se seznamte s polohou tlačítka nouzového zastavení. Toto tlačítko použijte k odpojení napájení v případě nehody.
- Před odpojením napájení se ujistěte, že je zařízení vypnuté.
- Do not put the equipment in a humid place. Prevent liquids from entering the equipment.
- Keep it away from high power wireless equipment such as wireless transmitters, radar transmitters, high frequency and current devices, and microwave ovens.
- Přímý nebo nepřímý kontakt s vysokým objtage or utility power may cause death.
Requirements for Installation Site
Pro zajištění normálního provozu zařízení a prodloužení jeho životnosti musí místo instalace splňovat následující požadavky.
Pozice
- Ujistěte se, že montážní poloha je dostatečně pevná, aby podpírala ovládací terminál a příslušenství.
- Ujistěte se, že je v místě instalace dostatek místa pro instalaci ovládacího terminálu, přičemž v každém směru je vyhrazen prostor pro odvod tepla.
Teplota a vlhkost
- Teplota a vlhkost pracovního prostředí by měla být udržována v rozumném rozmezí, aby byl zajištěn normální provoz a životnost zařízení.
- Zařízení se poškodí, pokud bude pracovat při nesprávné teplotě a vlhkosti prostředí.
- Když je relativní vlhkost příliš vysoká, izolační materiály nemusí fungovat dobře, což způsobuje svodové proudy. Mohou se také objevit mechanické změny vlastností, rezivění a koroze.
- Když je relativní vlhkost příliš nízká, izolační materiály vysychají a smršťují se a může dojít ke vzniku statické elektřiny a poškození elektrických obvodů zařízení.
Vzduch
Ensure that the contents of salt, acid, and sulfide in the air are within a reasonable range. Some hazardous substances will accelerate the rusting and corrosion of metals and the aging of parts. Keep the working environment free of harmful gases (for example, oxid siřičitý, sirovodík, oxid dusičitý a chlor).
Napájení
- svtage input: The input voltage of Agricultural Guidance System should be in the range of 12 V to 24 V.
- Connect the power cable to the positive and negative electrodes correctly and avoid direct contact of the cable with hot objects.
Instalační nástroje
Před instalací si připravte následující nástroje.
| Zemědělský Vedení Systém Instalace Nástroje | ||||
| Žádný. | Nástroj | Specifikace | množství. | Účel |
| 1 | SIM card tray ejector | Nainstalujte SIM kartu. | ||
| 2 | Křížový šroubovák | Střední | Install the GNSS receiver and bracket. | |
| 3 | Otevřený klíč | 8 | Install the GNSS receiver bracket on the top of the machine. | |
| 4 | 11 | Fix the U-bolt on the base of the terminal. | ||
| 5 | 12/14 | Connect the battery cables. The bolt size depends on the vehicle model. | ||
| 6 Pracovní nůž | I | Otevřete balíček. | ||
| 7 Nůžky | I | Odřízněte kabelové svazky. | ||
| 8 | Svinovací metr | 5m | Measure the vehicle body. | |
Vybalte a zkontrolujte
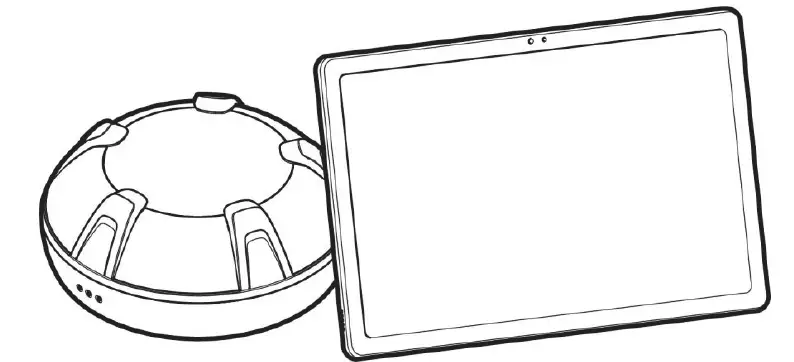
Unpack and check the following items.
| Shromáždění | Jméno | množství | Poznámky | |
| 1 | Terminál | Terminál | ||
| 2 | Držák držáku | |||
| 3 | Control Terminal Bracket | |||
| 4 | GNSS přijímač | GNSS přijímač | ||
| 5 | GNSS Receiver Bracket | Fix the GNS Sreceiver and bracket | ||
| 6 | Nálepka 3M | 2 | ||
| 7 | Bolt M4xl2 | 4 | ||
| 8 | Závitořezný šroub | 4 | ||
| 9 | Kabelový svazek | Hlavní napájecí kabel | ||
| 10 | GNSS Receiver Cable | |||
| 11 | Cab Charger Cable | |||
| 12 | Kabel typu C | |||
| 13 | Nabíjecí příslušenství | Cab Charger | ||
| 14 | Terminal Charger | l | ||
| 15 | Ostatní | Nylonová kabelová spona | 20 | |
| 16 | Vodotěsná taška | 3 | ||
| 17 | Uživatelská příručka | |||
| 18 | Osvědčení | |||
| 19 | Záruční list | |||
Poznámka: The screws and U-bolts are shipped with the product and not listed here.
The items that you receive may differ. Check the items according to the packing list or purchase order. Contact the dealer if you have any question or if any item is missing.
Pokyny k instalaci
Read Chapter 2 carefully and ensure that all requirements specified in Chapter 2 are met.
Zkontrolujte před instalací
Před instalací si udělejte podrobný plán a uspořádání týkající se místa instalace, napájení a zapojení zařízení a ujistěte se, že místo instalace splňuje následující požadavky.
- Je zde dostatek prostoru pro usnadnění odvodu tepla.
- Teplota a vlhkost prostředí splňují požadavky.
- The location meets the requirements for power supply and cabling.
- Vybraný napájecí zdroj odpovídá výkonu systému.
- The location meets the requirements for normal working of the device.
- U zařízení specifického pro uživatele zajistěte, aby byly splněny specifické požadavky.
Opatření pro instalaci
- Cut off the power supply when installing the device.
- Umístěte zařízení v dobře větraném prostředí.
- Do not place the device in a hot environment.
- Udržujte zařízení mimo dosah vysokého napětítage kabely.
- Keep the device away from strong thunderstorms and electric fields.
- Před čištěním odpojte napájecí zdroj.
- Zařízení nečistěte kapalinami.
- Neotevírejte kryt zařízení.
- Fix the device firmly.
Postup instalace
Installing the GNSS Receiver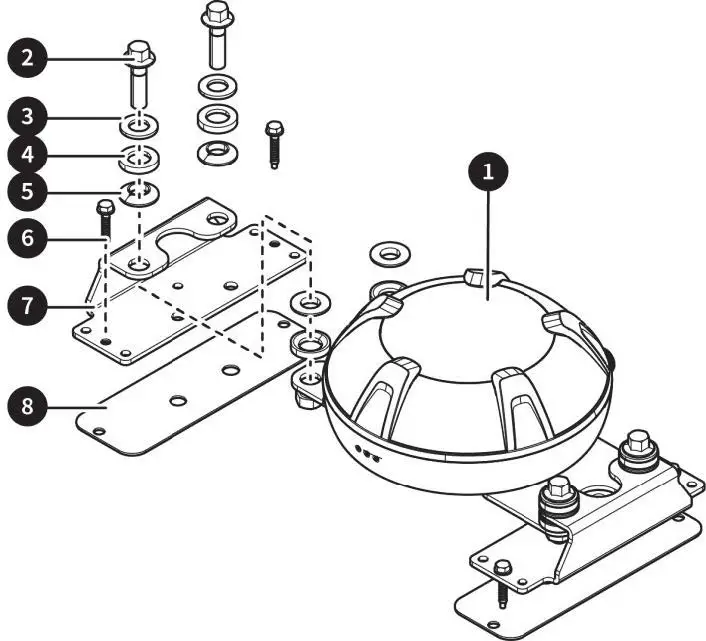
| Žádný. | Jméno | množství | Poznámky |
| 1 | GNSS přijímač | ||
| 2 | Hexagon flange bolt M8x3Q | 4 | |
| 3 | Flat washer class A MS | 4 | |
| 4 | Spherical washer | 8 | |
| 5 | Kuželová podložka | 8 | |
| 6 | Závitořezný šroub | 4 | |
| 7 | GNSS receiver bracket | 2 | |
| 8 | Nálepka 3M | 4 |
Instalace Kroky
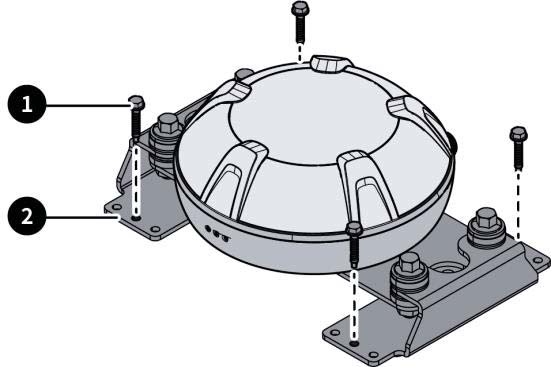
Install the GNSS receiver bracket on the top of the agricultural machinery with the flat washers, spherical washers, taper washers, and tapping screws or 3M stickers. The installation method is as follows:
- Step 1: The GNSS receiver is pre-installed on the bracket. Tighten the hexagon flange bolts 1. Use an appropriate number of washers 2 on both sides to ensure that the GNSS receiver is level.
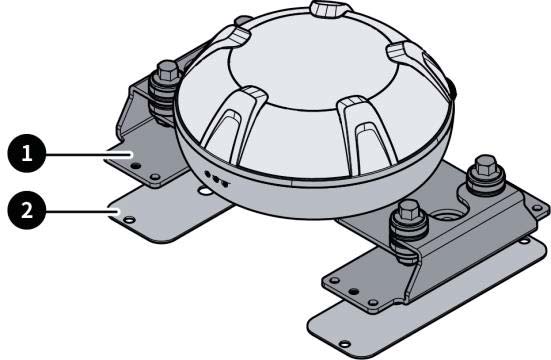
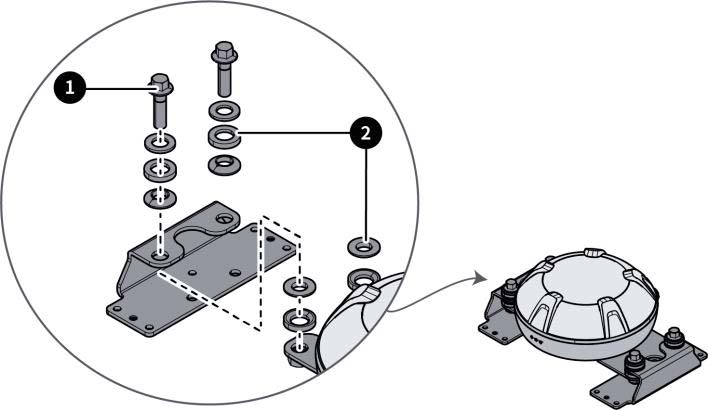 Step 2: Use the tapping screws or 3M stickers, whichever suitable, to fix the GNSS receiver on the top.
- Method 1: Use tapping screws 1 to fix the GNSS receiver bracket 2 on the top of the agricultural machinery.
- Method 2: Use the 3M stickers 1 to fix the GNSS receiver bracket 2.
- Method 1: Use tapping screws 1 to fix the GNSS receiver bracket 2 on the top of the agricultural machinery.
Installing the Terminal
Materiály 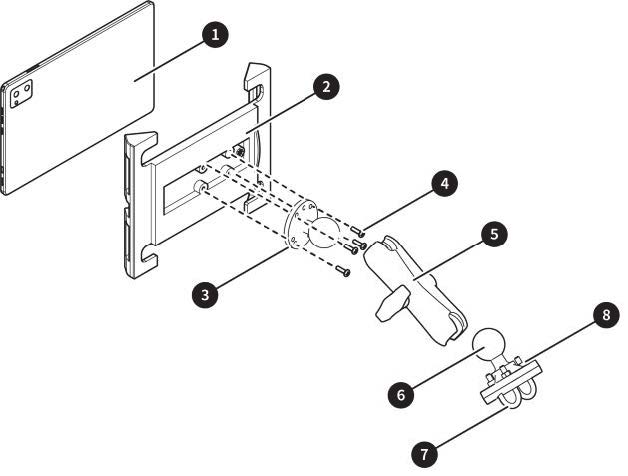
| Žádný. | Jméno | množství | Poznámky |
| 1 | Terminál | 1 | |
| 2 | Držák držáku | 1 | Provided with the terminal |
| 3 | Holder bracket base | 1 | |
| 4 | Šroub | 4 | |
| 5 | Držák adaptéru | 1 | |
| 6 | Základna držáku | 1 | |
| 7 | U-šroub | 2 | |
| 8 | Matice | 4 |
Kroky instalace
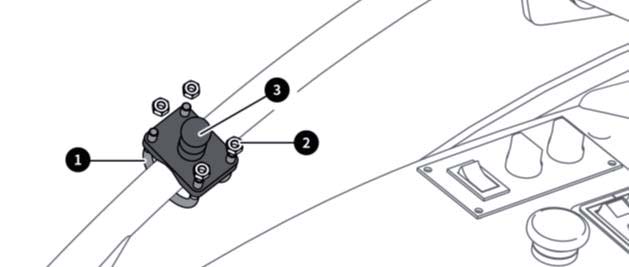
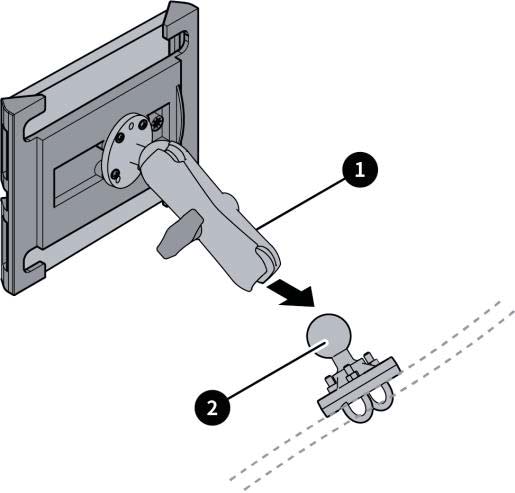
- Step 1: Select an appropriate position inside the cab for easy operation. Then, fix the bracket base 3 there with U-bolts 1 and nuts2.
- Step 2: Fix the bracket base 1 on the back of the terminal holder bracket 2 with screws and place in and fix the terminal 3 . Rotate the handle of the adapter bracket4 counterclockwise to loosen the ball socket, and then install the ball joint on the back of the terminal into the ball socket of the bracket.
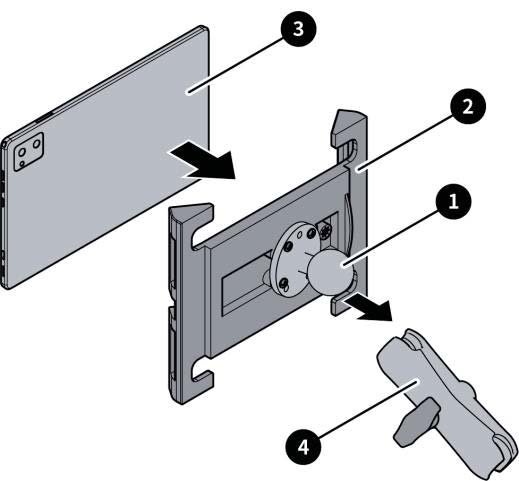
- Step 3: Install the ball joint 2 of the base into the other ball socket of the adapter bracket 1 , and rotate the handle clockwise to firmly fix the terminal.
Instalace SIM karty
Materiály
| Žádný. | Jméno | množství | Poznámky |
| SIM karta | The customer needs to prepare a micro-SIM card. |
 Poznámka:
- Ensure that you have data traffic for the SIM card.
- Check whether you need to set the APN and network type according to the user manual after installing the SIM card. If you need to, turn on the terminal and configure them in the Android system settings.
Postup instalace
- Locate the SIM card slot, insert the ejector into the hole on the slot, and press to eject the SIM card tray.
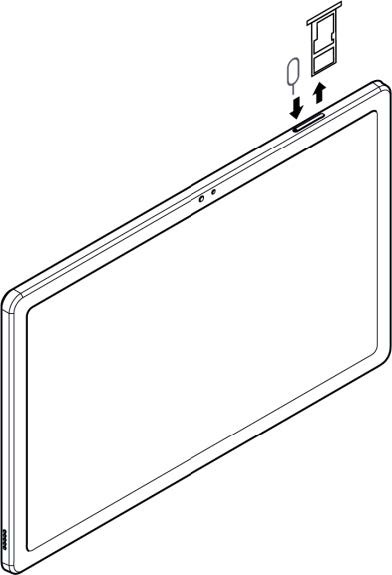
- Take out the SIM card tray, and put the SIM card into the tray. Be careful with the direction and ensure that the SIM card is level and fixed.
- Inset the SIM card try into the slot.
Installing Wiring Harnesses
Materiály 
| Žádný. | Jméno | množství | Poznámky |
| 1 | Cab charger cable | 1 | |
| 2 | Hlavní napájecí kabel | 1 | |
| 3 | GNSS receiver cable | 1 | |
| 4 | Cab charger | 1 |
Postup instalace
Connect the cables according to the figure below.
Poznámka:
- Turn off the agricultural machinery or its battery before plugging or unplugging cables or connecting devices.
- Avoid hot areas and sharp edges when wiring.
- Connect the main power cable to the negative electrode of the power supply, then to the positive electrode, and finally to other cables.
Návrhy:
- Route the GNSS receiver cable from the vehicle roof, for example, the sunroof, into the cab and to the right front of the seat.
- Connect the negative electrode of the main power cable to the negative electrode of the power supply, and do not connect the positive electrode to the power supply. Then, use nylon cable ties to fix the cable on the right side of the vehicle and into the cab from the right front.
- Connect one end of the cab charger cable to the main power cable and the other end to the GNSS receiver cable.
- To charge the terminal, connect the cab charger to the round end of the cab charger cable and connect port A of the USB A-Type-C cable to the cab charger (item Din the figure below) and the Type-C port to the terminal. If the agricultural machinery is equipped with a cigarette lighter (item E in the figure below), you can get power directly from it.
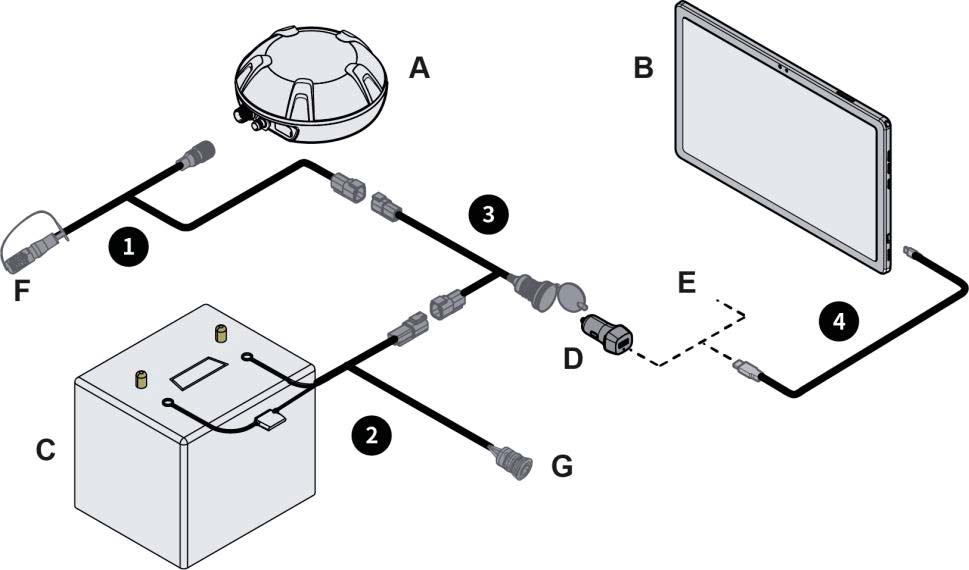
| l | GNSS receiver cable | A | GNSS přijímač | E | Cab charger |
| 2 | Napájecí kabel | B | Terminál | F | Rádiový port |
| 3 | Cab charger cable | C | Napájení | G | Vypínač |
| 4 | USB A-Type-C cable | D | Cab charger |
Upozornění na autorská práva:
SMAJAYU reserves the copyright for this manual and all contents herein. No part of this manual may be reproduced, extracted, reused, and/or reprinted in any form or by any means without the prior written permission of SMAJAYU.
Tato příručka se může změnit bez předchozího upozornění.
Revize:
| Verze | Datum | Popis |
| Rev. 1.0 | 2024.05 | První vydání |
Uvedení systému do provozu
Podmínky webu
- Ensure that the agricultural machinery is in good condition and all parts are functional.
- Ensure that there are no signal obstructions such as tall trees and buildings around the site.
- Ujistěte se, že nejsou žádné vysokoobjemovétagelektrické vedení do 150 m kolem místa.
- The site ground should be level and no smaller than 50 m x 10 m.
- Místo by mělo mít rovný betonový nebo asfaltový chodník.
- Kolaudace by měla být provedena na neveřejných komunikacích. Zajistěte, aby se v blízkosti rypadla během uvádění do provozu nezdržovala žádná irelevantní osoba, aby se předešlo nehodám.
Zapnutí
Zkontrolujte před zapnutím
- Zkontrolujte, zda je správně připojeno napájení.
- Zkontrolujte, zda napájecí objtage je vyhovující.
Check After Power-on
Zapněte ovládací terminál a zkontrolujte, zda se systémový program spouští normálně.
Kalibrace parametrů
Calibrate the implement parameters if there is any overlap or skip between guidance lines. Choose Menu > Device Settings > Calibration on the terminal, select whether to calculate the correction automatically or manually, and then tap Calibrate. The correction will be added to the accumulated correction. You can also tap the button again for correction. Tap Clear if you need to clear the correction and the accumulated correction.
The preceding commissioning procedure ensure that accurate navigation is available. Before proceeding, do the following:
Check the signal source connection – Check the task configuration – Create or select fields → Create or select a task →Create or select a boundary → Create or select a guidance line → Check the implement configuration→ Obtain the heading – Start the operation. For details, see the Agricultural Machinery Guidance System Software User Manual
Dodatek
Hardwarové specifikace
| Žádný. | Komponent | Specifikace |
| 1 | Terminál | Size: 248x157x8mmBasic configuration: 10.36-inch capacitive touchscreen, LED backlight, 12oox2000 pixels, 400 nits, 6 GB RAM, 128 GB ROM Power supply: 5 V Signal sources: radio, satellite, and 4G; Wi-Fi and Bluetooth connection Operating temperature: -10°C to +55°CStorage temperature: -20°C to +70°C |
| 2 | GNSS přijímač | Rozměr: 162×64.5 mm Frequency: GPS LlC/ A, LlC, L2P(W), L2C, L5; GLONASS L1 and L2; BDS Bll, B2I, B31, BlC, and B2a;Galileo El, E5a, E5b, and SBAS Provozní objemtage: 9 V až 36 V Provozní proud: < 300 mA Operating temperature: -20°c to +70°C Storage temperature: -40°C to +85°CIP rating: IP66 |
Záruka
- All users who purchase the agricultural machinery guidance system enjoy a 2-year warranty, including lifetime free updates for the system software. The warranty period starts from the date of product sale (invoice issuance).
- Within the warranty period of the agricultural machinery guidance system, any damaged part will be repaired or replaced by the dealer free of charge if the warranty for the damaged part is valid. If the damaged part is out of the warranty period, the user needs to purchase a new part, and the dealer will repair the system for the user.
- If the agricultural machinery guidance system is damaged due to improper use, maintenance, or adjustment of the user, or other non-quality reasons during the warranty period, the user needs to purchase a spare part, and the dealer or SMAJAYU will repair the system free of charge.
- The dealer will provide free installation, debugging, training, and service within the warranty period of the agricultural machinery guidance system.
- SMAJAYU s reserves the right of interpretation for this warranty commitment.
Před použitím si přečtěte:
 Install in strict accordance with this manual.
 Máte-li během používání nějaké otázky, obraťte se na servisního technika.
Zřeknutí se odpovědnosti:
- Zakoupené produkty, služby a funkce jsou stanoveny smlouvou. Všechny produkty, služby a funkce popsané v této příručce nebo jejich část nemusí spadat do rozsahu vašeho nákupu nebo použití. Pokud není ve smlouvě uvedeno jinak, veškerý obsah této příručky je poskytován „TAK, JAK JE“, bez záruk jakéhokoli druhu, výslovných nebo předpokládaných.
- The content of this manual is subject to change due to product upgrades and other reasons. SMAJAYU reserves the right to modify the content of this manual without notice.
- Tato příručka poskytuje pouze návod k použití tohoto produktu. Při přípravě této příručky bylo vynaloženo veškeré úsilí k zajištění přesnosti obsahu, ale žádné informace v této příručce nepředstavují záruku jakéhokoli druhu, výslovnou ani předpokládanou.
Předmluva
Thank you for using this SMAJAYU product. This manual provides detailed hardware installation guide. If you have any questions, contact the local dealer.
Účel a zamýšlení uživatelé
Tato příručka představuje fyzické vlastnosti, instalační postupy a technické specifikace produktu, jakož i specifikace a použití kabelových svazků a konektorů. Na základě předpokladu, že uživatelé jsou obeznámeni s termíny a pojmy souvisejícími s tímto produktem, je tato příručka určena uživatelům, kteří si přečetli předchozí obsah a mají zkušenosti s instalací a údržbou hardwaru.
Technická podpora
SMAJAYU official webmísto: www.smajayu.com For detailed information on installation, use and function updates, please contact us at tech@smajayu.com a podpora@smajayu.com.
FFCC statements
This device (FCC ID: 2BH4K-SMA10GPS) complies with part 15 of the FCC rules. Operation is subject to the following two conditions:
- Toto zařízení nesmí způsobovat škodlivé rušení a
- Toto zařízení musí akceptovat jakékoli přijaté rušení, včetně rušení, které může způsobit nežádoucí provoz.
POZNÁMKA: The manufacturer is not responsible for any radio or TV interference caused by unauthorized modifications or changes to this equipment. Such modifications or changes could void the user’s authority to operate the? equipment.
POZNÁMKA: Toto zařízení bylo testováno a shledáno vyhovujícím limitům pro digitální zařízení třídy B podle části 15 pravidel FCC. Tyto limity jsou navrženy tak, aby poskytovaly přiměřenou ochranu před škodlivým rušením při domácí instalaci. Toto zařízení generuje a může vyzařovat vysokofrekvenční energii, a pokud není nainstalováno a používáno v souladu s pokyny, může způsobovat škodlivé rušení rádiové komunikace. Nelze však zaručit, že při konkrétní instalaci k rušení nedojde. Pokud toto zařízení způsobuje škodlivé rušení rádiového nebo televizního příjmu, což lze zjistit vypnutím a zapnutím zařízení, doporučujeme uživateli, aby se pokusil napravit rušení jedním nebo více z následujících opatření:
- Přeorientujte nebo přemístěte přijímací anténu.
- Zvětšete vzdálenost mezi zařízením a přijímačem.
- Připojte zařízení do zásuvky v jiném okruhu, než ke kterému je připojen přijímač.
- Požádejte o pomoc prodejce nebo zkušeného rádiového/TV technika.
Federal Communication Commission (FCC) Radiation Exposure Statement When using the product, maintain a distance of 20cm from the body to ensure compliance with RF exposure requirements. Changes or modifications not expressly approved by the party responsible for compliance could void the user’s authority to operate the equipment.
©SMAJAYU. All rights reserved.
FAQ
- Otázka: Co mám dělat, když se při používání zařízení setkám s rušením?
- A: If interference occurs, try adjusting the device’s position or moving it to a different location to minimize interference. Ensure no unauthorized modifications have been made.
- Otázka: Jak mohu zajistit shodu s požadavky na vystavení RF?
A: Maintain a distance of at least 20cm between the device and your body while using it to comply with RF exposure requirements. - Otázka: Mohu provést úpravy zařízení za účelem přizpůsobení?
A: Only make modifications that are expressly approved by the responsible party for compliance to avoid voiding your authority to operate the equipment.
Dokumenty / zdroje
 |
SMAJAYU SMA10GPS GPS Tractor Multi Function Navigation System [pdfNávod k obsluze SMA10GPS, SMA10GPS GPS Tractor Multi Function Navigation System, GPS Tractor Multi Function Navigation System, Multi Function Navigation System, Navigation System |