AXXESS AXDSPX-GL10 Digital Signal Processor
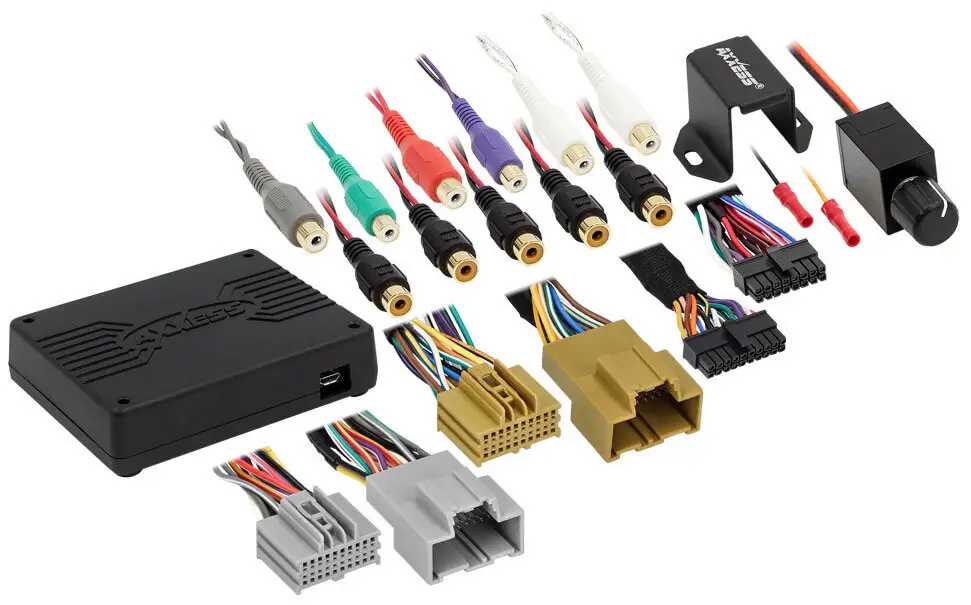
COMPONENTI INTERFACE
- Interfaccia AXDSPX-GL10
- Cintura d'interfaccia AXDSPX-GL10
- AXDSPX-GL10 cablaggio in T di u veiculu
- Pumba di Bass
APPLICAZIONI
- Visita Axxessinterfaces.com per a lista di applicazioni attuale
GM DSP Interface with Pre-Wired Harness 2016-2019
CARATTERISTICHE INTERFACE
- Prughjettu per non-ampmudelli lificati
- Include un DSP (Processore di Signal Digitale)
- Selectable 31-band graphic EQ or 5 5-band parametric EQ
- 10 uscite assignabili individualmente
- Equalizazione indipendente per ognuna di e 10 uscite
- Independent high-pass, low-pass, and band-pass filters
- Ogni canale pò esse ritardatu indipindente finu à 10ms
- Circuiti di rilevazione è limitazione di clipping
- Conserva i campanili di u sensore di parcheghju in fabbrica
- Retains OnStar® voice prompts (Features continued on next page)
Per l'Istruzzioni di Disassembly Dash, riferite à metraonline.com. Inserite l'annu, a marca è u mudellu di u veiculu in a Guida di Vehicle Fit for Radio Install kits.
FEATURES CONT.
- Livellu di campanile regolabile
- Facile daretu à l'installazione di a radio cun imbracatura pre-cablata
- Pulsante Bass inclusu per u cuntrollu di u nivellu di u subwoofer amp
- Impostazioni regolate via Bluetooth® in un'applicazione di dispositivi intelligenti (tablet o telefuninu mobile), compatibile sia cù i dispositivi Android sia Apple
- Leghjite, scrivite, è guardate cunfigurazioni per u futuru richiamatu
- Password-protect feature available in the mobile app
- Micro-B USB aghjurnabile
STRUMENTI E ACCESSORI D'INSTALLAZIONE NECESSARI
- Strumenta crimping è connectors, o pistola di saldatura, saldatura, è shrink calori
- Tape
- Tagliafili
- Cravatte zip
- Multimetru

ATTENZIONE: Cù a chjave fora di l'ignizione, disconnect u terminal negativu di a bateria prima di stallà stu pruduttu. Assicuratevi chì tutte e cunnessione di l'installazione, in particulare i luci di l'indicatore di l'airbag, sò inseriti prima di ricunniscendu a bateria o di ciclu l'ignizione per pruvà stu pruduttu.
NOTA: Cunsultate dinù l'istruzzioni incluse cù l'accessoriu di ricambio prima di stallà stu dispusitivu.
INSTALLAZIONE
OPZIONI DI INSTALLAZIONE
- Adding a subwoofer to a factory system:
- This feature offers the ability to add a subwoofer to a non-amplified factory system. (Refer to Page 3)
- Aghjunghjendu una gamma completa amp è subwoofer à un sistema di fabbrica:
- Questa funzione offre a capacità di aghjunghje una gamma completa amp and sub to a factory system on a non-amplified system. (Refer to Page 4)
- Nota: The interface provides a 12-volt 1-amp output per attivà u aftermarket amp(s). Se installate parechje amps, un relè automobilisticu SPDT serà necessariu se u amp corrente di accensione di tutti amps cumminati supera 1 amp. Aduprate u numeru di parte Metra E-123 (vendutu separatamente) per i migliori risultati.
INSTALLAZIONE
- Eliminate a radiu di fabbrica*, poi scollega tutti i cunnessi.
- Installa u T-harness di u veiculu AX-DSPX-GL10 à u veiculu è fate tutte e cunnessione necessarie, ma lasciate amp filu di accensione disconnessu.
- Cunnette u cablaggio in T di u veiculu AX-DSPX-GL10 à l'interfaccia AX-DSPX-GL10.
- Collega l'interfaccia AX-DSPX-GL10 all'interfaccia AX-DSPX-GL10.
- Scaricate è installate l'app AXDSP-X da Google Play Store o Apple App Store.
- Open the app then select the Bluetooth® Connection tab. Follow the instructions to pair the mobile device to the interface. Refer to Page 5 for more information.
- Scroll to the Configuration tab then select the vehicle type. Press the Lock Down ** button to save the configuration. Refer to Page 6 for more information.
- Cunnette u amp filu di accensione.
- Adjust the settings in the app as desired. Press the Lock Down button to save any new configurations.
- Riferite à metraonline.com for the dash disassembly. If Metra makes a dash kit for the vehicle, disassembly will be within those instructions.
- Anytime the interface is locked down, the key must be cycled off, then back on.
ADDING A SUBWOOFER TO A FACTORY SYSTEM

AGGIUNGIU UN PIANU COMPLETO AMP & SUB À UN SISTEMA DI FABBRICA

MOBILE APP: QUICK SETUP STEPS THROUGH AXDSP-XL APP
Google Play Store
Android 9 o superiore
Apple App Store
iOS 12.1 o superiore
- Download and install the AXDSP-XL App from the Google Play Store or Apple App Store.
- Turn Vehicle Ignition on. Make sure the Remote Turn On lead is disconnected.
- Open the app: Select Bluetooth® Connections page.
- Selezziunate Scan, tutti i dispositi AXDSP dispunibuli in u spaziu seranu visualizati. Selezziunate u vostru AXDSP è culpisce cunnette. (Figura A)
- Selezziunate a pagina di cunfigurazione.
- Selezziunà l'icona di u tipu di veiculu
- Select the Vehicle Make:____ (Example: CHEVROLET)
- Select the Vehicle’s model: ____ (Example: SILVERADO)
- Sceglite Cù OE Amp or Without OE Amp
- Hit Apply (Figura B)
- Assicuratevi chì u voluminu di a radiu hè in tuttu.
- Cunnette u amp turn-on wire from the AXDSPX-GL10 T-harness to the aftermarket amplifiers.

- From the Configuration page click the Identify button to confirm that the Locking Down Data AXDSPX-GL10 is connected properly. If so, a chime will be heard from the front left speaker.
- Press the Lock Down button to save the configuration. (Do not turn the ignition off until this process is completed) (Figure C)
- Select the Bluetooth® Configurations page and disconnect the DSPX.
- Turn ignition off, close all doors, then lock the vehicle using the key fob. The vehicle will need to sit uninterrupted for 10 minutes while the vehicle goes to sleep. (Make sure the Key fob is 15 feet away from the vehicle)
- Sblocca u Veiculu, accende l'ignizione è teste e funzioni di a radiu.
- Adjust the DSP settings in the app as desired. Refer to the instructions under the Setup Instructions tab, or online at Axxessinterfaces.com for an explanation of each tab in the app.

Last and most important: You MUST lock down your configuration and cycle the key!!!
SPECIFICAZIONI
Specificazioni
- Impedenza d'ingressu 1M Ohm
- Canali di input 6 Livellu altu / bassu selezziunà
- Input Options: High Level or Low Level
- Tipu di input Differential-Balanced
- Input Voltage: High Level Range 0 – 28 volts (Peak to Peak)
- Input Voltage: Low Level Range 0 – 4.9 volts (Peak to Peak)
- Canali di output 10
- Uscita Voltage Finu à 5 volti RMS
- Impedenza di uscita 50 Ohms
- Equalizer Type 31 Band EQ Graphic, +/- 10dB
- THD <0.03%
- Risposta di Frequenza 20Hz - 20kHz
- Crossover 3-Way LPF, BPF, HPF, THP per channel
- Crossover Type Linkwitz-Riley 24 dB Slope, Fixed
- Sampling 48kHz
- Rapportu S/N 105dB @ 5-volt RMS
Generale
- Voltage 10 – 16-volts DC
- Assorbimentu di corrente in standby ~ 7mA
- Corrente di operazione ~ 150 mA
- Aghjustazioni / Cuntrolli Applicazione via Bluetooth®
- Remote Output 12-volts DC (Signal Sense or with ignition)
MORE INFORMATION
- Scan QR Code
- Ulteriori passi di risoluzione di prublemi è informazioni ponu esse situatu à: axxessinterfaces.com/product/AXDSPX-GL10

- Ulteriori passi di risoluzione di prublemi è informazioni ponu esse situatu à: axxessinterfaces.com/product/AXDSPX-GL10
- Avè difficultà ? Semu quì per aiutà.
- Cuntattate a nostra linea di supportu tecnicu à: 386-257-1187
- O via email à:
- techsupport@metra-autosound.com
Ore di supportu tecnicu (ora standard orientale)
- Lunedì - Venerdì: 9:00 AM - 7:00 PM
- Sabatu: 10:00 AM - 5:00 PM
- Dumenica: 10:00 AM - 4:00 PM
- AxxessInterfaces.com
FAQs
- Q: Do I need to disconnect the negative battery terminal before installing the product?
- A: Yes, it is recommended to disconnect the negative battery terminal with the key out of the ignition before installation. Ensure all connections are made before reconnecting the battery.
- Q: How do I save configurations using the AXDSP-X app?
- A: In the app, navigate to the Configuration tab, select your vehicle type, adjust settings as desired, and press the Lock Down button to save the configurations.
Documenti / Risorse
 |
AXXESS AXDSPX-GL10 Digital Signal Processor [pdfManuale d'istruzzioni AXDSPX-GL10, AXDSPX-GL10 Digital Signal Processor, Digital Signal Processor, Signal Processor, Processor |