AXXESS AXDSPX-GL10 Digitale Seinverwerker
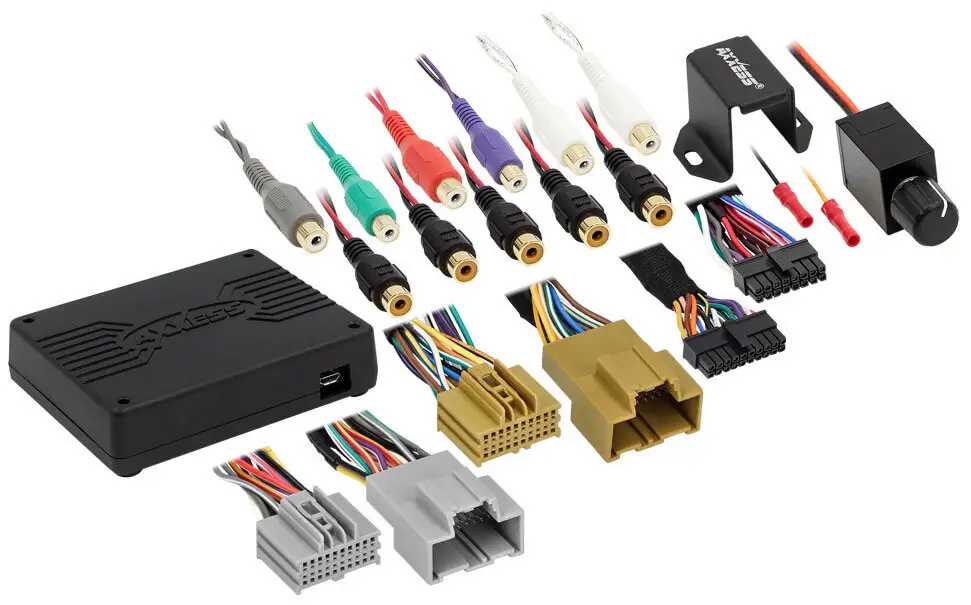
INTERFACE KOMPONENTE
- AXDSPX-GL10 koppelvlak
- AXDSPX-GL10 koppelvlak harnas
- AXDSPX-GL10 voertuig T-harnas
- Bas knop
AANSOEKE
- Besoek Axxessinterfaces.com vir huidige aansoeklys
GM DSP-koppelvlak met voorafbedrade harnas 2016-2019
INTERFACE KENMERKE
- Ontwerp vir nie-ampverskanste modelle
- Bevat 'n DSP (Digital Signal Processor)
- Selectable 31-band graphic EQ or 5 5-band parametric EQ
- 10 afsonderlik toewysbare uitsette
- Onafhanklike gelykmaking op elk van die 10 uitsette
- Independent high-pass, low-pass, and band-pass filters
- Elke kanaal kan tot 10 ms onafhanklik vertraag word
- Knipopsporing en beperking van stroombane
- Behou fabrieksparkeersensorklokke
- Retains OnStar® voice prompts (Features continued on next page)
Vir Dash Demontage Instruksies, verwys na metraonline.com. Voer die jaar, fabrikaat en model van die voertuig in die Voertuigpasgids vir Radio-installasiestelle in.
KENMERKE VERVOLG.
- Verstelbare gongvlak
- Maklik agter die radio-installasie met vooraf bedrade harnas
- Basknop ingesluit vir vlakbeheer van die subwoofer amp
- Instellings aangepas via Bluetooth® in 'n slimtoesteltoepassing (tablet of selfoon), versoenbaar met beide Android- en Apple -toestelle
- Lees, skryf en stoor konfigurasies vir toekomstige herroeping
- Password-protect feature available in the mobile app
- Micro-B USB opdateerbaar
GEREEDSKAP & INSTALLASIE TOEBEHORE VEREIST
- Krimpgereedskap en verbindings, of soldeergeweer, soldeersel en hittekrimp
- Band
- Draadkapper
- Ritsbande
- Multimeter

AANDAG: Met die sleutel uit die aansitter, ontkoppel die negatiewe batteryterminaal voordat hierdie produk geïnstalleer word. Maak seker dat alle installasieverbindings, veral die lugsak-aanwyserligte, ingeprop is voordat die battery weer gekoppel word of die aansitter gedraai word om hierdie produk te toets.
LET WEL: Verwys ook na die instruksies wat by die namarkbykomstigheid ingesluit is voordat hierdie toestel geïnstalleer word.
INSTALLASIE
INSTALLASIE-OPSIES
- Adding a subwoofer to a factory system:
- This feature offers the ability to add a subwoofer to a non-amplified factory system. (Refer to Page 3)
- Voeg 'n volledige reeks by amp en subwoofer na 'n fabriekstelsel:
- Hierdie funksie bied die moontlikheid om 'n volledige reeks by te voeg amp and sub to a factory system on a non-amplified system. (Refer to Page 4)
- Let wel: The interface provides a 12-volt 1-amp uitvoer om na -mark aan te skakel amp(s). As u meer as een installeer amps, sal 'n SPDT -motoraflos nodig wees as die amp aanskakelstroom van almal amps gekombineer oorskry 1 amp. Gebruik Metra-onderdeelnommer E-123 (afsonderlik verkoop) vir die beste resultate.
INSTALLASIE
- Verwyder die fabrieksradio* en trek dan alle verbindings uit.
- Installeer die AX-DSPX-GL10 voertuig T-harnas aan die voertuig en maak alle nodige verbindings, maar laat die amp aanskakeldraad ontkoppel.
- Koppel die AX-DSPX-GL10-voertuig-T-harnas aan die AX-DSPX-GL10-koppelvlak.
- Koppel die AX-DSPX-GL10-koppelvlakharnas aan die AX-DSPX-GL10-koppelvlak.
- Laai die AXDSP-X-toepassing af en installeer dit vanaf die Google Play Winkel of Apple App Store.
- Open the app then select the Bluetooth® Connection tab. Follow the instructions to pair the mobile device to the interface. Refer to Page 5 for more information.
- Scroll to the Configuration tab then select the vehicle type. Press the Lock Down ** button to save the configuration. Refer to Page 6 for more information.
- Koppel die amp aanskakeldraad.
- Adjust the settings in the app as desired. Press the Lock Down button to save any new configurations.
- Verwys na metraonline.com for the dash disassembly. If Metra makes a dash kit for the vehicle, disassembly will be within those instructions.
- Anytime the interface is locked down, the key must be cycled off, then back on.
VOEG 'N SUBWOOFER BY 'N FABRIEKSSTELSEL

TOEVOEGING VAN 'N VOLLEDIGE REEKS AMP & SONDER 'N FABRIEKSTELSEL

MOBIELE APP: VINNIGE OPSTELLINGSTAPPE DEUR DIE AXDSP-XL APP
Google Play Winkel
Android 9 of hoër
Apple App Store
iOS 12.1 of hoër
- Download and install the AXDSP-XL App from the Google Play Store or Apple App Store.
- Turn Vehicle Ignition on. Make sure the Remote Turn On lead is disconnected.
- Open the app: Select Bluetooth® Connections page.
- Kies Skandeer, alle beskikbare AXDSP-toestelle binne bereik sal vertoon word. Kies jou AXDSP en druk koppel. (Figuur A)
- Kies die konfigurasiebladsy.
- Kies Voertuigtipe-ikoon
- Select the Vehicle Make:____ (Example: CHEVROLET)
- Select the Vehicle’s model: ____ (Example: SILVERADO)
- Kies Met OE Amp of Sonder OE Amp
- Klik Toepas (Figuur B)
- Maak seker dat die radiovolume heeltemal af is.
- Koppel die amp aanskakeldraad vanaf die AXDSPX-GL10 T-harnas na die namark amplewendes.

- From the Configuration page click the Identify button to confirm that the Locking Down Data AXDSPX-GL10 is connected properly. If so, a chime will be heard from the front left speaker.
- Press the Lock Down button to save the configuration. (Do not turn the ignition off until this process is completed) (Figure C)
- Select the Bluetooth® Configurations page and disconnect the DSPX.
- Turn ignition off, close all doors, then lock the vehicle using the key fob. The vehicle will need to sit uninterrupted for 10 minutes while the vehicle goes to sleep. (Make sure the Key fob is 15 feet away from the vehicle)
- Ontsluit Voertuig, skakel die aansitter aan en toets radio se funksies.
- Adjust the DSP settings in the app as desired. Refer to the instructions under the Setup Instructions tab, or online at Axxessinterfaces.com for an explanation of each tab in the app.

Last and most important: You MUST lock down your configuration and cycle the key!!!
SPESIFIKASIES
Spesifikasies
- Insetimpedansie 1M Ohm
- Invoerkanale 6 Hoë/Lae vlak Kiesbaar
- Input Options: High Level or Low Level
- Invoertipe Differensiaal-gebalanseerd
- Invoer Voltage: High Level Range 0 – 28 volts (Peak to Peak)
- Invoer Voltage: Low Level Range 0 – 4.9 volts (Peak to Peak)
- Uitsetkanale 10
- Uitset Voltage Tot 5-volt RMS
- Uitsetimpedansie 50 Ohm
- Equalizer Tipe 31 Band Grafiese EQ, +/- 10dB
- THD <0.03%
- Frekwensierespons 20Hz – 20kHz
- Crossover 3-Way LPF, BPF, HPF, THP per channel
- Crossover Type Linkwitz-Riley 24 dB Slope, Fixed
- Sampling 48kHz
- S/N-verhouding 105dB @ 5-volt RMS
Algemeen
- Bedryfsvoltage 10 – 16-volts DC
- Standby huidige trekking ~7mA
- Werking Huidige trekking ~150mA
- Aanpassings/kontroles Toepassing via Bluetooth®
- Remote Output 12-volts DC (Signal Sense or with ignition)
MEER INLIGTING
- Skandeer QR-kode
- Verdere foutsporingstappe en inligting kan gevind word by: axxessinterfaces.com/product/AXDSPX-GL10

- Verdere foutsporingstappe en inligting kan gevind word by: axxessinterfaces.com/product/AXDSPX-GL10
- Het u probleme? Ons is hier om te help.
- Kontak ons Tegniese Ondersteuningslyn by: 386-257-1187
- Of per e-pos by:
- techsupport@metra-autosound.com
Tegniese ondersteuningsure (Eastern Standard Time)
- Maandag – Vrydag: 9:00 – 7:00
- Saterdag: 10:00 – 5:00
- Sondag: 10:00 – 4:00
- AxxessInterfaces.com
Gereelde vrae
- V: Moet ek die negatiewe batteryklem ontkoppel voordat ek die produk installeer?
- A: Yes, it is recommended to disconnect the negative battery terminal with the key out of the ignition before installation. Ensure all connections are made before reconnecting the battery.
- V: Hoe stoor ek konfigurasies met behulp van die AXDSP-X-app?
- A: In the app, navigate to the Configuration tab, select your vehicle type, adjust settings as desired, and press the Lock Down button to save the configurations.
Dokumente / Hulpbronne
 |
AXXESS AXDSPX-GL10 Digitale Seinverwerker [pdf] Instruksiehandleiding AXDSPX-GL10, AXDSPX-GL10 Digitale Seinverwerker, Digitale Seinverwerker, Seinverwerker, Verwerker |