![]()
TC72/TC77
Manyen Odinatè
Gid referans pwodwi
Pou Android 11™
MN-004303-01EN Rev A
TC7 Seri Touch Odinatè
Copyright
ZEBRA ak tèt zebra stilize a se mak komèsyal Zebra Technologies Corporation, ki anrejistre nan plizyè jiridiksyon atravè lemond. Google, Android, Google Play ak lòt mak yo se mak komèsyal Google LLC. Tout lòt mak komèsyal yo se pwopriyete pwopriyetè respektif yo. ©2021 Zebra Technologies Corporation ak/oswa afilye li yo. Tout dwa rezève.
Enfòmasyon ki nan dokiman sa a kapab chanje san avètisman. Lojisyèl ki dekri nan dokiman sa a bay anba yon akò lisans oswa akò non-divilgasyon. Yo ka itilize oswa kopye lojisyèl an sèlman an akò ak kondisyon akò sa yo.
Pou plis enfòmasyon konsènan deklarasyon legal ak pwopriyetè, tanpri ale nan:
lojisyèl: zebra.com/linkoslegal.
DWA DWA: zebra.com/copyright.
GARANTI: zebra.com/warranty.
AKÒ LISANS ITIlizatè FINI: zebra.com/eula.
Kondisyon Itilizasyon
Deklarasyon Pwopriyetè
Manyèl sa a gen enfòmasyon pwopriyetè Zebra Technologies Corporation ak filiales li yo ("Zebra Technologies"). Li fèt sèlman pou enfòmasyon ak itilizasyon pati ki opere ak antretyen ekipman ki dekri la a. Yo pa ka itilize, repwodui oswa divilge enfòmasyon prive sa yo bay okenn lòt pati pou okenn lòt rezon san otorizasyon eksprime, alekri Zebra Technologies.
Amelyorasyon pwodwi
Amelyorasyon kontinyèl nan pwodwi se yon politik Zebra Technologies. Tout espesifikasyon ak desen yo sijè a chanje san avètisman.
Limit responsabilite
Zebra Technologies pran mezi pou asire ke spesifikasyon Jeni yo ak manyèl yo pibliye yo kòrèk; sepandan, erè rive. Zebra Technologies rezève dwa pou l korije nenpòt erè sa yo epi li refize responsablite ki soti ladan l.
Limitasyon Responsablite
Nan okenn ka, Zebra Technologies oswa nenpòt lòt moun ki enplike nan kreyasyon, pwodiksyon oswa livrezon pwodwi ki akonpaye an (ki gen ladan pyès ki nan konpitè ak lojisyèl) ta dwe responsab pou nenpòt domaj kèlkeswa (ki gen ladan, san limitasyon, domaj konsekan ki gen ladan pèt pwofi biznis, entèripsyon biznis). , oswa pèt enfòmasyon biznis) ki soti nan itilizasyon, rezilta itilizasyon, oswa enkapasite pou sèvi ak pwodui sa a, menm si yo te avize Zebra Technologies sou posiblite a. nan domaj sa yo. Gen kèk jiridiksyon ki pa pèmèt esklizyon oswa limitasyon domaj aksidan oswa konsekan, kidonk limit oswa esklizyon ki anwo a ka pa aplike pou ou.
Konsènan Gid sa a
Konfigirasyon
Gid sa a kouvri konfigirasyon aparèy sa yo.
| Konfigirasyon | Radyo | Ekspozisyon | memwa | Done Capture Opsyon |
Sistèm operasyon |
| TC720L | WLAN: 802.11 a/b/g/n/ ac/d/h/i/r/k/v3/wWPAN: Bluetooth v5.0 Low Energy |
4.7" Segondè Definisyon (1280 x 720) LCD |
4 GB RAM / 32 GB Flash |
Imager 2D, kamera ak entegre NFC |
ki baze sou android, Google ™ mobil Sèvis (GMS) 11 |
| TC77HL | WWAN: HSPA+/LTE/ CDMAWLAN: 802.11 a/b/g/ n/ac/d/h/i/r/k/v3/wWPAN: Bluetooth v5.0 Low Energy |
4.7" Segondè Definisyon (1280 x 720) LCD |
4 GB RAM / 32 GB Flash |
Imager 2D, kamera ak NFC entegre | Ki baze sou android, Google ™ Sèvis mobil (GMS) 11 |
Konvansyon Notasyon
Yo itilize konvansyon sa yo nan dokiman sa a:
- Yo itilize tèks fonse pou mete aksan sou bagay sa yo:
- Bwat dyalòg, fenèt ak non ekran
- Lis drop-down ak non bwat lis
- Non kaz ak bouton radyo yo
- Ikon sou yon ekran
- Non kle sou yon klavye
- Non bouton sou yon ekran.
- Bal (•) endike:
- Atik aksyon
- Lis altènativ yo
- Lis etap obligatwa ki pa nesesèman sekans.
- Lis sekans (pa egzanpample, sa yo ki dekri etap pa etap pwosedi yo) parèt kòm lis nimewote.
Konvansyon Icon
Ansanm dokiman an fèt pou bay lektè a plis endikasyon vizyèl. Yo itilize ikon grafik sa yo nan tout seri dokiman an.
![]() REMAK: Tèks isit la endike enfòmasyon ki siplemantè pou itilizatè a konnen epi ki pa oblije ranpli yon travay. Tèks la endike enfòmasyon ki enpòtan pou itilizatè a konnen.
REMAK: Tèks isit la endike enfòmasyon ki siplemantè pou itilizatè a konnen epi ki pa oblije ranpli yon travay. Tèks la endike enfòmasyon ki enpòtan pou itilizatè a konnen.
![]() ENPÒTAN: Tèks la endike enfòmasyon ki enpòtan pou itilizatè a konnen.
ENPÒTAN: Tèks la endike enfòmasyon ki enpòtan pou itilizatè a konnen.
![]() ATANSYON: Si prekosyon an pa respekte, itilizatè a ka resevwa yon blesi minè oswa modere.
ATANSYON: Si prekosyon an pa respekte, itilizatè a ka resevwa yon blesi minè oswa modere.
![]() AVÈTISMAN: Si yo pa evite danje, itilizatè a ka blese grav oswa mouri.
AVÈTISMAN: Si yo pa evite danje, itilizatè a ka blese grav oswa mouri.
![]() DANJE: Si yo pa evite danje, itilizatè a ap blese grav oswa mouri.
DANJE: Si yo pa evite danje, itilizatè a ap blese grav oswa mouri.
Enfòmasyon sou Sèvis
Si ou gen yon pwoblèm ak ekipman ou, kontakte Zebra Global Customer Support pou rejyon ou an.
Enfòmasyon pou kontakte yo disponib nan: zebra.com/support.
Lè w ap kontakte sipò, tanpri genyen enfòmasyon sa yo disponib:
- Nimewo seri inite a
- Nimewo modèl oswa non pwodwi
- Kalite lojisyèl ak nimewo vèsyon an
Zebra reponn apèl pa imel, telefòn, oswa faks nan limit tan ki tabli nan akò sipò yo.
Si Sipò Kliyan Zebra pa ka rezoud pwoblèm ou a, ou ka bezwen retounen ekipman ou a pou fè sèvis epi yo pral ba w enstriksyon espesifik. Zebra pa responsab pou okenn domaj ki fèt pandan chajman si yo pa itilize veso anbake ki apwouve a. Anbake inite yo mal ka petèt anile garanti a.
Si ou te achte pwodwi biznis Zebra ou a nan men yon patnè biznis Zebra, kontakte patnè biznis sa a pou jwenn sipò.
Detèmine vèsyon lojisyèl
Anvan ou kontakte Sipò Kliyan, detèmine vèsyon lojisyèl aktyèl la sou aparèy ou an.
- Glise desann soti nan ba Estati a ak de dwèt pou ouvri panèl Aksè rapid la, epi apresa manyen
 .
. - Touche Sou telefòn.
- Scroll to view enfòmasyon sa yo:
• Enfòmasyon sou batri
• Enfòmasyon ijans
• Konpozan SW
• Enfòmasyon legal
• Modèl & pyès ki nan konpitè
• Android vèsyon
• Mizajou Sekirite Android
• Google Play sistèm aktyalizasyon
• Baseband vèsyon
• Kernel vèsyon
• Nimewo bati
Pou detèmine enfòmasyon IMEI aparèy la (WWAN sèlman), manyen About phone > IMEI.
- IMEI - Montre nimewo IMEI pou aparèy la.
- IMEI SV - Montre nimewo IMEI SV pou aparèy la.
Detèmine nimewo seri a
Anvan w kontakte Asistans Kliyan, detèmine nimewo seri aparèy ou an.
- Glise desann soti nan ba Estati a ak de dwèt pou ouvri panèl Aksè rapid la, epi apresa manyen .
- Touche Sou telefòn.
- Manyen modèl ak pyès ki nan konpitè.
- Manyen nimewo seri.
Kòmanse
Chapit sa a bay enfòmasyon pou fè aparèy la fonksyone pou premye fwa.
Debalaj Aparèy la
- Ak anpil atansyon retire tout materyèl pwoteksyon nan aparèy la epi sove veso a anbake pou depo pita ak anbake.
- Verifye ke sa ki annapre yo enkli:
• Manyen òdinatè
• 4,620 mAh PowerPercision + Lityòm-ion batri
• Men braslè
• Gid regilasyon. - Enspekte ekipman an pou domaj. Si nenpòt ki ekipman ki manke oswa domaje, kontakte sant la Sipò pou Kliyan Global imedyatman.
- Anvan w itilize aparèy la pou premye fwa, retire fim pwoteksyon anbake ki kouvri fenèt eskanè, ekspozisyon ak fenèt kamera a.
Karakteristik Aparèy
Figi 1 Devan View

Tablo 1 Devan View Karakteristik
| Nimewo | Atik | Fonksyon |
| 1 | Devan kamera fè fas a | Itilize pou pran foto ak videyo (si ou vle). |
| 2 | Done kaptire ki ap dirije | Endike estati kaptire done yo. |
| 3 | Chaje / Notifikasyon dirije |
Endike estati chaje batri pandan y ap chaje ak notifikasyon app ki te pwodwi. |
| 4 | Reseptè | Sèvi ak pou lèktur odyo nan mòd appareil. |
| 5 | Mikwofòn | Sèvi ak pou kominikasyon nan mòd Speakerphone. |
| 6 | Bouton pouvwa | Vire ekspozisyon an sou yo ak sou. Peze epi kenbe Reyajiste aparèy la, koupe oswa swap batri. |
| 7 | Capteur pwoksimite | Detèmine pwoksimite pou fèmen ekspozisyon lè nan mòd appareil. |
| 8 | Capteur limyè | Detèmine limyè anbyen pou kontwole ekspozisyon entansite ekleraj. |
| 9 | bouton meni | Ouvè yon meni ak atik ki afekte ekran oswa aplikasyon aktyèl la. |
| 10 | Bouton rechèch | Ouvè ekran aplikasyon ki sot pase a. |
| 11 | Oratè | Ofri pwodiksyon odyo pou lèktur videyo ak mizik. Bay odyo nan mòd oratè. |
| 12 | Chaje kontak | Bay pouvwa aparèy la soti nan câbles ak bèso. |
| 13 | Mikwofòn | Sèvi ak pou kominikasyon nan mòd appareil. |
| 14 | Bouton Kay | Montre ekran Kay la ak yon sèl laprès. Sou aparèy ki gen GMS, ouvè ekran Google Now a lè yo kenbe pou yon kout peryòd de tan. |
| 15 | Bouton tounen | Montre ekran anvan an. |
| 16 | Bouton PTT | Inisye kominikasyon pouse-a-pale (pwogramasyon). |
| 17 | Scan bouton | Inisye done kaptire (pwogramasyon). |
| 18 | Manyen ekran | Montre tout enfòmasyon ki nesesè yo opere aparèy la. |
Figi 2 Dèyè View

Tablo 2 Dèyè View Karakteristik
| Nimewo | Atik | Fonksyon |
| 19 | Kamera flash | Bay ekleraj pou kamera a. |
| 20 | Kamera | Pran foto ak videyo. |
| 21 | Men braslè aliye pwen | Bay pwen anklanche pou braslè men an. |
| 22 | Lage batri klete |
Peze yo retire batri a. |
| 23 | Men braslè | Sèvi ak pou kenbe aparèy la byen nan men ou. |
| 24 | Batri | Bay aparèy la pouvwa. |
| 25 | Manch elastik | Sèvi ak pou kenbe stylus si ou vle. |
| 26 | Bouton monte/desann volim | Ogmante ak diminye volim odyo (pwogramasyon). |
| 27 | Scan bouton | Inisye done kaptire (pwogramasyon). |
| 28 | Mikwofòn | Sèvi ak pandan anrejistreman videyo ak pou anile bri. |
| 29 | Sòti fenèt | Bay done kaptire lè l sèvi avèk Imager la. |
| 30 | Entèfas konektè |
Bay lame USB ak kominikasyon kliyan, odyo ak aparèy chaje atravè câbles ak akseswa. |
Mete kanpe aparèy la
Pou kòmanse itilize aparèy la pou premye fwa:
- Retire kouvèti SIM Lock Aksè (TC77 ak SIM Lock sèlman).
- Enstale yon kat SIM (TC77 sèlman).
- Enstale yon kat SAM.
- Enstale yon mikwo sekirite dijital (SD) kat (si ou vle).
- Enstale braslè men (si ou vle).
- Enstale batri a.
- Chaje aparèy la.
- Pouvwa sou aparèy la.
Retire SIM Lock Aksè kouvèti a
Modèl TC77 ak karakteristik SIM Lock gen ladan yon pòt aksè ki sekirize lè l sèvi avèk yon vis Microstix 3ULR-0.
![]() REMAK: TC77 ak SIM Lock sèlman.
REMAK: TC77 ak SIM Lock sèlman.
- Pou retire kouvèti aksè a, sèvi ak yon tournevis Microstix TD-54(3ULR-0) pou retire vis la nan panèl aksè a.
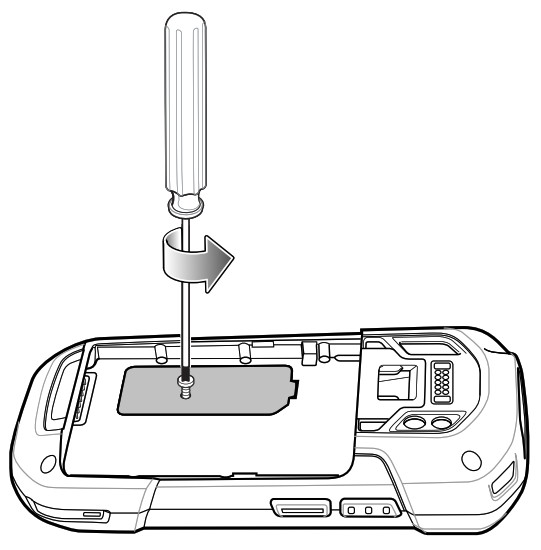
- Apre re-enstale kouvèti aksè a, asire w ke ou sèvi ak yon tournevis Microstix TD-54(3ULR-0) pou re-enstale vis la.
Enstale kat SIM la
![]() REMAK: TC77 sèlman.
REMAK: TC77 sèlman.
Sèlman sèvi ak yon kat nano SIM.
![]() ATANSYON: Swiv bonjan prekosyon pou egzeyat elektwostatik (ESD) pou evite domaje kat SIM la. Prekosyon ESD apwopriye yo enkli, men se pa sa sèlman, travay sou yon tapi ESD ak asire ke itilizatè a byen chita.
ATANSYON: Swiv bonjan prekosyon pou egzeyat elektwostatik (ESD) pou evite domaje kat SIM la. Prekosyon ESD apwopriye yo enkli, men se pa sa sèlman, travay sou yon tapi ESD ak asire ke itilizatè a byen chita.
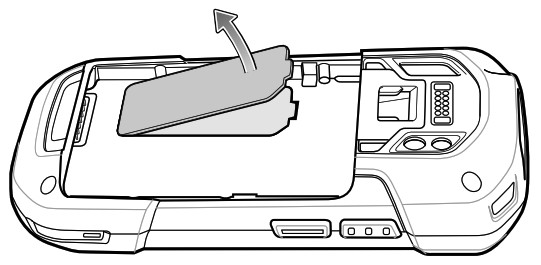
- Leve pòt aksè a.
 Figi 3 Kote plas TC77 SIM
 1 nano SIM plas 1 (default)
2 nano SIM plas 2 - Glise detantè kat SIM la nan pozisyon debloke.

- Leve pòt detantè kat SIM la.

- Mete kat nano SIM nan detantè kat la ak kontak fas atè.

- Fèmen pòt detantè kat SIM la epi glise nan pozisyon fèmen an.

- Ranplase pòt aksè a.

- Peze pòt aksè a desann epi asire li byen chita.
![]() ATANSYON: Pòt aksè a dwe ranplase epi byen chita pou asire bon aparèy sele.
ATANSYON: Pòt aksè a dwe ranplase epi byen chita pou asire bon aparèy sele.
Enstale kat SAM la
![]() ATANSYON: Swiv bonjan prekosyon pou dechaj elektwostatik (ESD) pou evite domaje kat Modil Aksè Sekirize (SAM). Prekosyon ESD apwopriye yo enkli, men se pa sa sèlman, travay sou yon tapi ESD ak asire ke itilizatè a byen chita.
ATANSYON: Swiv bonjan prekosyon pou dechaj elektwostatik (ESD) pou evite domaje kat Modil Aksè Sekirize (SAM). Prekosyon ESD apwopriye yo enkli, men se pa sa sèlman, travay sou yon tapi ESD ak asire ke itilizatè a byen chita.
![]() REMAK: Si w ap itilize yon kat mikwo SAM, yo mande yon adaptè twazyèm pati.
REMAK: Si w ap itilize yon kat mikwo SAM, yo mande yon adaptè twazyèm pati.
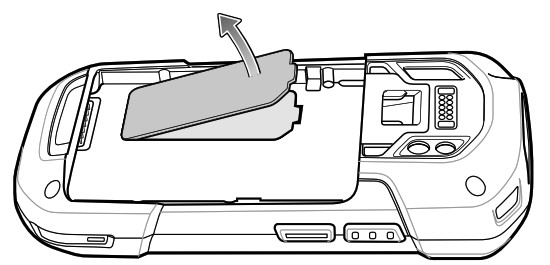
- Leve pòt aksè a.
- Mete yon kat SAM nan plas SAM la ak kwen koupe nan direksyon mitan aparèy la ak kontak yo fè fas a desann.
 1 Mini SAM plas
 - Asire w ke kat SAM la chita byen.
- Ranplase pòt aksè a.

- Peze pòt aksè a desann epi asire li byen chita.
 ATANSYON: Pòt aksè a dwe ranplase epi byen chita pou asire bon aparèy sele.
Enstale yon kat microSD
Fant pou kat microSD la bay depo segondè ki pa temèt. Plas la sitiye anba pake batri a.
Ale nan dokiman ki bay kat la pou plis enfòmasyon, epi swiv rekòmandasyon manifakti a pou itilize.
![]() ATANSYON: Swiv prekosyon apwopriye egzeyat Electrostatic (ESD) pou fè pou evite domaje kat la microSD. Bon prekosyon ESD gen ladan, men yo pa limite a sa sèlman, k ap travay sou yon tapi ESD ak asire ke operatè a byen chita.
ATANSYON: Swiv prekosyon apwopriye egzeyat Electrostatic (ESD) pou fè pou evite domaje kat la microSD. Bon prekosyon ESD gen ladan, men yo pa limite a sa sèlman, k ap travay sou yon tapi ESD ak asire ke operatè a byen chita.
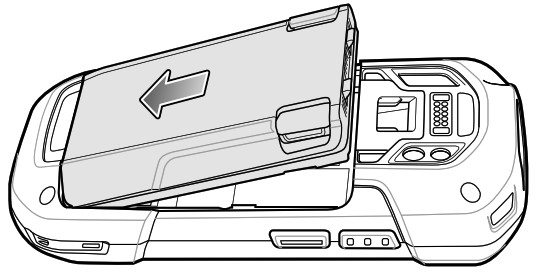
- Retire braslè men an, si enstale.
- Si aparèy la gen yon pòt aksè ki an sekirite, sèvi ak yon tournevis Microstix 0 pou retire vis 3ULR-0 la.

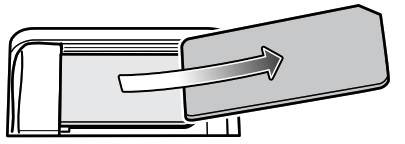
- Leve pòt aksè a.

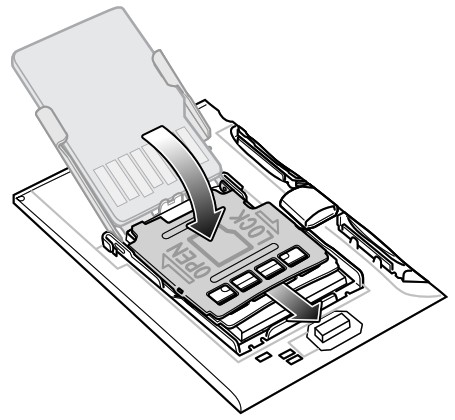
- Glise detantè kat microSD la nan pozisyon Louvri.
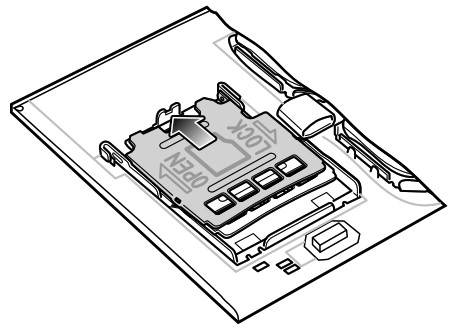
- Leve detantè kat microSD la.

- Mete kat la microSD nan pòt la detantè kat asire ke kat la glise nan onglè yo kenbe sou chak bò pòt la.

- Fèmen pòt detantè kat microSD la epi glise pòt la nan pozisyon Lock la.

- Ranplase pòt aksè a.

- Peze pòt aksè a desann epi asire li byen chita.
ATANSYON: Pòt aksè a dwe ranplase epi byen chita pou asire bon aparèy sele. - Si aparèy la gen yon pòt aksè ki an sekirite, sèvi ak yon tournevis Microstix 0 pou enstale vis 3ULR-0 la.

Enstale braslè a men ak batri
REMAK: Modifikasyon itilizatè nan aparèy la, patikilyèman nan batri a byen, tankou etikèt, avantaj tags, gravure, avek stickers son, elatriye, ka konpwomi pèfòmans entansyon an nan aparèy la oswa Pwodwi pou Telefòn. Nivo pèfòmans tankou sele (Pwoteksyon Ingress (IP)), pèfòmans enpak (gout ak tonbe), fonksyonalite, rezistans tanperati, elatriye ta ka fèt. PA mete okenn etikèt, avantaj tags, grave, avek stickers son, elatriye nan batri a byen.
REMAK: Enstalasyon braslè men an opsyonèl. Sote seksyon sa a si ou pa enstale braslè men an.
- Retire filler braslè men an nan plas braslè men an. Sere filler braslè a nan yon kote ki an sekirite pou ranplasman nan lavni.

- Mete plak braslè men an nan plas braslè men an.

- Mete batri a, anba an premye, nan lòj batri a nan do aparèy la.

- Peze batri a desann nan lòj la batri jiskaske seri yo batri lage menen nan plas li.

- Mete clip braslè men nan fant aliye braslè men an epi rale desann jiskaske li fèmen an plas.

Enstale batri a
REMAK: Modifikasyon itilizatè nan aparèy la, patikilyèman nan batri a byen, tankou etikèt, avantaj tags, gravure, avek stickers son, elatriye, ka konpwomi pèfòmans entansyon an nan aparèy la oswa Pwodwi pou Telefòn. Nivo pèfòmans tankou sele (Pwoteksyon Ingress (IP)), pèfòmans enpak (gout ak tonbe), fonksyonalite, rezistans tanperati, elatriye ta ka fèt. PA mete okenn etikèt, avantaj tags, grave, avek stickers son, elatriye nan batri a byen.
- Mete batri a, anba an premye, nan lòj batri a nan do aparèy la.
- Peze batri a desann nan lòj la batri jiskaske seri yo batri lage menen nan plas li.

Aparèy chaje
Anvan w sèvi ak aparèy la pou premye fwa, chaje batri prensipal la jiskaske dyòd dyòd limyè emisyon limyè vèt la (ki ap dirije) rete limen. Pou chaje aparèy la, sèvi ak yon kab oswa yon bèso ki gen ekipman pou pouvwa ki apwopriye a. Pou jwenn enfòmasyon sou Pwodwi pou Telefòn ki disponib pou aparèy la, gade Pwodwi pou Telefòn nan paj 142.
Batri a 4,620 mAh chaje konplètman nan mwens pase senk èdtan nan tanperati chanm.
Chaje batri a
- Konekte akseswar chaje a ak sous pouvwa ki apwopriye a.
- Mete aparèy la nan yon bèso oswa tache ak yon kab.
Aparèy la limen epi li kòmanse chaje. Chaje / Notifikasyon ki ap dirije a ap bat jòn pandan y ap chaje, Lè sa a, vire vèt solid lè konplètman chaje.
Endikatè chaje
| Eta | Endikasyon |
| Off | Aparèy la pa chaje. Aparèy la pa antre kòrèkteman nan bèso a oswa konekte ak yon sous kouran. Chargeur/bèso pa mache. |
| Amber k ap bat byen dousman (1 bat je chak 4 segonn) |
Aparèy la ap chaje. |
| Solid vèt | Chaje konplè. |
| Amber k'ap bat vit (2 kliyot/ dezyèm) |
Erè chaje: • Tanperati a twò ba oswa twò wo. • Chaj la kontinye twò lontan san yo pa fini (anjeneral uit èdtan). |
| Koupe wouj dousman (1 bat je chak 4 segonn) |
Aparèy la ap chaje men batri a nan fen lavi itil. |
| Solid Wouj | Chaje konplè men batri a se nan fen lavi itil. |
| Vit kliyote wouj (2 kliyote / dezyèm) | Erè chaje men batri a nan fen lavi itil. • Tanperati a twò ba oswa twò wo. • Chaj la kontinye twò lontan san yo pa fini (anjeneral uit èdtan). |
Ranplase batri a
![]() REMAK: Modifikasyon itilizatè nan aparèy la, patikilyèman nan batri a byen, tankou etikèt, avantaj tags, gravure, avek stickers son, elatriye, ka konpwomi pèfòmans entansyon an nan aparèy la oswa Pwodwi pou Telefòn. Nivo pèfòmans tankou sele (Pwoteksyon Ingress (IP)), pèfòmans enpak (gout ak tonbe), fonksyonalite, rezistans tanperati, elatriye ta ka fèt. PA mete okenn etikèt, avantaj tags, grave, avek stickers son, elatriye nan batri a byen.
REMAK: Modifikasyon itilizatè nan aparèy la, patikilyèman nan batri a byen, tankou etikèt, avantaj tags, gravure, avek stickers son, elatriye, ka konpwomi pèfòmans entansyon an nan aparèy la oswa Pwodwi pou Telefòn. Nivo pèfòmans tankou sele (Pwoteksyon Ingress (IP)), pèfòmans enpak (gout ak tonbe), fonksyonalite, rezistans tanperati, elatriye ta ka fèt. PA mete okenn etikèt, avantaj tags, grave, avek stickers son, elatriye nan batri a byen.
![]() ATANSYON: Pa ajoute oswa retire kat SIM, SAM oswa microSD pandan ranplasman batri a.
ATANSYON: Pa ajoute oswa retire kat SIM, SAM oswa microSD pandan ranplasman batri a.
- Retire nenpòt akseswar ki tache ak aparèy la.
- Peze bouton pouvwa a jiskaske meni an parèt.
- Touche Boukante Batri.
- Swiv enstriksyon ki sou ekran an.
- Tann pou dirije a etenn.
- Si braslè pou men yo tache, glise clip braslè men an anlè anlè aparèy la epi leve.

- Peze de fèmen batri yo nan.

- Leve batri a soti nan aparèy la.
 ATANSYON: Ranplase batri a nan de minit. Apre de minit aparèy la rdemare ak done yo ka pèdi.
 - Mete batri ranplasman an, anba an premye, nan lòj batri a nan do aparèy la.
- Peze batri a desann jiskaske fèmen batri a degaje batri a fèmen an plas.
- Ranplase braslè men an, si sa nesesè.
- Peze epi kenbe bouton pouvwa a pou limen aparèy la.
![]() REMAK: Apre w fin ranplase batri a, rete tann 15 minit anvan w itilize Battery Swap ankò.
REMAK: Apre w fin ranplase batri a, rete tann 15 minit anvan w itilize Battery Swap ankò.
Ranplase SIM oswa SAM Kat la
![]() REMAK: Ranplasman SIM aplike pou TC77 sèlman.
REMAK: Ranplasman SIM aplike pou TC77 sèlman.
- Peze epi kenbe bouton pouvwa a jiskaske meni an parèt.
- Manyen kouran.
- Manyen OK.
- Si braslè pou men yo tache, glise clip braslè men an anlè anlè aparèy la epi leve.

- Peze de fèmen batri yo nan.
- Leve batri a soti nan aparèy la.
- Leve pòt aksè a.

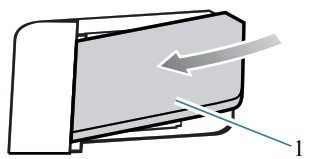
- Retire kat nan detantè a.
Figi 4 Retire kat SAM
 Figi 5 Retire kat Nano SIM

- Mete kat ranplasman an.
Figi 6 Mete kat SAM
 1 Mini SAM plas
Figi 7 Mete kat Nano SIM

- Ranplase pòt aksè a.

- Peze pòt aksè a desann epi asire li byen chita.
ATANSYON: Pòt aksè a dwe ranplase epi byen chita pou asire bon aparèy sele. - Mete batri a, anba an premye, nan lòj batri a nan do aparèy la.
- Peze batri a desann jiskaske fèmen batri a degaje batri a fèmen an plas.
- Ranplase braslè men an, si sa nesesè.
- Peze epi kenbe bouton pouvwa a pou limen aparèy la.
Ranplase kat microSD la
- Peze bouton pouvwa a jiskaske meni an parèt.
- Manyen kouran.
- Manyen OK.
- Si braslè pou men yo tache, glise clip braslè men an anlè anlè aparèy la epi leve.

- Peze de fèmen batri yo nan.
- Leve batri a soti nan aparèy la.
- Si aparèy la gen yon pòt aksè ki an sekirite, sèvi ak yon tournevis Microstix 0 pou retire vis 3ULR-0 la.

- Leve pòt aksè a.

- Glise detantè kat microSD la nan pozisyon Louvri.
- Leve detantè kat microSD la.
- Retire kat microSD nan detantè a.
- Mete kat microSD ranplasman an nan pòt detantè kat la pou asire kat la glise nan onglet kenbe yo sou chak bò pòt la.
- Fèmen pòt detantè kat microSD la epi glise pòt la nan pozisyon Lock la.
- Ranplase pòt aksè a.

- Peze pòt aksè a desann epi asire li byen chita.
ATANSYON: Pòt aksè a dwe ranplase epi byen chita pou asire bon aparèy sele. - Si aparèy la gen yon pòt aksè ki an sekirite, sèvi ak yon tournevis Microstix 0 pou enstale vis 3ULR-0 la.

- Mete batri a, anba an premye, nan lòj batri a nan do aparèy la.
- Peze batri a desann jiskaske fèmen batri a degaje batri a fèmen an plas.
- Ranplase braslè men an, si sa nesesè.
- Peze epi kenbe bouton pouvwa a pou limen aparèy la.
Sèvi ak Aparèy la
Seksyon sa a eksplike kijan pou itilize aparèy la.
Ekran Kay
Limen aparèy la pou montre ekran Kay la. Tou depan de fason administratè sistèm ou a konfigirasyon aparèy ou an, ekran Kay ou a ka parèt yon fason diferan pase grafik ki nan seksyon sa a.
Apre yon sispansyon oswa yon tan-out ekran, ekran Kay la parèt ak kurseur fèmen a. Manyen ekran an epi glise moute pou déblotché. Ekran Kay la bay kat ekran adisyonèl pou mete widgets ak rakoursi.
Glise ekran an agoch oswa adwat view ekran adisyonèl yo.
REMAK: Pa default, aparèy AOSP yo pa gen menm ikon yo sou ekran Kay la ak aparèy GMS yo. Ikon yo montre anba a pou egzanpample sèlman.
Ikon ekran lakay yo ka configuré pa itilizatè a epi yo ka sanble diferan de sa yo montre.
![]()
| 1 | Estati Bar | Montre tan an, ikon estati (bò dwat), ak ikon notifikasyon (bò gòch). |
| 2 | Widgets | Lanse aplikasyon otonòm ki kouri sou ekran Kay la. |
| 3 | Icône chemen kout | Louvri aplikasyon ki enstale sou aparèy la. |
| 4 | Dosye | Gen apps. |
Anviwònman wotasyon ekran lakay
Pa default, wotasyon ekran Kay la enfim.
- Manyen epi kenbe nenpòt kote sou ekran Kay la jiskaske opsyon yo parèt.
- Touche Anviwònman Kay.
- Manyen switch la Pèmèt ekran wotasyon.
- Touche Kay.
- Vire aparèy la.
Estati Bar
Ba Estati a montre tan an, ikon notifikasyon (bò gòch), ak ikon estati (bò dwat).
Si gen plis notifikasyon pase sa ki ka anfòm nan ba Estati a, yon pwen parèt ki endike ke gen plis notifikasyon. Glise desann soti nan ba Estati a pou ouvri panèl Notifikasyon an epi view tout notifikasyon ak estati.
Figi 8 Notifikasyon ak Ikon Estati

Ikon notifikasyon
Ikon notifikasyon endike evènman ak mesaj aplikasyon an.
Tablo 3 Ikon notifikasyon
| Icône | Deskripsyon |
| Batri prensipal la ba. | |
| • | Gen plis notifikasyon ki disponib pou viewing. |
| Done yo senkronize. | |
| Endike yon evènman k ap vini. Aparèy AOSP sèlman. | |
| Endike yon evènman k ap vini. Aparèy GMS sèlman. | |
| Rezo Wi-Fi louvri disponib. | |
| Odyo ap jwe. | |
| Gen pwoblèm ak enskripsyon oswa senkronizasyon ki te fèt. | |
| Aparèy la ap telechaje done. | |
| Animated: aparèy la ap telechaje done. Statik: telechaje a fini. | |
| Aparèy konekte oswa dekonekte nan yon rezo prive vityèl (VPN). | |
| Prepare depo entèn pa tcheke li pou erè. | |
| USB debogaj pèmèt sou aparèy la. | |
| Apèl ap fèt (WWAN sèlman). | |
| Bwat lèt la gen youn oswa plizyè mesaj vwa (WWAN sèlman). | |
| Apèl an rete (WWAN sèlman). | |
| Apèl te rate (WWAN sèlman). | |
| Se fil kask ak yon modil boom ki konekte ak aparèy la. | |
| Se fil kask san yon modil boom ki konekte ak aparèy la. | |
| Estati kliyan PTT Express Voice. Gade Kliyan Vwa PTT Express la pou plis enfòmasyon. | |
| Endike RxLogger aplikasyon an ap kouri. | |
| Endike eskanè Bluetooth la konekte ak aparèy la. | |
| Endike scanner bag la konekte ak aparèy la nan mòd HID. |
Ikon Estati
Ikon estati yo montre enfòmasyon sistèm pou aparèy la.
Ikon Estati
Ikon estati yo montre enfòmasyon sistèm pou aparèy la.
Tablo 4 Ikon Estati
| Icône | Deskripsyon |
| Alam aktif. | |
| Batri prensipal la konplètman chaje. | |
| Batri prensipal la se pasyèlman vide. | |
| Chaj batri prensipal la ba. | |
| Chaj batri prensipal la trè ba. | |
| Batri prensipal la ap chaje. | |
| Tout son yo, eksepte medya ak alam yo, yo fèmen. Mòd vibre aktif. | |
| Endike ke tout son eksepte medya ak alam yo muet. | |
| Pa deranje mòd aktif. | |
| Mòd Avyon aktif. Tout radyo yo etenn. | |
| Bluetooth limen. | |
| Aparèy la konekte ak yon aparèy Bluetooth. | |
| Konekte ak yon rezo Wi-Fi. Endike nimewo vèsyon Wi-Fi a. | |
| Pa konekte ak yon rezo Wi-Fi oswa pa gen okenn siyal Wi-Fi. | |
| Konekte ak yon rezo Ethernet. | |
| Speakerphone pèmèt. | |
| Hotspot Wi-Fi pòtab aktif (WWAN sèlman). | |
| Itinérance nan yon rezo (WWAN sèlman). | |
| Pa gen kat SIM enstale (WWAN sèlman). | |
| Konekte ak yon rezo 4G LTE/LTE-CA (WWAN sèlman) | |
| Konekte ak yon rezo DC-HSPA, HSDPA, HSPA+, HSUPA, LTE/LTE-CA oswa WCMDMA (WWAN sèlman) a | |
| Konekte ak yon rezo 1x-RTT (Sprint), EGDGE, EVDO, EVDV oswa WCDMA (WWAN sèlman)a | |
| Konekte ak yon rezo GPRS (WWAN sèlman) a | |
| Konekte ak yon rezo DC - HSPA, HSDPA, HSPA+, oswa HSUPA (WWAN a sèlman) | |
| Konekte ak yon rezo EDGE (WWAN sèlman)a | |
| Konekte ak yon rezo GPRS (WWAN sèlman)a | |
| Konekte ak yon rezo 1x-RTT (Verizon) (WWAN sèlman)a | |
| Ikon rezo selilè ki parèt depann de konpayi asirans lan/rezo a. | |
Jere Notifikasyon
Ikon notifikasyon rapòte arive nouvo mesaj, evènman kalandriye, alam, ak evènman k ap kontinye. Lè yon notifikasyon rive, yon icon parèt nan ba Estati a ak yon deskripsyon tou kout.
Figi 9 Panèl Notifikasyon Panèl Notifikasyon

- Quick Settings Bar.
• Pou view yon lis tout notifikasyon, louvri panèl Notifikasyon an lè w trennen ba Estati a desann soti nan tèt ekran an.
• Pou reponn a yon notifikasyon, louvri panèl Notifikasyon an epi manyen yon notifikasyon. Panèl Notifikasyon an fèmen epi aplikasyon ki koresponn lan ouvri.
• Pou jere notifikasyon ki sot pase yo oswa yo itilize souvan, louvri panèl Notifikasyon an epi touche Jere notifikasyon yo. Manyen switch la ki akote yon aplikasyon pou fèmen tout notifikasyon, oswa manyen yon aplikasyon pou plis opsyon notifikasyon.
• Pou efase tout notifikasyon yo, ouvri panèl Notifikasyon an epi touche CLEAR ALL. Tout notifikasyon ki baze sou evènman yo retire. Notifikasyon kontinyèl yo rete nan lis la.
• Pou fèmen panèl Notifikasyon an, glise panèl Notifikasyon an moute.
Ouvèti Panel Aksè Rapid la
Sèvi ak panèl Aksè rapid la pou jwenn aksè nan anviwònman yo itilize souvan (pa egzanpample, mòd Avyon).

![]() REMAK: Se pa tout ikon yo foto. Ikon yo ka varye.
REMAK: Se pa tout ikon yo foto. Ikon yo ka varye.
- Si aparèy la fèmen, glise desann yon fwa.
- Si aparèy la debloke, glise desann yon fwa ak de dwèt, oswa de fwa ak yon sèl dwèt.
- Si panèl Notifikasyon an louvri, glise desann soti nan ba a Anviwònman rapid.
Aksè rapid Panel Ikon
Ikon panèl Aksè rapid yo endike paramèt yo itilize souvan (pa egzanpample, mòd Avyon).
Tablo 5 Aksè rapid Panel Ikon
| Icône | Deskripsyon |
| Ekspozisyon klète - Sèvi ak kurseur pou diminye oswa ogmante klète ekran an. | |
| Rezo Wi-Fi - Limen oswa koupe Wi-Fi. Pou ouvri paramèt Wi-Fi, manyen non rezo Wi-Fi. | |
| Anviwònman Bluetooth - Limen oswa etenn Bluetooth. Pou ouvri paramèt Bluetooth, manyen Bluetooth. | |
| Ekonomize batri - Limen oswa etenn mòd ekonomize batri. Lè mòd batri ekonomizeur sou pèfòmans aparèy la redwi pou konsève pouvwa batri (pa aplikab). | |
| Envèse koulè - Envèse koulè ekspozisyon yo. | |
| Pa deranje - Kontwole ki jan ak ki lè pou resevwa notifikasyon. | |
| Done mobil - Limen oswa etenn radyo selilè. Pou ouvri paramèt done mobil, manyen epi kenbe (WWAN sèlman). | |
| Mòd Avyon - Limen oswa etenn mòd Avyon. Lè mòd Avyon an sou aparèy la pa konekte ak Wi-Fi oswa Bluetooth. | |
| Oto-wotasyon - Fèmen oryantasyon aparèy la nan mòd pòtrè oswa jaden flè oswa mete otomatikman wotasyon. | |
| Flach - Limen oswa etenn flach. Limen oswa etenn kamera flash. Sou aparèy kamera sèlman san yon motè eskanè entèn, flach la etenn lè yo louvri yon aplikasyon. Sa a asire kamera a disponib pou optik. | |
| Kote - Aktive oswa enfim karakteristik lokalizasyon. | |
| Hotspot – Limen pou pataje koneksyon done mobil aparèy la ak lòt aparèy. | |
| Data Saver - Limen pou anpeche kèk aplikasyon voye oswa resevwa done nan background nan. | |
| Limyè lannwit - Tinte ekran an Amber pou fè li pi fasil pou gade ekran an nan limyè ki fèb. Mete limyè lannwit pou limen otomatikman soti nan solèy kouche jiska solèy leve, oswa nan lòt lè. |
|
| Screen Cast – Pataje kontni telefòn sou Chromecast oswa yon televizyon ak Chromecast entegre. Manyen ekran jete pou montre yon lis aparèy, apresa manyen yon aparèy pou kòmanse jete. | |
| Tèm nwa - Active ak etenn tèm nwa. Tèm nwa diminye luminans ki emèt pa ekran an, pandan y ap satisfè rapò minimòm kontras koulè. Li ede amelyore ergonomics vizyèl pa diminye souch nan je, ajiste klète nan kondisyon aktyèl ekleraj, ak fasilite itilizasyon ekran nan anviwònman fè nwa, pandan y ap konsève pouvwa batri. | |
| Mòd Konsantre - Vire pou pran poz aplikasyon ki distrè yo. Pou ouvri anviwònman mòd Focus, manyen epi kenbe. | |
| Mòd lè dòmi - Limen ak koupe gri. Echèl gri vire ekran an nwa ak blan, diminye distraksyon telefòn yo ak amelyore lavi batri a. |
Edite ikon sou ba a Paramèt rapid
Premye plizyè mozayik anviwònman ki soti nan panèl Aksè rapid la vin ba Anviwònman rapid la.
Louvri panèl Aksè rapid la epi manyen ![]() pou edite, ajoute oswa retire mozayik anviwònman yo.
pou edite, ajoute oswa retire mozayik anviwònman yo.
Jesyon batri
Obsève konsèy yo rekòmande optimize batri pou aparèy ou an.
- Mete ekran an pou etenn apre yon kout peryòd de pa itilize.
- Diminye klète ekran an.
- Etenn tout radyo san fil lè yo pa itilize yo.
- Etenn senkronizasyon otomatik pou Imèl, Kalandriye, Kontak, ak lòt aplikasyon.
- Minimize itilizasyon apps ki anpeche aparèy la sispann, pa egzanpample, mizik ak videyo apps.
![]() REMAK: Anvan w tcheke nivo chaj batri a, retire aparèy la nan nenpòt sous kouran AC (bèso oswa kab).
REMAK: Anvan w tcheke nivo chaj batri a, retire aparèy la nan nenpòt sous kouran AC (bèso oswa kab).
Tcheke estati batri a
- Louvri Anviwònman epi touche Konsènan telefòn > Enfòmasyon sou batri. Oswa, glise soti anba ekran an epi manyen pou ouvri aplikasyon Manadjè Batri a.
Estati batri prezan endike si batri a prezan.
Nivo batri bay lis chaj batri a (tankou pousantajtage nan konplètman chaje). - Glise desann ak de dwèt nan ba estati a pou louvri panèl aksè rapid la.
Pousan batritage ap parèt akote icon batri a.
Siveyans Itilizasyon Batri
Ekran batri a bay detay chaj batri ak opsyon jesyon pouvwa pou pwolonje lavi batri a. Aplikasyon diferan montre enfòmasyon diferan. Gen kèk aplikasyon ki gen bouton ki louvri ekran yo ak paramèt pou ajiste itilizasyon pouvwa a.
- Ale nan Anviwònman.
- Manyen batri.
Pou montre enfòmasyon batri ak opsyon jesyon pouvwa pou yon aplikasyon espesifik:
- Ale nan Anviwònman.
- Touche Aplikasyon ak notifikasyon.
- Manyen yon aplikasyon.
- Touche Avanse > Batri.
Aplikasyon diferan montre enfòmasyon diferan. Gen kèk aplikasyon ki gen bouton ki louvri ekran yo ak paramèt pou ajiste itilizasyon pouvwa a. Sèvi ak bouton DISABLE oswa FORCE STOP pou etenn aplikasyon ki konsome twòp pouvwa.
Notifikasyon batri ki ba
Lè nivo chaj batri a desann pi ba pase nivo chanjman nan tablo ki anba a, aparèy la montre yon avi pou konekte aparèy la ak kouran. Chaje batri a lè l sèvi avèk youn nan Pwodwi pou Telefòn yo chaje.
Tablo 6 Notifikasyon batri ki ba
| Nivo chaj Gout anba a |
Aksyon |
| 18% | Itilizatè a ta dwe chaje batri a byento. |
| 10% | Itilizatè a dwe chaje batri a. |
| 4% | Aparèy la etenn. Itilizatè a dwe chaje batri a. |
Teknoloji Capteur entèaktif
Pou pran avantage nan detèktè sa yo, aplikasyon yo sèvi ak kòmandman API. Ale nan API Google Android Sensor yo pou plis enfòmasyon. Pou jwenn enfòmasyon sou Zebra Android EMDK, ale nan: techdocs.zebra.com. Aparèy la gen detèktè ki kontwole mouvman ak oryantasyon.
- Jiroskop - Mezire vitès wotasyon angilè pou detekte wotasyon aparèy la.
- Akseleromètr - Mezire akselerasyon lineyè mouvman pou detekte oryantasyon aparèy la.
- Bousòl dijital - Bousòl dijital oswa mayetomèt bay yon oryantasyon senp an relasyon ak jaden mayetik Latè a. Kòm yon rezilta, aparèy la toujou konnen ki direksyon Nò se konsa li ka oto wotasyon kat dijital depann sou oryantasyon fizik aparèy la.
- Capteur limyè - Detekte limyè anbyen ak ajiste klète ekran an.
- Capteur pwoksimite - Detekte prezans objè ki tou pre san kontak fizik. Capteur a detekte lè aparèy la fèmen nan figi ou pandan yon apèl ak fèmen ekran an, anpeche manyen ekran envolontè.
Reveye Aparèy la
Aparèy la antre nan mòd Sispansyon lè ou peze bouton Pouvwa a oswa apre yon peryòd inaktivite (mete nan fenèt Paramèt Display la).
- Pou reveye aparèy la nan mòd Sispansyon, peze bouton Pouvwa a.
Ekran Lock la ap parèt. - Glise ekran an pou déblotché.
• Si fonksyon debloke ekran Modèl la aktive, ekran Modèl la parèt olye pou ekran Lock la.
• Si fonksyon debloke ekran PIN oswa Modpas la aktive, antre PIN oswa modpas la apre ou fin debloke ekran an.
![]() REMAK: Si ou antre PIN, modpas oswa modèl mal senk fwa, ou dwe tann 30 segonn anvan ou eseye ankò.
REMAK: Si ou antre PIN, modpas oswa modèl mal senk fwa, ou dwe tann 30 segonn anvan ou eseye ankò.
Si ou bliye PIN, modpas, oswa modèl kontakte administratè sistèm ou a.
Kominikasyon USB
Konekte aparèy la nan yon òdinatè lame pou transfere files ant aparèy la ak òdinatè lame a.
Lè konekte aparèy la ak yon òdinatè lame, swiv enstriksyon òdinatè lame a pou konekte ak dekonekte aparèy USB, pou evite domaje oswa koripsyon. files.
Transfere Files
Sèvi ak Transfè files pou kopye files ant aparèy la ak òdinatè lame a.
- Konekte aparèy la nan yon òdinatè lame lè l sèvi avèk yon akseswar USB.
- Sou aparèy la, rale desann panèl Notifikasyon an epi touche Chaje aparèy sa a atravè USB.
Pa default, Pa gen transfè done yo chwazi. - Manyen File Transfè.
 REMAK: Apre chanje anviwònman an File Transfè, ak Lè sa a, dekonekte kab USB a, anviwònman an retounen tounen nan Pa gen transfè done. Si kab USB a rekonekte, chwazi File Transfere ankò.
 - Sou òdinatè lame a, louvri File Explorer.
- Jwenn aparèy la kòm yon aparèy pòtab.
- Louvri kat SD la oswa katab depo Entèn la.
- Kopi files ale ak soti nan aparèy la oswa efase files jan sa nesesè.
Transfere Foto
Sèvi ak PTP pou kopye foto ki soti nan aparèy la nan òdinatè lame a.
Li rekòmande enstale yon kat microSD nan aparèy la pou estoke foto akòz limite depo entèn yo.
- Konekte aparèy la nan yon òdinatè lame lè l sèvi avèk yon akseswar USB.
- Sou aparèy la, rale desann panèl Notifikasyon an epi touche Chaje aparèy sa a atravè USB.
- Manyen PTP.
- Manyen transfè foto PTP.
- Sou òdinatè lame a, louvri yon file aplikasyon eksploratè.
- Louvri katab depo Entèn la.
- Louvri kat SD la oswa katab depo Entèn la.
- Kopi oswa efase foto jan sa nesesè.
Dekonekte nan òdinatè lame a
![]() ATANSYON: Ak anpil atansyon swiv enstriksyon òdinatè lame a pou dekonekte aparèy USB kòrèkteman pou evite pèdi enfòmasyon.
ATANSYON: Ak anpil atansyon swiv enstriksyon òdinatè lame a pou dekonekte aparèy USB kòrèkteman pou evite pèdi enfòmasyon.
![]() REMAK: Ak anpil atansyon swiv enstriksyon òdinatè lame a pou demonte kat microSD la epi dekonekte aparèy USB kòrèkteman pou evite pèdi enfòmasyon.
REMAK: Ak anpil atansyon swiv enstriksyon òdinatè lame a pou demonte kat microSD la epi dekonekte aparèy USB kòrèkteman pou evite pèdi enfòmasyon.
- Sou òdinatè lame a, demonte aparèy la.
- Retire aparèy la nan akseswar USB la.
Anviwònman
Seksyon sa a dekri paramèt yo sou aparèy la.
Aksè Anviwònman
Gen plizyè fason pou jwenn aksè nan anviwònman sou yon aparèy.
- Glise desann ak de dwèt nan tèt ekran Kay la pou ouvri panèl Aksè rapid la epi touche
 .
. - Doub glise desann soti nan tèt ekran Kay la pou ouvri panèl Aksè rapid la epi touche .
- Glise soti anba ekran Kay la pou ouvri APLIKASYON epi touche
 Anviwònman.
Anviwònman ekspozisyon
Sèvi ak Paramèt Display pou chanje klète ekran an, pèmèt limyè lannwit, chanje imaj background nan, pèmèt wotasyon ekran an, fikse tan dòmi, ak chanje gwosè font.
Mete klète ekran an manyèlman
Manyèlman mete klète ekran an lè l sèvi avèk ekran tactile la.
- Glise desann ak de dwèt nan ba Estati a pou ouvri panèl Aksè rapid la.
- Glise icon nan ajiste nivo klète ekran an.
 Mete klète ekran an otomatikman
Otomatikman ajiste klète ekran an lè l sèvi avèk Capteur limyè bati-an.
- Ale nan Anviwònman.
- Manyen Display.
- Si enfim, manyen Adaptive klète pou ajiste otomatikman klète a.
Pa default, Adaptive klète pèmèt. Aktive switch la pou enfim.
Mete limyè lannwit
Anviwònman limyè lannwit lan tente ekran an jòn, sa ki fè ekran an pi fasil pou gade nan limyè ki ba.
- Ale nan Anviwònman.
- Manyen Display.
- Manyen limyè lannwit.
- Touche Orè.
- Chwazi youn nan valè orè yo:
• Okenn (default)
• Limen nan tan koutim
• Limen depi solèy kouche jiska solèy leve. - Pa default, limyè lannwit enfim. Touche ACTIVE KOUNYE A pou pèmèt.
- Ajiste tente a lè l sèvi avèk kurseur Entansite a.
Anviwònman wotasyon ekran
Pa default, wotasyon ekran an pèmèt.
- Ale nan Anviwònman.
- Touche Display > Avanse.
- Manyen oto-wotasyon ekran.
Pou mete wotasyon Ekran Kay la, gade Anviwònman Wotasyon Ekran Kay la nan paj 40.
Mete ekran Timeout
Mete tan dòmi ekran an.
- Ale nan Anviwònman.
- Manyen Display > Avanse > Timeout ekran.
- Chwazi youn nan valè dòmi:
• 15 segonn
• 30 segonn
• 1 minit (default)
• 2 minit
• 5 minit
• 10 minit
• 30 minit
Bloke Display ekran an
Anviwònman ekran fèmen reveye ekran an lè yo resevwa notifikasyon.
- Ale nan Anviwònman.
- Touche Display > Avanse.
- Manyen ekran fèmen.
- Nan seksyon Lè pou montre, aktive oswa enfim yon opsyon lè l sèvi avèk switch la.
Anviwònman Touch Key Light
Kat kle touche yo anba ekran an retroeklere. Konfigure limyè a kle touche pou konsève pou pouvwa batri.
- Ale nan Anviwònman.
- Touche Display > Avanse.
- Touche limyè kle.
- Chwazi yon opsyon pou chwazi konbyen tan limyè touche touche a rete limen:
• Toujou koupe
• 6 segonn (default)
• 10 segonn
• 15 segonn
• 30 segonn
• 1 minit
• Toujou sou.
Anviwònman Gwosè Font
Mete gwosè font la nan aplikasyon sistèm yo.
- Ale nan Anviwònman.
- Touche Display > Avanse.
- Manyen gwosè Font.
- Chwazi yon opsyon pou chwazi konbyen tan limyè touche touche a rete limen:
• Ti
• Default
• Gwo
• Pi gwo.
Notifikasyon ki ap dirije Nivo klète
- Ale nan Anviwònman.
- Touche Display > Avanse.
- Manyen Notifikasyon ki ap dirije Nivo klète.
- Sèvi ak kurseur la pou mete valè klète a (default: 15).
Anviwònman Touch Panel Mode
Ekspozisyon aparèy la kapab detekte manyen lè l sèvi avèk yon dwèt, yon stylus konduktif-tip, oswa yon dwèt gan.
![]() REMAK:
REMAK:
Yon gan ka fèt an latèks medikal, kwi, koton, oswa lenn mouton.
Pou pèfòmans optimal, sèvi ak yon dyaman sètifye Zebra.
- Ale nan Anviwònman.
- Touche Display > Avanse.
- Manyen TouchPanelUI.
- Chwazi:
• Stylus ak Dwèt (Screen Protector OFF) pou itilize yon dwèt oswa yon dwèt sou ekran an san yon pwoteksyon ekran.
• Gan ak Dwèt (Screen Protector OFF) pou itilize yon dwèt oswa yon dwèt gan sou ekran an san yon pwoteksyon ekran.
• Stylus ak Dwèt (Screen Protector ON) pou itilize yon dwèt oswa yon dwèt sou ekran an ak yon pwoteksyon ekran.
• Gan ak Dwèt (Screen Protector ON) pou itilize yon dwèt oswa yon dwèt gan sou ekran an ak yon pwoteksyon ekran.
• Dwèt sèlman pou itilize yon dwèt sou ekran an.
Mete dat ak lè
Dat ak lè yo otomatikman senkronize lè l sèvi avèk yon sèvè NITZ lè aparèy la konekte ak yon rezo selilè. Ou gen sèlman oblije mete zòn lè a oswa fikse dat ak lè a si LAN san fil pa sipòte Network Time Protocol (NTP) oswa lè yo pa konekte ak yon rezo selilè.
- Ale nan Anviwònman.
- Touche Sistèm > Dat ak lè.
- Touche Sèvi ak lè rezo bay pou enfim otomatik dat ak lè senkronizasyon.
- Touche Sèvi ak zòn lè rezo a pou enfim senkronizasyon otomatik zòn tan.
- Touche Dat pou chwazi dat la nan kalandriye a.
- Manyen OK.
- Touche Tan.
a) Manyen sèk vèt la, trennen nan lè aktyèl la, epi answit lage.
b) Manyen sèk vèt la, trennen nan minit aktyèl la, epi lage.
c) Manyen AM oswa PM. - Touche Zòn tan pou w chwazi zòn lè aktyèl la nan lis la.
- Touche Mizajou Entèval pou chwazi yon entèval pou senkronize tan sistèm lan nan rezo a.
- Nan FÒMA TAN, chwazi swa Sèvi ak default lokal oswa Sèvi ak fòma 24 èdtan.
- Touche Sèvi ak fòma 24 èdtan.
Anviwònman son jeneral
Peze bouton volim yo sou aparèy la pou montre kontwòl volim sou ekran an.
Sèvi ak paramèt Son yo pou konfigirasyon volim medya ak alam.
- Ale nan Anviwònman.
- Touche son.
- Manyen yon opsyon pou mete son.
Opsyon son
- Volim medya - Kontwole mizik, jwèt, ak volim medya yo.
- Volim apèl - Kontwole volim pandan yon apèl.
- Ring & volim notifikasyon - Kontwole sonri ak volim notifikasyon.
- Volim alam - Kontwole volim revèy alam la.
- Vibre pou apèl - Limen oswa etenn.
- Pa deranje - Fè sob kèk oswa tout son ak vibrasyon.
- Medya - Montre jwè medya a nan Anviwònman rapid pandan son ap jwe, sa ki pèmèt aksè rapid.
- Raccourci pou anpeche sonnen - Limen switch la pou fè aparèy la vibre lè yo resevwa yon apèl (default - enfim).
- Sonri telefòn - Chwazi yon son pou jwe lè telefòn nan sone.
- Default son notifikasyon - Chwazi yon son pou jwe pou tout notifikasyon sistèm yo.
- Son alam par défaut – Chwazi yon son pou jwe pou alam yo.
- Lòt son ak vibrasyon
• Ton pad konpoze – Jwe yon son lè w ap peze kle sou pad konpoze (default - enfim).
• Son bloke ekran - Jwe yon son lè bloke ak debloke ekran an (default - aktive).
• Chaje son ak Vibration - Li jwe yon son ak vibre lè yo aplike pouvwa a nan aparèy la (default - aktive).
• Son touche – Jwe yon son lè w ap fè seleksyon ekran (default – aktive).
• Vibration manyen - Vibre aparèy la lè w ap fè seleksyon ekran (default - aktive).
Kontwòl volim zèb
Anplis paramèt son default yo, Kontwòl Volim Zebra yo montre lè bouton volim yo peze.
Kontwòl Volim Zebra yo konfigirasyon lè l sèvi avèk Manadjè UI Volim Audio (AudioVolUIMgr). Administratè yo ka itilize AudioVolUIMgr pou ajoute, efase ak ranplase Audio Profiles, chwazi yon Audio Profile pou itilize aparèy la, epi modifye default Audio Pro lafile. Pou jwenn enfòmasyon sou fason pou konfigirasyon Kontwòl Volim Zebra lè l sèvi avèk AudioVolUIMgr, al gade nan techdocs.zebra.com.
Mete sous reveye
Pa default, aparèy la reveye nan mòd sispansyon lè itilizatè a peze bouton pouvwa a. Aparèy la ka configuré pou reveye lè itilizatè a peze bouton PTT oswa Scan sou bò gòch manch aparèy la.
- Ale nan Anviwònman.
- Manyen Sous Wake-Up.
• GUN_TRIGGER – Bouton pwogramasyon sou akseswar Trigger Manch la.
• LEFT_TRIGGER_2 – bouton PTT.
• RIGHT_TRIGGER_1 – Dwa bouton eskanè.
• SCAN – bouton eskanè gòch. - Manyen yon kaz. Yon chèk parèt nan kaz la.
Remapping yon bouton
Bouton sou aparèy la ka pwograme pou fè fonksyon diferan oswa kòm rakoursi nan aplikasyon enstale.
Pou yon lis non kle ak deskripsyon, gade nan: techdocs.zebra.com.
![]() REMAK: Li pa rekòmande pou remap bouton eskanè a.
REMAK: Li pa rekòmande pou remap bouton eskanè a.
- Ale nan Anviwònman.
- Touche pwogramè kle. Yon lis bouton pwogramasyon ap parèt.
- Chwazi bouton an pou remap.
- Manyen RACCORT la, KLE ak BOUTON yo, oswa onglet TRIGGERS ki bay lis fonksyon, aplikasyon ak deklannche ki disponib yo.
- Manyen yon fonksyon oswa yon rakoursi aplikasyon pou kat bouton an.
 REMAK: Si w chwazi yon rakoursi aplikasyon an, ikòn aplikasyon an parèt akote bouton an sou ekran pwogramè kle a.
 - Si w remape bouton Retounen, Kay, Rechèch, oswa Menu, fè yon Reset Soft.
Klavye
Aparèy la bay plizyè opsyon klavye.
- Android klavye - aparèy AOSP sèlman
- Gboard - aparèy GMS sèlman
- Klavye Enterprise - Pa pre-enstale sou aparèy la. Kontakte Zebra Support pou plis enfòmasyon.
![]() REMAK: Pa default Klavye Enterprise ak Virtual yo enfim. Klavye Enterprise la disponib pou telechaje sou sit sipò Zebra.
REMAK: Pa default Klavye Enterprise ak Virtual yo enfim. Klavye Enterprise la disponib pou telechaje sou sit sipò Zebra.
Konfigirasyon klavye
Seksyon sa a dekri konfigirasyon klavye aparèy la.
Pèmèt Klavye yo
- Ale nan Anviwònman.
- Touche Sistèm > Lang ak opinyon > Klavye vityèl > Jere klavye.
- Manyen yon klavye pou pèmèt.
Chanje ant klavye
Pou chanje ant klavye, manyen nan yon bwat tèks pou montre klavye aktyèl la.
![]() REMAK: Pa default, Gboard la aktive. Tout lòt klavye vityèl yo enfim.
REMAK: Pa default, Gboard la aktive. Tout lòt klavye vityèl yo enfim.
- Sou klavye Gboard la, manyen epi kenbe
 (GMS aparèy sèlman).
 - Sou klavye Android a, manyen epi kenbe (Aparèy AOSP sèlman).
- Sou klavye Enterprise a, manyen
 . Sèlman disponib ak Mobility DNA Enterprise License. Pa preenstale sou aparèy la. Kontakte Zebra Support pou plis enfòmasyon.
Sèvi ak Android ak Gboard Klavye yo
Sèvi ak klavye Android oswa Gboard pou antre tèks nan yon jaden tèks.
- Pou konfigirasyon anviwònman klavye yo, manyen epi kenbe , (vigil) epi chwazi paramèt klavye Android yo.
Edit tèks
Edite tèks antre epi sèvi ak kòmandman meni yo pou koupe, kopye, epi kole tèks nan oswa atravè aplikasyon yo. Gen kèk aplikasyon ki pa sipòte modifye kèk oswa tout tèks yo montre yo; lòt moun ka ofri pwòp fason yo chwazi tèks.
Antre nimewo, senbòl, ak karaktè espesyal
- Antre nimewo ak senbòl.
• Manyen epi kenbe youn nan kle ranje anlè yo jiskaske yon meni parèt epi chwazi yon nimewo oswa yon karaktè espesyal.
• Touche Shift la yon fwa pou yon sèl lèt majiskil. Manyen kle Shift la de fwa pou fèmen an majiskil.
Manyen kle Shift la yon twazyèm fwa pou déblotché Capslock.
• Touche ?123 pou chanje sou klavye nimewo ak senbòl yo.
• Touche =\< sou klavye chif yo ak senbòl yo view senbòl adisyonèl. - Antre karaktè espesyal.
• Manyen epi kenbe yon nimewo oswa yon kle senbòl pou ouvri yon meni senbòl adisyonèl. Yon vèsyon pi gwo nan kle a montre yon ti tan sou klavye a.
Enterprise klavye
Klavye Enterprise la gen plizyè kalite klavye.
![]() REMAK: Sèlman disponib ak Mobility DNA Enterprise License.
REMAK: Sèlman disponib ak Mobility DNA Enterprise License.
- Nimerik
- Alpha
- Karaktè espesyal
- Capture done.
Tab Nimerik
Klavye nimerik la gen lejann 123. Kle ki parèt yo varye selon aplikasyon an. Pou egzanpample, yon flèch montre nan Kontak, sepandan Fè montre nan konfigirasyon kont Imèl.
Alfa Tab
Klavye alfa a make lè l sèvi avèk kòd lang lan. Pou angle, klavye alfa a gen etikèt sou EN.
Onglet karaktè adisyonèl
Klavye karaktè adisyonèl yo make #*/.
- Manyen
 pou antre ikon emoji nan yon mesaj tèks.
 - Touche ABC pou retounen nan klavye Senbòl yo.
Scan Tab
Onglet Scan la bay yon karakteristik fasil kaptire done pou eskane kòd bar.
Itilizasyon Lang
Sèvi ak paramèt Lang ak opinyon pou chanje langaj aparèy la, ak mo ki ajoute nan diksyonè a.
Chanje Anviwònman Lang
- Ale nan Anviwònman.
- Touche Sistèm > Lang ak opinyon.
- Manyen Lang. Yon lis lang ki disponib yo ap parèt.
- Si lang ou vle a pa nan lis la, manyen Ajoute yon lang epi chwazi yon lang nan lis la.
- Manyen epi kenbe adwat lang ou vle a, apresa trennen l nan tèt lis la.
- Tèks sistèm operasyon an chanje nan lang ou chwazi a.
Ajoute mo nan diksyonè a
- Ale nan Anviwònman.
- Touch System > Lang ak opinyon > Avanse > diksyonè pèsonèl.
- Si yo mande, chwazi lang kote mo oswa faz sa a estoke.
- Touche + pou ajoute yon nouvo mo oswa fraz nan diksyonè a.
- Antre mo oswa fraz la.
- Nan bwat tèks la Raccourci, antre yon chemen kout pou mo a oswa fraz la.
Notifikasyon
Seksyon sa a dekri anviwònman, viewing, ak kontwole notifikasyon sou aparèy la.
Mete notifikasyon aplikasyon yo
Konfigure anviwònman notifikasyon yo pou yon aplikasyon espesifik.
- Ale nan Anviwònman.
- Touche Aplikasyon ak notifikasyon > GADE TOUT XX APLIKASYON. Ekran enfòmasyon sou aplikasyon an ap parèt.
- Chwazi yon aplikasyon.
- Manyen Notifikasyon.
Opsyon yo varye selon aplikasyon an chwazi. - Chwazi yon opsyon ki disponib:
Montre notifikasyon - Chwazi pou vire tout notifikasyon ki soti nan aplikasyon sa a sou (default) oswa koupe. Manyen yon kategori notifikasyon pou montre opsyon adisyonèl.
• Alèt - Pèmèt notifikasyon ki soti nan aplikasyon sa a fè son oswa vibre aparèy la.
• Pop sou ekran – Pèmèt notifikasyon ki soti nan aplikasyon sa a pou pòp notifikasyon sou ekran an.
• Silans - Pa pèmèt notifikasyon ki soti nan aplikasyon sa a fè son oswa vibre.
• Minimize - Nan panèl Notifikasyon an, tonbe notifikasyon yo nan yon sèl liy.
• Avanse – Manyen pou opsyon adisyonèl.
• Son – Chwazi yon son pou jwe pou notifikasyon nan aplikasyon sa a.
• Vibre - Pèmèt notifikasyon ki soti nan app sa a vibre aparèy la.
• Blink limyè - Pèmèt notifikasyon ki soti nan aplikasyon sa a limyè Notifikasyon ki ap dirije ble.
• Montre pwen notifikasyon – Pèmèt notifikasyon ki soti nan aplikasyon sa a pou ajoute yon pwen notifikasyon nan icon aplikasyon an.
• Anile Pa Deranje – Pèmèt notifikasyon sa yo entèwonp lè Pa Deranje yo aktive.
Avanse
• Pèmèt pwen notifikasyon – Pa pèmèt aplikasyon sa a ajoute yon pwen notifikasyon nan icon aplikasyon an.
• Anviwònman adisyonèl nan aplikasyon an – Louvri paramèt aplikasyon an.
Viewing Notifikasyon
- Ale nan Anviwònman.
- Manyen Aplikasyon ak Notifikasyon.
- Scroll down to Notifikasyon pou view konbyen aplikasyon ki gen notifikasyon etenn.
Kontwole Lock Screen Notifikasyon
Kontwole si wi ou non notifikasyon yo ka wè lè aparèy la fèmen
- Ale nan Anviwònman.
- Touche Aplikasyon ak notifikasyon > Notifikasyon .
- Manyen Notifikasyon sou ekran fèmen epi chwazi youn nan bagay sa yo:
• Montre alèt ak notifikasyon an silans (default)
• Montre notifikasyon alèt sèlman
• Pa montre notifikasyon.
Pèmèt Blink Light
Dirije Notifikasyon an limen ble lè yon aplikasyon, tankou imèl ak VoIP, jenere yon notifikasyon pwogramasyon oswa pou endike lè aparèy la konekte ak yon aparèy Bluetooth. Pa default, notifikasyon ki ap dirije yo aktive.
- Ale nan Anviwònman.
- Touche Aplikasyon ak notifikasyon > Notifikasyon > Avanse .
- Touche limyè Blink pou aktive notifikasyon an sou oswa etenn.
Aplikasyon
Apa de aplikasyon estanda Android pre-enstale, tablo sa a bay lis aplikasyon espesifik Zebra ki enstale sou aparèy la.
Aplikasyon enstale
Apa de aplikasyon estanda Android pre-enstale, tablo sa a bay lis aplikasyon espesifik Zebra ki enstale sou aparèy la.
Tablo 7 Aplikasyon yo
| Icône | Deskripsyon |
| Manadjè batri - Montre enfòmasyon sou batri, ki gen ladan nivo chaj, estati, sante ak nivo mete. | |
| Bluetooth Pairing Utility - Sèvi ak pou pè yon eskanè Zebra Bluetooth ak aparèy la lè w tcheke yon kòd bar. | |
| Kamera - Pran foto oswa anrejistre videyo. | |
| DataWedge - Pèmèt kaptire done lè l sèvi avèk imaj la. | |
| DisplayLink Presenter – Itilize pou prezante ekran aparèy la sou yon monitè ki konekte. | |
| DWDemo - Bay yon fason pou demontre karakteristik kaptire done yo lè l sèvi avèk imaj la. | |
| Manadjè Lisans - Sèvi ak pou jere lisans lojisyèl sou aparèy la. | |
| Telefòn – Sèvi ak pou konpoze yon nimewo telefòn lè yo itilize ak kèk kliyan Vwa sou IP (VoIP) (telefòn VoIP pare sèlman). Aparèy WAN sèlman. | |
| RxLogger - Itilize pou fè dyagnostik pwoblèm aparèy ak app. | |
| Anviwònman - Sèvi ak konfigirasyon aparèy la. | |
| StageNow – Pèmèt aparèy la stagyon aparèy pou premye itilize lè w kòmanse deplwaman paramèt, firmwèr, ak lojisyèl. | |
| VoD - Aplikasyon debaz Videyo sou Aparèy la bay yon videyo kijan pou netwaye aparèy apwopriye. Pou enfòmasyon sou lisans Videyo sou Aparèy, ale nan learning.zebra.com. | |
| Worry Free Wifi Analyzer - Yon aplikasyon entèlijan dyagnostik. Itilize pou fè dyagnostik zòn ki antoure epi montre estatistik rezo a, tankou deteksyon twou kouvèti asirans, oswa AP nan vwazinaj la. Al gade nan Gid Administratè Wi-Fi Analyzer Worry Free pou Android. | |
| Zebra Bluetooth Anviwònman – Sèvi ak pou konfigirasyon Bluetooth logging. | |
| Sèvis Done Zebra – Itilize pou pèmèt oswa enfim Sèvis Done Zebra. Administratè sistèm lan mete kèk opsyon. |
Aksè Apps
Aksede tout aplikasyon ki enstale sou aparèy la lè l sèvi avèk fenèt APPS la.
- Sou ekran Kay la, glise moute soti nan pati anba ekran an.
- Glise fenèt APPS la monte oswa desann view plis ikon app.
- Manyen yon icon pou ouvri aplikasyon an.
Chanje ant aplikasyon ki sot pase yo
- Touche Recent.
Yon fenèt parèt sou ekran an ak ikon nan aplikasyon yo itilize dènyèman. - Glise apps yo parèt monte ak desann nan view tout aplikasyon ki fèk itilize yo.
- Glise a goch oswa adwat pou retire aplikasyon an nan lis la epi fòse fèmen aplikasyon an.
- Manyen yon icon pou ouvri yon aplikasyon oswa touche Retounen pou retounen nan ekran aktyèl la.
Manadjè batri
Manadjè batri a bay enfòmasyon detaye sou batri a.
Seksyon sa a bay tou pwosedi swap batri pou aparèy ki sipòte yo.
Manadjè batri louvri
- Pou ouvri aplikasyon Manadjè Batri a, glise moute anba ekran Kay la, epi manyen
 .
.
Tab Enfòmasyon Manadjè Batri
Manadjè Batri a montre enfòmasyon detaye sou chaj batri, sante, ak sitiyasyon.
Tablo 8 Ikon batri
| Icône batri | Deskripsyon |
 |
Nivo chaj batri se ant 85% ak 100%. |
| Nivo chaj batri se ant 19% ak 84%. | |
| Nivo chaj batri se ant 0% ak 18%. |
- Nivo - Nivo chaj batri aktyèl la kòm yon pousantajtage. Montre -% lè nivo a se enkoni.
- Mete - Sante batri a nan fòm grafik. Lè nivo a mete depase 80%, koulè ba a chanje nan wouj.
- Sante - Sante batri a. Si yon erè kritik rive, parèt. Manyen pou view deskripsyon erè a.
• Dekomisyon - Batri a fin pase lavi itil li epi li ta dwe ranplase. Gade administratè sistèm lan.
• Bon – Batri a bon.
• Erè chaj – Yon erè ki te fèt pandan y ap chaje. Gade administratè sistèm lan.
• Over Current – Yon kondisyon ki depase kouran. Gade administratè sistèm lan.
• Mouri – Batri a pa gen chaj. Ranplase batri a.
• Plis pase Voltage – Yon sou-voltagkondisyon ki te fèt. Gade administratè sistèm lan.
• Anba Tanperati - Tanperati batri a pi ba pase tanperati fonksyònman an. Gade administratè sistèm lan.
• Detekte echèk – Yo detekte yon echèk nan batri a. Gade administratè sistèm lan.
• Enkoni – Gade administratè sistèm lan. - Estati Chaj
• Pa chaje - Aparèy la pa konekte ak kouran AC.
• Chaje-AC - Aparèy la konekte ak pouvwa AC ak chaje oswa chaje vit atravè USB.
• Chaje-USB - Aparèy la konekte ak yon òdinatè lame ak yon kab USB ak chaje.
• Dechaje - Batri a ap dechaje.
• Full – Ke batri a konplètman chaje.
• Enkoni - Estati batri a se enkoni. - Tan jiskaske plen - Kantite tan jiskaske batri a konplètman chaje.
- Tan depi chaje - Kantite tan depi aparèy la te kòmanse chaje.
- Tan jiskaske batri a vid - Kantite tan jiskaske batri a vid.
- Enfòmasyon avanse – Touche pou view plis enfòmasyon sou batri.
• Estati batri prezan – Endike ke batri a prezan.
• Echèl batri – Nivo echèl batri yo itilize pou detèmine nivo batri (100).
• Nivo batri - Nivo chaj batri a kòm yon pousantajtage nan echèl.
• Batri voltage – Vol batri aktyèl latage nan milivolt.
• Tanperati batri – Tanperati batri aktyèl la an degre santigrad.
• Teknoloji batri - Kalite batri a.
• Kouran batri – Kouran an mwayèn antre oswa soti nan batri a pandan dènye segonn nan mAh.
• Dat fabrikasyon batri - Dat fabrikasyon an.
• Nimewo seri batri - Nimewo seri batri a. Nimewo a matche ak nimewo seri ki enprime sou etikèt batri a.
• Nimewo pati batri - Nimewo pati batri a.
• Sitiyasyon batri a dekomode – Endike si batri a fin pase lavi li.
• Batri bon – Batri a an bon sante.
• Batri dekomisyone – Batri a fin pase lavi itil li epi li ta dwe ranplase.
• Chaj kimilatif de baz – Chaj kimilatif lè l sèvi avèk ekipman chaj Zebra sèlman.
• Kapasite aktyèl batri - Kantite maksimòm chaj ki ta ka rale soti nan batri a nan kondisyon aktyèl la egzeyat si batri a te konplètman chaje.
• Pousan sante batritage – Avèk yon seri de 0 a 100, sa a se rapò a nan "present_capacity" ak "design_capacity" nan yon pousantaj egzeyat nan "design_capacity".
• % papòt dezamenajman – % papòt dezamenajman an default pou yon batri ki gen don kòm 80%.
• Batri chaj prezan – Kantite chaj ki ka itilize ki rete nan batri a kounye a anba kondisyon egzeyat aktyèl yo.
• Batri total kimilatif chaj - Total chaj akimile nan tout chajè yo.
• Tan batri a depi premye itilize – Tan ki pase depi yo te mete batri a nan yon tèminal Zebra pou premye fwa.
• Estati erè batri - Estati erè batri a.
• Vèsyon aplikasyon an – Nimewo vèsyon aplikasyon an.
Tab Manadjè Batri Boukante
Sèvi ak pou mete aparèy la nan mòd echanj batri lè w ap ranplase batri a. Swiv enstriksyon yo sou ekran an. Touche Kontinye ak bouton swap batri.
![]() REMAK: Tab Boukante a parèt tou lè itilizatè a peze bouton Pouvwa a epi li chwazi Boukante batri.
REMAK: Tab Boukante a parèt tou lè itilizatè a peze bouton Pouvwa a epi li chwazi Boukante batri.
Kamera
Seksyon sa a bay enfòmasyon pou pran foto ak anrejistreman videyo lè l sèvi avèk kamera dijital entegre yo.
![]() REMAK: Aparèy la sove foto ak videyo sou kat microSD la, si yo enstale epi yo chanje chemen depo a manyèlman. Pa default, oswa si yon kat microSD pa enstale, aparèy la sove foto ak videyo sou depo entèn yo.
REMAK: Aparèy la sove foto ak videyo sou kat microSD la, si yo enstale epi yo chanje chemen depo a manyèlman. Pa default, oswa si yon kat microSD pa enstale, aparèy la sove foto ak videyo sou depo entèn yo.
Pran Foto
- Glise soti anba ekran Kay la epi touche Kamera.

1 Mòd sèn 2 Filtè 3 Chanjman kamera 4 HDR 5 Anviwònman 6 Mòd kamera 7 Bouton vole 8 Galeri - Si sa nesesè, manyen ikòn Mod Kamera a epi manyen
 .
. - Pou chanje ant kamera dèyè a ak kamera devan (si disponib), manyen
 .
. - Ankadre sijè a sou ekran an.
- Pou rale oswa ale, peze de dwèt sou ekspozisyon an epi zongle oswa elaji dwèt ou. Kontwòl zoom yo parèt sou ekran an.
- Manyen yon zòn sou ekran an pou konsantre. Sèk konsantre a parèt. De ba yo vire vèt lè yo konsantre.
- Manyen
 .
.
Pran yon foto panoramique
Mòd Panorama kreye yon sèl imaj lajè pa panoramique tou dousman atravè yon sèn.
- Glise soti anba ekran Kay la epi touche Kamera.

- Manyen ikòn Mode Kamera a epi manyen
 .
. - Ankadre yon bò nan sèn nan pran.
- Manyen
 epi tou dousman pan nan zòn nan pou kaptire. Yon ti kare blan parèt andedan bouton an ki endike kapti a ap fèt.
Si w ap panoramique twò vit, mesaj la Twò vit parèt. - Manyen
 pou fini piki a. Panorama a parèt imedyatman epi yon endikatè pwogrè parèt pandan l ap sove imaj la.
Anrejistreman videyo
- Glise soti anba ekran Kay la epi touche Kamera.
- Manyen meni an mòd kamera epi manyen
 .
.
1 Efè koulè 2 Chanjman kamera 3 Odyo 4 Anviwònman 5 Mòd kamera 6 Bouton vole 7 Galeri - Pou chanje ant kamera dèyè a ak kamera devan (si disponib), manyen
 .
. - Montre kamera a epi ankadre sèn nan.
- Pou rale oswa ale, peze de dwèt sou ekspozisyon an epi zongle oswa elaji dwèt. Kontwòl zoom yo parèt sou ekran an.
- Manyen
 pou kòmanse anrejistreman.
Tan videyo ki rete a parèt anlè a gòch ekran an. - Manyen pou fini anrejistreman an.
Videyo a parèt pou yon ti tan kòm yon ti miniature nan kwen gòch anba a.
Anviwònman foto
Nan mòd foto, paramèt foto yo parèt sou ekran an.
Manyen pou montre opsyon paramèt foto yo.
Anviwònman foto kamera dèyè
- Flash – Chwazi si kamera a depann sou kontè limyè li pou deside si yon flash nesesè, oswa pou limen oswa etenn li pou tout vaksen.
Icône Deskripsyon 
Off – Enfim flash. 
Oto - Ajiste flash otomatikman depann sou mèt limyè (default). 
On – Pèmèt flash lè w pran yon foto. - Kote PS - Ajoute enfòmasyon sou kote GPS nan meta-done foto yo. Limen oswa Off (default). (WAN sèlman).
- Gwosè foto a - Gwosè foto a (an piksèl) a: 13M piksèl (default), 8M piksèl, 5M piksèl, 3M piksèl, HD 1080, 2M piksèl, HD720, 1M piksèl, WVGA, VGA, oswa QVGA.
- Kalite foto – Mete paramèt bon jan kalite foto a sou: Low, Standard (default) oswa High.
- Countdown revèy - Chwazi Off (default), 2 segonn, 5 segonn oswa 10 segonn.
- Depo - Mete kote pou sere foto a nan: Telefòn oswa Kat SD.
- Piki kontinyèl - Chwazi pran yon seri foto byen vit pandan w ap kenbe bouton kaptire a. Off (default) oswa On.
- Deteksyon figi - Mete kamera a otomatikman ajiste konsantre pou figi yo.
- ISO - Mete sansiblite kamera a nan limyè a: Auto (default), ISO Auto (HJR), ISO100, ISO200, ISO400, ISO800 oswa ISO1600.
- Ekspozisyon - Mete paramèt ekspozisyon yo sou: +2, +1, 0 (default), -1 oswa -2.
- Balans blan - Chwazi fason kamera a ajiste koulè nan diferan kalite limyè, pou reyalize koulè ki pi natirèl.
Icône Deskripsyon 
Enkandesan - Ajiste balans blan an pou ekleraj enkandesan. 
Fluoresan - Ajiste balans blan an pou ekleraj fluorescent. 
Oto - Ajiste balans blan an otomatikman (default). 
Lajounen - Ajiste balans blan an pou limyè lajounen. 
Twoub - Ajiste balans blan an pou yon anviwònman twoub. - Rediksyon Redye - Ede elimine efè redye. Opsyon: Enfim (default), oswa Pèmèt.
- ZSL - Mete kamera a imedyatman pran yon foto lè bouton an peze (default - pèmèt).
- Son Shutter - Chwazi pou jwe yon son vole lè w ap pran yon foto. Opsyon: Enfim (default) oswa Pèmèt.
- Anti Banding - Pèmèt kamera a evite pwoblèm ki te koze pa sous limyè atifisyèl ki pa konstan. Sous sa yo sik (flicker) ase vit pou ale inapèsi nan je imen an, parèt kontinyèl. Je kamera a (capteur li) ka toujou wè tranbleman sa a. Opsyon: Auto (default), 60 Hz, 50 Hz, oswa Off.
Anviwònman foto devan kamera
- Selfie Flash - Vire ekran an blan pou ede pwodui yon ti limyè siplemantè nan anviwònman gradyasyon. Opsyon: Off (default), oswa On.
- Kote GPS - Ajoute enfòmasyon sou kote GPS nan meta-done foto yo. Opsyon: On oswa Off (default). (WAN sèlman).
- Gwosè foto - Mete gwosè foto a (an piksèl) sou: 5M piksèl (default), 3M piksèl, HD1080, 2M piksèl, HD720, 1M piksèl, WVGA, VGA, oswa QVGA.
- Kalite foto – Mete paramèt bon jan kalite foto a sou: Ba, Estanda oswa Segondè (default).
- Revèy Countdown - Mete sou: Off (default), 2 segonn, 5 segonn oswa 10 segonn.
- Depo - Mete kote pou sere foto a nan: Telefòn oswa Kat SD.
- Piki kontinyèl - Chwazi pran yon seri foto byen vit pandan w ap kenbe bouton kaptire a. Off (default) oswa On.
- Deteksyon figi - Chwazi pou fèmen deteksyon figi Off (default) oswa Limen.
- ISO - Mete kijan kamera a sansib pou limyè. Opsyon: Auto (default), ISO Auto (HJR), ISO100, ISO200, ISO400, ISO800 oswa ISO1600.
- Ekspozisyon - Manyen pou ajiste anviwònman ekspoze yo. Opsyon: +2, +1, 0 (default), -1 oswa -2.
- Balans blan - Chwazi fason kamera a ajiste koulè nan diferan kalite limyè, pou reyalize koulè ki pi natirèl.
| Icône | Deskripsyon |
| Enkandesan - Ajiste balans blan an pou ekleraj enkandesan. | |
|
Fluoresan - Ajiste balans blan an pou ekleraj fliyoresan. |
| Oto - Ajiste balans blan an otomatikman (default). | |
|
Lajounen - Ajiste balans blan an pou limyè lajounen. |
|
Twoub - Ajiste balans blan an pou yon anviwònman twoub. |
- Rediksyon Redye - Ede elimine efè redye. Opsyon: Enfim (default), oswa Pèmèt.
- ZSL - Mete kamera a imedyatman pran yon foto lè bouton an peze (default - aktive)
- Selfie Mirror - Chwazi pou konsève pou yon imaj glas nan foto a. Opsyon: Enfim (default), oswa Pèmèt.
- Son Shutter - Chwazi pou jwe yon son vole lè w ap pran yon foto. Opsyon: Enfim (default) oswa Pèmèt.
- Anti Banding - Pèmèt kamera a evite pwoblèm ki te koze pa sous limyè atifisyèl ki pa konstan. Sous sa yo sik (flicker) ase vit pou ale inapèsi nan je imen an, parèt kontinyèl. Je kamera a (capteur li) ka toujou wè tranbleman sa a. Opsyon: Auto (default), 60 Hz, 50 Hz, oswa Off.
Anviwònman videyo
Nan mòd videyo, paramèt videyo yo parèt sou ekran an. Manyen pou montre opsyon paramèt videyo yo.
Anviwònman videyo kamera dèyè
- Flash – Chwazi si Kamera ki anfas dèyè depann sou kontè limyè li pou deside si yon flash nesesè, oswa pou limen oswa etenn li pou tout vaksen.
Icône Deskripsyon Off – Enfim flash. On – Pèmèt flash lè w pran yon foto. - Kalite videyo - Mete bon jan kalite videyo a: 4k DCI, 4k UHD, HD 1080p (default), HD 720p, SD 480p, VGA, CIF, oswa QVGA.
- Dire videyo - Mete sou: 30 segonn (MMS), 10 minit, oswa 30 minit (default), oswa pa gen limit.
- Kote GPS - Ajoute enfòmasyon sou kote GPS nan meta-done foto yo. Limen oswa Off (default). (WAN sèlman).
- Depo - Mete kote pou sere foto a nan: Telefòn (default) oswa Kat SD.
- Balans blan- Chwazi ki jan kamera a ajiste koulè nan diferan kalite limyè, pou reyalize koulè ki pi natirèl yo.
- Estabilizasyon Imaj - Mete pou diminye videyo twoub akòz mouvman aparèy la. Opsyon: On oswa Off (default).
| Icône | Deskripsyon |
| Enkandesan - Ajiste balans blan an pou ekleraj enkandesan. | |
|
Fluoresan - Ajiste balans blan an pou ekleraj fluorescent. |
| Oto - Ajiste balans blan an otomatikman (default). | |
|
Lajounen - Ajiste balans blan an pou limyè lajounen. |
|
Twoub - Ajiste balans blan an pou yon anviwònman twoub. |
Anviwònman Videyo Kamera Devan
- Kalite videyo - Mete bon jan kalite videyo a: 4k DCI, 4k UHD, HD 1080p (default), HD 720p, SD 480p, VGA, CIF, oswa QVGA.
- Dire videyo - Mete sou: 30 segonn (MMS), 10 minit, oswa 30 minit (default), oswa pa gen limit.
- Kote GPS - Ajoute enfòmasyon sou kote GPS nan meta-done foto yo. Limen oswa Off (default). (WAN sèlman).
- Depo - Mete kote pou sere foto a nan: Telefòn (default) oswa Kat SD.
- Balans blan- Chwazi ki jan kamera a ajiste koulè nan diferan kalite limyè, pou reyalize koulè ki pi natirèl yo.
- Estabilizasyon Imaj - Mete pou diminye videyo twoub akòz mouvman aparèy la. Opsyon: On oswa Off (default).
| Icône | Deskripsyon |
| Enkandesan - Ajiste balans blan an pou ekleraj enkandesan. | |
|
Fluoresan - Ajiste balans blan an pou ekleraj fluorescent. |
| Oto - Ajiste balans blan an otomatikman (default). | |
|
Lajounen - Ajiste balans blan an pou limyè lajounen. |
| Twoub - Ajiste balans blan an pou yon anviwònman twoub. |
Demonstrasyon DataWedge
Sèvi ak DataWedge Demonstration (DWDemo) pou demontre fonksyonalite kaptire done yo. Pou konfigirasyon DataWedge, al gade nan techdocs.zebra.com/datawedge/.
Ikon Demonstrasyon DataWedge
Tablo 9 Ikon Demonstrasyon DataWedge
| Kategori | Icône | Deskripsyon |
| Ekleraj | Ekleraj imager la sou. Manyen pou etenn ekleraj. | |
| Ekleraj |  |
Ekleraj imaj la koupe. Manyen pou limen ekleraj. |
| Done Capture |  |
Fonksyon kaptire done se atravè imaj entèn la. |
| Done Capture | Yon imaj Bluetooth RS507 oswa RS6000 konekte. | |
| Done Capture | Yon imaj Bluetooth RS507 oswa RS6000 pa konekte. | |
| Done Capture |  |
Fonksyon kaptire done se atravè kamera dèyè a. |
| Scan Mode |  |
Imager se nan mòd picklist. Manyen pou chanje nan mòd eskanè nòmal. |
| Scan Mode |  |
Imager se nan mòd eskanè nòmal. Manyen pou chanje nan mòd picklist. |
| Menu | Ouvè yon meni pou view enfòmasyon aplikasyon an oswa pou mete aplikasyon DataWedge profile. |
Chwazi yon eskanè
Gade Capture Done pou plis enfòmasyon.
- Pou chwazi yon eskanè, manyen
 > Anviwònman > Seleksyon eskanè.
 - Peze bouton pwogramasyon an oswa manyen bouton eskanè jòn pou pran done yo. Done yo parèt nan jaden tèks ki anba a bouton jòn.
PTT Express Vwa Kliyan
PTT Express Voice Client pèmèt kominikasyon Push-To-Talk (PTT) ant aparèy antrepriz diferan. Swiv enfrastrikti rezo lokal san fil (WLAN) ki egziste deja, PTT Express delivre senp kominikasyon PTT san yo pa bezwen yon sèvè kominikasyon vwa.
![]() REMAK: Egzije yon Lisans PTT Express.
REMAK: Egzije yon Lisans PTT Express.
- Rele Gwoup - Peze epi kenbe bouton PTT (Pale) pou kòmanse kominike ak lòt itilizatè kliyan vwa yo.
- Repons Prive – Peze de fwa sou bouton PTT a pou reponn ak moun ki fè dènye emisyon an oswa pou fè yon Repons Prive.
PTT Express Entèfas Itilizatè
Sèvi ak koòdone PTT Express pou kominikasyon Push-To-Talk.
Figi 10 PTT Express Default User Interface
| Nimewo | Atik | Deskripsyon |
| 1 | Icon Notifikasyon | Endike eta aktyèl kliyan PTT Express la. |
| 2 | Endikasyon sèvis | Endike estati kliyan PTT Express la. Opsyon yo se: Sèvis Pèmèt, Sèvis Enfim oswa Sèvis Pa Disponib. |
| 3 | Gwoup pale | Lis tout 32 Gwoup Pale ki disponib pou kominikasyon PTT. |
| 4 | Anviwònman | Ouvè ekran Anviwònman PTT Express la. |
| 5 | Pèmèt/enfim switch | Limen ak koupe sèvis PTT la. |
PTT Endikatè ki tande
Ton sa yo bay siyal itil lè w ap itilize kliyan vwa a.
- Ton pale: Double chirp. Li jwe lè bouton Pale a peze. Sa a se yon èd memwa pou w kòmanse pale.
- Ton Aksè: Bip sèl. Li jwe lè yon lòt itilizatè jis fini yon emisyon oswa yon repons. Ou kapab kounye a kòmanse yon Emisyon Gwoup oswa Repons Prive.
- Ton okipe: Ton kontinyèl. Li jwe lè bouton Pale a peze epi yon lòt itilizatè ap deja kominike sou menm gwoup la. Li jwe apre yo fin rive nan tan maksimòm pou pale (60 segonn).
- Ton rezo:
- Twa bip ogmante ton. Li jwe lè PTT Express jwenn koneksyon WLAN epi sèvis la pèmèt.
- Twa beep ton an diminye. Li jwe lè PTT Express pèdi koneksyon WLAN oswa sèvis la enfim.
Ikon notifikasyon PTT
Ikon notifikasyon endike eta aktyèl kliyan PTT Express Voice la.
Tablo 10 ikon PTT eksprime
| Estati Icône | Deskripsyon |
 |
Kliyan PTT Express Voice la enfim. |
 |
Kliyan PTT Express Voice la aktive men li pa konekte ak yon WLAN. |
 |
Kliyan PTT Express Voice la aktive, konekte ak yon WLAN, epi koute Gwoup Pale a ki endike nan nimewo ki akote icon la. |
 |
Kliyan PTT Express Voice la aktive, konekte ak yon WLAN, epi kominike sou Gwoup Pale a ki endike nan nimewo ki akote ikòn la. |
 |
Kliyan PTT Express Voice la pèmèt, konekte ak yon WLAN, ak nan yon repons prive. |
 |
Kliyan PTT Express Voice la aktive ak muet. |
 |
Kliyan PTT Express Voice la aktive men li pa kapab kominike akòz yon apèl telefonik VoIP k ap fèt. |
Pèmèt PTT Kominikasyon
- Glise soti anba ekran Kay la epi manyen
 .
. - Glise switch la Pèmèt/Enfim nan pozisyon ON. Bouton an chanje an ON.
Chwazi yon Gwoup Pale
Gen 32 Gwoup Pale ki ka chwazi pa itilizatè PTT Express. Sepandan, yon sèl gwoup pale ka aktive nan yon moman sou aparèy la.
- Manyen youn nan 32 Gwoup Pale yo. Gwoup Pale chwazi a make.
PTT Kominikasyon
Seksyon sa a dekri konfigirasyon defo kliyan PTT Express la. Gade Gid Itilizatè PTT Express V1.2 pou jwenn enfòmasyon detaye sou itilizasyon kliyan an.
Yo kapab etabli kominikasyon PTT kòm yon apèl Gwoup. Lè PTT Express aktive, bouton PTT sou bò gòch aparèy la asiyen pou kominikasyon PTT. Lè yo itilize Headset Filè a, Apèl Gwoup yo kapab tou inisye lè l sèvi avèk bouton Pale nan kask.
Figi 11 Bouton PTT

1 bouton PTT
Kreye yon apèl gwoup
- Peze epi kenbe bouton PTT la (oswa bouton Pale sou ekoutè a) epi koute ton pou pale a.
Si w tande yon ton okipe, lage bouton an epi tann yon ti moman anvan w fè yon lòt tantativ. Asire w ke PTT Express ak WLAN yo aktive.
REMAK: Kenbe bouton an pou plis pase 60 segonn (default) gout apèl la, ki pèmèt lòt moun fè apèl Gwoup. Lage bouton an lè w fin pale pou pèmèt lòt moun fè apèl. - Kòmanse pale apre w fin tande ton pale a.
- Lage bouton an lè w fin pale.
Reponn ak yon repons prive
Repons Prive a ka sèlman inisye yon fwa yo te etabli yon Apèl Gwoup. Premye Repons Prive a bay moun ki fè apèl Gwoup la.
- Tann yon ton aksè.
- Nan 10 segonn, peze doub bouton PTT a, epi koute ton pale a.
- Si w tande yon ton okipe, lage bouton an epi tann yon ti moman anvan w fè yon lòt tantativ. Asire w ke PTT Express ak WLAN yo aktive.
- Kòmanse pale apre ton pale a jwe.
- Lage bouton an lè w fin pale.
Enfim kominikasyon PTT
- Glise soti anba ekran Kay la epi manyen .
- Glise switch la Pèmèt/Enfim nan pozisyon OFF. Bouton an chanje an OFF.
RxLogger
RxLogger se yon zouti dyagnostik konplè ki bay mezi aplikasyon ak sistèm, ak dyagnostik pwoblèm aparèy ak aplikasyon.
RxLogger anrejistre enfòmasyon sa yo: chaj CPU, chaj memwa, snapshots memwa, konsomasyon batri, eta pouvwa, anrejistreman san fil, anrejistreman selilè, pil fatra TCP, antre Bluetooth, antre GPS, logcat, pouse/rale FTP, pil fatra ANR, elatriye. fileyo sove sou depo flash sou aparèy la (entèn oswa ekstèn).
Konfigirasyon RxLogger
RxLogger bati ak yon achitekti ploge-in extensible epi li vini pake ak yon kantite ploge-in deja bati-an. Pou enfòmasyon sou konfigirasyon RxLogger, al gade nan techdocs.zebra.com/rxlogger/.
Pou ouvri ekran konfigirasyon an, nan ekran lakay RxLogger manyen Anviwònman yo.
Konfigirasyon File
Konfigirasyon RxLogger ka mete lè l sèvi avèk yon XML file.
Konfigirasyon config.xml la file sitiye sou kat microSD nan katab RxLogger\config. Kopi a file soti nan aparèy la nan yon òdinatè lame lè l sèvi avèk yon koneksyon USB. Edit konfigirasyon an file epi ranplase XML la file sou aparèy la. Pa gen okenn nesesite pou sispann ak rekòmanse sèvis la RxLogger depi la file chanjman otomatikman detekte.
Pèmèt Logging
- Glise ekran an leve epi chwazi
 .
. - Manyen Kòmanse.
Enfimite Logging
- Glise ekran an leve epi chwazi .
- Manyen Stop.
Ekstrè Log Files
- Konekte aparèy la nan yon òdinatè lame lè l sèvi avèk yon koneksyon USB.
- Sèvi ak yon file Explorer, ale nan katab RxLogger la.
- Kopi a file soti nan aparèy la nan òdinatè lame a.
- Dekonekte aparèy la nan òdinatè lame a.
Fè bak done
RxLogger Utility pèmèt itilizatè a fè yon zip file nan katab la RxLogger nan aparèy la, ki pa default gen tout mòso bwa RxLogger ki estoke nan aparèy la.
• Pou sove done yo backup, manyen ![]() > BackupNow.
> BackupNow.
RxLogger sèvis piblik
RxLogger Utility se yon aplikasyon siveyans done pou viewmòso bwa nan aparèy la pandan RxLogger ap kouri.
Yo jwenn aksè nan mòso bwa ak RxLogger karakteristik sèvis piblik yo lè l sèvi avèk Main Chat Head.
Inisye tèt la chat prensipal
- Louvri RxLogger.
- Manyen > Aktivite tèt chat.
Ikòn Tèt Chat prensipal la parèt sou ekran an. - Manyen epi trennen ikòn tèt chat prensipal la pou deplase li nan ekran an.
Retire tèt chat prensipal la
- Manyen epi trennen icon nan.
Yon sèk ki gen yon X parèt. - Deplase icon nan sou sèk la epi lage.
Viewing Logs
- Manyen ikòn Tèt Chat prensipal la.
Ekran RxLogger Utility parèt. - Manyen yon boutèy demi lit pou ouvri li.
Itilizatè a ka louvri anpil mòso bwa ak chak montre yon nouvo sub Chat Head. - Si sa nesesè, woule a goch oswa adwat view ikon adisyonèl Sub Chat Head.
- Manyen yon Tèt Sub Chat pou montre sa ki nan boutèy demi lit la.
Retire yon ikòn Tèt Sub Chat
- Pou retire yon icon Tèt sou chat, peze epi kenbe icon nan jiskaske li disparèt.
Fè bak nan kouvri View
RxLogger Utility pèmèt itilizatè a fè yon zip file nan katab la RxLogger nan aparèy la, ki pa default gen tout mòso bwa RxLogger ki estoke nan aparèy la.
Ikòn Sovgad la toujou disponib nan Overlay View.
- Manyen
 .
.
Bwat dyalòg Sovgad la parèt. - Manyen Wi pou kreye backup la.
Done Capture
Seksyon sa a bay enfòmasyon pou pran done kòd bar lè l sèvi avèk divès opsyon optik.
Aparèy la sipòte kaptire done lè l sèvi avèk:
- Imager entegre
- Kamera entegre
- RS507/RS507X Imager men-gratis
- RS5100 Bluetooth Ring Scanner
- RS6000 Imager men-gratis
- DS2278 Digital Scanner
- DS3578 Bluetooth eskanè
- DS3608 USB eskanè
- DS3678 Digital Scanner
- DS8178 Digital Scanner
- LI3678 Lineyè eskanè
Imaging
Aparèy la ak yon simagri 2D entegre gen karakteristik sa yo:
- Lekti omnidireksyon nan yon varyete senbòl kòd bar, ki gen ladan ki pi popilè lineyè, postal, PDF417, Digimarc, ak 2D matris kalite.
- Kapasite pou pran ak telechaje imaj nan yon lame pou yon varyete aplikasyon pou D.
- Avanse lazè entwisyon vize kwa-cheve ak pwen vize pou operasyon fasil pwen-ak-tire.
Imager a sèvi ak teknoloji imaj pou pran foto yon kòd bar, estoke imaj ki kapab lakòz la nan memwa, epi egzekite algoritm dekodaj lojisyèl dènye kri pou ekstrè done kòd bar yo nan imaj la.
Kamera dijital
Aparèy la ak yon solisyon kamera entegre ki baze sou eskanè kòd bar gen karakteristik sa yo:
- Lekti omnidireksyon nan yon varyete senbòl kòd bar, ki gen ladann ki pi popilè lineyè, postal, QR, PDF417, ak 2D matris kòd.
- Retikul kwa-cheve pou operasyon fasil pwen-ak-tire.
- Picklist mòd dekode yon kòd bar patikilye nan anpil nan jaden an nan view.
Solisyon an sèvi ak teknoloji kamera avanse pou pran yon foto dijital nan yon kòd bar, epi egzekite algorithm dekodaj lojisyèl dènye kri pou ekstrè done ki soti nan imaj la.
Imager lineyè
Aparèy la ak yon imaj lineyè entegre gen karakteristik sa yo:
- Li yon varyete senbòl kòd bar, ki gen ladan kalite kòd 1-D ki pi popilè.
- Entwisyon vize pou operasyon fasil pwen-ak-tire.
Imager a sèvi ak teknoloji imaj pou pran yon foto kòd bar, estoke imaj ki kapab lakòz nan memwa li, epi egzekite algoritm dekodaj lojisyèl dènye kri pou ekstrè done kòd bar ki soti nan imaj la.
Mòd operasyonèl yo
Aparèy la ak yon simagri entegre sipòte twa mòd operasyon.
Aktive chak mòd pa peze bouton Scan la.
- Mòd Dekode — Aparèy la eseye jwenn ak dekode kòd bar ki pèmèt yo nan domèn li yo view.
Imager a rete nan mòd sa a toutotan ou kenbe bouton eskanè a, oswa jiskaske li dekode yon kòd bar.
REMAK: Pou pèmèt Pick List Mode, konfigirasyon nan Data Wedge oswa mete nan yon aplikasyon lè l sèvi avèk yon lòd API. - Mòd Lis Chwazi — Selektif dekode yon kòd bar lè gen plis pase yon kòd bar nan jaden aparèy la view lè w deplase kwa ki vize a oswa pwen sou kòd bar ki nesesè yo. Sèvi ak karakteristik sa a pou lis chwazi ki gen plizyè kòd bar ak etikèt fabrikasyon oswa transpò ki gen plis pase yon kalite kòd bar (swa 1D oswa 2D).
REMAK: Pou pèmèt Mode Multi Barcode debaz, konfigirasyon nan Data Wedge oswa mete nan yon aplikasyon lè l sèvi avèk yon lòd API. - Mòd Debaz Multi Barcode — Nan mòd sa a, aparèy la eseye jwenn ak dekode yon kantite espesifik kòd bar inik nan domèn li. view. Aparèy la rete nan mòd sa a toutotan itilizatè a kenbe bouton eskanè a, oswa jiskaske li dekode tout kòd bar yo.
- Aparèy la eseye eskane nimewo ki pwograme nan kòd bar inik (ki soti nan 2 jiska 100).
- Si gen kòd bar kopi (menm kalite senbòl ak done), se sèlman youn nan kòd bar yo dekode epi rès la yo inyore. Si etikèt la gen de kòd bar kopi plis yon lòt de kòd bar diferan, yo pral dekode yon maksimòm twa kòd bar nan etikèt sa a; youn pral inyore kòm yon kopi.
- Kod bar yo ka nan plizyè kalite senbòl epi yo toujou akeri ansanm. Pou egzanpampLè sa a, si kantite espesifye pou yon eskanè MultiBarcode debaz se kat, de kòd bar yo ka senbolik kalite Kòd 128 ak lòt de yo ka senbòl kalite Kòd 39.
- Si nimewo a espesifye nan kòd bar inik se pa okòmansman nan view nan aparèy la, aparèy la pa pral dekode okenn done jiskaske aparèy la deplase pou pran kòd bar adisyonèl (yo) oswa tan soti rive.
Si jaden aparèy la view gen yon kantite kòd bar ki pi gran pase kantite ki espesifye a, aparèy la dekode owaza kòd bar (yo) jiskaske yo rive nan nimewo espesifye nan kòd bar inik. Pou egzanpample, si konte a mete de ak uit barcodes yo nan jaden an nan view, aparèy la dekode de premye kòd bar inik li wè, retounen done yo nan lòd o aza. - Debaz Multi Barcode Mode pa sipòte kòd bar konkatene.
Konsiderasyon analiz
Tipikman, optik se yon senp kesyon de vize, eskanè, ak dekode, ak kèk efò rapid rapid pou metrize li.
Sepandan, konsidere bagay sa yo pou optimize pèfòmans optik:
- Range — Scanners dekode pi byen sou yon seri travay patikilye — distans minimòm ak maksimòm de kòd bar la. Ranje sa a varye selon dansite kòd bar ak optik aparèy optik. Eskane nan ranje pou dekode rapid ak konstan; eskanè twò pre oswa twò lwen anpeche dekode. Deplase eskanè a pi pre ak pi lwen pou w jwenn bon ranje k ap travay pou kòd bar yo tcheke.
- Ang — Ang eskanè enpòtan pou dekode rapid. Lè ekleraj la / flash reflete dirèkteman tounen nan imaj la, refleksyon an espekilè ka avèg / satire imaj la. Pou evite sa, eskane kòd bar la pou gwo bout bwa a pa rebondi dirèkteman tounen. Pa eskane nan yon ang twò byen file; eskanè a bezwen kolekte refleksyon gaye nan eskanè a fè yon dekode siksè. Pratike byen vit montre ki tolerans pou travay nan.
- Kenbe aparèy la pi lwen pou pi gwo senbòl.
- Deplase aparèy la pi pre pou senbòl ki gen ba ki fèmen ansanm.
REMAK: Pwosedi eskane depann de konfigirasyon aplikasyon an ak aparèy. Yon aplikasyon ka sèvi ak pwosedi optik diferan de sa ki endike anwo a.
Optik ak Imager Entèn
Sèvi ak imaj entèn la pou pran done kòd bar.
![]() REMAK: Pou li yon kòd bar, yon aplikasyon ki pèmèt eskanè obligatwa. Aparèy la gen aplikasyon Data Wedge ki pèmèt itilizatè a pèmèt eskanè a dekode done kòd bar epi montre kontni kòd bar la.
REMAK: Pou li yon kòd bar, yon aplikasyon ki pèmèt eskanè obligatwa. Aparèy la gen aplikasyon Data Wedge ki pèmèt itilizatè a pèmèt eskanè a dekode done kòd bar epi montre kontni kòd bar la.
- Asire w ke yon aplikasyon louvri sou aparèy la ak yon jaden tèks konsantre (kurseur tèks nan jaden tèks).
- Montre fenèt la sòti nan aparèy la nan yon kòd bar.

- Peze epi kenbe bouton eskanè a.
Modèl vize lazè wouj la vire pou ede nan vize.
REMAK: Lè aparèy la nan mòd Lis Chwazi, aparèy la pa dekode kòd bar la jiskaske sant pwen vize a manyen kòd bar la. - Asire kòd bar la nan zòn ki fòme pa kwa-cheve yo nan modèl vize a. Se pwen an vize yo itilize pou ogmante vizibilite nan kondisyon ekleraj klere.
Figi 12 Modèl vize: Standard Range
REMAK: Lè aparèy la nan mòd Lis Chwazi, aparèy la pa dekode kòd bar la jiskaske sant kwa a manyen kòd bar la.
Figi 13 Chwazi mòd lis ak kòd bar miltip - Standard Range
Done Capture ki ap dirije limyè vèt ak yon bip sone, pa default, pou endike kòd bar la te dekode avèk siksè.
Dekode ki ap dirije limyè vèt la ak yon bip sone, pa default, pou endike kòd bar la te dekode avèk siksè. - Lage bouton eskanè a.
Done kontni kòd bar yo parèt nan jaden tèks la.
REMAK: Dekodaj Imager anjeneral rive enstantane. Aparèy la repete etap ki nesesè pou pran yon foto dijital (imaj) nan yon kòd bar pòv oswa difisil osi lontan ke bouton eskanè a rete peze.
Scanning ak Kamera Entèn
Sèvi ak kamera entèn la pou pran done kòd bar.
Lè w ap pran done kòd bar nan yon move limyè, limen mòd Ekleraj nan aplikasyon DataWedge.
- Lanse yon aplikasyon eskanè.
- Montre fenèt kamera a nan yon kòd bar.

- Peze epi kenbe bouton eskanè a.
Pa default, yon preview fenèt parèt sou ekran an. Dekode limyè emisyon dyod (dirije) limyè wouj pou endike ke kaptire done se nan pwosesis. - Deplase aparèy la jiskaske kòd bar la vizib sou ekran an.
- Si mòd Picklist aktive, deplase aparèy la jiskaske kòd bar la santre anba pwen vize sou ekran an.
- Dekode dirije limyè vèt, yon bip sone ak aparèy la vibre, pa default, pou endike kòd bar la dekode avèk siksè.
Done kaptire yo parèt nan jaden tèks la.
Analyse ak RS507/RS507X Hands-Free Imager la
Sèvi ak RS507/RS507X Hands-Free Imager pou pran done kòd bar.
Figi 14 RS507/RS507X Men-Lib Imager

Gade Gid Referans Pwodwi Imager RS507/RS507X pou plis enfòmasyon.
![]() REMAK: Pou li yon kòd bar, yon aplikasyon ki pèmèt eskanè obligatwa. Aparèy la gen aplikasyon Data Wedge ki pèmèt itilizatè a pèmèt eskanè a dekode done kòd bar epi montre kontni kòd bar la.
REMAK: Pou li yon kòd bar, yon aplikasyon ki pèmèt eskanè obligatwa. Aparèy la gen aplikasyon Data Wedge ki pèmèt itilizatè a pèmèt eskanè a dekode done kòd bar epi montre kontni kòd bar la.
Pou eskane ak RS507/RS507x:
- Pè RS507/RS507X ak aparèy la.
- Asire ke yon app louvri sou aparèy la ak yon jaden tèks se nan konsantre (kurseur tèks nan jaden tèks).
- Montre RS507/RS507X nan yon kòd bar.

- Peze epi kenbe deklanche a.
Modèl vize lazè wouj la vire pou ede nan vize. Asire kòd bar la nan zòn ki fòme pa kwa-cheve yo nan modèl vize a. Pwen an vize ogmante vizibilite nan kondisyon ekleraj klere.
Figi 15 RS507/RS507X Modèl vize
 Lè RS507/RS507X a nan mòd Pick List, RS507/RS507X a pa dekode kòd bar la jiskaske sant la nan kwa a manyen kòd bar la.
Figi 16 RS507/RS507X Chwazi mòd lis ak kòd bar miltip nan modèl vize
 LED RS507/RS507X yo limyè vèt ak yon bip sone pou endike kòd bar la te dekode avèk siksè.
Done kaptire yo parèt nan jaden tèks la.
Scanner ak Scanner Ring RS5100
Sèvi ak Scanner Ring RS5100 pou pran done kòd bar.
Figi 17 Scanner bag RS5100

Gade Gid Referans Pwodwi RS5100 Ring Scanner pou plis enfòmasyon.
![]() REMAK: Pou li yon kòd bar, yon aplikasyon ki pèmèt eskanè obligatwa. Aparèy la gen aplikasyon Data Wedge ki pèmèt itilizatè a pèmèt eskanè a dekode done kòd bar epi montre kontni kòd bar la.
REMAK: Pou li yon kòd bar, yon aplikasyon ki pèmèt eskanè obligatwa. Aparèy la gen aplikasyon Data Wedge ki pèmèt itilizatè a pèmèt eskanè a dekode done kòd bar epi montre kontni kòd bar la.
Pou eskane ak RS5100:
- Pè RS5100 a ak aparèy la.
- Asire ke yon app louvri sou aparèy la ak yon jaden tèks se nan konsantre (kurseur tèks nan jaden tèks).
- Montre RS5100 a nan yon kòd bar.

- Peze epi kenbe deklanche a.
Modèl vize lazè wouj la vire pou ede nan vize. Asire kòd bar la nan zòn ki fòme pa kwa-cheve yo nan modèl vize a. Pwen an vize ogmante vizibilite nan kondisyon ekleraj klere.
Figi 18 RS5100 Modèl vize
 Lè RS5100 a nan mòd Pick List, RS5100 a pa dekode kòd bar la jiskaske sant la nan kwa a manyen kòd bar la.
Figi 19 RS5100 Chwazi mòd lis ak kòd bar miltip nan modèl vize
 LED RS5100 yo limyè vèt ak yon bip sone pou endike kòd bar la te dekode avèk siksè.
Done kaptire yo parèt nan jaden tèks la.
Scanner ak RS6000 Bluetooth Ring Scanner la
Sèvi ak RS6000 Bluetooth Ring Scanner pou pran done kòd bar.
Figi 20 RS6000 Bluetooth Ring Scanner

Al gade nan Gid Referans pwodwi RS6000 Bluetooth Ring Scanner pou plis enfòmasyon.
![]() REMAK: Pou li yon kòd bar, yon aplikasyon ki pèmèt eskanè obligatwa. Aparèy la gen aplikasyon DataWedge ki pèmèt itilizatè a pèmèt eskanè a dekode done kòd bar epi montre kontni kòd bar la.
REMAK: Pou li yon kòd bar, yon aplikasyon ki pèmèt eskanè obligatwa. Aparèy la gen aplikasyon DataWedge ki pèmèt itilizatè a pèmèt eskanè a dekode done kòd bar epi montre kontni kòd bar la.
Pou eskane ak RS6000:
- Pè RS6000 a ak aparèy la.
- Asire ke yon app louvri sou aparèy la ak yon jaden tèks se nan konsantre (kurseur tèks nan jaden tèks).
- Montre RS6000 a nan yon kòd bar.

- Peze epi kenbe deklanche a.
Modèl vize lazè wouj la vire pou ede nan vize. Asire kòd bar la nan zòn ki fòme pa kwa-cheve yo nan modèl vize a. Pwen an vize ogmante vizibilite nan kondisyon ekleraj klere.
Figi 21 RS6000 Modèl vize
 Lè RS6000 a nan mòd Pick List, RS6000 a pa dekode kòd bar la jiskaske sant la nan kwa a manyen kòd bar la.
Figi 22 RS6000 Chwazi mòd lis ak kòd bar miltip nan modèl vize
 LED RS6000 yo limyè vèt ak yon bip sone pou endike kòd bar la te dekode avèk siksè.
Done kaptire yo parèt nan jaden tèks la.
Scanner ak eskanè dijital DS2278 la
Sèvi ak Scanner dijital DS2278 pou pran done kòd bar.
Figi 23 DS2278 Digital Scanner

Ale nan Gid Referans Pwodwi Scanner Digital DS2278 pou plis enfòmasyon.
![]() REMAK: Pou li yon kòd bar, yon aplikasyon ki pèmèt eskanè obligatwa. Aparèy la gen aplikasyon DataWedge ki pèmèt itilizatè a pèmèt eskanè a dekode done kòd bar epi montre kontni kòd bar la.
REMAK: Pou li yon kòd bar, yon aplikasyon ki pèmèt eskanè obligatwa. Aparèy la gen aplikasyon DataWedge ki pèmèt itilizatè a pèmèt eskanè a dekode done kòd bar epi montre kontni kòd bar la.
Pou eskane ak DS2278 la:
- Pè DS2278 a ak aparèy la. Gade Koup yon eskanè Bluetooth pou plis enfòmasyon.
- Asire ke yon app louvri sou aparèy la ak yon jaden tèks se nan konsantre (kurseur tèks nan jaden tèks).
- Montre eskanè a nan yon kòd bar.

- Peze epi kenbe deklanche a.
- Asire ke modèl vize a kouvri kòd bar la.

- Lè yon dekode siksè, eskanè a fè yon bip ak LED la ap klere, ak liy eskanè a etenn.
Done kaptire yo parèt nan jaden tèks la.
Scanner ak eskanè Bluetooth DS3578 la
Sèvi ak eskanè Bluetooth DS3678 pou pran done kòd bar.
Figi 24 DS3678 Digital Scanner

Gade Gid Referans Pwodwi DS3678 pou plis enfòmasyon.
![]() REMAK: Pou li yon kòd bar, yon aplikasyon ki pèmèt eskanè obligatwa. Aparèy la gen aplikasyon DataWedge ki pèmèt itilizatè a pèmèt eskanè a dekode done kòd bar epi montre kontni kòd bar la.
REMAK: Pou li yon kòd bar, yon aplikasyon ki pèmèt eskanè obligatwa. Aparèy la gen aplikasyon DataWedge ki pèmèt itilizatè a pèmèt eskanè a dekode done kòd bar epi montre kontni kòd bar la.
Pou eskane ak eskanè DS3578 la:
- Pè eskanè a ak aparèy la. Gade Kouplè eskanè Bluetooth pou plis enfòmasyon.
- Asire ke yon app louvri sou aparèy la ak yon jaden tèks se nan konsantre (kurseur tèks nan jaden tèks).
- Montre eskanè a nan yon kòd bar.

- Peze epi kenbe deklanche a.
Asire kòd bar la nan zòn ki fòme pa modèl vize a. Pwen an vize ogmante vizibilite nan kondisyon ekleraj klere.

Scanner ak eskanè USB DS3608 la
Sèvi ak eskanè Bluetooth DS3608 pou pran done kòd bar.
Figi 25 DS3608 Digital Scanner

Gade Gid Referans Pwodwi DS3608 pou plis enfòmasyon.
![]() REMAK: Pou li yon kòd bar, yon aplikasyon ki pèmèt eskanè obligatwa. Aparèy la gen aplikasyon DataWedge ki pèmèt itilizatè a pèmèt eskanè a dekode done kòd bar epi montre kontni kòd bar la.
REMAK: Pou li yon kòd bar, yon aplikasyon ki pèmèt eskanè obligatwa. Aparèy la gen aplikasyon DataWedge ki pèmèt itilizatè a pèmèt eskanè a dekode done kòd bar epi montre kontni kòd bar la.
Pou eskane ak eskanè DS3678 la:
- Konekte scanner USB a nan aparèy la.
- Asire ke yon app louvri sou aparèy la ak yon jaden tèks se nan konsantre (kurseur tèks nan jaden tèks).
- Montre eskanè a nan yon kòd bar.

- Peze epi kenbe deklanche a.
Asire kòd bar la nan zòn ki fòme pa modèl vize a. Pwen an vize ogmante vizibilite nan kondisyon ekleraj klere.
Figi 26 DS3608 Modèl vize

Scanner ak eskanè dijital DS8178 la
Sèvi ak eskanè Bluetooth DS8178 pou pran done kòd bar.
Figi 28 DS8178 Digital Scanner

Ale nan Gid Referans Pwodwi Scanner Digital DS8178 pou plis enfòmasyon.
REMAK: Pou li yon kòd bar, yon aplikasyon ki pèmèt eskanè obligatwa. Aparèy la gen aplikasyon DataWedge ki pèmèt itilizatè a pèmèt eskanè a dekode done kòd bar epi montre kontni kòd bar la.
Pou eskane ak eskanè DS8178 la:
- Pè eskanè a ak aparèy la. Gade Kouplè eskanè Bluetooth pou plis enfòmasyon.
- Asire ke yon app louvri sou aparèy la ak yon jaden tèks se nan konsantre (kurseur tèks nan jaden tèks).
- Montre eskanè a nan yon kòd bar.

- Peze epi kenbe deklanche a.
- Asire kòd bar la nan zòn ki fòme pa modèl vize a. Pwen an vize ogmante vizibilite nan kondisyon ekleraj klere.

- Lè yon dekode siksè, eskanè a fè yon bip ak LED la ap klere, ak liy eskanè a etenn. Done kaptire yo parèt nan jaden tèks la.
Analyse ak LI3678 Linear Imager la
Sèvi ak imager lineyè LI3678 pou pran done kòd bar.
Figi 29 LI3678 Bluetooth eskanè

Gade Gid Referans Pwodwi LI3678 pou plis enfòmasyon.
![]() REMAK: Pou li yon kòd bar, yon aplikasyon ki pèmèt eskanè obligatwa. Aparèy la gen aplikasyon DataWedge ki pèmèt itilizatè a pèmèt eskanè a dekode done kòd bar epi montre kontni kòd bar la.
REMAK: Pou li yon kòd bar, yon aplikasyon ki pèmèt eskanè obligatwa. Aparèy la gen aplikasyon DataWedge ki pèmèt itilizatè a pèmèt eskanè a dekode done kòd bar epi montre kontni kòd bar la.
Pou eskane ak LI3678:
- Pè LI3678 a ak aparèy la. Gade Koup yon eskanè Bluetooth pou plis enfòmasyon.
- Asire ke yon app louvri sou aparèy la ak yon jaden tèks se nan konsantre (kurseur tèks nan jaden tèks).
- Montre LI3678 nan yon kòd bar.
- Peze epi kenbe deklanche a.

- Asire ke modèl vize a kouvri kòd bar la.
 Lè dekode siksè, eskanè a fè yon bip ak LED a montre yon sèl flash vèt.
Done kaptire yo parèt nan jaden tèks la.
Scanner ak eskanè Bluetooth DS3678 la
Sèvi ak eskanè Bluetooth DS3678 pou pran done kòd bar.
Figi 30 DS3678 Digital Scanner

Gade Gid Referans Pwodwi DS3678 pou plis enfòmasyon.
![]() REMAK: Pou li yon kòd bar, yon aplikasyon ki pèmèt eskanè obligatwa. Aparèy la gen aplikasyon DataWedge ki pèmèt itilizatè a pèmèt eskanè a dekode done kòd bar epi montre kontni kòd bar la.
REMAK: Pou li yon kòd bar, yon aplikasyon ki pèmèt eskanè obligatwa. Aparèy la gen aplikasyon DataWedge ki pèmèt itilizatè a pèmèt eskanè a dekode done kòd bar epi montre kontni kòd bar la.
Pou eskane ak eskanè DS3678 la:
- Pè eskanè a ak aparèy la. Gade Kouplè eskanè Bluetooth pou plis enfòmasyon.
- Asire ke yon app louvri sou aparèy la ak yon jaden tèks se nan konsantre (kurseur tèks nan jaden tèks).
- Montre eskanè a nan yon kòd bar.

- Peze epi kenbe deklanche a.
Asire kòd bar la nan zòn ki fòme pa modèl vize a. Pwen an vize ogmante vizibilite nan kondisyon ekleraj klere.

Pairing yon eskanè Ring Bluetooth
Anvan w itilize yon Scanner Ring Bluetooth ak aparèy la, konekte aparèy la ak Scanner Ring la.
Pou konekte Scanner Ring la ak aparèy la, sèvi ak youn nan metòd sa yo:
- Near Field Communication (NFC) (RS6000 sèlman)
- Entèfas seri senp (SSI)
- Bluetooth Moun Interface Aparèy (HID) mòd.
Pairing nan mòd SSI lè l sèvi avèk Near Field Communication
Aparèy la bay kapasite pou pè Scanner Ring RS5100 oswa RS6000 nan mòd SSI lè l sèvi avèk NFC.
![]() REMAK: RS6000 sèlman.
REMAK: RS6000 sèlman.
- Asire w ke RS6000 a nan mòd SSI. Gade Gid Itilizatè RS6000 la pou plis enfòmasyon.
- Asire w ke NFC aktive sou aparèy la.
- Aliman ikòn NFC sou Ring Scanner la ak icon NFC sou do aparèy la.

1 NFC logo
2 Zòn antèn NFC
Ki ap dirije Estati a ap bat ble ki endike ke Scanner Ring la ap eseye etabli yon koneksyon ak aparèy la. Lè yo etabli yon koneksyon, LED Status la etenn epi Scanner Ring la emèt yon sèl seri bip ki ba/segondè.
Yon notifikasyon parèt sou ekran aparèy la.
La ![]() icon parèt nan ba Estati a.
icon parèt nan ba Estati a.
Pairing lè l sèvi avèk koòdone seri senp (SSI)
Koup Scanner Ring la ak aparèy la lè l sèvi avèk koòdone seri senp.
- Glise soti anba ekran Kay la epi manyen
 .
. - Sèvi ak Scanner Ring la, eskane kòd bar la sou ekran an.
Scanner Ring la emèt yon seri bip segondè / ba / segondè / ba. Dirije eskanè a klere vèt ki endike ke Scanner Ring la ap eseye etabli yon koneksyon ak aparèy la. Lè yon koneksyon etabli, Scan LED la etenn epi Ring Scanner la emèt yon seri bip ki ba/segondè.
Yon notifikasyon parèt sou panèl Notifikasyon ak nan icon parèt nan ba Estati a.
Pairing lè l sèvi avèk Bluetooth Aparèy Entèfas Imèn
Pè Scanner Ring la ak aparèy la lè l sèvi avèk Aparèy Entèfas Imèn (HID).
- Asire w ke Bluetooth aktive sou tou de aparèy yo.
- Asire w ke aparèy Bluetooth pou dekouvri a nan mòd dekouvèt.
- Asire ke de aparèy yo nan yon distans 10 mèt (32.8 pye) youn ak lòt.
- Mete Scanner Ring la nan mòd HID. Si Scanner Ring la deja nan mòd HID, ale nan etap 5.
a) Retire batri a nan Scanner Ring la.
b) Peze epi kenbe kle Restore a.
c) Enstale batri a sou Ring Scanner la.
d) Kontinye kenbe kle Retablisman an pou apeprè senk segonn jiskaske yo tande yon son epi led Scan yo klere vèt.
e) Eskane kòd bar ki anba a pou mete Scanner Ring la nan mòd HID.
Figi 31 RS507 Bluetooth HID Barcode

- Retire batri a nan Scanner Ring la.
- Re-enstale batri a nan Scanner Ring la.
- Glise desann soti nan ba Estati a pou ouvri panèl Aksè rapid la epi apresa manyen .
- Manyen Bluetooth.
- Manyen Pè nouvo aparèy. Aparèy la kòmanse chèche aparèy Bluetooth ki ka dekouvri nan zòn nan epi li montre yo anba Aparèy ki disponib.
- Scroll nan lis la epi chwazi Ring Scanner.
Aparèy la konekte ak Scanner Ring la epi Konekte parèt anba non aparèy la. Yo ajoute aparèy Bluetooth la nan lis Aparèy ki pè yo epi yo etabli yon koneksyon ki fè konfyans ("paire").
Yon notifikasyon parèt sou panèl Notifikasyon ak nan icon parèt nan ba Estati a.
Pairing yon eskanè Bluetooth
Anvan w itilize yon scanner Bluetooth ak aparèy la, konekte aparèy la ak scanner Bluetooth la.
Konekte eskanè a ak aparèy la lè l sèvi avèk youn nan metòd sa yo:
- Senp Serial Interface (SSI) mòd
- Bluetooth Moun Interface Aparèy (HID) mòd.
Pairing lè l sèvi avèk koòdone seri senp
Koup Scanner Ring la ak aparèy la lè l sèvi avèk koòdone seri senp.
- Asire ke de aparèy yo nan yon distans 10 mèt (32.8 pye) youn ak lòt.
- Enstale batri a nan eskanè a.
- Glise soti anba ekran Kay la epi manyen .

- Sèvi ak Scanner Ring la, eskane kòd bar la sou ekran an.
Scanner Ring la emèt yon seri bip segondè / ba / segondè / ba. Dirije eskanè a klere vèt ki endike ke Scanner Ring la ap eseye etabli yon koneksyon ak aparèy la. Lè yon koneksyon etabli, Scan LED la etenn epi Ring Scanner la emèt yon seri bip ki ba/segondè.
Yon notifikasyon parèt sou panèl Notifikasyon ak nan icon parèt nan ba Estati a.
Pairing lè l sèvi avèk Bluetooth Aparèy Entèfas Imèn
Pè eskanè Bluetooth la ak aparèy la lè l sèvi avèk HID.
Pou pè eskanè a ak aparèy la lè l sèvi avèk HID:
- Retire batri a nan eskanè a.
- Ranplase batri a.
- Apre eskanè a rekòmanse, eskane kòd bar ki anba a pou mete eskanè a nan mòd HID.
Figi 33 Bluetooth HID klasik Barcode

- Sou aparèy la, glise desann soti nan ba Estati a pou ouvri panèl Aksè rapid la epi manyen .
- Manyen Bluetooth.
- Manyen Pè nouvo aparèy. Aparèy la kòmanse chèche aparèy Bluetooth ki ka dekouvri nan zòn nan epi li montre yo anba Aparèy ki disponib.
- Defile lis la epi chwazi XXXXX xxxxxx, kote XXXXX se eskanè a ak xxxxxx se nimewo seri a.
Aparèy la konekte ak eskanè a, eskanè a fè yon bip yon fwa epi Konekte parèt anba non aparèy la. Yo ajoute aparèy Bluetooth la nan lis Aparèy ki pè yo epi yo etabli yon koneksyon ki fè konfyans ("paire").
DataWedge
Data Wedge se yon sèvis piblik ki ajoute kapasite avanse kòd bar nan nenpòt aplikasyon san ekri kòd. Li kouri nan background nan ak okipe koòdone nan bati-an eskanè barcode. Done kòd bar kaptire yo konvèti nan frap epi voye nan aplikasyon an sib kòm si li te tape sou klavye a. DataWedge pèmèt nenpòt aplikasyon sou aparèy la jwenn done ki soti nan sous opinyon tankou yon eskanè kòd bar, MSR, RFID, vwa, oswa pò seri epi manipile done yo ki baze sou opsyon oswa règ. Konfigure DataWedge pou:
- Bay sèvis kaptire done nan nenpòt aplikasyon.
- Sèvi ak yon eskanè patikilye, lektè oswa lòt aparèy periferik.
- Byen fòma ak transmèt done nan yon aplikasyon espesifik.
Pou konfigirasyon Data Wedge, al gade nan techdocs.zebra.com/datawedge/.
Pèmèt DataWedge
Pwosedi sa a bay enfòmasyon sou fason pou pèmèt DataWedge sou aparèy la.
- Glise soti anba ekran Kay la epi manyen
 .
. - Manyen > Anviwònman.
- Manyen kaz la DataWedge pèmèt.
Yon mak ble parèt nan kare a ki endike ke DataWedge aktive.
Enfim DataWedge
Pwosedi sa a bay enfòmasyon sou fason pou enfim DataWedge sou aparèy la.
- Glise soti anba ekran Kay la epi manyen .
- Manyen .
- Manyen Anviwònman.
- Touche DataWedge aktive.
Aparèy sipòte
Seksyon sa yo bay dekodè yo sipòte pou chak opsyon kaptire done.
Kamera sipòte dekodè
Lis dekodè yo sipòte pou kamera entèn la.
Tablo 11 Dekodè Kamera Sipòte
| Dekodeur | Eta Default | Dekodeur | Eta Default | Dekodeur | Eta Default |
| Postal Ostralyen | O | EAN8 | X | MSI | O |
| Aztèk | X | Kadriyaj Matris | O | PDF417 | X |
| Postal Kanadyen | O | GS1 DataBar | X | Kòd QR | X |
| Chinwa 2 nan 5 | O | GS1 DataBar elaji | X | Siyati dekodeur | O |
| Codabar | X | GS1 DataBar Limite |
O | TLC 39 | O |
| Kòd 11 | O | GS1 Datamatrix | O | Trioptic 39 | O |
| Kòd 128 | X | GS1 QRCode | O | UK Postal | O |
| Kòd 39 | X | HAN XIN | O | UPCA | X |
| Kòd 93 | O | Interleaved 2 nan 5 |
O | UPCE0 | X |
| Konpoze AB | O | Japonè Postal |
O | UPCE1 | O |
| Konpoze C | O | Koreyen 3 nan 5 | O | US4state | O |
| Disrè 2 nan 5 | O | MAK MAY | X | US4state FICS | O |
| Datamatrix | X | Matris 2 nan 5 | O | US Planèt | O |
| Olandè Postal | O | Maxicode | X | US Postnet | O |
| DotCode | X | MicroPDF | O | ||
| EAN13 | X | MicroQR | O |
SE4750-SR ak SE4750-MR Entèn Imager Sipòte Dekodè
Lis dekodè yo sipòte pou imajè entèn SE4750-SR ak SE4850-MR.
Tablo 12 Dekodè ki sipòte SE4750-SR ak SE4850-MR Entèn Imager
| Dekodeur | Eta Default | Dekodeur | Eta Default | Dekodeur | Eta Default |
| Postal Ostralyen | O | EAN8 | X | MSI | O |
| Aztèk | X | Kadriyaj Matris | O | PDF417 | X |
| Postal Kanadyen | O | GS1 DataBar | X | Kòd QR | X |
| Chinwa 2 nan 5 | O | GS1 DataBar elaji | X | Siyati dekodeur | O |
| Codabar | X | GS1 DataBar limite | O | TLC 39 | O |
| Kòd 11 | O | GS1 Datamatrix | O | Trioptic 39 | O |
| Kòd 128 | X | GS1 QRCode | O | UK Postal | O |
| Kòd 39 | X | HAN XIN | O | UPCA | X |
| Kòd 93 | O | Interleaved 2 nan 5 | O | UPCE0 | X |
| Konpoze AB | O | Japonè Postal | O | UPCE1 | O |
| Konpoze C | O | Koreyen 3 nan 5 | O | US4state | O |
| Disrè 2 nan 5 | O | MAK MAY | X | US4state FICS | O |
| Datamatrix | X | Matris 2 nan 5 | O | US Planèt | O |
| Olandè Postal | O | Maxicode | X | US Postnet | O |
| DotCode | X | MicroPDF | O | ||
| EAN13 | X | MicroQR | O |
Kle: X = Aktive, O = Enfim, — = Pa Sipòte
SE4770 Entèn Imager Sipòte Dekodè
Lis dekodè yo sipòte pou imajè entèn SE4770 la.
Tablo 13 SE4770 Dekodè Entèn Imager Sipòte
| Dekodeur | Eta Default | Dekodeur | Eta Default | Dekodeur | Eta Default |
| Postal Ostralyen | O | EAN8 | X | MSI | O |
| Aztèk | X | Kadriyaj Matris | O | PDF417 | X |
| Postal Kanadyen | O | GS1 DataBar | X | Kòd QR | X |
| Chinwa 2 nan 5 | O | GS1 DataBar elaji | X | Dekodeur Siyati |
O |
| Codabar | X | GS1 DataBar limite | O | TLC 39 | O |
| Kòd 11 | O | GS1 Datamatrix | O | Trioptic 39 | O |
| Kòd 128 | X | GS1 QRCode | O | UK Postal | O |
| Kòd 39 | X | HAN XIN | O | UPCA | X |
| Kòd 93 | O | Interleaved 2 nan 5 | O | UPCE0 | X |
| Konpoze AB | O | Japonè Postal | O | UPCE1 | O |
| Konpoze C | O | Koreyen 3 nan 5 | O | US4state | O |
| Disrè 2 nan 5 | O | MAK MAY | X | US4state FICS | O |
| Datamatrix | X | Matris 2 nan 5 | O | US Planèt | O |
| Olandè Postal | O | Maxicode | X | US Postnet | O |
| DotCode | X | MicroPDF | O | ||
| EAN13 | X | MicroQR | O |
Kle: X = Aktive, O = Enfim, – = Pa Sipòte
RS507/RS507x Sipòte Dekodè
Lis dekodè yo sipòte pou RS507/RS507x Ring Scanner la.
Tablo 14 Dekodè RS507/RS507x sipòte
| Dekodeur | Eta Default | Dekodeur | Eta Default | Dekodeur | Eta Default |
| Postal Ostralyen | O | EAN8 | X | MSI | O |
| Aztèk | X | Kadriyaj Matris | O | PDF417 | X |
| Postal Kanadyen | – | GS1 DataBar | X | Kòd QR | X |
| Chinwa 2 nan 5 | O | GS1 DataBar elaji | X | Dekodeur Siyati |
O |
| Codabar | X | GS1 DataBar limite | O | TLC 39 | O |
| Kòd 11 | O | GS1 Datamatrix | – | Trioptic 39 | O |
| Kòd 128 | X | GS1 QRCode | – | UK Postal | O |
| Kòd 39 | O | HAN XIN | – | UPCA | X |
| Kòd 93 | O | Interleaved 2 nan 5 | O | UPCE0 | X |
| Konpoze AB | O | Japonè Postal | O | UPCE1 | O |
| Konpoze C | O | Koreyen 3 nan 5 | O | US4state | O |
| Disrè 2 nan 5 | O | MAK MAY | – | US4state FICS | O |
| Datamatrix | X | Matris 2 nan 5 | O | US Planèt | O |
| Olandè Postal | O | Maxicode | X | US Postnet | O |
| DotCode | O | MicroPDF | O | ||
| EAN13 | X | MicroQR | O |
RS5100 Dekodeur sipòte
Lis dekodè yo sipòte pou RS5100 Ring Scanner la.
Tablo 15 Dekodè RS5100 sipòte
| Dekodeur | Eta Default | Dekodeur | Eta Default | Dekodeur | Eta Default |
| Postal Ostralyen | O | EAN8 | X | MSI | O |
| Aztèk | X | Kadriyaj Matris | O | PDF417 | X |
| Postal Kanadyen | O | GS1 DataBar | X | Kòd QR | X |
| Chinwa 2 nan 5 | O | GS1 DataBar Elaji |
X | Dekodeur Siyati |
O |
| Codabar | X | GS1 DataBar limite | O | TLC 39 | O |
| Kòd 11 | O | GS1 Datamatrix | O | Trioptic 39 | O |
| Kòd 128 | X | GS1 QRCode | O | UK Postal | O |
| Kòd 39 | X | HAN XIN | O | UPCA | X |
| Kòd 93 | O | Interleaved 2 nan 5 | O | UPCE0 | X |
| Konpoze AB | O | Japonè Postal | O | UPCE1 | O |
| Konpoze C | O | Koreyen 3 nan 5 | O | US4state | O |
| Disrè 2 nan 5 | O | MAK MAY | X | US4state FICS | O |
| Datamatrix | X | Matris 2 nan 5 | O | US Planèt | O |
| Olandè Postal | O | Maxicode | X | US Postnet | O |
| DotCode | O | MicroPDF | O | ||
| EAN13 | X | MicroQR | O |
Kle: X = Aktive, O = Enfim, – = Pa Sipòte
RS6000 Dekodeur sipòte
Lis dekodè yo sipòte pou RS6000 Ring Scanner la.
Tablo 16 Dekodè RS6000 sipòte
| Dekodeur | Eta Default | Dekodeur | Eta Default | Dekodeur | Eta Default |
| Postal Ostralyen | O | EAN8 | X | MSI | O |
| Aztèk | X | Kadriyaj Matris | O | PDF417 | X |
| Postal Kanadyen | O | GS1 DataBar | X | Kòd QR | X |
| Chinwa 2 nan 5 | O | GS1 DataBar Elaji |
X | Dekodeur Siyati |
O |
| Codabar | X | GS1 DataBar limite | O | TLC 39 | O |
| Kòd 11 | O | GS1 Datamatrix | O | Trioptic 39 | O |
| Kòd 128 | X | GS1 QRCode | O | UK Postal | O |
| Kòd 39 | X | HAN XIN | O | UPCA | X |
| Kòd 93 | O | Interleaved 2 nan 5 | O | UPCE0 | X |
| Konpoze AB | O | Japonè Postal | O | UPCE1 | O |
| Konpoze C | O | Koreyen 3 nan 5 | O | US4state | O |
| Disrè 2 nan 5 | O | MAK MAY | X | US4state FICS | O |
| Datamatrix | X | Matris 2 nan 5 | O | US Planèt | O |
| Olandè Postal | O | Maxicode | X | US Postnet | O |
| DotCode | O | MicroPDF | O | ||
| EAN13 | X | MicroQR | O |
DS2278 Sipòte Dekodè
Lis dekodè yo sipòte pou DS2278 Digital Scanner la.
Tablo 17 DS2278 Digital Scanner Sipòte Dekodè
| Dekodeur | Eta Default | Dekodeur | Eta Default | Dekodeur | Eta Default |
| Postal Ostralyen | O | EAN8 | X | MSI | O |
| Aztèk | X | Kadriyaj Matris | O | PDF417 | X |
| Kanadyen Postal |
— | GS1 DataBar | X | Kòd QR | X |
| Chinwa 2 nan 5 | O | GS1 DataBar elaji | X | Siyati dekodeur | O |
| Codabar | X | GS1 DataBar limite | O | TLC 39 | O |
| Kòd 11 | O | GS1 Datamatrix | O | Trioptic 39 | O |
| Kòd 128 | X | GS1 QRCode | O | UK Postal | O |
| Kòd 39 | X | HAN XIN | — | UPCA | X |
| Kòd 93 | O | Interleaved 2 nan 5 | O | UPCE0 | X |
| Konpoze AB | O | Japonè Postal | O | UPCE1 | O |
| Konpoze C | O | Koreyen 3 nan 5 | O | US4state | O |
| Disrè 2 nan 5 | O | MAK MAY | X | US4state FICS | O |
| Datamatrix | X | Matris 2 nan 5 | O | US Planèt | O |
| Olandè Postal | O | Maxicode | X | US Postnet | O |
| DotCode | O | MicroPDF | O | ||
| EAN13 | X | MicroQR | O |
Kle: X = Aktive, O = Enfim, — = Pa Sipòte
DS3578 Sipòte Dekodè
Lis dekodè yo sipòte pou DS3578 Digital Scanner la.
Tablo 18 DS3578 Digital Scanner Sipòte Dekodè
| Dekodeur | Eta Default | Dekodeur | Eta Default | Dekodeur | Eta Default |
| Postal Ostralyen | O | EAN8 | X | MSI | O |
| Aztèk | X | Kadriyaj Matris | O | PDF417 | X |
| Postal Kanadyen | — | GS1 DataBar | X | Kòd QR | X |
| Chinwa 2 nan 5 | O | GS1 DataBar elaji | X | Siyati dekodeur | — |
| Codabar | X | GS1 DataBar limite | O | TLC 39 | O |
| Kòd 11 | O | GS1 Datamatrix | O | Trioptic 39 | O |
| Kòd 128 | X | GS1 QRCode | O | UK Postal | O |
| Kòd 39 | X | HAN XIN | — | UPCA | X |
| Kòd 93 | O | Interleaved 2 nan 5 | O | UPCE0 | X |
| Konpoze AB | O | Japonè Postal | O | UPCE1 | O |
| Konpoze C | O | Koreyen 3 nan 5 | O | US4state | O |
| Disrè 2 nan 5 | O | MAK MAY | X | US4state FICS | O |
| Datamatrix | X | Matris 2 nan 5 | O | US Planèt | O |
| Olandè Postal | O | Maxicode | X | US Postnet | O |
| DotCode | O | MicroPDF | O | ||
| EAN13 | X | MicroQR | O |
Kle: X = Aktive, O = Enfim, — = Pa Sipòte
DS3608 Sipòte Dekodè
Lis dekodè yo sipòte pou eskanè DS3608 la.
Tablo 19 DS3608 Sipòte Dekodè
| Dekodeur | Eta Default | Dekodeur | Eta Default | Dekodeur | Eta Default |
| Postal Ostralyen | O | EAN8 | X | MSI | O |
| Aztèk | X | Kadriyaj Matris | O | PDF417 | X |
| Postal Kanadyen | — | GS1 DataBar | X | Kòd QR | X |
| Chinwa 2 nan 5 | O | GS1 DataBar elaji | X | Siyati dekodeur | — |
| Codabar | X | GS1 DataBar limite | O | TLC 39 | O |
| Kòd 11 | O | GS1 Datamatrix | O | Trioptic 39 | O |
| Kòd 128 | X | GS1 QRCode | O | UK Postal | O |
| Kòd 39 | X | HAN XIN | O | UPCA | X |
| Kòd 93 | O | Interleaved 2 nan 5 | O | UPCE0 | X |
| Konpoze AB | O | Japonè Postal | O | UPCE1 | O |
| Konpoze C | O | Koreyen 3 nan 5 | O | US4state | O |
| Disrè 2 nan 5 | O | MAK MAY | X | US4state FICS | O |
| Datamatrix | X | Matris 2 nan 5 | O | US Planèt | O |
| Olandè Postal | O | Maxicode | X | US Postnet | O |
| DotCode | O | MicroPDF | O | ||
| EAN13 | X | MicroQR | O |
Kle: X = Aktive, O = Enfim, — = Pa Sipòte
DS3678 Sipòte Dekodè
Lis dekodè yo sipòte pou eskanè DS3678 la.
Tablo 20 DS3678 Sipòte Dekodè
| Dekodeur | Eta Default | Dekodeur | Eta Default | Dekodeur | Eta Default |
| Postal Ostralyen | O | EAN8 | X | MSI | O |
| Aztèk | X | Kadriyaj Matris | O | PDF417 | X |
| Postal Kanadyen | — | GS1 DataBar | X | Kòd QR | X |
| Chinwa 2 nan 5 | O | GS1 DataBar elaji | X | Siyati dekodeur | — |
| Codabar | X | GS1 DataBar limite | O | TLC 39 | O |
| Kòd 11 | O | GS1 Datamatrix | O | Trioptic 39 | O |
| Kòd 128 | X | GS1 QRCode | O | UK Postal | O |
| Kòd 39 | X | HAN XIN | O | UPCA | X |
| Kòd 93 | O | Interleaved 2 nan 5 | O | UPCE0 | X |
| Konpoze AB | O | Japonè Postal | O | UPCE1 | O |
| Konpoze C | O | Koreyen 3 nan 5 | O | US4state | O |
| Disrè 2 nan 5 | O | MAK MAY | X | US4state FICS | O |
| Datamatrix | X | Matris 2 nan 5 | O | US Planèt | O |
| Olandè Postal | O | Maxicode | X | US Postnet | O |
| DotCode | O | MicroPDF | O | ||
| EAN13 | X | MicroQR | O |
Kle: X = Aktive, O = Enfim, — = Pa Sipòte
DS8178 Sipòte Dekodè
Lis dekodè yo sipòte pou eskanè dijital DS8178 la.
Tablo 21 DS8178 Digital Scanner Sipòte Dekodè
| Dekodeur | Eta Default | Dekodeur | Eta Default | Dekodeur | Eta Default |
| Postal Ostralyen | O | EAN8 | X | MSI | O |
| Aztèk | X | Kadriyaj Matris | O | PDF417 | X |
| Postal Kanadyen | — | GS1 DataBar | X | Kòd QR | X |
| Chinwa 2 nan 5 | O | GS1 DataBar elaji | X | Dekodeur Siyati |
— |
| Codabar | X | GS1 DataBar limite | O | TLC 39 | O |
| Kòd 11 | O | GS1 Datamatrix | O | Trioptic 39 | O |
| Kòd 128 | X | GS1 QRCode | O | UK Postal | O |
| Kòd 39 | X | HAN XIN | — | UPCA | X |
| Kòd 93 | O | Interleaved 2 nan 5 | O | UPCE0 | X |
| Konpoze AB | O | Japonè Postal | O | UPCE1 | O |
| Konpoze C | O | Koreyen 3 nan 5 | O | US4state | O |
| Disrè 2 nan 5 | O | MAK MAY | X | US4state FICS | O |
| Datamatrix | X | Matris 2 nan 5 | O | US Planèt | O |
| Olandè Postal | O | Maxicode | X | US Postnet | O |
| DotCode | O | MicroPDF | O | ||
| EAN13 | X | MicroQR | O |
Kle: X = Aktive, O = Enfim, — = Pa Sipòte
LI3678 Sipòte Dekodè
Lis dekodè yo sipòte pou eskanè LI3678 la.
Tablo 22 LI3678 Dekodè ki sipòte
| Dekodeur | Eta Default | Dekodeur | Eta Default | Dekodeur | Eta Default |
| Postal Ostralyen | — | EAN8 | X | MSI | O |
| Aztèk | — | Kadriyaj Matris | O | PDF417 | — |
| Postal Kanadyen | — | GS1 DataBar | X | Kòd QR | — |
| Chinwa 2 nan 5 | O | GS1 DataBar elaji | X | Siyati dekodeur | — |
| Codabar | X | GS1 DataBar limite | O | TLC 39 | O |
| Kòd 11 | O | GS1 Datamatrix | — | Trioptic 39 | O |
| Kòd 128 | X | GS1 QRCode | — | UK Postal | — |
| Kòd 39 | X | HAN XIN | O | UPCA | X |
| Kòd 93 | O | Interleaved 2 nan 5 | O | UPCE0 | X |
| Konpoze AB | — | Japonè Postal | — | UPCE1 | O |
| Konpoze C | — | Koreyen 3 nan 5 | O | US4state | — |
| Disrè 2 nan 5 | O | MAK MAY | — | US4state FICS | — |
| Datamatrix | — | Matris 2 nan 5 | O | US Planèt | — |
| Olandè Postal | — | Maxicode | — | US Postnet | — |
| DotCode | O | MicroPDF | — | ||
| EAN13 | X | MicroQR | — |
Kle: X = Aktive, O = Enfim, — = Pa Sipòte
San fil
Seksyon sa a bay enfòmasyon sou karakteristik san fil aparèy la.
Karakteristik san fil sa yo disponib sou aparèy la:
- Wireless Wide Area Network (WWAN)
- Rezo lokal san fil (WLAN)
- Bluetooth
- Jete
- Tou pre jaden kominikasyon (NFC)
Wireless Wide Area Networks
Sèvi ak WWANs (Wirezon Wide Area Networks) pou jwenn aksè nan done sou yon rezo selilè.
![]() REMAK: TC77 sèlman.
REMAK: TC77 sèlman.
Seksyon sa a bay enfòmasyon sou:
- Pataje yon koneksyon done
- Siveyans l 'done
- Chanje anviwònman rezo selilè
Pataje Koneksyon Done Mobil la
Anviwònman Tethering & Portable Hotspot pèmèt pataje koneksyon done mobil ak yon sèl òdinatè atravè USB tethering oswa Bluetooth tethering.
Pataje koneksyon done a ak jiska uit aparèy alafwa, lè w fè l tounen yon pòtab Wi-Fi otspo.
Pandan ke aparèy la ap pataje koneksyon done li yo, yon ikòn parèt nan tèt ekran an ak yon mesaj korespondan parèt nan lis notifikasyon an.
Pèmèt USB Tethering
![]() REMAK: Tethering USB pa sipòte sou òdinatè ki kouri Mac OS. Si òdinatè a ap kouri Windows oswa yon dènye vèsyon Linux (tankou Ubuntu), swiv enstriksyon sa yo san okenn preparasyon espesyal. Si w ap kouri yon vèsyon Windows ki anvan Windows 7, oswa kèk lòt sistèm opere, ou ka bezwen prepare òdinatè a pou etabli yon koneksyon rezo via USB.
REMAK: Tethering USB pa sipòte sou òdinatè ki kouri Mac OS. Si òdinatè a ap kouri Windows oswa yon dènye vèsyon Linux (tankou Ubuntu), swiv enstriksyon sa yo san okenn preparasyon espesyal. Si w ap kouri yon vèsyon Windows ki anvan Windows 7, oswa kèk lòt sistèm opere, ou ka bezwen prepare òdinatè a pou etabli yon koneksyon rezo via USB.
- Konekte aparèy la nan yon òdinatè lame ak yon kab USB.
Notifikasyon Chaje aparèy sa a atravè USB parèt nan panèl Notifikasyon yo. - Ale nan Anviwònman.
- Touche Rezo ak Entènèt.
- Manyen Hotspot & tethering.
- Touche USB tethering switch la pou pèmèt.
Òdinatè lame a kounye a pataje koneksyon done aparèy la.
Pou sispann pataje koneksyon done a, manyen switch USB tethering la ankò oswa dekonekte kab USB la.
Pèmèt Bluetooth Tethering
Sèvi ak Bluetooth tethering pou pataje koneksyon done ak yon òdinatè lame.
Konfigure òdinatè lame a pou jwenn koneksyon rezo li a lè l sèvi avèk Bluetooth. Pou plis enfòmasyon, gade dokiman òdinatè lame a.
- Pè aparèy la ak òdinatè lame a.
- Ale nan Anviwònman.
- Touche Rezo ak Entènèt.
- Manyen Hotspot & tethering.
- Manyen switch Bluetooth tethering la pou pèmèt.
Òdinatè lame a kounye a pataje koneksyon done aparèy la.
Pou sispann pataje koneksyon done a, manyen switch Bluetooth tethering la ankò.
Pèmèt Wi-Fi Hotspot
- Ale nan Anviwònman.
- Touche Rezo ak Entènèt.
- Manyen Hotspot & tethering.
- Manyen otspot Wi-Fi.
- Aktive switch la pou pèmèt.
Apre yon ti moman, aparèy la kòmanse difize non rezo Wi-Fi li (SSID). Konekte li ak jiska uit òdinatè oswa lòt aparèy. Hotspot la icon parèt nan ba Estati a.
Pou sispann pataje koneksyon done a, manyen switch la ankò.
Konfigirasyon Wi-Fi Hotspot la
- Ale nan Anviwònman.
- Touche Rezo ak Entènèt.
- Manyen Hotspot & tethering.
- Manyen otspot Wi-Fi.
- Nan jaden tèks non Hotspot la, modifye non hotspot la.
- Manyen Sekirite epi chwazi yon metòd sekirite nan lis deroule a.
• WPA2-Psonèl
a. Manyen modpas Hotspot.
b. Antre yon modpas.
c. Manyen OK.
• Okenn – Si yo chwazi Okenn nan opsyon Sekirite, yon modpas pa obligatwa. - Manyen Avanse.
- Si ou vle, manyen Etenn hotspot otomatikman pou etenn Wi-Fi Hotspot lè pa gen okenn aparèy ki konekte.
- Nan lis déroulant AP Band, chwazi 2.4 GHz Band oswa 5.0 GHz Band.
Itilizasyon Done
Itilizasyon done refere a kantite done ki telechaje oswa telechaje pa aparèy la pandan yon peryòd bay yo.
Tou depan de plan san fil la, yo ka fè w peye yon frè adisyonèl lè itilizasyon done ou a depase limit plan ou an.
Anviwònman itilizasyon done yo pèmèt:
- Pèmèt Data Saver.
- Mete nivo avètisman sou itilizasyon done yo.
- Mete yon limit itilizasyon done.
- View oswa limite itilizasyon done pa aplikasyon an.
- Idantifye otspo mobil yo ak mete restriksyon sou download background ki ka lakòz chaj siplemantè.
Siveyans Done Itilizasyon
- Ale nan Anviwònman.
- Touche Rezo ak entènèt > Rezo mobil > Itilizasyon done.
![]() ATANSYON: Itilizasyon ki parèt sou ekran paramèt itilizasyon done yo mezire pa aparèy ou an.
ATANSYON: Itilizasyon ki parèt sou ekran paramèt itilizasyon done yo mezire pa aparèy ou an.
Kontablite itilizasyon done konpayi asirans ou an ka diferan. Itilizasyon ki depase limit done plan konpayi asirans ou an ka lakoz nan chaj depase apik. Karakteristik ki dekri isit la ka ede w swiv itilizasyon ou, men li pa garanti pou anpeche chaj adisyonèl.
Pa default, ekran paramèt itilizasyon done yo montre paramèt done mobil yo. Sa vle di, rezo done oswa rezo konpayi asirans ou bay la.
Anviwònman Avètisman sou Itilizasyon Done
Mete yon alèt avètisman lè aparèy la te itilize yon sèten kantite done mobil.
- Ale nan Anviwònman.
- Touche Rezo ak entènèt > Rezo mobil > Itilizasyon done >
 .
. - Si sa nesesè, manyen Mete avètisman done pou pèmèt li.
- Manyen avètisman done.
- Antre yon nimewo.
Pou chanje ant megaokte (MB) ak gigaokte (GB), manyen flèch la desann. - Manyen SET.
Lè itilizasyon done yo rive nan nivo yo, yon notifikasyon parèt.
Mete limit done
- Ale nan Anviwònman.
- Touche Rezo ak entènèt > Rezo mobil > Itilizasyon done >.
- Touche Mete limit done.
- Manyen OK.
- Manyen Limit done.
- Antre yon nimewo.
Pou chanje ant megaokte (MB) ak gigaokte (GB), manyen flèch la desann. - Touche Set.
Lè yo rive nan limit la, done yo otomatikman etenn epi yon notifikasyon parèt.
Anviwònman rezo selilè
Paramèt rezo selilè yo aplike pou aparèy WWAN sèlman.
Done lè itinérance
Itinérance enfim pa default pou anpeche aparèy la transmèt done sou rezo mobil lòt konpayi asirans yo lè yo kite yon zòn ki kouvri pa rezo konpayi asirans lan. Sa a itil pou kontwole depans si plan sèvis la pa enkli done itinérance.
Anviwònman Kalite Rezo Prefere
Chanje mòd fonksyone rezo a.
- Ale nan Anviwònman.
- Touche Rezo & Entènèt > Rezo mobil > Avanse > Kalite rezo pi pito.
- Nan bwat dyalòg Kalite rezo Prefere a, chwazi yon mòd pou mete kòm default.
• Otomatik (LWG)
• LTE sèlman
• 3G sèlman
• 2G sèlman
Mete Rezo Prefere
Chanje mòd fonksyone rezo a.
- Ale nan Anviwònman.
- Touche Rezo & Entènèt > Rezo mobil > Avanse.
- Touche Chwazi rezo otomatikman.
- Touche Rezo.
- Nan lis rezo ki disponib, chwazi yon rezo konpayi asirans.
Sèvi ak Chèche pou MicroCell
Yon MicroCell aji tankou yon ti gwo fò won selilè nan yon bilding oswa rezidans epi konekte ak yon sèvis entènèt bande ki egziste deja. Li amelyore pèfòmans siyal selilè pou apèl vwa, tèks, ak aplikasyon pou done selilè tankou mesaj foto ak Web navige.
- Ale nan Anviwònman.
- Touche Rezo & Entènèt > Rezo mobil.
- Manyen Chèche pou MicroCell.
Konfigirasyon Non Point Aksè
Pou itilize done yo sou yon rezo, konfigirasyon enfòmasyon APN yo
![]() REMAK: Anpil done founisè sèvis non Access Point (APN) yo pre-konfigirasyon nan aparèy la.
REMAK: Anpil done founisè sèvis non Access Point (APN) yo pre-konfigirasyon nan aparèy la.
Ou dwe jwenn enfòmasyon APN pou tout lòt sèvis yo bay founisè sèvis san fil la.
- Ale nan Anviwònman.
- Touche Rezo & Entènèt > Rezo mobil > Avanse.
- Manyen non pwen aksè.
- Manyen yon non APN nan lis la pou modifye yon APN ki egziste deja oswa touche + pou kreye yon nouvo APN.
- Manyen chak paramèt APN epi antre done ki apwopriye yo jwenn nan founisè sèvis san fil la.
- Lè fini, manyen > Sove.
- Manyen bouton radyo ki akote non APN pou kòmanse sèvi ak li.
Fèmen kat SIM la
Bloke kat SIM la mande pou itilizatè a antre yon PIN chak fwa aparèy la limen. Si yo pa antre PIN kòrèk la, se sèlman apèl ijans ki ka fè.
- Ale nan Anviwònman.
- Touche Sekirite > SIM kat fèmen.
- Manyen fèmen kat SIM.
- Antre PIN ki asosye ak kat la.
- Manyen OK.
- Reyajiste aparèy la.
Rezo lokal san fil
Rezo lokal san fil (WLAN) pèmèt aparèy la kominike san fil andedan yon bilding. Anvan ou sèvi ak aparèy la sou yon WLAN, etablisman an dwe mete kanpe ak pyès ki nan konpitè ki nesesè pou kouri WLAN (pafwa ke yo rekonèt kòm enfrastrikti). Enfrastrikti a ak aparèy la dwe tou de byen konfigirasyon pou pèmèt kominikasyon sa a.
Al gade nan dokiman ki bay ak enfrastrikti a (pwen aksè (AP), pò aksè, switch, sèvè Radius, elatriye) pou enstriksyon sou kòman yo mete enfrastrikti a.
Yon fwa yo mete enfrastrikti a pou ranfòse konplo sekirite WLAN yo chwazi a, sèvi ak paramèt Wireless & rezo yo konfigirasyon aparèy la pou matche ak konplo sekirite a.
Aparèy la sipòte opsyon sekirite WLAN sa yo:
- Okenn
- Enhanced Open
- Wireless Ekivalan Privacy (WEP)
- Aksè Pwoteje Wi-Fi (WPA)/WPA2 Pèsonèl (PSK)
- WPA3-Psonèl
- WPA/WPA2/WPA3 Enterprise (EAP)
- Pwotokòl Otantifikasyon Pwoteje Pwoteje (PEAP) - ak otantifikasyon MSCHAPV2 ak GTC.
- Sekirite Kouch Transpò (TLS)
- Tunneled Transport Layer Security (TTLS) - ak Modpas Otantifikasyon Pwotokòl (PAP), MSCHAP ak otantifikasyon MSCHAPv2.
- Modpas (PWD).
- Metòd pwotokòl otantifikasyon ekstansib pou modil idantite abònen (SIM)
- Metòd pwotokòl otantifikasyon ekstansib pou Otantifikasyon ak Akò kle (AKA)
- Amelyore Metòd Pwotokòl Otantifikasyon Ekstansib pou Otantifikasyon ak Akò Kle (AKA')
- Pwotokòl Otantifikasyon ki lejè ekstansib (LEAP).
- WPA3-Enterprise 192-bit
Ba Estati a montre ikon ki endike disponiblite rezo Wi-Fi ak estati Wi-Fi.
![]() REMAK: Pou pwolonje lavi batri a, fèmen Wi-Fi lè li pa itilize.
REMAK: Pou pwolonje lavi batri a, fèmen Wi-Fi lè li pa itilize.
Konekte nan yon rezo Wi-Fi
- Ale nan Anviwònman.
- Touche Rezo ak Entènèt.
- Manyen Wi-Fi pou ouvri ekran Wi-Fi. Aparèy la chèche WLAN nan zòn nan epi lis yo.
- Scroll nan lis la epi chwazi rezo WLAN ou vle a.
- Pou rezo louvri, manyen profile yon fwa oswa peze epi kenbe epi chwazi Konekte oswa pou rezo an sekirite antre modpas ki nesesè a oswa lòt kalifikasyon epi klike sou Konekte. Gade administratè sistèm lan pou plis enfòmasyon.
Aparèy la jwenn yon adrès rezo ak lòt enfòmasyon ki obligatwa nan rezo a lè l sèvi avèk pwotokòl DHCP (dynamic host configuration protocol). Pou konfigirasyon aparèy la ak yon adrès pwotokòl entènèt (IP) fiks, gade Konfigirasyon Aparèy la pou Sèvi ak yon Adrès IP Estatik nan paj 124. - Nan jaden an anviwònman Wi-Fi, Konekte parèt ki endike ke aparèy la konekte ak WLAN la.
Wi-Fi vèsyon
Lè aparèy la konekte ak yon rezo Wi-Fi, icon Wi-Fi ki sou ba Estati a endike vèsyon rezo Wi-Fi.
Tablo 23 Ikon vèsyon Wi-Fi
| Icône | Deskripsyon |
 |
Konekte ak Wi-Fi 5, estanda 802.11ac. |
| Konekte ak Wi-Fi 4, estanda 802.11n. |
Retire yon rezo Wi-Fi
Retire yon rezo Wi-Fi sonje oswa konekte.
- Ale nan Anviwònman.
- Touche Rezo & Entènèt > Wi-Fi.
- Desann nan pati anba a nan lis la epi touche Rezo Sove.
- Manyen non rezo a.
- Manyen BLIYE.
Konfigirasyon WLAN
Seksyon sa a bay enfòmasyon sou konfigirasyon paramèt Wi-Fi.
Konfigirasyon yon rezo Wi-Fi an sekirite
- Ale nan Anviwònman.
- Touche Rezo & Entènèt > Wi-Fi.
- Glise switch la nan pozisyon an ON.
- Aparèy la chèche WLAN nan zòn nan epi lis yo sou ekran an.
- Scroll nan lis la epi chwazi rezo WLAN ou vle a.
- Manyen rezo a vle. Si sekirite rezo a louvri, aparèy la otomatikman konekte ak rezo a. Pou tout lòt sekirite rezo, yon bwat dyalòg parèt.
- Si sekirite rezo a se WPA/WPA2-Personal, WPA3-Personal, oswa WEP, antre modpas obligatwa a epi apresa manyen Konekte.
- Si sekirite rezo a se WPA/WPA2/WPA3 Enterprise:
a) Manyen lis deroulant metòd EAP a epi chwazi youn nan bagay sa yo:
• PEAP
• TLS
• TTLS
• PWD
• SIM
• AKA
• AKA'
• LEAP.
b) Ranpli enfòmasyon ki apwopriye yo. Opsyon yo varye selon metòd EAP yo chwazi a.
• Lè w ap chwazi sètifika CA, sètifika Otorite Sètifikasyon (CA) enstale lè l sèvi avèk paramèt Sekirite yo.
• Lè w ap itilize metòd EAP PEAP, TLS, oswa TTLS, presize yon domèn.
• Touche Opsyon avanse pou montre opsyon rezo adisyonèl. - Si sekirite rezo a se WPA3-Enterprise 192-bit:
• Manyen sètifika CA epi chwazi yon sètifika Otorite Sètifikasyon (CA). Remak: Sètifika yo enstale lè l sèvi avèk anviwònman Sekirite yo.
• Touche Sètifika itilizatè epi chwazi yon sètifika itilizatè. Nòt: Sètifika itilizatè yo enstale lè l sèvi avèk anviwònman Sekirite yo.
• Nan bwat tèks Idantite, antre kalifikasyon non itilizatè yo.
REMAK: Pa default, Proxy rezo a mete sou Okenn ak paramèt IP yo mete sou DHCP. Gade Konfigirasyon pou yon sèvè prokurasyon nan paj 124 pou konfigirasyon koneksyon an nan yon sèvè proxy epi gade Konfigirasyon aparèy la pou itilize yon adrès IP estatik nan paj 124 pou konfigirasyon aparèy la pou itilize yon adrès IP estatik. - Manyen Konekte.
Manyèlman ajoute yon rezo Wi-Fi
- Ale nan Anviwònman.
- Touche Rezo & Entènèt > Wi-Fi.
- Glise switch la Wi-Fi nan pozisyon an On.
- Scroll nan pati anba a nan lis la epi chwazi Ajoute rezo.
- Nan bwat tèks Non rezo a, antre non rezo Wi-Fi a.
- Nan lis deroulant Sekirite a, mete kalite sekirite a:
• Okenn
• Enhanced Open
• WEP
• WPA/WPA2-Personal
• WPA3-Psonèl
• WPA/WPA2/WPA3-Enterprise
• WPA3-Enterprise 192-bit - If the network security is None or Enhanced Open, touch Save.
- If the network security is WEP, WPA3-Personal,or WPA/WPA2-Personal, enter the required password and then touch Save.
REMAK: Pa default, Proxy rezo a mete sou Okenn ak paramèt IP yo mete sou DHCP. Gade Konfigirasyon pou yon sèvè prokurasyon nan paj 124 pou konfigirasyon koneksyon an nan yon sèvè proxy epi gade Konfigirasyon aparèy la pou itilize yon adrès IP estatik nan paj 124 pou konfigirasyon aparèy la pou itilize yon adrès IP estatik. - Si sekirite rezo a se WPA/WPA2/WPA3 Enterprise:
a) Manyen lis deroulant metòd EAP a epi chwazi youn nan bagay sa yo:
• PEAP
• TLS
• TTLS
• PWD
• SIM
• AKA
• AKA'
• LEAP.
b) Ranpli enfòmasyon ki apwopriye yo. Opsyon yo varye selon metòd EAP yo chwazi a.
• Lè w ap chwazi sètifika CA, sètifika Otorite Sètifikasyon (CA) enstale lè l sèvi avèk paramèt Sekirite yo.
• Lè w ap itilize metòd EAP PEAP, TLS, oswa TTLS, presize yon domèn.
• Touche Opsyon avanse pou montre opsyon rezo adisyonèl. - Si sekirite rezo a se WPA3-Enterprise 192-bit:
• Manyen sètifika CA epi chwazi yon sètifika Otorite Sètifikasyon (CA). Remak: Sètifika yo enstale lè l sèvi avèk anviwònman Sekirite yo.
• Touche Sètifika itilizatè epi chwazi yon sètifika itilizatè. Nòt: Sètifika itilizatè yo enstale lè l sèvi avèk anviwònman Sekirite yo.
• Nan bwat tèks Idantite, antre kalifikasyon non itilizatè yo. - Touch Save. To connect to the saved network, touch and hold on the saved network and select Connect to network.
Konfigirasyon pou yon sèvè proxy
Yon sèvè proxy se yon sèvè ki aji kòm yon entèmedyè pou demann kliyan k ap chèche resous nan lòt sèvè. Yon kliyan konekte ak sèvè prokurasyon an epi li mande kèk sèvis, tankou yon file, koneksyon, web paj, oswa lòt resous, ki disponib nan yon sèvè diferan. Sèvè prokurasyon an evalye demann lan selon règ filtraj li yo. Pou egzanpample, it may filter traffic by IP address or protocol. If the request is validated by the filter, the proxy provides the resource by connecting to the relevant server and requesting the service on behalf of the client.
It is important for enterprise customers to be able to set up secure computing environments within their companies, making proxy configuration essential. Proxy configuration acts as a security barrier ensuring that the proxy server monitors all traffic between the Internet and the intranet. This is normally an integral part of security enforcement in corporate firewalls within intranets.
- Ale nan Anviwònman.
- Touch Network & Internet > Wi-Fi .
- Glise switch la Wi-Fi nan pozisyon an On.
- In the network dialog box, select and touch a network.
- If configuring the connected network, touch
 to edit the network details and then touch the down arrow to hide the keyboard.
 - Touch Advanced options.
- Touch Proxy and select Manual.
- In the Proxy hostname text box, enter the address of the proxy server.
- In the Proxy port text box, enter the port number for the proxy server.
- In the Bypass proxy for text box, enter addresses for web sites that are not required to go through the proxy server. Use a comma “,” between addresses. Do not use spaces or carriage returns between addresses.
- If configuring the connected network, touch Save otherwise, touch Connect.
- Manyen Konekte.
Konfigirasyon aparèy la pou itilize yon adrès IP estatik
By default, the device is configured to use Dynamic Host Configuration Protocol (DHCP) to assign an Internet protocol (IP) address when connecting to a wireless network.
- Ale nan Anviwònman.
- Touche Rezo & Entènèt > Wi-Fi.
- Glise switch la Wi-Fi nan pozisyon an On.
- In the network dialog box, select and touch a network.
- If configuring the connected network, touch to edit the network details and then touch the down arrow to hide the keyboard.
- Touch Advanced options.
- Touch IP settings and select Static.
- In the IP address text box, enter an IP address for the device.
- If required, in the Gateway text box, enter a gateway address for the device.
- If required, in the Network prefix length text box, enter the prefix length.
- If required, in the DNS 1 text box, enter a Domain Name System (DNS) address.
- If required, in the DNS 2 text box, enter a DNS address.
- If configuring the connected network, touch Save otherwise, touch Connect.
Wi-Fi Preferans
Use the Wi-Fi preferences to configure advanced Wi-Fi settings. From the Wi-Fi screen scroll down to the bottom of the screen and touch Wi-Fi preferences.
- Turn on Wi-Fi automatically – When enabled, Wi-Fi automatically turns back on when near high quality saved networks.
- Open network notification – When enabled, notifies the user when an open network is available.
- Advanced – Touch to expand options.
- Additional settings – Touch to view additional Wi-Fi settings.
- Install Certificates – Touch to install certificates.
- Network rating provider – Disabled (AOSP devices). To help determine what constitutes a good WiFi network, Android supports external Network rating providers that provide information about the quality of open Wi-Fi networks. Select one of the providers listed or None. If none are available or selected, the Connect to open networks feature is disabled.
- Wi-Fi Direct – Displays a list of devices available for a direct Wi-Fi connection.
Additional Wi-Fi Settings
Use the Additional Settings to configure additional Wi-Fi settings. To view the additional Wi-Fi settings, scroll to the bottom of the Wi-Fi screen and touch Wi-Fi Preferences > Advanced > Additional settings.
![]() REMAK: Additional Wi-Fi settings are for the device, not for a specific wireless network.
REMAK: Additional Wi-Fi settings are for the device, not for a specific wireless network.
- Regilasyon
- Country Selection – Displays the acquired country code if 802.11d is enabled, else it displays the currently selected country code.
- Region code – Displays the current region code.
- Seleksyon bann ak chanèl
- Wi-Fi frequency band – Set the frequency band to: Auto (default), 5 GHz only or 2.4 GHz only.
- Available channels (2.4 GHz) – Touch to display the Available channels menu. Select specific channels and touch OK.
- Available channels (5 GHz) – Touch to display the Available channels menu. Select specific channels and touch OK.
- Logging
- Advanced Logging – Touch to enable advanced logging or change the log directory.
- Wireless logs – Use to capture Wi-Fi log files.
- Fusion Logger – Touch to open the Fusion Logger application. This application maintains a history of high level WLAN events which helps to understand the status of connectivity.
- Fusion Status – Touch to display live status of WLAN state. Also provides information about the device and connected profile.
- Konsènan
- Version – Displays the current Fusion information.
Wi-Fi dirèk
Wi-Fi Direct devices can connect to each other without having to go through an access point. Wi-Fi Direct devices establish their own ad-hoc network when required, letting you see which devices are available and choose which one you want to connect to.
- Ale nan Anviwònman.
- Touch Wi-Fi > Wi-Fi preferences > Advanced > Wi-Fi Direct. The device begins searching for another Wi-Fi Direct device.
- Under Peer devices, touch the other device name.
- On the other device, select Accept.
Connected appears on the device. On both devices, in their respective Wi-Fi Direct screens, the other device name appears in the list.
Bluetooth
Bluetooth devices can communicate without wires, using frequency-hopping spread spectrum (FHSS) radio frequency (RF) to transmit and receive data in the 2.4 GHz Industry Scientific and Medical (ISM) band (802.15.1). Bluetooth wireless technology is specifically designed for short-range (10 m (32.8 ft)) communication and low power consumption.
Devices with Bluetooth capabilities can exchange information (for example, files, randevou, ak travay) ak lòt aparèy ki pèmèt Bluetooth tankou enprimant, pwen aksè, ak lòt aparèy mobil.
Aparèy la sipòte Bluetooth Low Energy. Bluetooth Low Energy vize aplikasyon nan endistri swen sante, kondisyon fizik, sekirite ak amizman lakay yo. Li bay konsomasyon pouvwa redwi ak pri pandan w ap kenbe estanda Bluetooth ranje.
Adaptatif Frekans so
Adaptive Frequency Hopping (AFH) se yon metòd pou evite entèferans frekans fiks, epi li ka itilize ak vwa Bluetooth. Tout aparèy ki nan piconet (rezo Bluetooth) dwe gen kapasite AFH pou AFH fonksyone. Pa gen okenn AFH lè konekte ak dekouvri aparèy. Evite fè koneksyon Bluetooth ak dekouvèt pandan kominikasyon 802.11b enpòtan.
AFH pou Bluetooth konsiste de kat seksyon prensipal:
- Channel Classification – A method of detecting an interference on a channel-by-channel basis, or predefined channel mask.
- Link Management – Coordinates and distributes the AFH information to the rest of the Bluetooth network.
- Hop Sequence Modification – Avoids interference by selectively reducing the number of hopping channels.
- Channel Maintenance – A method for periodically re-evaluating the channels.
Lè AFH aktive, radyo Bluetooth la "se alantou" (olye pou yo atravè) chanèl wo-pousantaj 802.11b yo. AFH viv ansanm pèmèt aparèy antrepriz yo opere nan nenpòt enfrastrikti.
Radyo Bluetooth nan aparèy sa a fonksyone kòm yon klas pouvwa aparèy Klas 2. Pisans pwodiksyon maksimòm lan se 2.5 mW ak seri a espere se 10 m (32.8 pye). Yon definisyon ranje ki baze sou klas pouvwa difisil pou jwenn akòz pouvwa ak diferans aparèy, epi si wi ou non nan espas ouvè oswa espas biwo fèmen.
![]() REMAK: It is not recommended to perform Bluetooth wireless technology inquiry when high rate 802.11b operation is required.
REMAK: It is not recommended to perform Bluetooth wireless technology inquiry when high rate 802.11b operation is required.
Sekirite
The current Bluetooth specification defines security at the link level. Application-level security is not specified. This allows application developers to define security mechanisms tailored to their specific need.
Link-level security occurs between devices, not users, while application-level security can be implemented on a per-user basis. The Bluetooth specification defines security algorithms and procedures required to authenticate devices, and if needed, encrypt the data flowing on the link between the devices. Device
authentication is a mandatory feature of Bluetooth while link encryption is optional.
Pairing of Bluetooth devices is accomplished by creating an initialization key used to authenticate the devices and create a link key for them. Entering a common personal identification number (PIN) in the devices being paired generates the initialization key. The PIN is never sent over the air. By default, the Bluetooth stack responds with no key when a key is requested (it is up to user to respond to the key request event). Authentication of Bluetooth devices is based-upon a challenge-response transaction.
Bluetooth allows for a PIN or passkey used to create other 128-bit keys used for security and encryption.
The encryption key is derived from the link key used to authenticate the pairing devices. Also worthy of note is the limited range and fast frequency hopping of the Bluetooth radios that makes long-distance eavesdropping difficult.
Rekòmandasyon yo se:
- Perform pairing in a secure environment
- Keep PIN codes private and do not store the PIN codes in the device
- Implement application-level security.
Bluetooth Profiles
Aparèy la sipòte sèvis Bluetooth ki nan lis la.
Table 24 Bluetooth Profiles
| Profile | Deskripsyon |
| Pwotokòl Dekouvèt Sèvis (SDP) | Handles the search for known and specific services as well as general services. |
| Seri Port Profile (SPP) | Allows use of RFCOMM protocol to emulate serial cable connection between two Bluetooth peer devices. For example, konekte aparèy la ak yon enprimant. |
| Objè Pouse Profile (OPP) | Allows the device to push and pull objects to and from a push server. |
| Avanse Distribisyon Audio Profile (A2DP) | Allows the device to stream stereo-quality audio to a wireless headset or wireless stereo speakers. |
| Odyo / Videyo Remote Control Profile (AVRCP) | Allows the device to control A/V equipment to which a user has access. It may be used in concert with A2DP. |
| Personal Area Network (PAN) | Allows the use of Bluetooth Network Encapsulation Protocol to provide L3 networking capabilities over a Bluetooth link. Only PANU role is supported. |
| Moun Interface Aparèy Profile (HID) | Allows Bluetooth keyboards, pointing devices, gaming devices and remote monitoring devices to konekte ak aparèy la. |
| Headset Profile (HSP) | Allows a hands-free device, such as a Bluetooth headset, to place and receive calls on the device. |
| Men-gratis Profile (HFP) | Allows car hands-free kits to communicate with the device in the car. |
| Aksè Liv Telefòn Profile (PBAP) | Allows exchange of Phone Book Objects between a car kit and a mobile device to allow the car kit to display the name of the incoming caller; allow the car kit to download the phone book so you can initiate a call from the car display. |
| Deyò Band (OOB) | Allows exchange of information used in the pairing process. Pairing is initiated by NFC but completed using the Bluetooth radio. Paring requires information from the OOB mechanism. Using OOB with NFC enables pairing when devices simply get close, rather than requiring a lengthy discovery process. |
| Symbol Serial Interface (SSI) | Allows for communication with Bluetooth Imager. |
Bluetooth pouvwa Etazini
Radyo Bluetooth la pa defo.
- Suspend – When the device goes into suspend mode, the Bluetooth radio stays on.
- Airplane Mode – When the device is placed in Airplane Mode, the Bluetooth radio turns off. When Airplane mode is disabled, the Bluetooth radio returns to the prior state. When in Airplane Mode, the Bluetooth radio can be turned back on if desired.
Bluetooth radyo pouvwa
Etenn radyo Bluetooth pou ekonomize kouran oswa si w ap antre nan yon zòn ki gen restriksyon sou radyo (pa egzanpample, yon avyon). Lè radyo a etenn, lòt aparèy Bluetooth pa ka wè oswa konekte ak aparèy la. Limen radyo Bluetooth pou fè echanj enfòmasyon ak lòt aparèy Bluetooth (nan limit). Kominike sèlman ak radyo Bluetooth ki toupre.
![]() REMAK: To achieve the best battery life, turn off radios when not in use.
REMAK: To achieve the best battery life, turn off radios when not in use.
Pèmèt Bluetooth
- Swipe down from the Status bar to open the Notification panel.
- Manyen
 vire Bluetooth sou.
Enfim Bluetooth
- Swipe down from the Status bar to open the Notification panel.
- Manyen
 pou fèmen Bluetooth.
Dekouvri aparèy Bluetooth (yo)
The device can receive information from discovered devices without pairing. However, once paired, the device and a paired device exchange information automatically when the Bluetooth radio is on.
- Asire w ke Bluetooth aktive sou tou de aparèy yo.
- Asire w ke aparèy Bluetooth pou dekouvri a nan mòd dekouvèt.
- Asire ke de aparèy yo nan yon distans 10 mèt (32.8 pye) youn ak lòt.
- Swipe down from the Status bar to open the Quick Access panel.
- Manyen epi kenbe Bluetooth.
- Manyen Pè nouvo aparèy. Aparèy la kòmanse chèche aparèy Bluetooth ki ka dekouvri nan zòn nan epi li montre yo anba Aparèy ki disponib.
- Scroll through the list and select a device. The Bluetooth pairing request dialog box appears.
- Touch Pair on both devices.
- The Bluetooth device is added to the Paired devices list and a trusted (“paired”) connection is established.
Chanje non Bluetooth la
By default, the device has a generic Bluetooth name that is visible to other devices when connected.
- Ale nan Anviwònman.
- Touch Connected devices > Connection preferences > Bluetooth.
- If Bluetooth is not on, move the switch to turn Bluetooth on.
- Touch Device name.
- Enter a name and touch RENAME.
Konekte sou yon aparèy Bluetooth
Once paired, connect to a Bluetooth device.
- Ale nan Anviwònman.
- Touch Connected devices > Connection preferences > Bluetooth.
- In the list, touch the unconnected Bluetooth device.
Lè konekte, Konekte parèt anba non aparèy la.
Chwazi Profiles sou Aparèy Bluetooth la
Gen kèk aparèy Bluetooth ki gen plizyè profiles.
- Ale nan Anviwònman.
- Touch Connected devices > Connection preferences > Bluetooth .
- In the Paired Devices list, touch next to the device name.
- Turn on or off a profile pou pèmèt aparèy la sèvi ak pro safile.
Separe yon aparèy Bluetooth
Unpairing a Bluetooth device erases all pairing information.
- Ale nan Anviwònman.
- Touch Connected devices > Connection preferences > Bluetooth.
- In the Paired Devices list, touch next to the device name.
- Manyen BLIYE.
Using a Bluetooth Headset
Use a Bluetooth headset for audio communication when using an audio-enabled app. See Bluetooth for more information on connecting a Bluetooth headset to the device. Set the volume appropriately before putting on the headset. When a Bluetooth headset is connected, the speakerphone is muted.
Jete
Use Cast to mirror the device screen on a Miracast enabled wireless display.
- Ale nan Anviwònman.
- Touch Connected devices > Connection preferences > Cast.
- Manyen > Enable wireless display.
The device searches for nearby Miracast devices and lists them. - Touch a device to begin casting.
Toupre Field Communications
NFC/HF RFID is a short-range wireless connectivity technology standard that enables a secure transaction between a reader and a contactless smartcard.
The technology is based on ISO/IEC 14443 type A and B (proximity) ISO/IEC 15693 (vicinity) standards, using the HF 13.56 MHz unlicensed band.
Aparèy la sipòte mòd operasyon sa yo:
- Mòd lektè
- Card Emulation mode.
Using NFC, the device can: - Read contactless cards such as contactless tickets, ID cards and ePassport.
- Read and write information to contactless cards such as SmartPosters and tickets, as well as devices with NFC interface such as vending machines.
- Read information from supported medical sensors.
- Pair with supported Bluetooth devices such as printers ring scanners (for example, RS6000), and headsets (for example, HS3100).
- Exchange data with another NFC device.
- Emulate contactless cards such as payment, or ticket, or SmartPoster.
The device NFC antenna is positioned to read NFC cards from the top of the device while the device is being held.
The device NFC antenna is located on the back of the device, near the Interface Connector.
Lekti kat NFC
Li kat san kontak lè l sèvi avèk NFC.
- Lanse yon aplikasyon NFC pèmèt.
- Kenbe aparèy jan yo montre.

- Move the device close to the NFC card until it detects the card.
- Kenbe kat la fiks jiskaske tranzaksyon an fini (anjeneral aplikasyon an endike).
Sharing Information Using NFC
You can beam content like a web page, contact cards, pictures, YouTube links, or location information from your screen to another device by bringing the devices together back to back.
Make sure both devices are unlocked, support NFC, and have both NFC and Android Beam turned on.
- Open a screen that contains a web page, video, photo or contact.
- Move the front of the device toward the front of the other device.
When the devices connect, a sound emits, the image on the screen reduces in size, the message Touch to beam displays.
- Touch anywhere on the screen.
The transfer begins.
Enterprise NFC Settings
Improve NFC performance or increase battery life by selecting which NFC features to use on the device.
- Card Detection Mode – Select a card detection mode.
- Low – Increases battery life by lowering the NFC detection speed.
- Hybrid – Provides a balance between NFC detection speed and battery life (default).
- Standard – Provides the best NFC detection speed, but reduces battery life.
- Supported Card Technology – Select an option to detect only one NFC tag type, increasing battery life, but reducing detection speed.
- All (Default) – Detects all NFC tag types. This provides the best detection speed, but reduces battery life.
- ISO 14443 Type A
- ISO 14443 Type B
- ISO15693
- NFC Debug Logging – Use to enable or disable debug logging for NFC.
- Other NFC settings available with Zebra administrator tools (CSP) – Allows configuration of additional Enterprise NFC Settings through staging tools and Mobile Device Management (MDM) solutions with an MX version that supports the Enterprise NFC Settings Configuration Service Provider (CSP). For more information on using the Enterprise NFC Settings CSP, refer to: techdocs.zebra.com.
Apèl
Make a phone call from the Phone app, the Contacts app, or other apps or widgets that display contact information.
![]() REMAK: This section applies to WWAN devices only.
REMAK: This section applies to WWAN devices only.
Emergency Calling
The service provider programs one or more emergency phone numbers, such as 911 or 999, that the user can call under any circumstances, even when the phone is locked, a SIM card is not inserted or the phone is not activated. The service provider can program additional emergency numbers into the SIM card.
However, the SIM card must be inserted in the device in order to use the numbers stored on it. See the service provider for additional information.
![]() REMAK: Emergency numbers vary by country. The phone’s pre-programmed emergency number(s) may not work in all locations, and sometimes an emergency call cannot be placed due to network, environmental, or interference issues
REMAK: Emergency numbers vary by country. The phone’s pre-programmed emergency number(s) may not work in all locations, and sometimes an emergency call cannot be placed due to network, environmental, or interference issues
Mòd odyo
The device offers three audio modes for use during phone calls.
- Handset Mode – Switch audio to the receiver at the top front of the device to use the device as a handset. This is the default mode.
- Speaker Mode – Use the device as a speakerphone.
- Headset Mode – Connect a Bluetooth or wired headset to automatically switch audio to the headset.
Headset Bluetooth
Use a Bluetooth headset for audio communication when using an audio-enabled app.
Set the volume appropriately before putting on the headset. When a Bluetooth headset is connected, the speakerphone is muted.
Fil ekoutè
Use a wired headset and audio adapter for audio communication when using an audio-enabled app.
Set the volume appropriately before putting on the headset. When a wired headset is connected, the speakerphone is muted
To end a call using the wired headset, press and hold the headset button until the call ends.
Ajiste Volim Audio
Use the volume buttons to adjust the phone volume.
- Ring and notification volumes when not in a call.
- Conversation volume during a call.
Making a Call Using the Dialer
Use the dialer tab to dial phone numbers.
- On the Home screen touch
 .
. - Manyen
 .
. - Touch the keys to enter the phone number.
- Manyen
 below the dialer to initiate the call.
Opsyon Deskripsyon 
Send audio to the speakerphone. 
Mute the call. Montre pad an rele. 
Place the call on hold (not available on all services). 
Create a conference call. 
Increase audio level. - Manyen
 pou fini apèl la.
If using a Bluetooth headset, additional audio options are available. Touch the audio icon to open the audio menu.Opsyon Deskripsyon 
Audio is routed to the Bluetooth headset. 
Audio is routed to the speakerphone. 
Audio is routed to the earpiece.
Accessing Dialing Options
The dialer provides options to save the dialed number to contacts, send an SMS, or insert pauses and wait into the dial string.
- Enter at least one digit in the dialer, then touch .
- Add 2–sec pause – Pause the dialing of the next number for two seconds. Multiple pauses are added sequentially.
- Add wait – Wait for confirmation to send the rest of the digits.
Make a Call Using Contacts
There are two ways to make a call using contacts, using the Dialer or using the Contacts app.
Sèvi ak nimewo telefòn la
- On the Home screen touch .
- Manyen
 .
. - Touch the contact.
- Manyen
 pou kòmanse apèl la.
Opsyon Deskripsyon Send audio to the speakerphone. Mute the call. Montre pad an rele. Place the call on hold (not available on all services). Create a conference call. Increase audio level. - Manyen pou fini apèl la.
If using a Bluetooth headset, additional audio options are available. Touch the audio icon to open the audio menu.Opsyon Deskripsyon Audio is routed to the Bluetooth headset. Audio is routed to the speakerphone. Audio is routed to the earpiece.
Using the Contacts App
- Manyen
 .
. - Touch a contact name.
- Manyen pou kòmanse apèl la.
Make a Call Using Call History
Call History is a list of all the calls placed, received, or missed. It provides a convenient way to redial a number, return a call, or add a number to Contacts.
Arrow icons beside a call indicate the type of call. Multiple arrows indicate multiple calls.
Table 25 Call Type Indicators
| Icône | Deskripsyon |
| Missed incoming call | |
| Received incoming call | |
 |
Apèl sortan |
Using the Call History List
- On the Home screen touch .
- Manyen an
 tab.
tab. - Manyen next to the contact to initiate the call.
- Touch the contact to perform other functions.
- Manyen pou fini apèl la.
Making a Conference Call on GSM
Create a conference phone session with multiple people
![]() REMAK: Conference Calling and the number of conference calls allowed may not be available on all services. Please check with the service provider for Conference Calling availability.
REMAK: Conference Calling and the number of conference calls allowed may not be available on all services. Please check with the service provider for Conference Calling availability.
- On the Home screen touch .
- Manyen .
- Touch the keys to enter the phone number.
- Manyen below the dialer to initiate the call.
- When the call connects, touch .
Premye apèl la mete ann antant. - Manyen .
- Touch the keys to enter the second phone number.
- Manyen below the dialer to initiate the call.
When the call connects, the first call is placed on hold and the second call is active. - Manyen
 to create a conference call with three people.
 - Manyen to add another call.
The conference is placed on hold. - Manyen .
- Touch the keys to enter another phone number.
- Manyen below the dialer to initiate the call.
- Manyen icon to add the third call to the conference.
- Touch Manage conference call to view tout moun kap rele yo.
| Opsyon | Deskripsyon |
| Remove a caller from the conference. | |
| Speak privately with one party during a conference call. | |
| Include all parties again. |
Making a Call Using a Bluetooth Headset
- Pair the Bluetooth headset with the device.
- Press the Call button on the Bluetooth headset.
- Press the Call button on the Bluetooth headset to end the call.
Reponn apèl yo
When receiving a phone call, the Incoming Call screen displays the caller ID and any additional information about the caller that is in the Contacts app.
![]() REMAK: Not all options are available for all configurations.
REMAK: Not all options are available for all configurations.
To modify phone call settings, on the Home screen touch ![]() >
> ![]() > Anviwònman.
> Anviwònman.
- Touch ANSWER to answer the call or DECLINE to send the caller to voice mail.
If the screen lock is enabled, the user can answer the call without unlocking the device. - When a call arrives:
- Manyen and slide up to answer the call.
- Manyen and slide down to send the call to voice mail.
- Manyen
 to open a list of quick text responses. Touch one to send it to the caller immediately.
Anviwònman Rele
To modify phone call settings, on the Home screen touch ![]() >
> ![]() > Anviwònman.
> Anviwònman.
![]() REMAK: Not all options are available for all configurations
REMAK: Not all options are available for all configurations
- Montre opsyon
- Sort by – Set to First name or Last name.
- Name format – Set to First name first or Last name first.
- Sounds and vibrations – Touch to edit the general sound settings for the device.
- Quick responses – Touch to edit quick responses to use instead of answering a call.
- Speed dial settings – Set speed dial contact shortcuts.
- Calling accounts
- Settings – Touch a mobile provider to display options for that provider.
- Fixed Dialing Numbers – Set to only allow the phone to dial the phone number(s) or area code(s) specified in a Fixed Dialing list.
- Call forwarding – Set to forward incoming calls to a different phone number.
![]() REMAK: Call Forwarding may not be available on all networks. Check with the service provider for availability.
REMAK: Call Forwarding may not be available on all networks. Check with the service provider for availability.
- Anviwònman adisyonèl
- Caller ID – Set caller ID to reveal the identity of the person making an outgoing call. Options:
Network default (default), Hide number, Show number. - Call waiting – Set to be notified of an incoming call while on a call.
- SIP accounts – Choose to receive Internet calls for accounts added to the device, view or change SIP accounts, or add an Internet calling account.
- Use SIP calling – Set to For all calls or Only for SIP calls (default).
- Receive incoming calls – Enable to allow incoming calls (default – disabled).
- Wi-Fi calling – Enable to allow Wi-Fi calling and set the Wi-Fi calling preference (default – disabled).
- Call barring – Set to block certain types of incoming or outgoing calls.
- Blocked numbers – Set to block calls and texts from certain phone numbers. Touch ADD A NUMBER to block a phone number.
- Voicemail – Configure voicemail settings.
- Notifications – Configure voicemail notification settings.
- Importance – Set the notification importance to Urgent, High (default), Medium, or Low.
- Alerting – Touch to receive sound and vibration notifications when a voicemail is received.
Use toggle switches to enable or disable Pop on screen, Blink light, Show notification dot, and Override Do Not Disturb. - Silent – Touch to silence sound and vibration notifications when a voicemail is received. Use toggle switches to enable or disable Minimize, Show notification dot, and Override Do Not Disturb.
- Sound – Select a sound to play for notifications from this app.
- Vibrate – Allow notifications from this app to vibrate the device.
- Blink light – Allow notifications from this app the light the Notification LED blue.
- Show notification dot – Allow notifications from this app to add a notification dot to the app icon.
- Override Do Not Disturb – Allow these notifications to interrupt when Do Not Disturb is enable.
- Anviwònman avanse
- Service – Set the service provider or other provider for voicemail service.
- Setup – Select to update the phone number used to access voicemail.
- Aksesiblite
- Hearing aids – Select to enable hearing air compatibility.
- RTT settings – Configure Real-time text (RTT) settings.
- Real-time text (RTT) call – Select to allow messaging during a call.
- Set RTT visibility – Set to Visible during calls (default) or Always visible.
Pwodwi pou Telefòn
Seksyon sa a bay enfòmasyon pou itilize akseswa pou aparèy la.
This following table lists the accessories available for the device.
Table 26 Accessories
| Akseswar | Nimewo Pati | Deskripsyon |
| bèso | ||
| 2-Slot Charge sèlman bèso | CRD-TC7X-SE2CPP-01 | Provides device and spare battery charging. Use with power supply, p/n PWRBGA12V50W0WW. |
| 2-Slot USB/Ethernet bèso | CRD-TC7X-SE2EPP-01 | Provides device and spare battery charging and USB communication with a host computer and Ethernet communication with a network. Use with power supply, p/n PWRBGA12V50W0WW. |
| 5-Slot Charge sèlman bèso | CRD-TC7X-SE5C1-01 | Charges up to five devices. Use with power supply, p/n PWR-BGA12V108W0WW and DC line cord, p/n CBL-DC-381A1-01. Can accommodate one 4-Slot Battery Charger using the Battery Adapter Cup. |
| 5-Slot Ethernet bèso | CRD-TC7X-SE5EU1–01 | Provides device charging and provides Ethernet communication for up to five devices. Use with power supply, p/n PWRBGA12V108W0WW and DC line cord, p/n CBL-DC-381A1-01. Can accommodate one 4-Slot Battery Charger using the Battery Adapter Cup. |
| Mòn bèso | BRKT-SCRD-SMRK-01 | Mounts the 5-Slot Charge Only Cradle, 5Slot Ethernet Cradle, and 4-Slot Battery Charger to a wall or rack. |
| Batri ak chajè | ||
| 4,620 mAh PowerPrecision+ battery | BTRYTC7X-46MPP-01BTRYTC7X-46MPP-10 | Replacement battery (single pack).Replacement battery (10–pack). |
| 4-slot rezèv batri chajè | SAC-TC7X-4BTYPP-01 | Charges up to four battery packs. Use with power supply, p/n PWR-BGA12V50W0WW. |
| Battery Charger Adapter Cup | CUP-SE-BTYADP1-01 | Allows for one 4-Slot Battery Charger to be charged and docked on the left most slot of the 5-Slot cradles (maximum one per cradle). |
| Vehicle Solutions | ||
| Chaje kab gode | CHG-TC7X-CLA1-01 | Provides power to the device from a cigarette lighter socket. |
| Charge Only Vehicle Cradle | CRD-TC7X-CVCD1-01 | Charges and securely holds the device. Requires power cable CHG-AUTO-CLA1-01 or CHG-AUTO-HWIRE1-01, sold separately. |
| TC7X Data Communication Enabled Vehicle Cradle with Hub Kit | CRD-TC7X-VCD1-01 | Contains the TC7X Vehicle Communication Charging Cradle and the USB I/O Hub. |
| Adaptè limyè sigarèt Oto chaj kab |
CHG-AUTO-CLA1-01 | Provides power to the Vehicle Cradle from a cigarette lighter socket. |
| Hard-wire Auto Charge Cable | CHG-AUTO-HWIRE1-01 | Provides power to the Vehicle Cradle from the vehicle’s power panel. |
| RAM mòn | RAM-B-166U | Provides window mounting option for the Vehicle Cradle. RAM Twist Lock Suction Cup with Double Socket Arm and Diamond Base Adapter. Overall Length: 6.75”. |
| RAM Mount Base | RAM-B-238U | RAM 2.43″ x 1.31″ Diamond Ball base with 1″ ball. |
| Chaj ak Kominikasyon Câbles | ||
| Chaje kab gode | CHG-TC7X-CBL1-01 | Provides power to the device. Use with power supply, p/n PWR-BUA5V16W0WW, sold separately. |
| Snap-On USB kab | CBL-TC7X-USB1-01 | Provides power to the device and USB communication with a host computer. Use with power supply, p/n PWRBUA5V16W0WW, sold separately. |
| MSR adaptè | MSR-TC7X-SNP1-01 | Provides power and USB communication with a host computer. Use with USB-C cable, sold separately. |
| Snap-On DEX Cable | CBL-TC7X-DEX1-01 | Provides electronic data exchange with devices such as vending machines. |
| Audio akseswa | ||
| Ekoutè rezistan | HS2100-OTH | Rugged wired headset. Includes HS2100 Boom Module and HSX100 OTH Headband Module. |
| Headset Bluetooth | HS3100-OTH | Rugged Bluetooth Headset. Includes HS3100 Boom Module and HSX100 OTH Headband Module. |
| 3.5 mm Audio Adapter | ADP-TC7X-AUD35-01 | Snaps onto the device and provides audio to a wired headset with 3.5 mm plug. |
| 3.5 mm Headset | HDST-35MM-PTVP-01 | Use for PTT and VoIP calls. |
| 3.5 mm Quick Disconnect Kab adaptè |
ADP-35M-QDCBL1-01 | Provides connection to the 3.5 mm Headset. |
| Scanning | ||
| Deklanche Manch | TRG-TC7X-SNP1-02 | Adds gun-style handle with a scanner trigger for comfortable and productive scanning. |
| Trigger Handle Attach Plate with Tether | ADP-TC7X-CLHTH-10 | Trigger Handle Attach Plate with tether. Allows for installation of the Trigger Handle (10-pack). Use with charge only cradles. |
| Trigger Handle Attach Plate | ADP-TC7X-CLPTH1-20 | Trigger Handle Attach Plate. Allows for installation of the Trigger Handle (20-pack). Use with Ethernet and charge only cradles. |
| Pote solisyon yo | ||
| Holster mou | SG-TC7X-HLSTR1-02 | TC7X soft holster. |
| Holster rijid | SG-TC7X-RHLSTR1-01 | TC7X rigid holster. |
| Men braslè | SG-TC7X-HSTRP2-03 | Replacement hand strap with hand strap mounting clip (3–pack). |
| Stylus and Coiled Tether | SG-TC7X-STYLUS-03 | TC7X stylus with coiled tether (3-pack). |
| Pwoteksyon ekran | SG-TC7X-SCRNTMP-01 | Provides additional protection for the screen (1-pack). |
| Pwovizyon pou pouvwa | ||
| Pwovizyon pou pouvwa | PWR-BUA5V16W0WW | Provides power to the device using the Snap-On USB Cable, Snap-on Serial Cable or Charging Cable Cup. Requires DC Line Cord, p/n DC-383A1-01 and country specific three wire grounded AC line cord sold separeman. |
| Pwovizyon pou pouvwa | PWR-BGA12V50W0WW | Provides power to the 2–Slot cradles and 4-Slot Spare Battery Charger. Requires DC Line Cord, p/n CBL-DC-388A1-01 and country specific three wire grounded AC line cord sold separately. |
| Pwovizyon pou pouvwa | PWR-BGA12V108W0WW | Provides power to the 5-Slot Charge Only cradle and the 5-Slot Ethernet Cradle. Requires DC Line Cord, p/n CBLDC-381A1-01 and country specific three wire grounded AC line cord sold separately. |
| DC liy kòd | CBL-DC-388A1-01 | Provides power from the power supply to the 2-Slot cradles and 4-Slot Spare Battery Charger. |
| DC liy kòd | CBL-DC-381A1-01 | Provides power from the power supply to the 5-Slot Charge Only Cradle and 5-Slot Ethernet Cradle. |
Batri chaje
Charge the device with a battery installed or charge spare batteries.
Main batri chaje
The device’s Charging/Notification LED indicates the status of the battery charging in the device.
Batri a 4,620 mAh chaje konplètman nan mwens pase senk èdtan nan tanperati chanm.
Rezèv Chaje Batri
The spare battery Charging LED on the cup indicates the status of the spare battery charging.
Batri a 4,620 mAh chaje konplètman nan mwens pase senk èdtan nan tanperati chanm.
Table 27 Spare Battery Charging LED Indicators
| dirije | Endikasyon |
| Amber k ap Cliche dousman | Batri rezèv ap chaje. |
| Solid vèt | Chaje konplè. |
| Amber rapid k ap bat yo | Erè nan chaje; tcheke plasman batri rezèv. |
| Ralanti kliyote wouj | Spare battery is charging and battery is at the end of useful life. |
| Solid Wouj | Charging complete and battery is at the end of useful life. |
| Vit Clignote Wouj | Erè nan chaje; tcheke plasman batri rezèv ak batri se nan fen lavi itil. |
| Off | No spare battery in slot; spare battery not placed correctly; cradle is not powered. |
Tanperati chaje
Chaje pil nan tanperati ki soti nan 0 ° C a 40 ° C (32 ° F a 104 ° F). Aparèy la oswa bèso a toujou fè batri chaje nan yon fason ki san danje epi entèlijan. Nan tanperati ki pi wo (egzanp apeprè +37 °C (+98 °F)) aparèy la oswa bèso ka pou yon ti peryòd tan altènativman pèmèt ak enfim chaje batri a kenbe batri a nan tanperati akseptab. Aparèy la ak bèso endike lè chaje a enfim akòz tanperati nòmal atravè LED li yo.
2-Slot Charge sèlman bèso
![]() ATANSYON: Asire w ke w suiv direktiv pou sekirite batri ki dekri nan Gid pou sekirite batri nan paj 231.
ATANSYON: Asire w ke w suiv direktiv pou sekirite batri ki dekri nan Gid pou sekirite batri nan paj 231.
2-Slot Charge sèlman bèso a:
- Bay 5 VDC pouvwa pou opere aparèy la.
- Chaje batri aparèy la.
- Chaje yon batri rezèv.
Figure 34 2–Slot Charge Only Cradle

| 1 | Pouvwa ki ap dirije |
| 2 | Batri rezèv chaje ki ap dirije |
2-Slot Charge Only Cradle Setup
The 2-Slot Charge Only Cradle provides charging for one device and one spare battery.

Charging the Device with the 2-Slot Charge Only Cradle
- Mete aparèy la nan plas la pou kòmanse chaje.

- Asire aparèy la byen chita.
Charging the Spare Battery with the 2-Slot Charge Only Cradle
- Insert the battery into the right slot to begin charging.

- Asire w ke batri a chita byen.
2-Slot USB-Ethernet Cradle
![]() ATANSYON: Asire w ke w suiv direktiv pou sekirite batri ki dekri nan Gid pou sekirite batri nan paj 231.
ATANSYON: Asire w ke w suiv direktiv pou sekirite batri ki dekri nan Gid pou sekirite batri nan paj 231.
The 2-Slot USB/Ethernet Cradle:
- Bay 5.0 VDC pouvwa pou opere aparèy la.
- Chaje batri aparèy la.
- Chaje yon batri rezèv.
- Connects the device to an Ethernet network.
- Provides communication to a host computer using a USB cable.
![]() REMAK: Remove all attachments on the device, except the hand strap, before place onto the cradle.
REMAK: Remove all attachments on the device, except the hand strap, before place onto the cradle.
Figi 35 2-Slot USB/Ethernet bèso

| 1 | Pouvwa ki ap dirije |
| 2 | Batri rezèv chaje ki ap dirije |
2-Slot USB-Ethernet Cradle Setup
The 2-Slot USB/Ethernet Cradle provides USB and Ethernet communication for a device. Charging is also provided for the device and one spare battery.

Charging the Device with the 2-Slot USB-Ethernet Cradle
- Place the bottom of the device into the base.

- Rotate the top of the device until the connector on the back of the device mates with the connector on the cradle.
- Ensure the device is connected properly. The charging Charging/Notification LED on the device begins blinking amber indicating that the device is charging.
Charging the Spare Battery with the 2-Slot USB-Ethernet Cradle
- Insert the battery into the right slot to begin charging.

- Asire w ke batri a chita byen.
USB and Ethernet Communication
The 2–Slot USB/Ethernet Cradle provides both Ethernet communication with a network and USB communication with a host computer. Prior to using the cradle for Ethernet or USB communication, ensure that the switch on the USB/Ethernet module is set properly.
Setting the USB Ethernet Module
- Turn the cradle over to view modil la.
Figure 36 2–Slot USB/Ethernet Cradle Module Switch

- For Ethernet communication, slide the switch to the
 pozisyon.
 - For USB communication, slide the switch to the
 pozisyon.
 - Place the switch in the center position
 to disable communications.
Ethernet Module LED Indicators
There are two LEDs on the USB/Ethernet Module RJ-45 connector. The green LED lights to indicate that the transfer rate is 100 Mbps. When the LED is not lit the transfer rate is 10 Mbps. The yellow LED blinks to indicate activity, or stays lit to indicate that a link is established. When it is not lit it indicates that there is no link.
Figure 37 LED Indicators

| 1 | Dirije jòn |
| 2 | Green dirije |
Table 28 USB/Ethernet Module LED Data Rate Indicators
| Done Pousantaj | Dirije jòn | Green dirije |
| 100 Mbps | Limen/Blink | On |
| 10 Mbps | Limen/Blink | Off |
Establishing Ethernet Connection
- Ale nan Anviwònman.
- Touch Network & internet>Ethernet.
- Slide the Ethernet switch to the ON position.
- Insert the device into a slot. The
 icon parèt nan ba Estati a.
 - Touch Eth0 to view Ethernet connection details.
Configuring Ethernet Proxy Settings
The device includes Ethernet cradle drivers. After inserting the device, configure the Ethernet connection.
- Ale nan Anviwònman.
- Touch Network & internet>Ethernet.
- Place the device into the Ethernet cradle slot.
- Glise switch la nan pozisyon an ON.
- Touch and hold Eth0 until the menu appears.
- Touch Modify Proxy.
- Touch the Proxy drop-down list and select Manual.
- In the Proxy hostname field, enter the proxy server address.
- In the Proxy port field, enter the proxy server port number.
REMAK: When entering proxy addresses in the Bypass proxy for field, do not use spaces or carriage returns between addresses. - In the Bypass proxy for text box, enter addresses for web sites that do not require to go through the proxy server. Use the separator “|” between addresses.
- Touch MODIFY.
- Touche Kay.
Configuring Ethernet Static IP Address
The device includes Ethernet cradle drivers. After inserting the device, configure the Ethernet connection:
- Ale nan Anviwònman.
- Touch Network & internet>Ethernet.
- Place the device into the Ethernet cradle slot.
- Glise switch la nan pozisyon an ON.
- Touch Eth0.
- Touch Disconnect.
- Touch Eth0.
- Touch and hold the IP settings drop-down list and select Static.
- In the IP address field, enter the proxy server address.
- If required, in the Gateway field, enter a gateway address for the device.
- If required, in the Netmask field, enter the network mask address
- If required, in the DNS address fields, enter a Domain Name System (DNS) addresses.
- Touch CONNECT.
- Touche Kay.
5-Slot Charge sèlman bèso
![]() ATANSYON: Asire w ke w suiv direktiv pou sekirite batri ki dekri nan Gid pou sekirite batri nan paj 231.
ATANSYON: Asire w ke w suiv direktiv pou sekirite batri ki dekri nan Gid pou sekirite batri nan paj 231.
5-Slot Charge sèlman bèso a:
- Bay 5 VDC pouvwa pou opere aparèy la.
- Simultaneously charges up to five devices and up to four devices and one 4-Slot Battery Charger using the Battery Charger Adapter.
- Consists of a cradle base and cups that can be configured for various charging requirements.
Figure 38 5-Slot Charge Only Cradle

| 1 | Pouvwa ki ap dirije |
5-Slot Charge Only Cradle Setup
The 5-Slot Charge Only Cradle provides charging for up to five devices.

Charging the Device with the 5-Slot Charge Only Cradle
- Mete aparèy la nan yon plas yo kòmanse chaje.


- Asire aparèy la byen chita.
Installing the Four Slot Battery Charger
Install the Four Slot Battery charger onto a 5-Slot Charge Only Cradle base. This provides a total for four device charging slots and four battery charging slots.
![]() REMAK: The Battery Charger must be installed in the first slot only.
REMAK: The Battery Charger must be installed in the first slot only.
- Remove power from the cradle.

- Using a Phillips screwdriver, remove the screw securing the cup to the cradle base.

- Slide the cup to the front of the cradle.
Figure 39 Remove Cup

- Carefully lift the cup up to expose the cup power cable.
- Disconnect the cup power cable.
 REMAK: Place power cable into adapter to avoid pinching cable.
 - Connect the Battery Adapter power cable to the connector on the cradle.

- Place adapter onto cradle base and slide toward rear of cradle.

- Using a Phillips screwdriver, secure adapter to cradle base with screw.

- Align mounting holes on the bottom of the Four Slot Battery Charger with the stubs on the Battery Adapter.

- Slide the Four Slot battery Charger down toward the front of the cradle.
- Connect the output power plug into the power port on the Four Slot Battery Charger.

Removing the Four Slot Battery Charger
If necessary, you can remove the Four Slot Battery Charger from the 5-Slot Charge Only Cradle base.
- Disconnect the output power plug from the 4-Slot Battery Charger.
- At the back of the cup, press down on the release latch.

- Slide the 4-Slot Battery Charger toward the front of the cradle.
- Lift the 4-Slot off the cradle cup.
4-Slot chaj sèlman bèso ak chajè batri
![]() ATANSYON: Asire w ke w suiv direktiv pou sekirite batri ki dekri nan Gid pou sekirite batri nan paj 231.
ATANSYON: Asire w ke w suiv direktiv pou sekirite batri ki dekri nan Gid pou sekirite batri nan paj 231.
The 4-Slot Charge Only Cradle with Battery Charger:
- Bay 5 VDC pouvwa pou opere aparèy la.
- Simultaneously charges up to four devices and up to four spare batteries.
Figure 40 4-Slot Charge Only Cradle with Battery Charger

| 1 | Pouvwa ki ap dirije |
4-Slot Charge Only Cradle with Battery Charger Setup
Figure 41 Connect Battery Charger Output Power Plug

Figure 42 Connect Charge Only Cradle Power

Charging the Device with a 4-Slot Charge Only Cradle with Battery Charger
Use the 4-Slot Charge Only Cradle with Battery Charger to charge up to four devices and four spare batteries at the same time.
- Mete aparèy la nan yon plas yo kòmanse chaje.

- Asire aparèy la byen chita.
![]() REMAK: See Installing the Four Slot Battery Charger on page 156 for information on installing the 4-Slot Battery Charger onto the cradle.
REMAK: See Installing the Four Slot Battery Charger on page 156 for information on installing the 4-Slot Battery Charger onto the cradle.
Charging the Batteries with a 4-Slot Charge Only Cradle with Battery Charger
Use the 4-Slot Charge Only Cradle with Battery Charger to charge up to four devices and four spare batteries at the same time.
- Konekte plato a ak yon sous kouran.
- Insert the battery into a battery charging well and gently press down on the battery to ensure proper contact.

1 Batri 2 Batri chaj ki ap dirije 3 Plas batri
5-Slot Ethernet bèso
![]() ATANSYON: Asire w ke w suiv direktiv pou sekirite batri ki dekri nan Gid pou sekirite batri nan paj 231.
ATANSYON: Asire w ke w suiv direktiv pou sekirite batri ki dekri nan Gid pou sekirite batri nan paj 231.
Bèso Ethernet 5-slot la:
- Bay 5.0 VDC pouvwa pou opere aparèy la.
- Konekte jiska senk aparèy nan yon rezo Ethernet.
- Simultaneously charges up to five devices and up to four devices and on 4-Slot Battery Charger using the Battery Charger Adapter.
Figure 43 5-Slot Ethernet Cradle

Enstalasyon bèso Ethernet 5-slot
Connect the 5-Slot Ethernet cradle to a power source.

Daisy-chaining Ethernet Cradles
Daisy-chain up to ten 5-Slot Ethernet cradles to connect several cradles to an Ethernet network.
Use either a straight or crossover cable. Daisy-chaining should not be attempted when the main Ethernet connection to the first cradle is 10 Mbps as throughput issues will almost certainly result.
- Connect power to each 5-Slot Ethernet cradle.
- Connect an Ethernet cable to the one of the ports on the back of the first cradle and to the Ethernet switch.
- Connect the other end of the Ethernet cable to one of the ports of the back of the second 5-Slot Ethernet cradle.

1 Pou chanje 2 Pou ekipman pou pouvwa 3 To next cradle 4 Pou ekipman pou pouvwa - Connect additional cradles as described in step 2 and 3.
Charging the Device with a 5-Slot Ethernet Cradle
Charge up to five Ethernet devices.
- Mete aparèy la nan yon plas yo kòmanse chaje.

- Asire aparèy la byen chita.

Installing the Four Slot Battery Charger
Install the Four Slot Battery charger onto a 5-Slot Charge Only Cradle base. This provides a total for four device charging slots and four battery charging slots.
![]() REMAK: The Battery Charger must be installed in the first slot only.
REMAK: The Battery Charger must be installed in the first slot only.
- Remove power from the cradle.

- Using a Phillips screwdriver, remove the screw securing the cup to the cradle base.

- Slide the cup to the front of the cradle.
Figi 44 Remove Cup

- Carefully lift the cup up to expose the cup power cable.
- Disconnect the cup power cable.
 REMAK: Place power cable into adapter to avoid pinching cable.
 - Connect the Battery Adapter power cable to the connector on the cradle.

- Place adapter onto cradle base and slide toward rear of cradle.

- Using a Phillips screwdriver, secure adapter to cradle base with screw.

- Align mounting holes on the bottom of the Four Slot Battery Charger with the stubs on the Battery Adapter.

- Slide the Four Slot battery Charger down toward the front of the cradle.
- Connect the output power plug into the power port on the Four Slot Battery Charger.

Removing the Four Slot Battery Charger
If necessary, you can remove the Four Slot Battery Charger from the 5-Slot Charge Only Cradle base.
- Disconnect the output power plug from the 4-Slot Battery Charger.
- At the back of the cup, press down on the release latch.

- Slide the 4-Slot Battery Charger toward the front of the cradle.
- Lift the 4-Slot off the cradle cup.
Ethernet Kominikasyon
The 5-Slot Ethernet Cradle provides Ethernet communication with a network.
Endikatè Ethernet ki ap dirije
There are two green LEDs on the side of the cradle. These green LEDs light and blink to indicate the data transfer rate.
Tablo 29 LED Data Rate Indicators
| Done Pousantaj | 1000 dirije | 100/10 dirije |
| 1 Gbps | Limen/Blink | Off |
| 100 Mbps | Off | Limen/Blink |
| 10 Mbps | Off | Limen/Blink |
Establishing Ethernet Connection
- Ale nan Anviwònman.
- Touch Network & internet>Ethernet.
- Slide the Ethernet switch to the ON position.
- Insert the device into a slot.
La icon parèt nan ba Estati a. - Touch Eth0 to view Ethernet connection details.
Configuring Ethernet Proxy Settings
The device includes Ethernet cradle drivers. After inserting the device, configure the Ethernet connection.
- Ale nan Anviwònman.
- Touch Network & internet>Ethernet.
- Place the device into the Ethernet cradle slot.
- Glise switch la nan pozisyon an ON.
- Touch and hold Eth0 until the menu appears.
- Touch Modify Proxy.
- Touch the Proxy drop-down list and select Manual.
- In the Proxy hostname field, enter the proxy server address.
- In the Proxy port field, enter the proxy server port number.
REMAK: When entering proxy addresses in the Bypass proxy for field, do not use spaces or carriage returns between addresses. - In the Bypass proxy for text box, enter addresses for web sites that do not require to go through the proxy server. Use the separator “|” between addresses.
- Touch MODIFY.
- Touche Kay.
Configuring Ethernet Static IP Address
The device includes Ethernet cradle drivers. After inserting the device, configure the Ethernet connection:
- Ale nan Anviwònman.
- Touch Network & internet>Ethernet.
- Place the device into the Ethernet cradle slot.
- Glise switch la nan pozisyon an ON.
- Touch Eth0.
- Touch Disconnect.
- Touch Eth0.
- Touch and hold the IP settings drop-down list and select Static.
- In the IP address field, enter the proxy server address.
- If required, in the Gateway field, enter a gateway address for the device.
- If required, in the Netmask field, enter the network mask address
- If required, in the DNS address fields, enter a Domain Name System (DNS) addresses.
- Touch CONNECT.
- Touche Kay.
4-plas Charger batri
Seksyon sa a dekri kijan pou itilize Charger Batri 4 Plas la pou chaje jiska kat pil aparèy.
![]() ATANSYON: Asire w ke w suiv direktiv pou sekirite batri ki dekri nan Gid pou sekirite batri nan paj 231.
ATANSYON: Asire w ke w suiv direktiv pou sekirite batri ki dekri nan Gid pou sekirite batri nan paj 231.

| 1 | Plas batri |
| 2 | Batri chaje dirije |
| 3 | Pouvwa ki ap dirije |
4-Slot Battery Charger Setup
Figi 46 Four Slot Battery Charger Power Setup

Charging Spare Batteries in the 4-Slot Battery Charger
Charge up to four spare batteries.
- Konekte plato a ak yon sous kouran.
- Insert the battery into a battery charging well and gently press down on the battery to ensure proper contact.

| 1 | Batri |
| 2 | Batri chaj ki ap dirije |
| 3 | Plas batri |
3.5 mm Audio Adapter
The 3.5 mm Audio Adapter snaps onto the back of the device and removes easily when not in use. When attached to the device the 3.5 mm Audio Adapter allows a user to connect a wired headset to the device.
Connecting a Headset to the 3.5 mm Audio Adapter
- Connect the Quick Disconnect connect of the headset to the Quick Disconnect connector of the 3.5 mm Quick Disconnect Adapter Cable.

- Connect the audio jack of the 3.5 mm Quick Disconnect Adapter Cable to the 3.5 mm Audio Adapter.
Figi 47 Connect Adapter Cable to Audio Adapter

Attaching the 3.5 mm Audio Adapter
- Align the top mounting points on the 3.5 mm Audio Adapter with the mounting slots on the device.

- Rotate the Audio Adapter down and press down until it snaps into position.
Device with 3.5 mm Audio Adapter in Holster
When using the device and the audio adapter in a holster, ensure that the display faces in and the headset cable is securely attached to the audio adapter.
Figi 48 Device with 3.5 mm Audio Adapter in Holster

Removing the 3.5 mm Audio Adapter
- Disconnect headset plug from 3.5 mm Audio Adapter.
- Lift the bottom of the Audio Adapter away from the device.

- Remove Audio Adapter from the device.
Snap-On USB kab
The Snap-On USB Cable snaps on to the back of the device and removes easily when not in use. When attached to the device the Snap-On USB Cable allows the device to transfer data to a host computer and provide power for charging the device.
Attaching the Snap-On USB Cable
- Align the top mounting points on the cable with the mounting slots on the device.

- Rotate the cable down and press until it snaps into place. Magnetics hold the cable to the device.

Connecting the Snap-On USB Cable to a Computer
- Connect the Snap-On USB Cable to the device.

- Connect the USB connector of the cable to a host computer.
Charging the Device with the Snap-On USB Cable
- Connect the Snap-On USB Cable to the device.
- Connect the power supply to the Snap-On USB Cable

- Connect to the power supply to an AC outlet.
Removing the Snap-On USB Cable from the Device
- Press down on the cable.

- Rotate away from the device. The magnetics release the cable from the device.

Chaje kab gode
Use the Charging Cable Cup to charge the device.
Charging the Device with the Charging Cable Cup
- Insert the device into the cup of the Charging Cable Cup.

- Asire aparèy la byen chita.
- Slide the two yellow locking tabs up to lock the cable to the device.

- Connect the power supply to the Charging Cable Cup and to a power source.

Snap-On DEX Cable
The Snap-On DEX Cable snaps on to the back of the device and removes easily when not in use. When attached to the device the Snap-On DEX Cable provides electronic data exchange with devices such as vending machines.
Attaching the Snap-On DEX Cable
- Align the top mounting points on the cable with the mounting slots on the device.

- Rotate the cable down and press until it snaps into place. Magnetics hold the cable to the device.

Connecting the Snap-On DEX Cable
- Connect the Snap-On DEX Cable to the device.
- Connect the DEX connector of the cable to a device such as a vending machine.

Disconnecting the Snap-On DEX Cable from the Device
- Press down on the cable.

- Rotate away from the device. The magnetics release the cable from the device.

Deklanche Manch
The Trigger Handle adds a gun-style handle with a scanning trigger to the device. It increases comfort when using the device in scan-intensive applications for extended periods of time.
![]() REMAK: The Attachment Plate with Tether can only be used with Charge Only cradles.
REMAK: The Attachment Plate with Tether can only be used with Charge Only cradles.
Figi 49 Deklanche Manch

| 1 | Deklanche |
| 2 | Latch |
| 3 | Bouton lage |
| 4 | Attachment plate without tether |
| 5 | Attachment plate with tether |
Installing the Attachment Plate to Trigger Handle
![]() REMAK: Attachment Plate with Tether only.
REMAK: Attachment Plate with Tether only.
- Insert the loop end of the tether into the slot on the bottom of the handle.
- Feed the attachment plate through the loop.

- Pull the attachment plate until the loop tightens on the tether.
Installing the Trigger Handle Plate
- Peze epi kenbe bouton pouvwa a jiskaske meni an parèt.
- Manyen kouran.
- Manyen OK.
- Press in the two battery latches.
- Leve batri a soti nan aparèy la.
- Remove the hand strap filler plate from the hand strap slot. Store the hand strap filler plate in a safe place for future replacement.

- Insert the attachment plate into the hand strap slot.

- Mete batri a, anba an premye, nan lòj batri a nan do aparèy la.
- Rotate the top of the battery into the battery compartment.
- Peze batri a desann nan lòj la batri jiskaske seri yo batri lage menen nan plas li.
Inserting the Device into the Trigger Handle
- Align the back of the Trigger handle with the Trigger Mounting Plate.

- Press the two release latches.
- Rotate the device down and press down until it snaps into place.

Removing the Device from the Trigger Handle
- Press both Trigger Handle release latches.

- Rotate the device up and remove from the Trigger handle.

Vehicle Charging Cable Cup
This section describes how to use the Vehicle Charging Cable Cup to charge the device.

Charging the Device with the Vehicle Charging Cable
- Insert the device into the cup of the Vehicle Charging Cable.

- Asire aparèy la byen chita.
- Slide the two yellow locking tabs up to lock the cable to the device.

- Insert the Cigarette Lighter plug into the vehicle cigarette lighter socket.

Bèso machin
The cradle:
- Holds the device securely in place
- Provides power for operating the device
- Re-charges the battery in the device.
The cradle is powered by the vehicle’s 12V or 24V electrical system. The operating voltage range is 9V to 32V and supplies a maximum current of 3A.
Figi 50 Bèso machin

Inserting the Device into the Vehicle Cradle
![]() ATANSYON: Ensure that the device is fully inserted into the cradle. Lack of proper insertion may result in property damage or personal injury. Zebra Technologies Corporation is not responsible for any loss resulting from the use of the products while driving.
ATANSYON: Ensure that the device is fully inserted into the cradle. Lack of proper insertion may result in property damage or personal injury. Zebra Technologies Corporation is not responsible for any loss resulting from the use of the products while driving.
- To ensure the device was inserted correctly, listen for the audible click that signifies that the device locking mechanism was enabled and the device was locked into place.
Figi 51 Install Device into Vehicle Cradle

Removing the Device from the Vehicle Cradle
- To remove the device from the cradle, grasp the device and lift out of the cradle.
Figure 52 Remove Device from Vehicle Cradle

Charging the Device in the Vehicle Cradle
- Ensure the cradle is connected to a power source.
- Mete aparèy la nan bèso a.
The device starts to charge through the cradle as soon as it is inserted. This does not deplete the vehicle battery significantly. The battery charges in approximately four hours. See Charging Indicators on page 31 for charging indications.
REMAK: The Vehicle Cradle operating temperature is -40°C to +85°C. When in the cradle, the device will only charge when its temperature is between 0°C to +40°C.
TC7X Vehicle Communication Charging Cradle
The Vehicle Communication Charging Cradle: vehicle cradle
- holds the device securely in place
- provides power for operating the device
- re-charges the battery in the device.
The cradle is powered by the USB I/O Hub.
Refer to the TC7X Vehicle Cradle Installation Guide for information on installing the TC7X Vehicle Communication Charging Cradle.
Figi 53 TC7X Vehicle Communication Charging Cradle
Inserting the Device into the TC7X Vehicle Communication Charging Cradle
- To ensure the device was inserted correctly, listen for the audible click that signifies that the device locking mechanism was enabled and the device was locked into place.
![]() ATANSYON: Ensure that the device is fully inserted into the cradle. Lack of proper insertion may result in property damage or personal injury. Zebra Technologies Corporation is not responsible for any loss resulting from the use of the products while driving.
ATANSYON: Ensure that the device is fully inserted into the cradle. Lack of proper insertion may result in property damage or personal injury. Zebra Technologies Corporation is not responsible for any loss resulting from the use of the products while driving.
Figi 54 Insert Device into Cradle

Removing the Device from the TC7X Vehicle Communication Charging Cradle
- To remove the device from the cradle, press the release latch (1), grasp the device (2) and lift out of the vehicle cradle.
Figi 55 Remove Device from Cradle

Charging the Device in the TC7X Vehicle Communication Charging Cradle
- Mete aparèy la nan bèso a.
The device starts to charge through the cradle as soon as it is inserted. This does not deplete the vehicle battery significantly. The battery charges in approximately four hours. See Charging Indicators on page 31 for all charging indications.
REMAK: The Vehicle Cradle operating temperature is -40°C to +85°C. When in the cradle, the device will only charge when its temperature is between 0°C to +40°C.
USB IO Hub
The USB I/O Hub:
- provides power to a vehicle cradle
- provides USB hub for three USB devices (such as printers)
- provides a powered USB port for charging another device.
The cradle is powered by the vehicle’s 12V or 24V electrical system. The operating voltage range is 9V to 32V and supplies a maximum current of 3A to the vehicle cradle and 1.5 A to the four USB ports simultaneously.
Refer to the device Integrator Guide for Android 8.1 Oreo for information on installing the USB I/O Hub.
Figi 56 USB I/O Hub

Connecting Cables to the USB IO Hub
The USB I/O Hub provides three USB ports for connecting devices such as printers to a device in the vehicle cradle.
- Slide the cable cover down and remove.

- Insert the USB cable connector into one of the USB ports.
- Place each cable into the cable holder.

- Align the cable cover onto the USB I/O Hub. Ensure that the cables are within the cover opening.

- Slide cable cover up to lock into place.
Connecting External Cable to the USB IO Hub
The USB I/O Hub provides a USB port for charging external devices such as cell phones. This port is for charging only.
- Open the USB Access Cover.
- Insert the USB cable connector into the USB port.

1 USB pò 2 USB port access cover
Powering the Vehicle Cradle
The USB I/O Hub can provide power to a Vehicle Cradle.
- Connect the Power Output Cable connector to the Power Input Cable connector of the Vehicle Cradle.
- Tighten thumbscrews by hand until tight.

1 Vehicle cradle power and communication connector 2 Power and communication connector
Audio Headset Connection
The USB I/O Hub provides audio connection to the device in a vehicle cradle.
Depending upon the headset, connect the headset and audio adapter to the Headset connector.
Figi 57 Connect Audio Headset

| 1 | Headset |
| 2 | Kab adaptè |
| 3 | Kolye |
Replacing the Hand Strap
![]() ATANSYON: Close all running applications prior to replacing the hand strap.
ATANSYON: Close all running applications prior to replacing the hand strap.
- Peze epi kenbe bouton pouvwa a jiskaske meni an parèt.
- Manyen kouran.
- Manyen OK.
- Remove the hand strap clip from the hand strap mounting slot.

- Peze de fèmen batri yo nan.

- Leve batri a soti nan aparèy la.

- Retire batri a.
- Remove the hand strap plate from the hand strap slot.
- Insert the replacement hand strap plate into the hand strap slot.

- Insert the battery, bottom first, into the battery compartment.

- Rotate the top of the battery into the battery compartment.
- Peze batri a desann nan lòj la batri jiskaske seri yo batri lage menen nan plas li.

- Mete clip braslè men nan fant aliye braslè men an epi rale desann jiskaske li fèmen an plas.

Deplwaman aplikasyon
Seksyon sa a bay yon souview of device security, app development, and app management. It also provides instructions for installing apps and updating the device software.
Sekirite android
The device implements a set of security policies that determine whether an application is allowed to run and, if allowed, with what level of trust. To develop an application, you must know the security configuration of the device, and how to sign an application with the appropriate certificate to allow the application to run (and to run with the needed level of trust).
![]() REMAK: Ensure the date is set correctly before installing certificates or when accessing secure web sit.
REMAK: Ensure the date is set correctly before installing certificates or when accessing secure web sit.
Secure Certificates
If the VPN or Wi-Fi networks rely on secure certificates, obtain the certificates and store them in the device’s secure credential storage, before configuring access to the VPN or Wi-Fi networks.
If downloading the certificates from a web site, set a password for the credential storage. The device supports X.509 certificates saved in PKCS#12 key store files with a .p12 extension (if key store has a .pfx or other extension, change to .p12).
The device also installs any accompanying private key or certificate authority certificates contained in the key store.
Installing a Secure Certificate
If required by the VPN or Wi-Fi network, install a secure certificate on the device.
- Copy the certificate from the host computer to the root of the microSD card or the device’s internal memory. See Transferring Files on page 49 for information about connecting the device to a host computer and copying files.
- Ale nan Anviwònman.
- Touch Security > Encryption & credentials.
- Touch Install a certificate.
- Navigate to the location of the certificate file.
- Manyen an filename of the certificate to install.
- If prompted, enter the password for credential storage. If a password has not been set for the credential storage, enter a password for it twice, and then touch OK.
- Si yo mande w, antre modpas sètifika a epi touche OK.
- Enter a name for the certificate and in the Credential use drop-down, select VPN and apps or Wi-Fi. 10. Touch OK.
The certificate can now be used when connecting to a secure network. For security, the certificate is deleted from the microSD card or internal memory.
Konfigirasyon Anviwònman Depo Credential
Configure credential storage from the device settings.
- Ale nan Anviwònman.
- Touch Security > Encryption & credentials .
- Chwazi yon opsyon.
• Touch Trusted credentials to display the trusted system and user credentials.
• Touch User credentials to display user credentials.
• Touch Install from storage to install a secure certificate from the microSD card or internal storage.
• Touch Clear credentials to delete all secure certificates and related credentials.
Zouti Devlopman Android
Development tools for Android include Android Studio, EMDK for Android, and StageKounye a.
Android Development Workstation
Android development tools are available at developer.android.com.
To start developing applications for the device, download Android Studio. Development can take place on a Microsoft® Windows®, Mac® OS X®, or Linux® operating system.
Applications are written in Java or Kotlin, but compiled and executed in the Dalvik virtual machine. Once the Java code is compiled cleanly, the developer tools make sure the application is packaged properly, including the AndroidManifest.xml file.
Android Studio contains a full featured IDE as well as SDK components required to develop Android applications.
Enabling Developer Options
The Developer options screen sets development-related settings. By default, the Developer Options are hidden.
- Ale nan Anviwònman.
- Touche Sou telefòn.
- Scroll down to Build number.
- Tap Build number seven times.
The message You are now a developer! appears. - Touch Back.
- Touch System > Advanced > Developer options .
- Slide the USB debugging switch to the ON position.
EMDK for Android
EMDK for Android provides developers with tools to create business applications for enterprise mobile devices. It is designed for use with Google’s Android Studio and includes Android class libraries such as Barcode, sample applications with source code, and the associated documentation.
EMDK for Android allows applications to take full advantage of the capabilities that Zebra devices have to offer. It embeds Profile Manager technology within Android Studio IDE, providing a GUI-based development tool designed specifically for Zebra devices. This allows fewer lines of code, resulting in reduced development time, effort, and errors.
See Also For more information go to techdocs.zebra.com.
StageNow for Android
StageNow is Zebra’s next-generation Android Staging Solution built on the MX platform. It allows quick and easy creation of device profiles, and can deploy to devices simply by scanning a barcode, reading a tag, or playing an audio file.
- S latageNow Staging Solution includes the following components:
- S latageNow Workstation tool installs on the staging workstation (host computer) and lets the administrator easily create staging profiles for configuring device components, and perform other staging actions such as checking the condition of a target device to determine suitability for software upgrades or other activities. The StageNow Workstation stores profiles and other created content for later use.
- S latageNow Client resides on the device and provides a user interface for the staging operator to initiate staging. The operator uses one or more of the desired staging methods (print and scan a barcode, read an NFC tag or play an audio file) to deliver staging material to the device.
Gade tou
Pou plis enfòmasyon ale nan techdocs.zebra.com.
GMS Restricted
GMS Restricted mode deactivates Google Mobile Services (GMS). All GMS apps are disabled on the device and communication with Google (analytics data collection and location services) is disabled.
Sèvi ak StageNow to disable or enable GMS Restricted mode. After a device is in GMS Restricted mode, enable and disable individual GMS apps and services using StageNow. To ensure GMS Restricted mode persists after an Enterprise Reset, use the Persist Manager option in StageKounye a.
Gade tou
Pou plis enfòmasyon sou StageNow, refer to techdocs.zebra.com.
ADB USB Enstalasyon
To use the ADB, install the development SDK on the host computer then install the ADB and USB drivers.
Before installing the USB driver, make sure that the development SDK is installed on the host computer. Go to developer.android.com/sdk/index.html for details on setting up the development SDK.
The ADB and USB drivers for Windows and Linux are available on the Zebra Support Central web sit nan zebra.com/support. Download the ADB and USB Driver Setup package. Follow the instructions with the package to install the ADB and USB drivers for Windows and Linux.
Enabling USB Debugging
By default, USB debugging is disabled.
- Ale nan Anviwònman.
- Touche Sou telefòn.
- Scroll down to Build number.
- Tap Build number seven times.
The message You are now a developer! appears. - Touch Back.
- Touch System > Advanced > Developer options .
- Slide the USB debugging switch to the ON position.
- Manyen OK.
- Connect the device to the host computer using the Rugged Charge/USB Cable.
The Allow USB debugging? dialog box appears on the device.
If the device and host computer are connected for the first time, the Allow USB debugging? dialog box with the Always allow from this computer check box displays. Select the check box, if required. - Manyen OK.
- On the host computer, navigate to the platform-tools folder and open a command prompt window.
- Type adb devices.
Montre sa yo:
| Lis aparèy ki tache | XXXXXXXXXXXXXXX device |
Where XXXXXXXXXXXXXXX is the device number.
![]() REMAK: Si nimewo aparèy la pa parèt, asire w ke chofè ADB yo enstale byen.
REMAK: Si nimewo aparèy la pa parèt, asire w ke chofè ADB yo enstale byen.
Entering Android Recovery Manually
Many of the update methods discussed in this section require putting the device into Android Recovery mode. If you are unable to enter Android Recovery mode through adb commands, use the following steps to manually enter Android Recovery mode.
- Peze epi kenbe bouton pouvwa a jiskaske meni an parèt.
- Touch Restart.
- Press and hold the PTT button until the device vibrates
The System Recovery screen appears.
Application Installation Methods
After an application is developed, install the application onto the device using one of the supported methods.
- USB koneksyon
- Android Debug Bridge
- kat microSD
- Mobile device management (MDM) platforms that have application provisioning. Refer to the MDM software documentation for details.
Installing Applications Using the USB Connection
Use the USB connection to install applications onto the device.
![]() ATANSYON: When connecting the device to a host computer and mounting the microSD card, follow the host computer’s instructions for connecting and disconnecting USB devices, to avoid damaging or corrupting files.
ATANSYON: When connecting the device to a host computer and mounting the microSD card, follow the host computer’s instructions for connecting and disconnecting USB devices, to avoid damaging or corrupting files.
- Connect the device to a host computer using USB.
- On the device, pull down the Notification panel and touch Charging this device via USB. By default, No data transfer is selected.
- Manyen File Transfè.
- Sou òdinatè lame a, louvri yon file aplikasyon eksploratè.
- On the host computer, copy the application APK file from the host computer to the device.
ATANSYON: Ak anpil atansyon swiv enstriksyon òdinatè lame a pou demonte kat microSD la epi dekonekte aparèy USB kòrèkteman pou evite pèdi enfòmasyon. - Dekonekte aparèy la nan òdinatè lame a.
- Glise ekran an leve epi chwazi
 pou view files on the microSD card or Internal Storage.
 - Locate the application APK file.
- Touch the application file.
- Touch Continue to install the app or Cancel to stop the installation.
- To confirm installation and accept what the application affects, touch Install otherwise touch Cancel.
- Touch Open to open the application or Done to exit the installation process. The application appears in the App list.
Installing Applications Using the Android Debug Bridge
Use ADB commands to install applications onto the device.
![]() ATANSYON: When connecting the device to a host computer and mounting the microSD card, follow the host computer’s instructions for connecting and disconnecting USB devices, to avoid damaging or corrupting files.
ATANSYON: When connecting the device to a host computer and mounting the microSD card, follow the host computer’s instructions for connecting and disconnecting USB devices, to avoid damaging or corrupting files.
- Ensure that the ADB drivers are installed on the host computer.
- Connect the device to a host computer using USB.
- Ale nan Anviwònman.
- Touch System > Advanced > Developer options .
- Slide the USB debugging switch to the ON position.
- Manyen OK.
- If the device and host computer are connected for the first time, the Allow USB debugging? dialog box with the Always allow from this computer check box displays. Select the check box, if required.
- Touch OK or Allow.
- On the host computer, navigate to the platform-tools folder and open a command prompt window.
- Type adb install <application>. where: <application> = the path and filename of the apk file.
- Dekonekte aparèy la nan òdinatè lame a.
Installing Applications Using Wireless ADB
Use ADB commands to install an application onto the device.
Go to the Zebra Support & Downloads web site at zebra.com/support and download the appropriate Factory Reset file nan yon òdinatè lame.
![]() ENPÒTAN: Ensure the latest adb files are installed on the host computer.
ENPÒTAN: Ensure the latest adb files are installed on the host computer.
![]() ENPÒTAN: The device and host computer must be on the same wireless network.
ENPÒTAN: The device and host computer must be on the same wireless network.
- Ale nan Anviwònman.
- Touch System > Advanced > Developer options .
- Slide the USB debugging switch to the ON position.
- Slide the Wireless debugging switch to the ON position.
- If the device and host computer are connected for the first time, the Allow wireless debugging on this network? dialog box with the Always allow from this network check box displays. Select the check box, if required.
- Touch ALLOW.
- Touch Wireless debugging.
- Touch Pair with pairing code.
The Pair with device dialog box displays.

- On the host computer, navigate to the platform-tools folder and open a command prompt window.
- Type adb pair XX.XX.XX.XX.XXXXX.
where XX.XX.XX.XX:XXXXX is the IP address and port number from the Pair with device dialog box. - Type: adb connect XX.XX.XX.XX.XXXXX
- Peze Antre.
- Type the pairing code from the Pair with device dialog box
- Peze Antre.
- Type adb connect.
The device is now connected to the host computer. - Type adb devices.
Montre sa yo:
List of devices attached XXXXXXXXXXXXXXX device
Where XXXXXXXXXXXXXXX is the device number.
REMAK: Si nimewo aparèy la pa parèt, asire w ke chofè ADB yo enstale byen. - On the host computer command prompt window type: adb install <application> where: <file> = chemen an ak filename of the apk file.
- On the host computer, type: adb disconnect.
Installing Applications Using a microSD Card
Use a microSD card to install applications on your device.
![]() ATANSYON: When connecting the device to a host computer and mounting the microSD card, follow the host computer’s instructions for connecting and disconnecting USB devices, to avoid damaging or corrupting files.
ATANSYON: When connecting the device to a host computer and mounting the microSD card, follow the host computer’s instructions for connecting and disconnecting USB devices, to avoid damaging or corrupting files.
- Kopye APK la file nan rasin kat microSD la.
• Copy the APK file to a microSD card using a host computer (see Transferring Files for more information), and then install the microSD card into the device (see Replacing the microSD Card on page 35 for more information).
• Connect the device with a microSD card already installed to the host computer, and copy the .apk file to the microSD card. See Transferring Files for more information. Disconnect the device from the host computer. - Glise ekran an leve epi chwazi pou view files sou kat microSD la.
- Manyen
 Kat SD.
 - Locate the application APK file.
- Touch the application file.
- Touch Continue to install the app or Cancel to stop the installation.
- To confirm installation and accept what the application affects, touch Install otherwise touch Cancel.
- Touch Open to open the application or Done to exit the installation process.
The application appears in the App list.
Dezenstalasyon yon aplikasyon
Free up device memory by removing unused apps.
- Ale nan Anviwònman.
- Touche Aplikasyon ak notifikasyon.
- Touch See all apps to view all apps in the list.
- Scroll through the list to the app.
- Touch the app. The App info screen appears.
- Touch Uninstall.
- Touche OK pou konfime.
Android System Update
System Update packages can contain either partial or complete updates for the operating system. Zebra distributes the System Update packages on the Zebra Support & Downloads web site. Perform a system update using either a microSD card or using ADB.
Performing a System Update Using microSD Card
Go to the Zebra Support & Downloads web sit nan zebra.com/support and download the appropriate
System Update package to a host computer.
- Kopye APK la file nan rasin kat microSD la.
• Copy the APK file to a microSD card using a host computer (see Transferring Files for more information), and then install the microSD card into the device (see Replacing the microSD Card on page 35 for more information).
• Connect the device with a microSD card already installed to the host computer, and copy the .apk file to the microSD card. See Transferring Files for more information. Disconnect the device from the host computer. - Peze epi kenbe bouton pouvwa a jiskaske meni an parèt.
- Touch Restart.
- Press and hold the PTT button until the device vibrates.
The System Recovery screen appears. - Press the Up and Down buttons to navigate to Apply upgrade from SD card.
- Peze pouvwa.
- Press the Volume Up and Volume Down buttons to navigate to the System Update file.
- Press the Power button. The System Update installs and then the device returns to the Recovery screen.
- Press the Power button to reboot the device.
Performing a System Update Using ADB
Go to the Zebra Support & Downloads web sit nan zebra.com/support and download the appropriate System Update package to a host computer.
- Connect the device to a host computer using USB.
- Ale nan Anviwònman.
- Touch System > Advanced > Developer options .
- Slide the USB debugging switch to the ON position.
- Manyen OK.
- If the device and host computer are connected for the first time, the Allow USB debugging? dialog box with the Always allow from this computer check box displays. Select the check box, if required.
- Touch OK or Allow.
- On the host computer, navigate to the platform-tools folder and open a command prompt window.
- Type adb devices.
Montre sa yo:
List of devices attached XXXXXXXXXXXXXXX device
Where XXXXXXXXXXXXXXX is the device number.
REMAK: Si nimewo aparèy la pa parèt, asire w ke chofè ADB yo enstale byen. - Kalite: ADB rdemare rekiperasyon
- Peze Antre.
The System Recovery screen appears on the device. - Press the Volume Up and Volume Down buttons to navigate to Apply upgrade from ADB.
- Peze bouton pouvwa a.
- On the host computer command prompt window type: adb sideload <file> kote:file> = chemen an ak filenon postal la file.
- Peze Antre.
The System Update installs (progress appears as percentage in the Command Prompt window) and then the System Recovery screen appears on the device. - Press the Power button to reboot the device.
If you are not able to enter Android Recovery mode through the adb command, see Entering Android
Recovery Manually on page 212.
Performing a System Update Using Wireless ADB
Use wireless ADB to perform a system update.
Go to the Zebra Support & Downloads web site at zebra.com/support and download the appropriate
System Update package to a host computer.
![]() ENPÒTAN: Ensure the latest adb files are installed on the host computer.
ENPÒTAN: Ensure the latest adb files are installed on the host computer.
The device and the host computer must be on the same wireless network.
- Ale nan Anviwònman.
- Touch System > Advanced > Developer options .
- Slide the USB debugging switch to the ON position.
- Slide the Wireless debugging switch to the ON position.
- Touch Wireless debugging.
- If the device and host computer are connected for the first time, the Allow wireless debugging on this network? dialog box with the Always allow from this network check box displays. Select the check box, if required.
- Touch ALLOW.
- Touch Pair with pairing code.
The Pair with device dialog box displays.

- On the host computer, navigate to the platform-tools folder and open a command prompt window.
- Type adb pair XX.XX.XX.XX.XXXXX.
where XX.XX.XX.XX:XXXXX is the IP address and port number from the Pair with device dialog box. - Peze Antre.
- Type the pairing code from the Pair with device dialog box.
- Peze Antre.
- Type adb connect.
The device is now connected to the host computer. - Kalite: ADB rdemare rekiperasyon
- Peze Antre.
The System Recovery screen appears on the device. - Press the Volume Up and Volume Down buttons to navigate to Apply upgrade from ADB.
- Peze bouton pouvwa a.
- On the host computer command prompt window type: adb sideload <file> kote:file> = chemen an ak filenon postal la file.
- Peze Antre.
The System Update installs (progress appears as percentage in the Command Prompt window) and then the System Recovery screen appears on the device. - Navigate to Reboot system now and press the Power button to reboot the device.
- On the host computer, type: adb disconnect.
If you are not able to enter Android Recovery mode through the adb command, see Entering Android
Recovery Manually on page 212.
Verifying System Update Installation
Verify that the system update was successful.
- Ale nan Anviwònman.
- Touche Sou telefòn.
- Scroll down to Build number.
- Ensure that the build number matches the new system update package file nimewo.
Android Enterprise Reset
An Enterprise Reset erases all user data in the /data partition, including data in the primary storage locations (emulated storage). An Enterprise Reset erases all user data in the /data partition, including data in the primary storage locations (/sdcard and emulated storage).
Before performing an Enterprise Reset, provision all necessary configuration files and restore after the reset.
Performing an Enterprise Reset From Device Settings
Perform an Enterprise Reset from the device settings.
- Ale nan Anviwònman.
- Touch System > Reset options > Erase all data (enterprise reset).
- Touch Erase all data twice to confirm the Enterprise Reset.
Performing an Enterprise Reset Using microSD Card
Go to the Zebra Support & Downloads web site at zebra.com/support and download the appropriate
Antrepriz Reyajiste file nan yon òdinatè lame.
- Kopye APK la file nan rasin kat microSD la.
• Copy the APK file to a microSD card using a host computer (see Transferring Files for more information), and then install the microSD card into the device (see Replacing the microSD Card on page 35 for more information).
• Connect the device with a microSD card already installed to the host computer, and copy the .apk file to the microSD card. See Transferring Files for more information. Disconnect the device from the host computer. - Peze epi kenbe bouton pouvwa a jiskaske meni an parèt.
- Touch Restart.
- Press and hold the PTT button until the device vibrates.
The System Recovery screen appears. - Press the Volume Up and Volume Down buttons to navigate to Apply upgrade from SD card.
- Peze pouvwa.
- Press the Volume Up and Volume Down buttons to navigate to the Enterprise Reset file.
- Peze bouton pouvwa a.
The Enterprise Reset occurs and then the device returns to the Recovery screen. - Press the Power button to reboot the device.
Performing an Enterprise Reset Using Wireless ADB
Perform an Enterprise Reset using Wireless ADB.
Go to the Zebra Support & Downloads web site at zebra.com/support and download the appropriate Factory Reset file nan yon òdinatè lame.
![]() ENPÒTAN: Ensure the latest adb files are installed on the host computer.
ENPÒTAN: Ensure the latest adb files are installed on the host computer.
![]() ENPÒTAN: The device and host computer must be on the same wireless network.
ENPÒTAN: The device and host computer must be on the same wireless network.
- Ale nan Anviwònman.
- Touch System > Advanced > Developer options .
- Slide the USB debugging switch to the ON position.
- Slide the Wireless debugging switch to the ON position.
- If the device and host computer are connected for the first time, the Allow wireless debugging on this network? dialog box with the Always allow from this network check box displays. Select the check box, if required.
- Touch ALLOW.
- Touch Wireless debugging.
- Touch Pair with pairing code.
The Pair with device dialog box displays.

- On the host computer, navigate to the platform-tools folder and open a command prompt window.
- Type adb pair XX.XX.XX.XX.XXXXX.
where XX.XX.XX.XX:XXXXX is the IP address and port number from the Pair with device dialog box. - Type:adb connect XX.XX.XX.XX.XXXXX
- Peze Antre.
- Type the pairing code from the Pair with device dialog box
- Peze Antre.
- Type adb connect.
The device is now connected to the host computer. - Type adb devices.
Montre sa yo:
List of devices attached XXXXXXXXXXXXXXX device
Where XXXXXXXXXXXXXXX is the device number.
REMAK: Si nimewo aparèy la pa parèt, asire w ke chofè ADB yo enstale byen. - Kalite: ADB rdemare rekiperasyon
- Peze Antre.
The Factory Recovery screen appears on the device. - Press the Volume Up and Volume Down buttons to navigate to Apply upgrade from ADB.
- Peze bouton pouvwa a.
- On the host computer command prompt window type: adb sideload <file> kote:file> = chemen an ak filenon postal la file.
- Peze Antre.
The Enterprise Reset package installs and then the System Recovery screen appears on the device. - Press the Power button to reboot the device.
- On the host computer, type: adb disconnect.
If you are not able to enter Android Recovery mode through the adb command, see Entering Android Recovery Manually on page 212.
Performing an Enterprise Reset Using ADB
Go to the Zebra Support & Downloads web sit nan zebra.com/support and download the appropriate Enterprise Reset file nan yon òdinatè lame.
- Connect the device to a host computer using a USB-C cable or by inserting the device into the 1-Slot USB/Ethernet Cradle.
- Ale nan Anviwònman.
- Touch System > Advanced > Developer options .
- Slide the USB debugging switch to the ON position.
- Manyen OK.
- If the device and host computer are connected for the first time, the Allow USB debugging? dialog box with the Always allow from this computer check box displays. Select the check box, if required.
- Touch OK or Allow.
- On the host computer, navigate to the platform-tools folder and open a command prompt window.
- Type adb devices.
Montre sa yo:
List of devices attached XXXXXXXXXXXXXXX device
Where XXXXXXXXXXXXXXX is the device number.
REMAK: Si nimewo aparèy la pa parèt, asire w ke chofè ADB yo enstale byen. - Kalite: ADB rdemare rekiperasyon
- Peze Antre.
The System Recovery screen appears on the device. - Press the Volume Up and Volume Down buttons to navigate to Apply upgrade from ADB.
- Peze pouvwa.
- On the host computer command prompt window type: adb sideload <file> kote:file> = chemen an ak filenon postal la file.
- Peze Antre.
The Enterprise Reset package installs and then the System Recovery screen appears on the device. - Press the Power button to reboot the device.
If you are not able to enter Android Recovery mode through the adb command, see Entering Android Recovery Manually on page 212.
Android faktori Reyajiste
A Factory Reset erases all data in the /data and /enterprise partitions in internal storage and clears all device settings. A Factory Reset returns the device to the last installed operating system image. To revert to a previous operating system version, re-install that operating system image.
Performing a Factory Reset Using microSD Card
Go to the Zebra Support & Downloads web site at zebra.com/support and download the appropriate
Reset faktori file nan yon òdinatè lame.
- Kopye APK la file nan rasin kat microSD la.
• Copy the APK file to a microSD card using a host computer (see Transferring Files for more information), and then install the microSD card into the device (see Replacing the microSD Card on page 35 for more information).
• Connect the device with a microSD card already installed to the host computer, and copy the .apk file to the microSD card. See Transferring Files for more information. Disconnect the device from the host computer. - Peze epi kenbe bouton pouvwa a jiskaske meni an parèt.
- Touch Restart.
- Press and hold the PTT button until the device vibrates.
The System Recovery screen appears. - Press the Volume Up and Volume Down buttons to navigate to Apply upgrade from SD card.
- Peze pouvwa
- Press the Volume Up and Volume Down buttons to navigate to the Factory Reset file.
- Peze bouton pouvwa a.
The Factory Reset occurs and then the device returns to the Recovery screen. - Press the Power button to reboot the device.
Performing a Factory Reset Using ADB
Go to the Zebra Support & Downloads web site at zebra.com/support and download the appropriate Factory Reset file nan yon òdinatè lame.
- Connect the device to a host computer using a USB-C cable or by inserting the device into the 1-Slot USB/Ethernet Cradle.
- Ale nan Anviwònman.
- Touch System > Advanced > Developer options .
- Slide the USB debugging switch to the ON position.
- Manyen OK.
- If the device and host computer are connected for the first time, the Allow USB debugging? dialog box with the Always allow from this computer check box displays. Select the check box, if required.
- Touch OK or ALLOW.
- On the host computer, navigate to the platform-tools folder and open a command prompt window.
- Type adb devices.
Montre sa yo:
List of devices attached XXXXXXXXXXXXXXX device
Where XXXXXXXXXXXXXXX is the device number.
REMAK: Si nimewo aparèy la pa parèt, asire w ke chofè ADB yo enstale byen. - Kalite: ADB rdemare rekiperasyon
- Peze Antre.
The System Recovery screen appears on the device. - Press the Volume Up and Volume Down buttons to navigate to Apply upgrade from ADB.
- Peze bouton pouvwa a.
- On the host computer command prompt window type: adb sideload <file> kote:file> = chemen an ak filenon postal la file.
- Peze Antre.
The Factory Reset package installs and then the System Recovery screen appears on the device. - Press the Power button to reboot the device.
If you are not able to enter Android Recovery mode through the adb command, see Entering Android Recovery Manually on page 212.
Performing a Factory Rest Using Wireless ADB
Perform a Factory Reset using Wireless ADB.
Go to the Zebra Support & Downloads web site at zebra.com/support and download the appropriate
Reset faktori file nan yon òdinatè lame.
![]() ENPÒTAN: Ensure the latest adb files are installed on the host computer.
ENPÒTAN: Ensure the latest adb files are installed on the host computer.
![]() ENPÒTAN: The device and host computer must be on the same wireless network.
ENPÒTAN: The device and host computer must be on the same wireless network.
- Ale nan Anviwònman.
- Touch System > Advanced > Developer options .
- Slide the USB debugging switch to the ON position.
- Slide the Wireless debugging switch to the ON position.
- If the device and host computer are connected for the first time, the Allow wireless debugging on this network? dialog box with the Always allow from this network check box displays. Select the check box, if required.
- Touch ALLOW.
- Touch Wireless debugging.
- Touch Pair with pairing code.
The Pair with device dialog box displays.

- On the host computer, navigate to the platform-tools folder and open a command prompt window.
- Type adb pair XX.XX.XX.XX.XXXXX.
where XX.XX.XX.XX:XXXXX is the IP address and port number from the Pair with device dialog box. - Type:adb connect XX.XX.XX.XX.XXXXX
- Peze Antre.
- Type the pairing code from the Pair with device dialog box
- Peze Antre.
- Type adb connect.
The device is now connected to the host computer. - Type adb devices.
Montre sa yo:
List of devices attached XXXXXXXXXXXXXXX device
Where XXXXXXXXXXXXXXX is the device number.
REMAK: Si nimewo aparèy la pa parèt, asire w ke chofè ADB yo enstale byen. - Kalite: ADB rdemare rekiperasyon
- Peze Antre.
The Factory Reset package installs and then the System Recovery screen appears on the device. - Press the Volume Up and Volume Down buttons to navigate to Apply upgrade from ADB.
- Peze bouton pouvwa a.
- On the host computer command prompt window type: adb sideload <file> kote:file> = chemen an ak filenon postal la file.
- Peze Antre.
The Factory Reset package installs and then the System Recovery screen appears on the device. - Press the Power button to reboot the device.
- On the host computer, type: adb disconnect.
If you are not able to enter Android Recovery mode through the adb command, see Entering Android Recovery Manually on page 212.
Android Storage
The device contains multiple types of file depo.
- Random Access Memory (RAM)
- Depo entèn
- External storage (microSD card)
- Enterprise folder.
Aksè o aza memwa
Executing programs use RAM to store data. Data stored in RAM is lost upon a reset.
The operating system manages how applications use RAM. It only allows applications and component processes and services to use RAM when required. It may cache recently used processes in RAM, so they restart more quickly when opened again, but it will erase the cache if it needs the RAM for new activities.
The screen displays the amount of used and free RAM.
- Performance – Indicates memory performance.
- Total memory – Indicates the total amount of RAM available.
- Average used (%) – Indicates the average amount of memory (as a percentage) used during the period of time selected (default – 3 hours).
- Free – Indicates the total amount of unused RAM.
- Memory used by apps – Touch to view RAM usage by individual apps.
Viewing memwa
View the amount of memory used and free RAM.
- Ale nan Anviwònman.
- Touch System > Advanced > Developer options .
- Touch Memory.
Depo Entèn
The device has internal storage. The internal storage content can be viewed ak files copied to and from when the device is connected to a host computer. Some applications are designed to be stored on the internal storage rather than in internal memory.
Viewing Internal Storage
View available and used internal storage on the device.
- Ale nan Anviwònman.
- Touch Storage.
Internal Storage displays the total amount of space on internal storage and amount used.
If the device has removable storage installed, touch Internal shared storage to display the amount of internal storage used by apps, photos, videos, audio, and other files.
Depo ekstèn
The device can have a removable microSD card. The microSD card content can be viewed ak files copied to and from when the device is connected to a host computer.
Viewing External Storage
Portable storage displays the total amount of space on the installed microSD card and the amount used.
- Ale nan Anviwònman.
- Touch Storage.
Touch SD card to view sa ki nan kat la. - To unmount the microSD card, touch
 .
.
Formatting a microSD Card as Portable Storage
Format a microSD card as portable storage for the device.
- Touch SD card.
- Manyen > Storage settings.
- Touch Format.
- Touch ERASE & FORMAT.
- Manyen FÈ.
Formatting a microSD Card as Internal Memory
You can format a microSD card as internal memory to increase the actual amount of the device’s internal memory. Once formatted, the microSD card can only be read by this device.
![]() REMAK: The suggested maximum SD card size is 128 GB when using internal storage.
REMAK: The suggested maximum SD card size is 128 GB when using internal storage.
- Touch SD card.
- Manyen > Storage settings.
- Touch Format as internal.
- Touch ERASE & FORMAT.
- Manyen FÈ.
Enterprise Folder
The Enterprise folder (within internal flash) is a super-persistent storage that is persistent after a reset and an Enterprise Reset.
The Enterprise folder is erased during a Factory Reset. The Enterprise folder is used for deployment and device-unique data. The Enterprise folder is approximately 128 MB (formatted). Applications can persist data after an Enterprise Reset by saving data to the enterprise/user folder. The folder is ext4 formatted and is only accessible from a host computer using ADB or from an MDM.
Jere Apps
Apps use two kinds of memory: storage memory and RAM. Apps use storage memory for themselves and any files, settings, and other data they use. They also use RAM when they are running.
- Ale nan Anviwònman.
- Touche Aplikasyon ak notifikasyon.
- Touch See all XX apps to view all apps on the device.
- Touch > Show system to include system processes in the list.
- Touch an app, process, or service in the list to open a screen with details about it and, depending on the item, to change its settings, permissions, notifications and to force stop or uninstall it.
Detay aplikasyon an
Apps have different kinds of information and controls.
- Force stop – Stop an app.
- Disable – Disable an app.
- Uninstall – Remove the app and all of its data and settings from the device.
- Notifications – Set the app notification settings.
- Permissions – Lists the areas on the device that the app has access to.
- Storage & cache – Lists how much information is stored and includes buttons for clearing it.
- Mobile data & Wi-Fi – Provides information about data consumed by an app.
- Avanse
- Screen time – Displays the amount of time the app has displayed on the screen.
- Battery – Lists the amount of computing power used by the app.
- Open by default – If you have configured an app to launch certain file types by default, you can clear that setting here.
- Display over other apps – allows an app to display on top of other apps.
- App details – Provides a link to additional app details on the Play store.
- Additional settings in the app – Opens settings in the app.
- Modify system settings – Allows an app to modify the system settings.
Managing Downloads
Files and apps downloaded using the Browser or Email are stored on the microSD card or Internal storage in the Download directory. Use the Downloads app to view, open, or delete downloaded items.
- Swipe the screen up and touch .
- Manyen > Downloads.
- Touch and hold an item, select items to delete and touch
 . The item is deleted from the device.
Antretyen ak Depanaj
Maintenance and troubleshooting information for the device and charging accessories.
Kenbe aparèy la
Follow these guidelines to maintain the device properly.
For trouble-free service, observe the following tips when using the device:
- To avoid scratching the screen, use a Zebra approved capacitive compatible stylus intended for use with a touch-sensitive screen. Never use an actual pen or pencil or other sharp object on the surface of the device screen.
- The touch-sensitive screen of the device is glass. Do not drop the device or subject it to strong impact.
- Protect the device from temperature extremes. Do not leave it on the dashboard of a car on a hot day, and keep it away from heat sources.
- Do not store the device in any location that is dusty, damp, or wet.
- Use a soft lens cloth to clean the device. If the surface of the device screen becomes soiled, clean it with a soft cloth moistened with an approved cleanser.
- Periodically replace the rechargeable battery to ensure maximum battery life and product performance.
Battery life depends on individual usage patterns.
Gid Sekirite Batri
- Zòn kote inite yo chaje yo ta dwe klè ak debri ak materyèl ki ka pran dife oswa pwodui chimik yo. Yon atansyon patikilye ta dwe pran kote aparèy la chaje nan yon anviwònman ki pa komèsyal.
- Follow battery usage, storage, and charging guidelines found in this guide.
- Move itilizasyon batri ka lakòz yon dife, eksplozyon, oswa lòt danje.
- Pou chaje batri aparèy mobil la, batri anbyen ak tanperati plato a dwe ant 0 °C ak 40 °C (32 °F ak 104 °F).
- Pa sèvi ak pil ak chajè ki pa konpatib, ki gen ladan pil ak chajè ki pa Zebra. Sèvi ak yon batri enkonpatib oswa yon plato ka prezante yon risk pou dife, eksplozyon, flit, oswa lòt danje. Si w gen nenpòt kesyon sou konpatibilite yon batri oswa yon plato, kontakte Sant Sipò Kliyan Global la.
- Pou aparèy ki itilize yon pò USB kòm yon sous chaj, aparèy la dwe konekte sèlman ak pwodwi ki gen logo USB-IF la oswa ki te konplete pwogram konfòmite USB-IF la.
- Pa demonte oswa louvri, kraze, pliye oswa defòme, twou, oswa dechire batri a.
- Enpak grav nan jete nenpòt aparèy ki fonksyone ak batri sou yon sifas difisil ka lakòz batri a chofe.
- Pa kout sikwi yon batri oswa pèmèt objè metalik oswa kondiktif kontakte tèminal batri yo.
- Pa modifye oswa refabrike, eseye mete objè etranje nan batri a, plonje oswa ekspoze nan dlo oswa lòt likid, oswa ekspoze a dife, eksplozyon, oswa lòt danje.
- Pa kite oswa estoke ekipman an nan oswa toupre zòn ki ta ka chofe anpil, tankou nan yon machin ki estasyone oswa toupre yon radyatè oswa lòt sous chalè. Pa mete batri nan yon fou mikwo ond oswa seche rad.
- Itilizasyon batri pa timoun yo ta dwe sipèvize.
- Tanpri swiv règleman lokal yo pou byen jete pil rechargeable yo itilize yo.
- Pa jete pil nan dife.
- Si ta gen yon koule batri, pa kite likid la antre an kontak ak po a oswa je. Si yo te fè kontak, lave zòn ki afekte a ak dlo pou 15 minit, epi chèche konsèy medikal.
- Si ou sispèk domaj nan ekipman oswa batri ou, kontakte Asistans Kliyan pou fè aranjman pou enspeksyon.
Best Practices for Enterprise Mobile Computing Devices Operating in Hot Environments and Direct Sunlight
Exceeding the operating temperature by external hot environments will cause the device’s thermal sensor to notify the user of a shutdown of the WAN modem or shutdown the device until the device’s temperature returns to the operational temperature range.
- Avoid direct sunlight to the device – The easiest way to prevent overheating is to keep the device out of direct sunlight. The device absorbs light and heat from the sun and retains it, getting hotter the longer it remains in sunlight and heat.
- Avoid leaving the device in a vehicle on a hot day or hot surface – Similar to leaving the device out in direct sunlight, the device will also absorb the thermal energy from a hot surface or when left on the dashboard of a vehicle or seat, getting warmer the longer it remains on the hot surface or inside the hot vehicle.
- Turn off unused apps on the device. Open, unused apps running in the background can cause the device to work harder, which in turn may cause it to heat up. This will also improve your mobile computer device’s battery life performance.
- Avoid turning your screen brightness up – Just the same as running background apps, turning your brightness up will force your battery to work harder and create more heat. Minimizing your screen brightness may extend operating the mobile computer device in hot environments.
Enstriksyon netwayaj
![]() ATANSYON: Always wear eye protection. Read the warning label on alcohol product before using.
ATANSYON: Always wear eye protection. Read the warning label on alcohol product before using.
Si ou oblije sèvi ak nenpòt lòt solisyon pou rezon medikal, tanpri kontakte Global Customer Support Center pou plis enfòmasyon.
![]() AVÈTISMAN: Evite ekspoze pwodui sa a an kontak ak lwil cho oswa lòt likid ki ka pran dife. Si ekspoze sa a rive, deploge aparèy la epi netwaye pwodwi a imedyatman an akò ak direktiv sa yo.
AVÈTISMAN: Evite ekspoze pwodui sa a an kontak ak lwil cho oswa lòt likid ki ka pran dife. Si ekspoze sa a rive, deploge aparèy la epi netwaye pwodwi a imedyatman an akò ak direktiv sa yo.
Engredyan aktif netwayaj apwouve
100% of the active ingredients in any cleaner must consist of one or some combination of the following: isopropyl alcohol, bleach/sodium hypochlorite (see important note below), hydrogen peroxide, ammonium chloride, or mild dish soap.
![]() ENPÒTAN: Sèvi ak ti sèvyèt mouye davans epi pa kite netwayaj likid nan pisin.
ENPÒTAN: Sèvi ak ti sèvyèt mouye davans epi pa kite netwayaj likid nan pisin.
Due to the powerful oxidizing nature of sodium hypochlorite, the metal surfaces on the device are prone to oxidation (corrosion) when exposed to this chemical in the liquid form (including wipes). In the event that these type of disinfectants come in contact with metal on the device, prompt removal with an alcohol dampened twal oswa koton prelèvman apre etap netwayaj la se kritik.
Engredyan danjere
The following chemicals are known to damage the plastics on the device and should not come in contact with the device: acetone; ketones; ethers; aromatic and chlorinated hydrocarbons; aqueous or alcoholic alkaline solutions; ethanolamine; toluene; trichloroethylene; benzene; carbolic acid and TB-lysoform.
Many vinyl gloves contain phthalate additives, which are often not recommended for medical use and are known to be harmful to the housing of the device.
Cleaners that are not approved include:
The following cleaners are only approved for healthcare devices:
- Clorox Disinfecting Wipes
- Hydrogen Peroxide Cleaners
- Bleach Products.
Enstriksyon Netwayaj Aparèy
Do not apply liquid directly to the device. Dampen a soft cloth or use pre-moistened wipes. Do not wrap the device in the cloth or wipe, instead gently wipe the unit. Be careful not to let liquid pool around the display window or other places. Before use, allow the unit to air dry.
![]() REMAK: For thorough cleaning, it is recommended to first remove all accessory attachments, such as hand straps or cradle cups, from the mobile device and to clean them separately.
REMAK: For thorough cleaning, it is recommended to first remove all accessory attachments, such as hand straps or cradle cups, from the mobile device and to clean them separately.
Nòt netwayaj espesyal
Do not handle the device while wearing vinyl gloves containing phthalates. Remove vinyl gloves and wash hands to eliminate any residue left from the gloves.
1 When using sodium hypochlorite (bleach) based products, always follow the manufacturer’s recommended instructions: use gloves during application and remove the residue afterwards with a damp alcohol cloth or a cotton swab to avoid prolonged skin contact while handling the device.
If products containing any of the harmful ingredients listed above are used prior to handling the device, such as a hand sanitizer that contains ethanolamine, hands must be completely dry before handling the device to prevent damage to the device.
![]() ENPÒTAN: If the battery connectors are exposed to cleaning agents, thoroughly wipe off as much of the chemical as possible and clean with an alcohol wipe. It is also recommended to install the battery in the terminal prior to cleaning and disinfecting the device to help minimize buildup on the connectors. When using cleaning/disinfectant agents on the device, it is important to follow the directions prescribed by the cleaning/disinfectant agent manufacturer.
ENPÒTAN: If the battery connectors are exposed to cleaning agents, thoroughly wipe off as much of the chemical as possible and clean with an alcohol wipe. It is also recommended to install the battery in the terminal prior to cleaning and disinfecting the device to help minimize buildup on the connectors. When using cleaning/disinfectant agents on the device, it is important to follow the directions prescribed by the cleaning/disinfectant agent manufacturer.
Cleaning Materials Required
- Ti sèvyèt alkòl
- Lens tissue
- Cotton-tipped applicators
- Isopropyl alkòl
- Can of compressed air with a tube.
Netwayaj Frekans
The cleaning frequency is at the customer’s discretion due to the varied environments in which the mobile devices are used and may be cleaned as frequently as required. When dirt is visible, it is recommended to clean the mobile device to avoid the build-up of particles which makes the device more difficult to clean later on.
For consistency and optimum image capture, it is recommended to clean the camera window periodically especially when used in environments prone to dirt or dust.
Netwaye Aparèy la
This section describes how to clean the housing, display, and camera for the device.
Lojman
Thoroughly wipe the housing, including all buttons and triggers, using an approved alcohol wipe.
Ekspozisyon
The display can be wiped down with an approved alcohol wipe, but care should be taken not to allow any pooling of liquid around the edges of the display. Immediately dry the display with a soft, non-abrasive cloth to prevent streaking.
Camera and Exit Window
Wipe the camera and exit window periodically with lens tissue or other material suitable for cleaning optical material such as eyeglasses.
Cleaning Battery Connectors
- Remove the main battery from the mobile computer.
- Dip the cotton portion of the cotton-tipped applicator in isopropyl alcohol.
- To remove any grease or dirt, rub the cotton portion of the cotton-tipped applicator back-and-forth across the connectors on the battery and terminal sides. Do not leave any cotton residue on the connectors.
- Repeat at least three times.
- Use a dry cotton-tipped applicator and repeat steps 3 and 4. Do not leave any cotton residue on the connectors.
- Inspect the area for any grease or dirt and repeat the cleaning process if necessary.
ATANSYON: After cleaning the battery connectors with bleach-based chemicals, follow the Battery Connector Cleaning instructions to remove bleach from the connectors.
Cleaning Cradle Connectors
- Remove the DC power cable from the cradle.
- Dip the cotton portion of the cotton-tipped applicator in isopropyl alcohol.
- Rub the cotton portion of the cotton-tipped applicator along the pins of the connector. Slowly move the applicator back-and-forth from one side of the connector to the other. Do not leave any cotton residue on the connector.
- All sides of the connector should also be rubbed with the cotton-tipped applicator.
- Remove any lint left by the cotton-tipped applicator.
- If grease and other dirt can be found on other areas of the cradle, use a lint-free cloth and alcohol to remove.
- Allow at least 10 to 30 minutes (depending on ambient temperature and humidity) for the alcohol to air dry before applying power to cradle.
If the temperature is low and humidity is high, longer drying time is required. Warm temperature and low humidity requires less drying time.
![]() ATANSYON: After cleaning the cradle connectors with bleach-based chemicals, follow the Cleaning Cradle Connectors instructions to remove bleach from the connectors.
ATANSYON: After cleaning the cradle connectors with bleach-based chemicals, follow the Cleaning Cradle Connectors instructions to remove bleach from the connectors.
Depanaj
Troubleshooting the device and charging accessories.
Troubleshooting the Device
The following tables provides typical problems that might arise and the solution for correcting the problem.
Tablo 30 Troubleshooting the TC72/TC77
| Pwoblèm | Kòz | Solisyon |
| When pressing the power button the device does not turn on. | Batri pa chaje. | Charge or replace the battery In the device. |
| Battery not Installed properly. | Enstale batri a byen. | |
| Aksidan sistèm. | Fè yon reset | |
| When pressing the power button the device does not turn on but two LEDs blink. | Battery charge is at a level where data is maintained but battery should be re-charged. |
Charge or replace the battery in the device. |
| Battery did not charge. | Battery failed. | Replace battery. If the device still does not operate, perform a reset. |
| Device removed from cradle while battery was charging. | Insert device in cradle. The 4,620 mAh battery fully charges In less than five hours at room temperature. | |
| Extreme battery temperature. | Battery does not charge if ambient temperature is below 0°C (32°9 or above 40°C (104°F). | |
| Cannot see characters on display. | Device not powered on. | Peze bouton pouvwa a. |
| During data communication with a host computer, no data transmitted, or transmitted data was Incomplete. | Device removed from cradle or disconnected from host computer during communication. | Replace the device in the cradle, or reattach the communication cable and re-transmit. |
| Konfigirasyon kab ki pa kòrèk. | Gade administratè sistèm lan. | |
| Lojisyèl kominikasyon yo te mal enstale oswa konfigirasyon. | Fè konfigirasyon. | |
| During data communication over Wi-FI, no data transmitted, or transmitted data was incomplete. |
WI-FI radio Is not on. | Turn on the WI-Fl radio. |
| You moved out of range of an access point | Move closer to an access point. | |
| During data communication over WAN, no data transmitted, or transmitted data was Incomplete. |
You are in an area of poor cellular service. | Move into an area that has better service. |
| APN is not set up correctly. | See system administrator for APN setup information. | |
| SIM card not installed properly. | Remove and re-install the SIM card. | |
| Data plan not activated. | Contact your service provider and ensure that your data plan is enable. | |
| During data communication over Bluetooth, no data transmitted, or transmitted data was Incomplete. |
Radyo Bluetooth pa limen. | Limen radyo Bluetooth la. |
| You moved out of range of another Bluetooth device. | Deplase nan yon distans 10 mèt (32.8 pye) ak lòt aparèy la. | |
| Pa gen son. | Volume setting is low or turned off. | Ajiste volim nan. |
| Device shuts off. | Device is inactive. | The display turns off after a period of inactivity. Set this period to 15 seconds, 30 seconds, 1, 2, 5,10 or 30 minutes. |
| Batri ap vide. | Ranplase batri a. | |
| Tapping the window buttons or icons does not activate the corresponding feature. | Aparèy la pa reponn. | Reyajiste aparèy la. |
| A message appears stating that the device memory is full. | Twòp fileyo estoke sou aparèy la. | Delete unused memos and records. If necessary, save these records on the host computer (or use an SD card for additional memory). |
| Too many applications installed on the device. | Remove user-installed applications on the device to recover memory. Select > Storage > FREE UP SPACE > REVIEW RECENT ITEMS. Select the unused program(s) and tap FREE UP. | |
| The device does not decode with reading bar code. | Scanning application is not loaded. | Load a scanning application on the device or enable DataWedge. See the system administrator. |
| Unreadable bar code. | Asire w ke senbòl la pa defòme. | |
| Distance between exit window and bar code is incorrect. | Mete aparèy la nan yon seri optik apwopriye. | |
| Device is not programmed for the bar code. | Program the device to accept the type of bar code being scanned. Refer to the EMDK or DataWedge application. | |
| Device is not programmed to generate a beep. | If the device does not beep on a good decode, set the application to generate a beep on good decode. | |
| Batri a ba. | If the scanner stops emitting a laser beam upon a trigger press, check the battery level. When the battery is low, the scanner shuts off before the device low battery condition notification. Note: If the scanner is still not reading symbols, contact the distributor or the Global Customer Support Center. |
|
| Device cannot find any Bluetooth devices nearby. | Twò lwen lòt aparèy Bluetooth. | Ale pi pre lòt aparèy Bluetooth (yo), nan yon distans 10 mèt (32.8 pye). |
| The Bluetooth device(s) nearby are not turned sou. |
Limen aparèy Bluetooth (yo) pou jwenn. | |
| The Bluetooth device(s) are not in discoverable mòd. |
Set the Bluetooth device(s) to discoverable mode. If needed, refer to the device’s user documentation for help. | |
| Cannot unlock device. | User enters incorrect password. | If the user enters an incorrect password eight times, the user is requested to enter a code before trying again.If the user forgot the password, contact system administrator. |
Troubleshooting the 2-Slot Charge Only Cradle
Table 31 Troubleshooting the 2-Slot Charge only Cradle
| Sentòm | Kòz posib | Aksyon |
| LEDs do not light when device or spare battery is inserted. | Cradle pa resevwa pouvwa. | Ensure the power cable is connected securely to both the cradle and to AC power. |
| Device is not seated firmly in the cradle. | Remove and re-insert the device into the cradle, ensuring it is firmly seated. | |
| Spare battery is not seated firmly in the cradle. | Remove and re-insert the spare battery into the charging slot, ensuring it is firmly seated. | |
| Device battery is not charging. | Device was removed from cradle or cradle was unplugged from AC power too soon. | Ensure cradle is receiving power. Ensure device is seated correctly. Confirm main battery is charging. The 4,620 mAh battery fully charges in less than five hours. |
| Batri se defo. | Verify that other batteries charge properly. If so, replace the faulty battery. | |
| The device is not fully seated in the cradle. | Remove and re-insert the device into the cradle, ensuring it is firmly seated. | |
| Extreme battery temperature. | Battery does not charge if ambient temperature is below 0 °C (32 -9 or above 40 °C (104 09. | |
| Spare battery is not charging. | Battery not fully seated in charging slot | Remove and re-insert the spare battery in the cradle, ensuring it is firmly seated. The 4,620 mAh battery fully charges in less than five hours. |
| Batri antre mal. | Re-insert the battery so the charging contacts on the battery align with the contacts on the cradle. | |
| Batri se defo. | Verify that other batteries charge properly. If so, replace the faulty battery. |
Troubleshooting the 2-Slot USB/Ethernet Cradle
Table 32 Troubleshooting the 2-Slot USB/Ethernet Cradle
| Sentòm | Kòz posib | Aksyon |
| During communication, no data transmits, or transmitted data was incomplete. | Device removed from cradle during communications. | Replace device in cradle and retransmit. |
| Konfigirasyon kab ki pa kòrèk. | Ensure that the correct cable configuration. | |
| Device has no active connection. | An icon is visible in the status bar if a connection is currently active. | |
| USB/Ethernet module switch in not in the correct position. | For Ethernet communication, slide the switch to the |
|
| LEDs do not light when device or spare battery is inserted. | Cradle pa resevwa pouvwa. | Ensure the power cable is connected securely to both the cradle and to AC power. |
| Device is not seated firmly in the cradle. | Remove and re-Insert the device into the cradle, ensuring it is firmly seated. | |
| Spare battery is not seated firmly in the cradle. | Remove and re-Insert the spare battery into the charging slot, ensuring it is firmly seated. | |
| Device battery is not charging. | Device was removed from cradle or cradle was unplugged from AC power too soon. | Ensure cradle is receiving power. Ensure device is seated correctly. Confirm main battery is charging. The 4,620 mAh battery fully charges in less than five hours. |
| Batri se defo. | Verify that other batteries charge properly. If so, replace the faulty battery. | |
| The device is not fully seated in the cradle. | Remove and re-Insert the device into the cradle, ensuring It Is firmly seated. | |
| Extreme battery temperature. | Battery does not charge if ambient temperature is below 0 °C (32 °F) or above 40 °C (104 °F). | |
| Spare battery is not charging. | Battery not fully seated In charging slot. | Remove and re-Insert the spare battery in the cradle, ensuring It is firmly seated. The 4,620 mAh battery fully charges in less than five hours. |
| Battery Inserted incorrectly. | Re-Insert the battery so the charging contacts on the battery align with the contacts on the cradle. | |
| Batri se defo. | Verify that other batteries charge properly. If so, replace the faulty battery. |
Troubleshooting the 5-Slot Charge Only Cradle
Tablo 33 Troubleshooting the 5-Slot Charge Only Cradle
| Pwoblèm | Kòz | Solisyon |
| Batri a pa chaje. | Device removed from the cradle too soon. | Replace the device in the cradle. The battery fully charges in approximately five hours. |
| Batri se defo. | Verify that other batteries charge properly. If so, replace the faulty battery. | |
| Device is not inserted correctly in the cradle. | Remove the device and reinsert it correctly. Verify charging is active. Touch > System > About phone > Battery Information to view estati batri a. | |
| Tanperati anbyen of the cradle is too warm. |
Move the cradle to an area where the ambient temperature is between -10 °C (+14 °F) and +60 °C (+140 °F). |
Troubleshooting the 5-Slot Ethernet Cradle
Tablo 34 Troubleshooting the 5-Slot Ethernet Cradle
| During communication, no data transmits, or transmitted data was enkonplè. |
Device removed from cradle during communications. | Replace device in cradle and retransmit. |
| Konfigirasyon kab ki pa kòrèk. | Ensure that the correct cable configuration. | |
| Device has no active connection. | An icon is visible in the status bar if a connection is currently active. | |
| Batri a pa chaje. | Device removed from the cradle too soon. | Replace the device in the cradle. The battery fully charges in approximately five hours. |
| Batri se defo. | Verify that other batteries charge properly. If so, replace the faulty battery. | |
| Device is not inserted correctly in the cradle. | Remove the device and reinsert it correctly. Verify charging is active. Touch > System > About phone > Battery Information to view estati batri a. | |
| Ambient temperature of the cradle is too warm. | Move the cradle to an area where the ambient temperature is between -10 °C (+14 °F) and +60 °C (+140 °F). |
Troubleshooting the 4-Slot Battery Charger
Tablo 35 Troubleshooting the 4-Slot Battery Charger
| Pwoblèm | Pwoblèm | Solisyon | |
| Spare Battery Charging LED does not light when spare battery is inserted. | Spare battery is not correctly seated. | Remove and re-insert the spare battery into the charging slot, ensuring it is correctly seated. | |
| Spare Battery not charging. | Charger pa resevwa pouvwa. | Ensure the power cable is connected securely to both the charger and to AC power. | |
| Spare battery is not correctly seated. | Remove and re-insert the battery into the battery adapter, ensuring it is correctly seated. | ||
| Battery adapter is not seated properly. | Remove and re-insert the battery adapter into the charger, ensuring it is correctly seated. | ||
| Battery was removed from the charger or charger was unplugged from AC power too soon. | Ensure charger is receiving power. Ensure the spare battery is seated correctly. If a battery is fully depleted, it can take up to five hours to fully recharge a Standard Battery andit can take up to eight hours to fully recharge an Extended Life Battery. | ||
| Batri se defo. | Verify that other batteries charge properly. If so, replace the faulty battery. | ||
Espesifikasyon teknik
For device technical specifications, go to zebra.com/support.
Data Capture Supported Symbologies
| Atik | Deskripsyon |
| Kòd Bar 1D | Code 128, EAN-8, EAN-13, GS1 DataBar Expanded, GS1 128, GS1 DataBar Coupon, UPCA, Interleaved 2 of 5, UPC Coupon Codesymbologies |
| Kòd Bar 2D | PDF-417, QR Code, Digimarc, Dotcode |
SE4750-SR Decode Distances
The table below lists the typical distances for selected bar code densities. The minimum element width (or “symbol density”) is the width in mils of the narrowest element (bar or space) in the symbol.
| Symbol Density/ Bar Code Type | Ranje travay tipik | |
| Toupre | Byen lwen | |
| 3 mil Kòd 39 | 10.41 cm (4.1 pous) | 12.45 cm (4.9 pous) |
| 5.0 mil Kòd 128 | 8.89 cm (3.5 pous) | 17.27 cm (6.8 pous) |
| 5 mil PDF417 | 11.18 cm (4.4 pous) | 16.00 cm (6.3 pous) |
| 6.67 mil PDF417 | 8.13 cm (3.2 pous) | 20.57 cm (8.1 pous) |
| 10 mil Done Matris | 8.38 cm (3.3 pous) | 21.59 cm (8.5 pous) |
| 100% UPCA | 5.08 cm (2.0 pous) | 45.72 cm (18.0 pous) |
| 15 mil Kòd 128 | 6.06 cm (2.6 pous) | 50.29 cm (19.8 pous) |
| 20 mil Kòd 39 | 4.57 cm (1.8 pous) | 68.58 cm (27.0 pous) |
| Nòt: Photographic quality bar code at 18° tilt pitch angle under 30 fcd ambient illumination. | ||
I/O Connector Pin-Outs

| PIN | Siyal | Deskripsyon |
| 1 | GND | Power/signal ground. |
| 2 | RXD_MIC | UART RXD + Headset microphone. |
| 3 | PWR_IN_CON | External 5.4 VDC power input. |
| 4 | TRIG_PTT | Trigger or PTT input. |
| 5 | GND | Power/signal ground. |
| 6 | USB-OTG_ID | USB OTG ID pin. |
| 7 | TXD_EAR | UART TXD, Headset ear. |
| 8 | USB_OTG_VBUS | USB VBUS |
| 9 | USB_OTG_DP | USB DP |
| 10 | USB_OTG_DM | USB DM |
2-Slot Charge Only Cradle Technical Specifications
| Atik | Deskripsyon |
| Dimansyon | Wotè: 10.6 cm (4.17 pous) Lajè: 19.56 cm (7.70 pous) Pwofondè: 13.25 cm (5.22 pous) |
| Pwa | 748 g (26.4 oz.) |
| Antre Voltage | 12 VDC |
| Konsomasyon pouvwa | 30 wat |
| Tanperati Fonksyònman | 0 °C a 50 °C (32 °F a 122 °F) |
| Tanperati Depo | -40 °C a 70 °C (-40 °F a 158 °F) |
| Tanperati chaje | 0 °C a 40 °C (32 °F a 104 °F) |
| Imidite | 5% a 95% ki pa kondanse |
| Drop | 76.2 cm (30.0 pous) gout nan vinil mozayik beton nan tanperati chanm. |
| Egzeyat Electrostatic (ESD) | +/- 20kV lè +/- 10 kV kontak +/- 10 kV egzeyat endirèk |
2-Slot USB/Ethernet Cradle Technical Specifications
| Atik | Deskripsyon |
| Dimansyon | Wotè: 20 cm (7.87 pous) Lajè: 19.56 cm (7.70 pous) Pwofondè: 13.25 cm (5.22 pous) |
| Pwa | 870 g (30.7 oz.) |
| Antre Voltage | 12 VDC |
| Konsomasyon pouvwa | 30 wat |
| Tanperati Fonksyònman | 0 °C a 50 °C (32 °F a 122 °F) |
| Tanperati Depo | -40 °C a 70 °C (-40 °F a 158 °F) |
| Tanperati chaje | 0 °C a 40 °C (32 °F a 104 °F) |
| Imidite | 5% a 95% ki pa kondanse |
| Drop | 76.2 cm (30.0 pous) gout nan vinil mozayik beton nan tanperati chanm. |
| Egzeyat Electrostatic (ESD) | +/- 20kV lè +/- 10kV kontak +/- 10kV indirect discharge |
5-Slot Charge Only Cradle Technical Specifications
Figi 58
| Atik | Deskripsyon |
| Dimansyon | Wotè: 90.1 mm (3.5 pous) Lajè: 449.6 mm (17.7 pous) Pwofondè: 120.3 mm (4.7 pous) |
| Pwa | 1.31 kg (2.89 lbs.) |
| Antre Voltage | 12 VDC |
| Konsomasyon pouvwa | 65 wat 90 watts with 4–Slot Battery Charger installed. |
| Tanperati Fonksyònman | 0 °C a 50 °C (32 °F a 122 °F) |
| Tanperati Depo | -40 °C a 70 °C (-40 °F a 158 °F) |
| Tanperati chaje | 0 °C a 40 °C (32 °F a 104 °F) |
| Imidite | 0% a 95% ki pa kondanse |
| Drop | 76.2 cm (30.0 pous) gout nan vinil mozayik beton nan tanperati chanm. |
| Egzeyat Electrostatic (ESD) | +/- 20kV lè +/- 10kV kontak +/- 10kV indirect discharge |
5-Slot Ethernet Cradle Technical Specifications
| Atik | Deskripsyon |
| Dimansyon | Wotè: 21.7 cm (8.54 pous) Lajè: 48.9 cm (19.25 pous) Pwofondè: 13.2 cm (5.20 pous) |
| Pwa | 2.25 kg (4.96 liv) |
| Antre Voltage | 12 VDC |
| Konsomasyon pouvwa | 65 wat 90 watts with 4-Slot Battery Charger installed. |
| Tanperati Fonksyònman | 0 °C a 50 °C (32 °F a 122 °F) |
| Tanperati Depo | -40 °C a 70 °C (-40 °F a 158 °F) |
| Tanperati chaje | 0 °C a 40 °C (32 °F a 104 °F) |
| Imidite | 5% a 95% ki pa kondanse |
| Drop | 76.2 cm (30.0 pous) gout nan vinil mozayik beton nan tanperati chanm. |
| Egzeyat Electrostatic (ESD) | +/- 20kV lè +/- 10kV kontak +/- 10kV indirect discharge |
4-Slot Battery Charger Technical Specifications
| Atik | Deskripsyon |
| Dimansyon | Wotè: 4.32 cm (1.7 pous) Lajè: 20.96 cm (8.5 pous) Pwofondè: 15.24 cm (6.0 pous) |
| Pwa | 386 g (13.6 oz.) |
| Antre Voltage | 12 VDC |
| Konsomasyon pouvwa | 40 wat |
| Tanperati Fonksyònman | 0 °C a 40 °C (32 °F a 104 °F) |
| Tanperati Depo | -40 °C a 70 °C (-40 °F a 158 °F) |
| Tanperati chaje | 0 °C a 40 °C (32 °F a 104 °F) |
| Imidite | 5% a 95% ki pa kondanse |
| Drop | 76.2 cm (30.0 pous) gout nan vinil mozayik beton nan tanperati chanm. |
| Egzeyat Electrostatic (ESD) | +/- 20kV lè +/- 10kV kontak +/- 10kV indirect discharge |
Charge Only Vehicle Cradle Technical Specifications
| Atik | Deskripsyon |
| Dimansyon | Wotè: 12.3 cm (4.84 pous) Lajè: 11.0 cm (4.33 pous) Pwofondè: 8.85 cm (3.48 pous) |
| Pwa | 320 g (11.3 oz.) |
| Antre Voltage | 12/24 VDC |
| Konsomasyon pouvwa | 40 wat |
| Tanperati Fonksyònman | -40 °C a 85 °C (-40 °F a 185 °F) |
| Tanperati Depo | -40 °C a 85 °C (-40 °F a 185 °F) |
| Tanperati chaje | 0 °C a 40 °C (32 °F a 104 °F) |
| Imidite | 5% a 95% ki pa kondanse |
| Drop | 76.2 cm (30.0 pous) gout nan vinil mozayik beton nan tanperati chanm. |
| Egzeyat Electrostatic (ESD) | +/- 20kV lè +/- 10kV kontak |
Trigger Handle Technical Specifications
| Atik | Deskripsyon |
| Dimansyon | Wotè: 11.2 cm (4.41 pous) Lajè: 6.03 cm (2.37 pous) Pwofondè: 13.4 cm (5.28 pous) |
| Pwa | 110 g (3.8 oz.) |
| Tanperati Fonksyònman | -20 °C a 50 °C (-4 °F a 122 °F) |
| Tanperati Depo | -40 °C a 70 °C (-40 °F a 158 °F) |
| Imidite | 10% a 95% ki pa kondanse |
| Drop | 1.8 m (6 feet) drops to concrete over temperature range. |
| Egzeyat Electrostatic (ESD) | +/- 20kV lè +/- 10kV kontak |
Charging Cable Cup Technical Specifications
| Item | Deskripsyon |
| Longè | 25.4 cm (10.0 pous) |
| Antre Voltage | 5.4 VDC |
| Tanperati Fonksyònman | -20 °C a 50 °C (-4 °F a 122 °F) |
| Tanperati Depo | -40 °C a 70 °C (-40 °F a 158 °F) |
| Imidite | 10% a 95% ki pa kondanse |
| Egzeyat Electrostatic (ESD) | +/- 20kV lè +/- 10kV kontak |
Snap-On USB Cable Technical Specifications
| Atik | Deskripsyon |
| Longè | 1.5 cm (60.0 pous) |
| Antre Voltage | 5.4 VDC (external power supply) |
| Tanperati Fonksyònman | -20 °C a 50 °C (-4 °F a 122 °F) |
| Tanperati Depo | -40 °C a 70 °C (-40 °F a 158 °F) |
| Imidite | 10% a 95% ki pa kondanse |
| Egzeyat Electrostatic (ESD) | +/- 20kV lè +/- 10kV kontak |
DEX Cable Technical Specifications
| Atik | Deskripsyon |
| Longè | 1.5 cm (60.0 pous) |
| Tanperati Fonksyònman | -20 °C a 50 °C (-4 °F a 122 °F) |
| Tanperati Depo | -40 °C a 70 °C (-40 °F a 158 °F) |
| Imidite | 10% a 95% ki pa kondanse |
| Egzeyat Electrostatic (ESD) | +/- 20kV lè +/- 10kV kontak |
Dokiman / Resous
 |
ZEBRA TC7 Series Touch Computer [pdfGid Enstalasyon TC7 Series Touch Computer, TC7 Series, Touch Computer, Computer |


