![]()
TC72/TC77
કમ્પ્યુટર ટચ કરો
ઉત્પાદન સંદર્ભ માર્ગદર્શિકા
Android 11™ માટે
MN-004303-01EN રેવ એ
TC7 સિરીઝ ટચ કમ્પ્યુટર
કોપીરાઈટ
ઝેબ્રા અને સ્ટાઈલાઇઝ્ડ ઝેબ્રા હેડ એ ઝેબ્રા ટેક્નોલોજી કોર્પોરેશનના ટ્રેડમાર્ક છે, જે વિશ્વભરના ઘણા અધિકારક્ષેત્રોમાં નોંધાયેલ છે. Google, Android, Google Play અને અન્ય માર્કસ Google LLC ના ટ્રેડમાર્ક છે. અન્ય તમામ ટ્રેડમાર્ક્સ તેમના સંબંધિત માલિકોની મિલકત છે. ©2021 Zebra Technologies Corporation અને/અથવા તેના આનુષંગિકો. બધા હકો અમારી પાસે રાખેલા છે.
આ દસ્તાવેજમાંની માહિતી સૂચના વિના બદલવાને પાત્ર છે. આ દસ્તાવેજમાં વર્ણવેલ સોફ્ટવેર લાઇસન્સ કરાર અથવા બિન-જાહેર કરાર હેઠળ આપવામાં આવ્યું છે. સૉફ્ટવેરનો ઉપયોગ ફક્ત તે કરારોની શરતો અનુસાર જ થઈ શકે છે અથવા તેની નકલ કરી શકાય છે.
કાનૂની અને માલિકીના નિવેદનો સંબંધિત વધુ માહિતી માટે, કૃપા કરીને અહીં જાઓ:
સૉફ્ટવેર: zebra.com/linkoslegal.
કૉપિરાઇટ: zebra.com/copyright.
વોરંટી: zebra.com/warranty.
અંતિમ વપરાશકર્તા લાઇસન્સ કરાર: zebra.com/eula.
ઉપયોગની શરતો
માલિકીનું નિવેદન
આ માર્ગદર્શિકામાં Zebra Technologies Corporation અને તેની પેટાકંપનીઓ (“Zebra Technologies”)ની માલિકીની માહિતી છે. તે ફક્ત અહીં વર્ણવેલ સાધનોનું સંચાલન અને જાળવણી કરતી પાર્ટીઓની માહિતી અને ઉપયોગ માટે બનાવાયેલ છે. આવી માલિકીની માહિતીનો ઉપયોગ, પુનઃઉત્પાદન અથવા ઝેબ્રા ટેક્નૉલૉજીની સ્પષ્ટ, લેખિત પરવાનગી વિના કોઈપણ અન્ય હેતુ માટે અન્ય પક્ષકારોને કરી શકાશે નહીં.
ઉત્પાદન સુધારાઓ
ઉત્પાદનોમાં સતત સુધારો એ ઝેબ્રા ટેક્નોલોજીની નીતિ છે. તમામ વિશિષ્ટતાઓ અને ડિઝાઇન નોટિસ વિના બદલવાને પાત્ર છે.
જવાબદારી અસ્વીકરણ
ઝેબ્રા ટેક્નૉલૉજી તેના પ્રકાશિત એન્જિનિયરિંગ વિશિષ્ટતાઓ અને માર્ગદર્શિકાઓ સાચી છે તેની ખાતરી કરવા પગલાં લે છે; જો કે, ભૂલો થાય છે. Zebra Technologies આવી કોઈપણ ભૂલોને સુધારવાનો અધિકાર અનામત રાખે છે અને તેના પરિણામે થતી જવાબદારીને અસ્વીકાર કરે છે.
જવાબદારીની મર્યાદા
કોઈપણ ઘટનામાં ઝેબ્રા ટેક્નોલોજીસ અથવા સાથેના ઉત્પાદન (હાર્ડવેર અને સૉફ્ટવેર સહિત)ના નિર્માણ, ઉત્પાદન અથવા ડિલિવરીમાં સામેલ અન્ય કોઈપણ કોઈપણ નુકસાન માટે જવાબદાર રહેશે નહીં (જેમાં, મર્યાદા વિના, વ્યાપાર નફાની ખોટ, વ્યવસાયમાં વિક્ષેપ સહિત પરિણામી નુકસાન સહિત) , અથવા ધંધાકીય માહિતીની ખોટ) ઝેબ્રા ટેક્નૉલૉજી પાસે હોય તો પણ, આવા ઉત્પાદનના ઉપયોગના પરિણામો, અથવા તેનો ઉપયોગ કરવામાં અસમર્થતાથી ઉદ્ભવે છે. આવા નુકસાનની શક્યતા વિશે સલાહ આપવામાં આવી છે. કેટલાક અધિકારક્ષેત્રો આકસ્મિક અથવા પરિણામી નુકસાનની બાકાત અથવા મર્યાદાને મંજૂરી આપતા નથી, તેથી ઉપરોક્ત મર્યાદા અથવા બાકાત તમને લાગુ પડતી નથી.
આ માર્ગદર્શિકા વિશે
રૂપરેખાંકનો
આ માર્ગદર્શિકા નીચેના ઉપકરણ રૂપરેખાંકનોને આવરી લે છે.
| રૂપરેખાંકન | રેડિયો | ડિસ્પ્લે | સ્મૃતિ | ડેટા કેપ્ચર વિકલ્પો |
ઓપરેટિંગ સિસ્ટમ |
| TC720L | WLAN: 802.11 a/b/g/n/ ac/d/h/i/r/k/v3/wWPAN: બ્લૂટૂથ v5.0 લો એનર્જી |
4.7" હાઇ ડેફિનેશન (1280 x 720) LCD |
4 જીબી રેમ/32 જીબી ફ્લેશ |
2D ઈમેજર, કેમેરા અને સંકલિત NFC |
એન્ડ્રોઇડ આધારિત, Google™ મોબાઇલ સેવાઓ (GMS) 11 |
| TC77HL | WWAN: HSPA+/LTE/ CDMAWLAN: 802.11 a/b/g/ n/ac/d/h/i/r/k/v3/wWPAN: બ્લૂટૂથ v5.0 લો એનર્જી |
4.7" હાઇ ડેફિનેશન (1280 x 720) LCD |
4 જીબી રેમ/32 જીબી ફ્લેશ |
2D ઈમેજર, કેમેરા અને સંકલિત NFC | એન્ડ્રોઇડ આધારિત, ગૂગલ ™ મોબાઇલ સેવાઓ (GMS) 11 |
નોટેશનલ સંમેલનો
આ દસ્તાવેજમાં નીચેના સંમેલનોનો ઉપયોગ થાય છે:
- બોલ્ડ ટેક્સ્ટનો ઉપયોગ નીચેનાને પ્રકાશિત કરવા માટે થાય છે:
- ડાયલોગ બોક્સ, વિન્ડો અને સ્ક્રીનના નામ
- ડ્રોપ-ડાઉન સૂચિ અને સૂચિ બૉક્સના નામ
- ચેકબોક્સ અને રેડિયો બટનના નામ
- સ્ક્રીન પરના ચિહ્નો
- કીપેડ પર કી નામો
- સ્ક્રીન પર બટન નામો.
- બુલેટ્સ (•) સૂચવે છે:
- ક્રિયા વસ્તુઓ
- વિકલ્પોની સૂચિ
- જરૂરી પગલાંઓની યાદીઓ કે જે અનુક્રમે જરૂરી નથી.
- ક્રમિક યાદીઓ (દા.તample, જે પગલું-દર-પગલાં પ્રક્રિયાઓનું વર્ણન કરે છે) ક્રમાંકિત સૂચિ તરીકે દેખાય છે.
ચિહ્ન સંમેલનો
દસ્તાવેજીકરણ સમૂહ વાચકને વધુ વિઝ્યુઅલ સંકેતો આપવા માટે રચાયેલ છે. નીચેના ગ્રાફિક ચિહ્નોનો ઉપયોગ સમગ્ર દસ્તાવેજીકરણ સમૂહમાં થાય છે.
![]() નોંધ: અહીંનો ટેક્સ્ટ એવી માહિતી સૂચવે છે જે વપરાશકર્તાને જાણવા માટે પૂરક છે અને જે કાર્ય પૂર્ણ કરવા માટે જરૂરી નથી. અહીંનો ટેક્સ્ટ એવી માહિતી સૂચવે છે જે વપરાશકર્તા માટે જાણવી મહત્વપૂર્ણ છે.
નોંધ: અહીંનો ટેક્સ્ટ એવી માહિતી સૂચવે છે જે વપરાશકર્તાને જાણવા માટે પૂરક છે અને જે કાર્ય પૂર્ણ કરવા માટે જરૂરી નથી. અહીંનો ટેક્સ્ટ એવી માહિતી સૂચવે છે જે વપરાશકર્તા માટે જાણવી મહત્વપૂર્ણ છે.
![]() મહત્વપૂર્ણ: અહીંનો ટેક્સ્ટ એવી માહિતી સૂચવે છે જે વપરાશકર્તા માટે જાણવી મહત્વપૂર્ણ છે.
મહત્વપૂર્ણ: અહીંનો ટેક્સ્ટ એવી માહિતી સૂચવે છે જે વપરાશકર્તા માટે જાણવી મહત્વપૂર્ણ છે.
![]() સાવધાન: જો સાવચેતીનું ધ્યાન રાખવામાં ન આવે તો, વપરાશકર્તાને નાની કે મધ્યમ ઈજા થઈ શકે છે.
સાવધાન: જો સાવચેતીનું ધ્યાન રાખવામાં ન આવે તો, વપરાશકર્તાને નાની કે મધ્યમ ઈજા થઈ શકે છે.
![]() ચેતવણી: જો જોખમ ટાળવામાં ન આવે તો, વપરાશકર્તા ગંભીર રીતે ઘાયલ અથવા મૃત્યુ પામી શકે છે.
ચેતવણી: જો જોખમ ટાળવામાં ન આવે તો, વપરાશકર્તા ગંભીર રીતે ઘાયલ અથવા મૃત્યુ પામી શકે છે.
![]() જોખમ: જો જોખમ ટાળવામાં નહીં આવે, તો વપરાશકર્તા ગંભીર રીતે ઘાયલ અથવા મૃત્યુ પામશે.
જોખમ: જો જોખમ ટાળવામાં નહીં આવે, તો વપરાશકર્તા ગંભીર રીતે ઘાયલ અથવા મૃત્યુ પામશે.
સેવા માહિતી
જો તમને તમારા સાધનોમાં કોઈ સમસ્યા હોય, તો તમારા પ્રદેશ માટે Zebra વૈશ્વિક ગ્રાહક સપોર્ટનો સંપર્ક કરો.
સંપર્ક માહિતી અહીં ઉપલબ્ધ છે: zebra.com/support.
સપોર્ટનો સંપર્ક કરતી વખતે, કૃપા કરીને નીચેની માહિતી ઉપલબ્ધ રાખો:
- એકમનો સીરીયલ નંબર
- મોડલ નંબર અથવા ઉત્પાદન નામ
- સૉફ્ટવેર પ્રકાર અને સંસ્કરણ નંબર
ઝેબ્રા સપોર્ટ એગ્રીમેન્ટમાં નિર્ધારિત સમય મર્યાદામાં ઈમેલ, ટેલિફોન અથવા ફેક્સ દ્વારા કોલનો જવાબ આપે છે.
જો તમારી સમસ્યા ઝેબ્રા કસ્ટમર સપોર્ટ દ્વારા ઉકેલી શકાતી નથી, તો તમારે સર્વિસિંગ માટે તમારા સાધનો પરત કરવાની જરૂર પડી શકે છે અને ચોક્કસ દિશાઓ આપવામાં આવશે. જો માન્ય શિપિંગ કન્ટેનરનો ઉપયોગ કરવામાં ન આવ્યો હોય તો શિપમેન્ટ દરમિયાન થયેલા કોઈપણ નુકસાન માટે ઝેબ્રા જવાબદાર નથી. એકમોને અયોગ્ય રીતે મોકલવાથી વોરંટી રદ થઈ શકે છે.
જો તમે ઝેબ્રા બિઝનેસ પાર્ટનર પાસેથી તમારું ઝેબ્રા બિઝનેસ પ્રોડક્ટ ખરીદ્યું હોય, તો સપોર્ટ માટે તે બિઝનેસ પાર્ટનરનો સંપર્ક કરો.
સોફ્ટવેર આવૃત્તિઓ નક્કી
ગ્રાહક સમર્થનનો સંપર્ક કરતા પહેલા, તમારા ઉપકરણ પર વર્તમાન સોફ્ટવેર સંસ્કરણ નક્કી કરો.
- ક્વિક એક્સેસ પેનલ ખોલવા માટે સ્ટેટસ બારમાંથી બે આંગળીઓથી નીચે સ્વાઇપ કરો અને પછી ટચ કરો
 .
. - ફોન વિશે ટચ કરો.
- સુધી સ્ક્રોલ કરો view નીચેની માહિતી:
• બેટરી માહિતી
• કટોકટીની માહિતી
• SW ઘટકો
• કાનૂની માહિતી
• મોડલ અને હાર્ડવેર
• Android સંસ્કરણ
• Android સુરક્ષા અપડેટ
• Google Play સિસ્ટમ અપડેટ
• બેઝબેન્ડ વર્ઝન
• કર્નલ સંસ્કરણ
• બિલ્ડ નંબર
ઉપકરણ IMEI માહિતી (ફક્ત WWAN) નક્કી કરવા માટે, ફોન વિશે > IMEI ને ટચ કરો.
- IMEI - ઉપકરણ માટે IMEI નંબર દર્શાવે છે.
- IMEI SV - ઉપકરણ માટે IMEI SV નંબર દર્શાવે છે.
સીરીયલ નંબર નક્કી કરી રહ્યા છીએ
ગ્રાહક સપોર્ટનો સંપર્ક કરતા પહેલા, તમારા ઉપકરણનો સીરીયલ નંબર નક્કી કરો.
- ક્વિક એક્સેસ પેનલ ખોલવા માટે સ્ટેટસ બારમાંથી બે આંગળીઓથી નીચે સ્વાઇપ કરો અને પછી ટચ કરો .
- ફોન વિશે ટચ કરો.
- મોડેલ અને હાર્ડવેરને ટચ કરો.
- સીરીયલ નંબરને ટચ કરો.
શરૂઆત કરવી
આ પ્રકરણ ઉપકરણને પ્રથમ વખત ચાલુ કરવા માટે માહિતી પ્રદાન કરે છે.
ઉપકરણને અનપેક કરી રહ્યું છે
- ઉપકરણથી બધી રક્ષણાત્મક સામગ્રી કાળજીપૂર્વક દૂર કરો અને પછીના સ્ટોરેજ અને શિપિંગ માટે શિપિંગ કન્ટેનર સાચવો.
- ચકાસો કે નીચેનાનો સમાવેશ થાય છે:
• કમ્પ્યુટરને ટચ કરો
• 4,620 mAh PowerPercision+ લિથિયમ-આયન બેટરી
• હાથનો પટ્ટો
Ula નિયમનકારી માર્ગદર્શિકા. - નુકસાન માટેનાં સાધનોની તપાસ કરો. જો કોઈ ઉપકરણ ગુમ થયેલ છે અથવા નુકસાન થયેલ છે, તો તરત જ ગ્લોબલ ગ્રાહક સપોર્ટ સેન્ટરનો સંપર્ક કરો.
- પ્રથમ વખત ઉપકરણનો ઉપયોગ કરતા પહેલા, સ્કેન વિન્ડો, ડિસ્પ્લે અને કેમેરા વિન્ડોને આવરી લેતી રક્ષણાત્મક શિપિંગ ફિલ્મને દૂર કરો.
ઉપકરણ સુવિધાઓ
આકૃતિ 1 આગળ View

કોષ્ટક 1 આગળ View લક્ષણો
| નંબર | વસ્તુ | કાર્ય |
| 1 | ફ્રન્ટ ફેસિંગ કેમેરો | ફોટા અને વીડિયો લેવા માટે ઉપયોગ કરો (વૈકલ્પિક). |
| 2 | ડેટા કેપ્ચર એલઇડી | ડેટા કેપ્ચર સ્થિતિ સૂચવે છે. |
| 3 | ચાર્જિંગ / સૂચના એલઇડી |
ચાર્જ કરતી વખતે બેટરી ચાર્જિંગની સ્થિતિ અને એપ જનરેટેડ નોટિફિકેશન સૂચવે છે. |
| 4 | રીસીવર | હેન્ડસેટ મોડમાં audioડિઓ પ્લેબેક માટે ઉપયોગ કરો. |
| 5 | માઇક્રોફોન | સ્પીકરફોન મોડમાં સંદેશાવ્યવહાર માટે ઉપયોગ કરો. |
| 6 | પાવર બટન | ડિસ્પ્લે ચાલુ અને બંધ કરે છે. ડિવાઇસને ફરીથી સેટ કરવા, પાવર offફ અથવા બેટરી સ્વેપ કરવા માટે દબાવો અને હોલ્ડ કરો. |
| 7 | નિકટતા સેન્સર | હેન્ડસેટ મોડમાં હોય ત્યારે ડિસ્પ્લે બંધ કરવા માટે નિકટતા નક્કી કરે છે. |
| 8 | લાઇટ સેન્સર | ડિસ્પ્લે બેકલાઇટની તીવ્રતાને નિયંત્રિત કરવા માટે એમ્બિયન્ટ લાઇટ નક્કી કરે છે. |
| 9 | મેનુ બટન | વર્તમાન સ્ક્રીન અથવા એપ્લિકેશનને અસર કરતી આઇટમ્સ સાથેનું મેનૂ ખોલે છે. |
| 10 | શોધ બટન | તાજેતરની એપ્લિકેશન સ્ક્રીન ખોલે છે. |
| 11 | વક્તા | વિડિઓ અને મ્યુઝિક પ્લેબેક માટે audioડિઓ આઉટપુટ પ્રદાન કરે છે. સ્પીકરફોન મોડમાં audioડિઓ પ્રદાન કરે છે. |
| 12 | સંપર્કો ચાર્જ કરી રહ્યા છીએ | કેબલ્સ અને ક્રેડલ્સમાંથી ઉપકરણને પાવર પ્રદાન કરે છે. |
| 13 | માઇક્રોફોન | હેન્ડસેટ મોડમાં સંદેશાવ્યવહાર માટે ઉપયોગ કરો. |
| 14 | હોમ બટન | એક જ પ્રેસ સાથે હોમ સ્ક્રીન પ્રદર્શિત કરે છે. GMS સાથે ઉપકરણ પર, જ્યારે ટૂંકા ગાળા માટે રાખવામાં આવે ત્યારે Google Now સ્ક્રીન ખોલે છે. |
| 15 | પાછળનું બટન | પાછલી સ્ક્રીન દર્શાવે છે. |
| 16 | પીટીટી બટન | પુશ-ટુ-ટ communક કમ્યુનિકેશન્સ (પ્રોગ્રામેબલ) પ્રારંભ કરે છે. |
| 17 | સ્કેન બટન | ડેટા કેપ્ચર (પ્રોગ્રામેબલ) પ્રારંભ કરે છે. |
| 18 | ટચ સ્ક્રીન | ડિવાઇસને સંચાલિત કરવા માટે જરૂરી બધી માહિતી દર્શાવે છે. |
આકૃતિ 2 પાછળ View

કોષ્ટક 2 પાછળ View લક્ષણો
| નંબર | વસ્તુ | કાર્ય |
| 19 | કેમેરા ફ્લેશ | કેમેરા માટે રોશની પ્રદાન કરે છે. |
| 20 | કેમેરા | ફોટા અને વિડિઓઝ લે છે. |
| 21 | હેન્ડ સ્ટ્રેપ માઉન્ટ કરવાનું બિંદુ | હેન્ડ સ્ટ્રેપ માટે લૅચિંગ પૉઇન્ટ પ્રદાન કરે છે. |
| 22 | બેટરી રિલીઝ latches |
બેટરી દૂર કરવા માટે દબાવો. |
| 23 | હાથનો પટ્ટો | ઉપકરણને તમારા હાથમાં સુરક્ષિત રીતે પકડી રાખવા માટે ઉપયોગ કરો. |
| 24 | બેટરી | ઉપકરણને શક્તિ પ્રદાન કરે છે. |
| 25 | સ્થિતિસ્થાપક સ્લીવ | વૈકલ્પિક સ્ટાઈલસ રાખવા માટે ઉપયોગ કરો. |
| 26 | વોલ્યુમ અપ/ડાઉન બટન | Audioડિઓ વોલ્યુમ વધારો અને ઘટાડો (પ્રોગ્રામેબલ) |
| 27 | સ્કેન બટન | ડેટા કેપ્ચર (પ્રોગ્રામેબલ) પ્રારંભ કરે છે. |
| 28 | માઇક્રોફોન | વિડિઓ રેકોર્ડિંગ દરમિયાન અને અવાજ રદ કરવા માટે ઉપયોગ કરો. |
| 29 | વિંડોમાંથી બહાર નીકળો | ઇમેજરનો ઉપયોગ કરીને ડેટા કેપ્ચર પ્રદાન કરે છે. |
| 30 | ઈન્ટરફેસ કનેક્ટર |
યુએસબી હોસ્ટ અને ક્લાયંટ કોમ્યુનિકેશન્સ, ઓડિયો અને ડિવાઈસ ચાર્જિંગ દ્વારા પૂરી પાડે છે કેબલ્સ અને એસેસરીઝ. |
ડિવાઇસ સેટ કરી રહ્યું છે
પ્રથમ વખત ઉપકરણનો ઉપયોગ શરૂ કરવા માટે:
- સિમ લૉક એક્સેસ કવર દૂર કરો (ફક્ત સિમ લૉક સાથે TC77).
- સિમ કાર્ડ ઇન્સ્ટોલ કરો (ફક્ત TC77).
- SAM કાર્ડ ઇન્સ્ટોલ કરો.
- માઇક્રો સુરક્ષિત ડિજિટલ (એસડી) કાર્ડ (વૈકલ્પિક) સ્થાપિત કરો.
- હેન્ડ સ્ટ્રેપ (વૈકલ્પિક) સ્થાપિત કરો.
- બેટરી ઇન્સ્ટોલ કરો.
- ઉપકરણને ચાર્જ કરો.
- ઉપકરણ પર પાવર.
સિમ લૉક એક્સેસ કવર દૂર કરી રહ્યાં છીએ
સિમ લૉક સુવિધા સાથેના TC77 મોડલમાં એક્સેસ ડોરનો સમાવેશ થાય છે જે Microstix 3ULR-0 સ્ક્રૂનો ઉપયોગ કરીને સુરક્ષિત છે.
![]() નોંધ: માત્ર સિમ લોક સાથે TC77.
નોંધ: માત્ર સિમ લોક સાથે TC77.
- એક્સેસ કવરને દૂર કરવા માટે, એક્સેસ પેનલમાંથી સ્ક્રુને દૂર કરવા માટે Microstix TD-54(3ULR-0) સ્ક્રુડ્રાઈવરનો ઉપયોગ કરો.
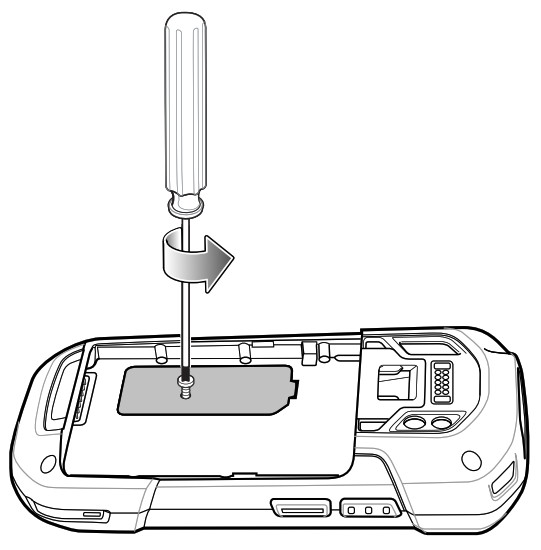
- એક્સેસ કવર ફરીથી ઇન્સ્ટોલ કર્યા પછી, સ્ક્રુને ફરીથી ઇન્સ્ટોલ કરવા માટે Microstix TD-54(3ULR-0) સ્ક્રુડ્રાઇવરનો ઉપયોગ કરવાની ખાતરી કરો.
સિમ કાર્ડ ઇન્સ્ટોલ કરી રહ્યું છે
![]() નોંધ: માત્ર TC77.
નોંધ: માત્ર TC77.
માત્ર નેનો સિમ કાર્ડનો ઉપયોગ કરો.
![]() સાવધાન: સિમ કાર્ડને નુકસાન ન થાય તે માટે યોગ્ય ઈલેક્ટ્રોસ્ટેટિક ડિસ્ચાર્જ (ESD) સાવચેતીઓનું પાલન કરો. યોગ્ય ESD સાવચેતીઓમાં ESD મેટ પર કામ કરવું અને વપરાશકર્તા યોગ્ય રીતે ગ્રાઉન્ડેડ છે તેની ખાતરી કરવી શામેલ છે, પરંતુ તેના સુધી મર્યાદિત નથી.
સાવધાન: સિમ કાર્ડને નુકસાન ન થાય તે માટે યોગ્ય ઈલેક્ટ્રોસ્ટેટિક ડિસ્ચાર્જ (ESD) સાવચેતીઓનું પાલન કરો. યોગ્ય ESD સાવચેતીઓમાં ESD મેટ પર કામ કરવું અને વપરાશકર્તા યોગ્ય રીતે ગ્રાઉન્ડેડ છે તેની ખાતરી કરવી શામેલ છે, પરંતુ તેના સુધી મર્યાદિત નથી.
- Doorક્સેસ દરવાજો ઉપાડો.
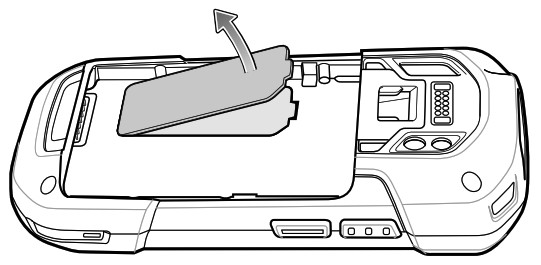 આકૃતિ 3 TC77 સિમ સ્લોટ સ્થાનો
 1 નેનો સિમ સ્લોટ 1 (ડિફોલ્ટ)
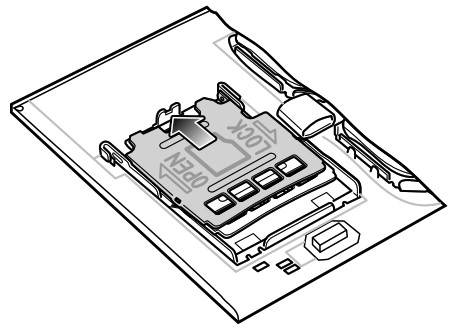
2 નેનો સિમ સ્લોટ 2 - SIM કાર્ડ ધારકને અનલોક સ્થિતિ પર સ્લાઇડ કરો.

- સિમ કાર્ડ ધારકનો દરવાજો ઉપાડો.

- નેનો સિમ કાર્ડને કાર્ડ ધારકમાં સંપર્કો નીચે તરફ રાખીને મૂકો.

- SIM કાર્ડ ધારકનો દરવાજો બંધ કરો અને લૉકની સ્થિતિમાં સ્લાઇડ કરો.

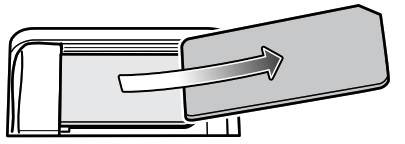
- એક્સેસ બારણું બદલો.

- એક્સેસ ડોર નીચે દબાવો અને ખાતરી કરો કે તે યોગ્ય રીતે બેઠેલું છે.
![]() સાવધાન: ઉપકરણની યોગ્ય સીલિંગની ખાતરી કરવા માટે ઍક્સેસ બારણું બદલવું અને સુરક્ષિત રીતે બેઠેલું હોવું આવશ્યક છે.
સાવધાન: ઉપકરણની યોગ્ય સીલિંગની ખાતરી કરવા માટે ઍક્સેસ બારણું બદલવું અને સુરક્ષિત રીતે બેઠેલું હોવું આવશ્યક છે.
SAM કાર્ડ ઇન્સ્ટોલ કરી રહ્યું છે
![]() સાવધાન: સિક્યોર એક્સેસ મોડ્યુલ (SAM) કાર્ડને નુકસાન ન થાય તે માટે યોગ્ય ઈલેક્ટ્રોસ્ટેટિક ડિસ્ચાર્જ (ESD) સાવચેતીઓનું પાલન કરો. યોગ્ય ESD સાવચેતીઓમાં ESD મેટ પર કામ કરવું અને વપરાશકર્તા યોગ્ય રીતે ગ્રાઉન્ડેડ છે તેની ખાતરી કરવી શામેલ છે, પરંતુ તેના સુધી મર્યાદિત નથી.
સાવધાન: સિક્યોર એક્સેસ મોડ્યુલ (SAM) કાર્ડને નુકસાન ન થાય તે માટે યોગ્ય ઈલેક્ટ્રોસ્ટેટિક ડિસ્ચાર્જ (ESD) સાવચેતીઓનું પાલન કરો. યોગ્ય ESD સાવચેતીઓમાં ESD મેટ પર કામ કરવું અને વપરાશકર્તા યોગ્ય રીતે ગ્રાઉન્ડેડ છે તેની ખાતરી કરવી શામેલ છે, પરંતુ તેના સુધી મર્યાદિત નથી.
![]() નોંધ: જો તમે માઇક્રો SAM કાર્ડનો ઉપયોગ કરો છો, તો તૃતીય-પક્ષ એડેપ્ટર જરૂરી છે.
નોંધ: જો તમે માઇક્રો SAM કાર્ડનો ઉપયોગ કરો છો, તો તૃતીય-પક્ષ એડેપ્ટર જરૂરી છે.
- Doorક્સેસ દરવાજો ઉપાડો.
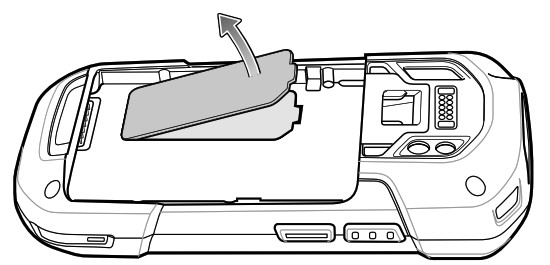
- SAM સ્લોટમાં SAM કાર્ડને ઉપકરણની મધ્ય તરફ અને સંપર્કો નીચેની તરફ કટ એજ સાથે દાખલ કરો.
 1 મીની SAM સ્લોટ
 - ખાતરી કરો કે SAM કાર્ડ યોગ્ય રીતે બેઠેલું છે.
- એક્સેસ બારણું બદલો.

- એક્સેસ ડોર નીચે દબાવો અને ખાતરી કરો કે તે યોગ્ય રીતે બેઠેલું છે.
 સાવધાન: ઉપકરણની યોગ્ય સીલિંગની ખાતરી કરવા માટે ઍક્સેસ બારણું બદલવું અને સુરક્ષિત રીતે બેઠેલું હોવું આવશ્યક છે.
માઇક્રોએસડી કાર્ડ સ્થાપિત કરવું
માઇક્રોએસડી કાર્ડ સ્લોટ ગૌણ નોન-વોલેટાઇલ સ્ટોરેજ પ્રદાન કરે છે. સ્લોટ બેટરી પેક હેઠળ સ્થિત છે.
વધુ માહિતી માટે કાર્ડ સાથે પૂરા પાડવામાં આવેલ દસ્તાવેજોનો સંદર્ભ લો અને ઉપયોગ માટે ઉત્પાદકની ભલામણોને અનુસરો.
![]() સાવધાન: માઇક્રોએસડી કાર્ડને નુકસાન ન થાય તે માટે યોગ્ય ઇલેક્ટ્રોસ્ટેટિક ડિસ્ચાર્જ (ઇએસડી) સાવચેતીઓનું પાલન કરો. ESD ની સાવચેતીમાં ESD સાદડી પર કામ કરવા અને operatorપરેટર યોગ્ય રીતે ગ્રાઉન્ડ થયેલ છે તેની ખાતરી કરવા માટે સમાવિષ્ટ છે, પરંતુ તે મર્યાદિત નથી.
સાવધાન: માઇક્રોએસડી કાર્ડને નુકસાન ન થાય તે માટે યોગ્ય ઇલેક્ટ્રોસ્ટેટિક ડિસ્ચાર્જ (ઇએસડી) સાવચેતીઓનું પાલન કરો. ESD ની સાવચેતીમાં ESD સાદડી પર કામ કરવા અને operatorપરેટર યોગ્ય રીતે ગ્રાઉન્ડ થયેલ છે તેની ખાતરી કરવા માટે સમાવિષ્ટ છે, પરંતુ તે મર્યાદિત નથી.
- જો ઇન્સ્ટોલ કરેલ હોય, તો હાથનો પટ્ટો દૂર કરો.
- જો ઉપકરણ પાસે સુરક્ષિત પ્રવેશ દરવાજો છે, તો 0ULR-3 સ્ક્રૂને દૂર કરવા માટે Microstix 0 સ્ક્રુડ્રાઈવરનો ઉપયોગ કરો.

- Doorક્સેસ દરવાજો ઉપાડો.

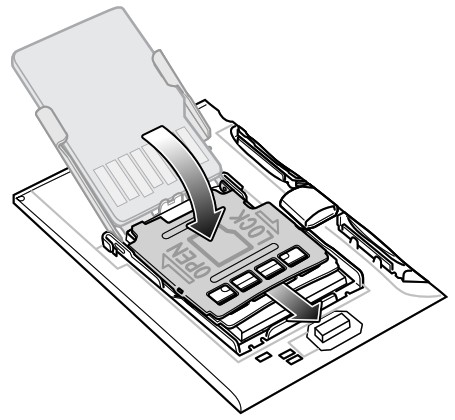
- માઇક્રોએસડી કાર્ડ ધારકને ઓપન પોઝિશન પર સ્લાઇડ કરો.
- માઇક્રોએસડી કાર્ડ ધારકને ઉપાડો.

- કાર્ડ ધારકના દરવાજામાં માઇક્રોએસડી કાર્ડ દાખલ કરો, ખાતરી કરો કે કાર્ડ દરવાજાની દરેક બાજુ હોલ્ડિંગ ટ tabબ્સમાં જાય છે.

- માઇક્રોએસડી કાર્ડ ધારકનો દરવાજો બંધ કરો અને દરવાજાને લૉકની સ્થિતિમાં સ્લાઇડ કરો.

- એક્સેસ બારણું બદલો.

- એક્સેસ ડોર નીચે દબાવો અને ખાતરી કરો કે તે યોગ્ય રીતે બેઠેલું છે.
સાવધાન: ઉપકરણની યોગ્ય સીલિંગની ખાતરી કરવા માટે ઍક્સેસ બારણું બદલવું અને સુરક્ષિત રીતે બેઠેલું હોવું આવશ્યક છે. - જો ઉપકરણ પાસે સુરક્ષિત પ્રવેશ દરવાજો છે, તો 0ULR-3 સ્ક્રુ ઇન્સ્ટોલ કરવા માટે Microstix 0 સ્ક્રુડ્રાઈવરનો ઉપયોગ કરો.

હેન્ડ સ્ટ્રેપ અને બેટરી ઇન્સ્ટોલ કરી રહ્યા છીએ
નોંધ: ઉપકરણમાં વપરાશકર્તા ફેરફાર, ખાસ કરીને બેટરીમાં સારી રીતે, જેમ કે લેબલ્સ, સંપત્તિ tags, કોતરણી, સ્ટીકરો, વગેરે, ઉપકરણ અથવા એસેસરીઝના હેતુપૂર્ણ પ્રદર્શન સાથે સમાધાન કરી શકે છે. પ્રદર્શન સ્તરો જેમ કે સીલિંગ (ઇન્ગ્રેસ પ્રોટેક્શન (આઈપી)), પ્રભાવ પ્રદર્શન (ડ્રોપ અને ટમ્બલ), કાર્યક્ષમતા, તાપમાન પ્રતિકાર, વગેરેને અસર થઈ શકે છે. કોઈપણ લેબલ, સંપત્તિ ન લગાવો tags, કોતરણી, સ્ટીકરો વગેરે બેટરીમાં સારી રીતે.
નોંધ: હેન્ડ સ્ટ્રેપની સ્થાપના વૈકલ્પિક છે. જો હેન્ડ સ્ટ્રેપ ઇન્સ્ટોલ ન કરી રહ્યાં હોવ તો આ વિભાગને અવગણો.
- હેન્ડ સ્ટ્રેપ સ્લોટમાંથી હેન્ડ સ્ટ્રેપ ફિલર દૂર કરો. હેન્ડ સ્ટ્રેપ ફિલરને ભવિષ્યમાં બદલવા માટે સુરક્ષિત જગ્યાએ સ્ટોર કરો.

- હેન્ડ સ્ટ્રેપ પ્લેટને હેન્ડ સ્ટ્રેપ સ્લોટમાં દાખલ કરો.

- ઉપકરણની પાછળના ભાગમાં બેટરીના ડબ્બામાં પ્રથમ, નીચે, બેટરી દાખલ કરો.

- જ્યાં સુધી બેટરી રીલિઝ થાય ત્યાં સુધી બરાબર ન આવે ત્યાં સુધી બેટરીને બેટરીના ડબ્બામાં નીચે દબાવો.

- હેન્ડ સ્ટ્રેપ ક્લિપને હેન્ડ સ્ટ્રેપ માઉન્ટિંગ સ્લોટમાં મૂકો અને જ્યાં સુધી તે જગ્યાએ ન આવે ત્યાં સુધી નીચે ખેંચો.

બેટરી ઇન્સ્ટોલ કરી રહ્યું છે
નોંધ: ઉપકરણમાં વપરાશકર્તા ફેરફાર, ખાસ કરીને બેટરીમાં સારી રીતે, જેમ કે લેબલ્સ, સંપત્તિ tags, કોતરણી, સ્ટીકરો, વગેરે, ઉપકરણ અથવા એસેસરીઝના હેતુપૂર્ણ પ્રદર્શન સાથે સમાધાન કરી શકે છે. પ્રદર્શન સ્તરો જેમ કે સીલિંગ (ઇન્ગ્રેસ પ્રોટેક્શન (આઈપી)), પ્રભાવ પ્રદર્શન (ડ્રોપ અને ટમ્બલ), કાર્યક્ષમતા, તાપમાન પ્રતિકાર, વગેરેને અસર થઈ શકે છે. કોઈપણ લેબલ, સંપત્તિ ન લગાવો tags, કોતરણી, સ્ટીકરો વગેરે બેટરીમાં સારી રીતે.
- ઉપકરણની પાછળના ભાગમાં બેટરીના ડબ્બામાં પ્રથમ, નીચે, બેટરી દાખલ કરો.
- જ્યાં સુધી બેટરી રીલિઝ થાય ત્યાં સુધી બરાબર ન આવે ત્યાં સુધી બેટરીને બેટરીના ડબ્બામાં નીચે દબાવો.

ઉપકરણ ચાર્જિંગ
પ્રથમ વખત ઉપકરણનો ઉપયોગ કરતા પહેલા, જ્યાં સુધી ગ્રીન ચાર્જિંગ/નોટિફિકેશન લાઇટ એમિટિંગ ડાયોડ (LED) પ્રગટે નહીં ત્યાં સુધી મુખ્ય બેટરીને ચાર્જ કરો. ઉપકરણને ચાર્જ કરવા માટે, યોગ્ય પાવર સપ્લાય સાથે કેબલ અથવા પારણુંનો ઉપયોગ કરો. ઉપકરણ માટે ઉપલબ્ધ એસેસરીઝ વિશે માહિતી માટે, પૃષ્ઠ 142 પર એસેસરીઝ જુઓ.
4,620 mAh બેટરી ઓરડાના તાપમાને પાંચ કલાકથી ઓછા સમયમાં સંપૂર્ણ ચાર્જ થાય છે.
બેટરી ચાર્જ કરી રહી છે
- ચાર્જિંગ એક્સેસરીને યોગ્ય પાવર સ્ત્રોત સાથે કનેક્ટ કરો.
- ઉપકરણને પારણામાં દાખલ કરો અથવા કેબલ સાથે જોડો.
ઉપકરણ ચાલુ થાય છે અને ચાર્જ કરવાનું શરૂ કરે છે. ચાર્જિંગ/નોટિફિકેશન LED ચાર્જ કરતી વખતે એમ્બરને ઝબકાવે છે, પછી જ્યારે સંપૂર્ણ ચાર્જ થાય છે ત્યારે તે નક્કર લીલું થઈ જાય છે.
ચાર્જિંગ સૂચકાંકો
| રાજ્ય | સંકેત |
| બંધ | ઉપકરણ ચાર્જ થઈ રહ્યું નથી. ઉપકરણ પારણામાં યોગ્ય રીતે દાખલ કરેલ નથી અથવા પાવર સ્ત્રોત સાથે જોડાયેલ નથી. ચાર્જર / પારણું સંચાલિત નથી. |
| ધીમો ઝબકતો એમ્બર (દર 1માં 4 ઝબકવું સેકંડ) |
ઉપકરણ ચાર્જ થઈ રહ્યું છે. |
| સોલિડ ગ્રીન | ચાર્જિંગ પૂર્ણ. |
| ફાસ્ટ બ્લિંકિંગ એમ્બર (2 ઝબકવું/ બીજું) |
ચાર્જિંગ ભૂલ: • તાપમાન ખૂબ ઓછું અથવા ખૂબ ઊંચું છે. • ચાર્જિંગ પૂર્ણ થયા વિના ખૂબ લાંબુ ચાલ્યું (સામાન્ય રીતે આઠ કલાક). |
| ધીમો ઝબકતો લાલ (દર 1માં 4 ઝબકવું સેકંડ) |
ઉપકરણ ચાર્જ થઈ રહ્યું છે પરંતુ બેટરી ઉપયોગી જીવનના અંતમાં છે. |
| ઘન લાલ | ચાર્જિંગ પૂર્ણ થયું પરંતુ બેટરી ઉપયોગી જીવનના અંતમાં છે. |
| ફાસ્ટ બ્લિંકિંગ રેડ (2 બ્લિંક્સ / સેકંડ) | ચાર્જિંગ ભૂલ પરંતુ બેટરી ઉપયોગી જીવનના અંતમાં છે. • તાપમાન ખૂબ ઓછું અથવા ખૂબ ઊંચું છે. • ચાર્જિંગ પૂર્ણ થયા વિના ખૂબ લાંબુ ચાલ્યું (સામાન્ય રીતે આઠ કલાક). |
બેટરી બદલી રહ્યા છીએ
![]() નોંધ: ઉપકરણમાં વપરાશકર્તા ફેરફાર, ખાસ કરીને બેટરીમાં સારી રીતે, જેમ કે લેબલ્સ, સંપત્તિ tags, કોતરણી, સ્ટીકરો, વગેરે, ઉપકરણ અથવા એસેસરીઝના હેતુપૂર્ણ પ્રદર્શન સાથે સમાધાન કરી શકે છે. પ્રદર્શન સ્તરો જેમ કે સીલિંગ (ઇન્ગ્રેસ પ્રોટેક્શન (આઈપી)), પ્રભાવ પ્રદર્શન (ડ્રોપ અને ટમ્બલ), કાર્યક્ષમતા, તાપમાન પ્રતિકાર, વગેરેને અસર થઈ શકે છે. કોઈપણ લેબલ, સંપત્તિ ન લગાવો tags, કોતરણી, સ્ટીકરો વગેરે બેટરીમાં સારી રીતે.
નોંધ: ઉપકરણમાં વપરાશકર્તા ફેરફાર, ખાસ કરીને બેટરીમાં સારી રીતે, જેમ કે લેબલ્સ, સંપત્તિ tags, કોતરણી, સ્ટીકરો, વગેરે, ઉપકરણ અથવા એસેસરીઝના હેતુપૂર્ણ પ્રદર્શન સાથે સમાધાન કરી શકે છે. પ્રદર્શન સ્તરો જેમ કે સીલિંગ (ઇન્ગ્રેસ પ્રોટેક્શન (આઈપી)), પ્રભાવ પ્રદર્શન (ડ્રોપ અને ટમ્બલ), કાર્યક્ષમતા, તાપમાન પ્રતિકાર, વગેરેને અસર થઈ શકે છે. કોઈપણ લેબલ, સંપત્તિ ન લગાવો tags, કોતરણી, સ્ટીકરો વગેરે બેટરીમાં સારી રીતે.
![]() સાવધાન: બેટરી રિપ્લેસમેન્ટ દરમિયાન SIM, SAM અથવા microSD કાર્ડ ઉમેરો કે દૂર કરશો નહીં.
સાવધાન: બેટરી રિપ્લેસમેન્ટ દરમિયાન SIM, SAM અથવા microSD કાર્ડ ઉમેરો કે દૂર કરશો નહીં.
- ઉપકરણ સાથે જોડાયેલ કોઈપણ સહાયકને દૂર કરો.
- મેનુ દેખાય ત્યાં સુધી પાવર બટન દબાવો.
- બેટરી સ્વેપને ટચ કરો.
- ઑન-સ્ક્રીન સૂચનાઓને અનુસરો.
- LED બંધ થાય ત્યાં સુધી રાહ જુઓ.
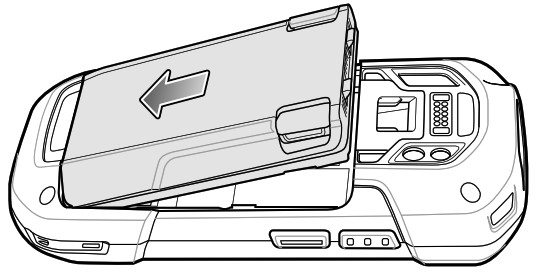
- જો હેન્ડ સ્ટ્રેપ જોડાયેલ હોય, તો હેન્ડ સ્ટ્રેપ ક્લિપને ઉપકરણની ટોચ તરફ સ્લાઇડ કરો અને પછી ઉપાડો.

- બે બેટરી લેચને દબાવો.

- ઉપકરણમાંથી બેટરી ઉપાડો.
 સાવધાન: બે મિનિટમાં બેટરી બદલો. બે મિનિટ પછી ઉપકરણ રીબૂટ થાય છે અને ડેટા ગુમ થઈ શકે છે.
 - ઉપકરણની પાછળના ભાગમાં બેટરીના કમ્પાર્ટમેન્ટમાં, પ્રથમ તળિયે, રિપ્લેસમેન્ટ બેટરી દાખલ કરો.
- જ્યાં સુધી બૅટરી રીલિઝ લૅચ સ્થાને ન આવે ત્યાં સુધી બૅટરી નીચે દબાવો.
- જો જરૂરી હોય તો, હાથનો પટ્ટો બદલો.
- ઉપકરણ ચાલુ કરવા માટે પાવર બટન દબાવો અને પકડી રાખો.
![]() નોંધ: બેટરી બદલ્યા પછી, બેટરી સ્વેપનો ફરીથી ઉપયોગ કરતા પહેલા 15 મિનિટ રાહ જુઓ.
નોંધ: બેટરી બદલ્યા પછી, બેટરી સ્વેપનો ફરીથી ઉપયોગ કરતા પહેલા 15 મિનિટ રાહ જુઓ.
SIM અથવા SAM કાર્ડને બદલવું
![]() નોંધ: સિમ રિપ્લેસમેન્ટ માત્ર TC77 પર લાગુ થાય છે.
નોંધ: સિમ રિપ્લેસમેન્ટ માત્ર TC77 પર લાગુ થાય છે.
- મેનુ દેખાય ત્યાં સુધી પાવર બટન દબાવો અને પકડી રાખો.
- ટચ પાવર બંધ.
- બરાબર ટચ કરો.
- જો હેન્ડ સ્ટ્રેપ જોડાયેલ હોય, તો હેન્ડ સ્ટ્રેપ ક્લિપને ઉપકરણની ટોચ તરફ સ્લાઇડ કરો અને પછી ઉપાડો.

- બે બેટરી લેચને દબાવો.
- ઉપકરણમાંથી બેટરી ઉપાડો.
- Doorક્સેસ દરવાજો ઉપાડો.

- ધારકમાંથી કાર્ડ દૂર કરો.
આકૃતિ 4 SAM કાર્ડ દૂર કરો
 આકૃતિ 5 નેનો સિમ કાર્ડ કાઢી નાખો

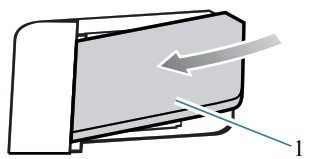
- રિપ્લેસમેન્ટ કાર્ડ દાખલ કરો.
આકૃતિ 6 SAM કાર્ડ દાખલ કરો
 1 મીની SAM સ્લોટ
આકૃતિ 7 નેનો સિમ કાર્ડ દાખલ કરો

- એક્સેસ બારણું બદલો.

- એક્સેસ ડોર નીચે દબાવો અને ખાતરી કરો કે તે યોગ્ય રીતે બેઠેલું છે.
સાવધાન: ઉપકરણની યોગ્ય સીલિંગની ખાતરી કરવા માટે ઍક્સેસ બારણું બદલવું અને સુરક્ષિત રીતે બેઠેલું હોવું આવશ્યક છે. - ઉપકરણની પાછળના ભાગમાં બેટરીના ડબ્બામાં પ્રથમ, નીચે, બેટરી દાખલ કરો.
- જ્યાં સુધી બૅટરી રીલિઝ લૅચ સ્થાને ન આવે ત્યાં સુધી બૅટરી નીચે દબાવો.
- જો જરૂરી હોય તો, હાથનો પટ્ટો બદલો.
- ઉપકરણ ચાલુ કરવા માટે પાવર બટન દબાવો અને પકડી રાખો.
માઇક્રોએસડી કાર્ડ બદલી રહ્યું છે
- મેનુ દેખાય ત્યાં સુધી પાવર બટન દબાવો.
- ટચ પાવર બંધ.
- બરાબર ટચ કરો.
- જો હેન્ડ સ્ટ્રેપ જોડાયેલ હોય, તો હેન્ડ સ્ટ્રેપ ક્લિપને ઉપકરણની ટોચ તરફ સ્લાઇડ કરો અને પછી ઉપાડો.

- બે બેટરી લેચને દબાવો.
- ઉપકરણમાંથી બેટરી ઉપાડો.
- જો ઉપકરણ પાસે સુરક્ષિત પ્રવેશ દરવાજો છે, તો 0ULR-3 સ્ક્રૂને દૂર કરવા માટે Microstix 0 સ્ક્રુડ્રાઈવરનો ઉપયોગ કરો.

- Doorક્સેસ દરવાજો ઉપાડો.

- માઇક્રોએસડી કાર્ડ ધારકને ઓપન પોઝિશન પર સ્લાઇડ કરો.
- માઇક્રોએસડી કાર્ડ ધારકને ઉપાડો.
- ધારકમાંથી માઇક્રોએસડી કાર્ડ દૂર કરો.
- કાર્ડ ધારકના દરવાજામાં બદલી માઇક્રોએસડી કાર્ડ દાખલ કરો જેથી કાર્ડ દરવાજાની દરેક બાજુએ હોલ્ડિંગ ટેબમાં સ્લાઇડ થાય.
- માઇક્રોએસડી કાર્ડ ધારકનો દરવાજો બંધ કરો અને દરવાજાને લૉકની સ્થિતિમાં સ્લાઇડ કરો.
- એક્સેસ બારણું બદલો.

- એક્સેસ ડોર નીચે દબાવો અને ખાતરી કરો કે તે યોગ્ય રીતે બેઠેલું છે.
સાવધાન: ઉપકરણની યોગ્ય સીલિંગની ખાતરી કરવા માટે ઍક્સેસ બારણું બદલવું અને સુરક્ષિત રીતે બેઠેલું હોવું આવશ્યક છે. - જો ઉપકરણ પાસે સુરક્ષિત પ્રવેશ દરવાજો છે, તો 0ULR-3 સ્ક્રુ ઇન્સ્ટોલ કરવા માટે Microstix 0 સ્ક્રુડ્રાઈવરનો ઉપયોગ કરો.

- ઉપકરણની પાછળના ભાગમાં બેટરીના ડબ્બામાં પ્રથમ, નીચે, બેટરી દાખલ કરો.
- જ્યાં સુધી બૅટરી રીલિઝ લૅચ સ્થાને ન આવે ત્યાં સુધી બૅટરી નીચે દબાવો.
- જો જરૂરી હોય તો, હાથનો પટ્ટો બદલો.
- ઉપકરણ ચાલુ કરવા માટે પાવર બટન દબાવો અને પકડી રાખો.
ઉપકરણનો ઉપયોગ કરીને
આ વિભાગ ઉપકરણનો ઉપયોગ કેવી રીતે કરવો તે સમજાવે છે.
હોમ સ્ક્રીન
હોમ સ્ક્રીન પ્રદર્શિત કરવા માટે ઉપકરણ ચાલુ કરો. તમારા સિસ્ટમ એડમિનિસ્ટ્રેટરે તમારા ઉપકરણને કેવી રીતે ગોઠવ્યું છે તેના આધારે, તમારી હોમ સ્ક્રીન આ વિભાગમાંના ગ્રાફિક્સ કરતાં અલગ રીતે દેખાઈ શકે છે.
સસ્પેન્ડ અથવા સ્ક્રીન સમય સમાપ્ત થયા પછી, હોમ સ્ક્રીન લોક સ્લાઇડર સાથે પ્રદર્શિત થાય છે. સ્ક્રીનને ટચ કરો અને અનલૉક કરવા માટે ઉપર સ્લાઇડ કરો. હોમ સ્ક્રીન વિજેટ્સ અને શૉર્ટકટ્સ મૂકવા માટે ચાર વધારાની સ્ક્રીન પ્રદાન કરે છે.
સ્ક્રીનને ડાબે અથવા જમણે સ્વાઇપ કરો view વધારાની સ્ક્રીનો.
નોંધ: ડિફૉલ્ટ રૂપે, AOSP ઉપકરણોમાં હોમ સ્ક્રીન પર GMS ઉપકરણોની જેમ સમાન ચિહ્નો હોતા નથી. ભૂતપૂર્વ માટે ચિહ્નો નીચે દર્શાવેલ છેampલે માત્ર.
હોમ સ્ક્રીન ચિહ્નો વપરાશકર્તા દ્વારા ગોઠવી શકાય છે અને બતાવ્યા કરતા અલગ દેખાઈ શકે છે.
![]()
| 1 | સ્ટેટસ બાર | સમય, સ્થિતિ ચિહ્નો (જમણી બાજુ) અને સૂચના ચિહ્નો (ડાબી બાજુ) દર્શાવે છે. |
| 2 | વિજેટ્સ | હોમ સ્ક્રીન પર ચાલતી સ્ટેન્ડ-અલોન એપ્સ લોન્ચ કરે છે. |
| 3 | શૉર્ટકટ આઇકન | ઉપકરણ પર ઇન્સ્ટોલ કરેલી એપ્લિકેશનો ખોલે છે. |
| 4 | ફોલ્ડર | એપ્સ સમાવે છે. |
હોમ સ્ક્રીન રોટેશન સેટ કરી રહ્યું છે
ડિફૉલ્ટ રૂપે, હોમ સ્ક્રીન રોટેશન અક્ષમ છે.
- જ્યાં સુધી વિકલ્પો દેખાય ત્યાં સુધી હોમ સ્ક્રીન પર ગમે ત્યાં ટચ કરો અને પકડી રાખો.
- હોમ સેટિંગ્સને ટચ કરો.
- હોમ સ્ક્રીન રોટેશન સ્વિચને મંજૂરી આપોને ટચ કરો.
- Touch Home.
- ઉપકરણને ફેરવો.
સ્ટેટસ બાર
સ્ટેટસ બાર સમય, સૂચના ચિહ્નો (ડાબી બાજુ) અને સ્થિતિ ચિહ્નો (જમણી બાજુ) દર્શાવે છે.
જો સ્ટેટસ બારમાં ફિટ થઈ શકે તે કરતાં વધુ સૂચનાઓ હોય, તો એક બિંદુ દર્શાવે છે જે દર્શાવે છે કે વધુ સૂચનાઓ અસ્તિત્વમાં છે. સૂચના પેનલ ખોલવા માટે સ્ટેટસ બારમાંથી નીચે સ્વાઇપ કરો અને view તમામ સૂચનાઓ અને સ્થિતિ.
આકૃતિ 8 સૂચનાઓ અને સ્થિતિ ચિહ્નો

સૂચના ચિહ્નો
સૂચના ચિહ્નો એપ્લિકેશન ઇવેન્ટ્સ અને સંદેશાઓ સૂચવે છે.
કોષ્ટક 3 સૂચના ચિહ્નો
| ચિહ્ન | વર્ણન |
| મુખ્ય બેટરી ઓછી છે. | |
| • | માટે વધુ સૂચનાઓ ઉપલબ્ધ છે viewing |
| ડેટા સમન્વયિત થઈ રહ્યો છે. | |
| આવનારી ઘટના સૂચવે છે. માત્ર AOSP ઉપકરણો. | |
| આવનારી ઘટના સૂચવે છે. માત્ર GMS ઉપકરણો. | |
| ઓપન Wi-Fi નેટવર્ક ઉપલબ્ધ છે. | |
| ઑડિયો ચાલી રહ્યો છે. | |
| સાઇન-ઇન અથવા સિંક સાથે સમસ્યા આવી છે. | |
| ઉપકરણ ડેટા અપલોડ કરી રહ્યું છે. | |
| એનિમેટેડ: ઉપકરણ ડેટા ડાઉનલોડ કરી રહ્યું છે. સ્થિર: ડાઉનલોડ પૂર્ણ થયું. | |
| ઉપકરણ વર્ચ્યુઅલ પ્રાઇવેટ નેટવર્ક (VPN) થી કનેક્ટ થયેલ અથવા ડિસ્કનેક્ટ થયેલ છે. | |
| ભૂલો માટે તેને ચકાસીને આંતરિક સ્ટોરેજ તૈયાર કરી રહ્યું છે. | |
| ઉપકરણ પર USB ડિબગીંગ સક્ષમ કરેલ છે. | |
| કૉલ ચાલુ છે (ફક્ત WWAN). | |
| મેઇલબોક્સમાં એક અથવા વધુ વૉઇસ સંદેશ (ફક્ત WWAN) છે. | |
| કૉલ હોલ્ડ પર છે (ફક્ત WWAN). | |
| કૉલ ચૂકી ગયો હતો (ફક્ત WWAN). | |
| બૂમ મોડ્યુલ સાથે વાયર્ડ હેડસેટ ઉપકરણ સાથે જોડાયેલ છે. | |
| બૂમ મોડ્યુલ વિના વાયર્ડ હેડસેટ ઉપકરણ સાથે જોડાયેલ છે. | |
| PTT એક્સપ્રેસ વૉઇસ ક્લાયંટ સ્થિતિ. વધુ માહિતી માટે PTT એક્સપ્રેસ વૉઇસ ક્લાયન્ટ જુઓ. | |
| સૂચવે છે કે RxLogger એપ ચાલી રહી છે. | |
| સૂચવે છે કે બ્લૂટૂથ સ્કેનર ઉપકરણ સાથે જોડાયેલ છે. | |
| સૂચવે છે કે રીંગ સ્કેનર ઉપકરણ સાથે HID મોડમાં જોડાયેલ છે. |
સ્થિતિ ચિહ્નો
સ્થિતિ ચિહ્નો ઉપકરણ માટે સિસ્ટમ માહિતી પ્રદર્શિત કરે છે.
સ્થિતિ ચિહ્નો
સ્થિતિ ચિહ્નો ઉપકરણ માટે સિસ્ટમ માહિતી પ્રદર્શિત કરે છે.
કોષ્ટક 4 સ્થિતિ ચિહ્નો
| ચિહ્ન | વર્ણન |
| એલાર્મ સક્રિય છે. | |
| મુખ્ય બેટરી સંપૂર્ણ ચાર્જ થયેલ છે. | |
| મુખ્ય બેટરી આંશિક રીતે ડ્રેઇન થયેલ છે. | |
| મુખ્ય બેટરી ચાર્જ ઓછો છે. | |
| મુખ્ય બેટરી ચાર્જ ખૂબ જ ઓછી છે. | |
| મુખ્ય બેટરી ચાર્જ થઈ રહી છે. | |
| મીડિયા અને અલાર્મ સિવાયના તમામ અવાજો મ્યૂટ છે. વાઇબ્રેટ મોડ સક્રિય છે. | |
| સૂચવે છે કે મીડિયા અને અલાર્મ સિવાયના તમામ અવાજો મ્યૂટ છે. | |
| ખલેલ પાડશો નહીં મોડ સક્રિય છે. | |
| એરપ્લેન મોડ સક્રિય છે. બધા રેડિયો બંધ છે. | |
| બ્લૂટૂથ ચાલુ છે. | |
| ઉપકરણ બ્લૂટૂથ ઉપકરણ સાથે જોડાયેલ છે. | |
| Wi-Fi નેટવર્કથી કનેક્ટ થયેલ છે. Wi-Fi સંસ્કરણ નંબર સૂચવે છે. | |
| Wi-Fi નેટવર્ક સાથે કનેક્ટેડ નથી અથવા Wi-Fi સિગ્નલ નથી. | |
| ઈથરનેટ નેટવર્કથી કનેક્ટેડ. | |
| સ્પીકરફોન સક્ષમ. | |
| પોર્ટેબલ Wi-Fi હોટસ્પોટ સક્રિય છે (ફક્ત WWAN). | |
| નેટવર્કથી રોમિંગ (ફક્ત WWAN). | |
| કોઈ સિમ કાર્ડ ઇન્સ્ટોલ કરેલ નથી (ફક્ત WWAN). | |
| 4G LTE/LTE-CA નેટવર્કથી કનેક્ટેડ (ફક્ત WWAN) | |
| DC-HSPA, HSDPA, HSPA+, HSUPA, LTE/LTE-CA અથવા WCMDMA નેટવર્ક સાથે જોડાયેલ છે (Nly WWAN) a | |
| 1x-RTT (સ્પ્રિન્ટ), EGDGE, EVDO, EVDV અથવા WCDMA નેટવર્ક (ફક્ત WWAN) સાથે કનેક્ટેડ | |
| GPRS નેટવર્ક સાથે જોડાયેલ છે (ફક્ત WWAN) a | |
| DC થી કનેક્ટેડ - HSPA, HSDPA, HSPA+ અથવા HSUPA નેટવર્ક (ફક્ત WWAN) | |
| EDGE નેટવર્ક સાથે જોડાયેલ છે (ફક્ત WWAN)a | |
| GPRS નેટવર્ક (માત્ર WWAN) સાથે જોડાયેલ છે a | |
| 1x-RTT (Verizon) નેટવર્ક (માત્ર WWAN) સાથે જોડાયેલ છે | |
| સેલ્યુલર નેટવર્ક આઇકન જે દેખાય છે તે કેરિયર/નેટવર્ક પર આધારિત છે. | |
સૂચનાઓનું સંચાલન
સૂચના ચિહ્નો નવા સંદેશાઓ, કૅલેન્ડર ઇવેન્ટ્સ, એલાર્મ્સ અને ચાલુ ઇવેન્ટ્સના આગમનની જાણ કરે છે. જ્યારે સૂચના આવે છે, ત્યારે સંક્ષિપ્ત વર્ણન સાથે સ્ટેટસ બારમાં એક ચિહ્ન દેખાય છે.
આકૃતિ 9 સૂચના પેનલ સૂચના પેનલ

- ઝડપી સેટિંગ્સ બાર.
• પ્રતિ view તમામ સૂચનાઓની સૂચિ, સ્ક્રીનની ટોચ પરથી સ્ટેટસ બારને નીચે ખેંચીને સૂચના પેનલ ખોલો.
• સૂચનાનો પ્રતિસાદ આપવા માટે, સૂચના પેનલ ખોલો અને પછી સૂચનાને સ્પર્શ કરો. સૂચના પેનલ બંધ થાય છે અને અનુરૂપ એપ્લિકેશન ખુલે છે.
• તાજેતરની અથવા વારંવાર ઉપયોગમાં લેવાતી સૂચનાઓનું સંચાલન કરવા માટે, સૂચના પેનલ ખોલો અને પછી સૂચનાઓનું સંચાલન કરો ટચ કરો. બધી સૂચનાઓ બંધ કરવા માટે એપ્લિકેશનની બાજુમાં ટૉગલ સ્વિચને ટચ કરો અથવા વધુ સૂચના વિકલ્પો માટે એપ્લિકેશનને ટચ કરો.
• બધી સૂચનાઓ સાફ કરવા માટે, સૂચના પેનલ ખોલો અને પછી બધાને સાફ કરો ટચ કરો. તમામ ઇવેન્ટ-આધારિત સૂચનાઓ દૂર કરવામાં આવી છે. ચાલુ સૂચનાઓ સૂચિમાં રહે છે.
• સૂચના પેનલને બંધ કરવા માટે, સૂચના પેનલને ઉપર સ્વાઇપ કરો.
ઝડપી ઍક્સેસ પેનલ ખોલી રહ્યું છે
વારંવાર ઉપયોગમાં લેવાતી સેટિંગ્સને ઍક્સેસ કરવા માટે ઝડપી ઍક્સેસ પેનલનો ઉપયોગ કરો (ઉદાample, એરપ્લેન મોડ).

![]() નોંધ: બધા ચિહ્નો ચિત્રિત નથી. ચિહ્નો અલગ અલગ હોઈ શકે છે.
નોંધ: બધા ચિહ્નો ચિત્રિત નથી. ચિહ્નો અલગ અલગ હોઈ શકે છે.
- જો ઉપકરણ લૉક કરેલ હોય, તો એકવાર નીચે સ્વાઇપ કરો.
- જો ઉપકરણ અનલૉક કરેલું હોય, તો બે આંગળી વડે એક વાર અથવા એક આંગળી વડે બે વાર નીચે સ્વાઇપ કરો.
- જો સૂચના પેનલ ખુલ્લી હોય, તો ઝડપી સેટિંગ્સ બારમાંથી નીચે સ્વાઇપ કરો.
ઝડપી ઍક્સેસ પેનલ ચિહ્નો
ક્વિક એક્સેસ પેનલના ચિહ્નો વારંવાર ઉપયોગમાં લેવાતી સેટિંગ્સ સૂચવે છે (ઉદાample, એરપ્લેન મોડ).
કોષ્ટક 5 ઝડપી ઍક્સેસ પેનલ ચિહ્નો
| ચિહ્ન | વર્ણન |
| ડિસ્પ્લે બ્રાઇટનેસ - સ્ક્રીનની બ્રાઇટનેસ ઘટાડવા અથવા વધારવા માટે સ્લાઇડરનો ઉપયોગ કરો. | |
| Wi-Fi નેટવર્ક - Wi-Fi ચાલુ અથવા બંધ કરો. Wi-Fi સેટિંગ્સ ખોલવા માટે, Wi-Fi નેટવર્ક નામને ટચ કરો. | |
| બ્લૂટૂથ સેટિંગ્સ - બ્લૂટૂથ ચાલુ અથવા બંધ કરો. બ્લૂટૂથ સેટિંગ્સ ખોલવા માટે, બ્લૂટૂથને ટચ કરો. | |
| બેટરી સેવર - બેટરી સેવર મોડ ચાલુ અથવા બંધ કરો. જ્યારે બૅટરી સેવર મોડ ચાલુ હોય ત્યારે બૅટરી પાવર (લાગુ પડતું નથી) જાળવવા માટે ઉપકરણનું પ્રદર્શન ઘટાડવામાં આવે છે. | |
| ઈન્વર્ટ કલર્સ - ડિસ્પ્લેના રંગોને ઈન્વર્ટ કરો. | |
| ખલેલ પાડશો નહીં - સૂચનાઓ કેવી રીતે અને ક્યારે પ્રાપ્ત કરવી તે નિયંત્રિત કરો. | |
| મોબાઇલ ડેટા - સેલ્યુલર રેડિયો ચાલુ અથવા બંધ કરે છે. મોબાઇલ ડેટા સેટિંગ્સ ખોલવા માટે, ટચ કરો અને પકડી રાખો (ફક્ત WWAN). | |
| એરપ્લેન મોડ - એરપ્લેન મોડ ચાલુ અથવા બંધ કરો. જ્યારે એરોપ્લેન મોડ ઉપકરણ પર હોય ત્યારે Wi-Fi અથવા Bluetooth સાથે કનેક્ટ થતું નથી. | |
| ઓટો-રોટેટ - ઉપકરણના ઓરિએન્ટેશનને પોટ્રેટ અથવા લેન્ડસ્કેપ મોડમાં લૉક કરો અથવા આપમેળે ફેરવવા માટે સેટ કરો. | |
| ફ્લેશલાઇટ - ફ્લેશલાઇટ ચાલુ અથવા બંધ કરો. કેમેરા ફ્લેશ ચાલુ અથવા બંધ કરો. આંતરિક સ્કેન એન્જિન વગરના કેમેરા-માત્ર ઉપકરણો પર, જ્યારે એપ્લિકેશન ખોલવામાં આવે ત્યારે ફ્લેશલાઇટ બંધ થાય છે. આ ખાતરી કરે છે કે કેમેરા સ્કેનિંગ માટે ઉપલબ્ધ છે. | |
| સ્થાન - લોકેશનિંગ સુવિધાને સક્ષમ અથવા અક્ષમ કરો. | |
| હોટસ્પોટ – ઉપકરણના મોબાઇલ ડેટા કનેક્શનને અન્ય ઉપકરણો સાથે શેર કરવા માટે ચાલુ કરો. | |
| ડેટા સેવર - કેટલીક એપ્લિકેશનોને પૃષ્ઠભૂમિમાં ડેટા મોકલવા અથવા પ્રાપ્ત કરવાથી રોકવા માટે ચાલુ કરો. | |
| નાઇટ લાઇટ - ઝાંખા પ્રકાશમાં સ્ક્રીનને જોવાનું સરળ બનાવવા માટે સ્ક્રીનને એમ્બર ટિન્ટ કરો. સૂર્યાસ્તથી સૂર્યોદય સુધી અથવા અન્ય સમયે આપમેળે ચાલુ કરવા માટે નાઇટ લાઇટ સેટ કરો. |
|
| સ્ક્રીન કાસ્ટ - Chromecast અથવા બિલ્ટ-ઇન Chromecast સાથે ટેલિવિઝન પર ફોન સામગ્રી શેર કરો. ઉપકરણોની સૂચિ પ્રદર્શિત કરવા માટે કાસ્ટ સ્ક્રીનને ટચ કરો, પછી કાસ્ટ કરવાનું શરૂ કરવા માટે ઉપકરણને ટચ કરો. | |
| ડાર્ક થીમ - ડાર્ક થીમ ચાલુ અને બંધ ટૉગલ કરે છે. ડાર્ક થીમ ન્યૂનતમ રંગ કોન્ટ્રાસ્ટ રેશિયોને પૂર્ણ કરતી વખતે સ્ક્રીન દ્વારા ઉત્સર્જિત લ્યુમિનન્સ ઘટાડે છે. તે આંખના તાણને ઘટાડીને, વર્તમાન લાઇટિંગ પરિસ્થિતિઓમાં તેજને સમાયોજિત કરીને અને બૅટરી પાવરને સાચવીને, શ્યામ વાતાવરણમાં સ્ક્રીનના ઉપયોગને સરળ બનાવીને વિઝ્યુઅલ અર્ગનોમિક્સ સુધારવામાં મદદ કરે છે. | |
| ફોકસ મોડ - વિચલિત કરતી એપ્લિકેશનોને થોભાવવા માટે ચાલુ કરો. ફોકસ મોડ સેટિંગ્સ ખોલવા માટે, ટચ કરો અને પકડી રાખો. | |
| બેડટાઇમ મોડ - ગ્રેસ્કેલ ચાલુ અને બંધ કરો. ગ્રેસ્કેલ સ્ક્રીનને બ્લેક એન્ડ વ્હાઇટ કરે છે, ફોનના વિક્ષેપોને ઘટાડે છે અને બેટરી લાઇફમાં સુધારો કરે છે. |
ઝડપી સેટિંગ્સ બાર પર ચિહ્નો સંપાદિત કરો
ક્વિક એક્સેસ પેનલમાંથી પ્રથમ કેટલીક સેટિંગ ટાઇલ્સ ક્વિક સેટિંગ બાર બની જાય છે.
ક્વિક એક્સેસ પેનલ ખોલો અને ટચ કરો ![]() સેટિંગ્સ ટાઇલ્સને સંપાદિત કરવા, ઉમેરવા અથવા દૂર કરવા માટે.
સેટિંગ્સ ટાઇલ્સને સંપાદિત કરવા, ઉમેરવા અથવા દૂર કરવા માટે.
બેટરી મેનેજમેન્ટ
તમારા ઉપકરણ માટે ભલામણ કરેલ બેટરી ઓપ્ટિમાઇઝેશન ટીપ્સનું અવલોકન કરો.
- બિન-ઉપયોગના ટૂંકા ગાળા પછી સ્ક્રીનને બંધ કરવા માટે સેટ કરો.
- સ્ક્રીનની બ્રાઇટનેસ ઓછી કરો.
- ઉપયોગમાં ન હોય ત્યારે તમામ વાયરલેસ રેડિયો બંધ કરો.
- ઈમેલ, કેલેન્ડર, સંપર્કો અને અન્ય એપ માટે સ્વચાલિત સમન્વયન બંધ કરો.
- એપ્સનો ઉપયોગ ઓછો કરો જે ઉપકરણને સસ્પેન્ડ થવાથી રાખે છે, ઉદાહરણ તરીકેample, સંગીત અને વિડિયો એપ્સ.
![]() નોંધ: બેટરી ચાર્જ લેવલ તપાસતા પહેલા, કોઈપણ AC પાવર સ્ત્રોત (પારણું અથવા કેબલ) માંથી ઉપકરણને દૂર કરો.
નોંધ: બેટરી ચાર્જ લેવલ તપાસતા પહેલા, કોઈપણ AC પાવર સ્ત્રોત (પારણું અથવા કેબલ) માંથી ઉપકરણને દૂર કરો.
બેટરી સ્ટેટસ તપાસી રહ્યું છે
- સેટિંગ્સ ખોલો અને ફોન વિશે > બેટરી માહિતીને ટચ કરો. અથવા, સ્ક્રીનની નીચેથી ઉપર સ્વાઇપ કરો અને બેટરી મેનેજર એપ્લિકેશન ખોલવા માટે ટચ કરો.
બૅટરી હાજર છે કે નહીં તે બૅટરીનું સ્ટેટસ સૂચવે છે.
બૅટરી લેવલ બૅટરી ચાર્જની સૂચિ આપે છે (એક ટકા તરીકેtagસંપૂર્ણ ચાર્જ થયેલ છે). - ઝડપી ઍક્સેસ પેનલ ખોલવા માટે સ્ટેટસ બારમાંથી બે આંગળીઓ વડે નીચે સ્વાઇપ કરો.
બેટરી ટકાtage બેટરી આઇકોનની બાજુમાં પ્રદર્શિત થાય છે.
મોનીટરીંગ બેટરી વપરાશ
બૅટરી સ્ક્રીન બૅટરી ચાર્જની વિગતો અને બૅટરીનું જીવન વધારવા માટે પાવર મેનેજમેન્ટ વિકલ્પો પ્રદાન કરે છે. વિવિધ એપ્લિકેશનો વિવિધ માહિતી પ્રદર્શિત કરે છે. કેટલીક એપ્લિકેશનોમાં પાવર વપરાશને સમાયોજિત કરવા માટે સેટિંગ્સ સાથે સ્ક્રીન ખોલતા બટનોનો સમાવેશ થાય છે.
- સેટિંગ્સ પર જાઓ.
- ટચ બેટરી.
ચોક્કસ એપ્લિકેશન માટે બેટરી માહિતી અને પાવર મેનેજમેન્ટ વિકલ્પો પ્રદર્શિત કરવા માટે:
- સેટિંગ્સ પર જાઓ.
- એપ્લિકેશન્સ અને સૂચનાઓને ટચ કરો.
- એપ્લિકેશનને ટચ કરો.
- એડવાન્સ > બેટરીને ટચ કરો.
વિવિધ એપ્લિકેશનો વિવિધ માહિતી પ્રદર્શિત કરે છે. કેટલીક એપ્લિકેશનોમાં પાવર વપરાશને સમાયોજિત કરવા માટે સેટિંગ્સ સાથે સ્ક્રીન ખોલતા બટનોનો સમાવેશ થાય છે. વધુ પડતી પાવરનો વપરાશ કરતી એપને બંધ કરવા માટે અક્ષમ કરો અથવા ફોર્સ સ્ટોપ બટનનો ઉપયોગ કરો.
ઓછી બેટરી સૂચના
જ્યારે બેટરી ચાર્જ લેવલ નીચે આપેલા કોષ્ટકમાં બદલાવના સ્તરથી નીચે આવે છે, ત્યારે ઉપકરણ ઉપકરણને પાવરથી કનેક્ટ કરવા માટે સૂચના પ્રદર્શિત કરે છે. ચાર્જિંગ એક્સેસરીઝમાંથી એકનો ઉપયોગ કરીને બેટરીને ચાર્જ કરો.
કોષ્ટક 6 ઓછી બેટરી સૂચના
| ચાર્જ લેવલ નીચે ટીપાં |
ક્રિયા |
| 18% | વપરાશકર્તાએ જલ્દી બેટરી ચાર્જ કરવી જોઈએ. |
| 10% | વપરાશકર્તાએ બેટરી ચાર્જ કરવી આવશ્યક છે. |
| 4% | ઉપકરણ બંધ થાય છે. વપરાશકર્તાએ બેટરી ચાર્જ કરવી આવશ્યક છે. |
ઇન્ટરેક્ટિવ સેન્સર ટેકનોલોજી
એડવાન લેવા માટેtagઆ સેન્સર્સમાંથી e, એપ્લિકેશન API આદેશોનો ઉપયોગ કરે છે. વધુ માહિતી માટે Google Android સેન્સર API નો સંદર્ભ લો. Zebra Android EMDK પર માહિતી માટે, અહીં જાઓ: techdocs.zebra.com. ઉપકરણમાં સેન્સર છે જે હલનચલન અને દિશાને મોનિટર કરે છે.
- ગાયરોસ્કોપ - ઉપકરણના પરિભ્રમણને શોધવા માટે કોણીય રોટેશનલ વેગને માપે છે.
- એક્સેલરોમીટર - ઉપકરણની દિશા શોધવા માટે ચળવળના રેખીય પ્રવેગકને માપે છે.
- ડિજિટલ હોકાયંત્ર - ડિજિટલ હોકાયંત્ર અથવા મેગ્નેટોમીટર પૃથ્વીના ચુંબકીય ક્ષેત્રના સંબંધમાં સરળ અભિગમ પ્રદાન કરે છે. પરિણામે, ઉપકરણ હંમેશા જાણે છે કે કયો માર્ગ ઉત્તર છે તેથી તે ઉપકરણના ભૌતિક અભિગમના આધારે ડિજિટલ નકશાને સ્વતઃ ફેરવી શકે છે.
- લાઇટ સેન્સર - આસપાસના પ્રકાશને શોધે છે અને સ્ક્રીનની તેજસ્વીતાને સમાયોજિત કરે છે.
- નિકટતા સેન્સર - શારીરિક સંપર્ક વિના નજીકના પદાર્થોની હાજરી શોધે છે. જ્યારે કોલ દરમિયાન ઉપકરણ તમારા ચહેરાની નજીક આવે ત્યારે સેન્સર શોધે છે અને સ્ક્રીનને બંધ કરે છે, અજાણતાં સ્ક્રીનને સ્પર્શતા અટકાવે છે.
ઉપકરણને જગાડવું
જ્યારે તમે પાવર બટન દબાવો છો અથવા નિષ્ક્રિયતાના સમયગાળા પછી ઉપકરણ સસ્પેન્ડ મોડમાં જાય છે (ડિસ્પ્લે સેટિંગ્સ વિંડોમાં સેટ કરો).
- ઉપકરણને સસ્પેન્ડ મોડમાંથી સક્રિય કરવા માટે, પાવર બટન દબાવો.
લૉક સ્ક્રીન પ્રદર્શિત થાય છે. - અનલૉક કરવા માટે સ્ક્રીનને ઉપર સ્વાઇપ કરો.
• જો પેટર્ન સ્ક્રીન અનલોક સુવિધા સક્ષમ હોય, તો લોક સ્ક્રીનને બદલે પેટર્ન સ્ક્રીન દેખાય છે.
• જો PIN અથવા પાસવર્ડ સ્ક્રીન અનલોક સુવિધા સક્ષમ હોય, તો સ્ક્રીનને અનલોક કર્યા પછી PIN અથવા પાસવર્ડ દાખલ કરો.
![]() નોંધ: જો તમે પાંચ વખત PIN, પાસવર્ડ અથવા પેટર્ન ખોટી રીતે દાખલ કરો છો, તો તમારે ફરીથી પ્રયાસ કરતા પહેલા 30 સેકન્ડ રાહ જોવી પડશે.
નોંધ: જો તમે પાંચ વખત PIN, પાસવર્ડ અથવા પેટર્ન ખોટી રીતે દાખલ કરો છો, તો તમારે ફરીથી પ્રયાસ કરતા પહેલા 30 સેકન્ડ રાહ જોવી પડશે.
જો તમે PIN, પાસવર્ડ અથવા પેટર્ન ભૂલી ગયા હોવ તો તમારા સિસ્ટમ એડમિનિસ્ટ્રેટરનો સંપર્ક કરો.
યુએસબી કોમ્યુનિકેશન
સ્થાનાંતરિત કરવા માટે ઉપકરણને હોસ્ટ કમ્પ્યુટર સાથે કનેક્ટ કરો fileઉપકરણ અને યજમાન કમ્પ્યુટર વચ્ચે s.
ઉપકરણને હોસ્ટ કમ્પ્યુટર સાથે કનેક્ટ કરતી વખતે, નુકસાન અથવા બગડવાનું ટાળવા માટે, USB ઉપકરણોને કનેક્ટ કરવા અને ડિસ્કનેક્ટ કરવા માટે હોસ્ટ કમ્પ્યુટરની સૂચનાઓને અનુસરો. files.
ટ્રાન્સફર કરી રહ્યા છીએ Files
ટ્રાન્સફરનો ઉપયોગ કરો files નકલ કરવા માટે fileઉપકરણ અને યજમાન કમ્પ્યુટર વચ્ચે s.
- USB સહાયકનો ઉપયોગ કરીને ઉપકરણને હોસ્ટ કમ્પ્યુટર સાથે કનેક્ટ કરો.
- ઉપકરણ પર, સૂચના પેનલને નીચે ખેંચો અને USB દ્વારા આ ઉપકરણને ચાર્જ કરવાનું ટચ કરો.
મૂળભૂત રીતે, કોઈ ડેટા ટ્રાન્સફર પસંદ કરેલ નથી. - સ્પર્શ File ટ્રાન્સફર.
 નોંધ: સેટિંગ બદલ્યા પછી File સ્થાનાંતરિત કરો, અને પછી USB કેબલને ડિસ્કનેક્ટ કરવાથી, સેટિંગ પાછું નો ડેટા ટ્રાન્સફર પર પાછું ફરે છે. જો USB કેબલ ફરીથી કનેક્ટ થયેલ હોય, તો પસંદ કરો File ફરીથી ટ્રાન્સફર કરો.
 - હોસ્ટ કમ્પ્યુટર પર, ખોલો File એક્સપ્લોરર.
- ઉપકરણને પોર્ટેબલ ઉપકરણ તરીકે શોધો.
- SD કાર્ડ અથવા આંતરિક સ્ટોરેજ ફોલ્ડર ખોલો.
- નકલ કરો files થી અને ઉપકરણમાંથી અથવા કાઢી નાખો files જરૂરી છે.
ફોટા ટ્રાન્સફર કરી રહ્યા છીએ
ઉપકરણમાંથી હોસ્ટ કમ્પ્યુટર પર ફોટાની નકલ કરવા માટે PTP નો ઉપયોગ કરો.
મર્યાદિત આંતરિક સ્ટોરેજને કારણે ફોટા સ્ટોર કરવા માટે ઉપકરણમાં માઇક્રોએસડી કાર્ડ ઇન્સ્ટોલ કરવાની ભલામણ કરવામાં આવે છે.
- USB સહાયકનો ઉપયોગ કરીને ઉપકરણને હોસ્ટ કમ્પ્યુટર સાથે કનેક્ટ કરો.
- ઉપકરણ પર, સૂચના પેનલને નીચે ખેંચો અને USB દ્વારા આ ઉપકરણને ચાર્જ કરવાનું ટચ કરો.
- PTP ને ટચ કરો.
- સ્થાનાંતરિત ફોટા PTP ને ટચ કરો.
- હોસ્ટ કમ્પ્યુટર પર, એ ખોલો file એક્સપ્લોરર એપ્લિકેશન.
- આંતરિક સંગ્રહ ફોલ્ડર ખોલો.
- SD કાર્ડ અથવા આંતરિક સ્ટોરેજ ફોલ્ડર ખોલો.
- જરૂર મુજબ ફોટા કોપી અથવા ડીલીટ કરો.
હોસ્ટ કમ્પ્યુટરથી ડિસ્કનેક્ટ થઈ રહ્યું છે
![]() સાવધાન: માહિતી ગુમાવવાનું ટાળવા માટે USB ઉપકરણોને યોગ્ય રીતે ડિસ્કનેક્ટ કરવા માટે હોસ્ટ કમ્પ્યુટરની સૂચનાઓને કાળજીપૂર્વક અનુસરો.
સાવધાન: માહિતી ગુમાવવાનું ટાળવા માટે USB ઉપકરણોને યોગ્ય રીતે ડિસ્કનેક્ટ કરવા માટે હોસ્ટ કમ્પ્યુટરની સૂચનાઓને કાળજીપૂર્વક અનુસરો.
![]() નોંધ: માઇક્રોએસડી કાર્ડને અનમાઉન્ટ કરવા માટે હોસ્ટ કમ્પ્યુટરની સૂચનાઓને કાળજીપૂર્વક અનુસરો અને માહિતી ગુમાવવાનું ટાળવા માટે USB ઉપકરણોને યોગ્ય રીતે ડિસ્કનેક્ટ કરો.
નોંધ: માઇક્રોએસડી કાર્ડને અનમાઉન્ટ કરવા માટે હોસ્ટ કમ્પ્યુટરની સૂચનાઓને કાળજીપૂર્વક અનુસરો અને માહિતી ગુમાવવાનું ટાળવા માટે USB ઉપકરણોને યોગ્ય રીતે ડિસ્કનેક્ટ કરો.
- હોસ્ટ કમ્પ્યુટર પર, ઉપકરણને અનમાઉન્ટ કરો.
- USB સહાયકમાંથી ઉપકરણને દૂર કરો.
સેટિંગ્સ
આ વિભાગ ઉપકરણ પરની સેટિંગ્સનું વર્ણન કરે છે.
ઍક્સેસ સેટિંગ્સ
ઉપકરણ પર સેટિંગને ઍક્સેસ કરવાની બહુવિધ રીતો છે.
- ક્વિક એક્સેસ પેનલ ખોલવા અને ટચ કરવા માટે હોમ સ્ક્રીનની ટોચ પરથી બે આંગળીઓ વડે નીચે સ્વાઇપ કરો
 .
. - ક્વિક એક્સેસ પેનલ ખોલવા અને ટચ કરવા માટે હોમ સ્ક્રીનની ટોચ પરથી નીચે બે વાર સ્વાઇપ કરો .
- APPS ખોલવા અને ટચ કરવા માટે હોમ સ્ક્રીનની નીચેથી ઉપર સ્વાઇપ કરો
 સેટિંગ્સ.
ડિસ્પ્લે સેટિંગ્સ
સ્ક્રીનની બ્રાઇટનેસ બદલવા, નાઇટ લાઇટ ચાલુ કરવા, બેકગ્રાઉન્ડ ઇમેજ બદલવા, સ્ક્રીન રોટેશન સક્ષમ કરવા, સ્લીપ ટાઇમ સેટ કરવા અને ફોન્ટનું કદ બદલવા માટે ડિસ્પ્લે સેટિંગ્સનો ઉપયોગ કરો.
સ્ક્રીનની બ્રાઇટનેસ મેન્યુઅલી સેટ કરવી
ટચસ્ક્રીનનો ઉપયોગ કરીને મેન્યુઅલી સ્ક્રીનની બ્રાઇટનેસ સેટ કરો.
- ક્વિક એક્સેસ પેનલ ખોલવા માટે સ્ટેટસ બારમાંથી બે આંગળીઓ વડે નીચે સ્વાઇપ કરો.
- સ્ક્રીનની તેજ સ્તરને સમાયોજિત કરવા માટે આયકનને સ્લાઇડ કરો.
 સ્ક્રીન બ્રાઇટનેસ આપમેળે સેટ કરી રહ્યું છે
બિલ્ટ-ઇન લાઇટ સેન્સરનો ઉપયોગ કરીને સ્ક્રીનની તેજને આપમેળે ગોઠવો.
- સેટિંગ્સ પર જાઓ.
- Touch Display.
- જો અક્ષમ હોય, તો તેજને આપમેળે સમાયોજિત કરવા માટે અનુકૂલનશીલ તેજને ટચ કરો.
ડિફૉલ્ટ રૂપે, અનુકૂલનશીલ તેજ સક્ષમ છે. અક્ષમ કરવા માટે સ્વિચને ટૉગલ કરો.
નાઇટ લાઇટ સેટ કરવી
નાઇટ લાઇટ સેટિંગ સ્ક્રીનને એમ્બર રંગ આપે છે, જે ઓછી પ્રકાશમાં સ્ક્રીનને જોવાનું સરળ બનાવે છે.
- સેટિંગ્સ પર જાઓ.
- Touch Display.
- નાઇટ લાઇટને ટચ કરો.
- શેડ્યૂલને ટચ કરો.
- શેડ્યૂલ મૂલ્યોમાંથી એક પસંદ કરો:
• કોઈ નહીં (ડિફૉલ્ટ)
• કસ્ટમ સમયે ચાલુ થાય છે
• સૂર્યાસ્તથી સૂર્યોદય સુધી ચાલુ થાય છે. - ડિફૉલ્ટ રૂપે, નાઇટ લાઇટ અક્ષમ છે. સક્ષમ કરવા માટે હમણાં ચાલુ કરો ટચ કરો.
- તીવ્રતા સ્લાઇડરનો ઉપયોગ કરીને ટિન્ટને સમાયોજિત કરો.
સેટિંગ સ્ક્રીન રોટેશન
ડિફૉલ્ટ રૂપે, સ્ક્રીન રોટેશન સક્ષમ છે.
- સેટિંગ્સ પર જાઓ.
- ડિસ્પ્લે > એડવાન્સ્ડને ટચ કરો.
- સ્વતઃ-રોટેટ સ્ક્રીનને ટચ કરો.
હોમ સ્ક્રીન રોટેશન સેટ કરવા માટે, પૃષ્ઠ 40 પર હોમ સ્ક્રીન રોટેશન સેટ કરવાનું જુઓ.
સેટિંગ સ્ક્રીન સમયસમાપ્તિ
સ્ક્રીન સ્લીપ ટાઇમ સેટ કરો.
- સેટિંગ્સ પર જાઓ.
- ડિસ્પ્લે > અદ્યતન > સ્ક્રીન સમયસમાપ્તિને ટચ કરો.
- ઊંઘના મૂલ્યોમાંથી એક પસંદ કરો:
• 15 સેકન્ડ
• 30 સેકન્ડ
• 1 મિનિટ (ડિફોલ્ટ)
• 2 મિનિટ
• 5 મિનિટ
• 10 મિનિટ
• 30 મિનિટ
સ્ક્રીન ડિસ્પ્લે લોકીંગ
જ્યારે સૂચનાઓ પ્રાપ્ત થાય છે ત્યારે લૉક સ્ક્રીન ડિસ્પ્લે સેટિંગ સ્ક્રીનને સક્રિય કરે છે.
- સેટિંગ્સ પર જાઓ.
- ડિસ્પ્લે > એડવાન્સ્ડને ટચ કરો.
- Touch Lock screen.
- ક્યારે બતાવવું વિભાગમાં, સ્વીચનો ઉપયોગ કરીને વિકલ્પને સક્ષમ અથવા અક્ષમ કરો.
ટચ કી લાઇટ સેટ કરી રહ્યું છે
સ્ક્રીનની નીચેની ચાર ટચ કી બેકલીટ છે. બેટરી પાવર બચાવવા માટે ટચ કી લાઇટને ગોઠવો.
- સેટિંગ્સ પર જાઓ.
- ડિસ્પ્લે > એડવાન્સ્ડને ટચ કરો.
- કી લાઇટને ટચ કરો.
- ટચ કી લાઇટ કેટલો સમય ચાલુ રહે તે પસંદ કરવા માટે વિકલ્પ પસંદ કરો:
• હંમેશા બંધ
• 6 સેકન્ડ (ડિફોલ્ટ)
• 10 સેકન્ડ
• 15 સેકન્ડ
• 30 સેકન્ડ
• 1 મિનિટે
• હંમેશા ચાલુ.
ફોન્ટનું કદ સેટ કરી રહ્યું છે
સિસ્ટમ એપ્લિકેશન્સમાં ફોન્ટનું કદ સેટ કરો.
- સેટિંગ્સ પર જાઓ.
- ડિસ્પ્લે > એડવાન્સ્ડને ટચ કરો.
- ફોન્ટ માપને ટચ કરો.
- ટચ કી લાઇટ કેટલો સમય ચાલુ રહે તે પસંદ કરવા માટે વિકલ્પ પસંદ કરો:
• નાનું
• મૂળભૂત
• મોટું
• સૌથી મોટું.
સૂચના LED બ્રાઇટનેસ લેવલ
- સેટિંગ્સ પર જાઓ.
- ડિસ્પ્લે > એડવાન્સ્ડને ટચ કરો.
- ટચ સૂચના LED બ્રાઇટનેસ સ્તર.
- તેજ મૂલ્ય સેટ કરવા માટે સ્લાઇડરનો ઉપયોગ કરો (ડિફોલ્ટ: 15).
ટચ પેનલ મોડ સેટ કરી રહ્યું છે
ઉપકરણ ડિસ્પ્લે આંગળી, વાહક-ટીપ સ્ટાઈલસ અથવા ગ્લોવ્ડ આંગળીનો ઉપયોગ કરીને સ્પર્શને શોધવામાં સક્ષમ છે.
![]() નોંધ:
નોંધ:
એક હાથમોજું તબીબી લેટેક્ષ, ચામડું, કપાસ અથવા ઊનનું બનેલું હોઈ શકે છે.
શ્રેષ્ઠ કામગીરી માટે ઝેબ્રા પ્રમાણિત સ્ટાઈલસનો ઉપયોગ કરો.
- સેટિંગ્સ પર જાઓ.
- ડિસ્પ્લે > એડવાન્સ્ડને ટચ કરો.
- TouchPanelUI ને ટચ કરો.
- પસંદ કરો:
• સ્ક્રીન પ્રોટેક્ટર વિના સ્ક્રીન પર આંગળી અથવા સ્ટાઈલસનો ઉપયોગ કરવા માટે સ્ટાઈલસ અને ફિંગર (સ્ક્રીન પ્રોટેક્ટર બંધ).
• સ્ક્રીન પ્રોટેક્ટર વગર સ્ક્રીન પર આંગળી અથવા ગ્લોવ્ડ આંગળીનો ઉપયોગ કરવા માટે ગ્લોવ અને ફિંગર (સ્ક્રીન પ્રોટેક્ટર બંધ).
• સ્ક્રીન પ્રોટેક્ટર સાથે સ્ક્રીન પર આંગળી અથવા સ્ટાઈલસનો ઉપયોગ કરવા માટે સ્ટાઈલસ અને ફિંગર (સ્ક્રીન પ્રોટેક્ટર ચાલુ).
• સ્ક્રીન પ્રોટેક્ટર સાથે સ્ક્રીન પર આંગળી અથવા ગ્લોવ્ડ આંગળીનો ઉપયોગ કરવા માટે ગ્લોવ અને ફિંગર (સ્ક્રીન પ્રોટેક્ટર ચાલુ).
• સ્ક્રીન પર આંગળીનો ઉપયોગ કરવા માટે માત્ર આંગળી.
તારીખ અને સમય સુયોજિત કરી રહ્યા છીએ
જ્યારે ઉપકરણ સેલ્યુલર નેટવર્ક સાથે જોડાયેલ હોય ત્યારે તારીખ અને સમય NITZ સર્વરનો ઉપયોગ કરીને આપમેળે સમન્વયિત થાય છે. જો વાયરલેસ LAN નેટવર્ક ટાઈમ પ્રોટોકોલ (NTP) ને સપોર્ટ કરતું નથી અથવા જ્યારે સેલ્યુલર નેટવર્ક સાથે જોડાયેલ ન હોય તો તમારે માત્ર સમય ઝોન સેટ કરવાની અથવા તારીખ અને સમય સેટ કરવાની જરૂર છે.
- સેટિંગ્સ પર જાઓ.
- ટચ સિસ્ટમ > તારીખ અને સમય.
- સ્વચાલિત તારીખ અને સમય સમન્વયનને અક્ષમ કરવા માટે નેટવર્ક દ્વારા પ્રદાન કરેલ સમયનો ઉપયોગ કરો ટચ કરો.
- સ્વચાલિત ટાઇમ ઝોન સિંક્રોનાઇઝેશનને અક્ષમ કરવા માટે નેટવર્ક દ્વારા પ્રદાન કરેલ સમય ઝોનનો ઉપયોગ કરો ટચ કરો.
- કૅલેન્ડરમાં તારીખ પસંદ કરવા માટે તારીખને ટચ કરો.
- બરાબર ટચ કરો.
- ટચ ટાઈમ.
a) લીલા વર્તુળને ટચ કરો, વર્તમાન કલાક સુધી ખેંચો અને પછી છોડો.
b) લીલા વર્તુળને ટચ કરો, વર્તમાન મિનિટ સુધી ખેંચો અને પછી છોડો.
c) AM અથવા PM ને ટચ કરો. - સૂચિમાંથી વર્તમાન સમય ઝોન પસંદ કરવા માટે ટાઈમ ઝોનને ટચ કરો.
- નેટવર્કમાંથી સિસ્ટમ સમયને સિંક્રનાઇઝ કરવા માટે અંતરાલ પસંદ કરવા માટે અપડેટ અંતરાલને ટચ કરો.
- TIME ફોર્મેટમાં, ક્યાં તો સ્થાનિક ડિફોલ્ટનો ઉપયોગ કરો અથવા 24-કલાક ફોર્મેટનો ઉપયોગ કરો પસંદ કરો.
- 24-કલાક ફોર્મેટનો ઉપયોગ કરો ટચ કરો.
સામાન્ય સાઉન્ડ સેટિંગ
ઓન-સ્ક્રીન વોલ્યુમ નિયંત્રણો પ્રદર્શિત કરવા માટે ઉપકરણ પરના વોલ્યુમ બટનોને દબાવો.
મીડિયા અને એલાર્મ વોલ્યુમોને ગોઠવવા માટે ધ્વનિ સેટિંગ્સનો ઉપયોગ કરો.
- સેટિંગ્સ પર જાઓ.
- ટચ સાઉન્ડ.
- અવાજ સેટ કરવા માટે વિકલ્પને ટચ કરો.
સાઉન્ડ વિકલ્પો
- મીડિયા વોલ્યુમ - સંગીત, રમતો અને મીડિયા વોલ્યુમને નિયંત્રિત કરે છે.
- કૉલ વૉલ્યૂમ - કૉલ દરમિયાન વૉલ્યૂમને નિયંત્રિત કરે છે.
- રિંગ અને સૂચના વોલ્યુમ - રિંગટોન અને સૂચના વોલ્યુમને નિયંત્રિત કરે છે.
- એલાર્મ વોલ્યુમ - એલાર્મ ઘડિયાળના વોલ્યુમને નિયંત્રિત કરે છે.
- કૉલ્સ માટે વાઇબ્રેટ કરો - ચાલુ અથવા બંધ કરો.
- ખલેલ પાડશો નહીં - કેટલાક અથવા બધા અવાજો અને સ્પંદનોને મ્યૂટ કરે છે.
- મીડિયા - ધ્વનિ વગાડતી વખતે ઝડપી સેટિંગ્સમાં મીડિયા પ્લેયર બતાવે છે, ઝડપી ઍક્સેસની મંજૂરી આપે છે.
- રિંગિંગને રોકવા માટે શૉર્ટકટ - જ્યારે કૉલ આવે ત્યારે ઉપકરણને વાઇબ્રેટ કરવા માટે સ્વીચ ચાલુ કરો (ડિફૉલ્ટ - અક્ષમ).
- ફોન રિંગટોન – જ્યારે ફોન વાગે ત્યારે વગાડવા માટે અવાજ પસંદ કરો.
- ડિફૉલ્ટ સૂચના અવાજ - બધી સિસ્ટમ સૂચનાઓ માટે ચલાવવા માટે અવાજ પસંદ કરો.
- ડિફૉલ્ટ એલાર્મ ધ્વનિ - એલાર્મ વગાડવા માટે અવાજ પસંદ કરો.
- અન્ય અવાજો અને સ્પંદનો
• ડાયલ પેડ ટોન - ડાયલ પેડ પર કી દબાવવા પર અવાજ વગાડો (ડિફોલ્ટ - અક્ષમ).
• સ્ક્રીન લોકીંગ સાઉન્ડ્સ – સ્ક્રીનને લોકીંગ અને અનલોક કરતી વખતે અવાજ વગાડો (ડિફોલ્ટ – સક્ષમ).
• ચાર્જિંગ સાઉન્ડ્સ અને વાઇબ્રેશન - અવાજ વગાડે છે અને જ્યારે ઉપકરણ પર પાવર લાગુ કરવામાં આવે ત્યારે વાઇબ્રેટ થાય છે (ડિફૉલ્ટ – સક્ષમ).
• ટચ સાઉન્ડ્સ – સ્ક્રીનની પસંદગી કરતી વખતે અવાજ વગાડો (ડિફોલ્ટ – સક્ષમ).
• ટચ વાઇબ્રેશન – સ્ક્રીનની પસંદગી કરતી વખતે ઉપકરણને વાઇબ્રેટ કરો (ડિફોલ્ટ – સક્ષમ).
ઝેબ્રા વોલ્યુમ નિયંત્રણો
ડિફોલ્ટ સાઉન્ડ સેટિંગ્સ ઉપરાંત, જ્યારે વોલ્યુમ બટનો દબાવવામાં આવે ત્યારે ઝેબ્રા વોલ્યુમ નિયંત્રણો પ્રદર્શિત થાય છે.
ઓડિયો વોલ્યુમ UI મેનેજર (AudioVolUIMgr) નો ઉપયોગ કરીને ઝેબ્રા વોલ્યુમ નિયંત્રણો ગોઠવવામાં આવે છે. સંચાલકો AudioVolUIMgr નો ઉપયોગ Audio Pro ઉમેરવા, કાઢી નાખવા અને બદલવા માટે કરી શકે છેfiles, ઓડિયો પ્રો પસંદ કરોfile ઉપકરણનો ઉપયોગ કરવા અને ડિફૉલ્ટ ઑડિઓ પ્રોમાં ફેરફાર કરવા માટેfile. AudioVolUIMgr નો ઉપયોગ કરીને ઝેબ્રા વોલ્યુમ કંટ્રોલ્સને કેવી રીતે ગોઠવવું તે અંગેની માહિતી માટે, આનો સંદર્ભ લો techdocs.zebra.com.
વેક-અપ સ્ત્રોતો સુયોજિત કરી રહ્યા છીએ
ડિફૉલ્ટ રૂપે, જ્યારે વપરાશકર્તા પાવર બટન દબાવશે ત્યારે ઉપકરણ સસ્પેન્ડ મોડમાંથી જાગે છે. જ્યારે વપરાશકર્તા ઉપકરણ હેન્ડલની ડાબી બાજુએ PTT અથવા સ્કેન બટનો દબાવશે ત્યારે ઉપકરણને જાગવા માટે ગોઠવી શકાય છે.
- સેટિંગ્સ પર જાઓ.
- વેક-અપ સ્ત્રોતોને ટચ કરો.
• GUN_TRIGGER – ટ્રિગર હેન્ડલ સહાયક પર પ્રોગ્રામેબલ બટન.
• LEFT_TRIGGER_2 – PTT બટન.
• RIGHT_TRIGGER_1 – જમણું સ્કેન બટન.
• સ્કેન - ડાબું સ્કેન બટન. - ચેકબોક્સને ટચ કરો. ચેકબોક્સમાં એક ચેક દેખાય છે.
એક બટન રીમેપિંગ
ઉપકરણ પરના બટનોને વિવિધ કાર્યો કરવા માટે અથવા ઇન્સ્ટોલ કરેલ એપ્લિકેશનોના શોર્ટકટ તરીકે પ્રોગ્રામ કરી શકાય છે.
મુખ્ય નામો અને વર્ણનોની સૂચિ માટે, આનો સંદર્ભ લો: techdocs.zebra.com.
![]() નોંધ: સ્કેન બટનને રીમેપ કરવાની ભલામણ કરવામાં આવતી નથી.
નોંધ: સ્કેન બટનને રીમેપ કરવાની ભલામણ કરવામાં આવતી નથી.
- સેટિંગ્સ પર જાઓ.
- કી પ્રોગ્રામરને ટચ કરો. પ્રોગ્રામેબલ બટનોની સૂચિ પ્રદર્શિત થાય છે.
- રીમેપ કરવા માટે બટન પસંદ કરો.
- શોર્ટકટ, કી અને બટનો અથવા ટ્રિગર ટેબ્સને ટચ કરો જે ઉપલબ્ધ કાર્યો, એપ્લિકેશનો અને ટ્રિગર્સની સૂચિ આપે છે.
- બટન પર મેપ કરવા માટે ફંક્શન અથવા એપ્લિકેશન શોર્ટકટને ટચ કરો.
 નોંધ: જો તમે એપ્લિકેશન શોર્ટકટ પસંદ કરો છો, તો e Key Programmer સ્ક્રીન પરના બટનની બાજુમાં એપ્લિકેશન આઇકોન દેખાય છે.
 - જો બેક, હોમ, સર્ચ અથવા મેનુ બટનને રિમેપ કરી રહ્યા હોય, તો સોફ્ટ રીસેટ કરો.
કીબોર્ડ
ઉપકરણ બહુવિધ કીબોર્ડ વિકલ્પો પ્રદાન કરે છે.
- એન્ડ્રોઇડ કીબોર્ડ – માત્ર AOSP ઉપકરણો
- Gboard – માત્ર GMS ઉપકરણો
- એન્ટરપ્રાઇઝ કીબોર્ડ - ઉપકરણ પર પૂર્વ-ઇન્સ્ટોલ કરેલ નથી. વધુ માહિતી માટે Zebra સપોર્ટનો સંપર્ક કરો.
![]() નોંધ: મૂળભૂત રીતે એન્ટરપ્રાઇઝ અને વર્ચ્યુઅલ કીબોર્ડ અક્ષમ છે. એન્ટરપ્રાઇઝ કીબોર્ડ Zebra સપોર્ટ સાઇટ પરથી ડાઉનલોડ કરવા માટે ઉપલબ્ધ છે.
નોંધ: મૂળભૂત રીતે એન્ટરપ્રાઇઝ અને વર્ચ્યુઅલ કીબોર્ડ અક્ષમ છે. એન્ટરપ્રાઇઝ કીબોર્ડ Zebra સપોર્ટ સાઇટ પરથી ડાઉનલોડ કરવા માટે ઉપલબ્ધ છે.
કીબોર્ડ રૂપરેખાંકન
આ વિભાગ ઉપકરણના કીબોર્ડને ગોઠવવાનું વર્ણન કરે છે.
કીબોર્ડ સક્ષમ કરી રહ્યા છીએ
- સેટિંગ્સ પર જાઓ.
- સિસ્ટમ > ભાષાઓ અને ઇનપુટ > વર્ચ્યુઅલ કીબોર્ડ > કીબોર્ડ મેનેજ કરોને ટચ કરો.
- સક્ષમ કરવા માટે કીબોર્ડને ટચ કરો.
કીબોર્ડ વચ્ચે સ્વિચિંગ
કીબોર્ડ વચ્ચે સ્વિચ કરવા માટે, વર્તમાન કીબોર્ડ પ્રદર્શિત કરવા માટે ટેક્સ્ટ બોક્સમાં ટચ કરો.
![]() નોંધ: ડિફૉલ્ટ રૂપે, Gboard ચાલુ છે. અન્ય તમામ વર્ચ્યુઅલ કીબોર્ડ અક્ષમ છે.
નોંધ: ડિફૉલ્ટ રૂપે, Gboard ચાલુ છે. અન્ય તમામ વર્ચ્યુઅલ કીબોર્ડ અક્ષમ છે.
- Gboard કીબોર્ડ પર, ટચ કરો અને પકડી રાખો
 (માત્ર GMS ઉપકરણો).
 - Android કીબોર્ડ પર, ટચ કરો અને પકડી રાખો (ફક્ત AOSP ઉપકરણો).
- એન્ટરપ્રાઇઝ કીબોર્ડ પર, ટચ કરો
 . માત્ર મોબિલિટી ડીએનએ એન્ટરપ્રાઇઝ લાયસન્સ સાથે ઉપલબ્ધ છે. ઉપકરણ પર પૂર્વ-ઇન્સ્ટોલ કરેલ નથી. વધુ માહિતી માટે Zebra સપોર્ટનો સંપર્ક કરો.
Android અને Gboard કીબોર્ડનો ઉપયોગ કરીને
ટેક્સ્ટ ફીલ્ડમાં ટેક્સ્ટ દાખલ કરવા માટે Android અથવા Gboard કીબોર્ડનો ઉપયોગ કરો.
- કીબોર્ડ સેટિંગ્સને ગોઠવવા માટે, ટચ કરો અને પકડી રાખો , (અલ્પવિરામ) અને પછી Android કીબોર્ડ સેટિંગ્સ પસંદ કરો.
ટેક્સ્ટ સંપાદિત કરો
દાખલ કરેલ ટેક્સ્ટને સંપાદિત કરો અને એપ્લિકેશનની અંદર અથવા સમગ્ર ટેક્સ્ટને કાપવા, કૉપિ કરવા અને પેસ્ટ કરવા માટે મેનૂ આદેશોનો ઉપયોગ કરો. કેટલીક એપ્લિકેશનો તેઓ પ્રદર્શિત કરે છે તે અમુક અથવા તમામ ટેક્સ્ટને સંપાદિત કરવાનું સમર્થન કરતી નથી; અન્ય લોકો ટેક્સ્ટ પસંદ કરવા માટે પોતાની રીતે ઓફર કરી શકે છે.
સંખ્યાઓ, ચિહ્નો અને વિશિષ્ટ અક્ષરો દાખલ કરો
- સંખ્યાઓ અને પ્રતીકો દાખલ કરો.
• મેનૂ દેખાય ત્યાં સુધી ટોચની પંક્તિ કીમાંથી એકને ટચ કરો અને પકડી રાખો પછી નંબર અથવા વિશિષ્ટ અક્ષર પસંદ કરો.
• એક મોટા અક્ષર માટે શિફ્ટ કીને એકવાર ટચ કરો. અપરકેસમાં લૉક કરવા માટે Shift કીને બે વાર ટચ કરો.
Capslock અનલૉક કરવા માટે Shift કીને ત્રીજી વખત ટચ કરો.
• નંબરો અને સિમ્બોલ કીબોર્ડ પર સ્વિચ કરવા માટે ?123 ને ટચ કરો.
• નંબરો અને સિમ્બોલ કીબોર્ડ પર =\< કીને ટચ કરો view વધારાના પ્રતીકો. - વિશિષ્ટ અક્ષરો દાખલ કરો.
• વધારાના પ્રતીકોનું મેનૂ ખોલવા માટે સંખ્યા અથવા પ્રતીક કીને ટચ કરો અને પકડી રાખો. કીનું મોટું સંસ્કરણ કીબોર્ડ પર સંક્ષિપ્તમાં પ્રદર્શિત થાય છે.
એન્ટરપ્રાઇઝ કીબોર્ડ
એન્ટરપ્રાઇઝ કીબોર્ડમાં બહુવિધ કીબોર્ડ પ્રકારો છે.
![]() નોંધ: માત્ર મોબિલિટી ડીએનએ એન્ટરપ્રાઇઝ લાયસન્સ સાથે ઉપલબ્ધ છે.
નોંધ: માત્ર મોબિલિટી ડીએનએ એન્ટરપ્રાઇઝ લાયસન્સ સાથે ઉપલબ્ધ છે.
- સંખ્યાત્મક
- આલ્ફા
- વિશિષ્ટ પાત્રો
- ડેટા કેપ્ચર.
સંખ્યાત્મક ટૅબ
આંકડાકીય કીબોર્ડ પર 123 લેબલ થયેલ છે. પ્રદર્શિત કીઓ ઉપયોગમાં લેવાતી એપ્લિકેશન પર બદલાય છે. માજી માટેample, સંપર્કોમાં એક તીર પ્રદર્શિત થાય છે, જો કે ઇમેઇલ એકાઉન્ટ સેટઅપમાં પૂર્ણ થાય છે.
આલ્ફા ટેબ
આલ્ફા કીબોર્ડ ભાષા કોડનો ઉપયોગ કરીને લેબલ થયેલ છે. અંગ્રેજી માટે, આલ્ફા કીબોર્ડને EN લેબલ થયેલ છે.
વધારાના અક્ષર ટેબ
વધારાના અક્ષરો કીબોર્ડ પર #*/ લેબલ થયેલ છે.
- સ્પર્શ
 ટેક્સ્ટ સંદેશમાં ઇમોજી ચિહ્નો દાખલ કરવા માટે.
 - પ્રતીકો કીબોર્ડ પર પાછા આવવા માટે ABC ને ટચ કરો.
સ્કેન ટેબ
સ્કેન ટેબ બારકોડ્સ સ્કેન કરવા માટે સરળ ડેટા કેપ્ચર સુવિધા પ્રદાન કરે છે.
ભાષાનો ઉપયોગ
ડિક્શનરીમાં ઉમેરેલા શબ્દો સહિત ઉપકરણની ભાષા બદલવા માટે ભાષા અને ઇનપુટ સેટિંગ્સનો ઉપયોગ કરો.
ભાષા સેટિંગ બદલવી
- સેટિંગ્સ પર જાઓ.
- સિસ્ટમ > ભાષાઓ અને ઇનપુટને ટચ કરો.
- ભાષાઓને ટચ કરો. ઉપલબ્ધ ભાષાઓની સૂચિ પ્રદર્શિત થાય છે.
- જો ઇચ્છિત ભાષા સૂચિબદ્ધ ન હોય, તો ભાષા ઉમેરો ટચ કરો અને સૂચિમાંથી એક ભાષા પસંદ કરો.
- ઇચ્છિત ભાષાની જમણી બાજુએ ટચ કરો અને પકડી રાખો, પછી તેને સૂચિની ટોચ પર ખેંચો.
- ઓપરેટિંગ સિસ્ટમ ટેક્સ્ટ પસંદ કરેલી ભાષામાં બદલાય છે.
શબ્દકોશમાં શબ્દો ઉમેરવા
- સેટિંગ્સ પર જાઓ.
- ટચ સિસ્ટમ > ભાષાઓ અને ઇનપુટ > એડવાન્સ > વ્યક્તિગત શબ્દકોશ.
- જો સંકેત આપવામાં આવે, તો તે ભાષા પસંદ કરો જ્યાં આ શબ્દ અથવા તબક્કો સંગ્રહિત છે.
- શબ્દકોશમાં નવો શબ્દ અથવા શબ્દસમૂહ ઉમેરવા માટે + ને ટચ કરો.
- શબ્દ અથવા શબ્દસમૂહ દાખલ કરો.
- શૉર્ટકટ ટેક્સ્ટ બૉક્સમાં, શબ્દ અથવા શબ્દસમૂહ માટે શૉર્ટકટ દાખલ કરો.
સૂચનાઓ
આ વિભાગ સેટિંગનું વર્ણન કરે છે, viewing, અને ઉપકરણ પર સૂચનાઓ નિયંત્રિત.
એપ્લિકેશન સૂચનાઓ સેટ કરી રહ્યું છે
ચોક્કસ એપ્લિકેશન માટે સૂચના સેટિંગ્સને ગોઠવો.
- સેટિંગ્સ પર જાઓ.
- એપ્લિકેશન્સ અને સૂચનાઓને ટચ કરો > બધી XX એપ્લિકેશન્સ જુઓ. એપ્લિકેશન માહિતી સ્ક્રીન દર્શાવે છે.
- એક એપ્લિકેશન પસંદ કરો.
- સૂચનાઓને ટચ કરો.
પસંદ કરેલ એપ્લિકેશનના આધારે વિકલ્પો બદલાય છે. - ઉપલબ્ધ વિકલ્પ પસંદ કરો:
સૂચનાઓ બતાવો - આ એપ્લિકેશનમાંથી તમામ સૂચનાઓ ચાલુ (ડિફોલ્ટ) અથવા બંધ કરવા માટે પસંદ કરો. વધારાના વિકલ્પો પ્રદર્શિત કરવા માટે સૂચના શ્રેણીને ટચ કરો.
• ચેતવણી - આ એપ્લિકેશનમાંથી સૂચનાઓને અવાજ બનાવવા અથવા ઉપકરણને વાઇબ્રેટ કરવાની મંજૂરી આપો.
• સ્ક્રીન પર પૉપ કરો - આ એપ્લિકેશનમાંથી સૂચનાઓને સ્ક્રીન પર પૉપ સૂચનાઓને મંજૂરી આપો.
• મૌન - આ એપ્લિકેશનમાંથી સૂચનાઓને અવાજ અથવા વાઇબ્રેટ કરવાની મંજૂરી આપશો નહીં.
• નાનું કરો - સૂચના પેનલમાં, સૂચનાઓને એક લાઇનમાં સંકુચિત કરો.
• અદ્યતન - વધારાના વિકલ્પો માટે ટચ કરો.
• ધ્વનિ - આ એપ્લિકેશનમાંથી સૂચનાઓ માટે વગાડવા માટે અવાજ પસંદ કરો.
• વાઇબ્રેટ - આ એપની સૂચનાઓને ઉપકરણને વાઇબ્રેટ કરવાની મંજૂરી આપો.
• બ્લિંક લાઇટ - આ એપ્લિકેશનમાંથી સૂચનાઓને સૂચના LED વાદળી પ્રકાશની મંજૂરી આપો.
• નોટિફિકેશન ડોટ બતાવો - આ એપના નોટિફિકેશનને એપ આઇકોન પર નોટિફિકેશન ડોટ ઉમેરવાની મંજૂરી આપો.
• ડુ નોટ ડિસ્ટર્બને ઓવરરાઇડ કરો - જ્યારે ડુ નોટ ડિસ્ટર્બ સક્ષમ હોય ત્યારે આ સૂચનાઓને વિક્ષેપિત થવા દો.
ઉન્નત
• નોટિફિકેશન ડોટને મંજૂરી આપો - આ એપને એપ આઇકોન પર નોટિફિકેશન ડોટ ઉમેરવાની મંજૂરી આપશો નહીં.
• એપ્લિકેશનમાં વધારાના સેટિંગ્સ - એપ્લિકેશન સેટિંગ્સ ખોલો.
Viewસૂચનાઓ
- સેટિંગ્સ પર જાઓ.
- એપ્લિકેશન્સ અને સૂચનાઓને ટચ કરો.
- ની સૂચનાઓ સુધી નીચે સ્ક્રોલ કરો view કેટલી એપ્સની સૂચનાઓ બંધ છે.
લૉક સ્ક્રીન સૂચનાઓનું નિયંત્રણ
જ્યારે ઉપકરણ લૉક હોય ત્યારે સૂચનાઓ જોઈ શકાય છે કે કેમ તે નિયંત્રિત કરો
- સેટિંગ્સ પર જાઓ.
- એપ્લિકેશન્સ અને સૂચનાઓ > સૂચનાઓને ટચ કરો.
- લૉકસ્ક્રીન પર સૂચનાઓને ટચ કરો અને નીચેનામાંથી એક પસંદ કરો:
• ચેતવણી અને સાયલન્ટ સૂચનાઓ બતાવો (ડિફૉલ્ટ)
• માત્ર ચેતવણી આપતી સૂચનાઓ જ બતાવો
• સૂચનાઓ બતાવશો નહીં.
બ્લિંક લાઇટને સક્ષમ કરી રહ્યું છે
જ્યારે કોઈ એપ, જેમ કે ઈમેલ અને VoIP, પ્રોગ્રામેબલ નોટિફિકેશન જનરેટ કરે છે અથવા જ્યારે ઉપકરણ બ્લૂટૂથ ડિવાઇસ સાથે કનેક્ટ થયેલ હોય ત્યારે તે સૂચવવા માટે નોટિફિકેશન LED લાઇટ વાદળી કરે છે. ડિફૉલ્ટ રૂપે, LED સૂચનાઓ સક્ષમ છે.
- સેટિંગ્સ પર જાઓ.
- એપ્લિકેશન્સ અને સૂચનાઓ > સૂચનાઓ > અદ્યતનને ટચ કરો.
- સૂચનાને ચાલુ અથવા બંધ કરવા માટે બ્લિંક લાઇટને ટચ કરો.
અરજીઓ
સ્ટાન્ડર્ડ પ્રી-ઇન્સ્ટોલ કરેલ એન્ડ્રોઇડ એપ્લીકેશન સિવાય, નીચેનું કોષ્ટક ઉપકરણ પર ઇન્સ્ટોલ કરેલ ઝેબ્રા-વિશિષ્ટ એપ્લિકેશનોની યાદી આપે છે.
ઇન્સ્ટોલ કરેલ એપ્લિકેશન્સ
સ્ટાન્ડર્ડ પ્રી-ઇન્સ્ટોલ કરેલ એન્ડ્રોઇડ એપ્લીકેશન સિવાય, નીચેનું કોષ્ટક ઉપકરણ પર ઇન્સ્ટોલ કરેલ ઝેબ્રા-વિશિષ્ટ એપ્લિકેશનોની યાદી આપે છે.
કોષ્ટક 7 એપ્લિકેશન્સ
| ચિહ્ન | વર્ણન |
| બેટરી મેનેજર - બેટરીની માહિતી દર્શાવે છે, જેમાં ચાર્જ લેવલ, સ્ટેટસ, હેલ્થ અને વેઅર લેવલનો સમાવેશ થાય છે. | |
| બ્લૂટૂથ પેરિંગ યુટિલિટી - બારકોડ સ્કેન કરીને ઉપકરણ સાથે ઝેબ્રા બ્લૂટૂથ સ્કેનરને જોડવા માટે ઉપયોગ કરો. | |
| કેમેરા - ફોટા લો અથવા વિડિયો રેકોર્ડ કરો. | |
| ડેટાવેજ - ઈમેજરનો ઉપયોગ કરીને ડેટા કેપ્ચરને સક્ષમ કરે છે. | |
| ડિસ્પ્લેલિંક પ્રસ્તુતકર્તા - કનેક્ટેડ મોનિટર પર ઉપકરણ સ્ક્રીનને પ્રસ્તુત કરવા માટે ઉપયોગ કરો. | |
| DWDemo - ઇમેજરની મદદથી ડેટા કેપ્ચર સુવિધાઓ દર્શાવવાની રીત પ્રદાન કરે છે. | |
| લાયસન્સ મેનેજર - ઉપકરણ પર સોફ્ટવેર લાઇસન્સનું સંચાલન કરવા માટે ઉપયોગ કરો. | |
| ફોન - જ્યારે કેટલાક વૉઇસ ઓવર IP (VoIP) ક્લાયન્ટ્સ (માત્ર VoIP ટેલિફોની તૈયાર) સાથે ઉપયોગમાં લેવાય ત્યારે ફોન નંબર ડાયલ કરવા માટે ઉપયોગ કરો. માત્ર WAN ઉપકરણો. | |
| RxLogger - ઉપકરણ અને એપ્લિકેશન સમસ્યાઓનું નિદાન કરવા માટે ઉપયોગ કરો. | |
| સેટિંગ્સ - ઉપકરણને ગોઠવવા માટે ઉપયોગ કરો. | |
| StageNow - ઉપકરણને s માટે પરવાનગી આપે છેtagસેટિંગ્સ, ફર્મવેર અને સોફ્ટવેરની જમાવટ શરૂ કરીને પ્રારંભિક ઉપયોગ માટે ea ઉપકરણ. | |
| VoD - ઉપકરણની મૂળભૂત એપ્લિકેશન પર વિડિઓ યોગ્ય ઉપકરણની સફાઈ માટે કેવી રીતે કરવી તે વિડિઓ પ્રદાન કરે છે. વિડીયો ઓન ડીવાઈસ લાઇસન્સીંગ માહિતી માટે, પર જાઓ learning.zebra.com. | |
| ચિંતા મુક્ત વાઇફાઇ વિશ્લેષક – એક ડાયગ્નોસ્ટિક બુદ્ધિશાળી એપ્લિકેશન. આસપાસના વિસ્તારનું નિદાન કરવા અને નેટવર્ક આંકડાઓ પ્રદર્શિત કરવા માટે ઉપયોગ કરો, જેમ કે કવરેજ હોલ ડિટેક્શન અથવા આસપાસના વિસ્તારમાં AP. એન્ડ્રોઇડ માટે ચિંતા મુક્ત Wi-Fi વિશ્લેષક એડમિનિસ્ટ્રેટર માર્ગદર્શિકાનો સંદર્ભ લો. | |
| ઝેબ્રા બ્લૂટૂથ સેટિંગ્સ - બ્લૂટૂથ લોગિંગને ગોઠવવા માટે ઉપયોગ કરો. | |
| ઝેબ્રા ડેટા સેવાઓ - ઝેબ્રા ડેટા સેવાઓને સક્ષમ અથવા અક્ષમ કરવા માટે ઉપયોગ કરો. કેટલાક વિકલ્પો સિસ્ટમ એડમિનિસ્ટ્રેટર દ્વારા સેટ કરવામાં આવ્યા છે. |
એપ્લિકેશન્સ ઍક્સેસ કરી રહ્યા છીએ
APPS વિંડોનો ઉપયોગ કરીને ઉપકરણ પર ઇન્સ્ટોલ કરેલી બધી એપ્લિકેશનોને ઍક્સેસ કરો.
- હોમ સ્ક્રીન પર, સ્ક્રીનની નીચેથી ઉપર સ્વાઇપ કરો.
- APPS વિન્ડોને ઉપર અથવા નીચે સ્લાઇડ કરો view વધુ એપ્લિકેશન ચિહ્નો.
- એપ્લિકેશન ખોલવા માટે આયકનને ટચ કરો.
તાજેતરની એપ્લિકેશનો વચ્ચે સ્વિચ કરવું
- તાજેતરના ટચ કરો.
સ્ક્રીન પર તાજેતરમાં ઉપયોગમાં લેવાતી એપ્સના ચિહ્નો સાથે વિન્ડો દેખાય છે. - પ્રદર્શિત એપ્લિકેશન્સને ઉપર અને નીચે સુધી સ્લાઇડ કરો view તાજેતરમાં ઉપયોગમાં લેવાતી તમામ એપ્લિકેશનો.
- સૂચિમાંથી એપ્લિકેશનને દૂર કરવા માટે ડાબે અથવા જમણે સ્વાઇપ કરો અને એપ્લિકેશનને બળપૂર્વક બંધ કરો.
- એપ્લિકેશન ખોલવા માટે આયકનને ટચ કરો અથવા વર્તમાન સ્ક્રીન પર પાછા ફરવા માટે પાછા ટચ કરો.
બેટરી મેનેજર
બેટરી મેનેજર બેટરી વિશે વિગતવાર માહિતી પ્રદાન કરે છે.
આ વિભાગ સપોર્ટેડ ઉપકરણો માટે બેટરી સ્વેપ પ્રક્રિયાઓ પણ પ્રદાન કરે છે.
બેટરી મેનેજર ખોલી રહ્યા છીએ
- બેટરી મેનેજર એપ્લિકેશન ખોલવા માટે, હોમ સ્ક્રીનની નીચેથી ઉપર સ્વાઇપ કરો અને પછી ટચ કરો
 .
.
બેટરી મેનેજર માહિતી ટેબ
બેટરી મેનેજર બેટરી ચાર્જિંગ, આરોગ્ય અને સ્થિતિ વિશે વિગતવાર માહિતી દર્શાવે છે.
કોષ્ટક 8 બેટરી ચિહ્નો
| બેટરી આઇકન | વર્ણન |
 |
બેટરી ચાર્જ લેવલ 85% અને 100% ની વચ્ચે છે. |
| બેટરી ચાર્જ લેવલ 19% અને 84% ની વચ્ચે છે. | |
| બેટરી ચાર્જ લેવલ 0% અને 18% ની વચ્ચે છે. |
- સ્તર - ટકાવારી તરીકે વર્તમાન બેટરી ચાર્જ સ્તરtagઇ. પ્રદર્શિત કરે છે -% જ્યારે સ્તર અજ્ઞાત હોય.
- પહેરો - ગ્રાફિકલ સ્વરૂપમાં બેટરીનું આરોગ્ય. જ્યારે વસ્ત્રોનું સ્તર 80% કરતાં વધી જાય છે, ત્યારે બારનો રંગ લાલ થઈ જાય છે.
- આરોગ્ય - બેટરીનું આરોગ્ય. જો કોઈ ગંભીર ભૂલ થાય, તો દેખાય છે. ને ટચ કરો view ભૂલનું વર્ણન.
• ડીકમિશન - બેટરી તેની ઉપયોગી આવરદા વીતી ગઈ છે અને તેને બદલવી જોઈએ. સિસ્ટમ એડમિનિસ્ટ્રેટર જુઓ.
• સારું – બેટરી સારી છે.
• ચાર્જ ભૂલ - ચાર્જ કરતી વખતે એક ભૂલ આવી. સિસ્ટમ એડમિનિસ્ટ્રેટર જુઓ.
• ઓવર કરંટ - એક ઓવર-કરંટ સ્થિતિ આવી. સિસ્ટમ એડમિનિસ્ટ્રેટર જુઓ.
• ડેડ - બેટરીમાં કોઈ ચાર્જ નથી. બેટરી બદલો.
• ઓવર વોલ્યુમtage - એક ઓવર-વોલ્યુમtage સ્થિતિ આવી. સિસ્ટમ એડમિનિસ્ટ્રેટર જુઓ.
• તાપમાન નીચે - બેટરીનું તાપમાન ઓપરેટિંગ તાપમાન કરતા ઓછું છે. સિસ્ટમ એડમિનિસ્ટ્રેટર જુઓ.
• નિષ્ફળતા મળી - બેટરીમાં નિષ્ફળતા મળી આવી છે. સિસ્ટમ એડમિનિસ્ટ્રેટર જુઓ.
• અજ્ઞાત - સિસ્ટમ એડમિનિસ્ટ્રેટર જુઓ. - ચાર્જ સ્થિતિ
• ચાર્જ થઈ રહ્યું નથી - ઉપકરણ AC પાવર સાથે જોડાયેલ નથી.
• ચાર્જિંગ-AC - ઉપકરણ એસી પાવર અને ચાર્જિંગ સાથે જોડાયેલ છે અથવા USB દ્વારા ઝડપી ચાર્જિંગ છે.
• ચાર્જિંગ-USB - ઉપકરણ હોસ્ટ કમ્પ્યુટર સાથે USB કેબલ અને ચાર્જિંગ સાથે જોડાયેલ છે.
• ડિસ્ચાર્જિંગ - બેટરી ડિસ્ચાર્જ થઈ રહી છે.
• પૂર્ણ - કે બેટરી સંપૂર્ણ ચાર્જ થઈ ગઈ છે.
• અજ્ઞાત - બેટરીની સ્થિતિ અજ્ઞાત છે. - પૂર્ણ થવા સુધીનો સમય - બેટરી સંપૂર્ણ ચાર્જ થાય ત્યાં સુધીનો સમય.
- ચાર્જ થયા પછીનો સમય - ઉપકરણ ચાર્જ થવાનું શરૂ થયું ત્યારથી જેટલો સમય.
- ખાલી થવા સુધીનો સમય - બેટરી ખાલી થાય ત્યાં સુધીનો સમય.
- અદ્યતન માહિતી - માટે ટચ કરો view વધારાની બેટરી માહિતી.
• બેટરી હાજર સ્થિતિ - સૂચવે છે કે બેટરી હાજર છે.
• બેટરી સ્કેલ - બેટરી સ્તર (100) નક્કી કરવા માટે વપરાયેલ બેટરી સ્કેલ લેવલ.
• બેટરી સ્તર - ટકાવારી તરીકે બેટરી ચાર્જ સ્તરtagસ્કેલનું e.
• બેટરી વોલ્યુમtage - વર્તમાન બેટરી વોલ્યુમtage મિલીવોલ્ટમાં.
• બેટરી તાપમાન - વર્તમાન બેટરી તાપમાન ડિગ્રી સેન્ટીગ્રેડમાં.
• બેટરી ટેકનોલોજી – બેટરીનો પ્રકાર.
• બેટરી કરંટ - mAh માં છેલ્લી સેકન્ડમાં બેટરીમાં અથવા બહારનો સરેરાશ પ્રવાહ.
• બેટરી ઉત્પાદન તારીખ – ઉત્પાદન તારીખ.
• બેટરી સીરીયલ નંબર – બેટરી સીરીયલ નંબર. નંબર બેટરી લેબલ પર છાપેલ સીરીયલ નંબર સાથે મેળ ખાય છે.
• બેટરી પાર્ટ નંબર – બેટરી પાર્ટ નંબર.
• બૅટરી ડિકમિશન સ્ટેટસ - સૂચવે છે કે શું બૅટરી તેની આવરદા પૂરી થઈ ગઈ છે.
• બૅટરી સારી - બૅટરીનું સ્વાસ્થ્ય સારું છે.
• ડીકમિશ્ડ બેટરી - બેટરી તેની ઉપયોગી આવરદા પૂરી થઈ ગઈ છે અને તેને બદલવી જોઈએ.
• બેઝ ક્યુમ્યુલેટિવ ચાર્જ - માત્ર ઝેબ્રા ચાર્જિંગ સાધનોનો ઉપયોગ કરીને સંચિત ચાર્જ.
• બેટરીની વર્તમાન ક્ષમતા - જો બેટરી સંપૂર્ણ ચાર્જ કરવામાં આવી હોય તો વર્તમાન ડિસ્ચાર્જ સ્થિતિમાં બેટરીમાંથી મહત્તમ ચાર્જ ખેંચી શકાય છે.
• બેટરી આરોગ્ય ટકાવારીtage – 0 થી 100 ની રેન્જ સાથે, આ "design_capacity" ના ડિસ્ચાર્જ દરે "present_capacity" થી "design_capacity" નો ગુણોત્તર છે.
• % ડિકમિશન થ્રેશોલ્ડ - ડિફોલ્ટ % ડિકમિશન થ્રેશોલ્ડ 80% તરીકે ભેટવાળી બેટરી માટે.
• બૅટરી હાજર ચાર્જ - વર્તમાન ડિસ્ચાર્જ શરતો હેઠળ બૅટરીનો ઉપયોગ કરી શકાય તેવો ચાર્જ બાકી છે.
• બેટરીનો કુલ સંચિત ચાર્જ – બધા ચાર્જરમાં કુલ સંચિત ચાર્જ.
• પ્રથમ ઉપયોગ પછી બેટરીનો સમય - પ્રથમ વખત ઝેબ્રા ટર્મિનલમાં બેટરી મૂકવામાં આવી ત્યારથી પસાર થયેલો સમય.
• બેટરીની ભૂલની સ્થિતિ – બેટરીની ભૂલની સ્થિતિ.
• એપ્લિકેશન સંસ્કરણ - એપ્લિકેશન સંસ્કરણ નંબર.
બેટરી મેનેજર સ્વેપ ટેબ
બેટરી બદલતી વખતે ઉપકરણને બેટરી સ્વેપ મોડમાં મૂકવા માટે ઉપયોગ કરો. સ્ક્રીન પરની સૂચનાઓને અનુસરો. બેટરી સ્વેપ બટન સાથે આગળ વધો ટચ કરો.
![]() નોંધ: જ્યારે વપરાશકર્તા પાવર બટન દબાવશે અને બેટરી સ્વેપ પસંદ કરે ત્યારે સ્વેપ ટેબ પણ દેખાય છે.
નોંધ: જ્યારે વપરાશકર્તા પાવર બટન દબાવશે અને બેટરી સ્વેપ પસંદ કરે ત્યારે સ્વેપ ટેબ પણ દેખાય છે.
કેમેરા
આ વિભાગ સંકલિત ડિજિટલ કેમેરાનો ઉપયોગ કરીને ફોટા લેવા અને વિડિયો રેકોર્ડ કરવા માટેની માહિતી પ્રદાન કરે છે.
![]() નોંધ: ઉપકરણ માઇક્રોએસડી કાર્ડ પર ફોટા અને વિડિયો સાચવે છે, જો ઇન્સ્ટોલ કરેલ હોય અને સ્ટોરેજ પાથ મેન્યુઅલી બદલાયેલ હોય. ડિફૉલ્ટ રૂપે, અથવા જો માઇક્રોએસડી કાર્ડ ઇન્સ્ટોલ કરેલ ન હોય, તો ઉપકરણ આંતરિક સ્ટોરેજ પર ફોટા અને વિડિયો સાચવે છે.
નોંધ: ઉપકરણ માઇક્રોએસડી કાર્ડ પર ફોટા અને વિડિયો સાચવે છે, જો ઇન્સ્ટોલ કરેલ હોય અને સ્ટોરેજ પાથ મેન્યુઅલી બદલાયેલ હોય. ડિફૉલ્ટ રૂપે, અથવા જો માઇક્રોએસડી કાર્ડ ઇન્સ્ટોલ કરેલ ન હોય, તો ઉપકરણ આંતરિક સ્ટોરેજ પર ફોટા અને વિડિયો સાચવે છે.
ફોટા લેવા
- હોમ સ્ક્રીનની નીચેથી ઉપર સ્વાઇપ કરો અને કૅમેરાને ટચ કરો.

1 દ્રશ્ય મોડ 2 ફિલ્ટર્સ 3 કેમેરા સ્વીચ 4 એચડીઆર 5 સેટિંગ્સ 6 કેમેરા મોડ 7 શટર બટન 8 ગેલેરી - જો જરૂરી હોય તો, કેમેરા મોડ આઇકનને ટચ કરો અને ટચ કરો
 .
. - પાછળના કેમેરા અને આગળના કેમેરા (જો ઉપલબ્ધ હોય તો) વચ્ચે સ્વિચ કરવા માટે, ટચ કરો
 .
. - સ્ક્રીન પર વિષયને ફ્રેમ કરો.
- ઝૂમ ઇન અથવા આઉટ કરવા માટે, ડિસ્પ્લે પર બે આંગળીઓ દબાવો અને તમારી આંગળીઓને ચપટી અથવા વિસ્તૃત કરો. ઝૂમ નિયંત્રણો સ્ક્રીન પર દેખાય છે.
- ફોકસ કરવા માટે સ્ક્રીન પરના વિસ્તારને ટચ કરો. ફોકસ સર્કલ દેખાય છે. જ્યારે ફોકસમાં હોય ત્યારે બે બાર લીલા થઈ જાય છે.
- સ્પર્શ
 .
.
પેનોરેમિક ફોટો લેવો
પેનોરમા મોડ સમગ્ર દ્રશ્યમાં ધીમે ધીમે પેન કરીને એક વિશાળ છબી બનાવે છે.
- હોમ સ્ક્રીનની નીચેથી ઉપર સ્વાઇપ કરો અને કૅમેરાને ટચ કરો.

- કૅમેરા મોડ આઇકનને ટચ કરો અને ટચ કરો
 .
. - કેપ્ચર કરવા માટે દ્રશ્યની એક બાજુ ફ્રેમ કરો.
- સ્પર્શ
 અને કેપ્ચર કરવા માટે ધીમે ધીમે સમગ્ર વિસ્તારને પેન કરો. બટનની અંદર એક નાનો સફેદ ચોરસ દેખાય છે જે દર્શાવે છે કે કેપ્ચર ચાલુ છે.
જો તમે ખૂબ ઝડપથી પૅન કરી રહ્યાં છો, તો ખૂબ ઝડપી સંદેશ દેખાય છે. - સ્પર્શ
 શોટ સમાપ્ત કરવા માટે. પેનોરમા તરત જ દેખાય છે અને જ્યારે તે છબીને સાચવે છે ત્યારે પ્રગતિ સૂચક પ્રદર્શિત થાય છે.
રેકોર્ડિંગ વિડિઓઝ
- હોમ સ્ક્રીનની નીચેથી ઉપર સ્વાઇપ કરો અને કૅમેરાને ટચ કરો.
- કેમેરા મોડ મેનૂને ટચ કરો અને ટચ કરો
 .
.
1 રંગ અસર 2 કેમેરા સ્વીચ 3 ઓડિયો 4 સેટિંગ્સ 5 કેમેરા મોડ 6 શટર બટન 7 ગેલેરી - પાછળના કેમેરા અને આગળના કેમેરા (જો ઉપલબ્ધ હોય તો) વચ્ચે સ્વિચ કરવા માટે, ટચ કરો
 .
. - કૅમેરાને નિર્દેશ કરો અને દ્રશ્યને ફ્રેમ કરો.
- ઝૂમ ઇન અથવા આઉટ કરવા માટે, ડિસ્પ્લે પર બે આંગળીઓ દબાવો અને આંગળીઓને ચપટી અથવા વિસ્તૃત કરો. ઝૂમ નિયંત્રણો સ્ક્રીન પર દેખાય છે.
- સ્પર્શ
 રેકોર્ડિંગ શરૂ કરવા માટે.
બાકી વિડિયો સમય સ્ક્રીનની ઉપર ડાબી બાજુએ દેખાય છે. - સ્પર્શ રેકોર્ડિંગ સમાપ્ત કરવા માટે.
વિડિયો ક્ષણભરમાં નીચેના ડાબા ખૂણામાં થંબનેલ તરીકે પ્રદર્શિત થાય છે.
ફોટો સેટિંગ્સ
ફોટો મોડમાં, ફોટો સેટિંગ્સ સ્ક્રીન પર દેખાય છે.
ફોટો સેટિંગ્સ વિકલ્પો પ્રદર્શિત કરવા માટે ટચ કરો.
રીઅર કેમેરા ફોટો સેટિંગ્સ
- ફ્લેશ – ફ્લેશ જરૂરી છે કે કેમ તે નક્કી કરવા માટે કેમેરો તેના લાઇટ મીટર પર આધાર રાખે છે કે કેમ તે પસંદ કરો અથવા બધા શોટ માટે તેને ચાલુ કે બંધ કરો.
ચિહ્ન વર્ણન 
બંધ - ફ્લેશ અક્ષમ કરો. 
સ્વતઃ - લાઇટ મીટર (ડિફૉલ્ટ) ના આધારે આપમેળે ફ્લેશને સમાયોજિત કરો. 
ચાલુ - ફોટો લેવા પર ફ્લેશ સક્ષમ કરો. - PS સ્થાન - ફોટો મેટા-ડેટામાં GPS સ્થાન માહિતી ઉમેરો. ચાલુ અથવા બંધ કરો (ડિફૉલ્ટ). (ફક્ત WAN).
- ચિત્રનું કદ – ફોટોનું કદ (પિક્સેલમાં) આમાં: 13M પિક્સેલ્સ (ડિફૉલ્ટ), 8M પિક્સેલ્સ, 5M પિક્સેલ્સ, 3M પિક્સેલ્સ, HD 1080, 2M પિક્સેલ્સ, HD720, 1M પિક્સેલ્સ, WVGA, VGA અથવા QVGA.
- ચિત્રની ગુણવત્તા - ચિત્ર ગુણવત્તા સેટિંગને આના પર સેટ કરો: નીચું, માનક (ડિફોલ્ટ) અથવા ઉચ્ચ.
- કાઉન્ટડાઉન ટાઈમર - બંધ પસંદ કરો (ડિફૉલ્ટ), 2 સેકન્ડ, 5 સેકન્ડ અથવા 10 સેકન્ડ.
- સ્ટોરેજ - ફોટો સ્ટોર કરવા માટે સ્થાન સેટ કરો: ફોન અથવા SD કાર્ડ.
- સતત શૉટ - કૅપ્ચર બટનને પકડી રાખીને ફોટાઓની શ્રેણી ઝડપથી લેવા માટે પસંદ કરો. બંધ (મૂળભૂત) અથવા ચાલુ.
- ફેસ ડિટેક્શન - ચહેરા માટે ફોકસને આપમેળે એડજસ્ટ કરવા માટે કેમેરા સેટ કરો.
- ISO – કેમેરાની સંવેદનશીલતાને આના પર સેટ કરો: ઑટો (ડિફૉલ્ટ), ISO ઑટો (HJR), ISO100, ISO200, ISO400, ISO800 અથવા ISO1600.
- એક્સપોઝર - એક્સપોઝર સેટિંગ્સને આના પર સેટ કરો: +2, +1, 0(ડિફોલ્ટ), -1 અથવા -2.
- સફેદ સંતુલન - સૌથી વધુ કુદરતી દેખાતા રંગો મેળવવા માટે કૅમેરા વિવિધ પ્રકારના પ્રકાશમાં રંગોને કેવી રીતે સમાયોજિત કરે છે તે પસંદ કરો.
ચિહ્ન વર્ણન 
અગ્નિથી પ્રકાશિત - અગ્નિથી પ્રકાશિત પ્રકાશ માટે સફેદ સંતુલન સમાયોજિત કરો. 
ફ્લોરોસન્ટ - ફ્લોરોસન્ટ લાઇટિંગ માટે સફેદ સંતુલન સમાયોજિત કરો. 
સ્વતઃ - વ્હાઇટ બેલેન્સને આપમેળે એડજસ્ટ કરો (ડિફોલ્ટ). 
ડેલાઇટ - ડેલાઇટ માટે વ્હાઇટ બેલેન્સ એડજસ્ટ કરો. 
વાદળછાયું - વાદળછાયું વાતાવરણ માટે સફેદ સંતુલન સમાયોજિત કરો. - રેડાઈ રિડક્શન - રેડાઈ ઈફેક્ટને દૂર કરવામાં મદદ કરે છે. વિકલ્પો: અક્ષમ (ડિફૉલ્ટ), અથવા સક્ષમ કરો.
- ZSL – જ્યારે બટન દબાવવામાં આવે ત્યારે તરત જ ચિત્ર લેવા માટે કેમેરાને સેટ કરો (ડિફોલ્ટ – સક્ષમ).
- શટર સાઉન્ડ – ફોટો લેતી વખતે શટર સાઉન્ડ વગાડવા માટે પસંદ કરો. વિકલ્પો: અક્ષમ કરો (ડિફૉલ્ટ) અથવા સક્ષમ કરો.
- એન્ટિ-બેન્ડિંગ - કેમેરાને કૃત્રિમ પ્રકાશ સ્રોતોને કારણે થતી સમસ્યાઓને ટાળવા દે છે જે સતત નથી. આ સ્ત્રોતોનું ચક્ર (ફ્લિકર) માનવ આંખ પર ધ્યાન ન જાય તેટલું ઝડપથી ચાલે છે, સતત દેખાય છે. કેમેરાની આંખ (તેના સેન્સર) હજુ પણ આ ફ્લિકર જોઈ શકે છે. વિકલ્પો: ઑટો (ડિફૉલ્ટ), 60 હર્ટ્ઝ, 50 હર્ટ્ઝ અથવા બંધ.
ફ્રન્ટ કેમેરા ફોટો સેટિંગ્સ
- સેલ્ફી ફ્લેશ - ઝાંખા સેટિંગ્સમાં થોડો વધારાનો પ્રકાશ ઉત્પન્ન કરવામાં મદદ કરવા માટે સ્ક્રીનને સફેદ કરે છે. વિકલ્પો: બંધ (ડિફૉલ્ટ), અથવા ચાલુ.
- GPS સ્થાન - ફોટો મેટા-ડેટામાં GPS સ્થાન માહિતી ઉમેરો. વિકલ્પો: ચાલુ અથવા બંધ (ડિફૉલ્ટ). (ફક્ત WAN).
- ચિત્રનું કદ - ફોટોનું કદ (પિક્સેલ્સમાં) આના પર સેટ કરો: 5M પિક્સેલ્સ (ડિફૉલ્ટ), 3M પિક્સેલ્સ, HD1080, 2M પિક્સેલ્સ, HD720, 1M પિક્સેલ્સ, WVGA, VGA અથવા QVGA.
- ચિત્રની ગુણવત્તા - ચિત્ર ગુણવત્તા સેટિંગને આના પર સેટ કરો: નીચા, પ્રમાણભૂત અથવા ઉચ્ચ (ડિફૉલ્ટ).
- કાઉન્ટડાઉન ટાઈમર - આના પર સેટ કરો: બંધ (ડિફૉલ્ટ), 2 સેકન્ડ, 5 સેકન્ડ અથવા 10 સેકન્ડ.
- સ્ટોરેજ - ફોટો સ્ટોર કરવા માટે સ્થાન સેટ કરો: ફોન અથવા SD કાર્ડ.
- સતત શૉટ - કૅપ્ચર બટનને પકડી રાખીને ફોટાઓની શ્રેણી ઝડપથી લેવા માટે પસંદ કરો. બંધ (મૂળભૂત) અથવા ચાલુ.
- ફેસ ડિટેક્શન - ફેસ ડિટેક્શન બંધ (ડિફોલ્ટ) અથવા ચાલુ કરવા માટે પસંદ કરો.
- ISO – કેમેરા પ્રકાશ માટે કેટલો સંવેદનશીલ છે તે સેટ કરો. વિકલ્પો: ઑટો (ડિફૉલ્ટ), ISO ઑટો (HJR), ISO100, ISO200, ISO400, ISO800 અથવા ISO1600.
- એક્સપોઝર - એક્સપોઝર સેટિંગ્સને સમાયોજિત કરવા માટે ટચ કરો. વિકલ્પો: +2, +1, 0 (ડિફોલ્ટ), -1 અથવા -2.
- સફેદ સંતુલન - સૌથી વધુ કુદરતી દેખાતા રંગો મેળવવા માટે કૅમેરા વિવિધ પ્રકારના પ્રકાશમાં રંગોને કેવી રીતે સમાયોજિત કરે છે તે પસંદ કરો.
| ચિહ્ન | વર્ણન |
| અગ્નિથી પ્રકાશિત - અગ્નિથી પ્રકાશિત પ્રકાશ માટે સફેદ સંતુલન સમાયોજિત કરો. | |
|
ફ્લોરોસન્ટ - ફ્લોરોસન્ટ લાઇટિંગ માટે સફેદ સંતુલન સમાયોજિત કરો. |
| સ્વતઃ - વ્હાઇટ બેલેન્સને આપમેળે એડજસ્ટ કરો (ડિફોલ્ટ). | |
|
ડેલાઇટ - ડેલાઇટ માટે વ્હાઇટ બેલેન્સ એડજસ્ટ કરો. |
|
વાદળછાયું - વાદળછાયું વાતાવરણ માટે સફેદ સંતુલન સમાયોજિત કરો. |
- રેડાઈ રિડક્શન - રેડાઈ ઈફેક્ટને દૂર કરવામાં મદદ કરે છે. વિકલ્પો: અક્ષમ (ડિફૉલ્ટ), અથવા સક્ષમ કરો.
- ZSL - જ્યારે બટન દબાવવામાં આવે ત્યારે તરત જ ચિત્ર લેવા માટે કેમેરાને સેટ કરો (ડિફોલ્ટ - સક્ષમ)
- સેલ્ફી મિરર - ફોટોની મિરર ઇમેજ સાચવવા માટે પસંદ કરો. વિકલ્પો: અક્ષમ કરો (ડિફૉલ્ટ), અથવા સક્ષમ કરો.
- શટર સાઉન્ડ – ફોટો લેતી વખતે શટર સાઉન્ડ વગાડવા માટે પસંદ કરો. વિકલ્પો: અક્ષમ કરો (ડિફૉલ્ટ) અથવા સક્ષમ કરો.
- એન્ટિ-બેન્ડિંગ - કેમેરાને કૃત્રિમ પ્રકાશ સ્રોતોને કારણે થતી સમસ્યાઓને ટાળવા દે છે જે સતત નથી. આ સ્ત્રોતોનું ચક્ર (ફ્લિકર) માનવ આંખ પર ધ્યાન ન જાય તેટલું ઝડપથી ચાલે છે, સતત દેખાય છે. કેમેરાની આંખ (તેના સેન્સર) હજુ પણ આ ફ્લિકર જોઈ શકે છે. વિકલ્પો: ઑટો (ડિફૉલ્ટ), 60 હર્ટ્ઝ, 50 હર્ટ્ઝ અથવા બંધ.
વિડિઓ સેટિંગ્સ
વિડિઓ મોડમાં, વિડિઓ સેટિંગ્સ સ્ક્રીન પર દેખાય છે. વિડિઓ સેટિંગ્સ વિકલ્પો પ્રદર્શિત કરવા માટે ટચ કરો.
રીઅર કેમેરા વિડિયો સેટિંગ્સ
- ફ્લેશ – ફ્લેશ જરૂરી છે કે કેમ તે નક્કી કરવા માટે, અથવા બધા શોટ માટે તેને ચાલુ કે બંધ કરવા માટે રીઅર-ફેસિંગ કેમેરા તેના લાઇટ મીટર પર આધાર રાખે છે કે કેમ તે પસંદ કરો.
ચિહ્ન વર્ણન બંધ - ફ્લેશ અક્ષમ કરો. ચાલુ - ફોટો લેવા પર ફ્લેશ સક્ષમ કરો. - વિડિયો ગુણવત્તા - વિડિયો ગુણવત્તાને આના પર સેટ કરો: 4k DCI, 4k UHD, HD 1080p (ડિફૉલ્ટ), HD 720p, SD 480p, VGA, CIF અથવા QVGA.
- વિડિઓ અવધિ - આના પર સેટ કરો: 30 સેકન્ડ (MMS), 10 મિનિટ, અથવા 30 મિનિટ (ડિફોલ્ટ), અથવા કોઈ મર્યાદા નથી.
- GPS સ્થાન - ફોટો મેટા-ડેટામાં GPS સ્થાન માહિતી ઉમેરો. ચાલુ અથવા બંધ કરો (ડિફૉલ્ટ). (ફક્ત WAN).
- સ્ટોરેજ - ફોટો સ્ટોર કરવા માટે સ્થાન સેટ કરો: ફોન (ડિફોલ્ટ) અથવા SD કાર્ડ.
- સફેદ સંતુલન- સૌથી વધુ કુદરતી દેખાતા રંગો મેળવવા માટે કૅમેરા વિવિધ પ્રકારના પ્રકાશમાં રંગોને કેવી રીતે સમાયોજિત કરે છે તે પસંદ કરો.
- છબી સ્થિરીકરણ - ઉપકરણની હિલચાલને કારણે અસ્પષ્ટ વિડિઓઝ ઘટાડવા માટે સેટ કરો. વિકલ્પો: ચાલુ અથવા બંધ (ડિફૉલ્ટ).
| ચિહ્ન | વર્ણન |
| અગ્નિથી પ્રકાશિત - અગ્નિથી પ્રકાશિત પ્રકાશ માટે સફેદ સંતુલન સમાયોજિત કરો. | |
|
ફ્લોરોસન્ટ - ફ્લોરોસન્ટ લાઇટિંગ માટે સફેદ સંતુલન સમાયોજિત કરો. |
| સ્વતઃ - વ્હાઇટ બેલેન્સને આપમેળે એડજસ્ટ કરો (ડિફોલ્ટ). | |
|
ડેલાઇટ - ડેલાઇટ માટે વ્હાઇટ બેલેન્સ એડજસ્ટ કરો. |
|
વાદળછાયું - વાદળછાયું વાતાવરણ માટે સફેદ સંતુલન સમાયોજિત કરો. |
ફ્રન્ટ કેમેરા વિડિઓ સેટિંગ્સ
- વિડિયો ગુણવત્તા - વિડિયો ગુણવત્તાને આના પર સેટ કરો: 4k DCI, 4k UHD, HD 1080p (ડિફૉલ્ટ), HD 720p, SD 480p, VGA, CIF અથવા QVGA.
- વિડિઓ અવધિ - આના પર સેટ કરો: 30 સેકન્ડ (MMS), 10 મિનિટ, અથવા 30 મિનિટ (ડિફોલ્ટ), અથવા કોઈ મર્યાદા નથી.
- GPS સ્થાન - ફોટો મેટા-ડેટામાં GPS સ્થાન માહિતી ઉમેરો. ચાલુ અથવા બંધ કરો (ડિફૉલ્ટ). (ફક્ત WAN).
- સ્ટોરેજ - ફોટો સ્ટોર કરવા માટે સ્થાન સેટ કરો: ફોન (ડિફોલ્ટ) અથવા SD કાર્ડ.
- સફેદ સંતુલન- સૌથી વધુ કુદરતી દેખાતા રંગો મેળવવા માટે કૅમેરા વિવિધ પ્રકારના પ્રકાશમાં રંગોને કેવી રીતે સમાયોજિત કરે છે તે પસંદ કરો.
- છબી સ્થિરીકરણ - ઉપકરણની હિલચાલને કારણે અસ્પષ્ટ વિડિઓઝ ઘટાડવા માટે સેટ કરો. વિકલ્પો: ચાલુ અથવા બંધ (ડિફૉલ્ટ).
| ચિહ્ન | વર્ણન |
| અગ્નિથી પ્રકાશિત - અગ્નિથી પ્રકાશિત પ્રકાશ માટે સફેદ સંતુલન સમાયોજિત કરો. | |
|
ફ્લોરોસન્ટ - ફ્લોરોસન્ટ લાઇટિંગ માટે સફેદ સંતુલન સમાયોજિત કરો. |
| સ્વતઃ - વ્હાઇટ બેલેન્સને આપમેળે એડજસ્ટ કરો (ડિફોલ્ટ). | |
|
ડેલાઇટ - ડેલાઇટ માટે વ્હાઇટ બેલેન્સ એડજસ્ટ કરો. |
| વાદળછાયું - વાદળછાયું વાતાવરણ માટે સફેદ સંતુલન સમાયોજિત કરો. |
ડેટાવેજ પ્રદર્શન
ડેટા કેપ્ચર કાર્યક્ષમતા દર્શાવવા માટે ડેટાવેજ ડેમોન્સ્ટ્રેશન (DWDemo) નો ઉપયોગ કરો. ડેટાવેજને ગોઠવવા માટે, નો સંદર્ભ લો techdocs.zebra.com/datawedge/.
ડેટાવેજ નિદર્શન ચિહ્નો
કોષ્ટક 9 ડેટાવેજ નિદર્શન ચિહ્નો
| શ્રેણી | ચિહ્ન | વર્ણન |
| રોશની | ઈમેજર રોશની ચાલુ છે. રોશની બંધ કરવા માટે ટચ કરો. | |
| રોશની |  |
ઈમેજર રોશની બંધ છે. રોશની ચાલુ કરવા માટે ટચ કરો. |
| ડેટા કેપ્ચર |  |
ડેટા કેપ્ચર કાર્ય આંતરિક ઈમેજર દ્વારા છે. |
| ડેટા કેપ્ચર | એક RS507 અથવા RS6000 બ્લૂટૂથ ઈમેજર જોડાયેલ છે. | |
| ડેટા કેપ્ચર | RS507 અથવા RS6000 બ્લૂટૂથ ઈમેજર કનેક્ટેડ નથી. | |
| ડેટા કેપ્ચર |  |
ડેટા કેપ્ચર કાર્ય પાછળના કેમેરા દ્વારા છે. |
| સ્કેન મોડ |  |
ઈમેજર પિકલિસ્ટ મોડમાં છે. સામાન્ય સ્કેન મોડમાં બદલવા માટે ટચ કરો. |
| સ્કેન મોડ |  |
ઈમેજર સામાન્ય સ્કેન મોડમાં છે. પિકલિસ્ટ મોડમાં બદલવા માટે ટચ કરો. |
| મેનુ | માટે મેનુ ખોલે છે view એપ્લિકેશન માહિતી અથવા એપ્લિકેશન ડેટાવેજ પ્રો સેટ કરવા માટેfile. |
સ્કેનર પસંદ કરી રહ્યા છીએ
વધુ માહિતી માટે ડેટા કેપ્ચર જુઓ.
- સ્કેનર પસંદ કરવા માટે, ટચ કરો
 > સેટિંગ્સ > સ્કેનર પસંદગી.
 - ડેટા મેળવવા માટે પ્રોગ્રામેબલ બટન દબાવો અથવા પીળા સ્કેન બટનને ટચ કરો. ડેટા પીળા બટનની નીચે ટેક્સ્ટ ફીલ્ડમાં દેખાય છે.
PTT એક્સપ્રેસ વૉઇસ ક્લાયન્ટ
પીટીટી એક્સપ્રેસ વોઈસ ક્લાયન્ટ વિભિન્ન એન્ટરપ્રાઈઝ ઉપકરણો વચ્ચે પુશ-ટુ-ટોક (PTT) સંચારને સક્ષમ કરે છે. હાલના વાયરલેસ લોકલ એરિયા નેટવર્ક (WLAN) ઈન્ફ્રાસ્ટ્રક્ચરનો ઉપયોગ કરીને, PTT એક્સપ્રેસ વૉઇસ કમ્યુનિકેશન સર્વરની જરૂર વગર સરળ PTT સંચાર પહોંચાડે છે.
![]() નોંધ: PTT એક્સપ્રેસ લાયસન્સ જરૂરી છે.
નોંધ: PTT એક્સપ્રેસ લાયસન્સ જરૂરી છે.
- ગ્રુપ કૉલ - અન્ય વૉઇસ ક્લાયંટ વપરાશકર્તાઓ સાથે વાતચીત શરૂ કરવા માટે PTT (ટોક) બટન દબાવો અને પકડી રાખો.
- ખાનગી પ્રતિસાદ - છેલ્લા પ્રસારણના પ્રેરકને પ્રતિસાદ આપવા અથવા ખાનગી પ્રતિસાદ આપવા માટે PTT બટનને બે વાર દબાવો.
પીટીટી એક્સપ્રેસ યુઝર ઈન્ટરફેસ
પુશ-ટુ-ટોક કોમ્યુનિકેશન માટે PTT એક્સપ્રેસ ઈન્ટરફેસનો ઉપયોગ કરો.
આકૃતિ 10 PTT એક્સપ્રેસ ડિફોલ્ટ યુઝર ઇન્ટરફેસ
| નંબર | વસ્તુ | વર્ણન |
| 1 | સૂચના ચિહ્ન | PTT એક્સપ્રેસ ક્લાયંટની વર્તમાન સ્થિતિ સૂચવે છે. |
| 2 | સેવા સંકેત | પીટીટી એક્સપ્રેસ ક્લાયંટની સ્થિતિ સૂચવે છે. વિકલ્પો છે: સેવા સક્ષમ, સેવા અક્ષમ અથવા સેવા અનુપલબ્ધ. |
| 3 | ટોક જૂથ | PTT સંચાર માટે ઉપલબ્ધ તમામ 32 ટોક જૂથોની યાદી આપે છે. |
| 4 | સેટિંગ્સ | PTT એક્સપ્રેસ સેટિંગ્સ સ્ક્રીન ખોલે છે. |
| 5 | સ્વીચને સક્ષમ/અક્ષમ કરો | PTT સેવા ચાલુ અને બંધ કરે છે. |
PTT શ્રાવ્ય સૂચકાંકો
વૉઇસ ક્લાયંટનો ઉપયોગ કરતી વખતે નીચેના ટોન મદદરૂપ સંકેતો પ્રદાન કરે છે.
- ટોક ટોન: ડબલ ચીપ. જ્યારે ટોક બટન દબાયેલું હોય ત્યારે ચાલે છે. આ તમારા માટે વાત શરૂ કરવાનો સંકેત છે.
- ઍક્સેસ ટોન: સિંગલ બીપ. જ્યારે અન્ય વપરાશકર્તાએ હમણાં જ બ્રોડકાસ્ટ અથવા પ્રતિસાદ સમાપ્ત કર્યો ત્યારે ચાલે છે. હવે તમે ગ્રૂપ બ્રોડકાસ્ટ અથવા ખાનગી પ્રતિસાદ શરૂ કરી શકો છો.
- વ્યસ્ત સ્વર: સતત સ્વર. જ્યારે ટોક બટન દબાયેલું હોય અને અન્ય વપરાશકર્તા તે જ ટોકગ્રુપ પર પહેલેથી જ વાતચીત કરી રહ્યો હોય ત્યારે ચાલે છે. મહત્તમ મંજૂર ટોક ટાઈમ (60 સેકન્ડ) સુધી પહોંચ્યા પછી ચાલે છે.
- નેટવર્ક ટોન:
- ત્રણ વધતી પીચ બીપ્સ. જ્યારે PTT એક્સપ્રેસ WLAN કનેક્શન મેળવે છે અને સેવા સક્ષમ હોય ત્યારે ચાલે છે.
- ત્રણ ઘટતી પીચ બીપ્સ. જ્યારે PTT Express WLAN કનેક્શન ગુમાવે છે અથવા સેવા અક્ષમ થાય છે ત્યારે ચાલે છે.
PTT સૂચના ચિહ્નો
સૂચના ચિહ્નો PTT એક્સપ્રેસ વૉઇસ ક્લાયંટની વર્તમાન સ્થિતિ દર્શાવે છે.
ટેબલ 10 PTT એક્સપ્રેસ ચિહ્નો
| સ્થિતિ ચિહ્ન | વર્ણન |
 |
PTT એક્સપ્રેસ વૉઇસ ક્લાયંટ અક્ષમ છે. |
 |
PTT એક્સપ્રેસ વૉઇસ ક્લાયંટ સક્ષમ છે પરંતુ WLAN સાથે જોડાયેલ નથી. |
 |
PTT એક્સપ્રેસ વૉઇસ ક્લાયન્ટ સક્ષમ છે, WLAN સાથે જોડાયેલ છે અને આઇકોનની બાજુના નંબર દ્વારા સૂચવવામાં આવેલા ટોક ગ્રુપ પર સાંભળવું. |
 |
PTT એક્સપ્રેસ વૉઇસ ક્લાયન્ટ સક્ષમ છે, WLAN સાથે જોડાયેલ છે, અને આઇકોનની બાજુમાં નંબર દ્વારા સૂચવવામાં આવેલા ટોક ગ્રુપ પર વાતચીત કરે છે. |
 |
PTT એક્સપ્રેસ વૉઇસ ક્લાયંટ સક્ષમ છે, WLAN સાથે જોડાયેલ છે અને ખાનગી પ્રતિસાદમાં છે. |
 |
PTT એક્સપ્રેસ વૉઇસ ક્લાયંટ સક્ષમ અને મ્યૂટ છે. |
 |
પીટીટી એક્સપ્રેસ વોઈસ ક્લાયંટ સક્ષમ છે પરંતુ ચાલુ વીઓઆઈપી ટેલિફોની કોલને કારણે તે વાતચીત કરવામાં સક્ષમ નથી. |
PTT કોમ્યુનિકેશન સક્ષમ કરી રહ્યું છે
- હોમ સ્ક્રીનની નીચેથી ઉપર સ્વાઇપ કરો અને ટચ કરો
 .
. - સક્ષમ/અક્ષમ સ્વિચને ચાલુ સ્થિતિમાં સ્લાઇડ કરો. બટન ON માં બદલાય છે.
ટોક ગ્રુપ પસંદ કરી રહ્યા છીએ
ત્યાં 32 ટોક જૂથો છે જે પીટીટી એક્સપ્રેસ વપરાશકર્તાઓ દ્વારા પસંદ કરી શકાય છે. જો કે, ઉપકરણ પર એક સમયે ફક્ત એક જ ટોક જૂથને સક્ષમ કરી શકાય છે.
- 32 ટોક જૂથોમાંથી એકને સ્પર્શ કરો. પસંદ કરેલ ટોક ગ્રુપ પ્રકાશિત થયેલ છે.
પીટીટી કોમ્યુનિકેશન
આ વિભાગ ડિફૉલ્ટ PTT એક્સપ્રેસ ક્લાયન્ટ ગોઠવણીનું વર્ણન કરે છે. ક્લાયંટનો ઉપયોગ કરવા પર વિગતવાર માહિતી માટે PTT Express V1.2 વપરાશકર્તા માર્ગદર્શિકાનો સંદર્ભ લો.
PTT સંચાર સમૂહ કૉલ તરીકે સ્થાપિત થઈ શકે છે. જ્યારે PTT એક્સપ્રેસ સક્ષમ હોય, ત્યારે ઉપકરણની ડાબી બાજુએ PTT બટન PTT સંચાર માટે અસાઇન કરવામાં આવે છે. જ્યારે વાયર્ડ હેડસેટનો ઉપયોગ કરવામાં આવે છે, ત્યારે હેડસેટ ટોક બટનનો ઉપયોગ કરીને ગ્રુપ કૉલ્સ પણ શરૂ કરી શકાય છે.
આકૃતિ 11 પીટીટી બટન

1 PTT બટન
ગ્રુપ કોલ બનાવી રહ્યા છીએ
- PTT બટન (અથવા હેડસેટ પર ટોક બટન) દબાવો અને પકડી રાખો અને ટોક ટોન સાંભળો.
જો તમે વ્યસ્ત સ્વર સાંભળો છો, તો બટન છોડો અને બીજો પ્રયાસ કરતા પહેલા થોડીવાર રાહ જુઓ. ખાતરી કરો કે PTT એક્સપ્રેસ અને WLAN સક્ષમ છે.
નોંધ: 60 સેકન્ડ (ડિફૉલ્ટ) કરતાં વધુ સમય માટે બટનને પકડી રાખવાથી કૉલ ડ્રોપ થઈ જાય છે, જેનાથી અન્ય લોકો ગ્રુપ કૉલ કરી શકે છે. અન્ય લોકોને કૉલ કરવાની મંજૂરી આપવા માટે જ્યારે વાત કરવાનું સમાપ્ત કરો ત્યારે બટન છોડો. - ટોક ટોન સાંભળ્યા પછી વાત શરૂ કરો.
- વાત પૂરી થાય ત્યારે બટન છોડો.
ખાનગી પ્રતિભાવ સાથે પ્રતિસાદ
એક વખત ગ્રુપ કૉલની સ્થાપના થઈ જાય પછી જ ખાનગી પ્રતિસાદ શરૂ કરી શકાય છે. પ્રારંભિક ખાનગી પ્રતિસાદ ગ્રુપ કૉલના પ્રેરકને આપવામાં આવે છે.
- ઍક્સેસ ટોન માટે રાહ જુઓ.
- 10 સેકન્ડની અંદર, PTT બટનને બે વાર દબાવો, અને ટોક ટોન સાંભળો.
- જો તમે વ્યસ્ત સ્વર સાંભળો છો, તો બટન છોડો અને બીજો પ્રયાસ કરતા પહેલા થોડીવાર રાહ જુઓ. ખાતરી કરો કે PTT એક્સપ્રેસ અને WLAN સક્ષમ છે.
- ટોક ટોન વાગે પછી વાત કરવાનું શરૂ કરો.
- વાત પૂરી થાય ત્યારે બટન છોડો.
PTT કોમ્યુનિકેશનને અક્ષમ કરી રહ્યું છે
- હોમ સ્ક્રીનની નીચેથી ઉપર સ્વાઇપ કરો અને ટચ કરો .
- સક્ષમ/અક્ષમ સ્વિચને બંધ સ્થિતિમાં સ્લાઇડ કરો. બટન OFF માં બદલાય છે.
RxLogger
RxLogger એ એક વ્યાપક નિદાન સાધન છે જે એપ્લિકેશન અને સિસ્ટમ મેટ્રિક્સ પ્રદાન કરે છે અને ઉપકરણ અને એપ્લિકેશન સમસ્યાઓનું નિદાન કરે છે.
RxLogger નીચેની માહિતીને લોગ કરે છે: CPU લોડ, મેમરી લોડ, મેમરી સ્નેપશોટ, બેટરી વપરાશ, પાવર સ્ટેટ્સ, વાયરલેસ લોગીંગ, સેલ્યુલર લોગીંગ, TCP ડમ્પ, બ્લુટુથ લોગીંગ, GPS લોગીંગ, logcat, FTP પુશ/પુલ, ANR ડમ્પ, વગેરે. બધા જનર લોગ અને files ઉપકરણ પર ફ્લેશ સ્ટોરેજ પર સાચવવામાં આવે છે (આંતરિક અથવા બાહ્ય).
RxLogger રૂપરેખાંકન
RxLogger એક એક્સટેન્સિબલ પ્લગ-ઇન આર્કિટેક્ચર સાથે બનેલ છે અને તે પહેલાથી જ બિલ્ટ-ઇન સંખ્યાબંધ પ્લગ-ઇન્સ સાથે પેક કરેલું છે. RxLogger રૂપરેખાંકિત કરવા વિશેની માહિતી માટે, નો સંદર્ભ લો techdocs.zebra.com/rxlogger/.
રૂપરેખાંકન સ્ક્રીન ખોલવા માટે, RxLogger હોમ સ્ક્રીનમાંથી સેટિંગ્સને ટચ કરો.
રૂપરેખાંકન File
RxLogger રૂપરેખાંકન XML નો ઉપયોગ કરીને સેટ કરી શકાય છે file.
config.xml રૂપરેખાંકન file RxLogger\config ફોલ્ડરમાં microSD કાર્ડ પર સ્થિત છે. નકલ કરો file USB કનેક્શનનો ઉપયોગ કરીને ઉપકરણમાંથી હોસ્ટ કમ્પ્યુટર પર. રૂપરેખાંકન સંપાદિત કરો file અને પછી XML બદલો file ઉપકરણ પર. ત્યારથી RxLogger સેવાને રોકવા અને પુનઃપ્રારંભ કરવાની જરૂર નથી file ફેરફાર આપોઆપ મળી આવે છે.
લૉગિંગ સક્ષમ કરી રહ્યું છે
- સ્ક્રીન ઉપર સ્વાઇપ કરો અને પસંદ કરો
 .
. - પ્રારંભ કરો ટચ કરો.
લોગીંગને અક્ષમ કરી રહ્યું છે
- સ્ક્રીન ઉપર સ્વાઇપ કરો અને પસંદ કરો .
- સ્ટોપને ટચ કરો.
લોગ કાઢવા Files
- USB કનેક્શનનો ઉપયોગ કરીને ઉપકરણને હોસ્ટ કમ્પ્યુટર સાથે કનેક્ટ કરો.
- એનો ઉપયોગ કરીને file એક્સપ્લોરર, RxLogger ફોલ્ડર પર નેવિગેટ કરો.
- નકલ કરો file ઉપકરણથી હોસ્ટ કમ્પ્યુટર પર.
- હોસ્ટ કમ્પ્યુટરથી ઉપકરણને ડિસ્કનેક્ટ કરો.
બેકઅપ ડેટા
RxLogger યુટિલિટી વપરાશકર્તાને ઝિપ બનાવવાની મંજૂરી આપે છે file ઉપકરણમાં RxLogger ફોલ્ડરનું, જેમાં ડિફૉલ્ટ રૂપે ઉપકરણમાં સંગ્રહિત તમામ RxLogger લૉગ્સ હોય છે.
• બેકઅપ ડેટા સાચવવા માટે, ટચ કરો ![]() > BackupNow.
> BackupNow.
RxLogger ઉપયોગિતા
RxLogger યુટિલિટી એ ડેટા મોનિટરિંગ એપ્લિકેશન છે viewજ્યારે RxLogger ચાલી રહ્યું હોય ત્યારે ઉપકરણમાં લૉગ ઇન કરો.
લોગ્સ અને RxLogger યુટિલિટી ફીચર્સ મેઈન ચેટ હેડનો ઉપયોગ કરીને એક્સેસ કરવામાં આવે છે.
મુખ્ય ચેટ હેડ શરૂ કરી રહ્યા છીએ
- RxLogger ખોલો.
- સ્પર્શ > ચેટ હેડને ટૉગલ કરો.
મુખ્ય ચેટ હેડ આઇકોન સ્ક્રીન પર દેખાય છે. - મુખ્ય ચેટ હેડ આઇકોનને સ્ક્રીનની આસપાસ ખસેડવા માટે તેને ટચ કરો અને ખેંચો.
મુખ્ય ચેટ હેડ દૂર કરી રહ્યા છીએ
- આયકનને ટચ કરો અને ખેંચો.
X સાથે એક વર્તુળ દેખાય છે. - આયકનને વર્તુળ પર ખસેડો અને પછી છોડો.
Viewing લોગ્સ
- મુખ્ય ચેટ હેડ આયકનને ટચ કરો.
RxLogger યુટિલિટી સ્ક્રીન દેખાય છે. - તેને ખોલવા માટે લોગને ટચ કરો.
વપરાશકર્તા નવા સબ ચેટ હેડ પ્રદર્શિત કરીને ઘણા લોગ ખોલી શકે છે. - જો જરૂરી હોય તો, ડાબે અથવા જમણે સ્ક્રોલ કરો view વધારાના સબ ચેટ હેડ ચિહ્નો.
- લોગ સમાવિષ્ટો પ્રદર્શિત કરવા માટે સબ ચેટ હેડને ટચ કરો.
સબ ચેટ હેડ આઇકોન દૂર કરી રહ્યા છીએ
- સબ ચેટ હેડ આયકનને દૂર કરવા માટે, જ્યાં સુધી તે અદૃશ્ય ન થઈ જાય ત્યાં સુધી આયકનને દબાવી રાખો.
ઓવરલે માં બેકઅપ View
RxLogger યુટિલિટી વપરાશકર્તાને ઝિપ બનાવવાની મંજૂરી આપે છે file ઉપકરણમાં RxLogger ફોલ્ડરનું, જેમાં ડિફૉલ્ટ રૂપે ઉપકરણમાં સંગ્રહિત તમામ RxLogger લૉગ્સ હોય છે.
બેકઅપ આઇકન હંમેશા ઓવરલેમાં ઉપલબ્ધ હોય છે View.
- સ્પર્શ
 .
.
બેકઅપ ડાયલોગ બોક્સ દેખાય છે. - બેકઅપ બનાવવા માટે હા ટચ કરો.
ડેટા કેપ્ચર
આ વિભાગ વિવિધ સ્કેનિંગ વિકલ્પોનો ઉપયોગ કરીને બારકોડ ડેટા કેપ્ચર કરવા માટેની માહિતી પ્રદાન કરે છે.
ઉપકરણ આનો ઉપયોગ કરીને ડેટા કેપ્ચરને સપોર્ટ કરે છે:
- સંકલિત ઈમેજર
- સંકલિત કેમેરા
- RS507/RS507X હેન્ડ્સ-ફ્રી ઈમેજર
- RS5100 બ્લૂટૂથ રીંગ સ્કેનર
- RS6000 હેન્ડ્સ-ફ્રી ઈમેજર
- DS2278 ડિજિટલ સ્કેનર
- DS3578 બ્લૂટૂથ સ્કેનર
- DS3608 યુએસબી સ્કેનર
- DS3678 ડિજિટલ સ્કેનર
- DS8178 ડિજિટલ સ્કેનર
- LI3678 લીનિયર સ્કેનર
ઇમેજિંગ
એકીકૃત 2D ઈમેજર સાથેના ઉપકરણમાં નીચેની સુવિધાઓ છે:
- સૌથી વધુ લોકપ્રિય રેખીય, પોસ્ટલ, PDF417, Digimarc અને 2D મેટ્રિક્સ કોડ પ્રકારો સહિત વિવિધ પ્રકારના બારકોડ પ્રતીકોનું સર્વદિશ વાંચન.
- વિવિધ ઇમેજિંગ એપ્લિકેશનો માટે હોસ્ટ પર છબીઓ કેપ્ચર અને ડાઉનલોડ કરવાની ક્ષમતા.
- સરળ પોઈન્ટ-એન્ડ-શૂટ ઓપરેશન માટે ક્રોસ-હેર અને ડોટ લક્ષ્ય રાખતું અદ્યતન સાહજિક લેસર.
ઈમેજર બારકોડની તસવીર લેવા માટે ઈમેજીંગ ટેક્નોલોજીનો ઉપયોગ કરે છે, પરિણામી ઈમેજને મેમરીમાં સ્ટોર કરે છે અને ઈમેજમાંથી બારકોડ ડેટા કાઢવા માટે અત્યાધુનિક સોફ્ટવેર ડીકોડિંગ અલ્ગોરિધમનો અમલ કરે છે.
ડિજિટલ કેમેરા
સંકલિત કેમેરા આધારિત બારકોડ સ્કેનિંગ સોલ્યુશન સાથેના ઉપકરણમાં નીચેની સુવિધાઓ છે:
- સૌથી વધુ લોકપ્રિય રેખીય, પોસ્ટલ, QR, PDF417 અને 2D મેટ્રિક્સ કોડ પ્રકારો સહિત વિવિધ પ્રકારના બારકોડ પ્રતીકોનું સર્વદિશ વાંચન.
- સરળ બિંદુ-અને-શૂટ ઓપરેશન માટે ક્રોસ-હેર રેટિકલ.
- ના ક્ષેત્રમાં ઘણા લોકો પાસેથી ચોક્કસ બારકોડને ડીકોડ કરવા માટે પિકલિસ્ટ મોડ view.
સોલ્યુશન બારકોડની ડિજિટલ પિક્ચર લેવા માટે અદ્યતન કેમેરા ટેક્નોલોજીનો ઉપયોગ કરે છે અને ઇમેજમાંથી ડેટા કાઢવા માટે અત્યાધુનિક સોફ્ટવેર ડીકોડિંગ અલ્ગોરિધમનો અમલ કરે છે.
લીનિયર ઈમેજર
એકીકૃત રેખીય ઇમેજર સાથેના ઉપકરણમાં નીચેની સુવિધાઓ છે:
- સૌથી વધુ લોકપ્રિય 1-D કોડ પ્રકારો સહિત વિવિધ બાર કોડ પ્રતીકો વાંચવા.
- સરળ બિંદુ-અને-શૂટ ઑપરેશન માટે સાહજિક લક્ષ્ય.
ઈમેજર બાર કોડની તસવીર લેવા માટે ઈમેજીંગ ટેકનોલોજીનો ઉપયોગ કરે છે, પરિણામી ઈમેજને તેની મેમરીમાં સંગ્રહિત કરે છે અને ઈમેજમાંથી બાર કોડ ડેટા કાઢવા માટે અત્યાધુનિક સોફ્ટવેર ડીકોડિંગ અલ્ગોરિધમનો અમલ કરે છે.
ઓપરેશનલ મોડ્સ
ઇન્ટિગ્રેટેડ ઇમેજર સાથેનું ઉપકરણ ઓપરેશનના ત્રણ મોડને સપોર્ટ કરે છે.
સ્કેન બટન દબાવીને દરેક મોડને સક્રિય કરો.
- ડીકોડ મોડ — ઉપકરણ તેના ક્ષેત્રમાં સક્ષમ બારકોડને શોધવા અને ડીકોડ કરવાનો પ્રયાસ કરે છે view.
જ્યાં સુધી તમે સ્કેન બટન દબાવી રાખો છો અથવા જ્યાં સુધી તે બારકોડ ડીકોડ ન કરે ત્યાં સુધી ઈમેજર આ મોડમાં રહે છે.
નોંધ: પિક લિસ્ટ મોડને સક્ષમ કરવા માટે, ડેટા વેજમાં ગોઠવો અથવા API આદેશનો ઉપયોગ કરીને એપ્લિકેશનમાં સેટ કરો. - સૂચિ મોડ પસંદ કરો - જ્યારે ઉપકરણના ક્ષેત્રમાં એક કરતાં વધુ બારકોડ હોય ત્યારે બારકોડને પસંદગીપૂર્વક ડીકોડ કરો view જરૂરી બારકોડ પર લક્ષ્યાંકિત ક્રોસહેર અથવા બિંદુને ખસેડીને. બહુવિધ બારકોડ અને એક કરતા વધુ બારકોડ પ્રકાર (ક્યાં તો 1D અથવા 2D) ધરાવતાં ઉત્પાદન અથવા પરિવહન લેબલ્સ ધરાવતી ચૂંટેલી સૂચિ માટે આ સુવિધાનો ઉપયોગ કરો.
નોંધ: મૂળભૂત મલ્ટી બારકોડ મોડને સક્ષમ કરવા માટે, ડેટા વેજમાં ગોઠવો અથવા API આદેશનો ઉપયોગ કરીને એપ્લિકેશનમાં સેટ કરો. - મૂળભૂત મલ્ટી બારકોડ મોડ — આ મોડમાં, ઉપકરણ તેના ક્ષેત્રમાં વિશિષ્ટ બારકોડની ચોક્કસ સંખ્યાને શોધવા અને ડીકોડ કરવાનો પ્રયાસ કરે છે. view. જ્યાં સુધી વપરાશકર્તા સ્કેન બટનને પકડી રાખે છે અથવા જ્યાં સુધી તે તમામ બારકોડ ડીકોડ ન કરે ત્યાં સુધી ઉપકરણ આ મોડમાં રહે છે.
- ઉપકરણ અનન્ય બારકોડ્સ (2 થી 100 સુધી) ની પ્રોગ્રામ કરેલ સંખ્યાને સ્કેન કરવાનો પ્રયાસ કરે છે.
- જો ત્યાં ડુપ્લિકેટ બારકોડ્સ (સમાન સિમ્બોલોજી પ્રકાર અને ડેટા) હોય, તો ડુપ્લિકેટ બારકોડમાંથી માત્ર એક જ ડીકોડ કરવામાં આવે છે અને બાકીનાને અવગણવામાં આવે છે. જો લેબલમાં બે ડુપ્લિકેટ બારકોડ ઉપરાંત બીજા બે જુદા જુદા બારકોડ હોય, તો તે લેબલમાંથી વધુમાં વધુ ત્રણ બારકોડ ડીકોડ કરવામાં આવશે; એકને ડુપ્લિકેટ તરીકે અવગણવામાં આવશે.
- બારકોડ બહુવિધ સિમ્બોલોજી પ્રકારના હોઈ શકે છે અને હજુ પણ એકસાથે મેળવી શકાય છે. માજી માટેampજો બેઝિક મલ્ટીબાર્કોડ સ્કેન માટે ઉલ્લેખિત જથ્થો ચાર છે, તો બે બારકોડ સિમ્બોલોજી પ્રકાર કોડ 128 હોઈ શકે છે અને અન્ય બે સિમ્બોલોજી પ્રકાર કોડ 39 હોઈ શકે છે.
- જો વિશિષ્ટ બારકોડ્સની ઉલ્લેખિત સંખ્યા શરૂઆતમાં ન હોય view ઉપકરણના, જ્યાં સુધી ઉપકરણને વધારાના બારકોડ(ઓ) કેપ્ચર કરવા માટે ખસેડવામાં ન આવે અથવા સમય સમાપ્ત ન થાય ત્યાં સુધી ઉપકરણ કોઈપણ ડેટાને ડીકોડ કરશે નહીં.
જો ઉપકરણ ક્ષેત્ર view ઉલ્લેખિત જથ્થા કરતાં વધુ સંખ્યાબંધ બારકોડ્સ સમાવે છે, જ્યાં સુધી વિશિષ્ટ બારકોડ્સની નિર્દિષ્ટ સંખ્યા પહોંચી ન જાય ત્યાં સુધી ઉપકરણ રેન્ડમલી બારકોડ(ઓ)ને ડીકોડ કરે છે. માજી માટેample, જો ગણતરી બે પર સેટ કરેલ હોય અને આઠ બારકોડના ક્ષેત્રમાં હોય view, ઉપકરણ તે જુએ છે તે પ્રથમ બે અનન્ય બારકોડ્સને ડીકોડ કરે છે, ડેટાને રેન્ડમ ક્રમમાં પરત કરે છે. - મૂળભૂત મલ્ટી બારકોડ મોડ સંકલિત બારકોડને સપોર્ટ કરતું નથી.
સ્કેનિંગ વિચારણાઓ
સામાન્ય રીતે, સ્કેનિંગ એ ધ્યેય, સ્કેન અને ડીકોડની સરળ બાબત છે, જેમાં તેને માસ્ટર કરવા માટે થોડા ઝડપી અજમાયશ પ્રયાસો કરવામાં આવે છે.
જો કે, સ્કેનિંગ કામગીરીને ઑપ્ટિમાઇઝ કરવા માટે નીચેનાનો વિચાર કરો:
- શ્રેણી — સ્કેનર્સ ચોક્કસ કાર્યકારી શ્રેણી પર શ્રેષ્ઠ ડીકોડ કરે છે — બારકોડથી લઘુત્તમ અને મહત્તમ અંતર. આ શ્રેણી બારકોડ ઘનતા અને સ્કેનિંગ ઉપકરણ ઓપ્ટિક્સ અનુસાર બદલાય છે. ઝડપી અને સતત ડીકોડ માટે શ્રેણીમાં સ્કેન કરો; સ્કેન ખૂબ નજીક અથવા ખૂબ દૂર ડીકોડ અટકાવે છે. સ્કેન કરવામાં આવી રહેલા બારકોડ્સ માટે યોગ્ય કાર્યકારી શ્રેણી શોધવા માટે સ્કેનરને નજીક અને વધુ દૂર ખસેડો.
- એન્ગલ - ઝડપી ડીકોડ માટે એંગલ સ્કેન કરવાનું મહત્વનું છે. જ્યારે રોશની/ફ્લેશ સીધા જ ઈમેજરમાં પ્રતિબિંબિત થાય છે, ત્યારે સ્પેક્યુલર પ્રતિબિંબ ઈમેજરને અંધ/સંતૃપ્ત કરી શકે છે. આને અવગણવા માટે, બારકોડને સ્કેન કરો જેથી કરીને બીમ સીધું પાછું બાઉન્સ ન થાય. ખૂબ તીક્ષ્ણ ખૂણા પર સ્કેન કરશો નહીં; સફળ ડીકોડ બનાવવા માટે સ્કેનરને સ્કેનમાંથી છૂટાછવાયા પ્રતિબિંબ એકત્રિત કરવાની જરૂર છે. પ્રેક્ટિસ ઝડપથી બતાવે છે કે કઈ સહનશીલતા અંદર કામ કરવાની છે.
- મોટા ચિહ્નો માટે ઉપકરણને વધુ દૂર પકડી રાખો.
- એકસાથે નજીક હોય તેવા બારવાળા પ્રતીકો માટે ઉપકરણને નજીક ખસેડો.
નોંધ: સ્કેનિંગ પ્રક્રિયાઓ એપ્લિકેશન અને ઉપકરણ ગોઠવણી પર આધારિત છે. એક એપ્લિકેશન ઉપર સૂચિબદ્ધ એકમાંથી અલગ સ્કેનીંગ પ્રક્રિયાઓનો ઉપયોગ કરી શકે છે.
આંતરિક ઇમેજર સાથે સ્કેન કરી રહ્યું છે
બારકોડ ડેટા મેળવવા માટે આંતરિક ઈમેજરનો ઉપયોગ કરો.
![]() નોંધ: બારકોડ વાંચવા માટે, સ્કેન-સક્ષમ એપ્લિકેશન આવશ્યક છે. ઉપકરણમાં ડેટા વેજ એપ્લિકેશન છે જે વપરાશકર્તાને બારકોડ ડેટા ડીકોડ કરવા અને બારકોડ સામગ્રી પ્રદર્શિત કરવા માટે સ્કેનરને સક્ષમ કરવાની મંજૂરી આપે છે.
નોંધ: બારકોડ વાંચવા માટે, સ્કેન-સક્ષમ એપ્લિકેશન આવશ્યક છે. ઉપકરણમાં ડેટા વેજ એપ્લિકેશન છે જે વપરાશકર્તાને બારકોડ ડેટા ડીકોડ કરવા અને બારકોડ સામગ્રી પ્રદર્શિત કરવા માટે સ્કેનરને સક્ષમ કરવાની મંજૂરી આપે છે.
- ખાતરી કરો કે ઉપકરણ પર એપ્લિકેશન ખુલ્લી છે અને ટેક્સ્ટ ફીલ્ડ ફોકસમાં છે (ટેક્સ્ટ ફીલ્ડમાં ટેક્સ્ટ કર્સર).
- ઉપકરણની એક્ઝિટ વિન્ડોને બારકોડ પર નિર્દેશિત કરો.

- સ્કેન બટન દબાવો અને પકડી રાખો.
લાલ લેસર લક્ષ્યાંક પેટર્ન લક્ષ્યમાં મદદ કરવા માટે ચાલુ થાય છે.
નોંધ: જ્યારે ઉપકરણ પિક લિસ્ટ મોડમાં હોય, ત્યારે જ્યાં સુધી લક્ષ્ય બિંદુનું કેન્દ્ર બારકોડને સ્પર્શે નહીં ત્યાં સુધી ઉપકરણ બારકોડને ડીકોડ કરતું નથી. - ખાતરી કરો કે બારકોડ લક્ષ્યાંક પેટર્નમાં ક્રોસ-હેર દ્વારા રચાયેલા વિસ્તારની અંદર છે. તેજસ્વી પ્રકાશની સ્થિતિમાં વધેલી દૃશ્યતા માટે લક્ષ્ય બિંદુનો ઉપયોગ થાય છે.
આકૃતિ 12 લક્ષિત પેટર્ન: માનક શ્રેણી
નોંધ: જ્યારે ઉપકરણ પસંદ સૂચિ મોડમાં હોય, ત્યારે જ્યાં સુધી ક્રોસહેરનું કેન્દ્ર બારકોડને સ્પર્શે નહીં ત્યાં સુધી ઉપકરણ બારકોડને ડીકોડ કરતું નથી.
આકૃતિ 13 બહુવિધ બારકોડ્સ સાથે યાદી મોડ પસંદ કરો - માનક શ્રેણી
ડેટા કેપ્ચર LED આછો લીલો અને એક બીપ અવાજ, મૂળભૂત રીતે, બારકોડ સફળતાપૂર્વક ડીકોડ કરવામાં આવ્યો હતો તે દર્શાવવા માટે.
ડીકોડ LED આછો લીલો અને એક બીપ અવાજ, મૂળભૂત રીતે, બારકોડ સફળતાપૂર્વક ડીકોડ કરવામાં આવ્યો હતો તે દર્શાવવા માટે. - સ્કેન બટન છોડો.
બારકોડ સામગ્રી ડેટા ટેક્સ્ટ ફીલ્ડમાં દેખાય છે.
નોંધ: ઈમેજર ડીકોડિંગ સામાન્ય રીતે તરત જ થાય છે. જ્યાં સુધી સ્કેન બટન દબાયેલું રહે ત્યાં સુધી ઉપકરણ નબળા અથવા મુશ્કેલ બારકોડનું ડિજિટલ ચિત્ર (ઇમેજ) લેવા માટે જરૂરી પગલાંઓનું પુનરાવર્તન કરે છે.
આંતરિક કેમેરા સાથે સ્કેનિંગ
બારકોડ ડેટા મેળવવા માટે આંતરિક કેમેરાનો ઉપયોગ કરો.
નબળી લાઇટિંગમાં બારકોડ ડેટા કેપ્ચર કરતી વખતે, ડેટાવેજ એપ્લિકેશનમાં ઇલ્યુમિનેશન મોડ ચાલુ કરો.
- સ્કેનિંગ એપ્લિકેશન લોંચ કરો.
- કેમેરા વિન્ડોને બારકોડ પર નિર્દેશ કરો.

- સ્કેન બટન દબાવો અને પકડી રાખો.
મૂળભૂત રીતે, એક પૂર્વview સ્ક્રીન પર વિન્ડો દેખાય છે. ડીકોડ લાઇટ એમિટીંગ ડાયોડ (LED) લાઇટ લાલ કરે છે જે દર્શાવે છે કે ડેટા કેપ્ચર પ્રક્રિયામાં છે. - સ્ક્રીન પર બારકોડ દેખાય ત્યાં સુધી ઉપકરણને ખસેડો.
- જો પિકલિસ્ટ મોડ સક્ષમ હોય, તો જ્યાં સુધી બારકોડ સ્ક્રીન પર લક્ષ્ય બિંદુની નીચે કેન્દ્રિત ન થાય ત્યાં સુધી ઉપકરણને ખસેડો.
- ડીકોડ એલઇડી લાઇટ્સ લીલી, બીપ સંભળાય છે અને ઉપકરણ વાઇબ્રેટ થાય છે, મૂળભૂત રીતે, બારકોડ સફળતાપૂર્વક ડીકોડ થયેલ છે તે દર્શાવવા માટે.
કેપ્ચર કરેલ ડેટા ટેક્સ્ટ ફીલ્ડમાં દેખાય છે.
RS507/RS507X હેન્ડ્સ-ફ્રી ઈમેજર સાથે સ્કેનિંગ
બારકોડ ડેટા મેળવવા માટે RS507/RS507X હેન્ડ્સ-ફ્રી ઈમેજરનો ઉપયોગ કરો.
આકૃતિ 14 RS507/RS507X હેન્ડ્સ-ફ્રી ઈમેજર

વધુ માહિતી માટે RS507/RS507X હેન્ડ્સ-ફ્રી ઈમેજર પ્રોડક્ટ રેફરન્સ ગાઈડનો સંદર્ભ લો.
![]() નોંધ: બારકોડ વાંચવા માટે, સ્કેન-સક્ષમ એપ્લિકેશન આવશ્યક છે. ઉપકરણમાં ડેટા વેજ એપ્લિકેશન છે જે વપરાશકર્તાને બારકોડ ડેટા ડીકોડ કરવા અને બારકોડ સામગ્રી પ્રદર્શિત કરવા માટે સ્કેનરને સક્ષમ કરવાની મંજૂરી આપે છે.
નોંધ: બારકોડ વાંચવા માટે, સ્કેન-સક્ષમ એપ્લિકેશન આવશ્યક છે. ઉપકરણમાં ડેટા વેજ એપ્લિકેશન છે જે વપરાશકર્તાને બારકોડ ડેટા ડીકોડ કરવા અને બારકોડ સામગ્રી પ્રદર્શિત કરવા માટે સ્કેનરને સક્ષમ કરવાની મંજૂરી આપે છે.
RS507/RS507x સાથે સ્કેન કરવા માટે:
- ઉપકરણ સાથે RS507/RS507X ની જોડી બનાવો.
- ખાતરી કરો કે એપ્લિકેશન ઉપકરણ પર ખુલ્લી છે અને એક ટેક્સ્ટ ફીલ્ડ ધ્યાન કેન્દ્રિત કરે છે (ટેક્સ્ટ ક્ષેત્રમાં ટેક્સ્ટ કર્સર)
- RS507/RS507X ને બારકોડ પર નિર્દેશ કરો.

- ટ્રિગર દબાવો અને પકડી રાખો.
લાલ લેસર લક્ષ્યાંક પેટર્ન લક્ષ્યમાં મદદ કરવા માટે ચાલુ થાય છે. ખાતરી કરો કે બારકોડ લક્ષ્યાંક પેટર્નમાં ક્રોસ-હેર દ્વારા રચાયેલા વિસ્તારની અંદર છે. લક્ષિત બિંદુ તેજસ્વી પ્રકાશની સ્થિતિમાં દૃશ્યતા વધારે છે.
આકૃતિ 15 RS507/RS507X એઇમિંગ પેટર્ન
 જ્યારે RS507/RS507X પિક લિસ્ટ મોડમાં હોય, ત્યારે RS507/RS507X જ્યાં સુધી ક્રોસહેરનું કેન્દ્ર બારકોડને સ્પર્શે નહીં ત્યાં સુધી બારકોડને ડીકોડ કરતું નથી.
આકૃતિ 16 RS507/RS507X એઇમિંગ પેટર્નમાં બહુવિધ બારકોડ્સ સાથે પિક લિસ્ટ મોડ
 RS507/RS507X LEDs આછો લીલો છે અને બારકોડ સફળતાપૂર્વક ડીકોડ કરવામાં આવ્યો છે તે દર્શાવવા માટે બીપનો અવાજ આવે છે.
કેપ્ચર કરેલ ડેટા ટેક્સ્ટ ફીલ્ડમાં દેખાય છે.
RS5100 રીંગ સ્કેનર સાથે સ્કેનિંગ
બારકોડ ડેટા મેળવવા માટે RS5100 રિંગ સ્કેનરનો ઉપયોગ કરો.
આકૃતિ 17 RS5100 રીંગ સ્કેનર

વધુ માહિતી માટે RS5100 રીંગ સ્કેનર ઉત્પાદન સંદર્ભ માર્ગદર્શિકાનો સંદર્ભ લો.
![]() નોંધ: બારકોડ વાંચવા માટે, સ્કેન-સક્ષમ એપ્લિકેશન આવશ્યક છે. ઉપકરણમાં ડેટા વેજ એપ્લિકેશન છે જે વપરાશકર્તાને બારકોડ ડેટા ડીકોડ કરવા અને બારકોડ સામગ્રી પ્રદર્શિત કરવા માટે સ્કેનરને સક્ષમ કરવાની મંજૂરી આપે છે.
નોંધ: બારકોડ વાંચવા માટે, સ્કેન-સક્ષમ એપ્લિકેશન આવશ્યક છે. ઉપકરણમાં ડેટા વેજ એપ્લિકેશન છે જે વપરાશકર્તાને બારકોડ ડેટા ડીકોડ કરવા અને બારકોડ સામગ્રી પ્રદર્શિત કરવા માટે સ્કેનરને સક્ષમ કરવાની મંજૂરી આપે છે.
RS5100 સાથે સ્કેન કરવા માટે:
- ઉપકરણ સાથે RS5100 જોડો.
- ખાતરી કરો કે એપ્લિકેશન ઉપકરણ પર ખુલ્લી છે અને એક ટેક્સ્ટ ફીલ્ડ ધ્યાન કેન્દ્રિત કરે છે (ટેક્સ્ટ ક્ષેત્રમાં ટેક્સ્ટ કર્સર)
- RS5100 ને બારકોડ પર નિર્દેશ કરો.

- ટ્રિગર દબાવો અને પકડી રાખો.
લાલ લેસર લક્ષ્યાંક પેટર્ન લક્ષ્યમાં મદદ કરવા માટે ચાલુ થાય છે. ખાતરી કરો કે બારકોડ લક્ષ્યાંક પેટર્નમાં ક્રોસ-હેર દ્વારા રચાયેલા વિસ્તારની અંદર છે. લક્ષિત બિંદુ તેજસ્વી પ્રકાશની સ્થિતિમાં દૃશ્યતા વધારે છે.
આકૃતિ 18 RS5100 એઇમિંગ પેટર્ન
 જ્યારે RS5100 પિક લિસ્ટ મોડમાં હોય, ત્યારે RS5100 બારકોડને ડીકોડ કરતું નથી જ્યાં સુધી ક્રોસહેરનું કેન્દ્ર બારકોડને સ્પર્શે નહીં.
આકૃતિ 19 RS5100 એઇમિંગ પેટર્નમાં બહુવિધ બારકોડ્સ સાથે પિક લિસ્ટ મોડ
 RS5100 LEDs આછો લીલો છે અને બારકોડ સફળતાપૂર્વક ડીકોડ કરવામાં આવ્યો છે તે દર્શાવવા માટે બીપનો અવાજ આવે છે.
કેપ્ચર કરેલ ડેટા ટેક્સ્ટ ફીલ્ડમાં દેખાય છે.
RS6000 બ્લૂટૂથ રિંગ સ્કેનર સાથે સ્કેનિંગ
બારકોડ ડેટા મેળવવા માટે RS6000 બ્લૂટૂથ રિંગ સ્કેનરનો ઉપયોગ કરો.
આકૃતિ 20 RS6000 બ્લૂટૂથ રીંગ સ્કેનર

વધુ માહિતી માટે RS6000 બ્લૂટૂથ રિંગ સ્કેનર ઉત્પાદન સંદર્ભ માર્ગદર્શિકાનો સંદર્ભ લો.
![]() નોંધ: બારકોડ વાંચવા માટે, સ્કેન-સક્ષમ એપ્લિકેશન આવશ્યક છે. ઉપકરણમાં ડેટાવેજ એપ્લિકેશન છે જે વપરાશકર્તાને બારકોડ ડેટા ડીકોડ કરવા અને બારકોડ સામગ્રી પ્રદર્શિત કરવા માટે સ્કેનરને સક્ષમ કરવાની મંજૂરી આપે છે.
નોંધ: બારકોડ વાંચવા માટે, સ્કેન-સક્ષમ એપ્લિકેશન આવશ્યક છે. ઉપકરણમાં ડેટાવેજ એપ્લિકેશન છે જે વપરાશકર્તાને બારકોડ ડેટા ડીકોડ કરવા અને બારકોડ સામગ્રી પ્રદર્શિત કરવા માટે સ્કેનરને સક્ષમ કરવાની મંજૂરી આપે છે.
RS6000 સાથે સ્કેન કરવા માટે:
- ઉપકરણ સાથે RS6000 જોડો.
- ખાતરી કરો કે એપ્લિકેશન ઉપકરણ પર ખુલ્લી છે અને એક ટેક્સ્ટ ફીલ્ડ ધ્યાન કેન્દ્રિત કરે છે (ટેક્સ્ટ ક્ષેત્રમાં ટેક્સ્ટ કર્સર)
- RS6000 ને બારકોડ પર નિર્દેશ કરો.

- ટ્રિગર દબાવો અને પકડી રાખો.
લાલ લેસર લક્ષ્યાંક પેટર્ન લક્ષ્યમાં મદદ કરવા માટે ચાલુ થાય છે. ખાતરી કરો કે બારકોડ લક્ષ્યાંક પેટર્નમાં ક્રોસ-હેર દ્વારા રચાયેલા વિસ્તારની અંદર છે. લક્ષિત બિંદુ તેજસ્વી પ્રકાશની સ્થિતિમાં દૃશ્યતા વધારે છે.
આકૃતિ 21 RS6000 એઇમિંગ પેટર્ન
 જ્યારે RS6000 પિક લિસ્ટ મોડમાં હોય, ત્યારે RS6000 બારકોડને ડીકોડ કરતું નથી જ્યાં સુધી ક્રોસહેરનું કેન્દ્ર બારકોડને સ્પર્શે નહીં.
આકૃતિ 22 RS6000 એઇમિંગ પેટર્નમાં બહુવિધ બારકોડ્સ સાથે પિક લિસ્ટ મોડ
 RS6000 LEDs આછો લીલો છે અને બારકોડ સફળતાપૂર્વક ડીકોડ કરવામાં આવ્યો છે તે દર્શાવવા માટે બીપનો અવાજ આવે છે.
કેપ્ચર કરેલ ડેટા ટેક્સ્ટ ફીલ્ડમાં દેખાય છે.
DS2278 ડિજિટલ સ્કેનર સાથે સ્કેનિંગ
બારકોડ ડેટા મેળવવા માટે DS2278 ડિજિટલ સ્કેનરનો ઉપયોગ કરો.
આકૃતિ 23 DS2278 ડિજિટલ સ્કેનર

વધુ માહિતી માટે DS2278 ડિજિટલ સ્કેનર પ્રોડક્ટ સંદર્ભ માર્ગદર્શિકાનો સંદર્ભ લો.
![]() નોંધ: બારકોડ વાંચવા માટે, સ્કેન-સક્ષમ એપ્લિકેશન આવશ્યક છે. ઉપકરણમાં ડેટાવેજ એપ્લિકેશન છે જે વપરાશકર્તાને બારકોડ ડેટા ડીકોડ કરવા અને બારકોડ સામગ્રી પ્રદર્શિત કરવા માટે સ્કેનરને સક્ષમ કરવાની મંજૂરી આપે છે.
નોંધ: બારકોડ વાંચવા માટે, સ્કેન-સક્ષમ એપ્લિકેશન આવશ્યક છે. ઉપકરણમાં ડેટાવેજ એપ્લિકેશન છે જે વપરાશકર્તાને બારકોડ ડેટા ડીકોડ કરવા અને બારકોડ સામગ્રી પ્રદર્શિત કરવા માટે સ્કેનરને સક્ષમ કરવાની મંજૂરી આપે છે.
DS2278 સાથે સ્કેન કરવા માટે:
- ઉપકરણ સાથે DS2278 જોડો. વધુ માહિતી માટે બ્લૂટૂથ સ્કેનરનું જોડાણ જુઓ.
- ખાતરી કરો કે એપ્લિકેશન ઉપકરણ પર ખુલ્લી છે અને એક ટેક્સ્ટ ફીલ્ડ ધ્યાન કેન્દ્રિત કરે છે (ટેક્સ્ટ ક્ષેત્રમાં ટેક્સ્ટ કર્સર)
- સ્કેનરને બારકોડ પર નિર્દેશ કરો.

- ટ્રિગર દબાવો અને પકડી રાખો.
- ખાતરી કરો કે લક્ષ્યાંક પેટર્ન બારકોડને આવરી લે છે.

- સફળ ડીકોડ પર, સ્કેનર બીપ કરે છે અને LED ફ્લેશ થાય છે, અને સ્કેન લાઇન બંધ થાય છે.
કેપ્ચર કરેલ ડેટા ટેક્સ્ટ ફીલ્ડમાં દેખાય છે.
DS3578 બ્લૂટૂથ સ્કેનર સાથે સ્કેનિંગ
બારકોડ ડેટા મેળવવા માટે DS3678 બ્લૂટૂથ સ્કેનરનો ઉપયોગ કરો.
આકૃતિ 24 DS3678 ડિજિટલ સ્કેનર

વધુ માહિતી માટે DS3678 પ્રોડક્ટ સંદર્ભ માર્ગદર્શિકાનો સંદર્ભ લો.
![]() નોંધ: બારકોડ વાંચવા માટે, સ્કેન-સક્ષમ એપ્લિકેશન આવશ્યક છે. ઉપકરણમાં ડેટાવેજ એપ્લિકેશન છે જે વપરાશકર્તાને બારકોડ ડેટા ડીકોડ કરવા અને બારકોડ સામગ્રી પ્રદર્શિત કરવા માટે સ્કેનરને સક્ષમ કરવાની મંજૂરી આપે છે.
નોંધ: બારકોડ વાંચવા માટે, સ્કેન-સક્ષમ એપ્લિકેશન આવશ્યક છે. ઉપકરણમાં ડેટાવેજ એપ્લિકેશન છે જે વપરાશકર્તાને બારકોડ ડેટા ડીકોડ કરવા અને બારકોડ સામગ્રી પ્રદર્શિત કરવા માટે સ્કેનરને સક્ષમ કરવાની મંજૂરી આપે છે.
DS3578 સ્કેનર સાથે સ્કેન કરવા માટે:
- ઉપકરણ સાથે સ્કેનર જોડો. વધુ માહિતી માટે બ્લૂટૂથ સ્કેનર્સનું પેરિંગ જુઓ.
- ખાતરી કરો કે એપ્લિકેશન ઉપકરણ પર ખુલ્લી છે અને એક ટેક્સ્ટ ફીલ્ડ ધ્યાન કેન્દ્રિત કરે છે (ટેક્સ્ટ ક્ષેત્રમાં ટેક્સ્ટ કર્સર)
- સ્કેનરને બારકોડ પર નિર્દેશ કરો.

- ટ્રિગર દબાવો અને પકડી રાખો.
ખાતરી કરો કે બારકોડ લક્ષ્યાંક પેટર્ન દ્વારા રચાયેલા વિસ્તારની અંદર છે. લક્ષિત બિંદુ તેજસ્વી પ્રકાશની સ્થિતિમાં દૃશ્યતા વધારે છે.

DS3608 USB સ્કેનર સાથે સ્કેનિંગ
બારકોડ ડેટા મેળવવા માટે DS3608 બ્લૂટૂથ સ્કેનરનો ઉપયોગ કરો.
આકૃતિ 25 DS3608 ડિજિટલ સ્કેનર

વધુ માહિતી માટે DS3608 પ્રોડક્ટ સંદર્ભ માર્ગદર્શિકાનો સંદર્ભ લો.
![]() નોંધ: બારકોડ વાંચવા માટે, સ્કેન-સક્ષમ એપ્લિકેશન આવશ્યક છે. ઉપકરણમાં ડેટાવેજ એપ્લિકેશન છે જે વપરાશકર્તાને બારકોડ ડેટા ડીકોડ કરવા અને બારકોડ સામગ્રી પ્રદર્શિત કરવા માટે સ્કેનરને સક્ષમ કરવાની મંજૂરી આપે છે.
નોંધ: બારકોડ વાંચવા માટે, સ્કેન-સક્ષમ એપ્લિકેશન આવશ્યક છે. ઉપકરણમાં ડેટાવેજ એપ્લિકેશન છે જે વપરાશકર્તાને બારકોડ ડેટા ડીકોડ કરવા અને બારકોડ સામગ્રી પ્રદર્શિત કરવા માટે સ્કેનરને સક્ષમ કરવાની મંજૂરી આપે છે.
DS3678 સ્કેનર સાથે સ્કેન કરવા માટે:
- USB સ્કેનરને ઉપકરણ સાથે કનેક્ટ કરો.
- ખાતરી કરો કે એપ્લિકેશન ઉપકરણ પર ખુલ્લી છે અને એક ટેક્સ્ટ ફીલ્ડ ધ્યાન કેન્દ્રિત કરે છે (ટેક્સ્ટ ક્ષેત્રમાં ટેક્સ્ટ કર્સર)
- સ્કેનરને બારકોડ પર નિર્દેશ કરો.

- ટ્રિગર દબાવો અને પકડી રાખો.
ખાતરી કરો કે બારકોડ લક્ષ્યાંક પેટર્ન દ્વારા રચાયેલા વિસ્તારની અંદર છે. લક્ષિત બિંદુ તેજસ્વી પ્રકાશની સ્થિતિમાં દૃશ્યતા વધારે છે.
આકૃતિ 26 DS3608 લક્ષ્યાંક પેટર્ન

DS8178 ડિજિટલ સ્કેનર સાથે સ્કેનિંગ
બારકોડ ડેટા મેળવવા માટે DS8178 બ્લૂટૂથ સ્કેનરનો ઉપયોગ કરો.
આકૃતિ 28 DS8178 ડિજિટલ સ્કેનર

વધુ માહિતી માટે DS8178 ડિજિટલ સ્કેનર પ્રોડક્ટ સંદર્ભ માર્ગદર્શિકાનો સંદર્ભ લો.
નોંધ: બારકોડ વાંચવા માટે, સ્કેન-સક્ષમ એપ્લિકેશન આવશ્યક છે. ઉપકરણમાં ડેટાવેજ એપ્લિકેશન છે જે વપરાશકર્તાને બારકોડ ડેટા ડીકોડ કરવા અને બારકોડ સામગ્રી પ્રદર્શિત કરવા માટે સ્કેનરને સક્ષમ કરવાની મંજૂરી આપે છે.
DS8178 સ્કેનર સાથે સ્કેન કરવા માટે:
- ઉપકરણ સાથે સ્કેનર જોડો. વધુ માહિતી માટે બ્લૂટૂથ સ્કેનર્સનું પેરિંગ જુઓ.
- ખાતરી કરો કે એપ્લિકેશન ઉપકરણ પર ખુલ્લી છે અને એક ટેક્સ્ટ ફીલ્ડ ધ્યાન કેન્દ્રિત કરે છે (ટેક્સ્ટ ક્ષેત્રમાં ટેક્સ્ટ કર્સર)
- સ્કેનરને બારકોડ પર નિર્દેશ કરો.

- ટ્રિગર દબાવો અને પકડી રાખો.
- ખાતરી કરો કે બારકોડ લક્ષ્યાંક પેટર્ન દ્વારા રચાયેલા વિસ્તારની અંદર છે. લક્ષિત બિંદુ તેજસ્વી પ્રકાશની સ્થિતિમાં દૃશ્યતા વધારે છે.

- સફળ ડીકોડ પર, સ્કેનર બીપ કરે છે અને LED ફ્લેશ થાય છે, અને સ્કેન લાઇન બંધ થાય છે. કેપ્ચર કરેલ ડેટા ટેક્સ્ટ ફીલ્ડમાં દેખાય છે.
LI3678 લીનિયર ઈમેજર સાથે સ્કેનિંગ
બારકોડ ડેટા મેળવવા માટે LI3678 રેખીય ઈમેજરનો ઉપયોગ કરો.
આકૃતિ 29 LI3678 બ્લૂટૂથ સ્કેનર

વધુ માહિતી માટે LI3678 પ્રોડક્ટ સંદર્ભ માર્ગદર્શિકાનો સંદર્ભ લો.
![]() નોંધ: બારકોડ વાંચવા માટે, સ્કેન-સક્ષમ એપ્લિકેશન આવશ્યક છે. ઉપકરણમાં ડેટાવેજ એપ્લિકેશન છે જે વપરાશકર્તાને બારકોડ ડેટા ડીકોડ કરવા અને બારકોડ સામગ્રી પ્રદર્શિત કરવા માટે સ્કેનરને સક્ષમ કરવાની મંજૂરી આપે છે.
નોંધ: બારકોડ વાંચવા માટે, સ્કેન-સક્ષમ એપ્લિકેશન આવશ્યક છે. ઉપકરણમાં ડેટાવેજ એપ્લિકેશન છે જે વપરાશકર્તાને બારકોડ ડેટા ડીકોડ કરવા અને બારકોડ સામગ્રી પ્રદર્શિત કરવા માટે સ્કેનરને સક્ષમ કરવાની મંજૂરી આપે છે.
LI3678 સાથે સ્કેન કરવા માટે:
- ઉપકરણ સાથે LI3678 ની જોડી બનાવો. વધુ માહિતી માટે બ્લૂટૂથ સ્કેનરનું જોડાણ જુઓ.
- ખાતરી કરો કે એપ્લિકેશન ઉપકરણ પર ખુલ્લી છે અને એક ટેક્સ્ટ ફીલ્ડ ધ્યાન કેન્દ્રિત કરે છે (ટેક્સ્ટ ક્ષેત્રમાં ટેક્સ્ટ કર્સર)
- LI3678 ને બારકોડ પર નિર્દેશ કરો.
- ટ્રિગર દબાવો અને પકડી રાખો.

- ખાતરી કરો કે લક્ષ્યાંક પેટર્ન બારકોડને આવરી લે છે.
 સફળ ડીકોડ પર, સ્કેનર બીપ કરે છે અને LED એક લીલો ફ્લેશ દર્શાવે છે.
કેપ્ચર કરેલ ડેટા ટેક્સ્ટ ફીલ્ડમાં દેખાય છે.
DS3678 બ્લૂટૂથ સ્કેનર સાથે સ્કેનિંગ
બારકોડ ડેટા મેળવવા માટે DS3678 બ્લૂટૂથ સ્કેનરનો ઉપયોગ કરો.
આકૃતિ 30 DS3678 ડિજિટલ સ્કેનર

વધુ માહિતી માટે DS3678 પ્રોડક્ટ સંદર્ભ માર્ગદર્શિકાનો સંદર્ભ લો.
![]() નોંધ: બારકોડ વાંચવા માટે, સ્કેન-સક્ષમ એપ્લિકેશન આવશ્યક છે. ઉપકરણમાં ડેટાવેજ એપ્લિકેશન છે જે વપરાશકર્તાને બારકોડ ડેટા ડીકોડ કરવા અને બારકોડ સામગ્રી પ્રદર્શિત કરવા માટે સ્કેનરને સક્ષમ કરવાની મંજૂરી આપે છે.
નોંધ: બારકોડ વાંચવા માટે, સ્કેન-સક્ષમ એપ્લિકેશન આવશ્યક છે. ઉપકરણમાં ડેટાવેજ એપ્લિકેશન છે જે વપરાશકર્તાને બારકોડ ડેટા ડીકોડ કરવા અને બારકોડ સામગ્રી પ્રદર્શિત કરવા માટે સ્કેનરને સક્ષમ કરવાની મંજૂરી આપે છે.
DS3678 સ્કેનર સાથે સ્કેન કરવા માટે:
- ઉપકરણ સાથે સ્કેનર જોડો. વધુ માહિતી માટે બ્લૂટૂથ સ્કેનર્સનું પેરિંગ જુઓ.
- ખાતરી કરો કે એપ્લિકેશન ઉપકરણ પર ખુલ્લી છે અને એક ટેક્સ્ટ ફીલ્ડ ધ્યાન કેન્દ્રિત કરે છે (ટેક્સ્ટ ક્ષેત્રમાં ટેક્સ્ટ કર્સર)
- સ્કેનરને બારકોડ પર નિર્દેશ કરો.

- ટ્રિગર દબાવો અને પકડી રાખો.
ખાતરી કરો કે બારકોડ લક્ષ્યાંક પેટર્ન દ્વારા રચાયેલા વિસ્તારની અંદર છે. લક્ષિત બિંદુ તેજસ્વી પ્રકાશની સ્થિતિમાં દૃશ્યતા વધારે છે.

બ્લૂટૂથ રિંગ સ્કેનરનું જોડાણ
ઉપકરણ સાથે બ્લૂટૂથ રિંગ સ્કેનરનો ઉપયોગ કરતા પહેલા, ઉપકરણને રિંગ સ્કેનર સાથે કનેક્ટ કરો.
રીંગ સ્કેનરને ઉપકરણ સાથે કનેક્ટ કરવા માટે, નીચેની પદ્ધતિઓમાંથી એકનો ઉપયોગ કરો:
- નિયર ફીલ્ડ કોમ્યુનિકેશન (NFC) (માત્ર RS6000)
- સિમ્પલ સીરીયલ ઈન્ટરફેસ (SSI)
- બ્લૂટૂથ હ્યુમન ઇન્ટરફેસ ડિવાઇસ (HID) મોડ.
નિયર ફીલ્ડ કોમ્યુનિકેશનનો ઉપયોગ કરીને SSI મોડમાં પેરિંગ
ઉપકરણ NFC નો ઉપયોગ કરીને SSI મોડમાં RS5100 અથવા RS6000 રિંગ સ્કેનરને જોડી કરવાની ક્ષમતા પ્રદાન કરે છે.
![]() નોંધ: માત્ર RS6000.
નોંધ: માત્ર RS6000.
- ખાતરી કરો કે RS6000 SSI મોડમાં છે. વધુ માહિતી માટે RS6000 વપરાશકર્તા માર્ગદર્શિકાનો સંદર્ભ લો.
- ખાતરી કરો કે ઉપકરણ પર NFC સક્ષમ છે.
- રીંગ સ્કેનર પરના NFC ચિહ્નને ઉપકરણની પાછળના NFC ચિહ્ન સાથે સંરેખિત કરો.

1 NFC લોગો
2 NFC એન્ટેના વિસ્તાર
સ્ટેટસ LED વાદળી ઝબકે છે જે દર્શાવે છે કે રીંગ સ્કેનર ઉપકરણ સાથે કનેક્શન સ્થાપિત કરવાનો પ્રયાસ કરી રહ્યું છે. જ્યારે કનેક્શન સ્થાપિત થાય છે, ત્યારે સ્ટેટસ LED બંધ થાય છે અને રીંગ સ્કેનર નીચા/ઉચ્ચ બીપ્સની એક જ સ્ટ્રિંગ બહાર કાઢે છે.
ઉપકરણ સ્ક્રીન પર એક સૂચના દેખાય છે.
આ ![]() સ્ટેટસ બારમાં આઇકોન દેખાય છે.
સ્ટેટસ બારમાં આઇકોન દેખાય છે.
સિમ્પલ સીરીયલ ઈન્ટરફેસ (SSI) નો ઉપયોગ કરીને પેરિંગ
સિમ્પલ સીરીયલ ઈન્ટરફેસનો ઉપયોગ કરીને ઉપકરણ સાથે રીંગ સ્કેનર જોડો.
- હોમ સ્ક્રીનની નીચેથી ઉપર સ્વાઇપ કરો અને ટચ કરો
 .
. - રીંગ સ્કેનરનો ઉપયોગ કરીને, સ્ક્રીન પરના બારકોડને સ્કેન કરો.
રીંગ સ્કેનર ઉચ્ચ/નીચી/ઉચ્ચ/નીચી બીપ્સની સ્ટ્રિંગ બહાર કાઢે છે. સ્કેન એલઇડી લીલો ચમકતો હોય છે જે દર્શાવે છે કે રીંગ સ્કેનર ઉપકરણ સાથે જોડાણ સ્થાપિત કરવાનો પ્રયાસ કરી રહ્યું છે. જ્યારે કનેક્શન સ્થાપિત થાય છે, ત્યારે સ્કેન LED બંધ થાય છે અને રિંગ સ્કેનર નીચા/ઉચ્ચ બીપ્સની એક સ્ટ્રિંગ બહાર કાઢે છે.
સૂચના પેનલ પર એક સૂચના દેખાય છે અને સ્ટેટસ બારમાં આઇકોન દેખાય છે.
બ્લૂટૂથ હ્યુમન ઇન્ટરફેસ ઉપકરણનો ઉપયોગ કરીને જોડી બનાવવી
હ્યુમન ઈન્ટરફેસ ડિવાઈસ (HID) નો ઉપયોગ કરીને ઉપકરણ સાથે રીંગ સ્કેનર જોડો.
- ખાતરી કરો કે બંને ઉપકરણો પર બ્લૂટૂથ સક્ષમ છે.
- ખાતરી કરો કે જે બ્લૂટૂથ ઉપકરણ શોધવાનું છે તે શોધી શકાય તેવા મોડમાં છે.
- ખાતરી કરો કે બંને ઉપકરણો એકબીજાથી 10 મીટર (32.8 ફૂટ)ની અંદર છે.
- રિંગ સ્કેનરને HID મોડમાં મૂકો. જો રિંગ સ્કેનર પહેલેથી HID મોડમાં છે, તો પગલું 5 પર જાઓ.
a) રીંગ સ્કેનરમાંથી બેટરી દૂર કરો.
b) રીસ્ટોર કી દબાવો અને પકડી રાખો.
c) બેટરીને રીંગ સ્કેનર પર ઇન્સ્ટોલ કરો.
d) રીસ્ટોર કીને લગભગ પાંચ સેકન્ડ સુધી પકડી રાખો જ્યાં સુધી કલરવ સંભળાય નહીં અને LEDs સ્કેન કરો ગ્રીન ફ્લેશ થાય.
e) રીંગ સ્કેનરને HID મોડમાં મૂકવા માટે નીચેનો બારકોડ સ્કેન કરો.
આકૃતિ 31 RS507 બ્લૂટૂથ HID બારકોડ

- રીંગ સ્કેનરમાંથી બેટરી દૂર કરો.
- રિંગ સ્કેનરમાં બેટરીને ફરીથી ઇન્સ્ટોલ કરો.
- ક્વિક એક્સેસ પેનલ ખોલવા માટે સ્ટેટસ બારમાંથી નીચે સ્વાઇપ કરો અને પછી ટચ કરો .
- Touch Bluetooth.
- નવા ઉપકરણની જોડીને ટચ કરો. ઉપકરણ વિસ્તારમાં શોધી શકાય તેવા બ્લૂટૂથ ઉપકરણોને શોધવાનું શરૂ કરે છે અને તેમને ઉપલબ્ધ ઉપકરણો હેઠળ પ્રદર્શિત કરે છે.
- સૂચિમાં સ્ક્રોલ કરો અને રિંગ સ્કેનર પસંદ કરો.
ઉપકરણ રીંગ સ્કેનર સાથે જોડાય છે અને ઉપકરણના નામની નીચે કનેક્ટેડ દેખાય છે. Bluetooth ઉપકરણ જોડી કરેલ ઉપકરણોની સૂચિમાં ઉમેરવામાં આવે છે અને વિશ્વસનીય ("જોડી") જોડાણ સ્થાપિત થાય છે.
સૂચના પેનલ પર એક સૂચના દેખાય છે અને સ્ટેટસ બારમાં આઇકોન દેખાય છે.
બ્લૂટૂથ સ્કેનરનું જોડાણ
ઉપકરણ સાથે બ્લૂટૂથ સ્કેનરનો ઉપયોગ કરતા પહેલા, ઉપકરણને બ્લૂટૂથ સ્કેનર સાથે કનેક્ટ કરો.
નીચેની પદ્ધતિઓમાંથી એકનો ઉપયોગ કરીને સ્કેનરને ઉપકરણ સાથે કનેક્ટ કરો:
- સરળ સીરીયલ ઈન્ટરફેસ (SSI) મોડ
- બ્લૂટૂથ હ્યુમન ઇન્ટરફેસ ડિવાઇસ (HID) મોડ.
સરળ સીરીયલ ઈન્ટરફેસનો ઉપયોગ કરીને જોડી બનાવવી
સિમ્પલ સીરીયલ ઈન્ટરફેસનો ઉપયોગ કરીને ઉપકરણ સાથે રીંગ સ્કેનર જોડો.
- ખાતરી કરો કે બંને ઉપકરણો એકબીજાથી 10 મીટર (32.8 ફૂટ)ની અંદર છે.
- સ્કેનરમાં બેટરી ઇન્સ્ટોલ કરો.
- હોમ સ્ક્રીનની નીચેથી ઉપર સ્વાઇપ કરો અને ટચ કરો .

- રીંગ સ્કેનરનો ઉપયોગ કરીને, સ્ક્રીન પરના બારકોડને સ્કેન કરો.
રીંગ સ્કેનર ઉચ્ચ/નીચી/ઉચ્ચ/નીચી બીપ્સની સ્ટ્રિંગ બહાર કાઢે છે. સ્કેન એલઇડી લીલો ચમકતો હોય છે જે દર્શાવે છે કે રીંગ સ્કેનર ઉપકરણ સાથે જોડાણ સ્થાપિત કરવાનો પ્રયાસ કરી રહ્યું છે. જ્યારે કનેક્શન સ્થાપિત થાય છે, ત્યારે સ્કેન LED બંધ થાય છે અને રિંગ સ્કેનર નીચા/ઉચ્ચ બીપ્સની એક સ્ટ્રિંગ બહાર કાઢે છે.
સૂચના પેનલ પર એક સૂચના દેખાય છે અને સ્ટેટસ બારમાં આઇકોન દેખાય છે.
બ્લૂટૂથ હ્યુમન ઇન્ટરફેસ ઉપકરણનો ઉપયોગ કરીને જોડી બનાવવી
HID નો ઉપયોગ કરીને ઉપકરણ સાથે બ્લૂટૂથ સ્કેનરનું જોડાણ કરો.
HID નો ઉપયોગ કરીને ઉપકરણ સાથે સ્કેનરને જોડવા માટે:
- સ્કેનરમાંથી બેટરી દૂર કરો.
- બેટરી બદલો.
- સ્કેનર રીબૂટ થયા પછી, સ્કેનરને HID મોડમાં મૂકવા માટે નીચેનો બારકોડ સ્કેન કરો.
આકૃતિ 33 Bluetooth HID Classic Barcode

- On the device, swipe down from the Status bar to open the Quick Access panel and then touch .
- Touch Bluetooth.
- નવા ઉપકરણની જોડીને ટચ કરો. ઉપકરણ વિસ્તારમાં શોધી શકાય તેવા બ્લૂટૂથ ઉપકરણોને શોધવાનું શરૂ કરે છે અને તેમને ઉપલબ્ધ ઉપકરણો હેઠળ પ્રદર્શિત કરે છે.
- Scroll through the list and select XXXXX xxxxxx, where XXXXX is the scanner and xxxxxx is the serial number.
The device connects to the scanner, the scanner beeps once and Connected appears below the device name. The Bluetooth device is added to the Paired devices list and a trusted (“paired”) connection is established.
ડેટાવેજ
Data Wedge is a utility that adds advanced barcode scanning capability to any application without writing code. It runs in the background and handles the interface to built-in barcode scanners. The captured barcode data is converted to keystrokes and sent to the target application as if it was typed on the keypad. DataWedge allows any app on the device to get data from input sources such as a barcode scanner, MSR, RFID, voice, or serial port and manipulate the data based on options or rules. Configure DataWedge to:
- Provide data capture services from any app.
- Use a particular scanner, reader or other peripheral device.
- Properly format and transmit data to a specific app.
To configure Data Wedge refer to techdocs.zebra.com/datawedge/.
ડેટાવેજને સક્ષમ કરી રહ્યું છે
This procedure provides information on how to enable DataWedge on the device.
- હોમ સ્ક્રીનની નીચેથી ઉપર સ્વાઇપ કરો અને ટચ કરો
 .
. - સ્પર્શ > સેટિંગ્સ.
- Touch the DataWedge enabled checkbox.
A blue checkmark appears in the checkbox indicating that DataWedge is enabled.
ડેટાવેજને અક્ષમ કરી રહ્યું છે
This procedure provides information on how to disable DataWedge on the device.
- હોમ સ્ક્રીનની નીચેથી ઉપર સ્વાઇપ કરો અને ટચ કરો .
- સ્પર્શ .
- સેટિંગ્સને ટચ કરો.
- Touch DataWedge enabled.
સમર્થિત ઉપકરણો
આ વિભાગો દરેક ડેટા કેપ્ચર વિકલ્પ માટે સપોર્ટેડ ડીકોડર્સ પૂરા પાડે છે.
Camera Supported Decoders
Lists the supported decoders for the internal camera.
Table 11 Camera Supported Decoders
| ડીકોડર | ડિફૉલ્ટ સ્થિતિ | ડીકોડર | ડિફૉલ્ટ સ્થિતિ | ડીકોડર | ડિફૉલ્ટ સ્થિતિ |
| ઓસ્ટ્રેલિયન પોસ્ટલ | O | EAN8 | X | MSI | O |
| એઝટેક | X | ગ્રીડ મેટ્રિક્સ | O | PDF417 | X |
| કેનેડિયન પોસ્ટલ | O | GS1 ડેટાબાર | X | QR કોડ | X |
| ચાઇનીઝ 2માંથી 5 | O | જીએસ 1 ડેટાબાર વિસ્તૃત | X | Decoder Signature | O |
| કોડાબાર | X | GS1 ડેટાબાર લિમિટેડ |
O | TLC 39 | O |
| કોડ 11 | O | GS1 Datamatrix | O | Trioptic 39 | O |
| કોડ 128 | X | GS1 QRCode | O | UK Postal | O |
| કોડ 39 | X | હાન ઝિન | O | યુપીસીએ | X |
| કોડ 93 | O | ઇન્ટરલીવ્ડ 2 5 ના |
O | UPCE0 | X |
| સંયુક્ત AB | O | જાપાનીઝ ટપાલ |
O | UPCE1 | O |
| સંયુક્ત સી | O | કોરિયન 3માંથી 5 | O | US4state | O |
| 2માંથી અલગ 5 | O | મેઇલ માર્ક | X | US4state FICS | O |
| ડેટામેટ્રિક્સ | X | 2માંથી મેટ્રિક્સ 5 | O | US Planet | O |
| ડચ ટપાલ | O | મેક્સિકોડ | X | US Postnet | O |
| ડોટકોડ | X | માઇક્રોપીડીએફ | O | ||
| EAN13 | X | માઇક્રોક્યુઆર | O |
SE4750-SR and SE4750-MR Internal Imager Supported Decoders
Lists the supported decoders for the SE4750-SR and SE4850-MR internal imager.
Table 12 SE4750-SR and SE4850-MR Internal Imager Supported Decoders
| ડીકોડર | ડિફૉલ્ટ સ્થિતિ | ડીકોડર | ડિફૉલ્ટ સ્થિતિ | ડીકોડર | ડિફૉલ્ટ સ્થિતિ |
| ઓસ્ટ્રેલિયન પોસ્ટલ | O | EAN8 | X | MSI | O |
| એઝટેક | X | ગ્રીડ મેટ્રિક્સ | O | PDF417 | X |
| કેનેડિયન પોસ્ટલ | O | GS1 ડેટાબાર | X | QR કોડ | X |
| ચાઇનીઝ 2માંથી 5 | O | જીએસ 1 ડેટાબાર વિસ્તૃત | X | Decoder Signature | O |
| કોડાબાર | X | GS1 ડેટાબાર લિમિટેડ | O | TLC 39 | O |
| કોડ 11 | O | GS1 Datamatrix | O | Trioptic 39 | O |
| કોડ 128 | X | GS1 QRCode | O | UK Postal | O |
| કોડ 39 | X | હાન ઝિન | O | યુપીસીએ | X |
| કોડ 93 | O | ઇન્ટરલીવ્ડ 2માંથી 5 | O | UPCE0 | X |
| સંયુક્ત AB | O | Japanese Postal | O | UPCE1 | O |
| સંયુક્ત સી | O | કોરિયન 3માંથી 5 | O | US4state | O |
| 2માંથી અલગ 5 | O | મેઇલ માર્ક | X | US4state FICS | O |
| ડેટામેટ્રિક્સ | X | 2માંથી મેટ્રિક્સ 5 | O | US Planet | O |
| ડચ ટપાલ | O | મેક્સિકોડ | X | US Postnet | O |
| ડોટકોડ | X | માઇક્રોપીડીએફ | O | ||
| EAN13 | X | માઇક્રોક્યુઆર | O |
કી: X = સક્ષમ, O = અક્ષમ, — = સમર્થિત નથી
SE4770 આંતરિક ઈમેજર સપોર્ટેડ ડીકોડર્સ
Lists the supported decoders for the SE4770 internal imager.
Table 13 SE4770 Internal Imager Supported Decoders
| ડીકોડર | ડિફૉલ્ટ સ્થિતિ | ડીકોડર | ડિફૉલ્ટ સ્થિતિ | ડીકોડર | ડિફૉલ્ટ સ્થિતિ |
| ઓસ્ટ્રેલિયન પોસ્ટલ | O | EAN8 | X | MSI | O |
| એઝટેક | X | ગ્રીડ મેટ્રિક્સ | O | PDF417 | X |
| કેનેડિયન પોસ્ટલ | O | GS1 ડેટાબાર | X | QR કોડ | X |
| ચાઇનીઝ 2માંથી 5 | O | જીએસ 1 ડેટાબાર વિસ્તૃત | X | ડીકોડર સહી |
O |
| કોડાબાર | X | GS1 ડેટાબાર લિમિટેડ | O | TLC 39 | O |
| કોડ 11 | O | GS1 Datamatrix | O | Trioptic 39 | O |
| કોડ 128 | X | GS1 QRCode | O | UK Postal | O |
| કોડ 39 | X | હાન ઝિન | O | યુપીસીએ | X |
| કોડ 93 | O | ઇન્ટરલીવ્ડ 2માંથી 5 | O | UPCE0 | X |
| સંયુક્ત AB | O | Japanese Postal | O | UPCE1 | O |
| સંયુક્ત સી | O | કોરિયન 3માંથી 5 | O | US4state | O |
| 2માંથી અલગ 5 | O | મેઇલ માર્ક | X | US4state FICS | O |
| ડેટામેટ્રિક્સ | X | 2માંથી મેટ્રિક્સ 5 | O | US Planet | O |
| ડચ ટપાલ | O | મેક્સિકોડ | X | US Postnet | O |
| ડોટકોડ | X | માઇક્રોપીડીએફ | O | ||
| EAN13 | X | માઇક્રોક્યુઆર | O |
કી: X = સક્ષમ, O = અક્ષમ, – = સમર્થિત નથી
RS507/RS507x Supported Decoders
Lists the supported decoders for the RS507/RS507x Ring Scanner.
Table 14 RS507/RS507x Supported Decoders
| ડીકોડર | ડિફૉલ્ટ સ્થિતિ | ડીકોડર | ડિફૉલ્ટ સ્થિતિ | ડીકોડર | ડિફૉલ્ટ સ્થિતિ |
| ઓસ્ટ્રેલિયન પોસ્ટલ | O | EAN8 | X | MSI | O |
| એઝટેક | X | ગ્રીડ મેટ્રિક્સ | O | PDF417 | X |
| કેનેડિયન પોસ્ટલ | – | GS1 ડેટાબાર | X | QR કોડ | X |
| ચાઇનીઝ 2માંથી 5 | O | જીએસ 1 ડેટાબાર વિસ્તૃત | X | ડીકોડર સહી |
O |
| કોડાબાર | X | GS1 ડેટાબાર લિમિટેડ | O | TLC 39 | O |
| કોડ 11 | O | GS1 Datamatrix | – | Trioptic 39 | O |
| કોડ 128 | X | GS1 QRCode | – | UK Postal | O |
| કોડ 39 | O | હાન ઝિન | – | યુપીસીએ | X |
| કોડ 93 | O | ઇન્ટરલીવ્ડ 2માંથી 5 | O | UPCE0 | X |
| સંયુક્ત AB | O | Japanese Postal | O | UPCE1 | O |
| સંયુક્ત સી | O | કોરિયન 3માંથી 5 | O | US4state | O |
| 2માંથી અલગ 5 | O | મેઇલ માર્ક | – | US4state FICS | O |
| ડેટામેટ્રિક્સ | X | 2માંથી મેટ્રિક્સ 5 | O | US Planet | O |
| ડચ ટપાલ | O | મેક્સિકોડ | X | US Postnet | O |
| ડોટકોડ | O | માઇક્રોપીડીએફ | O | ||
| EAN13 | X | માઇક્રોક્યુઆર | O |
RS5100 સપોર્ટેડ ડીકોડર્સ
RS5100 રીંગ સ્કેનર માટે સપોર્ટેડ ડીકોડર્સની યાદી આપે છે.
Table 15 RS5100 Supported Decoders
| ડીકોડર | ડિફૉલ્ટ સ્થિતિ | ડીકોડર | ડિફૉલ્ટ સ્થિતિ | ડીકોડર | ડિફૉલ્ટ સ્થિતિ |
| ઓસ્ટ્રેલિયન પોસ્ટલ | O | EAN8 | X | MSI | O |
| એઝટેક | X | ગ્રીડ મેટ્રિક્સ | O | PDF417 | X |
| કેનેડિયન પોસ્ટલ | O | GS1 ડેટાબાર | X | QR કોડ | X |
| ચાઇનીઝ 2માંથી 5 | O | GS1 ડેટાબાર વિસ્તૃત |
X | ડીકોડર સહી |
O |
| કોડાબાર | X | GS1 ડેટાબાર લિમિટેડ | O | TLC 39 | O |
| કોડ 11 | O | GS1 Datamatrix | O | Trioptic 39 | O |
| કોડ 128 | X | GS1 QRCode | O | UK Postal | O |
| કોડ 39 | X | હાન ઝિન | O | યુપીસીએ | X |
| કોડ 93 | O | ઇન્ટરલીવ્ડ 2માંથી 5 | O | UPCE0 | X |
| સંયુક્ત AB | O | Japanese Postal | O | UPCE1 | O |
| સંયુક્ત સી | O | કોરિયન 3માંથી 5 | O | US4state | O |
| 2માંથી અલગ 5 | O | મેઇલ માર્ક | X | US4state FICS | O |
| ડેટામેટ્રિક્સ | X | 2માંથી મેટ્રિક્સ 5 | O | US Planet | O |
| ડચ ટપાલ | O | મેક્સિકોડ | X | US Postnet | O |
| ડોટકોડ | O | માઇક્રોપીડીએફ | O | ||
| EAN13 | X | માઇક્રોક્યુઆર | O |
કી: X = સક્ષમ, O = અક્ષમ, – = સમર્થિત નથી
RS6000 સપોર્ટેડ ડીકોડર્સ
Lists the supported decoders for the RS6000 Ring Scanner.
Table 16 RS6000 Supported Decoders
| ડીકોડર | ડિફૉલ્ટ સ્થિતિ | ડીકોડર | ડિફૉલ્ટ સ્થિતિ | ડીકોડર | ડિફૉલ્ટ સ્થિતિ |
| ઓસ્ટ્રેલિયન પોસ્ટલ | O | EAN8 | X | MSI | O |
| એઝટેક | X | ગ્રીડ મેટ્રિક્સ | O | PDF417 | X |
| કેનેડિયન પોસ્ટલ | O | GS1 ડેટાબાર | X | QR કોડ | X |
| ચાઇનીઝ 2માંથી 5 | O | GS1 ડેટાબાર વિસ્તૃત |
X | ડીકોડર સહી |
O |
| કોડાબાર | X | GS1 ડેટાબાર લિમિટેડ | O | TLC 39 | O |
| કોડ 11 | O | GS1 Datamatrix | O | Trioptic 39 | O |
| કોડ 128 | X | GS1 QRCode | O | UK Postal | O |
| કોડ 39 | X | હાન ઝિન | O | યુપીસીએ | X |
| કોડ 93 | O | ઇન્ટરલીવ્ડ 2માંથી 5 | O | UPCE0 | X |
| સંયુક્ત AB | O | Japanese Postal | O | UPCE1 | O |
| સંયુક્ત સી | O | કોરિયન 3માંથી 5 | O | US4state | O |
| 2માંથી અલગ 5 | O | મેઇલ માર્ક | X | US4state FICS | O |
| ડેટામેટ્રિક્સ | X | 2માંથી મેટ્રિક્સ 5 | O | US Planet | O |
| ડચ ટપાલ | O | મેક્સિકોડ | X | US Postnet | O |
| ડોટકોડ | O | માઇક્રોપીડીએફ | O | ||
| EAN13 | X | માઇક્રોક્યુઆર | O |
DS2278 સપોર્ટેડ ડીકોડર્સ
Lists the supported decoders for the DS2278 Digital Scanner.
Table 17 DS2278 Digital Scanner Supported Decoders
| ડીકોડર | ડિફૉલ્ટ સ્થિતિ | ડીકોડર | ડિફૉલ્ટ સ્થિતિ | ડીકોડર | ડિફૉલ્ટ સ્થિતિ |
| ઓસ્ટ્રેલિયન પોસ્ટલ | O | EAN8 | X | MSI | O |
| એઝટેક | X | ગ્રીડ મેટ્રિક્સ | O | PDF417 | X |
| કેનેડિયન ટપાલ |
— | GS1 ડેટાબાર | X | QR કોડ | X |
| ચાઇનીઝ 2માંથી 5 | O | જીએસ 1 ડેટાબાર વિસ્તૃત | X | Decoder Signature | O |
| કોડાબાર | X | GS1 ડેટાબાર લિમિટેડ | O | TLC 39 | O |
| કોડ 11 | O | GS1 Datamatrix | O | Trioptic 39 | O |
| કોડ 128 | X | GS1 QRCode | O | UK Postal | O |
| કોડ 39 | X | હાન ઝિન | — | યુપીસીએ | X |
| કોડ 93 | O | ઇન્ટરલીવ્ડ 2માંથી 5 | O | UPCE0 | X |
| સંયુક્ત AB | O | Japanese Postal | O | UPCE1 | O |
| સંયુક્ત સી | O | કોરિયન 3માંથી 5 | O | US4state | O |
| 2માંથી અલગ 5 | O | મેઇલ માર્ક | X | US4state FICS | O |
| ડેટામેટ્રિક્સ | X | 2માંથી મેટ્રિક્સ 5 | O | US Planet | O |
| ડચ ટપાલ | O | મેક્સિકોડ | X | US Postnet | O |
| ડોટકોડ | O | માઇક્રોપીડીએફ | O | ||
| EAN13 | X | માઇક્રોક્યુઆર | O |
કી: X = સક્ષમ, O = અક્ષમ, — = સમર્થિત નથી
DS3578 સપોર્ટેડ ડીકોડર્સ
Lists the supported decoders for the DS3578 Digital Scanner.
Table 18 DS3578 Digital Scanner Supported Decoders
| ડીકોડર | ડિફૉલ્ટ સ્થિતિ | ડીકોડર | ડિફૉલ્ટ સ્થિતિ | ડીકોડર | ડિફૉલ્ટ સ્થિતિ |
| ઓસ્ટ્રેલિયન પોસ્ટલ | O | EAN8 | X | MSI | O |
| એઝટેક | X | ગ્રીડ મેટ્રિક્સ | O | PDF417 | X |
| કેનેડિયન પોસ્ટલ | — | GS1 ડેટાબાર | X | QR કોડ | X |
| ચાઇનીઝ 2માંથી 5 | O | જીએસ 1 ડેટાબાર વિસ્તૃત | X | Decoder Signature | — |
| કોડાબાર | X | GS1 ડેટાબાર લિમિટેડ | O | TLC 39 | O |
| કોડ 11 | O | GS1 Datamatrix | O | Trioptic 39 | O |
| કોડ 128 | X | GS1 QRCode | O | UK Postal | O |
| કોડ 39 | X | હાન ઝિન | — | યુપીસીએ | X |
| કોડ 93 | O | ઇન્ટરલીવ્ડ 2માંથી 5 | O | UPCE0 | X |
| સંયુક્ત AB | O | Japanese Postal | O | UPCE1 | O |
| સંયુક્ત સી | O | કોરિયન 3માંથી 5 | O | US4state | O |
| 2માંથી અલગ 5 | O | મેઇલ માર્ક | X | US4state FICS | O |
| ડેટામેટ્રિક્સ | X | 2માંથી મેટ્રિક્સ 5 | O | US Planet | O |
| ડચ ટપાલ | O | મેક્સિકોડ | X | US Postnet | O |
| ડોટકોડ | O | માઇક્રોપીડીએફ | O | ||
| EAN13 | X | માઇક્રોક્યુઆર | O |
કી: X = સક્ષમ, O = અક્ષમ, — = સમર્થિત નથી
DS3608 સપોર્ટેડ ડીકોડર્સ
DS3608 સ્કેનર માટે સપોર્ટેડ ડીકોડર્સની યાદી આપે છે.
Table 19 DS3608 Supported Decoders
| ડીકોડર | ડિફૉલ્ટ સ્થિતિ | ડીકોડર | ડિફૉલ્ટ સ્થિતિ | ડીકોડર | ડિફૉલ્ટ સ્થિતિ |
| ઓસ્ટ્રેલિયન પોસ્ટલ | O | EAN8 | X | MSI | O |
| એઝટેક | X | ગ્રીડ મેટ્રિક્સ | O | PDF417 | X |
| કેનેડિયન પોસ્ટલ | — | GS1 ડેટાબાર | X | QR કોડ | X |
| ચાઇનીઝ 2માંથી 5 | O | જીએસ 1 ડેટાબાર વિસ્તૃત | X | Decoder Signature | — |
| કોડાબાર | X | GS1 ડેટાબાર લિમિટેડ | O | TLC 39 | O |
| કોડ 11 | O | GS1 Datamatrix | O | Trioptic 39 | O |
| કોડ 128 | X | GS1 QRCode | O | UK Postal | O |
| કોડ 39 | X | હાન ઝિન | O | યુપીસીએ | X |
| કોડ 93 | O | ઇન્ટરલીવ્ડ 2માંથી 5 | O | UPCE0 | X |
| સંયુક્ત AB | O | Japanese Postal | O | UPCE1 | O |
| સંયુક્ત સી | O | કોરિયન 3માંથી 5 | O | US4state | O |
| 2માંથી અલગ 5 | O | મેઇલ માર્ક | X | US4state FICS | O |
| ડેટામેટ્રિક્સ | X | 2માંથી મેટ્રિક્સ 5 | O | US Planet | O |
| ડચ ટપાલ | O | મેક્સિકોડ | X | US Postnet | O |
| ડોટકોડ | O | માઇક્રોપીડીએફ | O | ||
| EAN13 | X | માઇક્રોક્યુઆર | O |
કી: X = સક્ષમ, O = અક્ષમ, — = સમર્થિત નથી
DS3678 સપોર્ટેડ ડીકોડર્સ
DS3678 સ્કેનર માટે સપોર્ટેડ ડીકોડર્સની યાદી આપે છે.
Table 20 DS3678 Supported Decoders
| ડીકોડર | ડિફૉલ્ટ સ્થિતિ | ડીકોડર | ડિફૉલ્ટ સ્થિતિ | ડીકોડર | ડિફૉલ્ટ સ્થિતિ |
| ઓસ્ટ્રેલિયન પોસ્ટલ | O | EAN8 | X | MSI | O |
| એઝટેક | X | ગ્રીડ મેટ્રિક્સ | O | PDF417 | X |
| કેનેડિયન પોસ્ટલ | — | GS1 ડેટાબાર | X | QR કોડ | X |
| ચાઇનીઝ 2માંથી 5 | O | જીએસ 1 ડેટાબાર વિસ્તૃત | X | Decoder Signature | — |
| કોડાબાર | X | GS1 ડેટાબાર લિમિટેડ | O | TLC 39 | O |
| કોડ 11 | O | GS1 Datamatrix | O | Trioptic 39 | O |
| કોડ 128 | X | GS1 QRCode | O | UK Postal | O |
| કોડ 39 | X | હાન ઝિન | O | યુપીસીએ | X |
| કોડ 93 | O | ઇન્ટરલીવ્ડ 2માંથી 5 | O | UPCE0 | X |
| સંયુક્ત AB | O | Japanese Postal | O | UPCE1 | O |
| સંયુક્ત સી | O | કોરિયન 3માંથી 5 | O | US4state | O |
| 2માંથી અલગ 5 | O | મેઇલ માર્ક | X | US4state FICS | O |
| ડેટામેટ્રિક્સ | X | 2માંથી મેટ્રિક્સ 5 | O | US Planet | O |
| ડચ ટપાલ | O | મેક્સિકોડ | X | US Postnet | O |
| ડોટકોડ | O | માઇક્રોપીડીએફ | O | ||
| EAN13 | X | માઇક્રોક્યુઆર | O |
કી: X = સક્ષમ, O = અક્ષમ, — = સમર્થિત નથી
DS8178 સપોર્ટેડ ડીકોડર્સ
Lists the supported decoders for the DS8178 Digital scanner.
Table 21 DS8178 Digital Scanner Supported Decoders
| ડીકોડર | ડિફૉલ્ટ સ્થિતિ | ડીકોડર | ડિફૉલ્ટ સ્થિતિ | ડીકોડર | ડિફૉલ્ટ સ્થિતિ |
| ઓસ્ટ્રેલિયન પોસ્ટલ | O | EAN8 | X | MSI | O |
| એઝટેક | X | ગ્રીડ મેટ્રિક્સ | O | PDF417 | X |
| કેનેડિયન પોસ્ટલ | — | GS1 ડેટાબાર | X | QR કોડ | X |
| ચાઇનીઝ 2માંથી 5 | O | જીએસ 1 ડેટાબાર વિસ્તૃત | X | ડીકોડર સહી |
— |
| કોડાબાર | X | GS1 ડેટાબાર લિમિટેડ | O | TLC 39 | O |
| કોડ 11 | O | GS1 Datamatrix | O | Trioptic 39 | O |
| કોડ 128 | X | GS1 QRCode | O | UK Postal | O |
| કોડ 39 | X | હાન ઝિન | — | યુપીસીએ | X |
| કોડ 93 | O | ઇન્ટરલીવ્ડ 2માંથી 5 | O | UPCE0 | X |
| સંયુક્ત AB | O | Japanese Postal | O | UPCE1 | O |
| સંયુક્ત સી | O | કોરિયન 3માંથી 5 | O | US4state | O |
| 2માંથી અલગ 5 | O | મેઇલ માર્ક | X | US4state FICS | O |
| ડેટામેટ્રિક્સ | X | 2માંથી મેટ્રિક્સ 5 | O | US Planet | O |
| ડચ ટપાલ | O | મેક્સિકોડ | X | US Postnet | O |
| ડોટકોડ | O | માઇક્રોપીડીએફ | O | ||
| EAN13 | X | માઇક્રોક્યુઆર | O |
કી: X = સક્ષમ, O = અક્ષમ, — = સમર્થિત નથી
LI3678 Supported Decoders
Lists the supported decoders for the LI3678 scanner.
Table 22 LI3678 Supported Decoders
| ડીકોડર | ડિફૉલ્ટ સ્થિતિ | ડીકોડર | ડિફૉલ્ટ સ્થિતિ | ડીકોડર | ડિફૉલ્ટ સ્થિતિ |
| ઓસ્ટ્રેલિયન પોસ્ટલ | — | EAN8 | X | MSI | O |
| એઝટેક | — | ગ્રીડ મેટ્રિક્સ | O | PDF417 | — |
| કેનેડિયન પોસ્ટલ | — | GS1 ડેટાબાર | X | QR કોડ | — |
| ચાઇનીઝ 2માંથી 5 | O | જીએસ 1 ડેટાબાર વિસ્તૃત | X | Decoder Signature | — |
| કોડાબાર | X | GS1 ડેટાબાર લિમિટેડ | O | TLC 39 | O |
| કોડ 11 | O | GS1 Datamatrix | — | Trioptic 39 | O |
| કોડ 128 | X | GS1 QRCode | — | UK Postal | — |
| કોડ 39 | X | હાન ઝિન | O | યુપીસીએ | X |
| કોડ 93 | O | ઇન્ટરલીવ્ડ 2માંથી 5 | O | UPCE0 | X |
| સંયુક્ત AB | — | Japanese Postal | — | UPCE1 | O |
| સંયુક્ત સી | — | કોરિયન 3માંથી 5 | O | US4state | — |
| 2માંથી અલગ 5 | O | મેઇલ માર્ક | — | US4state FICS | — |
| ડેટામેટ્રિક્સ | — | 2માંથી મેટ્રિક્સ 5 | O | US Planet | — |
| ડચ ટપાલ | — | મેક્સિકોડ | — | US Postnet | — |
| ડોટકોડ | O | માઇક્રોપીડીએફ | — | ||
| EAN13 | X | માઇક્રોક્યુઆર | — |
કી: X = સક્ષમ, O = અક્ષમ, — = સમર્થિત નથી
વાયરલેસ
This section provides information on the wireless features of the device.
The following wireless features are available on the device:
- વાયરલેસ વાઈડ એરિયા નેટવર્ક (WWAN)
- વાયરલેસ લોકલ એરિયા નેટવર્ક (WLAN)
- બ્લૂટૂથ
- કાસ્ટ
- નિયર ફિલ્ડ કોમ્યુનિકેશન્સ (NFC)
Wireless Wide Area Networks
Use Wireless wide area networks (WWANs) to access data over a cellular network.
![]() નોંધ: માત્ર TC77.
નોંધ: માત્ર TC77.
આ વિભાગ આના પર માહિતી પ્રદાન કરે છે:
- Sharing a data connection
- ડેટા વપરાશનું નિરીક્ષણ
- Changing Cellular Network settings
Sharing the Mobile Data Connection
The Tethering & Portable Hotspot settings allow sharing the mobile data connection with a single computer via USB tethering or Bluetooth tethering.
Share the data connection with up to eight devices at once, by turning it into a portable Wi-Fi hotspot.
While the device is sharing its data connection, an icon displays at the top of the screen and a corresponding message appears in the notification list.
USB ટિથરિંગ સક્ષમ કરી રહ્યું છે
![]() નોંધ: USB tethering is not supported on computers running Mac OS. If the computer is running Windows or a recent version of Linux (such as Ubuntu), follow these instructions without any special preparation. If running a version of Windows that precedes Windows 7, or some other operating system, you may need to prepare the computer to establish a network connection via USB.
નોંધ: USB tethering is not supported on computers running Mac OS. If the computer is running Windows or a recent version of Linux (such as Ubuntu), follow these instructions without any special preparation. If running a version of Windows that precedes Windows 7, or some other operating system, you may need to prepare the computer to establish a network connection via USB.
- Connect the device to a host computer with a USB cable.
The notification Charging this device via USB appears in the Notifications panel. - સેટિંગ્સ પર જાઓ.
- Touch Network & Internet.
- Touch Hotspot & tethering.
- Touch the USB tethering switch to enable.
The host computer is now sharing the device’s data connection.
To stop sharing the data connection, touch the USB tethering switch again or disconnect the USB cable.
Enabling Bluetooth Tethering
Use Bluetooth tethering to share the data connection with a host computer.
Configure the host computer to obtain its network connection using Bluetooth. For more information, see the host computer’s documentation.
- Pair the device with the host computer.
- સેટિંગ્સ પર જાઓ.
- Touch Networking & Internet.
- Touch Hotspot & tethering.
- Touch the Bluetooth tethering switch to enable.
The host computer is now sharing the device’s data connection.
To stop sharing the data connection, touch the Bluetooth tethering switch again.
Enabling Wi-Fi Hotspot
- સેટિંગ્સ પર જાઓ.
- Touch Networking & Internet.
- Touch Hotspot & tethering.
- Wi-Fi હોટસ્પોટને ટચ કરો.
- Toggle the switch to enable.
After a moment, the device starts broadcasting its Wi-Fi network name (SSID). Connect to it with up to eight computers or other devices. The Hotspot સ્ટેટસ બારમાં આઇકોન દેખાય છે.
To stop sharing the data connection, touch the toggle switch again.
Configuring the Wi-Fi Hotspot
- સેટિંગ્સ પર જાઓ.
- Touch Networking & Internet.
- Touch Hotspot & tethering.
- Wi-Fi હોટસ્પોટને ટચ કરો.
- In the Hotspot name text field, edit the name for the hotspot.
- Touch Security and select a security method from the drop-down list.
• WPA2-વ્યક્તિગત
a. Touch Hotspot password.
b. Enter a password.
c. Touch OK.
• None – If None is selected in the Security option, a password is not required. - એડવાન્સ્ડને ટચ કરો.
- If desired, touch Turn off hotspot automatically to turn off Wi-Fi Hotspot when no devices are connected.
- In the AP Band drop-down list, select 2.4 GHz Band or 5.0 GHz Band.
ડેટા વપરાશ
Data usage refers to the amount of data uploaded or downloaded by the device during a given period.
Depending on the wireless plan, you may be charged additional fees when your data usage exceeds your plan’s limit.
Data usage settings allow:
- Enable Data Saver.
- Set the data usage warning level.
- Set a data usage limit.
- View or restrict data usage by app.
- Identify mobile hotspots and restrict background downloads that may result in extra charges.
ડેટા વપરાશ મોનીટરીંગ
- સેટિંગ્સ પર જાઓ.
- Touch Network & internet > Mobile network > Data usage.
![]() સાવધાન: The usage displayed on the data usage settings screen is measured by your device.
સાવધાન: The usage displayed on the data usage settings screen is measured by your device.
Your carrier’s data usage accounting may differ. Usage in excess of your carrier plan’s data limits can result in steep overage charges. The feature described here can help you track your usage, but is not guaranteed to prevent additional charges.
By default, the data usage settings screen displays the mobile data settings. That is, the data network or networks provided by your carrier.
Setting Data Usage Warning
Set a warning alert when the device has used a certain amount of mobile data.
- સેટિંગ્સ પર જાઓ.
- Touch Network & internet > Mobile network > Data usage >
 .
. - If necessary, touch Set data warning to enable it.
- Touch Data warning.
- નંબર દાખલ કરો.
To switch between megabytes (MB) and gigabytes (GB), touch the down arrow. - SET ને ટચ કરો.
When the data usage reaches the set level, a notification appears.
Setting Data Limit
- સેટિંગ્સ પર જાઓ.
- Touch Network & internet > Mobile network > Data usage >.
- Touch Set data limit.
- બરાબર ટચ કરો.
- Touch Data limit.
- નંબર દાખલ કરો.
To switch between megabytes (MB) and gigabytes (GB), touch the down arrow. - ટચ સેટ.
When the limit is reached, data automatically turns off and a notification appears.
સેલ્યુલર નેટવર્ક સેટિંગ્સ
Cellular network settings applies to WWAN devices only.
Data When Roaming
Roaming is disabled by default to prevent the device from transmitting data over other carriers’ mobile networks when leaving an area that is covered by the carrier’s networks. This is useful for controlling expenses if the service plan does not include data roaming.
Setting Preferred Network Type
Change the network operating mode.
- સેટિંગ્સ પર જાઓ.
- Touch Network & Internet > Mobile network > Advanced > Preferred network type.
- In the Preferred network type dialog box, select a mode to set as default.
• Automatic (LWG)
• LTE only
• 3G only
• 2G only
Setting Preferred Network
Change the network operating mode.
- સેટિંગ્સ પર જાઓ.
- Touch Network & Internet > Mobile network > Advanced.
- Touch Automatically select network.
- ટચ નેટવર્ક.
- In the Available network list, select a carrier network.
ઉપયોગ કરીને માટે શોધો MicroCell
A MicroCell acts like a mini cell tower in a building or residence and connects to an existing broadband Internet service. It improves cell signal performance for voice calls, texts, and cellular data applications like picture messaging and Web સર્ફિંગ
- સેટિંગ્સ પર જાઓ.
- Touch Network & Internet > Mobile network.
- સ્પર્શ માટે શોધો MicroCell.
Configuring the Access Point Name
To use the data on a network, configure the APN information
![]() નોંધ: Many service provider Access Point Name (APN) data are pre-configured in the device.
નોંધ: Many service provider Access Point Name (APN) data are pre-configured in the device.
The APN information for all other service provides must be obtained from the wireless service provider.
- સેટિંગ્સ પર જાઓ.
- Touch Network & Internet > Mobile network > Advanced.
- Touch Access Point Names.
- Touch an APN name in the list to edit an existing APN or touch + to create a new APN.
- Touch each APN setting and enter the appropriate data obtained from the wireless service provider.
- જ્યારે સમાપ્ત થાય, ત્યારે સ્પર્શ કરો > સાચવો.
- Touch the radio button next to the APN name to start using it.
Locking the SIM Card
Locking the SIM card requires the user to enter a PIN every time the device is turned on. If the correct PIN is not entered, only emergency calls can be made.
- સેટિંગ્સ પર જાઓ.
- Touch Security > SIM card lock.
- Touch Lock SIM card.
- Enter the PIN associated with the card.
- બરાબર ટચ કરો.
- ઉપકરણને ફરીથી સેટ કરો.
વાયરલેસ લોકલ એરિયા નેટવર્ક્સ
Wireless local area networks (WLANs) allow the device to communicate wirelessly inside a building. Before using the device on a WLAN, the facility must be set up with the required hardware to run the WLAN (sometimes known as infrastructure). The infrastructure and the device must both be properly configured to enable this communication.
Refer to the documentation provided with the infrastructure (access points (APs), access ports, switches, Radius servers, etc.) for instructions on how to set up the infrastructure.
Once the infrastructure is set up to enforce the chosen WLAN security scheme, use the Wireless & networks settings configure the device to match the security scheme.
The device supports the following WLAN security options:
- કોઈ નહિ
- ઉન્નત ઓપન
- Wireless Equivalent Privacy (WEP)
- Wi-Fi Protected Access (WPA)/WPA2 Personal (PSK)
- WPA3-વ્યક્તિગત
- WPA/WPA2/WPA3 Enterprise (EAP)
- Protected Extensible Authentication Protocol (PEAP) – with MSCHAPV2 and GTC authentication.
- ટ્રાન્સપોર્ટ લેયર સિક્યુરિટી (TLS)
- Tunneled Transport Layer Security (TTLS) – with Password Authentication Protocol (PAP), MSCHAP and MSCHAPv2 authentication.
- Password (PWD).
- Extensible Authentication Protocol Method for Subscriber Identity Module (SIM)
- Extensible Authentication Protocol Method for Authentication and Key Agreement (AKA)
- Improved Extensible Authentication Protocol Method for Authentication and Key Agreement (AKA’)
- Lightweight Extensible Authentication Protocol (LEAP).
- WPA3-Enterprise 192-bit
The Status bar displays icons that indicate Wi-Fi network availability and Wi-Fi status.
![]() નોંધ: To extend the life of the battery, turn off Wi-Fi when not in use.
નોંધ: To extend the life of the battery, turn off Wi-Fi when not in use.
Wi-Fi નેટવર્કથી કનેક્ટ થઈ રહ્યું છે
- સેટિંગ્સ પર જાઓ.
- Touch Network & internet.
- Touch Wi-Fi to open the Wi-Fi screen. The device searches for WLANs in the area and lists them.
- Scroll through the list and select the desired WLAN network.
- For open networks, touch profile એકવાર અથવા દબાવો અને પકડી રાખો અને પછી કનેક્ટ પસંદ કરો અથવા સુરક્ષિત નેટવર્ક માટે જરૂરી પાસવર્ડ અથવા અન્ય ઓળખપત્રો દાખલ કરો પછી કનેક્ટને ટચ કરો. વધુ માહિતી માટે સિસ્ટમ એડમિનિસ્ટ્રેટર જુઓ.
ઉપકરણ ડાયનેમિક હોસ્ટ કન્ફિગરેશન પ્રોટોકોલ (DHCP) પ્રોટોકોલનો ઉપયોગ કરીને નેટવર્કમાંથી નેટવર્ક સરનામું અને અન્ય જરૂરી માહિતી મેળવે છે. ફિક્સ્ડ ઈન્ટરનેટ પ્રોટોકોલ (IP) એડ્રેસ સાથે ડિવાઈસને કન્ફિગર કરવા માટે, પેજ 124 પર સ્ટેટિક IP એડ્રેસનો ઉપયોગ કરવા માટે ડિવાઈસને કન્ફિગર કરવું જુઓ. - In the Wi-Fi setting field, Connected appears indicating that the device is connected to the WLAN.
Wi-Fi સંસ્કરણ
જ્યારે ઉપકરણ Wi-Fi નેટવર્ક સાથે જોડાયેલ હોય, ત્યારે સ્ટેટસ બાર પર Wi-Fi આઇકોન Wi-Fi નેટવર્ક સંસ્કરણ સૂચવે છે.
Table 23 Wi-Fi Version Icons
| ચિહ્ન | વર્ણન |
 |
Wi-Fi 5 સાથે કનેક્ટેડ, 802.11ac સ્ટાન્ડર્ડ. |
| Wi-Fi 4 સાથે કનેક્ટેડ, 802.11n સ્ટાન્ડર્ડ. |
Wi-Fi નેટવર્ક દૂર કરી રહ્યા છીએ
Remove a remembered or connected Wi-Fi network.
- સેટિંગ્સ પર જાઓ.
- Touch Network & Internet > Wi-Fi.
- Scroll down to the bottom of the list and touch Saved networks.
- Touch the name of the network.
- Touch FORGET.
ડબલ્યુએલએન રૂપરેખાંકન
આ વિભાગ Wi-Fi સેટિંગ્સને ગોઠવવા પર માહિતી પ્રદાન કરે છે.
સુરક્ષિત Wi-Fi નેટવર્ક ગોઠવી રહ્યું છે
- સેટિંગ્સ પર જાઓ.
- Touch Network & Internet > Wi-Fi.
- સ્વીચને ચાલુ સ્થિતિ પર સ્લાઇડ કરો.
- The device searches for WLANs in the area and lists them on the screen.
- Scroll through the list and select the desired WLAN network.
- Touch the desired network. If network security is Open, the device automatically connects to the network. For all other network security, a dialog box appears.
- If network security is WPA/WPA2-Personal, WPA3-Personal, or WEP, enter the required password and then touch Connect.
- If network security is WPA/WPA2/WPA3 Enterprise:
a) Touch the EAP method drop-down list and select one of the following:
• PEAP
• TLS
• TTLS
• PWD
• સિમ
• AKA
• AKA’
• LEAP.
b) Fill in the appropriate information. Options vary depending on the EAP method chosen.
• When selecting CA certificate, Certification Authority (CA) certificates are installed using the Security settings.
• When using the EAP methods PEAP, TLS, or TTLS, specify a domain.
• Touch Advanced options to display additional network options. - If the network security is WPA3-Enterprise 192-bit:
• Touch CA certificate and select a Certification Authority (CA) certificate. Note: Certificates are installed using the Security settings.
• Touch User certificate and select a user certificate. Note: User certificates are installed using the Security settings.
• In the Identity text box, enter the username credentials.
નોંધ: By default, the network Proxy is set to None and the IP settings is set to DHCP. See Configuring for a Proxy Server on page 124 for setting the connection to a proxy server and see Configuring the Device to Use a Static IP Address on page 124 for setting the device to use a static IP address. - કનેક્ટને ટચ કરો.
મેન્યુઅલી Wi-Fi નેટવર્ક ઉમેરવું
- સેટિંગ્સ પર જાઓ.
- Touch Network & Internet > Wi-Fi.
- Slide the Wi-Fi switch to the On position.
- Scroll to the bottom of the list and select Add network.
- In the Network name text box, enter the name of the Wi-Fi network.
- In the Security drop-down list, set the type of security to:
• કોઈ નહીં
• Enhanced Open
• WEP
• WPA/WPA2-Personal
• WPA3-વ્યક્તિગત
• WPA/WPA2/WPA3-Enterprise
• WPA3-Enterprise 192-bit - If the network security is None or Enhanced Open, touch Save.
- If the network security is WEP, WPA3-Personal,or WPA/WPA2-Personal, enter the required password and then touch Save.
નોંધ: By default, the network Proxy is set to None and the IP settings is set to DHCP. See Configuring for a Proxy Server on page 124 for setting the connection to a proxy server and see Configuring the Device to Use a Static IP Address on page 124 for setting the device to use a static IP address. - If network security is WPA/WPA2/WPA3 Enterprise:
a) Touch the EAP method drop-down list and select one of the following:
• PEAP
• TLS
• TTLS
• PWD
• સિમ
• AKA
• AKA’
• LEAP.
b) Fill in the appropriate information. Options vary depending on the EAP method chosen.
• When selecting CA certificate, Certification Authority (CA) certificates are installed using the Security settings.
• When using the EAP methods PEAP, TLS, or TTLS, specify a domain.
• Touch Advanced options to display additional network options. - If the network security is WPA3-Enterprise 192-bit:
• Touch CA certificate and select a Certification Authority (CA) certificate. Note: Certificates are installed using the Security settings.
• Touch User certificate and select a user certificate. Note: User certificates are installed using the Security settings.
• In the Identity text box, enter the username credentials. - Touch Save. To connect to the saved network, touch and hold on the saved network and select Connect to network.
પ્રોક્સી સર્વર માટે રૂપરેખાંકિત કરી રહ્યા છીએ
પ્રોક્સી સર્વર એ સર્વર છે જે અન્ય સર્વર પાસેથી સંસાધનો મેળવવા માંગતા ગ્રાહકોની વિનંતીઓ માટે મધ્યસ્થી તરીકે કાર્ય કરે છે. ક્લાયંટ પ્રોક્સી સર્વર સાથે જોડાય છે અને કેટલીક સેવાની વિનંતી કરે છે, જેમ કે a file, જોડાણ, web પૃષ્ઠ, અથવા અન્ય સંસાધન, એક અલગ સર્વરથી ઉપલબ્ધ છે. પ્રોક્સી સર્વર તેના ફિલ્ટરિંગ નિયમો અનુસાર વિનંતીનું મૂલ્યાંકન કરે છે. માજી માટેample, it may filter traffic by IP address or protocol. If the request is validated by the filter, the proxy provides the resource by connecting to the relevant server and requesting the service on behalf of the client.
It is important for enterprise customers to be able to set up secure computing environments within their companies, making proxy configuration essential. Proxy configuration acts as a security barrier ensuring that the proxy server monitors all traffic between the Internet and the intranet. This is normally an integral part of security enforcement in corporate firewalls within intranets.
- સેટિંગ્સ પર જાઓ.
- Touch Network & Internet > Wi-Fi .
- Slide the Wi-Fi switch to the On position.
- In the network dialog box, select and touch a network.
- If configuring the connected network, touch
 to edit the network details and then touch the down arrow to hide the keyboard.
 - Touch Advanced options.
- Touch Proxy and select Manual.
- In the Proxy hostname text box, enter the address of the proxy server.
- In the Proxy port text box, enter the port number for the proxy server.
- In the Bypass proxy for text box, enter addresses for web sites that are not required to go through the proxy server. Use a comma “,” between addresses. Do not use spaces or carriage returns between addresses.
- If configuring the connected network, touch Save otherwise, touch Connect.
- કનેક્ટને ટચ કરો.
સ્ટેટિક IP સરનામું વાપરવા માટે ઉપકરણને ગોઠવી રહ્યું છે
By default, the device is configured to use Dynamic Host Configuration Protocol (DHCP) to assign an Internet protocol (IP) address when connecting to a wireless network.
- સેટિંગ્સ પર જાઓ.
- Touch Network & Internet > Wi-Fi.
- Slide the Wi-Fi switch to the On position.
- In the network dialog box, select and touch a network.
- If configuring the connected network, touch to edit the network details and then touch the down arrow to hide the keyboard.
- Touch Advanced options.
- Touch IP settings and select Static.
- In the IP address text box, enter an IP address for the device.
- If required, in the Gateway text box, enter a gateway address for the device.
- If required, in the Network prefix length text box, enter the prefix length.
- If required, in the DNS 1 text box, enter a Domain Name System (DNS) address.
- If required, in the DNS 2 text box, enter a DNS address.
- If configuring the connected network, touch Save otherwise, touch Connect.
Wi-Fi પસંદગીઓ
Use the Wi-Fi preferences to configure advanced Wi-Fi settings. From the Wi-Fi screen scroll down to the bottom of the screen and touch Wi-Fi preferences.
- Turn on Wi-Fi automatically – When enabled, Wi-Fi automatically turns back on when near high quality saved networks.
- Open network notification – When enabled, notifies the user when an open network is available.
- Advanced – Touch to expand options.
- Additional settings – Touch to view additional Wi-Fi settings.
- Install Certificates – Touch to install certificates.
- Network rating provider – Disabled (AOSP devices). To help determine what constitutes a good WiFi network, Android supports external Network rating providers that provide information about the quality of open Wi-Fi networks. Select one of the providers listed or None. If none are available or selected, the Connect to open networks feature is disabled.
- Wi-Fi Direct – Displays a list of devices available for a direct Wi-Fi connection.
Additional Wi-Fi Settings
Use the Additional Settings to configure additional Wi-Fi settings. To view the additional Wi-Fi settings, scroll to the bottom of the Wi-Fi screen and touch Wi-Fi Preferences > Advanced > Additional settings.
![]() નોંધ: Additional Wi-Fi settings are for the device, not for a specific wireless network.
નોંધ: Additional Wi-Fi settings are for the device, not for a specific wireless network.
- નિયમનકારી
- Country Selection – Displays the acquired country code if 802.11d is enabled, else it displays the currently selected country code.
- Region code – Displays the current region code.
- બેન્ડ અને ચેનલ પસંદગી
- Wi-Fi frequency band – Set the frequency band to: Auto (default), 5 GHz only or 2.4 GHz only.
- Available channels (2.4 GHz) – Touch to display the Available channels menu. Select specific channels and touch OK.
- Available channels (5 GHz) – Touch to display the Available channels menu. Select specific channels and touch OK.
- લોગીંગ
- Advanced Logging – Touch to enable advanced logging or change the log directory.
- Wireless logs – Use to capture Wi-Fi log files.
- Fusion Logger – Touch to open the Fusion Logger application. This application maintains a history of high level WLAN events which helps to understand the status of connectivity.
- Fusion Status – Touch to display live status of WLAN state. Also provides information about the device and connected profile.
- વિશે
- Version – Displays the current Fusion information.
Wi-Fi ડાયરેક્ટ
Wi-Fi Direct devices can connect to each other without having to go through an access point. Wi-Fi Direct devices establish their own ad-hoc network when required, letting you see which devices are available and choose which one you want to connect to.
- સેટિંગ્સ પર જાઓ.
- Touch Wi-Fi > Wi-Fi preferences > Advanced > Wi-Fi Direct. The device begins searching for another Wi-Fi Direct device.
- Under Peer devices, touch the other device name.
- On the other device, select Accept.
Connected appears on the device. On both devices, in their respective Wi-Fi Direct screens, the other device name appears in the list.
બ્લૂટૂથ
Bluetooth devices can communicate without wires, using frequency-hopping spread spectrum (FHSS) radio frequency (RF) to transmit and receive data in the 2.4 GHz Industry Scientific and Medical (ISM) band (802.15.1). Bluetooth wireless technology is specifically designed for short-range (10 m (32.8 ft)) communication and low power consumption.
Devices with Bluetooth capabilities can exchange information (for exampલે, files, એપોઇન્ટમેન્ટ્સ અને કાર્યો) અન્ય બ્લૂટૂથ સક્ષમ ઉપકરણો જેમ કે પ્રિન્ટર, એક્સેસ પોઇન્ટ અને અન્ય મોબાઇલ ઉપકરણો સાથે.
ઉપકરણ બ્લૂટૂથ લો એનર્જીને સપોર્ટ કરે છે. બ્લૂટૂથ લો એનર્જી હેલ્થકેર, ફિટનેસ, સિક્યુરિટી અને હોમ એન્ટરટેઈનમેન્ટ ઈન્ડસ્ટ્રીઝમાં એપ્લિકેશન પર લક્ષિત છે. તે સ્ટાન્ડર્ડ બ્લૂટૂથ રેન્જ જાળવી રાખીને પાવર વપરાશ અને ખર્ચ ઘટાડે છે.
અનુકૂલનશીલ આવર્તન હોપિંગ
એડેપ્ટિવ ફ્રીક્વન્સી હોપિંગ (AFH) એ નિશ્ચિત ફ્રિકવન્સી ઇન્ટરફેરર્સને ટાળવાની એક પદ્ધતિ છે, અને તેનો ઉપયોગ બ્લૂટૂથ વૉઇસ સાથે થઈ શકે છે. AFH કામ કરે તે માટે પિકોનેટ (બ્લુટુથ નેટવર્ક)માંના તમામ ઉપકરણો AFH-સક્ષમ હોવા જોઈએ. ઉપકરણોને કનેક્ટ કરતી વખતે અને શોધતી વખતે કોઈ AFH નથી. મહત્વપૂર્ણ 802.11b સંચાર દરમિયાન બ્લૂટૂથ કનેક્શન અને શોધ કરવાનું ટાળો.
બ્લૂટૂથ માટે AFH ચાર મુખ્ય વિભાગો ધરાવે છે:
- Channel Classification – A method of detecting an interference on a channel-by-channel basis, or predefined channel mask.
- Link Management – Coordinates and distributes the AFH information to the rest of the Bluetooth network.
- Hop Sequence Modification – Avoids interference by selectively reducing the number of hopping channels.
- Channel Maintenance – A method for periodically re-evaluating the channels.
જ્યારે AFH સક્ષમ હોય છે, ત્યારે બ્લૂટૂથ રેડિયો 802.11b ઉચ્ચ-દર ચેનલો "આસપાસ ફરે છે" (માર્ગને બદલે). AFH સહઅસ્તિત્વ એન્ટરપ્રાઇઝ ઉપકરણોને કોઈપણ ઈન્ફ્રાસ્ટ્રક્ચરમાં કામ કરવાની મંજૂરી આપે છે.
આ ઉપકરણમાં બ્લૂટૂથ રેડિયો વર્ગ 2 ઉપકરણ પાવર ક્લાસ તરીકે કાર્ય કરે છે. મહત્તમ ઉત્પાદન શક્તિ 2.5 mW છે અને અપેક્ષિત શ્રેણી 10 m (32.8 ft) છે. પાવર ક્લાસ પર આધારિત રેન્જની વ્યાખ્યા પાવર અને ડિવાઈસના તફાવતોને કારણે અને ખુલ્લી જગ્યા હોય કે બંધ ઓફિસ સ્પેસને કારણે મેળવવી મુશ્કેલ છે.
![]() નોંધ: It is not recommended to perform Bluetooth wireless technology inquiry when high rate 802.11b operation is required.
નોંધ: It is not recommended to perform Bluetooth wireless technology inquiry when high rate 802.11b operation is required.
સુરક્ષા
The current Bluetooth specification defines security at the link level. Application-level security is not specified. This allows application developers to define security mechanisms tailored to their specific need.
Link-level security occurs between devices, not users, while application-level security can be implemented on a per-user basis. The Bluetooth specification defines security algorithms and procedures required to authenticate devices, and if needed, encrypt the data flowing on the link between the devices. Device
authentication is a mandatory feature of Bluetooth while link encryption is optional.
Pairing of Bluetooth devices is accomplished by creating an initialization key used to authenticate the devices and create a link key for them. Entering a common personal identification number (PIN) in the devices being paired generates the initialization key. The PIN is never sent over the air. By default, the Bluetooth stack responds with no key when a key is requested (it is up to user to respond to the key request event). Authentication of Bluetooth devices is based-upon a challenge-response transaction.
Bluetooth allows for a PIN or passkey used to create other 128-bit keys used for security and encryption.
The encryption key is derived from the link key used to authenticate the pairing devices. Also worthy of note is the limited range and fast frequency hopping of the Bluetooth radios that makes long-distance eavesdropping difficult.
ભલામણો છે:
- Perform pairing in a secure environment
- Keep PIN codes private and do not store the PIN codes in the device
- Implement application-level security.
બ્લૂટૂથ પ્રોfiles
ઉપકરણ સૂચિબદ્ધ બ્લૂટૂથ સેવાઓને સપોર્ટ કરે છે.
Table 24 Bluetooth Profiles
| પ્રોfile | વર્ણન |
| સર્વિસ ડિસ્કવરી પ્રોટોકોલ (SDP) | Handles the search for known and specific services as well as general services. |
| સીરીયલ પોર્ટ પ્રોfile (SPP) | Allows use of RFCOMM protocol to emulate serial cable connection between two Bluetooth peer devices. For example, ઉપકરણને પ્રિન્ટર સાથે કનેક્ટ કરી રહ્યું છે. |
| ઑબ્જેક્ટ પુશ પ્રોfile (ઓપીપી) | Allows the device to push and pull objects to and from a push server. |
| અદ્યતન ઓડિયો વિતરણ પ્રોfile (A2DP) | Allows the device to stream stereo-quality audio to a wireless headset or wireless stereo speakers. |
| ઑડિયો/વિડિયો રિમોટ કંટ્રોલ પ્રોfile (AVRCP) | Allows the device to control A/V equipment to which a user has access. It may be used in concert with A2DP. |
| Personal Area Network (PAN) | Allows the use of Bluetooth Network Encapsulation Protocol to provide L3 networking capabilities over a Bluetooth link. Only PANU role is supported. |
| હ્યુમન ઇન્ટરફેસ ડિવાઇસ પ્રોfile (HID) | Allows Bluetooth keyboards, pointing devices, gaming devices and remote monitoring devices to ઉપકરણ સાથે કનેક્ટ કરો. |
| હેડસેટ પ્રોfile (HSP) | Allows a hands-free device, such as a Bluetooth headset, to place and receive calls on the device. |
| હેન્ડ્સ-ફ્રી પ્રોfile (HFP) | Allows car hands-free kits to communicate with the device in the car. |
| ફોન બુક એક્સેસ પ્રોfile (PBAP) | Allows exchange of Phone Book Objects between a car kit and a mobile device to allow the car kit to display the name of the incoming caller; allow the car kit to download the phone book so you can initiate a call from the car display. |
| આઉટ ઓફ બેન્ડ (OOB) | Allows exchange of information used in the pairing process. Pairing is initiated by NFC but completed using the Bluetooth radio. Paring requires information from the OOB mechanism. Using OOB with NFC enables pairing when devices simply get close, rather than requiring a lengthy discovery process. |
| Symbol Serial Interface (SSI) | Allows for communication with Bluetooth Imager. |
બ્લૂટૂથ પાવર સ્ટેટ્સ
બ્લૂટૂથ રેડિયો ડિફૉલ્ટ રૂપે બંધ છે.
- Suspend – When the device goes into suspend mode, the Bluetooth radio stays on.
- Airplane Mode – When the device is placed in Airplane Mode, the Bluetooth radio turns off. When Airplane mode is disabled, the Bluetooth radio returns to the prior state. When in Airplane Mode, the Bluetooth radio can be turned back on if desired.
બ્લૂટૂથ રેડિયો પાવર
પાવર બચાવવા માટે અથવા જો રેડિયો પ્રતિબંધોવાળા વિસ્તારમાં પ્રવેશતા હોવ તો બ્લૂટૂથ રેડિયો બંધ કરો (દા.તample, એક વિમાન). જ્યારે રેડિયો બંધ હોય, ત્યારે અન્ય બ્લૂટૂથ ઉપકરણો ઉપકરણને જોઈ અથવા કનેક્ટ કરી શકતાં નથી. અન્ય બ્લૂટૂથ ઉપકરણો (રેન્જમાં) સાથે માહિતીની આપલે કરવા માટે બ્લૂટૂથ રેડિયો ચાલુ કરો. નિકટતામાં ફક્ત બ્લૂટૂથ રેડિયો સાથે જ વાતચીત કરો.
![]() નોંધ: To achieve the best battery life, turn off radios when not in use.
નોંધ: To achieve the best battery life, turn off radios when not in use.
બ્લૂટૂથ સક્ષમ કરી રહ્યાં છીએ
- Swipe down from the Status bar to open the Notification panel.
- સ્પર્શ
 બ્લૂટૂથ ચાલુ કરવા માટે.
બ્લૂટૂથ અક્ષમ કરી રહ્યાં છીએ
- Swipe down from the Status bar to open the Notification panel.
- સ્પર્શ
 બ્લૂટૂથ બંધ કરવા માટે.
બ્લૂટૂથ ઉપકરણ(ઉપકરણો) શોધવી
The device can receive information from discovered devices without pairing. However, once paired, the device and a paired device exchange information automatically when the Bluetooth radio is on.
- ખાતરી કરો કે બંને ઉપકરણો પર બ્લૂટૂથ સક્ષમ છે.
- ખાતરી કરો કે જે બ્લૂટૂથ ઉપકરણ શોધવાનું છે તે શોધી શકાય તેવા મોડમાં છે.
- ખાતરી કરો કે બંને ઉપકરણો એકબીજાથી 10 મીટર (32.8 ફૂટ)ની અંદર છે.
- Swipe down from the Status bar to open the Quick Access panel.
- બ્લૂટૂથને ટચ કરો અને પકડી રાખો.
- નવા ઉપકરણની જોડીને ટચ કરો. ઉપકરણ વિસ્તારમાં શોધી શકાય તેવા બ્લૂટૂથ ઉપકરણોને શોધવાનું શરૂ કરે છે અને તેમને ઉપલબ્ધ ઉપકરણો હેઠળ પ્રદર્શિત કરે છે.
- Scroll through the list and select a device. The Bluetooth pairing request dialog box appears.
- Touch Pair on both devices.
- The Bluetooth device is added to the Paired devices list and a trusted (“paired”) connection is established.
બ્લૂટૂથનું નામ બદલવું
By default, the device has a generic Bluetooth name that is visible to other devices when connected.
- સેટિંગ્સ પર જાઓ.
- Touch Connected devices > Connection preferences > Bluetooth.
- If Bluetooth is not on, move the switch to turn Bluetooth on.
- Touch Device name.
- Enter a name and touch RENAME.
બ્લૂટૂથ ડિવાઇસ સાથે કનેક્ટ થઈ રહ્યું છે
Once paired, connect to a Bluetooth device.
- સેટિંગ્સ પર જાઓ.
- Touch Connected devices > Connection preferences > Bluetooth.
- In the list, touch the unconnected Bluetooth device.
જ્યારે કનેક્ટેડ હોય, ત્યારે ઉપકરણના નામની નીચે કનેક્ટેડ દેખાય છે.
પ્રો પસંદ કરી રહ્યા છીએfileબ્લૂટૂથ ઉપકરણ પર s
કેટલાક બ્લૂટૂથ ઉપકરણોમાં બહુવિધ પ્રો હોય છેfiles.
- સેટિંગ્સ પર જાઓ.
- Touch Connected devices > Connection preferences > Bluetooth .
- In the Paired Devices list, touch next to the device name.
- Turn on or off a profile ઉપકરણને તે પ્રોનો ઉપયોગ કરવાની મંજૂરી આપવા માટેfile.
બ્લૂટૂથ ડિવાઇસ અન જોડી કરી રહ્યું છે
Unpairing a Bluetooth device erases all pairing information.
- સેટિંગ્સ પર જાઓ.
- Touch Connected devices > Connection preferences > Bluetooth.
- In the Paired Devices list, touch next to the device name.
- Touch FORGET.
Using a Bluetooth Headset
Use a Bluetooth headset for audio communication when using an audio-enabled app. See Bluetooth for more information on connecting a Bluetooth headset to the device. Set the volume appropriately before putting on the headset. When a Bluetooth headset is connected, the speakerphone is muted.
કાસ્ટ
Use Cast to mirror the device screen on a Miracast enabled wireless display.
- સેટિંગ્સ પર જાઓ.
- Touch Connected devices > Connection preferences > Cast.
- સ્પર્શ > Enable wireless display.
The device searches for nearby Miracast devices and lists them. - Touch a device to begin casting.
નિયર ફીલ્ડ કોમ્યુનિકેશન્સ
NFC/HF RFID is a short-range wireless connectivity technology standard that enables a secure transaction between a reader and a contactless smartcard.
The technology is based on ISO/IEC 14443 type A and B (proximity) ISO/IEC 15693 (vicinity) standards, using the HF 13.56 MHz unlicensed band.
ઉપકરણ નીચેના ઓપરેટિંગ મોડ્સને સપોર્ટ કરે છે:
- રીડર મોડ
- Card Emulation mode.
Using NFC, the device can: - Read contactless cards such as contactless tickets, ID cards and ePassport.
- Read and write information to contactless cards such as SmartPosters and tickets, as well as devices with NFC interface such as vending machines.
- Read information from supported medical sensors.
- Pair with supported Bluetooth devices such as printers ring scanners (for example, RS6000), and headsets (for example, HS3100).
- Exchange data with another NFC device.
- Emulate contactless cards such as payment, or ticket, or SmartPoster.
The device NFC antenna is positioned to read NFC cards from the top of the device while the device is being held.
The device NFC antenna is located on the back of the device, near the Interface Connector.
NFC કાર્ડ્સ વાંચવું
NFC નો ઉપયોગ કરીને કોન્ટેક્ટલેસ કાર્ડ્સ વાંચો.
- NFC સક્ષમ એપ્લિકેશન લોંચ કરો.
- બતાવ્યા પ્રમાણે ઉપકરણને પકડી રાખો.

- Move the device close to the NFC card until it detects the card.
- જ્યાં સુધી વ્યવહાર પૂર્ણ ન થાય ત્યાં સુધી કાર્ડને સ્થિર રાખો (સામાન્ય રીતે એપ્લિકેશન દ્વારા સૂચવવામાં આવે છે).
Sharing Information Using NFC
You can beam content like a web page, contact cards, pictures, YouTube links, or location information from your screen to another device by bringing the devices together back to back.
Make sure both devices are unlocked, support NFC, and have both NFC and Android Beam turned on.
- Open a screen that contains a web page, video, photo or contact.
- Move the front of the device toward the front of the other device.
When the devices connect, a sound emits, the image on the screen reduces in size, the message Touch to beam displays.
- Touch anywhere on the screen.
The transfer begins.
Enterprise NFC Settings
Improve NFC performance or increase battery life by selecting which NFC features to use on the device.
- Card Detection Mode – Select a card detection mode.
- Low – Increases battery life by lowering the NFC detection speed.
- Hybrid – Provides a balance between NFC detection speed and battery life (default).
- Standard – Provides the best NFC detection speed, but reduces battery life.
- Supported Card Technology – Select an option to detect only one NFC tag type, increasing battery life, but reducing detection speed.
- All (Default) – Detects all NFC tag types. This provides the best detection speed, but reduces battery life.
- ISO 14443 Type A
- ISO 14443 Type B
- ISO15693
- NFC Debug Logging – Use to enable or disable debug logging for NFC.
- Other NFC settings available with Zebra administrator tools (CSP) – Allows configuration of additional Enterprise NFC Settings through staging tools and Mobile Device Management (MDM) solutions with an MX version that supports the Enterprise NFC Settings Configuration Service Provider (CSP). For more information on using the Enterprise NFC Settings CSP, refer to: techdocs.zebra.com.
કૉલ્સ
Make a phone call from the Phone app, the Contacts app, or other apps or widgets that display contact information.
![]() નોંધ: This section applies to WWAN devices only.
નોંધ: This section applies to WWAN devices only.
Emergency Calling
The service provider programs one or more emergency phone numbers, such as 911 or 999, that the user can call under any circumstances, even when the phone is locked, a SIM card is not inserted or the phone is not activated. The service provider can program additional emergency numbers into the SIM card.
However, the SIM card must be inserted in the device in order to use the numbers stored on it. See the service provider for additional information.
![]() નોંધ: Emergency numbers vary by country. The phone’s pre-programmed emergency number(s) may not work in all locations, and sometimes an emergency call cannot be placed due to network, environmental, or interference issues
નોંધ: Emergency numbers vary by country. The phone’s pre-programmed emergency number(s) may not work in all locations, and sometimes an emergency call cannot be placed due to network, environmental, or interference issues
ઑડિયો મોડ્સ
The device offers three audio modes for use during phone calls.
- Handset Mode – Switch audio to the receiver at the top front of the device to use the device as a handset. This is the default mode.
- Speaker Mode – Use the device as a speakerphone.
- Headset Mode – Connect a Bluetooth or wired headset to automatically switch audio to the headset.
બ્લૂટૂથ હેડસેટ
Use a Bluetooth headset for audio communication when using an audio-enabled app.
Set the volume appropriately before putting on the headset. When a Bluetooth headset is connected, the speakerphone is muted.
વાયર્ડ હેડસેટ
Use a wired headset and audio adapter for audio communication when using an audio-enabled app.
Set the volume appropriately before putting on the headset. When a wired headset is connected, the speakerphone is muted
To end a call using the wired headset, press and hold the headset button until the call ends.
ઓડિયો વોલ્યુમ એડજસ્ટ કરી રહ્યું છે
Use the volume buttons to adjust the phone volume.
- Ring and notification volumes when not in a call.
- Conversation volume during a call.
Making a Call Using the Dialer
Use the dialer tab to dial phone numbers.
- On the Home screen touch
 .
. - સ્પર્શ
 .
. - Touch the keys to enter the phone number.
- સ્પર્શ
 below the dialer to initiate the call.
વિકલ્પ વર્ણન 
Send audio to the speakerphone. 
Mute the call. ડાયલ પેડ દર્શાવો. 
Place the call on hold (not available on all services). 
Create a conference call. 
Increase audio level. - સ્પર્શ
 કૉલ સમાપ્ત કરવા માટે.
If using a Bluetooth headset, additional audio options are available. Touch the audio icon to open the audio menu.વિકલ્પ વર્ણન 
Audio is routed to the Bluetooth headset. 
Audio is routed to the speakerphone. 
Audio is routed to the earpiece.
Accessing Dialing Options
The dialer provides options to save the dialed number to contacts, send an SMS, or insert pauses and wait into the dial string.
- Enter at least one digit in the dialer, then touch .
- Add 2–sec pause – Pause the dialing of the next number for two seconds. Multiple pauses are added sequentially.
- Add wait – Wait for confirmation to send the rest of the digits.
Make a Call Using Contacts
There are two ways to make a call using contacts, using the Dialer or using the Contacts app.
ડાયલરનો ઉપયોગ
- On the Home screen touch .
- સ્પર્શ
 .
. - Touch the contact.
- સ્પર્શ
 કૉલ શરૂ કરવા માટે.
વિકલ્પ વર્ણન Send audio to the speakerphone. Mute the call. ડાયલ પેડ દર્શાવો. Place the call on hold (not available on all services). Create a conference call. Increase audio level. - સ્પર્શ કૉલ સમાપ્ત કરવા માટે.
If using a Bluetooth headset, additional audio options are available. Touch the audio icon to open the audio menu.વિકલ્પ વર્ણન Audio is routed to the Bluetooth headset. Audio is routed to the speakerphone. Audio is routed to the earpiece.
Using the Contacts App
- સ્પર્શ
 .
. - Touch a contact name.
- સ્પર્શ કૉલ શરૂ કરવા માટે.
Make a Call Using Call History
Call History is a list of all the calls placed, received, or missed. It provides a convenient way to redial a number, return a call, or add a number to Contacts.
Arrow icons beside a call indicate the type of call. Multiple arrows indicate multiple calls.
Table 25 Call Type Indicators
| ચિહ્ન | વર્ણન |
| Missed incoming call | |
| Received incoming call | |
 |
આઉટગોઇંગ કોલ |
Using the Call History List
- On the Home screen touch .
- ને ટચ કરો
 ટેબ
ટેબ - સ્પર્શ next to the contact to initiate the call.
- Touch the contact to perform other functions.
- સ્પર્શ કૉલ સમાપ્ત કરવા માટે.
Making a Conference Call on GSM
Create a conference phone session with multiple people
![]() નોંધ: Conference Calling and the number of conference calls allowed may not be available on all services. Please check with the service provider for Conference Calling availability.
નોંધ: Conference Calling and the number of conference calls allowed may not be available on all services. Please check with the service provider for Conference Calling availability.
- On the Home screen touch .
- સ્પર્શ .
- Touch the keys to enter the phone number.
- સ્પર્શ below the dialer to initiate the call.
- When the call connects, touch .
પ્રથમ કોલ હોલ્ડ પર મૂકવામાં આવે છે. - સ્પર્શ .
- Touch the keys to enter the second phone number.
- સ્પર્શ below the dialer to initiate the call.
When the call connects, the first call is placed on hold and the second call is active. - સ્પર્શ
 to create a conference call with three people.
 - સ્પર્શ to add another call.
The conference is placed on hold. - સ્પર્શ .
- Touch the keys to enter another phone number.
- સ્પર્શ below the dialer to initiate the call.
- સ્પર્શ icon to add the third call to the conference.
- Touch Manage conference call to view બધા કોલર્સ.
| વિકલ્પ | વર્ણન |
| Remove a caller from the conference. | |
| Speak privately with one party during a conference call. | |
| Include all parties again. |
Making a Call Using a Bluetooth Headset
- Pair the Bluetooth headset with the device.
- Press the Call button on the Bluetooth headset.
- Press the Call button on the Bluetooth headset to end the call.
કોલ્સનો જવાબ આપવો
When receiving a phone call, the Incoming Call screen displays the caller ID and any additional information about the caller that is in the Contacts app.
![]() નોંધ: Not all options are available for all configurations.
નોંધ: Not all options are available for all configurations.
To modify phone call settings, on the Home screen touch ![]() >
> ![]() > સેટિંગ્સ.
> સેટિંગ્સ.
- Touch ANSWER to answer the call or DECLINE to send the caller to voice mail.
If the screen lock is enabled, the user can answer the call without unlocking the device. - When a call arrives:
- સ્પર્શ and slide up to answer the call.
- સ્પર્શ and slide down to send the call to voice mail.
- સ્પર્શ
 to open a list of quick text responses. Touch one to send it to the caller immediately.
કૉલ સેટિંગ્સ
To modify phone call settings, on the Home screen touch ![]() >
> ![]() > સેટિંગ્સ.
> સેટિંગ્સ.
![]() નોંધ: Not all options are available for all configurations
નોંધ: Not all options are available for all configurations
- ડિસ્પ્લે વિકલ્પો
- Sort by – Set to First name or Last name.
- Name format – Set to First name first or Last name first.
- Sounds and vibrations – Touch to edit the general sound settings for the device.
- Quick responses – Touch to edit quick responses to use instead of answering a call.
- Speed dial settings – Set speed dial contact shortcuts.
- Calling accounts
- Settings – Touch a mobile provider to display options for that provider.
- Fixed Dialing Numbers – Set to only allow the phone to dial the phone number(s) or area code(s) specified in a Fixed Dialing list.
- Call forwarding – Set to forward incoming calls to a different phone number.
![]() નોંધ: Call Forwarding may not be available on all networks. Check with the service provider for availability.
નોંધ: Call Forwarding may not be available on all networks. Check with the service provider for availability.
- વધારાની સેટિંગ્સ
- Caller ID – Set caller ID to reveal the identity of the person making an outgoing call. Options:
Network default (default), Hide number, Show number. - Call waiting – Set to be notified of an incoming call while on a call.
- SIP accounts – Choose to receive Internet calls for accounts added to the device, view or change SIP accounts, or add an Internet calling account.
- Use SIP calling – Set to For all calls or Only for SIP calls (default).
- Receive incoming calls – Enable to allow incoming calls (default – disabled).
- Wi-Fi calling – Enable to allow Wi-Fi calling and set the Wi-Fi calling preference (default – disabled).
- Call barring – Set to block certain types of incoming or outgoing calls.
- Blocked numbers – Set to block calls and texts from certain phone numbers. Touch ADD A NUMBER to block a phone number.
- Voicemail – Configure voicemail settings.
- Notifications – Configure voicemail notification settings.
- Importance – Set the notification importance to Urgent, High (default), Medium, or Low.
- Alerting – Touch to receive sound and vibration notifications when a voicemail is received.
Use toggle switches to enable or disable Pop on screen, Blink light, Show notification dot, and Override Do Not Disturb. - Silent – Touch to silence sound and vibration notifications when a voicemail is received. Use toggle switches to enable or disable Minimize, Show notification dot, and Override Do Not Disturb.
- Sound – Select a sound to play for notifications from this app.
- Vibrate – Allow notifications from this app to vibrate the device.
- Blink light – Allow notifications from this app the light the Notification LED blue.
- Show notification dot – Allow notifications from this app to add a notification dot to the app icon.
- Override Do Not Disturb – Allow these notifications to interrupt when Do Not Disturb is enable.
- અદ્યતન સેટિંગ્સ
- Service – Set the service provider or other provider for voicemail service.
- Setup – Select to update the phone number used to access voicemail.
- સુલભતા
- Hearing aids – Select to enable hearing air compatibility.
- RTT settings – Configure Real-time text (RTT) settings.
- Real-time text (RTT) call – Select to allow messaging during a call.
- Set RTT visibility – Set to Visible during calls (default) or Always visible.
એસેસરીઝ
આ વિભાગ ઉપકરણ માટે એક્સેસરીઝનો ઉપયોગ કરવા માટેની માહિતી પ્રદાન કરે છે.
This following table lists the accessories available for the device.
Table 26 Accessories
| સહાયક | ભાગ નંબર | વર્ણન |
| પારણું | ||
| 2-સ્લોટ ચાર્જ માત્ર પારણું | CRD-TC7X-SE2CPP-01 | Provides device and spare battery charging. Use with power supply, p/n PWRBGA12V50W0WW. |
| 2-સ્લોટ યુએસબી/ઇથરનેટ પારણું | CRD-TC7X-SE2EPP-01 નો પરિચય | Provides device and spare battery charging and USB communication with a host computer and Ethernet communication with a network. Use with power supply, p/n PWRBGA12V50W0WW. |
| 5-સ્લોટ ચાર્જ માત્ર પારણું | CRD-TC7X-SE5C1-01 | Charges up to five devices. Use with power supply, p/n PWR-BGA12V108W0WW and DC line cord, p/n CBL-DC-381A1-01. Can accommodate one 4-Slot Battery Charger using the Battery Adapter Cup. |
| 5-સ્લોટ ઈથરનેટ પારણું | CRD-TC7X-SE5EU1–01 | Provides device charging and provides Ethernet communication for up to five devices. Use with power supply, p/n PWRBGA12V108W0WW and DC line cord, p/n CBL-DC-381A1-01. Can accommodate one 4-Slot Battery Charger using the Battery Adapter Cup. |
| પારણું માઉન્ટ | બીઆરકેટી-એસસીઆરડી-એસએમઆરકે -01 | Mounts the 5-Slot Charge Only Cradle, 5Slot Ethernet Cradle, and 4-Slot Battery Charger to a wall or rack. |
| બેટરી અને ચાર્જર્સ | ||
| 4,620 mAh PowerPrecision+ battery | BTRYTC7X-46MPP-01BTRYTC7X-46MPP-10 | Replacement battery (single pack).Replacement battery (10–pack). |
| 4-સ્લોટ સ્પેર બેટરી ચાર્જર | SAC-TC7X-4BTYPP-01 | Charges up to four battery packs. Use with power supply, p/n PWR-BGA12V50W0WW. |
| Battery Charger Adapter Cup | કપ-SE-BTYADP1-01 | Allows for one 4-Slot Battery Charger to be charged and docked on the left most slot of the 5-Slot cradles (maximum one per cradle). |
| વાહન ઉકેલો | ||
| ચાર્જિંગ કેબલ કપ | CHG-TC7X-CLA1-01 માટે તપાસ સબમિટ કરો, અમે XNUMX કલાકમાં તમારો સંપર્ક કરીશું. | Provides power to the device from a cigarette lighter socket. |
| Charge Only Vehicle Cradle | CRD-TC7X-CVCD1-01 નો પરિચય | Charges and securely holds the device. Requires power cable CHG-AUTO-CLA1-01 or CHG-AUTO-HWIRE1-01, sold separately. |
| TC7X Data Communication Enabled Vehicle Cradle with Hub Kit | CRD-TC7X-VCD1-01 નો પરિચય | Contains the TC7X Vehicle Communication Charging Cradle and the USB I/O Hub. |
| સિગારેટ લાઇટ એડેપ્ટર ઓટો ચાર્જ કેબલ |
CHG-AUTO-CLA1-01 | Provides power to the Vehicle Cradle from a cigarette lighter socket. |
| Hard-wire Auto Charge Cable | CHG-AUTO-HWIRE1-01 | Provides power to the Vehicle Cradle from the vehicle’s power panel. |
| રેમ માઉન્ટ | RAM-B-166U | Provides window mounting option for the Vehicle Cradle. RAM Twist Lock Suction Cup with Double Socket Arm and Diamond Base Adapter. Overall Length: 6.75”. |
| RAM Mount Base | RAM-B-238U | RAM 2.43″ x 1.31″ Diamond Ball base with 1″ ball. |
| ચાર્જ અને કોમ્યુનિકેશન કેબલ્સ | ||
| ચાર્જિંગ કેબલ કપ | CHG-TC7X-CBL1-01 માટે તપાસ સબમિટ કરો, અમે XNUMX કલાકમાં તમારો સંપર્ક કરીશું. | Provides power to the device. Use with power supply, p/n PWR-BUA5V16W0WW, sold separately. |
| સ્નેપ-ઓન યુએસબી કેબલ | CBL-TC7X-USB1-01 નો પરિચય | Provides power to the device and USB communication with a host computer. Use with power supply, p/n PWRBUA5V16W0WW, sold separately. |
| MSR એડેપ્ટર | MSR-TC7X-SNP1-01 નો પરિચય | Provides power and USB communication with a host computer. Use with USB-C cable, sold separately. |
| Snap-On DEX Cable | CBL-TC7X-DEX1-01 | Provides electronic data exchange with devices such as vending machines. |
| Audioડિઓ એસેસરીઝ | ||
| કઠોર હેડસેટ | HS2100-OTH | Rugged wired headset. Includes HS2100 Boom Module and HSX100 OTH Headband Module. |
| બ્લૂટૂથ હેડસેટ | HS3100-OTH | Rugged Bluetooth Headset. Includes HS3100 Boom Module and HSX100 OTH Headband Module. |
| 3.5 mm Audio Adapter | ADP-TC7X-AUD35-01 નો પરિચય | Snaps onto the device and provides audio to a wired headset with 3.5 mm plug. |
| 3.5 mm Headset | એચડીએસટી -35 એમએમ-પીટીવીપી -01 | Use for PTT and VoIP calls. |
| 3.5 mm Quick Disconnect એડેપ્ટર કેબલ |
ADP-35M-QDCBL1-01 | Provides connection to the 3.5 mm Headset. |
| સ્કેનિંગ | ||
| ટ્રિગર હેન્ડલ | TRG-TC7X-SNP1-02 | Adds gun-style handle with a scanner trigger for comfortable and productive scanning. |
| Trigger Handle Attach Plate with Tether | ADP-TC7X-CLHTH-10 | Trigger Handle Attach Plate with tether. Allows for installation of the Trigger Handle (10-pack). Use with charge only cradles. |
| Trigger Handle Attach Plate | ADP-TC7X-CLPTH1-20 | Trigger Handle Attach Plate. Allows for installation of the Trigger Handle (20-pack). Use with Ethernet and charge only cradles. |
| ઉકેલો વહન | ||
| સોફ્ટ હોલ્સ્ટર | SG-TC7X-HLSTR1-02 | TC7X soft holster. |
| કઠોર હોલ્સ્ટર | SG-TC7X-RHLSTR1-01 માટે તપાસ સબમિટ કરો, અમે XNUMX કલાકમાં તમારો સંપર્ક કરીશું. | TC7X rigid holster. |
| હાથનો પટ્ટો | SG-TC7X-HSTRP2-03 | Replacement hand strap with hand strap mounting clip (3–pack). |
| Stylus and Coiled Tether | SG-TC7X-STYLUS-03 | TC7X stylus with coiled tether (3-pack). |
| સ્ક્રીન પ્રોટેક્ટર | SG-TC7X-SCRNTMP-01 | Provides additional protection for the screen (1-pack). |
| પાવર સપ્લાય | ||
| પાવર સપ્લાય | PWR-BUA5V16W0WW | Provides power to the device using the Snap-On USB Cable, Snap-on Serial Cable or Charging Cable Cup. Requires DC Line Cord, p/n DC-383A1-01 and country specific three wire grounded AC line cord sold અલગથી |
| પાવર સપ્લાય | પીડબ્લ્યુઆર-બીજીએ 12 વી 50 ડબલ્યુડબ્લ્યુ | Provides power to the 2–Slot cradles and 4-Slot Spare Battery Charger. Requires DC Line Cord, p/n CBL-DC-388A1-01 and country specific three wire grounded AC line cord sold separately. |
| પાવર સપ્લાય | પીડબ્લ્યુઆર-બીજીએ 12 વી 108 ડબલ્યુડબ્લ્યુ | Provides power to the 5-Slot Charge Only cradle and the 5-Slot Ethernet Cradle. Requires DC Line Cord, p/n CBLDC-381A1-01 and country specific three wire grounded AC line cord sold separately. |
| ડીસી લાઇન કોર્ડ | સીબીએલ-ડીસી -388 એ 1-01 | Provides power from the power supply to the 2-Slot cradles and 4-Slot Spare Battery Charger. |
| ડીસી લાઇન કોર્ડ | સીબીએલ-ડીસી -381 એ 1-01 | Provides power from the power supply to the 5-Slot Charge Only Cradle and 5-Slot Ethernet Cradle. |
બેટરી ચાર્જિંગ
Charge the device with a battery installed or charge spare batteries.
મુખ્ય બેટરી ચાર્જિંગ
The device’s Charging/Notification LED indicates the status of the battery charging in the device.
4,620 mAh બેટરી ઓરડાના તાપમાને પાંચ કલાકથી ઓછા સમયમાં સંપૂર્ણ ચાર્જ થાય છે.
ફાજલ બેટરી ચાર્જિંગ
The spare battery Charging LED on the cup indicates the status of the spare battery charging.
4,620 mAh બેટરી ઓરડાના તાપમાને પાંચ કલાકથી ઓછા સમયમાં સંપૂર્ણ ચાર્જ થાય છે.
Table 27 Spare Battery Charging LED Indicators
| એલઇડી | સંકેત |
| ધીમો ઝબકતો અંબર | ફાજલ બેટરી ચાર્જ થઈ રહી છે. |
| સોલિડ ગ્રીન | ચાર્જિંગ પૂર્ણ. |
| ફાસ્ટ બ્લિંકિંગ એમ્બર | ચાર્જિંગમાં ભૂલ; ફાજલ બેટરીની પ્લેસમેન્ટ તપાસો. |
| ધીમો ઝબકતો લાલ | Spare battery is charging and battery is at the end of useful life. |
| ઘન લાલ | Charging complete and battery is at the end of useful life. |
| ફાસ્ટ બ્લિંકિંગ રેડ | ચાર્જિંગમાં ભૂલ; ફાજલ બેટરીનું પ્લેસમેન્ટ તપાસો અને બેટરી ઉપયોગી જીવનના અંતે છે. |
| બંધ | No spare battery in slot; spare battery not placed correctly; cradle is not powered. |
ચાર્જિંગ તાપમાન
0°C થી 40°C (32°F થી 104°F) તાપમાનમાં બેટરી ચાર્જ કરો. ઉપકરણ અથવા પારણું હંમેશા સુરક્ષિત અને બુદ્ધિશાળી રીતે બેટરી ચાર્જિંગ કરે છે. ઊંચા તાપમાને (દા.ત. આશરે +37°C (+98°F)) ઉપકરણ અથવા પારણું થોડા સમય માટે બેટરીને સ્વીકાર્ય તાપમાને રાખવા માટે વૈકલ્પિક રીતે બેટરી ચાર્જિંગને સક્ષમ અને અક્ષમ કરી શકે છે. ઉપકરણ અને પારણું સૂચવે છે કે જ્યારે તેના LED દ્વારા અસામાન્ય તાપમાનને કારણે ચાર્જિંગ અક્ષમ થાય છે.
2-સ્લોટ ચાર્જ માત્ર પારણું
![]() સાવધાન: ખાતરી કરો કે તમે પાના 231 પર બેટરી સલામતી માર્ગદર્શિકામાં વર્ણવેલ બેટરી સલામતી માટેની માર્ગદર્શિકાનું પાલન કરો છો.
સાવધાન: ખાતરી કરો કે તમે પાના 231 પર બેટરી સલામતી માર્ગદર્શિકામાં વર્ણવેલ બેટરી સલામતી માટેની માર્ગદર્શિકાનું પાલન કરો છો.
2-સ્લોટ ચાર્જ માત્ર પારણું:
- ઉપકરણના સંચાલન માટે 5 વીડીસી પાવર પ્રદાન કરે છે.
- ઉપકરણની બેટરી ચાર્જ કરે છે.
- ફાજલ બેટરી ચાર્જ કરે છે.
Figure 34 2–Slot Charge Only Cradle

| 1 | પાવર એલઇડી |
| 2 | ફાજલ બેટરી ચાર્જિંગ LED |
2-Slot Charge Only Cradle Setup
The 2-Slot Charge Only Cradle provides charging for one device and one spare battery.

Charging the Device with the 2-Slot Charge Only Cradle
- ચાર્જ કરવાનું શરૂ કરવા માટે ઉપકરણને સ્લોટમાં દાખલ કરો.

- ખાતરી કરો કે ઉપકરણ યોગ્ય રીતે બેઠું છે.
Charging the Spare Battery with the 2-Slot Charge Only Cradle
- Insert the battery into the right slot to begin charging.

- ખાતરી કરો કે બેટરી યોગ્ય રીતે બેઠેલી છે.
2-Slot USB-Ethernet Cradle
![]() સાવધાન: ખાતરી કરો કે તમે પાના 231 પર બેટરી સલામતી માર્ગદર્શિકામાં વર્ણવેલ બેટરી સલામતી માટેની માર્ગદર્શિકાનું પાલન કરો છો.
સાવધાન: ખાતરી કરો કે તમે પાના 231 પર બેટરી સલામતી માર્ગદર્શિકામાં વર્ણવેલ બેટરી સલામતી માટેની માર્ગદર્શિકાનું પાલન કરો છો.
The 2-Slot USB/Ethernet Cradle:
- ઉપકરણના સંચાલન માટે 5.0 વીડીસી પાવર પ્રદાન કરે છે.
- ઉપકરણની બેટરી ચાર્જ કરે છે.
- ફાજલ બેટરી ચાર્જ કરે છે.
- Connects the device to an Ethernet network.
- Provides communication to a host computer using a USB cable.
![]() નોંધ: Remove all attachments on the device, except the hand strap, before place onto the cradle.
નોંધ: Remove all attachments on the device, except the hand strap, before place onto the cradle.
આકૃતિ 35 2-સ્લોટ યુએસબી/ઇથરનેટ પારણું

| 1 | પાવર એલઇડી |
| 2 | ફાજલ બેટરી ચાર્જિંગ LED |
2-Slot USB-Ethernet Cradle Setup
The 2-Slot USB/Ethernet Cradle provides USB and Ethernet communication for a device. Charging is also provided for the device and one spare battery.

Charging the Device with the 2-Slot USB-Ethernet Cradle
- Place the bottom of the device into the base.

- Rotate the top of the device until the connector on the back of the device mates with the connector on the cradle.
- Ensure the device is connected properly. The charging Charging/Notification LED on the device begins blinking amber indicating that the device is charging.
Charging the Spare Battery with the 2-Slot USB-Ethernet Cradle
- Insert the battery into the right slot to begin charging.

- ખાતરી કરો કે બેટરી યોગ્ય રીતે બેઠેલી છે.
USB and Ethernet Communication
The 2–Slot USB/Ethernet Cradle provides both Ethernet communication with a network and USB communication with a host computer. Prior to using the cradle for Ethernet or USB communication, ensure that the switch on the USB/Ethernet module is set properly.
Setting the USB Ethernet Module
- Turn the cradle over to view મોડ્યુલ
Figure 36 2–Slot USB/Ethernet Cradle Module Switch

- For Ethernet communication, slide the switch to the
 સ્થિતિ
 - For USB communication, slide the switch to the
 સ્થિતિ
 - Place the switch in the center position
 to disable communications.
Ethernet Module LED Indicators
There are two LEDs on the USB/Ethernet Module RJ-45 connector. The green LED lights to indicate that the transfer rate is 100 Mbps. When the LED is not lit the transfer rate is 10 Mbps. The yellow LED blinks to indicate activity, or stays lit to indicate that a link is established. When it is not lit it indicates that there is no link.
Figure 37 LED Indicators

| 1 | પીળી એલઇડી |
| 2 | લીલી એલ.ઇ.ડી. |
Table 28 USB/Ethernet Module LED Data Rate Indicators
| ડેટા દર | પીળી એલઇડી | લીલી એલ.ઇ.ડી. |
| 100 Mbps | ચાલુ/ઝબકવું | On |
| 10 Mbps | ચાલુ/ઝબકવું | બંધ |
Establishing Ethernet Connection
- સેટિંગ્સ પર જાઓ.
- Touch Network & internet>Ethernet.
- Slide the Ethernet switch to the ON position.
- Insert the device into a slot. The
 સ્ટેટસ બારમાં આઇકોન દેખાય છે.
 - Touch Eth0 to view Ethernet connection details.
Configuring Ethernet Proxy Settings
The device includes Ethernet cradle drivers. After inserting the device, configure the Ethernet connection.
- સેટિંગ્સ પર જાઓ.
- Touch Network & internet>Ethernet.
- Place the device into the Ethernet cradle slot.
- સ્વીચને ચાલુ સ્થિતિ પર સ્લાઇડ કરો.
- Touch and hold Eth0 until the menu appears.
- Touch Modify Proxy.
- Touch the Proxy drop-down list and select Manual.
- In the Proxy hostname field, enter the proxy server address.
- In the Proxy port field, enter the proxy server port number.
નોંધ: When entering proxy addresses in the Bypass proxy for field, do not use spaces or carriage returns between addresses. - In the Bypass proxy for text box, enter addresses for web sites that do not require to go through the proxy server. Use the separator “|” between addresses.
- Touch MODIFY.
- Touch Home.
Configuring Ethernet Static IP Address
The device includes Ethernet cradle drivers. After inserting the device, configure the Ethernet connection:
- સેટિંગ્સ પર જાઓ.
- Touch Network & internet>Ethernet.
- Place the device into the Ethernet cradle slot.
- સ્વીચને ચાલુ સ્થિતિ પર સ્લાઇડ કરો.
- Touch Eth0.
- Touch Disconnect.
- Touch Eth0.
- Touch and hold the IP settings drop-down list and select Static.
- In the IP address field, enter the proxy server address.
- If required, in the Gateway field, enter a gateway address for the device.
- If required, in the Netmask field, enter the network mask address
- If required, in the DNS address fields, enter a Domain Name System (DNS) addresses.
- Touch CONNECT.
- Touch Home.
5-સ્લોટ ચાર્જ માત્ર પારણું
![]() સાવધાન: ખાતરી કરો કે તમે પાના 231 પર બેટરી સલામતી માર્ગદર્શિકામાં વર્ણવેલ બેટરી સલામતી માટેની માર્ગદર્શિકાનું પાલન કરો છો.
સાવધાન: ખાતરી કરો કે તમે પાના 231 પર બેટરી સલામતી માર્ગદર્શિકામાં વર્ણવેલ બેટરી સલામતી માટેની માર્ગદર્શિકાનું પાલન કરો છો.
5-સ્લોટ ચાર્જ માત્ર પારણું:
- ઉપકરણના સંચાલન માટે 5 વીડીસી પાવર પ્રદાન કરે છે.
- Simultaneously charges up to five devices and up to four devices and one 4-Slot Battery Charger using the Battery Charger Adapter.
- Consists of a cradle base and cups that can be configured for various charging requirements.
Figure 38 5-Slot Charge Only Cradle

| 1 | પાવર એલઇડી |
5-Slot Charge Only Cradle Setup
The 5-Slot Charge Only Cradle provides charging for up to five devices.

Charging the Device with the 5-Slot Charge Only Cradle
- ચાર્જ કરવાનું પ્રારંભ કરવા માટે ઉપકરણને સ્લોટમાં દાખલ કરો.


- ખાતરી કરો કે ઉપકરણ યોગ્ય રીતે બેઠું છે.
Installing the Four Slot Battery Charger
Install the Four Slot Battery charger onto a 5-Slot Charge Only Cradle base. This provides a total for four device charging slots and four battery charging slots.
![]() નોંધ: The Battery Charger must be installed in the first slot only.
નોંધ: The Battery Charger must be installed in the first slot only.
- Remove power from the cradle.

- Using a Phillips screwdriver, remove the screw securing the cup to the cradle base.

- Slide the cup to the front of the cradle.
Figure 39 Remove Cup

- Carefully lift the cup up to expose the cup power cable.
- Disconnect the cup power cable.
 નોંધ: Place power cable into adapter to avoid pinching cable.
 - Connect the Battery Adapter power cable to the connector on the cradle.

- Place adapter onto cradle base and slide toward rear of cradle.

- Using a Phillips screwdriver, secure adapter to cradle base with screw.

- Align mounting holes on the bottom of the Four Slot Battery Charger with the stubs on the Battery Adapter.

- Slide the Four Slot battery Charger down toward the front of the cradle.
- Connect the output power plug into the power port on the Four Slot Battery Charger.

Removing the Four Slot Battery Charger
If necessary, you can remove the Four Slot Battery Charger from the 5-Slot Charge Only Cradle base.
- Disconnect the output power plug from the 4-Slot Battery Charger.
- At the back of the cup, press down on the release latch.

- Slide the 4-Slot Battery Charger toward the front of the cradle.
- Lift the 4-Slot off the cradle cup.
4-સ્લોટ ચાર્જ માત્ર બેટરી ચાર્જર સાથે પારણું
![]() સાવધાન: ખાતરી કરો કે તમે પાના 231 પર બેટરી સલામતી માર્ગદર્શિકામાં વર્ણવેલ બેટરી સલામતી માટેની માર્ગદર્શિકાનું પાલન કરો છો.
સાવધાન: ખાતરી કરો કે તમે પાના 231 પર બેટરી સલામતી માર્ગદર્શિકામાં વર્ણવેલ બેટરી સલામતી માટેની માર્ગદર્શિકાનું પાલન કરો છો.
The 4-Slot Charge Only Cradle with Battery Charger:
- ઉપકરણના સંચાલન માટે 5 વીડીસી પાવર પ્રદાન કરે છે.
- Simultaneously charges up to four devices and up to four spare batteries.
Figure 40 4-Slot Charge Only Cradle with Battery Charger

| 1 | પાવર એલઇડી |
4-Slot Charge Only Cradle with Battery Charger Setup
Figure 41 Connect Battery Charger Output Power Plug

Figure 42 Connect Charge Only Cradle Power

Charging the Device with a 4-Slot Charge Only Cradle with Battery Charger
Use the 4-Slot Charge Only Cradle with Battery Charger to charge up to four devices and four spare batteries at the same time.
- ચાર્જ કરવાનું પ્રારંભ કરવા માટે ઉપકરણને સ્લોટમાં દાખલ કરો.

- ખાતરી કરો કે ઉપકરણ યોગ્ય રીતે બેઠું છે.
![]() નોંધ: See Installing the Four Slot Battery Charger on page 156 for information on installing the 4-Slot Battery Charger onto the cradle.
નોંધ: See Installing the Four Slot Battery Charger on page 156 for information on installing the 4-Slot Battery Charger onto the cradle.
Charging the Batteries with a 4-Slot Charge Only Cradle with Battery Charger
Use the 4-Slot Charge Only Cradle with Battery Charger to charge up to four devices and four spare batteries at the same time.
- ચાર્જરને પાવર સ્ત્રોત સાથે કનેક્ટ કરો.
- Insert the battery into a battery charging well and gently press down on the battery to ensure proper contact.

1 બેટરી 2 બેટરી ચાર્જ LED 3 બેટરી સ્લોટ
5-સ્લોટ ઈથરનેટ પારણું
![]() સાવધાન: ખાતરી કરો કે તમે પાના 231 પર બેટરી સલામતી માર્ગદર્શિકામાં વર્ણવેલ બેટરી સલામતી માટેની માર્ગદર્શિકાનું પાલન કરો છો.
સાવધાન: ખાતરી કરો કે તમે પાના 231 પર બેટરી સલામતી માર્ગદર્શિકામાં વર્ણવેલ બેટરી સલામતી માટેની માર્ગદર્શિકાનું પાલન કરો છો.
5-સ્લોટ ઈથરનેટ પારણું:
- ઉપકરણના સંચાલન માટે 5.0 વીડીસી પાવર પ્રદાન કરે છે.
- પાંચ જેટલા ઉપકરણોને ઈથરનેટ નેટવર્ક સાથે જોડે છે.
- Simultaneously charges up to five devices and up to four devices and on 4-Slot Battery Charger using the Battery Charger Adapter.
Figure 43 5-Slot Ethernet Cradle

5-સ્લોટ ઈથરનેટ પારણું સેટઅપ
Connect the 5-Slot Ethernet cradle to a power source.

Daisy-chaining Ethernet Cradles
Daisy-chain up to ten 5-Slot Ethernet cradles to connect several cradles to an Ethernet network.
Use either a straight or crossover cable. Daisy-chaining should not be attempted when the main Ethernet connection to the first cradle is 10 Mbps as throughput issues will almost certainly result.
- Connect power to each 5-Slot Ethernet cradle.
- Connect an Ethernet cable to the one of the ports on the back of the first cradle and to the Ethernet switch.
- Connect the other end of the Ethernet cable to one of the ports of the back of the second 5-Slot Ethernet cradle.

1 સ્વિચ કરવા માટે 2 પાવર સપ્લાય માટે 3 To next cradle 4 પાવર સપ્લાય માટે - Connect additional cradles as described in step 2 and 3.
Charging the Device with a 5-Slot Ethernet Cradle
Charge up to five Ethernet devices.
- ચાર્જ કરવાનું પ્રારંભ કરવા માટે ઉપકરણને સ્લોટમાં દાખલ કરો.

- ખાતરી કરો કે ઉપકરણ યોગ્ય રીતે બેઠું છે.

Installing the Four Slot Battery Charger
Install the Four Slot Battery charger onto a 5-Slot Charge Only Cradle base. This provides a total for four device charging slots and four battery charging slots.
![]() નોંધ: The Battery Charger must be installed in the first slot only.
નોંધ: The Battery Charger must be installed in the first slot only.
- Remove power from the cradle.

- Using a Phillips screwdriver, remove the screw securing the cup to the cradle base.

- Slide the cup to the front of the cradle.
આકૃતિ 44 Remove Cup

- Carefully lift the cup up to expose the cup power cable.
- Disconnect the cup power cable.
 નોંધ: Place power cable into adapter to avoid pinching cable.
 - Connect the Battery Adapter power cable to the connector on the cradle.

- Place adapter onto cradle base and slide toward rear of cradle.

- Using a Phillips screwdriver, secure adapter to cradle base with screw.

- Align mounting holes on the bottom of the Four Slot Battery Charger with the stubs on the Battery Adapter.

- Slide the Four Slot battery Charger down toward the front of the cradle.
- Connect the output power plug into the power port on the Four Slot Battery Charger.

Removing the Four Slot Battery Charger
If necessary, you can remove the Four Slot Battery Charger from the 5-Slot Charge Only Cradle base.
- Disconnect the output power plug from the 4-Slot Battery Charger.
- At the back of the cup, press down on the release latch.

- Slide the 4-Slot Battery Charger toward the front of the cradle.
- Lift the 4-Slot off the cradle cup.
ઇથરનેટ કમ્યુનિકેશન
The 5-Slot Ethernet Cradle provides Ethernet communication with a network.
ઇથરનેટ એલઇડી સૂચકાંકો
There are two green LEDs on the side of the cradle. These green LEDs light and blink to indicate the data transfer rate.
કોષ્ટક 29 LED Data Rate Indicators
| ડેટા દર | 1000 એલઇડી | 100/10 એલઇડી |
| 1 જીબીપીએસ | ચાલુ/ઝબકવું | બંધ |
| 100 Mbps | બંધ | ચાલુ/ઝબકવું |
| 10 Mbps | બંધ | ચાલુ/ઝબકવું |
Establishing Ethernet Connection
- સેટિંગ્સ પર જાઓ.
- Touch Network & internet>Ethernet.
- Slide the Ethernet switch to the ON position.
- Insert the device into a slot.
આ સ્ટેટસ બારમાં આઇકોન દેખાય છે. - Touch Eth0 to view Ethernet connection details.
Configuring Ethernet Proxy Settings
The device includes Ethernet cradle drivers. After inserting the device, configure the Ethernet connection.
- સેટિંગ્સ પર જાઓ.
- Touch Network & internet>Ethernet.
- Place the device into the Ethernet cradle slot.
- સ્વીચને ચાલુ સ્થિતિ પર સ્લાઇડ કરો.
- Touch and hold Eth0 until the menu appears.
- Touch Modify Proxy.
- Touch the Proxy drop-down list and select Manual.
- In the Proxy hostname field, enter the proxy server address.
- In the Proxy port field, enter the proxy server port number.
નોંધ: When entering proxy addresses in the Bypass proxy for field, do not use spaces or carriage returns between addresses. - In the Bypass proxy for text box, enter addresses for web sites that do not require to go through the proxy server. Use the separator “|” between addresses.
- Touch MODIFY.
- Touch Home.
Configuring Ethernet Static IP Address
The device includes Ethernet cradle drivers. After inserting the device, configure the Ethernet connection:
- સેટિંગ્સ પર જાઓ.
- Touch Network & internet>Ethernet.
- Place the device into the Ethernet cradle slot.
- સ્વીચને ચાલુ સ્થિતિ પર સ્લાઇડ કરો.
- Touch Eth0.
- Touch Disconnect.
- Touch Eth0.
- Touch and hold the IP settings drop-down list and select Static.
- In the IP address field, enter the proxy server address.
- If required, in the Gateway field, enter a gateway address for the device.
- If required, in the Netmask field, enter the network mask address
- If required, in the DNS address fields, enter a Domain Name System (DNS) addresses.
- Touch CONNECT.
- Touch Home.
4-સ્લોટ બેટરી ચાર્જર
આ વિભાગ ચાર ઉપકરણ બેટરી સુધી ચાર્જ કરવા માટે 4-સ્લોટ બેટરી ચાર્જરનો ઉપયોગ કેવી રીતે કરવો તેનું વર્ણન કરે છે.
![]() સાવધાન: ખાતરી કરો કે તમે પાના 231 પર બેટરી સલામતી માર્ગદર્શિકામાં વર્ણવેલ બેટરી સલામતી માટેની માર્ગદર્શિકાનું પાલન કરો છો.
સાવધાન: ખાતરી કરો કે તમે પાના 231 પર બેટરી સલામતી માર્ગદર્શિકામાં વર્ણવેલ બેટરી સલામતી માટેની માર્ગદર્શિકાનું પાલન કરો છો.

| 1 | બેટરી સ્લોટ |
| 2 | બેટરી ચાર્જિંગ LED |
| 3 | પાવર એલઇડી |
4-Slot Battery Charger Setup
આકૃતિ 46 Four Slot Battery Charger Power Setup

Charging Spare Batteries in the 4-Slot Battery Charger
Charge up to four spare batteries.
- ચાર્જરને પાવર સ્ત્રોત સાથે કનેક્ટ કરો.
- Insert the battery into a battery charging well and gently press down on the battery to ensure proper contact.

| 1 | બેટરી |
| 2 | બેટરી ચાર્જ LED |
| 3 | બેટરી સ્લોટ |
3.5 mm Audio Adapter
The 3.5 mm Audio Adapter snaps onto the back of the device and removes easily when not in use. When attached to the device the 3.5 mm Audio Adapter allows a user to connect a wired headset to the device.
Connecting a Headset to the 3.5 mm Audio Adapter
- Connect the Quick Disconnect connect of the headset to the Quick Disconnect connector of the 3.5 mm Quick Disconnect Adapter Cable.

- Connect the audio jack of the 3.5 mm Quick Disconnect Adapter Cable to the 3.5 mm Audio Adapter.
આકૃતિ 47 Connect Adapter Cable to Audio Adapter

Attaching the 3.5 mm Audio Adapter
- Align the top mounting points on the 3.5 mm Audio Adapter with the mounting slots on the device.

- Rotate the Audio Adapter down and press down until it snaps into position.
Device with 3.5 mm Audio Adapter in Holster
When using the device and the audio adapter in a holster, ensure that the display faces in and the headset cable is securely attached to the audio adapter.
આકૃતિ 48 Device with 3.5 mm Audio Adapter in Holster

Removing the 3.5 mm Audio Adapter
- Disconnect headset plug from 3.5 mm Audio Adapter.
- Lift the bottom of the Audio Adapter away from the device.

- Remove Audio Adapter from the device.
સ્નેપ-ઓન યુએસબી કેબલ
The Snap-On USB Cable snaps on to the back of the device and removes easily when not in use. When attached to the device the Snap-On USB Cable allows the device to transfer data to a host computer and provide power for charging the device.
Attaching the Snap-On USB Cable
- Align the top mounting points on the cable with the mounting slots on the device.

- Rotate the cable down and press until it snaps into place. Magnetics hold the cable to the device.

Connecting the Snap-On USB Cable to a Computer
- Connect the Snap-On USB Cable to the device.

- Connect the USB connector of the cable to a host computer.
Charging the Device with the Snap-On USB Cable
- Connect the Snap-On USB Cable to the device.
- Connect the power supply to the Snap-On USB Cable

- Connect to the power supply to an AC outlet.
Removing the Snap-On USB Cable from the Device
- Press down on the cable.

- Rotate away from the device. The magnetics release the cable from the device.

ચાર્જિંગ કેબલ કપ
Use the Charging Cable Cup to charge the device.
Charging the Device with the Charging Cable Cup
- Insert the device into the cup of the Charging Cable Cup.

- ખાતરી કરો કે ઉપકરણ યોગ્ય રીતે બેઠું છે.
- Slide the two yellow locking tabs up to lock the cable to the device.

- Connect the power supply to the Charging Cable Cup and to a power source.

Snap-On DEX Cable
The Snap-On DEX Cable snaps on to the back of the device and removes easily when not in use. When attached to the device the Snap-On DEX Cable provides electronic data exchange with devices such as vending machines.
Attaching the Snap-On DEX Cable
- Align the top mounting points on the cable with the mounting slots on the device.

- Rotate the cable down and press until it snaps into place. Magnetics hold the cable to the device.

Connecting the Snap-On DEX Cable
- Connect the Snap-On DEX Cable to the device.
- Connect the DEX connector of the cable to a device such as a vending machine.

Disconnecting the Snap-On DEX Cable from the Device
- Press down on the cable.

- Rotate away from the device. The magnetics release the cable from the device.

ટ્રિગર હેન્ડલ
The Trigger Handle adds a gun-style handle with a scanning trigger to the device. It increases comfort when using the device in scan-intensive applications for extended periods of time.
![]() નોંધ: The Attachment Plate with Tether can only be used with Charge Only cradles.
નોંધ: The Attachment Plate with Tether can only be used with Charge Only cradles.
આકૃતિ 49 ટ્રિગર હેન્ડલ

| 1 | ટ્રિગર |
| 2 | લેચ |
| 3 | રિલીઝ બટન |
| 4 | Attachment plate without tether |
| 5 | Attachment plate with tether |
Installing the Attachment Plate to Trigger Handle
![]() નોંધ: Attachment Plate with Tether only.
નોંધ: Attachment Plate with Tether only.
- Insert the loop end of the tether into the slot on the bottom of the handle.
- Feed the attachment plate through the loop.

- Pull the attachment plate until the loop tightens on the tether.
Installing the Trigger Handle Plate
- મેનુ દેખાય ત્યાં સુધી પાવર બટન દબાવો અને પકડી રાખો.
- ટચ પાવર બંધ.
- બરાબર ટચ કરો.
- Press in the two battery latches.
- ઉપકરણમાંથી બેટરી ઉપાડો.
- Remove the hand strap filler plate from the hand strap slot. Store the hand strap filler plate in a safe place for future replacement.

- Insert the attachment plate into the hand strap slot.

- ઉપકરણની પાછળના ભાગમાં બેટરીના ડબ્બામાં પ્રથમ, નીચે, બેટરી દાખલ કરો.
- Rotate the top of the battery into the battery compartment.
- જ્યાં સુધી બેટરી રીલિઝ થાય ત્યાં સુધી બરાબર ન આવે ત્યાં સુધી બેટરીને બેટરીના ડબ્બામાં નીચે દબાવો.
Inserting the Device into the Trigger Handle
- Align the back of the Trigger handle with the Trigger Mounting Plate.

- Press the two release latches.
- Rotate the device down and press down until it snaps into place.

Removing the Device from the Trigger Handle
- Press both Trigger Handle release latches.

- Rotate the device up and remove from the Trigger handle.

Vehicle Charging Cable Cup
This section describes how to use the Vehicle Charging Cable Cup to charge the device.

Charging the Device with the Vehicle Charging Cable
- Insert the device into the cup of the Vehicle Charging Cable.

- ખાતરી કરો કે ઉપકરણ યોગ્ય રીતે બેઠું છે.
- Slide the two yellow locking tabs up to lock the cable to the device.

- Insert the Cigarette Lighter plug into the vehicle cigarette lighter socket.

વાહન પારણું
The cradle:
- Holds the device securely in place
- Provides power for operating the device
- Re-charges the battery in the device.
The cradle is powered by the vehicle’s 12V or 24V electrical system. The operating voltage range is 9V to 32V and supplies a maximum current of 3A.
આકૃતિ 50 વાહન પારણું

Inserting the Device into the Vehicle Cradle
![]() સાવધાન: Ensure that the device is fully inserted into the cradle. Lack of proper insertion may result in property damage or personal injury. Zebra Technologies Corporation is not responsible for any loss resulting from the use of the products while driving.
સાવધાન: Ensure that the device is fully inserted into the cradle. Lack of proper insertion may result in property damage or personal injury. Zebra Technologies Corporation is not responsible for any loss resulting from the use of the products while driving.
- To ensure the device was inserted correctly, listen for the audible click that signifies that the device locking mechanism was enabled and the device was locked into place.
આકૃતિ 51 Install Device into Vehicle Cradle

Removing the Device from the Vehicle Cradle
- To remove the device from the cradle, grasp the device and lift out of the cradle.
Figure 52 Remove Device from Vehicle Cradle

Charging the Device in the Vehicle Cradle
- Ensure the cradle is connected to a power source.
- ઉપકરણને પારણામાં દાખલ કરો.
The device starts to charge through the cradle as soon as it is inserted. This does not deplete the vehicle battery significantly. The battery charges in approximately four hours. See Charging Indicators on page 31 for charging indications.
નોંધ: The Vehicle Cradle operating temperature is -40°C to +85°C. When in the cradle, the device will only charge when its temperature is between 0°C to +40°C.
TC7X Vehicle Communication Charging Cradle
The Vehicle Communication Charging Cradle: vehicle cradle
- holds the device securely in place
- provides power for operating the device
- re-charges the battery in the device.
The cradle is powered by the USB I/O Hub.
Refer to the TC7X Vehicle Cradle Installation Guide for information on installing the TC7X Vehicle Communication Charging Cradle.
આકૃતિ 53 TC7X Vehicle Communication Charging Cradle
Inserting the Device into the TC7X Vehicle Communication Charging Cradle
- To ensure the device was inserted correctly, listen for the audible click that signifies that the device locking mechanism was enabled and the device was locked into place.
![]() સાવધાન: Ensure that the device is fully inserted into the cradle. Lack of proper insertion may result in property damage or personal injury. Zebra Technologies Corporation is not responsible for any loss resulting from the use of the products while driving.
સાવધાન: Ensure that the device is fully inserted into the cradle. Lack of proper insertion may result in property damage or personal injury. Zebra Technologies Corporation is not responsible for any loss resulting from the use of the products while driving.
આકૃતિ 54 Insert Device into Cradle

Removing the Device from the TC7X Vehicle Communication Charging Cradle
- To remove the device from the cradle, press the release latch (1), grasp the device (2) and lift out of the vehicle cradle.
આકૃતિ 55 Remove Device from Cradle

Charging the Device in the TC7X Vehicle Communication Charging Cradle
- ઉપકરણને પારણામાં દાખલ કરો.
The device starts to charge through the cradle as soon as it is inserted. This does not deplete the vehicle battery significantly. The battery charges in approximately four hours. See Charging Indicators on page 31 for all charging indications.
નોંધ: The Vehicle Cradle operating temperature is -40°C to +85°C. When in the cradle, the device will only charge when its temperature is between 0°C to +40°C.
USB IO Hub
The USB I/O Hub:
- provides power to a vehicle cradle
- provides USB hub for three USB devices (such as printers)
- provides a powered USB port for charging another device.
The cradle is powered by the vehicle’s 12V or 24V electrical system. The operating voltage range is 9V to 32V and supplies a maximum current of 3A to the vehicle cradle and 1.5 A to the four USB ports simultaneously.
Refer to the device Integrator Guide for Android 8.1 Oreo for information on installing the USB I/O Hub.
આકૃતિ 56 USB I/O Hub

Connecting Cables to the USB IO Hub
The USB I/O Hub provides three USB ports for connecting devices such as printers to a device in the vehicle cradle.
- Slide the cable cover down and remove.

- Insert the USB cable connector into one of the USB ports.
- Place each cable into the cable holder.

- Align the cable cover onto the USB I/O Hub. Ensure that the cables are within the cover opening.

- Slide cable cover up to lock into place.
Connecting External Cable to the USB IO Hub
The USB I/O Hub provides a USB port for charging external devices such as cell phones. This port is for charging only.
- Open the USB Access Cover.
- Insert the USB cable connector into the USB port.

1 યુએસબી પોર્ટ 2 USB port access cover
Powering the Vehicle Cradle
The USB I/O Hub can provide power to a Vehicle Cradle.
- Connect the Power Output Cable connector to the Power Input Cable connector of the Vehicle Cradle.
- Tighten thumbscrews by hand until tight.

1 Vehicle cradle power and communication connector 2 Power and communication connector
Audio Headset Connection
The USB I/O Hub provides audio connection to the device in a vehicle cradle.
Depending upon the headset, connect the headset and audio adapter to the Headset connector.
આકૃતિ 57 Connect Audio Headset

| 1 | હેડસેટ |
| 2 | એડેપ્ટર કેબલ |
| 3 | કોલર |
Replacing the Hand Strap
![]() સાવધાન: Close all running applications prior to replacing the hand strap.
સાવધાન: Close all running applications prior to replacing the hand strap.
- મેનુ દેખાય ત્યાં સુધી પાવર બટન દબાવો અને પકડી રાખો.
- ટચ પાવર બંધ.
- બરાબર ટચ કરો.
- Remove the hand strap clip from the hand strap mounting slot.

- બે બેટરી લેચને દબાવો.

- ઉપકરણમાંથી બેટરી ઉપાડો.

- બેટરી દૂર કરો.
- Remove the hand strap plate from the hand strap slot.
- Insert the replacement hand strap plate into the hand strap slot.

- Insert the battery, bottom first, into the battery compartment.

- Rotate the top of the battery into the battery compartment.
- જ્યાં સુધી બેટરી રીલિઝ થાય ત્યાં સુધી બરાબર ન આવે ત્યાં સુધી બેટરીને બેટરીના ડબ્બામાં નીચે દબાવો.

- હેન્ડ સ્ટ્રેપ ક્લિપને હેન્ડ સ્ટ્રેપ માઉન્ટિંગ સ્લોટમાં મૂકો અને જ્યાં સુધી તે જગ્યાએ ન આવે ત્યાં સુધી નીચે ખેંચો.

એપ્લિકેશન ડિપ્લોયમેન્ટ
આ વિભાગ એક ઓવર પ્રદાન કરે છેview of device security, app development, and app management. It also provides instructions for installing apps and updating the device software.
Android સુરક્ષા
The device implements a set of security policies that determine whether an application is allowed to run and, if allowed, with what level of trust. To develop an application, you must know the security configuration of the device, and how to sign an application with the appropriate certificate to allow the application to run (and to run with the needed level of trust).
![]() નોંધ: Ensure the date is set correctly before installing certificates or when accessing secure web સાઇટ્સ
નોંધ: Ensure the date is set correctly before installing certificates or when accessing secure web સાઇટ્સ
Secure Certificates
If the VPN or Wi-Fi networks rely on secure certificates, obtain the certificates and store them in the device’s secure credential storage, before configuring access to the VPN or Wi-Fi networks.
If downloading the certificates from a web site, set a password for the credential storage. The device supports X.509 certificates saved in PKCS#12 key store files with a .p12 extension (if key store has a .pfx or other extension, change to .p12).
The device also installs any accompanying private key or certificate authority certificates contained in the key store.
Installing a Secure Certificate
If required by the VPN or Wi-Fi network, install a secure certificate on the device.
- Copy the certificate from the host computer to the root of the microSD card or the device’s internal memory. See Transferring Files on page 49 for information about connecting the device to a host computer and copying files.
- સેટિંગ્સ પર જાઓ.
- Touch Security > Encryption & credentials.
- Touch Install a certificate.
- Navigate to the location of the certificate file.
- ને ટચ કરો filename of the certificate to install.
- If prompted, enter the password for credential storage. If a password has not been set for the credential storage, enter a password for it twice, and then touch OK.
- જો સંકેત આપવામાં આવે, તો પ્રમાણપત્રનો પાસવર્ડ દાખલ કરો અને ઓકે ટચ કરો.
- Enter a name for the certificate and in the Credential use drop-down, select VPN and apps or Wi-Fi. 10. Touch OK.
The certificate can now be used when connecting to a secure network. For security, the certificate is deleted from the microSD card or internal memory.
ઓળખપત્ર સંગ્રહ સેટિંગ્સને ગોઠવી રહ્યું છે
Configure credential storage from the device settings.
- સેટિંગ્સ પર જાઓ.
- Touch Security > Encryption & credentials .
- એક વિકલ્પ પસંદ કરો.
• Touch Trusted credentials to display the trusted system and user credentials.
• Touch User credentials to display user credentials.
• Touch Install from storage to install a secure certificate from the microSD card or internal storage.
• Touch Clear credentials to delete all secure certificates and related credentials.
એન્ડ્રોઇડ ડેવલપમેન્ટ ટૂલ્સ
Development tools for Android include Android Studio, EMDK for Android, and StageNow.
Android Development Workstation
Android development tools are available at developer.android.com.
To start developing applications for the device, download Android Studio. Development can take place on a Microsoft® Windows®, Mac® OS X®, or Linux® operating system.
Applications are written in Java or Kotlin, but compiled and executed in the Dalvik virtual machine. Once the Java code is compiled cleanly, the developer tools make sure the application is packaged properly, including the AndroidManifest.xml file.
Android Studio contains a full featured IDE as well as SDK components required to develop Android applications.
Enabling Developer Options
The Developer options screen sets development-related settings. By default, the Developer Options are hidden.
- સેટિંગ્સ પર જાઓ.
- ફોન વિશે ટચ કરો.
- Scroll down to Build number.
- Tap Build number seven times.
The message You are now a developer! appears. - Touch Back.
- Touch System > Advanced > Developer options .
- Slide the USB debugging switch to the ON position.
EMDK for Android
EMDK for Android provides developers with tools to create business applications for enterprise mobile devices. It is designed for use with Google’s Android Studio and includes Android class libraries such as Barcode, sample applications with source code, and the associated documentation.
EMDK for Android allows applications to take full advantage of the capabilities that Zebra devices have to offer. It embeds Profile Manager technology within Android Studio IDE, providing a GUI-based development tool designed specifically for Zebra devices. This allows fewer lines of code, resulting in reduced development time, effort, and errors.
See Also For more information go to techdocs.zebra.com.
StageNow for Android
StageNow is Zebra’s next-generation Android Staging Solution built on the MX platform. It allows quick and easy creation of device profiles, and can deploy to devices simply by scanning a barcode, reading a tag, or playing an audio file.
- એસtageNow Staging Solution includes the following components:
- એસtageNow Workstation tool installs on the staging workstation (host computer) and lets the administrator easily create staging profiles for configuring device components, and perform other staging actions such as checking the condition of a target device to determine suitability for software upgrades or other activities. The StageNow Workstation stores profiles and other created content for later use.
- એસtageNow Client resides on the device and provides a user interface for the staging operator to initiate staging. The operator uses one or more of the desired staging methods (print and scan a barcode, read an NFC tag or play an audio file) to deliver staging material to the device.
આ પણ જુઓ
વધુ માહિતી માટે પર જાઓ techdocs.zebra.com.
GMS Restricted
GMS Restricted mode deactivates Google Mobile Services (GMS). All GMS apps are disabled on the device and communication with Google (analytics data collection and location services) is disabled.
S નો ઉપયોગ કરોtageNow to disable or enable GMS Restricted mode. After a device is in GMS Restricted mode, enable and disable individual GMS apps and services using StageNow. To ensure GMS Restricted mode persists after an Enterprise Reset, use the Persist Manager option in StageNow.
આ પણ જુઓ
વધુ માહિતી માટે એસtageNow, refer to techdocs.zebra.com.
ADB યુએસબી સેટઅપ
To use the ADB, install the development SDK on the host computer then install the ADB and USB drivers.
Before installing the USB driver, make sure that the development SDK is installed on the host computer. Go to developer.android.com/sdk/index.html for details on setting up the development SDK.
The ADB and USB drivers for Windows and Linux are available on the Zebra Support Central web પર સાઇટ zebra.com/support. Download the ADB and USB Driver Setup package. Follow the instructions with the package to install the ADB and USB drivers for Windows and Linux.
Enabling USB Debugging
By default, USB debugging is disabled.
- સેટિંગ્સ પર જાઓ.
- ફોન વિશે ટચ કરો.
- Scroll down to Build number.
- Tap Build number seven times.
The message You are now a developer! appears. - Touch Back.
- Touch System > Advanced > Developer options .
- Slide the USB debugging switch to the ON position.
- બરાબર ટચ કરો.
- Connect the device to the host computer using the Rugged Charge/USB Cable.
The Allow USB debugging? dialog box appears on the device.
If the device and host computer are connected for the first time, the Allow USB debugging? dialog box with the Always allow from this computer check box displays. Select the check box, if required. - બરાબર ટચ કરો.
- On the host computer, navigate to the platform-tools folder and open a command prompt window.
- Type adb devices.
નીચેના ડિસ્પ્લે:
| જોડાયેલ ઉપકરણોની સૂચિ | XXXXXXXXXXXXXXX device |
Where XXXXXXXXXXXXXXX is the device number.
![]() નોંધ: જો ઉપકરણ નંબર દેખાતો નથી, તો ખાતરી કરો કે ADB ડ્રાઇવરો યોગ્ય રીતે ઇન્સ્ટોલ કરેલા છે.
નોંધ: જો ઉપકરણ નંબર દેખાતો નથી, તો ખાતરી કરો કે ADB ડ્રાઇવરો યોગ્ય રીતે ઇન્સ્ટોલ કરેલા છે.
Entering Android Recovery Manually
Many of the update methods discussed in this section require putting the device into Android Recovery mode. If you are unable to enter Android Recovery mode through adb commands, use the following steps to manually enter Android Recovery mode.
- મેનુ દેખાય ત્યાં સુધી પાવર બટન દબાવો અને પકડી રાખો.
- Touch Restart.
- Press and hold the PTT button until the device vibrates
The System Recovery screen appears.
Application Installation Methods
After an application is developed, install the application onto the device using one of the supported methods.
- યુએસબી કનેક્શન
- એન્ડ્રોઇડ ડીબગ બ્રિજ
- માઇક્રોએસડી કાર્ડ
- Mobile device management (MDM) platforms that have application provisioning. Refer to the MDM software documentation for details.
Installing Applications Using the USB Connection
Use the USB connection to install applications onto the device.
![]() સાવધાન: When connecting the device to a host computer and mounting the microSD card, follow the host computer’s instructions for connecting and disconnecting USB devices, to avoid damaging or corrupting files.
સાવધાન: When connecting the device to a host computer and mounting the microSD card, follow the host computer’s instructions for connecting and disconnecting USB devices, to avoid damaging or corrupting files.
- Connect the device to a host computer using USB.
- On the device, pull down the Notification panel and touch Charging this device via USB. By default, No data transfer is selected.
- સ્પર્શ File ટ્રાન્સફર.
- હોસ્ટ કમ્પ્યુટર પર, એ ખોલો file એક્સપ્લોરર એપ્લિકેશન.
- On the host computer, copy the application APK file from the host computer to the device.
સાવધાન: માઇક્રોએસડી કાર્ડને અનમાઉન્ટ કરવા માટે હોસ્ટ કમ્પ્યુટરની સૂચનાઓને કાળજીપૂર્વક અનુસરો અને માહિતી ગુમાવવાનું ટાળવા માટે USB ઉપકરણોને યોગ્ય રીતે ડિસ્કનેક્ટ કરો. - હોસ્ટ કમ્પ્યુટરથી ઉપકરણને ડિસ્કનેક્ટ કરો.
- સ્ક્રીન ઉપર સ્વાઇપ કરો અને પસંદ કરો
 થી view files on the microSD card or Internal Storage.
 - Locate the application APK file.
- Touch the application file.
- Touch Continue to install the app or Cancel to stop the installation.
- To confirm installation and accept what the application affects, touch Install otherwise touch Cancel.
- Touch Open to open the application or Done to exit the installation process. The application appears in the App list.
Installing Applications Using the Android Debug Bridge
Use ADB commands to install applications onto the device.
![]() સાવધાન: When connecting the device to a host computer and mounting the microSD card, follow the host computer’s instructions for connecting and disconnecting USB devices, to avoid damaging or corrupting files.
સાવધાન: When connecting the device to a host computer and mounting the microSD card, follow the host computer’s instructions for connecting and disconnecting USB devices, to avoid damaging or corrupting files.
- Ensure that the ADB drivers are installed on the host computer.
- Connect the device to a host computer using USB.
- સેટિંગ્સ પર જાઓ.
- Touch System > Advanced > Developer options .
- Slide the USB debugging switch to the ON position.
- બરાબર ટચ કરો.
- If the device and host computer are connected for the first time, the Allow USB debugging? dialog box with the Always allow from this computer check box displays. Select the check box, if required.
- Touch OK or Allow.
- On the host computer, navigate to the platform-tools folder and open a command prompt window.
- Type adb install <application>. where: <application> = the path and filename of the apk file.
- હોસ્ટ કમ્પ્યુટરથી ઉપકરણને ડિસ્કનેક્ટ કરો.
Installing Applications Using Wireless ADB
Use ADB commands to install an application onto the device.
Go to the Zebra Support & Downloads web site at zebra.com/support and download the appropriate Factory Reset file યજમાન કમ્પ્યુટર પર.
![]() મહત્વપૂર્ણ: Ensure the latest adb files are installed on the host computer.
મહત્વપૂર્ણ: Ensure the latest adb files are installed on the host computer.
![]() મહત્વપૂર્ણ: The device and host computer must be on the same wireless network.
મહત્વપૂર્ણ: The device and host computer must be on the same wireless network.
- સેટિંગ્સ પર જાઓ.
- Touch System > Advanced > Developer options .
- Slide the USB debugging switch to the ON position.
- Slide the Wireless debugging switch to the ON position.
- If the device and host computer are connected for the first time, the Allow wireless debugging on this network? dialog box with the Always allow from this network check box displays. Select the check box, if required.
- Touch ALLOW.
- Touch Wireless debugging.
- Touch Pair with pairing code.
The Pair with device dialog box displays.

- On the host computer, navigate to the platform-tools folder and open a command prompt window.
- Type adb pair XX.XX.XX.XX.XXXXX.
where XX.XX.XX.XX:XXXXX is the IP address and port number from the Pair with device dialog box. - Type: adb connect XX.XX.XX.XX.XXXXX
- Enter દબાવો.
- Type the pairing code from the Pair with device dialog box
- Enter દબાવો.
- Type adb connect.
The device is now connected to the host computer. - Type adb devices.
નીચેના ડિસ્પ્લે:
List of devices attached XXXXXXXXXXXXXXX device
Where XXXXXXXXXXXXXXX is the device number.
નોંધ: જો ઉપકરણ નંબર દેખાતો નથી, તો ખાતરી કરો કે ADB ડ્રાઇવરો યોગ્ય રીતે ઇન્સ્ટોલ કરેલા છે. - On the host computer command prompt window type: adb install <application> where: <file> = માર્ગ અને filename of the apk file.
- On the host computer, type: adb disconnect.
Installing Applications Using a microSD Card
Use a microSD card to install applications on your device.
![]() સાવધાન: When connecting the device to a host computer and mounting the microSD card, follow the host computer’s instructions for connecting and disconnecting USB devices, to avoid damaging or corrupting files.
સાવધાન: When connecting the device to a host computer and mounting the microSD card, follow the host computer’s instructions for connecting and disconnecting USB devices, to avoid damaging or corrupting files.
- APK ની નકલ કરો file to the root of the microSD card.
• Copy the APK file to a microSD card using a host computer (see Transferring Files for more information), and then install the microSD card into the device (see Replacing the microSD Card on page 35 for more information).
• Connect the device with a microSD card already installed to the host computer, and copy the .apk file to the microSD card. See Transferring Files for more information. Disconnect the device from the host computer. - સ્ક્રીન ઉપર સ્વાઇપ કરો અને પસંદ કરો થી view fileમાઇક્રોએસડી કાર્ડ પર એસ.
- સ્પર્શ
 SD કાર્ડ.
 - Locate the application APK file.
- Touch the application file.
- Touch Continue to install the app or Cancel to stop the installation.
- To confirm installation and accept what the application affects, touch Install otherwise touch Cancel.
- Touch Open to open the application or Done to exit the installation process.
The application appears in the App list.
એપ્લિકેશનને અનઇન્સ્ટોલ કરી રહ્યું છે
Free up device memory by removing unused apps.
- સેટિંગ્સ પર જાઓ.
- એપ્લિકેશન્સ અને સૂચનાઓને ટચ કરો.
- Touch See all apps to view all apps in the list.
- Scroll through the list to the app.
- Touch the app. The App info screen appears.
- Touch Uninstall.
- પુષ્ટિ કરવા માટે ઓકે ટચ કરો.
Android System Update
System Update packages can contain either partial or complete updates for the operating system. Zebra distributes the System Update packages on the Zebra Support & Downloads web site. Perform a system update using either a microSD card or using ADB.
Performing a System Update Using microSD Card
Go to the Zebra Support & Downloads web પર સાઇટ zebra.com/support and download the appropriate
System Update package to a host computer.
- APK ની નકલ કરો file to the root of the microSD card.
• Copy the APK file to a microSD card using a host computer (see Transferring Files for more information), and then install the microSD card into the device (see Replacing the microSD Card on page 35 for more information).
• Connect the device with a microSD card already installed to the host computer, and copy the .apk file to the microSD card. See Transferring Files for more information. Disconnect the device from the host computer. - મેનુ દેખાય ત્યાં સુધી પાવર બટન દબાવો અને પકડી રાખો.
- Touch Restart.
- Press and hold the PTT button until the device vibrates.
The System Recovery screen appears. - Press the Up and Down buttons to navigate to Apply upgrade from SD card.
- પ્રેસ પાવર.
- Press the Volume Up and Volume Down buttons to navigate to the System Update file.
- Press the Power button. The System Update installs and then the device returns to the Recovery screen.
- Press the Power button to reboot the device.
Performing a System Update Using ADB
Go to the Zebra Support & Downloads web પર સાઇટ zebra.com/support and download the appropriate System Update package to a host computer.
- Connect the device to a host computer using USB.
- સેટિંગ્સ પર જાઓ.
- Touch System > Advanced > Developer options .
- Slide the USB debugging switch to the ON position.
- બરાબર ટચ કરો.
- If the device and host computer are connected for the first time, the Allow USB debugging? dialog box with the Always allow from this computer check box displays. Select the check box, if required.
- Touch OK or Allow.
- On the host computer, navigate to the platform-tools folder and open a command prompt window.
- Type adb devices.
નીચેના ડિસ્પ્લે:
List of devices attached XXXXXXXXXXXXXXX device
Where XXXXXXXXXXXXXXX is the device number.
નોંધ: જો ઉપકરણ નંબર દેખાતો નથી, તો ખાતરી કરો કે ADB ડ્રાઇવરો યોગ્ય રીતે ઇન્સ્ટોલ કરેલા છે. - પ્રકાર: એડીબી રીબુટ પુનઃપ્રાપ્તિ
- Enter દબાવો.
The System Recovery screen appears on the device. - Press the Volume Up and Volume Down buttons to navigate to Apply upgrade from ADB.
- પાવર બટન દબાવો.
- On the host computer command prompt window type: adb sideload <file> ક્યાં:file> = માર્ગ અને fileઝિપનું નામ file.
- Enter દબાવો.
The System Update installs (progress appears as percentage in the Command Prompt window) and then the System Recovery screen appears on the device. - Press the Power button to reboot the device.
If you are not able to enter Android Recovery mode through the adb command, see Entering Android
Recovery Manually on page 212.
Performing a System Update Using Wireless ADB
Use wireless ADB to perform a system update.
Go to the Zebra Support & Downloads web site at zebra.com/support and download the appropriate
System Update package to a host computer.
![]() મહત્વપૂર્ણ: Ensure the latest adb files are installed on the host computer.
મહત્વપૂર્ણ: Ensure the latest adb files are installed on the host computer.
The device and the host computer must be on the same wireless network.
- સેટિંગ્સ પર જાઓ.
- Touch System > Advanced > Developer options .
- Slide the USB debugging switch to the ON position.
- Slide the Wireless debugging switch to the ON position.
- Touch Wireless debugging.
- If the device and host computer are connected for the first time, the Allow wireless debugging on this network? dialog box with the Always allow from this network check box displays. Select the check box, if required.
- Touch ALLOW.
- Touch Pair with pairing code.
The Pair with device dialog box displays.

- On the host computer, navigate to the platform-tools folder and open a command prompt window.
- Type adb pair XX.XX.XX.XX.XXXXX.
where XX.XX.XX.XX:XXXXX is the IP address and port number from the Pair with device dialog box. - Enter દબાવો.
- Type the pairing code from the Pair with device dialog box.
- Enter દબાવો.
- Type adb connect.
The device is now connected to the host computer. - પ્રકાર: એડીબી રીબુટ પુનઃપ્રાપ્તિ
- Enter દબાવો.
The System Recovery screen appears on the device. - Press the Volume Up and Volume Down buttons to navigate to Apply upgrade from ADB.
- પાવર બટન દબાવો.
- On the host computer command prompt window type: adb sideload <file> ક્યાં:file> = માર્ગ અને fileઝિપનું નામ file.
- Enter દબાવો.
The System Update installs (progress appears as percentage in the Command Prompt window) and then the System Recovery screen appears on the device. - Navigate to Reboot system now and press the Power button to reboot the device.
- On the host computer, type: adb disconnect.
If you are not able to enter Android Recovery mode through the adb command, see Entering Android
Recovery Manually on page 212.
Verifying System Update Installation
Verify that the system update was successful.
- સેટિંગ્સ પર જાઓ.
- ફોન વિશે ટચ કરો.
- Scroll down to Build number.
- Ensure that the build number matches the new system update package file સંખ્યા
Android Enterprise Reset
An Enterprise Reset erases all user data in the /data partition, including data in the primary storage locations (emulated storage). An Enterprise Reset erases all user data in the /data partition, including data in the primary storage locations (/sdcard and emulated storage).
Before performing an Enterprise Reset, provision all necessary configuration files and restore after the reset.
Performing an Enterprise Reset From Device Settings
Perform an Enterprise Reset from the device settings.
- સેટિંગ્સ પર જાઓ.
- Touch System > Reset options > Erase all data (enterprise reset).
- Touch Erase all data twice to confirm the Enterprise Reset.
Performing an Enterprise Reset Using microSD Card
Go to the Zebra Support & Downloads web site at zebra.com/support and download the appropriate
એન્ટરપ્રાઇઝ રીસેટ file યજમાન કમ્પ્યુટર પર.
- APK ની નકલ કરો file to the root of the microSD card.
• Copy the APK file to a microSD card using a host computer (see Transferring Files for more information), and then install the microSD card into the device (see Replacing the microSD Card on page 35 for more information).
• Connect the device with a microSD card already installed to the host computer, and copy the .apk file to the microSD card. See Transferring Files for more information. Disconnect the device from the host computer. - મેનુ દેખાય ત્યાં સુધી પાવર બટન દબાવો અને પકડી રાખો.
- Touch Restart.
- Press and hold the PTT button until the device vibrates.
The System Recovery screen appears. - Press the Volume Up and Volume Down buttons to navigate to Apply upgrade from SD card.
- પ્રેસ પાવર.
- Press the Volume Up and Volume Down buttons to navigate to the Enterprise Reset file.
- પાવર બટન દબાવો.
The Enterprise Reset occurs and then the device returns to the Recovery screen. - Press the Power button to reboot the device.
Performing an Enterprise Reset Using Wireless ADB
Perform an Enterprise Reset using Wireless ADB.
Go to the Zebra Support & Downloads web site at zebra.com/support and download the appropriate Factory Reset file યજમાન કમ્પ્યુટર પર.
![]() મહત્વપૂર્ણ: Ensure the latest adb files are installed on the host computer.
મહત્વપૂર્ણ: Ensure the latest adb files are installed on the host computer.
![]() મહત્વપૂર્ણ: The device and host computer must be on the same wireless network.
મહત્વપૂર્ણ: The device and host computer must be on the same wireless network.
- સેટિંગ્સ પર જાઓ.
- Touch System > Advanced > Developer options .
- Slide the USB debugging switch to the ON position.
- Slide the Wireless debugging switch to the ON position.
- If the device and host computer are connected for the first time, the Allow wireless debugging on this network? dialog box with the Always allow from this network check box displays. Select the check box, if required.
- Touch ALLOW.
- Touch Wireless debugging.
- Touch Pair with pairing code.
The Pair with device dialog box displays.

- On the host computer, navigate to the platform-tools folder and open a command prompt window.
- Type adb pair XX.XX.XX.XX.XXXXX.
where XX.XX.XX.XX:XXXXX is the IP address and port number from the Pair with device dialog box. - Type:adb connect XX.XX.XX.XX.XXXXX
- Enter દબાવો.
- Type the pairing code from the Pair with device dialog box
- Enter દબાવો.
- Type adb connect.
The device is now connected to the host computer. - Type adb devices.
નીચેના ડિસ્પ્લે:
List of devices attached XXXXXXXXXXXXXXX device
Where XXXXXXXXXXXXXXX is the device number.
નોંધ: જો ઉપકરણ નંબર દેખાતો નથી, તો ખાતરી કરો કે ADB ડ્રાઇવરો યોગ્ય રીતે ઇન્સ્ટોલ કરેલા છે. - પ્રકાર: એડીબી રીબુટ પુનઃપ્રાપ્તિ
- Enter દબાવો.
The Factory Recovery screen appears on the device. - Press the Volume Up and Volume Down buttons to navigate to Apply upgrade from ADB.
- પાવર બટન દબાવો.
- On the host computer command prompt window type: adb sideload <file> ક્યાં:file> = માર્ગ અને fileઝિપનું નામ file.
- Enter દબાવો.
The Enterprise Reset package installs and then the System Recovery screen appears on the device. - Press the Power button to reboot the device.
- On the host computer, type: adb disconnect.
If you are not able to enter Android Recovery mode through the adb command, see Entering Android Recovery Manually on page 212.
Performing an Enterprise Reset Using ADB
Go to the Zebra Support & Downloads web પર સાઇટ zebra.com/support and download the appropriate Enterprise Reset file યજમાન કમ્પ્યુટર પર.
- Connect the device to a host computer using a USB-C cable or by inserting the device into the 1-Slot USB/Ethernet Cradle.
- સેટિંગ્સ પર જાઓ.
- Touch System > Advanced > Developer options .
- Slide the USB debugging switch to the ON position.
- બરાબર ટચ કરો.
- If the device and host computer are connected for the first time, the Allow USB debugging? dialog box with the Always allow from this computer check box displays. Select the check box, if required.
- Touch OK or Allow.
- On the host computer, navigate to the platform-tools folder and open a command prompt window.
- Type adb devices.
નીચેના ડિસ્પ્લે:
List of devices attached XXXXXXXXXXXXXXX device
Where XXXXXXXXXXXXXXX is the device number.
નોંધ: જો ઉપકરણ નંબર દેખાતો નથી, તો ખાતરી કરો કે ADB ડ્રાઇવરો યોગ્ય રીતે ઇન્સ્ટોલ કરેલા છે. - પ્રકાર: એડીબી રીબુટ પુનઃપ્રાપ્તિ
- Enter દબાવો.
The System Recovery screen appears on the device. - Press the Volume Up and Volume Down buttons to navigate to Apply upgrade from ADB.
- પ્રેસ પાવર.
- On the host computer command prompt window type: adb sideload <file> ક્યાં:file> = માર્ગ અને fileઝિપનું નામ file.
- Enter દબાવો.
The Enterprise Reset package installs and then the System Recovery screen appears on the device. - Press the Power button to reboot the device.
If you are not able to enter Android Recovery mode through the adb command, see Entering Android Recovery Manually on page 212.
એન્ડ્રોઇડ ફેક્ટરી રીસેટ
A Factory Reset erases all data in the /data and /enterprise partitions in internal storage and clears all device settings. A Factory Reset returns the device to the last installed operating system image. To revert to a previous operating system version, re-install that operating system image.
Performing a Factory Reset Using microSD Card
Go to the Zebra Support & Downloads web site at zebra.com/support and download the appropriate
ફેક્ટરી રીસેટ file યજમાન કમ્પ્યુટર પર.
- APK ની નકલ કરો file to the root of the microSD card.
• Copy the APK file to a microSD card using a host computer (see Transferring Files for more information), and then install the microSD card into the device (see Replacing the microSD Card on page 35 for more information).
• Connect the device with a microSD card already installed to the host computer, and copy the .apk file to the microSD card. See Transferring Files for more information. Disconnect the device from the host computer. - મેનુ દેખાય ત્યાં સુધી પાવર બટન દબાવો અને પકડી રાખો.
- Touch Restart.
- Press and hold the PTT button until the device vibrates.
The System Recovery screen appears. - Press the Volume Up and Volume Down buttons to navigate to Apply upgrade from SD card.
- પ્રેસ પાવર
- Press the Volume Up and Volume Down buttons to navigate to the Factory Reset file.
- પાવર બટન દબાવો.
The Factory Reset occurs and then the device returns to the Recovery screen. - Press the Power button to reboot the device.
Performing a Factory Reset Using ADB
Go to the Zebra Support & Downloads web site at zebra.com/support and download the appropriate Factory Reset file યજમાન કમ્પ્યુટર પર.
- Connect the device to a host computer using a USB-C cable or by inserting the device into the 1-Slot USB/Ethernet Cradle.
- સેટિંગ્સ પર જાઓ.
- Touch System > Advanced > Developer options .
- Slide the USB debugging switch to the ON position.
- બરાબર ટચ કરો.
- If the device and host computer are connected for the first time, the Allow USB debugging? dialog box with the Always allow from this computer check box displays. Select the check box, if required.
- Touch OK or ALLOW.
- On the host computer, navigate to the platform-tools folder and open a command prompt window.
- Type adb devices.
નીચેના ડિસ્પ્લે:
List of devices attached XXXXXXXXXXXXXXX device
Where XXXXXXXXXXXXXXX is the device number.
નોંધ: જો ઉપકરણ નંબર દેખાતો નથી, તો ખાતરી કરો કે ADB ડ્રાઇવરો યોગ્ય રીતે ઇન્સ્ટોલ કરેલા છે. - પ્રકાર: એડીબી રીબુટ પુનઃપ્રાપ્તિ
- Enter દબાવો.
The System Recovery screen appears on the device. - Press the Volume Up and Volume Down buttons to navigate to Apply upgrade from ADB.
- પાવર બટન દબાવો.
- On the host computer command prompt window type: adb sideload <file> ક્યાં:file> = માર્ગ અને fileઝિપનું નામ file.
- Enter દબાવો.
The Factory Reset package installs and then the System Recovery screen appears on the device. - Press the Power button to reboot the device.
If you are not able to enter Android Recovery mode through the adb command, see Entering Android Recovery Manually on page 212.
Performing a Factory Rest Using Wireless ADB
Perform a Factory Reset using Wireless ADB.
Go to the Zebra Support & Downloads web site at zebra.com/support and download the appropriate
ફેક્ટરી રીસેટ file યજમાન કમ્પ્યુટર પર.
![]() મહત્વપૂર્ણ: Ensure the latest adb files are installed on the host computer.
મહત્વપૂર્ણ: Ensure the latest adb files are installed on the host computer.
![]() મહત્વપૂર્ણ: The device and host computer must be on the same wireless network.
મહત્વપૂર્ણ: The device and host computer must be on the same wireless network.
- સેટિંગ્સ પર જાઓ.
- Touch System > Advanced > Developer options .
- Slide the USB debugging switch to the ON position.
- Slide the Wireless debugging switch to the ON position.
- If the device and host computer are connected for the first time, the Allow wireless debugging on this network? dialog box with the Always allow from this network check box displays. Select the check box, if required.
- Touch ALLOW.
- Touch Wireless debugging.
- Touch Pair with pairing code.
The Pair with device dialog box displays.

- On the host computer, navigate to the platform-tools folder and open a command prompt window.
- Type adb pair XX.XX.XX.XX.XXXXX.
where XX.XX.XX.XX:XXXXX is the IP address and port number from the Pair with device dialog box. - Type:adb connect XX.XX.XX.XX.XXXXX
- Enter દબાવો.
- Type the pairing code from the Pair with device dialog box
- Enter દબાવો.
- Type adb connect.
The device is now connected to the host computer. - Type adb devices.
નીચેના ડિસ્પ્લે:
List of devices attached XXXXXXXXXXXXXXX device
Where XXXXXXXXXXXXXXX is the device number.
નોંધ: જો ઉપકરણ નંબર દેખાતો નથી, તો ખાતરી કરો કે ADB ડ્રાઇવરો યોગ્ય રીતે ઇન્સ્ટોલ કરેલા છે. - પ્રકાર: એડીબી રીબુટ પુનઃપ્રાપ્તિ
- Enter દબાવો.
The Factory Reset package installs and then the System Recovery screen appears on the device. - Press the Volume Up and Volume Down buttons to navigate to Apply upgrade from ADB.
- પાવર બટન દબાવો.
- On the host computer command prompt window type: adb sideload <file> ક્યાં:file> = માર્ગ અને fileઝિપનું નામ file.
- Enter દબાવો.
The Factory Reset package installs and then the System Recovery screen appears on the device. - Press the Power button to reboot the device.
- On the host computer, type: adb disconnect.
If you are not able to enter Android Recovery mode through the adb command, see Entering Android Recovery Manually on page 212.
એન્ડ્રોઇડ સ્ટોરેજ
The device contains multiple types of file સંગ્રહ
- Random Access Memory (RAM)
- આંતરિક સંગ્રહ
- External storage (microSD card)
- Enterprise folder.
રેન્ડમ એક્સેસ મેમરી
Executing programs use RAM to store data. Data stored in RAM is lost upon a reset.
The operating system manages how applications use RAM. It only allows applications and component processes and services to use RAM when required. It may cache recently used processes in RAM, so they restart more quickly when opened again, but it will erase the cache if it needs the RAM for new activities.
The screen displays the amount of used and free RAM.
- Performance – Indicates memory performance.
- Total memory – Indicates the total amount of RAM available.
- Average used (%) – Indicates the average amount of memory (as a percentage) used during the period of time selected (default – 3 hours).
- Free – Indicates the total amount of unused RAM.
- Memory used by apps – Touch to view RAM usage by individual apps.
Viewમેમરી
View the amount of memory used and free RAM.
- સેટિંગ્સ પર જાઓ.
- Touch System > Advanced > Developer options .
- Touch Memory.
આંતરિક સંગ્રહ
The device has internal storage. The internal storage content can be viewએડ અને files copied to and from when the device is connected to a host computer. Some applications are designed to be stored on the internal storage rather than in internal memory.
Viewing Internal Storage
View available and used internal storage on the device.
- સેટિંગ્સ પર જાઓ.
- Touch Storage.
Internal Storage displays the total amount of space on internal storage and amount used.
If the device has removable storage installed, touch Internal shared storage to display the amount of internal storage used by apps, photos, videos, audio, and other files.
બાહ્ય સંગ્રહ
The device can have a removable microSD card. The microSD card content can be viewએડ અને files copied to and from when the device is connected to a host computer.
Viewing External Storage
Portable storage displays the total amount of space on the installed microSD card and the amount used.
- સેટિંગ્સ પર જાઓ.
- Touch Storage.
Touch SD card to view કાર્ડની સામગ્રી. - To unmount the microSD card, touch
 .
.
Formatting a microSD Card as Portable Storage
Format a microSD card as portable storage for the device.
- Touch SD card.
- સ્પર્શ > Storage settings.
- Touch Format.
- Touch ERASE & FORMAT.
- થઈ ગયું ટચ કરો.
Formatting a microSD Card as Internal Memory
You can format a microSD card as internal memory to increase the actual amount of the device’s internal memory. Once formatted, the microSD card can only be read by this device.
![]() નોંધ: The suggested maximum SD card size is 128 GB when using internal storage.
નોંધ: The suggested maximum SD card size is 128 GB when using internal storage.
- Touch SD card.
- સ્પર્શ > Storage settings.
- Touch Format as internal.
- Touch ERASE & FORMAT.
- થઈ ગયું ટચ કરો.
Enterprise Folder
The Enterprise folder (within internal flash) is a super-persistent storage that is persistent after a reset and an Enterprise Reset.
The Enterprise folder is erased during a Factory Reset. The Enterprise folder is used for deployment and device-unique data. The Enterprise folder is approximately 128 MB (formatted). Applications can persist data after an Enterprise Reset by saving data to the enterprise/user folder. The folder is ext4 formatted and is only accessible from a host computer using ADB or from an MDM.
એપ્લિકેશંસનું સંચાલન કરી રહ્યું છે
Apps use two kinds of memory: storage memory and RAM. Apps use storage memory for themselves and any files, settings, and other data they use. They also use RAM when they are running.
- સેટિંગ્સ પર જાઓ.
- એપ્લિકેશન્સ અને સૂચનાઓને ટચ કરો.
- Touch See all XX apps to view all apps on the device.
- Touch > Show system to include system processes in the list.
- Touch an app, process, or service in the list to open a screen with details about it and, depending on the item, to change its settings, permissions, notifications and to force stop or uninstall it.
એપ્લિકેશન વિગતો
Apps have different kinds of information and controls.
- Force stop – Stop an app.
- Disable – Disable an app.
- Uninstall – Remove the app and all of its data and settings from the device.
- Notifications – Set the app notification settings.
- Permissions – Lists the areas on the device that the app has access to.
- Storage & cache – Lists how much information is stored and includes buttons for clearing it.
- Mobile data & Wi-Fi – Provides information about data consumed by an app.
- ઉન્નત
- Screen time – Displays the amount of time the app has displayed on the screen.
- Battery – Lists the amount of computing power used by the app.
- Open by default – If you have configured an app to launch certain file types by default, you can clear that setting here.
- Display over other apps – allows an app to display on top of other apps.
- App details – Provides a link to additional app details on the Play store.
- Additional settings in the app – Opens settings in the app.
- Modify system settings – Allows an app to modify the system settings.
Managing Downloads
Files and apps downloaded using the Browser or Email are stored on the microSD card or Internal storage in the Download directory. Use the Downloads app to view, open, or delete downloaded items.
- Swipe the screen up and touch .
- સ્પર્શ > Downloads.
- Touch and hold an item, select items to delete and touch
 . The item is deleted from the device.
જાળવણી અને મુશ્કેલીનિવારણ
Maintenance and troubleshooting information for the device and charging accessories.
ઉપકરણની જાળવણી
Follow these guidelines to maintain the device properly.
For trouble-free service, observe the following tips when using the device:
- To avoid scratching the screen, use a Zebra approved capacitive compatible stylus intended for use with a touch-sensitive screen. Never use an actual pen or pencil or other sharp object on the surface of the device screen.
- The touch-sensitive screen of the device is glass. Do not drop the device or subject it to strong impact.
- Protect the device from temperature extremes. Do not leave it on the dashboard of a car on a hot day, and keep it away from heat sources.
- Do not store the device in any location that is dusty, damp, or wet.
- Use a soft lens cloth to clean the device. If the surface of the device screen becomes soiled, clean it with a soft cloth moistened with an approved cleanser.
- Periodically replace the rechargeable battery to ensure maximum battery life and product performance.
Battery life depends on individual usage patterns.
બેટરી સલામતી માર્ગદર્શિકા
- જે વિસ્તારમાં એકમો ચાર્જ કરવામાં આવે છે તે કાટમાળ અને જ્વલનશીલ પદાર્થો અથવા રસાયણોથી મુક્ત હોવો જોઈએ. જ્યાં ઉપકરણ બિન-વ્યાપારી વાતાવરણમાં ચાર્જ કરવામાં આવે છે ત્યાં ખાસ કાળજી લેવી જોઈએ.
- Follow battery usage, storage, and charging guidelines found in this guide.
- બેટરીનો અયોગ્ય ઉપયોગ આગ, વિસ્ફોટ અથવા અન્ય સંકટમાં પરિણમી શકે છે.
- મોબાઇલ ઉપકરણની બેટરી ચાર્જ કરવા માટે, એમ્બિયન્ટ બેટરી અને ચાર્જરનું તાપમાન 0°C થી 40°C (32°F થી 104°F) ની વચ્ચે હોવું આવશ્યક છે.
- બિન-ઝેબ્રા બેટરી અને ચાર્જર સહિત અસંગત બેટરી અને ચાર્જરનો ઉપયોગ કરશો નહીં. અસંગત બેટરી અથવા ચાર્જરનો ઉપયોગ આગ, વિસ્ફોટ, લિકેજ અથવા અન્ય સંકટનું જોખમ રજૂ કરી શકે છે. જો તમને બેટરી અથવા ચાર્જરની સુસંગતતા વિશે કોઈ પ્રશ્નો હોય, તો વૈશ્વિક ગ્રાહક સમર્થન કેન્દ્રનો સંપર્ક કરો.
- ચાર્જિંગ સ્ત્રોત તરીકે USB પોર્ટનો ઉપયોગ કરતા ઉપકરણો માટે, ઉપકરણ ફક્ત USB-IF લોગો ધરાવનાર અથવા USB-IF અનુપાલન પ્રોગ્રામ પૂર્ણ કરેલ ઉત્પાદનો સાથે જ કનેક્ટેડ હોવું જોઈએ.
- બેટરીને ડિસએસેમ્બલ અથવા ખોલશો નહીં, ક્રશ કરશો નહીં, વાળશો નહીં અથવા વિકૃત કરશો નહીં, પંચર કરશો નહીં અથવા કટકા કરશો નહીં.
- બેટરી સંચાલિત કોઈપણ ઉપકરણને સખત સપાટી પર છોડવાથી ગંભીર અસર બેટરીને વધુ ગરમ થવાનું કારણ બની શકે છે.
- બેટરીને શોર્ટ સર્કિટ કરશો નહીં અથવા ધાતુ અથવા વાહક પદાર્થોને બેટરી ટર્મિનલ્સનો સંપર્ક કરવાની મંજૂરી આપશો નહીં.
- સંશોધિત કરશો નહીં અથવા પુનઃનિર્માણ કરશો નહીં, બેટરીમાં વિદેશી વસ્તુઓ દાખલ કરવાનો પ્રયાસ કરશો નહીં, પાણી અથવા અન્ય પ્રવાહીમાં નિમજ્જન કરશો અથવા ખુલ્લા કરશો નહીં અથવા આગ, વિસ્ફોટ અથવા અન્ય સંકટનો સંપર્ક કરશો નહીં.
- ખૂબ જ ગરમ થઈ શકે તેવા વિસ્તારોમાં અથવા તેની નજીકના સાધનોને છોડશો નહીં અથવા સ્ટોર કરશો નહીં, જેમ કે પાર્ક કરેલા વાહનમાં અથવા રેડિયેટર અથવા અન્ય ગરમીના સ્ત્રોતની નજીક. બેટરીને માઇક્રોવેવ ઓવન અથવા ડ્રાયરમાં ન મૂકો.
- બાળકો દ્વારા બેટરીના વપરાશ પર દેખરેખ રાખવી જોઈએ.
- વપરાયેલી રિચાર્જેબલ બેટરીનો યોગ્ય રીતે નિકાલ કરવા માટે કૃપા કરીને સ્થાનિક નિયમોનું પાલન કરો.
- આગમાં બેટરીનો નિકાલ કરશો નહીં.
- બેટરી લીક થવાની ઘટનામાં, પ્રવાહીને ત્વચા અથવા આંખોના સંપર્કમાં આવવા દો નહીં. જો સંપર્ક કરવામાં આવ્યો હોય, તો અસરગ્રસ્ત વિસ્તારને 15 મિનિટ સુધી પાણીથી ધોઈ લો અને તબીબી સલાહ લો.
- જો તમને તમારા ઉપકરણ અથવા બેટરીને નુકસાન થવાની શંકા હોય, તો નિરીક્ષણની વ્યવસ્થા કરવા માટે ગ્રાહક સપોર્ટનો સંપર્ક કરો.
Best Practices for Enterprise Mobile Computing Devices Operating in Hot Environments and Direct Sunlight
Exceeding the operating temperature by external hot environments will cause the device’s thermal sensor to notify the user of a shutdown of the WAN modem or shutdown the device until the device’s temperature returns to the operational temperature range.
- Avoid direct sunlight to the device – The easiest way to prevent overheating is to keep the device out of direct sunlight. The device absorbs light and heat from the sun and retains it, getting hotter the longer it remains in sunlight and heat.
- Avoid leaving the device in a vehicle on a hot day or hot surface – Similar to leaving the device out in direct sunlight, the device will also absorb the thermal energy from a hot surface or when left on the dashboard of a vehicle or seat, getting warmer the longer it remains on the hot surface or inside the hot vehicle.
- Turn off unused apps on the device. Open, unused apps running in the background can cause the device to work harder, which in turn may cause it to heat up. This will also improve your mobile computer device’s battery life performance.
- Avoid turning your screen brightness up – Just the same as running background apps, turning your brightness up will force your battery to work harder and create more heat. Minimizing your screen brightness may extend operating the mobile computer device in hot environments.
સફાઈ સૂચનાઓ
![]() સાવધાન: Always wear eye protection. Read the warning label on alcohol product before using.
સાવધાન: Always wear eye protection. Read the warning label on alcohol product before using.
જો તમારે તબીબી કારણોસર અન્ય કોઈ ઉકેલનો ઉપયોગ કરવો હોય તો કૃપા કરીને વધુ માહિતી માટે ગ્લોબલ કસ્ટમર સપોર્ટ સેન્ટરનો સંપર્ક કરો.
![]() ચેતવણી: આ ઉત્પાદનને ગરમ તેલ અથવા અન્ય જ્વલનશીલ પ્રવાહીના સંપર્કમાં આવવાનું ટાળો. જો આવા સંપર્કમાં આવે, તો ઉપકરણને અનપ્લગ કરો અને આ માર્ગદર્શિકા અનુસાર તરત જ ઉત્પાદનને સાફ કરો.
ચેતવણી: આ ઉત્પાદનને ગરમ તેલ અથવા અન્ય જ્વલનશીલ પ્રવાહીના સંપર્કમાં આવવાનું ટાળો. જો આવા સંપર્કમાં આવે, તો ઉપકરણને અનપ્લગ કરો અને આ માર્ગદર્શિકા અનુસાર તરત જ ઉત્પાદનને સાફ કરો.
મંજૂર ક્લીન્સર સક્રિય ઘટકો
100% of the active ingredients in any cleaner must consist of one or some combination of the following: isopropyl alcohol, bleach/sodium hypochlorite (see important note below), hydrogen peroxide, ammonium chloride, or mild dish soap.
![]() મહત્વપૂર્ણ: પહેલાથી ભેજવાળા વાઇપ્સનો ઉપયોગ કરો અને લિક્વિડ ક્લિનરને પૂલ થવા દો નહીં.
મહત્વપૂર્ણ: પહેલાથી ભેજવાળા વાઇપ્સનો ઉપયોગ કરો અને લિક્વિડ ક્લિનરને પૂલ થવા દો નહીં.
Due to the powerful oxidizing nature of sodium hypochlorite, the metal surfaces on the device are prone to oxidation (corrosion) when exposed to this chemical in the liquid form (including wipes). In the event that these type of disinfectants come in contact with metal on the device, prompt removal with an alcohol dampસફાઈનું પગલું મહત્વપૂર્ણ છે પછી કાપડ અથવા સુતરાઉ સ્વેબ.
હાનિકારક ઘટકો
The following chemicals are known to damage the plastics on the device and should not come in contact with the device: acetone; ketones; ethers; aromatic and chlorinated hydrocarbons; aqueous or alcoholic alkaline solutions; ethanolamine; toluene; trichloroethylene; benzene; carbolic acid and TB-lysoform.
Many vinyl gloves contain phthalate additives, which are often not recommended for medical use and are known to be harmful to the housing of the device.
Cleaners that are not approved include:
The following cleaners are only approved for healthcare devices:
- Clorox Disinfecting Wipes
- Hydrogen Peroxide Cleaners
- Bleach Products.
ઉપકરણ સફાઈ સૂચનાઓ
Do not apply liquid directly to the device. Dampen a soft cloth or use pre-moistened wipes. Do not wrap the device in the cloth or wipe, instead gently wipe the unit. Be careful not to let liquid pool around the display window or other places. Before use, allow the unit to air dry.
![]() નોંધ: For thorough cleaning, it is recommended to first remove all accessory attachments, such as hand straps or cradle cups, from the mobile device and to clean them separately.
નોંધ: For thorough cleaning, it is recommended to first remove all accessory attachments, such as hand straps or cradle cups, from the mobile device and to clean them separately.
ખાસ સફાઈ નોંધો
Do not handle the device while wearing vinyl gloves containing phthalates. Remove vinyl gloves and wash hands to eliminate any residue left from the gloves.
1 When using sodium hypochlorite (bleach) based products, always follow the manufacturer’s recommended instructions: use gloves during application and remove the residue afterwards with a damp alcohol cloth or a cotton swab to avoid prolonged skin contact while handling the device.
If products containing any of the harmful ingredients listed above are used prior to handling the device, such as a hand sanitizer that contains ethanolamine, hands must be completely dry before handling the device to prevent damage to the device.
![]() મહત્વપૂર્ણ: If the battery connectors are exposed to cleaning agents, thoroughly wipe off as much of the chemical as possible and clean with an alcohol wipe. It is also recommended to install the battery in the terminal prior to cleaning and disinfecting the device to help minimize buildup on the connectors. When using cleaning/disinfectant agents on the device, it is important to follow the directions prescribed by the cleaning/disinfectant agent manufacturer.
મહત્વપૂર્ણ: If the battery connectors are exposed to cleaning agents, thoroughly wipe off as much of the chemical as possible and clean with an alcohol wipe. It is also recommended to install the battery in the terminal prior to cleaning and disinfecting the device to help minimize buildup on the connectors. When using cleaning/disinfectant agents on the device, it is important to follow the directions prescribed by the cleaning/disinfectant agent manufacturer.
Cleaning Materials Required
- આલ્કોહોલ વાઇપ્સ
- Lens tissue
- Cotton-tipped applicators
- આઇસોપ્રોપીલ આલ્કોહોલ
- Can of compressed air with a tube.
સફાઈ આવર્તન
The cleaning frequency is at the customer’s discretion due to the varied environments in which the mobile devices are used and may be cleaned as frequently as required. When dirt is visible, it is recommended to clean the mobile device to avoid the build-up of particles which makes the device more difficult to clean later on.
For consistency and optimum image capture, it is recommended to clean the camera window periodically especially when used in environments prone to dirt or dust.
ઉપકરણની સફાઈ
This section describes how to clean the housing, display, and camera for the device.
હાઉસિંગ
Thoroughly wipe the housing, including all buttons and triggers, using an approved alcohol wipe.
ડિસ્પ્લે
The display can be wiped down with an approved alcohol wipe, but care should be taken not to allow any pooling of liquid around the edges of the display. Immediately dry the display with a soft, non-abrasive cloth to prevent streaking.
Camera and Exit Window
Wipe the camera and exit window periodically with lens tissue or other material suitable for cleaning optical material such as eyeglasses.
Cleaning Battery Connectors
- Remove the main battery from the mobile computer.
- Dip the cotton portion of the cotton-tipped applicator in isopropyl alcohol.
- To remove any grease or dirt, rub the cotton portion of the cotton-tipped applicator back-and-forth across the connectors on the battery and terminal sides. Do not leave any cotton residue on the connectors.
- Repeat at least three times.
- Use a dry cotton-tipped applicator and repeat steps 3 and 4. Do not leave any cotton residue on the connectors.
- Inspect the area for any grease or dirt and repeat the cleaning process if necessary.
સાવધાન: After cleaning the battery connectors with bleach-based chemicals, follow the Battery Connector Cleaning instructions to remove bleach from the connectors.
Cleaning Cradle Connectors
- Remove the DC power cable from the cradle.
- Dip the cotton portion of the cotton-tipped applicator in isopropyl alcohol.
- Rub the cotton portion of the cotton-tipped applicator along the pins of the connector. Slowly move the applicator back-and-forth from one side of the connector to the other. Do not leave any cotton residue on the connector.
- All sides of the connector should also be rubbed with the cotton-tipped applicator.
- Remove any lint left by the cotton-tipped applicator.
- If grease and other dirt can be found on other areas of the cradle, use a lint-free cloth and alcohol to remove.
- Allow at least 10 to 30 minutes (depending on ambient temperature and humidity) for the alcohol to air dry before applying power to cradle.
If the temperature is low and humidity is high, longer drying time is required. Warm temperature and low humidity requires less drying time.
![]() સાવધાન: After cleaning the cradle connectors with bleach-based chemicals, follow the Cleaning Cradle Connectors instructions to remove bleach from the connectors.
સાવધાન: After cleaning the cradle connectors with bleach-based chemicals, follow the Cleaning Cradle Connectors instructions to remove bleach from the connectors.
મુશ્કેલીનિવારણ
Troubleshooting the device and charging accessories.
Troubleshooting the Device
The following tables provides typical problems that might arise and the solution for correcting the problem.
કોષ્ટક 30 Troubleshooting the TC72/TC77
| સમસ્યા | કારણ | ઉકેલ |
| When pressing the power button the device does not turn on. | બેટરી ચાર્જ થતી નથી. | Charge or replace the battery In the device. |
| Battery not Installed properly. | બેટરી યોગ્ય રીતે ઇન્સ્ટોલ કરો. | |
| સિસ્ટમ ક્રેશ. | રીસેટ કરો | |
| When pressing the power button the device does not turn on but two LEDs blink. | Battery charge is at a level where data is maintained but battery should be re-charged. |
Charge or replace the battery in the device. |
| Battery did not charge. | Battery failed. | Replace battery. If the device still does not operate, perform a reset. |
| Device removed from cradle while battery was charging. | Insert device in cradle. The 4,620 mAh battery fully charges In less than five hours at room temperature. | |
| Extreme battery temperature. | Battery does not charge if ambient temperature is below 0°C (32°9 or above 40°C (104°F). | |
| Cannot see characters on display. | Device not powered on. | પાવર બટન દબાવો. |
| During data communication with a host computer, no data transmitted, or transmitted data was Incomplete. | Device removed from cradle or disconnected from host computer during communication. | Replace the device in the cradle, or reattach the communication cable and re-transmit. |
| ખોટી કેબલ ગોઠવણી. | સિસ્ટમ એડમિનિસ્ટ્રેટર જુઓ. | |
| કોમ્યુનિકેશન સોફ્ટવેર ખોટી રીતે ઇન્સ્ટોલ અથવા ગોઠવેલ હતું. | સેટઅપ કરો. | |
| During data communication over Wi-FI, no data transmitted, or transmitted data was incomplete. |
WI-FI radio Is not on. | Turn on the WI-Fl radio. |
| You moved out of range of an access point | Move closer to an access point. | |
| During data communication over WAN, no data transmitted, or transmitted data was Incomplete. |
You are in an area of poor cellular service. | Move into an area that has better service. |
| APN is not set up correctly. | See system administrator for APN setup information. | |
| SIM card not installed properly. | Remove and re-install the SIM card. | |
| Data plan not activated. | Contact your service provider and ensure that your data plan is enable. | |
| During data communication over Bluetooth, no data transmitted, or transmitted data was Incomplete. |
બ્લૂટૂથ રેડિયો ચાલુ નથી. | બ્લૂટૂથ રેડિયો ચાલુ કરો. |
| You moved out of range of another Bluetooth device. | બીજા ઉપકરણથી 10 મીટર (32.8 ફૂટ) ની અંદર ખસેડો. | |
| કોઈ અવાજ નથી. | Volume setting is low or turned off. | વોલ્યુમ સમાયોજિત કરો. |
| Device shuts off. | Device is inactive. | The display turns off after a period of inactivity. Set this period to 15 seconds, 30 seconds, 1, 2, 5,10 or 30 minutes. |
| બેટરી ખતમ થઈ ગઈ છે. | બેટરી બદલો. | |
| Tapping the window buttons or icons does not activate the corresponding feature. | ઉપકરણ પ્રતિસાદ આપતું નથી. | ઉપકરણને ફરીથી સેટ કરો. |
| A message appears stating that the device memory is full. | ઘણા બધા files ઉપકરણ પર સંગ્રહિત છે. | Delete unused memos and records. If necessary, save these records on the host computer (or use an SD card for additional memory). |
| Too many applications installed on the device. | Remove user-installed applications on the device to recover memory. Select > Storage > FREE UP SPACE > REVIEW RECENT ITEMS. Select the unused program(s) and tap FREE UP. | |
| The device does not decode with reading bar code. | Scanning application is not loaded. | Load a scanning application on the device or enable DataWedge. See the system administrator. |
| Unreadable bar code. | ખાતરી કરો કે પ્રતીક વિકૃત નથી. | |
| Distance between exit window and bar code is incorrect. | ઉપકરણને યોગ્ય સ્કેનિંગ રેન્જમાં મૂકો. | |
| Device is not programmed for the bar code. | Program the device to accept the type of bar code being scanned. Refer to the EMDK or DataWedge application. | |
| Device is not programmed to generate a beep. | If the device does not beep on a good decode, set the application to generate a beep on good decode. | |
| બેટરી ઓછી છે. | If the scanner stops emitting a laser beam upon a trigger press, check the battery level. When the battery is low, the scanner shuts off before the device low battery condition notification. Note: If the scanner is still not reading symbols, contact the distributor or the Global Customer Support Center. |
|
| Device cannot find any Bluetooth devices nearby. | અન્ય બ્લૂટૂથ ઉપકરણોથી ખૂબ દૂર. | ૧૦ મીટર (૩૨.૮ ફૂટ) ની રેન્જમાં, બીજા બ્લૂટૂથ ડિવાઇસ(ઓ) ની નજીક જાઓ. |
| The Bluetooth device(s) nearby are not turned પર |
શોધવા માટે બ્લૂટૂથ ડિવાઇસ(ઓ) ચાલુ કરો. | |
| The Bluetooth device(s) are not in discoverable મોડ |
Set the Bluetooth device(s) to discoverable mode. If needed, refer to the device’s user documentation for help. | |
| Cannot unlock device. | User enters incorrect password. | If the user enters an incorrect password eight times, the user is requested to enter a code before trying again.If the user forgot the password, contact system administrator. |
Troubleshooting the 2-Slot Charge Only Cradle
Table 31 Troubleshooting the 2-Slot Charge only Cradle
| લક્ષણ | સંભવિત કારણ | ક્રિયા |
| LEDs do not light when device or spare battery is inserted. | પારણું શક્તિ પ્રાપ્ત કરી રહ્યું નથી. | Ensure the power cable is connected securely to both the cradle and to AC power. |
| Device is not seated firmly in the cradle. | Remove and re-insert the device into the cradle, ensuring it is firmly seated. | |
| Spare battery is not seated firmly in the cradle. | Remove and re-insert the spare battery into the charging slot, ensuring it is firmly seated. | |
| Device battery is not charging. | Device was removed from cradle or cradle was unplugged from AC power too soon. | Ensure cradle is receiving power. Ensure device is seated correctly. Confirm main battery is charging. The 4,620 mAh battery fully charges in less than five hours. |
| બેટરી ખામીયુક્ત છે. | Verify that other batteries charge properly. If so, replace the faulty battery. | |
| The device is not fully seated in the cradle. | Remove and re-insert the device into the cradle, ensuring it is firmly seated. | |
| Extreme battery temperature. | Battery does not charge if ambient temperature is below 0 °C (32 -9 or above 40 °C (104 09. | |
| Spare battery is not charging. | Battery not fully seated in charging slot | Remove and re-insert the spare battery in the cradle, ensuring it is firmly seated. The 4,620 mAh battery fully charges in less than five hours. |
| Battery inserted incorrectly. | Re-insert the battery so the charging contacts on the battery align with the contacts on the cradle. | |
| બેટરી ખામીયુક્ત છે. | Verify that other batteries charge properly. If so, replace the faulty battery. |
Troubleshooting the 2-Slot USB/Ethernet Cradle
Table 32 Troubleshooting the 2-Slot USB/Ethernet Cradle
| લક્ષણ | સંભવિત કારણ | ક્રિયા |
| During communication, no data transmits, or transmitted data was incomplete. | Device removed from cradle during communications. | Replace device in cradle and retransmit. |
| ખોટી કેબલ ગોઠવણી. | Ensure that the correct cable configuration. | |
| Device has no active connection. | An icon is visible in the status bar if a connection is currently active. | |
| USB/Ethernet module switch in not in the correct position. | For Ethernet communication, slide the switch to the |
|
| LEDs do not light when device or spare battery is inserted. | પારણું શક્તિ પ્રાપ્ત કરી રહ્યું નથી. | Ensure the power cable is connected securely to both the cradle and to AC power. |
| Device is not seated firmly in the cradle. | Remove and re-Insert the device into the cradle, ensuring it is firmly seated. | |
| Spare battery is not seated firmly in the cradle. | Remove and re-Insert the spare battery into the charging slot, ensuring it is firmly seated. | |
| Device battery is not charging. | Device was removed from cradle or cradle was unplugged from AC power too soon. | Ensure cradle is receiving power. Ensure device is seated correctly. Confirm main battery is charging. The 4,620 mAh battery fully charges in less than five hours. |
| બેટરી ખામીયુક્ત છે. | Verify that other batteries charge properly. If so, replace the faulty battery. | |
| The device is not fully seated in the cradle. | Remove and re-Insert the device into the cradle, ensuring It Is firmly seated. | |
| Extreme battery temperature. | Battery does not charge if ambient temperature is below 0 °C (32 °F) or above 40 °C (104 °F). | |
| Spare battery is not charging. | Battery not fully seated In charging slot. | Remove and re-Insert the spare battery in the cradle, ensuring It is firmly seated. The 4,620 mAh battery fully charges in less than five hours. |
| Battery Inserted incorrectly. | Re-Insert the battery so the charging contacts on the battery align with the contacts on the cradle. | |
| બેટરી ખામીયુક્ત છે. | Verify that other batteries charge properly. If so, replace the faulty battery. |
Troubleshooting the 5-Slot Charge Only Cradle
કોષ્ટક 33 Troubleshooting the 5-Slot Charge Only Cradle
| સમસ્યા | કારણ | ઉકેલ |
| બેટરી ચાર્જ થતી નથી. | Device removed from the cradle too soon. | Replace the device in the cradle. The battery fully charges in approximately five hours. |
| બેટરી ખામીયુક્ત છે. | Verify that other batteries charge properly. If so, replace the faulty battery. | |
| Device is not inserted correctly in the cradle. | Remove the device and reinsert it correctly. Verify charging is active. Touch > System > About phone > Battery Information to view બેટરી સ્થિતિ. | |
| આસપાસનું તાપમાન of the cradle is too warm. |
Move the cradle to an area where the ambient temperature is between -10 °C (+14 °F) and +60 °C (+140 °F). |
Troubleshooting the 5-Slot Ethernet Cradle
કોષ્ટક 34 Troubleshooting the 5-Slot Ethernet Cradle
| During communication, no data transmits, or transmitted data was અપૂર્ણ |
Device removed from cradle during communications. | Replace device in cradle and retransmit. |
| ખોટી કેબલ ગોઠવણી. | Ensure that the correct cable configuration. | |
| Device has no active connection. | An icon is visible in the status bar if a connection is currently active. | |
| બેટરી ચાર્જ થતી નથી. | Device removed from the cradle too soon. | Replace the device in the cradle. The battery fully charges in approximately five hours. |
| બેટરી ખામીયુક્ત છે. | Verify that other batteries charge properly. If so, replace the faulty battery. | |
| Device is not inserted correctly in the cradle. | Remove the device and reinsert it correctly. Verify charging is active. Touch > System > About phone > Battery Information to view બેટરી સ્થિતિ. | |
| Ambient temperature of the cradle is too warm. | Move the cradle to an area where the ambient temperature is between -10 °C (+14 °F) and +60 °C (+140 °F). |
Troubleshooting the 4-Slot Battery Charger
કોષ્ટક 35 Troubleshooting the 4-Slot Battery Charger
| સમસ્યા | સમસ્યા | ઉકેલ | |
| Spare Battery Charging LED does not light when spare battery is inserted. | Spare battery is not correctly seated. | Remove and re-insert the spare battery into the charging slot, ensuring it is correctly seated. | |
| Spare Battery not charging. | ચાર્જરને પાવર પ્રાપ્ત થતો નથી. | Ensure the power cable is connected securely to both the charger and to AC power. | |
| Spare battery is not correctly seated. | Remove and re-insert the battery into the battery adapter, ensuring it is correctly seated. | ||
| Battery adapter is not seated properly. | Remove and re-insert the battery adapter into the charger, ensuring it is correctly seated. | ||
| Battery was removed from the charger or charger was unplugged from AC power too soon. | Ensure charger is receiving power. Ensure the spare battery is seated correctly. If a battery is fully depleted, it can take up to five hours to fully recharge a Standard Battery andit can take up to eight hours to fully recharge an Extended Life Battery. | ||
| બેટરી ખામીયુક્ત છે. | Verify that other batteries charge properly. If so, replace the faulty battery. | ||
ટેકનિકલ વિશિષ્ટતાઓ
For device technical specifications, go to zebra.com/support.
Data Capture Supported Symbologies
| વસ્તુ | વર્ણન |
| 1D બાર કોડ્સ | Code 128, EAN-8, EAN-13, GS1 DataBar Expanded, GS1 128, GS1 DataBar Coupon, UPCA, Interleaved 2 of 5, UPC Coupon Codesymbologies |
| 2D બાર કોડ્સ | PDF-417, QR Code, Digimarc, Dotcode |
SE4750-SR Decode Distances
The table below lists the typical distances for selected bar code densities. The minimum element width (or “symbol density”) is the width in mils of the narrowest element (bar or space) in the symbol.
| Symbol Density/ Bar Code Type | લાક્ષણિક કાર્યકારી શ્રેણીઓ | |
| નજીક | દૂર | |
| 3 મિલ કોડ | 10.41 સેમી (4.1 ઇંચ) | 12.45 સેમી (4.9 ઇંચ) |
| 5.0 મિલ કોડ | 8.89 સેમી (3.5 ઇંચ) | 17.27 સેમી (6.8 ઇંચ) |
| 5 મિલ PDF417 | 11.18 સેમી (4.4 ઇંચ) | 16.00 સેમી (6.3 ઇંચ) |
| 6.67 મિલ PDF417 | 8.13 સેમી (3.2 ઇંચ) | 20.57 સેમી (8.1 ઇંચ) |
| 10 મિલ ડેટા મેટ્રિક્સ | 8.38 સેમી (3.3 ઇંચ) | 21.59 સેમી (8.5 ઇંચ) |
| 100% UPCA | 5.08 સેમી (2.0 ઇંચ) | 45.72 સેમી (18.0 ઇંચ) |
| 15 મિલ કોડ | 6.06 સેમી (2.6 ઇંચ) | 50.29 સેમી (19.8 ઇંચ) |
| 20 મિલ કોડ | 4.57 સેમી (1.8 ઇંચ) | 68.58 સેમી (27.0 ઇંચ) |
| નોંધ: Photographic quality bar code at 18° tilt pitch angle under 30 fcd ambient illumination. | ||
I/O Connector Pin-Outs

| પિન | સિગ્નલ | વર્ણન |
| 1 | જીએનડી | Power/signal ground. |
| 2 | RXD_MIC | UART RXD + Headset microphone. |
| 3 | PWR_IN_CON | External 5.4 VDC power input. |
| 4 | TRIG_PTT | Trigger or PTT input. |
| 5 | જીએનડી | Power/signal ground. |
| 6 | USB-OTG_ID | USB OTG ID pin. |
| 7 | TXD_EAR | UART TXD, Headset ear. |
| 8 | યુએસબી_ઓટીજી_વીબીયુએસ | યુએસબી VBUS |
| 9 | USB_OTG_DP | યુએસબી ડીપી |
| 10 | USB_OTG_DM | યુએસબી ડીએમ |
2-Slot Charge Only Cradle Technical Specifications
| વસ્તુ | વર્ણન |
| પરિમાણો | ઊંચાઈ: 10.6 સેમી (4.17 ઇંચ) પહોળાઈ: 19.56 cm (7.70 in.) ઊંડાઈ: 13.25 સેમી (5.22 ઇંચ) |
| વજન | 748 ગ્રામ (26.4 zંસ.) |
| ઇનપુટ વોલ્યુમtage | 12 વીડીસી |
| પાવર વપરાશ | 30 વોટ |
| ઓપરેટિંગ તાપમાન | 0 °C થી 50 °C (32 °F થી 122 °F) |
| સંગ્રહ તાપમાન | -40 °C થી 70 °C (-40 °F થી 158 °F) |
| ચાર્જિંગ તાપમાન | 0 °C થી 40 °C (32 °F થી 104 °F) |
| ભેજ | 5% થી 95% બિન-ઘનીકરણ |
| છોડો | 76.2 cm (30.0 in.) ઓરડાના તાપમાને પ્લાસ્ટિકના જૂથમાંથી ટાઇલ્ડ કોંક્રિટમાં ડ્રોપ થાય છે. |
| ઇલેક્ટ્રોસ્ટેટિક ડિસ્ચાર્જ (ઇએસડી) | +/- 20 કેવી હવા +/- 10 કેવી સંપર્ક +/- 10 kV પરોક્ષ સ્રાવ |
2-Slot USB/Ethernet Cradle Technical Specifications
| વસ્તુ | વર્ણન |
| પરિમાણો | ઊંચાઈ: 20 સેમી (7.87 ઇંચ) પહોળાઈ: 19.56 cm (7.70 in.) ઊંડાઈ: 13.25 સેમી (5.22 ઇંચ) |
| વજન | 870 ગ્રામ (30.7 zંસ.) |
| ઇનપુટ વોલ્યુમtage | 12 વીડીસી |
| પાવર વપરાશ | 30 વોટ |
| ઓપરેટિંગ તાપમાન | 0 °C થી 50 °C (32 °F થી 122 °F) |
| સંગ્રહ તાપમાન | -40 °C થી 70 °C (-40 °F થી 158 °F) |
| ચાર્જિંગ તાપમાન | 0 °C થી 40 °C (32 °F થી 104 °F) |
| ભેજ | 5% થી 95% બિન-ઘનીકરણ |
| છોડો | 76.2 cm (30.0 in.) ઓરડાના તાપમાને પ્લાસ્ટિકના જૂથમાંથી ટાઇલ્ડ કોંક્રિટમાં ડ્રોપ થાય છે. |
| ઇલેક્ટ્રોસ્ટેટિક ડિસ્ચાર્જ (ઇએસડી) | +/- 20 કેવી હવા +/- 10kV સંપર્ક +/- 10kV indirect discharge |
5-Slot Charge Only Cradle Technical Specifications
આકૃતિ 58
| વસ્તુ | વર્ણન |
| પરિમાણો | ઊંચાઈ: 90.1 મીમી (3.5 ઇંચ) પહોળાઈ: 449.6 mm (17.7 in.) ઊંડાઈ: 120.3 mm (4.7 in.) |
| વજન | 1.31 કિગ્રા (2.89 પાઉન્ડ.) |
| ઇનપુટ વોલ્યુમtage | 12 વીડીસી |
| પાવર વપરાશ | 65 વોટ 90 watts with 4–Slot Battery Charger installed. |
| ઓપરેટિંગ તાપમાન | 0 °C થી 50 °C (32 °F થી 122 °F) |
| સંગ્રહ તાપમાન | -40 °C થી 70 °C (-40 °F થી 158 °F) |
| ચાર્જિંગ તાપમાન | 0 °C થી 40 °C (32 °F થી 104 °F) |
| ભેજ | 0% થી 95% બિન-ઘનીકરણ |
| છોડો | 76.2 cm (30.0 in.) ઓરડાના તાપમાને પ્લાસ્ટિકના જૂથમાંથી ટાઇલ્ડ કોંક્રિટમાં ડ્રોપ થાય છે. |
| ઇલેક્ટ્રોસ્ટેટિક ડિસ્ચાર્જ (ઇએસડી) | +/- 20 કેવી હવા +/- 10kV સંપર્ક +/- 10kV indirect discharge |
5-Slot Ethernet Cradle Technical Specifications
| વસ્તુ | વર્ણન |
| પરિમાણો | ઊંચાઈ: 21.7 સેમી (8.54 ઇંચ) પહોળાઈ: 48.9 cm (19.25 in.) ઊંડાઈ: 13.2 સેમી (5.20 ઇંચ) |
| વજન | 2.25 કિગ્રા (4.96 lbs) |
| ઇનપુટ વોલ્યુમtage | 12 વીડીસી |
| પાવર વપરાશ | 65 વોટ 90 watts with 4-Slot Battery Charger installed. |
| ઓપરેટિંગ તાપમાન | 0 °C થી 50 °C (32 °F થી 122 °F) |
| સંગ્રહ તાપમાન | -40 °C થી 70 °C (-40 °F થી 158 °F) |
| ચાર્જિંગ તાપમાન | 0 °C થી 40 °C (32 °F થી 104 °F) |
| ભેજ | 5% થી 95% બિન-ઘનીકરણ |
| છોડો | 76.2 cm (30.0 in.) ઓરડાના તાપમાને પ્લાસ્ટિકના જૂથમાંથી ટાઇલ્ડ કોંક્રિટમાં ડ્રોપ થાય છે. |
| ઇલેક્ટ્રોસ્ટેટિક ડિસ્ચાર્જ (ઇએસડી) | +/- 20 કેવી હવા +/- 10kV સંપર્ક +/- 10kV indirect discharge |
4-Slot Battery Charger Technical Specifications
| વસ્તુ | વર્ણન |
| પરિમાણો | ઊંચાઈ: 4.32 સેમી (1.7 ઇંચ) પહોળાઈ: 20.96 cm (8.5 in.) ઊંડાઈ: 15.24 સેમી (6.0 ઇંચ) |
| વજન | 386 ગ્રામ (13.6 zંસ.) |
| ઇનપુટ વોલ્યુમtage | 12 વીડીસી |
| પાવર વપરાશ | 40 વોટ |
| ઓપરેટિંગ તાપમાન | 0 °C થી 40 °C (32 °F થી 104 °F) |
| સંગ્રહ તાપમાન | -40 °C થી 70 °C (-40 °F થી 158 °F) |
| ચાર્જિંગ તાપમાન | 0 °C થી 40 °C (32 °F થી 104 °F) |
| ભેજ | 5% થી 95% બિન-ઘનીકરણ |
| છોડો | 76.2 cm (30.0 in.) ઓરડાના તાપમાને પ્લાસ્ટિકના જૂથમાંથી ટાઇલ્ડ કોંક્રિટમાં ડ્રોપ થાય છે. |
| ઇલેક્ટ્રોસ્ટેટિક ડિસ્ચાર્જ (ઇએસડી) | +/- 20 કેવી હવા +/- 10kV સંપર્ક +/- 10kV indirect discharge |
Charge Only Vehicle Cradle Technical Specifications
| વસ્તુ | વર્ણન |
| પરિમાણો | ઊંચાઈ: 12.3 સેમી (4.84 ઇંચ) પહોળાઈ: 11.0 cm (4.33 in.) ઊંડાઈ: 8.85 સેમી (3.48 ઇંચ) |
| વજન | 320 ગ્રામ (11.3 zંસ.) |
| ઇનપુટ વોલ્યુમtage | 12/24 વીડીસી |
| પાવર વપરાશ | 40 વોટ |
| ઓપરેટિંગ તાપમાન | -40 °C થી 85 °C (-40 °F થી 185 °F) |
| સંગ્રહ તાપમાન | -40 °C થી 85 °C (-40 °F થી 185 °F) |
| ચાર્જિંગ તાપમાન | 0 °C થી 40 °C (32 °F થી 104 °F) |
| ભેજ | 5% થી 95% બિન-ઘનીકરણ |
| છોડો | 76.2 cm (30.0 in.) ઓરડાના તાપમાને પ્લાસ્ટિકના જૂથમાંથી ટાઇલ્ડ કોંક્રિટમાં ડ્રોપ થાય છે. |
| ઇલેક્ટ્રોસ્ટેટિક ડિસ્ચાર્જ (ઇએસડી) | +/- 20 કેવી હવા +/- 10kV સંપર્ક |
Trigger Handle Technical Specifications
| વસ્તુ | વર્ણન |
| પરિમાણો | ઊંચાઈ: 11.2 સેમી (4.41 ઇંચ) પહોળાઈ: 6.03 cm (2.37 in.) ઊંડાઈ: 13.4 સેમી (5.28 ઇંચ) |
| વજન | 110 ગ્રામ (3.8 zંસ.) |
| ઓપરેટિંગ તાપમાન | -20 °C થી 50 °C (-4 °F થી 122 °F) |
| સંગ્રહ તાપમાન | -40 °C થી 70 °C (-40 °F થી 158 °F) |
| ભેજ | 10% થી 95% બિન-ઘનીકરણ |
| છોડો | 1.8 m (6 feet) drops to concrete over temperature range. |
| ઇલેક્ટ્રોસ્ટેટિક ડિસ્ચાર્જ (ઇએસડી) | +/- 20 કેવી હવા +/- 10kV સંપર્ક |
Charging Cable Cup Technical Specifications
| Iટેમ | વર્ણન |
| લંબાઈ | 25.4 સેમી (10.0 ઇંચ) |
| ઇનપુટ વોલ્યુમtage | 5.4 વીડીસી |
| ઓપરેટિંગ તાપમાન | -20 °C થી 50 °C (-4 °F થી 122 °F) |
| સંગ્રહ તાપમાન | -40 °C થી 70 °C (-40 °F થી 158 °F) |
| ભેજ | 10% થી 95% બિન-ઘનીકરણ |
| ઇલેક્ટ્રોસ્ટેટિક ડિસ્ચાર્જ (ઇએસડી) | +/- 20 કેવી હવા +/- 10kV સંપર્ક |
Snap-On USB Cable Technical Specifications
| વસ્તુ | વર્ણન |
| લંબાઈ | 1.5 સેમી (60.0 ઇંચ) |
| ઇનપુટ વોલ્યુમtage | 5.4 VDC (external power supply) |
| ઓપરેટિંગ તાપમાન | -20 °C થી 50 °C (-4 °F થી 122 °F) |
| સંગ્રહ તાપમાન | -40 °C થી 70 °C (-40 °F થી 158 °F) |
| ભેજ | 10% થી 95% બિન-ઘનીકરણ |
| ઇલેક્ટ્રોસ્ટેટિક ડિસ્ચાર્જ (ઇએસડી) | +/- 20 કેવી હવા +/- 10kV સંપર્ક |
DEX Cable Technical Specifications
| વસ્તુ | વર્ણન |
| લંબાઈ | 1.5 સેમી (60.0 ઇંચ) |
| ઓપરેટિંગ તાપમાન | -20 °C થી 50 °C (-4 °F થી 122 °F) |
| સંગ્રહ તાપમાન | -40 °C થી 70 °C (-40 °F થી 158 °F) |
| ભેજ | 10% થી 95% બિન-ઘનીકરણ |
| ઇલેક્ટ્રોસ્ટેટિક ડિસ્ચાર્જ (ઇએસડી) | +/- 20 કેવી હવા +/- 10kV સંપર્ક |
દસ્તાવેજો / સંસાધનો
 |
ZEBRA TC7 Series Touch Computer [પીડીએફ] સ્થાપન માર્ગદર્શિકા TC7 Series Touch Computer, TC7 Series, Touch Computer, Computer |


