
![]() Source-RTL
Source-RTL
User guide
Introducing Source-RTL
Written by Source Elements | Last published at: January 09, 2023
This article is part of the Source-RTL 1.0 User Guide
Source-RTL Remote TimeLine Creator & Player is a very simple RTS-enabled (Remote Transport Sync) application that allows for remote ADR where the talent does not need a DAW.
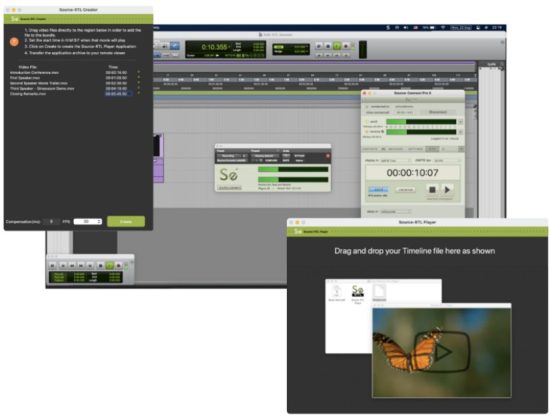
The only requirement is Source-Connect Standard or Pro on both sides. The talent does not need any application open except for Source-Connect & the RTL Player.
Technical Requirements for Source-RTL
Written by Source Elements | Last published at: October 17, 2024
This article is part of the Source-RTL 1.0 User Guide
Source-RTL is meant to be run with Source-Connect, so it has the same requirements. Unlike Source-Connect, however, Source-RTL runs only on Mac 10.10 and up.
Minimum recommended configurations
For Mac, the recommended configurations are as follows:
- macOS 10.14 (“Mojave”)
- 1 GHz Intel Core i7, 2GB RAM
- 1MB Internet upload or higher
Supported Operating Systems
- Source-RTL supports macOS 10.10 – 10.15.
Currently Supported Video Formats and Codecs
Written by Source Elements | Last published at: August 15, 2022
This article is part of the Source-RTL 1.0 User Guide
This article lists the multimedia file types and video codecs supported by Source-RTL.
File Types
The supported video formats for Source-RTL Creator are the following:
- MP4
- MOV
- 3GP
Other video formats are not supported for now.
Video Codecs
Below are the video codecs which are supported by Source-RTL:
- Apple Pro Res
- MPEG-4
- H.264 (Preferred)
- Several formats in the DV video and MPEG-2 family.
The following codecs are NOT supported:
- DNxHD codec (for example, DnxHD36)
- HEVC-encoded QuickTime videos or movies
Note that a particular computer, laptop or device might support additional formats or file types that are not listed in above.
Downloading and Installing Source-RTL
Written by Source Elements | Last published at: June 24, 2024
This article is part of the Source-RTL 1.0 User Guide
You can find Source-RTL, along with any other Source Elements software, on our website. Just log in with your account name and go to the Downloads section.
Note: To get access to the Downloads page, you will need a free iLok account and a valid evaluation or purchased license for RTL.
If you requested an evaluation license, or purchased a license you should have also created a new Source Elements account at the same time. Use this account to login to your account and download the software.
Need to sign up for a Source Elements account?
Check out this article for more information.
Downloading the Installer
Once you are in the dashboard, scroll down to the My Downloads page.

Installing Source-RTL
You should now have downloaded the correct software for your iLok license.
Launch the installer and follow the instructions. Newer versions of Source-RTL will install over existing installations.
Source-RTL Creator and Player at a first glance
Written by Source Elements | Last published at: January 31, 2025
After installing Source-RTL, you will see an application named Source-RTL Creator, which will allow you to drag and drop videos to create your timeline. The following is the interface you will see:
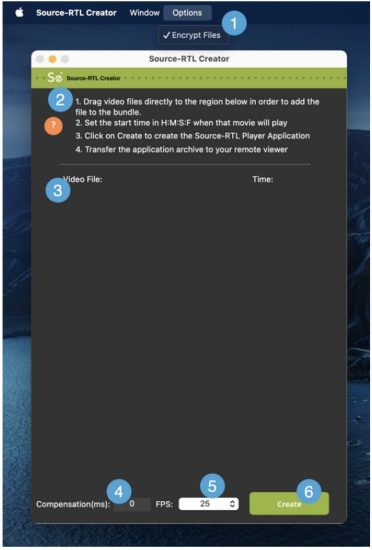
- Encrypt files. This option allows you to set a password for your videos – it is enabled by default.
- Quick start guide. The application comes with a set of quick instructions in order to get started with the Source-RTL creator.
- Video drop zone. The area where you can drop files to create your remote timeline. See page 5 for a list of currently supported video formats and codecs.
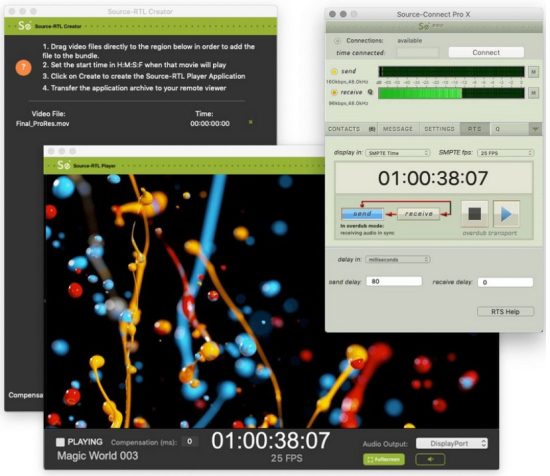
- Compensation (ms): the input where you can enter the compensation time (in milliseconds). Compensation serves as a possible delay offset between the input and output timecode in order to compensate for audio or network latency.
- FPS: the frames per second (frequency) at which the still images from the video will appear on the screen. By default, it will be set to 30
- Create button. The “Create” button on Source-RTL will start creating the Source-RTL Player application you will send to your remote viewer.
When you send over the Source-RTL Player to your remote viewer, they will see the following interface (with a different video image depending on the content you have uploaded):
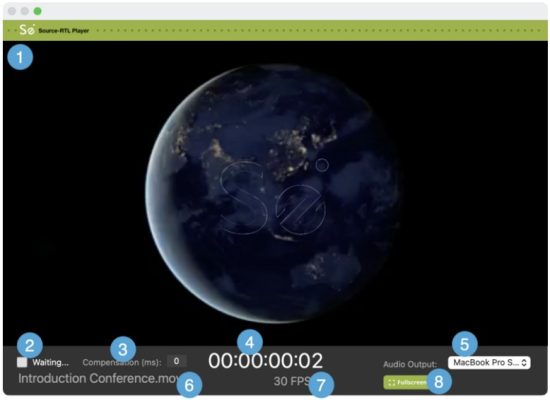
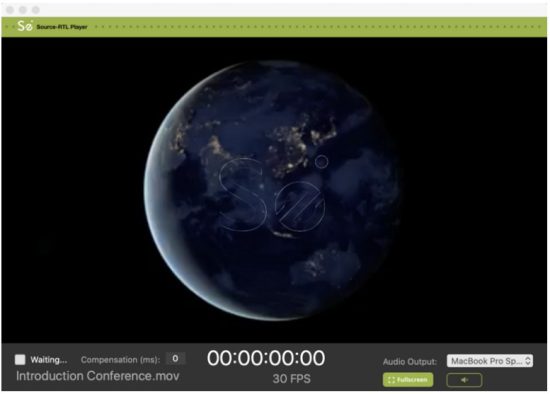
- Video reproduction: the videos you drop on the video drop zone will be played here once the RTS session starts.
- “Waiting…” message: before the RTS session starts, the Source-RTL Player will display a “Waiting…” message. Once the RTS session has been correctly started and configured, you will see “Playing” instead.
- Compensation (ms): a read-only display of the compensation time in milliseconds.
- Timecode display: the time main counter in timecode format (HH:MM:SS frames)
- Audio output: the remote viewer can configure the output device (speakers) to listen to the video in the Source-RTL Player.
- Video file name: the name of the video being played.
- FPS: the frames per second of the video file being played.
- Fullscreen: by default, the Source-RTL Player will be playing in a view which does not occupy your full screen. Click on this button to go into fullscreen.
Quick Start: Source-RTL Creator and Player
Written by Source Elements | Last published at: January 31, 2025
This article is part of the Source-RTL 1.0 User Guide
Remote TimeLine Quick start: version 1.0.3
Source-RTL Remote TimeLine Creator & Player is a very simple RTS-enabled (Remote Transport Sync) application that allows for remote ADR where the talent does not need a DAW. The only requirement is Source-Connect Standard or Pro on both sides. The talent does not need any application open except for Source-Connect & the RTL Player.
This article serves as a very quick overview. This product is in rapid development so new features are being added quickly, we welcome your feedback as to what you need to see so you can take advantage of this workflow.
Engineer side
- Set your frame rate in your DAW to match your project.
- Drag the video you want to send to the talent to the Creator window.
- Set the time in Hours, Minutes, Seconds and Frames when that movie will play so it matches your DAW session.
- Click on the “Create Player App” button. An archive will be created in the location you specify.
- Transfer this archive to your talent using any file transfer service.
If you use Dropbox to transfer your file, make sure you add ?dl=1 when sending the Dropbox link or instruct your talent to download the file from the top right-hand side of the Dropbox window.
Talent side
- Unarchive the zip file. Do NOT move the application from the folder.
- Right-click on the application to open it. On Catalina, you will need to allow permissions as this application is not yet Notarized.
- Optionally set the SMTPE fps menu (for visual verification only of sync between Source-Connect and the RTL player)
- Set the audio output device that the talent will use to listen to the videos or they can mute the audio if they choose.
Operation
- The Engineer must have Re Wire and RTS properly configured (see RTS checklist).
- Use the ADR sync mode/Overdub Transport mode.
- The talent’s video will start playing, and your Pro Tools transport will be delayed until the synced audio is returned via Source-Connect thus triggering your DAW to chase the talents picture.
- You will now hear the talent’s audio in sync with your local video.
Recommendations
See the RTS Checklist that covers using ADR sync mode, along with resolving Re Wire errors and a discussion on best practices:
- Rewire Checklist: https://support.source-elements.com/show/quickstart-checklist-forsourceconnect-rts
- Using RTS with Pro Tools: https://support.source-elements.com/show/remote-transport-sync-rtsand-pro-tools
Notes
- Familiarity with Source-Connect and Remote Transport Sync is assumed on the engineer side. Please schedule a support session with us if training is needed.
- Many talent are on macOS 10.15 Catalina. See https://support.sourceelements.com/show/sourceconnect-and-macos-catalina-1015
– It may be helpful to use a screen sharing application to set up the talent until the application is notarized: some can find it difficult to open an un-notarized application in macOS Catalina 10.15.
Using Source-RTL Creator as an Engineer
Written by Source Elements | Last published at: April 26, 2023
Using Source-RTL Creator is very easy and straightforward. After opening up the application, you will see a quick guide to get started.
Before getting started, you will need to prepare the video you will import into Source-RTL. The supported video formats for RTL are the following:
- MP4
- MOV
- 3GP
Other video formats are not supported for now.
Importing the File into Source-RTL
Once the video is ready, drag and drop it into Source-RTL Creator. The file will appear under the “Video File” list, along with any others you have added to the application.
TIP: If you are adding more than one video into Source-RTL Creator, they must all have the same frame rate.
The video (or videos) you have added to the application will be displayed in the “Video File” section.
You will be able to set the start time for each video (HH:MM:SS:FF) from the “Time” section.
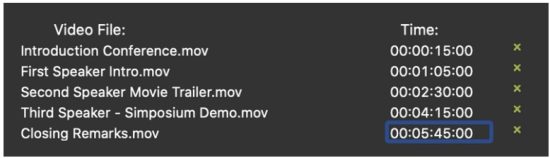
Videos can also be removed using the “x” icon next to the timestamp.
Configuring Additional Settings before creating the Bundle
At the bottom of the Source-RTL application, you will see a footer section with two additional settings you can configure:

- Compensation (in milliseconds): serves as a possible delay offset between the input and output timecode in order to compensate for audio or network (or other) latency. It can be used to finetune the sync between Source-RTL and Source-Connect.
- FPS (frames per second): the frequency at which the still images from the videos will appear on the screen. By default, it will be set to 30.
Make sure these settings match your DAW session.
Creating the Bundle
Once ready, click the green “Create” button to create the Source-RTL Player Application. You will be able to set a title and download location for your player in the following dialog.
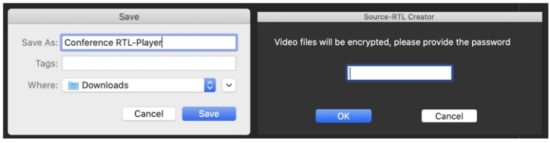 If File Encryption is enabled in the Options menu, you will also be prompted to set a password for the videos.
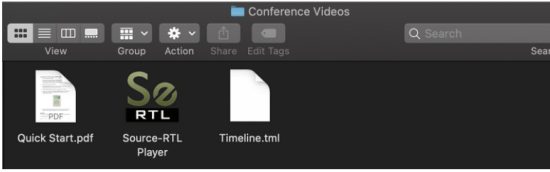
This will create a .ZIP file in the folder of your choice with the following files:
You will be able to verify how the video will play for your talent by double clicking Source-RTL Player:
The “Waiting” setting is controlled by the remote user. They can only be in “Waiting” status to receive and play the video and trigger RTS.
Sending the Bundle to your talent
Once you have verified that the player is correctly set up, and the timeline has been verified, transfer the Timeline.tml file to your talent using any file transfer service.
If you use Dropbox to transfer your file, make sure you add ?dl=1 when sending the Dropbox link or instruct your talent to download the file from the top right-hand side of the Dropbox window.
Using the Source-RTL Player: Quick Start
Written by Source Elements | Last published at: June 13, 2023
This article is part of the Source-RTL 1.0 User Guide
- You must have the Source-RTL Player open before connecting to your engineer.
Right-click on the application to open it. On Catalina you will need to allow permissions as this application is not yet Notarized. See here how to open it. - Drag the Timeline.tml file to the program.
- Set the audio output device that you will use to listen to the videos or you can mute the audio if they choose – your engineer will help you decide.
- Login to Source-Connect and establish a connection with your engineer.
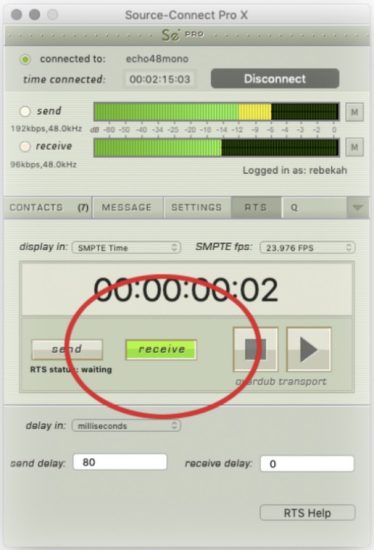
- Once you are connected, go to the RTS menu and click RECEIVE. The button will then turn green (only selected buttons turn green). Optionally, you can also set the SMPTE fps menu to the value you see in the Source-RTS Player window.
- Before quitting the Source-RTL Player, you must do one of the following:
● Disconnect from your engineer.
● Unclick the RECEIVE button.
● Quit Source-Connect.
IMPORTANT: Do NOT move the application from the folder you unzipped it from or it will no longer function.
For support please email support@source-elements.com
Troubleshooting Source-RTL
Written by Source Elements | Last published at: January 13, 2025
This article is part of the Source-RTL 1.0 User Guide
Notes and Known Issues
- We recommend that both parties use Source-Connect version 3.9 as Source-Stream is enabled for all users on this version and means that no port forwarding is required, lessening greatly the effort of the talent to get set up.
- When using Dropbox to transfer files, make sure to append the ?dl=1 parameter to your URL so your talent downloads the Zip archive. This will force-download their file.
- HEVC-encoded Quick Times may not play on all systems.
- On rare occasions, the mute button in the Source-RTL Player may not be displayed. Since the Source-RTL Player defaults with the mute enabled, you will need to click within the red area to unmute the sound.
Reporting Issues
To report an issue, please provide the following information:
- Source-RTL build number (available from the About Source-RTL Creator box)
- System configuration (Operating system, computer hardware)
- Network configuration i.e. LAN, DSL, wireless etc
- Source-RTL settings: username, settings
- Bandwidth report, for example from http://speedtest.net
- Description of what action(s) you were taking when the issue occurred, for example who you were connected to and what the settings were Technical Support is available via email, telephone and directly over Source-RTL
Contact Us
Contact Source Elements for technical and general support:
- Email: send an e-mail to technical support: support@source-mail.com
- Telephone: See our numbers here: http://source-elements.com/contact
![]()
Documents / Resources
 | Source RTL Remote Voice |
References
- Source Elements Accountdashboard.source-elements.com
- Source Elements Accountdashboard.source-elements.com
- ELEMENTS Fitness und Wellness in München, Frankfurt und Stuttgartelements.com
- How to force a Dropbox link to download - Dropbox Helphelp.dropbox.com
- Free email accounts with mail.com | Log in here or register todaymail.com
- mailto:support@source-elements.comsource-elements.com
- Contactsource-elements.com
- Remote Audio & Remote Video Collaboration - Source Elementssource-elements.com
- Installers can't be opened because Apple cannot check it for malicious software - Source Elementssource-elements.com
- support.source-support.source-
- User Manualmanual.tools