![]()
Temperature Module GEN2
Instruction Manual

Opentrons Labworks Inc.
Product and Manufacturer Description
Safety Information and Regulatory Compliance
Opentrons recommends that you follow the safe use specifications listed in this section and throughout this manual.
SAFE USE SPECIFICATIONS
Input and Output Connections
The Temperature Module has the following power requirements, which are met by the unit’s power supply.
![]() Warning: Do not replace the power supply cable unless at the direction of Opentrons Support.
Warning: Do not replace the power supply cable unless at the direction of Opentrons Support.
Module power:
Input: 100–240 VAC, 50/60 Hz, 4.0 A at 115 VAC, 2.0 A at 230 VAC
Output: 36 VDC, 6.1 A, 219.6 W maximum
Environmental Conditions
The Temperature Module should only be used indoors on a sturdy, dry, flat horizontal surface. It must be installed in a low-vibration environment with stable ambient conditions. Keep the Temperature Module away from direct sunlight or HVAC systems that may cause significant temperature or humidity changes.
Opentrons has validated the Temperature Module’s performance in the conditions recommended for system operation. Operating the unit in these conditions helps provide optimal results. The following table lists and defines the environmental operating conditions for recommended use and storage of your Temperature Module.
| Environmental Conditions | Recommended | Acceptable | Storage and Transportation |
| Ambient Temperatures | 20–22 °C (for optimal cooling) | 20–25 °C | –10 to +60 °C |
| Relative Humidity | Up to 60%, non-condensing | 80% maximum | 10–85%, non-condensing (below 30 °C) |
| Altitude | Up to 2000 m above sea level | Up to 2000 m above sea level | Up to 2000 m above sea level |
![]() Note: The Temperature Module is safe to use in conditions outside of the recommended ranges, but results may vary.
Note: The Temperature Module is safe to use in conditions outside of the recommended ranges, but results may vary.
The following table lists and defines standards for recommended use, acceptable use, and storage.
| Operating Conditions | Description |
| Recommended | Opentrons has validated the Temperature Module’s performance in the conditions recommended for system operation. Operating the Temperature Module in these conditions helps provide optimal results. |
| Acceptable | The Temperature Module is safe to use in conditions acceptable for system operation, but results may vary. |
| Storage | Storage and transportation conditions only apply when the device is completely disconnected from power and other equipment. |
Low Temperature Condensation
You may see condensation on the module’s cold surfaces upon reaching temperatures lower than ambient. The exact temperature at which condensation occurs depends on the atmospheric temperature and relative humidity in your lab. You can calculate this temperature by consulting any standard dew point index or condensation table.
SAFETY WARNING LABELS
Warning symbols on the Opentrons Temperature Module and in this manual warn you about sources of potential injury or harm.
The following table lists and defines each safety warning symbol.
| Symbol | Description |
| CAUTION: Hot surface! This symbol identifies instrument components that pose a risk of burning or heat damage if handled improperly. |
INSTRUMENT SAFETY WARNINGS
Warning symbols posted on the Opentrons Temperature Module refer directly to the safe use of the instrument. Refer to the previous table for symbol definitions.
| Symbol | Description |
| CAUTION: Warning about risk of burning. The Opentrons Temperature Module generates enough heat to cause serious burns. Wear safety goggles or other eye protection at all times during operation. Always ensure the sample block returns to idle temperature before removing samples. Always allow maximum clearance to avoid accidental burns. |
STANDARDS COMPLIANCE
The Temperature Module has been tested and found to be in compliance with all applicable requirements of the following safety and electromagnetic standards.
Safety
- IEC/UL/CSA 61010-1 Safety Requirements for Electrical Equipmentfor Measurement,Control, andLaboratory Use–
Part 1: General Requirements - IEC/UL/CSA 61010-2-010 Particular Requirements for Laboratory Equipment for the Heating of Materials
Electromagnetic Compatibility
- EN/BSI 61326-1 Electrical Equipment for Measurement,
ControlandLaboratoryUse –EMC Requirements–
Part1: GeneralRequirements - EN 55011 Industrial, Scientific and Medical Equipment – Radio
Frequency Disturbance Characteristics–Limits andMethods
ofMeasurement - FCC 47CFR Part 15 Subpart B Class A: Unintentional Radiators
- IC ICES–003 Spectrum Management and Telecommunications
Interference Causing Equipment Standard–Information
Technology Equipment (Including Digital Apparatus)
FCC Warnings and Notes
![]() Warning: Changes or modifications to this unit not expressly approved by Opentrons could void the user’s authority to operate the equipment.
Warning: Changes or modifications to this unit not expressly approved by Opentrons could void the user’s authority to operate the equipment.
This device complies with part 15 of the FCC Rules.
Operation is subject to the following two conditions:
- This device may not cause harmful interference.
- This device must accept any interference received, including interference that may cause undesired operation.
![]() Note: This equipment has been tested and found to comply with the limits for a Class A digital device, pursuant to part 15 of the FCC rules. These limits are designed to provide a reasonable protection against harmful interference when the equipment is operated in a commercial environment. This equipment generates, uses, and can radiate radio frequency energy and, if not installed and used in accordance with the instruction manual, may cause harmful interference to radio communications.
Note: This equipment has been tested and found to comply with the limits for a Class A digital device, pursuant to part 15 of the FCC rules. These limits are designed to provide a reasonable protection against harmful interference when the equipment is operated in a commercial environment. This equipment generates, uses, and can radiate radio frequency energy and, if not installed and used in accordance with the instruction manual, may cause harmful interference to radio communications.
Operation of this equipment in a residential area is likely to cause harmful interference in which case the user will be required to correct the interference at their own expense.
Canada ISED
Canada ICES–003(A) / NMB–003(A)
This productmeetstheapplicable Innovation,Science and Economic Development Canada technical specifications.
CISPR 11 Class A
Caution: This equipment is not intended for use in residential environments and may not provide adequate protection to radio reception in such environments.
Product Specifications

INCLUDED PARTS

PHYSICAL SPECIFICATIONS
| Dimensions | 194 mm L x 90 mm W x 84 mm H |
| Weight | 1.5 kg |
TEMPERATURE PROFILE
The Temperature Module is designed to achieve and maintain a target temperature on the top plate surface, within its performance specifications. The thermal block, labware, and sample volumes will affect the temperature of the sample, relative to the temperature of the top plate surface. Opentrons recommends testing the temperature within the sample to determine if additional adjustments are needed to meet the requirements of your application. If you have additional questions please contact Opentrons Support.
Additionally, Opentrons has tested the Temperature Module’s temperature profile with both the 24-well and 96-well thermal blocks. The module can generally reach its minimum temperature in 12 to 18 minutes, depending on the block and contents. The module
can reach a hot temperature (65 °C) in six minutes. For more details, see the Temperature Module White Paper.

FLEX THERMAL BLOCKS
For Flex, the Temperature Module caddy comes with a deep well block and a flat bottom block designed for use with the Flex Gripper.

The Flex flat bottom plate is compatible with various ANSI/SLAS standard well plates. It is different from the flat plate that ships with the Temperature Module and the separate three-piece set.
The Flex flat plate features a wider working surface and chamfered corner clips. These features help improve the performance of the Opentrons Flex Gripper when moving labware onto or off of the plate. You can tell which flat bottom plate you have because the one for Flex has the words “Opentrons Flex” on its top surface. The one for OT-2 does not.
THERMAL BLOCK COMPATIBILITY
The following table lists the thermal blocks recommended for use with either Flex or an OT-2.
| Thermal Block | Flex | OT-2 |
| 24-well | ||
| 96-well PCR | ||
| Deep Well | ||
| Flat Bottom for Flex | ||
| Flat Bottom for OT-2 |
WATER BATHS AND HEATING
Because air is a good thermal insulator, gaps between the wells in a thermal block and the labware placed in them can reduce time-totemperature performance and affect temperature results. Placing a little water in the wells of the aluminum thermal blocks eliminates air gaps and improves heating/cooling efficiency. The following tables provide suggested water volumes for each thermal block type.
| PCR Thermal Block Labware | Water Bath Volume |
| 0.2 μL Strip or Plate | 110 μL |
| 0.3 μL Strip or Plate | 60 μL |
| 1.5–2 mL Thermal Block Labware | Water Bath Volume |
| 1.5 mL tube | 1.5 mL |
| 2.0 mL tube | 1 mL |
Before You Begin

The OT-2 does not use caddies. Modules clip directly to the deck.
The Temperature Module caddy is also available for purchase from the Opentrons shop.
ANCHOR ADJUSTMENTS
Anchors are screw-adjustable panels on the Temperature Module caddy. They provide the clamping force that secures the module to its caddy. Use a 2.5 mm screwdriver to adjust the anchors.
- To loosen/extend the anchors, turn the screws counterclockwise.
- To tighten/retract the anchors, turn the screws clockwise.

Before installation:
- Check the anchors to make sure they’re level with or extend slightly past the base of the caddy.
- If the anchors interfere with installing the module, adjust them until there’s enough clearance to seat it, and then tighten them to hold the module in place.
DECK PLACEMENT AND CABLE ALIGNMENT
The supported deck slot positions for the Temperature Module GEN2 depend on the robot you’re using.

| Robot Model | Deck Placement |
| Flex | In any deck slot in column 1 or 3. The module can go in slot A3, but you need to move the trash bin first. |
| OT-2 | In deck slots 1, 3, 4, 6, 7, 9, or 10. |
To properly align the module relative to the robot, make sure its exhaust, power, and USB ports face outward, away from the center of the deck. This keeps the exhaust port clear and helps manage slack in the cables.
| Robot Model | Exhaust, Power, and USB Alignment |
| Flex | Facing left in column 1. Facing right in column 3. |
| OT-2 | Facing left in slot 1, 4, 7 or 10. Facing right in slot 3, 6, or 9 |
![]() Warning: Do not install the Temperature Module with the ports facing in, towards the middle of the deck.
Warning: Do not install the Temperature Module with the ports facing in, towards the middle of the deck.
This alignment vents air into the enclosure and makes cable routing and access difficult.
ATTACHING THE TEMPERATURE MODULE
- Choose the supported deck slot you want to use for the module. Use the 2.5 mm screwdriver that came with your Flex to remove the deck slot screws.
- Insert the module into its caddy by aligning the power button on the module with the on/off switch on the caddy..
 Tip: If you’re having trouble inserting the module into its caddy, the module’s power button is probably facing away from the caddy’s on/off switch. Turn the module so the power button faces the on/off switch and try again.
 - Holding the module in the caddy, use the 2.5 mm screwdriver to turn the anchor screws clockwise to tighten the anchors. The module is secure when it doesn’t move while gently pulling on it and rocking it from side to side.
- Connect the power and USB cables to the module. Route the cables through the cable management bracket on the end of the caddy’s exhaust duct.
- Insert the caddy into the deck slot, exhaust duct first, and route the power and USB cables through the Flex. Do not connect the power cable to a wall outlet yet.
- Connect the free end of the USB cable to a USB port on the Flex.
- Connect the power cable to a wall outlet.
- Gently press the on/off switch to turn the module on.
If the temperature LCD is illuminated, the module is powered on.
When successfully connected, the module appears in the Pipettes and Modules section on your robot’s device detail page in the Opentrons App.
Next, you’ll calibrate the module after attaching it for the first time.
CALIBRATING THE TEMPERATURE MODULE
When you first install a module on Flex, you need to run automated positional calibration. This process is similar to calibrating instruments like pipettes or the gripper. Module calibration ensures that the Flex moves to the exact correct location for optimal protocol performance. You do not have to recalibrate the module if you remove and reattach it to the same Flex.
To calibrate the Temperature Module, turn on the power supply.
This starts the calibration workflow process on the touchscreen.
Instructions on the touchscreen will guide you through the calibration procedure, which is outlined below.
![]() Warning: The gantry and pipette will move during calibration. Keep your hands clear of the working area before tapping an action button on the touchscreen.
Warning: The gantry and pipette will move during calibration. Keep your hands clear of the working area before tapping an action button on the touchscreen.
- Tap Start setup on the touchscreen. The robot checks the module’s firmware and updates it automatically, if required.
- Attach the Temperature Module’s calibration adapter to the module and tap Confirm placement.
 Note: The calibration adapter has two spring-loaded panels along its sides that help secure it to the module. Squeeze these panels as you place the adapter on the module. This gives the adapter enough clearance to fit properly.
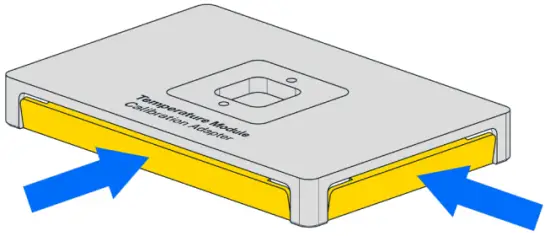
- Attach the calibration probe to the pipette.
- Tap Begin calibration.
- After the calibration process is complete, remove the calibration adapter from the module and remove the calibration probe from the pipette.
- Tap Exit.
OT-2 Attachment Steps
- Choose the supported deck slot you want to use for the module and press it gently into place.
- Connect the USB cable to the module and to a USB port on the OT-2.
- Connect the power cable to the module and then to a wall outlet.
- Gently press the on/off switch to turn the module on.
When successfully connected, the module appears in the Instruments and Modules section on your robot’s device detail page in the Opentrons App. The module is ready to use and does not require calibration on an OT-2.
Maintenance
Users should not attempt to service or repair the Temperature Module themselves. If you have concerns about the module’s performance or require maintenance, please contact Opentrons Support.
Cleaning
The following table lists the chemicals you can use to clean your Temperature Module. Diluted alcohol and distilled water are our recommended cleaning products, but you can refer to this list for other cleaning options.
![]() Warning:
Warning:
- Do not use acetone to clean the Temperature Module.
- Do not disassemble the Temperature Module for cleaning or attempt to clean its internal electronic components or mechanical parts.
- Do not put the Temperature Module in an autoclave.
| Solution | Recommendations |
| Alcohol | Includes ethyl/ethanol, isopropyl, and methanol. Dilute to 70% for cleaning. Do not use 100% alcohol. |
| Bleach | Dilute to 10% (1:10 bleach/water ratio) for cleaning. Do not use 100% bleach. |
| Distilled Water | You can use distilled water to clean or rinse your Temperature Module. |
Turn off the Temperature Module before cleaning it. You can clean the top surfaces of the module while it’s installed in a deck slot.
However, for better access, you may want to:
- Disconnect any USB or power cables before you begin.
- Remove the caddy (Flex only) and module from the deck slot.
- Remove the module from the caddy (Flex only).
Once you’ve prepared the module for cleaning:
- Dampen a soft, clean cloth or paper towel with a cleaning solution.
- Gently wipe off the module’s surfaces.
- Use a cloth dampened with distilled water as a rinse wipedown.
- Let the module air dry.
Additional Product Information
WARRANTY
All hardware purchased from Opentrons is covered under a 1-year standard warranty. Opentrons warrants to the end-user of the products that they will be free of manufacturing defects due to part quality issues or poor workmanship and also warrants that the products will materially conform to Opentrons’ published specifications.
SUPPORT
Opentrons Support can help you with questions about our products and services. If you discover a defect, or believe your product is not functioning to published specifications, contact us at support@opentrons.com.
Please have the Temperature Module’s serial number available when contacting support. You can find the serial number on the bottom of the module or in the Opentrons App. To find the module serial number in the app, go to the Instruments and Modules section of your robot’s device details page, click the three dot menu ( ⋮ ) and then click About.
APP DOWNLOAD
Control your liquid handling robot and modules using the Opentrons App. Download the app for Mac, Windows, or Linux at https://opentrons.com/ot-app.
WEEE POLICY
![]() Opentrons is dedicated to adhering to the EU Directive on Waste Electrical and Electronic Equipment (WEEE – 2012/19/ EU). Our goal is to ensure that our products are properly disposed of or recycled once they reach the end of their useful life.
Opentrons is dedicated to adhering to the EU Directive on Waste Electrical and Electronic Equipment (WEEE – 2012/19/ EU). Our goal is to ensure that our products are properly disposed of or recycled once they reach the end of their useful life.
Opentrons products that fall under the WEEE directive are labeled with the ![]() symbol, signifying that they should not be thrown away with regular household waste but must be collected and handled separately.
symbol, signifying that they should not be thrown away with regular household waste but must be collected and handled separately.
If you or your business have Opentrons products that are at end of life or need to be discarded for a separate purpose, contact Opentrons for proper disposal and recycling.
![]()
Post-sales service & contacting Opentrons
If you have any questions about the use of the system,
abnormal phenomena, or special needs, please contact:
support@opentrons.com. Also visit www.opentrons.com.
TEMPERATURE MODULE GEN2
Documents / Resources
 |
Opentrons GEN2 Temperature Module [pdf] Instruction Manual GEN2 Temperature Module, GEN2, Temperature Module, Module |