![]()
Modulu di temperatura GEN2
Manuale d'istruzzioni

Opentrons Labworks Inc.
Descrizzione di u produttu è u fabricatore
Infurmazione di sicurezza è Cumplicità di a regulazione
Opentrons consiglia di seguire le specifiche di uso sicuro elencate in questa sezione e in tutto il manuale.
SPECIFICAZIONI D'USU SAFE
Cunnessioni di input è output
U Modulu di Temperature hà i seguenti requisiti di energia, chì sò soddisfatti da l'alimentazione di l'unità.
![]() Attenzione: Do not replace the power supply cable unless at the direction of Opentrons Support.
Attenzione: Do not replace the power supply cable unless at the direction of Opentrons Support.
Module power:
Input: 100–240 VAC, 50/60 Hz, 4.0 A at 115 VAC, 2.0 A at 230 VAC
Output: 36 VDC, 6.1 A, 219.6 W maximum
Cundizioni Ambientali
The Temperature Module should only be used indoors on a sturdy, dry, flat horizontal surface. It must be installed in a low-vibration environment with stable ambient conditions. Keep the Temperature Module away from direct sunlight or HVAC systems that may cause significant temperature or humidity changes.
Opentrons hà validatu u funziunamentu di u Modulu di Temperature in e cundizioni cunsigliate per u funziunamentu di u sistema. U funziunamentu di l'unità in queste cundizioni aiuta à furnisce risultati ottimali. A tavula chì seguita lista è definisce e cundizioni di u funziunamentu ambientale per l'usu è u almacenamentu cunsigliatu di u vostru Modulu di Temperatura.
| Cundizioni Ambientali | Cunsigliatu | Acceptable | Storage è Trasportu |
| Temperature ambientali | 20–22 °C (for optimal cooling) | 20-25 ° C | –10 à +60 ° C |
| Umidità Relativa | Finu à 60%, senza cundensazione | 80% massimu | 10–85%, non-condensing (below 30 °C) |
| Altitudine | Finu à 2000 m sopra u livellu di u mari | Finu à 2000 m sopra u livellu di u mari | Finu à 2000 m sopra u livellu di u mari |
![]() Nota: The Temperature Module is safe to use in conditions outside of the recommended ranges, but results may vary.
Nota: The Temperature Module is safe to use in conditions outside of the recommended ranges, but results may vary.
A tavula seguente lista è definisce e norme per l'usu cunsigliatu, l'usu accettabile è u almacenamentu.
| Cundizioni di u funziunamentu | Descrizzione |
| Cunsigliatu | Opentrons has validated the Temperature Module’s performance in the conditions recommended for system operation. Operating the Temperature Module in these conditions helps provide optimal results. |
| Acceptable | U Modulu di Temperature hè sicuru d'utilizà in cundizioni accettabili per u funziunamentu di u sistema, ma i risultati pò varià. |
| Storage | E cundizioni di almacenamentu è di trasportu s'applicanu solu quandu u dispusitivu hè completamente disconnected from power and other equipment. |
Condensazione a bassa temperatura
You may see condensation on the module’s cold surfaces upon reaching temperatures lower than ambient. The exact temperature at which condensation occurs depends on the atmospheric temperature and relative humidity in your lab. You can calculate this temperature by consulting any standard dew point index or condensation table.
ETICHETTE DI AVVERTENZA DI SICUREZZA
Warning symbols on the Opentrons Temperature Module and in this manual warn you about sources of potential injury or harm.
The following table lists and defines each safety warning symbol.
| Simbulu | Descrizzione |
| ATTENZIONE: Superficie calda! This symbol identifies instrument components that pose a risk of burning or heat damage if handled improperly. |
AVVERTENZE DI SICUREZZA DI STRUMENTI
I simboli d'avvertimentu affissati nantu à u Modulu di Temperature Opentrons si riferiscenu direttamente à l'usu sicuru di l'instrumentu. Riferite à a tavula precedente per e definizione di simboli.
| Simbulu | Descrizzione |
| CAUTION: Warning about risk of burning. The Opentrons Temperature Module generates enough heat to cause serious burns. Wear safety goggles or other eye protection at all times during operation. Always ensure the sample bloc revient à la température de vide avant de retirer samples. Lasciate sempre un spaziu massimu per evità ustioni accidentali. |
CUMPLIMENTU DI STANDARDS
U Modulu di Temperature hè statu pruvatu è truvatu in cunfurmità cù tutti i requisiti applicabili di e seguenti norme di sicurezza è elettromagnetiche.
Sicurezza
- IEC/UL/CSA 61010-1 Safety Requirements for Electrical Equipmentfor Measurement,Control, andLaboratory Use–
Parte 1: Requisiti generali - IEC/UL/CSA 61010-2-010 Particular Requirements for Laboratory Equipment for the Heating of Materials
Cumpatibilità elettromagnetica
- EN/BSI 61326-1 Electrical Equipment for Measurement,
ControlandLaboratoryUse –EMC Requirements–
Part1: GeneralRequirements - EN 55011 Industrial, Scientific and Medical Equipment – Radio
Frequency Disturbance Characteristics–Limits andMethods
ofMeasurement - FCC 47CFR Part 15 Subpart B Class A: Unintentional Radiators
- IC ICES–003 Spectrum Management and Telecommunications
Interference Causing Equipment Standard–Information
Technology Equipment (Including Digital Apparatus)
Avvisi è Note FCC
![]() Attenzione: Changes or modifications to this unit not expressly approved by Opentrons could void the user’s authority to operate the equipment.
Attenzione: Changes or modifications to this unit not expressly approved by Opentrons could void the user’s authority to operate the equipment.
Stu dispusitivu hè conforme à a parte 15 di e regule FCC.
U funziunamentu hè sottumessu à i seguenti dui cundizioni:
- Stu dispusitivu ùn pò causari interferenza dannusu.
- Stu dispusitivu deve accettà ogni interferenza ricevuta, cumpresi l'interferenza chì pò causà operazione indesiderata.
![]() Nota: This equipment has been tested and found to comply with the limits for a Class A digital device, pursuant to part 15 of the FCC rules. These limits are designed to provide a reasonable protection against harmful interference when the equipment is operated in a commercial environment. This equipment generates, uses, and can radiate radio frequency energy and, if not installed and used in accordance with the instruction manual, may cause harmful interference to radio communications.
Nota: This equipment has been tested and found to comply with the limits for a Class A digital device, pursuant to part 15 of the FCC rules. These limits are designed to provide a reasonable protection against harmful interference when the equipment is operated in a commercial environment. This equipment generates, uses, and can radiate radio frequency energy and, if not installed and used in accordance with the instruction manual, may cause harmful interference to radio communications.
U funziunamentu di stu equipamentu in una zona residenziale hè prubabile di causà interferenza dannosa, in quale casu l'utilizatore serà dumandatu à correggere l'interferenza à i so spesi.
Canada ISED
Canada ICES–003(A) / NMB–003(A)
This productmeetstheapplicable Innovation,Science and Economic Development Canada technical specifications.
CISPR 11 Classe A
Attenzione: Stu equipamentu ùn hè micca pensatu per l'usu in ambienti residenziali è ùn pò micca furnisce una prutezzione adatta à a ricezione radio in tali ambienti.
Specificazioni di u produttu

PARTI INCLUSI

SPECIFICHE FISICHE
| Dimensioni | 194 mm L x 90 mm L x 84 mm H |
| Pesu | 1.5 kg |
TEMPERATURE PROFILE
U Modulu di Temperature hè cuncepitu per ottene è mantene una temperatura di destinazione nantu à a superficia di u pianu superiore, in e so specificazioni di rendiment. U bloccu termale, labware, è sample volumi affettaranu a temperatura di u sample, relative à a temperatura di a superficia di u top plate. Opentrons consiglia di testà a temperatura in u sample per determinà se aghjustamenti supplementari sò necessarii per risponde à i requisiti di a vostra applicazione. Se avete altre dumande, cuntattate l'Assistenza Opentrons.
Inoltre, Opentrons hà pruvatu a temperatura pro di u Modulu di Temperaturefile with both the 24-well and 96-well thermal blocks. The module can generally reach its minimum temperature in 12 to 18 minutes, depending on the block and contents. The module
can reach a hot temperature (65 °C) in six minutes. For more details, see the Temperature Module White Paper.

BLOCCHI TERMICI FLEX
Per Flex, u caddy di u Modulu di Temperature vene cun un bloccu di pozzu prufondu è un bloccu di fondu pianu cuncepitu per l'usu cù u Flex Gripper.

The Flex flat bottom plate is compatible with various ANSI/SLAS standard well plates. It is different from the flat plate that ships with the Temperature Module and the separate three-piece set.
The Flex flat plate features a wider working surface and chamfered corner clips. These features help improve the performance of the Opentrons Flex Gripper when moving labware onto or off of the plate. You can tell which flat bottom plate you have because the one for Flex has the words “Opentrons Flex” on its top surface. The one for OT-2 does not.
COMPATIBILITÀ DI BLOCCHI TERMICI
A tavula seguente lista i blocchi termichi cunsigliati per l'usu cù Flex o un OT-2.
| Bloccu termale | Flex | OT-2 |
| 24-bene | ||
| 96-well PCR | ||
| Bè Profonda | ||
| Flat Bottom for Flex | ||
| Flat Bottom for OT-2 |
BAGNI D'ACQUA E RISCALDA
Because air is a good thermal insulator, gaps between the wells in a thermal block and the labware placed in them can reduce time-totemperature performance and affect temperature results. Placing a little water in the wells of the aluminum thermal blocks eliminates air gaps and improves heating/cooling efficiency. The following tables provide suggested water volumes for each thermal block type.
| PCR Thermal Block Labware | Volume di bagnu d'acqua |
| 0.2 μL Strip or Plate | 110 μL |
| 0.3 μL Strip or Plate | 60 μL |
| 1.5–2 mL Thermal Block Labware | Volume di bagnu d'acqua |
| 1.5 mL tube | 1.5 ml |
| 2.0 mL tube | 1 ml |
Prima di principià

L'OT-2 ùn usa micca caddies. I moduli clip direttamente à u ponte.
U caddy di u Modulu di Temperature hè ancu dispunibule per compra da a buttrega Opentrons.
AJUSTAMENTI ANCHOR
L'ancora sò pannelli regulabili à viti nantu à u caddy di u Modulu di Temperature. Anu furnisce u clampforza chì assicura u modulu à u so caddy. Aduprate un cacciavite da 2.5 mm per aghjustà l'ancore.
- Per allargà / allargà l'ancore, girate i viti in senso antiorario.
- Per stringhje / ritruvà l'ancore, girate i viti in u sensu orariu.

Prima di a stallazione:
- Verificate l'ancora per assicurà chì sò à livellu o si estendenu ligeramente da a basa di u caddy.
- Se l'ancora interferiscenu cù a stallazione di u modulu, aghjustate finu à chì ci hè abbastanza spaziu per pusà, è poi stringhje per mantene u modulu in u locu.
SITUAZIONE DECK E ALIGNMENT CABLE
I posti di slot supportati per u Modulu di Temperatura GEN2 dipendenu da u robot chì stai aduprate.

| Robot Model | Posizionamentu di u ponte |
| Flex | In ogni slot di deck in a colonna 1 o 3. U modulu pò andà in u slot A3, ma avete bisognu di spustà u trash bin prima. |
| OT-2 | In i slot di ponte 1, 3, 4, 6, 7, 9 o 10. |
Per allineà currettamente u modulu relative à u robot, assicuratevi chì i so porti di scarico, di putenza è USB sò rivolti à l'esterno, luntanu da u centru di a piattaforma. Questu mantene u portu di scarico chjaru è aiuta à gestisce a slack in i cavi.
| Robot Model | Exhaust, Power, è Alignamentu USB |
| Flex | Di fronte à a manca in a colonna 1. Di fronte à a diritta in a colonna 3. |
| OT-2 | Facing left in slot 1, 4, 7 or 10. Facing right in slot 3, 6, or 9 |
![]() Attenzione: Do not install the Temperature Module with the ports facing in, towards the middle of the deck.
Attenzione: Do not install the Temperature Module with the ports facing in, towards the middle of the deck.
This alignment vents air into the enclosure and makes cable routing and access difficult.
ATTACHING U MODULU TEMPERATURE
- Choose the supported deck slot you want to use for the module. Use the 2.5 mm screwdriver that came with your Flex to remove the deck slot screws.
- Insert the module into its caddy by aligning the power button on the module with the on/off switch on the caddy..
 Cunsigliu: Sè avete prublemi à inserisce u modulu in u so caddy, u buttone di putenza di u modulu hè probabilmente di fronte à l'interruttore on/off di u caddy. Turn u modulu in modu chì u buttone d'alimentazione face l'interruttore on/off è pruvate di novu.
 - Tenendu u modulu in u caddy, aduprate u cacciavite di 2.5 mm per vultà i viti di l'ancora in u sensu orariu per stringe l'ancore. U modulu hè sicuru quandu ùn si move micca mentre tirà delicatamente nantu à ellu è bascula da un latu à l'altru.
- Connect the power and USB cables to the module. Route the cables through the cable management bracket on the end of the caddy’s exhaust duct.
- Insert the caddy into the deck slot, exhaust duct first, and route the power and USB cables through the Flex. Do not connect the power cable to a wall outlet yet.
- Cunnette l'estremità libera di u cable USB à un portu USB in u Flex.
- Cunnette u cable d'alimentazione à una presa di muru.
- Gently press the on/off switch to turn the module on.
Se u LCD di temperatura hè illuminatu, u modulu hè alimentatu.
Quandu hà cunnessu successu, u modulu appare in a sezione Pipette è Moduli in a pagina di dettagli di u vostru robot in l'App Opentrons.
Dopu, calibrate u modulu dopu avè attaccatu per a prima volta.
CALIBRATING U MODULU DI TEMPERATURA
Quandu prima stallate un modulu nantu à Flex, avete bisognu di eseguisce a calibrazione pusizionale automatizata. Stu prucessu hè simile à a calibrazione di strumenti cum'è pipette o pinza. A calibrazione di u modulu assicura chì u Flex si move in u locu precisu currettu per un rendimentu ottimale di u protocolu. Ùn avete micca bisognu di ricalibrate u modulu si sguassate è riattaccate à u stessu Flex.
To calibrate the Temperature Module, turn on the power supply.
This starts the calibration workflow process on the touchscreen.
Instructions on the touchscreen will guide you through the calibration procedure, which is outlined below.
![]() Attenzione: The gantry and pipette will move during calibration. Keep your hands clear of the working area before tapping an action button on the touchscreen.
Attenzione: The gantry and pipette will move during calibration. Keep your hands clear of the working area before tapping an action button on the touchscreen.
- Tap Start setup on the touchscreen. The robot checks the module’s firmware and updates it automatically, if required.
- Attach the Temperature Module’s calibration adapter to the module and tap Confirm placement.
 Nota: The calibration adapter has two spring-loaded panels along its sides that help secure it to the module. Squeeze these panels as you place the adapter on the module. This gives the adapter enough clearance to fit properly.
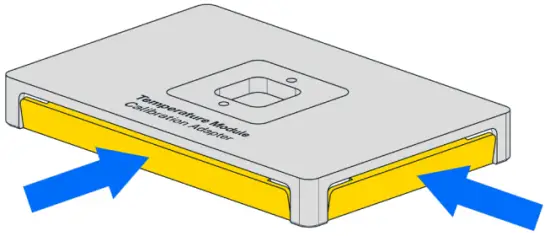
- Attach the calibration probe to the pipette.
- Tap Begin calibration.
- After the calibration process is complete, remove the calibration adapter from the module and remove the calibration probe from the pipette.
- Toccate Esci.
OT-2 Passi di Attachment
- Choose the supported deck slot you want to use for the module and press it gently into place.
- Connect the USB cable to the module and to a USB port on the OT-2.
- Cunnette u cable d'alimentazione à u modulu è dopu à una presa di muru.
- Gently press the on/off switch to turn the module on.
Quandu hà cunnessu successu, u modulu appare in a sezione Strumenti è Moduli in a pagina di dettagli di u vostru robot in l'App Opentrons. U modulu hè prontu à aduprà è ùn hè micca bisognu di calibrazione nantu à un OT-2.
Mantenimentu
L'utilizatori ùn devenu micca pruvà à serve o riparà u Modulu di Temperature stessu. Se avete preoccupazioni per u rendiment di u modulu o avete bisognu di mantenimentu, cuntattate l'Assistenza Opentrons.
Pulizia
A tavula seguente lista i sustanzi chimichi chì pudete aduprà per pulizziari u vostru Modulu Temperature. L'alcohol diluitu è l'acqua distillata sò i nostri prudutti di pulizia cunsigliati, ma pudete riferite à sta lista per altre opzioni di pulizia.
![]() Attenzione:
Attenzione:
- Do not use acetone to clean the Temperature Module.
- Ùn disassemble u Modulu di Temperature per a pulitura o pruvate di pulizziari i so cumpunenti elettronichi interni o parti meccaniche.
- Ùn mette micca u Modulu di Temperature in un autoclave.
| Soluzione | Raccomandazioni |
| Alcohol | Includes ethyl/ethanol, isopropyl, and methanol. Dilute to 70% for cleaning. Do not use 100% alcohol. |
| Bleach | Dilute to 10% (1:10 bleach/water ratio) for cleaning. Do not use 100% bleach. |
| Acqua distillata | Pudete aduprà acqua distillata per pulizziari o lavà u vostru Module Temperature. |
Turn off the Temperature Module before cleaning it. You can clean the top surfaces of the module while it’s installed in a deck slot.
However, for better access, you may want to:
- Disconnect any USB or power cables before you begin.
- Remove the caddy (Flex only) and module from the deck slot.
- Remove the module from the caddy (Flex only).
Una volta chì avete preparatu u modulu per a pulizia:
- Dampin un pannu dolce è pulitu o in un asciugamanu di carta cù una suluzione di pulizia.
- Gently wipe off the module’s surfaces.
- Aduprà un pannu dampened with distilled water as a rinse wipedown.
- Lasciate asciugà u modulu à l'aria.
Informazioni supplementari di u produttu
GARANTIA
Tuttu u hardware acquistatu da Opentrons hè cupartu sottu una garanzia standard di 1 annu. Opentrons garantisce à l'utilizatori finali di i prudutti chì seranu liberi di difetti di fabricazione per via di prublemi di qualità di parte o di mala fattura è ancu guarantisci chì i prudutti saranu materialimente conformi à e specificazioni publicate da Opentrons.
SUPPORTU
Opentrons Support pò aiutà vi cù e dumande nantu à i nostri prudutti è servizii. Sè scopre un difettu, o crede chì u vostru pruduttu ùn hè micca funziunendu à e specificazioni publicate, cuntattateci à support@opentrons.com.
Please have the Temperature Module’s serial number available when contacting support. You can find the serial number on the bottom of the module or in the Opentrons App. To find the module serial number in the app, go to the Instruments and Modules section of your robot’s device details page, click the three dot menu ( ⋮ ) and then click About.
DOWNLOAD APP
Control your liquid handling robot and modules using the Opentrons App. Download the app for Mac, Windows, or Linux at https://opentrons.com/ot-app.
POLITICA WEEE
![]() Opentrons is dedicated to adhering to the EU Directive on Waste Electrical and Electronic Equipment (WEEE – 2012/19/ EU). Our goal is to ensure that our products are properly disposed of or recycled once they reach the end of their useful life.
Opentrons is dedicated to adhering to the EU Directive on Waste Electrical and Electronic Equipment (WEEE – 2012/19/ EU). Our goal is to ensure that our products are properly disposed of or recycled once they reach the end of their useful life.
I prudutti Opentrons chì rientranu in a direttiva WEEE sò etichettati cù u ![]() simbulu, chì significa chì ùn devenu micca esse ghjittati cù i rifiuti domestichi regulari, ma devenu esse raccolti è trattati separatamente.
simbulu, chì significa chì ùn devenu micca esse ghjittati cù i rifiuti domestichi regulari, ma devenu esse raccolti è trattati separatamente.
Se voi o a vostra impresa avete i prudutti Opentrons chì sò à a fine di a vita o chì anu da esse scartati per un scopu separatu, cuntattate Opentrons per u riciclamentu è u riciclamentu.
![]()
Serviziu post-vendita è cuntattate Opentrons
If you have any questions about the use of the system,
abnormal phenomena, or special needs, please contact:
support@opentrons.com. Visita ancu www.opentrons.com.
MODULE DI TEMPERATURA GEN2
Documenti / Risorse
 |
Modulu di temperatura Opentrons GEN2 [pdfManuale d'istruzzioni GEN2 Temperature Module, GEN2, Temperature Module, Module |