
UART Fingerprint Sensor (C)
User Manual
OVERVIEW
This is a highly integrated round-shaped all-in-one capacitive fingerprint sensor module, which is nearly as small as a nail plate. The module is controlled via UART commands, easy to use. Its advantages include 360° Omni-directional verification, fast verification, high stability, low power consumption, etc.
Based on a high-performance Cortex processor, combined with a high-security commercial fingerprinting algorithm, the UART Fingerprint Sensor (C) features functionalities like fingerprint enrolling, image acquisition, feature finding, template generating and storing, fingerprint matching, and so on. Without any knowledge about the complicated fingerprinting algorithm, all you need to do is just send some UART commands, to quickly integrate it into fingerprint verification applications which require small size and high precision.
FEATURES
- Easy to use by some simple commands, you do not have to know any fingerprint technology or the module inter structure
- The commercial fingerprinting algorithm, stable performance, fast verification, supports fingerprint enrolling, fingerprint matching, collect fingerprint image, upload fingerprint feature, etc.
- Capacitive sensitive detection, just touch the collecting window lightly for fast verification
- Hardware highly integrated, processor and sensor in one small chip, suit for small size applications
- Narrow stainless-steel rim, large touching area, supports 360° Omni-directional verification
- Embedded human sensor, the processor will enter sleep automatically, and wake up when touching, lower power consumption
- Onboard UART connector, easy to connect with hardware platforms like STM32 and Raspberry Pi
SPECIFICATION
- Sensor type: capacitive touching
- Resolution: 508DPI
- Image pixels: 192×192
- Image grey scale: 8
- Sensor size: R15.5mm
- Fingerprint capacity: 500
- Matching time: <500ms (1:N, and N<100)
- False acceptance rate: <0.001%
- False rejection rate: <0.1%
- Operating voltage: 2.7–3V
- Operating current: <50mA
- Sleep current: <16uA
- Anti-electrostatic: contact discharge 8KV / aerial discharge 15KV
- Interface: UART
- Baudrate: 19200 bps
- Operating environment:
• Temperature: -20°C~70°C
• Humidity: 40%RH~85%RH (no condensation) - Storage environment:
• Temperature: -40°C~85°C
• Humidity: <85%RH (no condensation) - Life: 1 million times
HARDWARE
DIMENSION
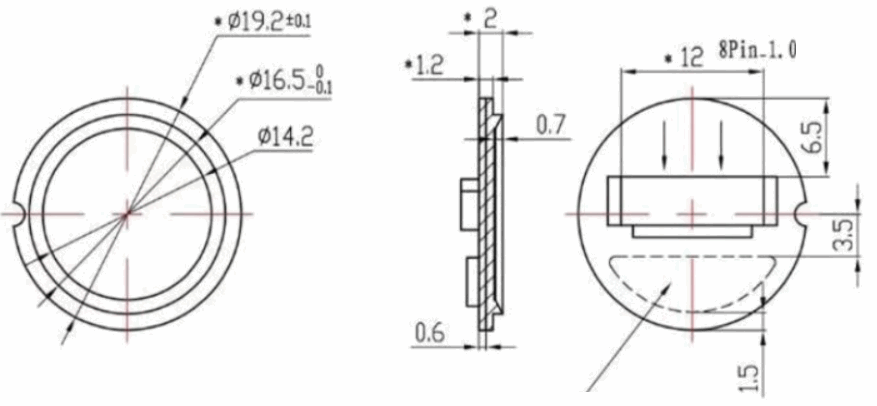
INTERFACE
Note: The color of actual wires may be different from the image. According to the PIN when connecting but not the color.
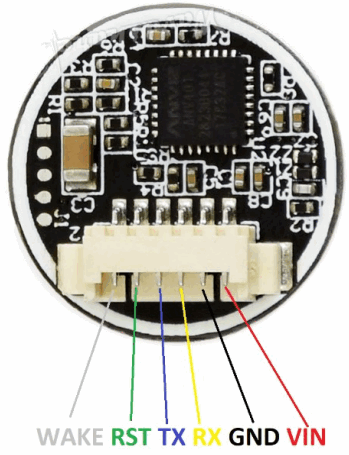
- VIN: 3.3V
- GND: Ground
- RX: Serial data input (TTL)
- TX: Serial data output (TTL)
- RST: Power enable/disable Pin
• HIGH: Power enable
• LOW: Power disable (Sleep Mode) - WAKE: Wake up pin. When the module is in sleep mode, the WKAE pin is HIGH when touching the sensor with a finger.
COMMANDS
COMMANDS FORMAT
This module works as a slave device, and you should control the Master device to send commands to control it. The communication interface is UART: 19200 8N1.
The format commands and responses should be:
1) =8 bytes
| Byte | 1 | 2 | 3 | 4 | 5 | 6 | 7 | 8 |
| CMD | 0xF5 | CMD | P1 | P2 | P3 | 0 | CHK | 0xF5 |
| ACK | 0xF5 | CMD | Q1 | Q2 | Q3 | 0 | CHK | 0xF5 |
Notes:
CMD: Type of command/response
P1, P2, P3: Parameters of command
Q1, Q2, Q3: Parameters of response
Q3: Generally, Q3 is valid/invalid information of the operation, it should be:
| #define ACK_SUCCESS #define ACK_FAIL #define ACK_FULL #define ACK_NOUSER #define ACK_USER_OCCUPIED #define ACK_FINGER_OCCUPIED #define ACK_TIMEOUT |
0x00 0x01 0x04 0x05 0x06 0x07 0x08 |
//Success //Failed //The database is full //The user is not exist //The user was exist //The fingerprint was exist //Time out |
CHK: Checksum, it is XOR result of bytes from Byte 2 to Byte 6
2) >8 bytes. This data contains two parts: data head and data packet data head:
| Byte | 1 | 2 | 3 | 4 | 5 | 6 | 7 | 8 |
| CMD | 0xF5 | CMD | Hi(Len) | Low(Len) | 0 | 0 | CHK | 0xF5 |
| ACK | 0xF5 | CMD | Hi(Len) | Low(Len) | Q3 | 0 | CHK | 0xF5 |
Note:
CMD, Q3: same as 1)
Len: Length of valid data in the data packet, 16bits (two bytes)
Hi(Len): High 8 bits of Len
Low(Len): Low 8 bits of Len
CHK: Checksum, it is XOR result of bytes from Byte 1 to Byte 6 data packet:
| Byte | 1 | 2…Len+1 | Len+2 | Len+3 |
| CMD | 0xF5 | Data | CHK | 0xF5 |
| ACK | 0xF5 | Data | CHK | 0xF5 |
Note:
Len: numbers of Data bytes
CHK: Checksum, it is XOR result of bytes from Byte 2 to Byte Len+1
data packet following data head.
COMMAND TYPES:
- Modify SN number of the module (CMD/ACK both 8 Byte)
Byte 1 2 3 4 5 6 7 8 CMD 0xF5 0x08 New SN (Bit 23-16) New SN (Bit 15-8) New SN(Bit 7-0) 0 CHK 0xF5 ACK 0xF5 0x08 old S (Bit 23-16) old SN (Bit 15-8) old SN (Bit 7-0) 0 CHK 0xF5 - Query Model SN (CMD/ACK both 8 Byte)
Byte 1 2 3 4 5 6 7 8 CMD 0xF5 0x2A 0 0 0 0 CHK 0xF5 ACK 0xF5 0x2A SN (Bit 23-16) SN (Bit 15-8) SN (Bit 7-0) 0 CHK 0xF5 - Sleep Mode (CMD/ACK both 8 Byte)
Byte 1 2 3 4 5 6 7 8 CMD 0xF5 0x2C 0 0 0 0 CHK 0xF5 ACK 0xF5 0x2C 0 0 0 0 CHK 0xF5 - Set/Read fingerprint adding mode (CMD/ACK both 8 Byte)
There are two modes: enable duplication mode and disable duplication mode. When the module is in disabled duplication mod: the same fingerprint could only be added as one ID. If you want to add another ID with the same fingerprint, DSP response failed information. The module is in disabled mode after powering on.Byte 1 2 3 4 5 6 7 8 CMD 0xF5 0x2D 0 Byte5=0:
0: Enable
1: Disable
Byte5=1: 00: a new mode
1: read current mode0 CHK 0xF5 ACK 0xF5 0x2D 0 Current mode ACK_SUCCUSS
ACK_FAIL0 CHK 0xF5 - Add fingerprint (CMD/ACK both 8 Byte)
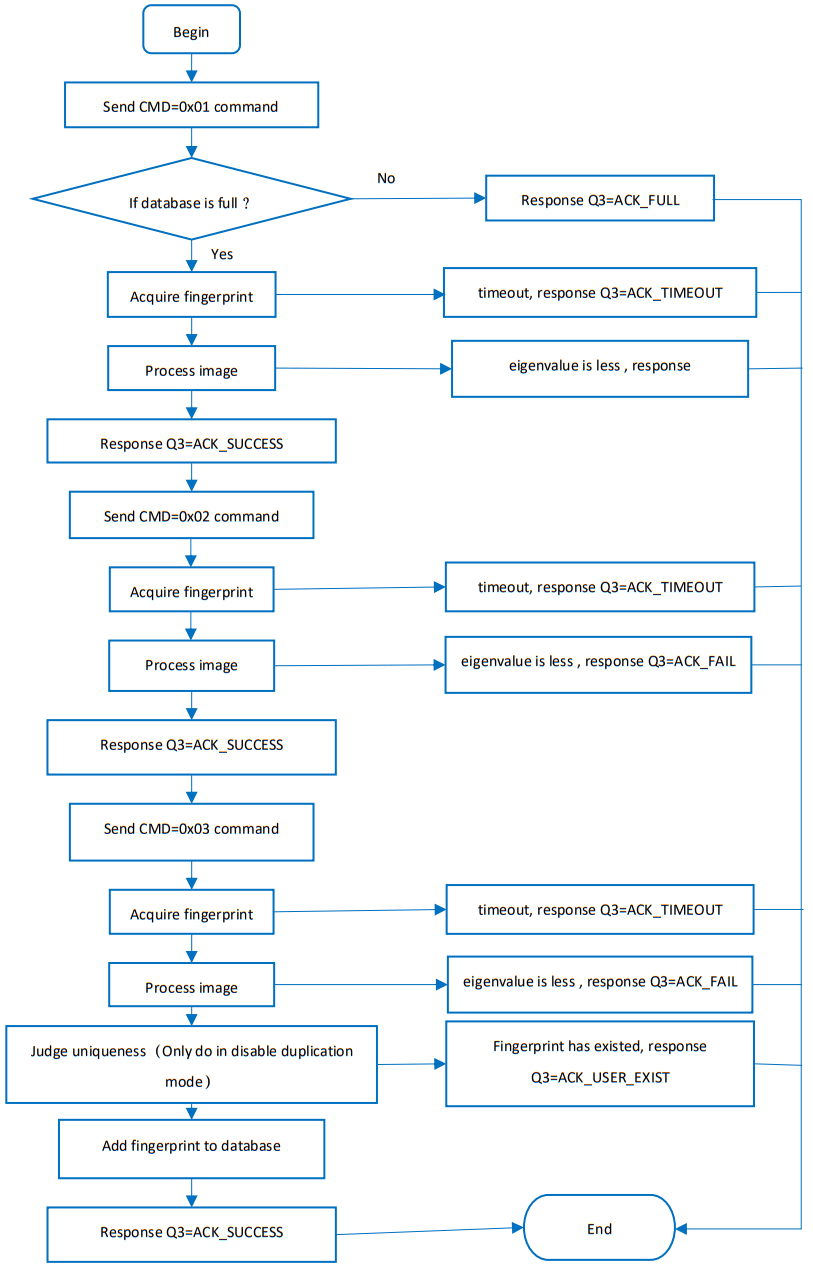
The master device should send commands triple times to the module and add fingerprint triple times, making sure the fingerprint added is valid.
a) FirstByte 1 2 3 4 5 6 7 8 CMD 0xF
50x0
1User ID (High 8Bit) User ID (Low 8Bit ) Permission(1/2/3) 0 CHK 0xF5 ACK 0xF
50x0
10 0 ACK_SUCCESS
ACK_FAIL0 CHK 0xF5 ACK_FULL
ACK_USER_OCCUPIED ACK_FINGER_OCCUPIED
ACK_TIMEOUTNotes:
User ID: 1~0xFFF;
User Permission: 1,2,3,(you can define the permission yourself)
b) SecondByte 1 2 3 4 5 6 7 8 CMD
0xF5
0x02
User ID (High 8Bit )
User ID (Low 8Bit )
Permission (1/2/3)
0
CHK
0xF5
ACK
0xF5
0x02
0
0
ACK_SUCCESS ACK_FAIL ACK_TIMEOUT
0
CHK
0xF5
c) third
Byte 1 2 3 4 5 6 7 8 CMD
0xF5
0x03
User ID (High 8Bit )
User ID (Low 8Bit )
Permission (1/2/3)
0
CHK
0xF5
ACK
0xF5
0x03
0
0
ACK_SUCCESS ACK_FAIL ACK_TIMEOUT
0
CHK
0xF5
Notes: User ID and Permission in three commands.
- Add users and upload eigenvalues (CMD =8Byte/ACK > 8 Byte)
These commands are similar to “5. add fingerprint”, you should add triple times as well.
a) First
Same as the First of “5. add fingerprint”
b) Second
Same as the Second of “5. add fingerprint”
c) Third
CMD Format:Byte 1 2 3 4 5 6 7 8 CMD 0xF5 0x06 0 0 0 0 CHK 0xF5 ACK Format:
1) Data head:Byte 1 2 3 4 5 6 7 8 ACK 0xF5 0x06 Hi(Len) Low(Len) ACK_SUCCESS
ACK_FAIL
ACK_TIMEOUT0 CHK 0xF5 2) Data packet:
Byte 1 2 3 4 5—Len+1 Len+2 Len+3 ACK 0xF5 0 0 0 Eigenvalues CHK 0xF5 Notes:
Length of Eigenvalues(Len-) is 193Byte
Data packet is sent when the fifth byte of ACK data is ACK_SUCCESS - Delete user (CMD/ACK both 8 Byte)
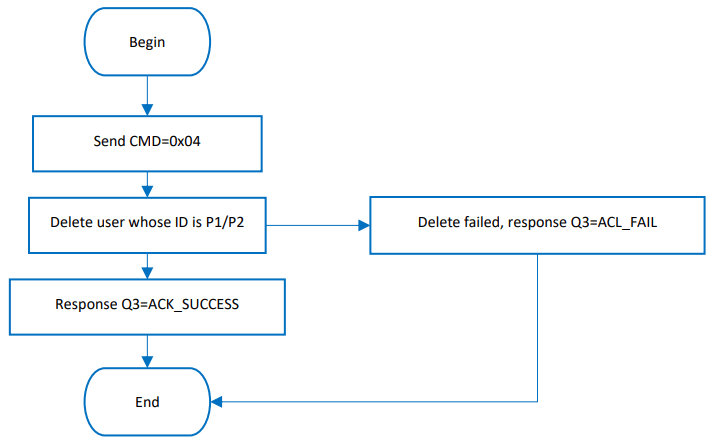
Byte 1 2 3 4 5 6 7 8 CMD 0xF5 0x04 User ID (High 8Bit) User ID (Low 8Bit) 0 0 CHK 0xF5 ACK 0xF5 0x04 0 0 ACK_SUCCESS
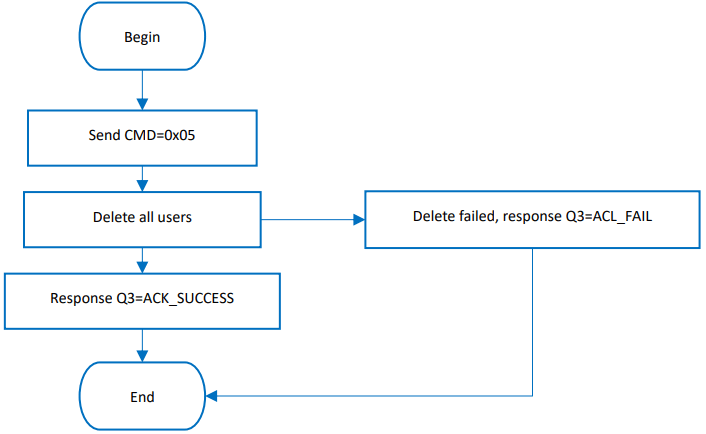
ACK_FAIL0 CHK 0xF5 - Delete all users(CMD/ACK both 8 Byte)
Byte 1 2 3 4 5 6 7 8 CMD 0xF5 0x05 0 0 0:Delete all users 1/2/3: delete users whose permission is 1/2/3 0 CHK 0xF5 ACK 0xF5 0x05 0 0 ACK_SUCCESS
ACK_FAIL0 CHK 0xF5 - Query count of users(CMD/ACK both 8 Byte)
Byte 1 2 3 4 5 6 7 8 CMD 0xF5 0x09 0 0 0: Query Count
0xFF: Query Amount0 CHK 0xF5 ACK 0xF5 0x09 Count/Amount (High 8Bit ) Count/Amount (Low 8Bit ) ACK_SUCCESS
ACK_FAIL
0xFF(CMD=0xFF)0 CHK 0xF5 - 1:1(CMD/ACK both 8Byte)
Byte 1 2 3 4 5 6 7 8 CMD 0xF5 0x0B User ID (High 8 Bit ) User ID (Low 8 Bit) 0 0 CHK 0xF5 ACK 0xF5 0x0B 0 0 ACK_SUCCESS
ACK_FAIL
ACK_TIMEOUT0 CHK 0xF5 - Comparison 1:N(CMD/ACK both 8 Byte)
Byte 1 2 3 4 5 6 7 8 CMD 0xF5 0x0C 0 0 0 0 CHK 0xF5 ACK 0xF5 0x0C User ID (High 8 Bit ) User ID (Low 8 Bit) Permission
(1/2/3)
ACK_NOUSER
ACK_TIMEOUT0 CHK 0xF5 - Query Permission(CMD/ACK both 8 Byte)
Byte 1 2 3 4 5 6 7 8 CMD 0xF5 0x0A User ID(High 8Bit) User ID(Low8Bit ) 0 0 CHK 0xF5 ACK 0xF5 0x0A 0 0 Permission
(1/2/3)
ACK_NOUSER0 CHK 0xF5 - Set/Query comparison level(CMD/ACK both 8 Byte)
Byte 1 2 3 4 5 6 7 8 CMD 0xF5 0x28 0 Byte5=0: New Level
Byte5=1: 00:Set Level
1:Query Level0 CHK 0xF5 ACK 0xF5 0x28 0 Current Level ACK_SUCCUSS
ACK_FAIL0 CHK 0xF5 Notes: Comparison level can be 0~9, larger the value, the stricter the comparison. Default 5
- Acquire image and upload(CMD=8 Byte/ACK >8 Byte)
CMD Format:Byte 1 2 3 4 5 6 7 8 CMD 0xF5 0x24 0 0 0 0 CHK 0xF5 ACK Format:
1)Data head:Byte 1 2 3 4 5 6 7 8 ACK 0xF5 0x24 Hi(Len) Low(Len) ACK_SUCCUSS
ACK_FAIL
ACK_TIMEOUT0 CHK 0xF5 2)Data packet
Byte 1 2—Len+1 Len+2 Len+3 ACK 0xF5 Image data CHK 0xF5 Notes:
In the DSP module, the pixels of the fingerprint images are 280*280, every pixel is represented by 8 bits. When uploading, DSP has skipped pixels sampling in horizontal/vertical direction to reduce data size, so that the image became 140*140, and just take the high 4 bits of the pixel. every two pixels composited into one byte for transferring (previous pixel high 4-bit, last pixel low 4-pixel).
Transmission starts line by line from the first line, each line starts from the first pixel, totally transferring 140* 140/ 2 bytes of data.
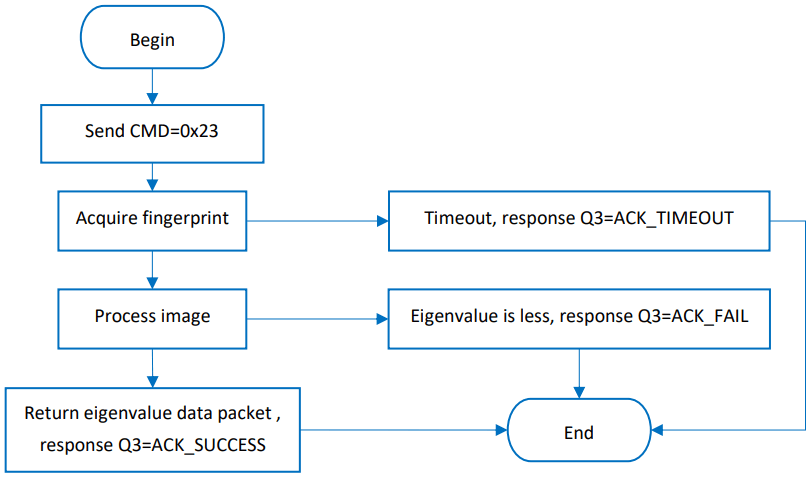
The data length of the image is fixed at 9800 bytes. - Acquire image and upload eigenvalues(CMD=8 Byte/ACK > 8Byte)
CMD Format:Byte 1 2 3 4 5 6 7 8 CMD 0xF5 0x23 0 0 0 0 CHK 0xF5 ACK Format:
1)Data head:Byte 1 2 3 4 5 6 7 8 ACK 0xF5 0x23 Hi(Len) Low(Len) ACK_SUCCUSS
ACK_FAIL
ACK_TIMEOUT0 CHK 0xF5 2)Data packet
Byte 1 2 3 4 5—Len+1 Len+2 Len+3 ACK 0xF5 0 0 0 Eigenvalues CHK 0xF5 Notes: The length of Eigenvalues (Len -3) is 193 bytes.
- Download eigenvalues and compare with fingerprint acquired(CMD >8 Byte/ACK=8 Byte)
CMD Format:
1)Data head:Byte 1 2 3 4 5 6 7 8 CMD 0xF5 0x44 Hi(Len) Low(Len) 0 0 CHK 0xF5 2)Data packet
Byte 1 2 3 4 5—Len+1 Len+2 Len+3 ACK 0xF5 0 0 0 Eigenvalues CHK 0xF5 Notes: The length of Eigenvalues (Len -3) is 193 bytes.
ACK Format:Byte 1 2 3 4 5 6 7 8 ACK 0xF5 0x44 0 0 ACK_SUCCUSS
ACK_FAIL
ACK_TIMEOUT0 CHK 0xF5 - Download eigenvalues and comparison 1:1(CMD >8 Byte/ACK=8 Byte)
CMD Format:
1)Data head:Byte 1 2 3 4 5 6 7 8 CMD 0xF5 0x42 Hi(Len) Low(Len) 0 0 CHK 0xF5 2)Data packet
Byte 1 2 3 4 5—Len+1 Len+2 Len+2 ACK 0xF5 User ID (High 8 Bit) User ID (Low 8 Bit) 0 Eigenvalues CHK 0xF5 Notes: The length of Eigenvalues (Len -3) is 193 bytes.
ACK Format:Byte 1 2 3 4 5 6 7 8 ACK 0xF5 0x43 0 0 ACK_SUCCUSS
ACK_FAIL0 CHK 0xF5 - Download eigenvalues and comparison 1:N(CMD >8 Byte/ACK=8 Byte)
CMD Format:
1)Data head:Byte 1 2 3 4 5 6 7 8 CMD 0xF5 0x43 Hi(Len) Low(Len) 0 0 CHK 0xF5 2)Data packet
Byte 1 2 3 4 5—Len+1 Len+2 Len+2 ACK 0xF5 0 0 0 Eigenvalues CHK 0xF5 Notes: The length of Eigenvalues (Len -3) is 193 bytes.
ACK Format:Byte 1 2 3 4 5 6 7 8 ACK 0xF5 0x43 User ID (High 8 Bit) User ID (Low 8 Bit ) Permission
(1/2/3)
ACK_NOUSER0 CHK 0xF5 - Upload eigenvalues from DSP model CMD=8 Byte/ACK >8 Byte)
CMD Format:Byte 1 2 3 4 5 6 7 8 CMD 0xF5 0x31 User ID (High 8 Bit ) User ID (Low 8 Bit ) 0 0 CHK 0xF5 ACK Format:
1)Data head:Byte 1 2 3 4 5 6 7 8 ACK 0xF5 0x31 Hi(Len) Low(Len) ACK_SUCCUSS
ACK_FAIL
ACK_NOUSER0 CHK 0xF5 2)Data packet
Byte 1 2 3 4 5—Len+1 Len+2 Len+3 ACK 0xF5 User ID (High 8 Bit ) User ID(Low 8 Bit ) Permission (1/2/3) Eigenvalues CHK 0xF5 Notes: The length of Eigenvalues (Len -3) is 193 bytes.
- Download eigenvalues and save as User ID to DSP(CMD>8 Byte/ACK =8 Byte)
CMD Format:
1)Data head:Byte 1 2 3 4 5 6 7 8 CMD 0xF5 0x41 Hi(Len) Low(Len) 0 0 CHK 0xF5 2) Data packet
Byte 1 2 3 4 5—Len+1 Len+2 Len+3 ACK 0xF5 User ID (High 8 Bit) User ID (Low8 Bit) Permission (1/2/3) Eigenvalues CHK 0xF5 Notes: The length of Eigenvalues (Len -3) is 193 bytes.
ACK Format:Byte 1 2 3 4 5 6 7 8 ACK 0xF5 0x41 User ID (High 8 Bit ) User ID (Low 8 Bit) ACK_SUCCESS
ACK_FAIL0 CHK 0xF5 - Query information (ID and permission) of all users added(CMD=8 Byte/ACK >8Byte)
CMD Format:Byte 1 2 3 4 5 6 7 8 CMD 0xF5 0x2B 0 0 0 0 CHK 0xF5 ACK Format:
1)Data head:Byte 1 2 3 4 5 6 7 8 ACK 0xF5 0x2B Hi(Len) Low(Len) ACK_SUCCUSS
ACK_FAIL0 CHK 0xF5 2)Data packet
Byte 1 2 3 4—Len+1 Len+2 Len+3 ACK 0xF5 User ID (High 8 Bit) User ID (Low 8 Bit) User information (User ID and permission) CHK 0xF5 Notes:
The data length of the Data packet (Len) is ”3*User ID+2”
User information Format:Byte 4 5 6 7 8 9 … Data User ID1 (High 8 Bit ) User ID1 (Low 8 Bit ) User 1 Permission (1/2/3) User ID2 (High 8 Bit) User ID2 (Low 8 Bit ) User 2 Permission (1/2/3) …
- Set/Query fingerprint capture timeout(CMD/ACK both 8 Byte)
Byte 1 2 3 4 5 6 7 8 CMD 0xF5 0x2E 0 Byte5=0: timeout
Byte5=1: 00:Set timeout
1:query timeout0 CHK 0xF5 ACK 0xF5 0x2E 0 timeout ACK_SUCCUSS
ACK_FAIL0 CHK 0xF5 Notes:
The range of fingerprint waiting timeout (tout) values is 0-255. If the value is 0, the fingerprint acquisition process will keep continuing if no fingerprints press on; If the value is not 0, the system will exist for the reason of timeout if no fingerprints press on in time tout * T0.
Note: T0 is the time required for collecting/processing an image, usually 0.2- 0.3 s.
COMMUNICATION PROCESS
ADD FINGERPRINT
DELETE USER
DELETE ALL USERS
ACQUIRE IMAGE AND UPLOAD EIGENVALUE
USER GUIDES
If you want to connect the fingerprint module to a PC, you need to buy one UART to the USB module. We recommend you use Waveshare FT232 USB UART Board (micro) module.
If you want to connect the fingerprint module to a development board like Raspberry Pi, if the working
level of your board is 3.3V, you can directly connect it to the UART and GPIO pins of your board. If it is 5V, please add level convert module/circuity.
CONNECT TO PC
HARDWARE CONNEC TION
You need:
- UART Fingerprint Sensor (C)*1
- FT232 USB UART Board *1
- micro USB cable *1
Connect the fingerprint module and FT232 USB UART Board to the PC
| UART Fingerprint Sensor (C) | FT232 USB UART Board |
| Vcc | Vcc |
| GND | GND |
| RX | TX |
| TX | RX |
| RST | NC |
| WAKE | NC |
TESTING
- Download UART Fingerprint Sensor test software from wiki
- Open the software and choose the correct COM port.(The software can only support COM1~COM8, if the COM port in your PC is out of this range, please modify it)
- Testing
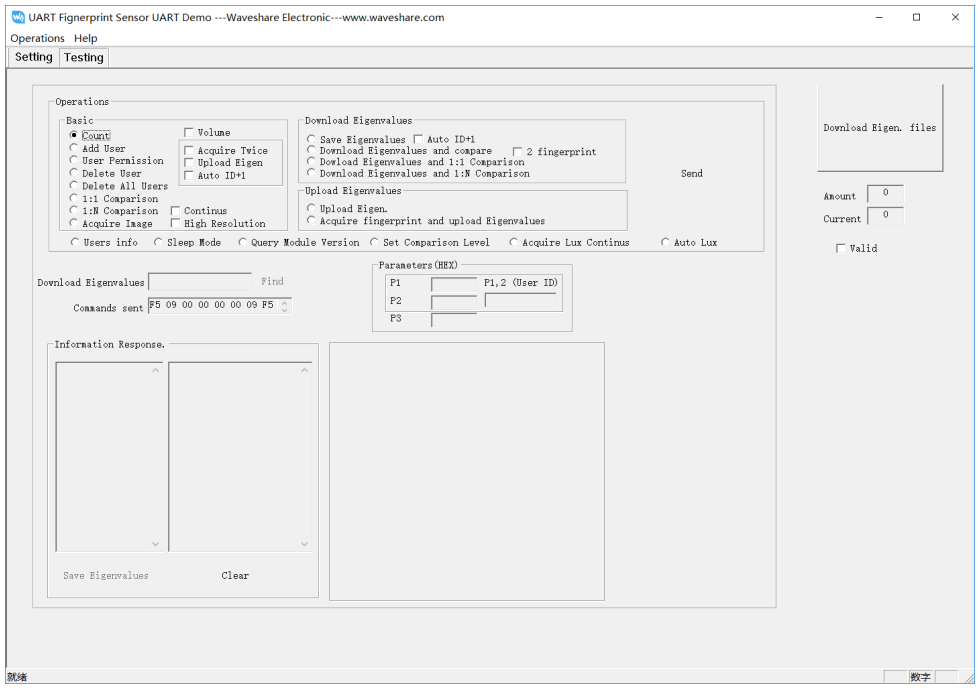
There are several functions provided in Testing interface
- Query Count
Choose Count, then click Send. The count of users is returned and displayed in the Information Response interface - Add User
Choose Add User, check to Acquire Twice and Auto ID+1, type the ID (P1 and P2) and permission (P3), then click Send. Finally, touch sensor to acquire fingerprint. - Delete user
Choose to Delete User, type the ID (P1 and P2) and permission (P3), then click Send. - Delete All Users
Choose Delete All Users, then click Send - Comparison 1:1
Choose 1:1 Comparison, type the ID (P1 and P2) and permission (P3), then click Send. - Comparison 1:N
Choose 1: N Comparison, then click Send.
…
For more functions, please test it. (Some of the functions are unavailable for this module)
CONNECT TO XNUCLEO-F103RB
We provide a demo code for XNCULEO-F103RB, which you can download from the wiki
| UART Fingerprint Sensor (C) | NUCLEO-F103RB |
| Vcc | 3.3V |
| GND | GND |
| RX | PA9 |
| TX | PA10 |
| RST | PB5 |
| WAKE | PB3 |
Note: About the pins, please refer to the Interface above
- Connect UART Fingerprint Sensor (C) to XNUCLEO_F103RB, and connect the programmer
- Open project (demo code) by keil5 software
- Check if programmer and device are recognized normally
- Compile and download
- Connect XNUCELO-F103RB to PC by USB cable, open Serial assistance software, set COM port: 115200, 8N1
Type commands to test module according to the information returned.
CONNECT TO RASPBERRY PI
We provide a python example for Raspberry Pi, you can download it from the wiki
Before you use the example, you should enable the serial port of Raspberry Pi first:
Input command on Terminal: Sudo raspi-config
Choose: Interfacing Options -> Serial -> No -> Yes
Then reboot.
| UART Fingerprint Sensor (C) | Raspberry Pi |
| Vcc | 3.3V |
| GND | GND |
| RX | 14 (BCM) – PIN 8 (Board) |
| TX | 15 (BCM) – PIN 10 (Board) |
| RST | 24 (BCM) – PIN 18 (Board) |
| WAKE | 23 (BCM) – PIN 16 (Board) |
- Connect fingerprint module to Raspberry Pi
- Download demo code to Raspberry Pi: wget https://www.waveshare.com/w/upload/9/9d/UART-Fignerprint-RaspberryPi.tar.gz
- unzip it
tar zxvf UART-Fingerprint-RaspberryPi.tar.gz - Run the example
cd UART-Fingerprint-RaspberryPi/sudo python main.py - Following guides to test the
Documents / Resources
 |
WAVESHARE STM32F205 UART Fingerprint Sensor [pdf] User Manual STM32F205, UART Fingerprint Sensor, STM32F205 UART Fingerprint Sensor, Fingerprint Sensor |


