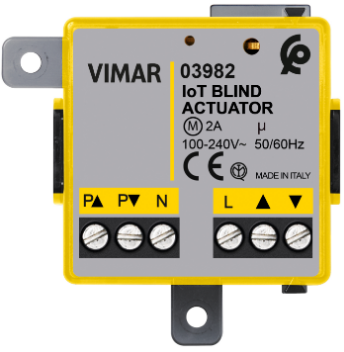
VIMAR 03982 Connected Roller Shutter Module
INTRODUCTION
The device is equipped with an output with 2 one-position stable relays with interlocked operation, in other words with mutually exclusive activation of the relays with a minimum interlocking time. In the event of a mains power supply failure, the relays both remain open. The push buttons connected to inputs P![]() and P
and P![]() only control the roller shutter actuator on board:
only control the roller shutter actuator on board:
- Short press: if the roller shutter is not moving, the slat rotates; if the roller shutter is moving, it stops.
- Long press: the push button connected to P
 raises the roller shutter whereas the one connected to P
 lowers it.
 - Double pressing of either of the two push buttons: recall of favorite position (this is saved via the View Wireless App).
TWO OPERATING MODES (ALTERNATIVE)
 Download the View Wireless
  App from the stores onto the tablet/smartphone
you will be using for configuration.
When the device is powered for the first configuration, we recommend you search for any new firmware and perform the update.Depending on the mode you select, you will need
 |
 |
| Gateway
art. 30807.x-20597-19597-14597 |
Smart Home Hub |
|
View App
for management via smartphone/tablet |
Samsung SmartThings Hub Amazon Echo Plus, Eco Show or Echo Studio |
| Amazon Alexa, Google Assistant, Siri (Homekit) voice assistants for possible voice operation |

CONFIGURATION IN
- Create your Installer account on MyVimar (on-line).
- Wire all the devices in the system (2-way switches, actuators, thermostats, gateway, etc.).
- Start the View Wireless App and log in with the credentials you just created.
- Create the system and the environment.
- Associate all the devices with the environments, except for the gateway (which should be associated last).
- To associate the roller shutter module:
- Select “Add” (
 ), choose the environment to place it, and give it a name
 - Select
 ; activate the Bluetooth connection on your tablet/smartphone and approach the module
 - Simultaneously press the push buttons connected to P and Puntil the LED flashes and set the desired function. To carry out this operation, only use a non-interlocked double push button (art. 30066-20066-19066-16121-14066)
- For every device, set the function, the parameters and any accessory devices (wired or radio control and related function).
- Transfer the configuration of the devices to the gateway and connect it to the Wi-Fi network.
- Transfer the system to the Administrator user (who must have created his/her profile on MyVimar
For details please refer to the View Wireless App manual you can download from www.vimar.com ![]() DOWNLOAD
DOWNLOAD ![]() View Wireless MOBILE
View Wireless MOBILE ![]() App
App
CONFIGURATION IN
Follow the procedure above from points 1 to 3. Associate the device directly to a ZigBee Hub (e.g. Amazon Echo Plus, SmartThings Hub)
- Download the Zigbee software using the View Wireless App (see the View Wireless App manual). Simultaneously press the push buttons connected to P and P until the LED flashes. To update the software on the device, the procedure is the same.
- After conversion to Zigbee technology (or the software update), the module automatically goes into pairing mode for 5 minutes. If the module is not in pairing mode, cut off the power supply and restore it after a few seconds.
- Associate the module according to the procedure envisaged by the ZigBee Hub (see the Hub’s manufacturer documentation).
Set the roller shutter module parameters.
- Within the first 5 minutes after the device has been powered (already associated with a ZigBee Hub), simultaneously press the push buttons connected to P and P for 15 s so you can set the activation time (the LED flashes green during the roller shutter closing, which will take 3 minutes, or until push button P is pressed). The LED is permanently lit green and within a timeout of 2 minutes, press push button Pfor a prolonged time to raise the roller shutter. During the raising process the LED flashes green; briefly press push button P to stop it. The time that passes between the long press and the short press of push button P is the raising/ lowering operating time that will be saved by the device (the LED lights up amber).
- Where present now set the total slat rotation time (however the slat management is usually not supported by zigbee hubs, it is recommended not to set this parameter). Press push button P, the roller shutter begins to close and the LED flashes amber; when the roller shutter is closed, the LED remains lit in amber permanently. Briefly press push button P to increase by he slat rotation time by 200 ms each time, while briefly pressing push button P will decrease it by 200 ms. Each press of the push buttons will turn the amber LED off and back on again and will move the slats.
- 3) Simultaneously press push buttons P and P to save the rotation time set; the LED flashes amber quickly three times to confirm the setting. N.B. If at the beginning of the slat handling time configuration, the push button is not pressed shortly and the confirmation is given immediately by pressing both push buttons at the same time, the slats will be excluded from operation. So in practice, when the roller shutter is in motion, pressing a push button briefly will stop it whereas if the roller shutter is not in motion pressing the button briefly will not give rise to any movement. N.B. When the voltage returns after a power outage, the roller shutter remains at a standstill. Summary of Zigbee technology mode signalling.
During normal operation
| LED | Meaning |
| Off | Normal operation |
In the configuration phase:
| LED | Meaning |
| Flashing white (for max 5 min.) | Zigbee mode active hub gateway association |
| Flashing blue (for max 2 min.) | Pending receipt of a fw update |
| Blue permanently lit | Device associated with the smartphone via Bluetooth |
| Flashing green during the time configuration | Roller shutter opening |
| Green permanently lit during configuration | Pending pressure on the p button after complete closure |
| Amber permanently lit | Start slat rotation time configuration |
| Amber on while the button is pressed | Increase or decrease slat rotation time |
| Flashing amber during the time configu- ration | Roller shutter closing |
|
Flashing green 3 times |
Confirm up and down time configuration mode |
| Flashing amber 3 times | Confirm slat rotation time configuration |
| Flashing green quickly 3 times | The device correctly associated with the voice assistant |
CONTROLLABLE LOADS
| Maximum loads | Roller shutter motor |
| 100 V~ | 2 A cos ø 0.6 |
| 240 V~ | 2 A cos ø 0.6 |
RESETTING THE DEVICE.
The reset restores the factory settings. Within the first 5 minutes from powering, simultaneously press the push buttons connected to P![]() and P
and P![]() for 30 s until the white LED flashes.
for 30 s until the white LED flashes.
 INSTALLATION RULES
- Installation must be carried out by qualified persons in compliance with the current regulations regarding the installation of electrical equipment in the country where the products are installed.
- The electronic switch shall be protected by a directly associated fuse with a rated breaking capacity of 1500 A or a circuit breaker with a rated current not exceeding 10 A.
- Installation must be carried out with the system switched off.
CHARACTERISTICS.
- Rated supply voltage: 100-240 V~, 50/60 Hz.
- Dissipated power: 0.55 W
- RF transmission power: < 100 mW (20 dBm)
- Frequency range: 2400-2483.5 MHz
- Switching on zero crossing
- Terminals:
- 2 terminals (L and N) for line and neutral2 terminals ( and ) for the roller shutter output2 terminals (P and P) for the connection of the push buttons for the actuator control and for configuration. For the actuator control, use push buttons art. 30066-20066-19066- 16121-14066 or art. 30062-20062-19062-16150-14062 whereas for configuration use only push buttons art. 30066-20066-19066-16121-14066.
- 2 terminals (L and N) for line and neutral2 terminals (
- RGB LED that indicates the configuration status (flashing blue)
- In Bluetooth technology mode, you can associate up to 2 radio devices (art. 03925) which makes it possible to control the actuator or activate a scenario.
- Operating temperature: -10 ÷ +40 °C (indoor)
- Protection degree: IP20
- Configuration from View Wireless App for Bluetooth technology system and Amazon App for Zigbee technology.
- Controllable via View App (for Bluetooth technology) and Amazon Alexa (for Zigbee technology).
OPERATION IN Bluetooth technology MODE.
The device operates by default in Bluetooth technology mode and this standard makes it possible to:
- associate the radio control 03925 which can be configured to control the actuator on-board or to recall a scenario;
- control the QUID system devices. Through the use of gateway 30807.x-20597-19597-16497-14597 the functions can be managed locally or remotely via the View App, and the control is also available via the voice assistants Amazon Alexa, Google Assistant and Siri. The device is also compatible with Homekit.
N.B.: From fw version 1.7.0, the device works as a repeater node for battery-operated devices (for instance art. 03980).
Settings.
The View Wireless App can be used to set the following parameters:
- Actuator: with or without slat (default: with slat).
- Roller shutter activation time (default: 60 s).
- Slat rotation time (default: 2 s).
- Favourite position saving (default: 50% roller shutter, 0% slats i.e. open).
- Scenario activation delay time (default: 0 s).
- Compatibility with QUID roller shutters (default: not active).
REGULATORY COMPLIANCE.
RED Directive. RoHS directive.
Standards EN 60669-2-1, EN 301 489-17, EN 300 328, EN 62479, EN 50581. Vimar SpA declares that the radio equipment complies with Directive 2014/53/EU. The full text of the EU declaration of conformity is on the product sheet available on the following website: www.vimar.com REACH (EU) Regulation no. 1907/2006 – Art.33. The product may contain traces of lead.
FRONT VIEW
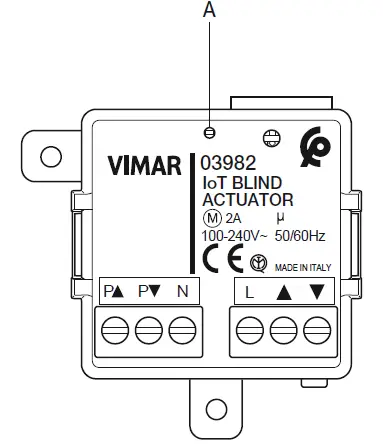
- A: Configuration LED
- : Roller shutter down output
- : Roller shutter up output
- L: Phase
- N: Neutral
- P: Input for roller shutter down push button
- P: Input for roller shutter up push button
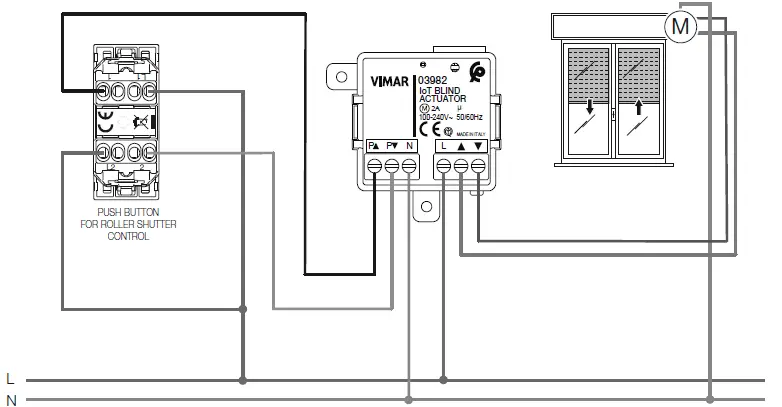
CONNECTIONS
 WEEE – User information
The crossed bin symbol on the appliance or on its packaging indicates that the product at the end of its life must be collected separately from other waste. The user must therefore hand the equipment at the end of its life cycle over to the appropriate municipal centres for the differentiated collection of electrical and electronic waste. As an alternative to independent management, you can deliver the equipment you want to dispose of free of charge to the distributor when purchasing a new appliance of an equivalent type. You can also deliver electronic products to be disposed of that are smaller than 25 cm for free, with no obligation to purchase, to electronics distributors with a sales area of at least 400 m2. Proper sorted waste collection for subsequent recycling, processing and environmentally conscious disposal of the old equipment helps to prevent any possible negative impact on the environment and human health while promoting the practice of reusing and/ or recycling materials used in manufacture.
Apple HomeKit is a trademark of Apple Inc. App Store is a service mark of Apple Inc. To control this HomeKit-enabled accessory, iOS 9.0 or later is recommended. Controlling this HomeKit-enabled accessory automatically and away from home requires an apple TV with tvOS 10.0 or later or an iPad with iOS 10.0 or later or a HomePod/Siri set up as a home hub. The Apple logo, iPhone, and iPad are trademarks of Apple Inc., registered in the U.S. and other countries\ and regions. App Store is a service mark of Apple Inc. Google, Google Play, and Google Home are trademarks of Google LLC. Amazon, Alexa and all related logos are trademarks of Amazon.com, Inc. or its affiliates.
contact
- Viale Vicenza 14
- 36063 Marostica VI – Italy
- 03982 05 2409 www.vimar.com
Documents / Resources
 |
VIMAR 03982 Connected Roller Shutter Module [pdf] Instructions 03982, 03982 Connected Roller Shutter Module, 03982, Connected Roller Shutter Module, Roller Shutter Module, Shutter Module, Module |


