![]() Studio19 Professional 3D Data Capture and Processing
Studio19 Professional 3D Data Capture and Processing
User Guide
Introduction
Two new algorithms have been added to Artec Studio 19 to allow users to reconstruct 30 models from sets of photos and videos. This is a Beta version of this feature. Please be aware that projects created by this version might not be compatible with older versions of Artec Studio.
NOTICE
Artec Studio recommends compiling neural networks during the first run after installation. Do not skip this step.
Types of Photogrammetry algorithms
Photo Reconstruction pipeline in Artec Studio is split into two consecutive stages:
Step 1. Sparse reconstruction: Where a set of photos imported into Artec Studio can be processed, resulting in positioning them in 30 space. The output is a sparse point cloud object (referred to as Sparse Reconstruction in the Workspace), representing the alignment of the images for further processing.
Step 2. Dense reconstruction: This stage involves creating a triangular mesh that can be used in Artec Studio in a traditional way (to process and texture). There are two types of algorithms:
- Separate object reconstruction
- Whole scene reconstruction
Both algorithms will generate a mesh, but each is suited for different purposes.
We recommend using two dense reconstruction algorithms under different conditions and for various scenes. While some scenes can be processed by either algorithm, others may be better handled by one over the other.
Separate object reconstruction
Separate object reconstruction is best suited for handling various objects, such as a controller, a statuette, a pen, or a chair. To enhance the quality of separate object reconstruction, a specialized object-detection algorithm processes all photos to generate masks for each one. For optimal results, ensure the entire object is fully captured within the frame and well-separated from the background. This clear separation is essential for the algorithm to create accurate masks and avoid potential reconstruction failures.
Whole scene reconstruction
In this photogrammetric scenario, there is no requirement for a strong separation between the object and the background. In fact, this could work both with or without masks. This type of reconstruction works best for feature-rich scenes, such as aerial or drone captures, or objects like stone, statues, architectural objects, etc.
Data capturing
In the current beta version of Artec Studio, there are several limitations related to photo acquisition.
- Artec Studio does not support data captured by multiple sensors simultaneously or captured with lenses with variable focal length so make sure you capture all photos on one camera and that the focus is fixed or set to manual and remains unchanged.
- Try to capture your object in a well-lit environment. Aim for a strong ambient light. The best light conditions are typically achieved by capturing outside on a cloudy day.
- Ensure that the entire object is distinctly in focus, so no areas of it appear blurred. If you find any blur, it is generally advisable to infuse additional light into the scene, marginally close the lens aperture or do some combination of both.
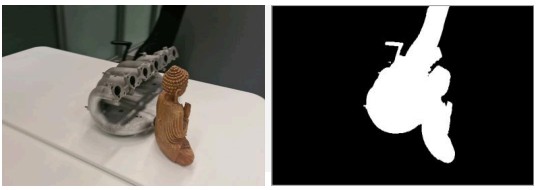
- When capturing data suited for Separate object reconstruction, ensure that each photo captures the entire object within the camera frame and separated from the background. Refrain from the scenarios where the majority of the frame is covered by the object with some parts of the background still visible, as this may confuse the object detector.
Good photos for the algorithm: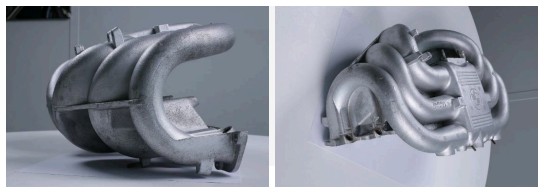 Photos which may confuse the object detector:
Several objects within the camera frame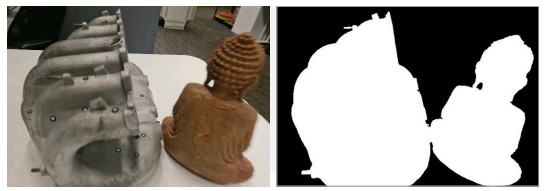 Closeups, when part of the object could be considered a background
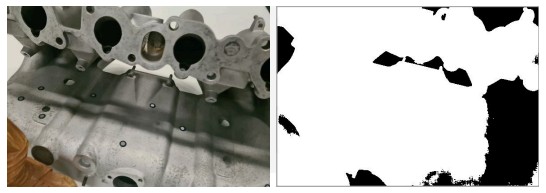
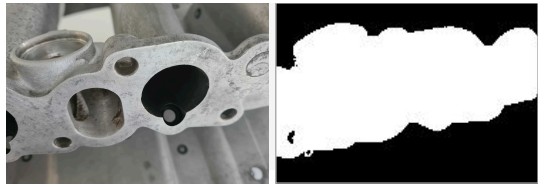
- Overloaded background, when part of the background could be considered an object
- When capturing a scene, you may disregard the point above (point 4).
- Try to capture your object from all the directions so the algorithm is fed with a big variety of views. A good practice here is to imagine a virtual sphere around the object and try to capture images from different angles.
- You can turn the object to another side and repeat the capture to get full 3D reconstruction. In that case make sure that images from each object orientation are imported into Artec Studio as a separate photoset.
- If your object lacks texture, ensure that the background contains many features.
- For Separate object reconstruction, 50-150 photos is typically enough to achieve good quality.
Import Photos and run Sparse Reconstruction
Here is the general pipeline for processing photogrammetry data in Artec Studio. You can follow these instructions when performing your first reconstruction. Import photos or videos into the Workspace (either by dropping a folder with photos or video files or using the File menu via File Import Photos and videos). For video files change “Files of type” in the import dialog to “All supported video files”.
General pipeline
Add scale references
If you have a scale bar defining the distance between two targets, you need to create a scale bar in Artec Studio before running Sparse reconstruction algorithm. Detecting targets makes it possible to recreate the object’s original dimensions.
To add a scale bar:
- Open the Sparse reconstruction pop-up by clicking the gear icon to the right of the Sparse Reconstruction option.
- Click the three-dot icon in the Scaled reference section.
- Define the IDs and the distance between two targets in mm and the name of a scale bar.
- Finally, click the Add reference button.
Do not forget to enable the Detect targets option in the Scaled reference section. Run Sparse Reconstruction
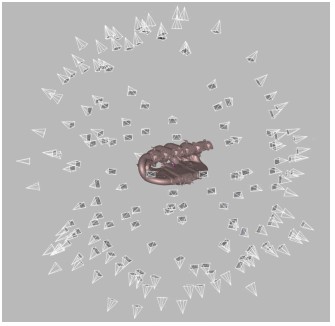
The Sparse Reconstruction algorithm registers photos by determining their position in space, resulting in a sparse point cloud of feature points.
If a video file is imported, Artec Studio will create a photo set in the Workspace out of it. You need to specify frame rate at which photos will be imported from the movie file. Select the imported photos in the Workspace and run the Sparse Reconstruction algorithm from the Tools Panel.
Basic settings
- Object orientation: Defines the direction the object is facing, which can be manually adjusted by selecting one of the available options.
- Optimize for: Suggests two options to prioritize optimization either speed or quality.
- Detect targets: Enables the recreation the object’s original dimensions. For more information on how to add scaled references, refer to the “Add scale references” section.
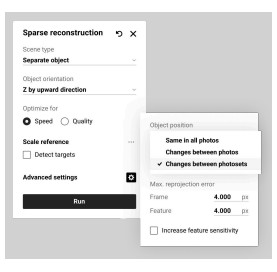 Advanced settings
- Object position: Specifies the object’s position relative to its background.
- Changes between photosets: Use this option when the object’s position remains consistent within a single photoset but varies between different photosets.
- Changes between photos: Select this when the object’s position changes within the same photoset.
- Same in all photos: Choose this if the object’s position is the same across all photos.
Max.reprojection error
- Frame: specifies the maximum allowable deviation for matching points between individual frames or photos. It limits how much point positions can vary within a photoset; if the reprojection error exceeds this value, the program may mark such frames as mismatches. The default value is 4.000 px.
- Feature: sets the maximum error for matching object features, such as contours or textures; lower values lead to more precise reconstruction of object details. The default value is 4.000 px.
- Increase feature sensitivity: Enhances the algorithm’s sensitivity to fine object
features, allowing it to more accurately recognize and account for small elements during reconstruction. This can improve model quality but may slow down the process or increase demands on photo quality.
Once calculation is finished, a Sparse Reconstruction object appears in the Workspace. This sparse point cloud is colored so you can see the general shape of your object.
Prepare for Dense Reconstruction
Double-click on the newly created Sparse Reconstruction object in the Workspace and modify the cropping box around the object to adjust the region of reconstruction.
The cropping box is required as it narrows the region of reconstruction. It is advisable to align it to follow the main directions of the object and tightly enclose the object, while still maintaining some space between the object and the cropping box. Inspect masks
The inspection of the masks should be carried out under two conditions:
- When using Separate object reconstruction
- If you encounter poor results or suspect that you did not adhere to our guidelines during capture
Note: For Separate object reconstruction, masks are consistently used throughout the process.
Inspect masks by left-clicking the gear icon and enabling masks view. Alternatively, you can use hotkeys for faster navigation: Ensure that the masks are generally correct. If they are entirely inaccurate, users can switch off the photo from Separate object reconstruction.
Note that if you plan to use Whole scene reconstruction and find that most of the masks are highly inaccurate, simply disable the ‘Use Masks’ checkbox in this algorithm. Manually turning off individual masks is unnecessary, as it will not improve the results.”
It may happen at times that the object detector fails to detect the central object due to the complexity of the scene or additional objects appearing close to the scanned one. If this is the case, disable the photo entirely. Disabled photos will be skipped during the Separate object reconstruction.
To do this, select a photo and press the ‘P’ key or, use the button in the left corner of the image thumbnail.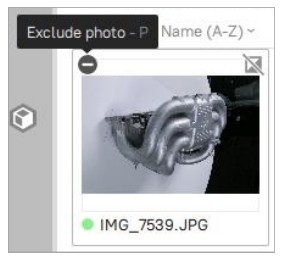 If a mask includes a stand or part of the object that extends beyond the cropping box, it can potentially lead to artifacts after Dense reconstruction. In this case, try expanding the cropping box to encompass both the object and the stand entirely.
Run Dense Reconstruction
Return to the Workspace using the ![]() arrow in the Workspace window header. Now, deselect everything except the Sparse Reconstruction object.
arrow in the Workspace window header. Now, deselect everything except the Sparse Reconstruction object.
Open the Tools Panel and click the gear icon of the Dense Reconstruction algorithm to open its settings window.
Running Separate object reconstruction
When reconstructing an object that is well-separated from its background, switch to the Separate object reconstruction by changing the Scene Type option. The object should be captured in a way that it is fully within each frame and distinct from the background.
Here you can adjust several parameters: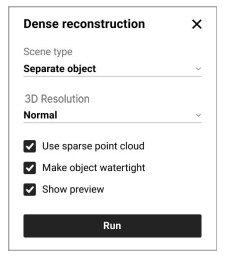
- 3D resolution: Choose between Normal and High options. In most cases, the Normal option would be enough. Use the High option if you need extra level of details or better reconstruction of thin structures of the object. Note that the High option might result in more detailed but noisier reconstruction compared to the Normal option. It also takes longer to calculate.
- Use sparse point cloud: Utilizes preliminary geometric data to assist in
reconstructing concave areas and cutting out holes where necessary. However, for highly reflective objects, it may introduce artifacts such as unwanted holes in the surface, so it’s advisable to disable this option and retry the reconstruction if issues arise. - Make object watertight: Toggles between creating a model with filled holes when enabled or leaving them open when disabled. Enabling this option ensures that the model is fully enclosed.
- Show preview: Enables a real-time preview.
Running Whole scene reconstruction
When reconstructing scenes or unbounded big objects, switch to the Whole scene reconstruction by changing the Scene Type option.
Here you can adjust several parameters:
- 3D resolution: Defines the smoothness. of resulted surface.
- Depth map resolution: Defines maximum image resolution during dense reconstruction. Higher values result in higher quality at a cost of increased process time.
- Depth map compression: Enables lossless compression of depth maps, which may slow down calculations due to additional processing time for compression and decompression. However, it reduces disk space usage, making it beneficial for systems with slow disks (HDD or network storage).
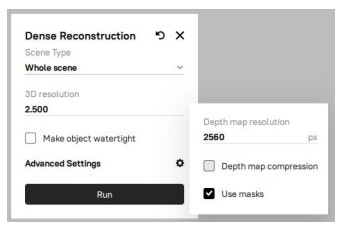
- Use masks: Defines whether to use masks during the reconstruction or not. This can greatly improve speed and quality but should be disabled for scenes or aerial scans.
Limitations
Here are certain limitations and caveats exists that you should be aware of:
- All photo sets should be captured with one camera.
- Speed of reconstruction is an area for improvement. Now, we do not recommend processing large datasets (more than 1000 photos) in the current version of Artec Studio.
2.1. The time required for the Separate object reconstruction does not depend on the number of photos in the dataset and depends on the:
2.1.1. Video card used (modern NVIDIA cards are required).
2.1.2. Selected profile: Normal or High resolution. The latter is 1.5 to 2 times slower.
2.2. The time required for the Dense Whole Scene reconstruction depends on the:
2.2.1. Number of photos
2.2.2. Video card, SSD speed, and CPU of your computer
2.2.3. Selected resolution - Graphics Card requirements:
3.1. We highly recommend using a modern NVIDIA card (other graphics cards are not supported)
3.2. We highly recommend having at least 8 GB of Video RAM
3.3. We highly recommend updating your graphics card drivers
3.4. The standard duration for Separate object reconstruction typically ranges from 10 to 30 minutes when operating with the Normal resolution. - Disk requirements
4.1. During the Dense Whole Scene reconstruction, a lot of disk space is needed to process the data. The amount of disk space required depends on the resolution of photos and selected resolution. This part can consume approximately – 15 GB of disk space per 100 photos. It is highly recommended to have 100 to-200 GB of free disk space on the disc where the Artec Studio Temp folder is located.
4.2. Whenever you encounter a shortage of free space on your system, do not hesitate to clear up some room by clicking the Clear Artec Studio temporary files button on the General tab of Settings (F10).
4.3. Nevertheless, it is advisable to set your Temp folder in Artec Studio settings to the disk with the highest speed and ample free space.
To set the Temp folder, open Settings (F10) and browse to the new destination.

![]() © 2024 ARTEC EUROPE s.e r.l.
© 2024 ARTEC EUROPE s.e r.l.
4 Rue Lou Hemmer, L-1748 Senningerberg, Luxembourg
www.artec3d.com
Documents / Resources
 |
Artec 3D Studio19 Professional 3D Data Capture and Processing [pdf] User Guide Studio19 Professional 3D Data Capture and Processing, Studio19, Professional 3D Data Capture and Processing, 3D Data Capture and Processing, Processing |