
1. Introduction
Thank you for choosing the Lefton Rotatable Bathroom Faucet BF2204. This manual provides detailed instructions for the proper installation, operation, and maintenance of your new faucet. Please read this manual thoroughly before installation and keep it for future reference.
⚠ IMPORTANT NOTICE ⚠:
- Please confirm the size before purchasing to ensure it fits your sink, countertop, or vanity.
- Some water inside the faucet is normal as all products are water-tested before shipment to ensure quality. Rest assured, all items are 100% brand new and never used.
2. Product Overview
The Lefton BF2204 is a rotatable bathroom faucet designed for deck mounting, featuring a single handle for water control and a brushed gold finish. It includes a pop-up stopper and a 10-inch cover plate for versatile installation.
Included Components:
- 1 x Lefton Rotatable Bathroom Faucet BF2204
- 1 x Pop-up Stopper
- 1 x 10" Cover Plate
- Instruction Manual (this document)

Image 2.1: The Lefton Rotatable Bathroom Faucet BF2204, including the main faucet body, the pop-up drain stopper, and the 10-inch cover plate, all in a brushed gold finish.
3. Specifications
| Feature | Specification |
|---|---|
| Brand | Lefton |
| Model Name | BF2204-FCP01-D01-6F |
| Item Model Number | BF2204-6 |
| Recommended Uses | Bathroom |
| Mounting Type | Deck Mount |
| Finish Type | Electroplate |
| Material | Brass, Stainless Steel |
| Color | Brushed Gold |
| Number of Handles | 1 |
| Special Feature | 360 Swivel Spout |
| Style | w/ 10" Cover & Pop-up Stopper |
| Maximum Flow Rate | 1.19 Gallons Per Minute |
| Product Dimensions | 1"D x 1"W x 1"H (Approximate) |

Image 3.1: Detailed dimensions of the faucet, including spout reach, height, and base measurements. Note the mounting hole diameter requirements (Min: 1.38"/35mm, Max: 1.5"/38mm) and maximum deck thickness (1.9"/48mm).

Image 3.2: Detailed dimensions of the pop-up stopper, showing its overall height, cap diameter, and thread size (G1 1/4").
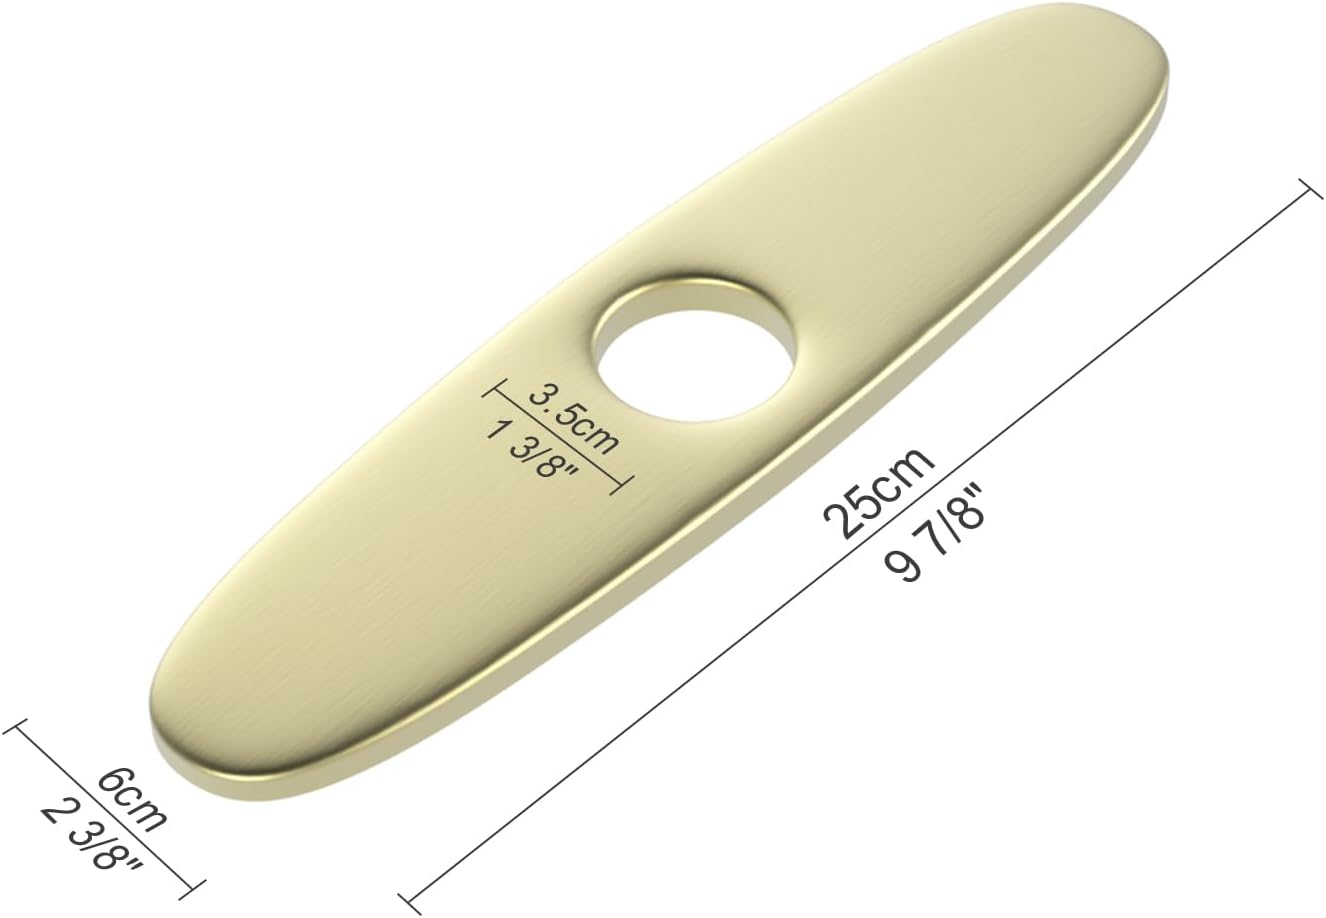
Image 3.3: Detailed dimensions of the 10-inch cover plate, indicating its length (9 7/8" / 25cm), width (2 3/8" / 6cm), and hole diameter (1 3/8" / 3.5cm).
4. Installation Guide
4.1 Before You Begin
- Ensure all necessary components are present as listed in Section 2.
- Turn off the main water supply to the installation area.
- Clear the workspace under the sink.
4.2 Tools Required (Not Included)
- Adjustable Wrench
- Phillips Head Screwdriver
- Plumber's Putty or Silicone Sealant
- Basin Wrench (optional, for tight spaces)
- Safety Glasses
4.3 Installation Steps
- Prepare the Sink/Countertop: Ensure the mounting hole on your sink or countertop meets the required dimensions (Min: 1.38"/35mm, Max: 1.5"/38mm). If using the 10" cover plate, place it over the mounting holes.
- Install the Faucet: Insert the faucet body through the mounting hole (and cover plate, if used). From underneath the sink, secure the faucet using the provided washer and mounting nut. Tighten firmly but do not overtighten.
- Connect Water Supply Lines: Attach the hot and cold water supply lines (23.6" length) to the corresponding inlets on the faucet body. Connect the other ends of the supply lines to your hot and cold water shut-off valves. Ensure all connections are hand-tight, then use a wrench for a final quarter-turn.
- Install the Pop-up Stopper: Disassemble the pop-up stopper. Apply plumber's putty or silicone sealant around the flange of the stopper and insert it into the drain hole from the top of the sink. From underneath, secure the stopper body with the provided washer and nut. Connect the lift rod (if applicable) to the faucet's lift mechanism.
- Check for Leaks: Once all connections are secure, slowly turn on the main water supply. Check all connections for any signs of leaks. If leaks are detected, tighten the connections slightly until the leak stops.
- Flush the Faucet: Remove the aerator from the faucet spout. Turn on both hot and cold water for a few minutes to flush out any debris from the lines. Turn off the water, reattach the aerator, and test the faucet's operation.
5. Operating Instructions
5.1 Faucet Operation
- Water Flow Control: The single handle controls both water flow and temperature. Lift the handle to increase water flow.
- Temperature Control: Move the handle left for hot water and right for cold water. Adjust the handle position to achieve the desired water temperature.
5.2 Pop-up Stopper Operation
- To close the drain and fill the sink, press down on the top of the pop-up stopper.
- To open the drain and allow water to flow, press down on the top of the pop-up stopper again.
5.3 Rotatable Spout Feature
- The faucet features a 360-degree swivel spout, allowing you to rotate the spout to direct water flow as needed for convenience.
6. Care and Maintenance
Proper care and maintenance will ensure the longevity and appearance of your Lefton faucet.
- Cleaning: Clean the faucet regularly with a soft cloth and mild soap. Rinse thoroughly with clean water and dry with a soft cloth to prevent water spots.
- Avoid Harsh Cleaners: Do not use abrasive cleaners, harsh chemicals, or polishes containing alcohol, ammonia, or bleach, as these can damage the finish.
- Aerator Maintenance: Periodically unscrew the aerator from the spout and clean any mineral deposits or debris that may accumulate, which can affect water flow.
- Temperature Extremes: Protect the faucet from freezing temperatures, which can cause damage to internal components.
7. Troubleshooting
If you encounter any issues with your faucet, please refer to the following table for common problems and solutions.
| Problem | Possible Cause | Solution |
|---|---|---|
| Low Water Flow | Clogged aerator; partially closed shut-off valve; kinked supply line. | Clean or replace aerator; fully open shut-off valves; straighten supply lines. |
| Leaking at Base | Loose mounting nut; improper sealant application. | Tighten mounting nut; reapply plumber's putty or silicone sealant. |
| Leaking from Spout | Worn cartridge. | Contact customer support for a replacement cartridge. |
| Water Temperature Issues | Incorrect supply line connection; water heater issues. | Verify hot/cold supply line connections; check water heater settings. |
| Pop-up Stopper Not Sealing | Improper installation; debris in drain. | Reinstall stopper ensuring proper alignment and sealant; clear drain of debris. |
8. Warranty Information
Lefton products are manufactured to high-quality standards. This product is subject to a 30-day return policy from the date of purchase. For specific warranty details beyond the return period, please refer to the warranty card included with your product or contact Lefton customer support.
9. Customer Support
If you have any questions, require assistance, or need to order replacement parts, please contact Lefton customer support:

Image 9.1: A customer service representative ready to assist with inquiries.
- Email Us: customer@leftonhome.com (24/7 Service)
- Call Us: 1 (601) 564 0548 (English Only, Mon. - Fri. 9:00 am - 6:00 pm PST)
For more information and products, visit the official Lefton Store: Lefton Sanitary Store


