1. Introduction
Thank you for choosing the HMF 2030-11 Electronic Key Safe. This manual provides essential information for the proper installation, operation, and maintenance of your key safe. Please read these instructions carefully before use to ensure optimal security and functionality.
The HMF 2030-11 is designed to securely store up to 30 keys, featuring a robust steel construction and an electronic lock for convenient access. It is ideal for homes, offices, and other environments requiring organized key management.

Image 1.1: HMF 2030-11 Electronic Key Safe with door open, revealing the electronic keypad and internal key hooks.
2. Components Included
Please check the package contents against the list below. If any items are missing or damaged, contact your retailer.
- 1 x HMF 2030-11 Electronic Key Safe
- 3 x Adjustable Hook Bars
- 30 x Key Tags (assorted colors)
- 2 x Emergency Keys
- 4 x Fixing Screws and 4 x Wall Plugs
- 1 x User Manual
3. Specifications
Detailed specifications for the HMF 2030-11 Electronic Key Safe:
| Feature | Description |
|---|---|
| Model Number | 2030-11 |
| External Dimensions (H x W x D) | 30 x 28 x 10 cm (approx. 11 cm including lock depth) |
| Weight | 6.2 kg |
| Material | Alloy Steel (Door: 3mm, Body: 1mm) |
| Lock Type | Electronic Combination Lock with Double Bolt Locking |
| PIN Code Length | 3 to 8 digits |
| Key Capacity | 30 hooks |
| Color | Anthracite |
| Mounting Type | Wall-mounted |
| Special Features | Emergency key override, adjustable hook bars, sound signals deactivatable |
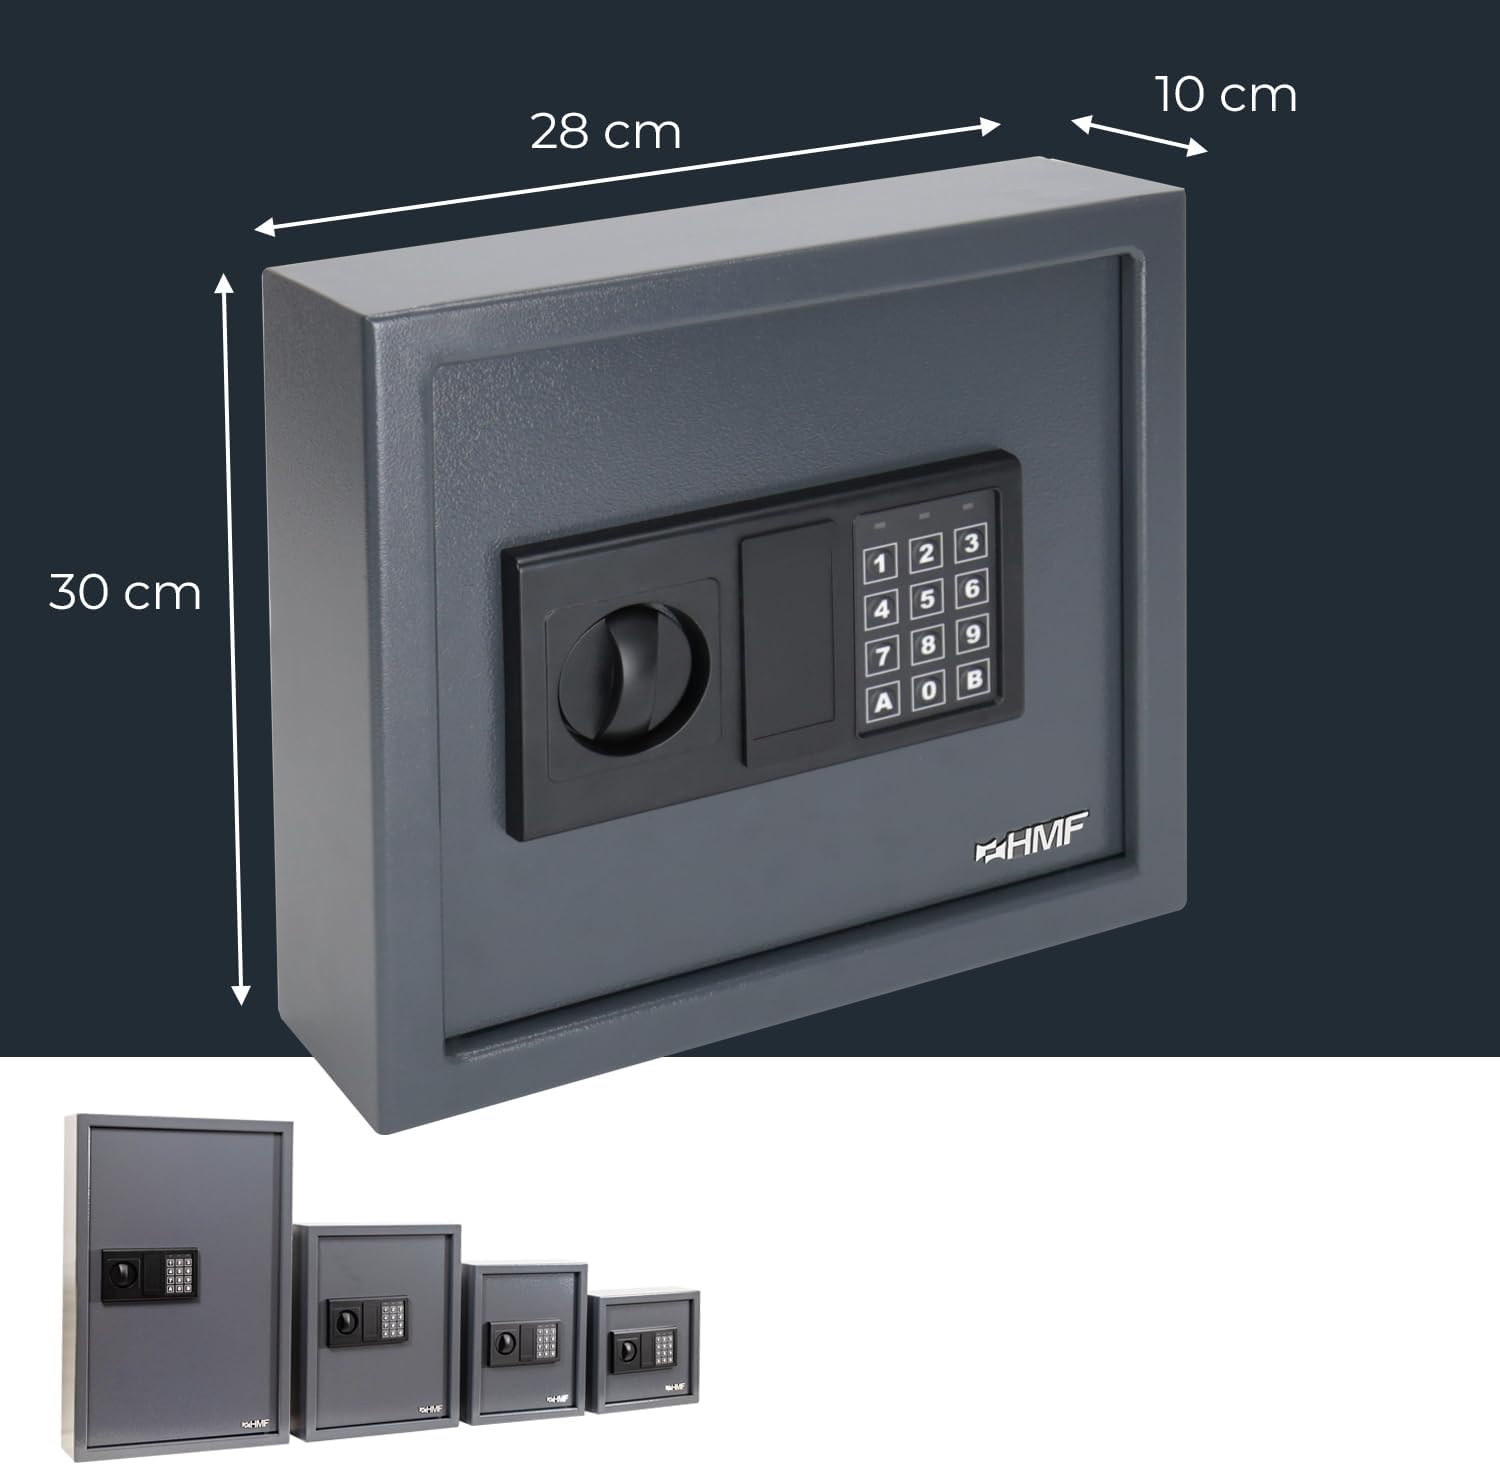
Image 3.1: External dimensions of the HMF 2030-11 Key Safe.
4. Setup and Installation
4.1. Battery Installation
The electronic lock requires batteries for operation. Although the product specifications state batteries are not required, electronic locks typically use them. Please locate the battery compartment, usually on the inside of the safe door or behind the keypad. Insert the correct type and number of batteries (typically 4x AA, not included) according to the polarity markings. Close the battery compartment securely.
4.2. Wall Mounting
The key safe is designed for wall mounting to ensure maximum security. Choose a suitable location that is discreet and offers a solid mounting surface (e.g., a concrete or brick wall).
- Mark Drilling Points: Hold the key safe against the wall at the desired height and use a pencil to mark the positions of the four mounting holes on the back of the safe.
- Drill Holes: Using an appropriate drill bit for your wall type, drill holes at the marked positions. Ensure the depth is sufficient for the wall plugs.
- Insert Wall Plugs: Insert the provided wall plugs into the drilled holes.
- Mount the Safe: Align the key safe's mounting holes with the wall plugs. Insert the fixing screws through the safe's holes and into the wall plugs. Tighten the screws firmly to secure the safe to the wall. Do not overtighten.

Image 4.1: Rear view of the key safe, indicating the four mounting points.

Image 4.2: Mounting hardware (screws and wall plugs) and their application.
5. Operating Instructions
5.1. Setting the User Code
The key safe comes with a factory default code (e.g., '159' or '1234'). It is crucial to change this immediately after battery installation.
- With the door open, press the red or green reset button located on the inside of the door, near the hinge. A beep will sound, and the yellow indicator light on the keypad will illuminate.
- Within 5 seconds, enter your new 3 to 8 digit PIN code on the keypad.
- Confirm the new code by pressing the 'A' or 'B' button (depending on model). A confirmation beep will sound, and the yellow light will turn off.
- Test the new code with the door open before closing it.
5.2. Opening the Safe with the User Code
- Enter your 3 to 8 digit PIN code on the keypad.
- Press the 'A' or 'B' button to confirm.
- If the code is correct, a green light will illuminate, and you will hear a beep. Turn the knob clockwise (or handle, if present) within 5 seconds to open the door.
- If an incorrect code is entered, a red light will flash, and you will hear a series of beeps. After three incorrect attempts, the system may lock for a short period.

Image 5.1: Electronic keypad for code entry.
5.3. Using Emergency Keys
In case of forgotten PIN code, battery depletion, or electronic lock malfunction, the safe can be opened using the emergency keys.
- Locate the emergency keyhole, usually hidden behind a small cover or panel on the keypad assembly.
- Remove the cover.
- Insert one of the emergency keys into the keyhole and turn it.
- While holding the key turned, rotate the main knob/handle to open the safe door.
- Keep emergency keys stored in a secure location away from the safe.

Image 5.2: Emergency key slot and key.
5.4. Key Management
The HMF 2030-11 features 30 numbered hooks and includes corresponding key tags for organized storage.
- Attach your keys to the provided key tags.
- Hang the key tags on the numbered hooks. The hook bars are adjustable, allowing you to customize the spacing as needed.
- Maintain a record of which key corresponds to which hook number for efficient retrieval.

Image 5.3: Interior view of the key safe with numbered hooks and key tags.
6. Maintenance
6.1. Cleaning
Clean the exterior of the key safe with a soft, damp cloth. Avoid using abrasive cleaners or solvents, as these can damage the finish or electronic components.
6.2. Battery Replacement
When the batteries are low, the electronic lock may emit a warning signal (e.g., a series of beeps or a flashing red light) when you attempt to open it. Replace all batteries promptly to ensure continuous operation. Refer to section 4.1 for battery installation instructions.
7. Troubleshooting
| Problem | Possible Cause | Solution |
|---|---|---|
| Safe does not open with PIN code. | Incorrect PIN entered. Low batteries. Electronic malfunction. | Re-enter PIN carefully. Replace batteries. Use emergency key. |
| Keypad is unresponsive. | Dead batteries. System locked after multiple incorrect attempts. | Replace batteries. Wait 5-10 minutes for the system to reset, then try again. Use emergency key. |
| Door does not close properly. | Obstruction in the door frame. Locking bolts misaligned. | Check for any obstructions. Ensure the safe is mounted level. Contact support if issue persists. |
| Forgotten PIN code. | User forgot the set code. | Use the emergency keys to open the safe. Once open, reset the PIN code (refer to section 5.1). |
8. Warranty and Support
For warranty information and customer support, please refer to the documentation provided at the time of purchase or contact HMF customer service directly. Keep your purchase receipt as proof of purchase.


